
HD3454 - Heating PHILIPS - Free user manual and instructions
Find the device manual for free HD3454 PHILIPS in PDF.
| Brand | Philips |
| Model | HD3454 |
| Product type | Electric convector |
| Category | Heating |
| Power supply | 220-240 V, 50/60 Hz (check rating plate) |
| Main functions | Convection heating, adjustable thermostat, frost protection, thermal safety |
| Heat levels | Eco (medium) and maximum |
| Thermostat | Adjustable from 1 to 10 (minimum to maximum) |
| Frost protection | Yes, minimum thermostat position (about +5°C) |
| Thermal safety device | Automatic cut-off in case of overheating |
| Wall mounting | Possible with supplied wall brackets |
| Feet | Removable for vertical use |
| Cord storage | Yes, integrated |
| Maintenance and cleaning | Unplug, clean exterior with damp cloth, vacuum air grilles |
| Safety precautions | Do not cover, 20 cm space around, do not use near water, do not insert objects |
| Type HD3455 (variant) | Model HD3455 has a Turbo fan to accelerate heating |
Frequently Asked Questions - HD3454 PHILIPS
User questions about HD3454 PHILIPS
0 question about this device. Answer the ones you know or ask your own.
Ask a new question about this device
Download the instructions for your Heating in PDF format for free! Find your manual HD3454 - PHILIPS and take your electronic device back in hand. On this page are published all the documents necessary for the use of your device. HD3454 by PHILIPS.
USER MANUAL HD3454 PHILIPS
- Keep page 3 open when reading these operating instructions.
Français Page 7
- Before connecting the appliance check that the voltage indicated on the type plate corresponds to the mains voltage in your home.
- Read the instructions for use together with the illustrations (page 3) before using the appliance.
- Use the heater only standing or hanging in a vertical position as illustrated in fig. 1.
- Do not use the appliance (standing upright) before mounting the two stands. These stands are packed separately.
- Allow ample space around the heater. A safe area to be left free is 20cm / 8 at the top and at the sides. If the appliance is used hanging from a wall, allow 15cm / 6 space below it as well.
- Keep the air openings free: do not hang anything in front of it or above it. If the heater is covered there is a fire risk.
- Keep the mains cord at a safe distance from the air inlet opening (A) and from the air outlet openings (B1, B2).
- The appliance shall not be located below a socket outlet.
- Do not place the heater on extremely deep-pile carpets.
- It may happen, especially if the heater operates on position and another electrical device is switched on as well, that a fuse or circuit breaker cuts off the mains power. In such a case, the fuse or circuit breaker may not allow this high electrical power.
You may connect one of the involved appliances to another circuit (employing another fuse or circuit breaker) or have the electrical installation revised by an authorized electrician.
- For your own safety and that of others: water and electricity are a dangerous combination! Do not use this heater in the immediate surroundings of a bath, a shower or a swimming pool.
- Do not insert any objects into the heater. Ensure that children cannot play with the appliance.
- If the mains cord of this appliance is damaged, it must only be replaced by Philips or their service representative, as special tools and/or parts are required.
General description (fig. 1 on page 3)
Air inlet opening
Air outlet opening(s)
Heat switch · "Eco" - moderate), with pilot light
Heat switch (maximum), with pilot light
"Turbo" switch (type HD 3455 only) for forced (hot) air output, with pilot light
Thermostat dial (to set a constant temperature)
Stands
Cord storage facility
Wall brackets
Working
The heating element inside the convector heats the air. The heated air rises and leaves the convector at the top (B1). At the same time, cold air is drawn in at the bottom (A).
The built-in turbo fan (B2) in type HD 3455 accelerates the outflow of heated air, so that a room can be heated more rapidly.
Safe positioning
- The heater must not be located below a socket outlet.
- If the appliance is covered there is a risk of fire.
- Position the appliance in such manner that the air flow, towards the heater and away from it, are not obstructed.
- Select a safe spot to avoid electrical shock and the risk of fire. Only touch the heater with dry hands.
- This appliance can be used as a free-standing unit by means of the stands (G). However, it can also be mounted to a (fireproof!) wall using the wall-brackets (I). This wall should be solid, flat and fireproof.
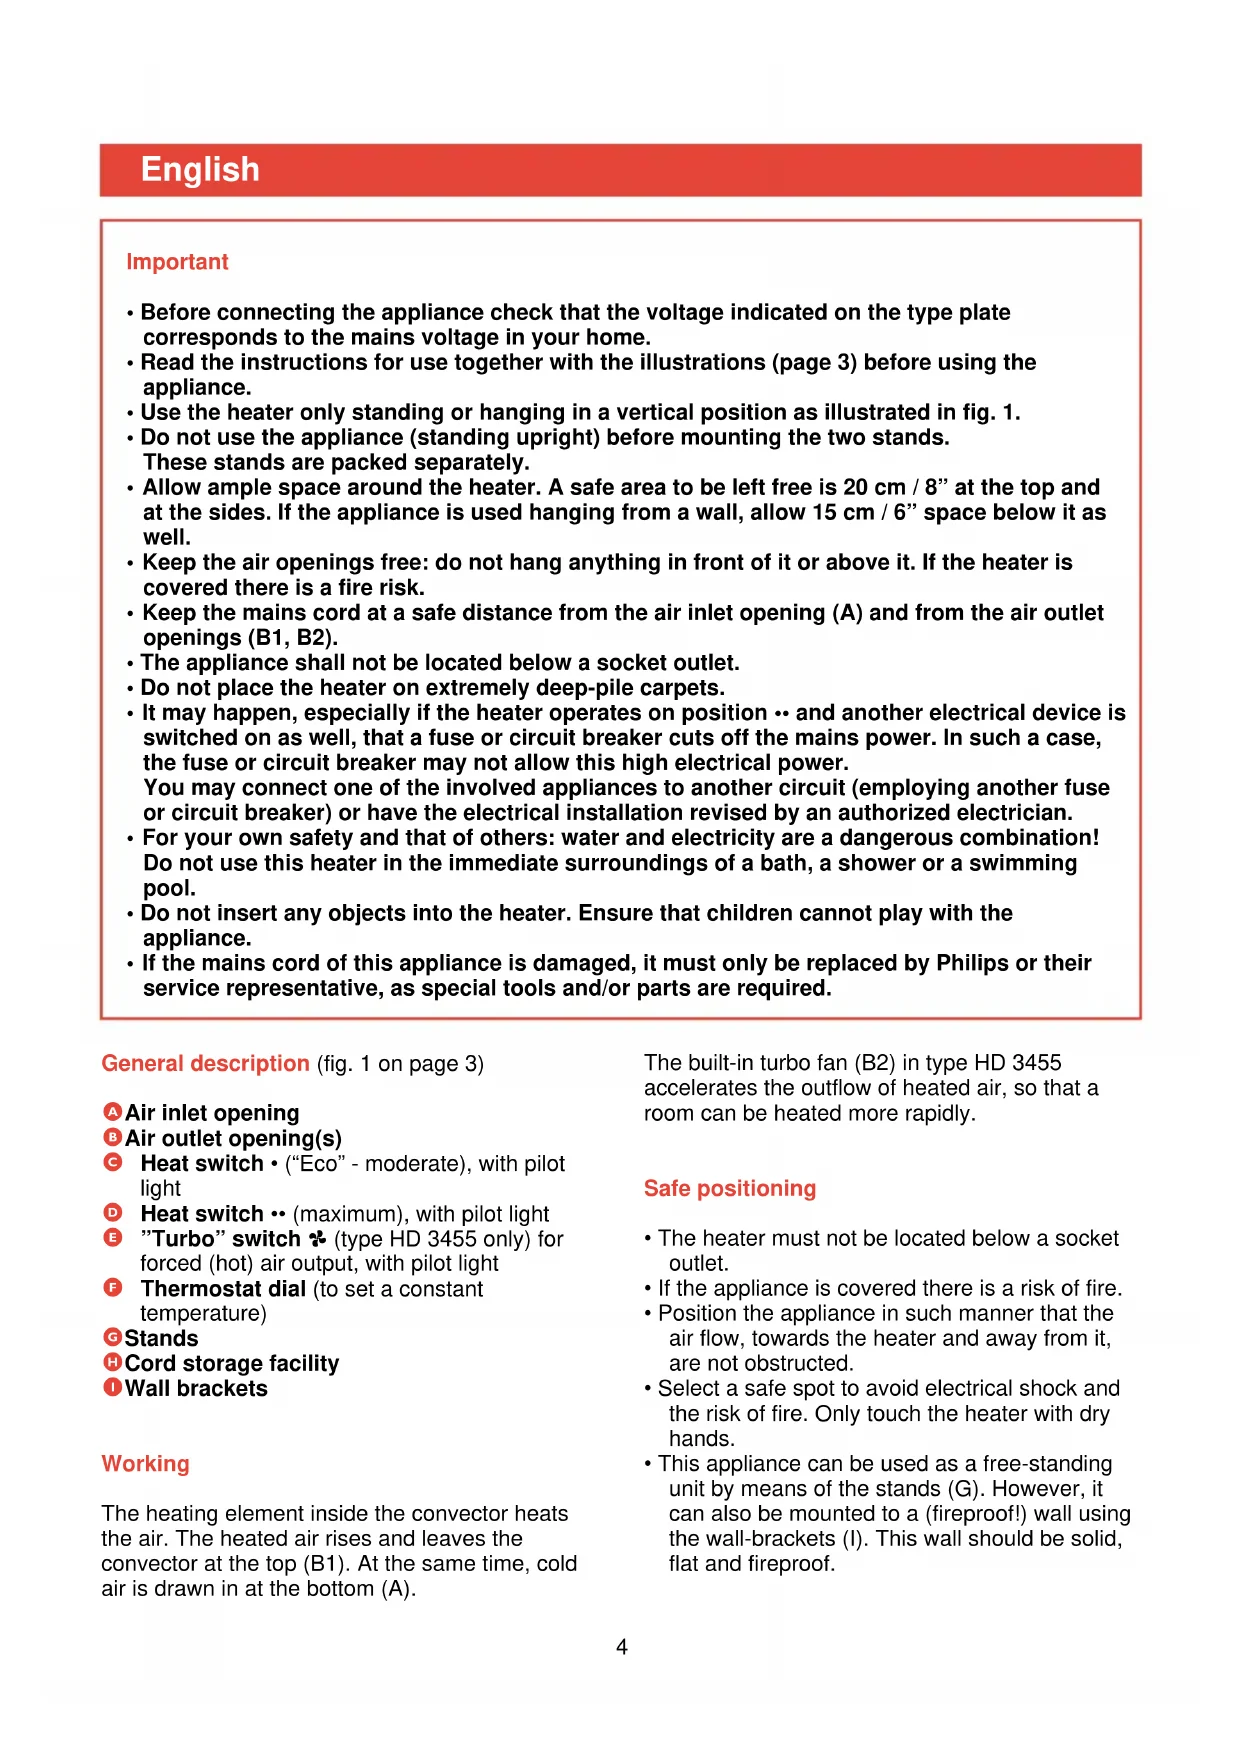
Mounting the stands (fig. 2a)
Mount the two stands (G) before using the heater standing upright for the first time. (Do not mount the stands if you wish to use the heater hanging on the wall.)
- Slide the two stands into the special holders in the direction of the arrows until "Click" is heard.
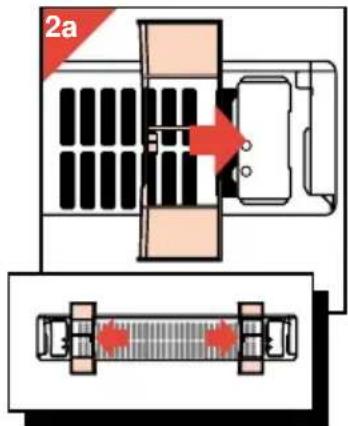
Removing the stands (For transport, storage or wall-mounting. Fig.2b)
Pull the lip a little upwards using a pair of pliers while sliding the stand out of the holder.
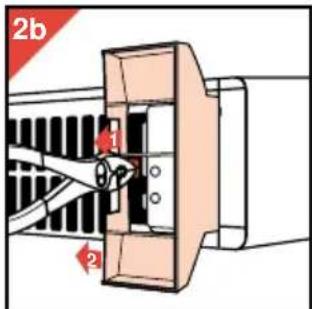
Wall-mounting
-
Drill the holes and fix the brackets to the wall using screws and rawlplugs (fig. 3).
-
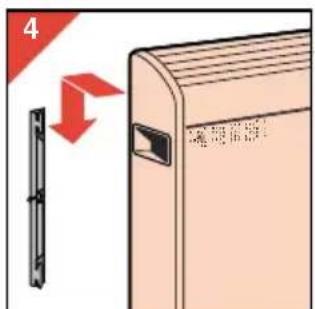
Slide the appliance correctly onto the brackets (fig. 4).
-
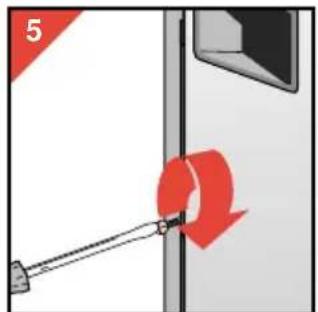
Secure with the two screws on the sides of the brackets (fig. 5).
-
Please note: do not lead the mains cord upward at the back side of the wall-mounted heater.
Operation
-
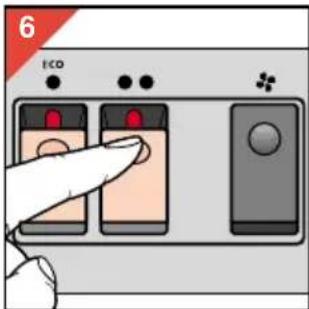
Switch on by selecting or (fig. 6). Position results in quicker heating.
-
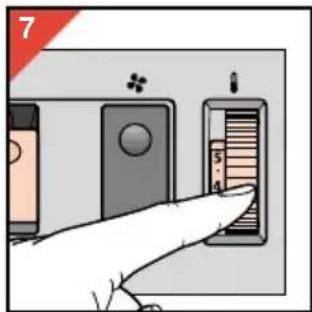
Then set the thermostat by means of thermostat dial (F) (fig. 7).
(Position 1 maximum, position ※ minimum.)
Subsequently, the heater will keep keep the surrounding air at the set temperature by switching on and off at intervals. You may adjust the thermostat during use.
To find the ideal thermostat setting for you:
- First set the dial to position 10 (= maximum).
- As soon as the temperature is comfortable, turn down the thermostat knob slowly until the heater goes off.
- When the appliance is connected to mains power and switched on by selecting or the pilot light will come on.
- The light will stay on until the appliance is switched off by setting switch (C) or (D) back into the original position (fig. 8) or by disconnecting from the mains.
- To indicate that the heater is still connected and in
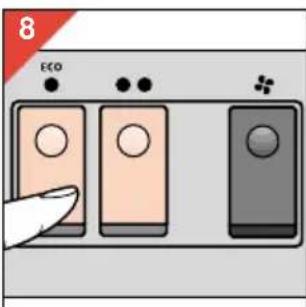
"switched-on" position (or ), the pilot light will remain alight when the set temperature is reached and the thermostat switches the appliance off.
Type HD 3455: "Turbo" position (fig.9)
To make the temperature rise more rapidly, you may switch on the fan at the extra air outlet opening (B2). The pilot light in the switch will come on.
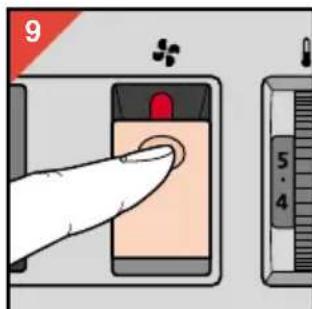
The fan will accelerate the flow of heated air, especially if heat setting has been selected. Do not forget to also set the thermostat dial (F) to the required temperature.
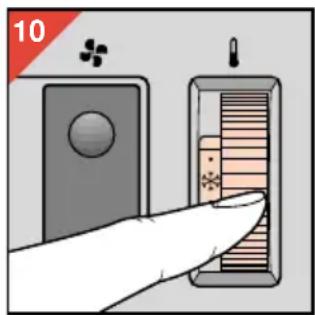
Anti-Frost setting (fig. 10)
If e.g. a water pipe must be prevented from freezing:
-
Position the heater (standing upright!) close to the pipe;
-
Switch the heater on by selecting or (depending on the size of the room, possible draught and the expected minimum temperature);
-
Set the thermostat dial to position i.e. the minimum thermostat setting, approx. +5 °C / +41 °F). This position can be used to keep the immediate vicinity of the heater free from frost.
Overheating safety device
To prevent damage and risks due to overheating, the built-in overheating safety device cuts off the power as soon as the heating elements become too hot.
If this should happen:
- First ensure that it was not the thermostat which has switched off the heater. Set the thermostat to maximum position. If the heater does not switch on, the safety device has been activated.
- Remove the mains plug from the wall socket.
- Let the heater cool down for 5 minutes.
- Replace the plug into the wall socket and switch the heater on again.
If the safety device again switches off the heater:
- Have the heater inspected by a Philips Service Centre or by your dealer.
Cleaning
- Before cleaning remove the mains plug from the wall socket. Wait for the heater to cool down sufficiently.
- You may clean the outside of the heater with a damp cloth. Make sure that no water runs into the appliance.
- The air inlet opening (A) and if necessary also the air outlet opening(s) (B1, B2) may be cleaned using the vacuum cleaner with small long-haired nozzle.
For U.K. only:
Fitting a different plug
This appliance is fitted with a BS 1363 13 Amp. plug.
Should you need to replace the plug, connect the wires as follows:
Brown wire to the Live (L) terminal of the new plug.
Blue wire to the Neutral (N) terminal of the new plug.
Always fit the same value of fuse as that originally supplied with your appliance.
Only use BS 1362 approved fuses.
As a guide only: Appliances under 700 W can have a 3 Amp. fuse (red) and all others should have a 13 Amp. fuse (brown).
When disposing of an old plug (particularly the moulded type which has been cut from the mains cord) always remove the fuse as the plug could be dangerous if ever inserted in a live socket.
Français
Important


Brand : PHILIPS
Model : HD3454
Category : Heating