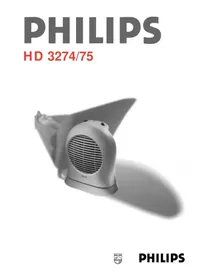
HD3275 - Heating PHILIPS - Free user manual and instructions
Find the device manual for free HD3275 PHILIPS in PDF.



| Product type | Fan heater |
| Brand | Philips |
| Model | HD3275 |
| Use | Supplemental heating |
| Power supply | 220-240 V ~, 50/60 Hz |
| Maximum power | 2000 W |
| Heat settings | Off (O), Cool air (✿), Half power (●), Full power (●●) |
| Thermostat | Adjustable with frost protection setting (5°C) |
| Safety device | Built-in thermal cut-out |
| Double insulation | Yes |
| Wall mounting | Possible (HD3275 model only) |
| Cord storage | Integrated compartment at the back |
| Indicator light | Indicates power on |
| Cold ventilation | Yes |
| Cleaning | Vacuum the grilles regularly to remove dust |
| Safety distance | 50 cm above and on sides, 120 cm in front |
Frequently Asked Questions - HD3275 PHILIPS
User questions about HD3275 PHILIPS
0 question about this device. Answer the ones you know or ask your own.
Ask a new question about this device
Download the instructions for your Heating in PDF format for free! Find your manual HD3275 - PHILIPS and take your electronic device back in hand. On this page are published all the documents necessary for the use of your device. HD3275 by PHILIPS.
USER MANUAL HD3275 PHILIPS
natural_image
Black-and-white photo of a portable electric heater with ventilation grille and cooling tower (no text or symbols visible)English Page 4
- Keep page 3 open when reading these operating instructions.
Français Page 7
- Before connecting the appliance check that the voltage indicated on the type plate corresponds to the mains voltage in your home.
- Read these instructions carefully, in conjunction with the illustrations, before using the appliance.
- The appliance is double insulated and need not be connected to an earthed mains outlet. If you wish to use an extension cord, a 2-wire type is suitable. However, ensure that the plugs and cord allow high power (16A-220V / 13A-240V AC). If a reel type is employed, please unroll completely to prevent overheating.
- It may happen, especially if the heater operates on position ●● and another electrical device is switched on as well, that a fuse or circuit breaker cuts off the mains power. In such a case, the fuse or circuit breaker may not allow this high electrical power. You may connect one of the involved appliances to another circuit (employing another fuse or circuit breaker) or have the electrical installation revised by an authorized electrician.
- The heater is not designed for use as the main form of heating. Use the appliance only for the intended use, i.e. extra heating in the house. - To avoid the risk of fire and electrical shock select a safe place for the heater. (See section “Safe positioning”.)
- Do not insert any objects into the heater.
- Ensure that children cannot play with the appliance.
- Attention: the front grille gets hot during use.
- Only touch the heater with dry hands.
General description (fig. 1 on page 3)
A Air inlet grille
B Air outlet grille
c Selector switch
D Thermostat knob
E Pilot light
F Mains cord storage
G Stand / wall bracket (only type HD 3275)
Safe positioning
- The heater must not be located immediately below a socket outlet.
- Only use the fan heater when it is standing (fig. 1) or mounted (only type HD 3275, fig. 4-8) in an upright position.
- For your own safety and that of others: water and electricity are a dangerous combination! When using the heater in the free standing mode do not place it in the immediate surroundings of a bath, a shower or a swimming pool.
Ensure that the appliance cannot fall into water (bath, wash basin, shower cubicle, etc.).
- Do not use the heater in rooms with explosive gas (e.g. petrol) or while using inflammable glue or solvent (e.g. when glueing or varnishing parquet floors, PVC etc.).
- Allow ample space around the heater. A safe area to be left free is 50 cm / 20" at the top and at the sides, and 120 cm / 47" at the front.
- Prevent overheating of the appliance by keeping the air inlet and outlet grilles free: do not hang anything in front of it or above it - otherwise there is a risk of fire.
Check the grilles from time to time for accumulated dust.
If overheating should occur, the built-in overheating safety device will switch off the appliance.
- Keep the mains cord at a safe distance from the air inlet and outlet grilles.
- Do not allow aerosols, inflammable substances or materials sensitive to heat to be in the flow of hot air.
- Do not use the heater on extremely deep-pile carpets.
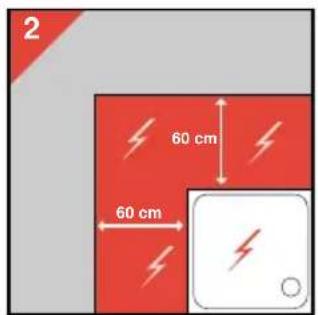
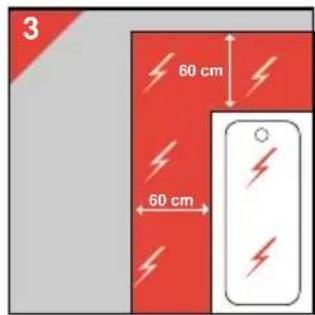
Only for type HD 3275:
If the heater is going to be used in the bathroom, it must be installed...
- so that switches and other controls cannot be touched by a person in the bath or shower;
- outside the colour indicated areas (figs. 2 and 3).
Storing the mains cord
Excess mains cord can be stored by pushing it into the storage compartment at the back of the heater.
Please Note: Do not use the appliance when the mains cord is kept inside the appliance.
Type HD 3274:
- You can fix the mains cord by pressing it into one of the three slots (F).
natural_image
Illustration of a fan or fan device with a red upward arrow indicating rotation (no text or symbols present)Type HD 3275:
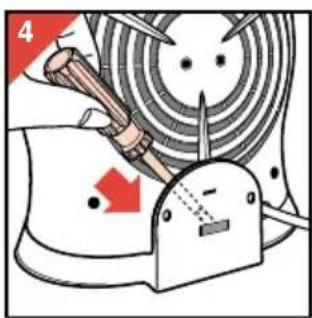
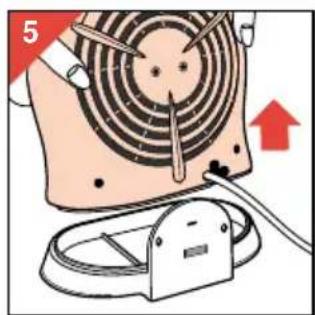
- Using a small screwdriver push the small lip downwards (fig. 4) and remove the heater from the stand / wall bracket (G) (fig. 5).
- You can fix the mains cord by pressing it into one of the three slots (F).
- Slide the appliance correctly onto the stand / wall bracket ("Click!") (fig. 8).
Wall-mounting (only for type HD 3275)
This model can be used as a free-standing unit, but it can also be mounted to a wall using the stand / wall bracket (G).
This wall should be solid, flat and fireproof.
- Using a small screwdriver push the small lip downwards (fig. 4) and remove the heater from the stand / wall bracket (fig. 5).
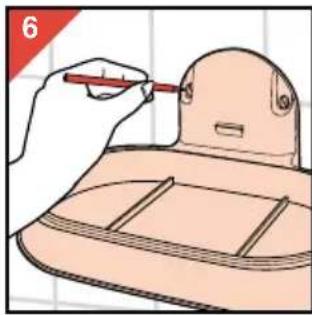
- Use the stand / wall bracket as a template to mark the drilling holes (fig. 6).
natural_image
Illustration of a hand using a red tool to apply material to a small mechanical component (no text or symbols visible)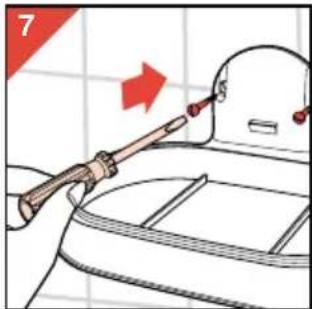
natural_image
Illustration of a gun trigger on a vehicle intake manifold, showing red motion direction (no text or symbols)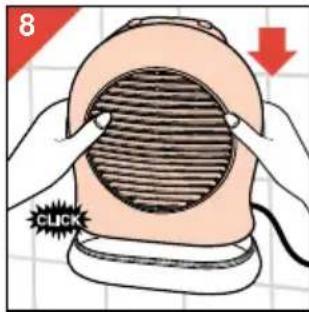
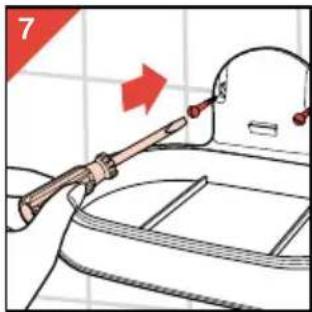
- Drill the holes and fix the stand / wall bracket to the wall using screws and rawlplugs (fig. 7).
- Slide the appliance correctly onto the stand / wall bracket ("Click!") (fig. 8).
How to use
The selector switch (C) and the thermostat knob (D) enable you to select the following functions:
Selector switch (C)
O = "Off". Both the fan and the two heating elements are switched off.
= "Cool air". Only the fan is switched on.
● = "Warm air" for gradual heating-up.
ECO positon (half power): the fan and one of the two heating elements are switched on.
●● = "Hot air" for quick heating-up.
Full power: the fan and the two heating elements are switched on.
Thermostat knob (D)
With the thermostat knob you can set a constant room temperature.
When the selector switch is set to position ● or position ●●, the heater will automatically switch on (using half power or full power respectively) as soon as the room temperature falls below the set temperature.
As soon as the set temperature is reached, the heater will switch off.
Rotate the knob anti-clockwise to obtain a higher temperature setting or clockwise for a lower temperature setting.
You may adjust the thermostat during use.
To find the ideal thermostat setting:
- First set the knob to maximum position. (Rotate anti-clockwise until the knob stops.)
- As soon as the temperature is comfortable, turn the knob clockwise slowly until the heater goes off.
= "Frost-free" position. This position corresponds with the minimum thermostat setting (i.e. approx. +5 ^ C / +41 ^ F) and can be used to keep the immediate vicinity of the heater free from frost. E.g. to prevent pipes from freezing, position the heater close to the pipe and select this position.
Please note: When using the cool air setting ✦, the thermostat knob should be in its highest position.
Pilot light
- When the appliance is connected to the mains and switched on by selecting ♣, ● or ●● the pilot light (E) will come on.
- The light will stay on until the appliance is switched off by setting the selector switch (C) to position O or by disconnecting from the mains.
- To indicate that the heater is still connected and in "switched-on" position (♣, ● or ●●), the pilot light will remain on when the set temperature is reached and the thermostat switches the appliance off.
For the same reason the pilot light will remain on when the overheating safety device switches the appliance off.
Overheating safety device
To prevent damage and risks due to overheating, the built-in overheating safety device cuts off the power as soon as the heating elements become too hot.
If this should happen:
- First ensure that it was not the thermostat which has switched off the heater. Set the thermostat to maximum position.
If the heater does not switch on, the safety device has been activated.
- Remove the mains plug from the wall socket.
- Let the heater cool down for 30 minutes.
- Check if the heater had been placed correctly.
- Check if anything is obstructing the air flow. If necessary, clean the grilles with a vacuum cleaner.
- Replace the plug into the wall socket and switch the heater on again.
If the safety device again switches off the heater:
- Remove the mains plug from the wall socket.
- Have the heater inspected by a Philips Service Centre or by your dealer.
Cleaning
- Set the selector switch (C) to position O to switch off.
- Remove the mains plug from the wall socket.
- Wait for the heater to cool down sufficiently.
- You may clean the outside of the heater with a damp cloth. Do not allow water to come into the appliance.
- Clean the air inlet and outlet grilles regularly (with normal use at least twice a year) with a vacuum cleaner, using the brush attachment.
Français
Important
natural_image
Illustration of a hand using a red tool to outline a small object on a flat surface (no text or symbols)Utilisation
natural_image
Illustration of a hand holding a tool inside a vehicle, with a red arrow indicating direction (no text or symbols)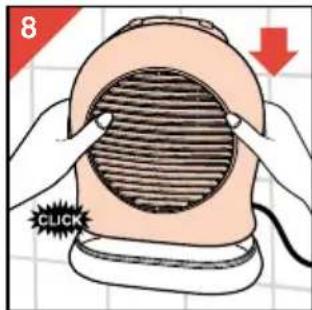
natural_image
Illustration of a tool applying red liquid to a container with a handle, no text or symbols present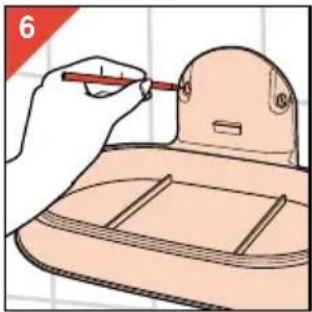
natural_image
Illustration of a hand using a red tool to outline a small object on a surface (no text or symbols)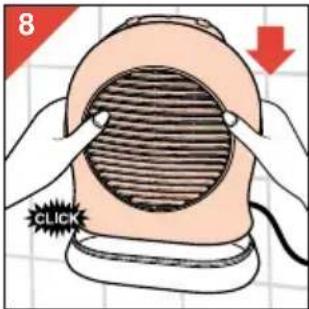
natural_image
Illustration of a fan with a screwdriver inserted into a socket, showing a red upward arrow (no text or symbols)Type HD 3275:
natural_image
Illustration of a hand using a red tool to apply material to a small object on a flat surface (no text or symbols)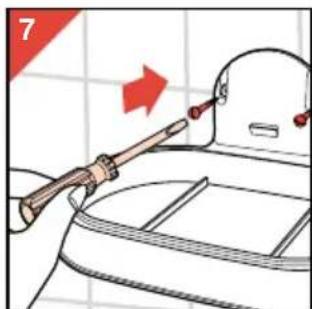
natural_image
Illustration of a hand tool applying red liquid to a car interior (no text or symbols)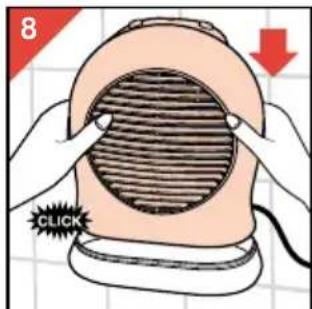
natural_image
Illustration of a fan blade with a tool inserted, showing a red upward arrow indicating motion (no text or symbols)Modello HD 3275:
natural_image
Illustration of a hand using a red tool to outline a small object on a flat surface (no text or symbols)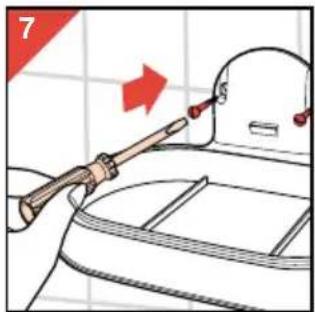
natural_image
Illustration of a hand holding a tool near a vehicle, with a red arrow indicating direction (no text or symbols)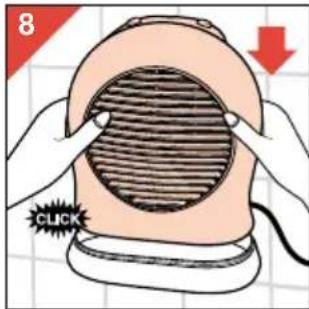
Interruptor selector.
natural_image
Illustration of a mechanical device with a tool and circular components, no visible text or symbols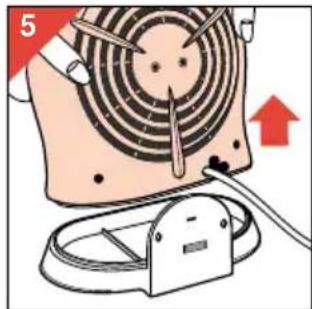
Tipo HD 3275 :
natural_image
Illustration of a hand holding a tool inside a toilet with a red arrow indicating direction (no text or symbols)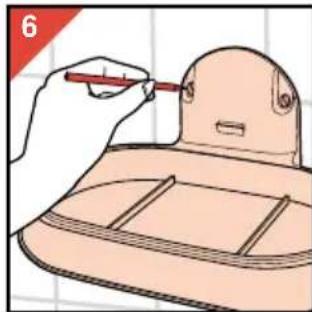
natural_image
Illustration of a hand using a red tool to apply material to a small mechanical component (no text or symbols visible)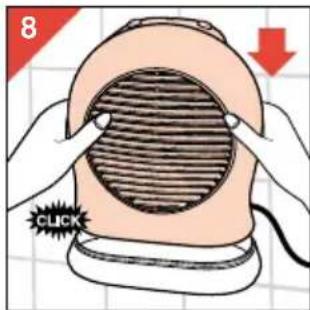
Interruptor selector (C)
natural_image
Illustration of a fan blade with blades and a power adapter, showing mechanical components (no text or symbols)Modelo HD 3275:
natural_image
Illustration of a hand using a red tool to outline a small object on a flat surface (no text or symbols)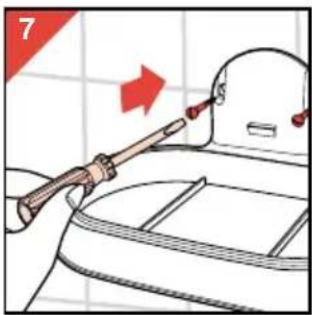
natural_image
Illustration of a tool applying red liquid to a car interior (no text or symbols)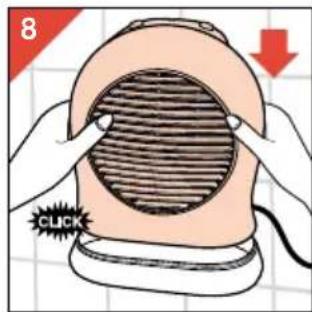
natural_image
Illustration of a hand holding a tool inside a vehicle, with a red arrow indicating direction (no text or symbols)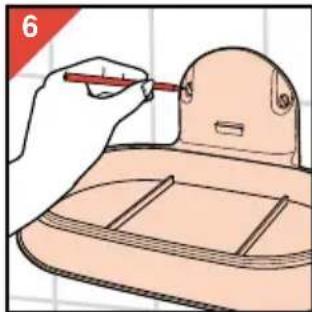
natural_image
Illustration of a hand using a red tool to outline a small object on a tray (no text or symbols)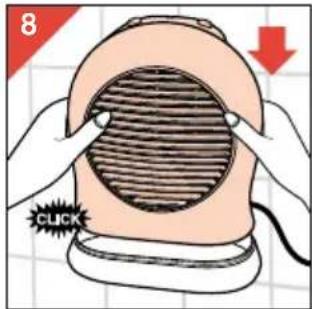
natural_image
Illustration of a fan with blades and a power adapter, showing a red upward arrow (no text or symbols)Type HD 3275:
- Bruk en liten skrutrekker til å dytte den lille kanten nedover (fig. 4) og fjern varmeviften fra stativ/veggbraketten (G) (fig. 5).
- De kan feste nettledningen ved å skyve den inn i en av de tre sporene.
- Sky apparatet korrekt tilbake i stativ/vegg-braketten ("Klikk") (fig. 8).
Veggmontering (bare for type HD 3275)
natural_image
Illustration of a hand using a red tool to outline a small object on a wooden surface (no text or symbols)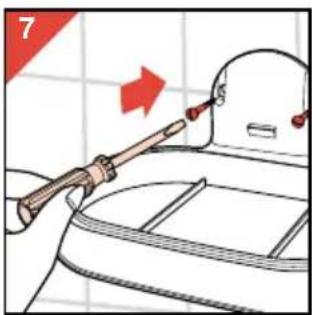
natural_image
Illustration of a tool applying red liquid to a car interior (no text or symbols)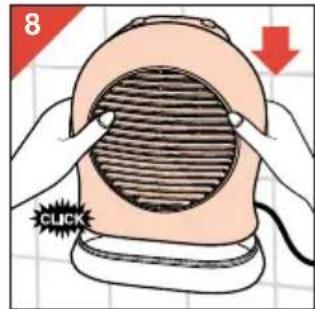
- Borr hullene og skru fast stativ/veggbraketten til veggen (fig. 7).
- Sky apparatet korrekt tilbake i stativ/vegg-braketten ("Klikk") (fig. 8).
Betjening
natural_image
Illustration of a mechanical device with a tool and circular components, no visible text or symbolsnatural_image
Illustration of a fan with a screwdriver inserted into a socket, showing a red upward arrow (no text or symbols)natural_image
Illustration of a hand using a red tool to apply material to a model airplane (no text or symbols present)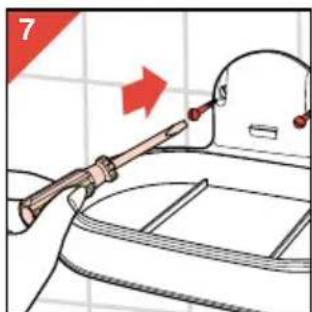
natural_image
Diagram of a car interior with a lever and red arrow indicating motion (no text or symbols)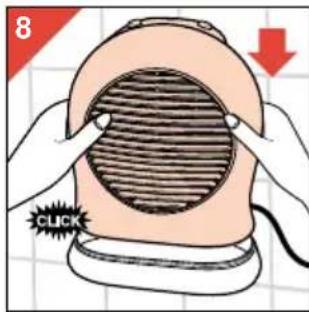
natural_image
Diagram of a mechanical device with a tool and circular components, no visible text or symbols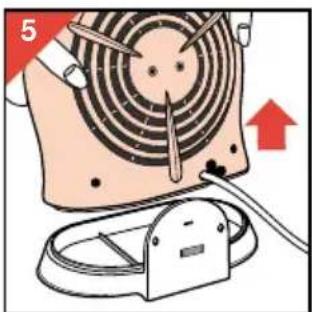
Malli HD 3275:
natural_image
Illustration of a hand using a tool to apply material to a small object on a curved surface (no text or symbols)natural_image
Illustration of a hand holding a tool near a mailbox with a red arrow indicating action (no text or symbols)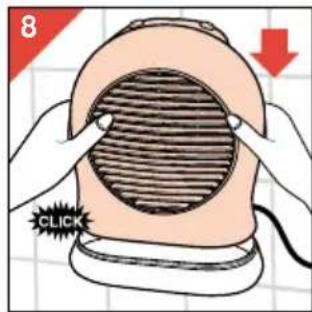
natural_image
Illustration of a fan blade being inserted into a socket, with a red upward arrow indicating motion (no text or symbols)natural_image
Illustration of a hand holding a tool near a vehicle, with a red arrow indicating direction (no text or symbols)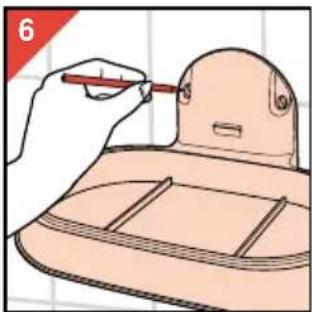
natural_image
Illustration of a hand holding a red pen over a small object on a grid background (no text or symbols)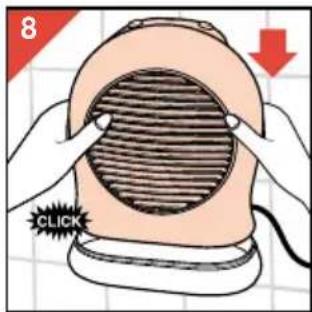



- English Page 4
- Français Page 7
- General description (fig. 1 on page 3)
- Safe positioning
- Storing the mains cord
- Wall-mounting (only for type HD 3275)
- How to use
- Selector switch (C)
- Thermostat knob (D)
- Pilot light
- Overheating safety device
- Cleaning
- Français
- Important
- Utilisation
- Interruptor selector (C)
- Veggmontering (bare for type HD 3275)
- Betjening
Brand : PHILIPS
Model : HD3275
Category : Heating