
HD3412 - Heating PHILIPS - Free user manual and instructions
Find the device manual for free HD3412 PHILIPS in PDF.

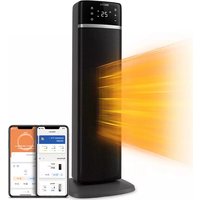
| Product type | Oil heater |
| Brand | Philips |
| Model | HD3412 |
| Power supply | 230-240 V ~ 50/60 Hz |
| Maximum power | 3000 W (estimation for 13 A) |
| Heating elements | 2 (switches A and B) |
| Adjustable thermostat | Yes, from 1 to 10 |
| Dimensions (approx.) | 60 x 25 x 40 cm (h x w x d) |
| Weight (approx.) | 12 kg |
| Recommended fuse | 13 A (230/240 V) |
| Wheel mounting | Yes, supplied |
| Safety | Use in vertical position; do not cover; min. distance 50 cm from flammable objects |
| Maintenance | Clean with a damp cloth; vacuum the ventilation holes |
| Repairability | Repairs only by Philips or authorized service center |
| Supplied accessories | Supports and wheels |
| Warranty | Refer to the complete manual |
Frequently Asked Questions - HD3412 PHILIPS
User questions about HD3412 PHILIPS
0 question about this device. Answer the ones you know or ask your own.
Ask a new question about this device
Download the instructions for your Heating in PDF format for free! Find your manual HD3412 - PHILIPS and take your electronic device back in hand. On this page are published all the documents necessary for the use of your device. HD3412 by PHILIPS.
USER MANUAL HD3412 PHILIPS
natural_image
Illustration of a row of industrial heat exchangers with a Philips air conditioner unit (no text or symbols on the devices themselves)English Page 4
- Keep pages 3 and 34 open when reading these operating instructions.
Français Page 6
English
Important
- Read the instructions for use together with the illustrations (pages 3 and 34) before using the appliance.
- Before connecting the appliance check that the voltage indicated on the type plate corresponds to the mains voltage in your home.
- Be careful when moving the appliance. First disconnect from the mains power and allow it to cool down.
- If the appliance is covered there is a risk of fire. Do not dry laundry on the heater.
- This heater is filled with a precise quantity of special oil. If leakage occurs and for all repairs requiring opening of the oil container contact your Philips dealer or an authorised Philips Service Centre.
- Do not place the heater against or under inflammable objects. Allow a free space of at least 50 cm (approx. 20") to furniture, curtains etc.
- The heater must not be located below a wall socket.
- Keep the mains cord at a safe distance from the hot parts of the appliance.
- For your own safety and that of others: water and electricity are a dangerous combination!
Do not use the heater in the neighbourhood of a bath, shower or swimming pool. - Use the heater only in a vertical position.
- Always remove the full length of mains cord from the mains cord storage before switching on.
- Connect the appliance to an earthed wall socket.
- All installation and wiring must comply with current IEE regulations.
- It may happen, especially if both knobs (A) and (B) are in “on” position and another electrical device is switched on as well, that a fuse or circuit breaker cuts off the mains power. In such a case, the fuse or the circuit breaker may not be able to handle high electrical power.
You may connect one of the involved appliances to another circuit (employing another fuse or circuit breaker) or have the electrical installation revised by an authorized electrician. - For United Kingdom (240 V AC):
Connect the heater (all types) via a 13 Ampere (or higher) fuse. - For other countries (220-230 V AC):
Connect types HD 3410 and HD 3411 via a 10 Ampere (or higher) fuse;
Connect type HD 3412 via a 13 Ampere (or higher) fuse. - If the mains cord of this appliance is damaged, it must only be replaced by Philips or their service representative, as special tools and/or parts are required.
General description (fig. 1)
A On/off switch: 1st heating element
B On/off switch: 2nd heating element
© Thermostat knob
D Hand grip
E Vents
F Radiator
G Supports
H Wheels
Mains cord
J Cord storage
Working
The heating element inside the radiator heats up the oil.
The warm radiator causes both a natural hot air flow (convection / heat distribution) and heat radiance (warm feeling on the skin).
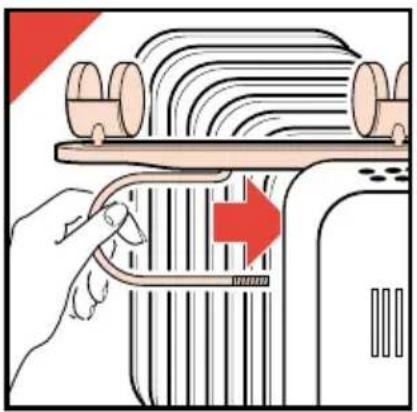
Mounting the supports
For safety: Mount the wheels before using the appliance.
- Place the heater on the floor upside down (fig. 2). (It is quite normal if you can hear the oil moving inside the radiator.)
- Mount the separately packed supports with wheels (figs. 3 - 6).
Tighten the winged nuts well using a pair of pliers. Check if the supports are correctly fixed. - Put the heater into normal position. Wait for at least three minutes before connecting up and switching on.
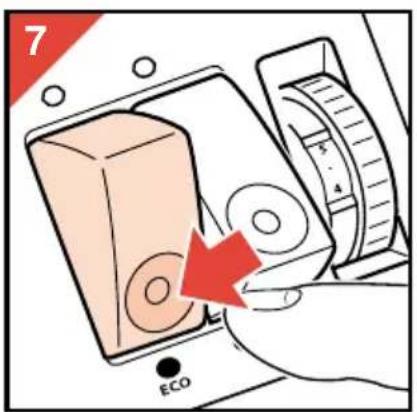
How to use
Power setting
Higher power settings result in quicker heating.
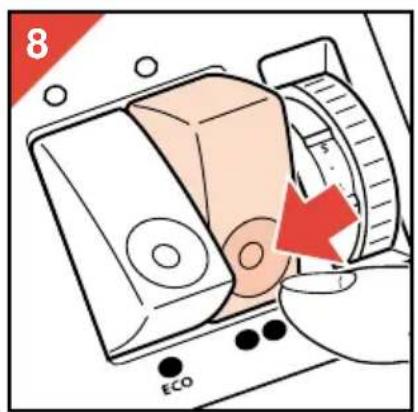
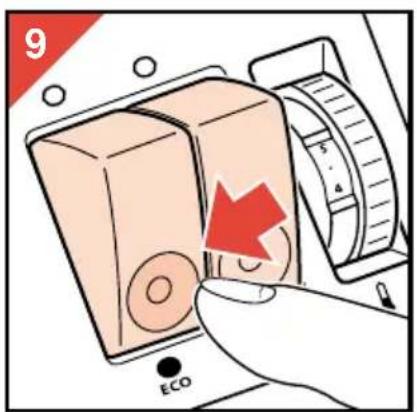
- Set switch (A) to position "on" (•) (fig. 7) for low power.
- Set switch (B) to position "on" (••) (fig. 8) for medium power.
- Set both switches (A) and (B) to position "on" (• ••) (fig. 9) for high power.
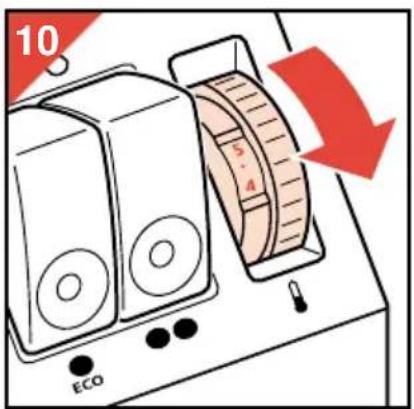
Setting the temperature
- Set the thermostat by means of knob (C) (fig. 10). (Position 10 = maximum, position 1 = minimum.)
After this, the heater will keep its environment at the set temperature by switching on and off at intervals.
When a heating element has been switched on by the thermostat the pilot lamp in the corresponding switch (A) and/or (B) will illuminate.
You can adjust the thermostat knob setting during use.
A good way of finding the ideal thermostat knob setting for you is as follows:
- First set the knob to position 10 (= maximum).
- As soon as the temperature is comfortable, turn down the thermostat knob slowly until the heater goes off.
Cleaning
- Before cleaning turn the heater off and remove the mains plug from the wall socket. Wait for the heater to cool down sufficiently.
- You may clean the outside of the heater with a damp cloth. Make sure that no water runs into the appliance.
* The vents (E) may be cleaned using the vacuum cleaner with small long-haired nozzle.
Non-rewireable mains plug (for Hong Kong only)
This appliance is supplied with a round-pin type earthed non-rewireable 15 Ampere fused plug. If the supplied plug is not suitable for the socket outlets in your home it can be removed and an appropriate one fitted. (See below). Please note: Do not connect the supplied 15 Ampere round-pin type plug to a socket for flat-pin type plugs via a "multiplug" adapter.
For U.K. only:
The appliance is supplied with a non-rewirable 13 Amp. plug.
The plug must never be used without the fuse cover being in place.
If a replacement fuse cover is required, it must be of the same type or colour as the coloured insert around the fuse cover.
Replacement fuse covers are available from Electrical Retailers or direct from Philips, tel. 0181 - 689 - 2166, ext. 8014.
Replacement 13 Amp. fuses must be BSI or ASTA BS 1362 approved.
Important safety information
If the non-rewirable plug is not suitable for the socket outlets in your home, it can be removed and replaced by a plug of the correct type. The non-rewirable plug must be cut from the mains cord, the fuse removed, and the plug safely discarded to prevent further use. The removed plug can be hazardous if inserted into a live mains socket.
Wiring Instructions (for U.K. only):
please refer to page 2
Français
Important
Temperatur-indstilling.
natural_image
Illustration of a hand pressing down on a striped conveyor belt with a red arrow indicating direction (no text or symbols)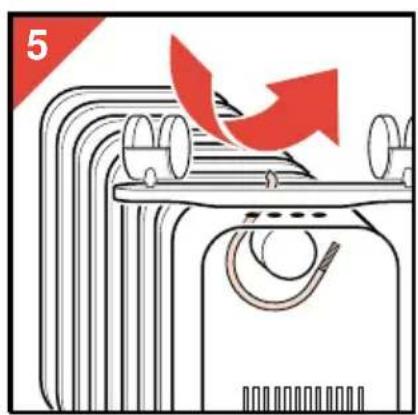
natural_image
Diagram of a washing machine with red arrows indicating motion or force, no text or symbols present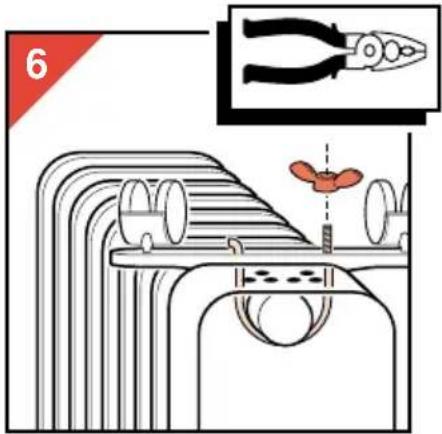
natural_image
Abstract geometric pattern with diagonal lines forming a partial square (no text or symbols)


- English Page 4
- Français Page 6
- English
- Important
- General description (fig. 1)
- Working
- Mounting the supports
- How to use
- Power setting
- Setting the temperature
- Cleaning
- Non-rewireable mains plug (for Hong Kong only)
- For U.K. only:
- Important safety information
- Wiring Instructions (for U.K. only):
- Français
- Temperatur-indstilling.
Brand : PHILIPS
Model : HD3412
Category : Heating