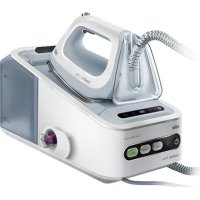
USER MANUAL CareStyle 7 IS 7055 BRAUN
Register your product
www.braunhousehold.com/register
CareStyle 7
CareStyle 7 Pro
Steam generator iron
Deutsch 6
English 11
Francais 16
Espanol 21
Portugues 26
Italiano 31
Nederlands 36
Dansk 41
Norsk 45
Svenska 49
Finnish 53
Polish 57
Czech 62
Slovak 66
Hungarian 70
Croatian 75
Slovenian 79
Turkish 83
Romanian (MD) 87
Greek 92
Kazakh 97
Russian 102
Ukrainian 107
112
De'Longhi Braun Household GmbH
Carl-Ulrich-Straße 4
63263 Neu-Isenburg/Germany
5712811851/11.16
DE/UK/FR/ES/PT/IT/NL/DK/NO/SE/FI/PL/CZ/
SK/HU/HR/SI/TR/RO/GR/KZ/RU/UA/Arab



German
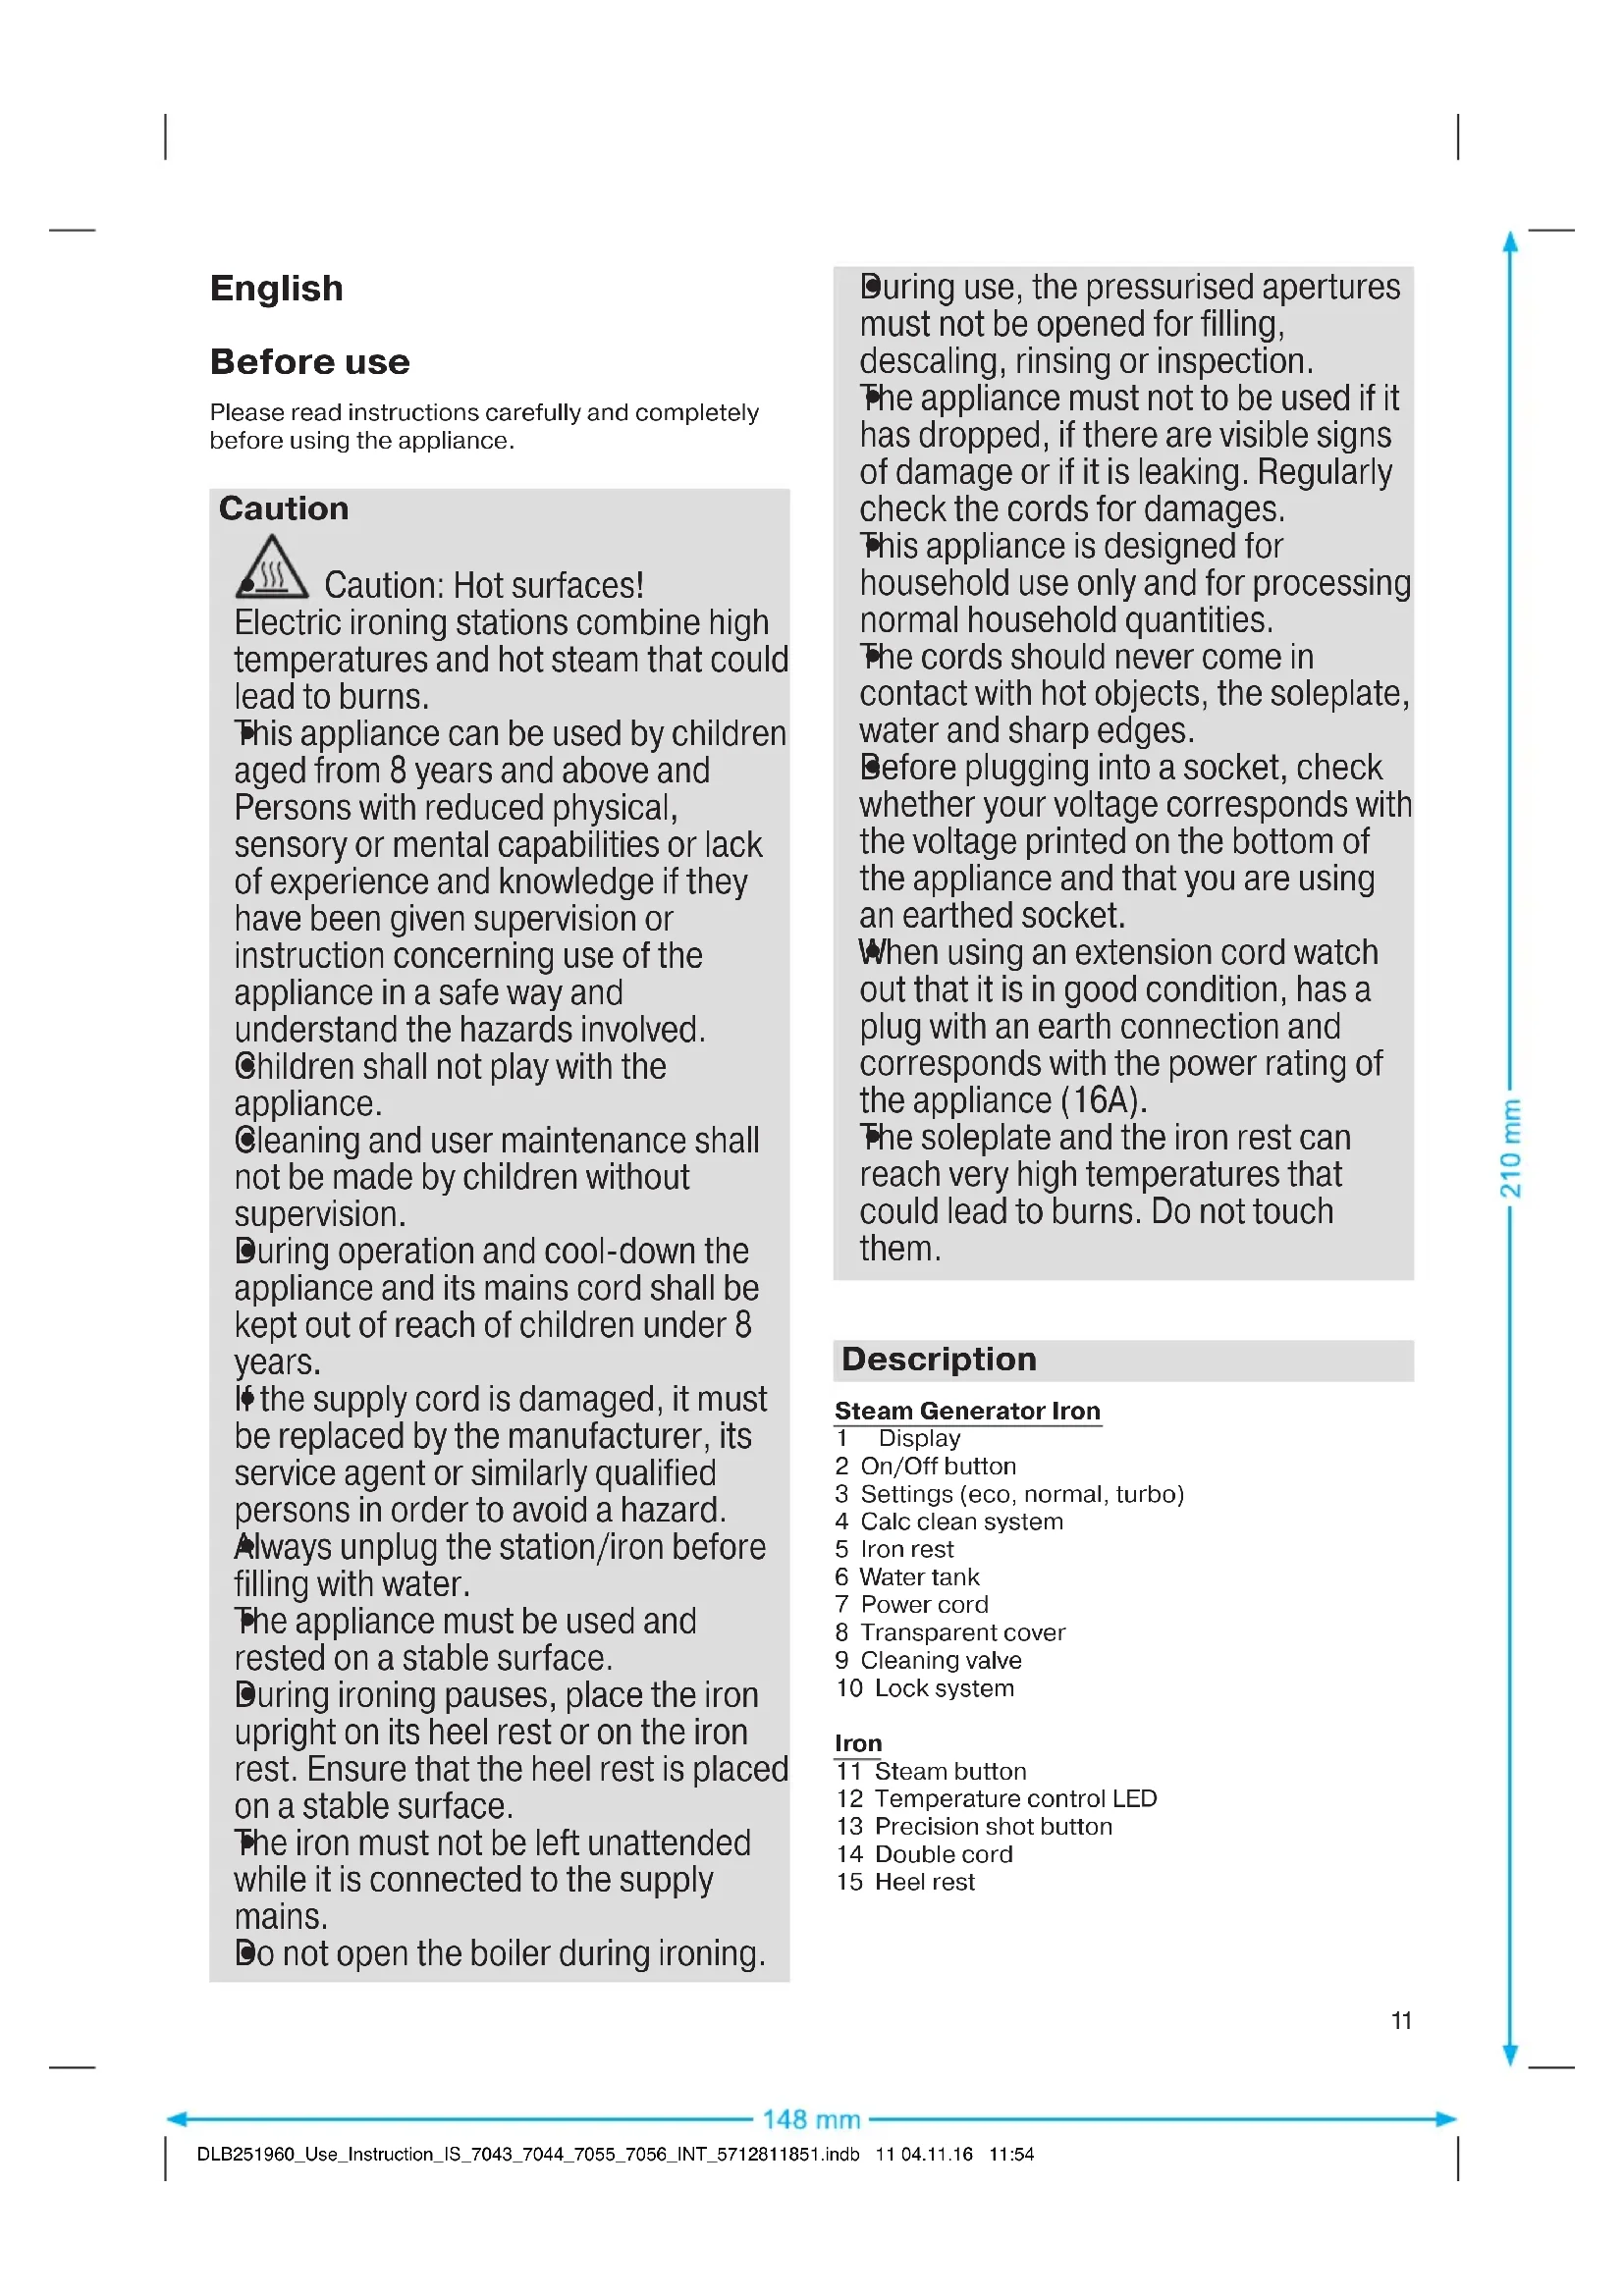
Before use
Please read instructions carefully and completely before using the appliance.
Caution

Caution: Hot surfaces!
Electric ironing stations combine high temperatures and hot steam that could lead to burns.
This appliance can be used by children aged from 8 years and above and persons with reduced physical, sensory or mental capabilities or lack of experience and knowledge if they have been given supervision or instruction concerning use of the appliance in a safe way and understand the hazards involved.
Children shall not play with the appliance.
Cleaning and user maintenance shall not be made by children without supervision.
During operation and cool-down the appliance and its mains cord shall be kept out of reach of children under 8 years.
If the supply cord is damaged, it must be replaced by the manufacturer, its service agent, or similarly qualified persons in order to avoid a hazard.
Always unplug the station/iron before filling with water.
The appliance must be used and rested on a stable surface.
During ironing pauses, place the iron upright on its heel rest or on the iron rest. Ensure that the heel rest is placed on a stable surface.
The iron must not be left unattended while it is connected to the supply mains.
Do not open the boiler during ironing.
During use, the pressurised apertures must not be opened for filling, descending, rinsing, or inspection.
The appliance must not be used if it has dropped, if there are visible signs of damage, or if it is leaking. Regularly check the cords for damages.
This appliance is designed for household use only and for processing normal household quantities.
The cords should never come in contact with hot objects, the soleplate, water, and sharp edges.
Before plugging into a socket, check whether your voltage corresponds with the voltage printed on the bottom of the appliance and that you are using an earthed socket.
When using an extension cord, watch out that it is in good condition, has a plug with an earth connection, and corresponds with the power rating of the appliance (16A).
The soleplate and the iron rest can reach very high temperatures that could lead to burns. Do not touch them.
Description
Steam Generator Iron
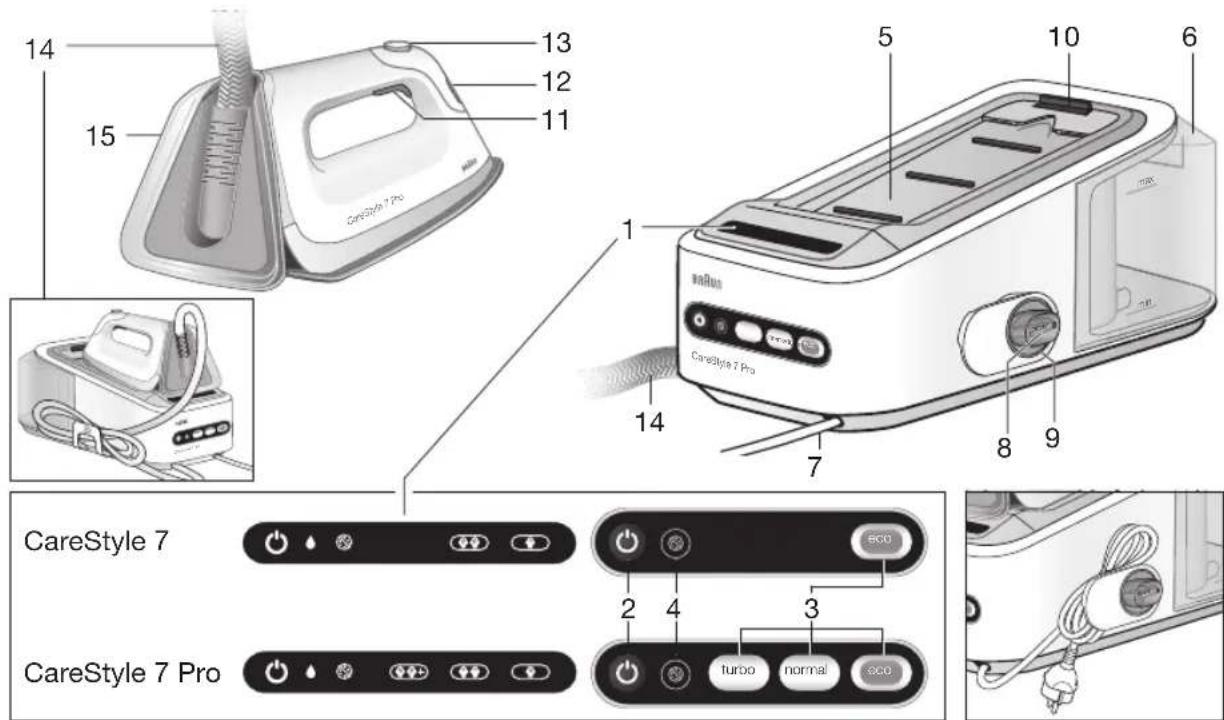
1 Display 2 On/Off button 3 Settings (eco, normal, turbo) 4 Calc clean system 5 Iron rest 6 Water tank 7 Power cord 8 Transparent cover 9 Cleaning valve 10 Lock system
Iron
11 Steam button 12 Temperature control LED 13 Precision shot button 14 Double cord 15 Heel rest
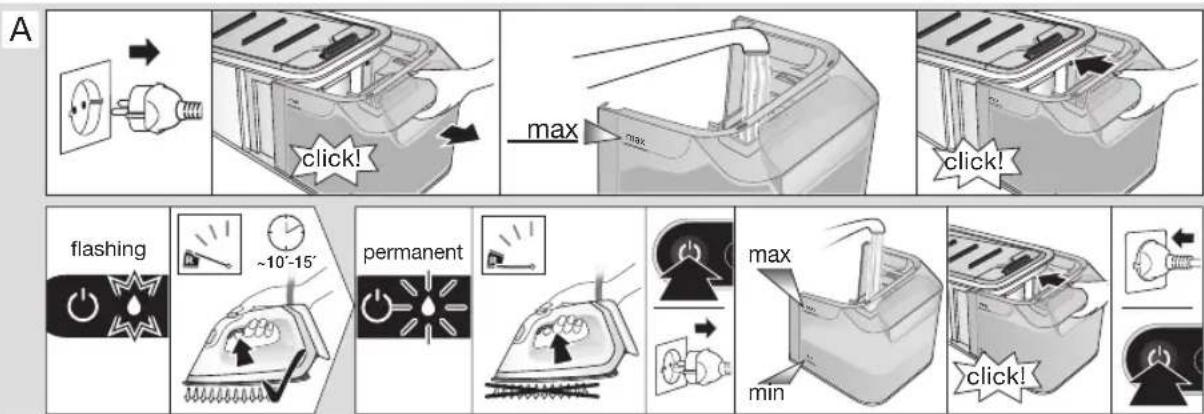
(A) Filling the water tank
- Make sure that the appliance is switched off and the system is unplugged.
- Remove the water tank (6).
- Fill the water tank with tap water, taking care not to exceed the "max" level but at least up to the mark "min" otherwise the appliance will not be ready to start steam ironing. If you have extremely hard water, we recommend that you use a mixture of 50% tap water and 50% distilled water.
- Never use distilled water exclusively. Do not add any additives (e.g. starch). Do not use condensation water from a tumble dryer.
- Insert the water tank.
- Place the appliance on a stable, level surface.
Note:
If you use filtering devices, make absolutely sure the water obtained is neutral pH.
Water reserve function
- When the water level is becoming low, the icon ♠ starts flashing. At this stage it is possible to continue steam ironing for about 10-15 minutes.
- When the icon ♠ turns permanently on, it becomes necessary to refill the tank. At the same time, the temperature control LED (12) is flashing and the icon related to the selected setting turns off.
- To continue steam ironing, refill the water tank (A).
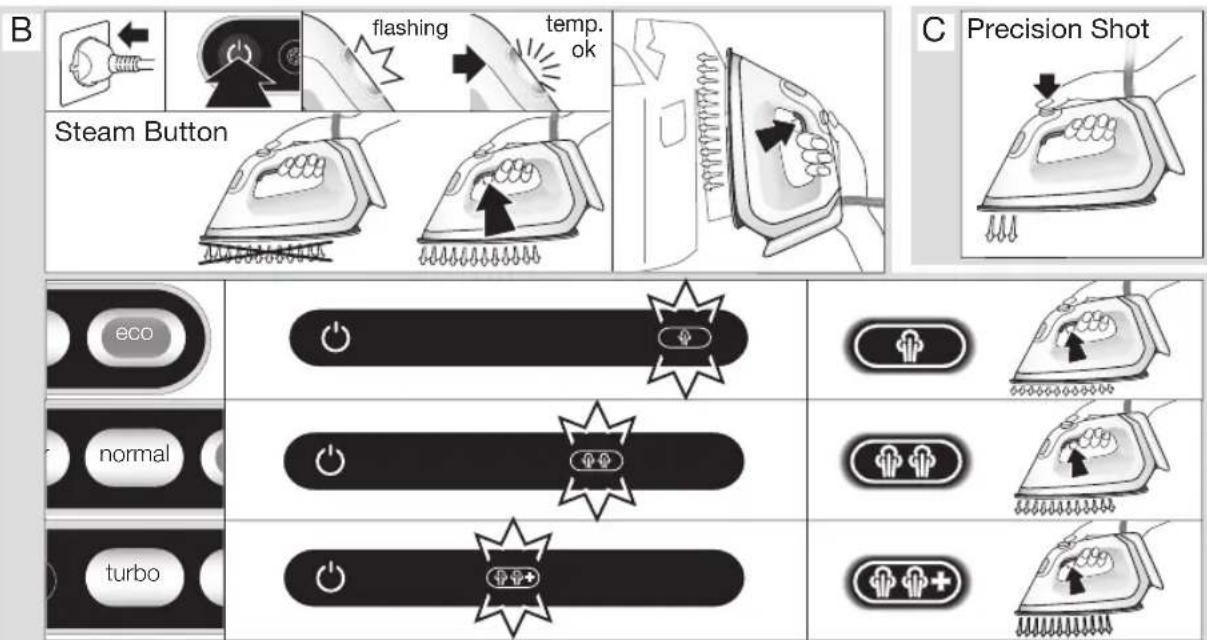
(B) Start ironing
- Place the iron on the iron rest (5) or on its heel rest (15), plug in the appliance and press the On/Off button (2).
- Select the setting (3) most suitable for the garments to be ironed.
- The iron will start to heat up and the temperature control LED (12) on the iron will flash.
- The related icon for the setting in the display (1) will start to flash. When steam is ready the icon turns permanently on.
- Once the temperature setting is reached, the temperature control LED (12) is permanently on.
- Settings: The requested setting can be chosen by pressing the corresponding button (eco, normal or turbo). To switch from one setting to another press the dedicated button (3).
CareStyle 7
eco
It is suggested for most delicate garments like synthetics, silk and blended fabrics for which you need less steam. This setting allows less power consumption.
normal
It is suggested for garments like wool, polyester and cotton/linen.
Note: The normal setting is automatically chosen when the appliance is switched on for the first time. From the second switch on, it will be set to the last setting chosen.
CareStyle 7 Pro
eco
It is suggested for most delicate garments like synthetics, silk and blended fabrics. This setting allows less power consumption.
normal
It is suggested for garments like wool, polyester and cotton.
turbo ①
It is suggested for garments that need more powerful steam, like thick cotton/linen and jeans.
Note: Due to higher temperature in the turbo mode, do not leave the iron unattended on garments to avoid any damage.
Note: When the appliance is switched on, it will always be set to the normal steam mode, independently of the last setting chosen.
- For steam ironing, press the steam button (11) below the iron handle. Steam will come out from all the holes in the soleplate.
- Double trigger: Press the steam button (11) or the precision shot button (13) twice in quick succession within 1 second. There will be a continuous steam emission for a few seconds. Press the steam button (11) or the precision shot button (13) once again to stop the function.
- For dry ironing, iron without pressing the steam button (11). Please note that after 10 minutes of dry ironing, the iron switches to the auto-off mode. Vertical steam: The iron can also be used for steaming hanging clothes (B).
- 3D soleplate: The unique round shape of the 3D soleplate ensures best gliding results on difficult parts (e.g. buttons, pockets etc.)
(C) Precision shot
- Press the precision shot button (13) completely down.
- Steam will come out of the tip area of the soleplate only.
- To stop this function, release the button (13).
- If you do not press it down completely, some steam may also come out from the rear steam holes in the soleplate.
(D) Iron Auto-Off
- When the iron is in the auto-off mode, the icon is flashing and the temperature control LED (12) is off. The iron will turn off to reduce power consumption. It is activated if after 10 minutes there has been no steam emission.
- To turn the iron on again, the On/Off button (2) has to be pressed. Before starting ironing again, wait until the temperature control LED (12) is continuously on.
After ironing
- Press the On/Off button (2) to turn off the appliance.
- Unplug and let the appliance cool down before storing.
- Empty the water tank.
- Lock the iron.
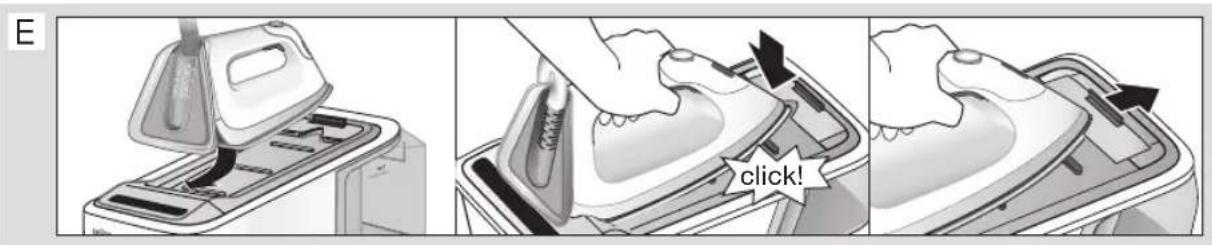
(E) Lock system
The lock system can be used for safe and easy storage of the steam station and the iron. Do not lift or carry the appliance on the handle of the locked iron.
- Place the soleplate into the recess on the iron mat.
- Press down the tip of the iron until you hear a "click" and the iron will be locked automatically.
- To unlock the iron, slide the locking system forward. The iron will be released.
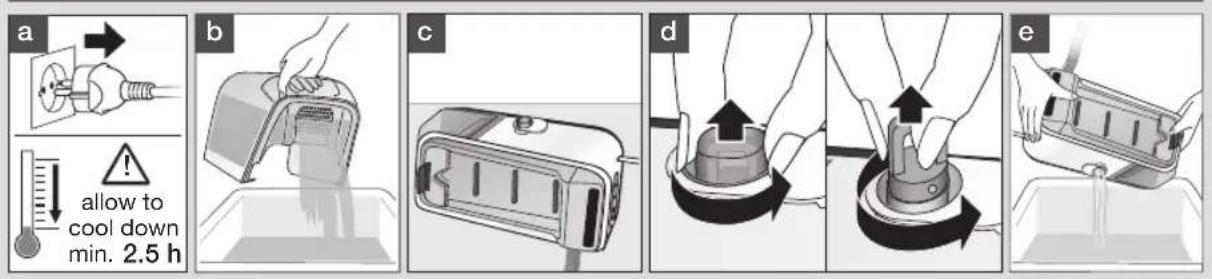
(F) Descaling
To maintain optimum performance, the system needs to be decalcified after every 15 litres of water consumption (about 8 complete refills).
The icon is flashing.
- First, switch off and unplug the appliance.
- Unlock the iron and remove the iron from the iron rest. Wait until the appliance has cooled down (minimum 2.5 hours).
- Remove and empty the water tank.
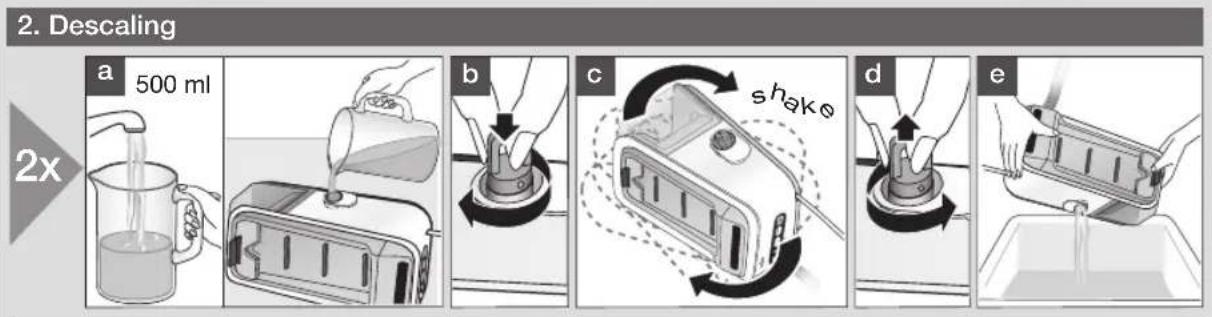
- Remove the transparent cover (8) and unscrew the cleaning valve (9).
- Empty the boiler.
- Pour in 500 ml tap water. Do not use any chemicals, additives or descaler.
- Screw the cleaning valve (9) to close the boiler.
- Shake the base unit to rinse, then empty the boiler.
- Repeat this procedure one more time.
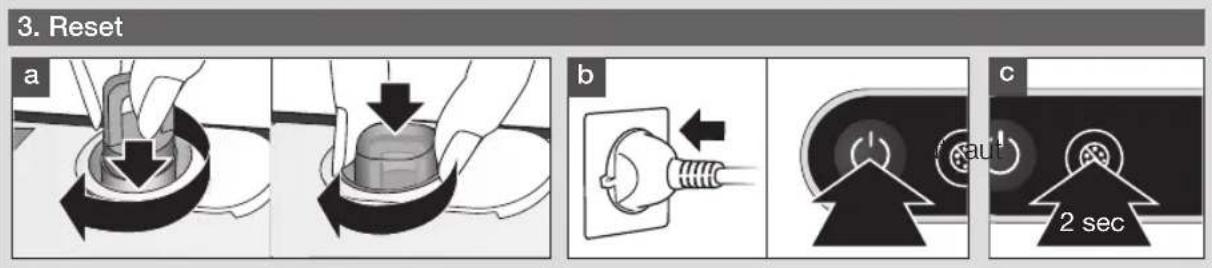
After having finished the descaling procedure, plug in, switch on (2) and press the calc clean system button (4) for 2 seconds to reset.
If the appliance is switched off without descaling, the icon will start to flash again when it is next switched on.
Note: Because of the different water composition by using an installed in-house permanent descaler, it is recommended to descale the system after every
4 complete refills. Please note that in this case the icon for descending will not automatically start flashing.
(G) Cleaning and maintenance
- Before cleaning, always make sure that the appliance is switched off, unplugged and has cooled down completely.
- Wipe the soleplate clean with a damp or dry cloth.
- Never use scouring pads, vinegar or other chemicals.
- To clean the soft material on the handle use a damp cloth.
For UK Only
Guarantee Information
All Braun Household products carry a minimum guarantee period of two years. The rights and benefits under this guarantee are additional to your statutory rights which are not affected.
Please keep your receipt as this will form the basis of your guarantee.
In the unlikely event of a breakdown you have access to professional help from our team simply by calling:
02392 392333
For service in the Republic of Ireland please call:
012475471
Braun Household undertakes within the specified period to repair or replace any part of the appliance, free of charge (with the exception of any glass or porcelain-ware incorporated in the product) found to be defective provided that;
- We are promptly informed of the defect. The product is used and maintained in accordance with the User Instructions.
- The appliance has not been altered in any way or subjected to misuse or repair by a person other than an authorized service agent for Braun Household.
- No rights are given under this guarantee to a person acquiring the appliance second hand or for commercial or communal use.
- Any repaired or replaced appliance will be guaranteed on these terms for the unexpired portion of the guarantee.
- The need for repair has not been caused by insufficient aftercare or cleaning: or damage caused by the chemical or electrochemical effects of water.
Under no circumstances shall the application of this guarantee give rise to the complete replacement of the appliance or entitle the consumer to damages.
Braun Household, New Lane, Havant, Hampshire PO9 2NH
www.braunhousehold.co.uk
Thank You for choosing Braun. We are confident that you will get excellent service from this product.
TO IMPROVE YOUR EXPERIENCE
Register now at www.braunhousehold.co.uk By registering we may send you from time to time details on exclusive offers, promotions, recipes and inside tips.
Troubleshooting guide
| PROBLEM CAUSE REMEDY | |
| The appliance does not switch on. | The appliance is not plugged into a mains socket. | Make sure the appliance is correctly connected and press the On/Off button. |
| Steam comes out under the base unit. | The "max" pressure safety system has opened. | Turn the appliance off immediately and contact an authorised Braun Customer Service. |
| There are some water drops from the holes in the bottom of the soleplate. | Water has condensed inside the tubes because steam is being used for the first time, or has not been used for some time. | Press the steam button several times away from the ironing board. This will eliminate cold water from the steam circuit. |
| Brown coloured fluid leaks from the soleplate. | Chemical water softeners or additives have been poured into the water tank. | Never pour products into the water tank. Clean the soleplate with a damp cloth and rinse the boiler. |
| The first time the appliance is turned on, you notice smoke or smell. | Some parts have been treated with sealer/lubricant which evaporates the first time the iron heats up. | This is normal and will stop when you have used the iron a few times. If the smoke/smell is still present after turning off the appliance, contact an authorised Braun Customer Service. |
| The appliance emits an intermittent noise associated with vibrations. | Water is being pumped into the boiler. | This is normal and no action is needed. |
| The appliance emits a continuous noise associated with vibrations. | System error. Unplug the appliance from the mains and contact an authorised Braun Customer Service. |
| The cleaning valve is difficult to unscrew. | Lime scale has made the cleaning valve difficult to open. | Turn the cap forcefully. To avoid the problem, rinse system frequently. |
| After refilling the water tank, the light▲does not reset. | The water float does not work appropriately. | Empty the water tank, rinse out and refill. |
| The water tank is not positioned correctly. | Position the water tank correctly. |
| All LEDs are flashing. System error. Unplug the appliance, plug it in again and press On/Off button. If this problem is still present, turn the appliance off immediately, unplug and contact an authorised Braun Customer Service. |
| Steam icon is permanently on, but there is no steam emission from the soleplate. | Water tank float is locked or the water tank is not correctly inserted. | Turn off and unplug the appliance.
Remove and empty the water tank, rinse out and refill.
Insert the water tank. Switch on the appliance and wait until the device is ready to use.
Press the steam button and wait until steam comes out.
Keep the steam button pressed for 10 seconds of steam emission then release the steam button. |
Subject to change without notice.
Please do not dispose the product in the household waste at the end of its useful life. Disposal can take place at a Braun Service Centre or at appropriate collection points provided in your country

Before use
Caution: hot surfaces!
(F) Descaling
Do not use the steam function while ironing.
Do not use the steam function while ironing.
This appliance can be used by children aged from 8 years and above and persons with reduced physical, sensory or mental capabilities or lack of experience and knowledge if they have been given supervision or instruction concerning use of the appliance in a safe way and understand the hazards involved.
When using the iron for the first time, it may emit some smoke and odor. This is normal and will cease after a short time.
If the iron is not used for a long time, it should be cleaned by a qualified person or an authorized service center to avoid any hazards.
Do not immerse the iron in water or any other liquid.
Always place the iron on its heel when not in use.
Before filling the water tank, unplug the iron.
Do not touch the soleplate or the hot parts of the iron. Always hold the iron by its handle.
Do not leave the iron unattended while it is connected to the power supply.
Do not use the iron on zippers, buttons, or metal parts.
When the appliance is used, it should be kept out of reach of children.
The device is intended for domestic use only, in accordance with the technical specifications. Do not use it for commercial or industrial purposes.
The device is designed for household use and its accessories are intended for use only with this device.
Do not immerse the device, cord, plug, or any other part in water or other liquids.
When plugging into an outlet, ensure that the device is turned off and that the plug is inserted correctly into the outlet.
When the device is not in use, unplug it from the outlet and ensure that the device is turned off before cleaning or storing it.
Do not touch hot surfaces, as the temperature may be high. Be careful to avoid burns.
Specifications
This device is for household use only.
1 Display 2 On/Off button 3 Regulator (temperature, speed, turbo) 4 Indicator light 5 Power cord 6 Water tank 7 Device body 8 Steam cap 9 Base plate 10 Handle
Iron
11 Steam button 12 Temperature control dial 13 Steam burst button 14 Water level 15 Spray
(A) Filling the water tank
Unplug the device before filling the water tank. Pour water into the tank up to the maximum level (6). Do not fill above the "max" mark, but ensure that the water level does not fall below the minimum mark. If the water is hard, mix 50% distilled water with 50% tap water. Do not use only distilled water. Do not add any additives (e.g., starch). Use only clean water. Place the tank back in its position. Ensure the device is on a stable, flat surface.
If you have:
If you have used the device, the water you have used may be hot. Be careful.
Set the temperature, select the desired program. The cycle will last 10-15 minutes. - For heavily soiled items, the water will be hot. Increase the number of cycles, check the temperature (12) and adjust the spin speed accordingly. - To start the cycle, press the start button (A).
(B) Start the cycle
Press the cycle button (5) or the prewash button (15), select the desired program, and press the start button (2). The selected program will be indicated by the indicator light (3). The temperature and spin speed can be adjusted using the buttons (12). - The selected program will be displayed on the screen. - When the desired temperature is reached, the temperature indicator (12) will light up. - Programs: To select a program, press the corresponding button (ECO, cotton, or synthetic). To switch from one program to another, press the button (3).
CareStyle 7
ECO
Synthetics, mixed fabrics, and delicate items can be washed in this program. The cycle is shorter.
Cotton
For cotton, polyester, and items made from mixed fabrics.
If the load is too large, the cotton program will automatically select a longer cycle. After the second rinse, the final spin will be performed.
CareStyle 7 Pro
ECO
Synthetics, mixed fabrics, and delicate items can be washed in this program. The cycle is shorter.
Cotton
For cotton, polyester, and items made from mixed fabrics.
Materials that have been in contact with food products must be cleaned.
If not used: In turbine mode, temperatures may be high, clean the filter, the valve, and the tank without fail.
If not used: When cleaning the filter, use the recommended mode, this mode is safe.
- To clean the filter, press the filter release button (11). The filter can be removed. Note: Do not press the cleaning button (13) more than once every 1 second. Otherwise, the device may be damaged. To stop the function, press the cleaning button (13) again. To dry the filter, press the filter release button (11). Within 10 minutes after drying, the dryer "AUTO-8" will turn off automatically.
- To clean the filter: To remove the filter, press the release button (B). 3D tab: The 3D tab's function is to increase the cleaning efficiency of the filter (tubes, valves, etc.) and to reduce the possibility of clogging.
(C) Cleaning button
Press the cleaning button (13) to the bottom. - This will remove the filter. - To stop the function, press the button (13) again. If you press the button to the bottom, the filter will be removed. The filter can be removed.
(D) AUTO-off function
When the filter is in AUTO-off mode, the temperature indicator (12) will light up. To turn off the filter, press the button. If it does not turn off within 10 minutes, it will turn off automatically. To turn off the filter, press the power/off button (2). To enter the setting mode, press and hold the temperature indicator (12).
When the filter is clogged
To clean the filter, press the power/off button (2). After the filter is clean, turn off the power, and remove the water. - Check the water level. - Turn off the filter.
(E) Lock function
The lock function can be used to lock the filter and prevent accidental operation. To lock the filter, press and hold the lock button for 3 seconds.
The filter's metal mesh can be removed. Press the filter release button, then the filter will automatically lock. To unlock the filter, press the lock button again. The filter can be removed.
Pour éviter les brûlures, laissez refroidir pendant au moins 15 minutes avant de nettoyer, puis retirez le réservoir (8) en le tournant.
L'appareil est chaud.
Premièrement, retirez la fiche de la prise de courant.
Ouvrez le couvercle en le tournant dans le sens inverse des aiguilles d'une montre. Ne nettoyez pas avec de l'eau (voir section 2.5).
Retirez le réservoir d'eau et videz-le.
- Retirez le filtre (8) et nettoyez-le sous l'eau courante (9).
Séchez le filtre.
- Versez 500 ml d'eau dans le réservoir. N'utilisez pas de produits chimiques, de détergents ou de nettoyants abrasifs.
Nettoyez sous l'eau courante (9) et séchez le filtre. - Si le réservoir est sale, videz-le. - Ne pas immerger dans l'eau. - Après avoir nettoyé les accessoires, replacez le filtre (2) et fermez le couvercle (4) en appuyant pendant 2 secondes.
Si le filtre n'est pas nettoyé régulièrement, les performances de l'appareil peuvent diminuer et des odeurs peuvent se développer.
Attention : Si l'appareil est utilisé avec de l'eau très dure, des dépôts de calcaire peuvent se former. Pour les éliminer, nettoyez le réservoir avec du vinaigre blanc après environ 4 semaines d'utilisation. Dans ce cas, le voyant de nettoyage s'allume automatiquement.
(G) Nettoyage et entretien des accessoires
Retirez toujours la fiche de la prise avant de nettoyer l'appareil. Ne le nettoyez jamais sous l'eau courante. - N'utilisez pas de nettoyants abrasifs, de solvants ou d'autres produits chimiques. - Pour nettoyer les surfaces en plastique, utilisez un chiffon doux et humide.
EAC
| Ynri IS 7043, 7044, 7055, 7056 |
| Kephey 220 - 240 B |
| Герц 50-60 Г. | |
| Ватт 2000-240 Вt |
| Сактушарлары: | Темпера typa: +5°C жени +45°C billyfaльный: <80% |
Kazakhstan, DeLong Brought Hauschka GmbH
Germany: DeLong Brought Hauschka GmbH, Carl-Ulrich-Straße 6, 63263 Neu-Isenburg
For warranty service, or for warranty service after the warranty period, please contact the authorized service centers of the company.
88002005262 Telephone hotline.
The product must be handed over for repair in its original packaging. The warranty period starts from the date of sale to the consumer, which is 2 years.
Importer:
«DeLong» LLC, Moscow, 127055,
Moscow city, Sushchevskaya street,
27/3 building (building 27, building 3)
Tel. +7(495)781-26-76
Authorized service centers
| AKAYIbIK CEBE6I JXHIDEV | |
| Курынfvы Косьлмайд. | Курынfvы Куат ке3иЕ Калларбafан. | Курынfvы Ксьлвп Дурьс Ксьлвп ТурfaынTekcepin, кocy/оширу Тумecin БасынБ. |
| Бу вебетин acынан byшыfaы. | "Max" Кысьм Кayincizdiri Кунeciашылп ketkeн. | Курынfvы Дурей Кшрр, Braun TуьншыларfaКызмт Керсу optalыгыххабарласынБ. |
| Утк Табанында fvteсikтердануТамшылайд. | Бу вориш pet Kolданылвп ольчдылвпТуктердд iшду сужиналынkanларп hemeceКурынfvы bipaaz yakbyTOLДАнлмAFAN. | Бу Тумесin БорhoepetбасынБ, bipak утіктуктейТаftасынан Кашьк устанБ.БуьbyЖуисinderi cyыксуд. |
| Табанынан коньр тустСуьИТьKafadл. | Су Кутвн bдысьнсужмсартавихимкалтap hemeceKosbyндылар Кшлар. | Су Кутвн bдысka оndдэнимderд Куюfa boлмады.Туктн,Tашындыmkbылшуберекпенсуртл anынБ.Зэн КайнТылбшыл.шайынБ. |
| Курынfvы ВориPetKosьлФанд,Тугн HemeceNicШыкалын bайkanьс. | Ytкгин Кебipбьшөнштрп TыБддыш MaTERралдармeн/Maɪлармeн eндлгeн, coNыктанутк Вори pet Kotsылардд coL 3aTTAP shBfAdb. | Бул_Kалынfvы Хаflдд дун eхнгд Борhoe petKOLДАнFAH CON, e3diRiHEN TOKТайд.Ер.Kурынfvы eшipirгнehen cohд рутih/nic Ketnece, BraunTуьыншыларfa Кызmeti Керсу optalыгыххабарласынБ. |
| Курынfvы ТербелicstepmenБайалныстby Y3dikTi ShyblShyfaradl. | Бу reheparotobha ry tarblynda.Бун KaIbInbI 星Фдджэ He Ew epeket JxacamaHb. |
| Курынfvы ТербелicstepreБайалныстby Y3dikCiz 3 ShyblShyfaradl. | Жуе kateliri. Курынfvы КуAT Ke3iHEN axbipatbI, BraunTуьыншыларfa КызmetуoptalыБынaxabarlacbHb3. |
| Тазалay Клаланьн ibyanany Kibn. | Эк тазалay Клаланьн aiyyfaKe dedri KeJItpiyde. | Кaknaшань Кштend Bypan aushbI3. МсениКайталанбac ушiH,by reheparotbpyнжишao kaxet. |
| Су ТOTьроганн кеи,ShambyКайta petteлmeidii. | Су Калымбы Дурьс Кшьс ictemeidi. | Су Курьн bдыctsb bocatbI,шайын,可靠ТOTьрьнbI3. |
| Су Курьн bдысьдурьс calbHbafan. | Су Курьн bдыctsb dupbictan calbHb3. |
| ЖарыдлodьtsiшamdarbDbapMbfbIЖынлбтAnTyrp. | Жуе kateliri. | Жуени КуAT Ke3iHe axbipatbI,可靠Тжалгызд,aKocy/оширу Тумecin БасынБ.Ер месе олд deшшлmese, Курьын bдыctsb Кызmeti Керсу optalыгыххабарласынБ. |
| Бу вел�циоту Туракты TурdeKosьлвп Tур,барТабанынан 6ушьлайд. | Су Курьн bдыс КалымбыБekittilreHemecse bдыс dypbicsalbHafan. | Курьнfvы eширin,КуAT Ke3iHEN axbipatbI3.Cу Курьн bдыctsb bocatbI,шайын,可靠ТOTьрьнbI3.Cу Курьн bдыctsb Ophынca calbHb3.Курьын bдыcshэдэrtболганша кутih3.Бу Тумесin bashin,6ушьканша кутih3.Бушьканda,6ушьмсin 10 cekyнд устанТурьнbI3,ODan KeiHbocatbIb3. |
Unauthorized repair is possible.
This manual must be read carefully before using the device.
The manufacturer is not responsible for any damage caused by improper use.

Russian
Before use
Please carefully read this operating manual before using the device.
Attention

Caution! Hot surface!
The steam iron operates at high temperatures and with hot steam, which can cause burns. This device can be used by children aged 8 and above, as well as by persons with reduced physical, sensory, or mental capabilities, or lack of experience and knowledge, if they have been given supervision or instruction concerning use of the appliance in a safe way and understand the hazards involved. Children shall not play with the appliance. Cleaning and user maintenance shall not be made by children without supervision. Keep the appliance and its cord out of reach of children aged less than 8 years. If the supply cord is damaged, it must be replaced by the manufacturer, its service agent, or similarly qualified persons in order to avoid a hazard. Always unplug the appliance from the mains before filling with water. During use, place the appliance on a stable surface.
Place it exclusively on a stable surface.
During breaks in ironing, place the iron vertically on its heel or on the platform. Ensure that the heel is on a stable surface. Do not leave the appliance plugged in unattended. Do not open the water reservoir during ironing. The filling, emptying, rinsing, or descaling openings, which are under pressure, must not be opened during operation. Do not use the appliance if it has visible damage or leaks. Regularly check the power cord for damage. This appliance is intended exclusively for household use and is designed for processing quantities of food in a domestic scale. Do not allow the cord to come into contact with hot objects, the soleplate of the iron, or water taps. Before plugging into the outlet, check that the mains voltage matches the voltage indicated on the bottom of the appliance. The outlet must be grounded. When using an extension cord, make sure it is in good condition, has a grounding plug, and matches the rated power of the appliance (16A). The soleplate and the base of the iron may heat up to extremely high temperatures, which can cause burns. Do not touch them.
Description of parts
Steam iron
1 Spray nozzle 2 On/Off button 3 Settings ("eco", "normal", "turbo") 4 Anti-scale system 5 Iron platform 6 Water reservoir 7 Cord 8 Transparent lid 9 Cleaning valve 10 Fixation system
iron
11 Steam button 12 Temperature indicator light 13 Precision steam shot button 14 Water cord 15 Heel
(A) Filling the water tank
- Make sure the appliance is switched off and disconnected from the power supply.
- Remove the water tank (6). Fill the tank with tap water up to the "MAX" mark, but not below the "MIN" mark; otherwise, the appliance is not ready for steam ironing. If your water is very hard, we recommend using a mixture of 50% tap water and 50% distilled water. Never use undiluted distilled water. Do not add any additives (e.g., starch). Do not use condensate from a tumble dryer. Insert the water tank.
- Place the appliance on a stable, flat surface.
Note:
Before using the ironing system, make sure that the water obtained has a neutral pH value.
Function of the water tank
When the water level is low, the indicator starts flashing. At this stage, you can continue steam ironing for another 10-15 minutes. When the indicator lights up continuously, it is necessary to refill the water tank. At the same time, the temperature indicator (12) flashes and the indicator corresponding to the selected setting turns off.
- To continue steam ironing, fill the water tank (A).
(B) Starting ironing
- Place the iron on the base (5) or on the heat-resistant pad (15), plug the appliance into the mains and press the ON/OFF button (2).
- Select the setting (3) that best suits the fabric to be ironed.
- The iron will start heating up, and the temperature indicator (12) will light up. The indicator on the display (1) will start flashing, corresponding to the selected setting. When steam is ready, the indicator will light up continuously. When the set temperature is reached, the temperature indicator (12) will light up continuously.
- Settings: You can select the required setting by pressing the corresponding button (ECO, normal, or turbo). To switch between settings, press the corresponding button (3).
eco

This setting is recommended for the most delicate fabrics, such as synthetic, silk, or blended fabrics, which require lower temperatures. It reduces energy consumption.
normal

This setting is recommended for fabrics such as wool, polyester, and cotton/linen.
Note: The normal setting is automatically selected when the appliance is first turned on; starting from the second power-on, the last used setting is automatically selected.
CareStyle 7 Pro
eco

This setting is recommended for the most delicate fabrics, such as synthetic, silk, or blended fabrics. It reduces energy consumption.
normal

This setting is recommended for fabrics such as wool, polyester, and cotton.
turbo+
This setting is recommended for fabrics that require a more powerful steam burst, for example, thick cotton, linen, or denim materials.
Note: Due to the particularly high temperature in the turbo mode, do not leave the iron on the fabric unattended, otherwise the fabric may be damaged.
Note: When the appliance is turned on, it is always in the standard steam setting, regardless of the last selected setting.
For steam ironing, press the steam button (11) under the iron handle. Steam will come out of all holes in the soleplate. - Double press: Quickly press the steam button (11) or the precision steam button (13) twice within 1 second. This triggers a continuous steam burst for several seconds. To stop this function, press the steam button (11) or the precision steam button (13) again. - For dry ironing, do not press the steam button (11) while ironing. Remember that after 10 minutes of dry ironing, the iron will switch to automatic shut-off mode. Vertical steam: The iron can also be used for steam ironing hanging garments (B). - 3D soleplate: Thanks to the unique rounded shape of the 3D soleplate, the best results are achieved when ironing complex parts (e.g., elements with buttons, pockets, etc.).
Press the steam burst button (13) down fully. Steam will be emitted only from the front part of the soleplate. To turn off this function, release the button (13). If the button is not fully pressed, some steam may also escape from the holes in the rear part of the soleplate.
(D) Auto shut-off mode
When the iron is in auto shut-off mode, the temperature indicator light (12) flashes. To turn off, to reduce energy consumption. This function activates if no steam has been produced for 10 minutes. To turn the iron back on, press the "On/Off" button (2). Before ironing again, wait until the temperature indicator light (12) stays on continuously.
After ironing
Press the "On/Off" button (2) to turn off the appliance. Unplug the appliance and let it cool down before storing it. Empty the water from the water reservoir. Secure the iron.
(E) Locking system
The locking system is used to ensure easy and reliable storage of the steam iron. Do not lift or carry the appliance by the handle of the locked iron.
- Place the soleplate of the iron on the ironing board platform. Press the front part of the iron down until you hear a click; the iron will lock automatically.
- To unlock the iron, press the locking element forward; the iron will be unlocked.
(F) Descaling
To ensure maximum efficiency of the system, it should be cleaned of limescale after every 15 liters of water (approximately 8 fillings).
The indicator light flashes.
- First, turn off the appliance and unplug it from the power supply. Unlock the iron and remove it from the platform. Wait until it has completely cooled down (at least 2.5 hours).
- Remove the water reservoir and empty the water from it.
- Remove the transparent cover (8) and open the drain valve (9).
- Empty the boiler. Pour in 500 ml of tap water. Do not use any chemicals, additives, or descaling agents. Close the drain valve (9) to seal the boiler.
- Turn on the base unit to start rinsing, then follow the water.
- Repeat this procedure once more.
- After the cleaning procedure is finished, connect the appliance to the power supply, turn it on (2), and press the “System Cleaning” button (4) for 2 seconds.
Turning off the appliance without performing the descaling procedure may cause scale to accumulate and affect the next use.
Note: Due to variations in water composition, when using the built-in descaling device to prevent scale formation, it is recommended to perform descaling approximately every 4 fills. It should be remembered that in this case, the indicator showing the need for descaling does not start flashing automatically.
(G) Cleaning and maintenance
- Before cleaning, always make sure that the appliance is switched off, unplugged from the power supply, and completely cool.
- Wipe the soleplate of the iron with a damp, soft cloth.
- Never use a sponge, vinegar, or acidic chemical agents. For cleaning the soleplate, use a damp cloth only.
Manufacturing date
To find out the manufacturing date, look at the rating label (next to the table with the serial number). The first digit indicates the last digit of the year of manufacture. The next two digits are the calendar week. The last two digits indicate the edition (automatically incremented since 1992).
Recommended for household use only.
turbo+
Recommended to iron, if more is needed, use the steam boost function.
Note: Due to the temperature in the turbo mode, do not iron without steam to avoid any damage.
Note: The recommended steam setting for ironing is set in normal steam mode, regardless of the selected steam setting.
For steam ironing, press the steam button (11) located on the iron handle. Steam comes out of the holes in the soleplate. - Steam burst: Quickly press the steam button (11) or the steam shot button (13) twice within 1 second. Steam continuously comes out for several seconds. To stop this function, press the steam button (11) or the steam shot button (13) again. - For dry ironing, do not press the steam button (11). Note that after 10 minutes of dry ironing, the iron automatically switches to standby mode. - Vertical steam: The iron can also be used for vertical steaming of hanging clothes (B). - 3D soleplate: The unique 3D soleplate shape ensures the best gliding results in difficult areas (e.g., buttons, pockets, etc.)
(C) Steam shot
- Press the steam shot button (13) to the stop.
- Steam comes out only from the soleplate nozzle.
- To stop this function, press the button (13) again.
- If you do not press the button to the stop, some steam may also come out of the steam holes in the soleplate.
(D) Automatic shut-off
When the iron is in automatic shut-off mode, the indicator light on the temperature control (12) is off. The iron turns off to reduce energy consumption. It activates if the iron is left unattended for 10 minutes. To turn the iron back on, press the on/off button (2). Before starting to iron, wait until the temperature control indicator (12) lights up.
After ironing
Press the on/off button (2) to turn off the iron. Unplug the iron from the electrical outlet and let it cool down before storing. - Empty the water reservoir. Store the iron.
(E) Lock system
The lock system can be used for safe and easy storage of the cord and the iron. Do not lift or carry the iron by the handle when it is locked.
- Press and hold the button until the valves close. This means the press will be locked automatically. To unlock the press, press the unlock system button. The press will unlock.
(F) Descaling
For optimal productivity, it is necessary to perform descaling of the system after every 15 liters of water consumed (approximately 8 full refills).
The indicator will blink.
First, turn off the appliance and unplug it from the electrical outlet. - Disassemble the press and remove it from the base. Wait until the appliance has completely cooled down (minimum 2.5 hours). - Remove the water reservoir and pour out the water. Remove the transparent lid (8) and unscrew the vent valve (9). - Pour water out of the boiler. Fill with 500 ml of tap water. Do not use harsh chemicals, powders, or cleaning agents. Close the vent valve (9), cover the boiler. - Shake the base unit to rinse it, then pour the water out of the boiler. - Repeat this procedure once. - After the descaling procedure, insert the plug into the socket, turn on (2) and press the descaling system button (4) for 2 seconds to reset the setting.
If the appliance is turned on without performing the descaling procedure, the indicator will blink again at the next power-on.
Note: When using a stationary household appliance for descaling through various water hardness levels, it is recommended to descale after every 4 full refills. Please note that in this case, the descaling indicator will not blink automatically.
(G) Cleaning and Maintenance
- Before cleaning, make sure the appliance is turned off and unplugged from the electrical outlet, and allow it to cool completely.
- Wipe the press body with a clean damp or dry cloth. Never use abrasive cleaners, solvents, or other chemical agents. - For stubborn stains on the handle, use a damp cloth.
The product does not contain substances harmful to health. It complies with the requirements of technical regulations regarding the use of hazardous substances in electrical and electronic equipment.

Hotline: 0 800 503-507 (toll-free from landline phones).
Troubleshooting and Fault Correction
1
(A)
(B)
. ( ) (jaiill/) On/Off jjiai, jai
.1gall g2gall (14)