
Notos - Air purifier Madeira - Free user manual and instructions
Find the device manual for free Notos Madeira in PDF.
| Product type | Air dehumidifier |
| Brand | Madeira |
| Model | Notos 10 L |
| Dimensions (W x H x D) | 292 x 501 x 190 mm |
| Net weight | 10.5 kg |
| Gross weight | 11.5 kg |
| Power supply | 220-240 V ~, 50 Hz |
| Rated power | 175 W |
| Dehumidification capacity | 10 L/day (30 °C, 80 % RH) |
| Water tank capacity | 2 L |
| Refrigerant | R290 (40 g) |
| Noise level | 42 dB(A) |
| Recommended application area | 15-18 m² |
| Operating temperature | 5 °C to 32 °C |
| Protection | IPX1 |
| Main functions | Automatic and continuous dehumidification, humidity setting, timer (1-24 h), two fan speeds (high efficiency and silent) |
| Maintenance and cleaning | Clean the casing with a damp cloth; clean the tank every 2 weeks; clean the air inlet grille every month; do not use solvents |
| Safety | Flammable refrigerant R290; room of at least 4.2 m²; do not use less than 40 cm above and 50 cm on the sides; automatic defrost |
| Spare parts and repairability | Contact HORNBACH for spare parts and service (service@hornbach.com) |
| General information | Indoor use only; transport in upright position; wait 4 hours before first use; do not use an extension cord |
Frequently Asked Questions - Notos Madeira
User questions about Notos Madeira
0 question about this device. Answer the ones you know or ask your own.
Ask a new question about this device
Download the instructions for your Air purifier in PDF format for free! Find your manual Notos - Madeira and take your electronic device back in hand. On this page are published all the documents necessary for the use of your device. Notos by Madeira.
USER MANUAL Notos Madeira
We are convinced that this appliance will exceed your expectations and wish you joy while using it. Please read this user manual completely and observe the safety instructions.
Scope of delivery
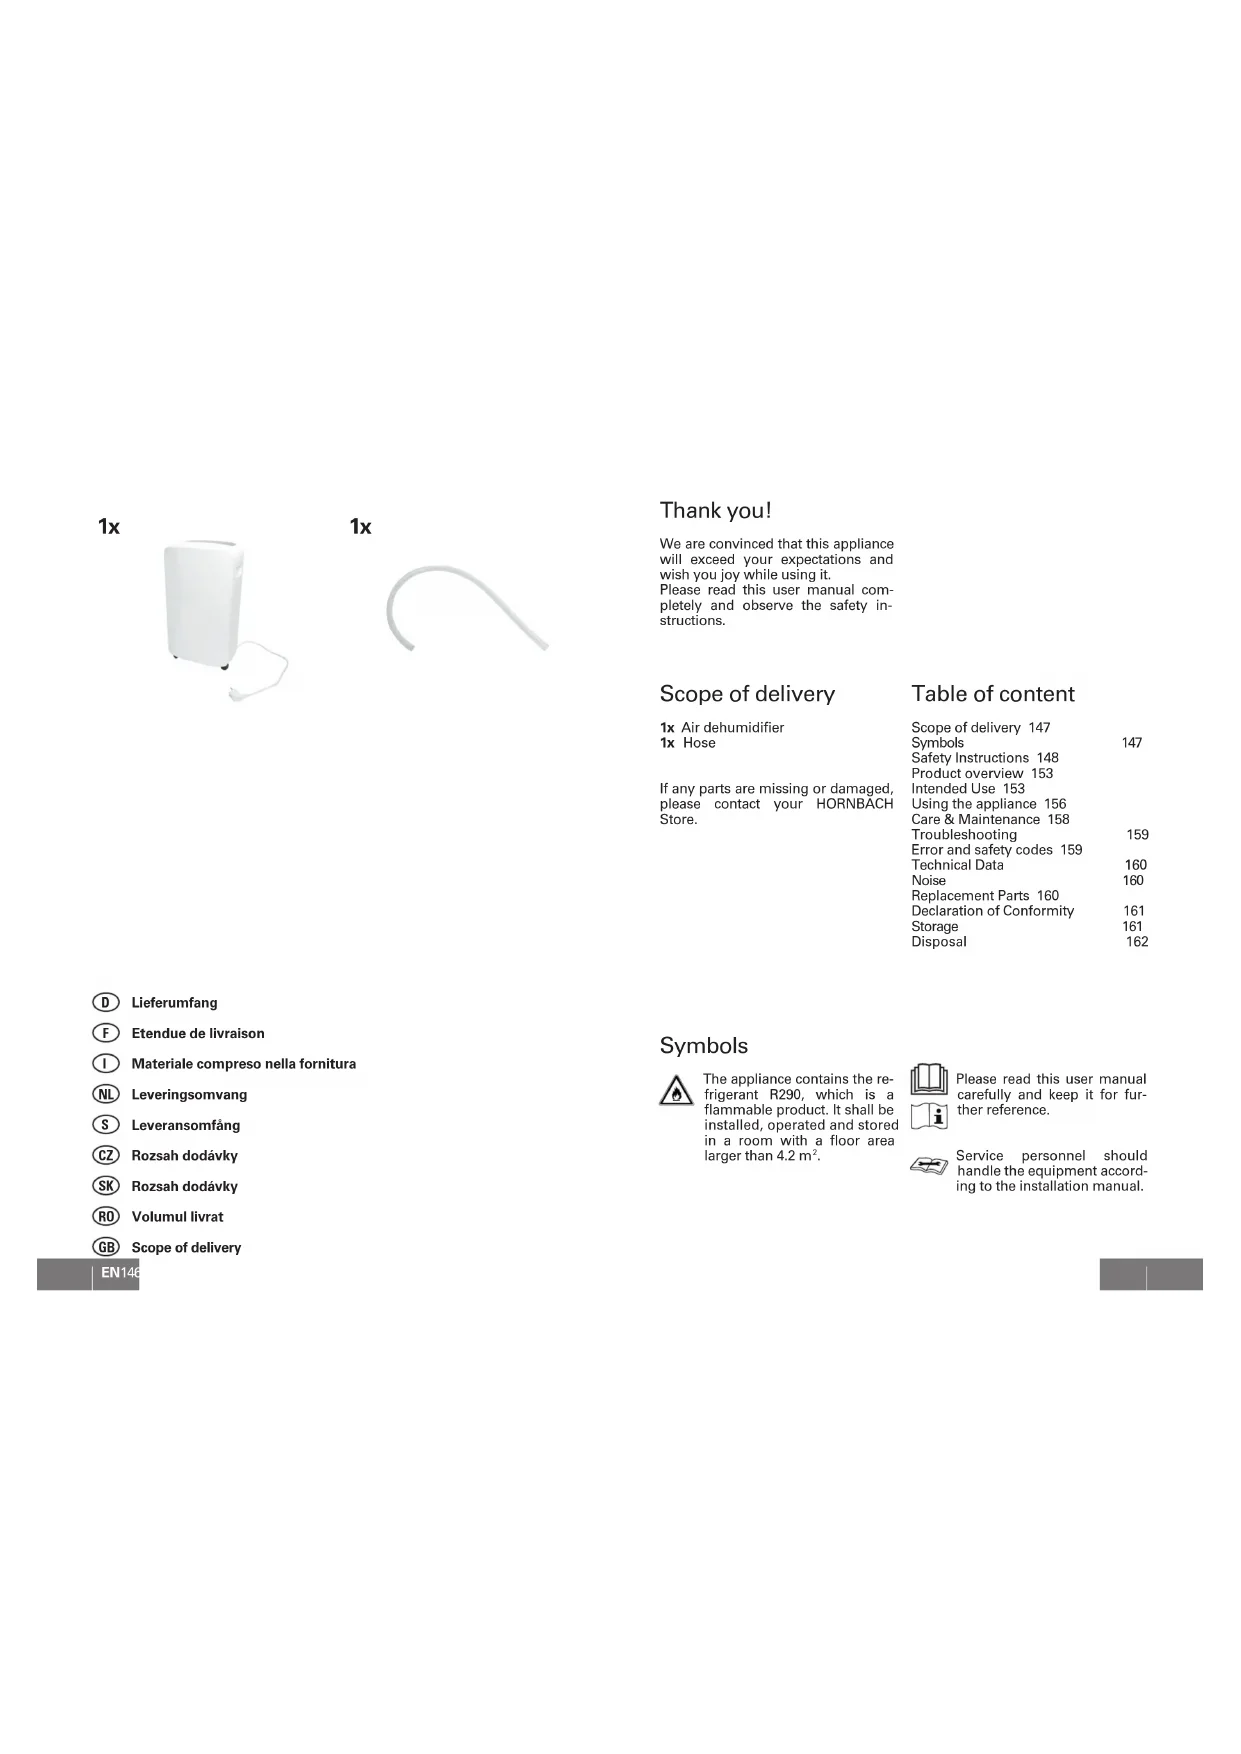
1x Air dehumidifier 1x Hose
If any parts are missing or damaged, please contact your HORNBACH Store.
Table of content
| Scope of delivery 147 | |
| Symbols | 147 |
| Safety Instructions 148 | |
| Product overview 153 | |
| Intended Use 153 | |
| Using the appliance 156 | |
| Care & Maintenance 158 | |
| Troubleshooting | 159 |
| Error and safety codes 159 | |
| Technical Data | 160 |
| Noise | 160 |
| Replacement Parts 160 | |
| Declaration of Conformity | 161 |
| Storage | 161 |
| Disposal | 162 |
D Lieferumfang
F Etendue de livraison
① Materiale compreso nella fornitura
NL Leveringsomvang
S Leveransomfang
C Rozsah dodávky
SK Rozsah dodávky
R0 Volumul livrat
GB Scope of delivery
Symbols

The appliance contains the refrigerant R290, which is a flammable product. It shall be installed, operated and stored in a room with a floor area larger than 4.2m^2

Please read this user manual carefully and keep it for further reference.

Service personnel should handle the equipment according to the installation manual.

Safety Instructions
Important safety instructions. Please read these safety instructions carefully before using the appliance. Keep this manual in a convenient place so you can always refer to it for the safe and proper use of the appliance. Please make sure to pass it on to any new owner of this appliance so he can become familiar with it and the safety warnings.
Always observe the safety instructions. Failure to follow the warnings and instructions may result in electric shock, fire and/or serious injury. The producer is not responsible for any damage or injuries that may result of it.
-
This appliance can be used by children aged from 8 years and above and persons with reduced physical, sensory or mental capabilities or lack of experience and knowledge if they have been given supervision or instruction concerning use of the appliance in a safe way and understand the hazards involved. Cleaning and user maintenance shall not be made by children without supervision. Children shall not play with the appliance.
-
Ensure to always transport the appliance in an upright position.
-
Before using for the first time, ensure that the appliance has been positioned upright on its final position for at least 4 hours. Not doing so will void your warranty claim.
- The appliance is not intended for commercial use.
- This appliance fulfils all current safety standards and must be treated with care.
- Always use the appliance as described in the intended use. Do not use the appliance in the following cases: near a fire
with defective main plugs
outdoors or in direct sunlight - near water and spraying water like bath tubs, showers or pools.
with extension cords or frame connectors - when the appliance is defective
- as construction dryer or in rooms with strong particulate pollution
- Always plug the appliance into a mains outlet meeting the requirements described in the technical data or the rating plate on the back of the appliance.
- Ensure to connect the appliance only to a grounded mains plug.
- Do not use the appliance in an altitude of more than 2000m above sea level.
-
During installation, always observe the national installation regulations.
-
The appliance shall only be stored in rooms without permanent ignition source.
- Escaping refrigerant can cause frostbite, irritate the respiratory passages or lead to a loss of consciousness and to suffocation.
- Avoid contact with the refrigerant.
- Prevent damage to refrigerant lines.
- The appliances are provided with the refrigerant R290. This refrigerant is an ecologically friendly, but flammable product. The appliance is only to be operated or stored in a room with a floor area of min. 4.2m^2 . The appliance must only be operated within the temperature range of 5^ to 32^ . Additionally, the following indications concerning appliances containing refrigerant R290 need to be followed:
- Do not damage the refrigerant circuit. Escaping refrigerant can catch fire.
In case of escaping refrigerant, keep any kind of open fire sources well away and ventilate the room thoroughly. Turn off the appliance immediately. Do not pull the plug out of the mains, as this can become a source of ignition. -
The system contains refrigerant under high pressure and shall only be maintained by the manufacturer or similarly qualified persons.
-
Warning: Refrigerants can be odourless!
- Before cleaning or maintaining the appliance, please turn it off and pull the power plug.
- Always clean the appliance with cleaning agents recommended by the manufacturer. Do not use any means or substances other than those recommended by the manufacturer to speed up the defrost process.
- Do not insert or pull out the power plug with wet hands.
- If the supply cord is damaged, it must be replaced by the manufacturer or its service agent or a similarly qualified person in order to avoid a hazard. Never operate the appliance with a defective supply cord.
- Never cover the appliance with a towel or anything similar. Keep air inlet and air outlet clear of obstacles.
- Keep children from playing or climbing on the appliance.
- Do not repair or disassemble the air conditioner by yourself.
- Always keep the appliance in an upright and stable position. Do not place any objects on the appliance.
- Prohibit inserting any fingers or objects into the appliance. Take special care with children. The functionality of the appliance could be damaged.
- Children and disabled people are not allowed to use
the unit without supervision.
- Close doors and windows when operating the appliance, so that it can work effectively.
- Empty the water tank regularly. Please observe, that high humidity can cause the water tank to fill quickly.
- The filter on the backside of the appliance must be cleaned regularly to guarantee an optimal air inlet.
Cabling
Check that cabling will not be subject to wear, corrosion, excessive pressure, vibration, sharp edges or any other adverse environmental effects. The check shall also take into account the effects of aging or continual vibration from sources such as compressors or fans.
Removal and evacuation
When breaking into the refrigerant circuit to make repairs - or for any other purpose - conventional procedures shall be used. However, it is important that best practice is followed since flammability is a consideration.
The following procedure shall be adhered to:
remove refrigerant;
purge the circuit with inert gas;
- evacuate;
purge again with inert gas;
open the circuit by cutting or brazing.
The refrigerant charge shall be recovered into the correct recovery cylinders. The system shall be "flushed" with OFN to render the unit safe. This process may need to be repeated several times. Compressed air or oxygen shall not be used for this task.
Flushing shall be achieved by breaking the vacuum in the system with OFN and continuing to fill until the working pressure is achieved, then venting to atmosphere, and finally pulling down to a vacuum. This process shall be repeated until no refrigerant is within the system. When the final OFN charge is used, the system shall be vented down to atmospheric pressure to enable work to take place. This operation is absolutely vital if brazing operations on the pipe-work are to take place.
Charging procedures
In addition to conventional charging procedures, the following requirements shall be followed.
- Ensure that contamination of different refrigerants does not occur when using charging
-
equipment. Hoses or lines shall be as short as possible to minimise the amount of refrigerant contained in them.
Cylinders shall be kept upright. -
Ensure that the refrigeration system is earthed prior to charging the system with refrigerant.
- Label the system when charging is complete (if not already).
- Extreme care shall be taken not to overfill the refrigeration system.
Prior to recharging the system it shall be pressure tested with OFN. The system shall be leak tested on completion of charging but prior to commissioning. A follow up leak test shall be carried out prior to leaving the site.
- Only set up the device in a room in which there is no source of ignition present (e.g. open flames, a gas appliance or an electric heater).
- Do not pierce or burn.

Product overview
Air dehumidifier
1 Control panel
2 Air outlet grille
3 Handle
4 Housing
5 Rolls
6 Power supply cord
7 Water tank
8 Condensation drain
9 Intake grille
Control panel
A Display
B Control UP
C Fan speed
D Timer
E On/off button
F Water level control
G Mode button
H Control DOWN
Intended Use
This tool is
- used to prevent moisture damage to objects or dwellings;
- used to support drying wet laundry;
only allowed to be used indoors, e.g. in living rooms, cellars, bath rooms, laundry rooms etc.;
to be operated at temperatures from 5^ to 32^ ;
to use according to the descriptions and safety instructions indicated in this operating manual.
The appliance is not intended for commercial use. Any other use or modification to the appliance is considered as improper use and could cause considerable dangers.
Setup
Use the handles 3. to carry the dehumidifier
Note: Close all doors, windows and other openings for efficient usage.
2 The dehumidifier can also be rolled by its rolls 5.
Caution! Make sure that the dehumidifier stands on a flat and even floor.
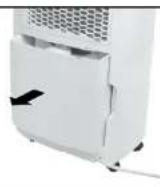
Empty the water tank
1 Carefully pull out the water tank 7 to avoid spilling water.
Caution! If water appears to be inside the appliance, empty the water tank and let the appliance dry.
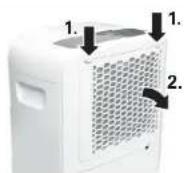
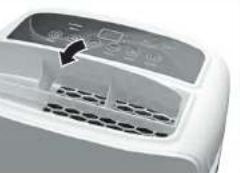
Remove intake grille
1 For cleaning the intake grille 9 (see "Care and Maintenance"), push the two flaps holding it and remove it.
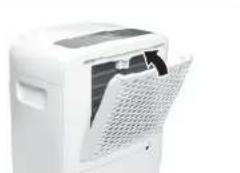
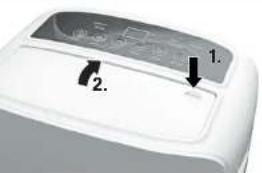
Open the air outlet grille
When putting the appliance into operation, open the flap of the air outlet grille 2 by pushing it open at the mark labelled with PUSH.
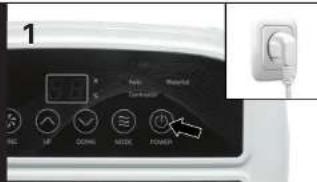
Switch on
1 Insert the power supply cord 6 into a suitable wall socket. Press the on/off button E.
Caution! Do not plug the appliance into a multiple socket with other devices.
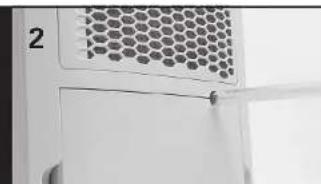
Use the condensation drain
Condensation water can permanently be derived with a drainage hose.
2 Empty and reinstall the water tank 7. Make sure it is installed properly.
Install intake grille
2 Push the intake grille 9 gently onto the housing until it clicks into place.
Close the air outlet grille
2 Close the air outlet grille 2 by pushing down the flap.
Switch off
2 Press the on/off button E to switch off the appliance. Note: Wait 3 minutes until switching on the appliance again.
1
2

1
2
1
2


Using the appliance
Warning! Never cover the appliance during operation. This could lead to heat accumulation or fire and damage to your appliance. Make sure no water can drop into the appliance.

Switch On/Off
Press ON/OFF button (E). The current humidity level in the room shows in the display (A).
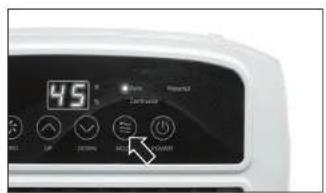
Mode
Press MODE (G) to switch between automatic and continuous dehumidification.

Setting humidity level
Ensure that the appliance is in Auto mode. Press UP (B) or DOWN (H) to set the desired humidity level. The appliance will start to work until the desired level is reached.

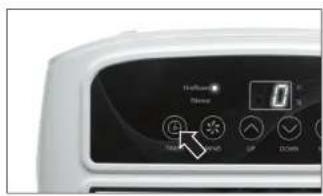
Fan speed
Press WIND (C) to switch between highly efficient (hi-efficient) and silent (Silence) fan speed.
Set timer
To run the dehumidifier for a preset amount of hours, press TIMER (D). "0" blinks on the display. Set the time you wish the appliance to operate between 1 and 24 hours.

Empty the container
If "Water full" lights up and the display shows "FL", the water tank needs to be emptied (see "Empty the water tank") After reinstalling the emptied water tank, the dehumidifier restarts automatically after three minutes.
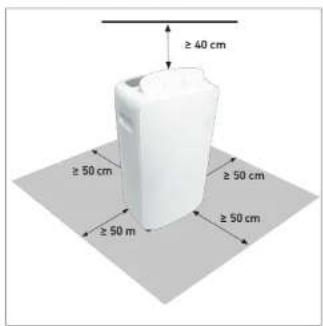
Placement guidelines
The dehumidifier should be used in closed rooms for efficient work. When operating the appliance, keep doors, windows and other openings closed.
Make sure to maintain distances of 40 cm upwards and 50 cm sideways for free air circulation
The dehumidifier can support drying laundry. Make sure to maintain distances of ≥ 50cm on all sides to the wet laundry.
Do not operate the dehumidifier near dryers, heaters or radiators.
Care & Maintenance

Warning! Make sure the appliance is switched off and unplugged.
Cleaning the housing
- Clean the housing regularly with a moist cloth and a mild cleaning detergent.
-Check and clean the grille monthly to avoid performance reduction due to dust and dirt. - Never use solvents; these could attack the plastic parts of the equipment.
- Ensure that no water can seep into the device.

Cleaning the filter
-
Make sure that no dirt gets into the appliance: Clean the supply air grille once a month using a soft brush.
-
Ensure that the grille is completely dry before inserting it into the dehumidifier.
-
Do not put the grille into the dishwasher.

Cleaning the water tank
Clean the water tank every 2 weeks to avoid deposit of algae, mould or bacteria.
Gently pull out the water tank from the dehumidifier and fill the tank partly with water and a mild cleaning detergent. Clean, empty and rinse the water tank thoroughly.
- Do not put the water tank into the dishwasher.
- The water tank has to be inserted correctly into the dehumidifier.
Troubleshooting
Problem Solution
| The appliance doesn't start. | - Check if the power supply cord is inserted cor- rectly. - Environmental temperature is too high or too low. - The dehumidifier has reached the preset humid- ity setting. - The water tank is not inserted correctly. |
| The appliance doesn't dry the air as expected. | - Time was too short. - Make sure the appliance is free from obstacles. - The humidity setting isn't set low enough. - Check if all windows and other openings are closed. - The room temperature is too low (lower than 5 °C). - There is an appliance which emits water vapour |
| Loud sounds from the appliance. | - The appliance stands tilted and not upright. - The floor is not flat. - Filter is blocked. Clean filter. |
| Ice appears on the spools. | This is a normal process. The appliance has an automatic defrost. |
Error and safety codes
Code Meaning Solution
| E2 Temperature sensor is defec- tive | Disconnect and connect the power supply cord. If error still occurs, con- tact your HORNBACH store. | |
| P1 | Appliance is defrosting | Code will disappear automatically when the appliance has defrosted. |
| FL | Water tank is full or not insert- ed correctly | Empty the water tank and insert it correctly into the appliance. |
| LO/HI | The ambient temperature is too low/high | It's a normal phenomenon. |
In case of service requests please contact your local HORNBACH store or write an email to: service@hornbach.com
Technical Data
Type Notos 10 L Tanimara 20 L
| HB Art # | 6772349 / 6808914 | 6772530 / 6808915 |
| Nominal voltage 220-240 V~ 220-240 V~ | ||
| Nominal frequency 50 Hz 50 Hz | ||
| Rated input 175 W 390 W | ||
| Degree of protection | IPX1 | IPX1 |
| Permissible operation pressure (high/ low) | 2.8/ 0.8 Mpa | 2.8/ 0.8 Mpa |
| Max. allowable pressure (high/ low) | 3.8/ 1.3 Mpa | 3.8/ 1.3 Mpa |
| Weight net/ gross | 10.5 kg/ 11.5 kg | 10.8 kg/ 11.8 kg |
| Capacity per day | 10 l (30 °C / 80% RH) | 20 l (30 °C / 80% RH) |
| Water tank capacity | 2 l | 2 l |
| Operating temperature | 5-32 °C | 5-32 °C |
| Refrigerant | R290/ 40g | R290/ 75g |
| Application floor area | 15-18 m2 | 20-25 m2 |
| Noise | 42 dB(A) | 48 dB(A) |
| Dimension (W x H x D) | 292 x 501 x 190 mm | |
Noise
The values given in these instructions have been measured in accordance with a standardized measurement procedure and can be used to compare appliances. It may be used for a preliminary assessment of exposure.
Replacement Parts
Warning! Replacement parts must conform with the requirements specified by the manufacturer. Therefore use original replacement parts only or spare parts authorised by the manufacturer.
In case of service requests or spare parts, please contact your local HORNBACH store or write an email to: service@hornbach.com
Declaration of Conformity Storage
We declare, that the product described in Technical Data:

Air dehumidifier
Notos 10 L and Tanimara 20 L
manufactured for:
is in conformity with the following directives:
Low Voltage Directive 2014/35/EU
EMC Directive 2014/30/EU
Clean the appliance, the water tank and the grilles before covering it with plastic foil.
Store the appliance in a dry and frost-proof place. Ensure to store the appliance in a room with a dimension of min. 25 - 30m^3 The appliance shall only be stored in rooms without permanent ignition source.
and in accordance to the following applicable harmonized standards:
EN 60335-1:2012+A2
EN 60335-2-40:2003+A13
EN 62233:2008
EN 55014-1:2017+A11
EN 55014-2:2021
EN 61000-3-2:2019+A1
EN 61000-3-3:2013+A1
Andreas Back
Head of Quality Management, envi
ronment & CSR
Person authorised to compile the
technical file
Bornheim, 04.01.2022
The crossed-out wheeled bin symbol requires separate disposal for waste electrical and electronic equipment (WEEE).
Such equipment may contain
valuable, but dangerous and hazardous substances. You are required by law to return these products to a designated collection point for the recycling of WEEE and must not under any circumstances dispose of them as unsorted municipal waste. In this way, you can help to conserve resources and protect the environment.
In Germany, HORNBACH is obliged:
-
to take back old appliances of the same type free of charge in HORNBACH stores when you purchase a new electrical or electronic appliance.
-
to take back up to 3 WEEE of the same type (up to max. 25 cm edge length) free of charge in HORN-BACH stores, even if you do not purchase a new appliance.
-
when delivering a new electrical or electronic appliance to a private household, to collect an old appliance of the same type free of charge or to enable you to return it in your immediate vicinity.
For further details, please consult www.hornbach.com or your local authorities.
The dismantling and disposal, especially the disposal of the refrigerant, is to be carried out exclusively by the manufacturer or by similarly qualified persons.
Children must not play with plastic bags and packaging material, due to the risk of injury and suffocation. Store such material safely or dispose of it in an environmentally friendly way.
Manufactured for
- Scope of delivery
- Table of content
- Symbols
- Safety Instructions
- Cabling
- Removal and evacuation
- Charging procedures
- Product overview
- Intended Use
- Using the appliance
- Switch On/Off
- Mode
- Setting humidity level
- Fan speed
- Set timer
- Empty the container
- Placement guidelines
- Care & Maintenance
- Warning! Make sure the appliance is switched off and unplugged.
- Cleaning the housing
- Cleaning the filter
- Cleaning the water tank
- Troubleshooting
- Error and safety codes
- Technical Data
- Noise
- Replacement Parts
- Declaration of Conformity Storage
- Air dehumidifier
Brand : Madeira
Model : Notos
Category : Air purifier