USER MANUAL Brave 7 LE Akaso
natural_image
Exterior view of a black Akaso digital camera with a green lens and screen (no text or symbols on the device body)
USER MANUAL
V1.8
English >>
Deutsch >>
Español >>
Français >>
Italiano >>
日本語
Polski >>
Русский >>
Contents
What's in the Box 02
Your Brave 7 LE 03
Getting Started 07
Overview of Modes 08
Customizing Your Brave 7 LE 09
Connecting to the AKASO GO App 16
Playing Back Your Content 17
Deleting Your Content 17
Offloading Your Content 18
Maintaining Your Camera 19
Maximizing Battery Life 19
Battery Storage and Handing 19
Remote Control 20
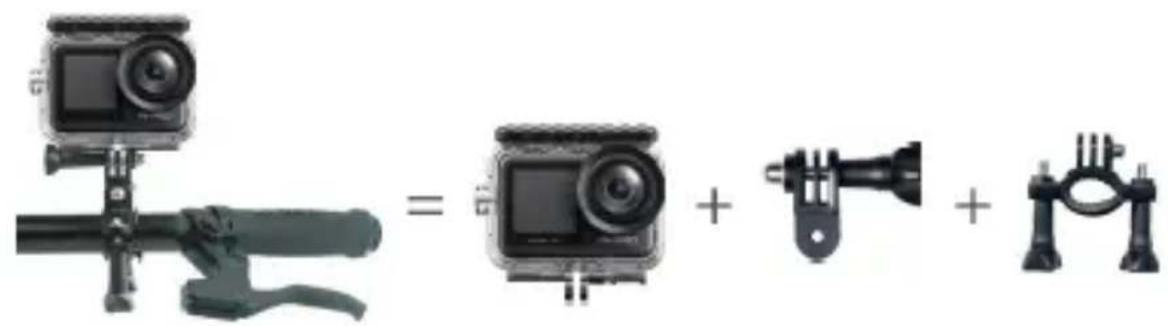
Mounting Your Camera 23
Contact Us 25
What's in the Box
| Brave 7 LEx1 | Waterproof Casex1 | Battery Chargerx1 | Batteryx2 | USB Cablex1 |
| Remote Controlx1 | Remote ControlStrap x 1 | Bandagex4 | Helmet Mount 1x1 | Helmet Mount 2x1 |
| Buckle Mountx1 | J-Hook Mountx1 | E Mountx1 | C Mountx1 | D Mountx1 |
| F Mountx1 | A Mountx1 | H Mountx1 | Spannerx1 | Tetherx5 |
| Lens Clothx1 | Double-SidedAdhesive Tape x 2 | Quick StartGuide x 1 | | |
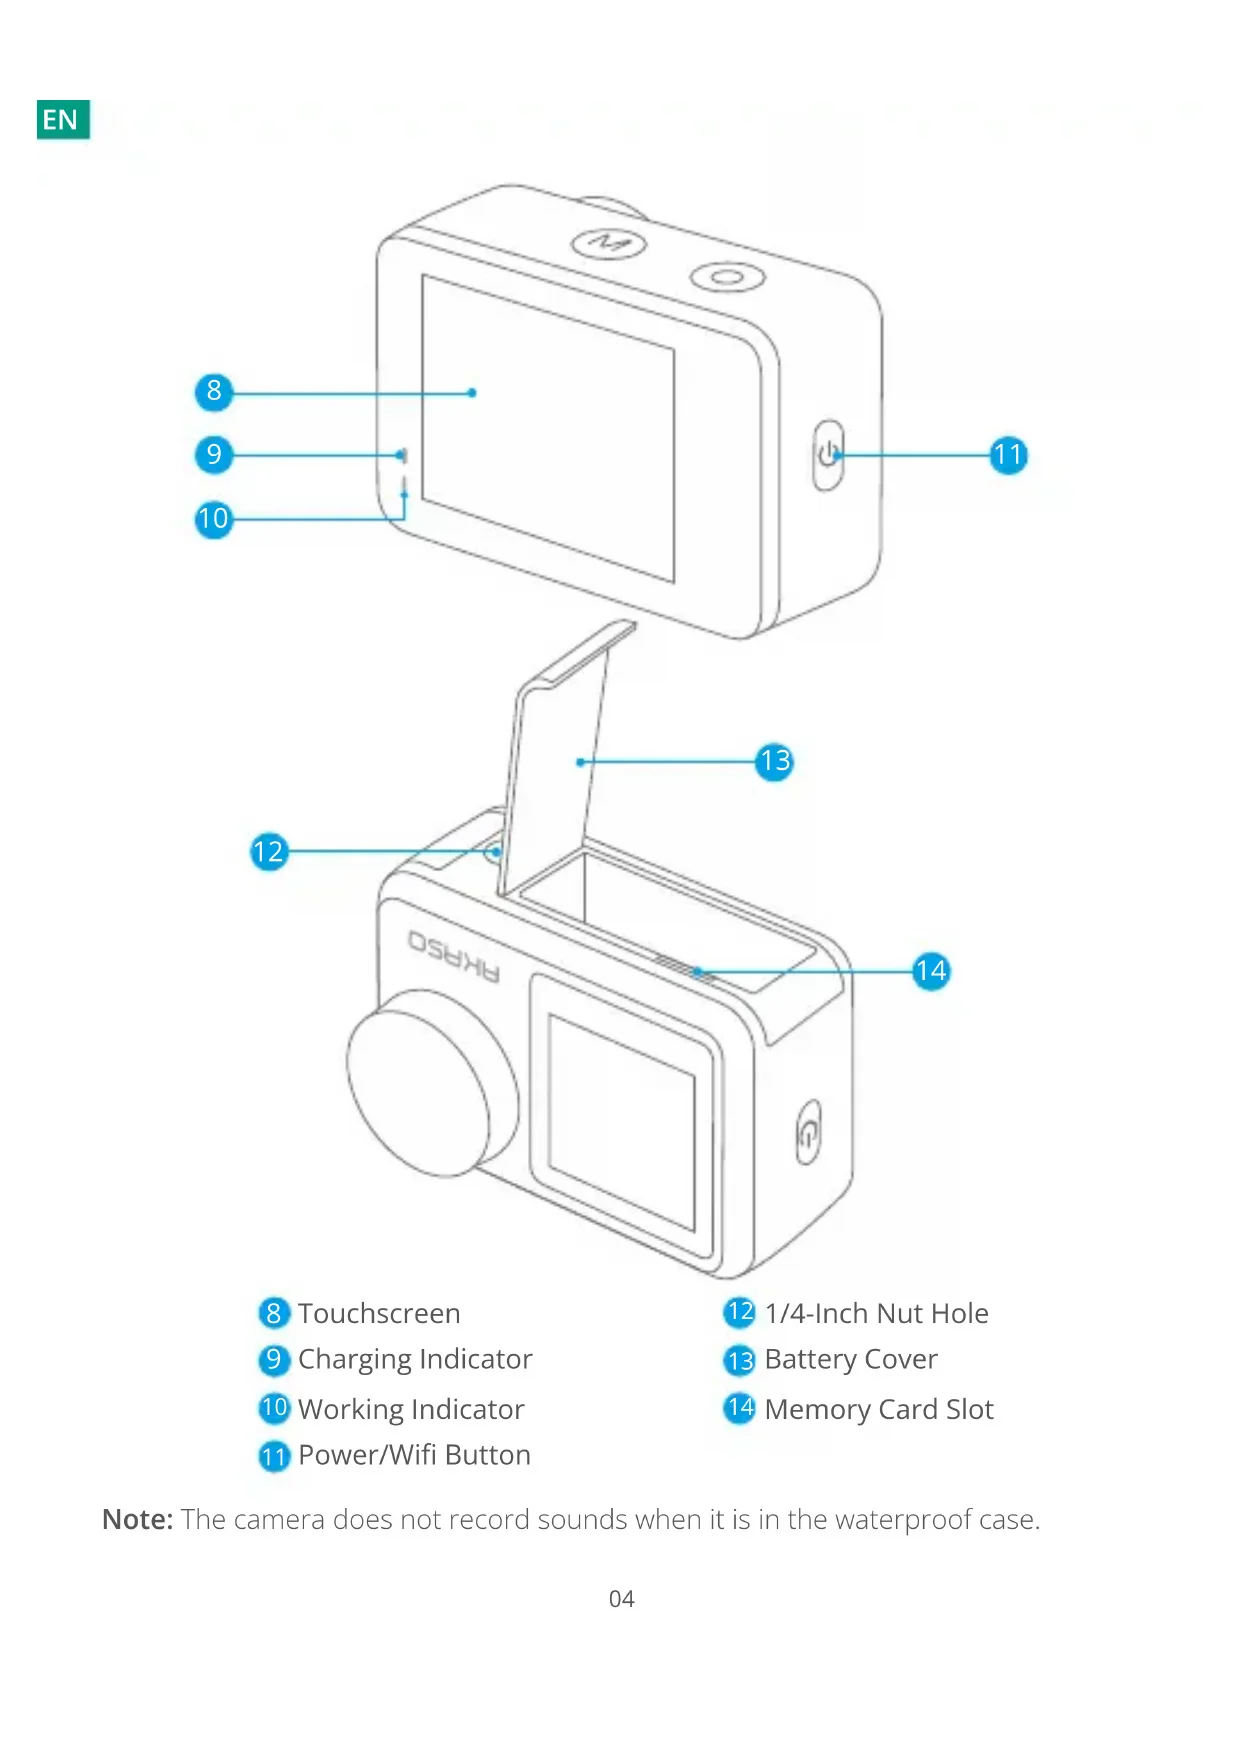
Your Brave 7 LE
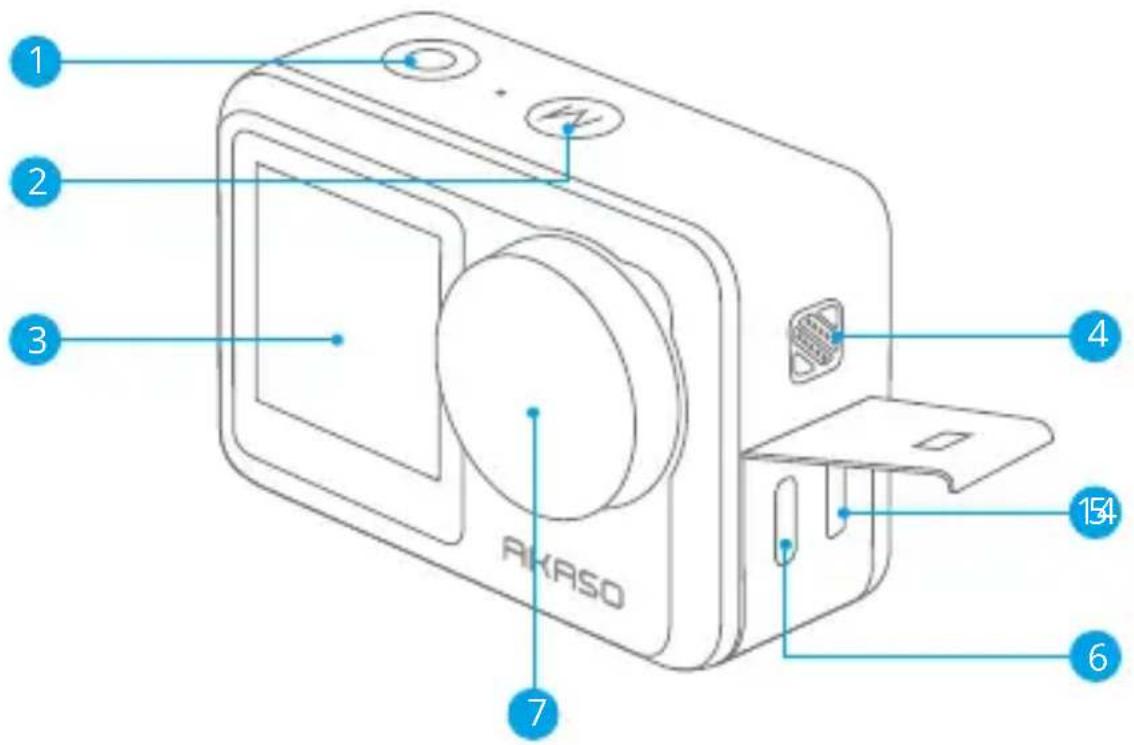
1 Shutter/OK Button
2 Mode/Exit Button
3 Front Screen
4 Speaker
5 Micro HDMI Port
6 USB/External Mic Port
7 Lens
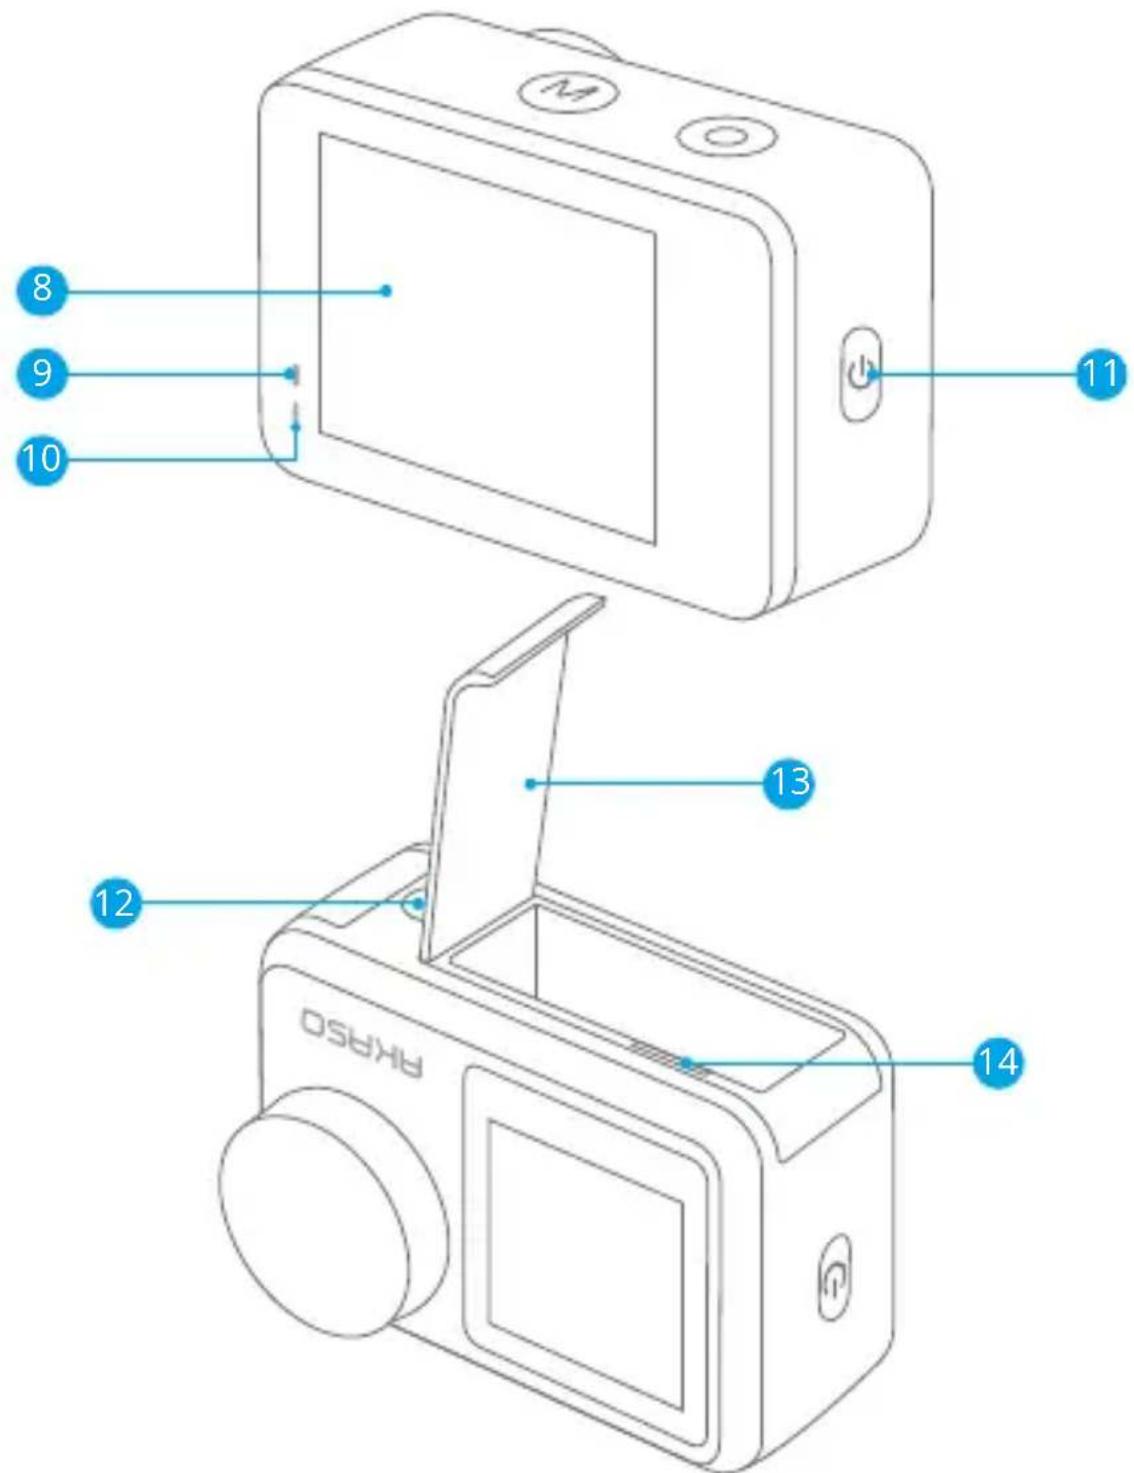
8 Touchscreen
12 1/4-Inch Nut Hole
9 Charging Indicator
13 Battery Cover
10 Working Indicator
14 Memory Card Slot
11 Power/Wifi Button
Note: The camera does not record sounds when it is in the waterproof case.
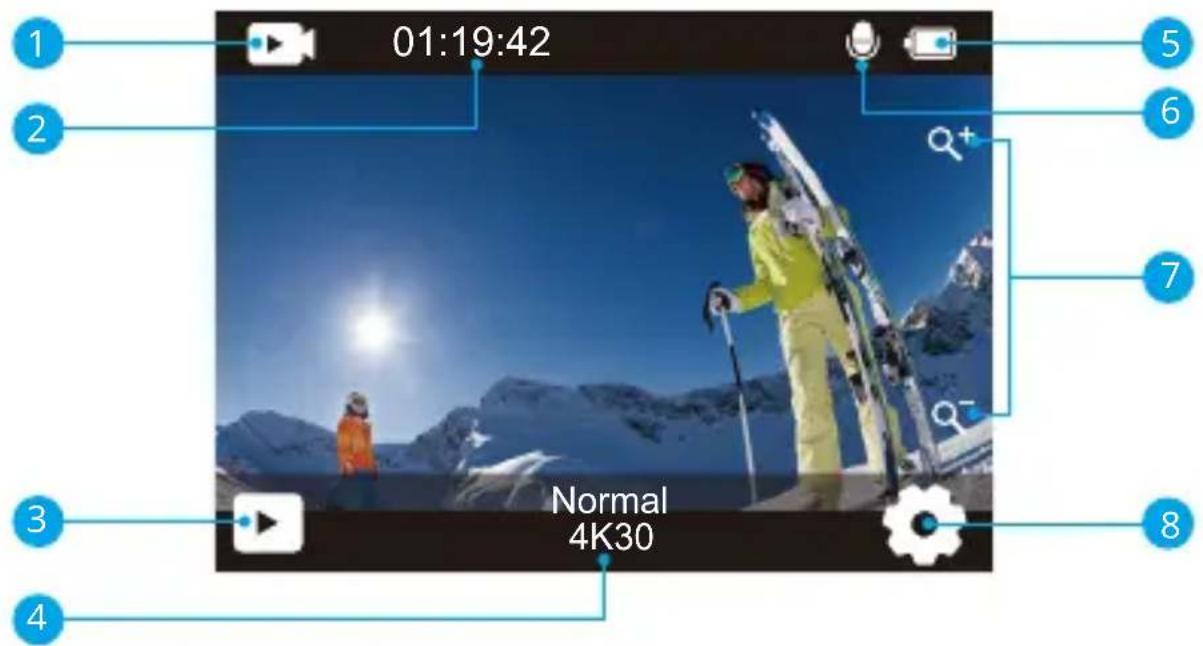
1 Mode
2 Recording Time/Photos Remaining
3 Playback
4 Current Shooting Mode
5 Battery Status
6 Audio Recording
7 Zoom Level
8 Settings
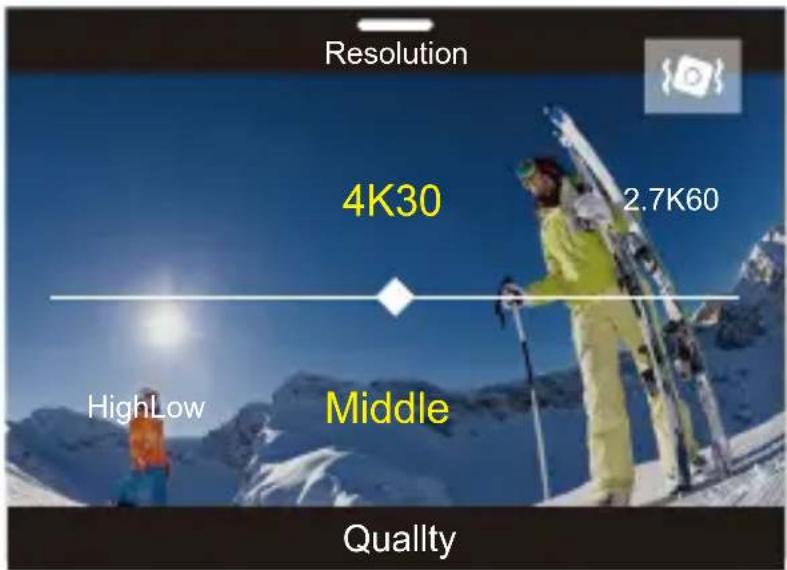
On the preview screen, swipe your finger from the bottom to the top of the screen to easily access the shortcut menu to adjust settings including resolution, quality, and image stabilization. Additionally, swipe your finger across the screen to scroll through the available options.
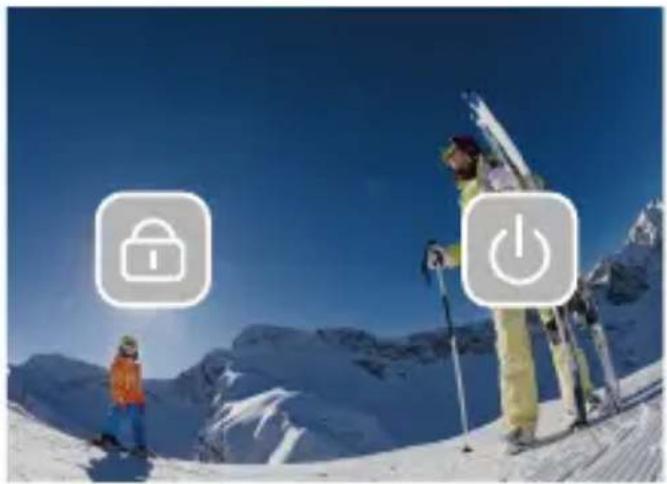
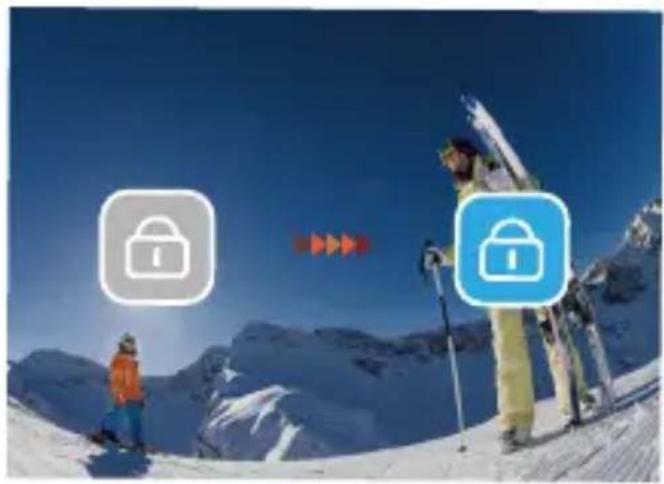
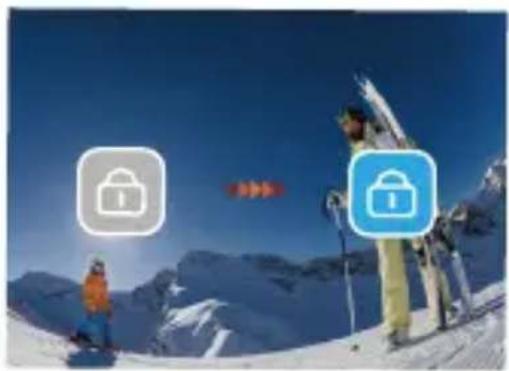
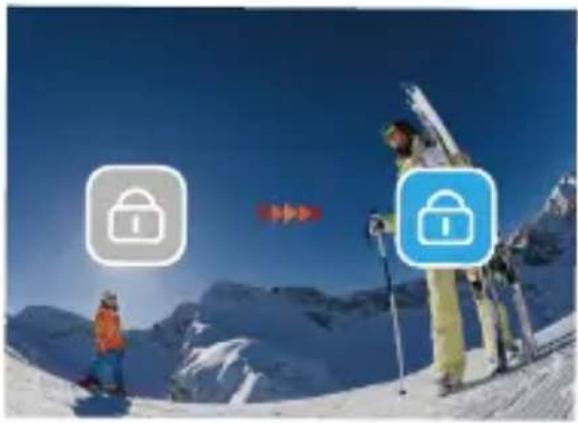
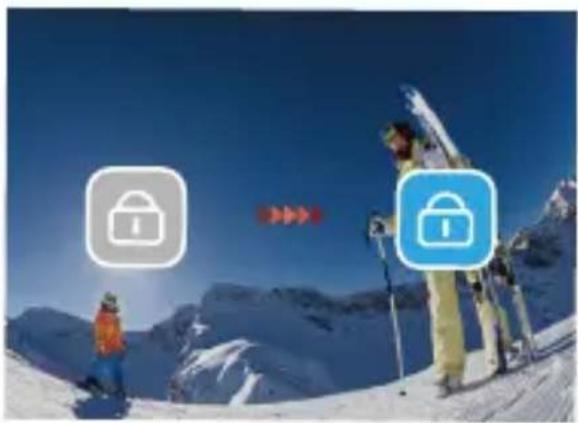
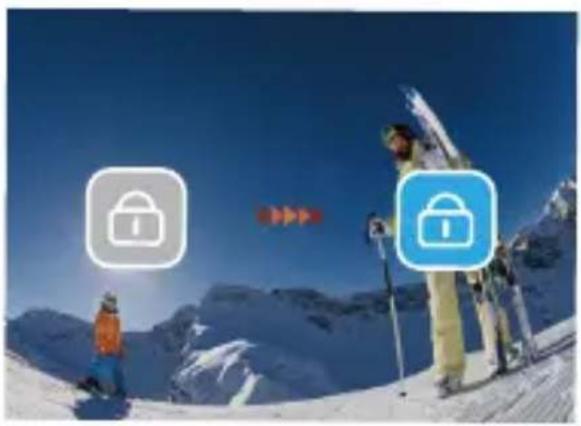
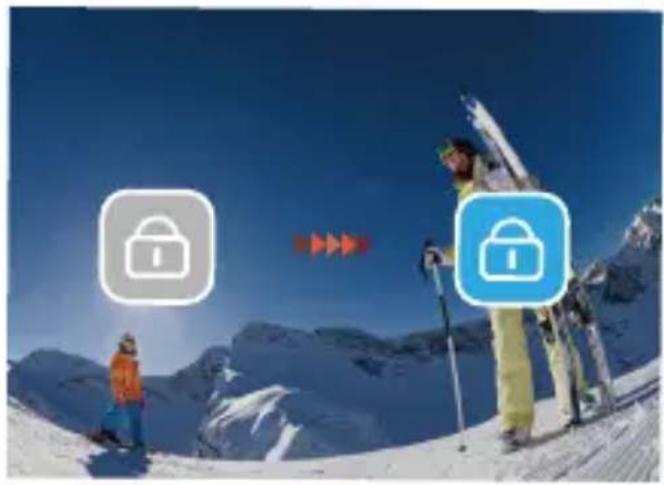
On the preview screen, swipe down to access the shortcut menu. From there, you can quickly lock the screen and turn off the camera. By tapping the Lock icon, you can lock the screen in seconds. To unlock the screen, simply swipe right. Additionally, you can quickly turn off the camera by tapping the Power icon.
natural_image
Mountain ski slope with two skiers and two padlocks on a clear blue sky (no text or symbols)
natural_image
Mountain ski slope with skiers and a padlock icon, no text or symbols present
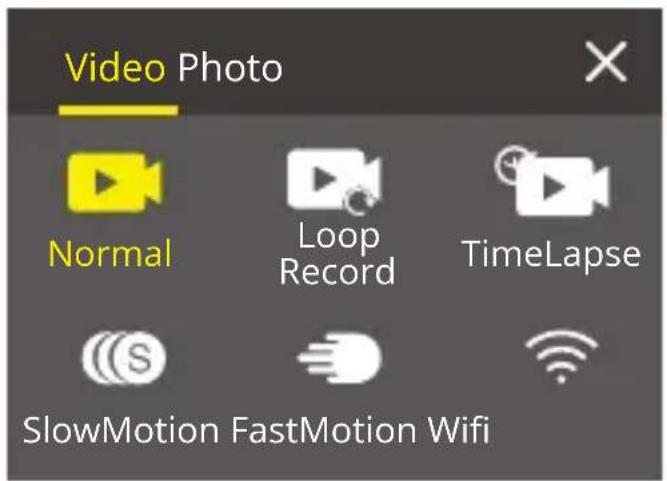
On the preview screen, tap the mode icon on the screen to access the mode menu screen. On this screen, tap the "Video" or "Photo" option to access the video or photo mode menu. You will be able to select the desired video or photo mode from the available options.

Switch Between Front Screen and Touch Screen
On the preview screen, press and hold the Mode button to switch between the front screen and the touchscreen.
Note: You can't perform this operation while the camera is recording video; the above instructions are specific to the touchscreen and will not apply to the front screen.
Getting Started
Welcome to your AKASO Brave 7 LE. To capture videos and photos, you need a memory card to start recording (sold separately).
Memory Cards
Please use brand name memory cards that meet these requirements:
• U3
- Capacity up to 64GB
Note:
- Please format the memory card first in this camera before using. To keep your memory card in good condition, reformat it on a regular basis. Reformatting erases all your content, so please make sure to offload your photos and videos before reformatting.
- FAT32 format memory card stops recording when the file size reaches to 4GB, and starts to record again on a new file.
Powering on and off
To power on:
When the camera is turned off, press and hold the Power button for 3 seconds to turn it on. The camera beeps with the status light turning on. When information appears on the display, your camera is on.
To power off:
When the camera is turned on, press and hold the Power button for 3 seconds to turn it off. The camera beeps with the status light going out.
Switching shooting modes
On the preview screen, tap the mode icon at the bottom of the screen to enter the mode menu. From there, you can tap the "Video" or "Photo" option to access the video or photo mode menu. You will be able to select the desired video or photo mode from the available options. To exit the mode menu, tap the "X" icon in the upper right corner.
Turning on and off Wifi
On the preview screen, press the Power button or tap the Wifi icon on the mode menu to turn on Wifi. To turn off Wifi, simply press the Power button again.

Overview of Modes
There are 6 modes of this camera: Video, Photo, Playback, System Setup, Video Setup, and Photo Setup.
Video Mode
The camera is in Video mode by default when it's turned on.
In Video mode, press the shutter button to record video at the set resolution and frame rate. To stop recording video, simply press the Shutter button again. You can also tap the Zoom icon on the screen to adjust the zoom level.
Photo Mode
On the preview screen, press the Mode button or swipe your finger across the screen to switch to Photo Mode. In this mode, press the Shutter button to take a photo at the set photo resolution. You can also tap the Zoom icon on the screen to adjust the zoom level.
Playback Mode
On the preview screen, tap the Playback icon in the bottom left corner to enter Playback Mode. Alternatively, press the Mode button twice followed by the Shutter button to enter this mode. In this mode, select the video or photo file you would like to watch for playback.
System Setup Mode
To enter System Setup Mode, first enter the camera's settings screen by pressing the Mode button or tapping the Settings icon in the bottom right corner of the screen.
Second, tap the Setup icon on the settings screen. In this mode, you're free to configure the system settings.
Video Setup Mode
On the preview screen, press the Mode button 3 times or tap the Video Setup icon on the settings screen to enter the Video Setup Mode. In this mode, you're free to configure the video settings.
Photo Setup Mode
On the preview screen, press the Mode button 4 times or tap the Photo Setup icon on the settings screen to enter Photo Setup Mode. In this mode, you're free to configure the photo settings.
Customizing Your Brave 7 LE
1. Normal Video
Normal Video is the default video mode.
2. Loop Record
1 Min/3 Min/5 Min (Default setting: 1 Min)
This option allows you to set the video length before recording loop videos. For instance, if you set "Loop Record" to "3 Min", the camera will save video files every 3 minutes. When the memory is full, new video files will overwrite the old ones to ensure continuous recording.
3. Time Lapse
1 Sec/3 Sec/5 Sec/10 Sec/30 Sec/1 Min (Default setting: 5 Sec)
This option lets you set the interval at which the camera captures a frame of video in Time Lapse Video. The camera will create video from frames captured at the specific interval and condense long events into shorter videos.
Note: Time lapse videos are captured without audio.
4. Time Lapse Duration
Unlimited/5 Min/10 Min/15 Min/20 Min/30 Min/60 Min (Default setting: Unlimited)
This option lets you set the duration of the video captured in Time Lapse Video mode.
5. Slow Motion
In Slow Motion Mode, the camera will record videos at the specified resolution, creating a slow-motion effect when the footage is played back.
6. Fast Motion
2x/4x/6x/10x/15x (Default setting: 2x)
This setting allows you to select the speed at which the video is sped up in Fast Motion Mode. The camera will capture steady and smooth fast-motion videos that appear to be moving faster than in real-time, making it ideal for use in fast-moving scenes.
1. Single Photo
Single Photo is the default photo mode.
2. Burst Photo
3 shots/7 shots/15 shots/30 shots (Default setting: 2 shots)
This option lets you set the number of photos to be taken per second in Burst Photomode. The camera will continuously capture photos at the set shot, making Burst Photo mode ideal for capturing dynamic and fast-paced activities.
3. Time Lapse
3 Sec/5 Sec/10 Sec/30 Sec/1 Min (Default setting: 3 Sec)
This option lets you set the time interval at which the camera captures photos in Time Lapse Photo mode. The camera will take a sequence of photos at designated intervals.
4. Time Lapse Duration
Unlimited/5 Min/10 Min/15 Min/20 Min/30 Min/60 Min (Default setting: Unlimited)
This option lets you set the duration of photos captured in Time Lapse Photo mode.
5. Self-Timer
Delay 2s/Delay 5s/Delay 10s (Default setting: Delay 2s)
Self-Timer Mode gives a delay between pressing the shutter release and the shutter's firing. This option lets you set the countdown before the camera takes a photo in Self-timer mode.
6. Long Exposure
1 Sec/2 Sec/5 Sec/8 Sec/30 Sec/60 Sec (Default setting: 1 Sec)
This option lets you set the exposure time in Long Exposure Mode. The camera will take photos until the set time comes to the end.
Note: Ensure camera stability throughout the entire exposure duration.
Video Setup
1. Video Resolution
4K30fps/2.7K60fps/2.7K30fps/1080P120fps/1080P60fps/1080P30fps /720P240fps /720P120fps/720P60fps
Configure the resolution settings before recording videos. The camera records up to 4K 30fps videos.
Note: Capturing high-resolution or high-fps videos in warm environments can cause the camera to heat up and consume more power.
2. Voice Record
Off/On (Default setting: On)
When Voice Record is disabled, the camera will record video without audio. You can choose to turn it on or off.
3. Image Stabilization
Off/On (Default setting: Off)
Image Stabilization can efficiently smooth out the lens shakes, resulting in smooth and clear videos. This feature is ideal for use in capturing scenes involving activities like riding, skating, and handheld use.
Note: Image stabilization is not available when the video resolution is set to 1080P120fps, 720P240fps, and 720P120fps; it will also be disabled when Distortion Calibration or when Auto Low Light is enabled.
4. Video Quality
High/Middle/Low (Default setting: Middle)
Adjust the level of details in your captured videos.5.Wind Noise ReductionOff/On (Default setting: Off)
Wind Noise Reduction effectively minimize the ambient wind noise during video recordings for clearer audio capture.
5. Wind Noise Reduction
Off/On (Default setting: Off)
Wind Noise Reduction effectively minimize the ambient wind noise during video recordings for clearer audio capture.
6. Auto Low Light
Off / On (Default setting: Off)
This option automatically adapts camera settings based on lighting conditions to deliver optimal performance in low-light situations. It eliminates the need for manual adjustments, even when transitioning between bright and dark environments.
Note: Auto Low Light is not available for 30fps frame rates; It will also be disabled when Image Stabilization is enabled.
7. EV
-2.0/-1.0/0/+1.0/+2.0 (Default setting: 0)
By default, your camera uses the entire image to determine the appropriate exposure level. However, exposure lets you select an area that you want the camera to
prioritize when determining exposure. This setting is particularly useful in shots where an important region might otherwise be over or underexposed.
8. Metering
Center/Multi (Default setting: Multi)
The metering mode refers to the way in which the camera determines exposure.
9. Date Stamp
Off/Date/Date & Time (Default setting: Date & Time)
A watermark will be added to the video based on your preferred settings. For example, if you choose the Date & Time option, the current date and time will be stamped on your video. You can choose to disable this setting by selecting the "Off" option.
Photo Setup
1. Photo Resolution
20MP/16MP/14MP/10MP/8MP/5MP/2MP (Default setting: 20MP)
Set the photo resolution before capturing photos. This camera is capable of capturing up to 20MP photos.
2. Image Quality
High/Middle/Low (Default setting: High)
Adjust the level of details in your captured photos.
3. ISO
Auto/100/200/400/800/1600/3200 (Default setting: Auto)
ISO determines the camera's sensitivity to light, and creates a trade-off between brightness and resulting image noise. Image noise refers to the degree of graininess in the image. In low light, higher ISO values result in brighter images, but with greater image noise. Lower values result in lower image noise, but darker images.
4. EV
-2.0/-1.0/0/+1.0/+2.0 (Default setting: 0)
By default, your camera uses the entire image to determine the appropriate exposure level. However, exposure lets you select an area that you want the camera to prioritize when determining exposure. This setting is particularly useful in shots where an important region might otherwise be over-or underexposed.
5. Metering
Center/Multi (Default setting: Multi)
The metering mode refers to the way in which a camera determines exposure.
6. Date Stamp
Off/Date/Date & Time
A watermark will be added to the photo based on your preferred settings. For example, if you choose the Date & Time option, the current date and time will be stamped on your photo.
System Setup
1. Sounds
Shutter/Boot-up/Beep/Volume You can turn these sound effects on or off and adjust the volume of the camera in this setting.
2. Angle
Super Wide/Wide/Medium/Narrow (Default setting: Super Wide)
The angle refers to how much of the scene (measured in degrees) can be captured through the camera lens. Super Wide angle captures the largest amount of the scene, while Narrow angle captures the least.
3. Diving Mode
Off/On (Default setting: Off)
Diving Mode compensates for the blue or green color cast caused by water, ensuring more accurate and natural colors in your underwater footage, making it ideal for underwater capture.
4. Effect
Normal/BW/Natural/Negative/Warm/Brightness Contrast (Default setting: Normal)
This setting offers multiple options for you to choose from. With different effects, you can capture the most gorgeous footage.
5. Distortion Calibration
Off/On (Default setting: Off)
This setting corrects the fisheye effect that can occur in wide-angle shots, resulting in distortion-free images.
Note: Distortion Calibration will be disabled when Image Stabilization is turned on.
6. Driving Mode
Off/On (Default setting: Off)
When Driving Mode is enabled and the camera is connected to a car cigarette lighter, it automatically powers on and begins recording video once the car engine is started. It will stop recording and power off automatically when the engine is turned off.
7. Upside Down
Off/On (Default setting: Off)
Determine the orientation of your video or photos to help you prevent upside down footage.
Note: The user interface will be upside-down when this options is enabled.
8. Screen Saver
Off/1 Min/3 Min/5 Min (Default setting: 1Min)
Determine when the camera's display should go dormant to conserve battery. If you need the screen back on, just tap it or press any button.
9. Auto Power Off
Off/1 Min/3 Min/5 Min (Default setting: 3 Min)
Set the duration of inactivity after which the camera automatically powers off. If not operated within the chosen duration, the camera will shut down.
10. Power Frequency
50Hz/60Hz (Default setting: 50Hz)
Choose the line frequency at which the video is recorded.
11. White Balance
Auto/Daylight/Shade/Tungsten Light/Fluorescent (Default setting: Auto)
White Balance fine-tunes the color temperature of your videos and photos, ensuring optimal color accuracy in both warm and cool lighting conditions.
12. Date & Time
Manually set the camera's date and time according to your local time.
Tip: The date and time will also be automatically updated when you connect your camera to the AKASO GO app.
13. Language
English/ Deutsch/ Français/ Italiano/Espanol/ Português/日本語 (Default setting:
English)
Set the system language that appears in your Brave 7 LE camera.
Yes/No (Default setting : No)
To keep your memory card in good condition, reformat it on a regular basis.
Reformatting erases all of your content, so be sure to offload your photos and videos first.
15. System
Factory Reset/System Info/Card Info
This setting allows you to reset your camera and check the system or card information.
16. Factory Reset
Yes/No (Default setting: No)
This option resets all settings to their default values.
System Info: Check the model and firmware version of your camera.
Card Info: Check the card capacity and remaining space of your memory card.
Note: Some functions cannot be used at the same time. Please refer to the information below.
| Electronic image stabilization | Video resolution: 1080P120fps, 720P240fps, 720P120fps |
| Electronic image stabilization | Distortion Calibration, Auto Low Light |
| Slow Motion | Video resolution: 4K30fps, 2.7K30fps, 1080P30fps |
| Auto Low Light | Video resolution: 4K30fps, 2.7K30fps, 1080P30fps; Image Stabilization |
| Diving mode Effect | |
| White balance: Daylight, Shade, Tungsten Light, White Fluorescent | Effect |
Connecting to the AKASO GO App
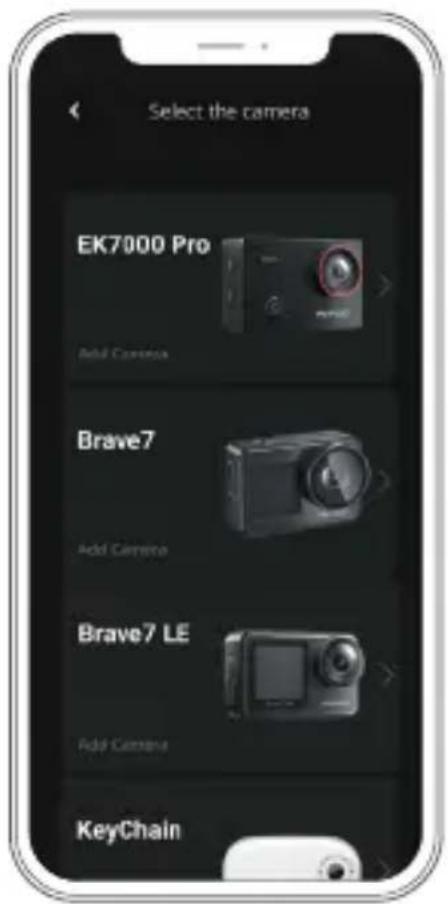
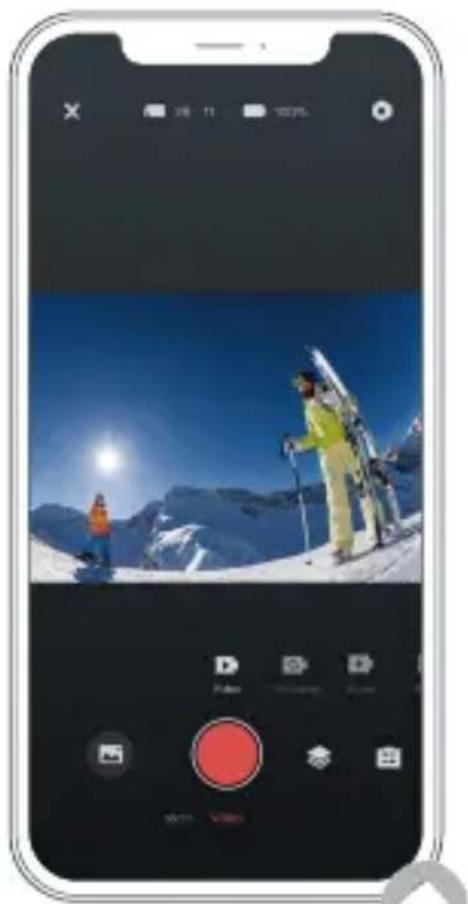
To connect your camera to the AKASO GO app, please download this app from the App Store or Google Play to your smartphone first. When your camera is connected to the AKASO GO app, you can control it to capture, or change the its settings using your phone. You can also live preview, playback, download, edit, and share videos via this app. Please follow the instructions below to connect your camera to the AKASO GO app.
- Turn on the camera, then tap on the Wifi icon on the mode menu or press the Power button to turn on Wifi. The camera will enter Wifi mode and display the Wifi information.
- Turn on your phone's Wifi to enter the Wifi settings page, find the Wifi SSID in the list and tap on it, then enter the password 1234567890 for connection.
- Open the AKASO GO app, tap "Device" → "Add device", then choose "Brave 7 LE" from the list for connection..
- Tick "The above operation has been confirmed", and click "Live Preview", your camera will connect with the AKASO GO app.

natural_image
Smartphone displaying a snowy mountain landscape with skiers and snow-capped peaks, alongside a music player interface (no readable text or symbols on the main image)
Playing Back Your Content
You can play back your contents on the camera, your computer, TV, or smartphone. To play back your videos and photos on a computer, you need to transfer these files first. Transferring files also frees up space on your memory for new contents. With this method, the playback resolution depends on the resolution of the device and its ability to play back that resolution.
Viewing Files on Your Brave 7 LE
- Turn on your camera, then tap on the Playback icon in the bottom left corner of the screen to enter the playback screen.
Note: If your memory card contains a lot of content, it might take a minute for it to load.
- In Playback Mode, swipe your finger across the screen to scroll through video or photo files.
- On the playback screen, tap on the video or photo icon to access the video or photo file.
- Choose the video or photo file you want to view, then tap the file in full-screen view. And it will then play.
Deleting Your Content
Deleting Files on Your Brave 7 LE
- Enter Playback mode. If your memory card contains a lot of content, it might take a minute for it to load.
- Swipe your finger across the screen to scroll through video or photo files.
- Tap the Delete icon on the screen → select the files you want to delete → tap the delete icon again.
- Confirm to delete the selected files or all files.
- To exit the Playback mode, tap the Return icon or press the Mode button.
Deleting Files on the AKASO GO App
-
Open the AKASO GO app, then connect it to your camera.
-
Tap on the Album icon in the bottom left corner to view all the videos and photos.
- After selecting the video or photo file you want to delete, tap on the Delete icon in the bottom left corner, then confirm the deletion of the file. The chosen file will deleted.
Offloading Your Content
Offloading Your Content to A Computer
You can transfer your content to a computer via a USB cable or a card reader (sold separately). To transfer files to your computer via a USB cable, connect your camera to the computer using the USB cable. When prompted, select "USB Storage" as your connection preference. To transfer files to the computer using a card reader, insert a memory card into the card reader, then connect the reader to your computer's USB port. After successful transmission, you can transfer the files to your computer or delete selected files using File Explorer.
Offloading Your Content to A Smartphone
- Open the AKASO GO App, then connect it to your camera.
- Tap on the Album icon in the bottom left corner to see the videos and photos.
- Tap the Select icon in the upper right corner to select the video or photo you want to download, then tap the Download icon in the bottom right corner. Patiently wait for the download process to complete. The file will be successfully saved to your phone's photo album.
Note:
- Please do not alter Wifi settings or disconnect from the app during the download progress.
- If you cannot download videos or photos to your iPhone via the app, please enter your phone's Settings page → Privacy→ Photos, find "AKASO GO", and select "All photos".
Maintaining Your Camera
Please follow these guidelines to get the best performance from your camera:
- For best audio performance, shake the camera or blow on the mic to remove debris from the microphone holes.
- To clean the lens, wipe it with a soft, lint-free cloth. Do not insert foreign objects around the lens.
- Don't touch the lens with fingers.
- Keep the camera away from drops and bumps, which may cause damage to the parts inside.
- Keep the camera away from high temperature and strong sunshine to avoid being damaged.
Maximizing Battery Life
If the battery reaches 0% while recording, the camera will save the file and power off. To maximize battery life, follow these guidelines when possible:
- Turn off Wireless Connections
• Capture video at lower frame rates and resolutions
- Use the Screen Saver setting
Battery Storage and Handing
- If storing for extended periods, maintain a battery charge of 50-60%. Charge every 3 months and discharge the battery every 6 months.
- Do not store the battery with metal objects such as coins, keys, or necklaces. If the battery terminals come close to metal objects, a short circuit may cause fire.
- Store the battery in dry areas, safe from potential physical damage caused by squeezing or collision.
- Avoid using or storing the battery at high temperatures, such as in direct sunlight or a hot compartment. The battery will heat up, malfunction, or have its service life shortened in these conditions.
-
Avoid using or storing the battery in low-temperature environments, as this will shorten the battery life or cause it to malfunction.
-
Avoid environments with strong static or magnetic fields; these can compromise the battery's protective unit, posing safety risks.
- If the battery emits an odor, overheats, changes color, gets distorted, or exhibits any anomalies, discontinue use and remove it immediately from the camera or the battery charger whether it is being used, charged, or stored.
- Safely insulate used electrodes to prevent potential hazards.
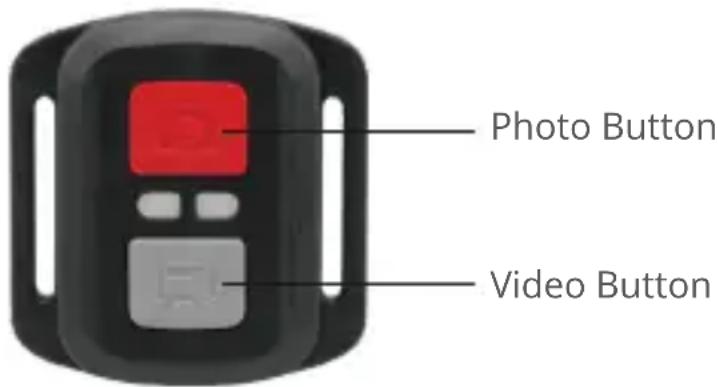
Remote Control
When the camera is turned on, it will be automatically connected to the remote. You can control the camera to take photos or record videos using the remote.
Note: The remote is splashproof only.
Video
To record video, first make sure the camera is in Video mode, then press the Video button. The camera's working indicator will be flashing during video recording. To stop recording, press the Video button again.
Photo
To capture a photo, first make sure the camera is in Photo mode, then press the photo button. The camera will emit a shutter sound indicating the completion of the shot.
Burst Photo
To capture burst photos, first verify the camera is in Burst Photo mode, then press the photo button. The camera will emit a shutter sound indicating the completion of the shot.
Time Lapse
To capture time lapse photos or videos, first verify the camera is in Time Lapse mode, then press the Photo or Video button.
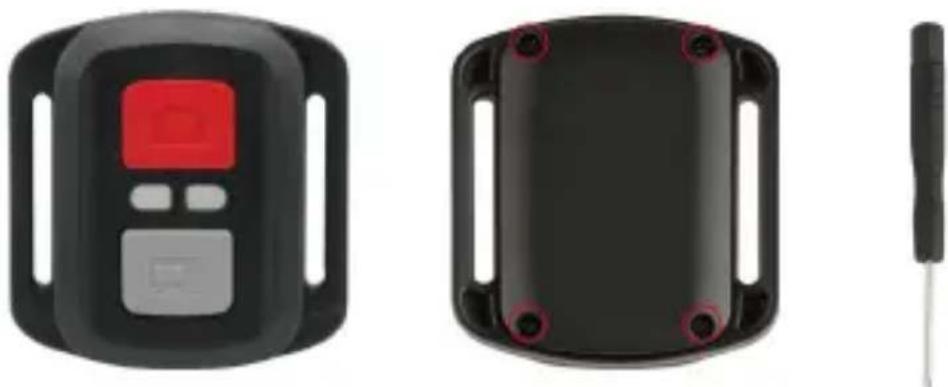
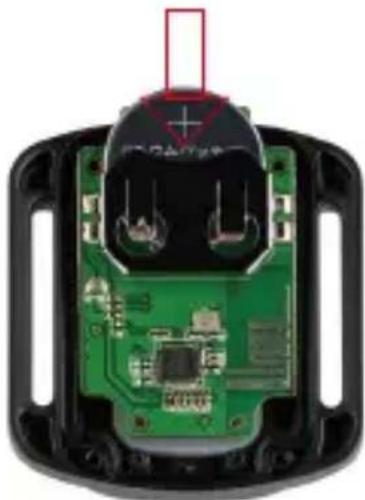
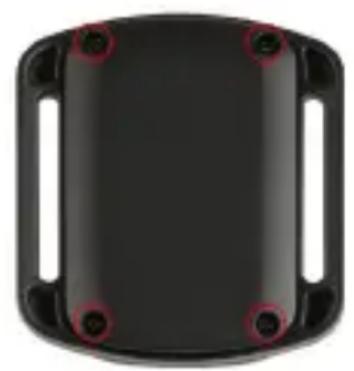
Replacing the CR2032 battery of the remote
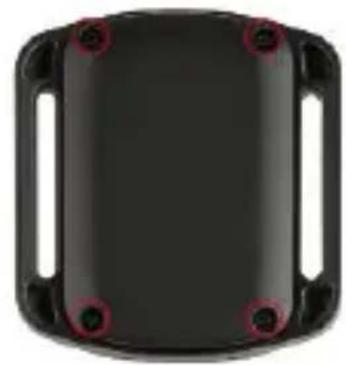
- Use a screwdriver to remove the 4 screws on the back cover of the remote, allowing you to open it.
natural_image
Three black electronic devices: a digital display, a black rectangular casing with red mounting holes, and a wire-wire (no visible text or symbols)
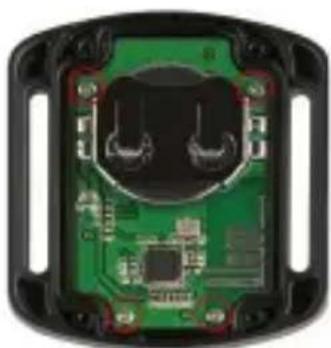
- Remove another 4 screws on the remote's circuit board.
natural_image
Interior view of an electronic device showing a green circuit board and two black plastic components (no text or symbols visible)
EN
- Lift the circuit board and slide out the battery, as shown below.
Note: Avoid rotating the circuit board to prevent reversing the remote control buttons.
natural_image
Close-up of a green printed circuit board with exposed components and a red triangle pointing to a component (no text or symbols visible)
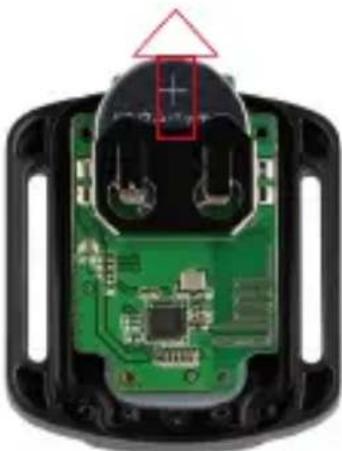
-
Install the new battery, keeping the "+" pole facing up.
-
Install all 4 screws back onto the circuit board.
natural_image
Close-up of a green printed circuit board with visible components and a red rectangular highlight (no text or symbols)
- Install all 4 screws back into the cover.
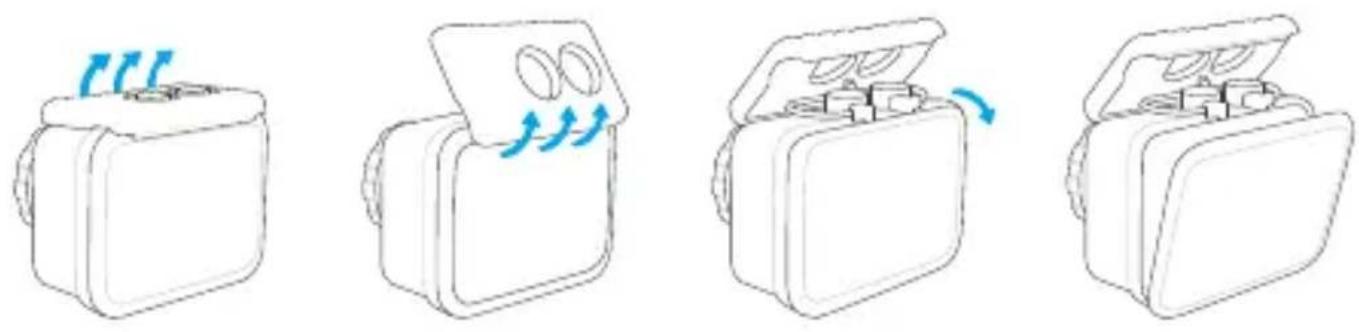
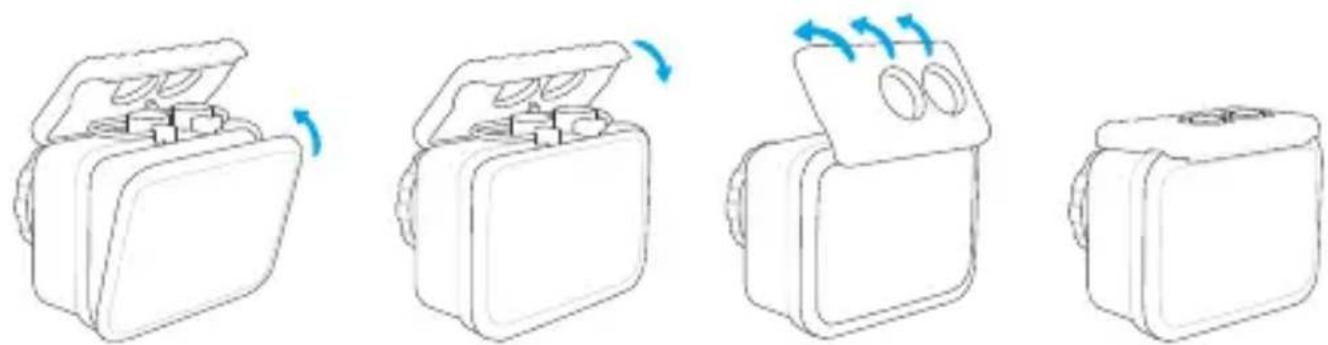
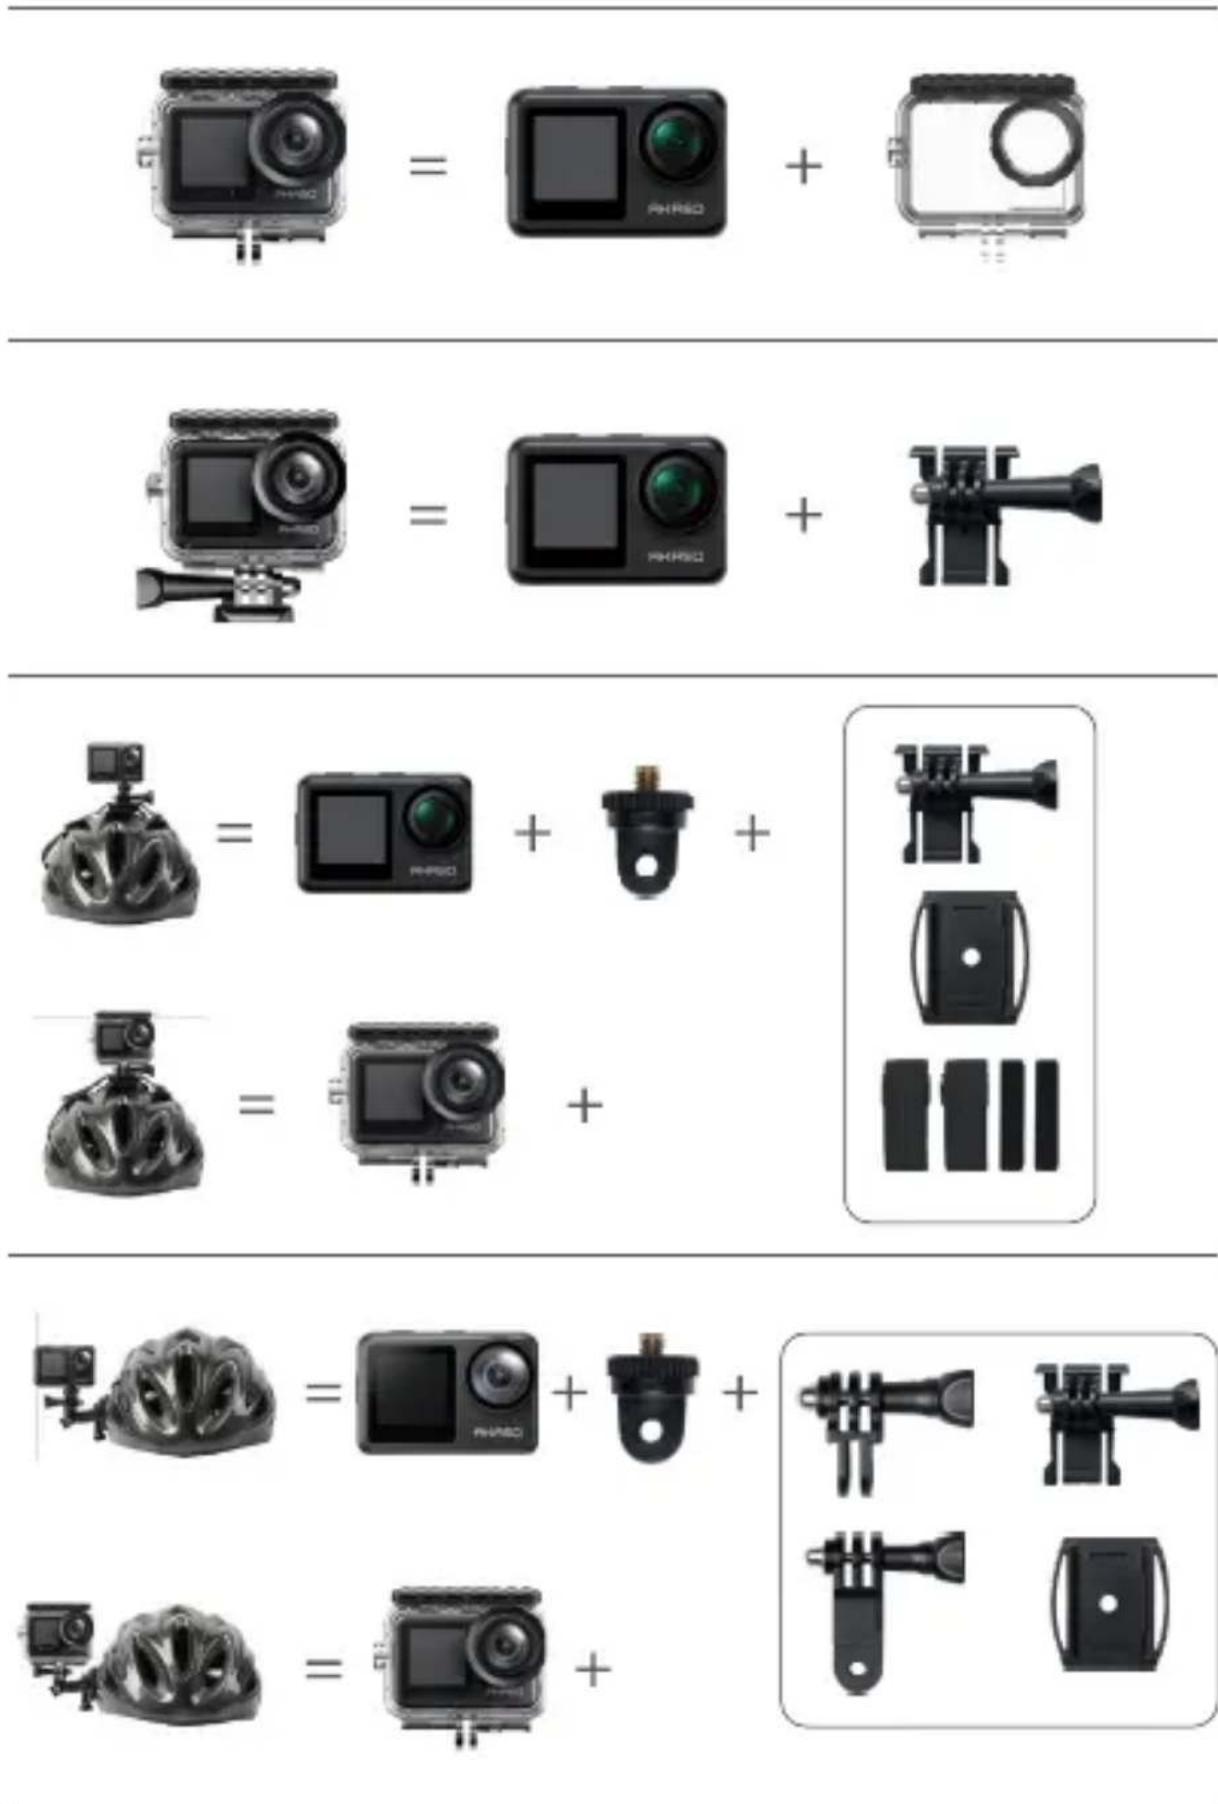
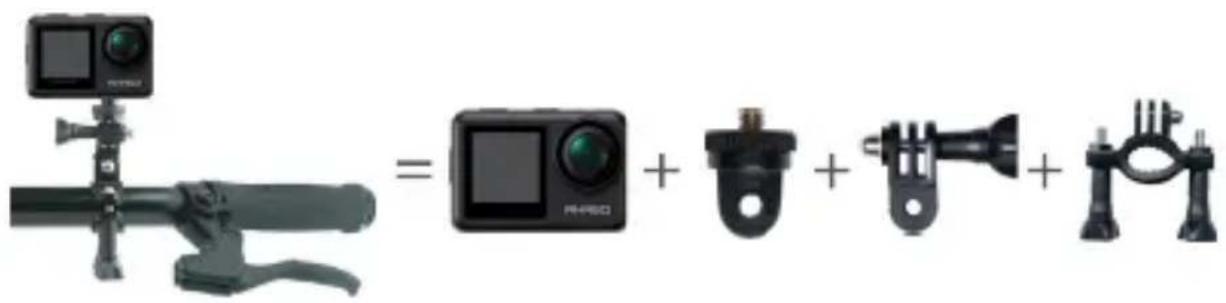
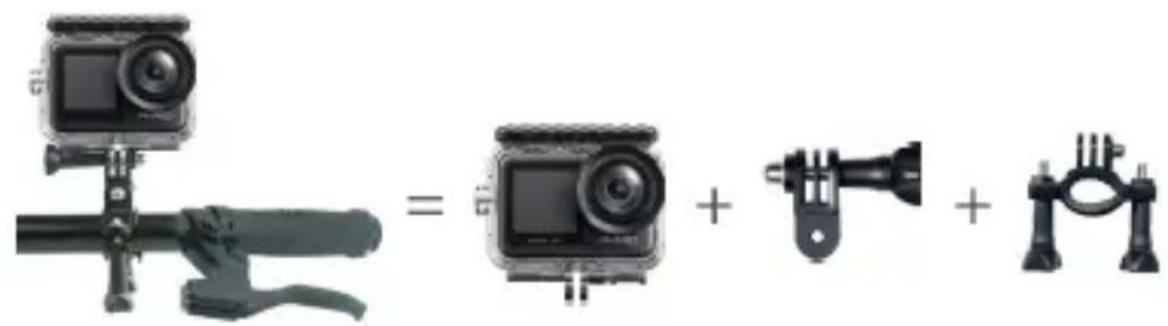
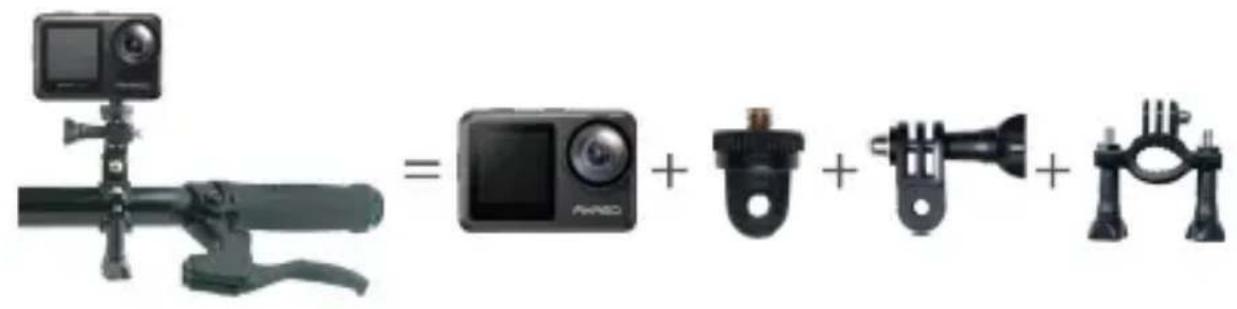
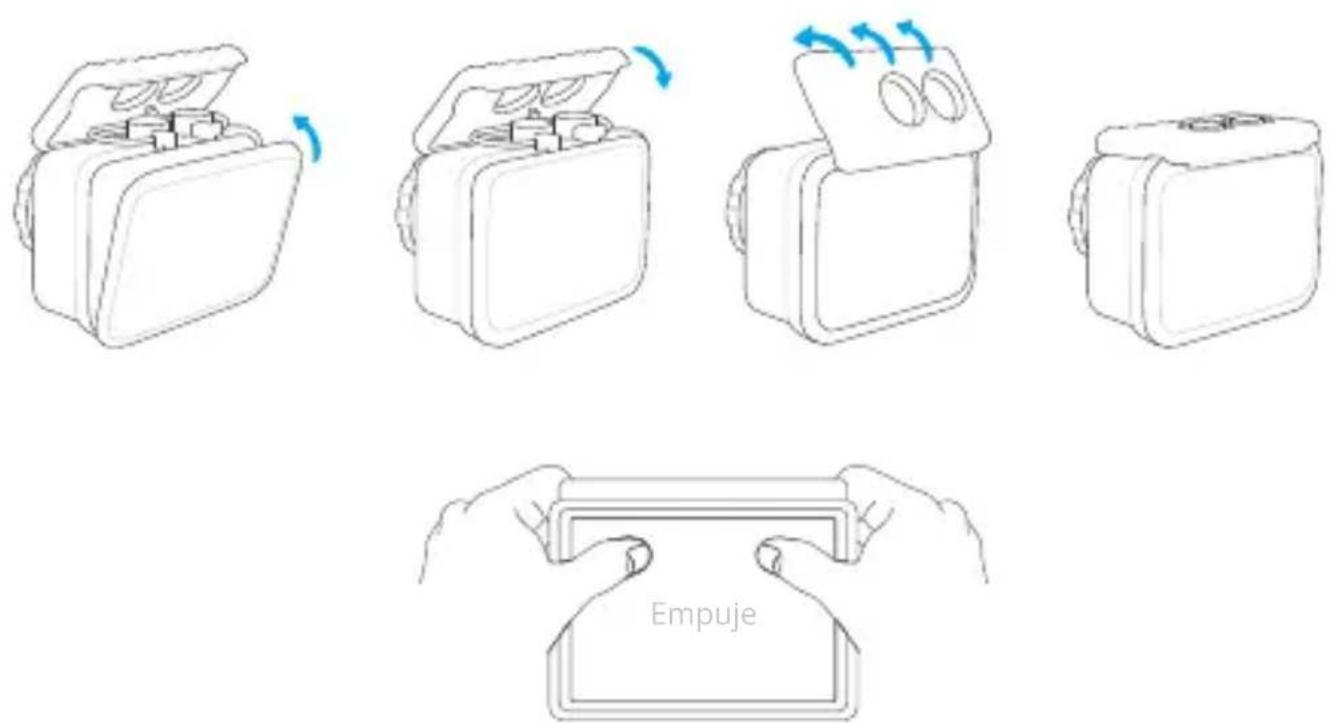
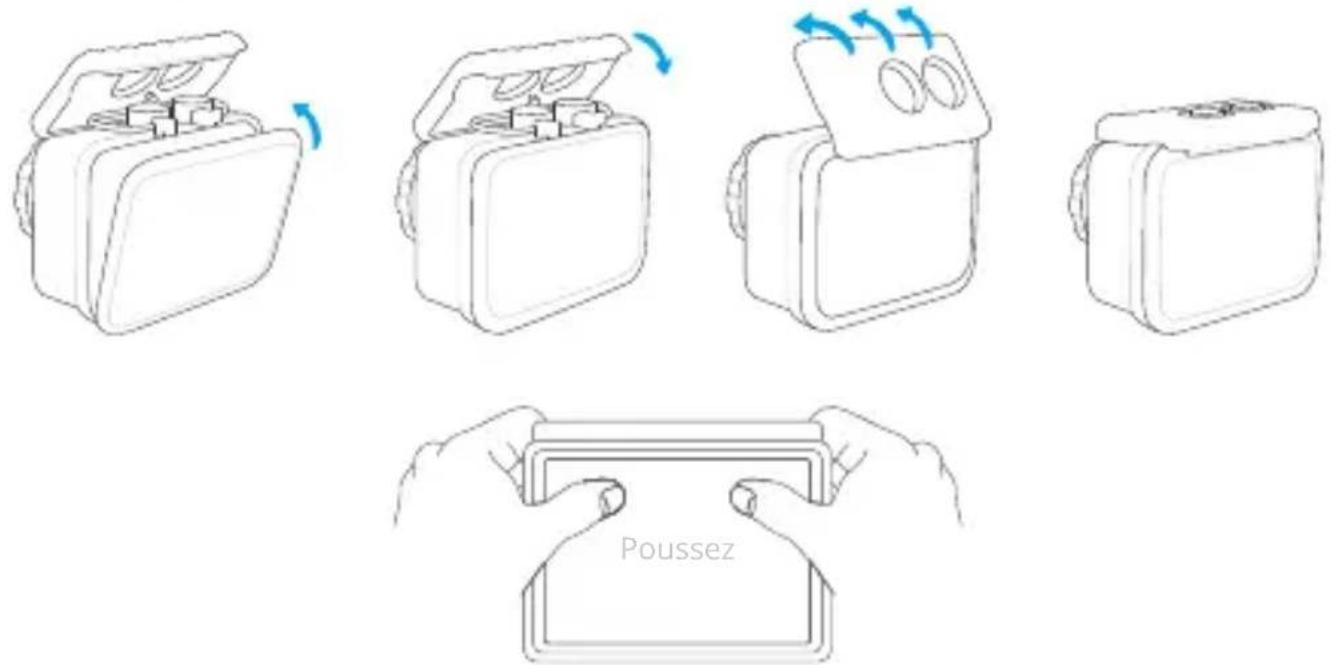
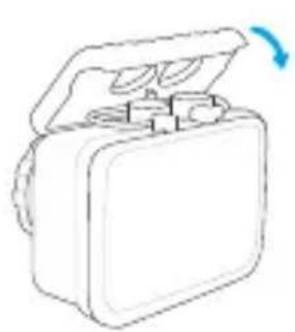
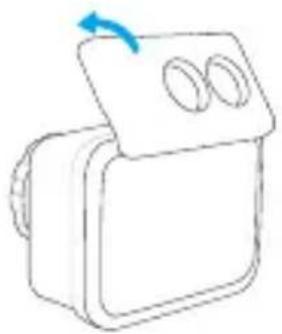
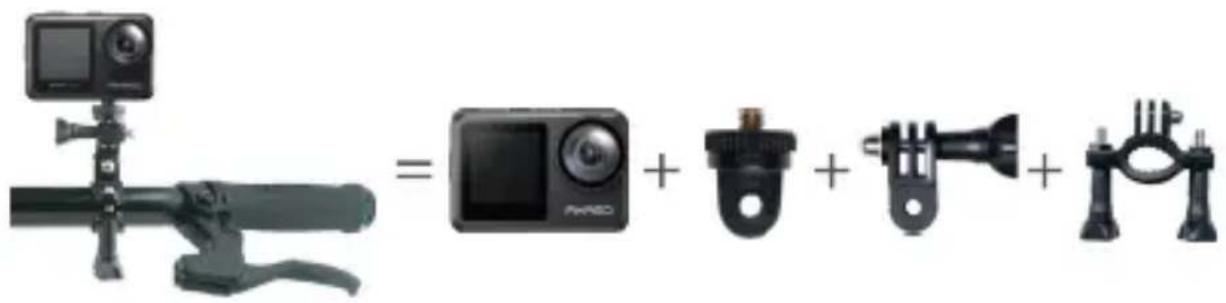
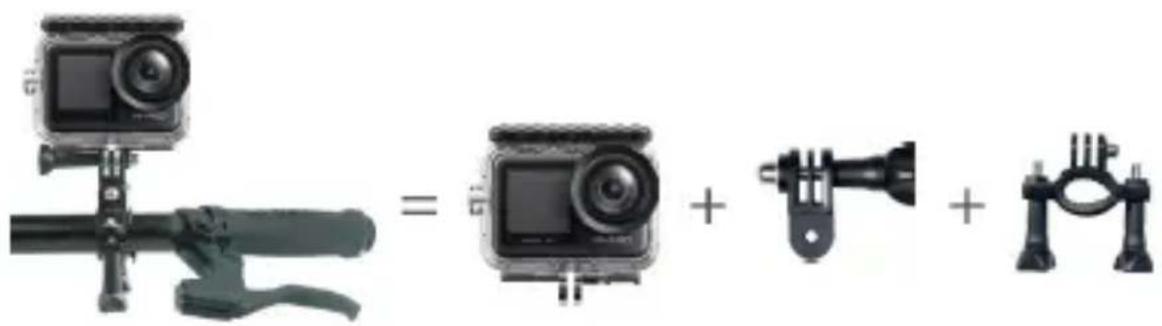
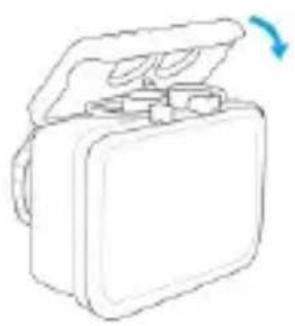
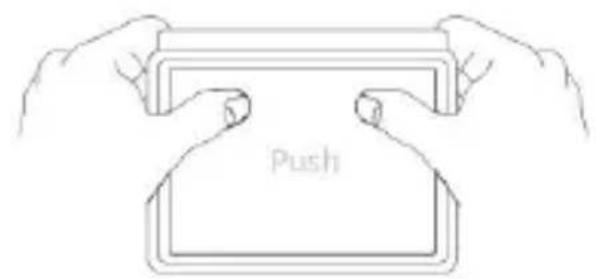
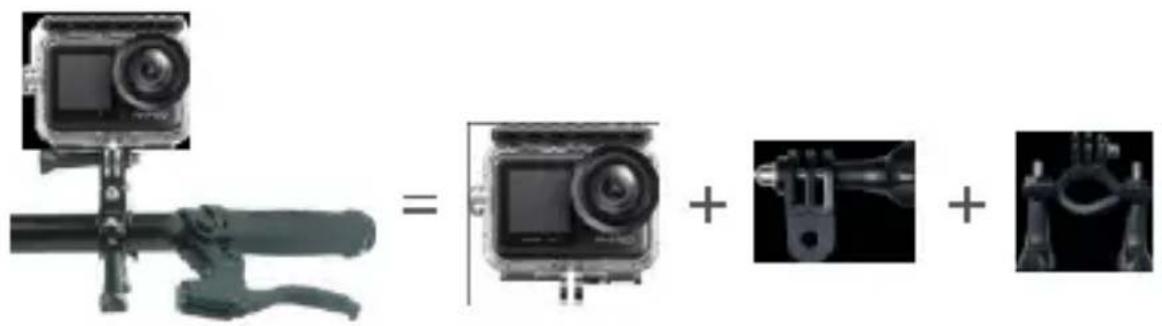
Mounting Your Camera
Attach your camera to helmets, gear and equipment.
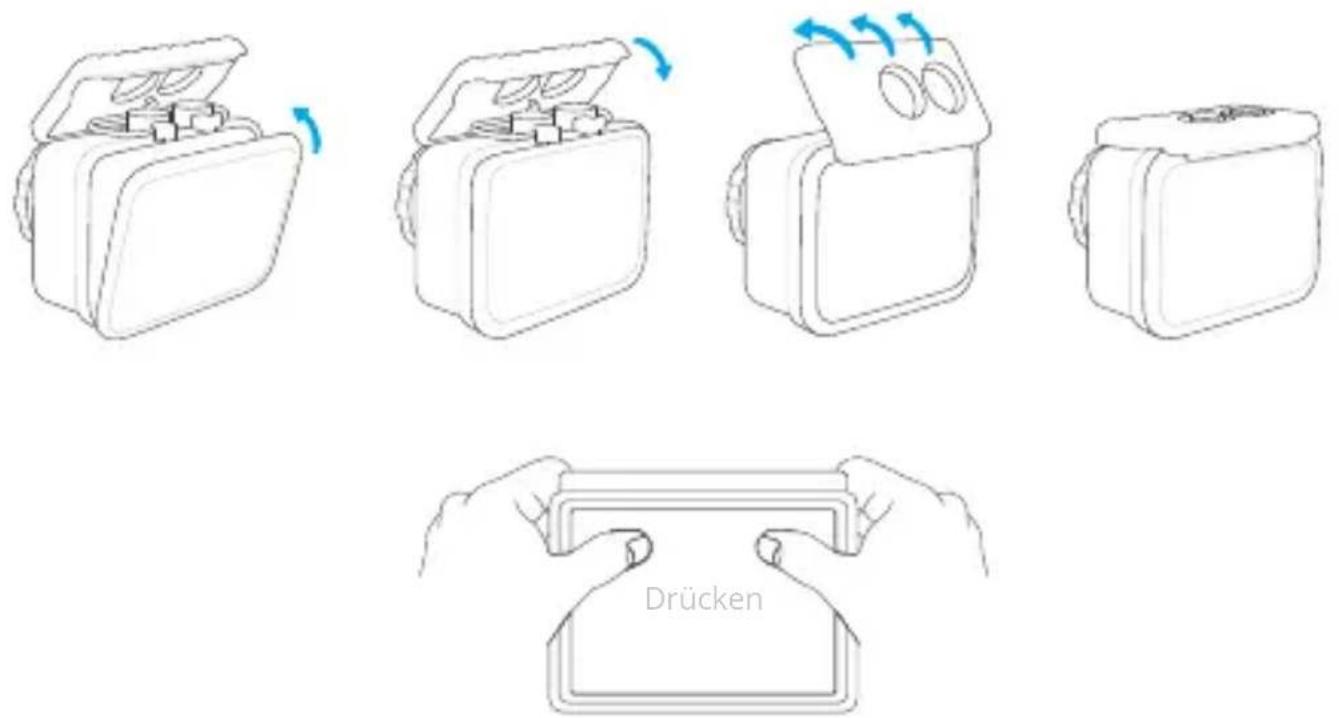
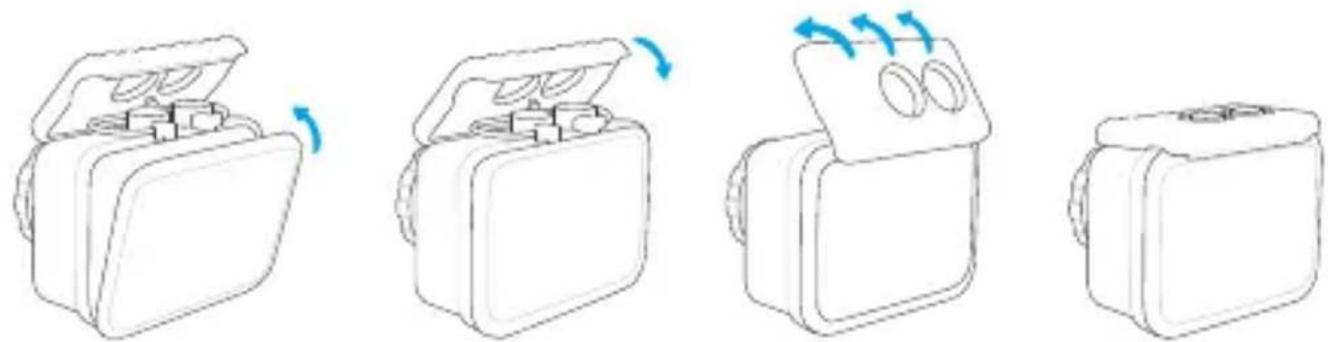
Open
natural_image
Four-step diagram showing a device with blue airflow indicators, no text or symbols present
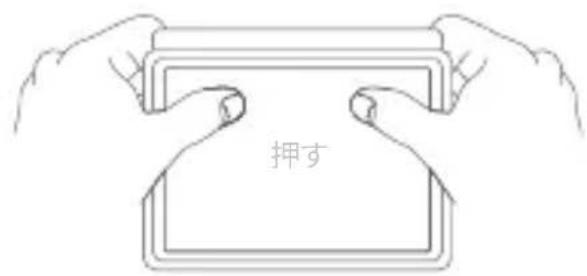
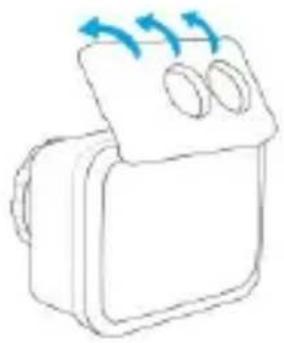
Close
natural_image
Four line drawings of a device with open top, showing internal components and rotation arrows (no text or symbols)
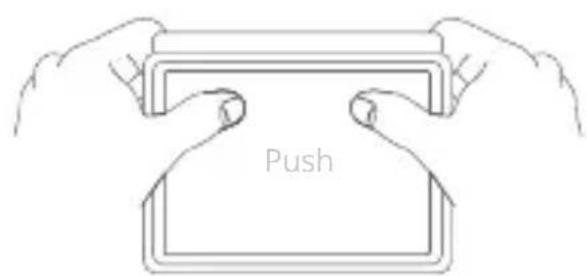
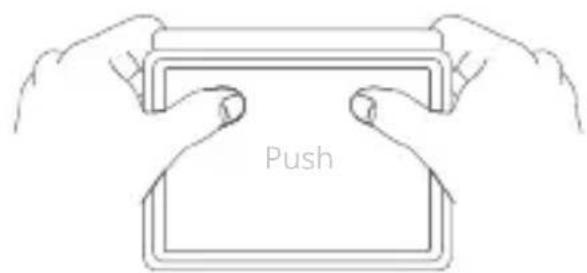
Note: Push and make sure that there is no gap between the waterproof strips of the waterproof case.
natural_image
Three camera modules shown in different configurations: a flat set, a screen with lens, and a bracket with a flashlight (no text or symbols present)
For any inquiries about AKASO products, please feel free to contact us.
We will respond within 24 hours.
Tel: (888) 466-9222 (US)
Email: cs@akasotech.com
Web: www.akasotech.com
BRAVE 7 LE
ACTION - KAMERAS

natural_image
Exterior view of a black Akaso digital camera with lens and screen (no text or symbols on body)
BENUTZERHANDBUCH
V1.8

Inhalt

Schraubenschlüssel
x 1
Anbindungen
x 5

Linsentuch
x 1
natural_image
Mountain ski slope with two people using icons: a lock and a power button, against a clear blue sky (no text or symbols on the figures or terrain)
natural_image
Mountain ski slope with two security icons showing lock and gear (no text or symbols)
Default setting is 2x.
6. Auto Low Light: Aus/Ein
5. Messung: Center/Multi
1. Geräusche: Shutter/Boot-up/Beep/Volume


natural_image
Smartphone screenshot displaying a snowy mountain landscape with two skiers on a slope, no visible text or symbols.
natural_image
Three black electronic devices: a digital display, a black rectangular device with red buttons, and a screwdriver (no visible text or symbols)
natural_image
Interior view of a green electronic device with exposed circuit board and two connectors (no text or symbols visible)
natural_image
Close-up of a green printed circuit board with exposed components and a red arrow pointing to a component (no text or symbols visible)
natural_image
Close-up of a green printed circuit board with black plastic components and a red warning symbol on top (no readable text or symbols)
natural_image
Four line drawings of a device with blue arrows indicating rotation or movement, showing different states of packaging (no text or symbols)
Schließen

Kontaktiere Uns
natural_image
Exterior view of a black Akaso digital camera with lens and screen (no text or symbols on body)
MANUAL DE USUARIO
V1.8

Contenido
natural_image
Mountain ski slope with two skiers and two icons (lock and power) against a clear blue sky, no text or symbols present.
natural_image
Mountain ski slope with two skiers and a lock icon, no text or symbols present
Default setting is 1 Min.

natural_image
Smartphone screenshot displaying a snowy mountain landscape with skiers and snow-capped peaks, alongside a recording app interface (no readable text or symbols on the main image)
natural_image
Three black electronic devices: a digital display, a black plastic housing with red mounting holes, and a tool tip (no visible text or symbols)
natural_image
Interior view of an electronic device showing a green circuit board with two black plastic components and red connectors (no text or symbols visible)
ES
natural_image
Close-up of a green printed circuit board with black plastic components and a red triangular annotation highlighting a component (no readable text or symbols)
natural_image
Close-up of a green printed circuit board with black plastic components and a red rectangular component on top (no visible text or symbols)
natural_image
Four line drawings of a device with blue arrows indicating motion or rotation, showing different states of assembly (no text or symbols)
Cerca

Contáctenos
natural_image
Exterior view of a black Akaso digital camera with lens and screen (no text or symbols on body)
MANUEL D'UTILISATION
V1.8

Contenu
natural_image
Mountain ski slope with two skiers and two padlock icons on a clear blue sky (no text or symbols)
natural_image
Mountain ski slope with two skiers and a lock icon, showing snow-covered peaks under a clear blue sky (no text or symbols)
6. Longue Exposition: 1 sec/2 sec/5 sec/8 sec/30 sec/60 sec
8. Mesure: Center/Multi
4. Exposition: -2.0/-1.0/0.0/+1.0/+2.0
5. Mesure: Center/Multi

natural_image
Smartphone screenshot showing a snowy mountain landscape with skiers and snow-capped peaks, no visible text or symbols on the main image area.
natural_image
Black and red handheld device with a red square display and gray buttons (no visible text or symbols)
natural_image
Top-down view of a black rectangular electronic device with two side slots and red mounting holes (no text or symbols visible)

natural_image
Interior view of a black plastic electronic device showing green circuit board and internal components (no text or symbols visible)
natural_image
Close-up of a green printed circuit board with exposed components and a red arrow pointing to a component (no visible text or symbols)
natural_image
Close-up of a green printed circuit board with black plastic components and a red rectangular component on top (no visible text or symbols)
natural_image
Four line drawings of a device with blue airflow indicators, showing internal components and packaging (no text or symbols)
Proche


natural_image
Exterior view of a black Akaso digital camera with lens and screen (no text or symbols on body)
MANUALE UTENTE
V1.8

Contenuti
natural_image
Mountain ski slope with two skiers and two app icons (open lock and power button) against a clear blue sky, no text or symbols present.

natural_image
Mountain ski slope with two skiers and a lock icon, no text or symbols present
2. Burst Foto: 3 shots/7 shots/15 shots/30 shots
- Risoluzione Video: 4K30fps/2.7K60fps/2.7K30fps/1080P120fps/1080P60fps/1080P30fps/720P240fps/720P120fps/720P60fps

natural_image
Smartphone screenshot displaying a snowy mountain landscape with two skiers on a slope under a bright sun (no text or symbols visible)
natural_image
Three black electronic devices: a digital display, a black rectangular casing with red mounting holes, and a tool tip (no text or symbols visible)
natural_image
Interior view of an electronic device showing a green circuit board with internal components and mounting brackets (no visible text or symbols)
natural_image
Close-up of an electronic device showing internal circuit board and connector (no text or symbols visible)
natural_image
Close-up of a green printed circuit board with black plastic components and a red rectangular component on top (no visible text or symbols)
natural_image
Four-step diagram showing a device with airflow indicators and internal components, no text or symbols present.
Vicino


Contattaci
natural_image
Exterior view of a black Akaso digital camera with a circular lens and screen (no text or symbols on the device body)
取扱説明書
V1.8

コンテンツ
パッケージ詳細 02
BRAVE 7 LE 03
はじめに 07
モード一覧 08
natural_image
Mountain ski slope with two skiers and two icons (lock and power) against a clear blue sky, no text or symbols present.
natural_image
Mountain ski slope with two skiers and a lock icon, no text or symbols present
- ビデオ解像度: 4K@30fps/2.7K@60fps/2.7K@30fps/1080P@120fps/1080P@60fps/1080P@30fps/720P@240fps/720P@120fps/720@P60fps
初期設定は4K@30fpsです。

natural_image
Smartphone screenshot showing a snowy mountain scene with skiers and snow-capped peaks, no visible text or symbols on the main image area.
コンテンツを再生する
natural_image
Three black electronic devices: a digital display, a black rectangular enclosure with red mounting holes, and a tool tip (no visible text or symbols)
natural_image
Interior view of a green electronic device with exposed circuit board and two black plastic components (no text or symbols visible)
natural_image
Interior view of a black plastic electronic device showing internal circuit board and connector (no text or symbols visible)
natural_image
Interior view of a black electronic device showing green circuit board and internal components (no visible text or symbols)
natural_image
Top-down view of a black rectangular electronic device with two side slots and mounting holes (no text or symbols visible)
カメラをマウントする
natural_image
Line drawing of a closed box with an open lid and internal compartments, no text or symbols present
natural_image
Line drawing of a closed toolbox with lid open, showing internal compartments and a blue circular arrow indicating rotation (no text or symbols)
natural_image
Simple line drawing of a box with two circular cutouts and an arrow indicating rotation (no text or symbols)
natural_image
Simple line drawing of a rectangular box with a lid (no text or symbols)
natural_image
Three camera modules with different lighting and mounting features, shown in separate diagrams (no text or symbols)
お問い合わせ
akaso_jp
BRAVE 7 LE
KAMERA SPORTOWA

natural_image
Exterior view of a black Akaso digital camera with green lens and screen (no text or symbols on body)
INSTRUKCJA OBSŁUGI
V1.8

Zawartość
natural_image
Two skiers on a snowy mountain peak with two app icons (open lock and power button) in the background, no text or symbols present.
natural_image
Mountain ski slope with skiers and a padlock icon, no text or symbols present
Default setting is Auto.

natural_image
Close-up of a black handheld device with a red display screen and control buttons (no visible text or symbols)
natural_image
Three black electronic devices: a digital display, a black plastic housing with red mounting holes, and a tool tip (no visible text or symbols)
natural_image
Interior view of a black plastic electronic device showing green circuit board and internal components (no text or symbols visible)
PL
natural_image
Close-up of a green printed circuit board with exposed components and a red triangular annotation highlighting a component (no text or symbols present)
natural_image
Close-up of a green electronic circuit board with exposed components and a red rectangular highlight (no text or symbols visible)
natural_image
Four-step diagram showing a device with airflow indicators and internal components, no text or symbols present.
Zamknij
natural_image
Four line drawings of a device with open top, showing internal components and blue rotation arrows (no text or symbols)
Kontakt z Nami
natural_image
Exterior view of a black Akaso digital camera with lens and screen (no text or symbols on body)
natural_image
Mountain ski slope with two skiers and two app icons (open lock and power button) against a clear blue sky, no text or symbols present.
natural_image
Mountain ski slope with two skiers and a lock icon, no text or symbols present


natural_image
Smartphone screenshot displaying a snowy mountain landscape with skiers and snowboarders under a bright sun (no text or symbols visible)
natural_image
Close-up of a black and red handheld device with a red display screen and control buttons (no visible text or symbols)
natural_image
Black rectangular object with four white side brackets and red corner markers (no text or symbols)

natural_image
Interior view of an electronic device showing a green circuit board with black connectors and internal components (no visible text or symbols)
natural_image
Interior view of a black electronic device showing internal circuit board and connector (no text or symbols visible)
natural_image
Interior view of an electronic device showing a green circuit board with internal components and a red arrow pointing to a component (no text or symbols visible)
natural_image
Simple line drawing of a closed storage case with a blue arrow indicating rotation (no text or symbols)
natural_image
Simple line drawing of a closed hard-shell device with a handle open, no text or symbols present.
natural_image
Simple line drawing of a device with two circular ports and blue directional arrows indicating flow or movement (no text or symbols)
natural_image
Simple line drawing of a rectangular box with a handle (no text or symbols)
СВЯЖИТЕСЬ С НАМИ