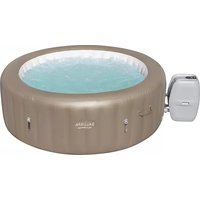
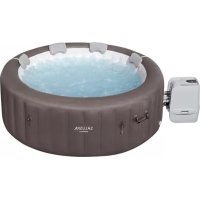
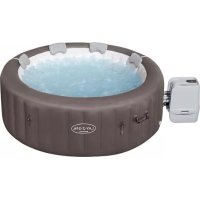
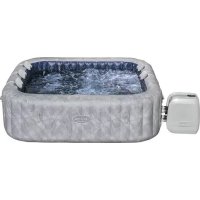
Swimfinity 58517 - Pool BESTWAY - Free user manual and instructions
Find the device manual for free Swimfinity 58517 BESTWAY in PDF.
User questions about Swimfinity 58517 BESTWAY
0 question about this device. Answer the ones you know or ask your own.
Ask a new question about this device
Download the instructions for your Pool in PDF format for free! Find your manual Swimfinity 58517 - BESTWAY and take your electronic device back in hand. On this page are published all the documents necessary for the use of your device. Swimfinity 58517 by BESTWAY.
USER MANUAL Swimfinity 58517 BESTWAY
text_image
Visit www.bestwaycorp.com/support for help WE SUGGEST NOT TO RETURN THE PRODUCT TO THE STORE QUESTIONS? PROBLEMS? MISSING PARTS? For FAQ, Manuals, Videos Or Spare Parts, Please Visit bestwaycorp.com/support58517
OWNER'S MANUAL
bestwaycorp.com/support
Visit Bestway YouTube channel YouTube
SWIM FITNESS SYSTEM OWNER'S MANUAL

text_image
Visit www.bestwaycorp.com/support for help WE SUGGEST NOT TO RETURN THE PRODUCT TO THE STORE QUESTIONS? PROBLEMS? MISSING PARTS? For FAQ, Manuals, Videos Or Spare Parts, Please Visit beakwaycorp.com/supportWARNING
IMPORTANT SAFETY INSTRUCTIONS
READ AND FOLLOW ALL SAFETY INSTRUCTIONS
SAVE THESE INSTRUCTIONS
- The appliance must be supplied through a residual current device (RCD) having a rated residual operating current not exceeding 30mA.
- Ensure the transformer is at least 2 meters away from pool. Keep distance as far as possible.
- The plug of the transformer must be at least 3.5m away from the pool.
- The appliance is only to be used with the provided transformer.
- Do not sit, straddle, step on or exert pressure on the product as injury could occur.
- DO NOT BURY CORD. Locate cord to minimize abuse from lawn mowers, hedge trimmers, or any other equipment.
- To reduce the risk of electric shock, replace damaged cord immediately.
- If the supply cord is damaged, it must be replaced by the manufacturer, its service agent or similarly qualified persons in order to avoid a hazard.
- Extension cords can't be used.
- Always unplug this product from the electrical outlet before removing, cleaning, servicing or making any adjustment to the product.
- Don't plug or unplug the appliance if hand is wet.
- Read the instructions before using the appliance, installing it, or reassembling it.
- If instructions are misplaced, please contact with Bestway or search it on the website: www.bestwaycorp.com
- This appliance can be used by children aged from 8 years and above and persons with reduced physical, sensory or mental capabilities or lack of experience and knowledge if they have been given supervision or instruction concerning use of the appliance in a safe way and understand the hazards involved. Children shall not play with the appliance. Cleaning and user maintenance shall not be made by children without supervision. (For EU market)
- This appliance is not intended for use by persons (including children) with reduced physical, sensory or mental capabilities, or lack of experience and knowledge, unless they have been given supervision or instruction concerning use of the appliance by a person responsible for their safety. Children should be supervised to ensure that they do not play with the appliance. (For market other than EU)
- This product is not intended for commercial use.
- The battery is non-replaceable.
• Non-rechargeable batteries are not to be recharged. - Exhausted batteries are to be removed from this product. Do not dispose of product and its batteries in fire. Check your local regulations for proper disposal instructions.
Suitable for in-ground pools or above ground metal frame pools (Pool size: length≥4.57 m(15'), width≥2.44 m(8'), depth≥1 m(39.5')) Suggested water temperature range: 15-35°C
Speed range (Approximate):
| INTENSITY LEVEL | 1 | 2 | 3 | 4 | 5 | 6 | 7 | 8 |
| m/s | 0.65 | 0.74 | 0.83 | 0.92 | 1.01 | 1.10 | 1.19 | 1.30 |
| yd/s | 0.71 | 0.81 | 0.91 | 1.01 | 1.10 | 1.20 | 1.30 | 1.42 |
Frequency band: 433.92 MHz
Maximum radio-frequency power: 8 dBm
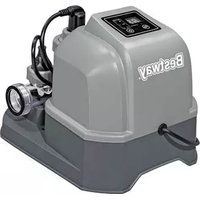
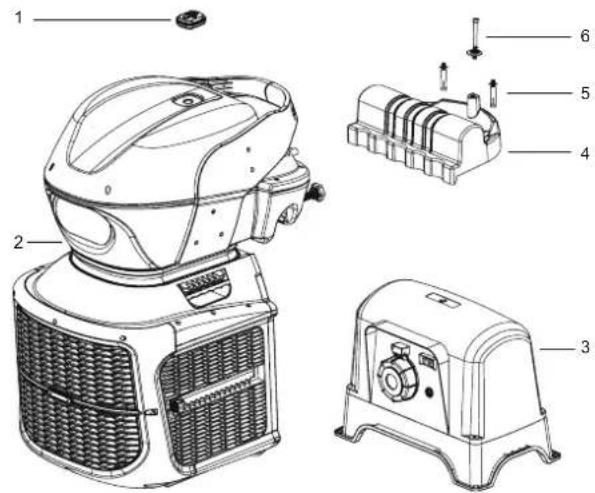
| No. | Item | Description | QTY |
| 1 | P04752 | Remote control | 1 |
| 2 | P04753 | Swim fitness system | 1 |
| 3 | P04754(EU)/P04875(GB)/P04874(CH) | Transformer | 1 |
| 4 | P04755 | Mounting bracket | 1 |
| 5 | P04756 | Screws | 2 |
| 6 | P04757 | Set screw | 1 |
text_image
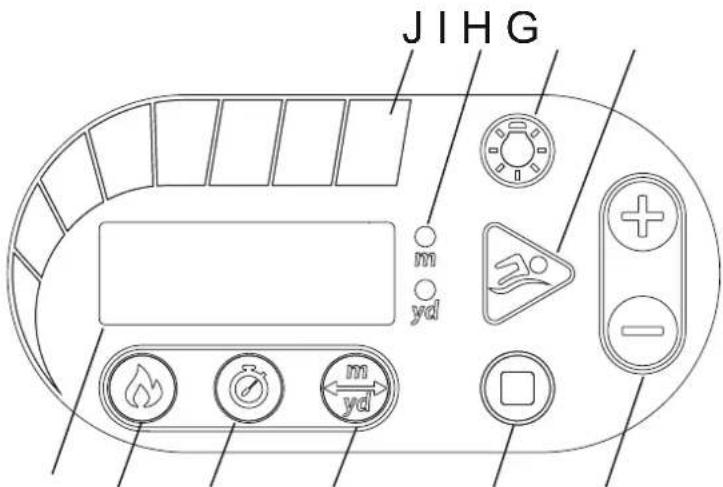
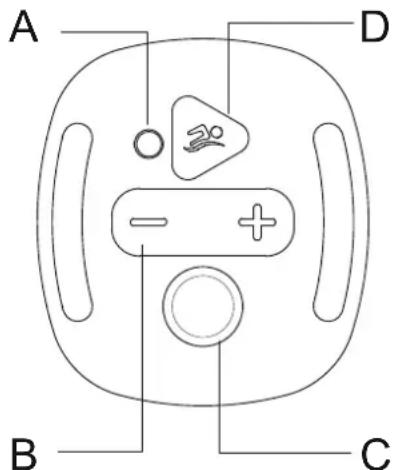
Technical diagram of a portable air conditioner with labeled parts including front panel, side panels, and internal components.Display Panel Function:
A Digital display window
Display current mode parameters
B Calorie counter mode
- Press this button in free running mode, the digital screen displays the calorie interface
- Press and hold this button in any state to enter the calorie consumption mode setting interface, and the calorie consumption mode button indicator will flash. Press the "+/-" button to set the parameter increase or decrease (range 10-1000 cal). After the setting is completed, press the ▶start button to start the operation.
C Ⓤ Timer mode
-
Press this button in free running mode, the digital screen displays the time interface
-
Press and hold this button in any state to enter the timing mode setting interface, and the timing mode button indicator will flash. Press the “+/-” button to set
text_image
JIHG m yd m ydA B C D E F
the parameter increase or decrease (range 5-90 minutes). After the setting is completed, press the ▶start button to start the operation.
D Distance mode
- Press this button in free running mode, the digital screen displays the distance interface
- Press and hold this button in any state to enter the distance mode setting interface, and the m/yd indicator will flash. Press the "+/-" button to set the parameter increase or decrease (range 10-5000 m/10-5500 yards). After the setting is completed, press the ▶start button to start the operation. (Pressing this button without holding it down will switch between m/yd units)
E ☐ Stop button
-
In all cases except the standby state, press the stop button to clear the current data and the machine will enter the standby state.
-
When the E01 fault code is reported, press this button to cancel the fault and the machine enters the standby state.
F Speed and parameters adjustment buttons
During operation, you can accelerate or decelerate by pressing the “+/-” key; in the mode setting, you can set the parameter to increase or decrease by pressing the “+/-” key.
G ▶ Start/pause button
- Press this button in the standby mode to enter the free mode, and press this button to pause during operation. The machine will stop automatically after a maximum of 90 minutes of operation.
- After the calorie consumption, timing or distance mode setting is completed, press this button to start running. Press this button to pause during operation.
H LED light switch button
Press to turn on/off the LED light
I Distance unit indicator
m/yd indicator
J Speed Setting Display
One speed bar represents one speed setting, which is represented from left to right with green representing slower speeds and red representing faster speeds. The default speed when the machine is activated is set at 4 speed bars.
Remote control:
A Indicator light
Flashes a red color when a button is pressed

Press to increase or decrease the speed setting

In an emergency, press the emergency stop switch to completely cut off the power to the device.

Press to start or pause
text_image
A D B CIf the remote control or the body of the Swimfinity is replaced, they must be paired again using the following instructions:
-
Ensure the body of the Swimfinity is in standby mode.
-
The remote control must be within 3 m (10 ft.) from the control panel.
-
On the remote control, press the speed adjustment buttons = + and emergency stop button ⊙ at the same time.
Hold it until you hear the buzzer sound. This means the pairing was successful.
Important: after the paring operation is finished, the E8.1 alarm will appear on the control panel. This is normal. Press the stop button ☐ on the control panel to reset the alarm, and you may use your Swimfinity.
MAINTENANCE
Please disassemble and store the product indoors when the device will not be used for a long period of time.
-
Turn off the transformer and unplug the power cable from the electrical outlet.
-
Disconnect the machine power cable from the transformer.
-
Remove the machine from the pool , and air-dry thoroughly .
-
Store the machine and transformer in a dry place. The storage's temperature should be between 4^ and 40^ .
Alarms
| Fault alarm code Problem Solution | ||
| E01 | After the remote control emergency stop button is pressed, the system is forced to enter the fault mode. The motor stops running and the alarm prompts. | You can press the stop button to cancel the fault or the system needs to be powered off and turned back on to solve the fault. |
| E02 | Motor idling and overload protection. If the motor is no-load rotating or stalling, the operation current is too large. The system enters the failure mode, the motor stops running and the alarm prompts. | Please check if the water level in the swimming pool is lower than the bottom of the motor impeller or if the motor impeller is blocked. |
| E03 | Motor failure. | For assistance, please visit the support section on our website, www.bestwaycorp.com. |
| E04 | Motor temperature is too high. | Turn off the power, and restart after 30 minutes or after the water temperature has cooled. |
| E07 | Signal problem between the control panel and PCB. | For assistance, please visit the support section on our website, www.bestwaycorp.com. |
| E08 | Input voltage is too low. | Please check if the voltage is within the range required by the rating label. |
TROUBLESHOOTING GUIDE
| PROBLEM | CAUSE | SOLUTION |
| Remote Control is no longer working | - The battery is on low power. | - Contact your local Bestway Service Center for instructions. |
| Too noisy / Jet water is weak | - The machine unit is not fully immersed in the water.- The machine is not parallel to the water surface.- Motor doesn't work properly. | - Make sure the device is under the water.- Check if the support plate is in place. Refer to the “Installation” for details.For assistance, please visit the support section on our website, www.bestwaycorp.com. |
| No LED display | - The transformer is unplugged or off.- The transformer is not connected with the machine.- Display panel cord or display panel failure. | - Ensure the transformer is plugged in and switched on.- Connect the transformer with the machine.For assistance, please visit the support section on our website, www.bestwaycorp.com. |

Disposal
Waste electrical products should not be disposed of with household waste. Please recycle where facilities exist. Check with your local authority or retailer for recycling advice.
SISTEMA DE FITNESS PARA PISCINA MANUAL DO PROPRIETÁRIO
Visite o canal da Bestway no YouTube YouTube

text_image
Technical diagram of a portable air conditioner unit with labeled parts including front, side, and top viewstext_image
Technical diagram of a portable air conditioner unit with numbered parts for identificationtext_image
JIHG m yd m ydA B C D E F
text_image
Technical diagram of a portable air conditioner with labeled parts including front panel, side panels, and internal components.text_image
JIHG m yd m ydA B C D E F
IMPORTANT SAFETY INSTRUCTIONS
LUE JA NOUDATA KAIKKIA TURVAOHJEITA
PIDÄ NÄMÄ OHJEET TALLESSA
text_image
Technical diagram of a portable air conditioner unit with numbered parts for identificationtext_image
Technical diagram of a portable air conditioner with labeled parts including front panel, side panels, and internal components.Werking displaypaneel:
text_image
Technical diagram of a portable air conditioner with labeled parts including front panel, rear panel, and internal components.text_image
Technical diagram of a portable air conditioner with labeled parts including front panel, rear panel, and internal components.text_image
Technical diagram of a portable air conditioner unit with numbered parts for identificationtext_image
JIHG m yd m ydA B C D E F
text_image
Technical diagram of a portable air conditioner with labeled parts including front panel, rear panel, and internal components.text_image
Technical diagram of a portable air conditioner with labeled parts including front panel, rear panel, and internal components.text_image
Technical diagram of a portable air conditioner with labeled parts including front panel, side panels, and internal components.text_image
JIHG m yd m ydA B C D E F
text_image
Technical diagram of a portable air conditioner unit with numbered parts for identificationtext_image
JIHG m yd m ydA B C D E F
D Distans
flowchart
graph TD
    A["Step 1: Patient positioning"] --> B["Step 2: Surgical procedure"]
    B --> C["Step 3: Surgery step"]
    C --> D["Step 4: Surgical procedure with checkmarks"]
    D --> E["Step 5: Surgical procedure with checkmarks"]
67
text_image
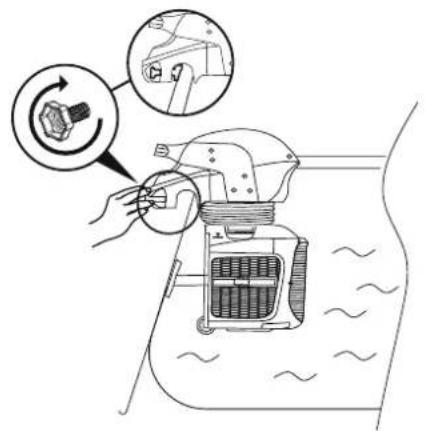
Diagram showing a hand using a cleaning tool to adjust a component, with an inset close-up highlighting the tool's rotation.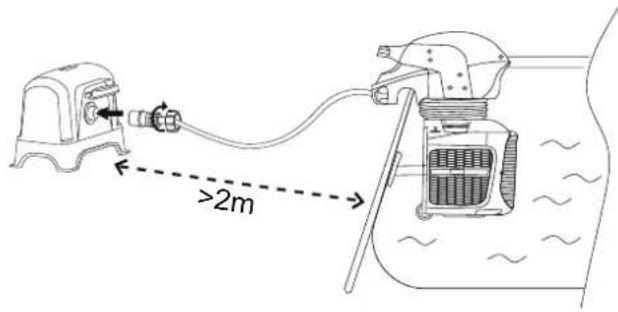
text_image
>2m
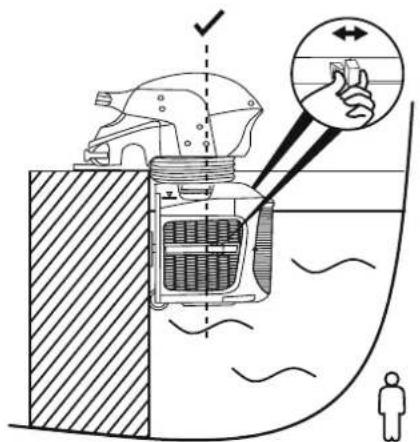
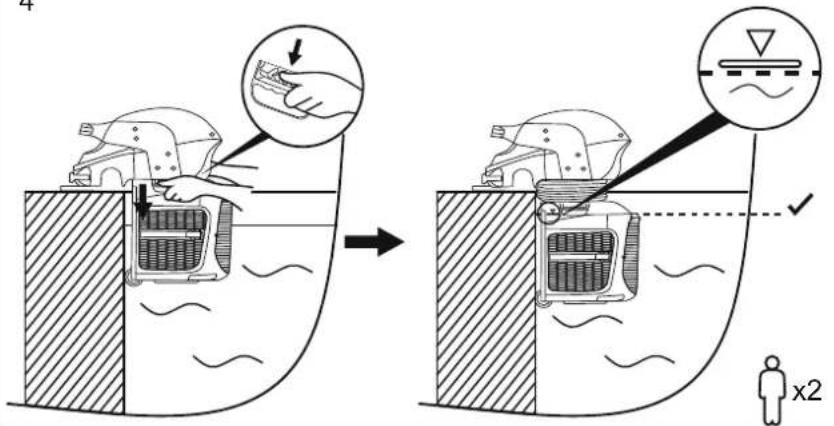
A. For above ground metal frame pool:
- Pull the fastening nut out, and remove the mounting bracket.
- Lift the machine up to the pool frame.
- Pull back the support plate, place it against the wall of the pool, and adjust it so the plate is placed securely against the pool wall.
- Grab the height adjustment handles on both sides of the machine to raise or lower the motor underwater.
- Adjust the machine slightly to make it horizontal against the water line.
- Tighten the locking screw.

text_image
1 160mm 140mm ø12mm 0-200mm 45mm2
text_image
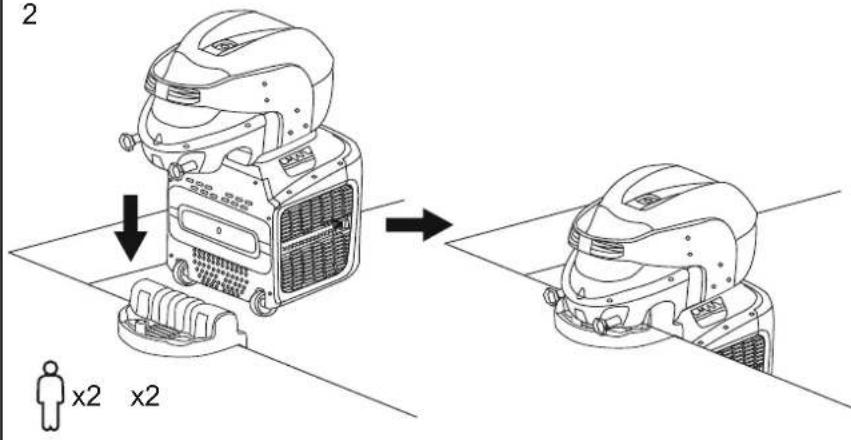
2 x2 x23
text_image
Diagram illustrating a hand gesture interacting with a car interior, showing directional arrows and human silhouette.4
text_image
Diagram illustrating a mechanical device operation with hand positioning and warning symbols, showing before-and-after states of inspection or repair.5
text_image
Diagram illustrating mechanical assembly steps with labeled parts and directional arrows indicating motion6
text_image
>2m
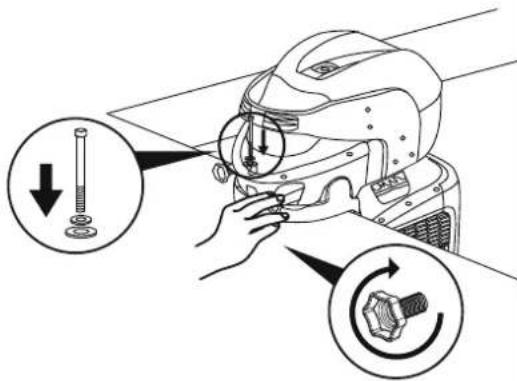
B. For in-ground pool:
- Install the in-ground pool mounting bracket.
- Make sure the top surface of the pool edge is stable, flat and level.
- Drill two holes on the pool edge – in the center of the shorter side – where the mounting bracket will be installed. Pay attention to the electrical, gas and water lines when drilling the holes.
- Place the machine on the mounting unit.
- Pull back the support plate, place it against the wall of the pool, and adjust it so the plate is placed securely against the pool wall.
- Grab the height adjustment handles on both sides of the machine to raise or lower the motor underwater.
- Use the set screw for enhanced stability.

B. Para piscina enterrada:
text_image
Ø8mm 440mm 240mm
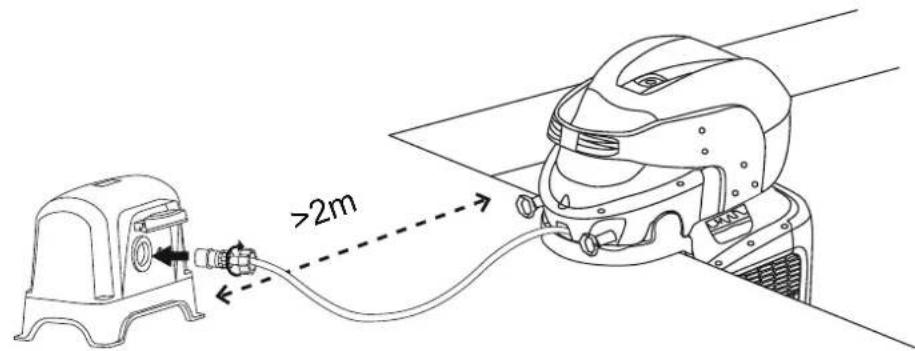
Transformer assembly:
- The transformer must be installed on a solid level area.
- The transformer requires free circulation of air for cooling.
- The transformer must be installed in a location protected from the moisture, rain and splashing water.

Connecting the swimming machine unit to the transformer:
- Be sure the transformer switch is OFF, and connect the transformer cable to a grounded electrical outlet.
- The transformer shall be placed at least 2m away from the pool. Connect the machine power cable plug to the transformer power receptacle. Be sure the plug cover is securely tightened.
- Test the PRCD before use:
a) Press the "RESET" button. The indicator on the PRCD should be ON.
b) Press the "TEST" button. The indicator on the PRCD should be OFF.
c) Press the "RESET" button again to start using the product.
d) Do not use the product if the test failed. Contact a qualified electrician to inspect the electrical outlet socket.
4. Turn the transformer switch ON.

For support please visit us at:
bestwaycorp.com/support
©2022 Bestway Inflatables & Material Corp.
All rights reserved/Tous droits réservés/Todos los derechos reservados/Alle Rechte vorbehalten/Tutti i diritti riservati
Trademarks used in some countries under license from/
Manufactured, distributed and represented in the European Union by/
Distributed in Australia & New Zealand by Bestway Australia Pty Ltd, Unit 2/98-104 Carnarvon St Silverwater, NSW 2128, Australia
Tel: Australia: (+61) 2 9037 1388; New Zealand: 0800 142 101
Distributed in United Kingdom by Bestway Corp UK Ltd. 8 Wentworth Road, Heathfield Industrial Estate, Newton Abbot, Devon, TQ12 6TL
Exported by/Exporté par/Exportado por/Exportiert von/Esportato da
Bestway (Hong Kong) International Ltd./Bestway Enterprise Company Limited
Suite 713, 7/Floor, East Wing, Tsim Sha Tsui Centre, 66 Mody Road, Kowloon, Hong Kong
www.bestwaycorp.com