ICompanion Touch Pro HF93E610 - Food Processor MOULINEX - Free user manual and instructions
Find the device manual for free ICompanion Touch Pro HF93E610 MOULINEX in PDF.
| Product type | Connected food processor cooker |
| Brand | Moulinex |
| Model | ICompanion Touch Pro HF93E610 |
| Total power | 1550 W (1000 W heating + 550 W motor) |
| Bowl capacity | 3 L (for soups) |
| Temperature range | 30 °C to 150 °C (adjustable in 5 °C increments) |
| Number of speeds | 13 (including 2 intermittent speeds and 1 max intermittent speed) |
| Built-in scale | 1 g to 4000 g (with tare up to 8 kg) |
| Automatic programs | 14 programs: Sauce, Cream soup, Blended soup, Brown, Stew, Risotto, Gentle steam, Intense steam, Bread, Brioche, Cake, Dessert, Reheat, Rinse |
| Connectivity | WiFi (IEEE 802.11) and Companion app (iOS/Android) |
| Screen | Color touchscreen (glass) |
| Bowl material | Stainless steel |
| Safety | Automatic lid locking, electronic motor safety |
| Cleaning | Bowl and accessories dishwasher safe (except common drive, seal and locking ring) |
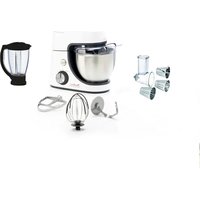
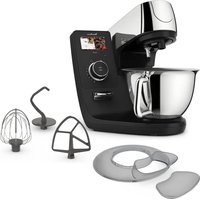
| Accessories included | Ultrablade chopping knife, mixer, whisk, kneading/crushing knife, steaming basket, spatula, cleaning brush, storage box |
| Weighing function | Built-in scale with tare and unit change (g, cl, ml, oz) |
| WiFi frequency | 2412 - 2483.5 MHz |
| Max transmitted power (WiFi) | 20 dBm |
Frequently Asked Questions - ICompanion Touch Pro HF93E610 MOULINEX
User questions about ICompanion Touch Pro HF93E610 MOULINEX
0 question about this device. Answer the ones you know or ask your own.
Ask a new question about this device
Download the instructions for your Food Processor in PDF format for free! Find your manual ICompanion Touch Pro HF93E610 - MOULINEX and take your electronic device back in hand. On this page are published all the documents necessary for the use of your device. ICompanion Touch Pro HF93E610 by MOULINEX.
USER MANUAL ICompanion Touch Pro HF93E610 MOULINEX
natural_image
Technical line drawing of three mechanical components with no visible text or symbols*selon modèle / fhankelijk van het model (NL) / Depending on model (EN) / je nach Modell (DE) / a seconda del modello (IT) / consoante o modelo (PT) / Según el modelo (ES) / үлгіге байланысты (KK) / в зависимости от модели (RU) / W zależności od modelu (PL)
text_image
A B G A1 B B3 B6 B2* B4* B1* B5*FR - * Icones visibles seulement lorsqu'ils vous seront utiles pour l'utilisation de votre appareil.
NL - * Pictogrammen zijn alleen zichtbaar als ze nuttig zijn voor het bedienen van uw apparaat.
EN - * Icons are visible only when they are useful for operating your appliance.
DE - * Symbole sind nur sichtbar, wenn sie für den Betrieb des Geräts nützlich sind.
π - * Icone visibili solo quando sono utili per il funzionamento dell'apparecchio.
PT - * Os ícones só são visíveis quando são úteis para utilizar o seu aparelho.
ES - * Los iconos solo son visibles cuando son útiles para utilizar el aparato.
КК - * Белгішелер тек құрылғыны қолдану үшін пайдалы болғанда көрінеді
EN - *Значки отображаются только в том случае, если они необходимы для работы с прибором.
PL - * Ikony są widoczne tylko wtedy, gdy są przydatne do obsługi urządzenia.
text_image
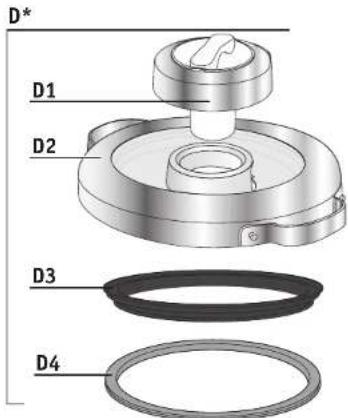
D* D1 D2 D3 D4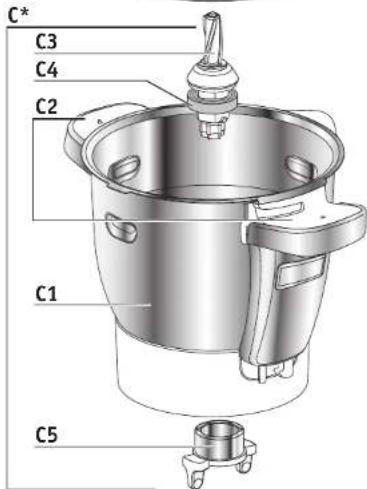
text_image
C* C3 C4 C2 C1 C5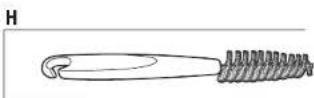
text_image
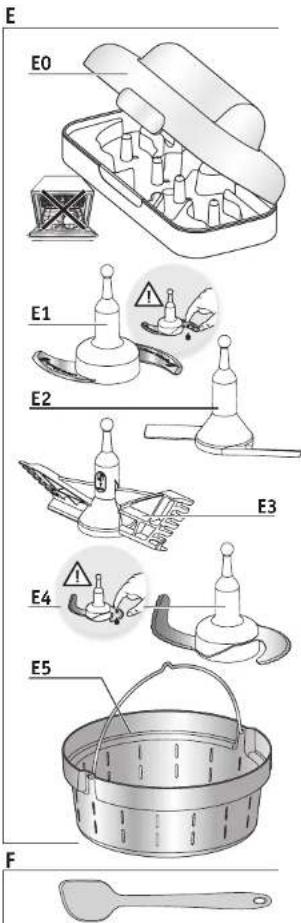
E E0 E1 E2 E3 E4 E5 F*selon modèle / afhankelijk van het model (NL) / Depending on model (EN) / je nach Modell (DE) / a seconda del modelo (IT) / consoante o modelo (PT) / Segün el modelo (ES) / yllgire bahlanysty (KK) / в зависимости от модели (RU) / W zoleżności od modelu (PL)
*selon modèle / afhankelijk van het model (NL) / Depending on model (EN) / je nach Modell (DE) / a seconda del modello (IT) / consoante o modelo (PT) / Según el modelo (ES) / yllrige bahlanysty (KK) / v зависимости от модели (RU) / W zależności od modelu (PL)
natural_image
Mechanical assembly diagram showing a component with a close-up view of a valve or knob (no text or symbols present)
natural_image
Mechanical component diagram showing a cylindrical housing with a curved arrow indicating rotation, labeled with number 6 (no text or symbols on the object itself)
text_image
a MAX b MIN 1 2 7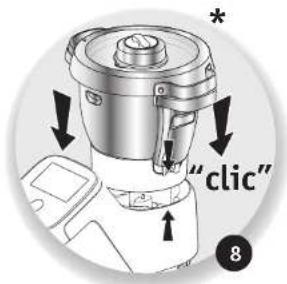
text_image
"click" 8
text_image
Diagram showing a hand using a tool to adjust or install a device, with an icon indicating control buttons and an asterisk marking the component.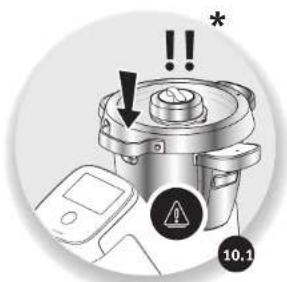
text_image
Diagram of a device with warning symbols and a warning label, showing a device with an alarm icon and warning symbol 10.1.*selon modèle / afhankelijk van het model (NL) / Depending on model (EN) / je nach Modell (DE) / a seconda del modello (IT) / consoante o modelo (PT) / Según el modelo (ES) / yngire bahlanysty (KK) / v зависимости от модели (RU) / W zależności od modelu (PL)
natural_image
Illustration of a cooking pot with a hand stirring it, no text or symbols present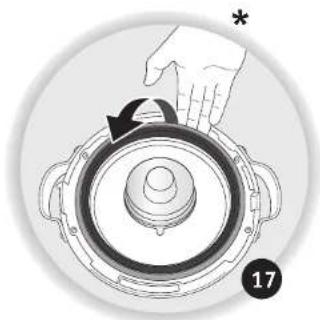
natural_image
Diagram of a hand pressing down on a speaker grille with an arrow indicating rotation (no text or symbols)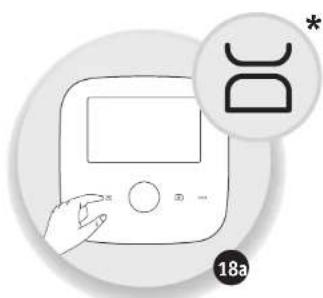
natural_image
Illustration of a hand interacting with a digital device, no text or symbols present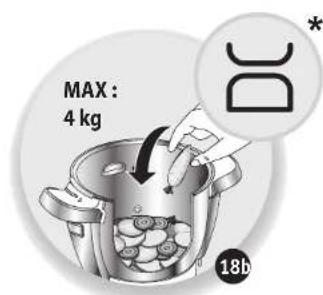
text_image
MAX : 4 kg DC * 18b'selon modèle / afhankelijk van het model (NL) /
Depending on model (EN) / je nach Modell (DE) /
a seconda del modello (IT) / consoante o modelo (PT) /
Según el modelo (ES) / yllgiro bайланысты (KK) /
в зависимости от модели (RU) / W zależności od modelu (PL)
*selon modèle / afhankelijk van het model (NL) / Depending on model (EN) / je nach Modell (DE) / a seconda del modelo (IT) / consoante o modelo (PT) / Según el modelo (ES) / yllgire bайланысты (KK) / в зависимости от модели (RU) /
W zależności od modelu (PL)
natural_image
Warning symbol depicting steam rising inside a triangle (no text or numbers)- 10 vitesses continues progressives
(vitesses 3 à 12).
• Association application
natural_image
Illustration of a hand pressing a button next to two white rectangular buttons with icons (no text or symbols)BESCHRIJVING VAN HET APPARAAT:
A Motorblok
A1: Weegfunctie
B Bedieningspaneel*
B1: Annuleren
B2: Weegschaal
B3: STARTEN en STOPPEN
B4: Video
B5: Instellingen
B6: Touchscreen
C Samenstelling kom
text_image
Image showing a hand cursor clicking a button next to two white buttons labeled '15' and '1', with a 'NL' label in the corner.- Receptenbibliotheek
- Read the instruction manual carefully before using your appliance for the first time and keep it in a safe place. The manufacturer shall not accept any liability in the event of any use that does not comply with the instructions.
- Always disconnect the appliance from the power supply if you are leaving it unattended and before assembling, disassembling and cleaning. Do not let children use the appliance unsupervised.
- This appliance should not be used by children. Keep the appliance and its power cord out of reach of children.
- This appliance is not designed for use by people (including children) with reduced physical, sensory or mental capabilities, or by people with no prior knowledge or experience, unless they are supervised by or have had previous instructions relating to the use of the appliance from a person responsible for their safety. Children should be supervised to ensure that they do not play with the appliance.
- Keep your appliance out of reach of children.
natural_image
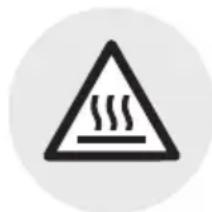
Warning symbol depicting a hot water barrier (no text or numbers present)- When using your appliance, some parts will become very hot (the stainless steel sections of the bowl and cap, the
detachable spindle, the transparent parts of the lid, the metal parts under the bowl and the basket). This may lead to burns. Handle the appliance using its non-conducting plastic parts (the handles and motor unit).
- Accessible surfaces may heat up when the appliance is in operation. Place the appliance on a stable, heat-resistant, clean and dry work surface.
- The appliance is not designed to be switched on using an external timer or a separate remote control system.
- Do not use your appliance if it is not working properly, if it has been damaged or if the power cord or plug is damaged. To avoid any risk of hazards, the power cord must be replaced at an authorised service centre (see list in the service booklet).
- The appliance must not be immersed in water. Do not place the motor unit (A) under running water.
- Your appliance is exclusively intended for interior use in domestic settings, at an altitude of less than 2000 m. The manufacturer shall not accept any liability and reserves the right to void the warranty in the event of commercial or inappropriate use, or if the instructions have not been followed.
-
This appliance has not been designed for use in the following cases, which are not covered by the guarantee:
-
Kitchen work areas in shops, offices and other working environments
- Kitchenettes used by employees in shops, offices and other professional environments
- On farms
- Use by guests in hotels, motels and

other residential environments In bed and breakfast environments

WARNING:
Your appliance releases steam which can cause burns.
Handle the lid and cap
with caution (using gloves or a pot holder if necessary). Handle the cap using the central part.
- Do not operate the appliance if the seal is not correctly positioned in the seal holder and/or if the seal holder is not correctly positioned on the lid. The appliance must be operated with the cap inserted into the lid opening (except when there are specific instructions in a recipe).

WARNING:
Injuries may occur if the appliance is used incorrectly.
Exercise caution with
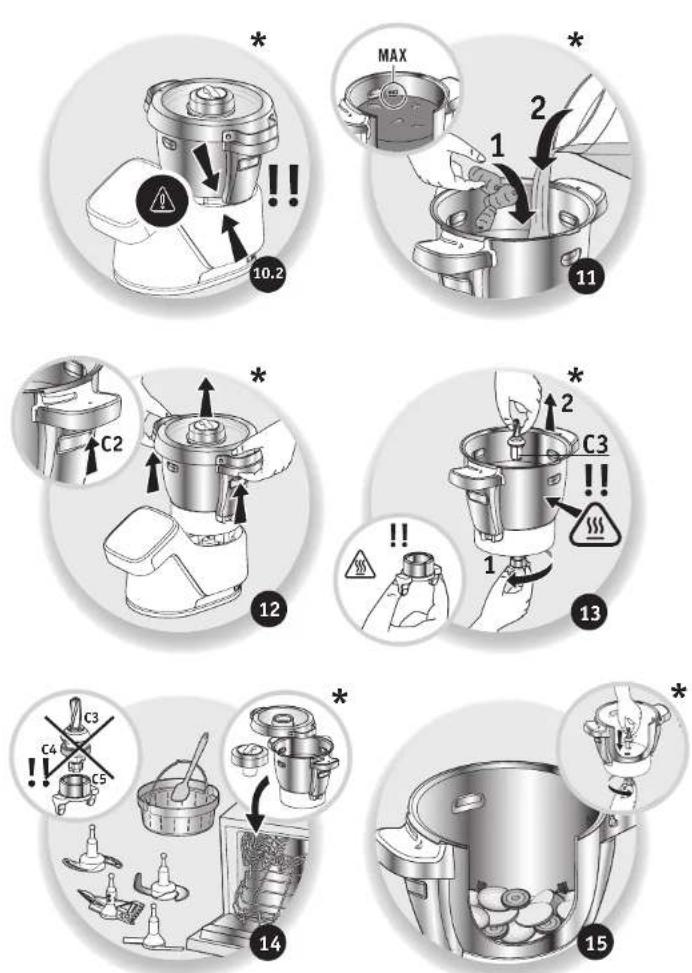
the sharp edges of the Ultrablade knife (E1) and the kneading/grinding blade (E4) when cleaning them and when emptying the bowl - they are extremely sharp.
Store the Ultrablade knife (E1) in the bowl after each use.
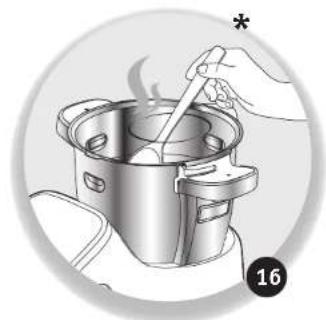
Be careful when pouring hot liquid into the food processor; this may be ejected from the appliance due to sudden boiling.
WARNING: Exercise caution when handling your appliance (cleaning,
filling and pouring). Ensure that no liquid is spilled onto the connectors.
WARNING: Some foods with a skin (whole sausages, tongue, poultry etc.) or large pieces of meat can spit when boiling liquids become trapped. We therefore advise you to prick them before cooking using a knife or fork.
WARNING: The surface of the heating element retains residual heat after use.
When your appliance is heating up and until it has cooled down completely, ensure that you only touch the handles (locks C2, lid handle D2 and cap handle D1).
Refer to the instruction manual to set the speeds and operating times for each accessory and each programme. Refer to the instruction manual for details on assembling and fitting the accessories to the appliance.
Refer to the instruction manual for details on cleaning and maintaining your appliance.
Always follow the cleaning instructions when cleaning your appliance:
- Unplug the appliance
- Do not clean the appliance when it is hot
- Clean with a damp cloth or sponge
- Do not immerse the appliance in water or place under running water.
Precautions when using accessories:
- The Ultrablade knife (E1), whisk (E3) and kneading/grinding blade (E4) accessories should not be used by children. Keep the appliance and its power cord out of reach of children.
- The steam basket (E5) and mixer (E2) accessories may be used by children aged eight years and over and by people with reduced physical, sensory or mental capabilities or by people with no prior knowledge or experience provided that they have received supervision or instructions relating to the safe use of the appliance and that they understand the dangers involved. Children must not play with the appliance. User cleaning and maintenance should not be carried out by children, unless they are over eight years of age and are supervised. Keep the appliance and its cord out of reach of children under eight years of age.
EUROPEAN MARKETS ONLY:
- Keep the appliance and its power cord out of reach of children under eight years of age. Children should not use the appliance as a toy.
- This appliance may be used by persons with reduced physical, sensory or mental capabilities, or who lack sufficient knowledge or experience, provided that they are supervised or have received instructions on how to use the appliance safely, and provided that they fully understand the potential dangers.
• This appliance can be used by children aged eight years or over,
provided that they are supervised or have received instructions on how to use the appliance safely, and provided that they fully understand the dangers related to the appliance. Cleaning and maintenance of the appliance should not be performed by children without supervision, unless they are eight years of age or older and under the supervision of an adult.

Electrical connection
- The appliance must be connected to an earthed electrical socket.
- The appliance is designed to operate on an alternating current only. Check that your mains voltage matches the voltage indicated on the appliance's identification plate.
- Any connection errors will void the guarantee.
- Do not pull on the power cord to unplug the appliance.
- Do not place the appliance, power cord or plug in liquids, near to or in contact with the heat-conducting parts of the appliance, near a heat source or on a sharp edge.
Incorrect use
- Do not touch the lid until the appliance has completely stopped (stop key). Wait until the food being mixed has stopped moving.

- Always add solid ingredients into the bowl first before adding liquid ingredients (see Fig. 11). Do not exceed the MAX marker on the inside of the bowl (see Fig. 11). If the bowl is too full, boiling water may be ejected.
• Note: During the Steam cooking programme, ensure that you add 0.7 litres of water (see Fig. 4.2). - Do not place your fingers or any other objects in the bowl while the appliance is in operation.
- Do not use the bowl as a container (for storage, freezing or sterilisation).
- Place the appliance on a stable, heat-resistant, clean and dry work surface.
- Do not place the appliance near walls or cabinets as the steam produced may cause damage.
- Do not place your appliance near a heat source that is in operation (a hob, electric household appliance etc.).
- Do not cover the lid with a cloth or other object and do not try to plug the lid opening - always use the steam regulator cap.
- Do not allow your hair, a scarf, a tie etc. hang over the bowl while the appliance is in operation.
- Never put the accessories into the microwave.
- Do not use the appliance outdoors.
- Do not exceed the maximum quantity indicated in the instructions.
- Only store the appliance after it has cooled down.
- Do not place the bowl into the
freezer to cool - always use the refrigerator.
- Do not leave the spatula in oil at 150^ for longer than 20 minutes.
- Make sure that nothing interferes with your appliance during weighing or calibration. The space around your appliance on the work surface must be clear, the power cord must not be taut or trapped between the work surface and the bottom of the appliance.
- The four feet of your appliance must be in contact with a horizontal work surface and the appliance must be stable during weighing.
- If you need to move your appliance to use it or to store it, do not slide your appliance across the work surface. Lift it up and place it in the correct location without any impact.
- Observe the maximum permissible weight, do not exceed it. Your Companion is only for weighing food.
AFTER-SALES SERVICE
- For your safety, do not use accessories or spare parts other than those provided by authorised after-sales service centres.
- Any operation other than cleaning or routine maintenance should be performed by an approved service centre.
- Refer to the table "What to do if your appliance does not work" at the end of the instruction manual.

This leaflet contains some tips for making the most of your appliance: preparing soups stews, steamed dishes and doughs/pastry.

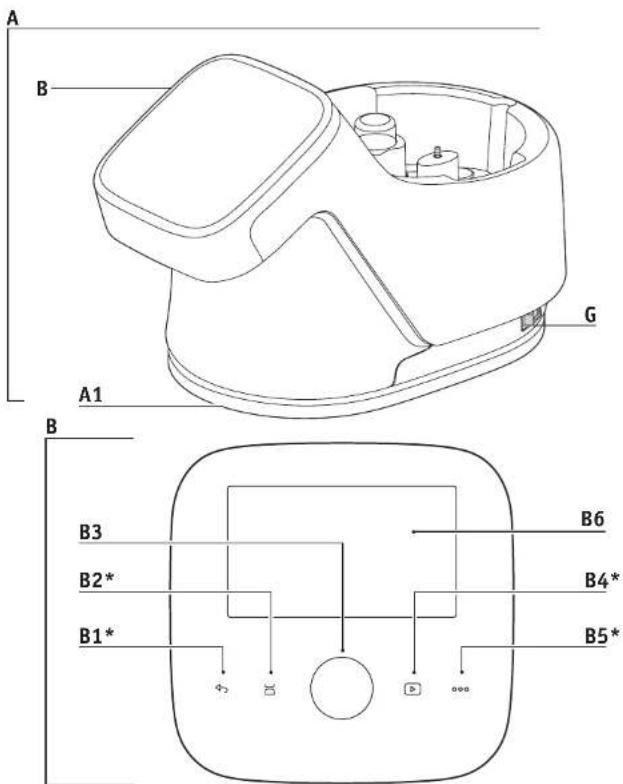
APPLIANCE DESCRIPTION:
| A Motor unit | D Lid assembly |
| A1: Weighing function | D1: Steam regulator cap |
| B Touch keys* | D2: Lid |
| B1: Cancel | D3: Seal holder |
| B2: Scales | D4: Sealing ring |
| B3: START and STOP | E Accessories |
| B4: Video | E0: Storage box for accessories |
| B5: Settings | E1: Ultrablade knife |
| B6: Touch screen | E2: Mixer |
| E3: Whisk | |
| C Bowl assembly | E4: Kneading/grinding blade |
| C1: Stainless steel bowl | E5: Steam basket |
| C2: Locks | |
| C3: Detachable spindle | F Spatula |
| C4: Sealing ring | G 0/T switch for switching off the power supply to your appliance |
| C5: Spindle locking ring | |
| H Cleaning brush |
"Icons are visible only when they are useful for operating your appliance.
TECHNICAL DATA FOR THE APPLIANCE:
| Power: 1550 W (1000 W: heating resistor/550 W: motor) |
| Temperature range: 30°C to 150°CAdjustable in 5°C increments |
| Range of operating time: 5 seconds to 2 hoursAdjustable in increments of 5 seconds min. to 1 minute max. |
| Number of speeds: 13 - 2 intermittent speeds:Speed 1 (5 secs On/20 secs Off)Speed 2 (10 secs On/10 secs Off) |
| - 10 continuous progressive speeds(speeds 3 to 12) |
| - 1 max. intermittent speed (speed 13) |
Frequency: 2412 - 2483,5 MHz
Maximum transmitted power: 20 dBm
| Standby mode: | The appliance goes into standby mode after 15 minutes of inactivityTo turn the appliance back on, press one of the touch keys (B1 to B5)Power consumption when the product is in standby mode: 0.32 Wh |
Built-in scales Weighing from 1 to 4000 g
*Google Play and Android are trademarks of Google Inc.
Apple and the Apple logo are trademarks of Apple Inc., registered in the U.S. and in other countries. App Store is a service mark of Apple Inc.


YOUR APPLIANCE
The following accessories are provided with your appliance:
These accessories also feature gripping areas to make them easier to use during recipe preparation.
| Chopping blade |  | Mixing soups | 12 | 3 min | 3 l | -->100°C |
| Mixing fruit purées | 40 secs | 1 kg | ||||
| Chopping vegetables | 15 secs | 0.6 kg | ||||
| Chopping meat | 30 secs | 1 kg | ||||
| Chopping fish | 15 secs | 1 kg | ||||
 | his accessory to chop hard ingredients; use the E4 kneading/grinding blade. | |||||
| [Z267] | ||||||
| Mixer | [3S24] | I and foods without damaging the ingredients | ||||
 | For browning stages early on during recipe preparation (risottos, soups) | |||||
 | Browning | 3 | 5 min | 500 g | 130°C | |
 | Stews | - | 45 min | 3 l | 95°C | |
 | Risottos | 2 | 22 min | 1.5 kg | 95°C | |
 | ||||||
 | ||||||
 | Ratatouille, chutneys, pulses (for settings see recipe booklet) | |||||
 | ||||||
| Whisk |  | Whisked egg white | 7 | 5/10 min | ### B max. | |
 | Mayonnaise, whipped cream | 7 | 2/5 min | 0.5 l | ||
 | Sauces, creams | 4 to 7 | 1/20 min | 1 l | 60>90°C | |
| [6G7Z] | Mashed potatoes | 6 to 7 | 1 min | 1 l | ||
| [Z24H] | Polenta | 4 to 5 | 1/16 min | 1 l | 90°C | |
| Kneeding/grinding blade |  | Kneading white bread dough | 5 | 2 min | 1.2 kg | |
| [T5XX] | Kneading short crust pastry, biscuit dough, speciality bread | 5 | 2 min | 1 kg | ||
| [8AAY] | Kneading rich dough (brioche, kugelhopf etc.) | + 5 | 30 secs | 0.8 kg | ||
 | 2 min | |||||
 | Mixing light batters (cakes etc.) | + 3 | 40 secs | 1 kg | ||
| [5YHB] | 3 min | |||||
 | Crushing nuts | 12 | 1 min | 0.6 kg | ||
 | Chopping hard ingredients | 12 | 1 min | 0.6 kg | ||
 | Crushing ice | 12 | 1 min | 6 to 10 | ||
 | ||||||
 | ||||||
| ||||||
| ||||||
| ||||||
| Pancake batter, waffle batter | 10 | 1 min | 1.5 l | ||
| Cap |  | Steam regulator capMax. (a) = steam cookingMin. (b) = risotto, cream desserts, sauces etc. | ||||
| [YTW] | ||||||
| ||||||
| ||||||
 | ||||||
 | The "min." position allows the maximum amount of condensation to escape, giving dishes or sauces a better consistency (risotto, cream desserts, sauces etc.) | |||||
 | ||||||
 | ||||||
 | ||||||
 | ||||||
 | The "max." position retains the maximum amount of heat and steam in the bowl for all cooking functions using steam (soups etc.)This position also prevents splashing when mixing | |||||
 | ||||||
 | ||||||
 | ||||||

| Steam basket | The cooking times for the steam basket are provided as a guide - in most cases they are a reliable indicator of cooking times. However, certain factors will impact cooking times; the size of vegetables (cut or uncut)/quantity of ingredients in the basket/variety and ripeness of vegetables/amount of water in the bowl, which must correspond to the markings (0.7 l). Ensure that the steam regulator cap is turned in the "max." direction (a). If the food is not sufficiently cooked, you can add extra cooking time. | ||||
| E5 | Steaming vegetables, fish or meat | 20/40 min | 1 kg | ||
| Chunky soups | 12 | 3 min | 3 l | ||
| P1 - Courgettes 20 min 800 g | |||||
| P1 - Parsnips 25 min 800 g | |||||
| P1 - Stem of a leek 25 min 800 g | |||||
| P1 - Broccoli 20 min 500 g | |||||
| P1 - Fish 15 min | 600 g (incl. baking paper) | ||||
| P2 - Potatoes 30 min 1 kg | |||||
| P2 - Carrots 30 min 1 kg | |||||
| P2 - Green beans 30 min 800 g | |||||
| P2 - White meat | 20 min | 600 g (incl. baking paper) | |||
| Detachable spindle | C3 | You can brown food in the bowl without the lid on, allowing you to stir the food and monitor the cooking process | |||
| The COOKING WITHOUT LID function is not suitable for jams or milk-based mixtures (risk of spillage) | |||||
| OPERATION UP TO 130°C | OPERATION FROM 135°C TO 150°C | ||||
| Cooking with or without the lid | Open lid only | Open lid only | |||
| Accessories | All accessories for use with the spindle | Only detachable spindle | |||
| Speed | Yes | No | |||
| Maximum time | - If the temperature is lower than or equal to 100°C: 2 hr- If the temperature is between 100°C and 130°C: 1hr | - If the temperature is higher than or equal to 135°C: 20 min | |||
| !! Do not remove detachable spindle immediately after using it. Pour water into the empty bowl to cool it down | |||||

 |  |  |  | |||
| [307A] | [75C] | [22H6] | [54W] | |||
| Steam basket | The cooking times for the steam basket are provided as a guide - in most cases they are a reliable indicator of cooking times. However, certain factors will impact cooking times; the size of vegetables (cut or uncut)/quantity of ingredients in the basket/variety and ripeness of vegetables/amount of water in the bowl, which must correspond to the markings (0.7 l). Ensure that the steam regulator cap is turned in the "max." direction (a). If the food is not sufficiently cooked, you can add extra cooking time. | |||||
| E5 | Steaming vegetables, fish or meat | 20/40 min | 1 kg | 100°C | ||
| Chunky soups | 12 | 3 min | 3 l | 100°C | ||
| P1 - Courgettes 20 min 800 g | ||||||
| P1 - Parsnips 25 min 800 g | [100K3] |  | [Y250] | [82YK] | ||
| P1 - Stem of a leek 25 min 800 g | ||||||
| P1 - Broccoli 20 min 500 g | ||||||
| P1 - Fish 15 min | 600 g (incl. baking paper) | |||||
| P2 - Potatoes 30 min 1 kg | ||||||
| P2 - Carrots 30 min 1 kg | ||||||
| P2 - Green beans 30 min 800 g | ||||||
| P2 - White meat | 20 min | 600 g (incl. baking paper) | ||||
| Detachable spindle | C3 | You can brown food in the bowl without the lid on, allowing you to stir the food and monitor the cooking process | ||||
| The COOKING WITHOUT LID function is not suitable for jams or milk-based mixtures (risk of spillage) | ||||||
| OPERATION UP TO 130°C | OPERATION FROM 135°C TO 150°C | |||||
| Cooking with or without the lid | Open lid only | Open lid only | ||||
| Accessories | All accessories for use with the spindle | Only detachable spindle | ||||
| Speed | Yes | No | ||||
| Maximum time | - If the temperature is lower than or equal to 100°C: 2 hr- If the temperature is between 100°C and 130°C: 1hr | - If the temperature is higher than or equal to 135°C: 20 min | ||||
| !! Do not remove detachable spindle immediately after using it. Pour water into the empty bowl to cool it down | ||||||
| The cooking times for the steam basket are provided as a guide - in most cases they are a reliable indicator of cooking times. However, certain factors will impact cooking times; the size of vegetables (cut or uncut)/quantity of ingredients in the basket/variety and ripeness of vegetables/amount of water in the bowl, which must correspond to the markings (0.7 l). Ensure that the steam regulator cap is turned in the "max." direction (a). If the food is not sufficiently cooked, you can add extra cooking time. | |||||
| E5 | Steaming vegetables, fish or meat | 20/40 min | 1 kg | 100°C | |
| Chunky soups | 12 | 3 min | 3 l | 100°C | |
| P1 - Courgettes 20 min 800 g | |||||
| P1 - Parsnips 25 min 800 g | |||||
| P1 - Stem of a leek 25 min 800 g | |||||
| P1 - Broccoli 20 min 500 g | |||||
| P1 - Fish 15 min | 600 g (incl. baking paper) | ||||
| P2 - Potatoes 30 min 1 kg | |||||
| P2 - Carrots 30 min 1 kg | |||||
| P2 - Green beans 30 min 800 g | |||||
| P2 - White meat | 20 min | 600 g (incl. baking paper) | |||
| C3 | You can brown food in the bowl without the lid on, allowing you to stir the food and monitor the cooking process | ||||
| The COOKING WITHOUT LID function is not suitable for jams or milk-based mixtures (risk of spillage) | |||||
| OPERATION UP TO 130°C | OPERATION FROM 135°C TO 150°C | ||||
| Cooking with or without the lid | Open lid only | Open lid only | |||
| Accessories | All accessories for use with the spindle | Only detachable spindle | |||
| Speed | Yes | No | |||
| Maximum time | - If the temperature is lower than or equal to 100°C: 2 hr- If the temperature is between 100°C and 130°C: 1hr | - If the temperature is higher than or equal to 135°C: 20 min | |||
| !! Do not remove detachable spindle immediately after using it. Pour water into the empty bowl to cool it down | |||||

INSTALLING THE BOWL AND ACCESSORIES AND LID ASSEMBLY
- Before first use, clean all parts (C, D, E, F, H) in warm water using washing-up liquid; however, do not clean not the motor unit (A). Your bowl (C) is fitted with a spindle (C3) that is removable to facilitate cleaning.
- Ensure that all packaging is removed before use - in particular the protection between the bowl (C) and the motor unit (A).
- Insert the sealing ring (D3) into the seat holder (D4) (see Fig. 1), clip the assembled pieces onto the lid (D2) (see Fig. 2).
- Position the sealing ring (C4) on the detachable spindle (C3). Lock the assembled pieces onto the bowl base using the locking ring (C5) (see Fig. 3). If you are using the cooking without a lid mode, position the sealing ring (C4) on the spindle (C3). Lock the assembled pieces onto the bowl base using the locking ring (C5) (see Fig. 3).
- Position the selected accessory in the bowl:
- Place the accessories (E1, E2, E3 or E4) on the spindle at the bottom of the bowl (see Fig. 4.1)
- For steaming, place the steam basket (E5) inside the bowl, (see Fig. 4.3), having carefully filled the bowl beforehand with 0.7 l of cooking liquid (water, sauce etc.) (see Fig. 4.2)
- Place the ingredients inside the bowl or steam basket.
- Place the lid on the bowl (C), aligning the two triangles (see Fig. 5); lock the lid, without forcing it, by turning it in the direction of the arrow (see Fig. 6).
- Place the steam regulator cap (D1) onto the lid; there are three possible positions (see Fig. 7).
- Position the bowl (C) on the motor unit (A) until you hear a "click" (see Fig. 8). The appliance will only start if the bowl and the lid are correctly positioned and locked on the motor unit.
If one or both of the components have been incorrectly positioned or locked (see Fig. 10.1 and 10.2), a safety warning will appear on the screen.
YOUR APPLIANCE IS EQUIPPED WITH A LID LOCKING SAFETY FEATURE
The lid is locked each time the appliance is in operation. This prevents the lid from being opened while a recipe is being prepared. Do not attempt to force the lid open when it is locked. This safety feature is deactivated each time the appliance stops. If you have selected a temperature of 50°C or higher and a speed of 5 or higher, a 10-second countdown will appear on the control panel display. It is only possible to open the lid once the countdown has ended.
COMPANION:
YOUR ASSISTANT FOR EVERYDAY COOKING
The following control buttons will light up when they are available for use:

The centre button has 11 functions. These functions vary depending on the steps to be followed (start, pause, next step, confirm, stop etc.)

If a video is available for the recipe being prepared, you can play it by tapping this button

Cancel/Go back
000
Settings (changes to settings, WiFi connection, recipe ingredients etc.)

Use of the integrated scales*
1. FIRST-TIME USE
Companion is a smart food processor that helps you make every meal a success. It offers hundreds of free recipes, available in just a few taps.
With its intuitive, interactive touch screen, it lets you prepare a range of dishes in record time.
Companion takes care of preparing, mixing and cooking your ingredients. It guides you step-by-step through all stages of the recipes.
Follow the steps - it couldn't be quicker or easier!
Turn on your Companion using the 0/I switch (see Fig. 9) and follow the instructions that appear on the screen. Throughout each of the steps, the icon offers help with how to carry out each step.
An FAQ page is also available at www.moulinex.fr
Video tutorials are also available to help you get to grips with your appliance: http://bit.ly/priseenmaincompanion
• Country-specific settings
The first time you use the appliance, you will access country-specific settings.
1 Select your country 2 Select your language
Once these two steps have been completed, a welcome screen will be displayed.


- Internet connection
You can now connect your Companion to your home Internet. You can complete this step now by selecting "Now" or later on by selecting "Later".
You can perform this step later by accessing the settings for your Companion from the home screen. An Internet connection is required to use the following features:
Access to all Companion recipes, "My recipe book", "In my fridge", photos and videos as part of the step-by-step guide for your recipes and product updates.
To connect your Companion to the Internet, you must perform the following steps:
- Select your network (Can't access your network? Go to "Settings" then "WiFi settings" then "Turn on WiFi")
- Enter the password for your WiFi connection
- A "Connection in progress" screen will open while the connection is loading. This step may take a few minutes
- If you are unable to connect your Companion to the WiFi, check that it is not close to a sheet of metal, a stainless steel splashback and that it is within a reasonable distance of your router.
- A "Congratulations!" screen will confirm that the connection has been established successfully √
- Finally, you will need to select your time zone
What the WiFi connection indicators mean:
The product is not connected to WiFi
The product is connecting to WiFi
The product is connected to WiFi
How-to videos for connecting your Companion to your WiFi are available here: http://bit.ly/priseenmaincompanion
- Linking the app
The Companion app lets you keep an eye on your Companion without needing to stay close to it. You can link the appliance to your smartphone or tablet. This also lets you access your recipes, wherever you are.
Please check that your smartphone/tablet's WiFi function is connected to the Internet (WiFi/4G/3G etc.). The Companion must be plugged into a power socket.
You can perform this step later by accessing the settings for your Companion from the home screen. Linking to your smartphone/tablet is required for use of the following features:
"My recipe book", remote recipe progress tracking using a smartphone, sending recipes from your smartphone/tablet to your Companion.
For more information about cookies, visit the Moulinex FAQ page: https://www.moulinex.fr/faq/product/csp/8010000781.
- Compatible devices:
A list of smartphone and tablet models that are compatible with Companion can be found at www.moulinex.com.
- Downloading the app:
Download the Companion app. Downloadable for free from the App Store (iPhone/iPad) and Google Play (Android).

Télécharger dans
I'App Store

APPLI ANDROID SUR
Google Play


- Linking your account:
From the Companion app on your smartphone/tablet, select the Companion product and create an account, or sign in to your account if you already have one.
Your appliance will generate a code (it will appear on the screen B6) that you will need to enter in your Companion app.
If you want to link multiple smartphones/tablets with your Companion, each app must be connected to the same Companion user account.
My first recipe
When using the appliance for the first time, your Companion will offer you the chance to make a first recipe for you to get to grips with the appliance. Selecting "My first recipe" will provide you with step-by-step instructions to guide you through the recipe.
This recipe will disappear from your home screen once it has been used or after you have used your Companion 10 times.
2. PRODUCT FEATURES
Your Companion appliance has the option of being operated in "online" mode, but can also be operated when in "offline" mode. It's also packed with features to help inspire you every day and make every meal a success! 310 recipes are available in "offline" mode, while in "online" mode you have access to hundreds more recipes!


- Recipe search
From the home screen, you can search for recipes using the "Search" button. You can search by the name of the recipe or by ingredients. Filters are also available for refining your search.
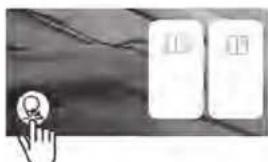
natural_image
Illustration of a hand cursor clicking a button next to two white rectangular buttons (no text or symbols visible)- Recipe library
From the home screen, you can access the "Recipe library" function. This function lets you access all recipes available in the Companion community.
In "offline" mode, a selection of pre-loaded recipe cards can be found on the home screen for each function on your Companion. You can start the step-by-step guidance directly from one of these recipe cards.
You can also search for a recipe within the community by tapping the "Search" icon To do this, simply type a dish or ingredient into the search bar and tap OK.
You can refine your search by adding filters (type of dish, preparation time and recipe origin).
- Recipe books (only available with WiFi connection)

You can access the "My recipe book" function from the home screen. This feature lets you find all recipes you have previously saved as favourites via the Companion app on your smartphone/tablet.
To use this feature, you will need to download the Companion app and create an account. You can create and edit your recipe books on your smartphone/tablet and access them on your Companion when it is connected to WiFi. Once your Companion is connected via WiFi, your recipe books will automatically sync between your appliance and smartphone/tablet each time you make a recipe.
• In my fridge (only available with WiFi connection)

You can access the "In my fridge" function from the home screen. This function lets you search for a recipe using ingredients of your choice.
To find a recipe idea, tap on the "In my fridge" function and then add your ingredients. For each of them you can indicate the quantities using the built-in scales. (Press on the weighing function and put your ingredients in the Companion bowl. Then confirm your weighing). Then tap "Search" and a list of recipes will be displayed that match the settings you entered.
PROGRAMMES


Your appliance has 14 pre-stored automatic programmes:

 programme programme |  programmes programmes | Soup programmes | Steam programmes | Dough programme | Dessert programme | Additional programmes |
 | Smooth soup | Gentle steam | Bread | Dessert Reheat | ||
| [02W4] | Course texture soup | High steam | Brioche | Rinse | ||
| Stew | ||||||
 | ||||||
| Risotto | Cake |
- Select the programme of your choice.
- The pre-programmed settings can be modified (depending on the chosen recipe, ingredients and quantities prepared). Set the cooking temperature, time and speed using the - and + buttons.
- When you have finished changing your settings, press the start button (B3) to start the programme.
- When the programme is complete, the appliance will beep.
- At the end of the Smooth soup, Coarse texture soup, Stew, Risotto, Sauce, Dessert, Gentle steam and High steam programmes, the appliance automatically switches to Keep warm mode for 45 minutes, during which time the food is ready to serve. During the Stew, Sauce and Dessert programmes, and in manual mode, the appliance motor operates at a particular speed for the purpose of preserving the consistency of the food mixture and preventing it from sticking to the bottom of the bowl. To end the Keep warm function, simply press the "Finished" button (B3). When the Bread and Brioche programmes have finished kneading, the appliance switches to
"Dough rising" mode at 30°C for 40 minutes, to give the dough more volume. If the lid is opened or the bowl is removed from its base when a programme is running, the programme will end. To stop this function, press the "Settings" button and select "Reset".
- When an automatic programme has started, you have the option of stopping the appliance at any time by pressing the "Stop" button. The automatic programme is then paused; you can restart it by pressing "Start". If you have entered the wrong programme and wish to cancel, press the "Cancel/Go back" button.
- The "Reheat" programme lets you reheat cooked food in 20 min (adjustable from 5 to 60 min).
- The "Rinse" programme helps you clean the bowl more easily. Fill the bowl with 0.7 l of water and one drop of washing-up liquid and start the programme.

FIND OUT MORE ABOUT THE AUTOMATIC PROGRAMMES AVAILABLE
| Automatic programmes | Sauce | Smooth soup | Course texture soup | Browned dish | Stew Risotto | |
| "Default" speed (adjustable) | S6 From S2 to S8 | 10 pulses and S12 for 2 min | S7 to S10 for 30 secs | S3 S1 S2 | ||
| "Default" temperature (adjustable) | 70°C (50°C to 100°C) | 100°C (90°C to 100°C) | 100°C (90°C to 100°C) | 130°C Not adjustable | 95°C (80°C to 100°C) | 95°C (80°C to 100°C) |
| "Default" time (adjustable) | 8 min (5 min to 40 min) | 40 min (20 min to 60 min) | 45 min (20 min to 60 min) | 5 min (2 min to 15 min) | 45 min (10 min to 2 hr) | 20 min (10 min to 2 hr) |
| "Default" Keep warm function at the end of the programme | 45 min 45 | min 45 min | 45 min | 45 min | ||
| Example recipes | Hollandaise sauce | Pumpkin soup | Coarse vegetable soup | Steamed vegetables | Beef bourguignon | Risotto |
| Compatible accessories |
Some recipes can cause unexpected overflow due to the formation of bubbles, especially when using frozen vegetables. In this case, you will need to reduce amounts accordingly.
| Automatic programmes | Gentle steam | High steam | Bread Brioche Cake | Dessert Reheat Rinse | |||
| "Default" speed (adjustable) | S5 for 2 min 30 secs | S5 for 1 min 30 secs, then S6 for 2 min | S3 for 40 secs, then S9 for 3 min | S4 (from S2 to S8) | S2 (from S2 to S6) | ||
| "Default" temperature (adjustable) | 100°C (not adjustable) | 100°C (not adjustable) | 90°C (50°C to 110°C) | 90°C (70°C to 100°C) | |||
| "Default" time (adjustable) | 30 min (1 min to 60 min) | 35 min (1 min to 60 min) | 2 min 30 secs (30 secs to 2 min 30 secs) | 3 min 30 secs (30 secs to 3 min 30 secs) | 30 min 40 secs (1 min 40 secs to 3 min 40 secs) | 15 min (5 min to 60 min) | 20 min (5 min to 60 min) |
| "Default" Keep warm function at the end of the programme | 45 min | 45 min | 45 min | ||||
| "Default" 30°C dough rising function at the end of the programme | 40 min | 40 min | |||||
| Example recipes | Steamed foie gras | Steamed carrot purée | Bread Brioche Fruit cake | Custard cream | Recipe containing liquid | 0.7 l of water + 1 drop of washing-up liquid | |
| Compatible accessories | |||||||


- Manual mode

You can customise the speed, temperature and cooking time settings of your Companion for your own recipes.
You can access the "Manual mode" function from the home screen.

Select motor speed.
Two intermittent speeds, 10 progressive continuous speeds and one max. intermittent speed (513).

Select cooking temperature.
From 30°C to 150°C.

Select operating time.
From 5 seconds to 2 hours.

Increased speed, cooking temperature and time.
Reduced speed, cooking temperature and time.
Instructions for use:
Your appliance is equipped with a microprocessor that controls and monitors its stability. In the event of instability, the motor rotation speed will be reduced automatically. If this instability continues, the motor will stop and a safety message will be displayed on your screen.
- Check that there are not too many ingredients and that the selected speed is appropriate
- Check that you are using the recommended accessory
- Then restart your appliance as normal
- Settings

You can access the "Settings" function from the home screen.
This function allows you to update the data stored during the first use of your Companion.
You can also connect your appliance to the WiFi or link it to the app if you did not do so when you first used your appliance.

- Scales

Correct use reminder: When using the scales, do not touch your Companion and make sure that there are no objects pressing against or under your appliance. Make sure that your appliance is stable on the work surface. Finally, check that the power cord is not jammed under the appliance or too taut, as this may cause your weighing to be incorrect.
During calibration or weighing, make sure that nothing is causing your Companion to vibrate (an induction hob, for example).
Using the scales function:
When the scale button lights up (B2) on your Companion, you can weigh your ingredients during the recipe preparation process. To weigh your ingredients, your bowl (C1) must be installed on the motor unit (A).
There are three possible uses for the scales:
Weighing throughout a recipe: You can weigh your ingredients while making your recipe, at the start of each new step:
1 - Press the scales logo (see Fig. 18a)
2 - Wait a few seconds for the automatic calibration to take place
3 - Weigh the ingredient shown on your screen by placing it in the bowl and pressing "OK"
4 - If the step requires using more than one ingredient, your screen will tell you the name of the next ingredient to weigh
5 - Once all of the ingredients in the step have been weighed, press "OK" and then continue on with your recipe by following the indications on the centre button (see Fig. B3)
"In my fridge" weighing: This function allows you to search for a recipe according to a quantity of an ingredient of your choice.
1 - Choose one or more ingredients from your fridge and select them in your Companion app using the search bar
2 - Press the scales logo (see Fig. 18a)
3 - Place your ingredients in the bowl on the motor unit
4 - A list of recipes will be proposed according to the quantities weighed
Manual weighing: You can weigh all of your ingredients before making your recipe in manual mode or using automatic programmes.
1 - Place the bowl (C1) on the motor unit (A)
2 - Press the scales logo (see Fig. 18a)
3 - Wait a few seconds for the automatic calibration to take place
4 - Weigh the first ingredient (see Fig. 18b)
5 - If you want to add ingredients, calibrate by pressing the "CALIBRATION" button and add the next ingredient. Pressing calibration improves the weighing accuracy. Without intermediate calibration, the maximum permissible weight in a single weighing is 4 kg. Above this weight, an overload message will be displayed
6 - Repeat this procedure as often as necessary without exceeding a total weight of 8.0 kg
Caution: When using, do not exceed the maximum quantities stated in the table on page 6 of this leaflet.
!! In manual mode, your Companion goes into standby mode after 15 minutes of inactivity. You can press your screen (B6) or one of the touch keys (B1, B2, B3, B4 or B5) to come out of standby mode.


CALIBRATION function
The CALIBRATION key is used to reset the scales display to 0.
UNIT function
The UNIT key allows you to change the weight unit (g, cl, ml, oz).
- Updates
To ensure that the product features function optimally, your product will offer you the option of performing updates. To do this, a window will appear on the screen and will prompt you to accept/not accept the installation of the latest available update. Tap accept and your Companion will perform the update.
Updates will also allow you to access all of Companion's digital services.
OFFLINE MODE
You can use your Companion when in offline mode. The below functions are available in offline mode:
- Recipe library
Detailed information on the Recipe library can be found on page 58.
The Recipe library gives you access to 310 recipes.
- Programmes
Detailed information on the use of automatic programmes can be found on page 59.
- Manual mode
Detailed information on the use of Manual mode can be found on page 62.
CLEANING THE APPLIANCE
- Clean the bowl immediately after use. The appliance must not be immersed in water. Do not place the motor unit (A) under running water.
After use, unplug the appliance. Clean the bowl after use:
- Press on the locks (C2) and lift the assembled bowl (C).
- Place the bowl on a flat surface.
- Unlock the lid by turning it a quarter of a turn in a clockwise direction. Remove the lid carefully.
- Exercise caution with the sharp edges of the Ultrablade knife (E1) and the kneading/ grinding blade (E4) when cleaning them and when emptying the bowl - they are extremely sharp.
- When the parts have cooled down:
- Remove the spindle (C3), the seal (C4) and the locking ring (C5) (see Fig. 13)
- Clean the bowl (C), spindle (C3), seal (C4) and locking ring (C5), accessories (E1), (E2), (E3), (E4), (E5), steam regulator cap (D1), lid (D2), sealing ring (D4) and seal holder (D3), using a sponge and warm, soapy water
- Rinse each of the parts under running water.
- For food stuck on to the bowl, soak for several hours with water and some washing-up liquid and scrape off any residue where required using the spatula (F) or with the rough side of a sponge.
- In the event of limescale in the bowl, use the rough side of a sponge, soaked in white vinegar if necessary.
- To maintain the appearance and lifespan of the glass screen, clean it using a sponge - do not use the abrasive side in order to avoid scratches.

- Use a damp cloth to clean the motor unit (A). Dry off thoroughly.
- For easier cleaning, please note that the bowl, assembled lid and accessories are dishwasher-safe, with the exception of the spindle (C3 and C4) and the locking ring (C5) (see Fig. 14).
- The accessories, detachable spindle and lid components may become slightly discoloured when certain ingredients are used (curry, carrot juice etc.). This does not pose a risk to your health and will not affect the operation of your appliance. To avoid this, clean these parts immediately after use.
IMPORTANT: APPLIANCE ENTERING SECURITY MODE

Your appliance is equipped, as standard, with electronic motor protection devices to ensure a long lifespan. This electronic system safeguards the motor against mal use, meaning it is completely pro-
Under certain, very extreme, operating conditions that do not comply with the recommendations contained in the manual (see "YOUR APPLIANCE" table: quantities potentially too big and/or unusually long operating time and/or not enough time allowed between recipes), the electronic protection system will be triggered to protect the motor. In this case, the appliance will stop and a "Security message" will appear on the screen to indicate that the appliance has temporarily stopped working.
- Before reusing your assembled bowl (C), always ensure that the electrical contacts under the bowl are clean and dry.
- To maintain the appearance and lifespan of the appliance lid, wash it by hand. Do not use the abrasive side of sponges, as this could lead to scratches.
- To avoid damaging the bowl (C), ensure that you follow the operating instructions for your dishwasher; do not increase the amount of salt or dishwasher product.
If a "Security message" appears on your screen and your appliance stops operating, proceed as follows:
- Leave your appliance plugged in and the O/I switch in position 1 "ON" (G).
- Refer to the on-screen recommendations to modify your programme settings (see "YOUR APPLIANCE" table for ingredient quantities/cooking time/temperature/accessory type).
Our Customer service department is available in case of any questions (see contact information in the warranty booklet).


WHAT TO DO IF YOUR APPLIANCE DOES NOT WORK
| PROBLEMS CAUSES SOLUTIONS | ||
| Food is insufficiently cooked | The cooking times provided are intended as a guide - in most cases they are a reliable indicator of cooking times.However, certain factors will impact cooking times:- The size of the ingredients (cut or not cut)- The quantity of ingredients- The variety and ripeness of vegetables- Whether the ingredients are frozen etc. | Add cooking time by pressing the + key on the display (B6).Use smaller-sized pieces. |
| Steam regulator cap not correctly positioned or not in place. | Position the steam regulator cap in the 'max.' position, this position retains the maximum amount of heat in the bowl for all cooking functions (soups, steaming etc.).This position also prevents splashing when mixing.The "Low steam setting" position allows the maximum amount of condensation to escape, giving dishes or sauces a better consistency (risotto, cream desserts, sauces etc.). | |
| Steamed food is insufficiently cooked | Incorrect amount of water in the bowl.Pieces of ingredients too big. | The quantity of water in the bowl must correspond to the markings (0.7 l).You can also use manual mode by selecting a temperature of 120°C and a cooking time depending on the quantity and type of ingredients.Use smaller-sized pieces. |
| Difficulties when making certain recipes | Unsuitable recipes. | Your recipes, whether personal or found on the Internet, may not be suitable for your appliance and its accessories (quantities, cooking times, unsuitable accessories). Before starting your recipe, ensure that you are following the operating instructions in this instruction manual. |
| The appliance does not operate | It is not plugged in. Plug the appliance into a power socket. | |
| My B6 screen is still blank/Your appliance is in "Standby" mode. | Press one of the touch keys (B1 to B5). | |
| The switch (G) is in position 0. Move the switch to position 1. | ||
| The bowl or lid is not positioned or locked correctly. | Check that the bowl or lid is correctly positioned and locked in accordance with the diagrams in the manual. | |
| The lid does not lock | The lid is not correctly assembled. | Check that the seal is correctly assembled on the seal holder and that the seal holder is correctly assembled on the lid. |
| PROBLEMS CAUSES | SOLUTIONS | |
| Excessive vibration | The appliance is not placed on a flat surface; the appliance is not stable. | Place the appliance on a flat surface. |
| Volume of ingredients is too much. | Reduce the quantity of ingredients. | |
| Wrong accessory. | Check that you are using the recommended accessory. | |
| Faint noise during operation | The spindle for your appliance may emit a sound when operating at reduced speed or with certain ingredients (rice etc.). | This happens only temporarily and does not affect the service life of your appliance. The sound will diminish or disappear with use of the appliance and after the detachable spindle has been cleaned a few times (see "Cleaning the appliance"). |
| Loud noise during operation | Using the wrong accessory. | Ensure that you are using the appropriate accessory (e.g. do not use the whisk E3 to knead or mix dough; use the blade E4). For more information, refer to the recommendations in the recipe and to the operating instructions in this instruction manual. |
| Leakage via the lid | Volume of ingredients is too much. | Reduce the quantity of ingredients. |
| The lid is not correctly positioned or locked. | Lock the lid securely onto the bowl. | |
| The sealing ring is not in place. | Position the sealing ring on the seal holder and clip the assembled pieces onto the lid. | |
| The sealing ring is broken or damaged. | Change the seal - contact an authorised service centre. | |
| Wrong accessory. | Check that you are using the recommended accessory. | |
| Leakage via the bowl | The seal is not in the right position. | Position the seal correctly. |
| The seal is damaged. | Contact an approved service centre. | |
| The locking ring (C5) is not correctly locked. | Lock the ring properly (C5). | |
| The blades have difficulty rotating | The pieces of food are too big or too hard. | Reduce the size or quantity of ingredients. Add liquid. |
| Smell coming from the motor | This may occur the first time you use the appliance or if there is overloading due to the quantity of ingredients being too much or pieces of food being too hard or too big. | Allow the motor to cool down (around 30 minutes) and reduce the quantity of ingredients in the bowl. |
| Security message displayed | Bowl or lid is not locked in place properly. | Before switching on the appliance, check that the bowl is correctly locked on the motor unit and that the lid is correctly locked on the bowl. If the problem persists, contact an authorised service centre. |
| The lid is locked on the bowl during the "Cooking without lid" function. | Unlock the lid before you begin the cooking programme. If the problem persists, contact an authorised service centre. |

| PROBLEMS CAUSES SOLUTIONS | ||
| The lid locking safety feature is still activated (air extended), meaning that the lid cannot be locked in position | The appliance got switched off during operation by knocking the I/O switch or it was simply unplugged during operation. | Simply switch the I/O switch to I to reset the appliance and the lid locking safety feature; the bar will automatically return to its original position and you can now lock the lid. |
| SECU error message The rotor will not rotate. | Empty the bowl, let it cool down and try again. If the problem persists, contact the after-sales service. | |
| ERR39 error message Bowl overheated. | Discontinue operation for a short period. Allow the bowl to cool down. If the problem persists, contact your after-sales service. | |
| SECU error message Motor overheated. | Allow the appliance to cool for 30 min and reduce the quantity in the bowl. | |
| SECU error message Appliance is unstable. | The appliance has stopped because it has detected an instability. Try decreasing the quantity of food in the bowl. | |
| ERR21, ERR22 | Your Companion has become overheated. | Please unplug your appliance and contact your after-sales service. |
| ERR31 The lid cannot be locked. | Turn your product off and on again. | |
| ERR35 | Your Companion is struggling to operate. | Discontinue operation for a short period. Unplug your appliance and plug it back in. If the problem persists, contact your after-sales centre. |
| ERR37, ERRO3, ERRO1 | Your appliance is struggling to operate. | Please contact the after-sales service. |
| ERR23 | Your Companion has overheated. | Please contact the after-sales service. |
| ERR02, ERR30 | Connection problem. | Your Companion is not able to communicate over WiFi. Please make sure that your home WiFi network is working properly and that your Companion is in a suitable location to communicate with your WiFi (away from metal objects/barriers, as close to the WiFi source as possible). Do not use the microwave whilst trying to connect. Turn your product off, then wait 10 seconds before turning it back on. |
| Displaying | The product is not connected to WiFi. | If your product has not connected to your WiFi, this is normal. See the "Internet connection" chapter to connect your product. If you have connected your product to the WiFi, turn your product off, then wait 10 seconds before turning it back on. Try to improve the signal by following the recommendations below. If you are unable to connect your Companion to the WiFi, check that it is not close to a sheet of metal, a stainless steel splashback and that it is within a reasonable distance of your router. |
| Displaying | The product is connecting to WiFi. | Wait for the following logo to be displayed |
| UI-1, UI-3 | Your product is having trouble loading certain data over WiFi. | If this is a recurring problem, your WiFi signal may be too weak. Try moving your product closer to your router or install a WiFi extender closer to your product to improve the quality of the WiFi signal. |
| PROBLEMS CAUSES | SOLUTIONS | |
| UI 2, UI-4, UI 5, UI-6 | Your appliance is having trouble retrieving certain local or WiFi data. | Turn your product off, then wait 10 seconds before turning it back on.If your device is not connected, connect it to the WiFi.If your product is connected, try to improve the WiFi signal quality (see above).There are many recipes on our database, move on to a similar recipe |
| An ERR34 error message is displayed on the screen | The heating resistor does not work. | Check that the power supply pins under the bowl are not dirty. If so, clean them and try again.If this still does not work, contact an authorised service centre. |
| Your Companion is not weighing correctly | - An object is touching the motor unit (B)- The power cord is under the Companion or taut- The Companion is not pressing against the four sensors- Other causes | - Make sure that nothing or nobody is pressed against the Companion- Remove the power cord from under your appliance and make sure that it is not taut- Make sure that the Companion is placed on a clean, flat work surface- If the problem persists, please contact the after-sales service |
| ERR45 | There is a problem with the scales function. | Be careful when weighing, your product must be stable for the scales to be accurate.Make sure that nothing is causing it to vibrate. |
| The scales display remains at 0 g when I put food in my bowl | There is a problem with the scales function. | Please contact the after-sales service. |
Is your appliance still not working?
Contact an approved service centre (see the list in the service booklet).
RECYCLING
- Disposing of the packaging and the appliance

The packaging is made up of environmentally safe materials and can, therefore, be disposed of in accordance with the recycling measures in force in your area.
To dispose of the appliance, check with the appropriate service in your area.
- Electronic or electrical products at the end of their service life:

Let's help protect the environment!
① Your appliance contains many recoverable or recyclable materials.
Leave it at a collection point for processing.
"The Bluetooth" trademarks and logos are registered trademarks of Bluetooth SLG, Inc. and their use by the SEB Group has been authorised. Google Play and Android are trademarks of Google Inc.
Apple and the Apple logo are trademarks of Apple Inc., registered in the U.S. and in other countries. App Store is a service mark of Apple Inc.
GLOSSARY
Pair: The act of grouping or linking two appliances together.
This happens the first time that you connect your smartphone or tablet with the Companion.
Synchronise: The act of updating information. The app synchronises with the Companion in order to exchange information when they are connected.
Connect: Establishing a link between the app (smartphone/tablet) and the appliance (Companion). This is required for synchronisation to take place.
Cookies: This is the usage information sent to Moulinex to improve the app.
DE
The image is too blurry to recognize any text content.

Kompatible Geräte:
natural_image
Illustration of a hand pressing a button next to two white rectangular buttons with icons (no text or symbols)
- Rezeptbibliothek
natural_image
Warning symbol depicting steam rising from a chimney (no text or numbers present)SOLO PER I MERCATI EUROPEI
natural_image
Illustration of a hand interacting with a touchscreen icon and two rectangular buttons (no text or symbols)natural_image
Warning symbol depicting steam rising inside a triangle (no text or numbers)Potencia: 1550 W (1000 W: resistor/550 W: motor)
Rango de temperatura: De 30 a 150 °C
Ajustable en incrementos de 5 °C
natural_image
Illustration of a hand pressing a button next to two white rectangular buttons with icons (no text or symbols)The image is too blurry to recognize any text content.
ES
PROBLEMAS CAUSAS SOLUCIONES
natural_image
Warning symbol depicting steam rising inside a triangle (no text or numbers)natural_image
Illustration of a hand interacting with a touchscreen display and two white rectangular buttons (no text or symbols visible)natural_image
Illustration of a hand pressing a button next to two white rectangular objects (no text or symbols visible)