
i-Companion Pro HF95J810 - Food Processor MOULINEX - Free user manual and instructions
Find the device manual for free i-Companion Pro HF95J810 MOULINEX in PDF.
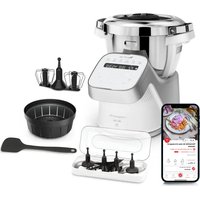


| Product type | Multi-cooker food processor |
| Brand | Moulinex |
| Model | i-Companion Pro HF95J810 |
| Dimensions (L x D x H) | 30 x 35 x 40 cm |
| Weight | 8.5 kg |
| Power supply | 220-240 V, 50/60 Hz, 1500 W |
| Bowl capacity | 3 L |
| Main functions | Cooking, mixing, kneading, blending, steaming, built-in scale |
| Automatic programs | Over 30 pre-programmed recipes |
| Screen | 7-inch color touchscreen |
| Connectivity | Wi-Fi, Companion mobile app |
| Bowl material | Stainless steel |
| Included accessories | Main bowl, lid, steam basket, whisk, beater, dough hook, recipe book |
| Cleaning | Bowl and accessories are dishwasher safe |
| Maintenance | Clean the base with a damp cloth |
| Safety | Overheat protection, non-slip feet, lid lock |
| Spare parts | Bowls, blades, seals, lids available online |
| Repairability | Repairability index: 7.5/10 |
| Warranty | 2 years |
| Country of manufacture | China |
Frequently Asked Questions - i-Companion Pro HF95J810 MOULINEX
User questions about i-Companion Pro HF95J810 MOULINEX
0 question about this device. Answer the ones you know or ask your own.
Ask a new question about this device
Download the instructions for your Food Processor in PDF format for free! Find your manual i-Companion Pro HF95J810 - MOULINEX and take your electronic device back in hand. On this page are published all the documents necessary for the use of your device. i-Companion Pro HF95J810 by MOULINEX.
USER MANUAL i-Companion Pro HF95J810 MOULINEX


CLEANING OF THE BOWL

• EN: To preserve the appearance and longevity of the dashboard, do not use household alcohol. Clean it with a slightly damp sponge without using the abrasive side to avoid scratching.
APPLICATION SERVICES

Recipe booklets
Recipe booklets
Recipe booklets
Recipe booklets
SAFETY INSTRUCTIONS:
Personal safety
- Read the instruction manual carefully before using your appliance for the first time and keep it in a safe place. The manufacturer shall not accept any liability in the event of any use that does not comply with the instructions.
- Always disconnect the appliance from the power supply if you are leaving it unattended and before assembling, disassembling and cleaning. Do not allow children to use the appliance without supervision.
- This appliance should not be used by children. Keep the appliance and its power cord out of reach of children.
- Keep your appliance out of reach of children.
- When the appliance is in use, some parts will become very hot (stainless steel wall of the bowl, detachable shared driver,
Transparent parts of the lid and cap, metal parts under the bowl, basket. They can cause burns. Handle the appliance by the cool plastic parts (handles, motor unit). The red heating indicator light shows that there is a risk of burning.
- The temperature of the accessible surfaces may be high when the appliance is in operation.
- The appliance is not intended to be operated using an external timer or by a separate remote control system.
- Do not use your appliance if it is not working properly, if it is
damaged or if the power cord or plug is damaged. To avoid any danger have the cord replaced by an approved service centre (see list in the guarantee booklet).
- The appliance should not be immersed in water. Never put the motor unit (A) under running water.
- This appliance is designed for indoor household use only and at an altitude below 2000 m. The manufacturer shall not accept any liability and reserves the right to cancel the guarantee in the event of commercial or inappropriate use or failure to follow the instructions.
- This appliance is intended for indoor, domestic household use only. It is not intended to be used in the following applications and the guarantee will not apply for:
- staff kitchen areas in shops, offices and other working environments;
- farm houses;
- On farms
- by clients in hotels, motels and other residential type environments;
- bed and breakfast type environments.

- Your appliance gives off steam which can cause burns. Handle the lid and the cap with caution (use oven
gloves, potholder, etc. if necessary). Handle the cap by its central section.
- Never operate the appliance if the seal is not positioned on the seal holder or if the seal holder is not
assembled on the lid. It is essential to operate the appliance with the cap positioned in the hole in the lid (unless specifically stated in the recipe).

WARNING: Be aware of the risk of injury in the event of incorrect use of the appliance.
Take care with the knives of the Ultrablade knife (F1) and the kneading & grinding blade (F4) when you are cleaning them and when you empty the bowl, they are extremely sharp. Be careful if a hot liquid is poured into the food processor because it could be ejected from the appliance due to it suddenly boiling.
WARNING: Be careful to avoid any spillage on the connector during cleaning, filling or pouring.
WARNING: Some foods that have an outer skin (whole sausages, tongue, poultry, etc.) or large pieces of meat may produce spatters as they trap boiling liquids. We therefore recommend piercing them with a knife or a fork prior to cooking.
WARNING: Your appliance releases steam which can cause burns.
WARNING: The heating element surface is subjected to residual heat after use.
Be sure to touch only the handles of your product (locks D2, handle of
the lid E2 and handle of the cap E1) during heating and until completely cooled down.
Refer to the instructions for setting the operating times and speed settings of each accessory and each programme.
Refer to the instructions for assembly and fitting accessories to the appliance.
Refer to the instructions for cleaning and maintenance of your appliance. Always follow the cleaning instructions on how to clean your appliance:
- Unplug the appliance.
- Do not clean the appliance while hot.
- Clean with a damp cloth or sponge.
- Never immerse the appliance in water or put it under running water.
EUROPEAN MARKETS ONLY:
- This device is not intended for use by persons (including children) with reduced physical, sensory, or mental capabilities, or lack of experience and knowledge, unless they have been given supervision or instruction concerning use of the appliance by a person responsible for their safety. Children should be supervised to ensure that they do not play with the appliance.
- When heating only: Keep the appliance and its power cord out of reach of children under eight years of age. Children should not use the appliance as a toy.
- This appliance may be used by persons with reduced physical, sensory or mental capabilities, or who lack sufficient knowledge or experience, provided that they are supervised or have received instructions on how to use the appliance safely, and provided that they fully understand the potential dangers.
- When heating only: This appliance can be used by children aged eight years or over, provided that they are supervised or have received instructions on how to use the appliance safely, and provided that they fully understand the dangers related to the appliance. Cleaning and maintenance of the appliance should not be performed by children without supervision, unless they are eight years of age or older and under the supervision of an adult.
- When using other functions: This appliance must not be used by children. Keep the appliance and its cable out of reach of children.
Precautions when using accessories: - The Ultrablade knife (F1), the mixer (F2), whisk (F3) and kneading/grinding blade (F4) accessories should not be used by children. Keep the appliance and its power cord out of reach of children. - The steam basket (F5) accessory may be used by children aged eight years and over and by people with reduced physical, sensory or mental capabilities or by people with no prior knowledge or experience, provided that they have received supervision or instructions
relating to the safe use of the appliance and that they understand the dangers involved. Children must not play with the appliance. User cleaning and maintenance should not be carried out by children, unless they are over eight years of age and are supervised. Keep the appliance and its cord out of reach of children under eight years of age.
Electrical connection
- The appliance must be connected to an earthed electrical socket.
- The appliance is designed to operate on alternating current only. Check that your mains voltage matches the voltage indicated on the appliance's identification plate.
- Any connection errors will void the guarantee.
- Do not pull on the power cord to unplug the appliance.
- Do not place the appliance, power cord or plug in liquids, near to or in contact with the heat-conducting parts of the appliance, near a heat source or on a sharp edge.
Incorrect use
- Do not touch the lid until the appliance has completely stopped (stop key). Wait until the food being mixed has stopped moving.
- Always add solid ingredients into the bowl first before adding liquid ingredients (see Fig. 11). Do not exceed the MAX marker on the inside of the bowl (see Fig. 11). If the bowl is too full, boiling water may be ejected.
• Note: During the Steam cooking programme, ensure that you add 0.7 litres of water (see Fig. 4.2). - Do not place your fingers or any other objects in the bowl while the appliance is in operation. - Do not use the bowl as a container (for storage, freezing or sterilisation). - Place the appliance on a stable, heat-resistant, clean and dry work surface. - Do not place the appliance near walls or cabinets as the steam produced may cause damage. - Do not place your appliance near a heat source that is in operation (a hob, electric household appliance etc.). - Do not cover the lid with a cloth or other object and do not try to plug the lid opening - always use the steam regulator cap. - Do not allow your hair, a scarf, a tie etc. hang over the bowl while the appliance is in operation. - Never put the accessories into the microwave. - Do not use the appliance outdoors. - Do not exceed the maximum quantity indicated in the instructions. - Only store the appliance after it has cooled down. - Do not place the bowl into the freezer to cool - always use the refrigerator. - Do not leave the spatula in oil at 150°C for longer than 20 minutes.
- Make sure that nothing interferes with your appliance during weighing or calibration. The space around your appliance on the work surface must be clear, the power cord must not be taut or trapped between the work surface and the bottom of the appliance.
- The four feet of your appliance must be in contact with a horizontal work surface and the appliance must be stable during weighing.
- If you need to move your appliance to use it or to store it, do not slide your appliance across the work surface. Lift it up and place it in the correct location without any impact.
- Observe the maximum permissible weight, do not exceed it. Your Companion is only for weighing food.
AFTER-SALES SERVICE
- For your safety, do not use accessories or spare parts other than those provided by authorised after-sales service centres.
- Any operation other than cleaning or routine maintenance should be performed by an approved service centre.
- Refer to the table «What to do if your appliance does not work» at the end of the instruction manual.
Thank you for choosing this appliance that is intended exclusively for the preparation of food in a domestic environment, within the household.


On reading this instruction manual, you will find recommendations for use, which will help you see the potential of your appliance: preparation of sauces, soups, stews, steamed dishes, pastries and desserts.
APPLIANCE DESCRIPTION:
A Motor unit
A1: Weighing function
B Control panel
B1: Automatic program selection
buttons
B2: Speed selector
B3: Cooking temperature selector and/or heating light indicator
B4: Operating time selector
B5: Turbo/pulse selector
B6: +/- selector
B7: Start/stop/reset button
B8: Scale indicator
B9: Connection indicator display*
C LCD screen
C1: Speed display
C2: Temperature display
C3: Time display
C4: Program selection display
C5: Safety indicator display ⑥
D Bowl assembly
D1: Stainless steel bowl
D2: Locks (located under handles)
D3: Detachable spindle
D4: Bowl seal
D5: Spindle locking ring
E Lid assembly
E1: Steam regulator cap/stopper
E2: Lid
E3: Seal holder
F4: Lid seal
F Accessories
FO: Accessory storage box
F1: Ultrablade chopping knife
F2: Mixer
F3: Whisk
F4: Kneading and grinding blade
F5: Steam basket
G Spatula
H On/Off Switch: marked 0/1 switches the
power supply to your appliance
I Cleaning brush
APPLIANCE TECHNICAL DATA:
Power: 1550W (1000W: heating element / 550W: motor)
| Temperature range : 30°C to 150°C | adjustable in steps of 5°C. |
| Operating duration range : | 5 sec to 2 hoursadjustable in steps of 5 sec min to 1 min max. |
| Number of speeds : 13 | - 2 intermittent speeds:speed 1 (5 sec On / 20 sec Off).speed 2 (10 sec On / 10 sec Off).- 10 progressive continuous speeds (speeds 3 to 12).- 1 max intermittent speed (speed 13). |
| Frequency : | 2412 - 2483,5 MHz |
| Standby mode : | Power consumption when the product is instandby mode: 0.5 Wh |
| Built-in scales | Weighing from 1 to 4000 g |
- The Bluetooth® word mark and logos are registered trademarks owned by Bluetooth SIG, Inc. and any use of such marks by SEB Group is under license.
- Google Play and Android are trademarks of Google Inc.
- Apple and the Apple logo are trademarks of Apple Inc., registered in the U.S. and other countries. App Store is a service mark of Apple Inc.
YOUR APPLIANCE
Your appliance is fitted with an On/Off switch (H). Set the switch to on. (See Fig. 9). Your appliance goes into standby mode after 15 minutes of inactivity. You can reactivate the appliance by pressing the start/stop button (B7). If you unplug and then quickly reconnect the appliance, it may remain in standby mode. To switch off the appliance completely, use switch (H). You have the following accessories with your appliance:
The following accessories are provided with your appliance:
These accessories also feature gripping areas to make them easier to use during recipe preparation.
| Chopping blade |  | Mixing soups | 12 | 3 min 3L | 40 secs 1kg | --→100°C |
| Mixing fruit purées | ||||||
| Chopping vegetables | 15 secs 1kg | |||||
| Chopping meat | 30 secs 1kg | |||||
| Chopping fish | 15 secs 1kg | |||||
| Do not use this accessory to chop hard ingredients: use the 64 kneading/grinding blade. | ||||||
| Mixer | This mixes cooked foods without damaging the ingredients This is very useful for browning stages early on during recipe preparation (risostos, soups) | |||||
 | Browning | 3 | 5 min 500g | 45 min 3 l | 130°C95°C95°C | |
| Stews | 1 | 45 min 3 l | ||||
| Risottos | 2 | 22 min 1.5 kg | ||||
| Ratatouille, chutneys, pulses (for settings see recipe booklet) | ||||||
| Whisk |  | Whisked egg white | 7 | 5/10 min | 7 max | |
| Mayonnaise, whipped cream | 7 | 2/5 min 0.5 l | ||||
| Sauces, creams | 47 | 1/20 min 1 l | 60-90°C | |||
| Mashed potatoes | 67 | 1 min 1 l | ||||
| Polenta | 45 | 1/16 min 1 l | 90°C | |||
| Kneeding/grinding blade |  | Kneading white bread dough | 5 | 2 min 30 secs | 1.2 kg | |
| Kneading short crust pastry, biscuit dough, speciality bread | 5 | 2 min 30 secs | 1 kg | |||
| Kneading rich dough (brloche, kugelhopf etc.) | +5 | 1 min 30 secs 2 min | 0.8 kg | |||
| Mixing light batters (cakes etc.) | +3 | 40 secs 3 min | 1 kg | |||
| Crushing nuts | 12 | 1 min 0.6 kg | ||||
| Chopping hard ingredients | 12 | 1 min 0.6 kg | ||||
| Crushing ice | 12 | 1 min | 6 to 10 | |||
| Pancake batter, waffle batter | 10 | 1 min 1.5 l | ||||
| Cap |  | Steam regulator capMax. (a) = steam cookingMin. (b) = risotto, cream desserts, sauces etc. | ||||
| The «min.» position allows the maximum amount of condensation to escape, giving dishes or sauces a better consistency (risotto, cream desserts, sauces etc.) | ||||||
| The «max.» position retains the maximum amount of heat and steam in the bowl for all cooking functions using steam (soups etc.) This position also prevents splashing when mixing | ||||||

 |  |  |  | ||
| The cooking times for the steam basket are provided as a guide - in most cases they are a reliable indicator of cooking times. However, certain factors will impact cooking times; the size of vegetables (cut or uncut)/quantity of ingredients in the basket/variety and ripeness of vegetables/amount of water in the bowl, which must correspond to the markings (0.7 l). Ensure that the steam regulator cap is turned in the "max." direction (a). If the food is not sufficiently cooked, you can add extra cooking time. | |||||
| Steam basket | F5 | Steaming vegetables, fish or meat | 20/40 min | 1Kg | |
| Chunky soups | 12 | 3 min | 3L | ||
| P1 - Courgettes | 20 min | 800 g | |||
| P1 - Parsnips | 25 min | 800 g | |||
| P1 - Stem of a leek | 25 min | 800 g | |||
| P1 - Broccoli | 20 min | 500 g | |||
| P1 - Fish | 15 min | 600 g (incl. baking paper) | |||
| P2 - Potatoes | 30 min | 1 kg | |||
| P2 - Carrots | 30 min | 1 kg | |||
| P2 - Green beans | 30 min | 800 g | |||
| P2 - White meat | 20 min | 600 g (incl. baking paper) | |||
| Detachable spindle | D3 | You can brown food in the bowl without the lid on, allowing you to stir the food and monitor the cooking process | |||
| The COOKING WITHOUT LID function is not suitable for jams or milk-based mixtures (risk of spillage) | |||||
| OPERATION UP TO 130°C | OPERATION FROM 135°C TO 150°C | ||||
| Cooking with or without the lid | Open lid only | Open lid only | |||
| Accessories | All accessories for use with the spindle | Only detachable spindle | |||
| Speed | Yes | No | |||
| Maximum time | - If the temperature is lower than or equal to 100°C: 2 hr- If the temperature is between 100°C and 130°C: 1 hr | - If the temperature is higher than or equal to 135°C: 20 min | |||
| !! Do not remove detachable spindle immediately after using it. Pour water into the empty bowl to cool it down | |||||
YOUR APPLIANCE HAS 2 OPERATING MODES:
• Automatic program mode:
Speed, cooking temperature and duration are pre-programmed to make sauces, soups, stews, steamed dishes, pastry and desserts automatically.
- Manual mode:
You can manually set the speed, cooking temperature and duration.
YOUR APPLIANCE FEATURES A SAFETY LOCK ON THE LID
The lid will lock every time the appliance is switched on. This safety device stops the lid opening while a recipe is being made (see Fig.16).
Do not try and force the lid when it is locked. This safety device will unlock when the appliance stops.
If you have selected a temperature over or equal to 50°C and a speed higher than or equal to 5, a 10 second countdown will appear on the LCD screen on the control panel. (see Fig.17).
The lid can only be opened at the end of the countdown.
INSTALLING THE BOWL, ACCESSORIES AND THE LID ASSEMBLY
- Before using for the first time, wash all items (D, E, F, G) in warm soapy water, but not the motor unit (A). Your bowl (D) is fitted with a detachable spindle (D3) for easier cleaning.
- Ensure that all packaging has been removed before use, particularly the protection located between the bowl (D) and the motor unit (A).
- Fit the seal (E4) on the seal holder (E3) (See Fig. 1), clip the assembly to the lid (E2) (See Fig 2).
- Position the seal (D4) on the spindle (D3). Lock the assembly onto the base of the bowl with the locking ring (D5) (See Fig. 3). If you use the
cooking mode without a lid, position the gasket (D4) over the detachable spindle (D3). Use the locking ring to lock the assembly to the bottom of the bowl (D5) (see Fig. 3).
- Position the chosen accessory in the bowl: -theaccessories(F1, F2, F3, or F4) fit on the spindle (See Fig. 4.1).
- the steam basket inside the bowl (F5), (See Fig. 4.3), having taken care beforehand to fill the bowl (F5) with 0.7l liquid (water,sauce...) (See Fig. 4.2).
- Place the ingredients into the bowl or steam basket.
- Position the lid with the arrow on the lid handle on the left side. Align the triangle on the lid with the triangle on the bowl handle (See Fig. 5). Lock the lid by turning anticlockwise (See Fig. 6).
- Position the steam regulator cap (E1) on the lid; two positions are possible: high steam (a) or low steam (b).
- Position the bowl (D) on the motor unit (A) until you hear a "click" (See Fig. 8).
- The appliance only starts up if the bowl and the lid are correctly positioned and locked on the motor unit.
- At the end of the program, start emptying your bowl by tilting it slightly toward the spout or using a spoon or ladle. Then, if the mix is still hot, use a glove or pot holder to remove the accessory from the bowl and finish pouring the rest of your mix.
- Knives are sharp tools and are hazardous if used without caution.
In the event of incorrect positioning or incorrect locking of either (See Fig. 10.1 and 10.2), the logo Ⓤ starts to flash when a function is activated.
Like most LCD screens, the one on your device is sensitive to static electricity. As a result, luminous traces may appear when you remove the protective film from the screen, or when you rub your screen with a cloth, for example. These luminous traces disappear after a few moments. This is a normal phenomenon which in no way affects the operation or lifespan of your device.

USING THE CONTROL PANEL (B)
Selecting an automatic program:

Sauces Steam cooking
Soups
(P1 for smooth soup / P2 for soup with a coarser texture.)
Slow cook (stews)
(P1 for vegetable stews / P2 for meat and poultry stew /
P3 for risotto)
Selecting custom settings:
Selecting the motor speed:
2 intermittent speeds (Speed 1 & 2) and 10 continuous progressive
speeds (Speed 3 to 12)
Selecting cooking temperature From 30° to 150°C.
Heating indicator light: it lights up when cooking starts and switches off when the temperature inside the bowl falls to below 50°C.
Selecting operating time. From 5 sec to 2 hours.
Use of the integrated scales
The UNIT key allows you to change the weight unit (g, cl, ml, oz).
(P1 gentle steam / P2 high steam)
Pastry
(P1 for bread / P2 for brioche / P3 for cake)
Desserts
Increase speed, cooking temperature and duration. Decrease speed, cooking temperature and duration.
This button has 3 functions: - "Validation" of the choice of your automatic program or your settings chosen in the context of manual use (speed, cooking temperature time). - "Pause" during use, once the appliance has been started up. - "Reset" of the settings selected on the appliance by pressing for 2 seconds.
Tips for use:
Your appliance is fitted with a microprocessor that controls and analyses its stability. In the event of instability, the motor rotation speed will be automatically reduced, if this instability continues, the motor will be stopped and "STOP" will be displayed on the screen. If this happens:
- Check that the quantity of ingredients is not too large and that the speed used is the correct one.
- Check that you are using the recommended accessory.
- Then restart your appliance normally.
USING THE APPLIANCE
Plug in the appliance, set the On/Off switch (H) to 1, and the LCD screen (C) displays all settings at "0" (See Fig. 9)
AUTOMATIC PROGRAM MODE

1- Press the program of your choice (B1), a triangle appears on the screen (C4) In the case of the soups, slow cook, steam and pastry programs, successively pressing the program button takes you to the different sub-programs.
2- The pre-programmed settings can be modified for the time of a recipe (depending on the chosen recipe, ingredients and quantities prepared). Press the speed
selector (B2) or the cooking temperature selector (B3) or the time selector (B4), the setting chosen will flash on the screen (C1-C2-C3).

3- Adjust the setting(s) using the +/- selector (B6).

4- When you have finished modifying all your settings, press the "start" button (B7) to start the program. When your appliance is using cooking mode, the red indicator light
(B3) lights up to inform you that cooking has started.
5- When the program has ended, the appliance emits 3 beeps.
6- At the end of the sauce, soup, slow cook programs P2 and P3, steam cooking and desserts, the appliance automatically changes to keep warm mode for 45 minutes to maintain the preparation ready for serving. In the 'sauces' program, P2 and 'slow cook' P3 program, desserts and manual mode, the appliance motor functions at a specific speed, in order to preserve the preparation and avoid it sticking to the bottom of the bowl. To stop keep warm mode, simply press the "stop" button (B7). If you open the lid, press the locks (D2) or remove the bowl and keep warm mode will be automatically stopped. At the end of the sauce programs, slow cook P2 and P3 and the dessert program; during the keeping warm function, the motor will continue to operate so that the ingredients do not stick to the bottom of the bowl. At the end of kneading in the pastry programs P1 and P2, the appliance changes to "dough rising" mode at 30°C for 40 minutes for your dough to prove. If you open the lid, press the locks (D2) or remove the bowl, the appliance changes to pause mode and you have the possibility of restarting it by pressing "start" again. If you wish to stop this mode, press and hold the "stop" button for 2 seconds.
7- Press the locks (D2) and then remove the bowl assembly (D) (See Fig. 12).
When the automatic program has started up, you have the possibility of stopping the appliance at any time by pressing the "stop" button. The automatic program is then in pause mode, you have the possibility of restarting by pressing the "start" button again. If you have chosen the wrong program and if you want to cancel it, press and hold the "stop" button for 2 seconds.


MANUAL MODE
EN


1-Press directly on the button for the setting you want to adjust, i.e. the speed selector (B2) or the cooking temperature selector (B3) or the time selector (B4), the chosen setting flashes on the screen (C1-C2-C3).
2-Then adjust the setting(s) using the +/- selector (B6). For safety reasons, it is not possible to set a temperature without setting a cooking time.
3- When you have finished entering all your settings, press the "start" button (B7). When your appliance is using cooking mode, the red indicator light (B3) lights up to inform you that cooking has started. When the program has started, you have the possibility of stopping the appliance at any time by pressing the "stop" button. The program is then in pause mode and you have the possibility of restarting by pressing "start" again. If you have chosen the wrong program and if you want to cancel it, press and hold the "stop" button for 2 seconds.
4- When the program has ended, the appliance emits 3 beeps.
5- Press the locks (D2) and then remove the bowl assembly (D) (See Fig. 12).
RECIPE EXAMPLE
PÂTÉ CASSEROLE
1 kg PORK BELLY (SKINNED AND DEBONED)
• 1 ONION
• 2 CLOVES OF GARLIC
• 30 ml OIL
• 100 ml WHITE WINE
• 50 ml ARMAGNAC
- 1 tsp RABELAIS® SPICES (OR FIVE-SPICE MIXTURE)
• 17 g SALT
• 3 g PEPPER
12 SERVINGS — PREPARATION 10 MIN — COOKING 2 HRS
1 - Peel the garlic and onion, and cut them into quarters. Cut the pork belly into large cubes.
2 - Put the ultrablade knife onto the appliance and add the onion and garlic. Mix using speed 12 mode for 15 seconds. Set aside in a bowl.
3 - Put the oil and pork belly into the food processor and mix at speed 12 at 100°C for 30 seconds. Remove the meat and replace the knife with the mixer. Put all of the ingredients into the bowl. Start the P3 Stew program at 100°C for 2 hours. After 30 minutes of cooking, use the spatula to break up the large pieces of meat.
4 - When cooking has finished, place the cooked meat in a terrine container, then remove some of the fat from the surface.
TIP - Leave enough fat for the terrine to hold together.
DISCOVER THE AUTOMATIC PROGRAMS AVAILABLE:
| Sauce Soup P1 Soup P2 Slow cook P1 Slow cook P2 | Slow cook P3 | ||||||
| Automatic programs | |||||||
| Accessories | |||||||
| Default speed (adjustable) |  | Speed 6 (speed 2 to speed 8) | 10 pulses and S12 for 2 min | S7 to S10 for 30 s | S3 S1 | S2 | |
| Default temperature (adjustable) |  | 70°C (50°C to 100°C) | 100°C (90°C to 100°C) | 100°C (90°C to 100°C) | 130°C (non-adjustable) | 95°C (80°C to 100°C) | 95°C (80°C to 100°C) |
| Default processing time (adjustable) |  | 8 min (5 min to 40 min) | 40 min (20min to 60 min) | 45 min (20 min to 60 min) | 5 min (2 min to 15 min) | 45 min (10 min to 2hr) | 20 min (10 min to 2hr) |
| Keep warm function (at the end of the program) |  | 45 min 45 | min 45 | min | 45 min | 45 min | |
| Motor speed on keep warm program |  | speed 4 | 5s ON at speed 3 / 20s OFF | 10s ON at V3 / 10s OFF | |||
| Steamed dishes P1 | Steamed dishes P2 | Pastry P1 | Pastry P2 | Pastry P3 | Dessert | |||
| Automatic programs | ||||||||
| Accessories | ||||||||
| Default speed (adjustable) |  | S5 for 2min 30s | S5 for 1 min 30 s then S6 for 2 min | S3 for 40 s then S9 for 3 min | Speed 4 (speed 2 to speed 8) | |||
| Default temperature (adjustable) |  | 100°C (non adjustable) | 100°C (non adjustable) | 90°C (50°C to 110°C) | ||||
| Default processing time (adjustable) |  | 30 min (1 min to 60 min) | 35 min (1 min to 60 min) | 2 min 30s (30s to 2 min 30s) | 3 min 30s (30s to 3 min 30s) | 3 min 40s (1 min 40s to 3 min 40s) | 15 min (5 min to 60 min) | |
| Keep warm function (at the end of the program) |  | 45 min 45 | min 45 min | |||||
| Motor speed on keep warm program |  | speed 4 | ||||||
| "Default" dough rising mode at 30°C at the end of the program | 40min 40min | |||||||
EN
COOKING WITHOUT A LID
You can brown food in your bowl without the lid, while stirring and monitoring its cooking. (see Fig. 19).

For this cooking method it is obligatory to select a temperature ranging between 135°C and 150°C. Set your cooking time (up to 20 mins). The COOKING WITHOUT A LID mode is not suitable for making jams and milk-based preparations (risk of overflowing).
Correct use reminder: When using the scales, do not touch your Companion and make sure that there are no objects pressing against or under your appliance. Make sure that your appliance is stable on the work surface. Finally, check that the power cord is not jammed under the appliance or too taut, as this may cause your weighing to be incorrect.
SCALE
Using the scales function:
1-Place the bowl (D1) on the motor unit (A)
2-Press the scales logo (B8) (see Fig. 16a)
3-Wait a few seconds for the automatic calibration to take place.
4-Weigh the first ingredient (see Fig. 16b).
5- If you want to add ingredients, calibrate by pressing the «CALIBRATION» button and add the next ingredient. Pressing calibration improves the weighing accuracy. Without intermediate calibration, the maximum permissible weight in a single weighing is 4 kg. Above this weight, an overload message will be displayed. 6- Repeat this procedure as often as necessary without exceeding a total weight of 8.0 kg.
Caution: When using, do not exceed the maximum quantities stated in the table on page 6 of this leaflet.
!! To exit the weighing function: press one of the following keys, B2 (speed), B3 (Temp), B4 (Time) or B7 (Start/stop). You can then continue with your recipe. IMPORTANT: in connected mode, when using a recipe from the application and the weighing function, you must exit weighing mode before moving on to the next step in the recipe.
CALIBRATION function
The CALIBRATION key is used to reset the scales display to 0.
UNIT function
The UNIT key allows you to change the weight unit (g, cl, ml, oz).
USE IN CONNECTED MODE
Powering up your appliance
Frequency: 2,4835GHz. Maximum transmitted output: 7.7 dBm
Your appliance has an on/off switch marked 0/1. Switch it to 1. (See Fig. 9).
The LCD screen will display all the settings as '0'.
In connected mode, the I Companion Pro LCD screen is blue.
PREPARING TO INSTALL
Go to www.moulinex.com to find the list of Smartphone and Tablet models that are compatible with I Companion Pro


INSTALL I COMPANION PRO
What you need to install I Companion Pro:
- The Moulinex app, which can be downloaded for free from App Store (iPhone/iPad) and Google Play (Android)
- A Bluetooth connection supplied by your Bluetooth® Smart 4.0 smartphone or tablet: I Companion Pro connects to your smartphone/tablet via a stand-alone wireless connection
- The smartphone/tablet must be close to the I Companion Pro (the connection range varies, depending on the layout of the home).
- A power point for plugging in the I Companion Pro : I Companion Pro is only connected to your smartphone/tablet when it is plugged in to the power supply.
About Bluetooth® Smart
Bluetooth® Smart 4.0 technology (or Bluetooth Low Energy) makes it possible to communicate wirelessly between an app and a device with very low energy consumption.
FIRST CONNECTION OF I COMPANION PRO IN CONNECTED MODE
Downloading the app
To start, download the app onto your smartphone/tablet by connecting to App Store for iOS or Google Play for Android.
Once you have downloaded the app, you will be able to make your first recipes with I Companion Pro within just a few minutes, without creating an account. (50 recipes are available to you without creating an account).
If you create an account on the app you will be able to access all the content, and vary your menus.
Bluetooth activation
Move close to the I Companion Pro and check that Bluetooth is activated on your smartphone/tablet.
Launching the app
Launch the Moulinex app by clicking on the 'I Companion Pro' icon.

Pairing
What is pairing?
On first connection, your Companion product will automatically and quickly detect the Moulinex application that you have previously downloaded onto your smartphone and/or tablet, as long as you follow the steps below.


EN
If you wish, you can pair up to 10 devices with i-Companion xl.
To do this, pair each device separately.
However, only one device may be connected at a time.
- Accept the cookies, which will improve the app by collecting your usage preferences.

- Select your device

- When requested by the app, press and hold the Time button 📋 (B4) on the I Companion Pro (for 4 seconds).

The connection indicator (B9) will blink for a maximum of 30 seconds, while the I Companion Pro connects to your smartphone/tablet.
- Accept the pairing request displayed on your smartphone/tablet or access the notification centre to accept the pairing.

When the connection indicator (B9) is constantly lit it indicates that the connection has been established.
NB: When the pairing has been carried out, I Companion Pro will automatically recognise your smartphone/tablet when you next connect. You will not have to carry out this pairing step again.
The connection has been successful
Your 1 Companion Pro is now connected to your smartphone/tablet. The connection indicator (B9) is lit.
The connection has failed
The connection indicator (B9) is off.
Please repeat the following operations:
- Move close to I Companion Pro.
- Check that I Companion Pro is properly plugged into the socket and that the plug is working properly.
- Check that your smartphone/tablet is compatible (see compatibility list at www.moulinex.com).
- Check that Bluetooth is activated on your smartphone/tablet.
- Start the pairing steps again, and consult the FAQs (frequently asked questions).
If there is still a problem, make sure that your smartphone/tablet is compatible
If you are using an Android device, make sure that it is one of the compatible models (see compatibility list at www.moulinex.com).
- Access the app menu to see our range of recipes.
Menu
In connected mode, during a step-by-step recipe, the first reset ends the step, and the second reset ends the recipe.

FAQs: FREQUENTLY ASKED QUESTIONS
Where should I put I Companion Pro?
- Put I Companion Pro on a flat, stable, heat resistant work surface.

- For the best connection between I Companion Pro and your smartphone/tablet, we recommend you make any changes required to ensure the connection is at a reasonable distance.
- If the connection indicator (B9) is constantly lit, this shows that your devices are connected.
- If the connection is lost (the connection symbol is shown crossed out), move closer to I Companion Pro to re-establish the connection.
What happens if the connection is lost during a recipe?
If the connection between I Companion Pro and your smartphone/tablet is lost during a recipe, the two devices will be automatically synchronised as soon as the connection is re-established. You will be able to carry on with your recipe from the step you were on when the connection was lost.
Can I use I Companion Pro without the app?
Your appliance may be used without the app. (See first use in unconnected mode).
For this, please refer to the 'use of the appliance' paragraph.
However, only the app will enable you to benefit from the many advantages of the connected product.
Can I Companion Pro be used with more than one smartphone or tablet?
If you wish, you can pair several devices with I Companion Pro. To do this, pair each device separately. (See pairing).
However, only one device may be connected at a time.
USING THE INTERNAL STEAM BASKET
Cooking times are for information purposes only; in most cases the food will be properly cooked.
However, certain conditions may affect the cooking time:
- size of the vegetables (cut or uncut)
- quantity of ingredients in the basket
- type of vegetables, their ripeness
You can also use the manual mode by selecting a temperature of 130°C and the cooking time according to the quantity and type of ingredients: see table below.
Steam cooking time (for fresh ingredients)
| Ingredients | Quantities (max) | Estimated cooking times | Recommended steam program |
| Courgettes (sliced) | 800 g | 20 min | P1 |
| Parsnips (sliced or cubed) | 800 g | 25 min | P1 |
| White part of the leek | 800 g | 25 min | P1 |
| Broccoli (florets) | 500 g | 20 min | P1 |
| Fish (thick fillets or steaks) | 600 g (with baking parchment) | 15 min | P1 |
| Potatoes (small whole new) | 1 kg | 30 min | P2 |
| Carrots (sliced) | 1 kg | 30 min | P2 |
| Green beans | 800 g | 30 min | P2 |
| White meat (chicken breast fillets) | 600 g (with baking parchment) | 20 min | P2 |
Some recipes may cause the water to overflow due to the formation of bubbles, particularly when using frozen vegetables. In this case, you need to reduce the volumes accordingly.
IMPORTANT - 'MAKING YOUR APPLIANCE SECURE' INSTRUCTIONS ('SECU')

Your appliance is equipped, as standard, with electronic motor protection to guarantee its longevity. This electronic security safeguards against in-
correct use; in this way, the motor is properly protected.
In cases of extreme use which disregard the recommendations in the instructions (see paragraph 'FIRST USE': potentially excessively large quantities and/or abnormally long use and/or preparing different recipes at short intervals), the electronic protection will be triggered to preserve the motor; in this case, the appliance will stop functioning and the message 'SECU' will be displayed on the LCD screen of the control
panel to indicate that the appliance is temporarily out of service.
If 'SECU' is displayed on the control panel and your appliance stops working, proceed accordingly:
- Leave your appliance plugged in, do not press the '0/1' switch.
- Please refer to the recommendations in the instructions and readapt your use of the appliance (see table page 6: amount of ingredients/recipe preparation time/temperature/ type of accessories).
- Allow the motor to cool down for half an hour.
- Restart the appliance by pressing on the 'Start/Stop/Reset' button (B7) for two seconds. Your appliance is now ready to be used again. For further information, please contact customer services (see details in the guarantee booklet).
CLEANING YOUR APPLIANCE
- The appliance should not be immersed. Never put the motor unit (A) under running water.
- Once you have finished using it, disconnect the appliance.
- Clean the bowl immediately after use to avoid staining.
- Press the locks (D2) then lift the bowl assembly (D).
- Place the bowl on a flat surface.
- Unlock the lid by rotating one quarter of a turn clockwise. Carefully remove the lid.
- The parts of the lid (seal, seal holder and lid) are removable. When the parts have cooled down, unclip the seal holder from the lid (See Fig. 15).
- Take care with the knives of the ultrablade blade (F1) and the kneading / grinding knife (F4) when you are cleaning them and when you empty the bowl, they are extremely sharp.
- When the parts have cooled down:
- Dismantle the spindle (D3), the seal (D4) and the locking ring (D5) (See Fig. 13).
- Clean the bowl (D), the spindle (D3), the seal (D4), the locking ring (D5), the
accessories (F1), (F2), (F3), (F4), (F5), the steam regulator cap (E1), the lid (E2), the seal holder (E3) and the seal (E4) using a sponge and some soapy water.
- Do not use surgical spirit to clean the control panel (B). • To clean the motor unit (A), use a damp cloth. Dry carefully. • To ensure that the control panel (B) has a long life, clean it with the soft side of a slightly damp sponge to avoid scratching it.
- To help you with cleaning, the bowl, lid assembly and accessories are dishwasher safe, with the exception of the spindle (D3 and D4) and the locking ring (D5) (See Fig. 14).
- The accessories, the detachable spindle (D3) and the parts of the lid may become slightly discoloured with certain ingredients such as curry, carrot juice, etc; this does not represent any danger for your health or for the operation of your appliance. To avoid this, clean these parts immediately after use. clean it with the soft side of a slightly damp sponge to avoid scratching it.
- To help you with cleaning, the bowl, lid assembly and accessories are dishwasher safe, with the exception of the spindle (D3 and D4) and the locking ring (D5) (See Fig. 14).
- The accessories, the detachable spindle (D3) and the parts of the lid may become slightly discoloured with certain ingredients such as curry, carrot juice, etc; this does not represent any danger for your health or for the operation of your appliance. To avoid this, clean these parts immediately after use.

- Before using the bowl (D), make sure that the electrical contacts under the bowl are clean and dry. • To avoid altering the materials of the bowl (D), ensure that you respect the instructions for use
of your dishwasher, do not increase the dose of dishwasher salt or dishwashing products.
ADVICE
How do I clean the bowl and accessories?
For easier cleaning:
Empty the bowl then fit the beater attachment. Pour in 0.7 L of water and add a few drops of washing-up liquid.
Close the lid with the stopper fitted.
Set your appliance to speed 8 at 80°C for 5 minutes, then press "Start".
When the appliance goes into "keep warm" mode (a beep will sound), stop the appliance and finish cleaning the attachment under the tap.
(This applies to all four attachments).
How do I clean food stuck to the bottom of the bowl?
1- Let it soak for one hour (water + washing-up liquid)
2- Scrape away the food with a spatula or wooden spoon 3- After emptying the bowl, scrub the bottom of the bowl with the green side of the sponge 4- If any marks remain, use a steel wool pad. You can replace the washing-up liquid with lemon juice, white vinegar or a dishwasher tablet dissolved in water (leave for as long as necessary).
How do I clean the bottom of my bowl?
To remove white marks or rainbow stains from the bottom of the bowl, follow these three steps:
- 1/ Pour 100 ml of white vinegar into the appliance bowl fitted with the default driver and leave for one hour.
- 2/ Empty the bowl and wipe the inside with a sponge.
- 3/ Rinse the bowl several times with clean water.
WHAT TO DO IF YOUR APPLIANCE DOES NOT WORK
| PROBLEMS CAUSES SOLUTIONS | ||
| Problems when steam cooking. | Insufficient cooking time. | Cooking times are only a guide and approximate. However, certain conditions may affect the cooking time:- size of the vegetables (cut or uncut)- quantity of ingredients in the basket- type of vegetables, their ripeness- quantity of water in the bowl, which corresponds to the measurement (0.7l). If the food is not properly cooked, you can set an additional cooking time. You can also use the manual mode by selecting a temperature of 130°C and the cooking time according to the quantity and type of ingredients. |
| The steam regulator cap is not properly positioned or is missing. | Set the steam regulator cap to 'maxi steam' (turn towards you); this setting allows a maximum amount of steam to build up in the bowl for all types of steam cooking (soups, etc.), so there will be more steam in the bowl and the cooking process will be more efficient. This position also helps to avoid splashing during cooking. The 'mini steam' position allows a maximum amount of condensation to escape and is recommended when making sauces and dishes such as risotto, egg custard desserts, etc. The "zero" position enables the steam regulator valve on the lid to be secured and removed. | |
| Poor cooking results in Manual mode | Unsuitable recipes | Your recipes, either personal or taken from the Internet may not be suited to your appliance and its accessories (quantities, cooking time, duration, inadequate accessories). Before starting your recipe, make sure you follow the instructions of use provided in this manual. |
| The appliance does not work. | It is not plugged in. Plug the appliance into an electrical socket. | |
| The switch (H) is in position 0. | Move the switch to position 1. | |
| The bowl or the lid are not correctly positioned or locked. | Check that the bowl or the lid are correctly positioned and locked according to the diagrams in the instruction manual. | |
| The lid does not lock. | The lid is not fully assembled. | Check that the seal is correctly assembled on the seal holder and that the seal holder is fully pushed onto the lid in all places. |
| Excessive vibration. | The appliance is not positioned on a flat surface, the appliance is not stable. | Place the appliance on a flat surface. |
| Volume of ingredients too high. Reduce | the quantity of ingredients processed. | |
| Accessory error. | Check that you are using the recommended accessory. | |
| Slight noise during operation | The spindle of your appliance may create a noise during operation at reduced speed or with the use of certain ingredients (rice...) | This is a temporary phenomenon, which has no consequences on the life of your appliance. It will fade or disappear after a few uses and cleaning operations of the removable spindle (refer to the paragraph "Cleaning the appliance"). |
| Excessive noise during operation | The use of a wrong accessory | Please use an adequate accessory (e.g.: do not use the beater F3 for kneading or mixing the dough, use the knife F4). For this, refer to the recommendations in the recipes and the operating instructions provided in this manual. |
| Leak through lid. | Volume of ingredients too high. | Reduce the quantity of ingredients processed. |
| The lid is not correctly positioned or locked. | Lock the lid correctly on the bowl. | |
| The lid seal is not present. | Position the seal on the seal holder and clip the assembly to the lid. | |
| The lid seal is cut or damaged. | Change the seal, contact an approved service centre. | |
| Accessory error. | Check that you are using the recommended accessory. | |
| Leak from the driver in the bowl. | The bowl seal (D4) is not correctly positioned. | Position the seal correctly. |
| The bowl seal is damaged. Contact an approved service centre. | ||
| The locking ring (D5) is not locked correctly. | Screw the ring in place (D5). | |
| The blades do not rotate easily. | Pieces of food that are too big or too hard. | Reduce the size or quantity of the ingredients processed. Add some liquid. |
| Smell from motor. | On using the appliance for the first time, or in the event of overload of the motor caused by too large a quantity of ingredients or by pieces that are too hard or too big. | Allow the motor to cool down (about 30 minutes) and reduce the number of ingredients in the bowl. |
| "STOP" is displayed. | The appliance has detected too many vibrations and has changed to the safety mode. | Check that you are at the right speed and that you are using the recommended accessory. |
| The control panel does not work. | The screen is wet or the user has wet fingers. | Wiping. |
| "SECU" is displayed. | Motor overload caused by too many ingredients or pieces which are too hard or too large or overuse without sufficient cooling down time. | Allow the motor to cool down (about 30 minutes) and reduce the number of ingredients in the bowl. |
| "SECU" is displayed + red indicator light is flashing. | Overheating of temperature sensors. Contact an approved service centre. | |
| "Err1" is displayed.+ red indicator light is flashing. | The heating element is not working. | Check that the power pins under the bowl are not clogged. If this is the case, clean them and try again.If that still does not work, contact an approved service centre. |
| "Err2" is displayed. Electronic fault. Contact an approved service centre. | ||
| "Err3" is displayed. Speed fault. Contact an approved service centre. | ||
| "Err4" is displayed. | Communication fault with chopper electronic card. | Contact an approved service centre. |
| Display "Err8" Safety locking sensor fault Contact an Approved Service Centre. | ||
| PROBLEMS CAUSES SOLUTIONS | ||
| Display "Err9" | Your appliance should no longer be used in this state as it has a fault that requires action from your service centre. | Contact an Approved Service Centre. |
| "ntc1" is displayed.+ red indicator light is flashing. | Temperature sensor 1 is no longer working. | Contact an approved service centre. |
| "ntc2" is displayed.+ red indicator light is flashing. | Temperature sensor 2 is no longer working. | Contact an approved service centre. |
| "ntc3" is displayed.+ red indicator light is flashing. | Temperature sensor 3 is no longer working. | Contact an approved service centre. |
| Safety indicator display (C5) 6 | Improper locking of the bowl or lid | Prior to operating the appliance, check that the bowl is properly locked on the motor unit and that the lid is properly locked on the bowl. If the problem persists, contact an authorised centre. |
| The lid is locked on the bowl in the "cooking without a lid" mode | Unlock the lid prior to launching the cooking program. If the problem persists, contact an authorised centre. | |
| The safety lock on the lid remained active (rod extended) and prevents the lid from locking. | The appliance was turned off as a recipe was in progress by toggling the I/O switch to the "0" position or was simply unplugged as a recipe was in progress. | Simply toggle the I/O switch to the "I" position to reset the food processor, along with the safety lock on the lid; the rod will automatically return to its original position. You may now lock the lid. |
| Connection problem See the app guide | ||
| Your Companion is not weighing correctly | - An object is touching the motor unit (B)- The power cord is under the Companion or taut- The Companion is not pressing against the four sensors- Other causes | - Make sure that nothing or nobody is pressed against the Companion- Remove the power cord from under your appliance and make sure that it is not taut- Make sure that the Companion is placed on a clean, flat work surface- If the problem persists, please contact the after-sales service |
| ERR 45 | There is a problem with the scales function. | Please contact the after-sales service. |
| The scales display remains at 0 g when I put food in my bowl | There is a problem with the scales function | Please contact the after-sales service. |
| LCD screen default display (temporary effects) | Like most LCD screens, your appliance's display is sensitive to static electricity. As a result, light spots may appear when you remove the protective film from the screen or when you rub your screen with a cloth, for example. | These light spots will disappear after a few moments. This is a normal occurrence and does not affect the functioning or life of your appliance. |
Is your appliance still not working?
Contact an approved service centre (see list in service booklet).

RECYCLING
- Elimination of packaging and appliance materials.

The packaging exclusively contains materials that are not dangerous to the environment, which can be disposed of in accordance with the recycling regulations in force.
To dispose of your appliance, ask the appropriate department of your local authority.
• End-of-life electronic or electrical appliances:
Environment protection first!

Your appliance contains valuable materials which can be recovered or recycled.
Leave it at a local civic waste collection point.
- *The Bluetooth® brand and logos are registered brands of Bluetooth SIG, Inc. and their use by the SEB Group has been officially authorised.
- Google Play and Android are Google Inc. brands.
- Apple and the Apple logo are Apple Inc. brands, registered in the USA and other countries. App Store is an Apple Inc. service mark.
GLOSSARY
Pairing: grouping or associating two devices.
This is carried out when your smartphone or tablet first connects with I Companion Pro.
Synchronising: updating of information. The app and I Companion Pro synchronise with each other to exchange information when they are connected.
Connecting: establishing a link between the app (smartphone/tablet) and the appliance (I Companion Pro). Connecting is vital for synchronisation.
Cookies: usage information sent to Moulinex to improve the app.
Speed 2 (10 s On / 10 s Off).
The connection failed
FAQ: FREQUENTLY ASKED QUESTIONS
TO THE APPLIANCE ("SECU")

YOUR APPLIANCE DOES NOT WORK. WHAT NOW?
FAQ: FREQUENTLY ASKED QUESTIONS
ONLY EUROPEAN MARKETS
B5: Turbo/pulse selector
B6: +/- selector
B7: Start/stop/reset button

INSTALL I COMPANION PRO
B5: Turbo/boost selector
B6: +/- selector


- APPLICATION SERVICES
- SAFETY INSTRUCTIONS
- PERSONAL SAFETY
- EUROPEAN MARKETS ONLY
- ELECTRICAL CONNECTION
- INCORRECT USE
- AFTER-SALES SERVICE
- APPLIANCE DESCRIPTION
- APPLIANCE TECHNICAL DATA
- YOUR APPLIANCE
- YOUR APPLIANCE HAS 2 OPERATING MODES
- AUTOMATIC PROGRAM MODE
- MANUAL MODE
- YOUR APPLIANCE FEATURES A SAFETY LOCK ON THE LID
- INSTALLING THE BOWL, ACCESSORIES AND THE LID ASSEMBLY
- USING THE CONTROL PANEL (B)
- SELECTING AN AUTOMATIC PROGRAM
- SELECTING CUSTOM SETTINGS
- TIPS FOR USE
- USING THE APPLIANCE
- RECIPE EXAMPLE
- PÂTÉ CASSEROLE
- COOKING WITHOUT A LID
- SCALE
- USING THE SCALES FUNCTION
- CALIBRATION FUNCTION
- UNIT FUNCTION
- USE IN CONNECTED MODE
- POWERING UP YOUR APPLIANCE
- PREPARING TO INSTALL
- INSTALL I COMPANION PRO
- ABOUT BLUETOOTH® SMART
- FIRST CONNECTION OF I COMPANION PRO IN CONNECTED MODE
- DOWNLOADING THE APP
- BLUETOOTH ACTIVATION
- LAUNCHING THE APP
- PAIRING
- EN
- THE CONNECTION HAS BEEN SUCCESSFUL
- THE CONNECTION HAS FAILED
- MENU
- FAQS: FREQUENTLY ASKED QUESTIONS
- WHERE SHOULD I PUT I COMPANION PRO
- WHAT HAPPENS IF THE CONNECTION IS LOST DURING A RECIPE
- CAN I USE I COMPANION PRO WITHOUT THE APP
- CAN I COMPANION PRO BE USED WITH MORE THAN ONE SMARTPHONE OR TABLET
- USING THE INTERNAL STEAM BASKET
- IMPORTANT - 'MAKING YOUR APPLIANCE SECURE' INSTRUCTIONS ('SECU')
- CLEANING YOUR APPLIANCE
- ADVICE
- HOW DO I CLEAN THE BOWL AND ACCESSORIES
- HOW DO I CLEAN FOOD STUCK TO THE BOTTOM OF THE BOWL
- HOW DO I CLEAN THE BOTTOM OF MY BOWL
- IS YOUR APPLIANCE STILL NOT WORKING
- RECYCLING
- ENVIRONMENT PROTECTION FIRST
- GLOSSARY
- THE CONNECTION FAILED
- FAQ: FREQUENTLY ASKED QUESTIONS
- TO THE APPLIANCE ("SECU")
- ONLY EUROPEAN MARKETS
Brand : MOULINEX
Model : i-Companion Pro HF95J810
Category : Food Processor