
SC40P - Lawn mower SCHEPPACH - Free user manual and instructions
Find the device manual for free SC40P SCHEPPACH in PDF.
| Brand | Scheppach |
| Model | SC40P |
| Product type | Scarifier (lawn mower) |
| Engine type | 4-stroke, 1 cylinder |
| Displacement | 212 cm³ |
| Max power | 4.2 kW |
| Working speed | 3600 min⁻¹ |
| Fuel | Unleaded petrol |
| Tank capacity | 3.6 L |
| Engine oil | 10W30 / SAE 30 |
| Oil capacity | 0.6 L |
| Spark plug | LG F6TC |
| Working width | 400 mm |
| Number of blades | 18 |
| Blade diameter | 160 mm |
| Scarification depth | +5 mm to -15 mm (6 positions) |
| Collection bag capacity | 45 L |
| Weight | 31 kg |
| Sound pressure level | 81.5 dB(A) |
| Sound power level | 97.49 dB(A) |
| Vibrations (left/right) | 3.789 / 2.449 m/s² |
| Safety | Engine brake, safety lever, ejection cover |
| Maintenance | Regular cleaning, oil change, air filter and spark plug replacement |
| Wear parts | V-belt, blade roller, air filter, spark plug |
Frequently Asked Questions - SC40P SCHEPPACH
User questions about SC40P SCHEPPACH
0 question about this device. Answer the ones you know or ask your own.
Ask a new question about this device
Download the instructions for your Lawn mower in PDF format for free! Find your manual SC40P - SCHEPPACH and take your electronic device back in hand. On this page are published all the documents necessary for the use of your device. SC40P by SCHEPPACH.
USER MANUAL SC40P SCHEPPACH
natural_image
Black-and-white photo of a lawn mower with visible branding and model number 212 (no text or symbols on the main body)
SC40P
2

natural_image
Top-down view of a black leather jacket with a side panel and label '6' pointing to it (no text or symbols on the jacket itself)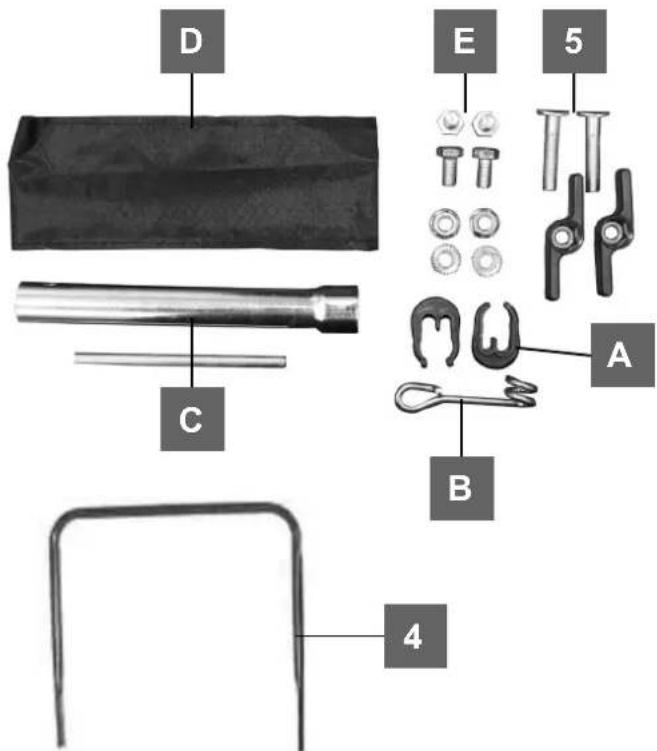


natural_image
Black rectangular container with open lid, no visible text or symbols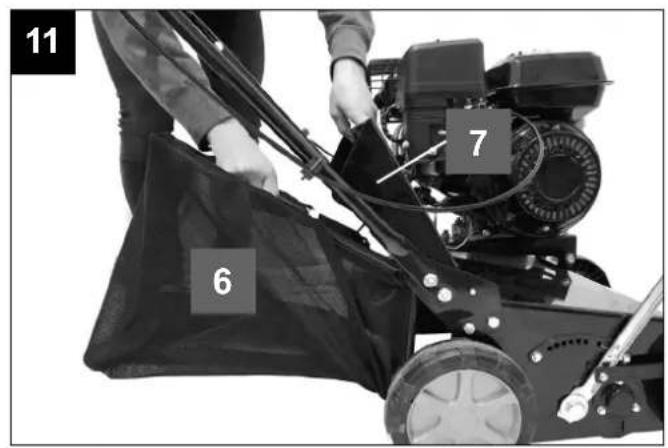
natural_image
Close-up of a mechanical component with labeled parts (11 and 12), showing no readable text or symbols beyond labels.


natural_image
Close-up of a hand adjusting a mechanical component with directional arrows indicating motion (no text or symbols)
natural_image
Close-up of a hand holding a small metallic component with a curved wire, mounted on a metal tray (no visible text or symbols)
natural_image
Close-up of a mechanical component with a black arrow pointing to a cylindrical part, no visible text or symbols
natural_image
Close-up of a mechanical component with a spark plug and valve, showing a curved arrow indicating rotation (no text or symbols visible)Günzburger Straße 69
D-89335 Ichenhausen
Verehrter Kunde,
Explanation of the symbols on the device
 | Attention! Read the usage instructions before commissioning. |
 | Keep third parties (persons and animals) away from the danger zone. |
 | Important. Hot parts. Keep your distance. |
 | Sharp tools – do not cut your fingers or toes – remove the spark plug before starting any maintenance work. |
 | Wear hearing and eye protection. |
 | Before using it for the first time, fill in oil and fuel. |
| △ Attention! | In this operating manual, we have used this sign to mark all sections that concern your safety. |
Table of contents: Page:
- Introduction......17
- Device Description (Fig. 1-2)....17
- Unpacking 17
- Intended use....17
- Safety information .... 18
- Technical data ....20
- Montage 20
- Operation....20
- Cleaning and maintenance....21
- Disposal and recycling 22
- Troubleshooting....23
1. Introduction
Manufacturer:
scheppach
Günzburger Straße 69
D-89335 Ichenhausen
Dear Customer,
we hope your new tool brings you much enjoyment and success.
Note:
According to the applicable product liability laws, the manufacturer of the device does not assume liability for damages to the product or damages caused by the product that occurs due to:
- Improper handling,
• Non-compliance of the operating instructions, - Repairs by third parties, not by authorized service technicians,
- Installation and replacement of non-original spare parts,
• Application other than specified,
We recommend:
Read through the complete text in the operating instructions before installing and commissioning the device.
The operating instructions are intended to help the user to become familiar with the machine and take advantage of its application possibilities in accordance with the recommendations..
The operating instructions contain important information on how to operate the machine safely, professionally and economically, how to avoid danger, costly repairs, reduce downtimes and how to increase reliability and service life of the machine.
In addition to the safety regulations in the operating instructions, you have to meet the applicable regulations that apply for the operation of the machine in your country.
Keep the operating instructions package with the machine at all times and store it in a plastic cover to protect it from dirt and moisture. Read the instruction manual each time before operating the machine and carefully follow its information. The machine can only be operated by persons who were instructed concerning the operation of the machine and who are informed about the associated dangers. The minimum age requirement must be complied with.
In addition to the safety requirements in these operating instructions and your country's applicable regulations, you should observe the generally recognized technical rules concerning the operation of identical constructed machines.
We accept no liability for accidents or damage that occur due to a failure to observe this manual and the safety instructions.
2. Device Description (Fig. 1-2)
- Handle
- Engine brake lever
- Throttle lever
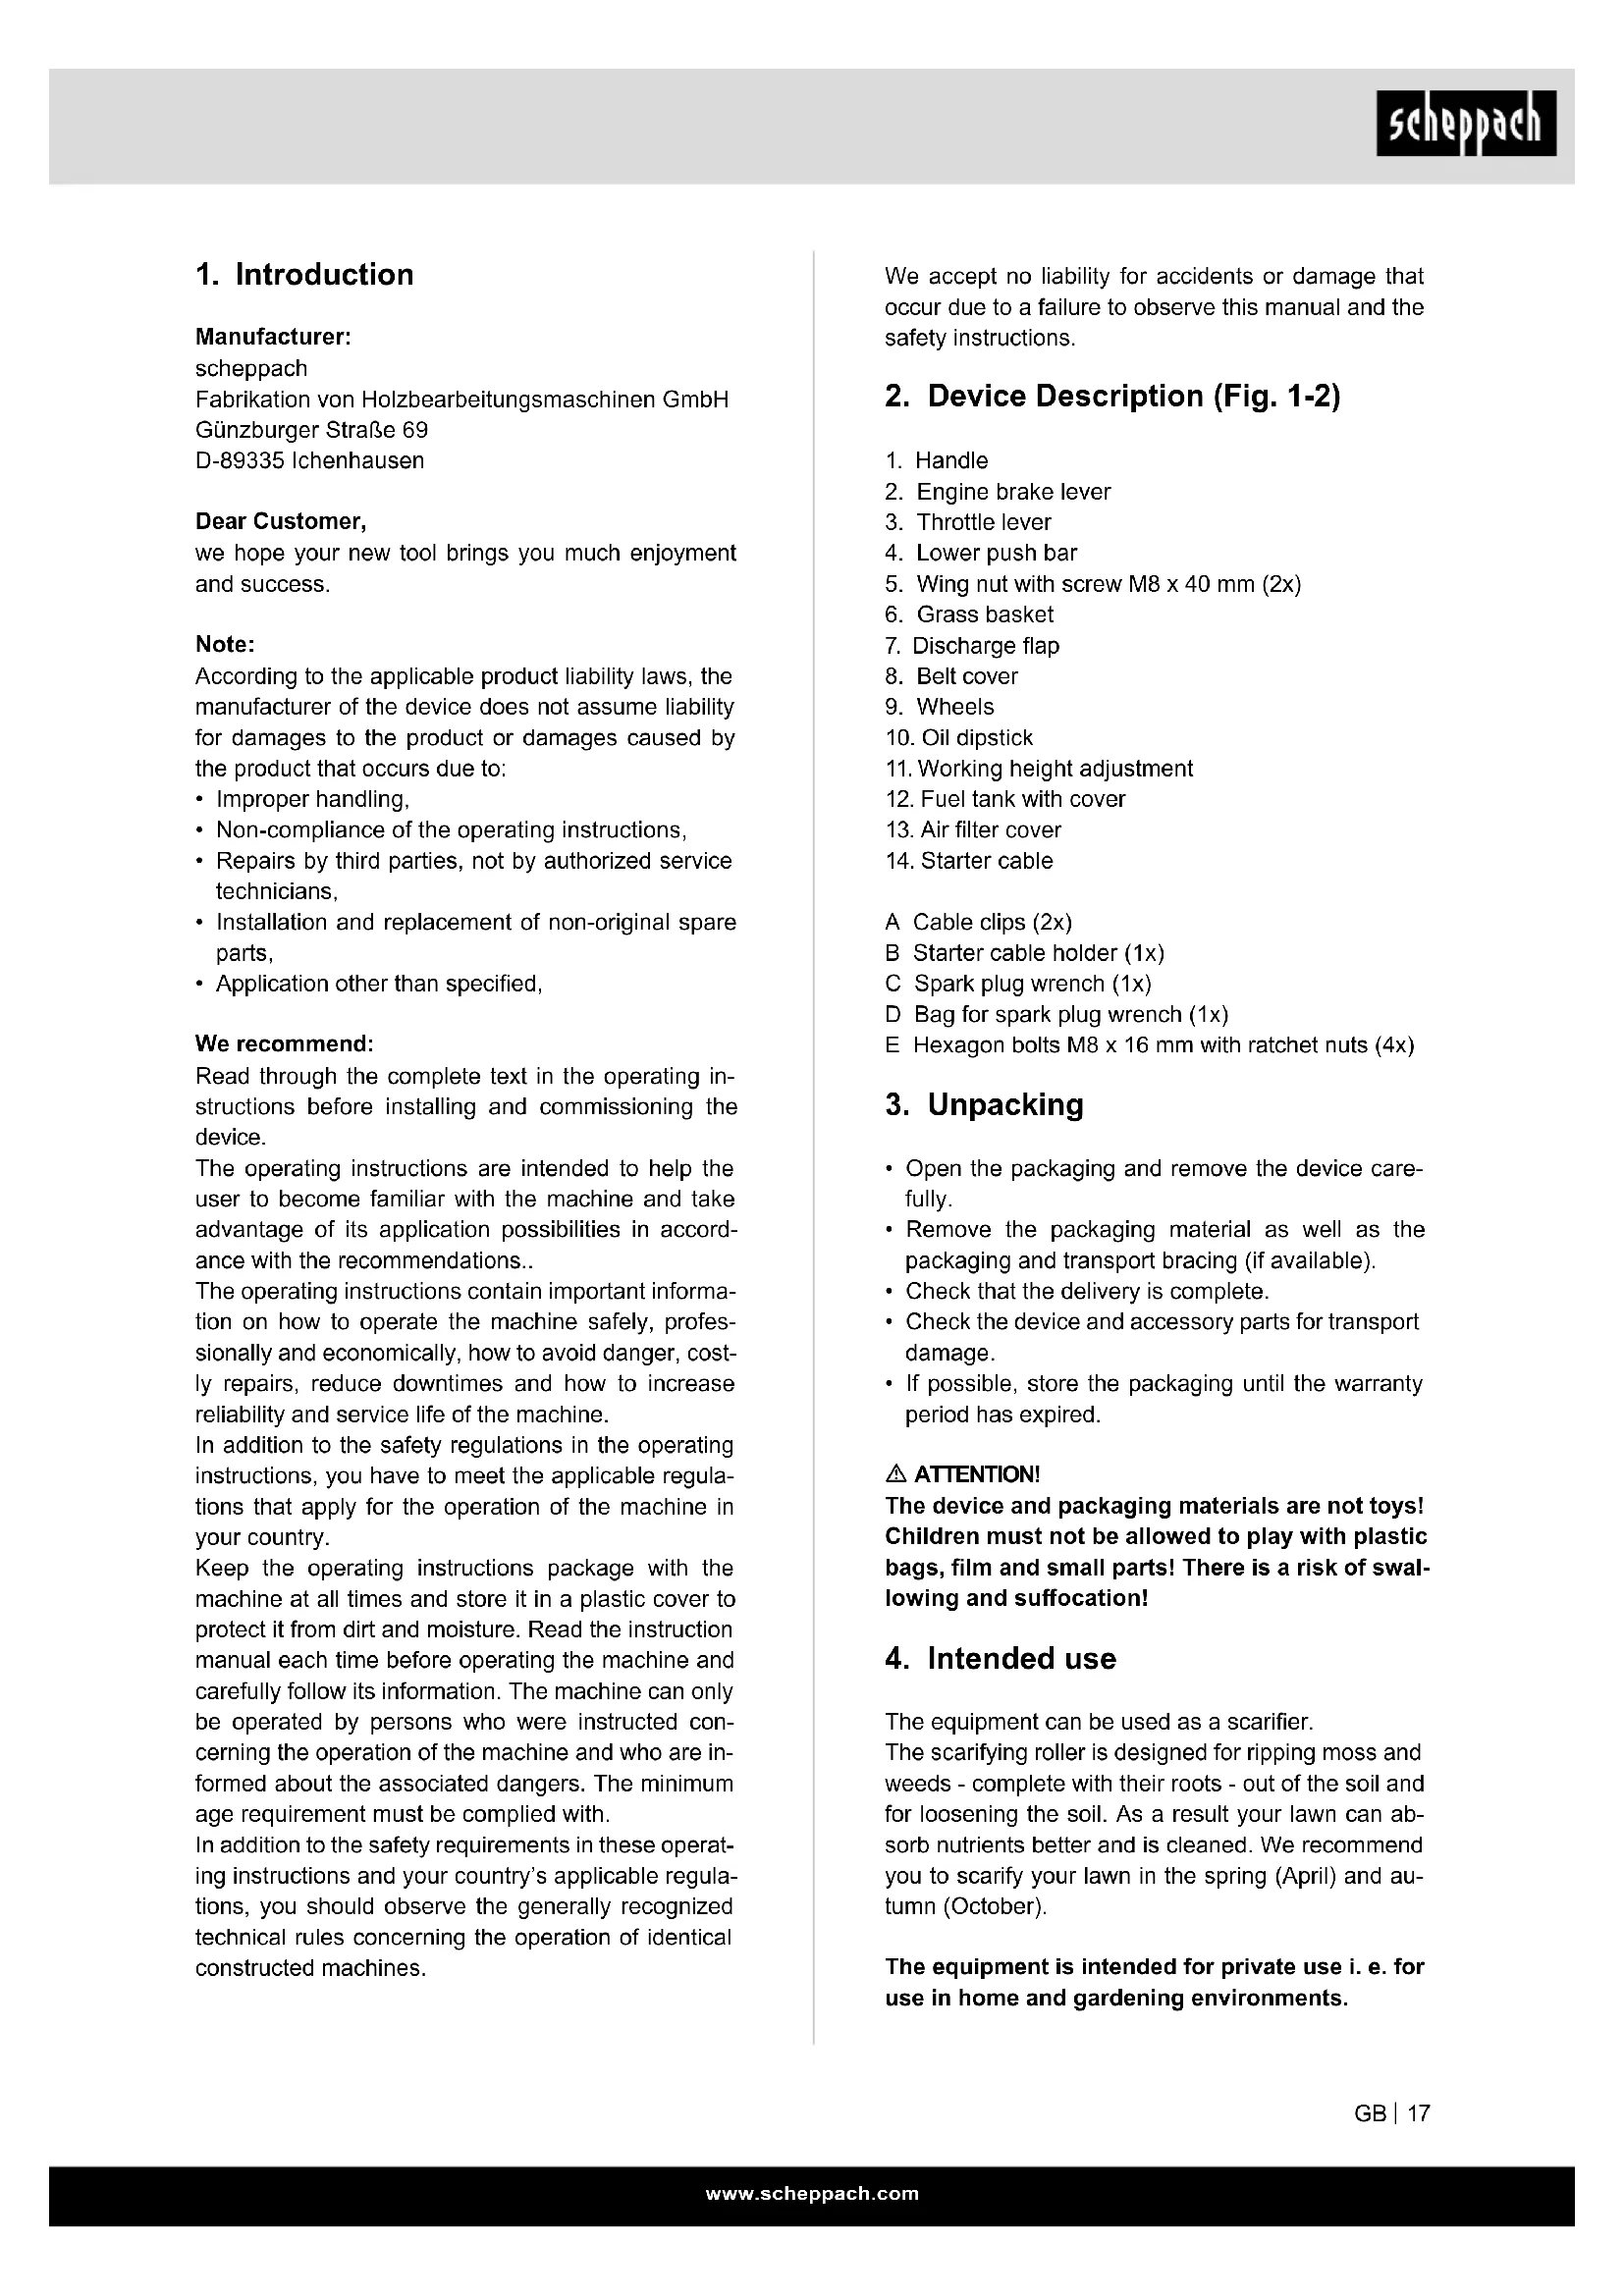
- Lower push bar
- Wing nut with screw M8 x 40 mm (2x)
- Grass basket
- Discharge flap
- Belt cover
- Wheels
- Oil dipstick
- Working height adjustment
- Fuel tank with cover
- Air filter cover
- Starter cable
A Cable clips (2x)
B Starter cable holder (1x)
C Spark plug wrench (1x)
D Bag for spark plug wrench (1x)
E Hexagon bolts M8 x 16 mm with ratchet nuts (4x)
3. Unpacking
- Open the packaging and remove the device carefully.
- Remove the packaging material as well as the packaging and transport bracing (if available).
- Check that the delivery is complete.
- Check the device and accessory parts for transport damage.
- If possible, store the packaging until the warranty period has expired.
ATTENTION!
The device and packaging materials are not toys! Children must not be allowed to play with plastic bags, film and small parts! There is a risk of swallowing and suffocation!
4. Intended use
The equipment can be used as a scarifier.
The scarifying roller is designed for ripping moss and weeds - complete with their roots - out of the soil and for loosening the soil. As a result your lawn can absorb nutrients better and is cleaned. We recommend you to scarify your lawn in the spring (April) and autumn (October).
The equipment is intended for private use i. e. for use in home and gardening environments.
Scarifiers for private use are machines whose annual operating time generally does not exceed 10 hours, during which the machine is primarily used to maintain small-scale, residential lawns and home/hobby gardens.
Public facilities, sporting halls, and agricultural/forestry applications are excluded.
The operating instructions as supplied by the manufacturer must be kept and referred to in order to ensure that the equipment is properly used and maintained. The instructions contain valuable information on operating, maintenance and servicing conditions.
⚠ Warning! Due to the high risk of bodily injury to the user, the equipment may not be used to grind up branch or hedge clippings. Moreover, the equipment may not be used as a power cultivator to level out high areas such as mole hills.
For safety reasons, the scarifier may not be used as a drive unit for other equipment or toolkits of any kind, unless specifically advised to do so by the manufacturer.
The equipment is to be used only for its prescribed purpose. Any other use is deemed to be a case of misuse. The user / operator and not the manufacturer will be liable for any damage or injuries of any kind caused as a result of this.
Please note that our equipment has not been designed for use in commercial, trade or industrial applications. Our warranty will be voided if the machine is used in commercial, trade or industrial businesses or for equivalent purposes.
5. Safety information
General safety rules
Understand your machine.
Read and understand the operator's manual and labels affixed to the machine. Learn its application and limitations as well as the specific potential hazards peculiar to it. Be thoroughly familiar with the controls and their proper operation. Know how to stop the machine and disengage the controls quickly.
Make sure to read and understand all the instructions and safety precautions as outlined in the Engine Manufacturer's Manual, packed separately with your unit. Do not attempt to operate the machine until you fully understand how to properly operate and maintain the Engine and how to avoid accidental injuries and/or property damage.
Safety at work area
Never start or run the engine inside a closed area. The exhaust fumes are dangerous, containing carbon monoxide, an odourless and deadly gas.
Operate this unit only in a well ventilated outdoor area. Never operate the machine without good visibility or light. Never operate the machine on a steep slope. Always work transversally, not up and down.
Personal safety
-
Do not operate the machine while under the influence of drugs, alcohol, or any medication that could affect your ability to use it properly.
-
Dress properly. Wear heavy long pants, boots and gloves. Do not wear loose clothing, short pants, and jewellery of any kind. Secure long hair so it is above shoulder level. Keep your hair, clothing and gloves away from moving parts. Loose clothes, jewellery or long hair can be caught in moving parts.
-
Use safety equipment. Always wear eye protection.
-
Safety equipment such as a dust mask, hard hat, or hearing protection used for appropriate conditions will reduce personal injuries.
-
Check your machine before starting it. Keep guards in place and in working order. Make sure all nuts, bolts, etc. are securely tightened.
-
Never operate the machine when it is in need of repair or is in poor mechanical condition.
-
Replace damaged, missing or failed parts before using it. Check for fuel leaks. Keep the machine in safe working condition.
-
Never tamper with safety device. Check their proper operation regularly.
-
Do not use the machine if the engine's switch does not turn it on or off. Any gasoline powered machine that can not be controlled with the engine switch is dangerous and must be replaced.
-
Form a habit of checking to see that keys and adjusting wrenches are removed from machine area before starting it. A wrench or a key that is left attached to a rotating part of the machine may result in personal injury.
-
Stay alert, watch what you are doing and use common sense when operating the machine.
-
Do not overreach. Do not operate the machine while barefoot or when wearing sandals or similar lightweight footwear. Wear protective footwear that will protect your feet and improve your footing on slippery surfaces.
-
Keep proper footing and balance at all times. This enables better control of the machine in unexpected situations.
-
Avoid accidental starting. Be sure the engine is off before transporting the machine or performing any maintenance or service on the unit. Transporting or performing maintenance or service on a machine with engine on invites accidents.
Fuel Safety
- Fuel is highly flammable, and its vapors can explode if ignited. Take precautions when using to reduce the chance of serious personal injury.
- When refilling or draining the fuel tank, use an approved fuel storage container while in a clean, well-ventilated outdoor. Do not smoke, or allow sparks, open flames or other sources of ignition near the area while adding fuel or operating the unit. Never fill fuel tank indoors.
- Keep grounded conductive objects, such as tools, away from exposed, live electrical parts and connections to avoid sparking or arcing. These events could ignite fumes or vapors.
- Always stop the engine and allow it to cool before filling the fuel tank. Never remove the cap of the fuel tank or add fuel while the engine is running or when the engine is hot. Do not operate the machine with known leaks in the fuel system.
- Loose the fuel tank cap slowly to relieve any pressure in the tank.
- Never over fill fuel tank. Fill tank to no more than 12.5 mm (1/2" below the bottom of the filler neck to provide space for expansion as the heat of the engine can cause fuel to expand).
- Replace all fuel tank and container caps securely and wipe up spilled fuel. Never operate the unit without the fuel cap securely in place.
- Avoid creating a source of ignition for spilled fuel. If fuel is spilled, do not attempt to start the engine but move the machine away from the area of spillage and avoid creating any source of ignition until fuel vapors have dissipated.
- Store fuel in containers specifically designed and approved for this purpose.
- Store fuel in a cool, well-ventilated area, safely away from sparks, open flames or other sources of ignition.
- Never store fuel or machine with fuel in the tank inside a building where fumes may reach a spark, open flame, or other sources of ignition, such as a water heater, furnace, clothes dryer and the like. Allow the engine to cool before storing in any enclosure.
Instructions for use and maintenance of the machine
- Never pick up or carry a machine while the engine is running.
- Do not force the machine. Use the correct machine for your application. The correct machine will do the job better and safer at the rate for which it was designed.
- Do not change the engine governor settings GB or over-speed the engine. The governor controls the maximum safe operating speed of the engine.
-
Do not run the engine at a high speed when you are not tilling.
-
Do not put hands or feet near rotating parts
- Avoid contact with hot fuel, oil, exhaust fumes and hot surfaces. Do not touch the engine or muffler. These parts get extremely hot from operation. They remain hot for a short time after you turn off the unit. Allow the engine to cool before doing maintenance or making adjustments.
- If the machine should start to make an unusual noise or vibration, immediately shut off the engine, disconnect the spark plug wire, and check for the cause. Unusual noise or vibration is generally warning of trouble.
- Use only attachments and accessories approved by the manufacturer. Failure to do so can result in personal injury.
- Maintain the machine. Check for misalignment or binding of moving parts, breakage of parts and any other condition that may affect the machine's operation. If damaged, have the machine repaired before use. Many accidents are caused by poorly maintained equipment.
- Keep the engine and muffler free of grass, leaves, excessive grease or carbon build up to reduce the chance of a fire hazard.
- Keep cutting tools sharp and clean. Properly maintained cutting tools with sharp cutting edges are less likely to bind and are easier to control.
- Never douse or squirt the unit with water or any other liquid. Keep handles dry, clean and free from debris. Clean after each use.
- Observe proper disposal laws and regulations for gas, oil, etc. to protect the environment.
- Store idle machine out of the reach of children and do not allow persons unfamiliar with the machine or these instructions to operate it. Machine is dangerous in the hands of untrained users.
Instructions for maintenance
Before cleaning, repair, inspecting, or adjusting, shut off the engine and make certain all moving parts have stopped. Disconnect the spark plug wire, and keep the wire away from the plug to prevent accidental starting. Have your machine serviced by qualified repair personnel using only identical replacement parts. This will ensure that the safety of the machine maintained.
6. Technical data
Engine type 1-cylinder; 4-stroke
| Displacement 212 cm3 | |
| Max. engine output 4,2 kw | |
| Working speed 3600 rpm | |
| Fuel unleaded fuel | |
| Tank capacity 3,6 l | |
| Engine oil | 10W 30 / SAE 30 |
| Tank capacity /oil | 0.6 L |
| spark plug | LG F6TC |
| Depth setting | +5 / -15 |
| Working width | 400 mm |
| Number of blades | 18 |
| Blade diameter | 160 mm |
| Collection bag capacity | 45L |
| Weight | 31 kg |
Subject to technical changes!
Information concerning noise emission measured according to relevant standards:
Sound pressure L_PA = 81.5 dB(A)
Sound power L_WA = 97.49 dB(A)
Uncertainty K_PA = 2 dB(A)
Wear ear-muffs. The impact of noise can cause damage to hearing.
Vibrations:
Vibration A_nv (left/right) = 3.789 m/s² / 2.449 m/s²
Uncertainty K_PA = 1.5 m/s^2
Keep the noise emissions and vibrations to a minimum.
- Only use appliances which are in perfect working order.
• Service and clean the appliance regularly. - Adapt your working style to suit the appliance.
- Do not overload the appliance.
- Have the appliance serviced whenever necessary.
- Switch the appliance off when it is not in use.
- Wear protective gloves.
Before starting the equipment
Before you connect the equipment to the mains supply make sure that the data on the rating plate are identical to the mains data.
Warning!
The scarifier is delivered unassembled. The grass basket and the complete push bar must be assembled and mounted before using the scarifier. Follow the operating instructions step-by-step and use the pictures provided as a visual guide to easily assemble the machine.
7. Montage
⚠ Important!
You must fully assemble the appliance before using it for the first time!
Mounting of the guide rail (Fig. 3-9)
- Mount the lower push bar (4) as shown in pictures 3 + 4. Fix the bracket with four hexagon bolts and the locknuts (E).
- Connect the upper push bar (handle) (1) to the lower push bar (4). Use the two wing nuts with the respective screws (5) (Fig. 5 + 6).
- Attach the cable pull retainer (B) to the right side of the handlebar as shown in Figure 7.
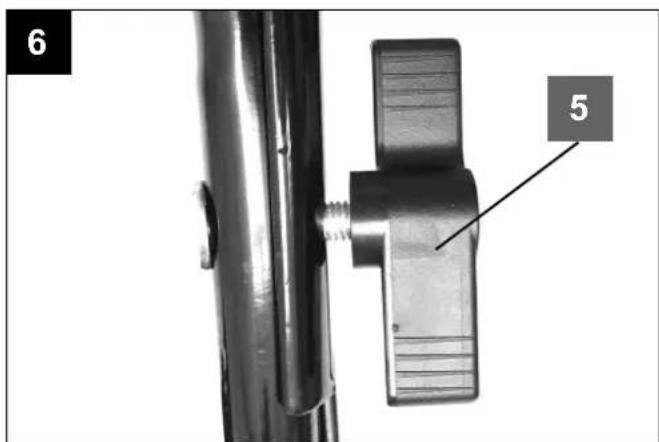
- Fix the cables with the two cable clamps (A) on the push handle. (Fig. 8 + 9)
Mounting the grass catcher (Fig. 10-11)
- Lift the ejection flap (Fig. 11 / Item 7) with one hand and hook in the catching basket (Fig. 11 / Item 6) with the other hand on the handle from above. Attention! To hang the grass catcher, the engine must be switched off and the roller must not turn!
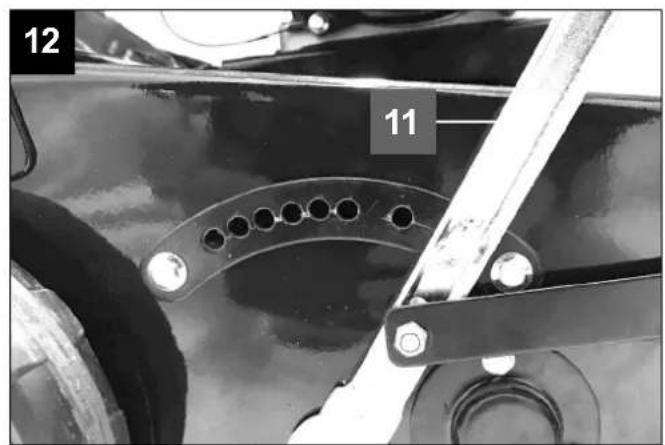
Adjusting the scarifying depth (Fig. 12)
The scarifying depth is set using the depth adjustment (11). To do this, pull the depth adjuster (11) slightly to the right and bring it into the desired position and let it snap into place.
+1 = driving or transport position
0 = 0 mm
-1 = Scarifying depth -2,5 mm
-2 = Scarifying depth -5 mm
-3 = Scarifying depth -7.5 mm
-4 = Scarifying depth -10 mm
-5 = Scarifying depth -12,5 mm
-6 = Scarifying depth -15 mm
8. Operation
Important!
The engine does not come with oil in it. Therefore, be sure to add oil before starting the engine. The oil level in the engine must be checked each time before carrying out any work.
Starting the equipment
In order to avoid any unintentional start-ups of the engine, it comes equipped with an engine brake (Fig. 1 / Item 1) which must be pressed at all times whilst the device is in use, otherwise the engine will stop. Important: When the engine brake lever is released it must return to its initial position and the engine must stop. If this is not the case, do not use the equipment again.
- Open the petrol cock (Fig. 14 / Item B). Set the cock to "ON" for this purpose.
- Set the choke lever (Fig. 14/Item A) to the "Choke" position. Note: Normally the choke is not required to restart a warm engine.
- Move the throttle lever (Fig. 13 / Item 3) to the centre position.
- Press the engine brake lever (Fig. 13) and pull the starter cable (Item 14) forcefully until the engine starts.
- Allow the engine to warm up briefly and then set the choke lever (Fig. 13 / Item A) to the "RUN" Position.
- The speed of the cutter unit can be controlled using the throttle lever (Fig. 13 / Item 3).
Important: Always pull the starter cable slowly until you feel the initial resistance before you then pull it quickly to start the engine. Do not allow the starter cable to whip back of its own accord.
Important: The scarifier roller begins to rotate as soon as the engine is started.
Important! Never open the ejector flap when the motor is running. A rotating cutting unit can cause injuries. Always fasten the ejector flap carefully. The flap flips back to the "Closed" position by the tension springs! Always ensure that a safe distance (provided by the long handles) is maintained between the user and the housing. Be especially careful when scarifying and changing direction on slopes and inclines. Maintain a solid footing and wear sturdy, nonslip footwear and long trousers. Always scarify along the incline (not up and down).
For safety reasons, the scarifier may not be used to scarify inclines whose gradient exceeds 15 degrees. Use special caution when backing up and pulling the scarifier (tripping hazard)!
Tips for proper working
It is recommended that you overlap scarifying paths a little. Try to scarify in straight lines for a nice, clean look. In so doing, the aeration swaths should always overlap each other by a few centimetres in order to avoid bare strips.
As soon as grass clippings start to trail the scarifier, it is time to empty the grass basket.
Important! Before taking off the grass basket, switch off the motor and wait until the roller has come to a stop.
To remove the grass basket, lift up the ejector flap with one hand, while unhooking the basket with the other. How frequently you should scarify your lawn is determined primarily by the speed at which the grass grows and the hardness of the soil. Keep the underside of the equipment clean and remove soil and grass build-up. Deposits make it more difficult to start the aerator and decrease the quality of the scarifying. Always scarify along inclines (not up and down). Switch off the motor before doing any checks on the roller.
Important!
The roller rotates for a few seconds after the motor is switched off. Never attempt to stop the roller. In the event that the rotating roller strikes an object, immediately switch off the equipment and wait for the roller to come to a complete stop. Then inspect the condition of the roller. Replace any parts that are damaged.
9. Cleaning and maintenance
Danger!
Always pull out the mains power plug before starting any cleaning work.
Cleaning
- Keep all safety devices, air vents and the motor housing free of dirt and dust as far as possible. Wipe the equipment with a clean cloth or blow it with compressed air at low pressure.
- We recommend that you clean the device immediately each time you have finished using it.
- Clean the equipment regularly with a moist cloth and some soft soap. Do not use cleaning agents or solvents; these could attack the plastic parts of the equipment.
Maintenance
- A worn out or damaged cutting unit should be replaced by an authorised expert.
- Take care that all fastening elements (screws, nuts, etc.) are firmly tightened, so that you can work safely with the scarifier.
- Store the scarifier in a dry place.
- For longer life, all screw-fastened parts, such as wheels and axles should be cleaned and subsequently oiled.
- Regular servicing of the scarifier not only secures longer endurance and performance, but also contributes to an accurate and simple scarification of your lawn.
- At the end of the season, carry out a general check of the scarifier, and remove all residue collected. Before the start of every season, it is absolutely necessary to check the state of the scarifier. Contact our Customer Service if repair work is necessary.
Servicing the air filter
Soiled air filters reduce the engine output by supply too little air to the carburetor.
Regular checks are therefore essential. The air filter should be checked after every 50 hours of use and cleaned if necessary. If the air contains a lot of dust, the air filter should be checked more frequently.
- Remove the air filter as shown in Fig. 15+16.
- Clean the air filter only with compressed air or by tapping it.
- Assemble in reverse order
Important: Never clean the air filter with petrol or inflammable solvents.
Servicing/Replacing the spark plug
Check the spark plug for dirt and grime after 10 hours of operation and if necessary clean it with a copper wire brush. Thereafter service the spark plug after every 50 hours of operation.
- Pull off the spark plug boot (Fig. 17) with a twist.
- Remove the spark plug using a spark plug wrench (Fig. 18).
- Assemble in reverse order.
Preparing the equipment for storage
Caution: Do not empty the petrol tank in enclosed areas, near fire or wen smoking. Petrol fumes can cause explosions and fire.
- Empty the petrol tank with a petrol suction pump.
- Start the engine and let it run until any remaining petrol has been used up.
- Change the oil at the end of every season. To do so, remove the used engine oil from a warm engine and refill with fresh oil.
- Remove the spark plug from the cylinder head. Fill the cylinder with approx. 20 ml of oil from an oil can. Slowly pull back the starter handle, which will bathe the cylinder wall with oil. Screw the spark plug back in.
- Clean the cooling fins of the cylinder and the housing.
- Be sure to clean the entire machine to protect the paint.
- Store the machine in a well-ventilated place.
Preparing the device for transport
- Drain the petrol tank using a petrol extraction pump.
- Always let the engine run until it has used up the remainder of petrol in the tank.
- Empty the engine oil from the warm engine.
- Remove the spark plug boot from the spark plug.
- Clean the cooling fins of the cylinder and the housing.
- Remove the push bars if necessary. Ensure that the cables are not kinked.
Service information
Please note that the following parts of this product are subject to normal or natural wear and that the following parts are therefore also required for use as consumables.
Wear parts*: V-belt, cutting unit, air filter, spark plug
* Not necessarily included in the scope of delivery!
10. Disposal and recycling

The equipment is supplied in packaging to prevent it from being damaged in transit. The raw materials in this packaging can be reused or recycled. The equipment and its accessories are made of various types of material, such as metal and plastic. Defective
components must be disposed of as special waste. Ask your dealer or your local council.
11. Troubleshooting
| Fault Possible causes Rectification | ||
| Motor does not start • Engine | brake lever not pressedSpark plug defectiveFuel tank emptyPetrol cock closed | Press the engine brake leverReplace spark plugTop up fuelOpen petrol cock |
| Engine performance drops | soil is too firmHousing cloggedRoller badly worn | Change working depthClean housingReplace roller |
| Imprecise scarifying result | roller wornWrong working depth | Replace rollerCorrect working depth |
| Motor is running, roller is not rotating | toothed belt is torn • By customer service workshop | |
Günzburger Straße 69
D-89335 Ichenhausen
Chers clients,
Günzburger Straße 69
D-89335 Ichenhausen
Tisztelt vásárló!
Günzburger Straße 69
D-89335 Ichenhausen
Vážený zákazníku,
Günzburger Straße 69
D-89335 Ichenhausen
Vážený Zákazník,
Günzburger Straße 69
D-89335 Ichenhausen
Geachte klant,
Günzburger Straße 69
D-89335 Ichenhausen
Austatud klient!
Günzburger Straße 69
D-89335 Ichenhausen
Arvoisa asiakas
Günzburger Straße 69
Günzburger Straße 69
D-89335 Ichenhausen
Gerbiamas kliente,
Günzburger Straße 69
D-89335 Ichenhausen
Bästa Kund!
CE - Declaration of Conformity
GB hereby declares the following conformity under the EU Directive and standards for the following article
Noise: measured L_w,w = 81.5 dB(A); guaranteed L_w,w = 98 dB(A)
P = xx KW; L/∅ = cm
Notified Body:
Notified Body No.:

006/42/EC
Annex IV
Notified Body:
Notified Body No.:
Certificate No.:

2010/26/EC
Emission. No: e24*2016/1628*2016/1628SYA1/P*0019*00
Standard references:
EN ISO 14982:2009; EN 13684:2018
This declaration of conformity is issued under the sole responsibility of the manufacturer.
The object of the declaration described above fulfils the regulations of the directive 2011/65/EU of the European Parliament and Council from 8th June 2011, on the restriction of the use of certain hazardous substances in electrical and electronic equipment.
Subject to change without notice
Documents registrar: Stefan Hartinger
Günzburger Str. 69, D-89335 Ichenhausen
Garantiebedingungen
Apparent defects must be notified within 8 days from the receipt of the goods. Otherwise, the buyeris rights of claim due to such defects are invalidated. We guarantee for our machines in case of proper treatment for the time of the statutory warranty period from delivery in such a way that we replace any machine part free of charge which provably becomes unusable due to faulty material
or defects of fabrication within such period of time. With respect to parts not manufactured by us we only warrant insofar as we are entitled to warranty claims against the upstream suppliers. The costs for the installation of the new parts shall be borne by the buyer. The cancellation of sale or the reduction of purchase price as well as any other claims for damages shall be excluded.
Garantie FR


- SC40P
- Verehrter Kunde,
- Table of contents: Page:
- Introduction
- Manufacturer:
- Dear Customer,
- Note:
- We recommend:
- Device Description (Fig. 1-2)
- Unpacking
- ATTENTION!
- Intended use
- Safety information
- General safety rules
- Safety at work area
- Personal safety
- Fuel Safety
- Instructions for use and maintenance of the machine
- Instructions for maintenance
- Technical data
- Subject to technical changes!
- Vibrations:
- Before starting the equipment
- Warning!
- Montage
- ⚠ Important!
- Mounting the grass catcher (Fig. 10-11)
- Adjusting the scarifying depth (Fig. 12)
- Operation
- Important!
- Starting the equipment
- Tips for proper working
- Cleaning and maintenance
- Danger!
- Cleaning
- Maintenance
- Servicing the air filter
- Servicing/Replacing the spark plug
- Preparing the equipment for storage
- Preparing the device for transport
- Service information
- Disposal and recycling
- Troubleshooting
- Chers clients,
- Tisztelt vásárló!
- Vážený zákazníku,
- Vážený Zákazník,
- Geachte klant,
- Austatud klient!
- Arvoisa asiakas
- Gerbiamas kliente,
- Bästa Kund!
- CE - Declaration of Conformity
- Standard references:
- EN ISO 14982:2009; EN 13684:2018
- Garantiebedingungen
- Garantie FR
Brand : SCHEPPACH
Model : SC40P
Category : Lawn mower