
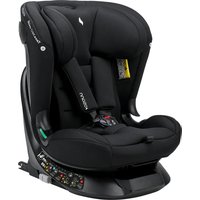
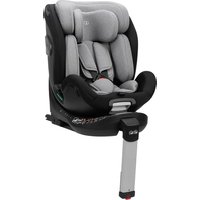
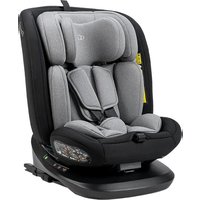
Flux Isofix - High chair Osann - Free user manual and instructions
Find the device manual for free Flux Isofix Osann in PDF.



| Product type | Car seat group 1/2/3 with Klimax technology |
| Weight group | 9 to 36 kg |
| Recommended age | 9 months to 12 years |
| Installation | ISOFIX + Top Tether or three-point seat belt |
| Mounting direction | Forward facing |
| Klimax technology | Automatic heating (T<5°C) and ventilation (T>30°C) |
| Power supply | 12 V DC via cigarette lighter socket, cable 4.50 m |
| Comfort functions | Automatic ventilation and heating, temperature display |
| Headrest adjustment | Yes, red lever, multiple positions |
| Harness | 5-point height adjustable for group 1 |
| Side protection | Integrated |
| Materials | Plastic, fabric cover |
| Cover maintenance | Hand wash at max 30°C, no bleach, no tumble dryer |
| Plastic cleaning | Damp cloth, no harsh cleaner |
| Seat weight | Approximately 8 kg (estimate) |
| Dimensions (L x W x H) | Approximately 45 x 40 x 60 cm (estimate) |
Frequently Asked Questions - Flux Isofix Osann
User questions about Flux Isofix Osann
0 question about this device. Answer the ones you know or ask your own.
Ask a new question about this device
Download the instructions for your High chair in PDF format for free! Find your manual Flux Isofix - Osann and take your electronic device back in hand. On this page are published all the documents necessary for the use of your device. Flux Isofix by Osann.
USER MANUAL Flux Isofix Osann
natural_image
Black and gray baby car seat with visible branding and model number 'OSAN' (no text-heavy elements)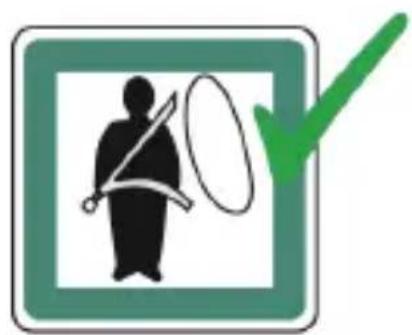
natural_image
Green checkmark icon with a silhouette of a person holding a sword and a large oval, no text or symbols present.
natural_image
Line drawing of a car seat assembly with no text or symbolsnatural_image
Illustration of a car seat assembly with a hand adjusting the seatbelt (no text or symbols present)natural_image
Illustration of a person adjusting a seatbelt on a white chair (no text or symbols)natural_image
Illustration of a child sitting in a car seat with a red belt (no text or symbols)
natural_image
Illustration of a child wearing a seatbelt sitting in a white car seat, with a hand adjusting the seatbelt (no text or symbols present)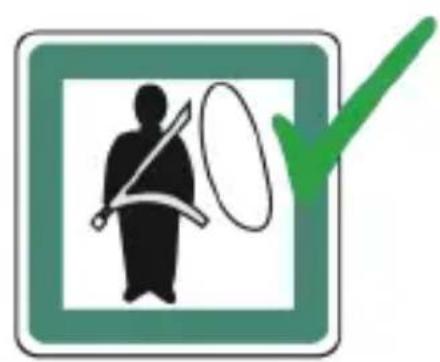
natural_image
Green checkmark icon with a silhouette of a person holding a sword and a large oval, no text or symbols present.
natural_image
Line drawing of a car comfort seat with seatbelt and seatbelt (no text or symbols)natural_image
Illustration of a person adjusting a seatbelt on a white chair (no text or symbols)
natural_image
Illustration of a child sitting in a car seat with a red belt (no text or symbols)

natural_image
Illustration of a child wearing a seatbelt sitting in a white car seat, with a hand adjusting the seatbelt (no text or symbols present)We would like to congratulate you on your purchase of a group 1/2/3 car seat. If you would like to obtain any help regarding this product, you can contact our customer service.
SAFETY INSTRUCTIONS
- Please read these instructions carefully before using the seat and keep this guide in a safe place for future reference.
- If you do not comply with these instructions, the safety of your child could be compromised.
- When somebody else is using your car seat, ensure they also know how to use it, especially the correct way to adjust it.
- This child seat can be used for children of 9 to 36 kg in weight (recommended age: 9 months to 12 years).
- This car seat is only suitable if the vehicle is fitted with 3-point seat belt, approved to UN/ECE Regulation No. 16 or other equivalent standards.
- Using the child seat on passenger seats with front airbag, slide back the passenger seat.
- The safest position for this seat is on the rear seat of a vehicle. Never transport the child without using the belt. For correct use of car seat belt please refer to this instruction booklet. The car seat belt cannot be used to any identified forcing point.
- Periodically inspect the harness for wear, to make sure each harness and vehicle seat belt are completely fastened. The seat belt should be adjusted according to the body of child and should not be twisted.
- Don't use any car seat again after impact or accident.
- Car interiors can become very hot when in direct sunlight, it is therefore recommended that the child seat should be covered when not in use. So it will not burning your child.
- Do not leave your child unattended in the seat at any time.
- Luggage and other heavy or sharp objects should be secured in the car. Loose objects are liable to cause injury in the event of an accident.
- The child seat must not be used without the cover.
- The cover cannot be changed to other materials, other than manufacturers recommended, as it will impact the functions of child seat system.
- In the event of an emergency it is important that the child can be released quickly. This means that the buckle is not fully tamper proof and so your child must be taught never to play with the buckle.
- When the child seat is not in use, it is recommended that it is fastened into the car with a seat belt to avoid injury in the event of an accident.
- Store this child seat in a safe place when it is not being used. Avoid placing heavy objects on top of it.
- Do not allow your child seat to come in contact with corrosive substances e.g. battery acid.
- Do not leave the child seat with a child in it on a raised surface, such as a table, work top, bed or shopping trolley, due to risk of falling.
- Do not use this child seat in the home. It has not been designed for home use and should only be used in your car.
- The manufacturer can only guarantee the safety of the car seat if it is used by the original owner.
• We strongly advise against using a second-hand product, as you can never be sure of its history.
• Always check to make sure the seat fits in your car properly before purchasing it.
Parts and fittings

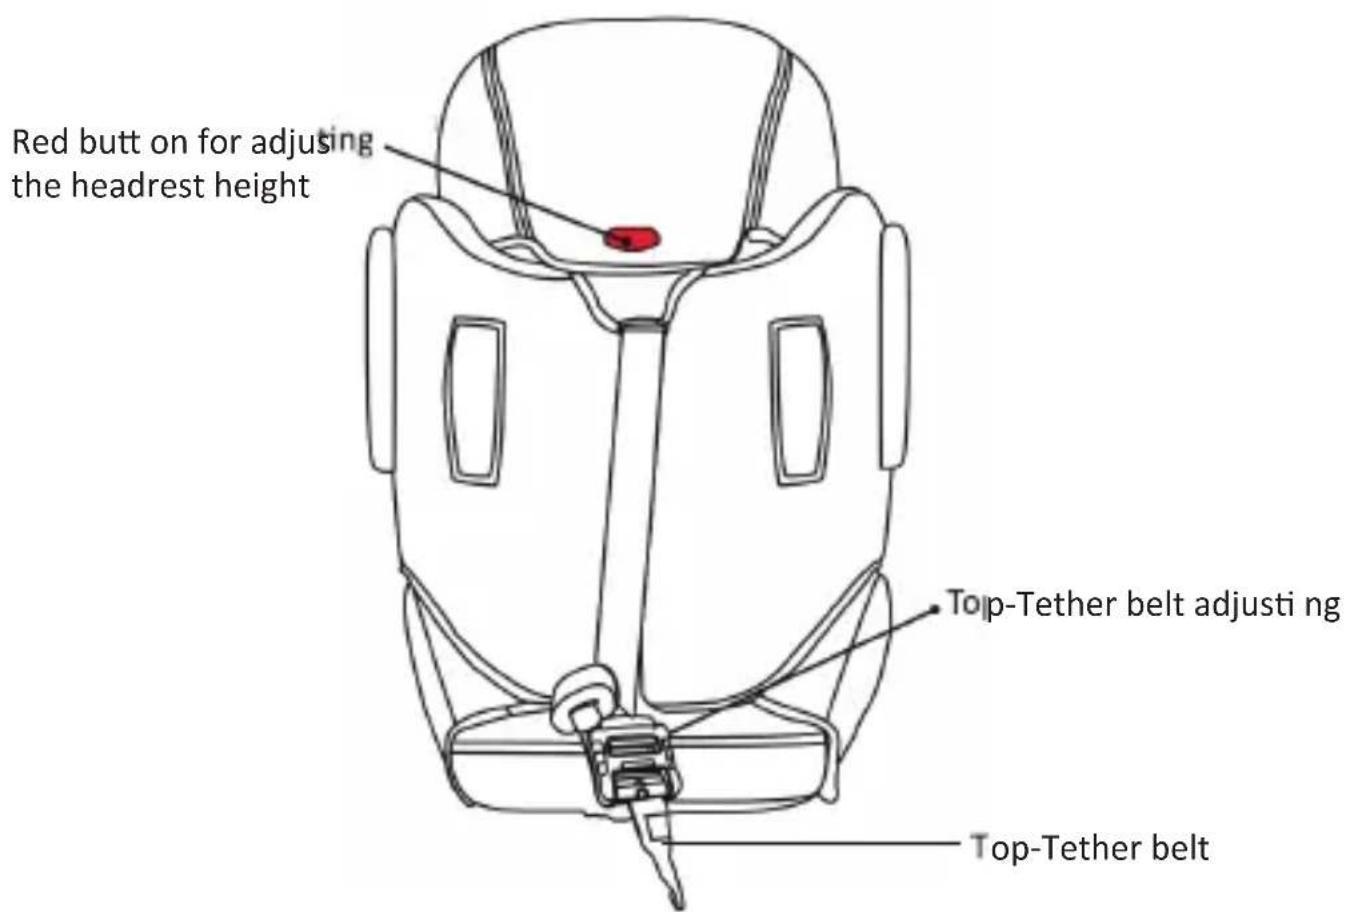
Correct shoulder strap height

Always check that the shoulder straps are at the correct height for your child. The child's shoulders should always be below the slot for the harness.
Changing the shoulder strap height
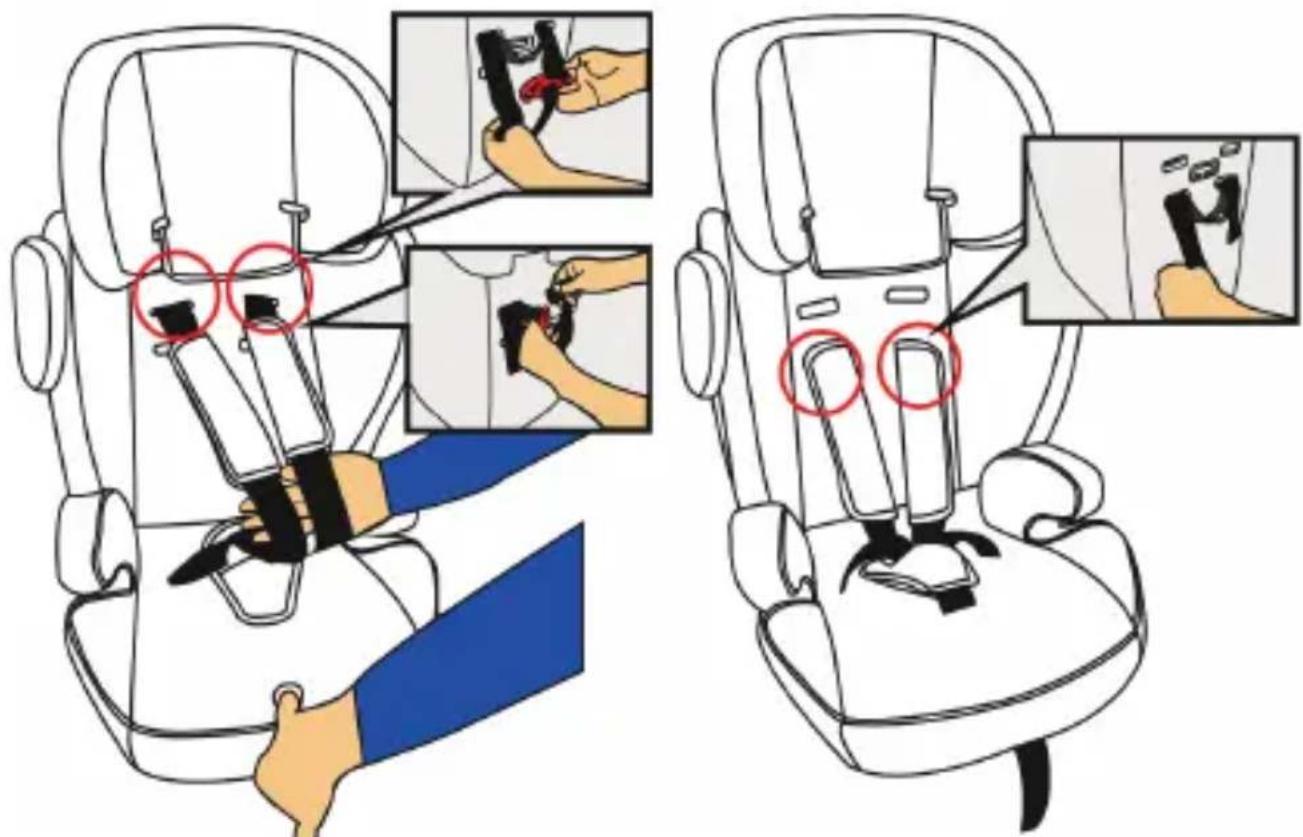
Slide one of the harness straps off the harness connector. Then from the front of the seat, pull it through the slot in the seat's backrest and fabric cover. Thread the harness strap back through the next hole up or down on the seat's backrest. Re-thread the harness strap back onto the harness connector at the back of the seat. Repeat the same process for the other harness strap. Make sure both of the straps go through slots at the same height.
Removing all straps
1. Removing the safety harness shoulder straps

Release the strap at the bottom of the backrest cover to gain access to the harness. Slide both of the harness straps off the harness connector at the back of the backrest and pull the webbing through the slots in the seat's backrest and fabric cover.
2. Removing the safety harness lap straps
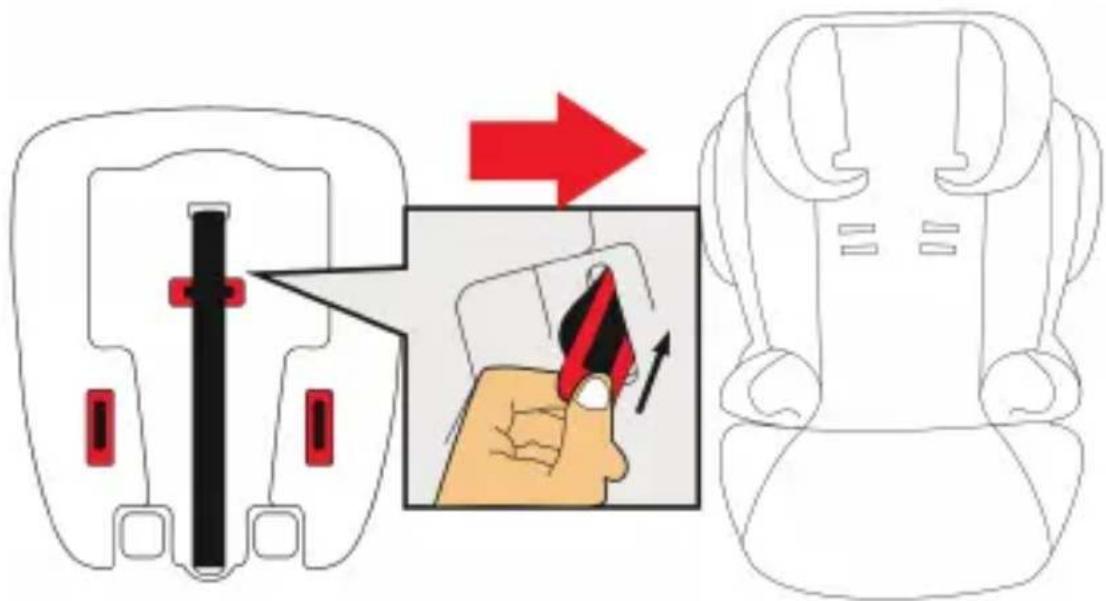
Turn the webbing retainers on their narrowest end and feed them through the slots in the base of the seat and then through the slots in the fabric cover.
WARNING: Never remove the back of your car seat. Without the back, your child will not be protected laterally.
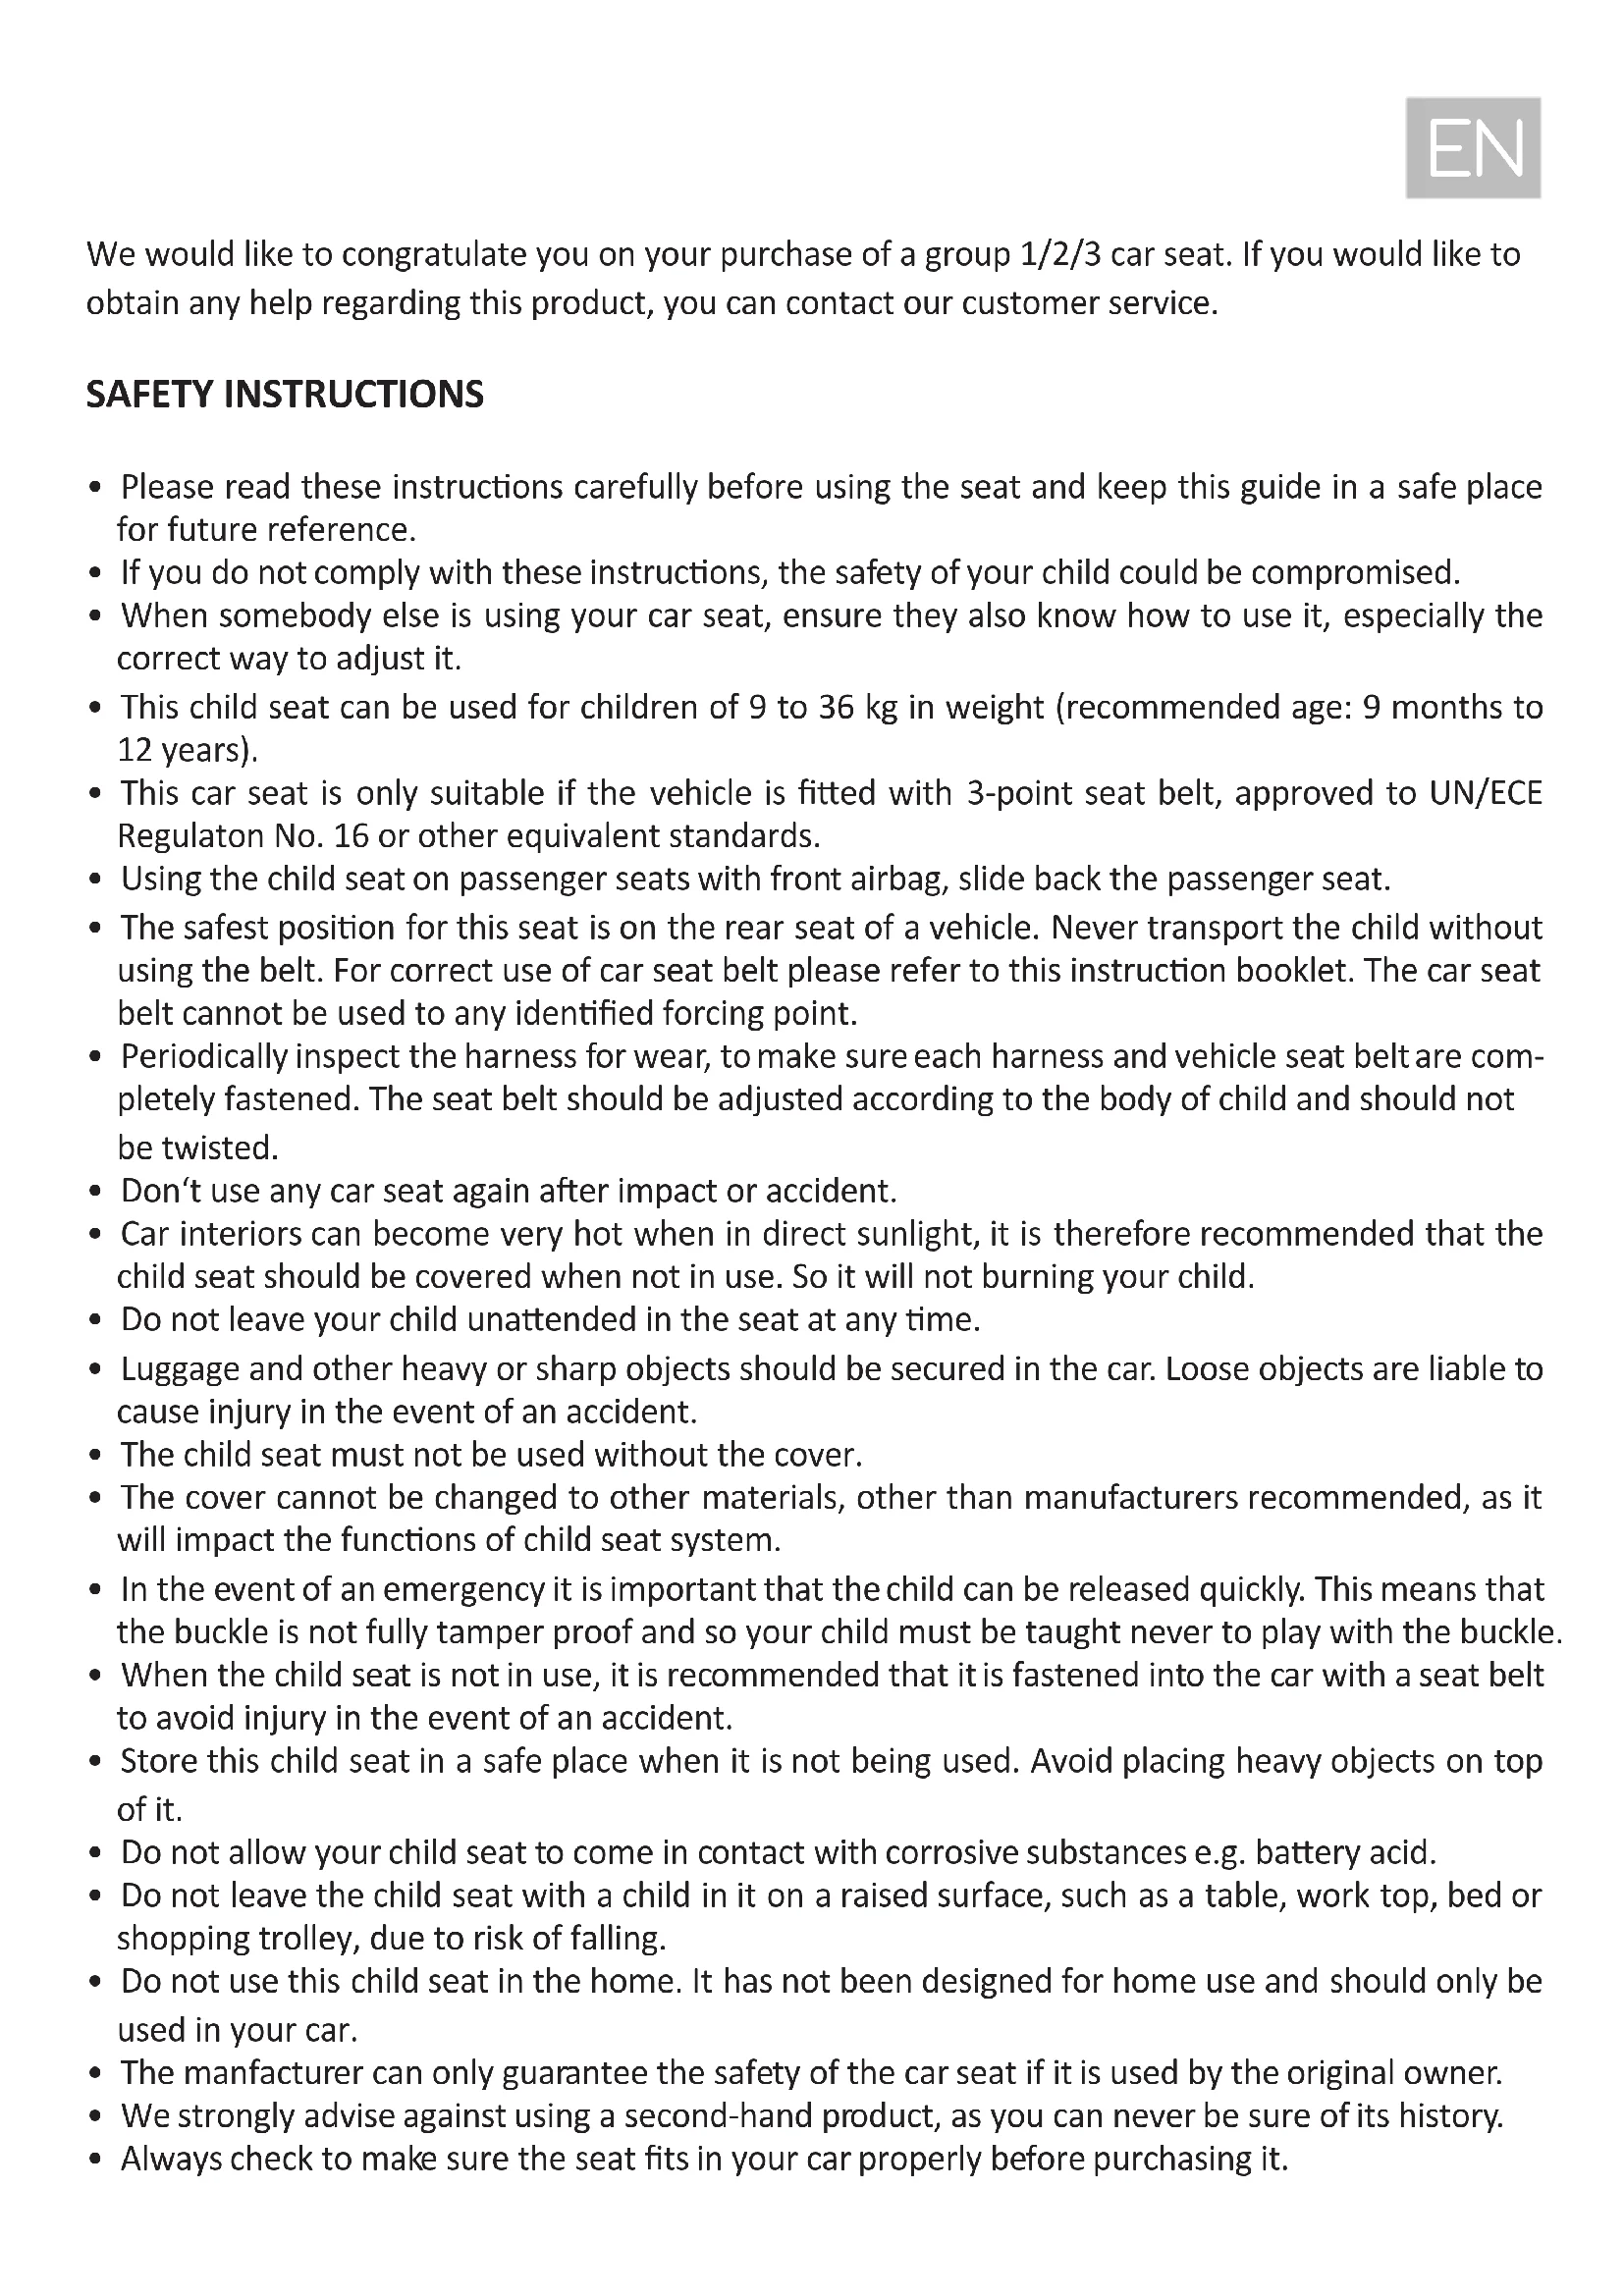
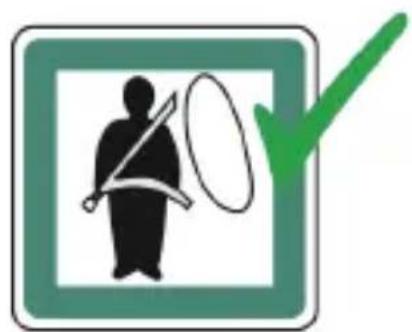
Universal Retaining system: for cars without Isofi x
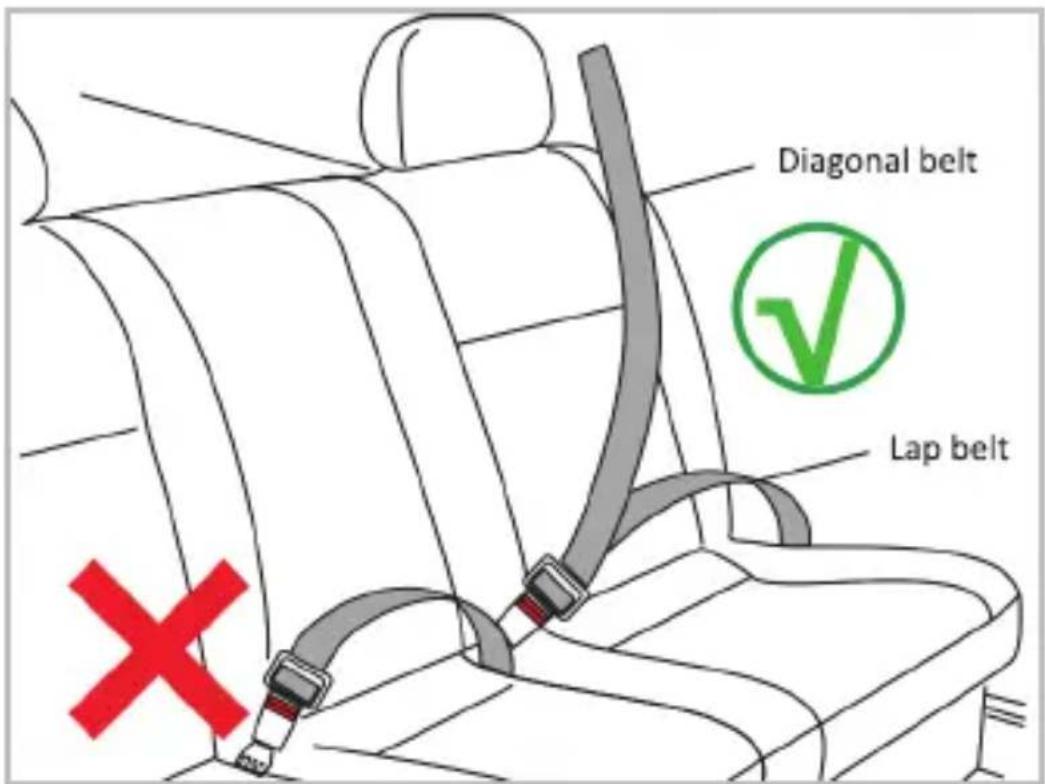
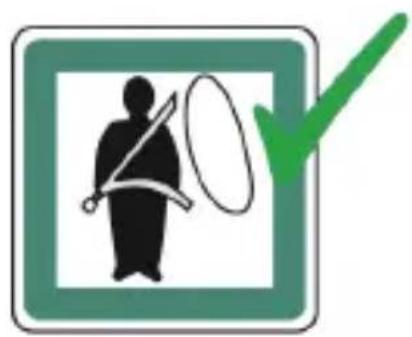
This type of approved seat belt you should have

natural_image
Green checkmark icon with a silhouette of a person holding a crossbar and a large oval, no text or symbols present.
This car seat is only suitable if the vehicle is fitted with 3-point-static, 3-point retractor safety belts, approved to UN/ECE Regulation on No. 16 or other equivalent standards.
This type of child seat may be compati ble to other car seats, too.
If you have any doubt, please consult the manufacturer or retailer.
Fitting the car seat for 9-18 kg (Group I, approx. 9 months to 4 years)
Install the child seat in consistent with the vehicle driving direction.

natural_image
Line drawing of a car seat assembly with no text or symbolsStep 1: Place the child seat on the vehicle's seat ensuring that it firmly leans against the car seat backrest.

natural_image
Illustration of a car seat assembly with a hand adjusting the seatbelt (no text or symbols present)Step 2: Fasten the seat cushion and backrest fully as shows in the picture.

Step 3: Cauti on: From the back view, make sure that the seat belt goes under the belt of the child's seat, go over is the incorrect installation. This is very important.

Step 4: Make sure that the seat belt is not twisted. Also make sure that the lap secti on of seat belt webbing goes under the armrest and the diagonal secti on of the seat belt webbing goes under the red clip. Fastening the belt into the buckle, make sure that you hear a „click“ and then fasten the belt.
Fitting the car seat for 9-18 kg (Group I, approx. 9 months to 4 years)

natural_image
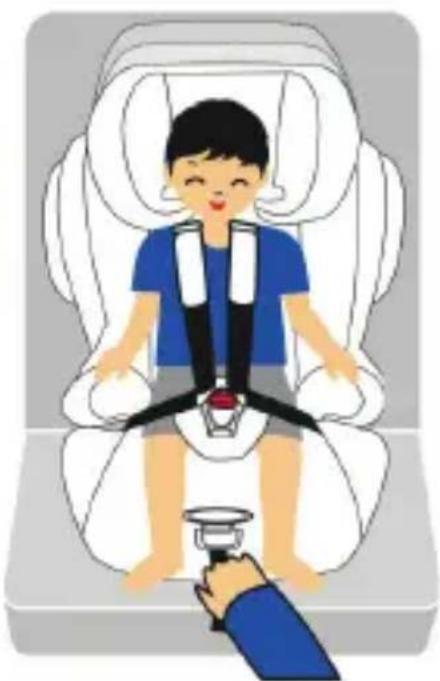
Illustration of a person adjusting a seatbelt on a white chair (no text or symbols)Step 1: As shows in the picture above, one hand press the harness adjuster, and another hand loose the shoulder straps, then we can loose the shoulder straps its longest lenght.

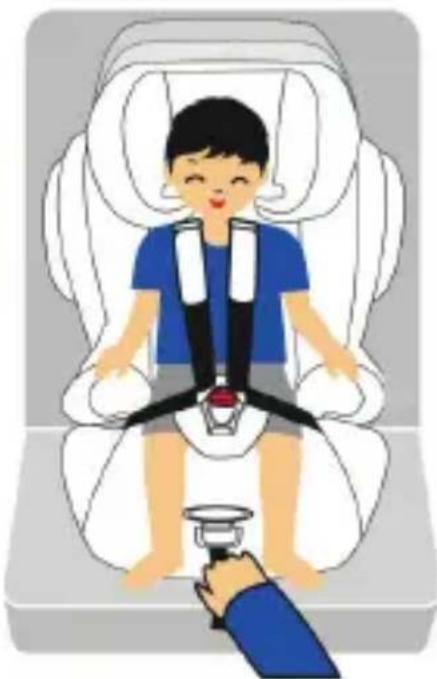
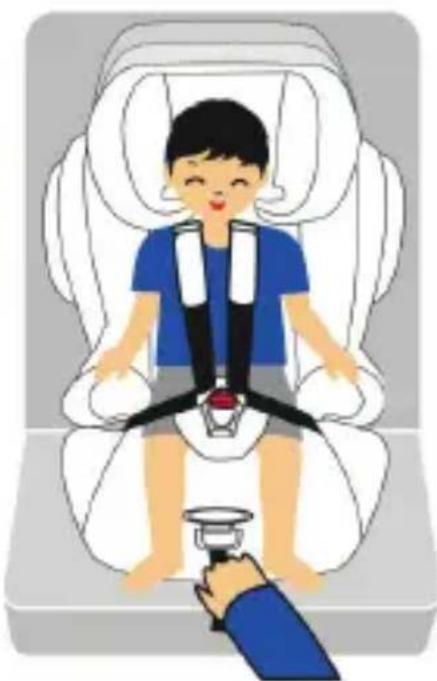
Step 2: As shows in the picture press the red button to release the buckle, then put the shoulder straps on both sides of the armrest.

natural_image
Illustration of a child sitting in a car seat with a red belt (no text or symbols)
natural_image
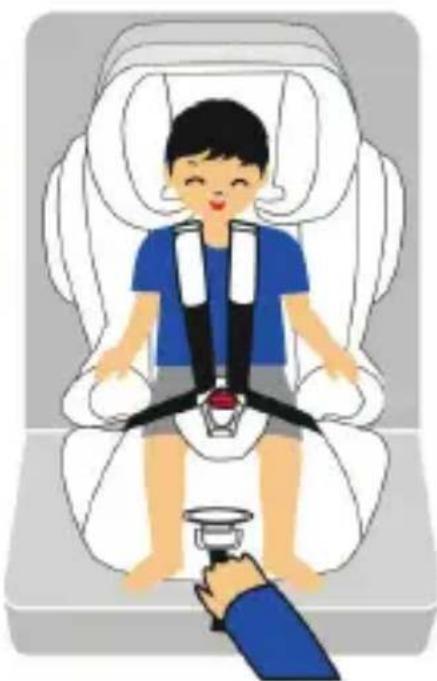
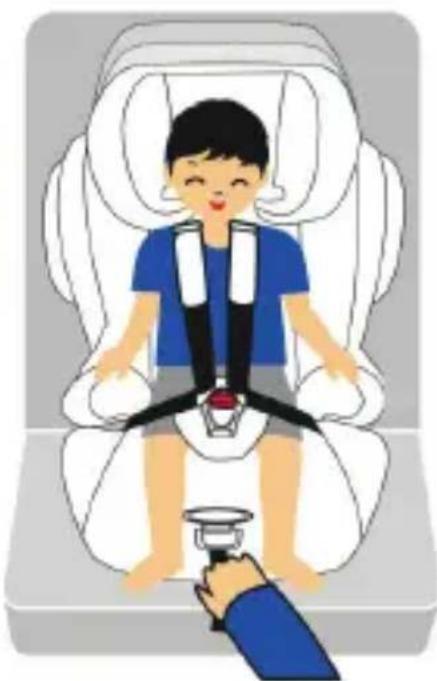
Illustration of a child wearing a seatbelt sitting inside a car seat, with a hand holding a small cup (no text or symbols present)Step 3: Put your baby into the child seat, put the shoulder straps in its original position. Adjust the shoulder straps according to the height of your child's shoulder. Close the insert and press it into the buckle, make sure you hear a „click“. Make sure that the seat belt is not twisted. Fastening the shoulder section of belt, and finally adjust the height of the headrest according to your child's height.
Fitting the car seat for 15-36 kg (Group II & III, approx. 3 years to 12 years)

Step 1: Place the child seat on the vehicle's seat ensuring that it is firmly pressed against the car seat's backrest.
Step 2: Place your child into the child seat.
Step 3: Fastening the seat belt, making sure that a) the lap secti on of the seat belt webbing goes above the crotch of the child; b) the diagonal secti ons of the seat belt webbing goes above your child's shoulder. Making sure the lap secti on of the seat belt webbing goes under the armrest and then fasten it into the buckle.
Step 4: Make sure that the seat belt is not twisted. Check whether the diagonal sections of the seat belt webbing goes through the groove on the armrest. At the same time, the shoulder straps should be adjusted to the height that is right over your child's neck.
Step 5: Adjust the height of the headrest, make sure that the hook on the headrest is 1 cm over your child's shoulder.
Step 6: Fasten the seat belt upwards firmly, ensure that the seat is firmly installed.
Cauti on: Make sure that the seat belt is not twisted. Also check whether the cover is correctly installed, and whether match will with the seat belt.
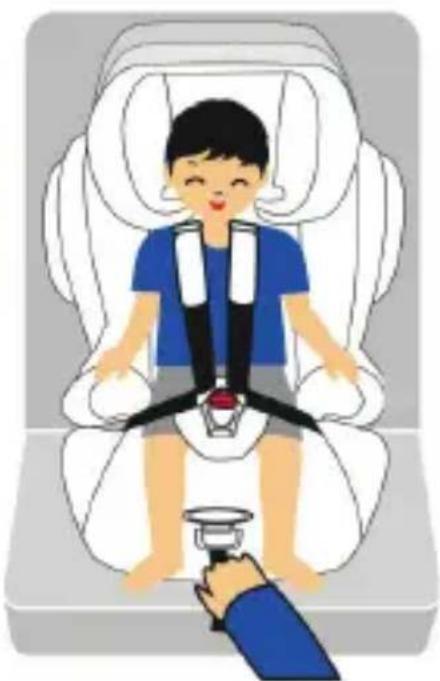
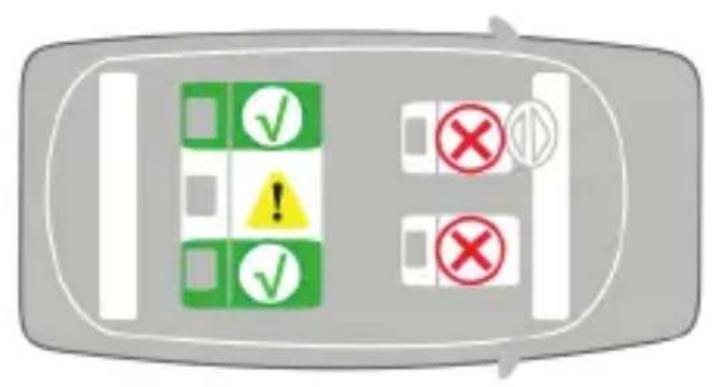
Universal retaining system: for cars with Isofi x


natural_image
Green checkmark icon with a silhouette of a person holding a sword and a large oval, no text or symbols present.
You can install the child seat here only when equipped with 3-point static c, 3-point retractor safety belts that the ECE R16 regulati on suggests.
This type of child seat may be compatible to other car seats, too.
If you have any doubt, please consult the manufacturer or seller.
Fitting the car seat for 9-18 kg (approx. 9 months to 4 years)
Install the child seat in consistent with the vehicle's driving direction.

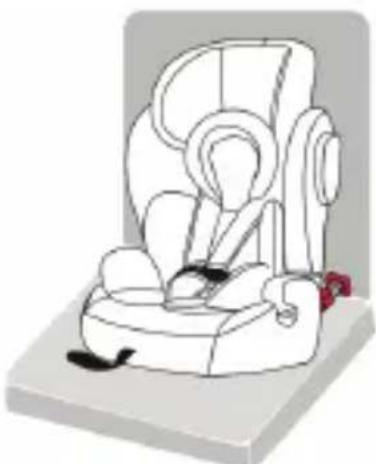
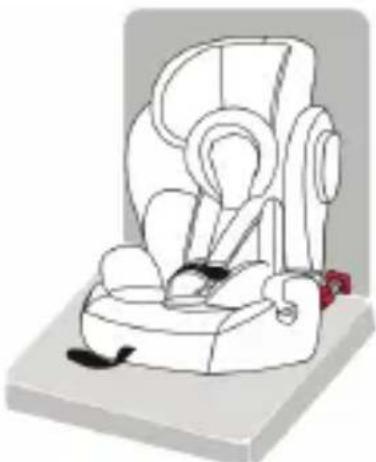
Step 1: Put the red isofi x guide groove into the positi on of the Isofi x anchorage points.

natural_image
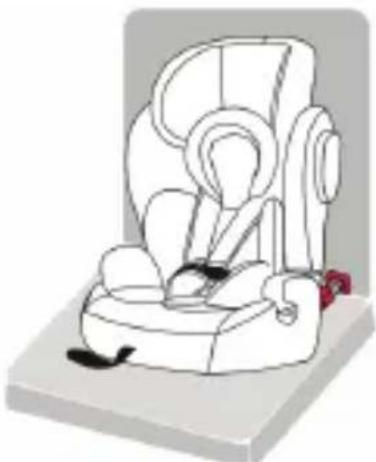
Line drawing of a car comfort seat with seatbelt and seat, no text or symbols presentStep 2: Rotate out the isofi x connectors uti l you hear a „click“. Check that the isofi x connectors are moving within the angle of 15°, and cannot turn around.

natural_image
Illustration of a hand using a computer to adjust or install a car seat, with a red arrow indicating the motion (no text or symbols present)Step 3: Pull afterwards the black plastic coat of isofix connectors to make the isofix connectors in red window. Red means the isofix connectors are unlocked. Push the isofix base towards the fixed point, make sure the isofix base locked on the fixed points. Make sure the isofix connector is in green window.
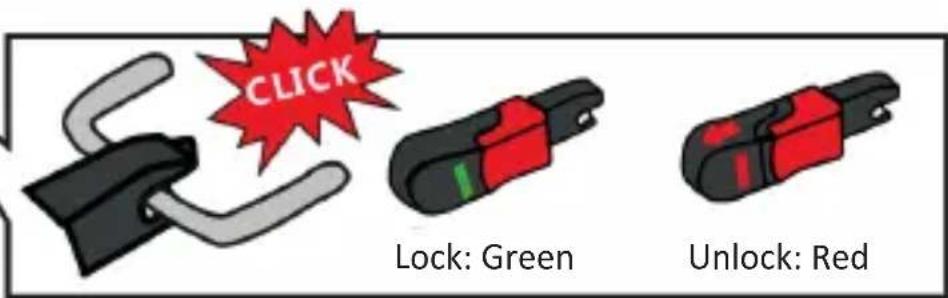

Step 4: Open the vehicle latch connector cover, let top tether hook lock the latch anchorage points and make sure that it is fully ti ghtend. (latch anchorage points are a litt le diff erent with regard to diff erent types of car, please read instructi ons of the car carefully).
CAUTION: Make sure that the seat belt is not twisted.

Step 5: Fasten the belts in its tightest status, and check whether the latch connector shows green window. In this way, the child seat is firmly pressed against the vehicle seat backrest and do not need to install by the belts. If in doubt, consult either the child restraint manufacturer or the retailer.
Fitting the car seat for 9-18 kg (Group I, approx. 9 months to 4 years)
natural_image
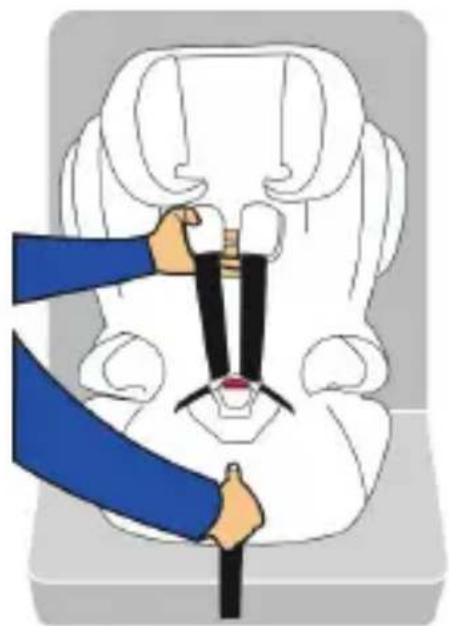
Illustration of a person adjusting a white seatbelt, no text or symbols presentStep 1: As shows in the picture above, one hand press the harness adjuster, and another hand loose the shoulder straps, then we can loose the shoulder straps its longest lenght.
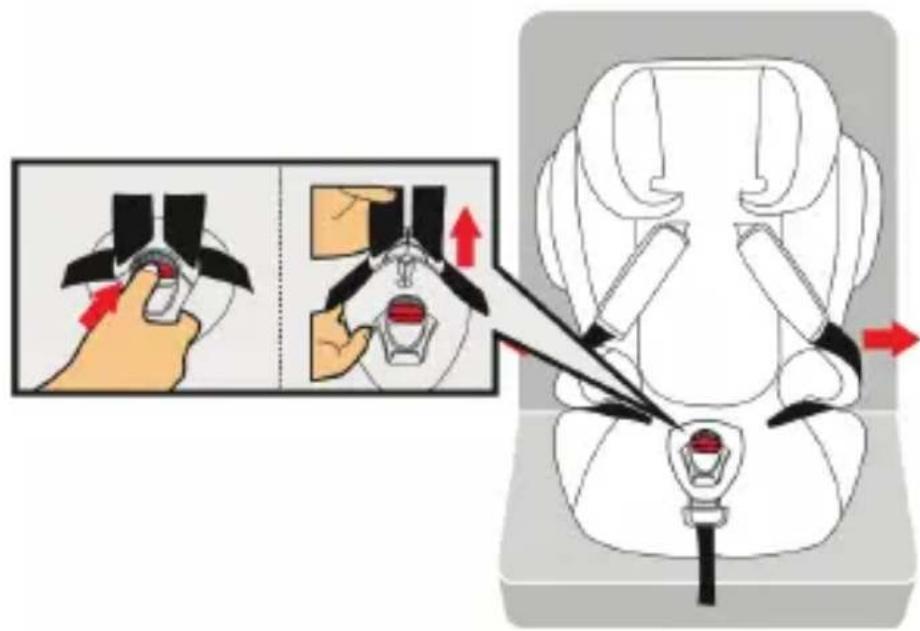
Step 2: As shows in the picture press the red button to release the buckle, then put the shoulder straps on both sides of the armrest.

natural_image
Illustration of a child sitting in a car seat with a bicycle seat, no text or symbols present
natural_image
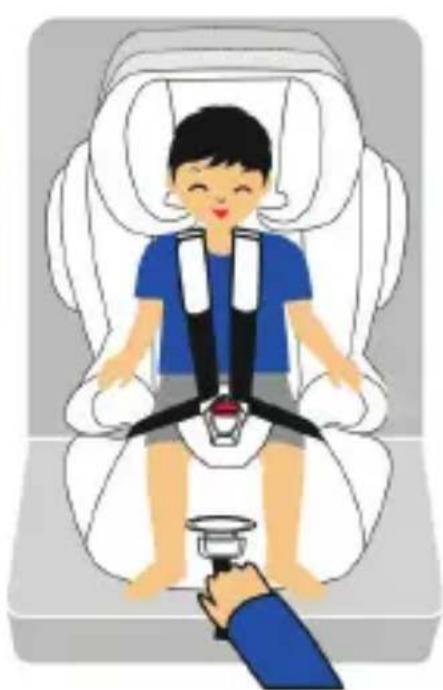
Illustration of a child seated in a car seat with a hand holding a seatbelt (no text or symbols present)Step 3: Put your baby into the child seat, put the shoulder straps in its original position. Adjust the shoulder straps according to the height of your child's shoulder. Close the insert and press it into the buckle, make sure you hear a „click“. Make sure that the seat belt is not twisted. Fastening the shoulder section of belt, and finally adjust the height of the headrest according to your child's height.
Fitting the car seat for 15-36 kg (approx. 3 years to 12 years)
Install the child seat in consistent with the vehicle's driving direction.
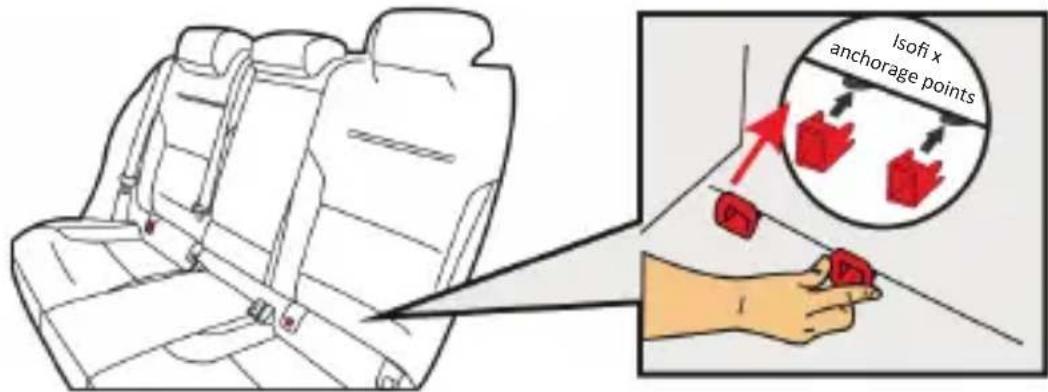
Step 1: Put the red isofi x guide groove into the positi on of the Isofi x anchorage points.

Step 2: Rotate out the isofi x connectors until you hear a „click“. Check that the isofi x connectors are moving within the angle of 15^ , and cannot turn around.

Fitting the car seat for 15-36 kg (Group II & III, approx. 3 years to 12 years)
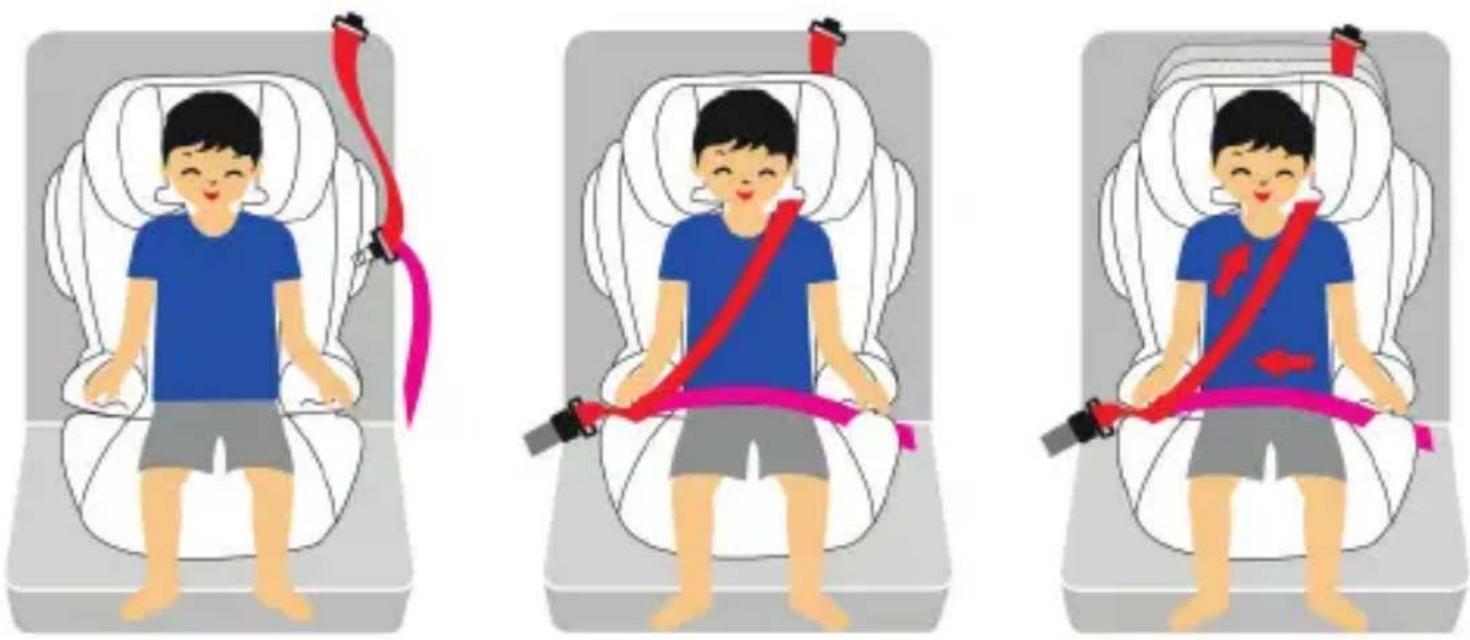
Step 1: Place the child seat on the vehicle's seat ensuring that it is firmly pressed against the car seat's backrest.
Step 2: Place your child into the child seat.
Step 3: Fastening the seat belt, making sure that a) the lap secti on of the seat belt webbing goes above the crotch of the child; b) the diagonal secti ons of the seat belt webbing goes above your child's shoulder. Making sure the lap secti on of the seat belt webbing goes under the armrest and then fasten it into the buckle.
Step 4: Make sure that the seat belt is not twisted. Check whether the diagonal sections of the seat belt webbing goes through the groove on the armrest. At the same time, the shoulder straps should be adjusted to the height that is right over your child's neck.
Step 5: Adjust the height of the headrest, make sure that the hook on the headrest is 1 cm over your child's shoulder.
Step 6: Fasten the seat belt upwards firmly, ensure that the seat is firmly installed.
Cauti on: Make sure that the seat belt is not twisted. Also check whether the cover is correctly installed, and whether match will with the seat belt.
Care and maintenance
1. Removing the cover
Backrest cover removal: First, release the elasti c strap at the bottom of the backrest cover, then slide the cover off.
Headrest and booster seat cover removal: Slide the cover off .
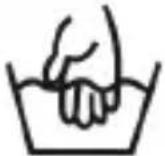 | Hand Wash No dry-cleans |  | |
 | Temperature below 30 degree |  | Do not iron |
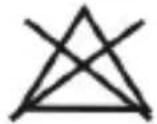 |  | Use mild soapNo decolorizer |
2. Cleaning the seat cover:
All the material parts can be removed. Slight stains can be removed using a damp sponge soaked in soapy water or it can be washed by hand at 30^ in soapy water. Do not use bleach, do not iron, do not machine wash, and do not tumble dry.
3.Cleaning the seat:
The harness and plastic parts can be sponged with very mild detergent and warm water. Do not use chemical cleansers, bleach or corrosives on any part of the seat.
natural_image
Green checkmark icon with a silhouette of a person holding a shield and an oval, no text or symbols present.
natural_image
Line drawing of a car seat assembly with no text or symbolsnatural_image
Illustration of a baby car seat with red belt and blue straps, no text or symbols presentnatural_image
Illustration of a person adjusting a seatbelt on a white chair (no text or symbols)natural_image
Illustration of a child sitting in a car seat with a red belt (no text or symbols)

natural_image
Illustration of a child wearing a seatbelt sitting in a white car seat, with a hand adjusting the seatbelt (no text or symbols present)
natural_image
Line drawing of a car comfort seat with seatbelt and seatbelt (no text or symbols)natural_image
Illustration of a hand using a computer to adjust or install a car seat, with no visible text or symbols.natural_image
Illustration of a person adjusting a seatbelt on a white chair (no text or symbols)natural_image
Illustration of a child sitting in a car seat with a red belt (no text or symbols)

natural_image
Illustration of a child wearing a seatbelt sitting in a white car seat, with a hand adjusting the seatbelt (no text or symbols present)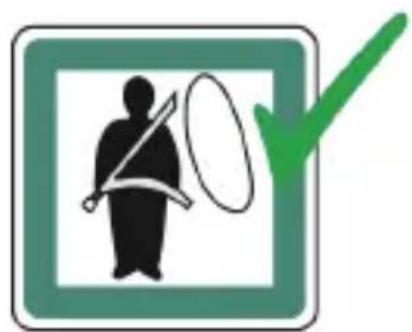
natural_image
Green checkmark icon with a silhouette of a person holding a cross and a large oval, no text or symbols present.
natural_image
Line drawing of a car seat assembly with no text or symbolsnatural_image
Illustration of a car seat assembly with a hand adjusting the seatbelt (no text or symbols present)natural_image
Illustration of a person adjusting a seatbelt on a white chair (no text or symbols)natural_image
Illustration of a child sitting in a car seat with a red belt (no text or symbols)
natural_image
Illustration of a child wearing a seatbelt sitting in a white car seat, with a hand adjusting the seatbelt (no text or symbols present)natural_image
Line drawing of a car seat with seatbelt and seat, no text or symbols presentnatural_image
Illustration of a hand using a computer to adjust or install a car seat frame, with no visible text or symbols.natural_image
Illustration of a person adjusting a white seatbelt, no text or symbols presentnatural_image
Illustration of a child sitting in a car seat with a bicycle seat, no text or symbols present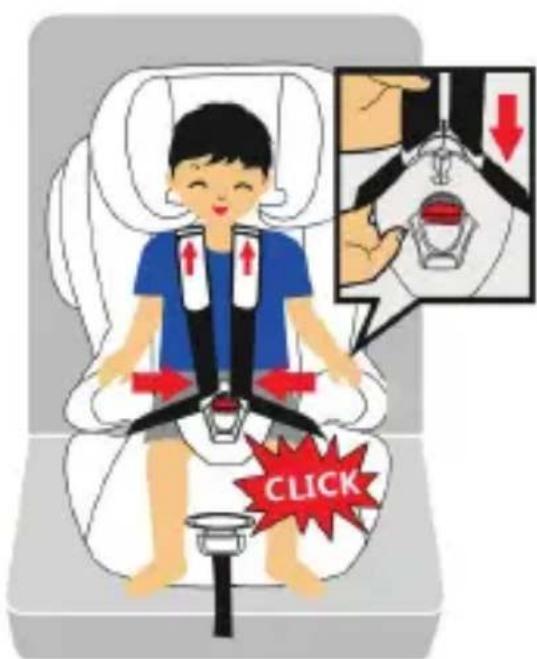

natural_image
Illustration of a child seated in a car seat with a hand holding a seatbelt (no text or symbols present)
natural_image
Green checkmark icon with a silhouette of a person holding a tool, no text or symbols present
natural_image
Line drawing of a car seat assembly with no text or symbolsnatural_image
Illustration of a car seat assembly with a hand adjusting the seatbelt (no text or symbols present)natural_image
Illustration of a person adjusting a seatbelt on a white chair (no text or symbols)natural_image
Illustration of a child sitting in a car seat with a red brake pad on the seat (no text or symbols)

natural_image
Illustration of a child wearing a seatbelt sitting inside a car seat, with a hand holding a small cup (no text or symbols present)
natural_image
Green checkmark icon with a silhouette of a person crossing a horizontal line and an oval, enclosed in a square frame (no text or symbols)

natural_image
Line drawing of a car seat with no text or symbolsnatural_image
Illustration of a hand using a computer to adjust or install a car seat, with no visible text or symbols.natural_image
Illustration of a person adjusting a seatbelt on a white chair (no text or symbols)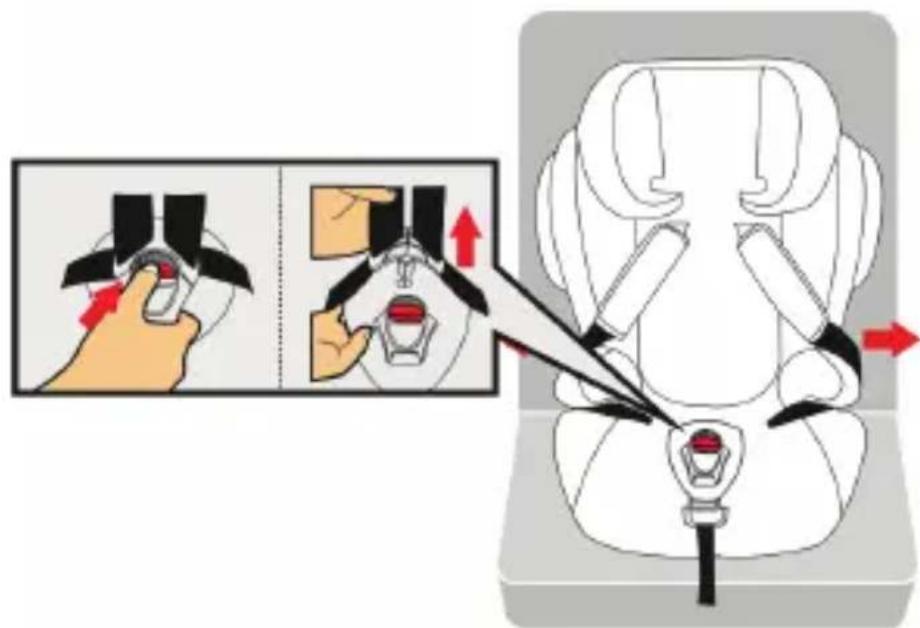
natural_image
Illustration of a child sitting in a car seat with a red belt (no text or symbols)

natural_image
Illustration of a child wearing a seatbelt sitting in a white car seat, with a hand adjusting the seatbelt (no text or symbols present)
natural_image
Green checkmark icon with a silhouette of a person holding a sword and a target, no text or symbols present.
natural_image
Line drawing of a car seat assembly with no text or symbolsnatural_image
Illustration of a car seat assembly with a hand adjusting the seatbelt (no text or symbols present)natural_image
Illustration of a person adjusting a seatbelt on a white chair (no text or symbols)natural_image
Illustration of a child sitting in a car seat with a red belt (no text or symbols)
natural_image
Illustration of a child wearing a seatbelt sitting in a white car seat, with a hand holding a small cup (no text or symbols present)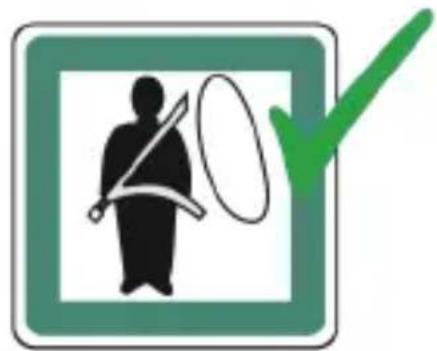
natural_image
Green checkmark icon with a silhouette of a person crossing a horizontal line and an oval, enclosed in a square frame (no text or symbols)

natural_image
Line drawing of a car seat with seatbelt and seatbelt connector (no text or symbols)natural_image
Illustration of a hand using a computer to adjust a car seat component, with no visible text or symbols.natural_image
Illustration of a person adjusting a seatbelt on a white chair (no text or symbols)natural_image
Illustration of a child sitting in a car seat with a red belt (no text or symbols)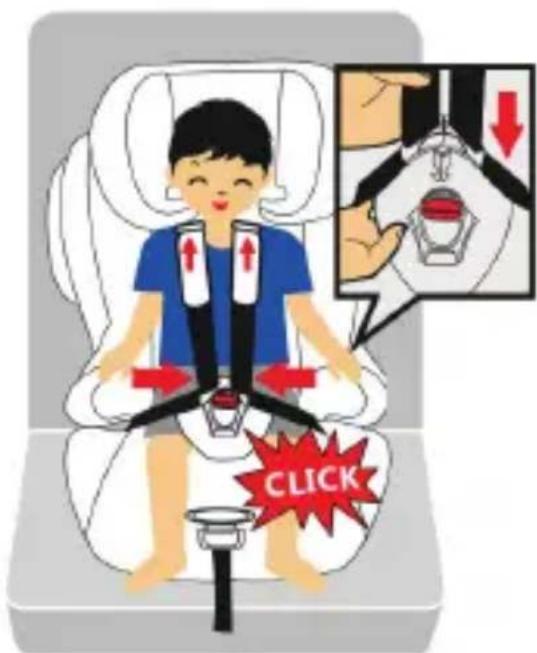
natural_image
Illustration of a child wearing a seatbelt sitting in a white car seat, with a hand holding a small cup (no text or symbols present)natural_image
Line drawing of a car seat assembly with no text or symbols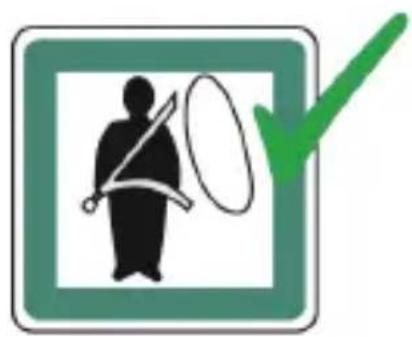
natural_image
Green checkmark icon with a silhouette of a person holding a shield and an oval, no text or symbols present.
natural_image
Line drawing of a car seat assembly with no text or symbolsnatural_image
Illustration of a child's seat assembly with a hand adjusting the seatbelt (no text or symbols present)natural_image
Illustration of a car seatbelt with red straps and a 'CLICK' button, no text or symbols presentnatural_image
Illustration of a medical procedure showing a hand adjusting a white object with a black bandage (no text or symbols present)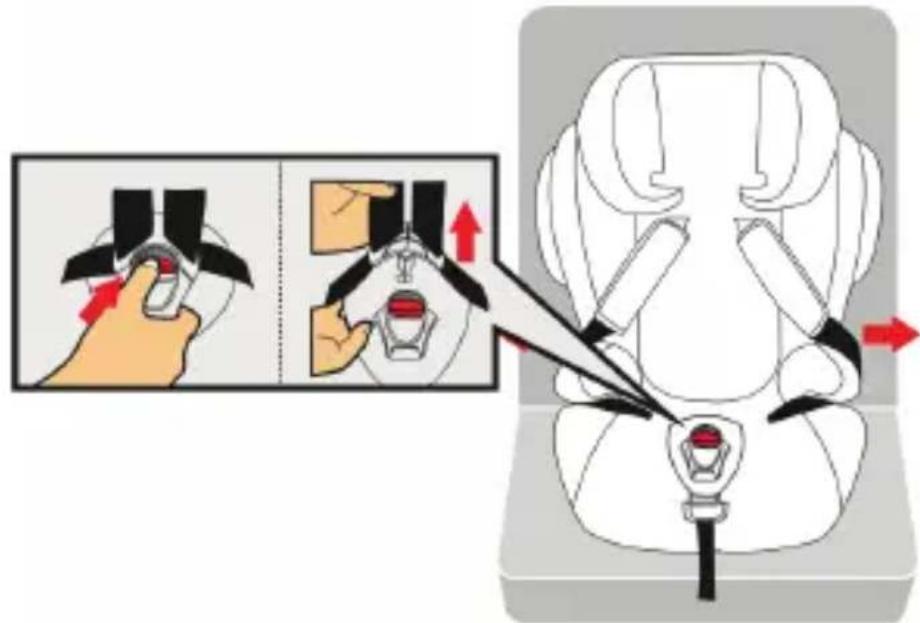
natural_image
Illustration of a child sitting in a car seat with a seatbelt device (no text or symbols)

natural_image
Illustration of a child wearing a seatbelt sitting in a white car seat, with a hand holding a small cup (no text or symbols present)
natural_image
Green checkmark icon with a silhouette of a person holding a tool and an oval, no text or symbols present.
natural_image
Line drawing of a car seat with seatbelt and seatbelt buckle (no text or symbols)natural_image
Illustration of a hand using a blue tool to lift a car seat, with red arrows indicating motion (no text or symbols)natural_image
Illustration of a medical procedure showing a hand adjusting a white object with a black bandage (no text or symbols present)
natural_image
Illustration of a child sitting in a car seat with a seatbelt device (no text or symbols)

natural_image
Illustration of a child wearing a seatbelt sitting in a white car seat, with a hand holding a small cup (no text or symbols present)Držiaky pásov otočte na úzkej strane a preti ahnite ich cez sedačku a potah sedačky.

natural_image
Green checkmark icon with a silhouette of a person holding a tool, no text or symbols present
natural_image
Line drawing of a car seat assembly with no text or symbolsKrok 1: Detskú sedačku umiestnite na sedadlo vozidla a zabezpečte, aby pevne priliehala k opierke chrbta sedadla vozidla.

natural_image
Illustration of a car seat assembly with a hand adjusting the seatbelt (no text or symbols present)natural_image
Illustration of a car seatbelt buckle assembly with red and black bands, shown in two views (no text or symbols)natural_image
Illustration of a person adjusting a seatbelt on a white chair (no text or symbols)natural_image
Illustration of a child sitting in a car seat with a red belt (no text or symbols)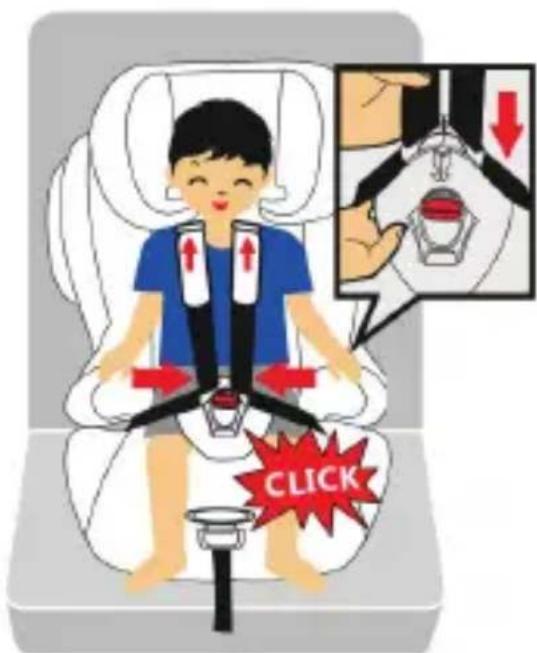

natural_image
Illustration of a child wearing a seatbelt sitting in a white car seat, with a hand adjusting the seatbelt (no text or symbols present)
natural_image
Green checkmark icon with a silhouette of a person crossing a horizontal line and an oval, enclosed in a square frame (no text or symbols)
natural_image
Line drawing of a car seat with seatbelt and seatbelt buckle (no text or symbols)natural_image
Illustration of a hand using a blue tool to adjust or install a white car seat, with a red arrow indicating the motion (no text or symbols present)natural_image
Illustration of a person adjusting a seatbelt on a white chair (no text or symbols)natural_image
Illustration of a child sitting in a car seat with a red belt (no text or symbols)
natural_image
Illustration of a child wearing a seatbelt sitting inside a white car seat, with a hand holding a small cup (no text or symbols present)natural_image
Facebook logo icon (no text or symbols present)
Find us on Facebook!
www.facebook.com/Osann.de

osann
Osann GmbH
Gewerbestr. 22
D-78244 Gottmadingen
natural_image
Icon of an open book with an information symbol inside, enclosed in a yellow circle (no text or symbols)DE
EN FR IT
ES
NL PL CZ
SK

osann
natural_image
Hand holding a red and black connector with a cable, next to a circular device (no visible text or symbols)
natural_image
Close-up of a black handheld device with a red circle highlighting a component, attached to a curved cable (no text or symbols visible)Optimal seating climate for little ones!
Our Klimax child car seat series stands out thanks to its genuine innovation: special technology provides pleasant cooling on hot summer days and a cosy, warm seat in winter.
What's more: As the first of its kind, our Klimax series opens up an entirely new chapter in seating comfort for children.
TABLE OF CONTENTS
- Explanation of symbols 14
- Safety information 14
- Intended use 16
- Scope of delivery 16
- Using Klimax technology 17
- Warranty
- Troubleshooting 19
- Disposal/environment 21
- Technical data
01. EXPLANATION OF SYMBOLS

WARNING!
Safety information indicating a hazardous situation which, if not avoided, may result in death or serious injury.

CAUTION!
Safety information indicating a hazardous situation which, if not avoided, may result in minor or moderate injury.

ATTENTION!
Information referring to a situation which, if not avoided, may result in property damage.

NOTE
Supplementary information regarding the product's operation.
02. SAFETY INFORMATION

NOTE
- The child car seat with Klimax technology is intended only for use in the car. The Klimax technology can be used in all cars equipped with a 12 V on-board power socket.
- Before using the child car seat with Klimax technology, please read the operating manual thoroughly and follow all the instructions regarding its safe and proper use.
- Should there be any visible signs of damage to the unit, it must no longer be used
- These operating instructions explain how to operate the Klimax technology. To install the child car seat properly in your car and for further relevant safety information, please read the separate operating manuals of the respective child car seat.
- When installing and operating the child car seat, ensure that airbags in the vehicle are in no way impaired or even covered (e.g. by the cable).
- The child car seat can, of course, be used without deploying the Klimax technology.
- The Klimax technology may be operated by adults only.

WARNING!
- Failure to observe this safety information can result in death or serious injury.
• Danger to life due to electric shock. - Do not allow the unit and/or connection cable to come into contact with moisture or liquids, to avoid the risk of electric shock. Do not handle the unit with wet hands.
- Do not make any modifications to the child car seat. Do not remove any parts from the child car seat beyond those steps listed in these instructions under the item “Cleaning”, as well as the usage instructions for the respective seat.
- Allow repairs to the child car seat, the connection plug or the connection cable to be carried out only by a specialist workshop or by the manufacturer. Improper (or otherwise attempted) repairs can lead to considerable damage and pose a genuine hazard.
- If any part of the connection plug gets stuck in the 12 V on-board voltage socket as a foreign object, it must be removed with insulated pliers or a similar tool. Always disconnect the vehicle battery before reaching into the 12 V on-board power socket. There is a risk of electric shock and short-circuiting of the car's electrics.
- Have repairs to the 12 V on-board power socket or the car's electrical system carried out by a specialist workshop only.
- Do not insert any pointed or metallic objects into the unit's openings.
- Do not use the Klimax technology if there are any visible signs of damage to the child car seat itself, the connection plug or the connection cable, if the child car seat has been dropped or if the child car seat has been involved in a traffic accident.
- Never leave your child unattended in the child car seat with Klimax technology. Never leave your child alone in the car when the outside temperature is high in summer or low in winter, respectively. Klimax technology does not guarantee protection against death attributable to extreme heat or cold.
• Children must be supervised at all times to ensure that they do not play with the child car seat.

CAUTION!
- Before commissioning, please ensure that the connection cable and plug are dry and clean.
- When laying the connection cable, please ensure that it is not crushed or chafed in any way.
- Always ensure to disconnect the child car seat from the power supply before any cleaning and maintenance work.
- Never use the child car seat with Klimax technology in conjunction with a cover other than the one supplied in the original packaging, to ensure air permeability.
- Do not cover the child car seat with Klimax technology – including the 12 V plug and connection cable – with additional blankets, covers or cushions. Keep the child car seat away from other sources of warmth, such as heating, seat heating or direct sunlight.

ATTENTION!
- Plug the connection plug only into a 12 V DC on-board power socket in your car that corresponds to the “Technical data” contained in these instructions.
- Never pull the connection plug out of the on-board power socket by the connection cable.
- Before using the child car seat with Klimax technology, please ensure that the ventilation openings on the child car seat are not covered up.
- Protect the child car seat and its connection cable – including the connection plug – from moisture.
03. INTENDED USE
Essentially, the child car seat with Klimax technology is intended for transporting a child in a car. Use in other means of transport (truck, bus, plane, boat) is not permitted.
These operating instructions explain how to operate the Klimax technology. To ensure the proper installation of the child car seat in your car and for further safety instructions relating to the child car seat, please read the separate operating instructions for the respective child car seat!
The Klimax technology can be used in all cars equipped with a 12 V on-board power socket.
04. SCOPE OF DELIVERY
Illustrations of the seat booster and child car seat are for example purposes only.
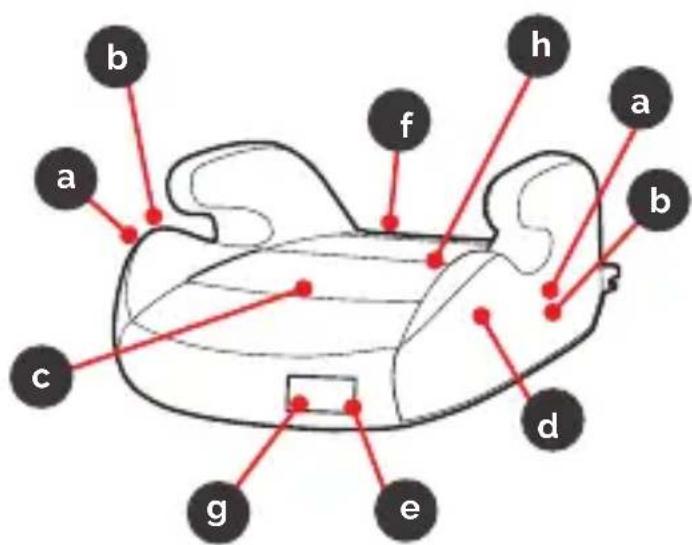
a Fan (seat booster 2 x)
b Fan casing
c Pressure sensor
d Temperature sensor (inside the body)
e Control circuit board (behind the display)
f 12 V plug with switch and connection cable
g Display
h Heating pad (1 x seat area)
i Operating instructions (without illustration)

a Fan (large child car seat 4 x)
b Fan casing
c Pressure sensor
d Temperature sensor (inside the body)
e Control circuit board (behind the display)
f 12 V plug with switch and connection cable
g Display
h Heating pad (1 x seat area, 1 x back rest)
i Operating instructions (without illustration)
05. USING KLIMAX TECHNOLOGY
POWER SUPPLY
The power supply for the child car seat is provided by the 12 V on-board power socket in your car. This may be located in various places in your car (e.g. boot, centre armrest, cockpit).
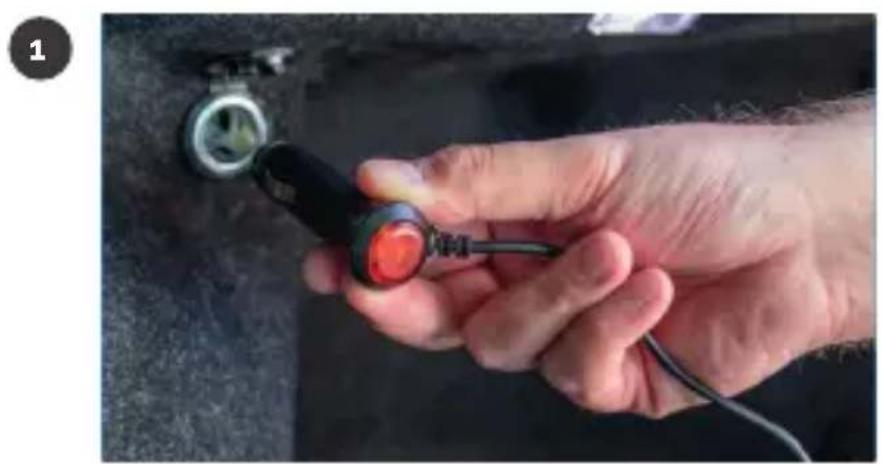
Some 12 V on-board voltage sockets are supplied with power only when the car's ignition is switched on. Please be sure to check this first. To check, insert the plug into the 12 V on-board power socket in your car (1). You can switch the system on or off using the red button on the plu (2). (The red button illuminates = on, the red button does not illuminate = off).
natural_image
Hand holding a black cable with red illuminated connector, next to a wall-mounted electrical socket (no text or symbols visible)
natural_image
Close-up of a black handheld device with a red circle highlighting a component, attached to a cable (no text or symbols visible)Switch off the power supply manually when the child car seat (or Klimax technology respectively) is not in use, to prevent the display from lighting up continuously. The power supply for the Klimax technology switches off automatically after 30 minutes if no child is sitting in the child car seat or if no pressure is exerted on the pressure sensor.
KLIMAX TECHNOLOGY
As soon as the plug is inserted into the 12 V on-board power socket in your car and switched on using the red button, the system is ready for use.
The Klimax technology activates only when pressure is applied to the sensor in the seat.
ATTENTION: Use the child car seat only for transporting your child. Never use it to transport items that could activate the Klimax technology when the system is switched on.
The Klimax technology is fully automated. You do not need to adjust any settings other than switch on the system (as described above).
SUMMER COOLING
The integrated sensor measures the temperature inside the child car seat. If this temperature is above 30^ C, the system is activated and removes the warm air, creating a cooling air circulation effect.
WINTER WARMING
When the integrated sensor measures a temperature of less than 5^ C, however, the seat area is automatically heated until the inside of the seat has reached a temperature of 20^ C.
DISPLAY
The display shows you the measured temperature inside the child car seat in degrees Celsius (°C). The function currently active is also displayed: Ventilation or heating.

CLEANING
You can clean the child car seat cover according to the washing instructions on the washing label, which is located on the cover itself.
Use a damp cloth to clean the plastic body. Thoroughly dry the cleaned areas to ensure that no moisture can damage the electronics. Do not use chemicals or abrasive cleaning agents.
06. WARRANTY
The statutory warranty period shall apply. If the product is defective, please contact your specialist retailer or the manufacturer.
You must submit the following documents when applying for any repair or warranty work to be undertaken:
• A copy of the invoice with date of purchase
- The reason for the complaint or a description of the defect
Please do not send the product for repair or warranty processing without prior consultation with your specialist retailer or the manufacturer.
07. TROUBLESHOOTING
| Fault Possible cause Suggested solution | ||
| 12 V plug is not plugged in or not switched on | Insert the 12 V plug into the 12 V on-board power socket and switch it on. | |
| 12 V plug or connection cable is defective or otherwise damaged | Have the 12 V plug or connection cable replaced by an authorised service centre/manufacturer. | |
| The fans no longer work | Starting temperature not reached | The temperature measured by the sensor must be above 30°C for the fans to be activated. The pressure sensor must also be activated. |
| A foreign object is blocking the fan | Please remove the foreign object. To do this, please first disconnect the 12 V plug from the 12 V on-board power socket. | |
| The fan, pressure sensor or temperature sensor is defective | Please have the fan, pressure sensor or temperature sensor replaced by an authorised service centre/the manufacturer. | |
Fault Possible cause Suggested solution
| 12 V plug is not plugged in or not switched on | Insert the 12 V plug into the 12 V on-board power socket and switch it on. | |
| 12 V plug or connection cable is defective or otherwise damaged | Have the 12 V plug or connection cable replaced by an authorised service centre/manufacturer. | |
| The heating pad is not working | Starting temperature not reached | The temperature measured by the sensor must be below 5°C for the heating pad to be activated. The pressure sensor must also be activated. |
| The heating pad, pressure sensor or temperature sensor is defective | Have the heating pad, pressure sensor or temperature sensor replaced by an authorised service centre/the manufacturer. | |
| The display is not working | There is no power coming from the 12 V DC on-board power socket in your vehicle | Switch on the ignition and check that the 12 V plug is correctly inserted. |
| The display or the pressure sensor is defective | Have the display, the control circuit board or the pressure sensor replaced by an authorised service centre/the manufacturer. | |
| 12 V plug is not plugged in or not switched on | Insert the 12 V plug into the 12 V on-board power socket and switch it on. | |
| 12 V plug or connection cable is defective or otherwise damaged | Have the 12 V plug or connection cable replaced by an authorised service centre/manufacturer. |
08. DISPOSAL/ENVIRONMENT
Please recycle the child car seat and the packaging in an environmentally friendly manner.

Electrical appliances do not belong in household waste.
If you are no longer using the product, please dispose of it in an environmentally friendly manner and in accordance with local legislation. Information on waste collection points that accept discarded appliances free of charge can be obtained from your local or city council.
09. TECHNICAL DATA
| Operating voltage/electricity consumption | Large child car seats with 4 fans:DC 12 V 2.2 ASeat booster with 2 fans: DC 12 V 1.1 A |
| Plug | 12 V plug for 12 V on-board voltage sockets incl. 4.50 m connection cable |
| Fans | Brushless, DC 12 V 0.05 A, housing dimensions: 50 x 50 x 10.5 mm |
| Heating pad | Large child car seat: 2 units (1 x seat area, 1 x back rest);Seat booster: 1 unit (seat area);Maximum temperature: 35°C |
CE RoHS
In the course of product improvements, we reserve the right to make technical and visual changes to the product.
natural_image
Hand holding a black cable with red illuminated connector, next to a circular device (no visible text or symbols)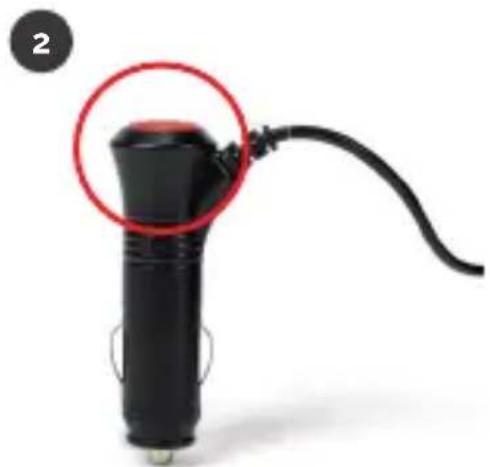
natural_image
Close-up of a black handheld device with a red circle highlighting a component, attached to a cable (no text or symbols visible)03. CONFORMITÀ D'USO
natural_image
Hand holding a black cable with red illuminated components, next to a circular connector (no text or symbols visible)
natural_image
Close-up of a black handheld device with a red circle highlighting a component, no visible text or symbols.05. USO DE LA TECNOLOGÍA KLIMAX
natural_image
Hand holding a black USB flash bulb with red LED, attached to a wall-mounted connector (no text or symbols visible)
natural_image
Close-up of a black handheld device with a red circle highlighting a component, attached to a cable (no text or symbols visible)natural_image
Hand holding a black tool with red and orange buttons, attached to a wall-mounted sink (no text or symbols visible)
natural_image
Close-up of a black handheld device with a red circle highlighting a component, attached to a cable (no text or symbols visible)natural_image
Hand holding a black tool with a red illuminated component, next to a wall-mounted device (no visible text or symbols)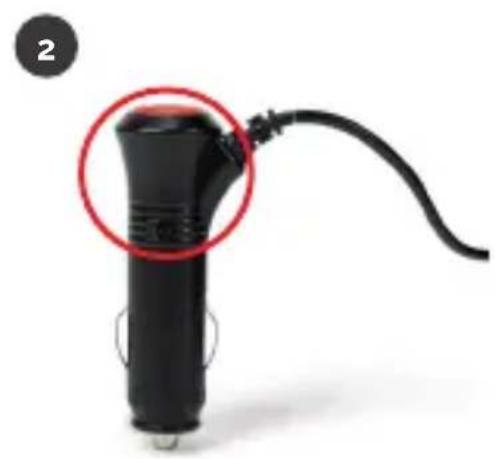
natural_image
Close-up of a black handheld device with a red circle highlighting a component, attached to a cable (no text or symbols visible)natural_image
Hand holding a black cable with red connector, attached to a wall-mounted sink (no text or symbols visible)
natural_image
Close-up of a black handheld device with a red circle highlighting a component, attached to a cable (no text or symbols visible)natural_image
Hand holding a black USB flash bulb with red LED, next to a wall-mounted electrical plug (no text or symbols visible)
natural_image
Close-up of a black handheld device with a red circle highlighting a component, attached to a cable (no text or symbols visible)Fax: +49(0)7731/970055
E-Mail: info@osann.de

- SAFETY INSTRUCTIONS
- Parts and fittings
- Correct shoulder strap height
- Changing the shoulder strap height
- Removing all straps
- Removing the safety harness shoulder straps
- Removing the safety harness lap straps
- Universal Retaining system: for cars without Isofi x
- This type of approved seat belt you should have
- Fitting the car seat for 9-18 kg (Group I, approx. 9 months to 4 years)
- Fitting the car seat for 15-36 kg (Group II & III, approx. 3 years to 12 years)
- Universal retaining system: for cars with Isofi x
- Fitting the car seat for 9-18 kg (approx. 9 months to 4 years)
- Fitting the car seat for 15-36 kg (approx. 3 years to 12 years)
- Care and maintenance
- Removing the cover
- Cleaning the seat cover:
- 3.Cleaning the seat:
- osann
- Optimal seating climate for little ones!
- TABLE OF CONTENTS
- EXPLANATION OF SYMBOLS
- WARNING!
- CAUTION!
- ATTENTION!
- NOTE
- SAFETY INFORMATION
- INTENDED USE
- SCOPE OF DELIVERY
- USING KLIMAX TECHNOLOGY
- POWER SUPPLY
- KLIMAX TECHNOLOGY
- SUMMER COOLING
- WINTER WARMING
- DISPLAY
- CLEANING
- WARRANTY
- TROUBLESHOOTING
- DISPOSAL/ENVIRONMENT
- TECHNICAL DATA
- CE RoHS
- CONFORMITÀ D'USO
- USO DE LA TECNOLOGÍA KLIMAX
Brand : Osann
Model : Flux Isofix
Category : High chair