Floyd - High chair Osann - Free user manual and instructions
Find the device manual for free Floyd Osann in PDF.

| Brand | Osann |
| Model | Floyd |
| Category | High Chair |
| Product Dimensions (approx.) | 80 x 60 x 90 cm |
| Weight | 8 kg |
| Material | Plastic and metal |
| Maximum User Weight | 15 kg |
| Recommended Age Range | 6 months to 3 years |
| Number of Recline Positions | 3 |
| Height Adjustable | Yes, 5 positions |
| Removable Tray | Yes, dishwasher safe |
| Safety Harness Type | 5-point harness |
| Foldable for Storage | Yes |
| Cleaning Instructions | Wipe with damp cloth, mild soap |
| Assembly Required | Yes, tools included |
| Color Options | Various |
| Safety Standard | EN 14988 |
| Warranty | 2 years |
Frequently Asked Questions - Floyd Osann
User questions about Floyd Osann
0 question about this device. Answer the ones you know or ask your own.
Ask a new question about this device
Download the instructions for your High chair in PDF format for free! Find your manual Floyd - Osann and take your electronic device back in hand. On this page are published all the documents necessary for the use of your device. Floyd by Osann.
USER MANUAL Floyd Osann
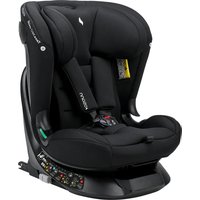
natural_image
Illustration of a baby car seat with attached straps and seatbelt (no text or symbols)osann
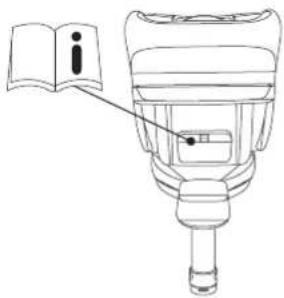
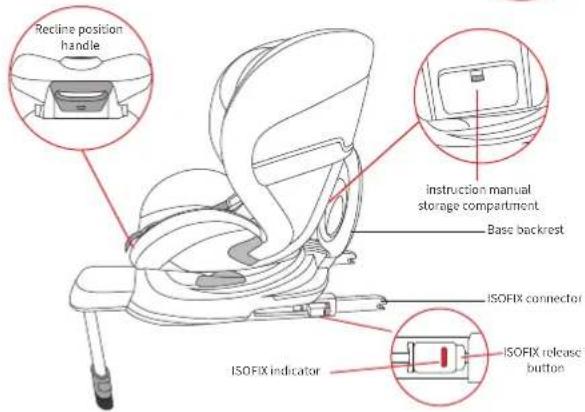
Please carefully read this manual and follow each step to ensure a comfortable travel and best protection for your child. Please keep the instruction manual in the instruction manual storage compartment at the back of these at body at all times.
NOTICE
- Notice regarding i-Size category Enhanced Child Restraint Systems
- This is an i-Size Enhanced Child Restraint System.
- It is approved according to UN Regulation No.129, for use in i-Size compatible vehicles eating positions as indicated by vehicle manufacturers in the vehicle user's manual.
- If in doubt, consult either the Enhanced Child Restraint system manufacturer or the retailer.
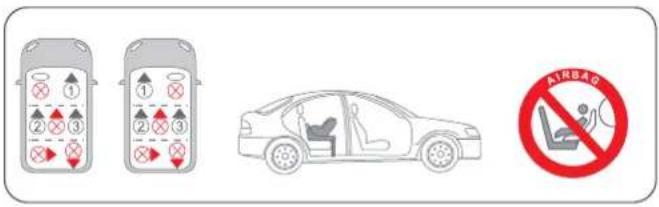
NOT TO USE REARWARD FACING ECRS IN SEATING POSITIONS WHERE THERE IS AN ACTIVE FRONTAL AIRBAG INSTALLED.
IMPORTANT-DO NOT USE FORWARD FACING BEFORE THE
CHILD'S AGE EXCEEDS 15 months(Refer to instructions).
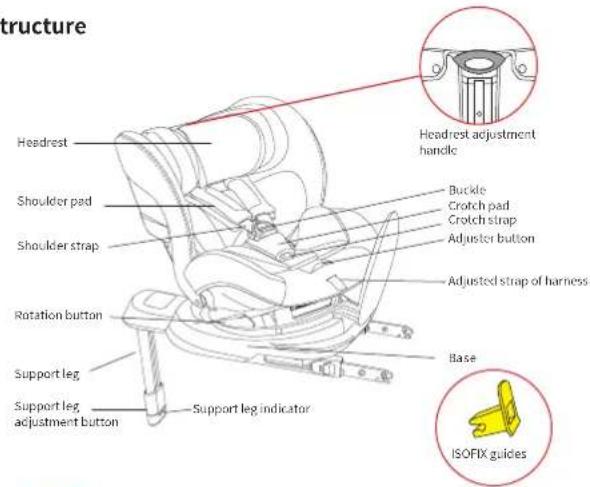
1.Structure
2.Feature
- This enhanced child seat can be adjusted 360°rotation. According to UN Regulation No/129/02, this enhanced child seat is a Universal ISOFIX Child Restraint and should be fitted using the ISOFIX connections.
• To use this enhanced child seat approved to the ECER 129/02 Regulation, your child must meet the following requirements. - ForwardFacing: Childheight76cm105cm/Childweights22kg; RearwardFacing: Childheight40cm-87cm/Childweights22kg;
3.WARNING
• In order to properly protect your child, please take the time to read the instruction manual and install the enhanced child seat and use it exactly as described in the instruction manual at all times,
- This instruction manual must be retained in hand in the instruction manual storage compartment at the back of these at body for its life period at all times..
• To use this child seat with the ISOFIX connections according to the ECER 02Regulation, you r child must meet the follo Forward Facing: Childheight76cm - RearwardFacing: Childheight40cm-87cm/Childweights22kg; IMPORTANT-DO NOT USE FORWARD FACING BEFORE THE CHILD'S AGE EXCEEDS 15 months(Refer to instructions)". Keep your child rearward facing as long as possible as rearward facing is the safest position.
- WARNING: DO NOT use rearward facing child seat in seating positions where an active frontal airbag installed. Death or serious injury can occur.
- Do not use this enhanced child seat in the home. It has not been design home use and should only be used in your car.
- Do not leave your child unattended in the enhanced child seat at anytime.
- The enhanced child seat should be replaced when it has been subject to violent stresses in an accident.
- For the reason of safety, the enhanced child seat must be fixed inside the vehicle even if you do not put your child inside the enhanced child seat.
- Always make sure that any straps holding the restraint to the vehicle shall tight, that any support-leg should be in contact with the vehicle floor, that any straps or impact shields restraining the child should be adjusted to the child body, and check that the straps shall not be twisted.
- Ensuring that any lap straps is worn low down, so that the pelvis is firmly engaged, shall be stressed.
• Do not use any load bearing contact points other than those described in the
instruction manual and marked in the child restraint.
- Any luggage or other objects liable to cause injuries in the event of a collision shall be properly secured.
- The rigid items and plastic parts of this enhanced child seat must be so located and installed that they are not liable, during everyday use of the vehicle become trapped by a moveable seat or in a door of the vehicle.
• To prevent from the risk of fall, your child should always be fastened.
- It is dangerous to make any alteration or additions to the device without approval of the competent authority, and a danger of not following closely the installation instructions provided by the child restraint manufacturer
• The enhanced child seat should not be used without the cover.
• These at cover should not be replaced with any other than the one recommended by the manufacturer, because the cover constitutes an integral part of the restraint performance.
- Before you adjust any movable or adjustable parts of your enhanced child seat, you must remove your baby from the enhanced child seat firstly..
The enhanced child seat should be kept away from sunlight if these at provided with a textile, otherwise it maybe too hot for the child's skin.
Never use a second-hand product, as you can be certain what was happened to it.
- Do not place any objects in the load leg area in front of your base.
- Frequently check the ISOFIX guides for dirt and clean them if necessary. Reliability can be effected by ingress of dirt, dust, food particles etc.
- Correct Installation is only permitted by use of the ISOFIX connectors
• DO NOT install this enhanced child seat under the following conditions: Vehicle
seats facing sideways or rearward with respect to the running direction of vehicle.
• Tell your child that he/she should never play with the harness buckle.
- No enhanced child seat can guarantee full protection from injury in an accident. However, proper use of this enhanced child seat will reduce the risk of serious injury of death to your child.
- Do not have your child in large/oversized clothes because this may prevent your child from being properly and securely fastened by the shoulder harness straps and the crotch strap between the legs.
Do not put anything other than the recommended baby insert in this enhanced child seat.
Please referred to the vehicle manufacturer's handbook before installing this i-size ECRS.
4. USE IN THE VEHICLE
4.1. Installation position of the enhanced child seat in vehicle
- This is an i-Size Enhanced Child Restraint System. It is approved according to UN Regulation No.129/02, for use in, i-Size compatible vehicle seating positions, as defined and approved according to UN Regulations No.16. According to UN Regulation No.129/02, this enhanced child seat is a Universal ISOFIX Child Restraint and should be fitted using the ISOFIX connections.
• To use this enhanced child seat approved to the ECER 129/02 Regulation, your child must meet the following requirements. - ForwardFacing: Childheight76cm-105cm/Childweight≤22kg;
- RearwardFacing: Childheight40cm-87cm/Childweight≤22kg;
• If in doubt, consult either the Enhanced Child Restraint System manufacturer or the retailer. - WARNING: DO NOT use rearward facing child seat in seating positions where an active frontal airbag installed.
• IMPORTANT-DO NOT USE FORWARD FACING BEFORE THE CHILD'S AGE EXCEEDS 15 months(Refer to instructions).
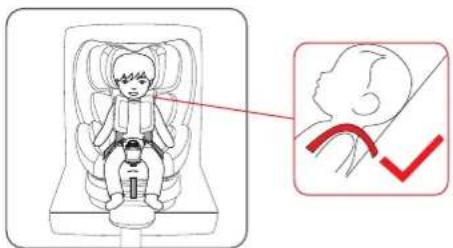
4.2. Checking the shoulder strap height
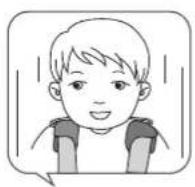
NO-Too low
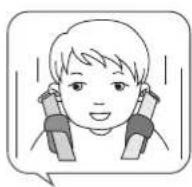
NO-Too high
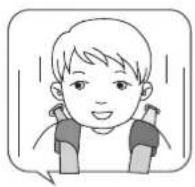
Yes-Correct
Always check that the shoulder straps are at the correct height for your child. The child's shoulders should always be thread through the slots in the cover and seat shell that are closest to the top of your child's shoulders.
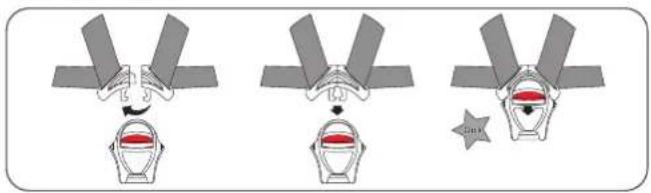
4.3. Usage of buckle
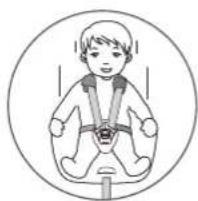
natural_image
Illustration of a child wearing a full-body seatbelt (no text or symbols)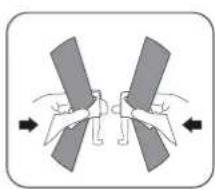
natural_image
Diagram showing two hands holding a split rectangular object with arrows indicating direction (no text or symbols)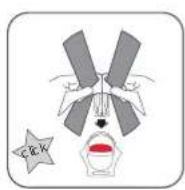
Firstly, adjust the shoulder straps height, please proceed as follows:
Step 1. Put the two metal sections of the buckle connector together.
Step2. Slot the two buckle connectors into the slot in the buckle until they "click" in place.
Step3. Check the harness is correctly locked by pulling the shoulder str upwards.
To release the ha rness, you can press the red button of the buckle downwards, the two metal sections will be pop up.
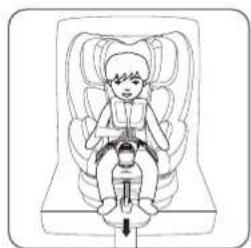
4.4. Adjust and use the harness
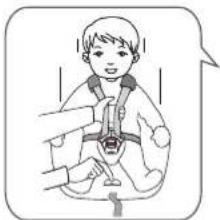
natural_image
Illustration of a child wearing a full-body safety harness, no text or symbols present- The harness is slacked by pressing the adjuster cover on the front of the seat.
- Press down the adjuster cover as you grip the two shoulder straps with your another hand. Pull the shoulder straps towards you to loosen the harness.
Tighten the harness
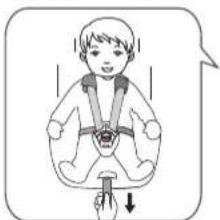
natural_image
Illustration of a child wearing a full-body safety harness, holding a cable with a downward arrow (no text or symbols)- Pull the shoulder straps upwards to remove the slack from the lap sections of the harness then pull the adjuster strap until the harness is fully tightened.
• The harness should be adjusted as tightly as possible without causing discomfort to your child.
• A loose harness can be dangerous. - Check the harness adjuster and tighten each time the child is placed in the seat.
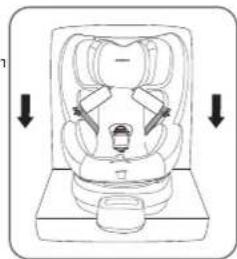
4.5. Adjust the enhanced child seat to different recline positions

natural_image
Three sequential line drawings of a baby car seat with a red arrow indicating rotation (no text or symbols)• The seat body of the enhanced child seat can be adjusted 4 different positions: rearward facing position, position 1, position 2, position 3.
• For forward facing: position 1, position 2, position 3.
- Pull the recline adjustment handle under the front seat body forward, and then pull or push these at forwards or backwards. Release the recline adjustme handle in the desired position and push until you can hear a "click".
• Now the child seat is locked in the desired recline position.
• For rearward facing: rearward facing position
- Rotate these at body rearward facing and pull the recline adjustment hand under the front seat body forward to the largest recline position. Release recline adjustment handle in the rearward facing position and push until you can hear a "click". Now the child seat is locked in the rearward facing position.
• Make sure the child seat is securely locked in the desired position by pulling pushing or pull on these at body.
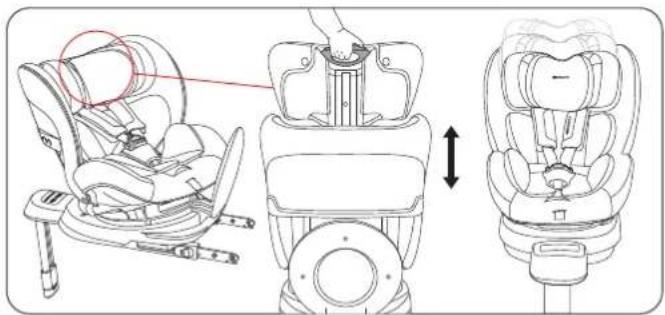
4.6. Height adjustment for shoulder strap and headrest
According to children's different height, the headrest and the shoulder strap can be adjusted up and down, totally 8 positions. Adjust the headrest by pulling the headrest adjustment handle, raise or lower according to your child's height. release the handle, the headrest and the shoulder belts reach the desired height and you will hear a "click". The harness strap should be level with your child's shoulders. Check that the headrest is properly engaged by sliding the headrest down a little.
natural_image
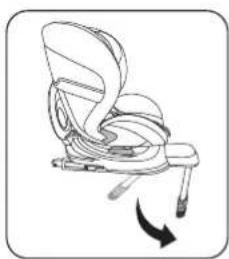
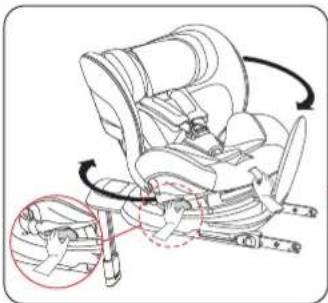
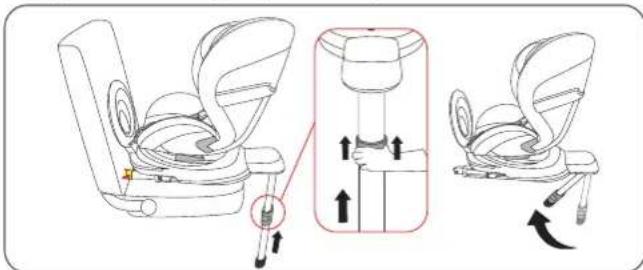
Line drawing of a car seat assembly showing front, side, and top views with no text or symbols4.7. Usage of The support leg
natural_image
Line drawing of a baby car seat with a curved arrow indicating rotation (no text or symbols)- Unfold and pull the support leg away from the bottom of the enhanced child seat until it locks in place.
natural_image
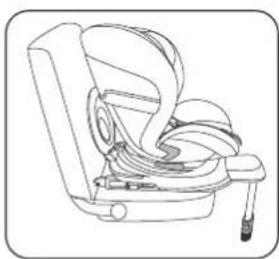
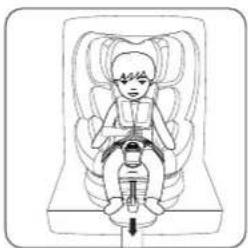
Line drawing of a car backseat with seatbelt and seat rack (no text or symbols)- Place the enhanced child seat forwarder facing on a vehicle seat.
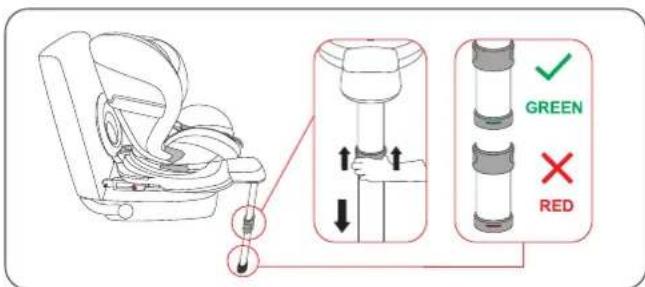
Important! It is not allowed to place objects under the support leg. For information on the storage compartments in the foot area please contact your vehicle manufacturer.
Make sure that support leg must never be suspended in mid-air or supported by other objects.
Make sure that the support leg does not lift the bottom of the base of the child seat up from the surface of the vehicle seat.
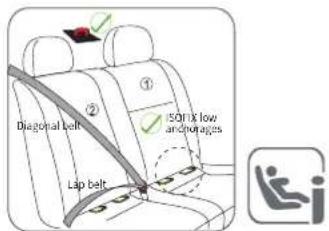
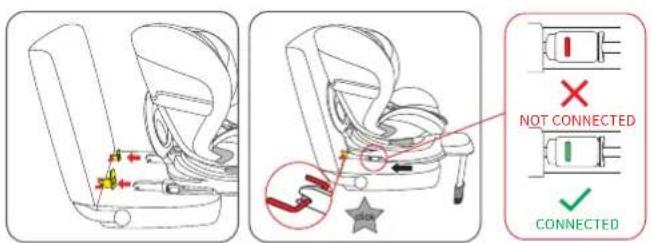
4.8. Usage of the ISOFIX
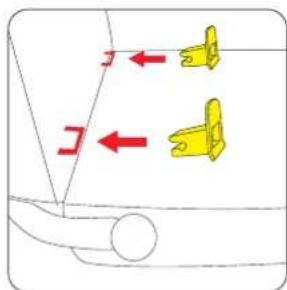
natural_image
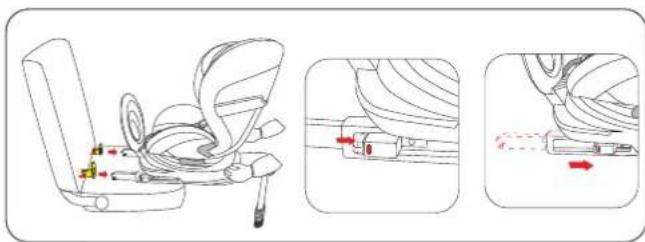
Illustration of a hand holding a yellow tool near a yellow tool, with no visible text or symbols.Warning: Ensure that your vehicle has ISOFIX anchorage points. Insert ISOFIX guides to assist with installation.
1. Place the child seat forwarder facing on a vehicle seat.
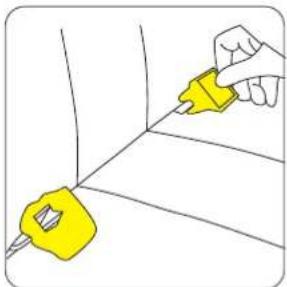
natural_image
Line drawing of a car comfort seat with seatbelt and seat rack (no text or symbols)- Press and push ISOFIX release button on both sides of these at and make 4. Shake the enhanced child seat to ensure that it is securely fastened and check
ISOFIX connectors are fully extended. This ensures that both hooks on the
ISOFIX connectors are open and ready to use, now both ISOFIX indicators of
ISOFIX release button show red color.
the safety buttons to make sure that the two indicators are fully green
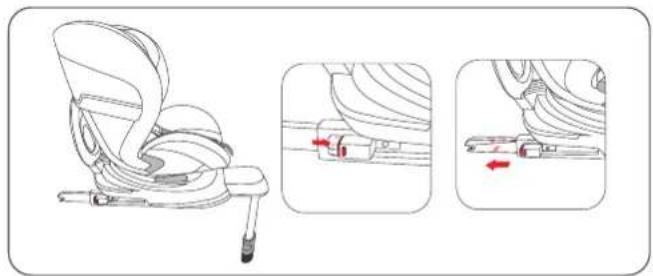
natural_image
Illustration of a car seatbelt buckle with three steps showing adjustment (no text or symbols)- Push the ISOFIX connectors through ISOFIX guides directly into the anchorages until heard an audible sound" click". Now both ISOFIX indicator of
ISOFIX release button show green color. At the same time, push the backrest of
the base of the enhanced child seat as soon as possible toward vehicle seat until tightly.
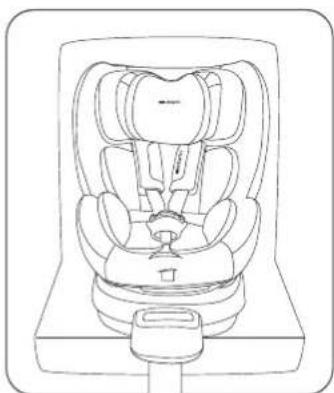
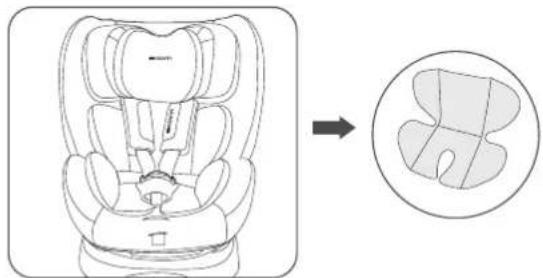
4.9. Using the baby insert
• The baby insert must be used up to a maximum body size of 60cm.
- Place the baby insert in the child safety seat and lay both shoulder straps over the baby insert.
* Hook the two plastic hooks into the loops on the cover of the headrest.
• Guide the harness buckle and the crotch pad through the openings in the bottom part of the baby insert.
• Always make sure that your child is properly secured.
natural_image
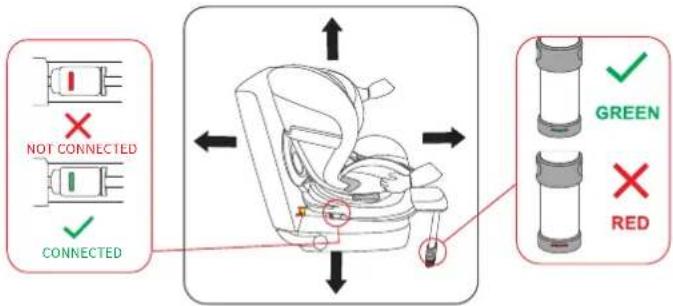
Line drawing of a car comfort seat with a magnified inset showing internal structure (no text or symbols)5.0. Changing the direction of travel
This enhanced child seat can be adjusted 360° rotation. The i-SIZE enhanced child seat can be used:
- ForwardFacing: Childheight76cm-105cm/Childweight≤22kg;
• RearwardFacing: Childheight40cm-87cm/Childweights22kg;
• To change the direction of travel, press the rotation button and turn these at body to the desired direction until it engages.
natural_image
Diagram of a car seat assembly showing internal components and motion arrows (no text or symbols)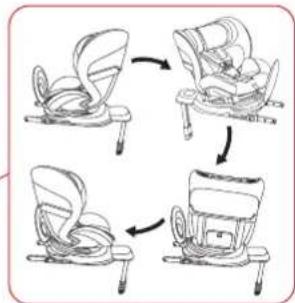
flowchart
graph TD
    A["Start: Seat Position"] --> B["Step 1: Rear Position"]
    B --> C["Step 2: Backrest"]
    C --> D["Step 3: Rear Position"]
    D --> E["Step 4: Backrest"]
Important! Before making any car journey, ensure that the rotating part of the child safety seat is fully engaged by trying to rotate the enhanced child seat in both directions.
Important! It is not allowed to place objects under the support leg. For information on the storage compartments in the foot area please contact your vehicle manufacturer.
Do not use the enhanced child seat facing forwards if your child is under 76cm/15 months old.
Important! The enhanced child seat should be only in forward facing or rearward facing direction during the travel.
5.1. INSTALLATION THE i-Size CHILD SEAT
Unfold and pull the support leg away from the bottom of the enhanced child seat until it locks in place. Place the enhanced child seat forwarder facing on a vehicle seat. Install the enhanced child seat on the vehicle seat, please refer to Section 4.7, Section 4.8, Section 4.9, Section 5.0.
5.2. Securing your child in the enhanced child seat
ForwardFacing: Childheight76cm-105cm/Childweights22kg; Recline position Positions 1, position 2, position 3
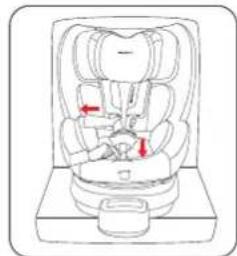
natural_image
Line drawing of a car seatbelt with red arrows indicating movement or pressure points (no text or symbols)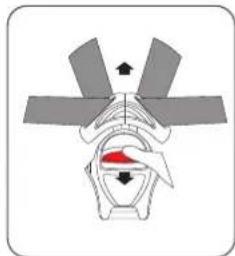
natural_image
Diagram of a mechanical or electrical component with no visible text, numbers, or symbols- Press the strap 2 a B j o s s mtehnet rec button, while pulling out the shoulder button to disengage harnesses to the proper length. the buckle.
natural_image
Line drawing of a car seat with arrows indicating downward motion (no text or symbols)- Fix the two metal sections of the buckle connector on
the both sides of enhanced child seat.
- Place the child into the enhanced child seat and pass both arms through harnesses. Position the harness straps at or below the child's shoulders. After the child is seated, recheck whether the shoulder harnesses are at the proper height.
Check and adjust the height of the shoulder straps and headrest to the cor position according to your child's height.
- Engage the buckle and put the two metal sections of the buckle connector together. Slot the two buckle connectors into the slot in the buckle until they "click" in place.
Check that the harness has not become twisted and also check that the cover is not impeding the movement or fit of the harness in anyway.
natural_image
Illustration of a child seated in a car seat, no text or symbols present- Pull down the adjustment strap and adjust it to the proper length to make sure your child is snugly secured.
natural_image
Illustration of a child seated in a car seat, viewed from above (no text or symbols)-
Make sure the space between the child and the shoulder harness is about the thickness of one hand.
-
Adjust the child seat to desire of incline position and make your child comfortable.
• Important! Do not use the enhanced child seat facing forwards if your child under 76cm/15 months old.
To disassemble your baby and the child seat, repeat the above prescribe procedures in reverse order.
5.3. Securing your child in the enhanced child seat
natural_image
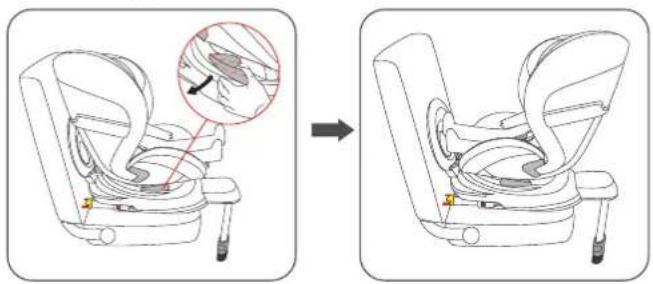
Diagram showing a car seat assembly before and after, with a magnified inset highlighting the detail of the seat (no text or symbols present)- RearwardFacing: Child height 40cm-87cm/Child weight≤22kg;
- Recline position: rearward facing position If you want to use the enhanced child seat rearward facing, press the rotation button and turn these at body rearward facing, at the same time, pull the recline adjustment handle under the seat body forward to the largest recline position.
- Release the recline adjustment handle in the rearward facing position and push until you can hear a "click". Now the child seat is locked in the rearward facing position.
• Make sure the enhanced child seat is securely locked in the desired position by
pulling or pushing or pull on these at body.
- Important! Before making any car journey, ensure that the rotating part of the enhanced child seat is fully engaged by trying to rotate the enhanced child seat in both directions.
- WARNING: DO NOT use rearward facing child seat in seating positions where an active frontal airbag installed. Death or serious injury can occur.
5.4. Putting the child in/Taking the child out
-
- Adjust the rotation handle on the side of the base, rotating these at body 90^ towards the vehicle door at the same time.
• 2. Now you can put your child in or take him or her out easily.
• 3. Secure your child in the seat
- Adjust the rotation handle on the side of the base, rotating these at body 90^ towards the vehicle door at the same time.
- Rotate these at body 90" again so it is facing either forwards or back depending on the age of your child, until it engages with a clicking sound. Important! Before every journey, make sure that the rotating seat body is fully engaged.
5.5. Removing the enhanced child seat
• 1. Hold and push support leg adjustment handle and slide the lower section into the upper section of the support leg until it is fully stored.
- 2. Loosen the ISOFIX connectors on both sides by pressing the ISOFIX release button.at the same time, move the ISOFIX connectors back into the ISOFIX frame of the base.
- The ISOFIX connectors are protected against damage once they are pushed back to the ISOFIX frame of the base.
- Important! The enhanced child seat must always be secured when it is vehicle, even if no child is being transported.
Maintenance and cleaning
Daily maintenance
• 1. In daily use, check periodically the child seat. The child seat should be replaced after an accident.
• 2. Please keep this child seat in dry and ventilated place to avoid damp moldy.
• 3. If the child seat becomes dusty, clean the seat belt and the plastic piec swiping them with a damp sponge and let it dry under ambiance.
• 4. If food or drink drop accidentally on the buckle, disassemble the seat belt from the child seat and rinse it gently by warm water. Leave it dry under ambiance.
• 5. For cleaning the entire child seat fabric cover, please refer to the w instruction.
Washing instruction
Never use any solvent, chemical detergent or lubricant on any part of your child seat.

Hand wash, water temperature below 30°C

Do not bleach

Dryclean, any solvent except trichloroethylene.

Do not tumble dry

Do not iron