Cloud Z2 iSize - Car seat CYBEX - Free user manual and instructions
Find the device manual for free Cloud Z2 iSize CYBEX in PDF.

| Product type | Child car seat (baby shell) |
| Brand | Cybex |
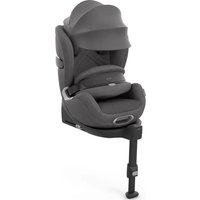
| Model | Cloud Z2 iSize |
| Category | Car seat |
| Standard | i-Size (R129/03) |
| Child height | 45 to 87 cm |
| Max child weight | 13 kg |
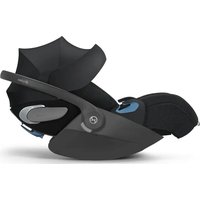
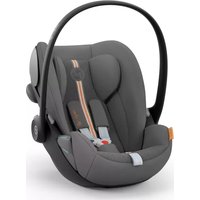
| Installation | Base Z2 ISOFIX or 3-point seat belt |
| Rotation | 360° with base Z2 |
| Recline positions | 2 positions (intermediate in car, full outside) |
| Side protection | Linear side impact protection (L.S.P.) deployable |
| Harness | 5-point, height adjustable |
| Headrest | Adjustable, max 2 cm gap above shoulders |
| Sun visor | Integrated, foldable |
| Power supply (base) | CR2032 battery (compartment on load leg) |
| Indicators | ISOFIX, load leg, seat lock, driving direction (LED/audible) |
| Use with stroller | Yes, via adapters (not included) |
| Cover maintenance | Wash at 30°C, delicate cycle, no tumble dryer |
| Plastic cleaning | Soft cloth, warm water, no harsh chemicals |
| Lifespan | 8 years maximum |
| Warranty | 3 years (conditions at go.cybex-online.com) |
| Included accessories | Newborn insert, base Z2, load leg |
Frequently Asked Questions - Cloud Z2 iSize CYBEX
User questions about Cloud Z2 iSize CYBEX
0 question about this device. Answer the ones you know or ask your own.
Ask a new question about this device
Download the instructions for your Car seat in PDF format for free! Find your manual Cloud Z2 iSize - CYBEX and take your electronic device back in hand. On this page are published all the documents necessary for the use of your device. Cloud Z2 iSize by CYBEX.
USER MANUAL Cloud Z2 iSize CYBEX


GO TO CYBER ONLINE COM
TO WATCH AN INSTRUCTIONAL VIDEO
DE....2
EN....6
IT 10
FR 15
NL 20
PL 25
HU 30
CZ 34
SK....38
ES 42
PT 47
SE....52
NO 56
FI 60
DK....64
SL 68
HR 72
RU 76
UK....81
EE 85
LT 89
LV 93
TR 97
AR....101
BG 105
SR....110
EL 114
RO 119
SQ 123
BS 127
MK 131
ME 136
HI 140
TH 144
VI....148
MS 152
HY....157
CMN 162
YUE 166
JA 170
KO 174
Size range: 45–87 cm
Weight: max. 13 kg
Thank you for deciding on the CLOUD Z2 i-Size when choosing your car seat. Carefully read this User guide before installing the car seat in your vehicle and always keep it to hand in the designated compartment (34).

IMPORTANT INFORMATION AND WARNINGS
Without the approval of the Type Approval Authority, the car seat may not be modified or added to in any way.
In order to keep your child properly protected, it is absolutely essential that you use the car seat as described in this User guide.
This car seat may only be installed on vehicle seats which are approved for the use of child restraint systems according to the vehicle manual.
The car seat can either be attached with the Base Z2 and ISOFIX, or with a 3-point automatic belt that is approved according to UN regulation No. 16 or an equivalent standard.
If the car seat is installed using a 3-point automatic belt, the vehicle belt buckle must never reach in the lap belt guide of the car seat. If the belt whip is too long, the car seat is not suitable for use in this position in the vehicle.
The installation of this car seat on the front passenger seat with the front airbag activated is NOT PERMITTED.
Do not use any load-bearing contact points other than those described in the User guide and marked on the child restraint.
The Newborn inlay is used to protect your child and must be used up until they have reached a height of 60 cm.
Before each journey make sure that the car seat harness system is correctly adjusted and fits tightly to the child's body. The belts must never be twisted!
Always buckle up your child when it is in the car seat.
Only an optimally adjusted headrest can offer your child maximum protection and comfort while ensuring that the belt system can be fitted appropriately.
The car seat must always be correctly installed and secured in the vehicle even when not in use.
If the car seat is used with the Base Z2 the load leg must always make direct contact with the floor of the vehicle. If your vehicle has storage compartments in the footwell, be sure to contact the vehicle manufacturer.

While driving, the car seat must always be locked in the rear-facing position.
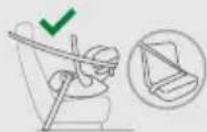
For the car seat to provide the best possible protection, always use the linear side-impact protection (L.S.P.).
If using the car seat on a middle seat of the vehicle, the linear side-impact protection (L.S.P.) must never be folded out.
The car seat has also been tested and approved for use without the linear side-impact protection (L.S.P.) folded out.
Always ensure that the car seat is not jammed against any surface when closing the vehicle door or adjusting the back seat.
Luggage or any other objects present in the vehicle must always be firmly secured. Otherwise, they may be thrown within the vehicle, which could cause fatal injuries.
The car seat must never be used without the seat cover. Ensure that only an original CYBEX seat cover is used, as the cover is a key element allowing the seat to function correctly.
Never leave your child unattended in the vehicle.
It is allowed to use the intermediate lie-flat position in the car if the seat is used with Base Z2. If the car seat is installed using a 3-point automatic belt, it has to be in the most upright position.
The full lie-flat position may only be used outside the vehicle.
Do not place the car seats on raised surfaces, such as a table.
Parts of this child restraint system can heat up when exposed to direct sunlight and could potentially burn your child's skin. Protect your child and the car seat from direct sun exposure.
An accident may cause damage to the car seat that is not identifiable with the naked eye. Please replace the car seat after an accident. In case of doubt, please consult your dealer or the manufacturer.
Do not use this car seat for more than 8 years. The car seat is exposed to high stress during its product lifespan, which leads to changes in the quality of its materials with increasing age.
The plastic parts can be cleaned with a mild cleaning agent and warm water. Never use harsh cleaning agents or bleaches!
On some vehicle seats made of sensitive materials, the use of car seats may leave marks and/or cause discolouration. To prevent this, you can place a blanket, towel or similar underneath the car seat to protect the vehicle seat.
PRODUCT PARTS
| Battery compartment (1) | Diagonal belt guide (18) |
| Base (2) | Seat release handle (19) |
| Load leg (3) | Load leg parking position (20) |
| Newborn inlay (4) | Headrest (21) |
| ISOFIX-Release buttons (5) | Headrest adjustment handle (22) |
| ISOFIX-Locking arms (6) | Belt adjustment button (23) |
| ISOFIX-Anchorage points (7) | Shoulder belt (24) |
| ISOFIX-Indicators (8) | Belt buckle (25) |
| Load leg adjustment button (9) | Buckle tongue (26) |
| Load leg indicator (10) | Central adjustment belt (27) |
| Carrying handle (11) | Seat rotation handle (28) |
| Carrying handle release buttons (12) | Driving direction indicator (29) |
| Seat locking indicator (13) | Driving Direction Control (D.D.C.) (30) |
| Linear side-impact protection (L.S.P.) (14) | Sun canopy (31) |
| Tilt angle indicator (15) | Release handle for lie-flat position (32) |
| 3-point automatic belt (16) | Release button for stroller adapter (33) |
| Lap belt guide (17) | User guide compartment (34) |
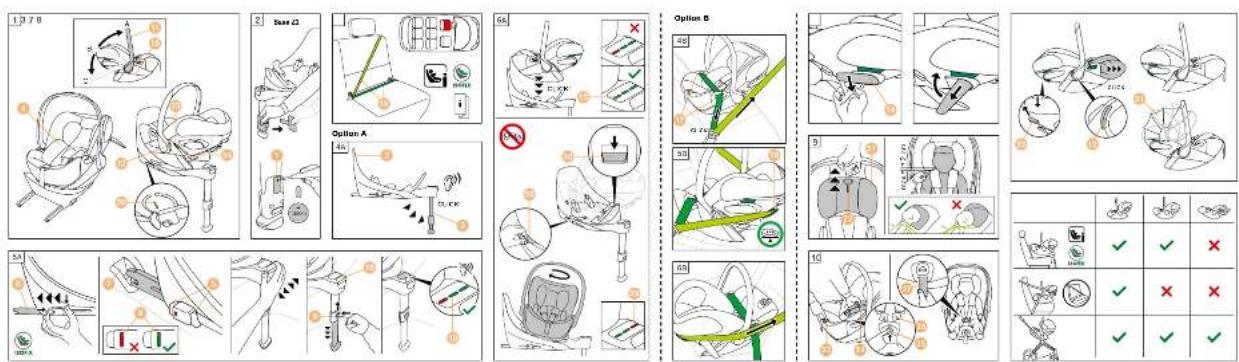
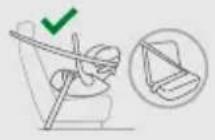
THE CORRECT POSITION IN THE VEHICLE
This is an i-Size Enhanced Child Restraint System. It is approved according to UN Regulation No. R129/03, for use in i-Size compatible vehicle seating positions as indicated by vehicle manufacturers in their vehicle user manuals. If your vehicle does not have an i-Size seating position, please check the enclosed vehicle Type List. You can obtain the most up-to-date version of the Type List from www.cybex-online.com.
Alternatively, the car seat may be installed on forward-facing vehicle seats equipped with a 3-point automatic belt system.
DIFFERENT USES OF THE SEAT
| 45 – 87 cm, max. 13 kg | ||
 |  | |
45 – 60 cm > 60 cm 45 – 60 cm > 60 cm |  |  |
| 45 - 60 cm > 60 cm 45 - 60 cm > 60 cm |
The Newborn inlay (4) integrated at purchase should be removed if your child is taller than 60 cm. To remove the Newborn inlay (4) open the belt buckle (25), pull off the shoulder pads and then remove the inlay.
PREPARING TO INSTALL THE BASE Z2
Before using the base for the first time, the plastic strip must be removed from the Battery compartment (1) on the Load leg (3). The Base (2) will emit an audible warning signal until it has been correctly installed. If the Load leg (3) is folded out and there is no sound, the battery must be checked. To check the battery, the Battery compartment (1) on the back of the load leg can be opened with a screwdriver. The battery may only be replaced with a CR2032 size battery.
INSTALLATION IN THE VEHICLE
Always ensure that...
- the backrests in the vehicle are locked in their upright position.
- when installing the car seat on the front passenger seat, adjust the vehicle seat as far back as possible.
The infant car seat is exclusively made for forward facing car seats, which are equipped with ISOFIX or with a 3-point belt system.
Installation of the car seat with Base Z2
EN 1. Keep the Driving Direction Control (D.D.C.) button (30) downward and ensure the base is adjusted for rearward facing car seats.
2. Fold out the Load leg (3) until it locks into its foremost position. An acoustic warning signal will sound until the load leg has been correctly installed.
3. Release the ISOFIX-Release buttons (5) to extend the ISOFIX-Locking arms (6).
The ISOFIX-Release buttons can both be released independently allowing the ISOFIX-Locking arms to be adjusted independently.
4. Push the ISOFIX-Locking arms (6) out of the base to their furthest extent.
5. Place the base (2) on an appropriate seat in the vehicle.
6. Push the ISOFIX-Locking arms (6) into the ISOFIX-Anchorage points (7) until these lock into place with an audible "CLICK". The two ISOFIX-Indicators (8) will switch from RED to GREEN.
7. Ensure the base is secure by trying to pull it out of the ISOFIX-Anchorage points (7).
8. Push the Base (2) towards the backrest of the vehicle seat until it is fully aligned with the backrest.
Moving the base from side to side will also brace it against the vehicle backrest.
9. Press the Load leg adjustment button (9) and extend the leg until it touches the vehicle floor.
10. Pull the Load leg (3) out to the next locking position to ensure optimal force transmission.
11. The Load leg indicator (10) switches to GREEN when the load leg is correctly positioned on the vehicle floor and the acoustic warning signal stops.
12. Move the Carrying handle (11) to position A. Therefor, press the two Carrying Handle release buttons (12) on the left and right of the Carrying handle at the same time.
13. Place the car seat on the Base (2).
14. The car seat can also be locked in its entry position on the base. Then turn the car seat until it is aligned opposite to the direction of travel.
15. Please ensure that the car seat locks into place with an audible "CLICK".
16. Check whether the Seat locking indicator (13) on the base is GREEN.
17. In order to achieve the best possible protection, activate the Linear side impact protection (L.S.P) (14) on the side of the car seat facing the vehicle door by pulling on it's end.
The car seat can also be used with the L.S.P. folded in if there is not enough space in the vehicle. To do this, fold in the element back to its starting position.
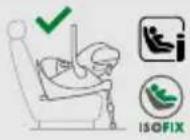
Installing the car seat with 3-point automatic belt
- Place the car seat on the vehicle seat against the direction of travel.
- Make sure that the Carrying handle (11) is locked in position A.
- Make sure that the Tilt indicator (15) is parallel with the vehicle floor.
- Pull out the 3-point automatic belt (16) and place its lap section into the lap belt guide (17).
- Lock the 3-point automatic belt (16) of the vehicle in its belt buckle.
- Tighten the lap section by pulling the diagonal section in the direction of travel.
- Guide the diagonal section of the belt behind the head end of the car seat and through the diagonal belt guide (18) and above the Linear side-impact protection (L.S.P) (14).
- In order to achieve the best possible protection, activate the Linear side impact protection (L.S.P) (14) on the side of the car seat facing the vehicle door by pulling on its end.
The car seat can also be used with the L.S.P. folded in if there is not enough space in the vehicle. To do this, fold in the element back to its starting position.
REMOVAL FROM THE VEHICLE
Removal of the car seat with Base Z2
- To unlock the car seat from the base (2), pull the Seat release handle (19) up.
- Tilt the car seat slightly and lift it off the base (2).
- Unlock the ISOFIX-Locking arms (6) on both sides by pressing the ISOFIX-Release buttons (5) and at the same time pulling them back.
- Pull out the Base (2) from the ISOFIX-Anchorage points (7).
- Remove the Base (2) and slide the ISOFIX-Locking arms (6) completely back into their transport positions.
- Push the Load leg (3) back into its original position and then fold it in to save space.
- It is important to fully fold in the load leg so that the acoustic warning is muted. There is a Load leg parking position (20) indicated on the underside of the base.
Removal of the car seat with 3-point automatic belt
- Take the diagonal section of the belt out of the diagonal belt guide (18).
- Unlock the vehicle seat belt buckle and take the lap section of the belt out from the lap belt guides (17).
ADJUSTING THE HEADREST
The adjustable Headrest (21) can be adjusted by using the Headrest adjustment handle (22). When adjusting the Headrest (21) ensure that no more than 2cm (approx. 2 finger's width) remain between the child's shoulders and the headrest.
SECURING THE CHILD
- Press the Belt adjustment button (23) and pull both Shoulder belts (24) at the same time to loosen them.
- Undo the Belt buckle (25) by pressing the red button firmly.
- Put your child in the car seat with their buttocks at the back.
- Place the Shoulder belts (24) directly over your child's shoulders.
- Place both Buckle tongues (26) together and lock them in place in the Belt buckle (25). You should hear an audible "CLICK".
- If you are using a seat with a SensorSafe Clip, push the clip closed until you hear an audible "CLICK" and slide the closed clip down towards the Belt buckle (25).
- Pull on the Central adjustment belt (27) to tighten the Shoulder belts (24) until they rest snug against your child's body.
The harness should be fitted tight enough so that it is not possible to put a fold in any of the straps.
- When using the SensorSafe clip, position the clip directly below the shoulder pads.
ROTATION FUNCTION BASE Z2
Pull the Seat rotation handle (28) on the base to turn the car seat.
Before starting your journey, make sure that the car seat is properly locked into place and the Driving direction indicator (29) shows GREEN.
ADJUSTING THE SUN CANOPY
Unfold the Sun canopy (31) by pulling on the plastic cover.
ADJUSTING THE LYING POSITIONS
The car seat can be switched between the lie-flat positions by pressing the release handle for the lie-flat position (32) while simultaneously shifting the back section downwards.
The car seat can be put into two lie-flat positions: the intermediate lie-flat position is also available inside the car if the car seat is used in combination with Base Z2. The full lie-flat position is only available outside the vehicle.
TRAVEL SYSTEM
You can attach the car seat to any approved stroller. Click the car seat onto the approved adapter, facing the parent. To unlock, hold down the two Release buttons for the stroller adapter (33) and lift it up.
REMOVING AND REATTACHING THE SEAT COVER
The car seat cover consists of 6 parts. These are fastened to the car seat at several places. Once unfastened, the individual parts of the cover can be removed. To reattach the cover, follow the removal instructions in the reverse order.
The cover may only be washed at 30^ C with a delicate wash program otherwise it may result in discolouration of the cover fabric. Please wash the cover separately from other laundry and do not dry it in the dryer or in direct sunlight!
MANUFACTURER'S WARRANTY AND DISPOSAL REGULATION
CYBEX GmbH (Riedingerstr. 18, 95448 Bayreuth, Germany) gives you 3 years warranty on this product. The warranty is valid in the country where this product was initially sold by a retailer to a customer. The contents of the warranty and all essential information required for the assertion of the warranty can be found on our homepage: go.cybex-online.com/manufacturer-warranty-car-seats. If a warranty is shown in the article description, your legal rights against us for defects remain unaffected.

Please observe the waste disposal regulations in your country.
CERTIFICAZIONE
CLOUD Z2 i-Size
INSTALLASJON I KJ∅RET∅YET
Sjekk alltid at ...
Base Z2 م Expected Attention ب Affordable
MAKLUMAT PENTING DAN AMARAN
&PTS THFEC SRULUANRSU3FL UH2N8NHU
Uw i-Size tpthwjh uwuhj lwwunuwqnipjwu qwuhwuwufw lwwunwptqwqnpdwlud hwulfwupq t: zwwnwnwlud t pwn UU4-h gwubnwwhpq No. R129/03-h, i-Size-h htin hwulfwntnjh utptawjh wuuwnwnlnh nhpptpnuu lhpwnfuwu hwufwp, huzyutu uzlud t upwuuwnpnnuwjh uphngh upwuuwnpnntph lpnuhg upwuuwnpnnuwjh uphngh oqnuwqnpdfuwu ngtgnughtpmnu: Ept 2tp upwuuwnpnnuwjh uphngn yntuh i-Size wuuwnwnlnh nhpp, huiynpuu lup uunnqlu lgulud upwuuwnpnnuwjh uphngh Stuwhtph gwuhp: Uwpnn tp atnp rptpi Stuwhtph gwuhj wultuwyltpghi unwpptpwlp www.cybex-online.com-hg: Ujl ltpwj, utpthwj wuuwnwntnp lwpnn t intwnwnnltL zwpduwu mhnnpjuwf utptuwj wuuwnwntnph qnw, npnip hwqtgwud tü 3 lywnwung wqunnduwu qnnmt hwulfuwqnpl;
LUSUSTH OHSUANTOUU SURF6R 26460
45 - 87 uif, umuultL. 13 lqq
45 - 60 uu

60 uuf

45 - 60 uuf

60 uul

The following table contains the names of the first letter in each cell. The first letter is a Chinese character and is not explicitly labeled in the image.
Uptāwuh wūwqwu wūwuntnp yuqn k pūnniāl yuwnlqmi nhhppn utnufjnd yuwhtm nhhph wnāwhfúw probwyn (32) uhwudwubwih tinhhu hwnluωp ntujh quw wtnwzwpdtjnl:
Qptbujh wuhwuhu buunwutnp qwntih t lqnqwqnpti qwnytim ltpjnt nhhpnq' Nwnyliqni uphju nhppn unwuwlu hwwuwuh t uptbujh utpunui, tpt uptbujh wuhwuhu buunwutnp oqnwqnpdniui t Base Z2-h htn huwuwgduup: fünjhi wunywud nhppn hwwuwutih t uhpju unpwuwynpwnuhu uhonghg nntpu:
Ph Th C N O H O S O H U C P U G U U Y B F I N U C
Imp lqnpn kp utptāwnjh tuunwnntnp hgtl oqnwnqnpsfuw huufup pnynwnptph gwulqwugud uwhlwwwwwjwljh: Yunungnyi wdpwuhgtp utptbwnjh tuunwnntnp huuwnwnnuqd wnuwqnntph qnu ntúpnq ntyqh dünnh lynnfp: Uquhlqnqkni huvfup utnfsud wpuht pwhlwwwwwwwjlwh wnuwqnntph (33) Upawlqfuw tplyni lynawhutpp lu wju qtp pnpapwugntp:
LUSURUT TUSUUT ZUTLE BY UNIF3 UURUSTABLE
Ukptwuh wuulpulwua wunwnntnh ywnwnlup pwnlquwud t 6 uuwhg: Uwpup wupugdnu tu uktwuh wunwnntnhu wnpptn uwtpnu: Uuw wupugdlnu ywnwnluh wunutahu uwtnnp lhuplh t huul: Wwnwnup inphg wupugdlnu hwufp htunlp hwutni gngmutphu hwqwrwl htpwuhwunpuwup:
Wunjuup uhtnp t, iquwu 30° C qtpuwnuhawndi unpp hwqnwnh lquguiu dpuqnul, huiywnuyl nluqnul wunjuuh qnpduwdp lwpnn t qniwuqphl: 'Wunjuup plwgtp wnubahu u ih znpwgtp whi znpugfuu uwppnul ywh wuph niqh dwnwqwprutph nuhy:
URSUNTH BRUDHFC BY MUФИЛТВР YBIFAB3UL YUJUNYURG
CYBEX GmbH (Riedingerstr. 18, 95448 Fwjpnnp, 9tpuwuhw) pultpnnipntnp unpwuwnpnu t 3 wnwpu knw2hhp wju wpwnwnpwuph huwup: knw2hhp qnpdnul t wja tnlpnnul, npntn wju wwpwupp yuwawnnha h ulqpwut yuwuntl t hwawwnpnhtu: knw2hph pnlwunwnpnntup u trnw2hph hwwwnwnfuw huwup wihpwud2yn pnjn lpwnlp ulnklnpnjntu4pp lwpnn tp quutl utp qghwulp kmuf go.cybex-online.com/manufacturer-warranty-car-seats-nui: Upt wpwnwnpwuph ulwunwpnnpjuw a utg unqw t knw2hhp, wuw ptpnnipnniutph huwup utp ulwunwup atp ophbwlpw hpwnlnputpp uunu la nch upg:

Ivūnppnuī túp hūnluī ātp tṛplpnuī pùwǔnbuītph hānwguwū huàuān uuhu wūnluād lquánluwūwupqkphú:
证明
CLOUD Z2 i-Size
尺寸范围:45--87厘米
重量:最大 13 千克