YOXI - Stroller Kindercraft - Free user manual and instructions
Find the device manual for free YOXI Kindercraft in PDF.
| Product type | Stroller |
| Brand | Kindercraft |
| Model | YOXI |
| Recommended age | 0 months to 4 years |
| Maximum child weight | 22 kg |
| Number of backrest positions | 4 (flat, 2 semi-reclined, upright) |
| Footrest positions | 5 |
| Adjustable parent handle | 4 height levels |
| Seat mounting direction | Forward or rear facing |
| Front wheel type | Swivel with straight-line lock |
| Brake | Parking brake operated by foot |
| Canopy | Included, removable |
| Safety bar | Included, removable |
| Seat belts | 5-point harness with magnetic buckle |
| Included accessories | Mosquito net, rain cover, cup holder, car seat adapters, bag |
| Maximum basket load | 5 kg |
| Maximum cup holder load | 0.5 kg |
| Maximum load of bag hanging on handle | 1 kg |
| Maximum weight of car seat on adapters | 13 kg |
| Washing temperature range (textile) | 30°C, delicate mode |
| Chassis maintenance | Wipe with a damp cloth and mild detergent |
| Storage | Do not fold or store wet, avoid moisture |
| Warranty | See conditions on www.kinderkraft.com |
Frequently Asked Questions - YOXI Kindercraft
User questions about YOXI Kindercraft
0 question about this device. Answer the ones you know or ask your own.
Ask a new question about this device
Download the instructions for your Stroller in PDF format for free! Find your manual YOXI - Kindercraft and take your electronic device back in hand. On this page are published all the documents necessary for the use of your device. YOXI by Kindercraft.
USER MANUAL YOXI Kindercraft
$$ \left. \right.\left. \right.\left. \right.\left. \right.\left. \right.\left. \right.\left. \right.\left.\left.\left.\left.\left.\left.\left.\left.\left.\left.\left.\left.\left.\left.\left.\left.\left.\left.\left.\left.\left.\left.\left.\left.\left.\left.\left.\right.\right.\right.\right.\right.\right.\right.\right.\right.\right.\right.\right.\right.\right.\right.\right.\right.\right.\right.\right.\right.\right.\right.\right.\right.\right.\right\rangle_ {i} ^ {j} = 0 $$
$$ \left. \sum_ {i = 1} ^ {n} \sum_ {j = 1} ^ {m} \sum_ {k = 1} ^ {n} \sum_ {l = 1} ^ {m} \sum_ {m = 1} ^ {n} \sum_ {n = 1} ^ {m} \sum_ {l = 1} ^ {n} \sum_ {m = 1} ^ {n} \right} $$
$$ \left. \right.\left. \right.\left. \right.\left. \right.\left. \right.\left. \right.\left. \right.\left. \right.\left. \right.\left. \right.\left. \right.\left. \right.\left.\left.\left.\left.\left.\left.\left.\left.\left.\left.\left.\left.\left.\left.\left.\left.\left.\left.\left.\left.\left.\left. \text {B u g g} \right]\right]\right]\right]\right]\right]\right]\right]\right]\right]\right]\right]\right]\right]\right]\right]\right]\right]\right]\right]\right]\right] $$
$$ p _ {i} \cdot i = 1, j = 2, k = 3, l = 4 $$
$$ \left. \frac {1}{2} \right| \frac {1}{2} \frac {1}{2} \frac {1}{2} \frac {1}{2} \frac {1}{2} \frac {1}{2} \frac {1}{2} \frac {1}{2} \frac {1}{2} \frac {1}{2} \frac {1}{2} \frac {1}{2} \frac {1}{2} \frac {1}{2} \frac {1}{2} \cdot $$
$$ \begin{array}{l} \text {L a i l} \ \text {L a i l} \ \text {L a i l} \ \text {L a i l} \ \text {L a i l} \ \text {L a i l} \ \text {L a i l} \ \text {L a i l} \ \text {L a i l} \ \text {L a i l} \ \text {L a i l} \ \text {L a i l} \ ① \end{array} $$
$$ \cdot \left. \frac {1}{2} \int_ {0} ^ {1} \log_ {2} 4 \int_ {0} ^ {1} 2 2 g \frac {1}{g} \leq 2 2 g \frac {1}{g} \leq 0 \text {且} \int_ {0} ^ {1} \log_ {2} 0 \text {且} \int_ {0} ^ {1} \frac {1}{g} \leq 2 2 g \frac {1}{g} \leq 0 \text {且} \int_ {0} ^ {1} \log_ {2} 0 \text {且} \int_ {0} ^ {1} \frac {1}{g} \leq 2 2 g \frac {1}{g} \leq 0\right) $$
$$ \delta \text {r a l l} \quad \text {j e t} \quad \text {j e t} \quad \text {j e t} \quad \text {j e t} \quad \text {j e t} \quad \text {j e t} \quad \text {j e t} \quad \text {j e t} \quad \text {j e t} \quad \text {j e t} \quad \text {j e t} \quad \text {j e t}. $$
$$ \cdot \rho \leq 5 \text {a l l} \text {a l g o u l} \text {a l l} \text {a l l} \text {a l l} \text {a l l} \text {a l l} \text {a l l} \text {a l l} \text {a l l} \text {a l l} \text {a l l} \text {a l l} \text {a l l} \text {a l l} \text {a l l} \text {a l l}. $$
$$ \cdot \text {a} _ {\text {a}} \text {a} _ {\text {a}} \text {a} _ {\text {a}} \text {a} _ {\text {a}} \text {a} _ {\text {a}} \text {a} _ {\text {a}} \text {a} _ {\text {a}} \text {a} _ {\text {a}} \text {a} _ {\text {a}} \text {a} _ {\text {a}} g / g g g g g g g g g g g g g g g g g g g g g g g g g g g g g g g g g g g g g g g g g g g g g g g g $$
$$ \cdot \text {p s l} g \text {a b a l l} \text {d i f f} \text {a d e l l} \text {a b a l l} \text {a d e l l} \text {a d e l l} \text {a d e l l} \text {a d e l l} \text {a d e l l} \text {a d e l l} \text {a d e l l} \text {a d e l l} $$
$$ \cdot \leq 0. 5 \text {i} \frac {\partial}{\partial x} \text {i} \frac {\partial}{\partial y} \text {i} \frac {\partial}{\partial z} \text {i} \frac {\partial}{\partial w} \text {i} \frac {\partial}{\partial z} \text {i} \frac {\partial}{\partial w} \text {i} \dots $$
$$ \cdot \rho D l w a l l g i d e s u r e s i n c o n t a c t i o n $$
$$ . l i g i a r y j s! \text {g} \text {a} y e l l \text {j} s d \text {j} b l l \text {e} \text {s} \text {i} \text {c} \text {j} k \text {o l l} \text {j} s \text {d} \text {b} \text {j} $$
$$ \left. \right.\left. \right.\left. \right.\left. \right.\left. \right.\left. \right.\left. \right.\left.\left.\left.\left.\left.\left.\left.\left.\left.\left.\left.\left.\left.\left.\left.\left.\left.\left.\left.\left.\left.\left.\left.\left.\left.\left.\left.\right.\right.\right.\right.\right.\right.\right.\right.\right.\right.\right.\right.\right.\right.\right.\right.\right.\right.\right.\right.\right.\right.\right.\right.\right.\right.\right\rangle_ {1} ^ {2} = 0, 0, 0, 0, 0, 0, 0, 0, 0, 0, 0, 0, 0, 0, 0, 0, 0, 0, 0, 0, 0, 0, 0, 0, 0, 0, 0, 0, 0, 0, 0, 0, 0, 0, $$
$$ \left. \right.\left. \right.\left. \right.\left. \right.\left. \right.\left. \right.\left. \right.\left.\left.\left.\left.\left.\left.\left.\left.\left.\left.\left.\left.\left.\left.\left.\left.\left.\left.\left.\left.\left.\left.\left.\left.\left.\left.\left.\right.\right.\right.\right.\right.\right.\right.\right.\right.\right.\right.\right.\right.\right.\right.\right.\right.\right.\right.\right.\right.\right.\right.\right.\right.\right.\right\rangle_ {1} ^ {2} = 0, 0, 0, 0, 0, 0, 0, 0, 0, 0, 0, 0, 0, 0, 0, 0, 0, 0, 0, 0, 0, 0, 0, 0, 0, 0, 0, 0, 0, 0, 0, 0, 0, 0, $$
$$ \cdot \dot {s} \dot {l} \dot {s}! p \dot {b} \dot {b} y $$
$$ \begin{array}{l} \text {d i s t a t e} \ \text {d i s t a t e} \ \text {d i s t a t e} \ \text {d i s t a t e} \ \text {d i s t a t e} \ \text {d i s t a t e} \ \text {d i s t a t e} \ \text {d i s t a t e} \ \text {d i s t a t e} \ \text {a l a w d i s t a t e} \ \text {a l a w d i s t a t e} \ \text {a l a w d i s t a t e} \ \text {a l a w d i s t a t e} \ \text {a l a w d i s t a t e} \ \text {a l a w d i s t a t e} \ \text {a l a w d i s t A L} \ \text {a l a w d i s t A L} \ \text {a l a w d i s t A L} \ \text {a l a w d i s t A L} \ \text {a l a w d i s t A L} \ \text {a l a w d i s t A L} \ \text {a l a w d i s t A L} \ \text {a l a w} \ \text {a l a w} \ \text {a l a w} \ \text {a l a w} \ \text {a l a w} \ \text {a l a w} \ \text {a l a w} \ \text {a l a w} \ \text {a l a w} \ \text {a l a w} \ \text {a l a w} \ \text {a l a w} \end{array} $$
$$ \ddot {a} \dot {y} \dot {u} \dot {w} \dot {w} \dot {y} \dot {y} s \dot {c} \dot {c} \dot {c} \dot {c} \dot {c} \dot {c} \dot {c} \dot {c} \dot {c} $$
aagaae aee. (p. 0) dall jlae c uill abai y n deall lal bll g bll aac lae . (p) dall rlae lcl aayrjll aabwblbll cngdell eae all . (p. p. )
Jg jgl gblal lglal aaglln Jlal 1yge yjgall gall gdl .
(.s)aill aieil jiaeall
aalll aalall lallll allll allll allll allll allll allll allll allll allll allll allll allll allll allll allll allll allll allll allll allll allll allll allll allll allll allll allll allll allll allll allll allll allll alill
.
.
i 1
g 1
Jieb2y 45
XVI

a1 = 2,b1 = 3
aolaloc
pLuswU (y) 111 Laii:
aasakbsagabjulaa
J. J. J. J. J. J. J. J. J. J. J. J. J. J. J. J. J. J. J. J. J. J. J. J. J. J. J. J. J. J. J. J. J. J. J. J. J. J. J. J. J. J. J. J. J. J. J. J. J. J. J.
CS
Vázeni zákaznici,
Thank you for purchasing a Kinderkraft product. Our products have been designed for your child's safety and comfort. The buggy is an ideal solution for those who value quality, modernity and functionality. Please read the manual carefully and follow its recommendations.
IMPORTANT - READ CAREFULLY AND KEEP FOR FUTURE REFERENCE.
WARNING!
- Never leave the child unattended.
- Ensure that all the locking devices are engaged before use.
- To avoid injury ensure that the child is kept away when unfolding and folding this product.
- Do not let the child play with this product.
- Check that the pram body or seat unit or car seat attachment devices are correctly engaged before use.
- This product is not suitable for running or skating.
- Always use the restraint system.
- The product is intended for children from 0 months up to 22kg or 4 years whichever come first.
We recommend using lowest reclined position for newborn babies - The product is designed to transport one child at a time.
- The maximum basket load is 5kg .
- Any load attached to the handle and/or on the back of the backrest and/or on the sides of the vehicle will affect the stability of the vehicle.
Maximum weight of a bag attached to the adjustable handle is 1kg - The maximum load carried in the cup holder must never exceed 0,5kg .
- Lift the front suspension when going up a curb or step.
- The brakes should be locked when the child is placed in or taken out of the buggy.
- Use only parts and accessories supplied or recommended by the manufacturer. Do not use other parts or accessories.
- Do not place the product near open flame or other heat sources.
- Do not use with an additional platform.
Applies for car seats adapters
- Adapters are intended to assembly the car seats on the YOXi pram frame. Adapters can be used with baby car seats with max. weight of 13 kg.
- If the car seat is used together with the chassis, it does not replace a cot or bed. For sleep, place the child in a suitable pram body, cot or bed.
- Use only parts and accessories supplied or recommended by the manufacturer.
I PUSHCHAIR'S ELEMENTS
- Frame with a basket (2) 3. Front wheel x2
- Rear wheel x2
- Seat with a safety harness system (6) and a mosquito net (7)
8.Hood 9.Bar - Rain cover 11. Cup holder
- Adapters 13. Bag
II UNFOLDING THE PUSHCHAIR'S FRAME
Set the frame (1) with a basket (2) on a flat surface with the handle upwards. Release the locking element (PIC.A), press the folding button (PIC.W.I), and hold it while unfolding the pushchair's frame upwards (PIC.B) until you hear a characteristic locking sound (PIC.C).
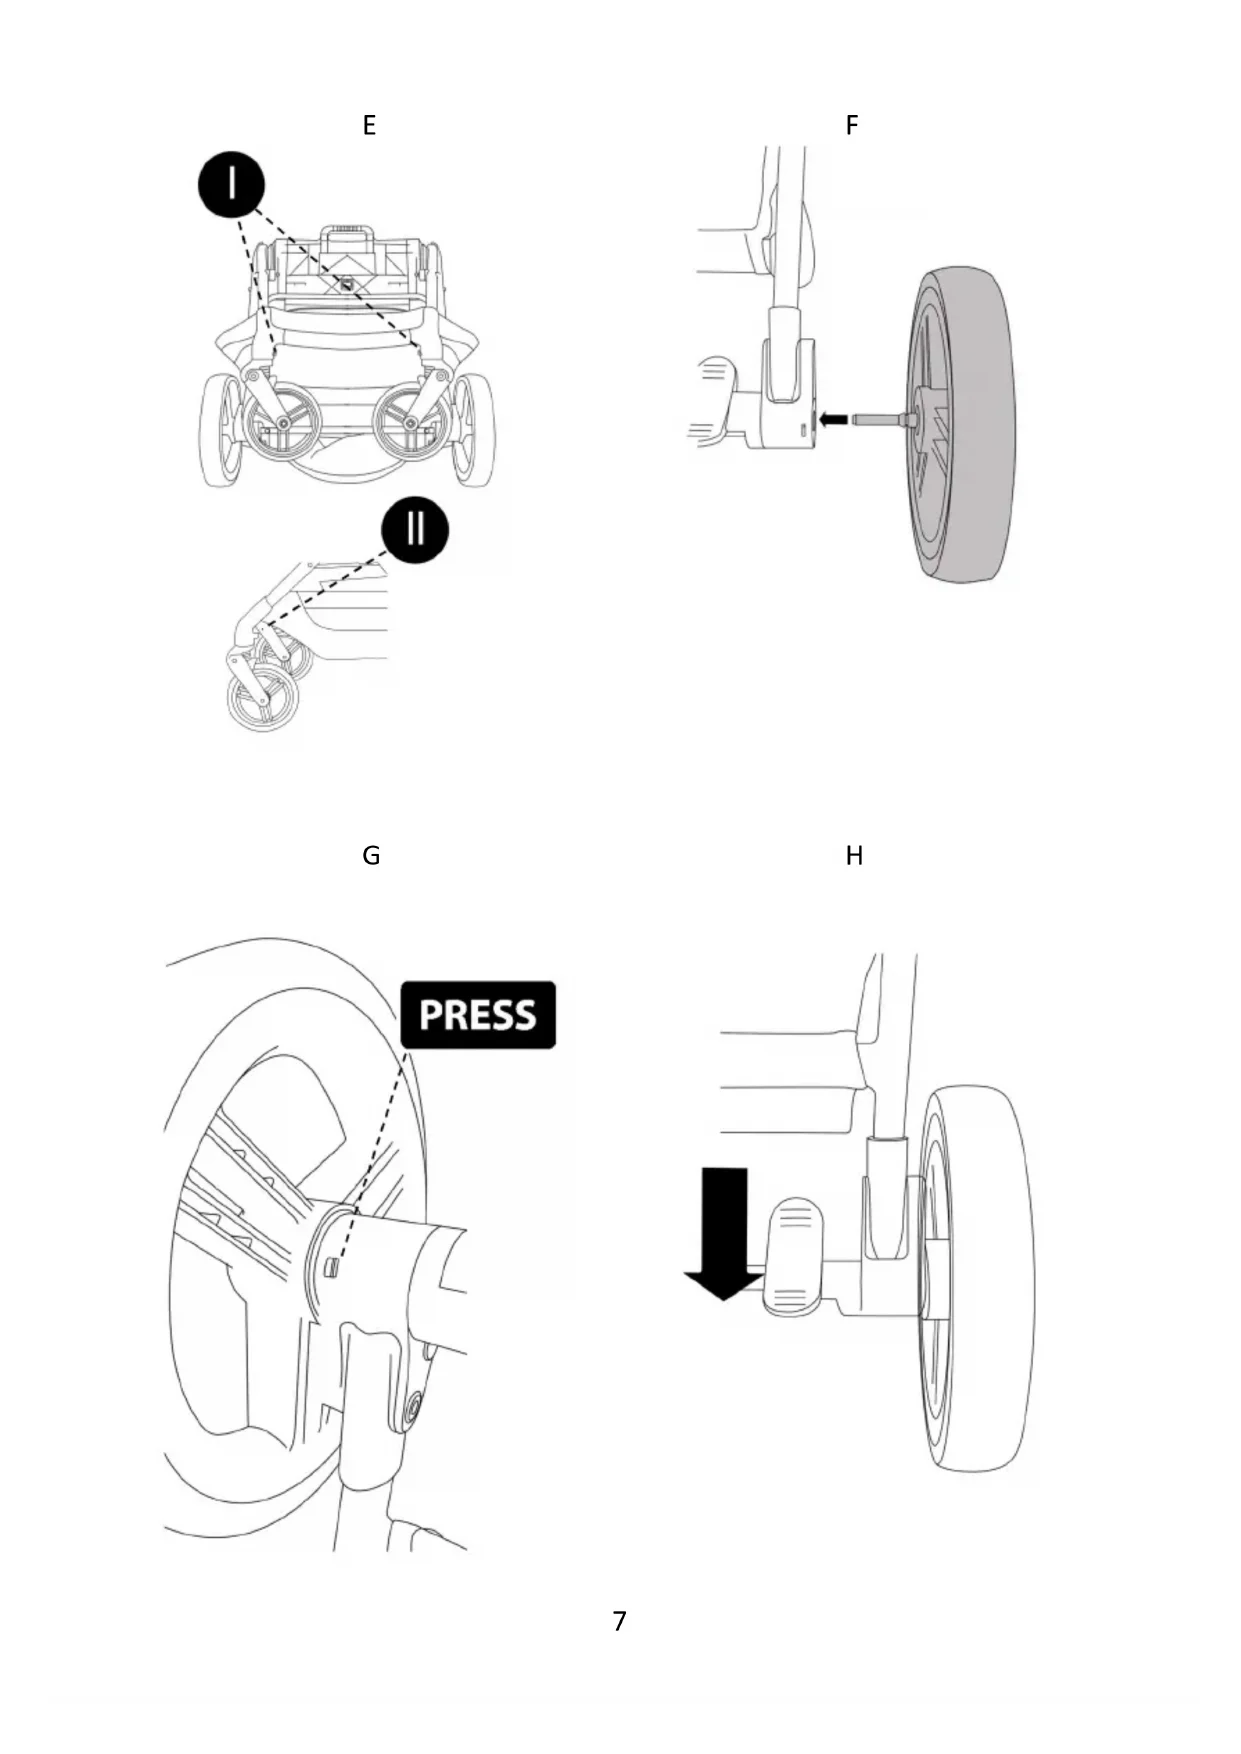
III MOUNTING AND DISMOUNTING OF FRONT WHEELS
Slide in the front wheels (3) into designated slots until you hear a locking sound (PIC.D). To release the wheel, press the button and pull out the wheel (PIC.E.I). The pushchair has a pivoting front wheels system with an option of lock to ride straight. To unlock, slide the lock up/down (PIC.E.II).
IV MOUNTING AND DISMOUNTING OF REAR WHEELS
Slide in the rear wheels (4) into a designated slots until you hear a locking sound (PIC.F). To release the wheel, press the buton and pull out the wheel (PIC.G).
WARNING! Before using the pushchair, make sure all wheels are correctly fitted.
V USING THE BRAKE
The pushchair is equipped with a foot-operated parking brake. Press the brake with your foot. Once the lock sound is heard, the brake is active (PIC.H). Unlocking happens after lifting up the brake lock (PIC.l).
VI ASSEMBLY/DISASSEMBLY OF THE SEAT AND HOOD
To mount the seat ( 7 ) slide it on the pushchairs frame until hearing a characteristic 'click' (PIC.J). The seat can be fitted front or rear-way facing (PIC.K). To dismount the seat, press the buttons (PIC.L.l) on both sides and lift the seat up (PIC.L.II). Begin the hood assembly by sliding the metal latches into the fixing point on the seat's frame (PIC.M.l). Correct locking is signaled by a gentle click (PIC.M.II). Pull the fabric over the seat levers and secure the hood fabric with the four fasteners on the seat backrest (PIC.N). To disassemble the hood, press the buttons on the pushchair's frame located from the inner side of the hood hooks and take out the metal latches from the fixing (PIC.O)
CAUTION! Assemble the hood before using the pushchair.
VII BUMPER BAR ASSEMBLY
To assemble the bumper bar, slide it in on both sides of the frame until it locks (PIC.P). To disassemble the element. Press the buttons on both sides of the guide and pull out the bumper bar (PIC. Q).
VIII SAFETY HARNESS
Adjust the safety harness (6) at every use to make sure the child is correctly secured.
The belts of this stroller are adapted to newborn babies. Always use the fastening system. To secure the child, slide the hip belts into the shoulder straps (PIC.R) and connect them by creating a central buckle (PIC.S), and secure them with a magnetic clamp until it locks (PIC.T.I). To release the belts, press the buttons on the center buckle (PIC.T.II).
IX SEAT POSITIONS
The seat has four positions: lie-flat, two semi-reclining, and sitting, adjustable using the backrest adjustment lever (PIC.U).
X FOOTREST ADJUSTMENT
The footrest can be adjusted in one of five positions. Simultaneously press the buttons located on both sides of the footrest and set in the chosen position (PIC.V).
XI PARENT HANDLE ADJUSTMENT
To adjust the parent handle, press the button located in the middle of the handle (PIC.W.I) and set the handle in a preferable position. You can adjust the parent handle height on one of 4 levels (PIC.W.II).
XII CUP HOLDER, MOSQUITO NET AND RAIN COVER, BAG ASSEMBLY
Attach the cup holder to the pushchair's right side stem.
Pull over the mosquito net onto the seat (PIC.X.I) and to fix it, fasten the snaps on the back of the backrest (PIC.X.II).
Place the rain cover on the pushchair as shown on PIC.Y.
Hang the parent bag (13) on the handle using the hangers (PIC. AL-AM).
XIII FOLDING THE PUSHCHAIR
When folding the pushchair with the car seat or a carrycot, first, detach those elements from the pushchair's frame. The pushchair can be folded with the seat fixed front or rear way facing. The pushchair has an upright position once folded- turn the wheels in the opposite direction of travel and lock them using the straight-ahead travel lock button.
The pushchair can be folded in two ways:
- Seat fitted facing the parent (PIC. Z) - set the backrest on a frame level (PIC.AA). To fold the frame, press the folding button located on the handle and push the handle forward, holding the folding button according to the PIC. 13.AB. until the latch locks on the stem (PIC.AC)
- Seat fitted backward to the parent (PIC.AD)- set the backrest in the third position as shown on the PIC.AE). Lift the footrest as shown on the PIC.AF. To fold the frame, press the folding button located on the handle and push the handle forward, holding the folding button according to the PIC. 13.AG. until the latch locks on the stem (PIC.AH)
XIV INSTALLATION OF ADAPTERS AND CAR SEAT
Slide the adapters into the slots on the frame until you hear the lock sound (PIC.AI). Caution! Make sure that the adapters are installed correctly. When installing the car seat using the adapters, clip it to the intended sockets - one on each side of the pushchair - until you hear a distinctive "click" (PIC.AJ). Caution! Make sure that the car seat is installed correctly. To remove the car seat, perform the actions in reverse order. To disassemble the adapters from the pushchair's frame, press the lock buttons on each adapter (PIC.AK). WARNING! The car seat on the frame must always be affixed in the rearward facing position (the child facing the person pushing the pushchair).
XV CARE AND MAINTENANCE The buyer is responsible for proper installation of all functional elements as well as for carrying out all required maintenance and adjustments in order to keep the buggy in good technical condition. The buggy must be periodically checked for potential problems. Significant measures to be applied to ensure the child's safety and prevent shortening of the product life have been presented below:
- Check the strength and safety of all rivets and connections.
- Check all wheel locking equipment and tyres. If necessary, replace or repair.
- Check if all safety devices work properly, particularly the main and additional fasteners that should move freely at any time.
Please, stop using the buggy if there are doubts as to its proper use or a suspicion of any danger.
If the wheels squeak, apply a thin layer of silicone. Do not use oil or grease based products as they attract dirt, which makes buggy movement difficult.
XVI CLEANING If the elements of the buggy chassis have been exposed to saltwater, rinse with tap water as soon as possible.
| Do not wash. Clean the product gently with a damp cloth and a mild detergent | Hand wash at max. 40C. |
| 30 Wash at max. 30°C, gentle process | Do not dry in a tumble dryer |
| Do not bleach | Do not dry clean |
| Do not iron |
Do not fold or store the product when wet, and never store it in damp conditions as it can lead to mold formation.
Mosquito net, Seat cover, Seat canopy, Basket, Rain cover, Bag: Do not wash. The product can be gently wiped with a damp cloth and mild detergent, do not bleach, do not tumble dry, do not iron, do not dry clean
XVII Warranty
The full text of the Terms and Conditions of the Warranty is available on the website www.KINDERKRAFT.COM
ES
ESTIMADO CLIENTE!
YcTaHOBnTe DoXDeBnK Ha KOLaCKy, KaK NOKa3aHo Ha PNC. Y.
NobecbTe cyMKy (13) Ha pyuKy, nCnoJb3yra noDbceKn (PNC. AL-AM)
XIIICKJIADbIBAHNE DETCKO KOLIACKN
PnCKaIbIbAHmKoJIaCKnC aBtOKpecIOM nI IIObKO HeO6xOJMo CHaayala OTCoeHNHTb 3TN 3JeMeHbI OT paMbI KOJIaCKN. KoJIaCKy MOJHO cIoxHTb, BMeCTe C cnDeHbEM ycTaHOBLeHHbIM KaK IINcOM BnepeD Tak N Ha3aD NO HApBaJIeHHIO dBIXeHnA. B cIoxHeHHOM BVdE KOJIaCKa CTOnT cama - Heo6xOJMo IOBepHyTB KOJIeCA B npOTnBOJNOJXHOM HApBaJIeHHIO OT dBIXeHnA 3a6NoKIpOBaTB IN C NOMU bIO KHOJIK6NIO BIXeHnI pIqmo.
KoJIaCKy MoXHO CNoXHTb DByMa cNooc6aMn:
Cudheye yctahOBHeHoe Iuom KpoDnteIO (PNC.Z)-yctAHOBITE CnIHky Ha OHom ypOBe c pAmo (PNC.AA).YTo6bIcNoHTbpaMy, HaxMTe KONKy cKlaDbIBaHHa hypuKe n, ydePKHBa KONKy cKlaDbIBaHHa, npoDBraTe pykByBnepe, kak noka3aHO h PNC.13.AB,doTexnop, noka 3aueIka He 3aΦHKcpyetca Ha stnΦte (PNC.AC)
Cudhe yctahOBHeHoe cHHoK pOHTeIIO (PNC.AD) - yctAHOBtce cHHky B TpeTbe noLOKeHne, KaK nOKa3aHO Ha pcyHke (PNC.AE). POnHMITE NOHOKKY, KaK nOKa3aHO Ha Pnc. AF. IJRA TORO YTO6bl CLOKHTb paMy, HAKMITE KNONKy CKlaDbIBaHnHa pyueKe i ToIKHtpepykBnepei, KaK nOKa3aHO Ha Pnc. 13.AG. noka 3aUeJIka He 3aΦHKcnpyETcra Ha wtuΦTe (PNC.AH)
XIV YCTAHOBKA AADANTEPOB IN ABTOKPECNA
UcTaHOBnTe aAdTepbI B OTBepCTna Ha pame, noka He ycblIuNTe 3Byk fNkcaun (PNC.AI). BnHMaHne! IpOBebpTe npaBnIbHoCTb yCtAHOBKn aAdTepob. Pnp YcTaHOBKe ABTOKpeCna Ha aAdTepbI BCTabBe cnDeHbe B npedYcmOTpeHHbIe na3bl, no OJHOmy C KaJdoon cToPOhbl KoJIaCKn, Do xapaTePHoro 5eLnuKa (Pnc. AI). BnHMaHne! U6eINTEcb, YTO ABTOKpeCNO yCtAHOBLeHO npaBnIbHO. IInr ChrTnABTOKpeCna BbINOHNte DeiCTBnB O6paTHOM nopAJaKe. TTo6bl ChrTb aAdTepbI C paMbI KOJIaCKn, HAnMITE Ha KHOJIKN FfKCaUNn Ha KaJDoom aAdTape (PNC. AK). INPEDOCTEPEXHEHNE! ABTOKpeCNo Ha pame Bcerda DOnjHo 6bIb YcTaHOBHeo IpOTNB XOda DBNKeHnra (pe6eHOK Nlucm K TOMy, KTO ynpabJIeR TOLRAckOJ).
XV YXOD N KOHCEPBALN
O63aHnocbIIO nokynataJIЯBIAeTc o6ecneueHne HaJnxkaIey ycTaHOBKn Bcex yHKUHOHaIbHbIX 3JeMeHTOB, a TaKKe OcyueeCTBLeHne npabInlbHbIX pOoEduP NO KOHcepBaunN I perylnpObaHnIO, YTo6bl CoepKaTb KOLrCKy B XopoWem TEXHnueckOM COCTOAHIN.
Kolny cneyuT nepnoDnueckn npOBepaTb Ha HauuHne NoteHuaNbHbix npO6IeM. Hnke npBBeHeB baxHbie waR, KOtOpbl dOnkHbI 6bITb BbIOHaHeHbI dIa TORo, YTO6bl oecneuHb 6e3oNaChocTb pe6eHka n ppeoTbpaTb cokpauneHc cpoKa cnXkbI:
- PpOBePHTb npOuHocTb n 6e3oNaChocTb Bcex 3aKJIenOK n CoeDnHeHn.
International contact:
support@kinderkraft.com
+442045250748
VYROBCE/HERSTELLER/MANUFACTURER/FABRICANTE/ FABRICANT/GYARTO/FABBRICANTE/FABRIKANT/PRODUCENT/ FABRICANTE/PRODUCACTOR/IPON3BOIDNTIb/VYROBCA/TILLVERKARE:
4Kraft Sp. z o.o. ul. Tatrzanska 1/5 60-413 Poznan, Poland