AromaFresh Therm Pro - Coffee machine MELITTA - Free user manual and instructions
Find the device manual for free AromaFresh Therm Pro MELITTA in PDF.

User questions about AromaFresh Therm Pro MELITTA
0 question about this device. Answer the ones you know or ask your own.
Ask a new question about this device
Download the instructions for your Coffee machine in PDF format for free! Find your manual AromaFresh Therm Pro - MELITTA and take your electronic device back in hand. On this page are published all the documents necessary for the use of your device. AromaFresh Therm Pro by MELITTA.
USER MANUAL AromaFresh Therm Pro MELITTA
Electronic Equipment).
1.1 Proper use.. 15
1.2 Danger from electric current 15
1.3 Risk of burns and scalds.. 16
1.4 General safety 16
1.5 Children 16
I For your safety. 15
2 Appliance at a glance. 17
3 First steps. 18
3.1 Unpacking the appliance 18
3.2 Setting up the appliance 18
3.3 Connecting the appliance 18
3.4 Switching on the appliance for the first time 18
4 Preparing to make beverages 18
4.1 Filling with tap water 18
4.2 Using a filter paper 18
4.3 Filling with coffee beans 18
4.4 Setting number of cups to be brewed..19
4.5 Setting grinding fineness and brewing strength 19
5 Preparing coffee 19
5.1 Preparing coffee with coffee beans....19
5.2 Preparing coffee with ground coffee....20
6 Using the timer 20
6.1 Preparing coffee with the timer 20
6.2 Setting the starting time.. 20
7 Changing settings 20
8 Cleaning the appliance. 21
8.1 Cleaning surfaces.. 21
8.2 Cleaning the jug 21
8.3 Cleaning the grinder 21
8.4 Cleaning the ground coffee chute..22
9 Descaling the appliance 22
9.1 Descale program 22
9.2 Rinsing the appliance 23
10 Disposal 23
II Technical data 24
12 Troubleshooting 24
I For your safety
1.1 Proper use
The appliance is intended for use in private households or comparable environments to prepare coffee beverages.
Any other use is regarded as improper and may lead to personal injury and material damage.
1.2 Danger from electric current
Only use the appliance if it is in a technically flawless condition.
Only connect the appliance to a correctly installed earthed mains socket.
Make sure that the power cable does not touch the hotplate while it is hot.
If the appliance or the power cable is damaged, there is a risk of fatal electric shock. You may not use the appliance in this case, but instead you need to have it repaired by the manufacturer, the customer services or a service partner.
You must not immerse the appliance in water or let the power cable come into contact with water.
Disconnect the appliance from the power supply when left unsupervised for a long time.
1.3 Risk of burns and scalds
The coffee and steam produced are very hot. Avoid direct contact with the flowing coffee and the steam. Do not open the hinged filter holder during the brewing process.
The jug and the hotplate become very hot during preparation and also remain hot for a long period after preparation. Do not touch the jug or the hotplate when they are hot. Touch the hot jug only by the handle.
1.4 General safety
Do not operate the appliance in a cabinet.
Do not reach into the interior of the appliance during operation.
You may not open the housing or manipulate the appliance in any other way.
You may not use the jug in a microwave.
Do not use abrasive cleaning agents or scouring milk to clean parts that come into contact with food. Remove the remains of the cleaning agents with clear water.
1.5 Children
Children must not be allowed to play with the appliance.
You must keep children who are younger than 8 years away from the appliance.
This appliance may be used by children over 8 years of age and by persons with reduced physical, sensory or mental capabilities or a lack of experience and knowledge, but only if they are supervised or have been instructed in using the appliance safely and understand the resulting risks.
Cleaning and maintenance must not be undertaken by children younger than 8 years of age.
Children older than 8 years of age must be supervised during cleaning and maintenance.
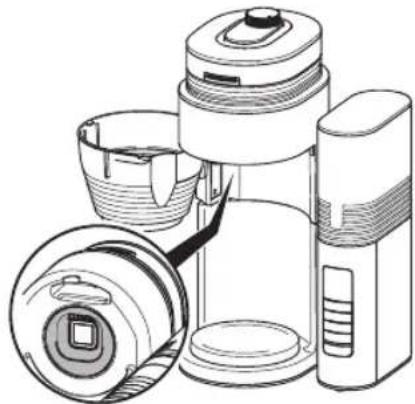
2 Appliance at a glance

I Bean container with lid
2 Grinding fineness regulator
3 Water tank with lid
4 Power cable with cable insert compartment
5 Control panel
6 Hotplate
7 Brush
8 Jug with lid
9 Hinged filter holder
10 Drip stop
I Filter insert


Item Designation
Function
12 Screen Shows functions and information.
13 Function Displays the assignment of the function buttons.
14 + 23 Function buttons
Select menu items.
15 Timer Starts the timer function and stops the timer.
16 + 21 Cups Increases or reduces the number of cups to be brewed.
17 + 20 Strength Increases or reduces the brewing strength. 0 deactivates the grinder.
18 LED Displays the status of the appliance.
19 Start/Stop Starts or stops the preparation and exits menus.
22 OK Confirms the selection in the menu.
3 First steps
3.1 Unpacking the appliance
Remove the packaging material and the adhesive strips from the appliance. Please keep the original packaging.
The appliance has been tested in the factory to ensure that it functions perfectly. Therefore, the appliance may still contain traces of coffee and water.
3.2 Setting up the appliance
Set up the appliance in a dry room.
- Set up the appliance on a stable, flat and dry surface. The surface may not be hot. The appliance may not be placed in the vicinity of sinks or the like.
- Route the power cable so it does not lie over edges or cannot be damaged by hot surfaces or the hotplate.
3.3 Connecting the appliance
Only connect the appliance to an easily accessible, properly installed earthed mains socket.
Full isolation from the mains is achieved by disconnecting the mains plug.
3.4 Switching on the appliance for the first time
When switching on for the first time, you must rinse the appliance. Rinsing is done without a filter paper and without coffee.
I. Connect the appliance to the mains supply.
2. Set the Time and the Language with the function buttons. Confirm each selection with the "OK" button.
3. Set the "Strength -" button to 0 to deactivate the grinder. No coffee beans are ground.
» The spoon symbol appears on the screen.
- Place the jug with the lid under the outlet.
- Remove the water tank. Rinse out the water tank with clean tap water.
- Fill the water tank with fresh, cold tap water up to the 8-cup marking and insert it.
- Start preparation with the "Start/Stop" button.
The preparation ends automatically and the LED lights up green.
- Switch off the hotplate with the "Start/Stop" button.
- Empty the jug.
Repeat steps 4 to 9 to rinse the appliance a second time.
4 Preparing to make beverages
4.1 Filling with tap water
Fill the water tank only with fresh, cold tap water. Close the filled water tank with the lid.
The markings on the water tank correspond with the number of cups that you prepare during a brewing process. The brewing process will always use up all of the water in the water tank. Therefore, fill only the quantity of water that you require for the subsequent brewing process.
The filled quantity of water may not exceed the 10 cup marking as the jug will otherwise overflow.
4.2 Using a filter paper
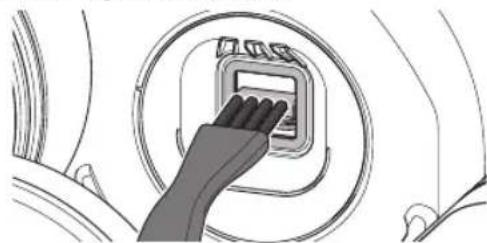
Use Melitta® filter papers in the size 1x4. Fold the filter paper along the stamped seam and fit the filter paper in the filter insert. Push the filter paper down carefully to achieve an ideal fit. The hinged filter holder should click into place when you close it.
After preparation, remove the filter insert with the filter paper and dispose of the filter paper.
4.3 Filling with coffee beans
Roasted coffee beans lose their aroma after a few days. Therefore, do not fill too many coffee beans into the bean container. When the bean container is full, you can prepare coffee 2 or 3 times with the maximum water quantity.
Attention! Extremely oily and caramelised coffee beans can clog up the grinder. Ground coffee can also damage the grinder.
If the bean container is ground empty during preparation, three short signal tones will sound and the grinding process will be interrupted. A corresponding message will also appear on the screen.
Fill the bean container with sufficient coffee beans and confirm with the "OK" button. The remaining quantity required will be ground and the preparation continued.
4.4 Setting number of cups to be brewed
Set the number of cups to be brewed with the "Cup +" and "Cup -" buttons.
Always set the number of cups so it corresponds with the filled quantity of water. The appliance will then use up all of the water in the water tank. This setting is used to set the quantity of coffee beans to be ground. The brewing process will be optimised for the quantity set.
4.5 Setting grinding fineness and brewing strength
The grinding fineness basically influences the flavour of the coffee. If the grinding fineness is too fine, the coffee will have a bitter taste. If the grinding fineness is too coarse, the coffee will taste acidic.
Turn the "grinding fineness regulator" clockwise to set a finer grinding fineness. Turn it anti-clockwise to set a coarser grinding fineness.
You use the "Strength" buttons to set the quantity of coffee beans being ground. The 0 setting deactivates the grinder allowing you to use ground coffee. The grinding results and the brewing strength can vary between different coffee varieties. You should try out different settings to obtain the best results. Always start with a medium setting.
Note: If, despite setting the grinding fineness and strength, you do not obtain tasty coffee, you can also set the quantity of coffee beans to be ground in the menu under Mill Settings. Note that this setting influences the taste of
the coffee with all strength levels and with any number of cups set.
5 Preparing coffee
Observe the following instructions during preparation:
- Start the preparation with the "Start/Stop" button. The LED flashes green during preparation.
- You can end preparation at any time by pressing the "Start/Stop" button again.
The preparation ends automatically. The LED lights up green and a signal tone sounds depending on the setting. - The drip stop in the filter insert stops coffee dripping when you remove the jug.
Depending on the setting, the screen is darkened after a few minutes of inactivity. Press any button to activate the screen.
The hotplate also remains switched on after preparation. The hotplate switches off automatically only at the end of the set keep-warm time. The screen shows you the remaining time until switch off. - Switch off the hotplate with the "Start/Stop" button if there is not a jug with brewed coffee in the appliance.
5.1 Preparing coffee with coffee beans
I. Fill enough coffee beans into the bean container.
2 Set the grinding fineness.
3. Fit a suitable filter paper in the filter insert.
4. Fill the water tank according to the required number of cups.
5. Place the jug with the lid in the appliance.
6. Set the number of cups to be brewed.
7. - + Set the brewing strength. The strength may not be 0.
8. Start preparation with the "Start/Stop" button.
5.2 Preparing coffee with ground coffee
Use approx. 6 to 8g of ground coffee per cup.
I. Set the "Strength -" button to 0 to deactivate the grinder.
» The spoon symbol appears on the screen.
2 Fit a suitable filter paper in the filter insert.
-
Put the required quantity of ground coffee into the filter paper.
-
Fill the water tank according to the required number of cups.
-
Place the jug with the lid in the appliance.

Set the number of cups to be brewed.
- Start preparation with the "Start/Stop" button.
6 Using the timer
The timer allows the appliance to automatically start the preparation at a set time. You need to set the time in order to use the timer, see section 7 Changing settings on page 20.
6.1 Preparing coffee with the timer
I. Prepare the appliance as described in the section 5.1 or 5.2 without pressing the "Start/Stop" button.
2 Activate the timer with the "Timer" button.
3. Select a start time with the left function button.
4. Start the timer with the "OK" button.
The start time is displayed on the screen and the LED lights up white.
Preparation starts at the selected time.
You can deactivate the timer before the end of the start time by pressing the "Timer" button again.
6.2 Setting the starting time
You can set two start times that you can then select by pressing the buttons.
I. Press the "Timer" button.
2. Select the start time that you want to change with the left function button.
3. Press the right function button to activate the setting.
- Set the required time with the function buttons. Confirm each selection with the "OK" button.
- Press the right function button to save the setting and activate the timer.
Use the left function button to save the time. The timer is not activated, however.
7 Changing settings
This menu contains functions for configuring the appliance and for maintenance.
Press the right function button to call up the menu. Navigate within the menu using the two function buttons. Confirm your entries with "OK". Press the "Start/Stop" button to exit a function without saving the setting. The current assignment of the function buttons is shown on the screen.
The settings are retained even when you disconnect the appliance from the electricity mains.
| Display | Description |
| Descale: Starts the descending program, see section 9 on page 22. | |
| Clean mill: Opens or closes the flap for the ground coffee chute, see section 8.4 on page 22. The QR code calls up useful information. | |
| Keep warm: Length of the keep-warm time after ending preparation. | |
| Time: Sets the time. Press the function button to activate fast forward. | |
| Mill: Sets the quantity of coffee beans to be ground. This allows the brewing strength to be changed. 1 bean = 90 % of the factory setting 2 beans = 100 % of the factory setting 3 beans = 110 % of the factory setting | |
| Display: Sets the brightness of the inactive screen. Press the “Start/Stop” button for 3 seconds to darken the screen manually. | |
| Volume: Sets the volume of the signal tones. The setting 0% deactivates the tones. Error signals are always active. |
Display Description

Language: Sets the language.

Service/information: Shows the appliance counter and the software version.
The Factory setting function resets all settings to the original values. The appliance counters are not reset.

Exit: Exit the menu.
8 Cleaning the appliance
Regular cleaning and maintenance of the appliance guarantee the consistent high quality of your coffee.
Always allow the appliance to cool down before cleaning it.
Attention! Unsuitable cleaning agents can damage the appliance. Only use the recommended cleaning agents.
8.1 Cleaning surfaces
Use a soft, damp cloth to clean the surfaces. Remove external soiling immediately.
You can remove residue from the coffee beans in the bean container with a soft cloth. The cloth needs to be dry.
8.2 Cleaning the jug
Rinse the jug, the lid and the filter insert with clear, warm water and a small quantity of washing up liquid. You can also clean these parts in the dishwasher.
8.3 Cleaning the grinder
Clean the grinder if you see visible soiling. After each time you clean the grinder, you should also clean the ground coffee chute, see section 8.4 Cleaning the ground coffee chute on page 22.

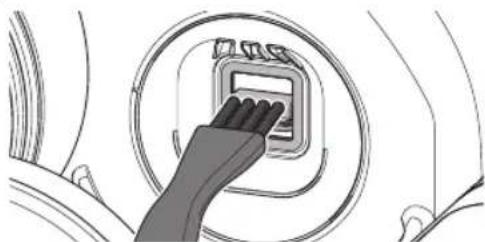
You can also watch a video of the cleaning steps. To do this, simply use the adjacent QR code.
Disassembling and cleaning the grinding fineness regulator
I. Empty the bean container.
2. Allow the grinder to grind itself empty. Do this by fitting a filter paper in the filter insert and starting the grinding process with the "Start/Stop" button. The appliance indicates that there are no coffee beans in the bean container.
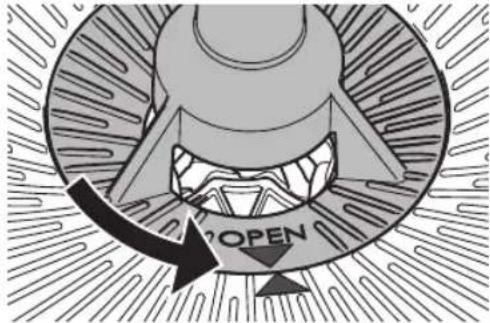
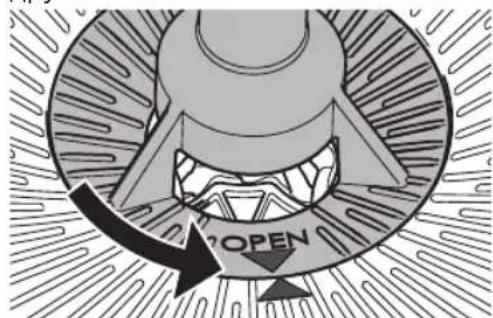
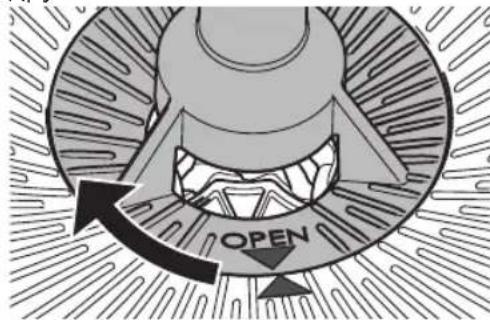
3. Turn the grinding fineness regulator until the two triangles point towards each other.
- Pull the grinding fineness regulator vertically upwards out of the appliance.
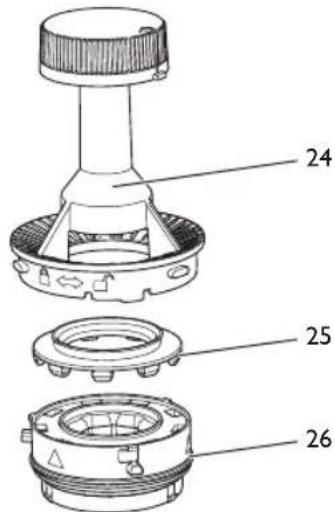
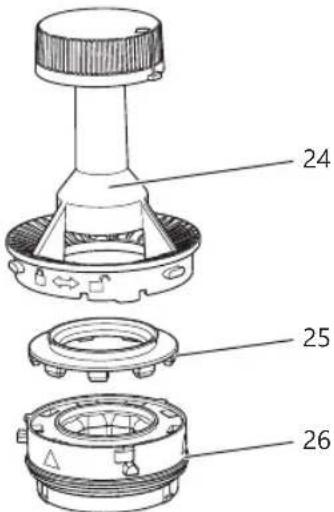
- Disassemble the grinding fineness regulator as shown in the following picture.

To loosen the grinding ring (26), turn it to the position shown.
- Clean all parts of the grinder with the brush.
You can remove the ground coffee from the grinding ring by knocking it lightly. You can also remove the ground coffee with a vacuum cleaner.
If it is heavily soiled, you can clean the grinding ring under running water. Allow the grinding ring to dry completely.
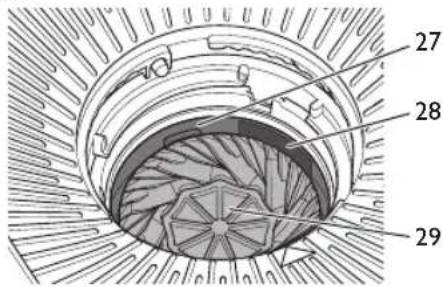
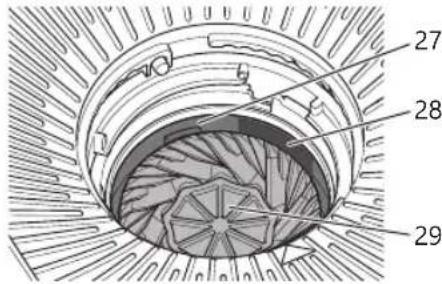
- Clean the lower grinding disc (29), the gap (27) and the entrance to the ground coffee chute (28). You can remove loose ground coffee with a vacuum cleaner. Loosen caked-on ground coffee with the brush.
Fitting the grinding fineness regulator All parts of the grinding fineness regulator must be completely dry.
I. Reassemble the grinding fineness regulator. Make sure you press the silicone gasket (25) evenly and as far as it will go into the grinding ring (26).

To lock the grinding ring, turn it to the position shown.
2 Insert the grinding fineness regulator vertically into the appliance. The two triangles must point towards each other.
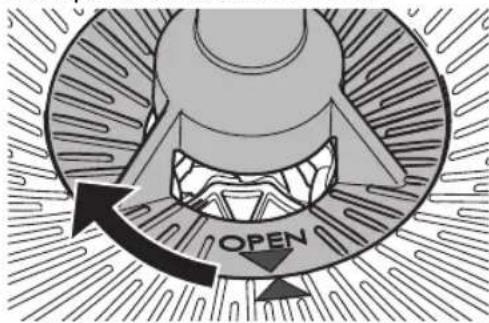
- Press the grinding fineness regulator down gently and turn it clockwise to the stop.
8.4 Cleaning the ground coffee chute
I. Empty the bean container.
2. Allow the grinder to grind itself empty. Do this by fitting a filter paper in the filter insert and starting the grinding process with the "Start/Stop" button.
The appliance indicates that there are no coffee beans in the bean container.
- Open the hinged filter holder.
- Clean the area above the hinged filter with the brush and a moist cloth.
- Open the flap for the ground coffee chute by selecting Clean mill > Ground coffee chute > Open in the menu.
- Clean the ground coffee chute with the brush. Make sure that you also clean the parts that are further inside.
- Close the flap for the ground coffee chute by selecting Clean mill > Ground coffee chute > Close in the menu.
- Close the hinged filter holder.
9 Descaling the appliance
9.1 Descale program
After you have used the appliance for a while, limescale deposits will build up inside it. To ensure that your appliance works perfectly and has a long life, you need to descale it on a regular basis.
The Descale program removes the limescale deposits. You should run the program every four weeks or when the red drop on the screen asks you to do so. The program takes
approximately 25 minutes and should not be interrupted.
Use Melitta® Anti Calc liquid descending agent for filter coffee machines. Observe the instructions on the packaging of the descending agent.
Caution! Descaling agent causes eye irritation. If it accidentally comes into contact with your eyes, you should rinse them with clear water for several minutes. Consult a doctor if symptoms persist.
I. Remove the filter paper from the appliance.
2 Start the descending program by selecting Settings > Descale in the menu. Note: When the red drop on the screen asks you to descale the appliance, you can also start the program with the left function button.
3. Fill at least 500ml of descending fluid into the water tank.
4. Place the jug with the lid in the appliance.
5. Press the right function button to start the program.
The LED flashes red.
The descending program runs and finishes automatically.
» The display on the screen asks you to rinse the appliance.
- Rinse the appliance twice, see section 9.2 Rinsing the appliance on page 23.
If the appliance asks you to descale it again after a short period, the layer of limescale in the heater was too thick or the descending agent was not sufficiently effective. In this case, run the program again.
9.2 Rinsing the appliance
After descending, you must rinse the appliance to remove all remains of the descending agent. You should also rinse the appliance if you do not use the appliance for a longer period.
I. Remove the water tank. Rinse out the water tank with clean tap water.
2 Fill the water tank with fresh, cold tap water up to the 8-cup marking and insert it.
3. Place the jug with the lid in the appliance.
4. Set the "Strength -" button to 0 to deactivate the grinder.
» The spoon symbol appears on the screen.
- Start the rinsing process with the "Start/ Stop" button.
- Allow the water to flow through completely and empty the jug.
10 Disposal
Appliances bearing this symbol are subject to the European Directive 2012/19/EU for WEEE (Waste Electrical and Electronic Equipment).
Electrical appliances do not belong in domestic waste. Dispose of the appliance in an environmentally friendly way via suitable collection systems.
II Technical data
| Technical data | |
| Operating voltage 220V to 240V, 50/60 Hz | |
| Power consumption 970W to 1130W | |
| Dimensions: | |
| Width | 268 mm |
| Height | 463 mm |
| Depth | 252 mm |
| Holding capacity: | |
| Bean container | approx. 180 g |
| Water tank | 1250 ml |
| Ambient conditions: | |
| Temperature | 10°C to 32°C |
| Relative humidity | 30% to 80%(non-condensing) |
You find detailed technical data via the following link.

12 Troubleshooting
Contact our hotline if the actions listed below fail to rectify the problems or if other problems not listed here occur.
| Problem/display on screen | Cause Action | |
| The grinder and/or the ground coffee chute are blocked. | Clean the grinder, see section 8.3 on page 21. | |
| Grinding fineness regulator is not locked. | Insert the grinding fineness regulator again and lock it, see section 8.3 on page 21. | |
| The flap in the ground coffee chute is jammed. | Check the ground coffee chute for foreign objects and, if necessary, remove any foreign objects, see section 8.4 on page 22. | |
| There are no coffee beans in the bean container. | Fill the bean container. Then press the "OK" button to grind the remaining quantity of coffee. Press the "Start/Stop" button to end preparation. | |
| The coffee beans do not drop into the grinder. | Tap lightly on the bean container. Clean the bean container. | |
| Contact Hedline ERROR | System error Contact the hotline. | |
| Preparation is taking noticeably long and the appliance is rattling. | The appliance is covered inside with limescale. | Descale the appliance, see section 9 on page 22. |
| A red drop is displayed on the screen. | ||
| The drip stop is leaking. | The drip stop is soiled. | Clean the drip stop under running, warm water and operate the drip stop several times while doing so. |
| The screen is dark. The appliance is not connected. | Connect the mains plug to the power socket. | |
| The appliance is inactive. | Press any button. | |
| The jug is overflowing. | The water tank is too full. | Fill the water tank no higher than the 10-cup mark. |
| The coffee does not taste good. | The grinding fineness and the amounts are not set optimally. | Change the grinding fineness and amounts, see section 5 on page 19 and section 7 on page 20. |
Sommaire
I Sécurité 25
Electronic Equipment).
KolnueCTBO npiroToBnBaembIX yaWeK HAcTpaNBAeTC
C NOMOuKHOHONK «HaKa +» I «HaJa -»
BJIIO6OM cIyue cIeAyeT yCTaHOBnTB KOJIuYeCTBO YaIeK B COOTBETCTBUN C 3aJIITbIM KOJIuYeCTBOM BOIbI, DaJKe ecIJN
BCERda NcnoJb3yeTcB CBAuN KOHTeHepa.C NOMOUBo 3TOH HAcTPOINyCTaHABnBaETcKOLNuYeCTBO KOFeHNbIX3peH dJa NOMOJa N ONTMn3npyETcPOnuecc PnuroTOBHeHn Ja HAcTpoEHHO YncLa YaWeK.
4.5 HacrtpoiKa ToHkoCTn NOMoJa N KpeNoCTN Kofoe
ToHKOCTb NOMOJa cyUeCTBeHHo BInaTeHa BKyc Kofo. Pn CnIshKOM ToHKOM NOMOE Kofo IMeet rOpBKn BVc.B Cnyae CnIshKOM rpy6oro NOMOA Kofo IMeET KNCIOBaTbIK BKyc.
NoBepHntepepyJrTopToHKoCTnNOMOJa no yacobOn CTpeKe dJa 60Jeet OTHKOro NOMOA. NoBepHnteero npOTNB yacobOn CTpeKn dJa 60Jeerpy6oro NOMOA.
C NOMOUBKHOJOK «KpeNoCTb»HaCTpaUNBaETcKoJIueCTBO KOeHbIX 3epeHДЯ NOMOA.Пи HAcTpoKe O MeJIbHnUHbIMexAHn3M BbIKIQUaETCrN MOxHONCIOB3OBaTB MoIOTbI Koe.
Pe3yIbTaT NOMOJ N KpeNoCTb MOryt OTnUaTcBdIpa3HbIX COPTOB Kofoe. 1TO6blIOCTnHHTb ONTMaJIbHOro pe3yIbTaT, CNeDyET Nonpo6oBaTb pa3HbIe HAcTPOKn. HaunTe c COOTBeTCTByIoUeN CpeDHeH NaCTPOKn.
Yka3aHne. Ecn KoFe BCE paBHO noLyua-ETc HEBKycbIM, HECMOTpHa HaHAcTPOyKy TOHKoCTN NOMOJa IN KpeNoCTN, B NyHKTe MeHIO HacmpouKa MeIbHuCyBI MOxHO DOONHHTeNbHO HAcTPONTb KOJIueCtBO KOeHbIX 3epeH dJa NOMOJa.CJeNyET yuHTbBaTb, YTO 3Ta HAcTPOJKa BInreT Ha BKyc KoFe npn JIO60 CTeneHn KpeNoCTN IN pRn JIO6OM HAcTPOeHHOM KOJIueCtBe YaWeK.
5Приготовленkekoфe
Co6IIOaIte cIeIyIoUne yKa3aHnB BO Bpem nprirotOBHeHn HAnrKa:
-
PnroTOBJIeHne 3aNyCkaETcH aXaTHeM KHOKn «Iyck/CTon». Bo BpeMa npiroTOBJIeHn Muraet 3eJeHbI CBeToIDNoD.
-
PnroToBJIeHne MoXHo npepBaTb B IHO6oe BpeM IOBTOPbIM HaKaTHeM KhoNk «Iyck/CTon>.
- PnroTOBJIeHHe 3aKaHUNBaETcA ABToMaTnueckN. TOpNT 3eJIeHbI CBeTOJNOB, B 3aBNCUMOCTN OT HaCTpOuKN pa3da-etCra 3ByKOBOI CnHaJI.
- POTNBOKaJIeJIbHOe yCTpoIcTBO B ΦIJIbTpYIOUeM 3JIeMeHTe IpeIOTBpaA UaET BbITEKaHne KAnJIb KOe, KOrDa KaOeHnK ChrT C yCTpoIcTBA.
B 3aBnCmOCTN OT HAcTPOKNIkpan raChET Uepe3 HeCKoJIbKO MInHyT B Cnyuae HeAKTNBHOCTN. HaxMMTe IIO6yIO KHONKy, uTO6bl aKTINBnPoBaTb 3kpaH. - PaHelb IaIy IIOOrpeBa OCTaetc BKJIHOeHHoJ DaXe NocIe nprirotOBHeHn. OHa aBTomatueckn BbIKluOaETcToIbKO NocIe NCTeUeHn HAcTpoEHHOrO BpemHn IOOrpeBa. Ha 3kpaHe oTO6paXaETc OCTabWeecBpemdo BBIKluOeHN.
- EcIn B yctpoiCTBe OTCyTCTBye T KofoeHNK CO CBapeHHbIM Kofoe, BblIOHHTe NaHeIb IJI NOOgPeBa HaxaTneM KHOKN «Nyck/CTOn>.
IpeK kaxdoon uNCTKOaHTe yCTPOINCTBY OCTbITb.
BhmuHne! HenoXoJyue uNCTaune CpeCTBa MOYr NOBpeNTb yCTPOINCTBO. IcnoJIb3yIte ToJIbKO peKOMeHdyEmble qnCTaune CpeCTBa.
8.1 Ounstka nobepxHocTei
Дя Oунстк NOBepxHOCTe NcNoIb3ynte MЯrkyIO, BlaXHyIO TkaHeByIO caIfoETKy. CneJyET He3aMeIInTeIbHO ydaJIaTb BHeUHHe 3arpa3HeHnI.
OCTaTK KofoeHbIX 3epeh B KOHTeHep
IJIa 3epeh MoXHO ydaIITb MraKoJ caI-
foTeKo. CanfoTeKa dOJxHa 6bITb cyxoJ.
8.2 OuNTka KofoeHnka
IpomOte KofoeHnK, KpbUk Ky n Onilb- TpyuOuN 3JIeMeHT YnCToT TeIIOB BOoJ C He6OJIbUWM KOJIuYeCTBOM CpeCTBa IJr MbITb NOCyDbl. 3TN DeTaII NaKxE MoXHO MbITB NOCyDOMOeHOn MaUNHe.
8.3 Ounstka MeIbHnUHOro MexaHn3Ma
BbINOHNHe ONUCTKy MeIbHnUHOro
MexaHn3Ma Ipi NaHnUu BNIMbIX
3aRpa3HeHn.IocLe KaKdoN OUYCTKn
MeIbHnUHO MEXaHn3Ma TaKke Tpe- 6ByeTc ONUCTNb KaHaJ dJa MOJOToro
Kofoe,cm.ΓaBy 8.4 OucmKa KaHaJa dJa
MOJOMO2o Kofoe Ha cTp.119.

3tanbl ounctkn MOxHO taKxe nocmotpeb B BVneOpolnke. ⅡЯ 3TORO BOCNOLb3yntecb QR-koDom,paCNOJoxKeHHbIM
PRAOM.
Демонтхи ounstka perylantopa TOHKOCTN NOMOLA
- OnopoxHnTe KOHTeHep dIa KofoeHbIX 3epEH.
2.BKlnohuTe MeIbHnUHbI MExaHn3M I daIte emy npa6oTaTb, noka He 6ydyT IepemOJLOTb BCE mHeouncB HEM
3epHa.ДЯЗTORO BCTaBbTeФИьTpВФИьTpPyUOuN 3IeMeHNTI 3aNyCTnte npOuecc pa3MOJa HaxKaTneM KHOKN «Пуck/СтOn»
»Ha 3KpaHe yCTpoiCTBa OTO6paXaETc, UTO KOHTeHep Ira KoFeuHbIX 3epe HpyctOi.
3.Повернite peryларToHkoCTn NOMOla TaKIM 6pa3OM, uTo6bI o6a TpeyrolbHnka yKa3bIBaJI n dpyr Ha dpyra.
- BbHbTe peRyIaTOp TOHKoCTn NOMOJIa BepTKKaJIbHO BBepx n3 yCTpoiCTBa.
- Pa36epuTe peryJrTop B COOTBeTCTBUN c pncyHKOM HnKe.
YTo6bI OTCOEINHHTb MeJIHOUe e KOJIbUO (26), NOBepHInTe erO B yKa3aHHoe NIOJoxKeHne.
- OuNCTIe BCE DeTaJI MElbHnUHO MExaHn3Ma KnCTOuKoI.
MoIOTbIKofoBMeJIIOUeM KOJIbue MoKHO ydaIITb C NOMOUsBOJeRKOro NOCTyKINBaHn. TaKxe MOJOTbIKofoe MoKHO ydaIITb C NOMOUsBO NblIEcoCa. PnCnIbHOM 3aRpa3HeHm MeJIooee KOJIbUO MOXHO IpomByTb NOd IpOTOU-
HOBoOJ. DaIte MeIHOUeMy KOJIbCy IIOJIHOCTbIO BbICOXHyTb.
- OuHCTHe HxHm MeHoun nnck (29), 3a3Op (27) n OTBepCTne K KaHaIy dIa MOnOToro KoOe (28). CBo6oHbIM MOJOTbIK KoOe MoXHO ydaJIITb c NOMOUsbIO nbIeCocca. 3actpRbWm KoOe cJeMyET ydaJIITb c NOMOUsbIO KNCTOcKn.
YcTaHOBka peryIaTopa ToHkOCTn NOMoJa
Bce deTann peryIaTOPa TOHKOCTn NOMoJa DOJXHbI 6bITb COBepWeHHO cyxIMN.
- Co6epuTe peryIaTOp ToHKOCTn NOMoJa. PpocJIeIte 3a TeM, YTO6bI CnIIKHOBOE yIIOThHeHne (25) paBHomePHO n Do yNopa 6blIO npIXKaTo K MeJIHOseMy KOJIbUy (26).

UTo6bI 3aΦnKcnpoBaTb MeJIO- Uee KOJIb4O, NOBepHnte erO B HoE PNOJOKeHne.
- BCTaBbTe peryJrTOp TOHkOcTn NOMoJa BepTKaJIbHO B yCTpoiCTBO. Oba TpeyroJIbHnKa DOJIxHbI YKa3bIBaTb Dpyr Ha dpyra.
- Clerka npnxMITE peryIaTOp TOHKOCTN NOMOBA BnH3 NOBepHnte ero no yacoboi CTpeKe Do ynpa.
8.4 OuNTka KaHala Ia MoIOTOro KoΦe
- Onopoxhnte KOHTeHep dIa KoOeHbIX 3epeH.
- BkIIOHTe MeJIbHnUHbI MExaHn3M n daIte emy npa6OtaTb, noka He 6ydyT nepemolotbI BCE mEIOUncsraB HEm 3epHa.ДЯ 3TOrO BCTaBbTe ΦnIbTpB φnIbTppyoUssn 3JeMeENT n 3aNyCTnte npouecc pa3MOJa HaXaTNEM KHOJKN «Nyc/CTon».
»Ha 3kpAhe yctpoiCTBa OTo6paXaETc, UTO KOHTeHep IJRA KOFeHbIX 3epeH nyCToN.
- OTPpoTe NOBOPoTHbI ΦJIbTp.
- OuHCTnTe NOBepxHOCTb HaI NOBOPOTHbIM FmJIbTpOM C NOMOUsK NCTOUKN IN BnaXHoJ caIΦeTKN.
- OTKpoIte 3acJohky KaHana dJa MOIOTOro Kofoe. BbI6epuTe dJa 3Toro B MeHIO nyHKtbi OucmKa MeJIb-HuSyI > KaHAn dJa MoJomOzo Kofoe> OmKpbimb.
- OuHCTnTe KaHaJI dIa MoJOTOrO Kofoe c NOMOUI KNCToUKN. IpocJeIte 3a TEM, yTObI TaKKe OuHCTnTb HaxOJaUN-ecra B rIy6nHe DetaJI.
- 3akpoIte 3acNoHky KaHaJa dIra MoIOTOro Kofoe. BbI6epnTe dIra 3TOrO B
MeHIO NyHKTbO OucmcKa MeIbHuu> KaHaI dIa Monomoo Kofo > 3aKpbimb.
8.3aKpoTe nobopoTHbI nJIbTp.
9 YdalenHe NaKnBvCtpoIcTBe
Waste Electrical and Electronic Equipment).
Division Household Products
Ringstr. 99
D-32427 Minden
Germany
www.melitta.de
Editorial department:
ZINDELAG
www.zindel.de
1100210-01
4364-0525