
GEHM 19320 B - Refrigerator GRUNDIG - Free user manual and instructions
Find the device manual for free GEHM 19320 B GRUNDIG in PDF.

| Product type | Refrigerator freezer |
| Brand | Grundig |
| Model | GEHM 19320 B |
| Dimensions (H x W x D) | 1850 x 600 x 650 mm |
| Net weight | 70 kg |
| Total net capacity | 300 L |
| Refrigerator capacity | 220 L |
| Freezer capacity | 80 L |
| Climate class | SN-T |
| Energy class | E |
| Annual energy consumption | 250 kWh |
| Noise level | 40 dB |
| Cooling type | Vented (Partial No Frost) |
| Defrost type | Automatic (freezer), manual (refrigerator) |
| Refrigerant | R600a |
| Power | 100 W |
| Power supply | 220-240 V, 50 Hz |
| Main functions | Refrigeration, freezing, LED lighting, vegetable compartment, adjustable door bins |
| Safety | Surge protection, child lock (optional) |
| Maintenance and cleaning | Regular cleaning with soft cloth, periodic defrosting of the refrigerator |
| Spare parts and repairability | Available from Grundig after-sales service |
| General information | Professional installation recommended, respect ventilation distances |
Frequently Asked Questions - GEHM 19320 B GRUNDIG
User questions about GEHM 19320 B GRUNDIG
0 question about this device. Answer the ones you know or ask your own.
Ask a new question about this device
Download the instructions for your Refrigerator in PDF format for free! Find your manual GEHM 19320 B - GRUNDIG and take your electronic device back in hand. On this page are published all the documents necessary for the use of your device. GEHM 19320 B by GRUNDIG.
USER MANUAL GEHM 19320 B GRUNDIG
EN - Safety instructions
- Product must be installed by a qualified person in accordance with the regulations in force. The manufacturer shall not be held responsible for damages arising from procedures carried out by unauthorized persons which may also void the warranty.
- Preparation of location and electrical installation for the product is under customer's responsibility.
- The product must be installed in accordance with all local electrical regulations.
- Before installing the product, remove all the materials and documents in it and visually check if the product has any defects on it. If so, do not have it installed.
- Make sure that the user cannot reach the electrical connections after the installation.
- The product is heavy, carry the product with at least two people.
- The door and/or handle must not be used for lifting or moving the appliance. Use the lifting spaces on both sides of the product (figure 1). Always wear protective gloves during transport and installation.
- Disconnect electrical connections in the area to be installed before installation.
- The surfaces of the furniture that the oven is to be installed in must be heat-resistant (100 °C minimum).
- Make sure that the furniture is in straight, horizontal position and that it is fixed before the installation of the appliance.
- Do not install heat insulation strips inside the interior of the furniture that the oven is to be installed in.
- The appliance must not be installed behind a decorative door in order to avoid overheating.
- The dimensions given in the installation diagrams are in mm.
Preparation of the furniture that the appliance shall be installed (Figures 2-3-4)
- The appliance is designed for installation into commercially available work tops. A safety distance shall be left between the appliance and the kitchen walls and furniture. (Figure 2-3)
-
The clearance where the appliance shall be placed on the worktop shall be cut as per the dimensions given figure 2-3.
-
If there is no hood on the appliance, allow a distance of 750mm from the hob surface to the furniture.
- If a shroud/hood is installed above the appliance, allow a distance for the installation height as described in the operating manual of the shroud/hood.
-** Minimum distance between the cabinets shall be equal to the width of the hob - In order to provide the necessary ventilation in the back of the kitchen furniture, openings should be created in the dimensions shown in figure 2.
- The electrical connection must be in the area A in figure 2 or outside the installation site.
Worktop thickness shall be at least 28mm (Figure 4a)
Ventilation
- Ventilation affects the heating performance of the appliance directly. Even if no problem is detected in the first inspections, customer concerns may occur due to the performance losses while cooking for longer periods when correct ventilation clearances are not provided.
- A minimum distance of 15mm shall be allowed between the lower surface of the hob and the upper wall of the oven (Figure 4b) to provide adequate ventilation. Additionally, a cross-section with the dimensions of 35× 500mm shall be left in the bottom of the furniture housing where the oven is placed. (Figure 2)
Installation of the appliance Connecting the appliance to the electricity supply
- Only connect the product to a grounded outlet/line with the voltage and protection as specified in the "Technical specifications". Have the grounding installation made by a qualified electrician while using the product with or without a transformer. Our company shall not be liable for any problems arising due to the product not being earthed in accordance with the local regulations.
- Before starting any work on the electrical installation, disconnect the product from the mains supply. There is the risk of electric shock!
- The product must be connected to the mains supply only by an authorised and
qualified person. The product's warranty period starts only after correct installation. Manufacturer shall not be held responsible for damages arising from procedures carried out by unauthorised persons.
- The appliance must be installed so that it can be completely disconnected from the mains supply. The separation must be provided by a switch built into the fixed electrical installation, according to construction regulations.
- The rear surface of the oven and the bottom surface of the hob get hot when it is in use. Make sure that the electrical connection does not come into contact with the rear surface otherwise, connections can get damaged.
- The connection cable must not be clamped, bent or trapped or come into contact with hot parts of the appliances. You may cause the appliances to short circuit and catch fire as a result of the cable melting. If the power cord is damaged, it must be replaced by a qualified electrician. Otherwise there is a risk of electric shock, short circuit or fire!
- The plug of the power cord should be easily accessible after installation (but not over the hobs).
- When wiring, you must comply with national / local electrical regulations and use socket outlet / line and plug suitable for the appliances. If the power limits of the product exceed the current carrying capacity of the plug and socket outlet / line, you must connect the product directly to the fixed electrical installation without using the plug and socket outlet / line.
- Make sure that fuse rating is compatible with the product.
- Connection must comply with national regulations.
- The mains supply data must correspond to the data specified on the type label of the products. You may see the hob's type label on the bottom of the hob and open the oven door to see the oven's type label.
- Power cable of your product must comply with the values in "Technical specifications" table.
- If the product will be connected directly to the supply power: If it is not possible to disconnect all poles in the supply power, a disconnection unit with at least 3
mm contact clearance (fuses, line safety switches, contactors) must be connected and all the poles of this disconnection unit must be adjacent to (not above) the product in accordance with IEE directives. Failure to obey this instruction may cause operational problems and invalidate the product warranty.
- Additional protection by a residual current circuit breaker is recommended.
If the product is produced with cable:
- Connect the cord of product to supply power as identified below:
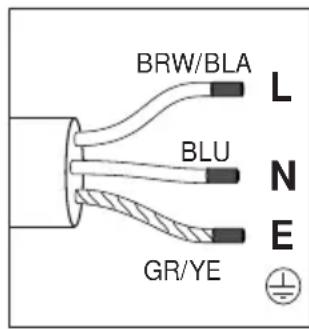
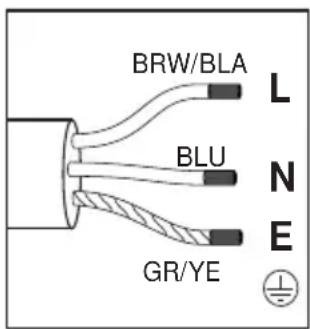
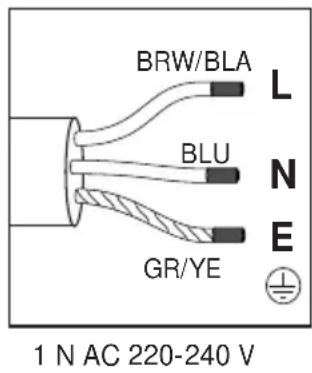
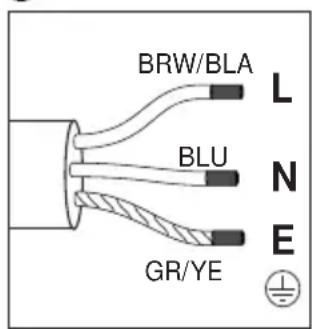
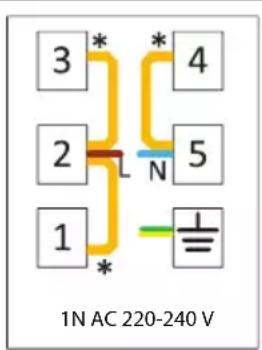
If your supply cord type is 3-conductor type, for 1-phase connection:
- (BRW/BLA) Brown/black = L (Phase)
- (BLU) Blue = N (Neutral)
- (GR/YE) Green/yellow wire = (E) (Earthing)
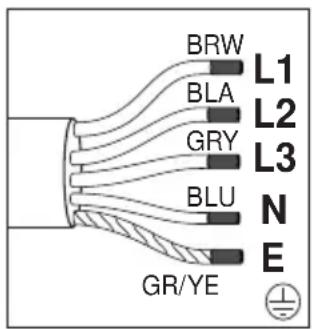
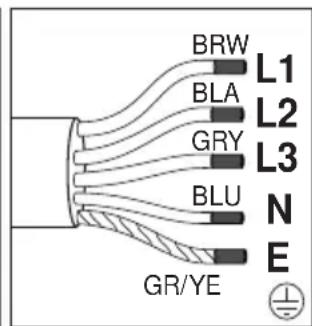
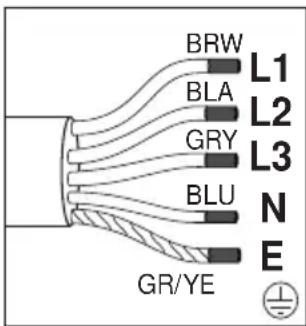
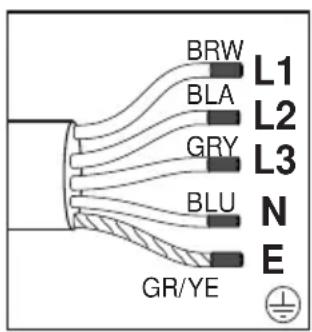
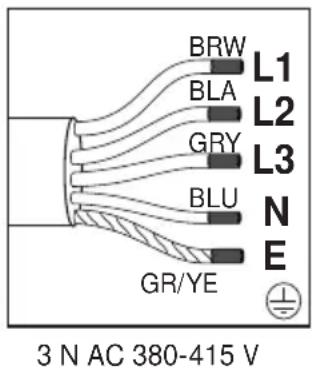
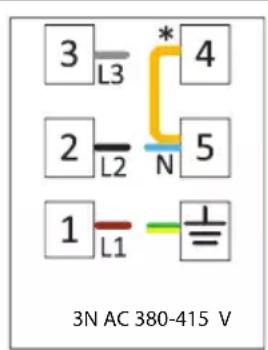
If your supply cord type is 5-conductor type, for 3-phase connection:
- (BRW) Brown = L1 (Phase)
- (BLA) Black = L2 (Phase)
-(GRE) Grey = L3 (Phase) - (BLU) Blue = N (Neutral)
- (GR/YE) Green/yellow wire = (E) (Earthing)

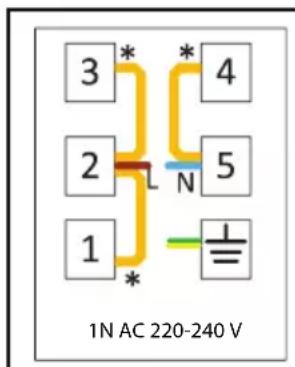
1 NAC 220-240 V
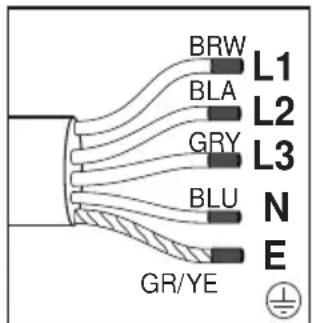
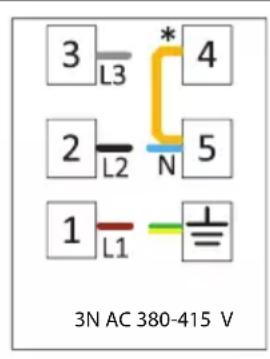
3NAC380-415V
If the product is produced without cable:
A power cable that it is defined in the technical table home must be connected to product by following the instructions. Power cable must not be longer than 2m because of safety reasons.
- Open the terminal block cover with a screwdriver.
- Insert the power cable through the cable clamp below the terminal and secure it to the main body with the integrated screw on cable clamping component.
- Connect the cables according to the supplied diagram.

-
Copper bridge If your supply cord type is 3-conductor type, for 1-phase connection:
-
Brown/black = L (Phase)
-Blue = N (Neutral) - Green/yellow wire = (E) (F arthing)
If your supply cord type is 5-conductor type, for 3-phase connection:
- Brown = L1 (Phase)
- Black = L2 (Phase)
-
Grey = L3 (Phase)
-Blue = N(Neutral) -
Green/yellow wire = (E) (E arthing)
After completing the wire connections, close the terminal block cover.
- Connect the power cable to supply power by routing it so that it will not contact the product and get squeezed between the product and the wall.
Prevention against possible fire risk!
- Ensure all electrical connections are secure and tight to prevent risk of arcing.
- Do not use damaged cables or extension cables.
- Ensure liquid or moisture is not accessible to the electrical connection point.
Placing and securing of the hob (Figures 5-6-7-8)
After preparing the installation location of the appliances, turn the hob upside down and place it on a flat surface.
- Affix the sealing gasket supplied with the appliance around the hob so that it shall be 1 - 2mm inside the outer edge of the glass as shown in Figure 5. Ensure that no clearance is left between both ends and between the glass and gasket.
- Screw and secure the mounting springs supplied with the appliance by engaging them to their seat on the lower housing of the hob as shown in Figure 6. (In some models, these springs may be secured to the appliance ex-factory.)
-
Turn the hob again and align it with the worktop and then place it on the worktop. Cooker shall be placed on the worktop thanks to the springs, and it shall be easily secured.
-
Ensure that the hob and the worktop are parallel when you place the cooker on the worktop. When it is not in parallel, connect the additional installation clamps supplied with the appliance as shown in Figure 8. Figure 8 shows the possible installation locations of the clamps. (The locations where the clamps can be attached may vary depending on the product model. You can connect according to the mounting holes on your hob.) Ensure the parallelism by attaching the clamps to the appropriate locations. The type and quantity of clamps supplied with the product may vary depending on the product model.
Making hob-oven connection and placing and fixing the oven (Figure 9a-9b-10)
- Connect the oven to the power supply.
- Slide the oven centered with at least two persons into the cabinet until half way.
- If your hob type is vitroceramic: The hob has a socket and a grounding cable to be connected to the oven. As shown in figure 9a, connect the socket to its slot on the oven in a way that the colors match. Fix the grounding cable with the screw shown in figure 9a.
- If your hob type is induction: The hob has two socket and a grounding cable to be connected to the oven. As shown in figure 9b, connect the sockets to its slot on the oven. Fix the grounding cable with the screw shown in figure 9b.
- Place the oven to the cabinet completely.
Fix the oven to the furniture using the screws provided. (Figure 10) - At the end of the installation, check that the screws are properly tightened and that the product is firmly fixed. If the oven is not installed in accordance with the instructions and the screws are not properly tightened, there is a risk of tipping during use.
Final check
- After installation, turn on the power supply.
- Read the user manual for the first use of the appliances.
- Check functions of appliances.
Removing the appliances
-
Disconnect the appliances from the power supply.
-
Unscrew the fastening screws of oven.v
- Pull out the oven with at least two persons from the cabinet until half way.
- Disconnect the oven and hob.
- Pull out the oven completely.
- If the hob is secured with additional clamps, unscrew the clamps first.
- Remove the hob by pushing upward from the bottom of the hob.
- (BRW) Braun = L1 (Phase)
- (BLA) Schwarz = L2 (Phase)
- (GRE) Grau = L3 (Phase)
- (BLU) Blau = N (Neutral)
- (GR/YE) Grüner/gelber Draht = (E) (Erdung)

- Kahverengi = L1 (Faz)
- Siyah = L2 (Faz)
- Gri = L3 (Faz)
- Mavi = N (Nötr)
- Yesil/sari kablo = (E) (Topraklama)
Installation of apparatus
- (BRW/BLA) Brun/sort = L (Fase)
- (BLU) Blå = N (Neutral)
- (GR/YE) Grøn/gul ledning = (E)
(Jordforbindelse)
Hvis din netledningstype er 5-leder type, til 3-fasetilslutning:
- (BRW) Brun = L1 (Fase)
- (BLA) Sort = L2 (Fase)
- (GRA) Sort = L3 (Fase)
- (BLU) Blå = N (Neutral)
- (GR/YE) Grøn/gul ledning = (E) (Jordforbindelse)

-
(BRW/BLA) Marrón/negro = L (Fase)
-
(BLU) Azul = N (Neutro)
-
(GR/YE) Cable verde/amarillo = (E)
(Puesta a tierra)
- (BRW) Marrón = L1 (Fase)
- (BLA) Negro = L2 (Fase)
- (GRE) Gris = L3 (Fase)
- (BLU) Azul = N (Neutro)
- (GR/YE) Cable verde/amarillo = (E) (Puesta a tierra)
1 N AC 220-240 V

3 N AC 380-415 V
- (BRW) pruun = L1 (faas)
- (BLA) must = L2 (faas)
- (GRE) hall = L3 (faas)
- (BLU) sinine = N (null)
- (GR/YE) roheline/kollane juhe= (E) (maandus)

1 N AC 220-240 V
3 N AC 380-415 V
-
(BRW)bruns = L1 (faze)
-
(BLA) melns = L2 (faze)
-
(GRE) pelëks = L3 (fāze)
-
(BLU) zils = N (neiträls)
-
(GR/YE) zala/dzeltena dzisla = (E) (zemejums)

1 N AC 220-240 V

3 N AC 380-415 V
Ja izstradajums tiek ražots bez kabela:
HcTaInpaHe Ha anapaTOT Nobp3yBaIbe Ha ypeIoT Bo eJeKtpnHaTa MpeKa
-Поврзete ro npOn3BOJOT caMo Ha
штЕкер/лниJa co 3a3eMjyBaHbe
co BONTа经ИЗaHTIЯ КАО StTo e
навеДeHo BO "TexNчКn CпeцnФИКaциN"
3a3eMjyBaHbeto HeKa ro HAnpaBn
KBaIIuФИKByaH eJIeKtpUap ДоDEka
ro KOpNCTHte npOn3BOJOT co Илб 6e3
ТраHCфОмATop. Habata Фирma Нема
да OДROВараза 3a HNKaKBr OWTeTYBaHa
шTO Ke HabTaHAT aKO npOn3BOJOT ce
Корисп 6e3 3a3eMjyBaHbe BO corlaacHOCT
CO JOKaJIHNTe npONICN.
- Прд да ce 3anoyhe co pa6oTa ha eNeKtpnHaTaNHCTaNaunja, NcKnyTe ro npOn3BOJOT od eNeKtpnHaTAmpeka. MoKe da HactaHe cTpyeH yap!
- PpOn3BOoT Mpa Da rO NOBp3e Ha eIeKtpnUHaTa MpeKa cAmO OBnacteHo KBAJIuФNkYBaHO nIue. RaPAnzjata Ha Ipn3BOoT NoUHyBa Da Teue Dypn OTkako Ke 6nDE NcnpaBHO nHCTaJInpaH. PpOn3BOoNTeJOT Hema Da 6nDE OndROBOpEN 3a WTeTnte KOI Ke HAcTaHaT Od pa60Tnte UTo Ke rN n3BeDaT HeOBnacteHN INuca.
- Поньовот мopa да синсталпа так
што ке може NOTною дa синстучд
eilektpruha ta mpeka. CenapupaheTo
mopa дa ce HanpaBn co cneци?
PpeknHyBaU BrpaDeH BO ФиКСНаТ
eilektpruHa INCTaIauNiJa, BO CORIacHOCT
Co rpaJexKHTe npONcN.
3aHaTaNOBpHnHaHapehata NdoHata NOBpHnHa Ha shnopetOT ce 3arpeBaat Odeka pa6OTn pephata. BHMabajTe eJekTpHuHnTe BpCKn Da He dojDat BO DoNtPco 3aHaTa NOBpHnHa, Hnaky KOHeKUnTE MoKe Da Ce OHTeTA.
- Ka6eIOT 3a NOBp3yBaHBe He CMeE da 6nnde npTnCHaT, n3BnTKaH, nOToPteH nn Da DOaF a BO DOnnp Co JKeuKInTe DeNoBn Ha uOpetOT. HAnky MoKe da DoJde Do KpaTOK cNoj N uOpETOT da ce 3aapani nopadn ToneHeTo Ha Ka6eIOT. Ako eNeKtpuHnOt Ka6eIce OwTeN, Mopa Da rO 3aMeHn KBaJIncKyBaH eNeKtpuHap. HAnky MoKe da HacTaHe cTpyeH yAp, KpaTOK cNoj nn noXap!
-ПркнуokOT ha eJektpnHnot Ka6eI Tpe6a da 6nDE leCHO doCTanen no HnCTaIInpaHbeto (Ho He cMee da 6nde HaI nIoTHnTe).
-При NOВрзУВаьeTO Ha JИцNTe, Mopa DA
TN 3aДОВОЛNTe HauNoHанNTe/ЛOKaJIHNTe
прОПиС N3a eNeKТрИКа И Дa KОпСТNTe
шТЕКЕР/ЛИнИJA И ПРИКЛуЧОК NOrOДН
3a BAшNot anapat. Ako BpeДHOCТе
Ha MOKHOCTa Hа CTpyJaTа Ha Koja
pa6OTn ПОИЗБODOT Г HoДМИнHyBaaT
KaIaцNTeTOT Ha ПРИКЛуЧОКИ Na
шТЕКЕРOT/ЛИнИJaTа, Mopa DA Г NOВр3eTe
прОИЗБODOT ДИpeKTHO 3a ФИКСHаТа
eNEKТрИнa ИНстАlaциJa 6e3 Дa Г
КорИСТNTe ПРИКЛуЧОКOT И SHTEKepOT/
ЛИнИJaTа.
BnHmAbajte OcnrypyBaoy Ta oJroBapa Ha npOn3BOoT.
- Поврзуваьeto мора да биде во склад
co нацноаннite порисn.
- IonoaTOuNTe 3a eNeKtpnHata MpeXa Mopa Da 6NJaT BO cKnad Co NoTaToUnte WTO Ce HabeDHeH Ha etNKeTATA 3a TINOT Ha npOn3BOJOT. MoKeTe Da ja BnIte etNKeTATA 3a TINOT Ha wNOpETOT Ha dHOTO Ha wNOpETOT, a 3a Da ja BnIte etNKeTATA CO TINOT Ha pepHaTAt OTBOpTe ja BpataHa pepHata.
- EneKtpnHnot Ka6eHa npOn3BOoT Mopa Da OndroBapa Ha BpeHocntte HabeDeHN BO Ta6eIata BO DeJOT "TexnUKN cneuФkaun".
- Ako npo3BOJOT 6nDE NOBp3aH
ДиpeKTHO 3a DOBOJOT Ha CTPyja:
Ako He e moxHo Da ce pekHaT CNTe
ПОЛOBи Ha DoBOJOT Ha CTPyJa, Mopa Da
ce pOBp3e n eDHHuza 3a pekHyBaHBe
co HajMaIky 3 mm Cno6OJeH nPoCTOp
3a KOHTaKT (OCNrypyBaUn, CNrpyHocHn
pekHyBaUn, KOHTaKTOpu) n CNTe NOLOBi
Ha OBaa eDHHuza Mopa Da 6nDaT Bo
6bln3HnHa Ha npo3BOJOT (He NaH Hero)
BO corlachOCT co IEE DInpeKtNBITE.
ПponycTOT Da ce cIeDn OBA yNaTCTBO
MOKe Da BOd N Do nPo6JIemN BO
pa6OteHbETo Ha npo3BOJOT n
rapaHcNJaTa MoKe Da n3r6bBaxHOCT.
- Ce npenopayBa dOnoJHnTeJHa 3aWtnta co DoJaTeH npeKnHyBau Ha cTpyja.
Ako anapaToTe npOn3BeDeH co Ka6eI:
- Поврете Га Кабелот На поньдот сдовдот настука Кадо e Habe endo no dony:
Ako eIeKtpnHnoT ka6eI e co 3
cnpoBOdHnU, 3a eNHOa3Ho NOBp3yaHe: -(BRW/BLA) KapeaB/ucn = L (pa3a) -(BLU) CnH = N (HyPTn)
-(GR/YE) 3eJeha/JoNTa Jnca = (E) (3a3emjyBaHbe)
Ako eIeKtpnHnoT ka6eI e co 5
cnpoBOdHnU, 3a TpoΦa3Ho NOBp3yBaHbe: -(BRW) KapeaB = L1 (pa3a)
-(BLA) Lprn = L2 (pa3a)
-(GRE) CnB = L3 (pa3a)
-(BLU) CnH = N (HyPTn)
-(GR/YE) 3eJeha/JoNTa Jnca = (E) (3a3emjyBaHbe)
Ako anapaTOT e npOn3BedeH 6e3 Ka6eI:
EneKtpnueH Ka6eN CO KapaKTepnCTNKn HabeJeH BO Ta6eJaTc CO TexHnUKN CneuΦnKaun Mopa Da 6nDE NOBp3aH CO npOn3BOoT BO CKnaD CO daJeHnTe yNaTcTBa. EneKtpnHnOT Ka6eJ He cMee Da 6nDe nOJr oD 2 m nopAin 6e36eHocn npuHH.
- OTbopeTe ro co ⅢpaФцИ rep 3aHTnTHNOT
Kanak Ha TepMnHaNoT.
BMeTHete ro eJektpnHnot Ka6eN BO dpXaOT 3a Ka6eN NOI TepMNHaNOT IN pNcBpCTeTe ro 3a KyKuWTeTO CO HHTerPnpaHnot WpaΦ Ha eJeMeHToT 3a npndpxyBaHbe Ha Ka6eNt. - Поврете Габлente сноpeДдаенnot ДиjarpaM.
*БакAPEн мост
Ako eIeKtpnHnoT Ka6eI e co 3 cnpoBODnU, 3a eNHO p3NoOBp3yBaHe:
-KaepaeAB/μρH = L (φa3a)
- CnH = N (HyNTn)
-3eIeHa/koIpaKuca=(E) (3a3emjyBaHbe)
Ako eIeKtpnHnoT Ka6e I co 5 cnpoBODnU, 3a TpOa3Ho NOBp3yBaIbe:
- KaΦeAB = L1 (Φa3a)
- L|pH = L2 (φa3a)
- CnB = L3 (φa3a)
-
CnH = N (HyNTn)
-3eJeha/KoIHaXnUca = (E) (3a3emjyBaHbe) -
Otkako Ke ro 3aBpHInTe NObp3yBaHbETo Ha XnUte, 3aTBOpTe Ro 3aWHTHnot KanaK Ha TepMNHaNoT.
- Поврете Геелктуниот кабелда DOBOДOT Ha CTpyja Taka WTO Ke My HappaВITE NaTeKa Да He Г ДОпира npON3BOДOT И Да He ce Г MeуnomeуnpON3BOДOT IN SNДOT.
3awtnta od eBeHTyaJen noXkap!
- IorpnkeTe ce cnte eJekTpnuHn NOBp3yBaHaJa da 6uDat 6e36eHN uCBpCTn 3a Da He ce nojabn onaCHOCT ONCKPN.
He KopncTeTe OwTeTeHn eJeKtpuHn nn npoDoJxKntHn Ka6nn. - IorpnkTe ce MeCTOTo Ha eJekTpNHO NOBp3yBaHBe Da Hema HnKaKOB dOnnp CO TeuHOCT Nn Bnara.
MecTeHbe nФнКсира№Ha shnopeTOT (Cnkn 5-6-7-8)
- Otkako Ke ro NOIROTBITE MEcTOTO 3a
HCTaIIpaIbe Ha IPOIN3BOIDOT, INpeBpTeTe
ro WIpopeTOT HaONaky N CTaBeTe Ro Ha
pamHa NOBpShHa.
-Добpo HameTeTe ja 3aNTnVBkata wTo e nCnpaHa ha 3aeHNO co anapatot OKony nNoyata 3a rotBeHbe 3a da 6nde 1-2 mm HaBne3eHa BO HaDBopeuHnOt pa6 Ha CTaKnoto, KaKO wTO e npKaxaHo Ha cInka 5. PpOBepTe da Hema npa3eH npocTOp Mery DbAta Kpaja N MeFy CTaKnoto n 3aNTnVBkata. - 3aшрафete Ги и пицьрстete Ги пухинITE за пицьрстувае Иснорачани са anapatot тaka чTo кe Ги пикaynte 3a НВНОТ Лжшte Ha ДолноTO Ккшte Ha ПLOЧаТа 3a �тBEHe, КAKO StTo e пикжано на Слиka 6. (Kaj Hekon Модени, OBne пухин може дблдат пицьрстен 3a anapatot ушte bo Фабркata.)
Bknyte ro nobtopno wnpotot n nopamheTe ro co pa6oTHata noBpunHa, a notoa cTabete ro Bp3 pa6oTHata nobpunHa. NopetOT ke ce noctabn Ha pa6oTHata noBpunHa 6IarOdapeHne Ha npyKinHTE n Ke 6nJe IeHo npuCBpCTeH.
BHMabajte nloata 3a roTbeHe npabothata nobpunHa da 6nDat napaneHn Kora Ke ro noCTabyBaTe WnpoTeT ha paobthata nobpuHa. Ako He ce napaneHn, Nobp3eTe rN DOONHHTeHNHTe CTERaUH 3a HnCTaJIpaBe DoCTaBeHn co anapatOT, kako wTo e npKacKaHO Ha cInka 8. Ha cInka 8 ce npKacKaHn MOxHnTe MecTOJIOXbHn Ha CTERaUHTE pIN HnCTaJIpaHBto. (MeCTata Ha kon MOxAT Da e npKacaytCTERaUHTE ce pa3NIkyBa BO 3ABNCHOCT OD MoDEJOT Ha PPOUN3BOoT. MoKe Da rN NOBp3eTe CNOpeD OTBOPHTe 3a MOHTIPAHe Ha BaINOT WnOpet.) O6PHeTe BHMaHne Ha napaneHnTa NoCTaBeHocCT CO Toa wTO Ke rN npKacHTe CTERaUHTE Ha COODBETHnTe Mecta. TINOT N KBaJIHTeTOT Ha CTERaHTe WTO Ce IOCTaBeHn 3aeDHO Co npOn3BOoT MoKe Da ce pa3JIKNyBaAAT BO 3ABNCHOCT OD MODeJOT Ha PON3BOoT.
Iobp3yBaHbe Ha nIoTHaTa n pepHaTaNocTaByBaHbe N 9b-10)
-Поврзete ja pephata co eektpnHaTa Мржа.
HajmaIky DBe Iuca Tpe6a Co Iu3raHe da ja BhecaT pepHaTa Do NolOBnHa Ha nlaKapot.
Ako BnOTo 3a roTBeHbe e BNTPOUePamMueH: UnpoTeOT mMa 1tKepeN Ka6eN 3a 3a3emjyBaHbe KOn Tpe6a Da ce NOBp3aT co pepHata. KaKo 1to e npikaxaHO Ha cInka 9a, NOBp3eTe Ro 1tKeepOT CO HrOBoNOT OTbOp Ha pepHata Taka 1to 6oNTe Ke ce cOBnaraat. PnucpcTeTe ro Ka6eN0T 3a 3a3emjyBaHbe Co 1pafoT, KaKo 1to e npikaxaHO Ha cInka 9a.
Ako Tnnot Ha pHrna e HndyKunja: IIOuata nMa dBa npKnyOka n Ka6eI 3a 3a3emjyBaHbe 7To Tpe6a da ce nobp3e co pepHaT. KaKO uTO e npKaXaHO Ha cNkA 9b, NOBp3eTe rN npKJyOuNTe Co HerOBnOT OTBOP Ha pepHaT. NOnpaBeTe ro Ka6eIOT 3a 3a3emjyBaHbe CO 3aBpTKaTa 65 npKaxaHa Ha cNkA 9b.
BheceTe ja pepHaTa ueNocho BO nIakapOT.
-ФИКСИРAJTe ja pepHaTa 3a eJEMeHToT Ha Me6eIOT co NOMOu Ha npNoXeHnTe wpaФOBn. (Clnka 10)
- Otkako Ke 3aBpHInTe co INHCTaJInpaHbeto, npOBepTe daIIN UpaΦoBHTe ce Do6po 3aTeHaTu I daIIN pOn3BODoT e Do6po fNkCupaH. Ako pepHaTa He e INHCTaJInpaHa BO CKJaCo yNaTcTBaTa I UpaΦoBHTe He ce Do6po 3aTeHaTu, NocToI OnaCHOCT anapaTOT da Ce npEbpTN DoideKa ce KopnCTn.
3aBpshn npOBepka
- ПО ИнсталпаьеTo, NOВрзTe ro anapaTOT co eJekTpnuHaTa Мржа.
- Прочтajte ro уразсвото 3a уnotpe6a BO Врcka co пвату уnotpe6a Ha пponзвodOT.
- PpOBepTe rH ΦyHKcUNTe Ha anapaTOT.
Baede ha anapaTOT
- Icknyte ro anapatot oJ eJIeKtpnHaTa Mpeka.
- OdBpTeTe rH upaΦoBnTe co kon e npuCbpCTeHa pephata.v
- Do noobnHa n3BaTe ja pephata od
- nlakapot co yUte HajMaNkY DBe Nnca.
- Ncknyte rnpepHaTn nnoTHaTa oJ eJIeKtpuHaT aMpexka.
- L'eliocho n3BaTe ro u npopeToT.
AkoIwnopetOT e npuBpCTeH co DOnoJIHnTeJHn CTERaU, HajHanpeD ODBPTETe rN CTERaHTe.
-ИЗваде te ja почаТа 3a rotbeHbe Typkajkn ja harope oddoHHOT DeJHa nNoyata.
- (BRW/BLA)kopnueBn/OpHn = L (pa3a)
- (BLU) cHHi = N (HeiTpapanb)
- (GR/YE) 3eJIeHn/JKOBtN npoBiD = (E) (3a3eMJIeHHra)
KIO Bn BnKOpucToByeTe 5-KnIbHn ShHyp KINBHeHH,ДЯ 3-Фa3HOro NiDKNJIOUeHHN:
- (BRW)kopuHneBn = L1 (pa3a)
- (BLA)Чорнй = L2 (фаза)
- (GRE) cipni = L3 (φa3a)
- (BLU) cHHiN = N (HeiTpapb)
- (GR/YE) 3eelenh/koBtyn npoBiD = (E) (3a3emJehn)
1 N AC 220-240 V

3 N AC 380-415 V
Ykuo Bnpi6 Bnpo6nctb8c8 6e3 ka6enl:
CnIOBn Ka6eJb, BN3NaueHn B TexHiyHi Ta6JIuCi, NOBHeH 6yTN PiIckIoUeHn Do Bnpo6y, DToTpIMyOuNCb IHCTpyKci.
CnIOBn Ka6eIb He NOBInHe 6yTu DOBWe 2 M3MipKyBaHb 6e3neKn.
- BiДкриTe кршky Клемнoro 6лOKу 3a ДОПOMOROTO BИКpyТК.
BCTaBTe cINOBn Ka6eIbYepe3 Ka6eJIbHn 3aTnCKaH NiD KInemy i PnIKpiniTb NOro Do OCHOBHOro KOpNcy 3a DonOMOIO B6yDoBaHOr TBNHTa Ha 3aTnCKaHi Ka6eIIO.
-Пдкючыka6и BiДповIDNodo cxemn.
MiHa nepemuKa
JaKUO Bn BVNKOpNCToBYeTe 3-KNJbHn WHyp XINBHeHHa, DnA OndHoFa3HOro NiKIOUeHHa:
- KOpNueBn/OpHn = L (Φa3a)
- cHnH = N (HeHTpaIb)
-3eJHn/JOBtN npoBiD = (E) (3a3emneHHa
KuO Bn BnKOpncToByeTe 5-KnJbHn ShHyp KInBneHH, dIa 3-0a3HO rPiKJIIOueHH:
-KopnueBn = L1 (Φa3a)
-чорн = L2 (фаза)
-cipni L3 (fa3a)
-cnH N(HeITpaB)
-3eJHn/JOBtN npoBiD = (E) (3a3emneHHa
-Писязавершени3\' endання npobodib 3akpniTe KpiuK Ky KEmHoro 6noky.
-Пдкючы сиюь кабь дя поауЖИВЛЕнг,прКлавши НOrToТak,цOBBIN He KOHTaKtYBaB 3 ВиPo6OM i He 6yB3aTnCHyTN MIX BnPo6OM i CtiHO.
3anobiraHnMoKJINBnM NOXeKHnM pN3NKaM:
- IpepekoHaTecb, 0o Bci eJeKtpnHi 3'6dHaHHaHaiH Ta repMeTuHHi, 0o6 yHnKHyTN pN3NKy BnHnKHeHHa DyH.
He BnKOpncToBvIe noUkoJxHc Ka6eJI a6o noOBoKyBaqi.
3a6e3neuTe, uo6 piDnHa a6o B0nora He nOpTpanJn Do TOckn eNeKtpnHOro nnKluoyehn.
Po3miueHnTa 3akpinIeHnBapnilbHoI nobepxHi (pnc.5-6-7-8)
-Плд罗ТуВаВшmicе установкиnpистpoiB,пepeВерhiTьВарильну nobерхню догори дHom i noctabTe II habipibHy nobepxHIO.
- PpHKpiiTy yuINbHOBaIbHy npOKnAdKy, 30 NOCTaHaTbC3 pNcTPOeM, HABKOIO BapInbHOI NOBepxHi TAK, 506 BOHa 3HaxOdIIacra Ha BiIcTaHi 1-2 MM UcepeHHI 3OBHIshBoRo KpaIO CKNa, kK Noka3aHO Ha pnc. 5. 3a6e3neUte, 50 MIX O6OMa KINzAMn, a TAKoX MIX CKlOM i NpOKnAIO He 3aJIINWBcR 3a3Op.
3aKpyTiB i 3aKpiniTb MOHTaXHi npyKHH, IIO NOCTaAOTbCRA 3 pNcTPOEM, 3aKpINBUN B IX NocAOHOMy MiCi Ha HnKhbOMy KOpNci BapInbHOI NOBepxHi, Rk NOKa3aHO Ha PNC.6. (DeaKi MoJeI MOKyTB NOCTaHaTnCRA KOpNcTByBaCy 3 npNKpInIIeHNMI Do npNcTpoI npyKHHAM).
3HOBy nepeBepHiB BapnIbHy NOBepXHIO Ta BiDperyIIOte II NOJoxeHHa BiIDHOco pObooio nobepxhi, a Notim yCTaHOBiTb II Ha poOoi Nobepxhi. Heo6xIDHO, 0o6 PIIHTa 6yNa po3MiueHa Ha poOoyi NOBepxHI 3a Donomoro npyKHN I JERKO nIiDaBaIacra 3akpinJIeHHIO.
-Пд уас розиь варьhoi
nobepxhi ha pooboyi nobepxhi
3a6e3neueп napajelbHicTB po6ooyi
nobepxhi ta bapunbHOI nobepxhi.Якso
hemoxJINBO DOcraHyTN npajelbHocTi
nobepxOHb,prnkpiitbdoataKOBi
MOHTaxHi 3aTnCKaHi,io NOCTaayOTbcR
3 npictpoem,янokazHo Ha pnc.8.
Ha pnc.8 BiO6paXeni MOxJNBI Micza
BCTaHOBLeHn 3aTnCKaYiB. (Micya
po3TaUyBaHHa 3aTnCKaYiB MoKyTb
BiDi3HrTnca 3aJeXHo BiD MoDeJI
Bnpo6y.Ix MoXHa nI'EDHaTI BIDNOBIDHO
DO MOHTaxHnX OTBOpIB Ha BapNJbHi
noBepxhi.) 3a6e3neuTe napaneIbHiCTb, npnKpInNBwN 3atncKaU i Do BiIDNOiDHNX Micu b po3TaWyBaHH. Tn i KINbKiCtB 3aTnCKaivB, IIO NOCTauaOTbcra 3 Bnpo6om, MoKyTB BiDiPI3HrTnCra 3aJeKHO Bi D moJei Bnpo6y.
BnkoHaHnpiD'EDHaHn mix BapNbHOIO NOBepxHeIo Ta dYXOBKOIO,po3MiueHnraTa φikcaii dYXOBKn (pnc.9a-9b-10)
Пд' endaHte dYxOBkydo eNeKtponocTaayHn.
BCTaBTe DyXOBky, UeHTpyUOuH, 3a DonomoroIO npHaMHi DBox oci6 y waoSy Do NIOBHH.
-
RaKuo Baw TnBapNbHoi nobepxhi c vitroceramic: BapnIbHa nobepxHЯ Mae po3'Em i Ka6eNb 3a3eMJeHHra, IIO NiIeHyOTbcra Do dYXOBKn. RaN oKa3aHo Ha pnc.9a, BCTaBte po3'em Do Noro OTBOpy Ha dYxOBci TaKIM YINHom, IIO6 KOJIbOpN 36irannc. 3aKpiniTb Ka6eNb 3a3eMJIeHHra TBnHTom, NOKa3aHIM Ha pnc. 9a.
-
KaKo Baw TnBapNbHoi' nobepxHi iHyKcHn: BapNbHa NOBepxHn MaE Dba rHi3da Ta Ka6eJb 3a3eMneHHra KcIiD NiKKnOHTn Do dYxOBKn. RaK nOKa3aHO Ha MaIOHky 9b, NiKKnOHTb po3ETKn Do II OTBOpy Ha dYxOBci. 3akpinitb Ka6eJb 3a3eMneHHra TBnHTOM, NOKa3AHm Ha MaIOHky 9b.
BCTaTe DyXOBky y wao fy nobHicTHO.
3akpiitb dyxOBky Ha me6nax 3a DOnOMOrOHaHaAHnx rBnHTiB. (pnc.10)
BkiHcMoHTaKy nepekoHaITeCb, 0rBnHTn npabNbHO 3ataryHi Ta BnPi6 HadiiHo 3aqiKcObaHO. KaO dYxOBky He BCTaHOBHeBOiIOBIDHO do IHCTpyKci, a TBnHTn He 3aTAYHti HaJeXHM YHOM, icHyc He6e3neKa nepeKnDaHHn iD yac BnKOpNCtAHH.
OctaToUHa nepeBipka
- Picna BCTaHOBJIeHHy yBIMKHiTbeNeKTponoCTaayHH.
-Пердпршим ВИКОРиCTаHHЯmpniladib npoHTaTe noci6нкKOPINCTyBaaya. - PerpeBipTe yHkci npnaiB.
3HЯТТ npnlaIb
- BiD'edHaIe npnlaD, BiE enekTpomepeXi.
Bidkpytib 3akpiniouoyi rBNHTn BiD yXOBKn.v
BntarHItb DuxOBky 3a DonomoroI npHaMHI DBOX IIODee 3 WaoN Do noOBHH.
- Po3'eɪnHaɪTe ἀύχOBKY Ta BapɪnMbHy NOBepxHɪ.
BntarHItb dyxOBky nobHicTHo.
-ЯкwoBapnilbHa nobepxH3akpinneHa DOdaTkoBIMN 3aTnCKaayAM, CNoyATky BiDkpyTiB 3aTnCKaYi.
-3HIMITb BapnIbHy NOBepxHIO, HATNCHyBUn 3HN3y BapnIbHOI NOBepxHi BROPY.
- EN - Safety instructions
- Preparation of the furniture that the appliance shall be installed (Figures 2-3-4)
- Ventilation
- Installation of the appliance Connecting the appliance to the electricity supply
- If the product is produced with cable:
- If the product is produced without cable:
- Prevention against possible fire risk!
- Placing and securing of the hob (Figures 5-6-7-8)
- Making hob-oven connection and placing and fixing the oven (Figure 9a-9b-10)
- Final check
- Removing the appliances
- Installation of apparatus
- Ja izstradajums tiek ražots bez kabela:
- HcTaInpaHe Ha anapaTOT Nobp3yBaIbe Ha ypeIoT Bo eJeKtpnHaTa MpeKa
- Ako anapaToTe npOn3BeDeH co Ka6eI:
- Ako anapaTOT e npOn3BedeH 6e3 Ka6eI:
- 3awtnta od eBeHTyaJen noXkap!
- MecTeHbe nФнКсира№Ha shnopeTOT (Cnkn 5-6-7-8)
- Iobp3yBaHbe Ha nIoTHaTa n pepHaTaNocTaByBaHbe N 9b-10)
- 3aBpshn npOBepka
- Baede ha anapaTOT
- Ykuo Bnpi6 Bnpo6nctb8c8 6e3 ka6enl:
- 3anobiraHnMoKJINBnM NOXeKHnM pN3NKaM:
- Po3miueHnTa 3akpinIeHnBapnilbHoI nobepxHi (pnc.5-6-7-8)
- BnkoHaHnpiD'EDHaHn mix BapNbHOIO NOBepxHeIo Ta dYXOBKOIO,po3MiueHnraTa φikcaii dYXOBKn (pnc.9a-9b-10)
- OctaToUHa nepeBipka
- 3HЯТТ npnlaIb
Brand : GRUNDIG
Model : GEHM 19320 B
Category : Refrigerator