
AWT Fp - Water dispenser Kärcher - Free user manual and instructions
Find the device manual for free AWT Fp Kärcher in PDF.
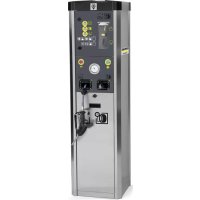


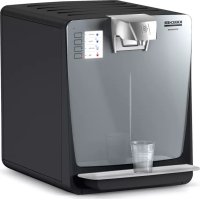
| Product type | Water dispenser and tire inflator |
| Brand | Kärcher |
| Model | AWT Fp |
| Power supply | 230 V, 50 Hz, 450 W |
| Protection type | IP44 |
| Water supply pressure | 0.1 - 0.5 MPa |
| Compressed air pressure | 0.1 - 0.8 MPa |
| Compressed air flow rate | 100 l/min |
| Dimensions (L x W x H) | 423 x 423 x 1550 mm |
| Weight | 71 kg |
| Temperature range with frost protection | -10 to +40 °C |
| Temperature range without frost protection | +5 to +40 °C |
| Permissible air humidity | 10 - 80 % |
| Sound pressure level (LpA) | < 70 dB(A) |
| Sound power level (LWA) | 76.8 dB(A) |
| Main functions | Non-potable water distribution, tire inflation and deflation |
| Usage | Professional |
| Coin acceptor | Accepts coins: 50 cent EUR, 50 pence GBP, 1 CHF, 1 PLN, 5 NOK |
| Duration setting | 30 s to 7 min via rotary knob |
| Frost protection | Optional (dedicated switch) |
| Daily maintenance | Emptying the coin cassette, checking hoses and nozzle |
| Warranty | According to commercial conditions of the country |
Frequently Asked Questions - AWT Fp Kärcher
User questions about AWT Fp Kärcher
0 question about this device. Answer the ones you know or ask your own.
Ask a new question about this device
Download the instructions for your Water dispenser in PDF format for free! Find your manual AWT Fp - Kärcher and take your electronic device back in hand. On this page are published all the documents necessary for the use of your device. AWT Fp by Kärcher.
USER MANUAL AWT Fp Kärcher
Czech 60
Slovenian 64
Polish 68
Romanian 71
Slovak 75
Croatian 79
Serbian 83
Bulgarian 87
Estonian 91
Latvian 95
Lithuanian 98
Ukrainian 102
Table of Contents
① "STOP" button
① Valve connector ② + button ③ - button ④ Pressure gauge ⑤ Lever ⑥ Dispensing gun
Draw water

①Cover ②Condensate drain valve
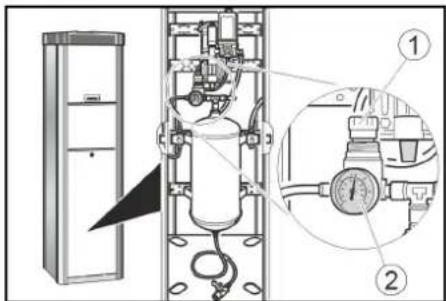
①Pressure reducer ②Pressure gauge
12062 Cherasco (Cn) - Italy
Tel. +39 0172 427311
Fax +39 0172 495437
C.F./R.I./P.IVA/V.A.T.: IT 02469390047
Cap. Soc. € 255.000 - REA CN-178422 CCIAA
info@mtmhydro.it
PEC: mtmhydro@multipec.it
www.mtmhydro.it
Cherasco, 2018/09/01
Contents
General notes 5
Environmental protection 5
Accessories and spare parts.... 6
Safety instructions.... 6
Initial startup.... 6
Operation 6
Settings.... 7
Frost protection.... 7
Shutting down 7
Care and service.... 8
Transport.... 8
Storage 8
Troubleshooting guide 8
Warranty 9
Technical data 9
EU Declaration of Conformity 9
General notes
Read these original instructions and the safety instructions chapter before using the
device for the first time. Act in accordance with them.
Keep them safe for future reference or for future owners.
Environmental protection
The packing materials can be recycled. Please dispose of packaging in accordance with the environmental regulations.

Electrical and electronic appliances contain valuable, recyclable materials and often components such as batteries.
Appliances marked by this symbol are not allowed to be disposed of together with the household rubbish.
Notes on the content materials (REACH)
Current information on content materials can be found at: www.kaercher.com/REACH
Accessories and spare parts
Only use original accessories and original spare parts. They ensure that the appliance will run fault-free and safely. Information on accessories and spare parts can be found at www.kaercher.com.
Safety instructions
Hazard levels
DANGER
- Indication of an imminent threat of danger that will lead to severe injuries or even death.
⚠ WARNING
Indicates a potentially dangerous situation that may lead to severe injuries or even death.
△ CAUTION
Indicates a potentially dangerous situation that may lead to minor injuries.
ATTENTION
Indicates a potentially dangerous situation that may lead to damage to property.
General
To avoid danger to persons, animals, and property, it is imperative to read and observe the following documents before operating the device:
- Operating instructions • All safety instructions
- The respectively applicable national regulations
In self-service operation, the operator must ensure that the users are informed by means of clearly visible information notices:
• Potential dangers - Safety devices - Operating the device.
Operation
⚠ WARNING
- Children over the age of 8 and persons with reduced physical, sensory, or mental capabilities, or those with a lack of experience and knowledge, are only allowed to use the appliance if they are properly supervised, have been instructed with respect to using the appliance safely by a person responsible for their safety, and understand the resultant dangers involved. • Children must not play with the appliance.
- Cleaning and user maintenance may not be carried out by unsupervised children.
- Always keep the area around the device clean and free of oil and grease.
Behaviour in the event of an emergency
- In the event of an emergency, push the STOP button.
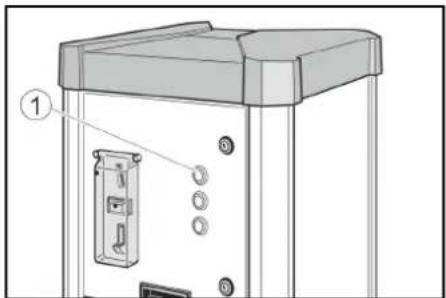
①"STOP" button
Symbols on the device

△DANGER
Danger of injury from electrical
voltage.
Do not open any covers that are marked in this way.

⚠ WARNING
Risk of burns from hot surface.
Do not touch any components with this symbol.
Intended use
This device has 2 functions.
- Regulating vehicle tyre pressures by increasing or decreasing pressure.
- Dispensing water that is not suitable as drinking water.
Operation in explosive atmospheres is prohibited.
During operation, the door must be closed and the cover must be attached.
This device is suitable for commercial use.
Calibration requirement
The tyre inflation system of the AWT-C and AWT-C Fp device versions is calibrated and must be checked by the responsible gauging office after installation and then every 2 years.
Initial startup
- Open the on-board water inlet.
- Switch on the on-board power supply.
- Open locks.
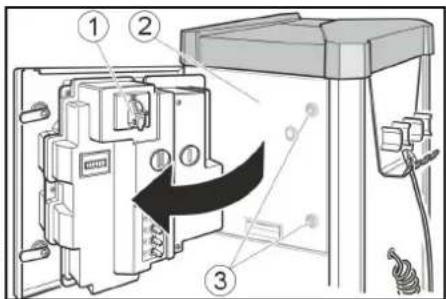
①Main switch ②Door ③Lock
- Set the main switch to "ON" position. The "STOP" button flashes when the device is in operation.
- Close the door.
Operation
AWT, AWT Fp operation
Control elements
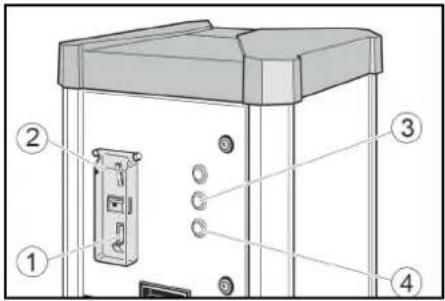
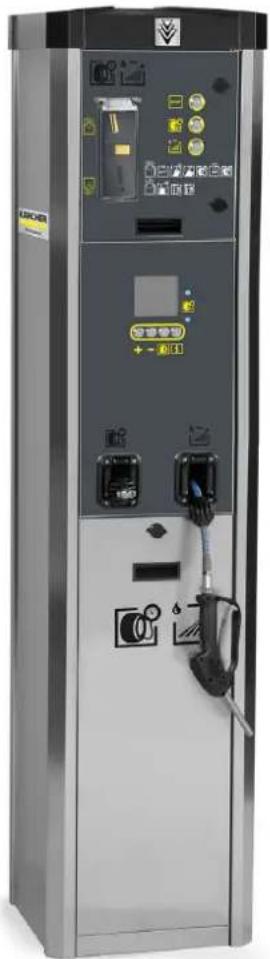
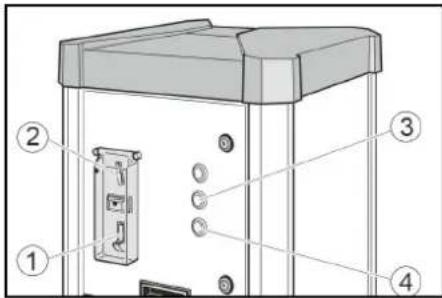
① Coin return ② Coin slot ③ Tyre pressure button ④ Water dispenser button
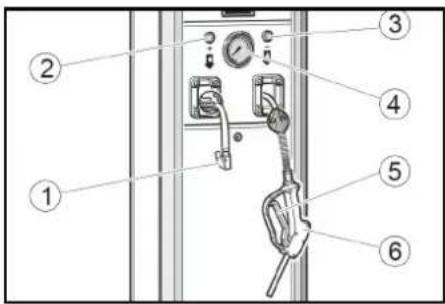
① Valve connector ② Button + ③ Button - ④ Pressure gauge ⑤ Lever ⑥ Fuel pump nozzle
Drawing water


- Insert a coin in the coin slot.
- Press the water dispenser button.
- Hold the fuel pump nozzle in the container opening.
Pull the fuel pump nozzle lever until the desired filling level has been reached. 4. Hang the fuel pump nozzle back on the device.
Checking tyre pressure


- Insert a coin in the coin slot.
- Press the tyre pressure button.
- Secure the valve connector on the tyre valve.
- Read the tyre pressure at the pressure gauge.
- Increase the tyre pressure by pressing the + button or reduce it by pressing the - button.

- Remove the valve connector.
- Pull on the hose briefly and feed the hose in via the automatic hose reel.
AWT -C, AWT -C Fp operation Control elements
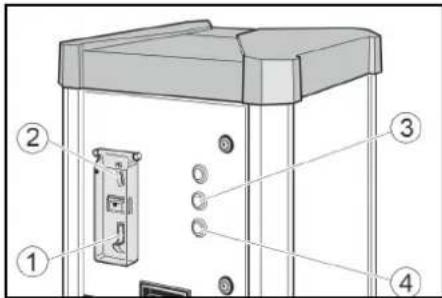
①Coin return
②Coin slot
③Tyre pressure button
④Water dispenser button
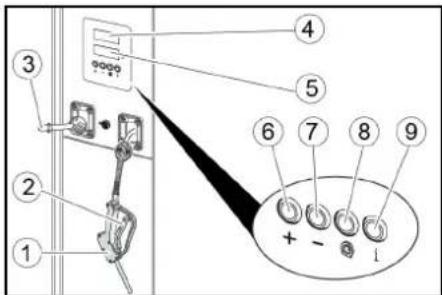
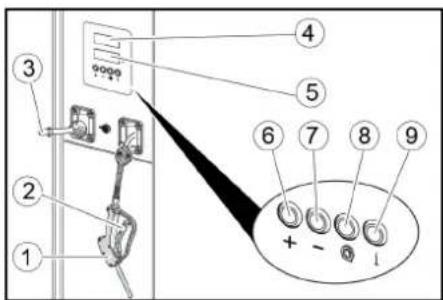
①Fuel pump nozzle ② Lever ③Valve connector ④Target pressure display ⑤Tire pressure display ⑥Button + ⑦Button - ⑧Flat tyre button ⑨No function
Drawing water

- Insert a coin in the coin slot.

- Press the water dispenser button.

- Hold the fuel pump nozzle in the container opening. Pull the fuel pump nozzle lever until the desired filling level has been reached.

- Hang the fuel pump nozzle back on the device.

Checking tyre pressure
- Insert a coin in the coin slot.

- Press the tyre pressure button.

- Set the target tyre pressure with the + and - buttons in the target pressure display (upper display).

- Secure the valve connector on the tyre valve. The tyre pressure display (lower display) shows the tyre pressure.

- Wait until an acoustic signal indicates that the tyre target pressure has been reached.

- Remove the valve connector.
- Pull on the hose briefly and feed the hose via the automatic hose reel.
Filling flat tyres
If the tyre has no pressure, the device cannot detect that the valve connector has been connected to the valve.

- Insert a coin in the coin slot.

- Press the tyre pressure button.

- Set the target tyre pressure with the + and - buttons in the target pressure display (upper display).
- Secure the valve connector on the tyre valve.
The tyre pressure display (lower display) shows the tyre pressure.

- Press the "Flat tyre" button.

- Wait until an acoustic signal indicates that the tyre target pressure has been reached.

- Remove the valve connector.
- Pull on the hose briefly and feed the hose via the automatic hose reel.
Settings
Setting the run time
Note
The adjustable run time applies to the insertion of one of the following coins:
• 50 Eurocents • 50 British pence • 1 Swiss franc • 1 Polish złoty • 5 Norwegian Kroner
Customer Service can set up different types of coins.
- Set the run time with the P I rotary knob. Possible setting range of 30 seconds to 7 minutes.
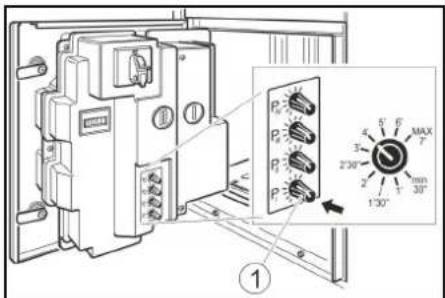
①Rotary knob P I
Note
Rotary knobs P II, P III and P IV have no function.
Frost protection
Device with frost protection
- Turn the frost protection switch "ON" at temperatures below +5°C.
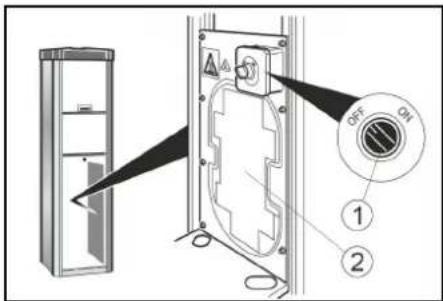
①Frost protection switch ②Frost protection heater
ATTENTION
Risk of damage
The frost protection is active only when the main switch is "ON".
When activating the frost protection, check whether the main switch is in the "ON" position.
Note
The frost protection heater is not thermostat-controlled. When switched on, the heater is continuously in use.
Device without frost protection
In a device without frost protection, a shut-down must be carried out if there is risk of frost.
Shutting down
- Close the water inlet
- Drain the condensate in the compressed air tank (see "Maintenance tasks").
- Set the main switch to the "OFF" position.
Shutdown in the case of potential frost
- Close the water inlet.
- Remove water from the device and supply line.
- Drain the condensate from the compressed air tank (see "Maintenance work").
- Set the main switch in "OFF" position.
Care and service
Daily
- Empty the coin cassette (see "Maintenance tasks").
- Check the general condition of the device.
- Check the condition of the valve connector.
- Check the condition of the hose lines.
- Open the lower cover and check the condition of the compressor.
- Have damaged parts replaced.
Weekly
- Clean the outside of the device.
- Drain the condensate in the compressed air tank (see "Maintenance tasks").
ATTENTION
Risk of damage
The water in the compressed air line can damage the tyre pressure sensor. Drain the condensate in the compressed air tank regularly.
Service every 2 years
Only with AWT -C, AWT -C Fp
- Have the pressure measuring device of the tyre inflator calibrated by the gauging office.
Maintenance work
Emptying the coin cassette
- Open the door.
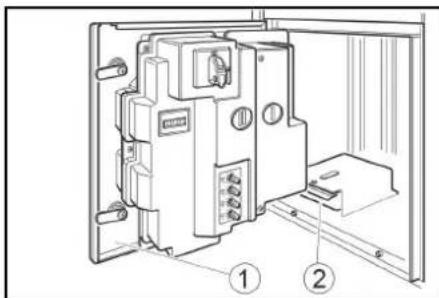
①Door ②Coin cassette 2. Remove and empty the coin cassette.
Drain the condensate
- Remove the cover.
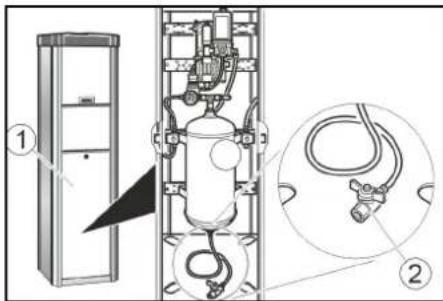
①Bar cover
②Condensate drain valve
- Hold the condensate drain valve over a shaft or collecting container.
⚠ WARNING
Risk of injury, risk of damage
The water stream escaping from the condensate drain valve can cause injury or damage.
Never point the condensate drain valve at people, animals, the device or electrical components.
- Slowly open the condensate drain valve and drain the condensate.
- Close the condensate drain valve.
- Attach the cover.
Transport
△CAUTION
Risk of injury, risk of damage
Be aware of the weight of the device during transportation.
- When transporting in vehicles, secure the device against slipping and tipping over according to the applicable guidelines.
Storage
△CAUTION
Risk of injury and damage
Be aware of the weight of the device during storage.
Troubleshooting guide
△DANGER
Danger from electric shock.
Before working on the device, set the main switch to "OFF" and disconnect the on-board power supply.
The device does not work
- Check the on-site voltage supply.
- Set the main switch to "ON" position.
- Contact customer service.
The device does not start after the valve connector has been connected to the tyre.
- Check that the valve connector is seated correctly.
- Check the condition of the hose and of the valve connector.
- Press the "tyre flat" button.
There is no compressed air
● Pull the compressor on-button upward.
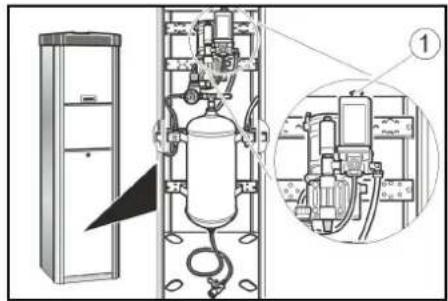
① Compressor on-button
● The compressor is overheated: Wait until the compressor has cooled off.
The tyre pressure is too low
- Check the pressure on the pressure gauge. Readjust the pressure reducer if necessary.
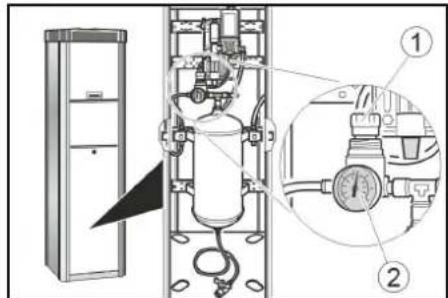
①Pressure reducer ②Pressure gauge
Malfunctions with information shown on the display
| Fault Cause Rectification | ||
| ER1 Unstable pressure measurement due to defective valve connector or hose | Replace the valve connector.Replace the hose. | |
| ER2, ER7 The tyre pressure is too low.Unstable pressure measurement due to defective valve connector or hose. | Check the tyre pressure on the pressure gauge and readjust the pressure reducer if necessary.Replace the valve connector.Replace the hose. | |
| ER3 | The tyre pressure is too low. | Check the pressure on the pressure gauge and readjust the pressure reducer if necessary. |
| ER4 | The tyre pressure is too high. | Check the pressure on the pressure gauge and readjust the pressure reducer if necessary. |
| ER5 | The voltage supply is disturbed. | Contact customer service. |
| ER6, ER8, ER9, ERU, ERB | Malfunction in the electronics. | Contact customer service. |
| ERP | The valve connector came loose during inflation.The tyre pressure is not stable. | Check that the valve connector is seated correctly.Check the pressure on the pressure gauge and readjust the pressure reducer if necessary. |
Warranty
The warranty conditions issued by our relevant sales company apply in all countries. We shall remedy possible malfunctions on your appliance within the warranty period free of cost, provided that a material or manufacturing defect is the cause. In a warranty case, please contact your dealer (with the purchase receipt) or the next authorised customer service site. (See overleaf for the address)
Technical data
Electrical connection
| Mains voltage V 230 |
| Phase ~ 1 |
| Frequency Hz 50 |
| Power rating W 450 |
| Degree of protection IP44 |
Compressed air
| Flow rate | l/min | 100 |
| Pressure | MPa | 0,1...0,8 |
Water connection
| Feed pressure | MPa | 0,1...0,5 |
Ambient conditions
| Temperature with frost protection | °C | -10...+40 |
| Temperature without frost protection | °C | +5...+40 |
| Humidity | % | 10...80 |
Noise emission
| Sound pressure level LpA | dB(A) | <70 |
| Sound power level LWA + K uncertaintyWA | dB(A) | 76,8 |
| Sound power level LWA + uncertainty KWA | dB(A) | 4 |
Dimensions and weights
| Weight | kg | 71 |
| Length | mm | 423 |
| Width | mm | 423 |
| Height AWT | mm | 1550 |
| Height AWT-C | mm | 1760 |
Subject to technical modifications.
EU Declaration of Conformity
We hereby declare that the machine described below complies with the relevant basic safety and health requirements in the EU Directives, both in its basic design and construction as well as in the version placed in circulation by us. This declaration is invalidated by any changes made to the machine that are not approved by us.
Product: Tyre inflator
Type: AWT, AWT Fp, AWT -C, AWT -C Fp
Currently applicable EU Directives
2006/42/EC
2014/35/EU
2014/30/EU
Documentation supervisor: Gianmarco Stra
MTM Hydro Srl
Via Moglia, 33
12062 Cherasco (Cn) - Italy
Tel. +39 0172 427311
Fax +39 0172 495437
CF / RI / P.IVA / VAT: IT 02469390047
Cap. Soc. €255,000 - REA CN-178422
CCIAA
info@mtmhydro.it
PEC: mtmhydro@multipec.it
www.mtmhydro.it
Cherasco, 2018/09/01
Contents
① "STOP" button
① Cover
12062 Cherasco (Cn) - Italy
Tel. +39 0172 427311
Fax +39 0172 495437
C.F./R.I./P.IVA/V.A.T.°: IT 02469390047
Cap. Soc. € 255.000 - REA CN-178422 CCIAA
info@mtmhydro.it
PEC°: mtmhydro@multipec.it
www.mtmhydro.it
Cherasco, 2018/09/01
Index
www.kaercher.com/REACH
Accessories and spare parts
① "STOP" button
① Cover
① "STOP" button
① Main switch
② Door
③ Lock
① Coin return
② Coin slot
③ Tire pressure button
④ Water dispensing button
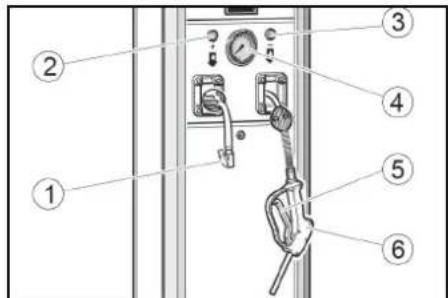
① Valve connector
② Plus button
③ Minus button
④ Pressure gauge
⑤ Lever
⑥ Tap nozzle
Water extraction

① Coin return ② Coin slot ③ Tire pressure button ④ Water dispensing button
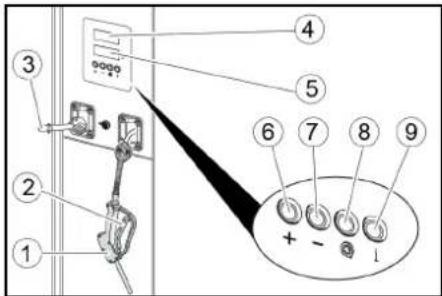
① Door
② Coin cassette
① Cover
② Condensate drain valve
① Compressor power switch
① Pressure regulator
② Pressure gauge
① "STOP" button
①Main switch
②Door
③Lock
①Cover
①STOP button
①Main switch ②Door ③Lock
①Valve connector ②+ key
③- key
④Pressure gauge
⑤Lever
⑥Spray gun
Draw water


①Door
②Coin cassette
①Cover
②Condensate drain valve
12062 Cherasco (Cn) - Italy
Tel. +39 0172 427311
Fax +39 0172 495437
C.F./R.I./P.IVA/V.A.T.: IT 02469390047
Cap. Soc. 255 000 € - REA CN-178422
CCIAA
info@mtmhydro.it
PEC: mtmhydro@multipec.it
www.mtmhydro.it
Cherasco, 01/09/2018
Contents
①"STOP" button
Symbols on the machine

⚠️DANGER
① Coin return ② Coin slot ③ Tire pressure button ④ Water drain button
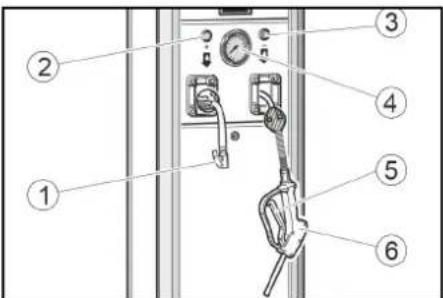
① Valve connector ② + button ③ - button ④ Pressure gauge ⑤ Arm ⑥ Filling gun
Draining water


① Coin return ② Coin slot ③ Tire pressure button ④ Water drain button
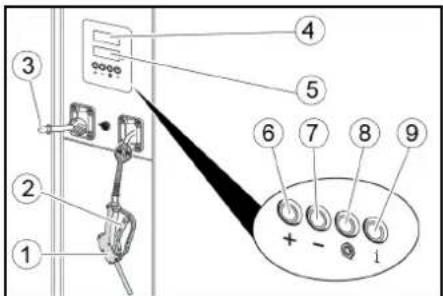
① Cover
① Compressor connection button
① "STOP" key
① Coin return ② Coin slot ③ Tire pressure button ④ Water drain button
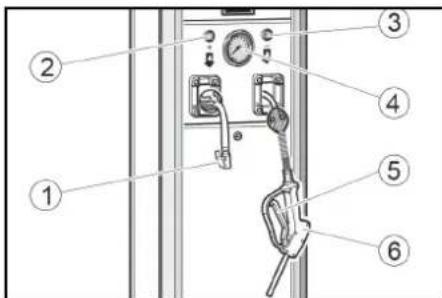
① Valve nozzle ② + button ③ - button ④ Pressure gauge ⑤ Lever ⑥ Tap
Drain water
- Insert a coin into the coin slot.


- Press the water button.

① Coin return ② Coin slot ③ Tire pressure button ④ Water drain button
① Door ② Coin cassette 2. Pull out the coin cassette and empty it.
Drain condensation water
①Lid
①Pressure reducer
②Pressure gauge
①"STOP" button
Symbols on the machine

⚠️DANGER
①Valve connection ②+ button ③- button ④Pressure gauge ⑤Lever ⑥Water gun
Drain water

①Frost protection button
①Door
②Coin cassette
①Cover
①Compressor connection button
①"STOP" button
①Door
②Coin battery
①Cover
①Pressure reducer
②Pressure gauge
①"STOP" button
①Cover
①Pressure regulator
②Pressure gauge
12062 Cherasco (Cn) - Italy
Tel. +39 0172 427311
Fax +39 0172 495437
C.F./R.I./P.IVA/V.A.T.: IT 02469390047
Cap. Soc. € 255.000 - REA CN-178422
CCIAA
info@mtmhydro.it
PEC: mtmhydro@multipec.it
www.mtmhydro.it
Cherasco, 2018/09/01
Table of contents
General warnings 48
Environmental protection 48
Accessories and spare parts.... 48
①"STOP" button
Symbols on the device

DANGER
①Antifreeze switch
② Antifreeze heater
CAUTION
①Door
①Cover
Tip: AWT, AWT Fp, AWT -C, AWT -C Fp
① "STOP" button
① Reducer ② Pressure gauge
12062 Cherasco (Cn) - Italy
Tel.: +39 0172 427311
① "STOP" button
① Main switch
② Door ③ Lock
① Cover
① Pressure reducer
② Pressure gauge
www.kaercher.com/REACH
① "STOP" key
① Door
② Coin cassette
①Cover
①STOP button
Symbols on the device

⚠DANGER
①Main switch
②Door
③Lock
- Set the main switch to the ON position. While the device is operating, the STOP button flashes.
- Close the door.
Operation
Operation AWT, AWT Fp Controls

① Coin return
②Coin slot
③Tire pressure valve
① Valve plug
② + button
③ - button
④ Pressure gauge
⑤ Handle
⑥ Filling gun
Water filling


① Compressor power button - Compressor is overheated: Wait for the compressor to cool down.
Air pressure too low
- Check the pressure on the gauge. If necessary, adjust the pressure regulator.
① Pressure regulator
② Pressure gauge
Display malfunctions
| Napaka Vzrok Odpravljanje | ||
| ER1 Nestabilno merjenje tlaka zaradi poškodo-vanega ventilnega vtiča ali gibke cevi | Zamenjajte ventilni vtič.Zamenjajte gibko cev. | |
| ER2, ER7 | Zračni tlak je prenizek.Nestabilno merjenje tlaka zaradi poškodo-vanega ventilnega vtiča ali gibke cevi. | Preverite zračni tlak na manometru, po potrebi pona-stavite reducirni ventil.Zamenjajte ventilni vtič.Zamenjajte gibko cev. |
| ER3 | Zračni tlak je prenizek. | Preverite tlak na manometru, po potrebi ponastavite re-ducirni ventil. |
| ER4 | Zračni tlak je previsok. | Preverite tlak na manometru, po potrebi ponastavite re-ducirni ventil. |
| ER5 | Oskrba z napetostjo je motena. | Obvestite servisno službo. |
| ER6, ER8, ER9, ERU, ERB | Motnje v elektroniki. | Obvestite servisno službo. |
| ERP | Med napihovanjem se je ventilni vtič sprostil.Zračni tlak ni stabilen. | Preverite pravilno nasedanje ventilnega vtiča.Preverite tlak na manometru, po potrebi ponastavite re-ducirni ventil. |
Warranty
① "STOP" button
① Main switch
② Door
③ Lock
① Door
② Coin box
① Cover
① "STOP" button
Symbols on the device

△DANGER
① Door
② Coin box
① Cover
① Compressor start button
① Pressure reducer
② Pressure gauge
Type: AWT, AWT Fp, AWT -C, AWT -C Fp
Relevant EU Directive
2006/42/EC
2014/35/EU
2014/30/EU
① "STOP" button
① Frost protection switch ② Frost protection heating
CAUTION
① Door
② Coin cassette
① Cover
① Compressor start button
① Pressure reducing valve
② Pressure gauge
Faults with indication on the display
12062 Cherasco (Cn) - Italy
Tel. +39 0172 427311
Fax +39 0172 495437
C.F./R.I./P.IVA/V.A.T.: IT 02469390047
Cap. Soc. 255 000 € - REA CN-178422
CCIAA
info@mtmhydro.it
PEC: mtmhydro@multipec.it
www.mtmhydro.it
Cherasco, 01.09.2018
Contents
General notes 79
Environmental protection 79
Accessories and spare parts.... 79
Safety instructions 79
Commissioning.... 80
Operation 80
Settings 81
Frost protection.... 81
Decommissioning 81
①"STOP" button
Symbols on the device

△DANGER
Risk of electric shock.
①Main switch ②Door ③Lock 4. Set the main switch to the "ON" position. The "STOP" button flashes while the device is operating. 5. Close the door.
Operation
Operation of device versions AWT, AWT Fp
①Coin return ②Coin slot ③Tire pressure button ④Water delivery button
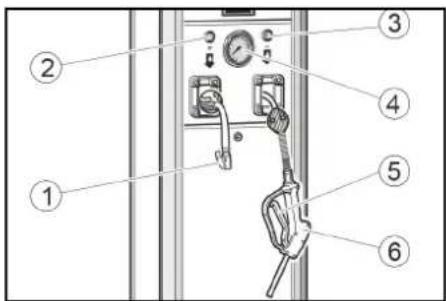
①Valve plug ②+ button ③- button ④Pressure gauge ⑤Lever ⑥Filling gun
Water dispensing
- Insert a coin into the coin slot.
- Press the water supply button.
- Hold the dispensing nozzle in the tank opening.
①Coin return ②Coin slot ③Tire pressure button ④Water supply button
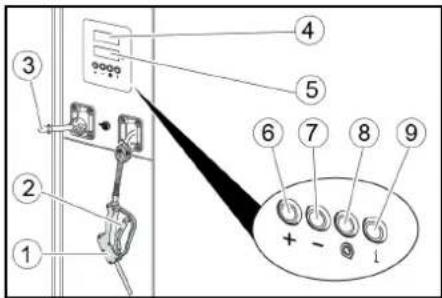
①Dispensing nozzle ②Lever ③Valve plug ④Set pressure display ⑤Tire pressure display ⑥+ button ⑦- button ⑧Flat tire button ⑨No function
Water dispensing

- Insert a coin into the coin slot.

- Press the water supply button.

- Hold the dispensing nozzle in the tank opening.
①Freeze protection switch ②Freeze protection heater
CAUTION
①Door
②Coin cassette
- Pull out the coin cassette and empty it.
① Cover
① Compressor on button
- Compressor is overheated: Wait for the compressor to cool down.
Air pressure is too low
① Pressure reducer
② Pressure gauge
Display malfunctions
① "STOP" button
Symbols on the device

△DANGER
① Main switch ② Door ③ Lock 4. Set the main switch to "STOP" position. "STOP" flashes when the device is in operation. 5. Close the door.
Operation
Operation AWT, AWT Fp Control elements
① Coin return ② Coin insertion ③ Tire pressure button ④ Water delivery button
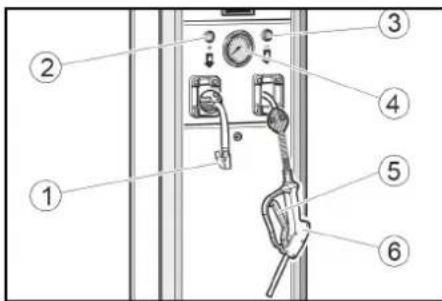
① Valve plug ② + button ③ - button ④ Pressure gauge ⑤ Lever ⑥ Dispensing gun
Water filling


① Coin return ② Coin insertion ③ Tire pressure button ④ Water delivery button
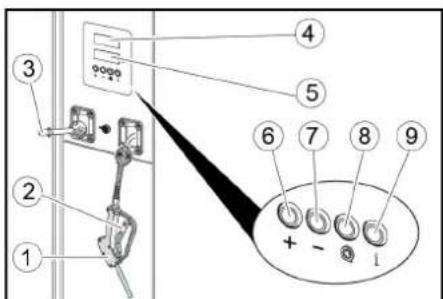
① Filling gun ② Lever ③ Valve plug ④ Set pressure display
⑤ Tire pressure display ⑥ + button ⑦ - button ⑧ Flat tire button ⑨ No function
Water filling


① Frost protection switch ② Frost protection heating
CAUTION
① Door ② Coin cassette 2. Pull out the coin cassette and empty it.
① Cover ② Condensate drain valve 2. Hold the condensate drain valve above a shaft or catch basin.
⚠WARNING
Risk of injury, risk of damage
Water jet coming out of the condensate drain valve can cause injury or damage.
Never point the condensate drain valve at people, animals, the device, or electrical components.
- Slowly open the condensate drain valve and release the condensate.
- Close the condensate drain valve.
- Put the cover on.
Transport
△CAUTION
Risk of injury, risk of damage
When transporting, pay attention to the weight of the device.
- When transporting in vehicles, secure the device against slipping and tipping over according to the applicable directives.
Storage
△CAUTION
Risk of injury and damage
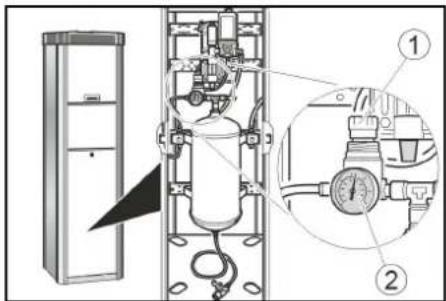
① Compressor switch button - Compressor is overheated: Wait for the compressor to cool down. Air pressure is too low ● Check the pressure on the pressure gauge. If necessary, adjust the pressure reducer. ①Pressure reducer ②Pressure gauge
Display malfunction
| Greška Uzrok Otklanjanje | ||
| ER1 Neprecizno merenje pritiska | zbogneispravnog utikača ventila ili creva | Zamenite utikač ventila.Zamenite crevo. |
| ER2, ER7 Pritisak vazduha je suviše nizak. | Neprecizno merenje pritiska usledneispravnog utikača ventila ili creva. | Proverite pritisak vazduha na manometru, po potrebi naknadno podesite reduktor pritiska.Zamenite utikač ventila.Zamenite crevo. |
| ER3 | Pritisak vazduha je suviše nizak. | Proverite pritisak na manometru, po potrebi naknadno podesite reduktor pritiska. |
| ER4 | Pritisak vazduha je suviše visok. | Proverite pritisak na manometru, po potrebi naknadno podesite reduktor pritiska. |
| ER5 | Postoji smetnja u napajanju. | Obavestite servisnu službu. |
| ER6, ER8, ER9, ERU, ERB | Smetnja na elektronici. | Obavestite servisnu službu. |
| ERP | Utikač ventila se otpustio prilikom upumpavanja.Pritisak vazduha nije stabilan. | Proverite da li je utikač ventila pravilno postavljen.Proverite pritisak na manometru, po potrebi naknadno podesite reduktor pritiska. |
Warranty
In each country, the warranty conditions issued by our responsible distribution organization apply. We will rectify any malfunctions on the device free of charge within the warranty period, provided the cause of the malfunction is a material or manufacturing defect. In the event of a warranty claim, contact your distributor with the receipt or the next authorized service center. (Address on the back)
Technical data
| Električni priključak | ||
| Napon električne mreže | V | 230 |
| Faza | ~ | 1 |
| Frekvencija | Hz | 50 |
| Priključna snaga | W | 450 |
| Vrsta zaštite | IP44 | |
| komprimovanog vazduha | ||
| Protočna količina | l/min | 100 |
| Pritisak | MPa | 0,1...0,8 |
| Priključak za vodu | ||
| Dovodni pritisak | MPa | 0,1...0,5 |
| Uslovi okruženja | ||
| Temperatura sa zaštitom od smrzavanja | °C | -10...+40 |
| Temperatura bez zaštite od smrzavanja | °C | +5...+40 |
| Vlažnost vazduha | % | 10...80 |
| Emisija buke | ||
| Nivo zvučnog pritiska LpA | dB(A) | <70 |
| Nivo zvučne snage LWA + nepouzdanost KWA | dB(A) | 76,8 |
| Nivo zvučne snage LWA + nepouzdanost KWA | dB(A) | 4 |
Dimensions and weights
| Težina | kg | 71 |
| Dužina | mm | 423 |
| Širina | mm | 423 |
| Visina AWT | mm | 1550 |
| Visina AWT-C | mm | 1760 |
Subject to technical changes.
① "STOP" button
Symbols on the device

⚠️ DANGER
Danger due to
① Main switch
② Door
③ Lock
① Cover
12062 Cherasco (Cn) - Italy
① "STOP" button
① Main switch ② Door ③ Lock
① Valve nozzle ② Button + ③ Button - ④ Pressure gauge ⑤ Lever ⑥ Gun
Draining water
- Insert coin into coin slot.


①Pistol
②Lever
③Valve tip
④Target pressure display
⑤Tire pressure display
⑥+ button
⑦- button
⑧Flat tire button
⑨without function
Water discharge


①Door ②Coin slot
①Compressor start button
①Pressure reducer
②Pressure gauge
①"STOP" button
Symbols on the device

EXPLANATION
① Valve plug ② Button + ③ Button - ④ Pressure gauge ⑤ Lever ⑥ Filling gun
Water intake

① Filling gun ② Lever ③ Valve plug ④ Required pressure display
⑤ Tire pressure display
① Door
② Coin cassette
① Cover
① Pressure reducer ② Pressure gauge
① "STOP" button
① Main switch ② Door ③ Lock
① Valve plug ② "+" button ③ "-" button ④ Pressure gauge ⑤ Lever ⑥ Filling gun
Water filling

① Cover
① Compressor connection button
① Pressure limiter
② Pressure gauge
① STOP button
Symbols on the device

△ DANGER
① Cover
① Pressure reducer
② Pressure gauge
THANK YOU!
MERCI! DANKE! iGRACIAS!

Register your product and benefit from many advantages.
www.kaercher.com/welcome


Rate your product and tell us your opinion.
www.kaercher.com/dealersearch
Alfred Kärcher SE & Co. KG
Alfred-Kärcher-Str. 28-40
71364 Winnenden (Germany)
Tel.: +49 7195 14-0
Fax: +49 7195 14-2212
- TABLE OF CONTENTS
- DRAW WATER
- CONTENTS
- GENERAL NOTES
- ENVIRONMENTAL PROTECTION
- NOTES ON THE CONTENT MATERIALS (REACH)
- ACCESSORIES AND SPARE PARTS
- SAFETY INSTRUCTIONS
- HAZARD LEVELS
- DANGER
- ⚠ WARNING
- △ CAUTION
- ATTENTION
- GENERAL
- OPERATION
- BEHAVIOUR IN THE EVENT OF AN EMERGENCY
- SYMBOLS ON THE DEVICE
- △DANGER
- DANGER OF INJURY FROM ELECTRICAL
- VOLTAGE
- RISK OF BURNS FROM HOT SURFACE
- INTENDED USE
- CALIBRATION REQUIREMENT
- INITIAL STARTUP
- AWT, AWT FP OPERATION
- CONTROL ELEMENTS
- DRAWING WATER
- CHECKING TYRE PRESSURE
- AWT -C, AWT -C FP OPERATION CONTROL ELEMENTS
- FILLING FLAT TYRES
- SETTINGS
- SETTING THE RUN TIME
- NOTE
- FROST PROTECTION
- DEVICE WITH FROST PROTECTION
- RISK OF DAMAGE
- DEVICE WITHOUT FROST PROTECTION
- SHUTTING DOWN
- SHUTDOWN IN THE CASE OF POTENTIAL FROST
- CARE AND SERVICE
- DAILY
- WEEKLY
- SERVICE EVERY 2 YEARS
- MAINTENANCE WORK
- EMPTYING THE COIN CASSETTE
- DRAIN THE CONDENSATE
- RISK OF INJURY, RISK OF DAMAGE
- TRANSPORT
- △CAUTION
- STORAGE
- RISK OF INJURY AND DAMAGE
- TROUBLESHOOTING GUIDE
- DANGER FROM ELECTRIC SHOCK
- THE DEVICE DOES NOT WORK
- THE DEVICE DOES NOT START AFTER THE VALVE CONNECTOR HAS BEEN CONNECTED TO THE TYRE
- THERE IS NO COMPRESSED AIR
- THE TYRE PRESSURE IS TOO LOW
- WARRANTY
- TECHNICAL DATA
- EU DECLARATION OF CONFORMITY
- CURRENTLY APPLICABLE EU DIRECTIVES
- INDEX
- WATER EXTRACTION
- SYMBOLS ON THE MACHINE
- ⚠️DANGER
- DRAINING WATER
- DRAIN WATER
- DRAIN CONDENSATION WATER
- CAUTION
- ⚠DANGER
- OPERATION AWT, AWT FP CONTROLS
- WATER FILLING
- AIR PRESSURE TOO LOW
- RELEVANT EU DIRECTIVE
- OPERATION OF DEVICE VERSIONS AWT, AWT FP
- WATER DISPENSING
- OPERATION AWT, AWT FP CONTROL ELEMENTS
- ⚠WARNING
- ⚠️ DANGER
- DANGER DUE TO
- WATER DISCHARGE
- EXPLANATION
- WATER INTAKE
- △ DANGER
- THANK YOU
- MERCI! DANKE! IGRACIAS
Brand : Kärcher
Model : AWT Fp
Category : Water dispenser