
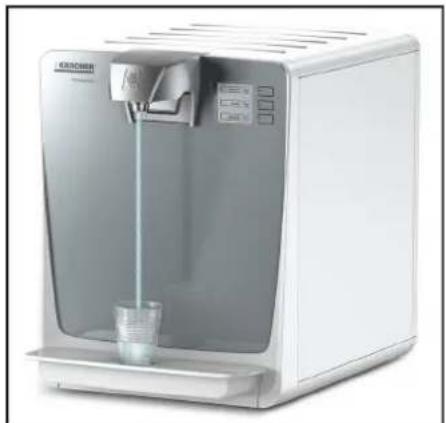
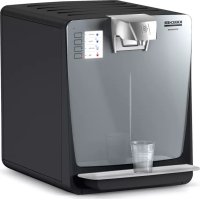
WPD 200 Basic - Water dispenser Kärcher - Free user manual and instructions
Find the device manual for free WPD 200 Basic Kärcher in PDF.
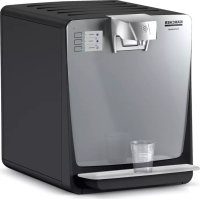


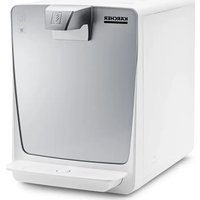
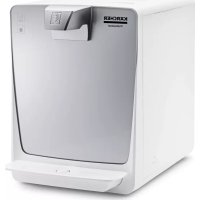
| Product type | Water dispenser |
| Brand | Kärcher |
| Model | WPD 200 Basic |
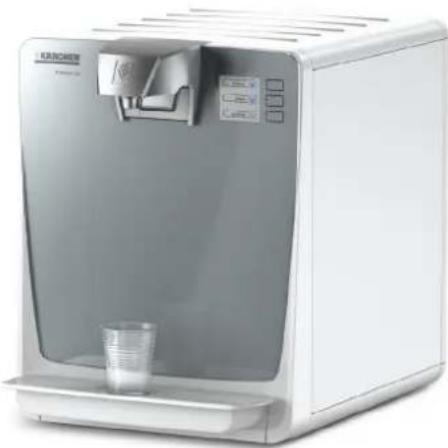
| Dimensions (W x D x H) without stand | 365 x 530 x 465 mm |
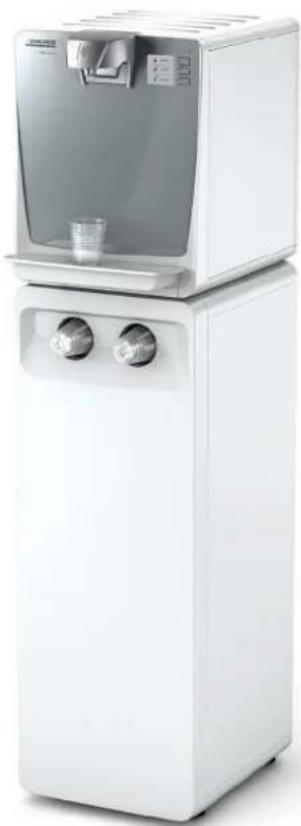
| Height with stand | 1432 mm |
| Weight without stand | 30 kg |
| Weight with stand | 45 kg |
| Electrical supply | 220-240 V, 50 Hz, 300 W |
| Inlet water pressure | 1.5 to 6 bar |
| Maximum flow rate | 2 L/min |
| Chilled water temperature | 8 °C (factory setting) |
| Water functions | Unchilled water, chilled water, sparkling water (CO₂ option) |
| Filtration type | Active-Pure filter, Hy-ProTECT or Hy-Pure (depending on version) |
| Active-Pure / Hy-ProTECT filter capacity | 10,000 litres each |
| Hy-Pure filter capacity | 2,500 litres |
| Noise level | < 60 dB(A) |
| Ambient temperature | +5 to +35 °C |
| Regular maintenance | Chemical cleaning every 6 months, filter change, UV lamp |
| Electrical safety | 30 mA circuit breaker, emergency stop |
| Included accessories | Stand, hose, CO₂ pressure reducer (depending on version) |
| Warranty | According to local conditions, contact customer service |
Frequently Asked Questions - WPD 200 Basic Kärcher
User questions about WPD 200 Basic Kärcher
0 question about this device. Answer the ones you know or ask your own.
Ask a new question about this device
Download the instructions for your Water dispenser in PDF format for free! Find your manual WPD 200 Basic - Kärcher and take your electronic device back in hand. On this page are published all the documents necessary for the use of your device. WPD 200 Basic by Kärcher.
USER MANUAL WPD 200 Basic Kärcher
WPD 100/200/600 Basic
English 15
Chairman of the Board of Management
S. Reiser Director Regulatory Affairs & Certification
71364 Winnenden (Germany)
Tel.: +49 7195 14-0
Fax: +49 7195 14-2212
Winnenden, 2018/07/01
Please read and comply with these original instructions prior to the initial operation of your appliance and store them for
later use or subsequent owners.
Contents
Contents EN 1
Safety EN 1
Environmental protection EN 1
General notes EN 2
Transport EN 2
Proper use EN 2
Function EN 2
Connecting the appliance EN 2
Start up EN 3
Operation EN 4
Shutdown EN 4
Startup after shutdown EN 4
Storage EN 4
Care and maintenance EN 5
Consumables EN 9
Accessories EN 9
Troubleshooting EN 10
Technical specifications EN 11
Spare parts EN 11
Warranty EN 11
EU Declaration of Conformity EN 11
Maintenance sheet WPD 100/200/600 EN 12
Safety
Danger or hazard levels
DANGER
Indicates an immediate hazard that will result in severe injury or death.
WARNING
Indicates a potentially hazardous situation that could result in severe injury or death.
CAUTION
Indicates a potentially hazardous situation that could result in minor injury.
ATTENTION
Indicates a potentially hazardous situation that could result in property damage.
Safety instructions
DANGER
Risk of electric shock!
First remove the mains plug before performing any work on the device. The socket must be protected by a residual current device (RCD) with a tripping current of 30 mA.
DANGER
Danger of death due to a possibly bursting CO2 gas cylinder.
Install and secure the compressed gas cylinder in an upright position. Never connect the compressed gas cylinder without a pressure reducer and safety valve. The pressure reducer
with safety valve must be approved for the device type.
Do not expose the gas cylinder to direct sunlight. The gas cylinder must be protected against excessive heating.
DANGER
Risk of explosion!
Do not use C2Bottle with riser. Riser bottles are, for example, marked with a red warning label.
DANGER
Risk of suffocation on account of escaping carbon dioxide.
The installation room must be aerated and ventilated sufficiently or if a suitable gas warning system must be installed. Country-specific statutory provisions concerning the minimum room size, warning systems and ventilation during the emptying of gas cylinders must be observed.
WARNING
Health risk due to the contamination with germs.
When replacing the filter cartridges, ensure hygiene and cleanliness. Wear sterile disposable gloves when replacing the filter. Do not touch the water dispenser outlet with your fingers or clean it with a cleaning cloth. If necessary, soak a sterile cloth with RM735 (see annex) and wipe it down with this cloth. In order to be able to dispense water of proper quality, the surfaces of the appliance must be cleaned regularly. Chemical cleaning must be performed at least every 6 months. After a warning regarding the microbiological contamination has been issued by the drinking water supplier, a chemical cleaning must be performed at least once. Repeat the chemical cleaning several times if required. In case of doubt, contact Kärcher Service.
WARNING
Health hazards on account of improperly repaired device.
The appliance may only be repaired by trained and skilled personnel.
WARNING
Health risk due to increased micro-organism concentration in the water.
If the device has not been used for more than 4 days, the following actions must be taken:
Set the appliance switch to → Open the water supply. Start cleaning (see "Care and Maintenance/Chemical cleaning").
△WARNING
Risk of injury on account of bursting bottles. Carbonated water must only be filled into pressure-resistant bottles (10 bar).
ATTENTION
If it cannot be ruled out that the device has been stored or transported in a horizontal position, you must wait 24 hours after the set-up of the device before using it. In case of non-observation, the internal cooling device can be damaged.
Environmental protection
| The packaging material can be recycled. Please do not throw the packaging material into household waste; please send it for recycling. |
| Old appliances contain valuable materials that can be recycled; these should be sent for recycling. Batteries, oil, and similar substances must not enter the environment. Please dispose of your old appliances using appropriate collection systems. |
Electrical and electronic devices often contain components which could potentially pose a danger to human health and the environment if handled or disposed of incorrectly. However, these components are necessary for the proper operation of the device. Devices marked with this symbol must not be disposed of with regular household rubbish. This appliance contains the coolant R-134a. This coolant must not leak outside the appliance. Please contact your Kärcher service partner concerning the proper disposal. Work on the cooling unit may only be carried out by qualified electricians. Notes about the ingredients (REACH) You will find current information about the ingredients at: www.kaercher.com/REACH
General notes
In order to ensure the water quality of the dispensed water, only drinking water from a public water utility may be used. Here, the quality must comply with at least the guideline of the World Health Organization (WHO). If the drinking water supply must be tapped to install the appliance, this must be performed by trained expert personnel that is in possession of a permit that meets the local laws and regulations. This work must be ordered by the customer if required. To protect from water damage caused by a burst water supply hose, we recommend the installation of a Shut-off-valve and an aqua stop (sold separately) in the water supply line. Care tasks on the inside of the device may only be performed by the operator of the device, who has read these operating instructions. The door of the base must always be locked. If you are using a CO2 bottle, please observe the local guidelines to mark the installation room. Do not clean the device with a water stream. Plastic surfaces must not be cleaned with alcohol-containing, aggressive or abrasive detergents. The surface cleaner CA 30 R (6.295-686.0) is recommended. After initial start-up, filter change and longer standstill times the water may temporarily appear milky when dispensing unchilled water. This is ascribed to fine air bubbles and does not effect the quality of the water.
Transport
CAUTION
Mind the weight of the appliance during transport. Do not transport the device horizontally. Because of its weight, the WPD 600 should be set up by 2 persons or with the help of relevant aids such as a hand truck.
Proper use
The device is used to dispense tempered and untempered drinking water of approved food quality for self-service. Depending on the unit model, the water dispenser is equipped with various filters (Active-Pure-Filter, Hy-Protection-Filter, Hy-Pure-Filter, or UV-Proct). This device is not intended for use by persons (including children) with reduced physical, sensory, or mental abilities, or lacking experience and/or knowledge, unless they are supervised by a person responsible for their safety or are instructed by these persons on the use of the device. Children should be supervised to ensure that they do not play with the device. The appliance must be installed in frost-free rooms. Do not use or park the device outdoors. Do not lay down the device or store or transport it in a horizontal position.
Function
From the water inlet, the water flows first through the filters (for a description of the filters, see Consumables) or the UV light. Depending on the operated button, the water then flows through the cooling module, the CO2 mixer (depending on the equipment), or directly to the water output.
When carbonated water is required (option), the water (option) will be enriched with carbon dioxide.
The entire water system must be chemically cleaned at regular intervals.
Connecting the appliance
Preconditions
△DANGER
Should it be necessary to open the side parts for the installation and initial startup of the device, this may only be done by a qualified electrician.
During the initial installation and in case of repairs that involve the replacement of accessories, you must make sure that only the components defined as accessories are used (connection kit, CO2 pressure regulator (option, appliance with CO2). These parts are components that have been released by KARCHER for installation. These components are tested and certified to meet the high quality requirements of the certification by the SGS Institut Fresenius GmbH and the KARCHER quality standards. Never use other components. The power connection and the water input pressure must conform to the data in the specifications. Depending on local regulations, the use of an approved check valve is required.
Devices with a drip pan that drains into the building's wastewater line must be designed with a trap to protect against unpleasant odors from the wastewater line. The trap must be positioned lower than the drip pan. Only with a continuously falling wastewater hose will the drip pan drain work reliably. There must be an even surface available to install the appliance. Power plug and receptacle must be freely accessible after installation. To reduce power consumption, the power supply can be switched off when the device is not in use (e.g., using a timer clock). Power switch, fuse, and water connection at the back of the device must be freely accessible. The minimum distance to the wall is 100 mm. Only for WPD 100 and WPD 200 with base: To guarantee great stability of the device in accordance with the provisions of the device standard, a device with base must be secured to the floor or wall (attachment kit floor fixing WPD 2.643-483.0).
Alternatively, the attachment kit additional weight for base WPD (2.643-474.0) can be used to lower the center of gravity of the device accordingly.
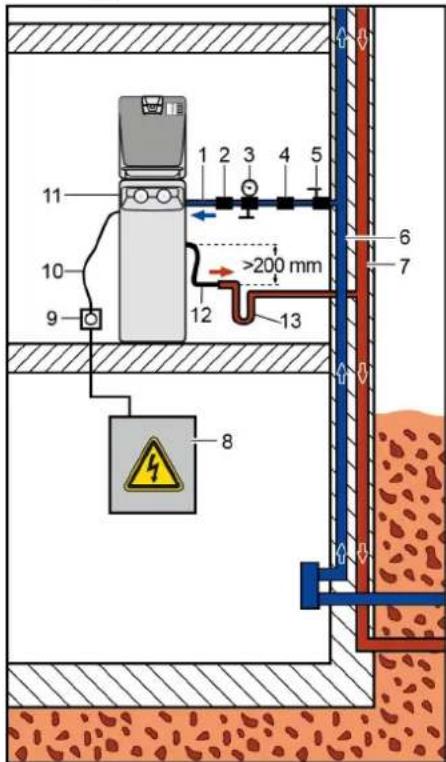
1 Water supply line 2 Check valve 3 Pressure reducer 4 Aqua stop 5 Water faucet 6 Drinking water supply * 7 Wastewater line 8 Facility power supply * 9 Socket, protected via residual current protective switch 30 mA 10 Connecting cable 11 WPD 100/200/600 12 Drain of drip pan *** 13 Trap** * on site, not included in the scope of delivery ** optional, not included in the scope of delivery *** optional, depending on the device configuration
Establishing connection
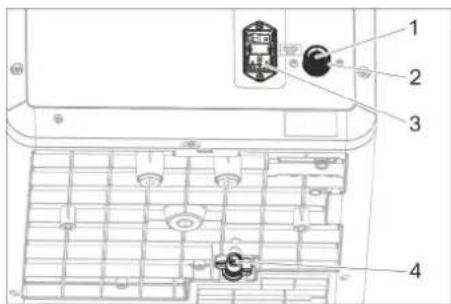
1 Inlet sieve 2 Water connection (connection thread 3/4") 3 Main supply 4 Drip pan drain (optional)
Device without drip pan drain
With this device design, no drain hoses need to be installed.
Device without base, with drip pan drain
Connect the hose to the drip pan drain and install it to the siphon or to the can.
Device with base and drip pan drain
Use an elbow to connect the hose to the drip pan drain and install it through the base to the siphon or to the can.
All device designs
Connect the water supply hose to the water connection (connection thread 3/4") at the back of the device. Connect the power cable to the power supply on the back of the device. Insert the mains plug into the socket.
Start up
Open the device door
1 Drip pan 2 Device door 3 Release button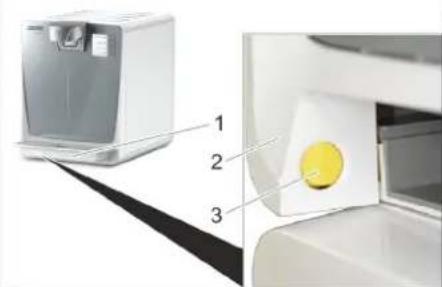
Remove the drip pan.
Push the unlocking button and open the device door.
Insert filter
1 Bracket 2 Plate 3 Filter 4 Handle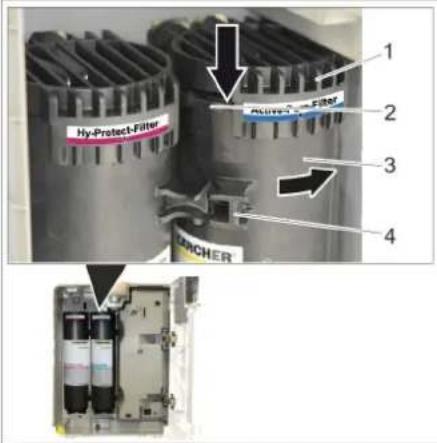
Do not touch the marked areas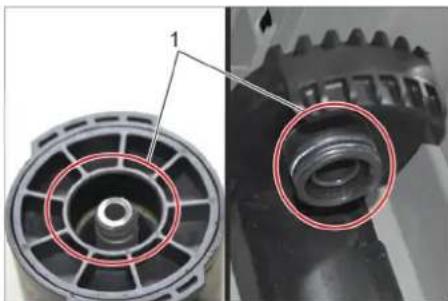
WARNING
Health risk due to contamination with germs.
When replacing the filter cartridges, ensure hygiene and cleanliness. Do not touch the connections of the socket and filters. Wear sterile disposable gloves when replacing the filter. Do not interchange filters, observe colour coding. Remove drip pan and open the device door. Turn the filter so that the handle is on the left side and insert it into the relevant support from the bottom.
1 Marking Turn the filter to the right all the way to the stop. Check installation position. The marking on the label on the support and on the filter must be aligned with each other. Close device door and insert drip pan.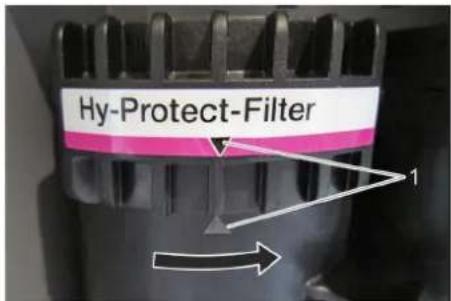
Open the door of the base.
The door of the base can be locked. 1 Door of the base. 2 Door lock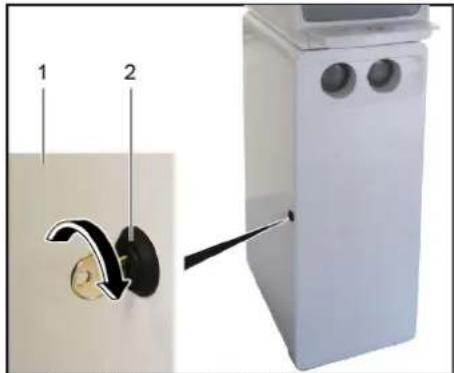
Unlock the door lock.
Open the door on the support leg.
Insert the CO2 bottle
Note:
Observe general information on handling CO2 bottles (see Chapter "Care and maintenance/general information on handling CO2 bottles")
1 Rotating regulator 2 Pressure reducer 3 Union joint 4 Main tap 5 Pressure gauge control pressure 6 CO2 hose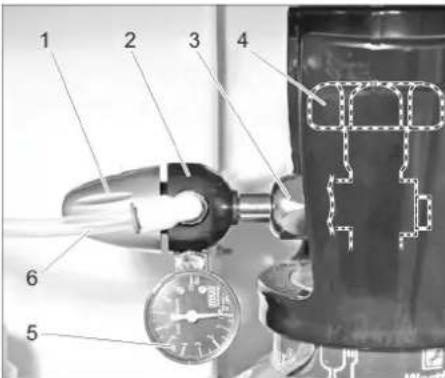
Place the CO2 bottle in the base and secure it by means of the tie down strap.
Briefly open the main tap so that possibly present, liquid CO2 can escape.
Screw the pressure reducer onto the new gas bottle. Watch for correct mounting of the sealing ring!
Tighten covering nut firmly.
Connect the CO2 hose to the pressure reducer.
Slowly open the main tap on the gas bottle.
Set 3 bar on the pressure reducer by means of the control knob.
Close the main tap on the gas bottle.
Read the value indicated on the pressure gauge control pressure.
The indicated value must remain constant for at least 5 minutes.
With detectable pressure reduction:
Check if the O-ring between the gas cylinder and the pressure reducer is present and free of damage. Replace defective O-ring.
Check the correct positioning of the pressure reducer.
Tighten covering nut firmly.
Check the hose coupling on the pressure reducer and the CO2 hose for visible damage. In case of doubt, call the Customer Service.
If the pressure reduction cannot be remedied by the stated measures, the pressure reducer is defective and must be replaced.
Open main tap.
Set the operating pressure on the pressure reducer by means of the control knob.
If the pressure reduction cannot be remedied by the stated measures, the pressure reducer is defective and must be replaced. Open main tap. Set the operating pressure on the pressure reducer by means of the control knob. WPD 100: Presetting 4 bar, re-adjustable if necessary.
WPD 200/600: Set the CO2 pressure regulator to approx. 3 bar (static) prior to the dispensing of water and then check if the pressure is approx. 3.0 bar during the dispensing of carbonated water (sparkling).
Close the door of the base.
Inserting the 425g CO2 bottle
1 Pressure regulator scale 2 Pressure regulator 3 Adjustment wheel 4 Screw connection of the bottle 5 425g CO2 bottle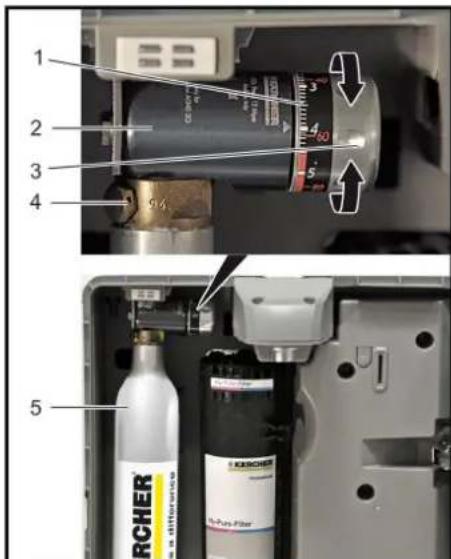
Remove drip pan and open the device door.
Turn the pressure regulator to "OFF".
Remove the cover of the CO2 bottle.
Screw the 425g CO2 bottle onto the bottle screw connection of the pressure regulator.
If resistance is felt, turn the 425 g CO2 bottle slightly further until it is tightened. A short hissing noise may be audible.
Pre-set the pressure regulator to "4".
Close the device door and insert the drip pan.
After initial startup, readjust the pressure on the pressure regulator to achieve the desired CO2 concentration in the water.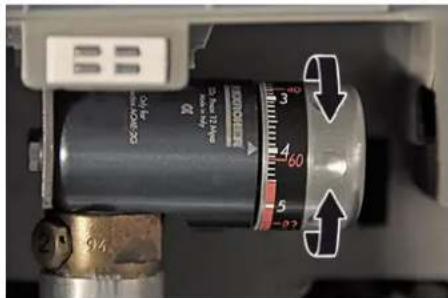
Note:
Regulate strongly spraying water stream during dispensing of carbonated water by lowering the CO2 pressure. If the water is not sufficiently carbonated, increase the CO2 pressure.
Initial startup
Open the water supply. Set the appliance switch to "I".
With WPD 200 and WPD 600 only: In the first minute after switch-on, the CO2 mixer is first automatically filled with water. Rinse filter.
Operate the button for unchilled water.
The maximum dispensing time is limited to 60 seconds. To resume the rinsing process, press the button for unchilled water again.
Perform the rinsing process for at least 10 minutes (or approx. 20 litres). Then push the button for chilled water for at least 4 minutes (or 8 litres). With devices with CO2 function (option), press the button for carbonated water for at least 4 minutes. Please bear in mind that the dispensing process is interrupted after 30 seconds respectively.
To resume the rinsing process, push the button again.
After that the device is ready for operation.
Following this, it is recommended to perform a chemical cleaning (see "Care and maintenance/Chemical cleaning").
WPD 200/600 only: Adjusting the compensation regulator
The compensation regulator is used for the fine adjustment of the dispensing of carbonated water. Remove the drip pan and open the device door.
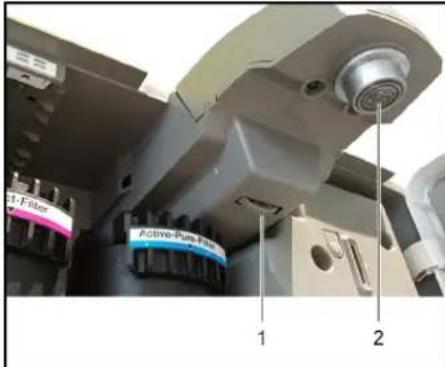
1 Adjusting wheel 2 Water dispenser
The entire adjusting range is 4 rotations and should be screwed in approx. 2.5 rotations for fine adjustment.
Place a measuring cup with a capacity of at least 1 litre under the water outlet. Press the button for carbonated water until 1 litre of water has been dispensed and observe the behaviour of the water stream. If the amount of water dispensed becomes less towards the end of the removal and the jet is disrupted by gas leaks, carefully turn the adjusting wheel clockwise. Repeat the procedure until 1 litre of carbonated water can be extracted without the jet becoming disrupted towards the end of the removal. Press the button for carbonated water until 300 ml of water have been dispensed. Wait for 10 seconds. Remove another 300 ml of water and then wait for 10 seconds. Repeat this procedure 5 times. If the carbonation becomes less with each extraction, carefully rotate the adjusting wheel anticlockwise.
Operation
Operator and display elements
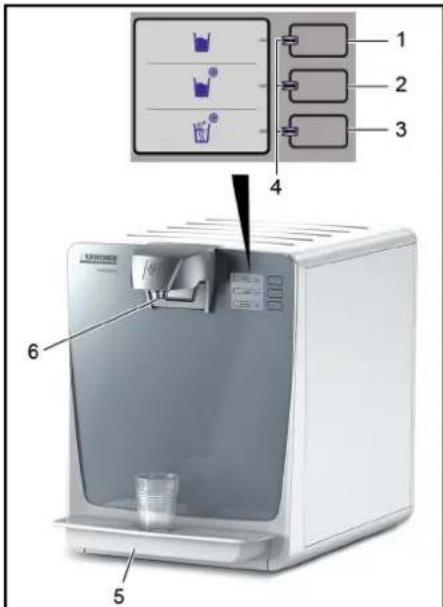
1 Button for unchilled water 2 Button for chilled water 3 Button for carbonated water (option) or dummy button 4 LEDs blue and red 5 Drip pan 6 Water dispenser
Note
The buttons are sensor buttons. They can be operated with merely a light touch.
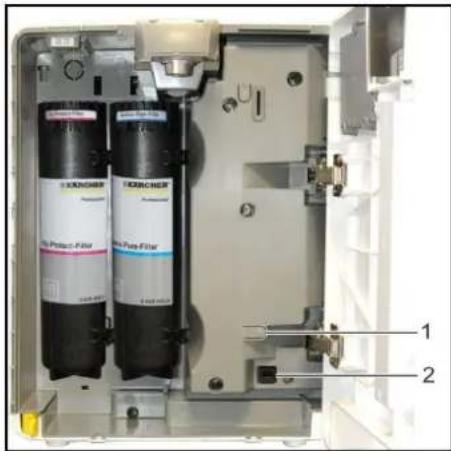
1 Button RESET 2 Service interface
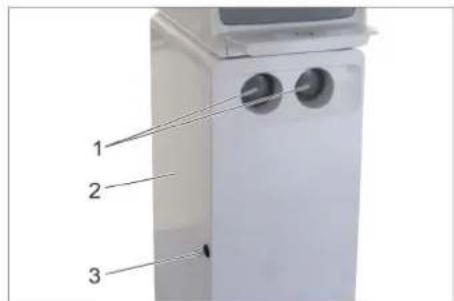
Support leg (option)
1 Cup dispenser 2 Door base 3 Door lock
Water dispenser
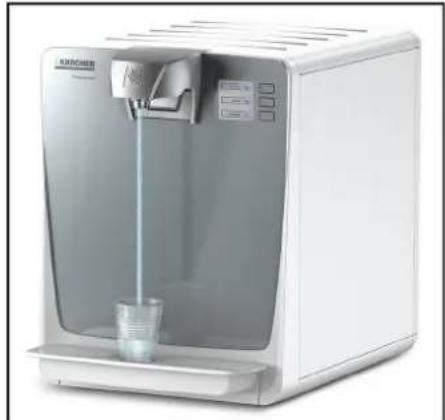
Place the receptacle in the middle of the drip pan. Press the button for the selected water type and hold it down until the desired amount of water has been dispensed into the receptacle.
Shutdown
If the appliance will not be needed for more than 4 days:
Shut off water supply. Set the appliance switch to "0".
Startup after shutdown
△WARNING
Health risk due to increased micro-organism concentration in the water.
If the appliance has not been used for more than 4 days, the following actions must be taken:
Set the appliance switch to "I". Open the water supply. Start chemical cleaning (see "Care and Maintenance/Chemical cleaning").
Storage
CAUTION
Consider the weight of the appliance when storing it. Prior to restarting after storage:
Uninstall filters that are inserted in the device and replace them with new filters. Start chemical cleaning (see "Care and Maintenance/Chemical cleaning").
Maintenance instructions
△ WARNING
Health hazards on account of improperly maintained device. The device may only be maintained by trained and skilled personnel. Use only original parts of the manufacturer or parts suggested by him, such as parts and wearing parts, accessories parts, operating materials, cleaning agents. Before doing any work on the machine: Set the appliance switch to "0". Pull out the mains plug. Shut off water supply.
Maintenance contract
In order to ensure a reliable operation of the device, we recommend that you conclude a maintenance contract. Please contact your competent KÄRCHER service.
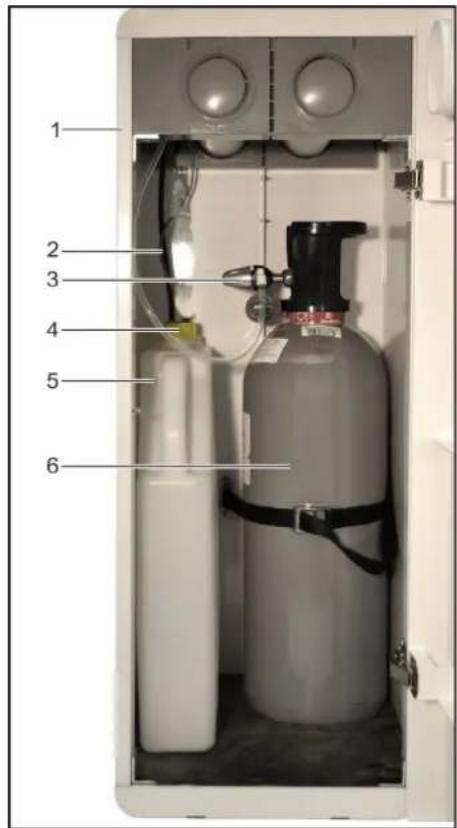
Note: The base and all components shown are optionally available. 1 Base 2 Drain hose drip pan 3 Pressure reducer 4 Can lid 5 Can 6 CO2 bottle 7 Additional cooler (WPD 600 only)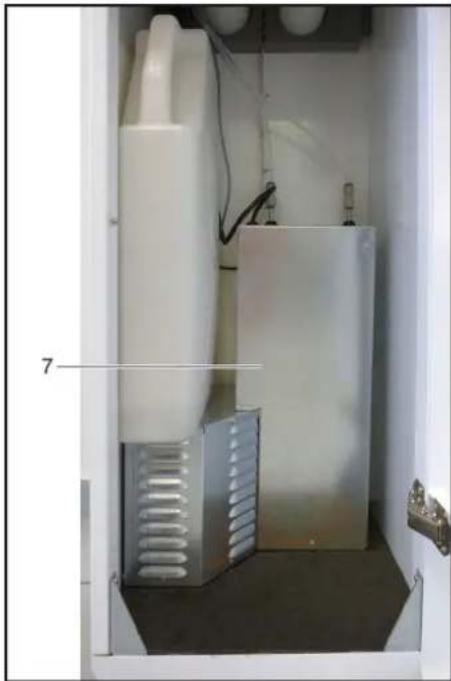
Maintenance schedule
| Time Performance | |
| daily Clean the drip pan and the water output with disinfecting detergent (RM735, see consumables). | |
| Check the drip pan drain (option) for obstructions. | |
| If the device was not used overnight, dispense and pour away 0.5 l of each water type. | |
| weekly, more frequently if necessary | Clean the outside surfaces of the appliance with disinfecting detergent. Clean the drip pan with hot water or in the dishwasher. Do not use detergents that contain alcohol, acidic ingredients or scouring agents for cleaning plastic surfaces. |
| Empty can. | |
| Check can for cleanliness and clean or replace if required. | |
| Quarterly | Check and clean the inlet sieve in the water connection (see "Care and maintenance/cleaning inlet sieve"). Clean the inlet sieve on a monthly basis in case of heavy soiling. |
| half-yearly Perform the chemical cleaning operation. | |
| Replace the UV lamp. | |
| annually * Have annual customer service work performed. | |
| Replace the Active-Pure and Hy-ProTECT filter. | |
| Replace Hy-Pure filter. | |
| The changing intervals of the filter apply to the defined test conditions and can deviate from the indicated times. | |
Cleaning inlet sieve
Shut off water supply to the appliance. Press the button for unchilled water briefly in order to reduce the water pressure in the device. Remove the water inlet hose on the appliance. Pull out the inlet sieve using needlenose pliers. Clean inlet sieve. Insert the inlet sieve into the device. Connect the water supply hose to the water connection on the rear of unit. Open the water supply.
Chemical cleaning Rinsing after
chemotherapyProtect filter (filter on the left-hand side) to the left until the tab is visible.
Chemical cleaning must be performed after initial startup, after a shutdown for more than four days, after a filter change or otherwise at least every 6 months.
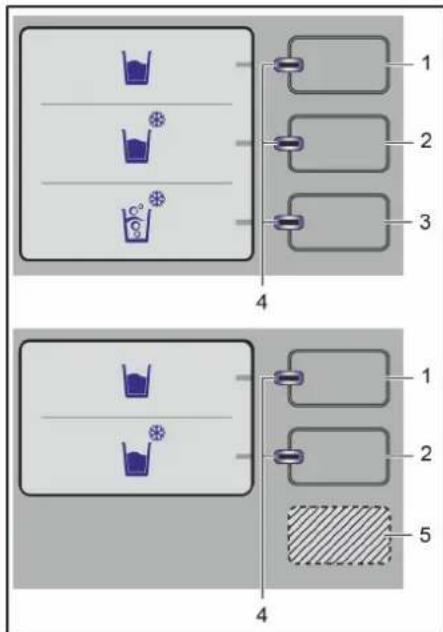
1 Button for unchilled water 2 Button for chilled water 3 Button for carbonated water (option) 4 LEDs blue and red 5 Dummy button
1 Service cartridge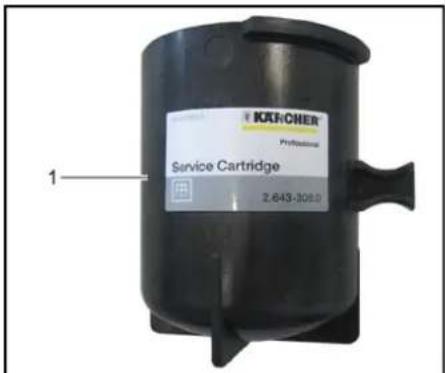
WARNING
Risk of damage. The Hy-Protection filter will become damaged if the Service Cartridge is used at the right-hand filter position instead of the Active-Pure filter. Always insert the service cartridge into the left filter position instead of the Hy-protect filter.
CAUTION
Risk of injury from contact with detergent. Wear protective gloves and safety goggles when performing the chemical cleaning.
Empty the can in units with drip pan drain. Place a measuring cup with a capacity of at least 1 litre under the water outlet. Press the button for unchilled water and the button for carbonated water or dummy button at the same time.
Note:
Simultaneous actuation of these two buttons starts the cleaning programme. The dispensing of drinking water is blocked during the cleaning programme. The cleaning programme with subsequent rinsing takes approx. 1 hour and must be carried out in its entirety. Due to safety considerations, the control does not permit the process to be cancelled before completion.
When the acoustic signal sounds, hold the button down for 5 seconds until the second acoustic signal sounds. All LEDs are flashing blue. Push any button. The pressure in the system is released. The process takes 30 seconds. All LEDs are flashing red. Remove drip pan and open the device door. As long as the door is opened and the drip pan is removed acoustic signals will sound.
Pull the filter downwards out of the support and remove it. Put detergent into the service cartridge and insert the service cartridge into the filter mount. Dosage: 4 cleaning tabs.
Note
The following steps must be performed very carefully, as otherwise the effect of the chemical cleaning is not guaranteed.
In the event of malfunction during chemical cleaning (power failure, device switch-off, message that the can is full), the cleaning programme will always jump to the rinsing process. The rinsing process must be carried out in its entirety before the chemical cleaning can be restarted.
Neither premature exiting of the cleaning programme nor a shortened rinse cycle is possible.
Close device door and insert drip pan. Place the measuring cup under the water outlet. The LED of the button for unchilled water is flashing blue. Push the button for unchilled water and dispense 500 ml of water to fill the service cartridge. 5 seconds after releasing the button the dissolving time of the cleaning tabs begins. Wait for 2.5 minutes, while all LEDs are flashing red. As soon as the LED of the button for unchilled water is flashing blue, actuate the button once again until another 500 ml of water has flown into the measuring cup. Now the line for unchilled water will be flushed with cleaning solution. 5 seconds after releasing the button the contact time begins. Empty the measuring cup during the 2.5-minute contact time and place it under the water outlet. As soon as the LED for chilled water is flashing blue, push it until another 500 ml of water have been dispensed.
The line for chilled water is flushed.
5 seconds after releasing the button the contact time begins. Empty the measuring cup during the 2.5-minute contact time and place it under the water outlet. As soon as the LED for carbonated water is flashing blue, push it until another 500 ml of water have been dispensed.
The line for carbonated water is flushed.
5 seconds after releasing the button the contact time begins. During the contact time of 15 minutes all LEDs are flashing red and the buttons are deactivated. → Empty the measuring cup during the contact time and place it under the water outlet. → After completion of the contact time all LEDs are red. Press the button for unchilled water and the button for carbonated water or dummy button at the same time. When the acoustic signal sounds, hold the button down for 5 seconds until the second acoustic signal sounds. The pressure in the system is released. The process takes 30 seconds. → Remove drip pan and open the device door. → Remove service cartridge → Insert the filter from the bottom into the relevant support. Mind the position of the tab. → Turn the filter to the right all the way to the stop. Check installation position. The marking on the label on the support and on the filter must be aligned with each other. → Close device door and insert drip pan. Place the measuring cup under the water outlet. The LED of the button for unchilled water is flashing blue. → Start rinsing process (see "Rinsing after chemical cleaning").
Note
The chemical cleaning process with rinsing takes approx. 1 hour.
The water dispensed during cleaning is not fit for human consumption!
Note
Hold the respective button pressed down for water dispensing.
Release the button to interrupt the flow.
The necessary rinsing time has been reached when the water dispenser stops automatically and the respective next button flashes in blue.
→ Place rinsing cup (order number 6.640-341.0) underneath the water outlet. → Operate the button for unchilled water.
The water dispenser may be interrupted at any time.
The rinsing process takes a total of 2.5 minutes.
→ Empty the rinsing cup and place under the water outlet again.
→ Actuate the button for chilled water.
The water dispenser may be interrupted at any time.
The rinsing process takes a total of 2.5 minutes.
Empty the rinsing cup and place it under the water outlet again.
Actuate the button for carbonated water (option). The water dispenser may be interrupted at any time.
The rinsing process takes a total of 2.5 minutes. After completion of the rinsing process, all LEDs will be illuminated in red.
To complete the chemical cleaning and return to normal operation:
Press the button for unchilled water and the button for carbonated water or dummy button at the same time.
When the acoustic signal sounds, hold the button down for 5 seconds until the second acoustic signal sounds.
The appliance is initialised automatically and is ready to operate at that point.
All LEDs are blue.
With WPD 200 and WPD 600:
During the subsequent dispensing of carbonated water, no carbonation is contained in the first half litre!
Sampling
In order to be able to test the function of the chemical cleaning, samples should be taken immediately after the completed cleaning under observance of the rules for the microbiological water analysis and evaluated by an accredited laboratory.
Installing/removing filter
WARNING
Health risk due to the contamination with germs.
When replacing the filter cartridges, ensure hygiene and cleanliness.
Do not touch the connections of the socket and filters.
Wear sterile disposable gloves when replacing the filter.
Shut off water supply to the appliance. Place the container under the water output of the appliance. Press the button for unchilled water until no more water is dispensed. Set the appliance switch to "0". Remove drip pan and open the device door.
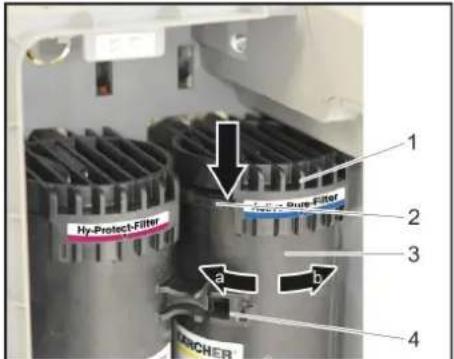
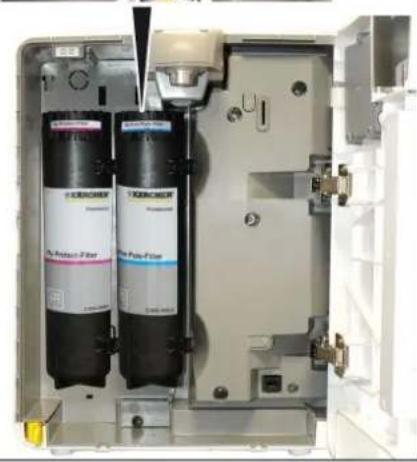
1 Bracket 2 Plate 3 Filter 4 Handle a Remove the filter. b Insert filter
Turn the filter to the left until the tab is visible. Pull the filter downwards out of the support and remove it.
Note:
The used filter can be disposed of as domestic waste after the water has been drained.
Wear sterile gloves. Unpack the new filter. Turn the filter so that the handle is on the left side and insert it into the relevant support from the bottom. Turn the filter to the right all the way to the stop.
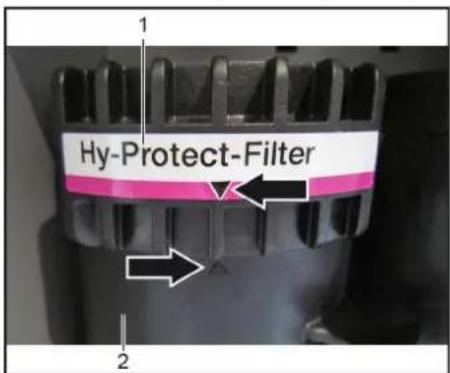
1 Bracket
2 Filter
Check installation position.
The marking on the label on the support and on the filter must be aligned with each other.
Note
If both filters are replaced at the same time, also replace the other filter at this time. The subsequent rinse process can be performed on both filters simultaneously.
Note:
Filters must be installed in the same position and must not be interchanged! Observe marking!
Close the device door and insert the drip pan. Place a receptacle underneath the water outlet.
Set the appliance switch to "I". Open the water supply again. Place a receptacle underneath the water outlet. Operate the button for unchilled water. The new filter is flushed. The maximum dispensing time is limited to 60 seconds. To resume the rinsing process, press the button for unchilled water again. Rinse the filter until the dispensed water is clear and odour-free, however, at least with 20 litres. After every filter change the performance of a chemical cleaning is recommended (see "chemical cleaning").
Uninstalling and installing the UV-lamp
The lamp of the UV light must be replaced every six months.
Disconnect the mains plug from the socket. Set the appliance switch to "0". Remove the drip pan and open the device door.
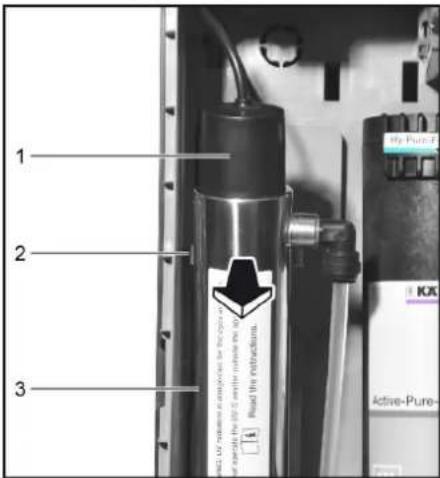
1 Cover cap 2 Top holder 3 UV-lamp
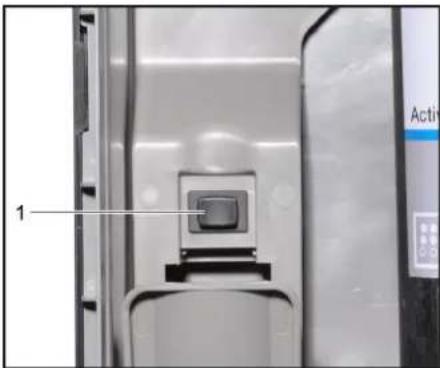
1 Safety button
Tilt the UV-lamp forwards out of the holder at the top.
The safety button behind the UV light is triggered.
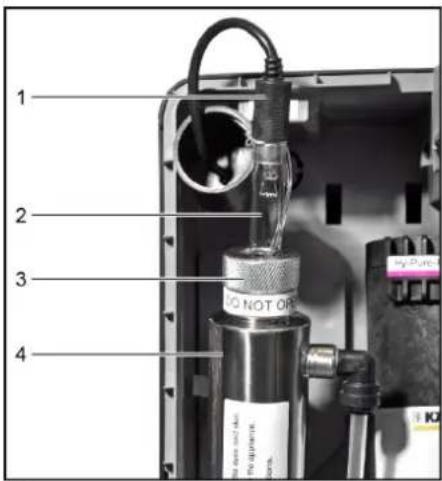
1 Top connector 2 Illuminant 3 Lock nut with seal 4 UV-lamp
Note
Do not unscrew the lock nut with seal (water leak). Avoid rotary movements when pulling out the lamp.
Remove the cover cap. Pull the lamp approx. 10 cm out of the cylinder. Remove upper plug. Pull the lamp out of the cylinder.
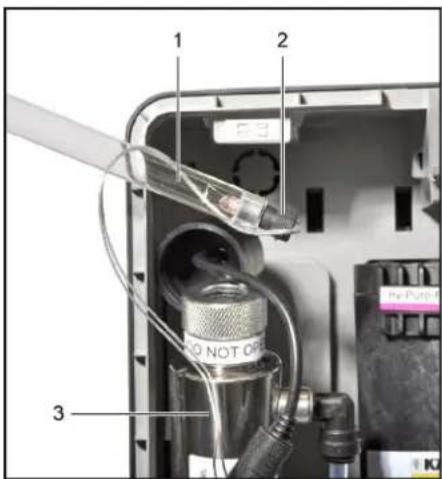
1 Illuminant
2 Bottom connector 3 UV-lamp
Remove lower plug. Remove lamp and dispose of via household rubbish.
ATTENTION
Lamps are sensitive to grease. Do not touch lamps with bare fingers. Prior to installation, clean soiled lamps by means of a dry, grease-free cloth.
Remove new lamp from the packaging. Attach lower plug to the new lamp. Slide the lamp approximately halfway into the UV light.
Note
Carefully slide the two cables of the lower plug simultaneously with the lamp into the UV-lamp.
Attach upper plug to the lamp. Slide the lamp all the way into the UV light. Fit cover. Fold back the UV-lamp and snap into the upper support.
The safety switch is operated.
Close device door and insert drip pan. Insert the mains plug into the socket. Set the appliance switch to "I".
Emptying the drip pan
As soon as the drip pan has reached its maximum filling level, the LED of the button for unchilled water starts flashing blue.
Remove the drip pan. Empty the drip pan. Check drip pan for soiling and clean as necessary. Insert drip pan. The device is ready for operation again. The selection water types is shown on the display.
Emptying the can (option)
As soon as the can has reached its maximum filling level, the LED of the button for chilled water starts flashing blue. Open the door on the support leg.
1 Cap with filling level sensor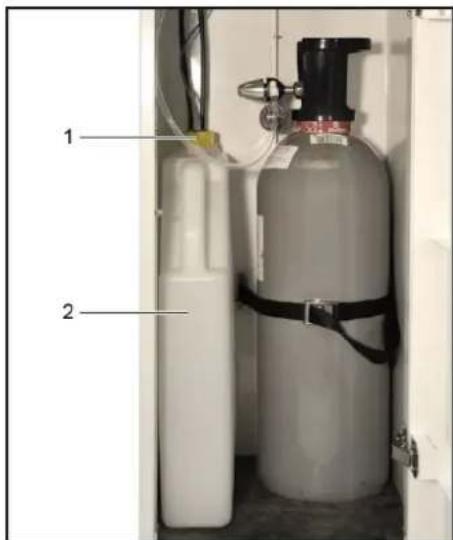
2 Can
Unscrew the locking cover. Remove cap with filling level sensor. Remove and empty can. Reinsert the can. Fit cap with filling level sensor and tighten. Close the door of the base.
All LEDs are blue.
The device is ready for operation again.
General Information on handling CO2 bottles
When replacing CO2 bottles, the safety instructions of the gas supplier and any statutory regulations must be observed.
The CO2 bottle must be equipped with a pressure reducer approved by Karcher, so that the level of carbonation of the water can be adjusted. The food gas carbon dioxide E 290 must comply with the purity requirements as per directive 96/77/EG and must be marked as per Art. 7 of the directive 89/107/EWG. Prior to using a gas bottle, one has to make sure that the correct gas type has been provided. Only the hazardous goods label, which must be present on all gas bottles, can be considered reliable information about the type of gas. The colour of the gas bottle does not always provide clear information regarding the gas type. A gas bottle whose content is questionable or which is abnormal in any other way (damage, fire damage, signs of mechanical tampering), must not be used. Please adhere to country-specific regulations. DANGER
Risk of explosion!
Do not use CO2 bottle with riser. Riser bottles are, for example, marked with a red warning label. Mortal danger due to possibly bursting CO2 gas tank. Install and fasten the pressure gas container in an upright position. Never connect the pressure gas container without pressure reducer and safety valve. The pressure reducer with safety valve must be approved for the device type.
Risk of suffocation on account of escaping carbon dioxide.
The installation room must be aerated and ventilated sufficiently or if a suitable gas warning system must be installed. Do not expose the gas cylinder to direct sunlight. The gas cylinder must be protected against excessive heating.
Attach visible marking that points out the potential presence of gaseous CO2.

Replacing the CO2 bottle
Prompt to replace the CO2 bottle:
| WPD 100 | none |
| WPD 200 | Button for carbonated water deactivated |
| WPD 600 | LED for carbonated water flashes |
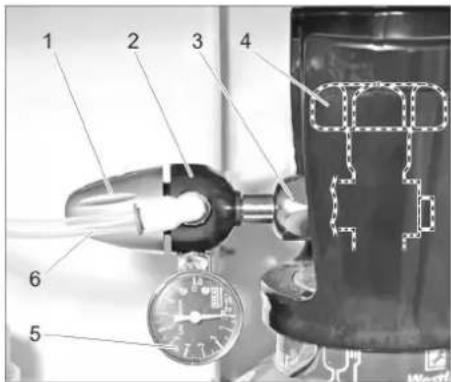
1 Rotating regulator 2 Pressure reducer 3 Union joint 4 Main tap 5 Pressure gauge control pressure 6 CO2 hose
Open the door on the support leg. Close the gas bottle at the main tap. Turn the pressure regulator to 0. Unscrew the pressure reducer from the empty gas bottle. Screw the protective cap onto the empty gas bottle. Loosen the tie down strap for securing the CO2 bottle. Remove the empty gas bottle. Insert the new gas bottle in the base and secure it by means of the tie down strap. Unscrew the protective cap from the new gas bottle. Briefly open the main tap so that possibly present, liquid CO2 can escape. Screw the pressure reducer onto the new gas bottle. Watch for correct mounting of the sealing ring! Slowly open the main tap on the gas bottle. Set 3 bar on the pressure reducer by means of the control knob. Close the main tap on the gas bottle. Read the value indicated on the pressure gauge control pressure. The indicated value must remain constant for at least 5 minutes. With detectable pressure reduction: Check if the O-ring between the gas cylinder and the pressure reducer is present and free of damage. Replace defective O-ring. Check the correct positioning of the pressure reducer.
Tighten covering nut firmly.
Check the hose coupling on the pressure reducer and the CO2 hose for visible damage. In case of doubt, call the Customer Service.
If the pressure reduction cannot be remedied by the stated measures, the pressure reducer is defective and must be replaced. Open main tap. Set the operating pressure on the pressure reducer by means of the control knob.
WPD 100: Presetting 4 bar, re-adjustable if necessary.
WPD 200/600: Set the CO2 pressure regulator to approx. 3 bar (static) prior to the dispensing of water and then check if the pressure is approx. 3.0 bar during the dispensing of carbonated water (sparkling).
Close the door of the base. Place a receptacle underneath the water outlet. WPD 200/600 only: After replacing the CO2 bottle, dispense one litre of "sparkling water" so that the CO2 mixer fills up again.
Note:
| Water stream splashes strongly | Water mildly carbon-ated | |
| WPD 100 | Lower CO2 pressure | Increase CO2 pressure |
| WPD 200 | Check CO2 pressure. | |
| WPD 600 | Adjust the switching lever (see "Initial start-up/Setting the switching lever"). |
Note:
If the pressure reducer is separated from the CO2 bottle although there is still sufficient pressure, the O-ring between the bottle and the pressure reducer is deformed and must be replaced.
Replacing the 425g CO2 bottle
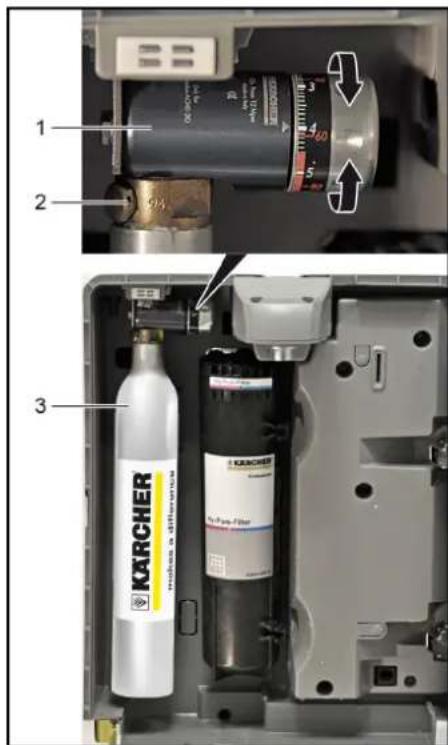
1 Pressure regulator
2 Screw connection of the bottle
3425gCO 2 bottle
Turn the pressure regulator to "OFF". Remove the drip pan and open the device door. Unscrew the 425g CO2 bottle from the bottle screw connection. Remove the 425g CO2 bottle. Remove the cover of the new CO2 bottle. Screw the 425g CO2 bottle onto the bottle screw connection of the pressure regulator. If resistance is felt, turn the 425g CO2 bottle slightly further until it is tightened. A short hissing noise may be audible. Pre-set the pressure regulator to "4". Close the device door and insert the drip pan. After initial startup, readjust the pressure on the pressure regulator to achieve the desired CO2 concentration in the water.
Note:
| Water stream splashes strongly | Water mildly carbonated |
| Lower CO2 pressure Increase | CO2pressure |
Note:
425 g CO2 bottles are available in drug stores, electronics stores, and supermarkets.
Consumables
| Description Description Order No. | ||
| Replacement filter Active pure filter | Removal of negative taste or odour producing substances (e.g. chlorine), retention of heavy metals and contamination from the supply line system. | 8.643-305.0 |
| Replacement filter Hy-ProTECT-Filter | Protection from viruses and bacteria. 2.643-306.0 | |
| Replacement filter Hy-Pure filter | Combination of Active-Pure and Hy-ProTECT filter. 2.643-307.0 | |
| UV-lamp OSRAM GERMICIDAL PURITEC HNS G5 11W replacement lamp 6.640-634.0 | ||
| O-ring 11.91 x 2.6 KTW Seal of the pressure reducer on the screw connection of the bottle. 6.640-731.0 | ||
Detergent for chemical cleaning
| Description Description Order No. | ||
| Bevi tabs alkaline | Chemical detergent for semi-annual internal cleaning of the WPDs, packaging unit 1x 10 tabs | 6.295-891.0 |
| Service Cartridge WPD Range | Auxiliary equipment for carrying out the chemical cleaning. 2.643-308.0 | |
Detergent for exterior cleaning of the device Accessories
| Description Description Order No. | ||
| CA 30 R | Ready-to-use surface cleaner for normal contaminations, 0.5 l bottle without spray head (to be ordered separately) | 6.295-686.0 |
| Spray head for CA 30 R | With the initial order of CA 30R this reusable spray head is required for the spray bottle. | 6.295-723.0 |
| RM 735 | Neutral disinfectant, 20 ml concentrate for 0.25 l disinfectant solution | 6.295-476.0 |
| Spray bottle is empty | For the mixing and application of the RM 735 disinfectant solution, 0.25 l content | 6.295-575.0 |
Support leg
| Description | Order No. |
| Base white | 2.643-266.0 |
| Base black | 2.643-267.0 |
| Attachment kit for cup dispenser cover | 2.643-785.0 |
Rinse cup
| Description | Order No. |
| Rinsing cup 4 l | 6.640-341.0 |
Spare parts
| Description | Order No. |
| Pressure reducer 1.5 - 6 bar - 1/2 | 6.640-625.0 |
| Touch-up pen signal white RAL 9003 | 6.640-326.0 |
| Cover water connection WPD white | 5.640-407.0 |
| Cover water connection WPD black | 5.640-618.0 |
| WPD dripping pan plate | 5.640-599.0 |
Bottles
| Description | Order No. | |
| Bottle 0.5 l, made of Tri- tan, dishwasher-safe | 6.640-430.0 | |
| Bottle 0.75 l, made of Tri- tan, dishwasher-safe | 6.640-512.0 | |
| Bottle 0.6 l with mouth- piece and lid made of Tritan, dishwasher-safe | 6.640-469.0 |
Cup
| Description | Order No. |
| Plastic cup, 200 ml, without logo, 3,000 pieces | 6.640-454.0 |
| Plastic cup, 200 ml, with KÄRCHER logo, 3,000 pieces | 6.640-453.0 |
| Hard paper cup, also for hot beverages, 180 ml, without logo, 2,500 pieces | 6.640-455.0 |
| Hard paper cup, also for hot beverages, 180 ml, with KÄRCHER logo, 2,500 pieces | 6.640-460.0 |
Pitchers
| Description | Order No. | |
| Water pitcher, 1 l, glass, with plastic lid and KÜRCHER logo, dishwasher-safe | 6.640-431.0 | |
| Decanter Eva Solo, 1 l, dishwasher-safe. | 0.017-575.0 |
Installation material
| Description | Order No. |
| Fault current protective switch 30mA, 230 V, 50 Hz | 6.640-427.0 |
| Check-valve | 4.640-463.0 |
| Aquastop, leakage water indicator with solenoid valve and brass screw connection G 3/4" | 6.640-291.0 |
| Water block, flooding fuse | 6.640-338.0 |
| Attachment kit additional weight for base WPD | 2.643-474.0 |
| Attachment kit floor fixing WPD | 2.643-483.0 |
Troubleshooting
△WARNING
Health hazards due to improperly repaired appliance. The appliance may only be repaired by trained and skilled personnel.
Before doing any work on the machine:
Set the appliance switch to "0". Pull out the mains plug. Shut off water supply.
Indicator lamps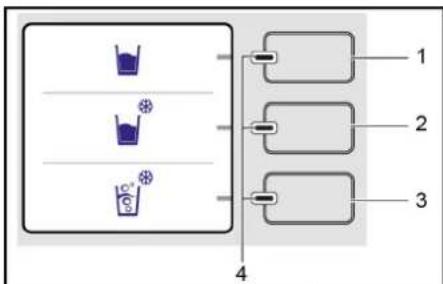
1 Button for unchilled water 2 Button for chilled water 3 Button for carbonated water (optional) or dummy button 4 LEDs blue and red
| Faults / display Possible cause Remedy | |||
| LED of the button for unchilled water is flashing blue. Drip pan full Empty the drip pan. | |||
| LED of the button for chilled water is flashing blue. Can full Empty can. | |||
| No CO2in the water (WPD 100 only). CO | 2 pressure set to low. Increase CO | 2 pressure until the result is satisfactory. | |
| Not WPD 100 | Button for carbonated water deactivated. CO | 2 bottle empty. Replace the CO | 2 bottle. |
| LED of the button for carbonated water is red. | Level sensor carbonator defective. | Set the appliance switch to "0". Restart the device after approx. 5 minutes.If it is occurs again, contact service. | |
| No CO2in the water, button for carbonated water not blocked | CO2bottle almost empty. Open the door | on the support leg.Observe the pressure gauge during dispensing of carbonated water. If the pressure falls significantly, replace the CO2bottle. | |
| No CO2in the water after chemical cleaning. | Discard 1 litre of "sparkling water" after chemical cleaning. | ||
| Appliance does not dispense water, but shows "Ready". All LEDs are blue. | Water supply interrupted. | Ensure adequate water supply, check locking devices.If the fault persists, contact customer service. | |
| The device does not function / none of the LEDs is on or flashing. | Voltage supply is interrupted. | Insert the mains plug into the socket. | |
| The appliance is switched off. | Set the appliance switch to "1". | ||
| Blown fuse. | Pull out the fuse holder next to the power switch, replace fuse with fuse of same rating.If the fuse blows again, switch off the device and call Service. | ||
| LED of the button for unchilled water is flashing red and blue continuously. | Cooling module 1 in the device defective. | Set the appliance switch to "0".Inform service. | |
| LED of the button for chilled water is flashing red and blue at the same time. | Temperature cooling module 1 too low. | Set the appliance switch to "0".Inform service. | |
| LED of the button for chilled water is alternatingly flashing red and blue. | Temperature cooling module 2 too low. | Set the appliance switch to "0".Inform service. | |
| All red and blue LEDs are on. | Electronics error. | Inform service. | |
| Malfunction of control panel (buttons) after fluid has entered from above | Tipped over receptacle on top of the appliance. | Set the appliance switch to "0".Restart the device after 12 hours.If it is occurs again, contact service. | |
| Poor water drain from the drip pan (only devices with drain in the sewage line) | Missing trap. | Install trap. | |
| Height difference between drip pan and sewage line to low. | Increase height difference. | ||
| Poor water drain from the drip pan (only devices with drain in the sewage line or can) | Drip pan drain or drain hose soiled. | Clean drip pan, clean drain hose. | |
| Malfunction during chemical cleaning:All LEDs are on red and interval tone sounds. | Power failure, power switch set to "0". | Chemical cleaning was interrupted and the program jumps automatically to the start of the rinsing cycleCarry out entire rinsing cycle (see "Care and Maintenance/Rinsing after chemical cleaning").Restart chemical cleaning (see "Care and Maintenance/Chemical cleaning"). | |
| Filling level sensor for the can (option) in the base has responded. | Emptying the can (see "Care and Maintenance/Empting the can (option)").Chemical cleaning was interrupted and the program jumps automatically to the start of the rinsing cycleCarry out entire rinsing cycle (see "Care and Maintenance/Rinsing after chemical cleaning").Restart chemical cleaning (see "Care and Maintenance/Chemical cleaning"). | ||
Technical specifications
| WPD 100 WPD 200 WPD 600 | |||
| Operating voltage V/~/Hz 220...240/1/50 | |||
| Connection output max. W 300 300 600 | |||
| Minimum power protection A10 | |||
| Water flow pressure MPa (bar) 0,15...0,6 (1,5...6) | |||
| Water supply temperature °C +4...+35 | |||
| Water dispensed, max. l/min 2 | |||
| Temperature of chilled water * | °C | 8 | |
| Setting of CO2 pressure | Presetting 4 bar Re-adjustable | Presetting 3.0 bar during dispensing of water 2.8...3.2 bar | |
| Ambient temperature | °C +5...+35 | ||
| Width | mm | 365 | |
| Depth | mm | 530 | |
| Depth with water connection | mm | 600 | |
| Height without support leg | mm | 465 | |
| Height with support leg | mm | 1432 | |
| Weight | |||
| without base | kg | 30 | 35 |
| with base | kg | 45 | 50 |
| Sound pressure level during normal operation | dB(A) | <60 | |
| *Factory setting, can be changed only by customer service. Minimum temperature 4°C. | |||
| Hy-ProTECT-Filter | Active pure filter | Hy-Pure filter | |
| max. permissible media temperature | + 80°C | + 35°C | + 80°C |
| max. permissible operating pressure | 0.6 MPa (6 bar) | ||
| max. flow performance | 120 l/h | ||
| max. capacity | 10,000 litres | 10,000 litres | 2,500 litres |
| Materials / approvals | All water-bearing parts/components are suited and approved for the use in direct contact with drinking water as mandated by the industry standard.The device was certified for food grade by the Institut Fresenius and meets the requirements of the mineral and table water regulations. | ||
Spare parts
Only use original accessories and spare parts, they ensure the safe and trouble-free operation of the device. For information about accessories and spare parts, please visit www.kaercher.com.
Warranty
The warranty terms published by the relevant sales company are applicable in each country. We will repair potential failures of your appliance within the warranty period free of charge, provided that such failure is caused by faulty material or defects in manufacturing. In the event of a warranty claim please contact your dealer or the nearest authorized Customer Service centre. Please submit the proof of purchase.
EU Declaration of Conformity
We hereby declare that the machine described below complies with the relevant basic safety and health requirements of the EU Directives, both in its basic design and construction as well as in the version put into circulation by us. This declaration shall cease to be valid if the machine is modified without our prior approval.
Product: Water Dispenser WPD
Type: 1.024-xxx
Relevant EU Directives
2006/95/EEC
2014/30/EU
2011/65/EU
Applied harmonized standards
EN 55014-1:2006+A1:2009+A2:2011
EN 55014-2:2015
EN 60335-1
EN60335-2-75
EN 61000-3-2: 2014
EN 61000-3-3:2013
EN 62233:2008
EN 50581
Applied national standards
Applied regulations
1935/2004
10/2011
The signatories act on behalf of and with the authority of the company management.
Documentation supervisor: S. Reiser
Alfred Karcher SE & Co. KG
71364 Winnenden (Germany)
Tel.: +49 7195 14-0
Fax: +49 7195 14-2212
Winnenden, 2018/07/01
| Maintenance sheet WPD 100 / 200 / 600 | ||||||||||
| Appliance: Installation site: | ||||||||||
| Appliance type: Installation date: | ||||||||||
| Serial number: Installed by: | ||||||||||
| The operator was informed that the water quality must be checked on a regular basis to comply with the national and local regulations. The operator was informed that he is responsible for the performance of regular maintenance procedures according to the "maintenance schedule".Signature of service technician Place, Date Signature of customer | ||||||||||
| Date | Technician | Operating hours | Filter replacement | Other parts UV-Protect | Chemical cleaning | Remarks | Signature Technician | |||
| Hy Protect* | Active Pure* | Hy-Pure* | ||||||||
Table of contents
Table of contents FR 1
Safety FR 1
www.kaercher.com/REACH
General instructions
Support foot (option)
Chairman of the Board of Management
S. Reiser Director Regulatory Affairs & Certification
Responsible for documentation:
S. Reiser
Alfred Karcher SE & Co. KG
71364 Winnenden (Germany)
Tel.: +49 7195 14-0
Fax: +49 7195 14-2212
Winnenden, 2018/07/01
www.kaercher.com/REACH
General warnings
Chairman of the Board of Management
S. Reiser Director Regulatory Affairs & Certification
71364 Winnenden (Germany)
Tel.: +49 7195 14-0
Fax: +49 7195 14-2212
Winnenden, 2018/07/01
Product: Waterdispenser
WPD
Type: 1.024-xxx
Chairman of the Board of Management
S. Reiser Director Regulatory Affairs & Certification
71364 Winnenden (Germany)
Tel.: +49 7195 14-0
Fax: +49 7195 14-2212
Winnenden, 2018/07/01
www.kaercher.com/REACH
Chairman of the Board of Management
S. Reiser Director Regulatory Affairs & Certification
Documentation responsible:
S. Reiser
Alfred Karcher SE & Co. KG
Alfred-Karcher-StraBe 28-40
71364 Winnenden (Germany)
Tel.: +49 7195 14-0
Fax: +49 7195 14-2212
Winnenden, 2018/07/01
www.kaercher.com/REACH
General instructions
71364 Winnenden (Germany)
Tel.: +49 7195 14-0
Fax: +49 7195 14-2212
Winnenden, 2018/07/01
Dosage: 4 cleaning tablets.
NOTE
Release the button to stop.
The required rinse quantity is reached when the water drain stops automatically and the next button flashes blue.
Place the rinse cup (order number 6.640-341.0) under the water outlet. Press the button for cold water. The water drain can be stopped at any time. The rinse process lasts a total of 2.5 minutes. Empty the rinse cup and place it back under the water outlet. Press the button for cold water. The water drain can be stopped at any time. The rinse process lasts a total of 2.5 minutes. Empty the rinse cup and place it back under the water outlet. Press the button for carbonated water (option). The water drain can be stopped at any time. The rinse process lasts a total of 2.5 minutes.
When the rinse process is finished, all LED lamps light up red.
The new filter is rinsed.
Chairman of the Board of Management
S. Reiser
Director Regulatory Affairs & Certification
71364 Winnenden (Germany)
Tel.: +49 7195 14-0
Fax: +49 7195 14-2212
Winnenden, 2018/07/01
Insert the CO2 cylinder.
Note:
- Holder 2 Gasket 3 Filter 4 Handle a Remove filter b Insert filter
71364 Winnenden (Germany)
Tel.: +49 7195 14-0
Fax: +49 7195 14-2212
Winnenden, 2018/07/01
Commissioning after storage SV 4
Storage SV 4
1 RESET button 2 Service interface
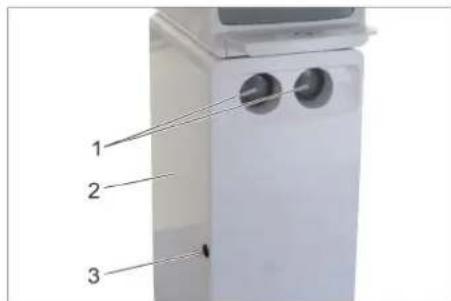
Foot (optional)
1 Cup holder 2 Door foot 3 Door lock
Water outlet
Commissioning after storage
Chairman of the Board of Management
S. Reiser
Director Regulatory Affairs & Certification
Authorized for documentation:
S. Reiser
Alfred Karcher SE & Co. KG
71364 Winnenden (Germany)
Tel.: +49 7195 14-0
Fax: +49 7195 14-2212
Winnenden, 2018/07/01
www.kaercher.com/REACH
General instructions
Chairman of the Board of Management
S. Reiser
Director Regulatory Affairs & Certification
71364 Winnenden (Germany)
Tel.: +49 7195 14-0
Fax: +49 7195 14-2212
Winnenden, 2018/07/01
http://www.kaercher.com/dealersearch
- WPD 100/200/600 BASIC
- CONTENTS
- SAFETY
- DANGER OR HAZARD LEVELS
- DANGER
- WARNING
- CAUTION
- ATTENTION
- SAFETY INSTRUCTIONS
- △WARNING
- ENVIRONMENTAL PROTECTION
- GENERAL NOTES
- TRANSPORT
- PROPER USE
- FUNCTION
- CONNECTING THE APPLIANCE
- PRECONDITIONS
- △DANGER
- ESTABLISHING CONNECTION
- DEVICE WITHOUT DRIP PAN DRAIN
- DEVICE WITHOUT BASE, WITH DRIP PAN DRAIN
- DEVICE WITH BASE AND DRIP PAN DRAIN
- ALL DEVICE DESIGNS
- START UP
- OPEN THE DEVICE DOOR
- INSERT FILTER
- OPEN THE DOOR OF THE BASE
- INSERT THE CO2 BOTTLE
- NOTE
- INSERTING THE 425G CO2 BOTTLE
- INITIAL STARTUP
- WPD 200/600 ONLY: ADJUSTING THE COMPENSATION REGULATOR
- OPERATION
- OPERATOR AND DISPLAY ELEMENTS
- WATER DISPENSER
- SHUTDOWN
- STARTUP AFTER SHUTDOWN
- STORAGE
- MAINTENANCE INSTRUCTIONS
- △ WARNING
- MAINTENANCE CONTRACT
- CLEANING INLET SIEVE
- CHEMICAL CLEANING RINSING AFTER
- SAMPLING
- INSTALLING/REMOVING FILTER
- UNINSTALLING AND INSTALLING THE UV-LAMP
- SAFETY BUTTON
- EMPTYING THE DRIP PAN
- EMPTYING THE CAN (OPTION)
- GENERAL INFORMATION ON HANDLING CO2 BOTTLES
- REPLACING THE CO2 BOTTLE
- REPLACING THE 425G CO2 BOTTLE
- TROUBLESHOOTING
- SPARE PARTS
- WARRANTY
- EU DECLARATION OF CONFORMITY
- RELEVANT EU DIRECTIVES
- APPLIED REGULATIONS
- TABLE OF CONTENTS
- GENERAL INSTRUCTIONS
- GENERAL WARNINGS
- INSERT THE CO2 CYLINDER
- WATER OUTLET
- COMMISSIONING AFTER STORAGE
Brand : Kärcher
Model : WPD 200 Basic
Category : Water dispenser