Motion All Size 360 - Car seat Silver Cross - Free user manual and instructions
Find the device manual for free Motion All Size 360 Silver Cross in PDF.
User questions about Motion All Size 360 Silver Cross
0 question about this device. Answer the ones you know or ask your own.
Ask a new question about this device
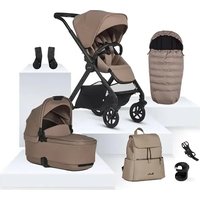
Download the instructions for your Car seat in PDF format for free! Find your manual Motion All Size 360 - Silver Cross and take your electronic device back in hand. On this page are published all the documents necessary for the use of your device. Motion All Size 360 by Silver Cross.
USER MANUAL Motion All Size 360 Silver Cross
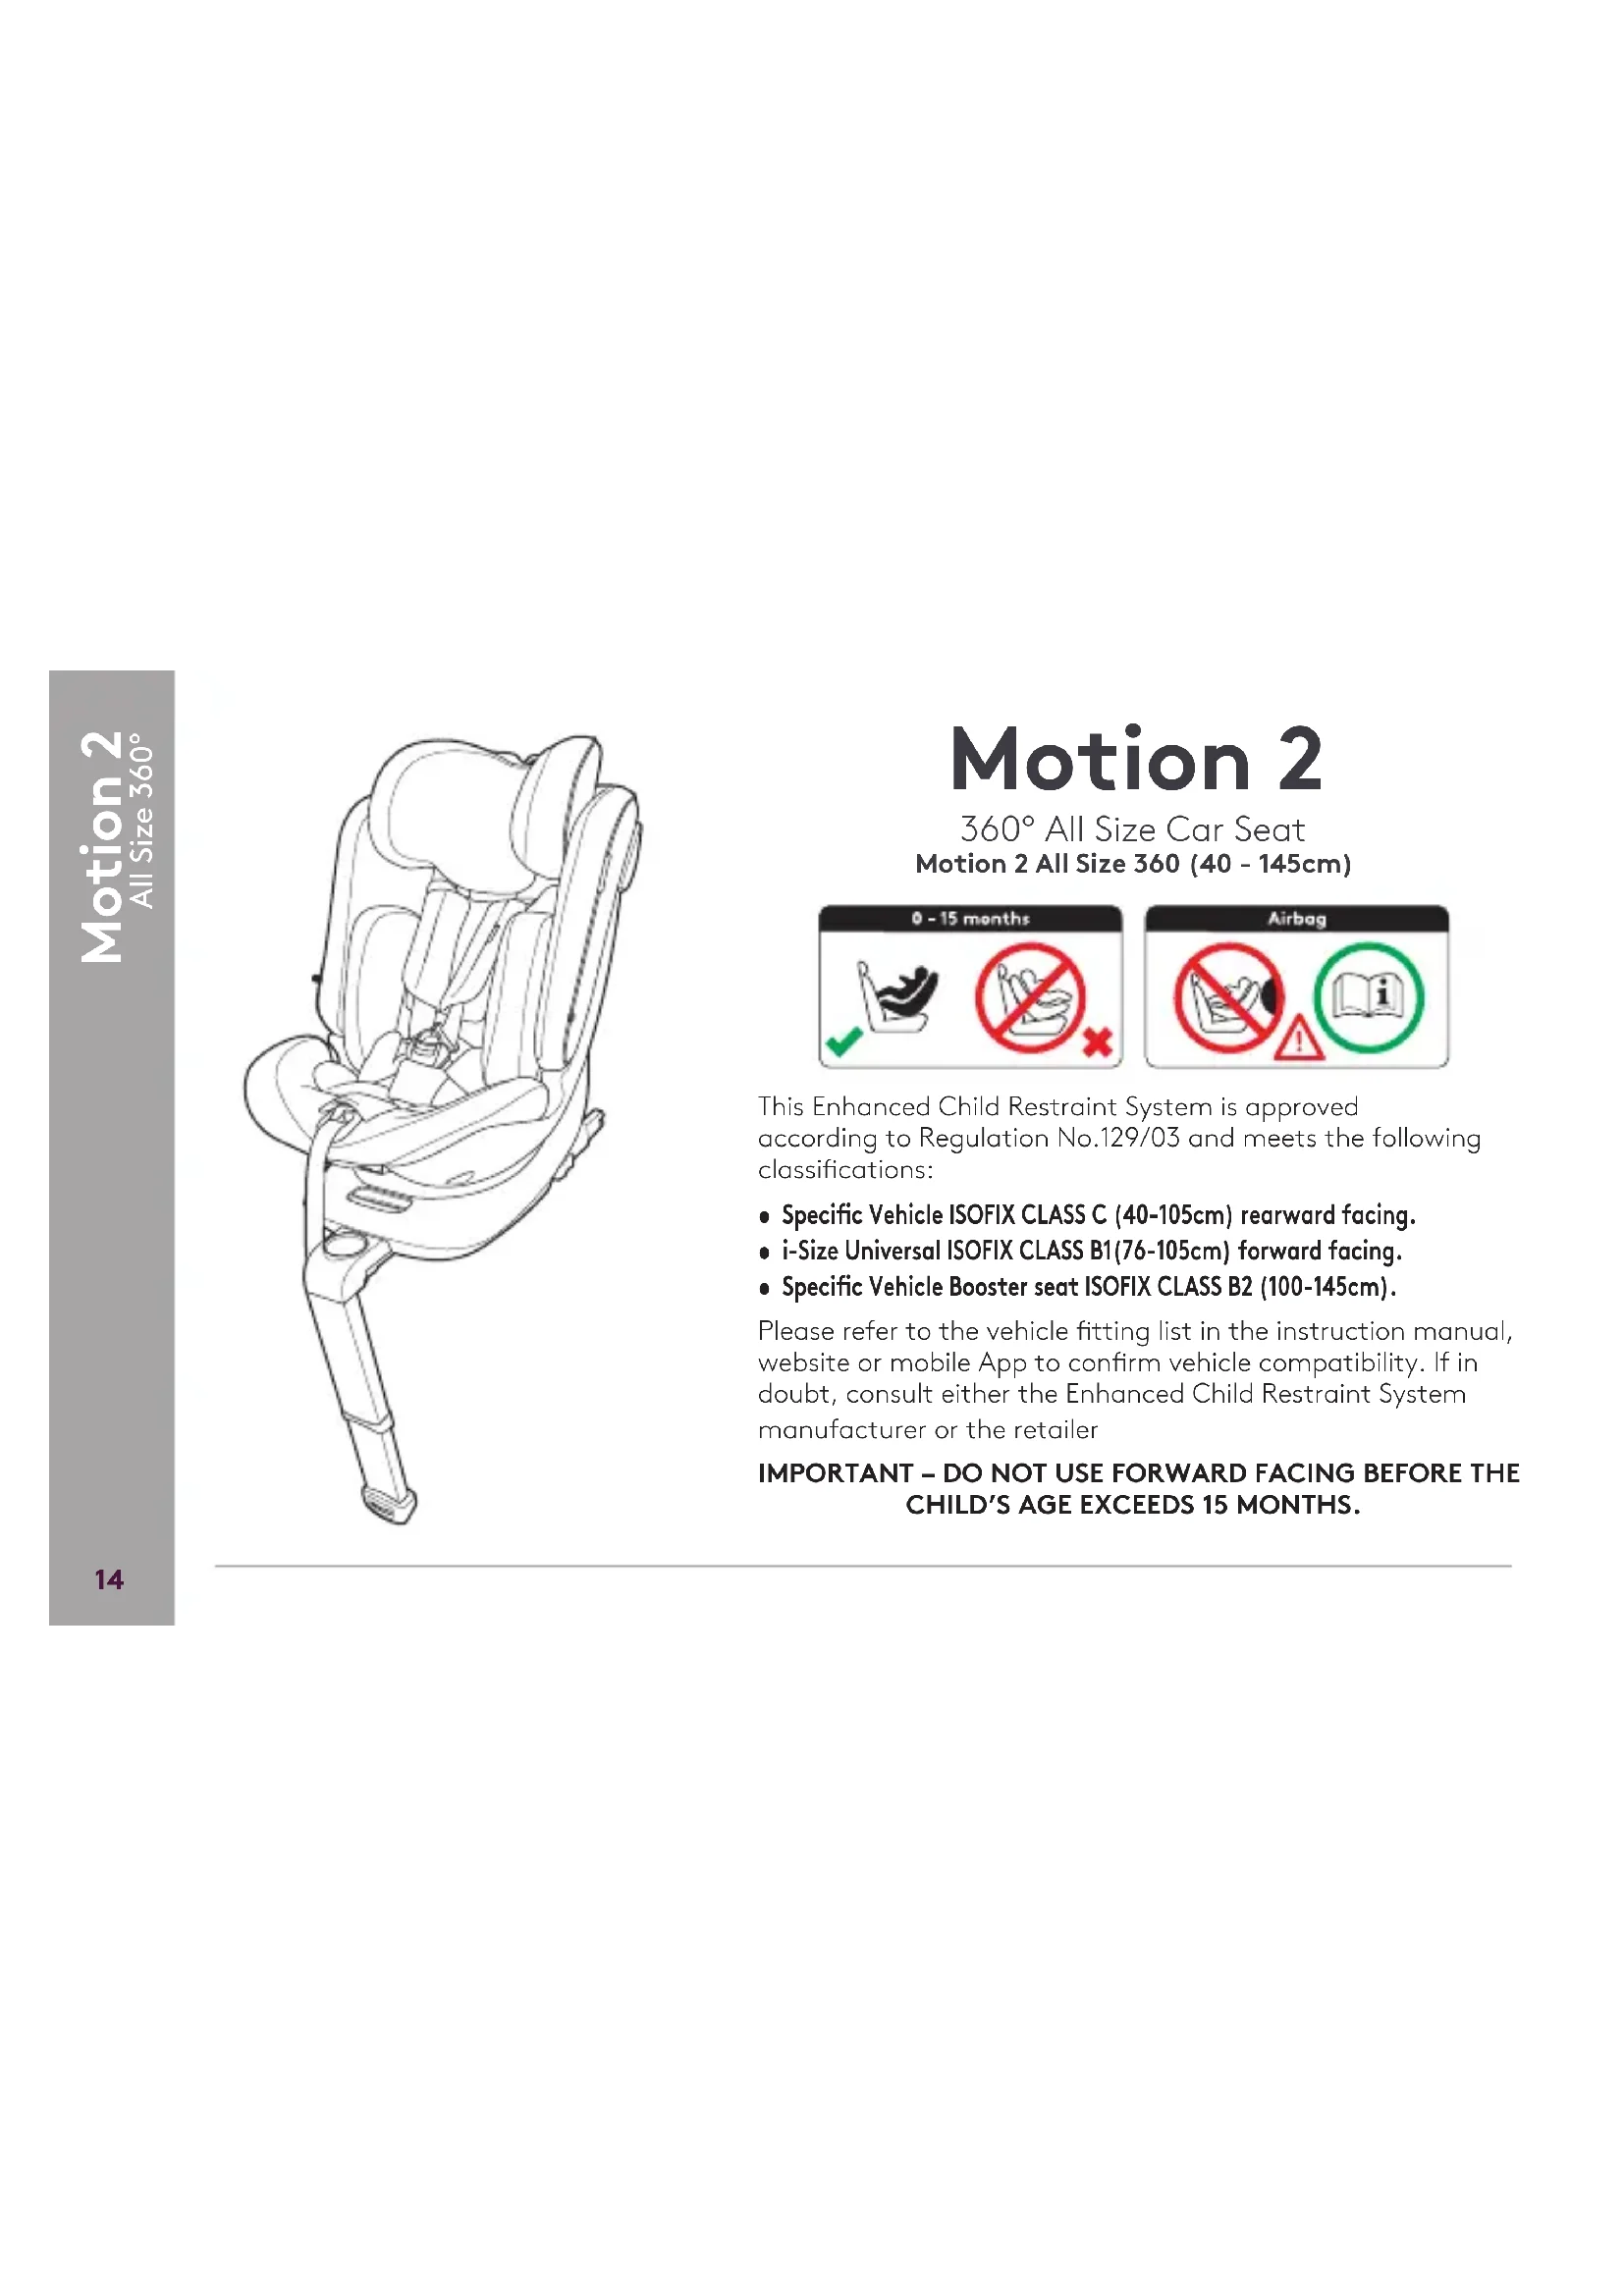
All Stage Rotating Car Seat
40cm - 145cm / Birth to approx 12 years

text_image
QR code image containing encoded data, no visible human-readable textIMPORTANT – READ THE INSTRUCTIONS CAREFULLY BEFORE USE AND KEEP FOR FUTURE REFERENCE

text_image
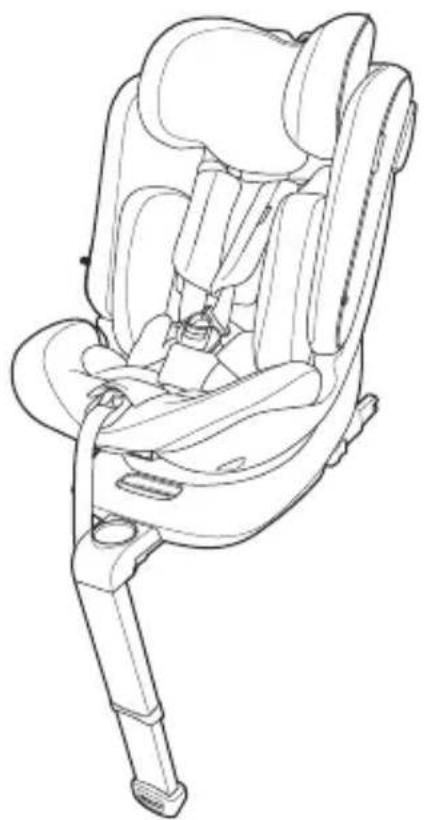
Technical diagram of a car comfort seat with numbered parts for identification1 Headrest adjustment handle
2 Headrest
3 Headrest belt guide
4 Side Protection System (SPS)
5 Rebound bar cover
6 5-point Safety Harness
7 Lap belt guide
8 Harness adjustment button
9 Recline button
10 Rotation button
11 ISOFIX connector arms
12 ISOFIX release button
13 ISOFIX connector arms extension paddle lever
14 Support leg adjustment button
15 Support leg
16 Support leg pressure indicator
17 Support leg buffer stop
18 Insert
19 Hydro Protect Liner
20 Plastic ISOFIX guides
21 ISOFIX Storage protector
FRA
natural_image
Illustration of a car seatbelt device with a purple arrow indicating left side (no text or symbols)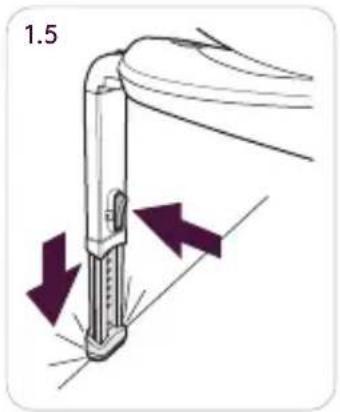
natural_image
Diagram of a mechanical device with directional arrows indicating motion or force (no text or symbols)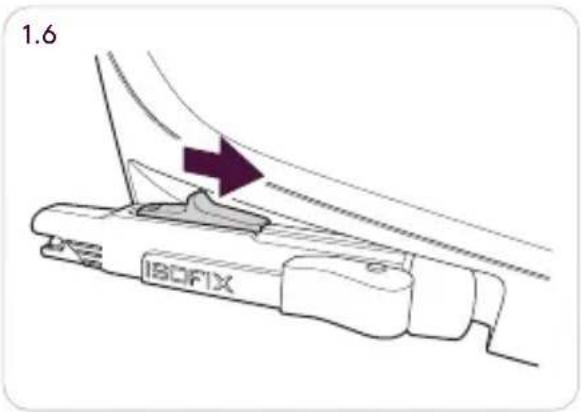
text_image
1.6 ISOFIX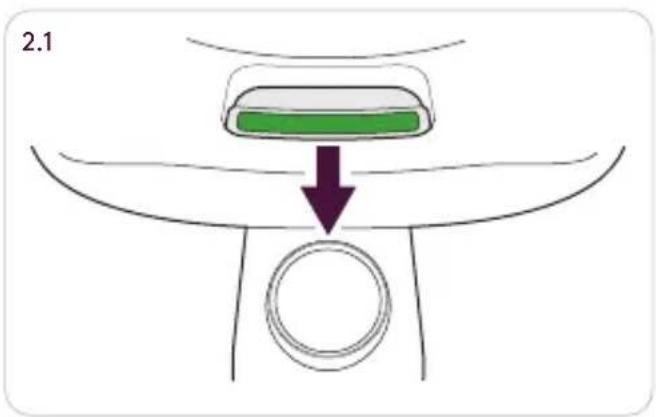
text_image
2.1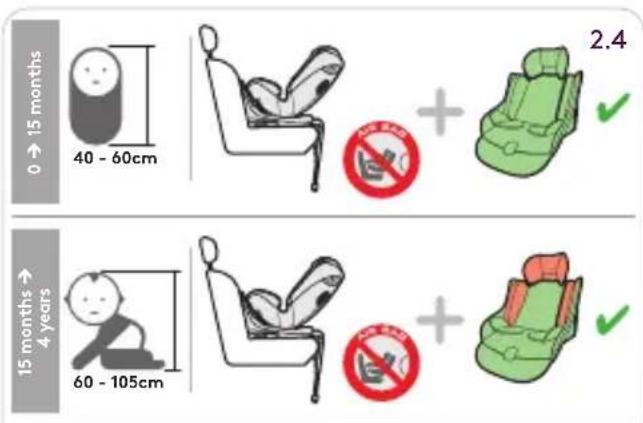
text_image
0 → 15 months 40 - 60cm 2.4 15 months → 4 years 60 - 105cm +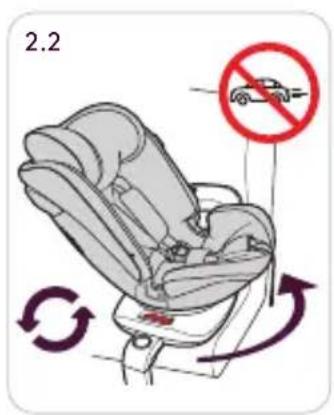
text_image
2.2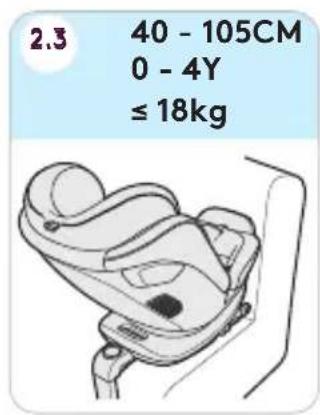
text_image
2.3 40 - 105CM 0 - 4Y ≤ 18kg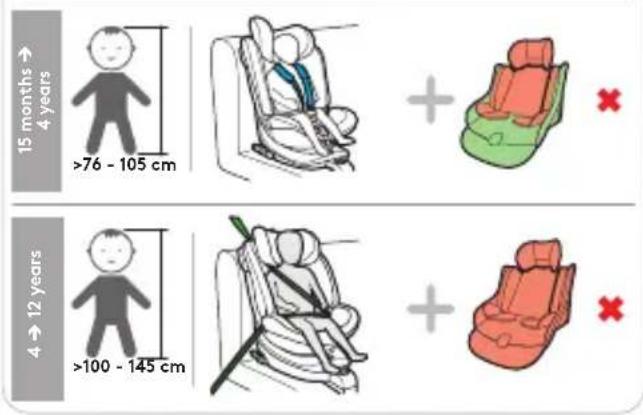
text_image
15 months 4 years >76 - 105 cm 4 → 12 years >100 - 145 cmsilvercrossbaby.com
text_image
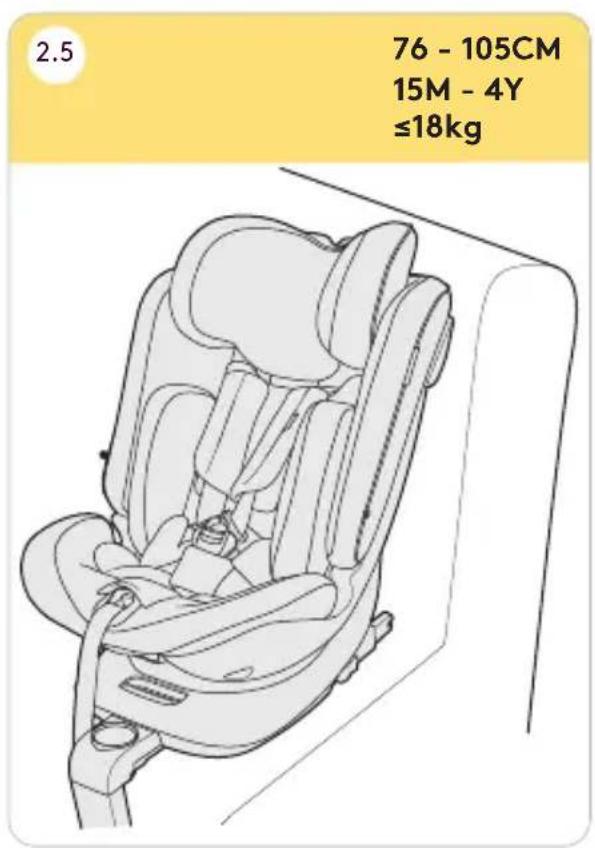
2.5 76 - 105CM 15M - 4Y ≤18kg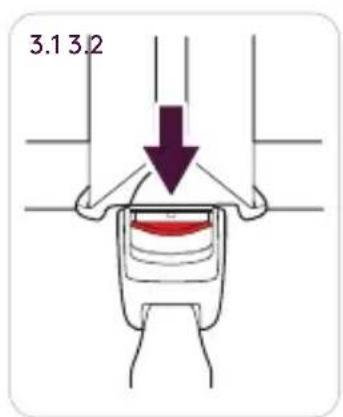
text_image
3.1 3.2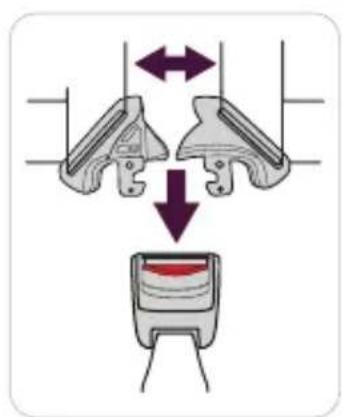
text_image
Diagram illustrating mechanical assembly or disassembly process with labeled arrows and a red component inside a device.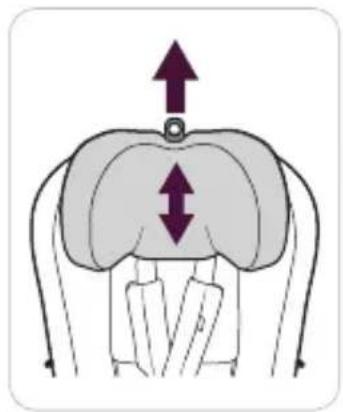
natural_image
Diagram of a human head with two upward arrows indicating pressure or movement, no text or symbols present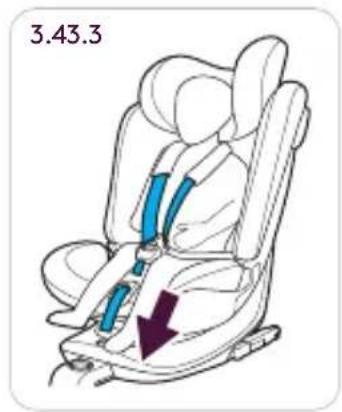
text_image
3.43.3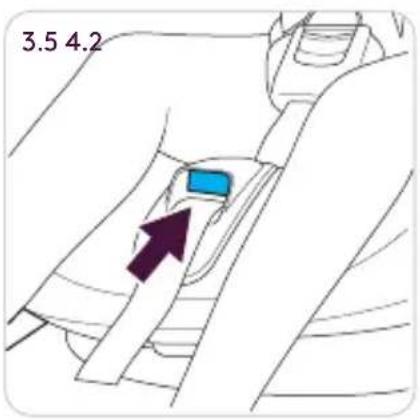
text_image
3.5 4.2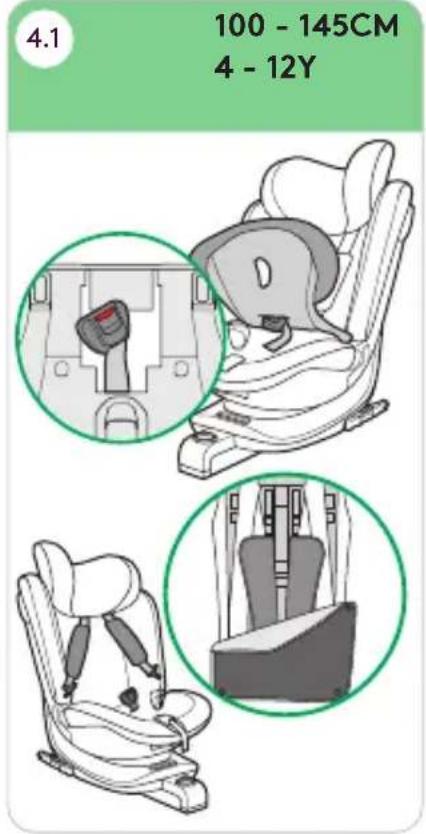
text_image
4.1 100 - 145CM 4 - 12Y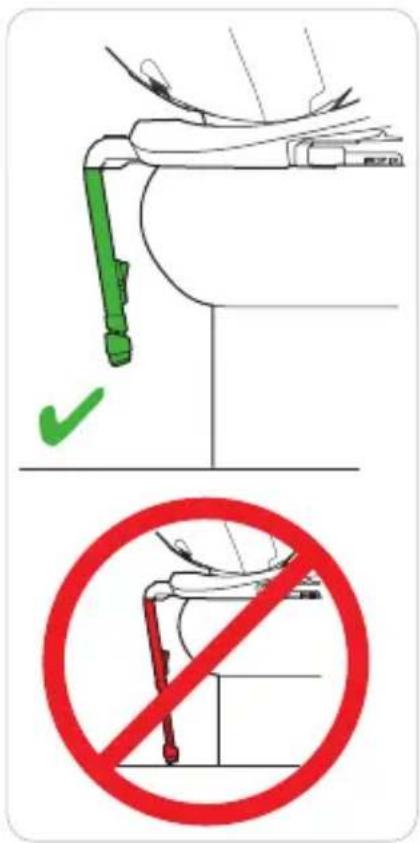
text_image
Safety instruction diagram showing correct and incorrect vehicle door placement rules with green checkmark and red prohibition symbolsilvercrossbaby.com
text_image
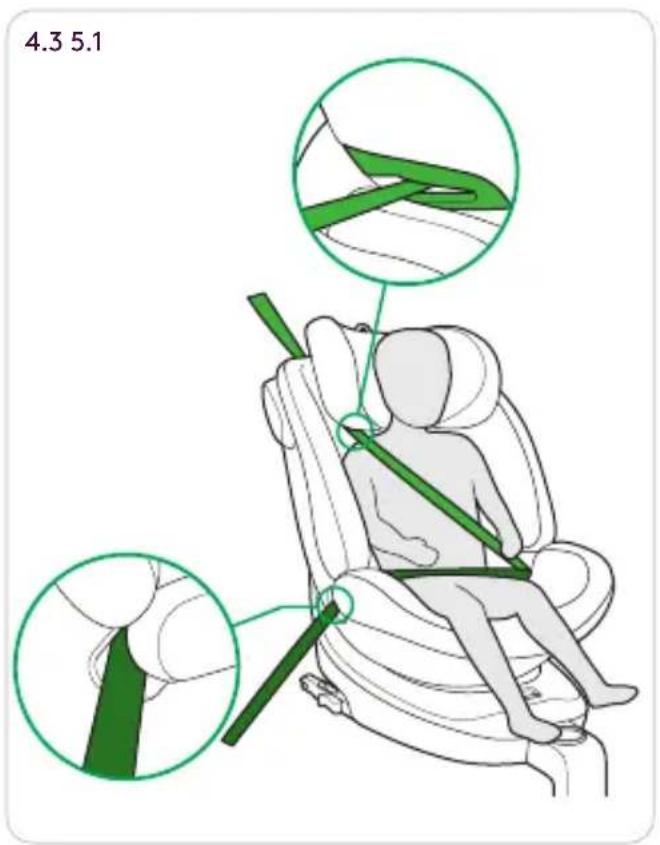
4.3 5.1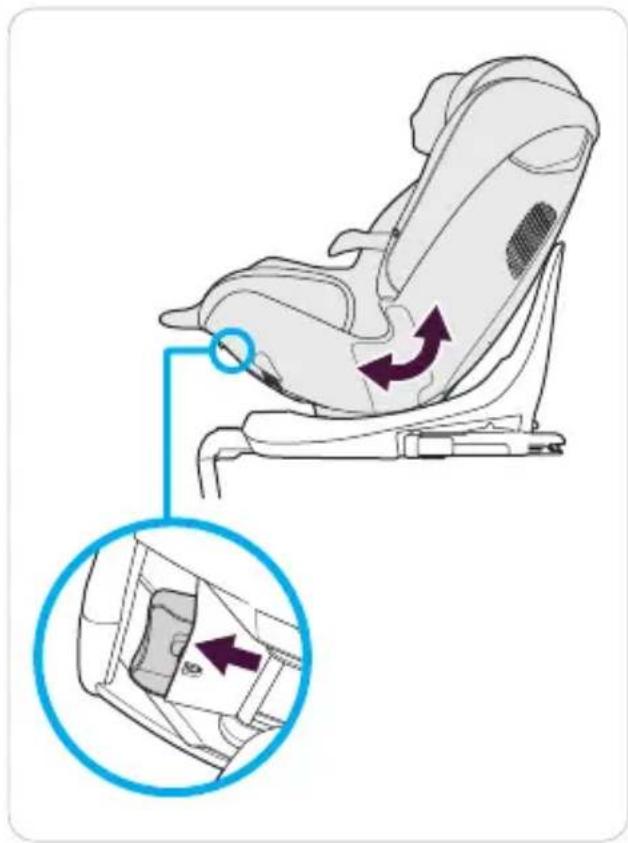
text_image
Diagram illustrating car seat assembly with directional arrows and a magnified inset showing internal components.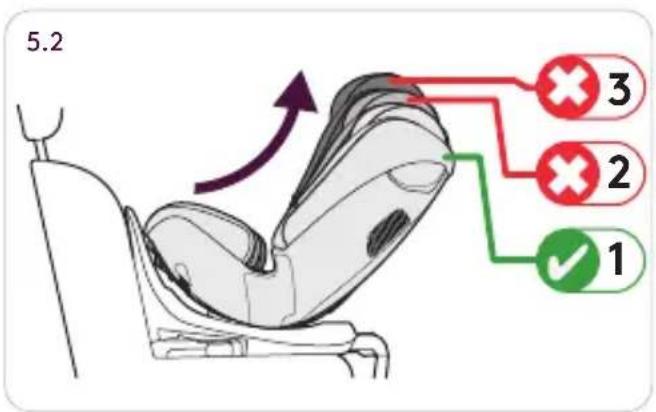
text_image
5.2 3 2 1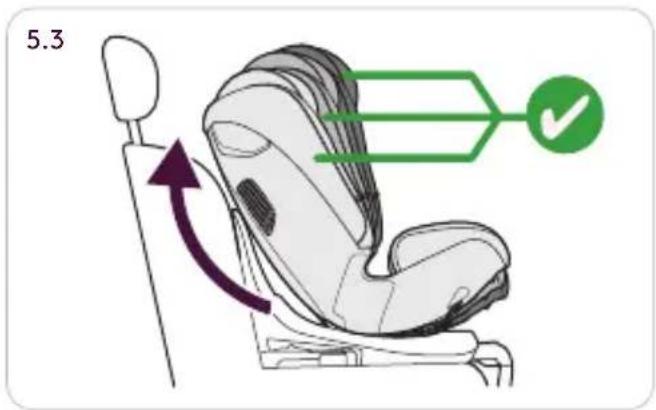
text_image
5.3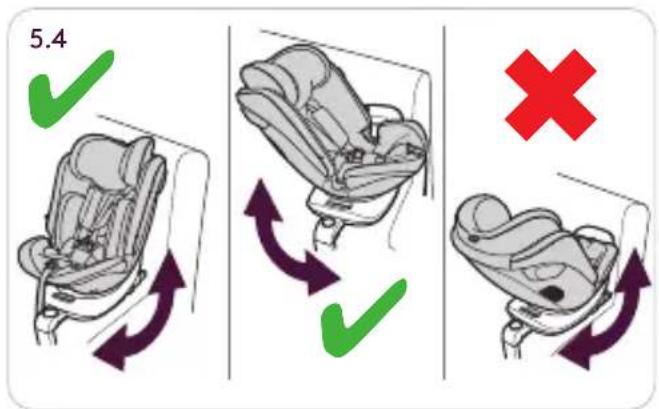
text_image
5.4 ✓ ✓ ✓ ✗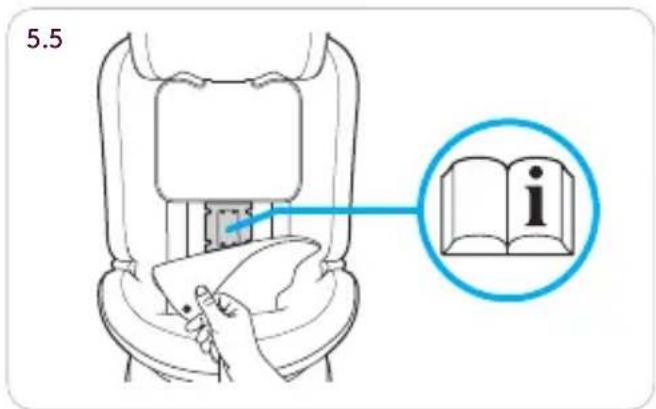
text_image
5.5 isilvercrossbaby.com
natural_image
Line drawing of a car seat assembly (no text or symbols)Motion 2
360° All Size Car Seat Motion 2 All Size 360 (40 - 145cm)

text_image
0 - 15 months ✓ No ×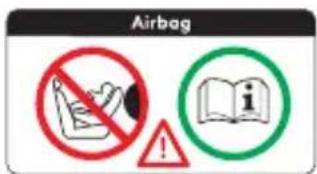
text_image
AirbagThis Enhanced Child Restraint System is approved according to Regulation No.129/03 and meets the following classifications:
- Specific Vehicle ISOFIX CLASS C (40-105cm) rearward facing.
- i-Size Universal ISOFIX CLASS B1(76-105cm) forward facing.
- Specific Vehicle Booster seat ISOFIX CLASS B2 (100-145cm).
Please refer to the vehicle fitting list in the instruction manual, website or mobile App to confirm vehicle compatibility. If in doubt, consult either the Enhanced Child Restraint System manufacturer or the retailer
IMPORTANT – DO NOT USE FORWARD FACING BEFORE THE CHILD'S AGE EXCEEDS 15 MONTHS.
INSTALLING THE CHILD SEAT
1.1 Unfold the support leg (15) until it is in the vertical position as shown.
1.2 Move the button (11) to slide the ISOFIX connector arms (9) backwards unfolding the connector fully. Do this for both connector arms.
1.3 Guide the connector arms towards the ISOFIX anchors in your vehicle until they lock together by clicking into place and the indicator changes from red to green on both sides of the base.
1.4 Move the seat backwards pressing the backrest against the vehicle seat. Then pull the safety seat towards you to check that it is securely locked in place.
1.5 Press the button (14) to adjust the height of the support leg (15) until it is firmly in contact with the floor. It should not be on top of any type of compartment. At this point make sure that the support leg is at 90 degrees to the safety seat.
The visual ISOFIX indicators show whether the connector is open or closed. It may be that the connector is closed but not locked into the ISOFIX anchor. Please check that all the connectors are correctly locked into the vehicle anchor points by pulling the seat once it is installed.
TO DETACH THE SEAT FOLLOW THE SAME STEPS IN REVERSE:
1.6 Move the button (12) to open the connector and release it from the anchor point.
silvercrossbaby.com
INSTALLING THE SEAT IN THE REAR FACING POSITION
FROM 40CM TO 105CM
NOTICE: DO NOT USE ON A PASSENGER SEAT FITTED WITH ACTIVATED FRONTAL AIRBAG.
2.1 Press the button (10) to turn the seat.
2.2 Turn the seat to the loading position ready for the child to be placed in it (Perpendicular to the forward facing position).
2.3 Rotate the seat in the rear facing position. It is important to check that the seat is firmly locked into place.
2.4 The cushion insert (18) is designed for use with newborn babies to give them greater comfort and stability, and offer them a more stretched out position. The insert can be used until the baby is 60cm or until they outgrow it.
INSTALLING THE SEAT IN THE FORWARD FACING POSITION
FROM 76CM TO 105CM
FROM 15 MONTHS OF AGE
2.1 Press the button (10) again to place the seat in the forward facing position. It is important to check that the seat is firmly locked into place.
STRAPPING THE CHILD INTO THE SEAT
3.1 Turn the seat to the loading position (2.2) and open the harness (6). Move the harness straps to the sides to place the child in the seat.
3.2 Place the straps over the child and fasten the buckle.
3.3 To adjust the headrest (2) pull the lever handle (1) on the top. It should be set to the right position, this means that the shoulder harness should come out approximately 1 cm above the child's shoulders.
3.4 Tighten the harness by pulling the strap (8), it should fit the child snugly.
5.1 Once the child is securely strapped in, you can recline the seat by pressing the button (9) to the required position.
GETTING THE CHILD OUT OF THE SEAT
To get the child out of the seat, you should first place the seat into the loading position (2.2).
3.5 Loosen the harness straps by pressing the adjustment button.
3.1 Then unfasten the buckle to remove the child.
Please make sure that the child gets out of the vehicle on the pavement side.
INSTALLING THE SEAT IN THE FORWARD FACING POSITION USING THE VEHICLES SAFETY BELT
FROM 100CM TO 145CM
STORING THE 5-POINT HARNESS:
Once the child reaches a weight of 18kg the 5-point safety harness should be stored away and the child should be secured with the vehicle safety belt.
4.1 To store the 5-point safety harness away it needs to be fully loosened first. Press the red release button and undo the harness. Lift the cover under the cushion and store the buckle parts in the compartment. Then put the cover back on the seat.
Open the flap on the back of the seat and stow the shoulder sections of the harness behind.
4.2 IMPORTANT: The support leg is not needed for the 100 - 145cm configuration, raise it so that it does not touch the floor of the vehicle.
STRAPPING THE CHILD INTO THE SEAT
4.3 With the child in the seat pull the seat belt around the front, locating it into both seat belt lap section guides (7). Pass the shoulder section through the diagonal section seat belt guide(3).
Fasten the seat belt buckle and pull the seat belt tight, removing any slack.
RECLINING THE CAR SEAT
5.1 The car seat has 3 recline positions to offer the best comfort.
To recline the seat pull the recline lever and pull the seat forward or backwards until reaching the required position.
When using the seat in the rearward facing position, from 40-105 cm.
5.2 The seat should be fully reclined before rotate to rearward facing, only the position 1 is allowed.
When use the seat in the forward facing position, from 76-145 cm.
5.3 Once the child is securely strapped in, you can recline the seat by pressing the button (9) to the required position, all the 3 positions are allowed.
5.4 You can adjust the angle of the seat when in the forward facing position
or when in the loading position. YOU CANNOT adjust the angle of the car seat when it is in the rearward facing position.
STORING YOUR INSTRUCTIONS
5.5 You can store the instructions in the recess in the car seats frame.
WARNINGS
READ THESE INSTRUCTIONS CAREFULLY. INCORRECT INSTALLATION OF THE CHILD RESTRAINT SYSTEM MAY CAUSE THE CHILD SERIOUS INJURY. IF USED INCORRECTLY, THE MANUFACTURER CANNOT BE HELD RESPONSIBLE.
YOUR CHILD'S SAFETY IS YOUR RESPONSIBILITY.
YOU CAN ONLY EXPECT THE MOTION 2 CAR SEAT TO PROVIDE MAXIMUM PROTECTION IF IT IS FITTED AND USED CORRECTLY AS PER THE MANUFACTURER'S INSTRUCTIONS.
THIS CHILD RESTRAINT SYSTEM HAS BEEN APPROVED UNDER REGULATION 129/03 FOR CHILDREN OF BETWEEN 40CM AND 145CM IN HEIGHTS.
DO NOT USE THE SEAT IN THE FORWARD FACING POSITION WITH CHILDREN UNDER 15 MONTHS OLD.
YOU ARE ADVISED TO USE THE REAR FACING POSITION FOR AS LONG AS POSSIBLE.
DO NOT LEAVE THE CHILD UNATTENDED IN THE VEHICLE.
WHEN INSTALLING THE SAFETY SEAT IN THE FORWARD FACING POSITION, IT IS ADVISABLE TO MOVE THE FRONT SEAT OF THE VEHICLE AS FAR FORWARD AS POSSIBLE.
KEEP THE CHILD RESTRAINT SYSTEM AWAY FROM CORROSIVE LIQUIDS, PAINTS OR SOLVENTS THAT COULD DAMAGE THE PRODUCT.
USE THE PLASTIC ISOFIX GUIDES PROVIDED WHEN NECESSARY.
SILVER CROSS CANNOT BE HELD RESPONSIBLE FOR DAMAGE OR MARKING TO VEHICLE SEAT UPHOLSTERY.
THE CHILD RESTRAINT SYSTEM SHOULD BE REPLACED AFTER AN ACCIDENT, EVEN IF THERE ARE NO VISIBLE SIGNS OF DAMAGE. THE PRODUCT MAY HAVE UNSEEN INTERNAL DAMAGE THAT COULD COMPROMISE THE CHILD'S SAFETY.
TAKE REGULAR BREAKS WHEN TRAVELING SO THE CHILD CAN GET OUT OF THE SEAT AND WALK ABOUT A BIT. IT IS NOT ADVISABLE TO TRAVEL FOR MORE THAN 2 HOURS AT A TIME WITHOUT TAKING A BREAK. THIS ADVISE IS VERY IMPORTANT FOR BABIES.
DO NOT PLACE THE FRONT SUPPORT LEG ON A FLOOR
STORAGE COMPARTMENT LID. THE FRONT SUPPORT LEG MUST MAKE FULL AND FIRM CONTACT WITH THE VEHICLE FLOOR WHEN USING THE SEAT IN THE 40-105CM CONFIGURATION.
There are 2 fastening points for the cover on the front. Unfasten these points and gently pull the front part of the cover.
There are plastic parts on the sides of the cover used to fasten it in place. Simply pull gently to remove the cover.
To fit the cover back on, follow the same steps in reverse. Insert the side parts in the slot.
CLEANING
The seat cover is easily removable and should be washed on a delicate cycle at 30 degrees using a mild detergent.
Take out all removable internal plastic / foam parts from inside any fabrics before washing.
Please follow the washing instructions on the care label on the cover.
Do not tumble dry the cover as the padding could come away from the fabric.
Do not expose the cover to the sunlight for prolonged periods, when the seat is not in use cover it up or store it in the luggage compartment.
PLASTIC/METAL PARTS
Wipe clean using a mild hand soap and warm water. You must not use detergents, solvents or strong soaps. This may weaken your infant carrier shell or harness. You must not remove, dismantle or alter any part of the infant carrier shell or harness.
You must not oil or lubricate any part of your infant carrier shell or harness system.
RECOMMENDATIONS
Keep this instruction book for future reference.
Make sure that all luggage as well as any other object that could cause an injury in the event of an accident is properly secured or fastened inside the vehicle.
If you require any further advice as to the suitability of this restraint system for your vehicle, please contact your retailer or the Silver Cross customer services on 0845 8726900.
INSTALLATION DU SIÈGE AUTO
POUR INSTALLER LE SYSTÈME DE RETENUE POUR ENFANTS MOTION 2, PROCÉDEZ COMME SUIT :
MAKSYMALNA OCHRONE, JEŚLI JEST
PRAWIDŁOWO ZAMONTÓWANY I
UZYWANY ZGODNIE Z INSTRUKCJA
OBSŁUGI PRODUCENTA.
FOTELIK TEN ZOSTAŁ
ZATWIERDZONY POD REGULACJE
129/03 DLA DZIECI POMIĘDZY 40
CM I 145 CM WYSOKOŚCI.
NIE UŻYWAJ FOTELIKA PRZODEM
DO KIERUNKU JAZDY DLA DZIECI
JAZDY, NALEŻY PRZESUNAĆ
PRZEDNI FOTEL SAMOCHODU
NAJBARDZIEJ DO PRZODU, JAK
TO TYLKO MOZLIWE.
TRZYMAJ FOTELIK Z DALA OD
PŁYNÓW KOROZYJNYCH, FARB
LUB ROZPUSZCZALNIKÓW,
KTORE MOGŁYBY USZKODZIC
PRODUKT.
W RAZIE KONIECZNOŚCI, SKORZYSTAJ Z DOSTARCZONYCH PLASTIKOWYCH PROWADNIC ISOFIX. SILVER CROSS NIE MOŻE PONOSIĆ ODPOWIEDZIALNOŚCI ZA USZKODZENIA LUB PRZETARCIA TAPICERKI SIEDZENIA POJAZDU.
FOTELIK SAMOCHODOWY NALEŻY WYMIENIĆ PO WYPADKU LUB KOLIZJI, NAWET JEŚLI BRAK JEST WIDOCZNYCH ZNAKÓW USZKODZENIA. USZKODZENIA MOGĄ BYĆ NIEWIDOCZNE. USZKODZENIA WEWNĘTRZNE FOTELIKA MOGĄ NARAŻAĆ DZIECKO NA NIEBEZPIECZEŃSTWO.
RÓB REGULARNE PRZERWY W TRAKCIE PODRÓŻY. W CZASIE PRZERWY POZWÓL DZIECKU NA OPUSZCZENIE FOTELIKA, ABY POCZUŁO SIĘ BARDZIEJ KOMFORTOWO. NIE ZALECA SIĘ PODRÓŻOWAĆ DŁUŻEJ NIŻ 2
GODZINY BEZ PRZERWY. JEST TO BARDZO WAŻNE DLA DOBREGO SAMOPOCZUCIA DZIECKA.
NIE UMIESZCZAJ PRZEDNIEGO WSPORNIKA NA POKRYWIE SCHOWKA W PODŁODZE. PRZEDNIA NOGA PODPOROWA MUSI MIEĆ PEŁNY I PEWNY KONTAKT Z PODŁOGĄ POJAZDU PODCZAS UŻYWANIA FOTELIKA W KONFIGURACJI 40–105 CM.
PASY NIGDY NIE POWINNY BYĆ SKREÇONE.
KLAMRA PASÓW MUSI BYĆ PRAWIDŁOWO ZAMOCOWANA I PASY POWINNY CIASNO PRZYLEGAĆ DO DZIECKA.
OBRÓĆ DO POZYCJI BOCZNEJ, ABY ODCHYLIĆ SIEDZENIE.
POKROWIEC Z TKANINY JEST NIEZBĘDNYM ELEMENTEM FOTELIKA.
NIE MOŻE BYĆ ZASTĄPIONY INNYM POKROWCEM BEZ ZEWZWOLENIA OD PRODUCENTA.
NIE MODYFIKUJ PRODUKTU, DODAJĄC LUB USUWAJĄC JAKIEKOLWIEK AKCESORIA.
NIE POZOSTAWIAJ BEZ ZABEZPIECZENIA BAGAŻU LUB PRZEDMIOTÓW NA PÓŁCE W SAMOCHODZIE, PONIEWAŻ W PRZYPADKU WYPADKU, MOGA ONE SPOWODOWAĆ POWAŻNY URAZ.
PRZYKRYJ FOTELIK, JEŚLI JEST WYSTAWIONY NA BEZPOŚREDNIE DZIAŁANIE PROMIENI SŁONECZNYCH. POWIERZCHNIE PLASTIKOWE I METALOWE BARDZO SIĘ NAGRZEWAJĄ I MOGA SPOWODOWAĆ POPARZENIE. PRAWDOPODOBNIĘ WYBLAKNIE RÓWNIEŻ POKROWIEC FOTELIKA.
KONSERWACJA
ZAKŁADANIE / ZDEJMOWANIE POKROWCA
VED INSTALLERING AV SIKKERHETEN SETE I FREMVENDT POSISJON, DET L∅SES Å FLYTT FORSETE PÅ THE KJ∅RET∅Y SÅ LANGT FREM SOM MULIG.
BEHOLD BARNESIKRING SYSTEM BORTE FRA ETSENDE VÄESKER, MALING ELLER L∅SNINGSMIDLER DET KAN SKADE PRODUKT.
BRUK PLAST ISOFIX-VEILEDNINGENE SOM LEVERES Når NøDVENDIG. SILVER CROSS KAN IKKE HOLDES ANSVARLIG FOR SKADE ELLER MERKING PÅ KJ∅RET∅YSETTEPLAN.
BARNESIKRINGSSYSTEMET B∅R SKIFTES ETTER AN ULYKKE, SELV OM DET ER INGEN SYNLIGE TEGN PÅ SKADE. PRODUKTET KAN HA USETT INDRE SKADE SOM KAN KOMPROMISS BARNETS SIKKERHET. TA VANLIGE PAUSER NÅR REISER SÅ BARNET KAN GÅ UT AV SETET OG GÅ OM LITT. DET L∅BES IKKE Å REISE I MER ENN 2 TIMER AV GANGEN UTEN TAR EN PAUSE. DETTE RÅDET ER VELDIG VIKTIG FOR BABYER.
IKKE PLASSER DET FREMRE ST∅TTEBENET PÅ ET LOKK PÅ ET OPPBEVARINGSROM PÅ GULVET. DET FREMRE ST∅TTEBENET MÅ HA FULL OG FAST KONTAKT. MED KJ∅RET∅YETS GULV NÅR DU BRUKER SETET I 40-105 CM- KONFIGURASJONEN.
STEMMEN SKAL ALDRI VRES. SELESPENEN MÅ FESTES RIKTIG OG STEIMEN SKAL PASSE BARNET.
ROTER TIL SIDESTILLING FOR Å LEGGE SETET TILBAKE.
STOFTREKKET ER AN VIKTIG DEL AV BARNET BEHOLDNINGSSYSTEM. DET MÅ IKKE BLI ERSTATTET MED EN ANNET DEKK UTEN FORHANDLING AUTORISASJON FRA PRODUSENT.
IKKE ENDRE PRODUKTET VED Å LEGGE TIL ELLER FJERNE NOE TILBEH∅R ELLER KOMPLEMENT.
IKKE LA USIKRET BAGASJE ELLER OBJEKTER PÅ PAKKEHYLLE I KJ∅RET∅YET, FORDI I TILFELLE AV EN ULYKKE DE KANNE FORÅRSAKE ALVORLIG SKADE PÅ BEVATTER.
DEKK TIL SETET HVIS DET STÅR I DIREKTE SOLLYS. PLAST- OG METALLOVERFLATER BLIR VELDIG VARME OG KAN BRENNE. BILSETETREKKET VIL SANNSYNLIGVIS OGSÅ FALME.
VEDLIKEHOLD
PASSE / FJERNE DEKSLET
text_image
Silver CrossUK
Silver Cross (UK) Ltd. Micklethorn, Broughton, Skipton, North Yorkshire BD23 3JA
EU/PACIFIC
Silver Cross (Pacific) Ltd. Office 527, Lee Garden Three, 1 Sunning Road, Causeway Bay, Hong Kong
silvercrossbaby.com
Silver Cross
silvercrossbaby.com