
Discover - Car seat Silver Cross - Free user manual and instructions
Find the device manual for free Discover Silver Cross in PDF.
| Product type | Child car seat group II/III |
| Child weight | 15 to 36 kg |
| Recommended age | Approximately 3 to 12 years |
| Approval | ECE R44/04 |
| Installation | Forward-facing with ISOFIX or 3-point seat belt |
| Headrest | Height adjustable |
| Side wings | Integrated side protection |
| Armrests | Integrated into seat |
| ISOFIX arms | Retractable with click indicator |
| Belt guide | Diagonal guide and lap guide |
| Locking system | ISOFIX adjustment lever and headrest |
| Materials | Plastic shell, metal structure, fabric cover |
| Care - Cover | Washable at 30°C, delicate cycle, air dry |
| Care - Plastic/metal parts | Clean with warm water and mild soap |
| Safety instructions | Do not use on front seat with active airbag; replace after any accident |
| Additional features | Universal use (without ISOFIX) or semi-universal use (with ISOFIX) |
| Instruction manual storage | Under the seat base |
| Warranty | Refer to manufacturer's conditions |
| Country of origin | Not specified in the manual |
Frequently Asked Questions - Discover Silver Cross
User questions about Discover Silver Cross
0 question about this device. Answer the ones you know or ask your own.
Ask a new question about this device
Download the instructions for your Car seat in PDF format for free! Find your manual Discover - Silver Cross and take your electronic device back in hand. On this page are published all the documents necessary for the use of your device. Discover by Silver Cross.
USER MANUAL Discover Silver Cross
15kg - 36kg (approx 3 to 12 years old)
IMPORTANT - READ THE INSTRUCTIONS CAREFULLY BEFORE USE AND KEEP FOR FUTURE REFERENCE
UK FRA
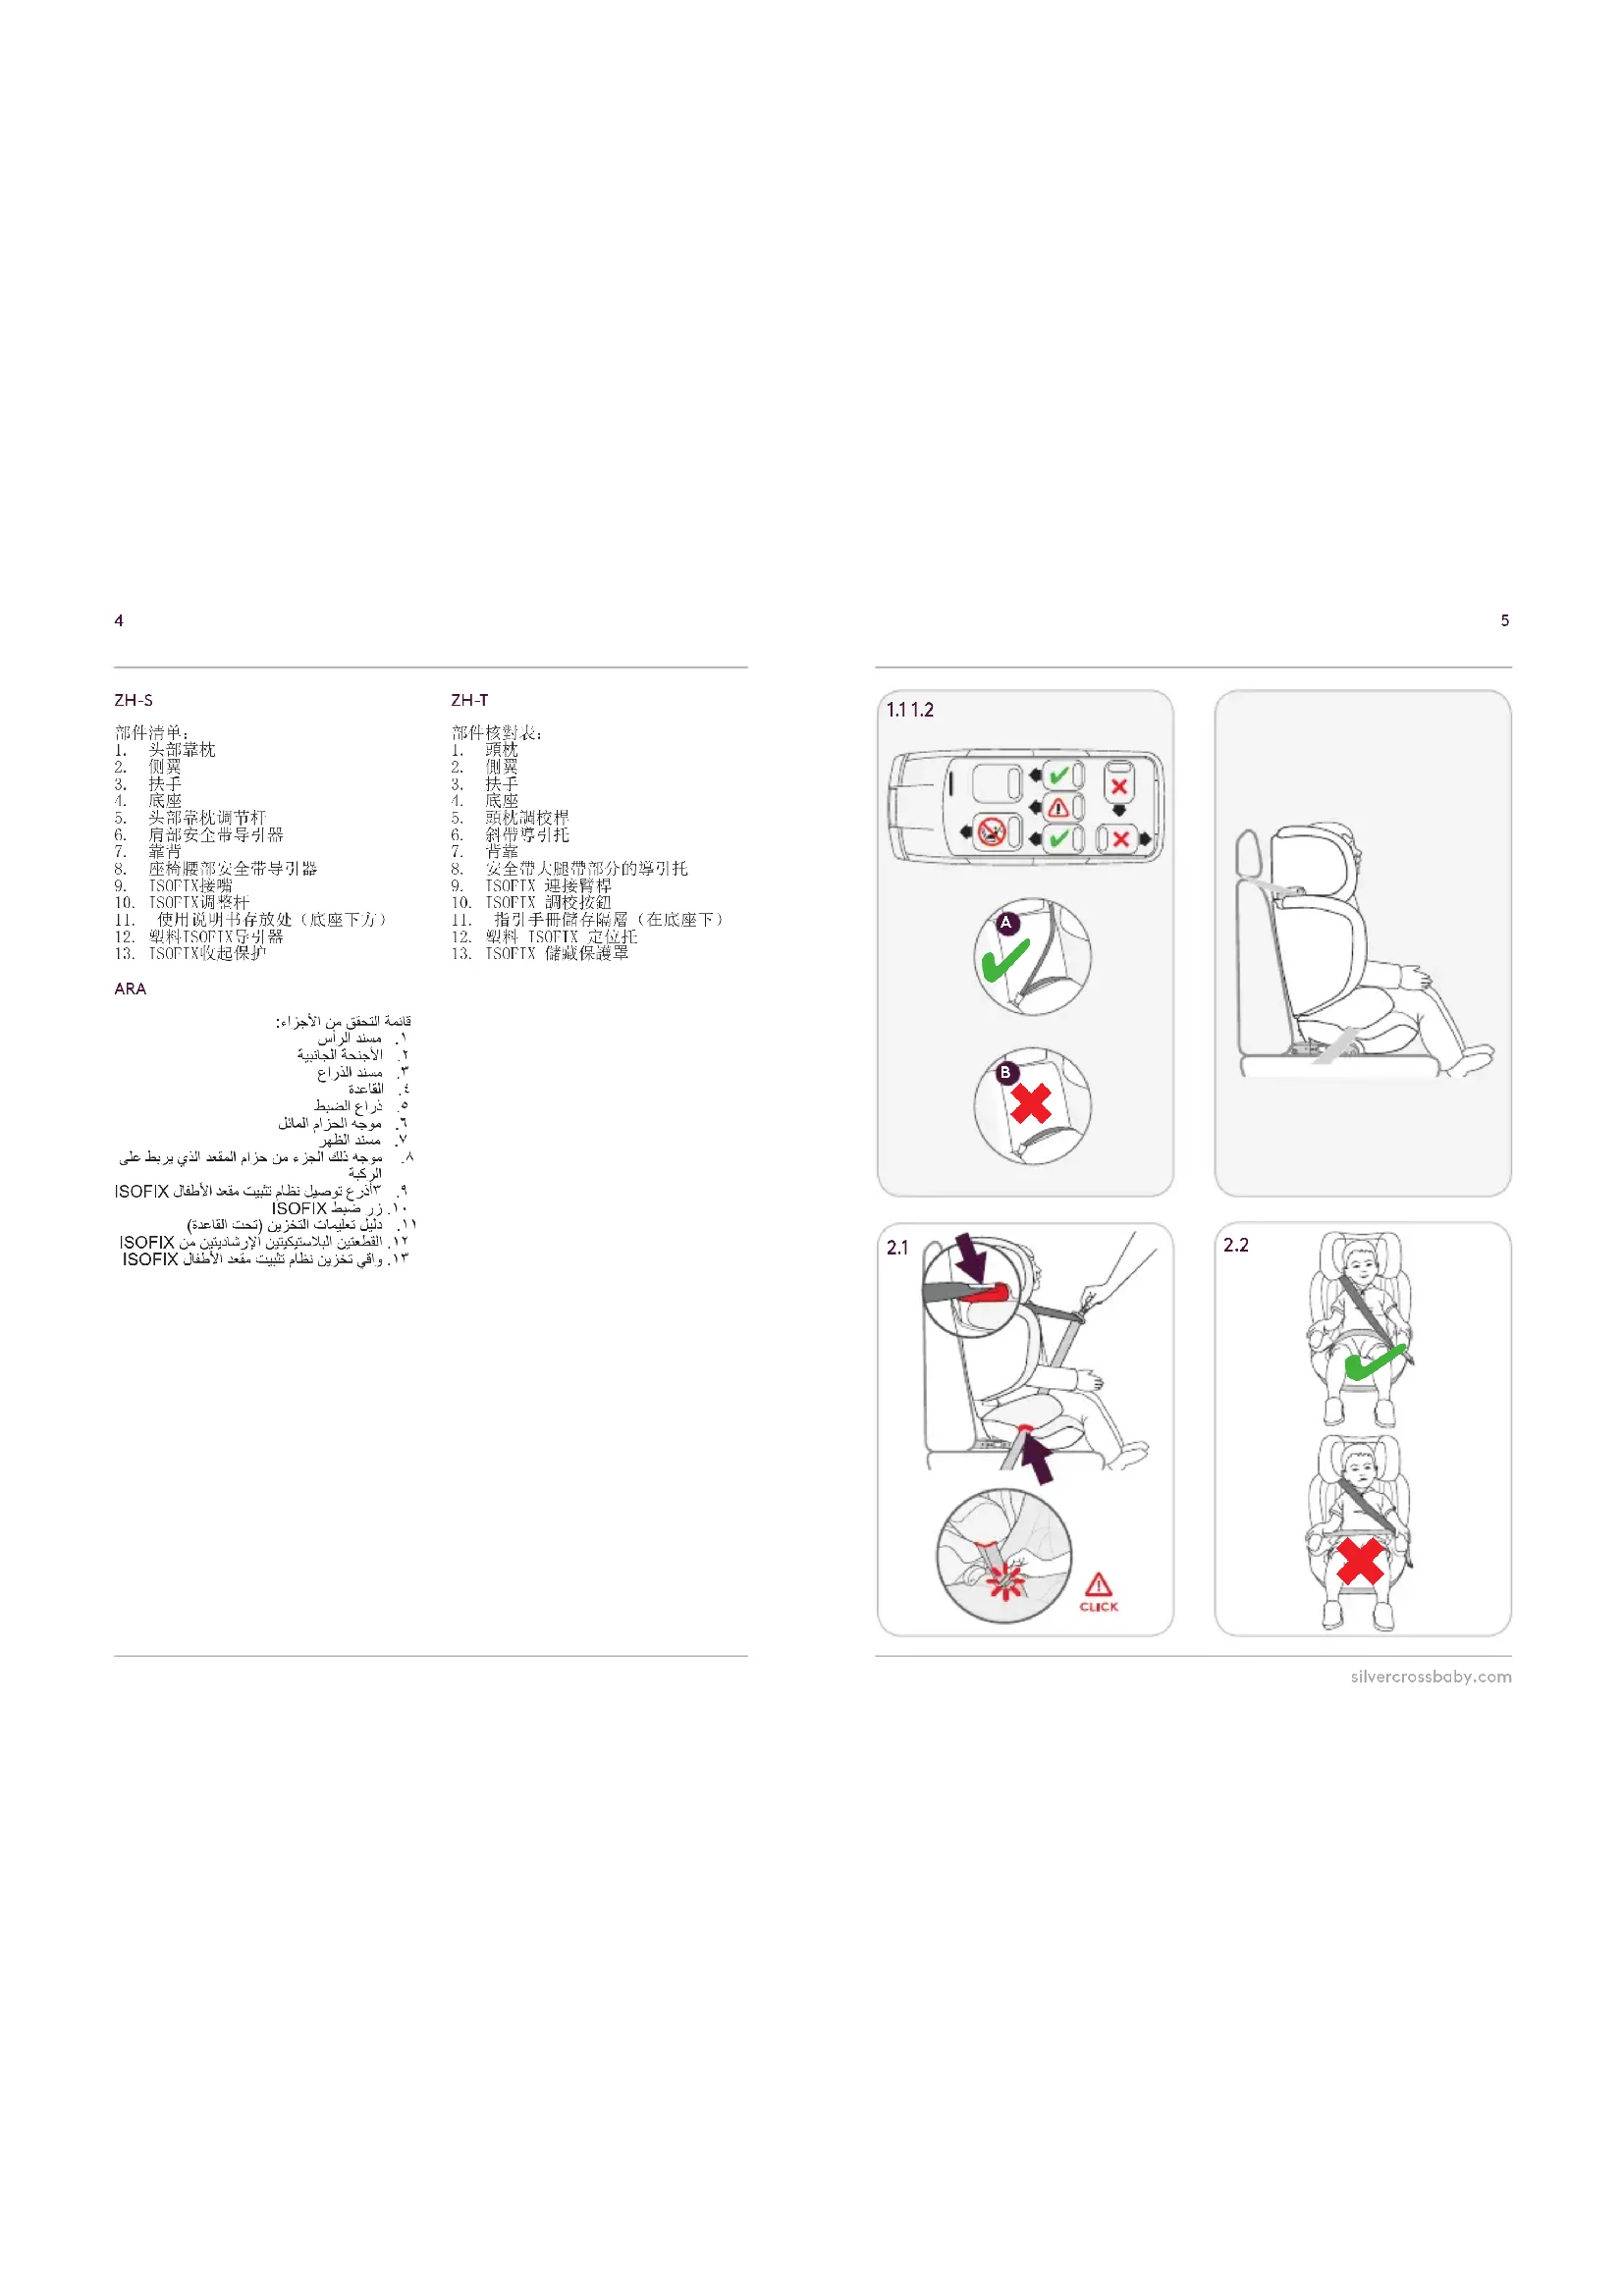
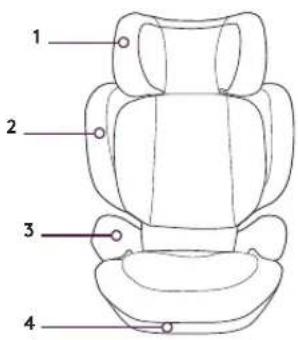
Parts checklist:
- Headrest
- Side Wings
- Armrest
- Base
- Adjustment Lever
- Diagonal Belt Guide
- Backrest
- Seat belt lap section guide
9.ISOFIX connector arms - ISOFIX adjustment button
- InstructionmanualStorage
(Under base) - Plastic ISOFIX guides
- ISOFIX Storage protector
Liste des pièces :
natural_image
Line drawing of a person sitting in a car seat, no text or symbols present2.1
2.2
silvercrossbaby.com
6
3.1
3.2
3.5
7

3.3
3.4
4.1
5.1
5.2
IMPORTANT
Please read the whole of this instruction guide carefully. Failure to do so could put your child in danger. You can only expect the Discover Car Seat to provide maximum protection if it is fitted and used correctly as per the manufacturer's instructions.
This child restraint system has been approved under Standard ECE 44 04 to be used by children weighing between 15 kg and 36 kg (Approx. 3 to 12 years of age).
The Discover Car Seat may be used for the following configurations:
Universal-Without ISOFIX fittings.
Semi-universal-With ISOFIX fittings.
Only suitable for use in the listed vehicles fitted with 3 point safety-belts, approved to ECE Regulation No.16 or other equivalent standards.
Do NOT use a 2-point belt.
CHECK OUR WEBSITE FOR THE LATEST LIST OF APPROVED CARS.
NOTICE: DO NOT USE ON A PASSENGER SEAT FITTED WITH ACTIVATED FRONTAL AIRBAG.
EXTREME HAZARD NEVER USE IN FRONT PASSENGER SEATS EQUIPPED WITH AIRBAGS (SRS)THIS CAN INCLUDE REAR PASSENGER SEATS THAT ARE EQUIPPED WITH AIRBAGS*
*Consult car manufacturer for suitability. Children's bodies are not able to withstand the forces exerted on them by a deploying air-bag.
THE ISOFIX CONNECTION ARMS HAVE BEEN DESIGNED TO IMPROVE STABILITY. IN CASE OF PROBLEM DURING USE IN YOUR VEHICLE, IT IS POSSIBLE TO USE THE SILVER CROSS DISCOVER CAR SEAT WITHOUT THIS OPTION.
REMOVE OR CHANGE THE HEIGHT OF THE VEHICLE HEADREST IF IT INTERFERES WITH THE DISCOVER SITTING FLUSH AGAINST THE VEHICLE SEAT.
KEEP THE CHILD RESTRAINT SYSTEM AWAY FROM CORROSIVE LIQUIDS, PAINTS OR SOLVENTS THAT COULD DAMAGE THE PRODUCT.
DO NOT LET YOUR CHILD PLAY WITH THIS PRODUCT.
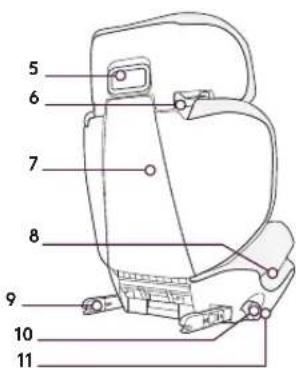
INSTALLING THE CHILD INTO THE DISCOVER
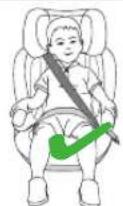
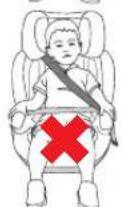
With the child in the seat pull the seat belt around the front, locating it into both seat belt lap section guides (8).
Pass the shoulder section through the diagonal section seat belt guide(6).
Fasten the seat belt buckle and pull the seat belt tight, removing any slack.
3.1 If your vehicle is equipped with ISOFIX anchor points, these should be used to obtain a more stable installation. These cars will have plastic elements that guide the seat's ISOFIX anchors into their correct positions. If your vehicle does not have these guide elements, you can use the plastic guides provided
3.2 Place the car seat in the appropriate position on the vehicle's seat, facing in the direction of travel.
Rotate the adjustment lever in an anti-clockwise direction, and pull the ISOFIX connector arms outwards, making sure it cannot be pushed backwards.
Position the car seat facing forwards on the vehicle seat with ISOFIX points.
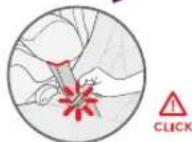
Match the ISOFIX connectors to the vehicle's anchoring point until you hear a "click". Rotate the adjustment lever in an anti-clockwise direction, and simultaneously push the seat against the vehicle to eliminate the gap between car seat and vehicle's seat.
WARNING: THE CHILD MUST ALWAYS BE SECURED INTO THE SEAT BY MEANS OF THE 3 POINT VEHICLE SEAT BELT.
WARNING: DURING EVERYDAY USE OF THE VEHICLE, ENSURE THAT NO PARTS OF THE SEAT BELT OR CHILD SEAT CAN BECOME TWISTED OR TRAPPED BY A MOVABLE SEAT OR IN A DOOR OF THE VEHICLE.
ADJUSTING THE HEADREST HEIGHT
3.4 To adjust the height of the car seat's headrest, pull upwards on the button situated behind the headrest, and slide the headrest in the desired direction.
REMOVING THE CAR SEAT
4.1 To remove the car seat, pull the ISOFIX adjustment buttons to release the car seat from vehicle's ISOFIX anchor points.
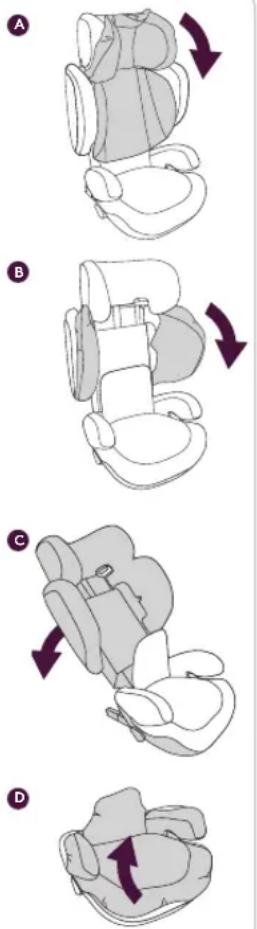
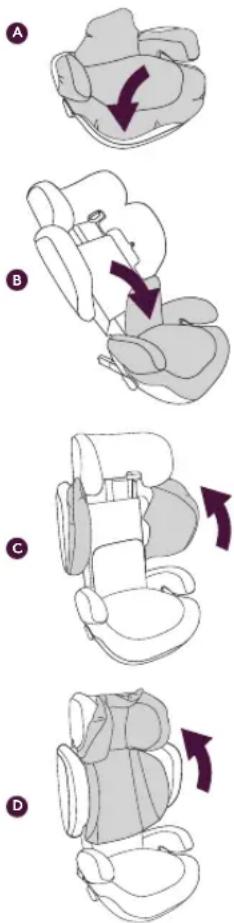
5.1 REMOVING THE SEAT COVER
A. Remove the headrest covers by pulling the cover forward and off. Remove the elastic loops.
B. Unfasten Velcro on inside edge of the side wings and pull them forward and off.
C. Separate the backrest from the base by rotating the backrest flat detaching the connection points between the two parts.
D. Remove the base cover by pulling forward and off.
5.2 REPLACING THE SEAT COVER
A. Slide the base cover onto each armrest, and then pull the cover over the front and down around the back of the base.
B. Mounting the backrest by connecting the points of the two parts.
C. Slide the cover down, over each side wing to secure the edge of cover is in the gap of the wings.
D. Slide the headrest cover over the headrest to secure the edge of cover is in the gap of the headrest.
WARNINGS
DO NOT MAKE UNAUTHORIZED MODIFICATIONS OR ALTERATIONS TO THE CHILD CAR SEAT.
ANY FAILURE TO FIT THE CHILD CAR SEAT IN STRICT ACCORDANCE WITH THE INSTRUCTIONS. THE MANUFACTURER ACCEPTS NO LIABILITY FOR ISSUES ARISING FROM UNAUTHORIZED MODIFICATIONS, USES OR FITTING.
PLEASE DO NOT LEAVE THE CHILD UNATTENDED IN THE VEHICLE.
USE THE PLASTIC ISOFIX GUIDES PROVIDED WHEN NECESSARY. SILVER CROSS CANNOT BE HELD RESPONSIBLE FOR DAMAGE OR MARKING TO VEHICLE SEAT UPHOLSTERY. DO NOT LEAVE UNSECURED LUGGAGE OR OBJECTS ON THE PARCEL SHELF IN THE VEHICLE, BECAUSE IN THE EVENT OF AN ACCIDENT THEY COULD CAUSE SERIOUS INJURY TO THE OCCUPANTS.
DO NOT LEAVE CHILDREN ALONE IN THE CAR.
YOUR CHILD'S SAFETY IS YOUR RESPONSIBILITY ENSURE THAT THE CHILD CAR SEAT IS SECURED TO THE CAR SEAT AT ALL TIMES - EVEN WHEN NOT IN USE.
DO NOT USE THE CHILD CAR SEAT IN THE HOME - IT HAS ONLY BEEN DESIGNED TO BE USED IN THE CAR.
THE CHILD CAR SEAT MUST NOT BE USED WITHOUT ITS ORIGINAL COVER. THE ORIGINAL COVER IS ESSENTIAL FOR THE SAFE OPERATION OF THE CHILD CAR SEAT.
AVOID WINTER CLOTHING - BULKY CLOTHING CAN LEAD TO INCORRECT HARNESS TIGHTENING. NEVER USE ANY LOAD BEARING CONTACT POINTS OTHER THAN THOSE DESCRIBED IN THESE INSTRUCTIONS OR MARKED ON THE CHILD CAR SEAT. ENSURE THAT THE LAP SECTION OF THE SEATBELT OR HARNESS IS WORN LOW DOWN, SO THAT THE PELVIS IS FIRMLY ENGAGED. NEVER USE THE SEAT WITHOUT THE BACKREST NEVER USE A SEATBELT ROUTING SCHEME THAT DIFFERS FROM THESE INSTRUCTIONS. THE LAP AND DIAGONAL SEAT BELT (AND HARNESS IF FITTED) MUST BE USED AT ALL TIMES WHEN YOUR CHILD IS IN THE CHILD CAR SEAT. MAKE SURE THE CHILD'S FASTENING HARNESS IS FITTED CORRECTLY AND NOT TWISTED AT ALL. COVER THE SEAT IF IT IS LEFT IN DIRECT SUNLIGHT. PLASTIC AND METAL SURFACES GET VERY HOT AND COULD BURN. THE CAR SEAT COVER IS ALSO LIKELY TO FADE.
THE COVER & CHEST PADS ARE TO BE FITTED AT ALL TIMES. THEY ARE AN IMPORTANT SAFETY FEATURE.
THE CHILD RESTRAINT SYSTEM SHOULD BE REPLACED AFTER AN ACCIDENT, EVEN IF THERE ARE NO VISIBLE SIGNS OF DAMAGE. THE PRODUCT MAY HAVE UNSEEN INTERNAL DAMAGE THAT COULD COMPROMISE THE CHILD'S SAFETY.
MAINTENANCE AND CLEANING
FABRICS
The seat cover is easily removable and should be washed on a delicate cycle at 30 degrees using a mild detergent.
Take out all removable internal plastic / foam parts from inside any fabrics before washing.
Do not press, iron, dry clean, tumble dry or wring the covers.
Do not use solvents, caustic or abrasive cleaning materials.
Dry flat, away from direct heat and sunlight.
THE FABRIC COVER IS AN ESSENTIAL PART OF THE CHILD RESTRAINT SYSTEM. IT MUST NOT BE REPLACED BY A DIFFERENT COVER WITHOUT PRIOR AUTHORIZATION FROM THE MANUFACTURER.
PLASTIC/METAL PARTS
Wipe clean using a mild hand soap and warm water. You must not use detergents, solvents or strong soaps. This may weaken your infant carrier shell or harness. You must not remove, dismantle or alter any part of the infant carrier shell or harness. You must not oil or lubricate any part of your infant carrier shell or harness system Check your child car seat regularly for wear and tear.
If you require any further advice as to the suitability of this restraint system for your vehicle, please contact your retailer or the Silver Cross customer services on 0845 8726900.
IMPORTANT
Silver Cross (UK) Ltd, Micklethorn, Broughton, Skipton, North Yorkshire, BD23 3JA
silvercrossbaby.com


- IMPORTANT - READ THE INSTRUCTIONS CAREFULLY BEFORE USE AND KEEP FOR FUTURE REFERENCE
- UK FRA
- IMPORTANT
- INSTALLING THE CHILD INTO THE DISCOVER
- WARNING: THE CHILD MUST ALWAYS BE SECURED INTO THE SEAT BY MEANS OF THE 3 POINT VEHICLE SEAT BELT.
- ADJUSTING THE HEADREST HEIGHT
- REMOVING THE CAR SEAT
- REMOVING THE SEAT COVER
- REPLACING THE SEAT COVER
- WARNINGS
- MAINTENANCE AND CLEANING
- FABRICS
- PLASTIC/METAL PARTS
Brand : Silver Cross
Model : Discover
Category : Car seat