Reef 2 - Car seat Silver Cross - Free user manual and instructions
Find the device manual for free Reef 2 Silver Cross in PDF.


| Product type | Car seat |
| Brand | Silver Cross |
| Model | Reef 2 |
| Dimensions (L x W x H) | Approximately 65 x 45 x 55 cm |
| Weight | Approximately 12 kg |
| Safety standards | UN ECE R129/03 (i-Size) regulation |
| 360° rotation | Yes, with rotation button |
| ISOFIX attachment | Yes, with ISOFIX arms and visual indicators |
| Support leg | Front support leg with height adjustment |
| Harness | 5-point harness with height adjustment |
| Recline positions | 3 recline positions |
| Rear-facing use | From 40 to 105 cm (from birth) |
| Forward-facing use | From 76 to 145 cm (from 15 months) |
| Maximum child weight | Up to 18.5 kg (with harness), then up to 36 kg (with vehicle seat belt) |
| Insert cushion | Yes, for newborns up to 60 cm |
| Cover material | Machine washable fabric at 30°C |
| Cleaning | Cover washable on delicate cycle, plastic parts cleanable with warm water and mild soap |
| Included accessories | Insert cushion, belt guide, instruction manual |
| Warranty | 2 years (according to manufacturer's conditions) |
| Country of manufacture | Designed in United Kingdom, made in China |
Frequently Asked Questions - Reef 2 Silver Cross
User questions about Reef 2 Silver Cross
0 question about this device. Answer the ones you know or ask your own.
Ask a new question about this device
Download the instructions for your Car seat in PDF format for free! Find your manual Reef 2 - Silver Cross and take your electronic device back in hand. On this page are published all the documents necessary for the use of your device. Reef 2 by Silver Cross.
USER MANUAL Reef 2 Silver Cross
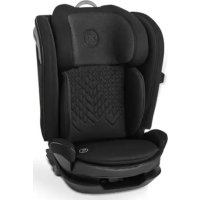
All Stage Rotating Car Seat
40cm - 145cm / Birth to approx 12 years
IMPORTANT - READ THE INSTRUCTIONS CAREFULLY BEFORE USE AND KEEP FOR FUTURE REFERENCE
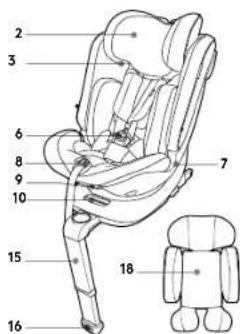
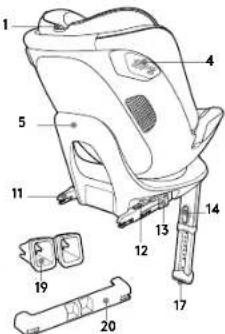
1 Headrest adjustment handle
2 Recedrect 3. Lendortin oit guice
- Side Protection System (SPS)
5 Rebound bar covers
6 5 point solely 7. I am not a child
- Earnings adjustment button
9 Redo button
10 Rotation butter
11 10 12 13
- ISOFIX suppressor arms
extension pndle cysr
14 Support leg adjustment
burton 15
- support plan
indicator
- Support eg buffer stop
18 Insert
19 Plastic ISCFIX guides
20 ISONX storage project
FRA
1-geene de ngge cfoe
24p10e
2017年/6月25日星期五
4 -neseu de prooition (35)
Cauoie de la barre de robin
6.8.8.8.8.8.8.8.8.8.8.8.8.8.8.8.8.8.8.8.8.8.8.8.8.8.8.8.8.8.8.8.8.8.8.8.8.8.8.8.8.8.8.8.8.8.8.8.8.8.8.
h
9 Soutendisson
10.2.2.3.2.2.2.2.2.2.2.2.2.2.2.2.2.2.2.2.2.2.2.2.2.2.2.2.2.2.2.2.2.2.2.2.2.2.2.2.2.2.2.2.2.2.2.2.2.2.2.2.2.2.
11. Ercce Fomcr-DCX 12. 30, 1984
1
B02
H. Bucun de reakge, ples de a.
15 Rcsdopson
18.17.20,201306.00
11.公司名称:美都科技
19. Suae DcHs pizbue
20 1
SPA
17P00000000000000000
18-
IS Guide/SPG. Replica:
2018年1月24日星期六
SWE
1 1
1.
- [see above] [51]
!Oring
6.2.10.5
- Tumors in tumors object
1
- 甲组的基因型
12
10
14.2.2.37
10
B. 16 × 24
1.
Kussele 5000-1000 mm
2) C = C + H , C = C + H
PL
1 1
Zagbuk
1
- Dividend yield
5.1000000000
7 Pwadnncs paa bdoowep 6 Snepepee
Prrnneepnneep
1 Fyck000613 0083 127
11.72% 037%
- Bnck 506X
11.
STH
14 Przaskregicjogosubpo
15 h
12 Waaarraa aay
- Gmertngn
:
This Enhanced Child Restraint System is approved according to Regulation No.129/03 and meets the following classifications:
- Specific Vehicle ISOFIX CLASS C (40-105cm × 10.5kg ) rearward facing.
- I-Size Universal ISOFIX CLASS B1(76-105cm × 18.5kg ) forward facing.
- Specific Vehicle Booster seat ISOFIX CLASS B2 (100-145cm ≥18.5kg)
Please refer to the vehicle fitting list in the Instruction manual, website or mobile App to confirm vehicle compatibility. If in doubt, consult either the Enhanced Child Restraint System manufacturer or the retailer
IMPORTANT -DO NOT USE FORWARD FACING BEFORE THE CHILD'S AGE EXCEEDS 15 MONTHS.
INSTALLING THE CHILD SEAT
1.1 Unfold the support leg (15) until it is in the vertical position as shown.
1.2 Move the button (11) to slide the ISOFIX connector arms (9) backwards unfolding the connector fully. Do this for both connector arms.
1.3 Guide the connector arms towards the ISOFIX anchors in your vehicle until they lock together by clicking into place and the indicator changes from red to green on both sides of the base.
1.4 Move the seat backwards pressing the backrest against the vehicle seat. Then pull the safety seat towards you to check that it is securely locked in place.
1.5 Press the button (14) to adjust the height of the support leg (15) until it is firmly in contact with the floor. It should not be on top of any type of compartment. At this point make sure that the support leg is at 90 degrees to the safety seat.
The visual ISOFIX indicators show whether the connector is open or closed. It may be that the connector is closed but not locked into the ISOFIX anchor. Please check that all the connectors are correctly locked into the vehicle anchor points by pulling the seat once it is installed.
TO DETACH THE SEAT FOLLOW THE SAME STEPS IN REVERSE:
1.6 Move the button (12) to open the connector and release it from the anchor point.
INSTALLING THE SEAT IN THE REAR FACING POSITION
FROM 40CM TO 105CM
NOTICE:DO NOT USE ON A PASSENGER SEAT FITTED WITH ACTIVATED FRONTAL AIRBAG.
2.1 Press the button (10) to turn the seat.
2.2 Turn the seat to the loading position ready for the child to be placed in it (Perpendicular to the forward facing position).
2.3 Rotate the seat in the rear facing position. It is important to check that the seat is firmly locked into place.
2.4 The cushion insert (18) is designed for use with newborn babies to give them greater comfort and stability, and offer them a more stretched out position. The insert can be used until the baby is 60cm or until they outgrow it.
INSTALLING THE SEAT IN THE FORWARD FACING POSITION
FROM 76CM TO 105CM
FROM 15 MONTHS OF AGE
2.1 Press the button (10) again to place the seat in the forward facing position. It is important to check that the seat is firmly locked into place.
STRAPPING THE CHILD INTO THE SEAT
3.1 Turn the seat to the loading position (2.2) and open the harness (6). Move the harness straps to the sides to place the child in the seat.
3.2 Place the straps over the child and fasten the buckle.
3.3 To adjust the headrest (2) pull the lever handle (1) on the top. It should be set to the right position, this means that the shoulder harness should come out approximately 1 cm above the child's shoulders.
3.4 Tighten the harness by pulling the strap (8), it should fit the child snugly.
5.1 Once the child is securely strapped in, you can recline the seat by pressing the button (9) to the required position.
GETTING THE CHILD OUT OF THE SEAT
To get the child out of the seat, you should first place the seat into the loading position (2.2).
3.5 Loosen the harness straps by pressing the adjustment button.
3.1 Then unfasten the buckle to remove the child.
Please make sure that the child gets out of the vehicle on the pavement side.
INSTALLING THE SEAT IN THE FORWARD FACING POSITION USING THE VEHICLES SAFETY BELT
FROM 100CM TO 145CM, ≥ 18.5KG STORING THE 5-POINT HARNESS:
Once the child reaches a weight of 18.5kg the 5-point safety harness should be stored away and the child should be secured with the vehicle safety belt.
4.1 To store the 5-point safety harness away it needs to be fully loosened first. Press the red release button and undo the harness. Lift the cover under the cushion and store the buckle parts in the compartment. Then put the cover back on the seat.
Open the flap on the back of the seat and stow the shoulder sections of the harness behind.
4.2 IMPORTANT: The support leg is not needed for the 100 - 145cm configuration, raise it so that it does not touch the floor of the vehicle.
STRAPPING THE CHILD INTO THE SEAT
4.3 With the child in the seat pull the seat belt around the front, locating it into both seat belt lap section guides (7). Pass the shoulder section through the diagonal section seat belt guide(3).
Fasten the seat belt buckle and pull the seat belt tight, removing any slack.
RECLINING THE CAR SEAT
5.1 The car seat has 3 recline positions to offer the best comfort.
To recline the seat pull the recline lever and pull the seat forward or backwards until reaching the required position.
When using the seat in the rearward facing position, from 40-105 cm.
5.2 The seat should be fully reclined before rotate to rearward facing, only the position 1 is allowed.
When use the seat in the forward facing position, from 76-145 cm.
5.3 Once the child is securely strapped in, you can recline the seat by pressing the button (9) to the required position, all the 3 positions are allowed.
5.4 You can adjust the angle of the seat when in the forward facing position
or when in the loading position. YOU CANNOT adjust the angle of the car seat when it is in the rearward facing position.
STORING YOUR INSTRUCTIONS
5.5 You can store the instructions in the recess in the car seats frame.
WARNING
READ THESE INSTRUCTIONS CAREFULLY. INCORRECT INSTALLATION OF THE CHILD RESTRAINT SYSTEM MAY CAUSE THE CHILD SERIOUS INJURY. IF USED INCORRECTLY, THE MANUFACTURER CANNOT BE HELD RESPONSIBLE. YOUR CHILD'S SAFETY IS YOUR RESPONSIBILITY.
YOU CAN ONLY EXPECT THE MOTION CAR SEAT TO PROVIDE MAXIMUM PROTECTION IF IT IS FITTED AND USED CORRECTLY AS PER THE MANUFACTURER'S INSTRUCTIONS.
THIS CHILD RESTRAINT SYSTEM HAS BEEN APPROVED UNDER REGULATION 129/03 FOR CHILDREN OF BETWEEN 40CM AND 145CM IN HEIGHTS.
DO NOT USE THE SEAT IN THE FORWARD FACING POSITION WITH CHILDREN UNDER 15 MONTHS OLD. YOU ARE ADVISED TO USE THE REAR FACING POSITION FOR AS LONG AS POSSIBLE.
DO NOT LEAVE THE CHILD UNATTENDED IN THE VEHICLE. WHEN INSTALLING THE SAFETY SEAT IN THE FORWARD FACING POSITION, IT IS ADVISABLE TO MOVE THE FRONT SEAT OF THE VEHICLE AS FAR FORWARD AS POSSIBLE.
KEEP THE CHILD RESTRAINT SYSTEM AWAY FROM CORROSIVE LIQUIDS, PAINTS OR SOLVENTS THAT COULD DAMAGE THE PRODUCT. USE THE PLASTIC ISOFIX GUIDES PROVIDED WHEN NECESSARY.
SILVER CROSS CANNOT BE HELD RESPONSIBLE FOR DAMAGE OR MARKING TO VEHICLE SEAT UPHOLSTERY. THE CHILD RESTRAINT SYSTEM SHOULD BE REPLACED AFTER AN ACCIDENT, EVEN IF THERE ARE NO VISIBLE SIGNS OF DAMAGE. THE PRODUCT MAY HAVE UNSEER INTERNAL DAMAGE THAT COULD COMPROMISE THE CHILD'S SAFETY.
TAKE REGULAR BREAKS WHEN TRAVELING SO THE CHILD CAN GET OUT OF THE SEAT AND WALK ABOUT A BIT. IT IS NOT ADVISIBLE TO TRAVEL FOR MORE THAN 2 HOURS AT A TIME WITHOUT TAKING A BREAK. THIS ADVISE IS VERY IMPORTANT FOR BABIES. DO NOT PLACE THE FRONT SUPPORT LEG ON A FLOOR
STORAGE COMPARTMENT LID.
THE FRONT SUPPORT LEG MUST MAKE FULL AND FIRM CONTACT WITH THE VEHICLE FLOOR WHEN USING THE SEAT IN THE 40-105CM CONFIGURATION.
THE STRAPS SHOULD NEVER BE TWISTED.
THE HARNESS BUCKLE MUST BE FASTENED CORRECTLY AND THE STRAPS SHOULD FIT THE CHILD SNUGLY.
ROTATE TO SIDE LOADING
POSITION TO RECLINE SEAT.
THE FABRIC COVER IS AN
ESSENTIAL PART OF THE CHILD
RESTRAINT SYSTEM. IT MUST NOT
BE REPLACED BY A DIFFERENT
COVER WITHOUT PRIOR
AUTHORIZATION FROM THE
MANUFACTURER.
DO NOT ALTER THE PRODUCT BY ADDING OR REMOVING ANY ACCESSORY OR COMPLEMENT. DO NOT LEAVE UNSECURED Luggage OR OBJECTS ON THE PARCEL SHELF IN THE VEHICLE, BECAUSE IN THE EVENT OF AN ACCIDENT THEY COULD CAUSE SERIOUS INJURY TO THE OCCUPANTS.
COVER THE SEAT IF IT IS LEFT IN DIRECT SUNLIGHT, PLASTIC AND METAL SURFACES GET VERY HOT AND COULD BURN. THE CAR SEAT COVER IS ALSO LIKELY TO FADE.
MAINTENANCE
FITTING / REMOVING THE COVER
There are 2 fastening points for the cover on the front. Unfasten these points and gently pull the front part of the cover.
There are plastic parts on the sides of the cover used to fasten it in place. Simply pull gently to remove the cover.
To fit the cover back on, follow the same steps in reverse. Insert the side parts in the slot.
CLEANING
The seat cover is easily removable and should be washed on a delicate cycle at 30 degrees using a mild detergent.
Take out all removable internal plastic / foam parts from inside any fabrics before washing.
Please follow the washing instructions on the care label on the cover.
Do not tumble dry the cover as the padding could come away from the fabric.
Do not expose the cover to the sunlight for prolonged periods, when the seat is not in use cover it up or store it in the luggage compartment.
PLASTIC/METAL PARTS
Wipe clean using a mild hand soap and warm water. You must not use detergents, solvents or strong soaps. This may weaken your infant carrier shell or harness. You must not remove, dismantle or alter any part of the infant carrier shell or harness.
silvercrossbaby.com
You must not oil or lubricate any part of your infant carrier shell or harness system.
RECOMMENDATIONS
Keep this instruction book for future reference.
Make sure that all luggage as well as any other object that could cause an injury in the event of an accident is properly secured or fastened inside the vehicle. If you require any further advice as to the suitability of this restraint system for your vehicle, please contact your retailer or the Silver Cross customer services on 0845 8726900.
INSTALLATION DU SIÉGE AUTO POUR INSTALLER LE SYSTème DE RETENUE POUR ENFANTS MOTION, PROCÉDEZ COMME SUIT :
aalaiy jai aaiy yie 1000
(3)
ydaal jaaaal
( 0,12,0) ,( 0,12,0)
juiuuiuaiaai
y 51
5.5
y
1
40 1
105
5.2
1.1
76 pabg gag g aagaaa aal
145
5.3
(9)
25
54
y 1
2011 1
.
1
y j 1 y j 1 1 1 1 1 1 1 1 1 1 1 1 1 1 1 1 1 1 1 1 1 1 1 1 1 1 1 1 1 1 1 1 1 1 1 1 1 1 1
a aalaa a aay yde a aagaa g aaiy aalaa a aay a aay a aay a aay a aay a aay a aay a aay a aay a aay a aay a aay a aay a aay a aay a aay a aay a aay a aay a aay a aay a aay a aay a aay a aay a aay a aay a aay a aay a aay a aay a
plal 155 155
1
y
a
ISOFIX 1234567890101123456789010112345678901011234567890101123456789010112345678901011234567890101123456789010112345678
a a a a a a a a a a a a a a a a a a a a a a a a a a a a a a a a a a a a a a
a a a a a a a a a a a a a a a a a a a a a a a a a a a a a a a a a a a a a a a a a a a a a
y 10000000000000000000000000000000000000000000000000000000000000000000000000000000000
aal
a a 100000000000000000000000000000000000000000000000000000000000000000000000000000000000000000
y 845 1234567890
y 845 1234567890
y 845 1234567890
y 845 1234567890
y 845 1234567890
y 845 1234567890
y 845 12345678
UK
Silver Cross (UK) Ltd.
Micklethorn, Broughton,
Skipton, North Yorkshire
BD23 3JA
EU/PACIFIC
Silver Cross (Pacific) Ltd. Office 527, Lee Garden Three,
1 Sunning Road, Causeway Bay, Hong Kong
silvercrossbaby.com


The list of
silvercrossbaby.com

- IMPORTANT - READ THE INSTRUCTIONS CAREFULLY BEFORE USE AND KEEP FOR FUTURE REFERENCE
- FRA
- SPA
- SWE
- PL
- INSTALLING THE CHILD SEAT
- TO DETACH THE SEAT FOLLOW THE SAME STEPS IN REVERSE:
- INSTALLING THE SEAT IN THE REAR FACING POSITION
- FROM 40CM TO 105CM
- NOTICE:DO NOT USE ON A PASSENGER SEAT FITTED WITH ACTIVATED FRONTAL AIRBAG.
- INSTALLING THE SEAT IN THE FORWARD FACING POSITION
- FROM 76CM TO 105CM
- FROM 15 MONTHS OF AGE
- STRAPPING THE CHILD INTO THE SEAT
- GETTING THE CHILD OUT OF THE SEAT
- INSTALLING THE SEAT IN THE FORWARD FACING POSITION USING THE VEHICLES SAFETY BELT
- FROM 100CM TO 145CM, ≥ 18.5KG STORING THE 5-POINT HARNESS:
- RECLINING THE CAR SEAT
- STORING YOUR INSTRUCTIONS
- WARNING
- MAINTENANCE
- FITTING / REMOVING THE COVER
- CLEANING
- PLASTIC/METAL PARTS
- RECOMMENDATIONS
- INSTALLATION DU SIÉGE AUTO POUR INSTALLER LE SYSTème DE RETENUE POUR ENFANTS MOTION, PROCÉDEZ COMME SUIT :
- UK
- EU/PACIFIC
Brand : Silver Cross
Model : Reef 2
Category : Car seat