
Approach Plus 360 - Car seat Silver Cross - Free user manual and instructions
Find the device manual for free Approach Plus 360 Silver Cross in PDF.
| Product type | 360° swivel car seat i-Size |
| Brand | Silver Cross |
| Model | Approach Plus 360 |
| Category | Car seat (child restraint system) |
| Approval | UN Regulation No. 129 (i-Size) |
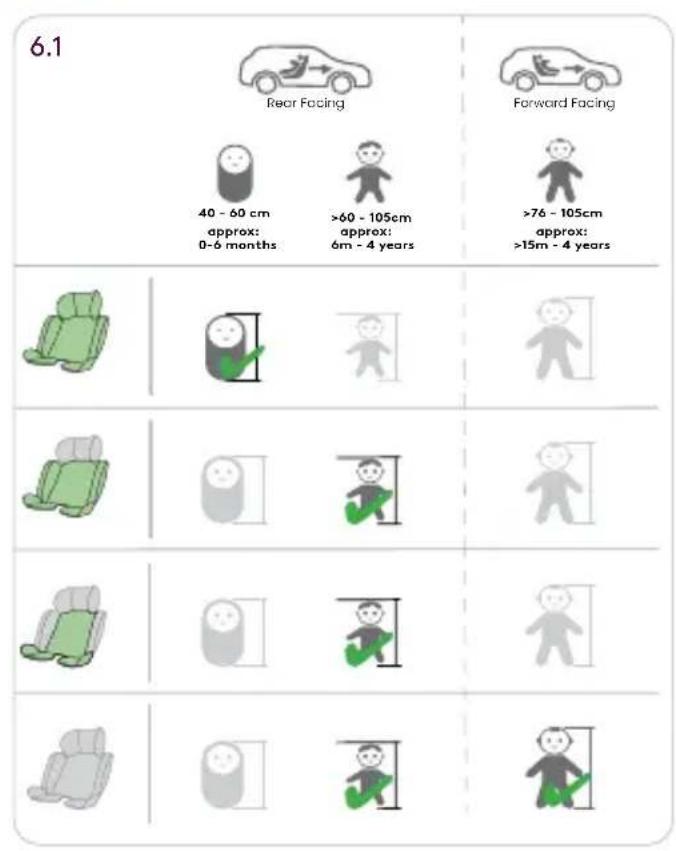
| Use | Rear-facing (40–105 cm, ≤19.5 kg) and forward-facing (from 76 cm and 15 months) |
| Installation | ISOFIX + support leg (Base Plus 360 required, sold separately) |
| Rotation mechanism | 360° rotation with rotation button |
| AgeLock locking | Switch blocking forward-facing orientation before 15 months |
| Shell recline | 4 positions (including full recline for rear-facing) |
| Inner recline | 3 positions (position 1 required for forward-facing) |
| Harness | 5-point, height adjustable with headrest |
| Headrest | Height adjustable (must be at shoulder level) |
| Newborn insert | 3 pieces, mandatory from 40 to 60 cm (rear-facing only) |
| Maximum child weight | 19.5 kg |
| Child height | 40 to 105 cm |
| Orientation | Rear and forward facing |
| Materials | Plastic shell, textile harness, foam padding |
| Cover cleaning | Machine washable at 30°C, delicate cycle (do not tumble dry) |
| Cleaning plastic/metal parts | Soft cloth and mild soap (no solvents) |
| Maintenance | Do not oil, do not modify, replace after an accident |
| Included accessories | Newborn insert 3 pieces, ISOFIX guides |
| Required base | Base Plus 360 (required, not included with the seat) |
Frequently Asked Questions - Approach Plus 360 Silver Cross
User questions about Approach Plus 360 Silver Cross
0 question about this device. Answer the ones you know or ask your own.
Ask a new question about this device
Download the instructions for your Car seat in PDF format for free! Find your manual Approach Plus 360 - Silver Cross and take your electronic device back in hand. On this page are published all the documents necessary for the use of your device. Approach Plus 360 by Silver Cross.
USER MANUAL Approach Plus 360 Silver Cross
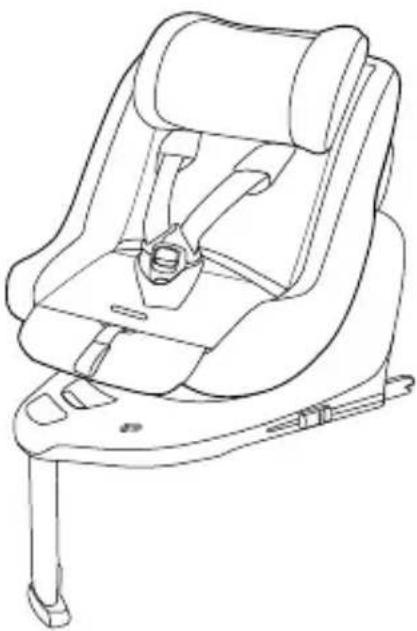
Approach Plus 360
For use with Base Plus 360
40cm - 105cm / ≤19.5kg / Birth to approx 4 years
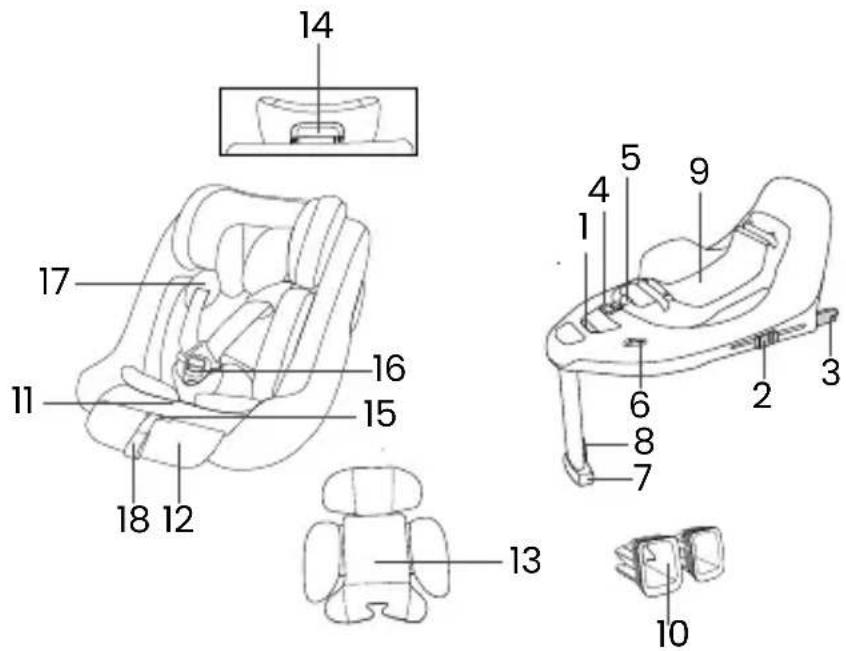
1 Rotation button
2 ISOFIX adjuster button
3 ISOFIX connector arms
4 QuickRelease strap
5 Secure connection indicator
6 AgeLock rotation switch
7 Support leg
8 Support leg adjustment button
9 Turntable
10 Plastic ISOFIX guides
11 Inner seat recline
12 Outer seat shell recline
13 Newborn insert
14 Headrest height adjustment
15 Harness adjustment button
16 Harness buckle
17 Harness straps
18 Harness adjuster strap

natural_image
Line drawing of a baby car seat with a hand holding the seat, showing a purple arrow indicating force or movement (no text or symbols)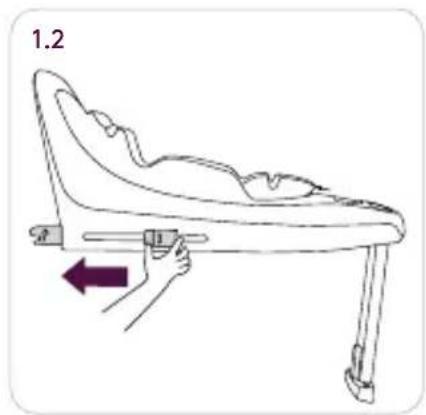
natural_image
Line drawing of a baby seat with a hand holding a horizontal bar, showing posture and movement (no text or symbols)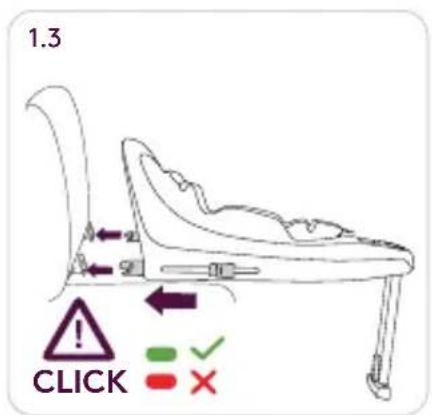
natural_image
Line drawing of a baby seat with a checkmark and cross symbols indicating selection (no text or labels)silvercrossbaby.com
natural_image
Line drawing of a baby seat with adjustable legs and arm, labeled '2.1' (no text or symbols on the diagram itself)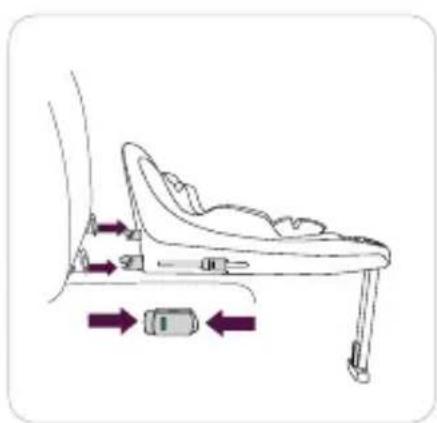
silvercrossbaby.com
natural_image
Line drawing of two car seats with different seat designs, no text or symbols presentsilvercrossbaby.com
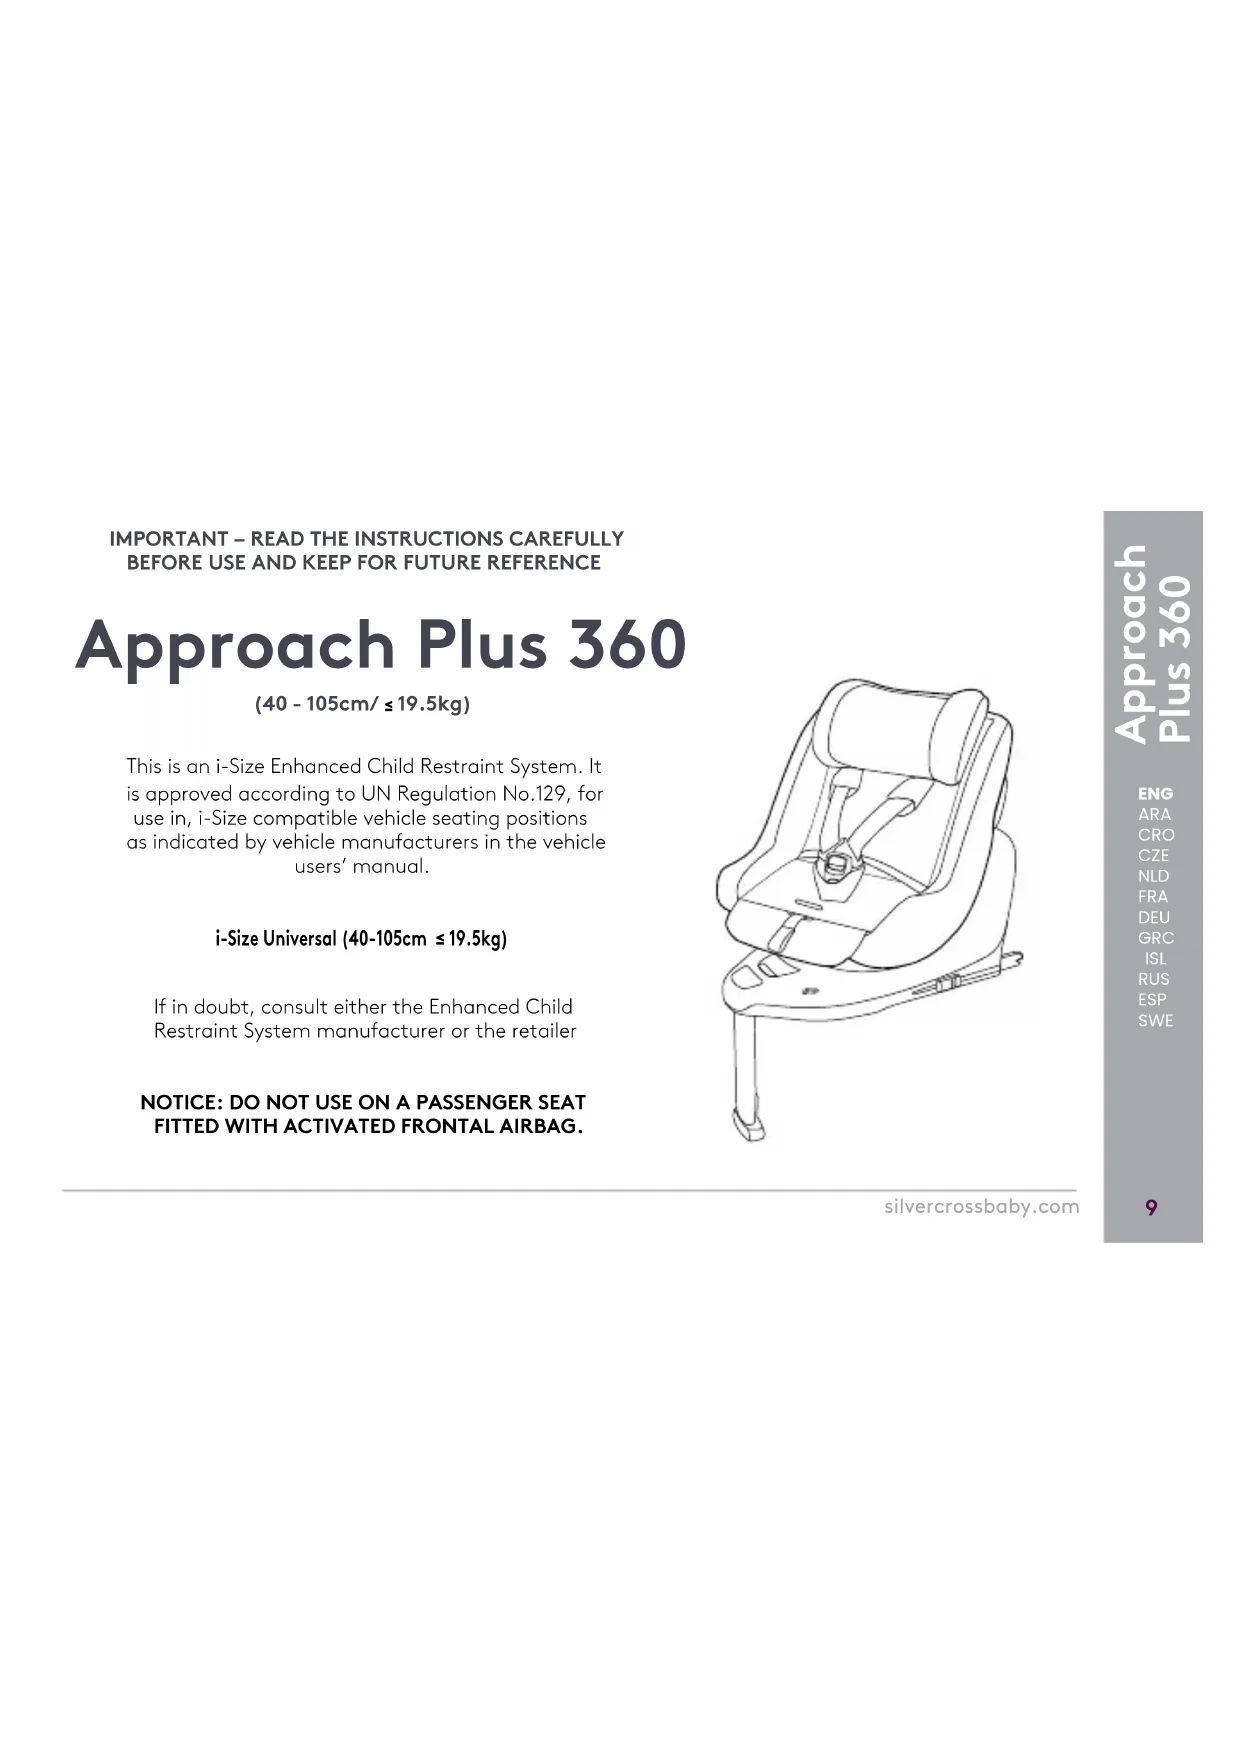
IMPORTANT – READ THE INSTRUCTIONS CAREFULLY BEFORE USE AND KEEP FOR FUTURE REFERENCE
Approach Plus 360
(40 - 105cm/ ≤ 19.5kg)
This is an i-Size Enhanced Child Restraint System. It is approved according to UN Regulation No.129, for use in, i-Size compatible vehicle seating positions as indicated by vehicle manufacturers in the vehicle users' manual.
i-Size Universal (40-105cm ≤ 19.5kg)
If in doubt, consult either the Enhanced Child Restraint System manufacturer or the retailer
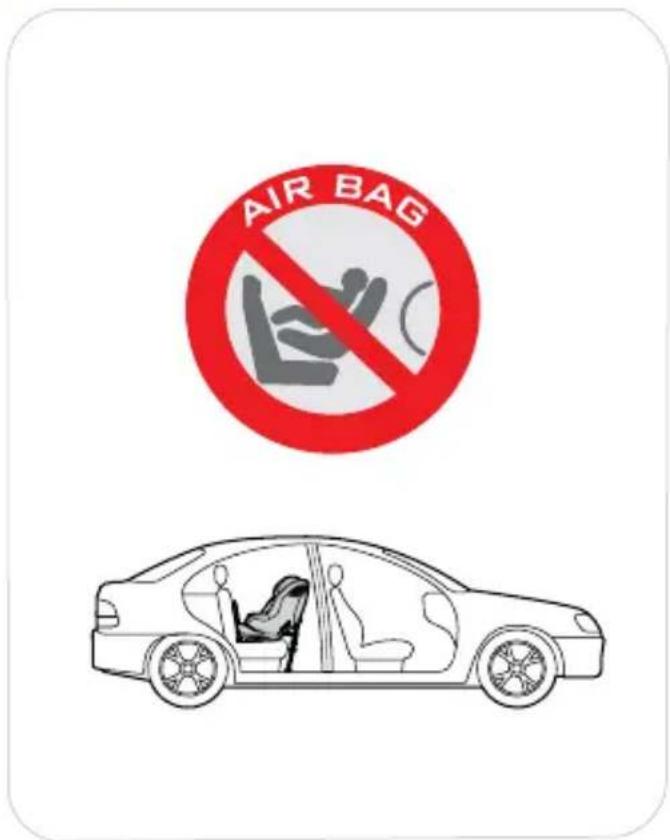
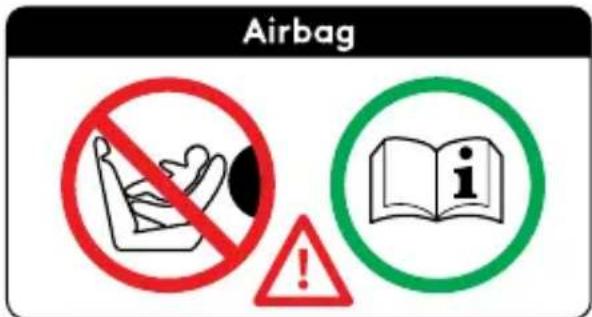
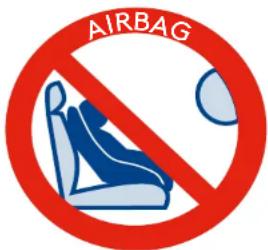
NOTICE: DO NOT USE ON A PASSENGER SEAT FITTED WITH ACTIVATED FRONTAL AIRBAG.
natural_image
Line drawing of a car comfort seat with seatbelt and lapel (no text or symbols)silvercrossbaby.com
INSTALLING THE CHILD SEAT
TO INSTALL THE BASE PLUS 360 CHILD RESTRAINT SYSTEM FOLLOW THE STEPS BELOW:
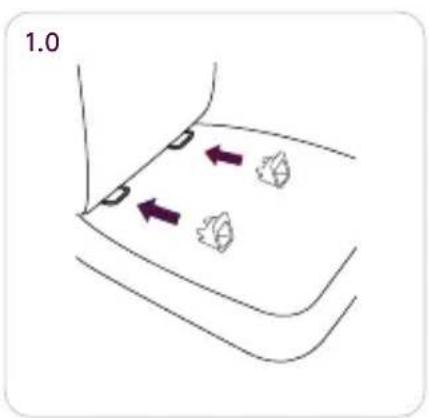
1.0 Attach the ISOFIX guides (10) to the vehicle's ISOFIX anchor points if required(see vehicle owner's manual).
The ISOFIX guides can protect the surface of the vehicle seat from being torn.
They can also guide the ISOFIX connectors. If your vehicle seat has built in guides, you do not need to use the ones provided.
1.1 Unfold the support leg (7) from storage compartment.
1.2 Extend the ISOFIX connectors (3) by pressing the ISOFIX adjustment button (2) while pulling on the connector
1.3 Line up the ISOFIX connectors (3) with the ISOFIX guides, and then click both
ISOFIX connectors into the ISOFIX anchor points
Make sure that both ISOFIX connectors are securely attached to the vehicle's ISOFIX anchor points. There should be two audible clicks and the colors of the indicators on both ISOFIX connectors should be completely green.
Check to make sure the base is securely installed by pulling on both ISOFIX connectors.
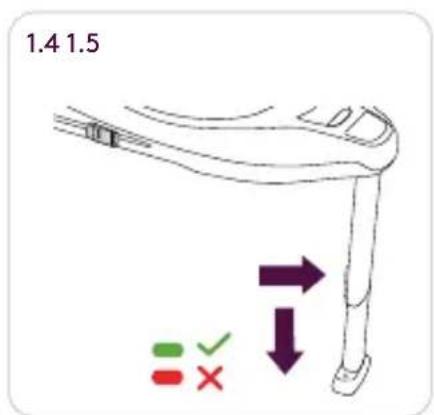
1.4 After securing the ISOFIX, extend the support leg (7) to floor. When the support leg is installed correctly, the support leg indicator will showgreen. Red will be shown when installed incorrectly.
Make sure the support leg is in full contact with the vehicle floor pan.
The support leg has multiple positions. When the Support leg indicator shows red this means the support leg is in the wrong position.
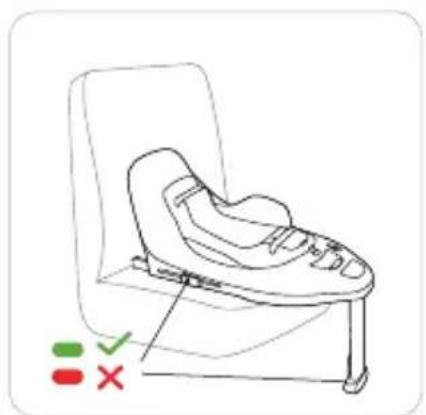
1.5 The completely assembled base. The ISOFIX connectors must be attached and locked onto the ISOFIX anchor points. The support leg must be installed correctly with green indicator.
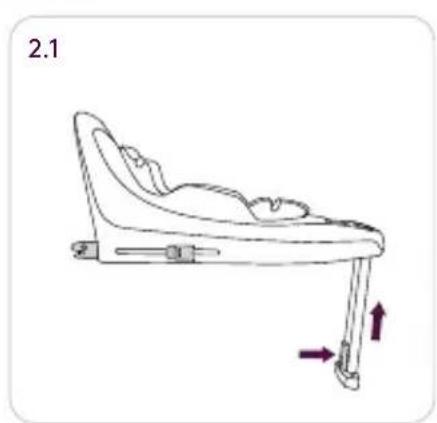
2.1 To remove the base from the vehicle seat, press the support leg adjustment button (8) and move upward. The support leg will no longer contact the vehicle floor.
2.2 To release the ISOFIX from the vehicle seat, push the secondary lock buttons first and then press the ISOFIX releasing buttons (2) on the ISOFIX connectors (3) before removing the base from the vehicle seat. Retract the ISOFIX
connectors (3) when the base is not in use.
AGELOCK ROTATION SWITCH
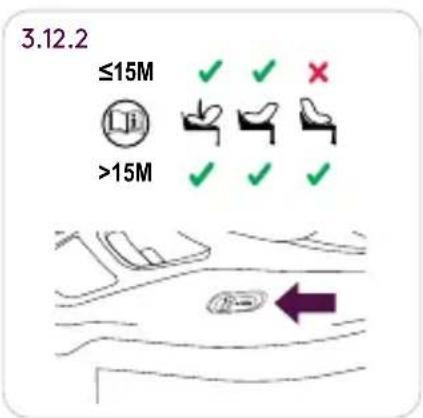
3.1 Base Plus 360 features AgeLock rotation switch (6). When ≤15m is visible the turntable (9) will not move to a forward facing position. Moving AgeLock to show >15m will allow the turntable to lock forward facing.
NOTE! Approach Plus 360 requires mandatory rear facing use until your child is at least 15m + 76cm. We recommend you continue rear facing your child for as long as possible.
CONNECTING APPROACH PLUS 360 TO THE BASE
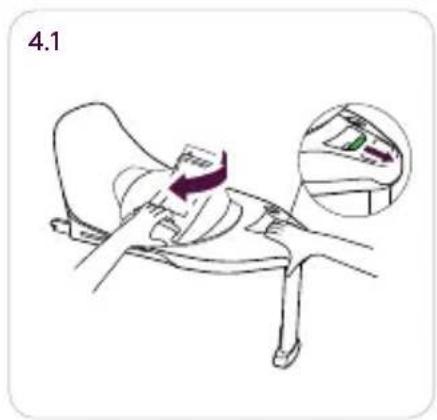
4.1 Rotate Base Plus 360 by pulling the rotation button (1). When rotation button (1) is held the base turntable (9) is free to move.
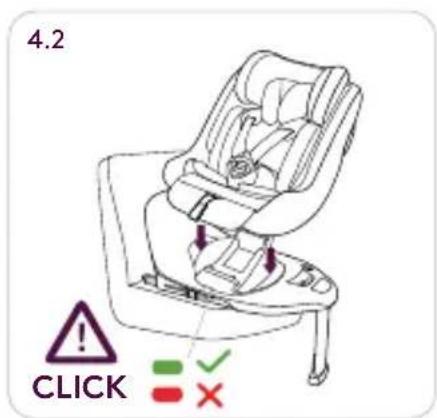
4.2 Position Approach Plus 360 over the base, locating the connection points. Push the child seat firmly onto the base. Ensure the connection indicator (5) is green
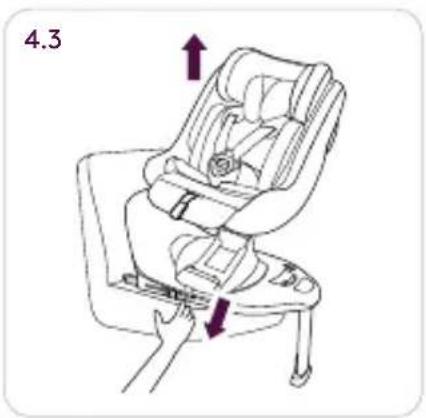
4.3 To remove Approach Plus 360 from the base, ensure it is rotated to the side loading position. Pull the QuickRelease strap (4) and lift the child seat off the base.
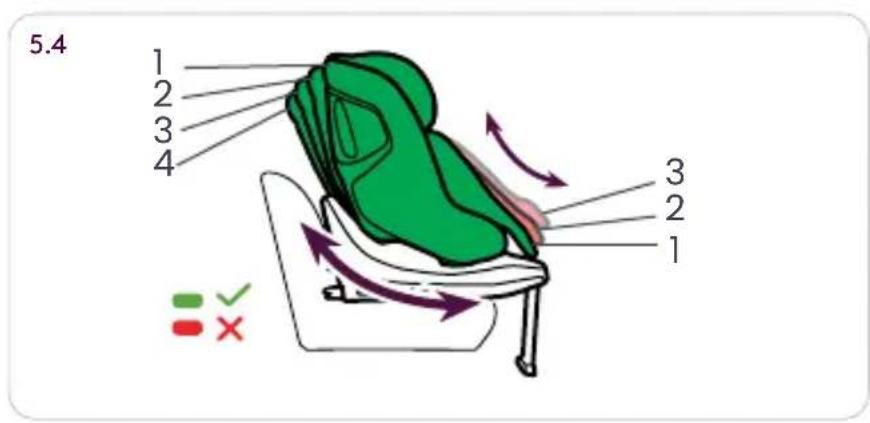
RECLINING APPROACH PLUS 360
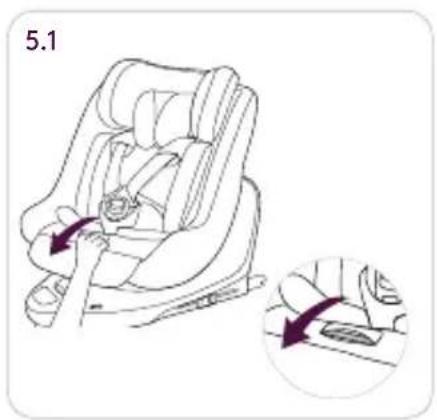
5.1 To operate the inner seat recline(11), place your hand into the fabric slot and pull the grey lever firmly forward.
There are three inner recline positions
Position 1 - upright
Position 2 - mid recline
Position 3 - full recline
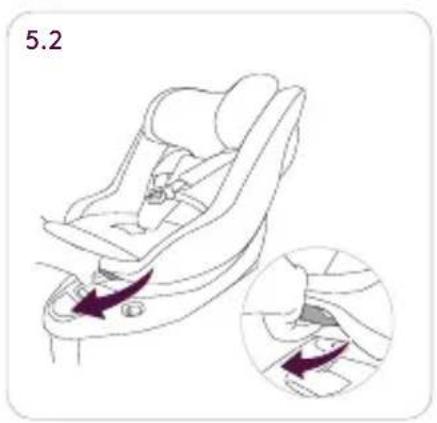
5.2 To operate the seat shell recline, pull the grey lever (12) located underneath the front of the seat shell.
There are four seat recline positions
Position 1 - Upright
Position 2 - mid recline
Position 3 - mid recline
Position 4 - full recline
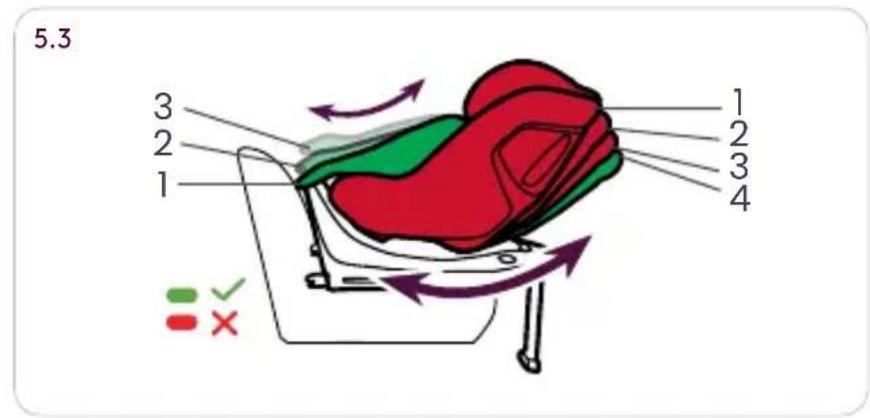
5.3 When using Approach Plus 360 rear facing, use seat shell recline position 4. Any inner recline position may be used.
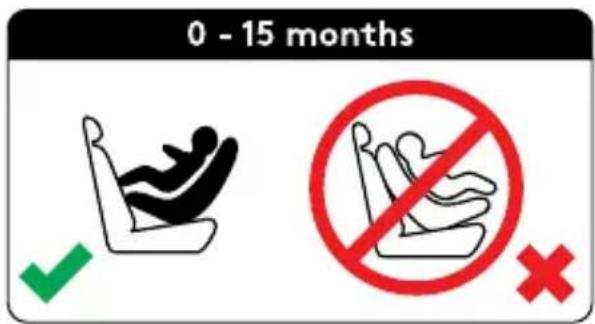
5.4 When using Approach Plus 360 forward facing, any seat shell recline position may be used. Inner recline position 1 must be used when forward facing.
SETTING UP APPROACH PLUS 360 FOR THE CHILD
6.1 Approach Plus 360 has a three part newborn insert (13). The full insert must be used for children between 40-60cm in length.
When your child has exceeded 60cm, the insert may be freely adapted to best suit your child's comfort.
The newborn insert must never be used forward facing.
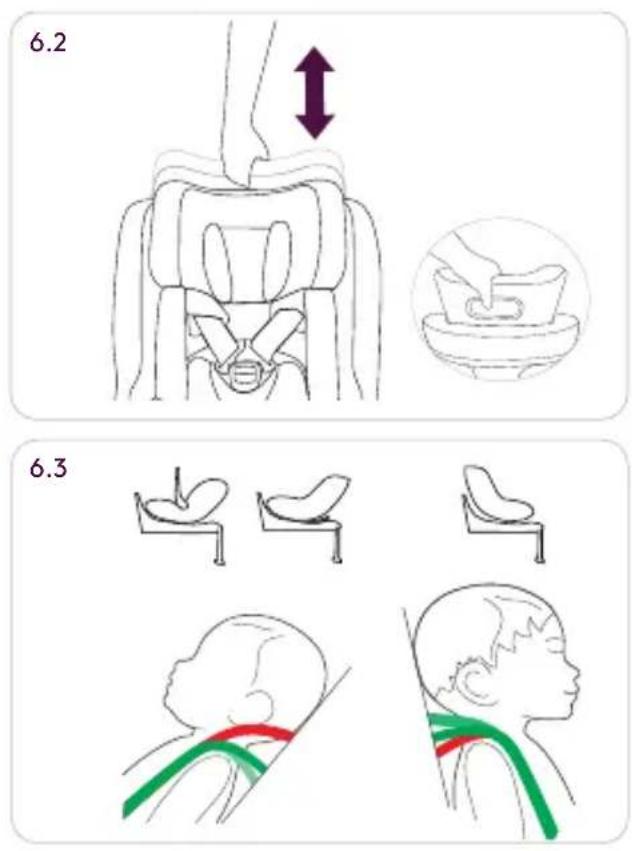
6.2 The headrest height should be adjusted for your child before they use Approach Plus 360. To adjust the headrest height, loosen the harness straps (17), squeeze the grey lever (14) at the top of the headrest. While squeezing the lever, adjust to the desired height.
Check the headrest height periodically throughout use of Approach Plus 360 - it will require adjusting as your child grows.
6.3 The headrest height should be level with your child's shoulders. If you find the headrest between height positions, opt for the lower setting when rear facing and upper setting when forward facing.
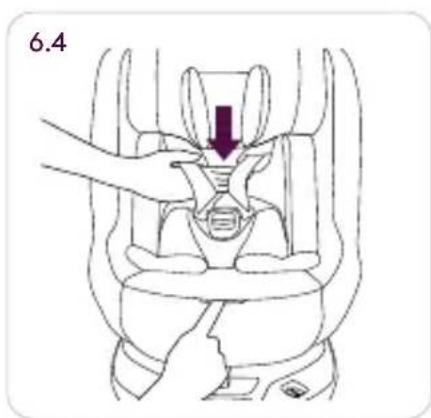
6.4 To secure your child in Approach Plus 360, loosen the harness (17) by pressing the adjuster button (15) and open the buckle (16)
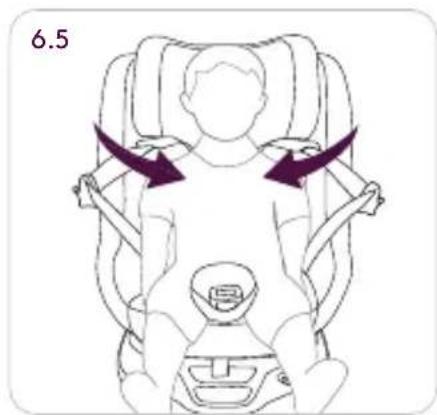
6.5 Pull the shoulder straps (17) over the top of your child's shoulders. Ensure any coats or thick clothing is removed prior to securing the harness.
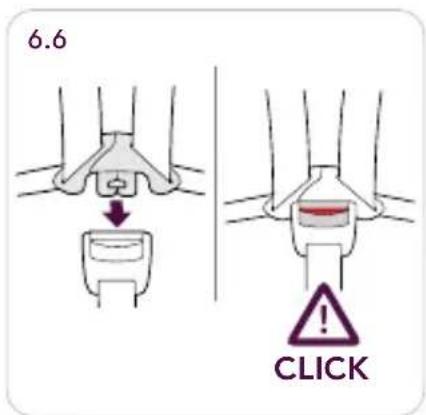
6.6 To secure the harness, first join the two harness buckle pieces together. Once together, push firmly into the buckle (16). There will be an audible CLICK when the buckle is connected.
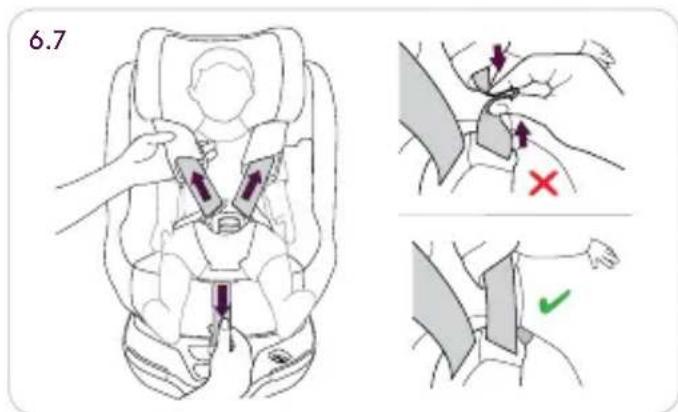
6.7 Hold both harness straps between the buckle and shoulder pads, pull upward - this will remove any slack in the hip area of the harness. Next, pull the adjuster strap (18) firmly to tension the harness.
The harness should be tight enough that you cannot pinch the harness webbing together.
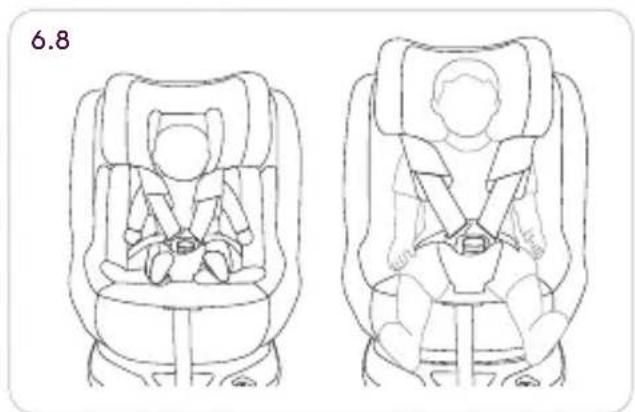
6.8 The images demonstrate a correctly secured baby and toddler in Approach Plus 360.
MAINTENANCE
FITTING / REMOVING THE COVER
Gently pull the front part of the cover.
There are plastic parts on the sides of the cover used to fasten it in place. Simply pull gently to remove the cover.
To fit the cover back on, follow the same steps in reverse. Insert the side parts in the slot.
CLEANING
The seat cover is easily removable and should be washed on a delicate cycle at 30 degrees celsius using a mild detergent. Take out all removable internal plastic / foam parts from inside any fabrics before washing.
Please follow the washing instructions on the care label on the cover.
Do not tumble dry the cover as the padding could come away from the fabric.
Do not expose the cover to the sunlight for prolonged periods. When the seat is not in use cover it up or store it in the luggage compartment.
PLASTIC/METAL PARTS
Wipe clean using a mild hand soap and warm water. You must not use detergents, solvents or strong soaps. This may weaken your infant carrier shell or harness. You must not remove, dismantle or alter any part of the infant carrier shell or harness.
You must not oil or lubricate any part of your infant carrier shell or harness system.
WARNINGS
READ THESE INSTRUCTIONS CAREFULLY.
INCORRECT INSTALLATION OF THE CHILD RESTRAINT SYSTEM MAY CAUSE THE CHILD SERIOUS INJURY. IF USED INCORRECTLY, THE MANUFACTURER CANNOT BE HELD RESPONSIBLE.
THE CHILD'S SAFETY IS YOUR RESPONSIBILITY.
YOU CAN ONLY EXPECT BASE PLUS 360 CAR SEAT TO PROVIDE MAXIMUM PROTECTION IF IT IS FITTED AND USED CORRECTLY AS PER THE MANUFACTURER'S INSTRUCTIONS.
THIS CHILD RESTRAINT SYSTEM HAS BEEN APPROVED UNDER REGULATION 129/04 FOR
CHILDREN OF BETWEEN 40CM AND 105CM IN HEIGHT.
DO NOT USE THE BASE IN THE FORWARD FACING POSITION WITH CHILDREN UNDER 15 MONTHS OLD.
YOU ARE ADVISED TO USE THE REAR FACING POSITION FOR AS LONG AS POSSIBLE.
DO NOT LEAVE THE CHILD UNATTENDED IN THE VEHICLE.
WHEN INSTALLING THE SAFETY SEAT IN THE FORWARD FACING POSITION, IT IS ADVISABLE TO MOVE THE FRONT SEAT OF THE VEHICLE AS FAR FORWARD AS POSSIBLE.
KEEP THE CHILD RESTRAINT SYSTEM AWAY FROM CORROSIVE LIQUIDS, PAINTS OR SOLVENTS
THAT COULD DAMAGE THE PRODUCT.
USE THE PLASTIC ISOFIX GUIDES PROVIDED WHEN NECESSARY. SILVER CROSS CANNOT BE HELD RESPONSIBLE FOR DAMAGE OR MARKING TO VEHICLE SEAT UPHOLSTERY.
THE CHILD RESTRAINT SYSTEM SHOULD BE REPLACED AFTER AN ACCIDENT, EVEN IF THERE ARE NO VISIBLE SIGNS OF DAMAGE. THE PRODUCT MAY HAVE UNSEEN INTERNAL DAMAGE THAT COULD COMPROMISE THE CHILD'S SAFETY.
TAKE REGULAR BREAKS WHEN TRAVELING SO THE CHILD CAN GET OUT OF THE SEAT AND WALK ABOUT. IT IS NOT ADVISABLE TO TRAVEL FOR MORE THAN
2 HOURS AT A TIME WITHOUT TAKING A BREAK. THIS ADVISE IS VERY IMPORTANT FOR BABIES.
DO NOT PLACE THE FRONT SUPPORT LEG ON A FLOOR STORAGE COMPARTMENT LID. THE FRONT SUPPORT LEG MUST MAKE FULL AND FIRM CONTACT WITH THE VEHICLE FLOOR.
MANUFACTURER. DO NOT ALTER THE PRODUCT BY ADDING OR REMOVING ANY ACCESSORY OR COMPLEMENT.
DO NOT LEAVE UNSECURED LUGGAGE OR OBJECTS ON THE PARCEL SHELF IN THE VEHICLE, BECAUSE IN THE EVENT OF AN ACCIDENT THEY COULD CAUSE SERIOUS INJURY TO THE OCCUPANTS.
COVER THE SEAT IF IT IS LEFT IN DIRECT SUNLIGHT. PLASTIC AND METAL SURFACES GET VERY HOT AND COULD BURN. THE CAR SEAT COVER IS ALSO LIKELY TO FADE.
SIGURNOST VAŠEG DJETETA VAŠA JE ODGOVORNOST.
MOŽETE OČEKIVATI DA ĆE BASE PLUS 360 AUTOSJEDALICA PRUŽITI MAKSIMALNU ZAŠTITU SAMO AKO JE POSTAVLJENA I PRAVILNO KORIŠTENA PREMA UPUTAMA PROIZVOĐACA.
OVAJ SIGURNOSNI SUSTAV ZA DJECU ODOBREN JE U SKLADU S PROPISOM 129/04 ZA DJECU VISINE IZMEĐU 40 CM I 105 CM.
NEMOJTE KORISTITI BAZU U POLOŽAJU OKRENUTOM PREMA NAPRIJED S DJECOM MLAĐOM OD 15 MJESECI.
i-Size Universal (40-105cm ≤ 19,5kg)
i-Size Universal (40-105cm ≤ 19,5kg)
i-Size Universal (40-105cm ≤ 19.5kg)
TENGING ADFLUGS PLÚS 360 VID GRUNNINN
MÁTUN / FJARLÆGING Á HLÍFINNI
i-Size Universal (40-105cm ≤ 19,5kg)
Silver Cross (UK) Ltd,
Micklethorn,
Broughton,
Skipton,
North Yorkshire,
BD23 3JA
EU/PACIFIC
Silver Cross (Pacific) Ltd.
Office 527,
Lee Garden Three,
1 Sunning Road,
Causeway Bay,
Hong Kong
EU/UE Responsible person, Отговорно лице, Osoba odpovědná, Ansvarlige person, Verantwortliche Person, Утєúθυνο πρόσωπο, Persona responsable, Vastutav isik, Vastuuhenkilö, Personne responsable, Duine atá freagrach, Odgovorna osoba, Felelős személy Persona responsabile, Atsakingas asmuo, Atbildīgā persona, Persuna responsabbli, Verantwoordelijk persoon, Osoba odpowiedzialna, Pessoa responsável, Persoana responsabilă, Žodpovedná osoba, Odgovorna oseba, Ansvarig person:
Silver Cross Europe S.L., Carrer de Pau Claris, 138, Entresòl, 08009 Barcelona, Spain (gpsr@silvercrossbaby.com)

Contact Us
Customer service: 0345 872 6900
e-mail: customerservice@silvercrossbaby.com

Vehicle Fitting List
Base Plus 360 with:
Glide Plus 360
Approach Plus 360
40cm - 105cm / ≤19.5kg / Birth to approx 4 years
IMPORTANT SAFETY GUIDE
DO NOT USE ON A PASSENGER SEAT WITH A FRONT AIRBAG, IT IS VERY DANGEROUS AND ILLEGAL (YOU MAY BE ABLE TO DISCONNECT THE AIRBAG MANUALLY OR AUTOMATICALLY TO COMPLY WITH THE LAW). REFER TO YOUR VEHICLE HANDBOOK.

IF POSSIBLE, SILVER CROSS RECOMMEND FITTING THE SEAT IN THE REAR SEAT OF THE VEHICLE, IT IS STATISTICALLY SAFER.
For the latest vehicle fitting lists please refer to the Silver Cross website:
www.silvercrossbaby.com/ customer-service/instructionmanuals or on the Silver Cross App.


This fitting-list was carefully prepared using scientific data collected from both vehicle and car seat. No liability is accepted for the accuracy of the list, which is for guidance purposes only. You are advised to check that the seat you purchase is compatible with your car at the time of purchase.
VEHICLE FITTING INFORMATION
The numbers on the diagram below correspond with the vehicle fitting positions listed in the following pages.
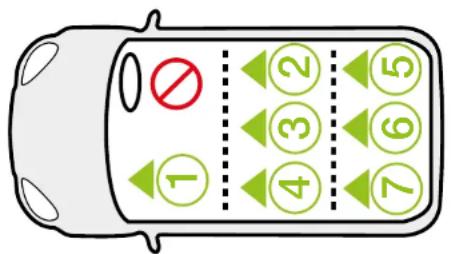
If your child restraint can be fitted, it is marked with Y.
If your child restraint cannot be fitted, it is marked with N.
If your vehicle is not listed in this manual or it is not marked with either a Y or N then please refer to your vehicle's handbook or contact the manufacturer for further information. Seat positions in other cars may also be suitable to accept the child restraint.
natural_image
Line drawing of a baby car seat with a curved seat and attached arm (no text or symbols)Glide Plus 360
i-Size infant carrier with Base Plus 360
Birth - approx. 18m. 40-87cm 13kg
Fitting Method:
Base Plus 360 OR
Vehicle 3 point seatbelt
natural_image
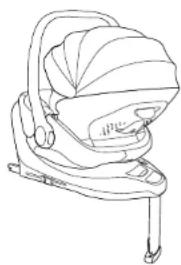
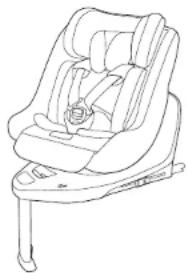
Line drawing of a baby car seat with no text or symbolsApproach Plus 360
Multi stage seat with Base Plus 360
Birth - approx. 4y. 40-105cm 19.5kg
Fitting Method:
Base Plus 360 only
| Glide Plus 360 with Base Plus 360 | Approach Plus 360 with Base Plus 360 | |||
| Vehicles NOTES i-Size | Approved Seating Positions | Approved Seating Positions | ||
| Alfa Romeo 4C Coupe (2014 - ) -- | ||||
| Alfa Romeo Giulia (2017 - ) Y 2, 4 2, 4 | ||||
| Alfa Romeo Guilietta (2010 - ) 2, 4 2, 4 | ||||
| Alfa Romeo MiTo 3dr (2009 - ) -- | ||||
| Alfa Romeo Stelvio (2017 - ) Y 2, 4 2, 4 | ||||
| Aston Martin DB11 (2019 - ) -- | ||||
| Aston Martin DBS (2019 - ) -- | ||||
| Aston Martin Vantage (2019 - ) -- | ||||
| Audi A1 5dr (2018 - ) Y 2, 4 2, 4 | ||||
| Audi A1 Sportback 5dr (2012 - ) -- | ||||
| Audi A3 5dr (2005 - 2011) 2, 4 2, 4 | ||||
| Audi A3 3dr (1996 - 2003) 2, 4 2, 4 | ||||
| Audi A3 Hatch 5dr (2012 - ) | 2, 4 2, 4 | |||
| Audi A3 S3 5dr (2012 - ) | 2, 4 2, 4 | |||
| Audi A3 Saloon (2014 - ) | 2, 4 2, 4 | |||
| Audi A3 e-Tron Sportback (2015 - ) | 2, 4 2, 4 | |||
| Audi A4 2005 (2005 - 2008) | 2, 4 2, 4 | |||
| Audi A4 (2015 - ) | Y 2, 4 2, 4 | |||
| Audi A4 Avant (2008 - ) 2, 4 2, 4 | ||||
| Audi A5 Sportback (2009 - ) 2, 4 2, 4 | ||||
| Audi A5/S5 Cabriolet (2017 - ) Y 2, 4 2, 4 | ||||
| Audi A5/S5 Coupe (2016 - ) 2, 4 2, 4 | ||||
| Audi A5/S5 Sportback (2017 - ) Y 2, 4 2, 4 | ||||
| Audi A6 Allroad (2011 - ) 2, 4 2, 4 | ||||
| Audi A6 Avant (2011 - ) 2, 4 2, 4 | ||||
| Audi A7 Sportback (2011 - ) 2, 4 2, 4 | ||||
| Audi A7/S7 Sportback (2016 - ) 2, 4 2, 4 | ||||
| Audi A7/S7 Sportback (2018 - ) 2, 4 2, 4 | ||||
| Audi A8 (2011 - ) 2, 4 2, 4 | ||||
| Audi A8 S8 (2011 - ) 2, 4 2, 4 | ||||
| Audi A8/S8 (2018 - ) Y 2, 4 2, 4 | ||||
| Audi Q2 (2016 - ) | MOTION 2: RECLINE AND ROTATE REDUCED WHEN FORWARD FACING | Y 1, 2, 4 | 1, 2, 4 | |
| Audi Q3 (2011 - ) | 1, 2, 4 | 1, 2, 4 | ||
| Audi Q3 (2019 - ) | Y | 1, 2, 4 | 2, 4 | |
| Audi Q4 e-Tron (2021 - ) | Y | 2, 4 | 2, 4 | |
| Audi Q5 (2009 - ) | 2, 4 2, 4 | |||
| Audi Q5/SQ5 (2017 - ) | 2, 4 2, 4 | |||
| Audi Q7 (2006 - ) | 2, 4 2, 4 | |||
| Audi Q7 (2015 - ) | Y 2, 4 2, 4 | |||
| Audi Q8 (2018 - ) | Y | 1, 2, 4 | 1, 2, 4 | |
| Audi TT Coupe (2008 - ) | - | - | ||
| BMW 1 Series (f20) 5dr (2011 - ) | 2, 4 2, 4 | |||
| BMW 1-Series 5dr (2004 - 2010) | 2, 4 2, 4 | |||
| BMW 1-Series Cabrio (2008 - ) 2, 4 2, 4 | ||||
| BMW 1-Series Coupe (2008 - ) 2, 4 2, 4 | ||||
| BMW 2-Series AC-T (2015 - ) 2, 4 2, 4 | ||||
| BMW 2-Series Coupe (2014 - ) 2, 4 2, 4 | ||||
| BMW 3 Series (f30) (2012 - ) 2, 4 2, 4 | ||||
| BMW 3-Series (E46) Coupe (2002 - 2006) -- | ||||
| BMW 3-Series Coupe (E90) (2007 - ) 2, 4 2, 4 | ||||
| BMW 3GT (2013 - ) 2, 4 2, 4 | ||||
| BMW 4-Series Gran Coupe (2014 - ) 2, 4 2, 4 | ||||
| BMW 5-GT (2010 - ) 2, 4 2, 4 | ||||
| BMW 5-Series (F10) (2011 - ) 2, 4 2, 4 | ||||
| BMW 5-Series (E60) (2003 - 2010) 2, 4 2, 4 | ||||
| BMW 5-Series (2018 - ) | Y | 2, 4 | 2, 4 | |
| BMW 6-Series Cabrio (2011 - ) | 2, 4 2, 4 | |||
| BMW 6-Series Coupe (2Dr) (2011 - ) | 2, 4 2, 4 | |||
| BMW 6-Series Gran Coupe (4Dr) (2011 - ) | 2, 4 2, 4 | |||
| BMW 7-Series (2010 - ) | 2, 4 2, 4 | |||
| BMW 7-Series (2015 - ) | 2, 4 2, 4 | |||
| BMW XI (2009 -2015) | 2, 4 2, 4 | |||
| BMW XI (2016 - ) | Y | 1, 2, 4 | 1, 2, 4 | |
| BMW X3 (2007 - ) | 2, 4 2, 4 | |||
| BMW X3 (F25) (2011 - ) | 2, 4 2, 4 | |||
| BMW X3 (2018 - ) | Y | 2, 4 | 2, 4 | |
| BMW X4 (2014 - ) | 2, 4 2, 4 | |||
| BMW X5 (2000 - 2006) | -- | |||
| BMW X5 (2007 - 2014) 2, 4 2, 4 | ||||
| BMW X5 (2015 - ) 2, 4 2, 4 | ||||
| BMW X6 (2009 - ) 2, 4 2, 4 | ||||
| BMW X6 (2015 - ) 2, 4 2, 4 | ||||
| BMW i3 (2014 - ) 2, 4 2, 4 | ||||
| BMW i8 (2014 - ) -- | ||||
| BMW iX (2021 - ) Y 2, 4 2, 4 | ||||
| BMW iX3 (2022 - ) Y 2, 4 2, 4 | ||||
| Bentley Continental Flying Spur (2005 - ) 2, 4 2, 4 | ||||
| Bentley Continental GT (2003 - 2012) -- | ||||
| Bentley Continental GT Conv (2006 - 2012) -- | ||||
| Bentley Mulsanne (2012 - ) 2, 4 2, 4 | ||||
| Cadillac BLS (2005 - 2012) | 2, 4 2, 4 | |||
| Chevrolet Aveo 5dr (2012 - ) | 2, 4 | - | ||
| Chevrolet Captiva (2010 - ) | 2, 4 2, 4 | |||
| Chevrolet Cruze (2011 - ) | 2, 4 2, 4 | |||
| Chevrolet Orlando (2011 - ) | 2, 4 2, 4 | |||
| Chevrolet Spark 5dr (2012 - ) | FRONT SEAT ROOM REDUCTION MAYBE EXPERIENCED WITH A REAR FACINGSEAT. BALANCE I-SIZE ONLYCOMPATIBLE IF APPROVED VEHICLETOP TETHER POINT IS PRESENT. | 2, 4 2, 4 | ||
| Chevrolet Traxx (2013 - ) | 2, 4 2, 4 | |||
| Chevrolet Volt (2011 - ) | 2, 4 2, 4 | |||
| Chrysler 300C (2012 - ) | 2, 4 2, 4 | |||
| Chrysler Delta (2007 - ) 2, 4 2, 4 | ||||
| Chrysler Grand Voyager (2008 - ) 2, 4 2, 4 | ||||
| Chrysler Ypsilon 3dr (2012 - ) 2, 4 - | ||||
| Citroen Berlingo II SB! (2008 - ) | FLOOR STORAGE COMPARTMENT PRESENT | - | - | |
| Citroen Berlingo Multispace SB! (2007 - ) | FLOOR STORAGE COMPARTMENT PRESENT | - | - | |
| Citroen C-Cactus (2015) Y 2, 4 2, 4 | ||||
| Citroen Cl 5dr (2015 - ) 2, 4 - | ||||
| Citroen Cl 3dr (2006 - ) - - | ||||
| Citroen C3 5Dr (2009 - ) 2, 4 2, 4 | ||||
| Citroen C3 5dr (2005 - 2009) 2, 4 2, 4 | ||||
| Citroen C3 5dr (2016 - ) Y 2, 4 2, 4 | ||||
| Citroen C3 Aircross (2017 - ) Y 2, 4 2, 4 | ||||
| Citroen C3 Picasso SB! (2009 - ) | SUPPORT LEG TO BOTTOM OF STORAGE BOX | 2, 4 - | ||
| Citroen C4 G-Picasso SB! (2007 - 2013) | SUPPORT LEG TO BOTTOM OF STORAGE BOX | 2, 4 2, 4 | ||
| Citroen C4 G-Picasso SB! (2014 - ) | SUPPORT LEG TO BOTTOM OF STORAGE BOX | 2, 4 2, 4 | ||
| Citroen C4 Picasso SB! (2007 - 2013) | SUPPORT LEG TO BOTTOM OF STORAGE BOX | 2, 4 - | ||
| Citroen C5 (2008 - ) 2, 4 2, 4 | ||||
| Citroen C5 (2005 - 2008) | 2, 4 2, 4 | |||
| Citroen C5 Aircross (2019 - ) | Y | 2, 4 | 2, 4 | |
| Citroen C5 Tourer (2009 - ) 2, 4 2, 4 | ||||
| Citroen DS3 (2011 - ) 2, 4 2, 4 | ||||
| Citroen DS3 Cabrio (2013 - ) 2, 4 2, 4 | ||||
| Citroen DS3 Crossback (2019 - ) Y 2, 4 2, 4 | ||||
| Citroen DS4 (2011 - ) 2, 4 2, 4 | ||||
| Citroen DS5 (2013 - ) 2, 4 2, 4 | ||||
| Citroen DS7 (2018 - ) Y 2, 4 2, 4 | ||||
| Citroen Jumpy (2007 - 2016) 2, 4 2, 4 | ||||
| Citroen Nemo (2008 - ) 2, 4 2, 4 | ||||
| Citroen Xsara 5dr (2000 - 2004) | NO ISOFIX IN MODEL ASSESSED | - | - | |
| Citroen Xsara Picasso SB! (2000 - 2012) | SUPPORT LEG TO BOTTOM OF STORAGE BOX | 2, 4 2, 4 | ||
| Cupra Terramar (2024 - ) Y 2, 4 2, 4 | ||||
| Cupra Tavascan (2024 - ) Y 2, 4 2, 4 | ||||
| Cupra Born (2021 - ) | Y 2, 4 2, 4 | |||
| Cupra Formentor (2020 - ) | Y | 2, 4 | 2, 4 | |
| Cupra Leon (2020 - ) | Y 2, 4 2, 4 | |||
| Cupra Leon Estate (2020 - ) | Y | 2, 4 | 2, 4 | |
| Cupra Aleca (2018 - ) | Y 2, 4 2, 4 | |||
| Dacia Duster (2012 - ) | 2, 4 2, 4 | |||
| Dacia Jogger (2022 - ) | Y 2, 4 2, 4 | |||
| Dacia Logan MCV (2013 - ) | 2, 4 2, 4 | |||
| Dacia Logan MCV 2006 (2008-2013) | 2, 4 2, 4 | |||
| Dacia Sandero (2013 - ) | 2, 4 2, 4 | |||
| Dacia Sandero Stepway (2013 - ) | 2, 4 2, 4 | |||
| Dacia Spring (2021 - ) | FRONT SEAT SPACE REDUCTION WHEN INSTALLING A REAR FACING CHILD RESTRAINT | 2,4 2,4 | ||
| Dacia Bigster (2025 - ) | MOTION 2: NOT APPROVED DUE TO INSUFFICIENT SPACE IN VEHICLE | 2,4 2,4 | ||
| FIAT 124 Spider 2016 (2016 - ) -- | ||||
| FIAT 500 (2008 - ) | VEHICLE DOES NOT ALLOW FOR ISOFIX REAR FACING CHILD SEATS | - | - | |
| FIAT 500L (2013 - ) 2,4 2,4 | ||||
| FIAT 500X (2015 - ) Y 2,4 2,4 | ||||
| FIAT Bravo (2007 - ) 2,4 2,4 | ||||
| FIAT Doblo (2007 - ) 2,4 2,4 | ||||
| FIAT Panda (2012 - ) -- | ||||
| FIAT Punto 3dr (Grande Punto) (2006 - ) -- | ||||
| FIAT Qubo (2008 - ) 2,4 2,4 | ||||
| FIAT Tipo (2016 - ) Y 2,4 2,4 | ||||
| Ford B-Max (2012 - ) 2,4 2,4 | ||||
| Ford C-Max (2011 - ) 2,4 2,4 | ||||
| Ford C-Max SB! (2003 - 2013) -- | ||||
| Ford EcoSport (2015 - ) Y 2,4 2,4 | ||||
| Ford Edge (2016 - ) | 2,4 2,4 | |||
| Ford Fiesta 3dr (2004 - 2008) | NO ISOFIX IN MODEL ASSESSED | - | - | |
| Ford Fiesta MK6 5dr (2008 - 2017) | 2,4 2,4 | |||
| Ford Fiesta Mk7 (2017 - 2023) | Y | 2,4 | 2,4 | |
| Ford Focus (2010 - ) 2,4 2,4 | ||||
| Ford Focus 2005 (2005 - 2009) | NO ISOFIX IN MODEL ASSESSED | - | - | |
| Ford Focus 2018 (2018 - ) Y 2, 4 2, 4 | ||||
| Ford Focus EV (2015- ) 2, 4 2, 4 | ||||
| Ford Focus Mk1 (1998 - 2004) NO ISOFIX IN MODEL ASSESSED -- | ||||
| Ford Galaxy (2006 - ) 2, 4 2, 4 | ||||
| Ford Galaxy (2016 - ) Y 2, 4 2, 4 | ||||
| Ford Ka 3dr (2009 - 2013) NO ISOFIX IN MODEL ASSESSED -- | ||||
| Ford Ka+ 5dr (2016 - ) Y 2, 4 2, 4 | ||||
| Ford Kuga (2008 - 2012) 2, 4 2, 4 | ||||
| Ford Kuga (2013 - ) 2, 4 2, 4 | ||||
| Ford Kuga (2017 - ) | Y 2, 4 2, 4 | |||
| Ford Kuga (2020 - ) | Y 2, 4 2, 4 | |||
| Ford Mondeo (2000 - 2007) | -- | |||
| Ford Mondeo Estate (2007 - ) | 2, 4 2, 4 | |||
| Ford Mustang Cabrio (2015 - ) | -- | |||
| Ford Mustang Coupe (2015 - ) | -- | |||
| Ford Mustang Mach E (2022 - ) | Y | 2, 4 | 2, 4 | |
| Ford New Mondeo (2014 - ) | Y | 2, 4 | 2, 4 | |
| Ford Puma (2020 - ) | Y 2, 4 2, 4 | |||
| Ford Ranger Double-Cab Pickup (2019 - ) | 2, 4 2, 4 | |||
| Ford S-Max SB! (2006 - ) | SUPPORT LEG ON TOP OF STORAGEBOX ONLY WHEN OFFICIAL FORD FOAMSPACER USED. IF NO FOAM SPACER,FIT IS NOT APPROVED | 2, 3, 4 | 2, 3, 4 | |
| Ford S-Max (2015 - ) | Y 2, 4 2, 4 | |||
| Genesis G80 (2021 - ) Y 2, 4 2, 4 | ||||
| Genesis GV80 SUV (2021 - ) Y 2, 4 2, 4 | ||||
| Honda Accord Saloon (2008 - ) 2, 4 2, 4 | ||||
| Honda CR-V (2007 - 2012) 2, 4 2, 4 | ||||
| Honda CR-V (2012 - ) 2, 4 2, 4 | ||||
| Honda CR-V (2019 - ) Y 2, 4 2, 4 | ||||
| Honda Civic (2012 - ) 2, 4 2, 4 | ||||
| Honda Civic (2006 - 2011) 2, 4 2, 4 | ||||
| Honda Civic (2017 - ) Y 2, 4 2, 4 | ||||
| Honda Civic Saloon (2019 - ) Y 2, 4 2, 4 | ||||
| Honda Civic Tourer (2014 - ) 2, 4 2, 4 | ||||
| Honda E (2020 - 2023) | MOTION 2: FRONT SEAT SPACE REDUCTION | 2, 4 2, 4 | ||
| Honda E:nYI (2023 - ) Y 2, 4 2, 4 | ||||
| Honda Elysion (2012 - ) | 2, 4 2, 4 | |||
| Honda FRV (2006 - 2011) | 2, 4 | - | ||
| Honda HR-V (2015 - ) | Y | 2, 4 | 2, 4 | |
| Honda HR-V (2022 - ) | Y | 2, 4 | 2, 4 | |
| Honda Insight (2009 - ) | 2, 4 2, 4 | |||
| Honda Jazz (2008 - 2015) 2, 4 2, 4 | ||||
| Honda Jazz (2002 - 2008) | NO ISOFIX IN MODEL ASSESSED | - | - | |
| Honda Jazz (2016 - ) Y 2, 4 2, 4 | ||||
| Honda Jazz (2020 - ) Y 2, 4 2, 4 | ||||
| Honda Jazz Crosstar (2021 - ) | Y | 2, 4 | 2, 4 | |
| Honda Odyssey (2010 - ) | - | - | ||
| Hyundai Genesis Sedan (2016 - ) 2, 4 2, 4 | |||
| Hyundai Getz 5dr (2005 - 2011) 2, 4 2, 4 | |||
| Hyundai Ioniq Hybrid (2016 - ) Y 2, 4 2, 4 | |||
| Hyundai Ix20 (2011 - ) 2, 4 2, 4 | |||
| Hyundai Kona (2017 - ) Y 2, 4 2, 4 | |||
| Hyundai Santa Fe (2012 - ) 2, 4 2, 4 | |||
| Hyundai Santa Fe (2007 - 2012) 2, 4 2, 4 | |||
| Hyundai Tucson (2015 - ) Y 2, 4 2, 4 | |||
| Hyundai Veloster (2012 - ) -- | |||
| Hyundai i10 5dr (2014 - ) Y 2, 4 2, 4 | |||
| Hyundai i10 5dr (2008 - ) -- | |||
| Hyundai i20 (2014 - ) | 2, 4 2, 4 | ||
| Hyundai i20 (2015 - ) | 2, 4 2, 4 | ||
| Hyundai i20 Hatch (2009 - ) | -- | ||
| Hyundai i30 Hatch (2012 - ) | 2, 4 2, 4 | ||
| Hyundai i30 Hatch (2015 - 2017) 2, 4 2, 4 | |||
| Hyundai i30 Hatch (2017 - ) | Y | 2, 4 | 2, 4 |
| Hyundai i40 (2011 - ) | 2, 4 2, 4 | ||
| Hyundai i800/HI (2008 - ) | 2, 4 2, 4 | ||
| Hyundai ix35 (2010 - ) | 2, 4 2, 4 | ||
| Infiniti EX SUV (2009 - ) | 2, 4 2, 4 | ||
| Infiniti FX SUV (2009 - ) | 2, 4 2, 4 | ||
| Infiniti G Coupe (2009 - ) | -- | ||
| Infiniti G Saloon (2009 - ) | 2, 4 2, 4 | ||
| Infiniti M Saloon (2010 - ) | 2, 4 2, 4 |
| Infiniti Q50 (2016 - ) | BALANCE ISIZE: RECLINE SEAT TO PULL TOP TETHER TIGHT | 2,4 2,4 | ||
| Jaguar E-Pace (2018 - ) Y 2,4 2,4 | ||||
| Jaguar F-Pace (2016 - ) Y 2,4 2,4 | ||||
| Jaguar F-Type Coupe (2014 - ) -- | ||||
| Jaguar I-Pace (2018 - ) Y 2,4 2,4 | ||||
| Jaguar X-Type (2001 - 2010) -- | ||||
| Jaguar XE (2015 - ) Y 2,4 2,4 | ||||
| Jaguar XF (2008 - ) 2,4 2,4 | ||||
| Jaguar XF (2015 - ) Y 2,4 2,4 | ||||
| Jaguar XF Estate (2015 - ) Y 2,4 2,4 | ||||
| Jaguar XF Sportbrake (2012 - ) 2,4 2,4 | ||||
| Jaguar XJ (2010 - ) 2,4 2,4 | ||||
| Jaguar XK Coupe (2006 - ) -- | ||||
| Jeep Cherokee (2014 - ) | MOTION 2 - RECLINE AND ROTATION REDUCED WHEN USING FORWARD FACING | 2,4 2,4 | ||
| Jeep Compass (2011 - ) 2,4 2,4 | ||||
| Jeep Grand Cherokee (2011 - ) 2,4 2,4 | ||||
| Jeep Renegade (2015 - ) | Y | 2,4 | 2,4 | |
| Jeep Wrangler 5Dr (2007 - ) | -- | |||
| KIA Ceed (2020 - ) | Y 2,4 2,4 | |||
| KIA EV6 (2022 - ) | Y 2,4 2,4 | |||
| KIA Sorento (2015 - ) | 2,4 2,4 | |||
| KIA Sorento (2020 - ) | Y | 2,4 | 2,4 | |
| KIA Soul EV (2015 - ) 2, 4 2, 4 | ||||
| KIA Soul EV (2019 - ) Y 2, 4 2, 4 | ||||
| KIA Xceed (2020 - ) Y 2, 4 2, 4 | ||||
| Kia Carens SB! (2013 - ) 2, 4 2, 4 | ||||
| Kia Cee'D Hatch (2012 - ) 2, 4 2, 4 | ||||
| Kia Niro (2017 - ) Y 2, 4 2, 4 | ||||
| Kia Niro Hybrid (2022 - ) Y 2, 4 2, 4 | ||||
| Kia Optima (2011 - ) 2, 4 2, 4 | ||||
| Kia Optima (2016 - ) Y 2, 4 2, 4 | ||||
| Kia Picanto 5dr (2011 - 2015) 2, 4 2, 4 | ||||
| Kia Picanto (2017 - ) Y 2, 4 2, 4 | ||||
| Kia Picanto 5dr (2008 - ) - | - | |||
| Kia Rio (2012 - 2017) 2, 4 2, 4 | ||||
| Kia Rio (2017 - ) | Y 2, 4 2, 4 | |||
| Kia Sorento (2012 - ) | 2, 4 2, 4 | |||
| Kia Sorento (2003 - 2009) | 2, 4 2, 4 | |||
| Kia Soul (2009 - ) | 2, 4 2, 4 | |||
| Kia Sportage (2011 - ) | 2, 4 2, 4 | |||
| Kia Sportage (2016 - 2022) | Y | 2, 4 | 2, 4 | |
| Kia Sportage (2022 - ) | Y | 2, 4 | 2, 4 | |
| Kia Stonic (2017 - ) | Y 2, 4 2, 4 | |||
| Kia Venga (2011 - ) | 2, 4 2, 4 | |||
| Lancia Thema (2012 - ) | 2, 4 2, 4 | |||
| Lancia Voyager (2010 - ) | 2, 4 2, 4 | |||
| Lancia Ypsilon 3dr (2012 - ) | 2, 4 | - |
| Land Rover Defender (2020 - ) Y1, 2, 4 2, 4 | |||
| Land Rover Discovery 4 (2009 - ) 2, 4 2, 4 | |||
| Land Rover Discovery 5 (2017 - ) Y1, 2, 4 2, 4 | |||
| Land Rover Discovery Sport (2015 - ) 2, 4 2, 4 | |||
| Land Rover Freelander 2 (2006 - 2014) 2, 4 2, 4 | |||
| Land Rover Range Rover (2002 - 2012) 2, 4 2, 4 | |||
| Land Rover Range Rover (2013 - ) 2, 4 2, 4 | |||
| Land Rover Range Rover Evoque (2011 - ) 2, 4 2, 4 | |||
| Land Rover Range Rover Evoque 5dr (2019 - ) | Y 2, 4 2, 4 | ||
| Land Rover Range Rover Evoque 5dr (2011 - ) 2, 4 2, 4 | |||
| Land Rover Range Rover Sport (2005 - 2012) 2, 4 2, 4 | |||
| Land Rover Range Rover Sport (2013 - ) 2, 4 2, 4 | |||
| Land Rover Range Rover VELAR (2017 - ) Y 2, 4 2, 4 | |||
| Lexus CT (2011 - ) | 2, 4 2, 4 | ||
| Lexus ES Hybrid (2019 - ) | Y | 2, 4 | 2, 4 |
| Lexus GS (2013 - ) | 2, 4 2, 4 | ||
| Lexus IS (2005 - ) | 2, 4 2, 4 | ||
| Lexus IS 200 (1999 - ) | 2, 4 2, 4 | ||
| Lexus NX (2014 - ) | Y 2, 4 2, 4 | ||
| Lexus RX (2010 - ) | 2, 4 2, 4 | ||
| Lexus RX (2017 - ) | Y 2, 4 2, 4 | ||
| Lexus UX (2019 - ) | Y 2, 4 2, 4 |
| MG S5 (2025 - ) 2, 4 2, 4 | ||||
| MG 4 EV (2022 - ) | MOTION 2 - RECLINE AND ROTATION REDUCED WHEN USING FORWARD FACING | Y 2, 4 2, 4 | ||
| MG 5 EV Estate (2020 - ) Y 2, 4 2, 4 | ||||
| MG GS (2016 - ) Y 2, 4 2, 4 | ||||
| MG HS PHEV SUV (2021 - ) Y 2, 4 2, 4 | ||||
| MG HS SUV (2021 - ) Y 2, 4 2, 4 | ||||
| MG Motor MG6 (2012 - ) 2, 4 2, 4 | ||||
| MG ZS (2021 - ) Y 2, 4 2, 4 | ||||
| MG ZS EV (2021 - ) Y 2, 4 2, 4 | ||||
| Mini Clubman (2016 - ) Y 2, 4 2, 4 | ||||
| MINI Aceman (2025 - ) Y 2, 4 2, 4 | ||||
| MINI Countryman (2010 - 2017) 2, 4 2, 4 | ||||
| Mini Countryman (2017 - ) Y 2, 4 2, 4 | ||||
| MINI Coupe (2009 - ) | - | - | ||
| MINI Hatch (2006 - ) | - | - | ||
| MINI Hatchback 3Dr (2014 - ) 1, 2, 4 | 2, 4 | |||
| MINI Hatchback 3dr (2000 - 2006) | - | - | ||
| MINI Hatchback 5dr (2015 - ) 1, 2, 4 | 2, 4 | |||
| MINI Paceman (2013 - ) | 2, 4 2, 4 | |||
| Maserati Ghibli (2014 - ) | 2, 4 2, 4 | |||
| Maserati Gran Turismo (2007 - ) | - | - | ||
| Maserati Levante (2017 - ) | 2, 4 2, 4 | |||
| Maserati Quattroporte (2016 - ) | 2, 4 2, 4 | |||
| Mazda 2 (2007 - ) 2, 4 2, 4 | ||||
| Mazda 2 5dr (2015 - ) Y 2, 4 2, 4 | ||||
| Mazda 3 Hatch (2009 - 2013) 2, 4 2, 4 | ||||
| Mazda 3 Hatchback (2014 - ) 2, 4 2, 4 | ||||
| Mazda 5 (2005 - 2010) 2, 4 2, 4 | ||||
| Mazda 6 (2007 - 2012) 2, 4 2, 4 | ||||
| Mazda 6 (2018 - ) Y 2, 4 2, 4 | ||||
| Mazda 6 Estate (2013 - ) 2, 4 2, 4 | ||||
| Mazda 6 Saloon (2013 - ) 2, 4 2, 4 | ||||
| Mazda CX-3 (2015 - ) Y 2, 4 2, 4 | ||||
| Mazda CX-5 (2011 - ) 2, 4 2, 4 | ||||
| Mazda CX-7 (2007 - ) 2, 4 2, 4 | ||||
| Mazda MX-5 (2015 - ) -- | ||||
| Mercedes-Benz A Class (2005 - 2012) | 2, 4 2, 4 | |||
| Mercedes-Benz A-Class (2013 - ) | 2, 4 2, 4 | |||
| Mercedes-Benz A-Class Hatchback (2019 - ) | Y | 2, 4 | 2, 4 | |
| Mercedes-Benz A-Class Saloon (2019 - ) | Y | 2, 4 | 2, 4 | |
| Mercedes-Benz B-Class (2012 - ) | 2, 4 2, 4 | |||
| Mercedes-Benz B-Class EV (2015 - ) | 2, 4 2, 4 | |||
| Mercedes-Benz C-Class Estate (2015 - ) | 2, 4 2, 4 | |||
| Mercedes-Benz C-Class Coupe (2011 - ) | 2, 4 2, 4 | |||
| Mercedes-Benz C-Class Estate (2008 - ) | 2, 4 2, 4 | |||
| Mercedes-Benz CLA (2013 - ) 2, 4 2, 4 | ||||
| Mercedes-Benz CLA (2019 - ) | Y | 2, 4 | 2, 4 |
| Mercedes-Benz CLA Shooting-Brake (2015 - ) Y 2, 4 2, 4 | |||
| Mercedes-Benz CLS Coupe (2011 - ) 2, 4 2, 4 | |||
| Mercedes-Benz CLS Shooting Brake (2012 - ) 2, 4 2, 4 | |||
| Mercedes-Benz E-Class (2006 - 2009) 2, 4 2, 4 | |||
| Mercedes-Benz E-Class Cabriolet (2017 - ) 2, 4 2, 4 | |||
| Mercedes-Benz E-Class Coupe (2009 - ) 2, 4 2, 4 | |||
| Mercedes-Benz E-Class Coupe (2017 - ) Y 2, 4 2, 4 | |||
| Mercedes-Benz E-Class Estate (2016 - ) Y 2, 4 2, 4 | |||
| Mercedes-Benz E-Class (2013 - ) 2, 4 2, 4 | |||
| Mercedes-Benz EQA (2021 - ) Y 2, 4 2, 4 | |||
| Mercedes-Benz EQC (2021 - ) Y 2, 4 2, 4 | |||
| Mercedes-Benz OL Class (2012 - ) 2, 4 2, 4 | |||
| Mercedes-Benz GLA (2021 - ) Y 2, 4 2, 4 | |||
| Mercedes-Benz GLC (2016 - ) Y 2, 4 2, 4 | |||
| Mercedes-Benz GLC Coupe (2019 - ) | Y | 2, 4 | 2, 4 |
| Mercedes-Benz GLB (2019 - ) | 2, 4 2, 4 | ||
| Mercedes-Benz GLE (2015 - ) | 2, 4 2, 4 | ||
| Mercedes-Benz GLE (2020 - ) | Y | 2, 4 | 2, 4 |
| Mercedes-Benz R-Class (2006 - 2012) | 2, 4 2, 4 | ||
| Mercedes-Benz S Class (2014 - ) | 2, 4 2, 4 | ||
| Mercedes-Benz S-Class (2006 - 2013) | 2, 4 2, 4 | ||
| Mercedes-Benz SL-Class (2012 - ) | - | - | |
| Mercedes-Benz SLK (2012 - ) | - | - | |
| Mercedes-Benz V-Class (2015 - ) 2, 4, 5, 7 2, 4, 5, 7 | |||
| Mitsubishi ASX (2010 - ) 2, 4 2, 4 | |||
| Mitsubishi Colt (2007 - 2013) 2, 4 - | |||
| Mitsubishi Eclipse Cross (2019 - ) Y 2, 4 2, 4 | |||
| Mitsubishi Lancer (2008 - 2011 >) 2, 4 2, 4 | |||
| Mitsubishi Lancer Sportback (2008 - 2011 >) 2, 4 2, 4 | |||
| Mitsubishi Mirage (2012 - ) 2, 4 2, 4 | |||
| Mitsubishi Outlander (2007 - 2013) 2, 4 2, 4 | |||
| Mitsubishi Outlander (2013 - ) 2, 4 2, 4 | |||
| Mitsubishi Outlander PHEV (2015- ) 2, 4 2, 4 | |||
| Mitsubishi Shogun (2007 - ) | 2, 4 2, 4 | ||
| Nissan X-Trail (2008 - ) | 2, 4 2, 4 | ||
| Nissan Juke (2010 - ) | 2, 4 2, 4 | ||
| Nissan Leaf EV (2010 - 2017) | 2, 4 2, 4 | ||
| Nissan Micra (2017 - ) | 2, 4 2, 4 | ||
| Nissan Micra 5dr (2011 - ) | MODEL ASSESSED DID NOT HAVE TOP TETHER POINT | 2, 4 2, 4 | |
| Nissan Murano (2016 - ) | 2, 4 2, 4 | ||
| Nissan Navara (2015 - ) | 2, 4 2, 4 | ||
| Nissan Note (2006 - 2013) | 2, 4 2, 4 | ||
| Nissan Note (2014 - ) | 2, 4 2, 4 | ||
| Nissan Pulsar (2015 - ) | 2, 4 2, 4 | ||
| Nissan Qashqai (2006 -2013) | 2, 4 2, 4 | ||
| Nissan Qashqai (2014 - ) | 2, 4 2, 4 | ||
| Nissan Qashqai+2 (2008 - ) | 2, 4 2, 4 |
| Nissan Quest MPV (2012 - ) 2, 4 2, 4 | ||||
| Nissan X-Trail (2015 - ) 2, 4 2, 4 | ||||
| Opel Adam (2013 - ) 2, 4 - | ||||
| Opel Agila (2008 - ) 2, 4 2, 4 | ||||
| Opel Ampera (2011 - ) 2, 4 2, 4 | ||||
| Opel Antara (2007 - ) 2, 4 2, 4 | ||||
| Opel Astra 5dr (2003 - 2009) 2, 4 2, 4 | ||||
| Opel Astra 5dr (2010 - ) 2, 4 2, 4 | ||||
| Opel Astra (2015 - ) Y 2, 4 2, 4 | ||||
| Opel Astra GTC (2011 - ) 2, 4 2, 4 | ||||
| Opel Corsa 5dr (2015 - ) 2, 4 2, 4 | ||||
| Opel Corsa Hatch 5dr (2006 - ) | 2, 4 2, 4 | |||
| Opel Insignia Hatch (2009 - ) | 2, 4 2, 4 | |||
| Opel Karl (2015 - ) | - | - | ||
| Opel Meriva (2010 - ) | 2, 4 2, 4 | |||
| Opel Mokka (2013 - ) | 2, 4 2, 4 | |||
| Opel Vectra (2002 - 2008) | 2, 4 2, 4 | |||
| Opel Zafira (2005 - ) | 2, 4 2, 4 | |||
| Opel Zafira Tourer (2012 - ) 2, 4 2, 4 | ||||
| Peugeot 107 3dr (2005 - 2013) - | - | |||
| Peugeot 108 5dr (2015 - ) - | - | |||
| Peugeot 2008 (2013 - ) | 2, 4 2, 4 | |||
| Peugeot 2008 (2020 - ) | Y | 1, 2, 4 | 1, 2, 4 | |
| Peugeot 206 5dr (1998 - 2009) | 2, 4 2, 4 | |||
| Peugeot 207 3dr Hatchback (2006 - 2012) | - | - | ||
| Peugeot 207 5dr (2012 - ) 2, 4 2, 4 | ||||
| Peugeot 208 5dr (2020 - ) Y 2, 4 2, 4 | ||||
| Peugeot 208 5dr (2012 - ) 2, 4 2, 4 | ||||
| Peugeot 208 EV 5dr (2020 - ) Y 2, 4 2, 4 | ||||
| Peugeot 3008 (2017 - ) Y 1, 2, 4 2, 4 | ||||
| Peugeot 3008 SB! (2009 - ) | NO APPROVAL AS STORAGE BOXES PRESENT IN MODEL ASSESSED | - | - | |
| Peugeot 307 Hatchback (2001 - 2007) 2, 4 2, 4 | ||||
| Peugeot 308 (2014 - ) 2, 4 2, 4 | ||||
| Peugeot 308 Hatchback (2007 - ) 2, 4 2, 4 | ||||
| Peugeot 407 (2004 - 2011) 2, 4 2, 4 | ||||
| Peugeot 5008 SB! (2011 - ) | 2, 3, 4 | 2, 4 | ||
| Peugeot 5008 SB! (2018 - ) | Y | 2, 3, 4 | 2, 3, 4 | |
| Peugeot 508 (2011 - ) | 2, 4 2, 4 | |||
| Peugeot 508 (2018 - ) | Y | 1, 2, 4 | 2, 4 | |
| Peugeot 508 Estate PHEV (2019 - ) | Y | 1, 2, 4 | 2.4 | |
| Peugeot Bipper Tepee (2008 - ) | 2, 4 2, 4 | |||
| Peugeot Expert Tepee (2008 - ) | 2, 4 2, 4 | |||
| Peugeot Partner Combi (2004 - 2010) | -- | |||
| Peugeot Partner Teepee SB! (2008 - ) | NO APPROVAL AS STORAGE BOXES PRESENT IN MODEL ASSESSED | - | - | |
| Peugeot RCZ (2011 - ) | -- | |||
| Peugeot Traveller (2016 - ) | 2, 3, 4, 5, 6, 7 2, 3, 4, 5, 6, 7 | |||
| Polestar 4 (2024 - ) | 2, 4 2, 4 | |||
| Polestar 3 (2024 - ) | 2, 4 2, 4 | |||
| Polestar 2 (2021 - ) | MOTION 2 - RECLINE AND ROTATION REDUCED WHEN USING FORWARD FACING | Y 2, 4 2, 4 | ||
| Porsche Cayenne (2011 - ) 2, 4 2, 4 | ||||
| Porsche Cayenne (2017 - ) Y 2, 4 2, 4 | ||||
| Porsche Cayenne E-Hybrid (2015 - ) 2, 4 2, 4 | ||||
| Porsche Macan (2014 - ) 2, 4 2, 4 | ||||
| Porsche Panamera (2011 - ) 2, 4 2, 4 | ||||
| Porsche Panamera E-Hybrid (2015 - ) 2, 4 2, 4 | ||||
| Renault Captur (2015 - ) 1, 2, 4 1, 2, 4 | ||||
| Renault Clio 5dr (2005 - 2013) 2, 4 2, 4 | ||||
| Renault Clio 5dr (2013 - ) 2, 4 2, 4 | ||||
| Renault Espace (2003 - 2012) 2, 3, 4 2, 3, 4 | ||||
| Renault Grand Espace (2003 - 2012) | 2, 3, 4 2, 3, 4 | |||
| Renault Kadjar (2015 - ) | 2, 4 2, 4 | |||
| Renault Koleos (2018 - ) | Y | 2, 4 | 2, 4 | |
| Renault Laguna Sport Tourer (2008 - 2012) | 2, 4 2, 4 | |||
| Renault Megane Hatch (2016 - ) | Y | 2, 4 | 2, 4 | |
| Renault Megane Hatch SB! (2008 - ) | 2, 4 2, 4 | |||
| Renault Megane Hatch SBI (2002 - 2009) | 2, 4 2, 4 | |||
| Renault Modus (2004 - 2012) | 2, 4 2, 4 | |||
| Renault Scenic SB! (2003 - 2009) | NO APPROVAL AS STORAGE BOXES PRESENT IN MODEL ASSESSED | - | - | |
| Renault Scenic SB! (2017 - ) | FRONT SEAT USE ONLY IF ISOFIX AVAILABLE IN MODEL | Y | 1, 2, 4 | 1 |
| Renault Scenic SB! (2009 - ) | NO APPROVAL AS STORAGE BOXES PRESENT IN MODEL ASSESSED | - | - | |
| Renault Twingo (2015 - ) -- | ||||
| Renault Twingo 3dr (2007 - ) -- | ||||
| Rover 25 / Streetwise (1999 - 2005) -- | ||||
| SAAB 93 Sport Wagon (2005 - 2012) 2, 4 2, 4 | ||||
| SAAB New 95 (2011 - 2012) 2, 4 2, 4 | ||||
| SEAT Alhambra SB! (2010 - ) 3 3 | ||||
| SEAT Altea (2004 - 2012) 2, 4 2, 4 | ||||
| SEAT Arona (2021 - ) Y 2, 4 2, 4 | ||||
| SEAT Arosa (1997 - 2004) -- | ||||
| SEAT Ateca (2018 - ) Y 2, 4 2, 4 | ||||
| SEAT Cupra Born EV (2022- ) Y 2, 4 2, 4 | ||||
| SEAT Exeo ST (2008 - ) 2, 4 2, 4 | ||||
| SEAT Ibiza (2018 - ) | Y 2, 4 2, 4 | |||
| SEAT Ibiza HATCH 5 door (2008 - 2013) | 2, 4 2, 4 | |||
| SEAT Leon FR (2006 - 2012) | 2, 4 2, 4 | |||
| SEAT Leon (2000 - 2005) | 2, 4 2, 4 | |||
| SEAT New Toledo (2013 - ) | 2, 4 2, 4 | |||
| SEAT mii 5dr (2011 - ) | -- | |||
| Seat Leon (2013 - ) | 2, 4 2, 4 | |||
| Skoda Citigo 5dr (2011 - ) | -- | |||
| Skoda Citigo 5dr (2012 - ) | -- | |||
| Skoda Enyaq EV (2021 - ) | Y 2, 4 2, 4 | |||
| Skoda Fabia (2015 - ) | 2, 4 2, 4 | |||
| Skoda Fabia (2021 - ) Y 2, 4 2, 4 | ||||
| Skoda Fabia Hatch (2007 - ) 2, 4 2, 4 | ||||
| Skoda Kamiq (2021 - ) Y 2, 4 2, 4 | ||||
| Skoda Karoq (2017 - ) Y 2, 4 2, 4 | ||||
| Skoda Karoq Facelift (2023 - ) | FRONT SEAT USE - MOVE FRONT SEAT TO REARMOST POSITION | 1, 2, 4 1, 2, 4 | ||
| Skoda Kodiaq (2017 - ) Y 2, 4 2, 4 | ||||
| Skoda Octavia (2004 - 2012) 2, 4 2, 4 | ||||
| Skoda Octavia (2020 - ) Y 2, 4 2, 4 | ||||
| Skoda Octavia Hatch (2013 - ) 2, 4 2, 4 | ||||
| Skoda Rapid (2013 - ) 2, 4 2, 4 | ||||
| Skoda Roomster (2006 - ) 2, 4 2, 4 | ||||
| Skoda Scala (2022 - ) Y 2, 4 2, 4 | ||||
| Skoda Superb (2015 - ) | Y 2, 4 2, 4 | |||
| Skoda Superb Combi/Estate (2008 - ) | 2, 4 2, 4 | |||
| Skoda Yeti (2009 - ) | 2, 4 2, 4 | |||
| Smart For Two Coupe (2007 - 2011) | - | - | ||
| Smart For Two Coupe (2015 - 2019) | 1 | 1 | ||
| Smart FourFour (2015 - ) | - | - | ||
| Ssangyong Actyon (2006 - 2011) | 2, 4 2, 4 | |||
| Ssangyong Korando (2011 - ) | 2, 4 2, 4 | |||
| Ssangyong Musso Pickup (2016 - ) | 2, 4 2, 4 | |||
| Ssangyong Rexton (2014 - 2016) | 2, 4 2, 4 | |||
| Ssangyong Tivoli (2015 - ) | 2, 4 2, 4 | |||
| Ssangyong Turismo (2014 - ) | 2, 4 2, 4 | |||
| Subaru BRZ (2012 - ) -- | ||||
| Subaru Forester (2013 - ) 2, 4 2, 4 | ||||
| Subaru Impreza 5dr (2007- ) 2, 4 2, 4 | ||||
| Subaru Impreza Hatchback (2013 - ) 2, 4 2, 4 | ||||
| Subaru Legacy (2012 - ) 2, 4 2, 4 | ||||
| Subaru Levorg (2014 - ) Y 2, 4 2, 4 | ||||
| Subaru Outback (2012 - ) 2, 4 2, 4 | ||||
| Subaru XV Hatchback (2011 - ) 2, 4 2, 4 | ||||
| Suzuki Across (2020 - ) Y 2, 4 2, 4 | ||||
| Suzuki Alto (2009 - ) | MOTION 2: REDUCTION IN FRONT SEAT SPACE | 2, 4 2, 4 | ||
| Suzuki Baleno (2018 - ) Y 2, 4 2, 4 | ||||
| Suzuki Celerio 5dr (2015 - ) Y 2, 4 2, 4 | ||||
| Suzuki Grand Vitara (2005 - ) 2, 4 2, 4 | ||||
| Suzuki Ignis (2016 - ) | Y | 2, 4 | 2, 4 | |
| Suzuki SX-4 5dr (2006 - ) | 2, 4 2, 4 | |||
| Suzuki Splash (2008 - ) | MOTION 2: REDUCTION IN FRONT SEAT SPACE | 2, 4 2, 4 | ||
| Suzuki Swift (2017 - ) | Y | 2, 4 | 2, 4 | |
| Suzuki Swift Sport 5dr (2011 - ) | MOTION 2: REDUCTION IN FRONT SEAT SPACE | 2, 4 2, 4 | ||
| Suzuki Vitara (2015 - ) | 2, 4 2, 4 | |||
| Tesla Model 3 (2019 - ) Y 2, 4 2, 4 | ||||
| Tesla Model S (2012 - ) | MOTION 2 - POOR SEAT POSITION DUE TO VEHICLE SEAT SHAPE AND ISOFIX POINTS | 2,42,4 | ||
| Tesla Model X (2015 - ) 2,42,4 | ||||
| Tesla Model Y (2022 - ) Y 2,42,4 | ||||
| Toyota Verso SB! (2013 - ) 2,42,4 | ||||
| Toyota Auris (2007 - 2013) 2,42,4 | ||||
| Toyota Auris (2013 - ) 2,42,4 | ||||
| Toyota Avensis Hatch (2003 - 2011) 2,42,4 | ||||
| Toyota Aygo (2014 - ) | MOTION 2: REDUCTION IN FRONT SEAT SPACE | 2,42,4 | ||
| Toyota Aygo (2019 - ) Y 2,42,4 | ||||
| Toyota Aygo 3dr (2005 - ) -- | ||||
| Toyota Aygo X (2021 - ) Y 2,42,4 | ||||
| Toyota C-HR (2017 - ) Y 2,42,4 | ||||
| Toyota Corolla (2018 - ) | MOTION 2 - RECLINE AND ROTATION REDUCED WHEN USING FORWARD FACING | Y 2,42,4 | ||
| Toyota EZ Mpv (2013 - ) 2,42,4 | ||||
| Toyota GT86 (2012 - ) -- | ||||
| Toyota Highlander (2013 - ) | 2,42,4 | |||
| Toyota Highlander (2021 - ) | Y | 2,4 | 2,4 | |
| Toyota Hilux (2020 - ) | 2,42,4 | |||
| Toyota Land Cruiser (2003 - 2009) | 2,42,4 | |||
| Toyota Landcruiser (2009 - ) | 2,42,4 | |||
| Toyota Prius 2 (2004 - 2009) 2, 4 2, 4 | ||||
| Toyota Prius 3 (2010 - 2015) 2, 4 2, 4 | ||||
| Toyota Prius 4 (2015 - 2022) Y 2, 4 2, 4 | ||||
| Toyota Prius Hybrid (2025 - ) 2, 4 2, 4 | ||||
| Toyota Prius Plus+ (2012 - ) 2, 4 2, 4 | ||||
| Toyota RAV 4 (2006 - 2012) 2, 4 2, 4 | ||||
| Toyota RAV4 (2013 - ) 2, 4 2, 4 | ||||
| Toyota RAV4 (2019 - ) Y 2, 4 2, 4 | ||||
| Toyota RAV4 Hybrid (2015 - ) Y 2, 4 2, 4 | ||||
| Toyota Verso SB! (2009 - 2012) 2, 4 - | ||||
| Toyota Yaris (2017 - ) 2, 4 2, 4 | ||||
| Toyota Yaris (2019 - ) | Y | 2, 4 | 2, 4 | |
| Toyota Yaris Cross (2022 - ) | Y | 2, 4 | 2, 4 | |
| Toyota Yaris Hatch (2011 - ) | - | - | ||
| Toyota Yaris Hatch 5dr (2006 - 2011) | - | - | ||
| VW Amarok Double-Cab (2022 - ) | 2, 4 2, 4 | |||
| VW Arteon (2017 - ) | Y 2, 4 - | |||
| VW Beetle (2012 - ) | 2, 4 2, 4 | |||
| VW Beetle (1999 - 2005) - | - | |||
| VW Caddy Maxilife SBI (2010 - ) | NO APPROVAL AS STORAGE BOXES PRESENT IN MODEL ASSESSED | - | - | |
| VW E-Golf Hatch Mk7 (2015 - ) | 2, 4 2, 4 | |||
| VW E-UP! 5dr (2015- ) | - | - | ||
| VW Golf Cabriolet (2009 - ) | - | - | ||
| VW Golf GTE Hatch Mk7 (2015 - ) | 2, 4 2, 4 | |||
| VW Golf Hatch (2009 - 2013) | BALANCE ISIZE APPROVAL ONLY IF APPROVED VEHICLE TOP TETHER PRESENT - CHECK VEHICLE HANDBOOK | 2,42,4 | ||
| VW Golf Hatch Mk5 (2004 - 2008) 2,42,4 | ||||
| VW Golf Hatch Mk7 (2012 - ) 2,42,4 | ||||
| VW Golf Plus (2009 - 2013) | BALANCE ISIZE APPROVAL ONLY IF APPROVED VEHICLE TOP TETHER PRESENT - CHECK VEHICLE HANDBOOK | 2,42,4 | ||
| VW ID3 EV (2020 - ) Y 2,42,4 | ||||
| VW ID4 EV (2021 - ) Y 2,42,4 | ||||
| VW ID5 EV (2022 - ) Y 2,42,4 | ||||
| VW Jetta (2011 - ) 2,42,4 | ||||
| VW Lupo (1999 - 2005) -- | ||||
| VW Multivan Caravelle (2008 - ) 2,4,5,7 2,4,5,7 | ||||
| VW Passat CC (2008 - ) 2,42,4 | ||||
| VW Passat Estate (2005 - 2011) 2,42,4 | ||||
| VW Passat Estate (2011-2015) | 2,42,4 | |||
| VW Passat Estate (2015 - ) | Y | 2,4 | 2,4 | |
| VW Passat Saloon (2005 - 2011) | 2,42,4 | |||
| VW Passat Saloon (2011-2015) | 2,42,4 | |||
| VW Passat Saloon (2015 - ) | Y | 2,4 | 2,4 | |
| VW Polo (2017 - ) | Y 2,4 2,4 | |||
| VW Polo 3dr (2009 - 2016) | MOTION 2 - NO APPROVAL AS INSUFFICIENT ROOM IN VEHICLE | 2,42,4 | ||
| VW Polo 5dr (2009 - 2016) 2,42,4 | ||||
| VW Scirocco (2011 - ) 2,42,4 | ||||
| VW Sharan SB! (2010 - ) 33 | ||||
| VW T-Cross (2019 - ) Y 2,42,4 | ||||
| VW T-Roc (2017 - ) Y 2,42,4 | ||||
| VW Taigo (2022 - ) Y 2,42,4 | ||||
| VW Tiguan (2008 - ) 2,42,4 | ||||
| VW Tiguan (2016 - ) Y 2,42,4 | ||||
| VW Tiguan Allspace (2017 - ) Y 2,42,4 | ||||
| VW Touareg (2012 - ) 2,42,4 | ||||
| VW Touareg (2003 - 2010) 2,42,4 | ||||
| VW Touareg (2018 - ) | Y 2,42,4 | |||
| VW Touran (2016 - ) | Y | 2,3,4 | 2,3,4 | |
| VW Touran SBI (2010 - ) | 2,42,4 | |||
| VW UP! 5dr (2015 - ) | - | - | ||
| Vauxhall Adam (2013 - ) | 2,4 | - | ||
| Vauxhall Agila (2008 - ) | 2,42,4 | |||
| Vauxhall Ampera (2011 - ) 2,42,4 | ||||
| Vauxhall Antara (2007 - ) | 2,42,4 | |||
| Vauxhall Astra 5dr (2010 - ) | 2,42,4 | |||
| Vauxhall Astra (2015 - ) | Y | 2,4 | 2,4 | |
| Vauxhall Astra e (2023 - ) | Y | 2,4 | 2,4 | |
| Vauxhall Astra GTC (2011 - ) | 2,42,4 | |||
| Vauxhall Astra Saloon (1998 - 2004) -- | ||||
| Vauxhall Corsa 5dr (2015 - ) 2, 4 2, 4 | ||||
| Vauxhall Corsa Hatch 5dr (2006 - ) 2, 4 2, 4 | ||||
| Vauxhall Insignia Hatch (2009 - ) 2, 4 2, 4 | ||||
| Vauxhall Meriva (2010 - ) 2, 4 2, 4 | ||||
| Vauxhall Mokka (2013 - ) 2, 4 2, 4 | ||||
| Vauxhall Vectra (2005 - 2008) 2, 4 2, 4 | ||||
| Vauxhall Viva (2015 - ) -- | ||||
| Vauxhall Zafira (2005 - ) 2, 4 2, 4 | ||||
| Vauxhall Zafira Tourer (2012 - ) 2, 4 2, 4 | ||||
| Vauxhall/Opel Crossland X (2018 - ) Y 2, 4 2, 4 | ||||
| Vauxhall/Opel Grandland X (2019 - ) Y 2, 4 2, 4 | ||||
| Vauxhall/Opel Insignia (2018 - ) Y 2, 4 2, 4 | ||||
| Volvo C30 (2007 - 2013) | 2, 4 | 2, 4 | ||
| Volvo S40 (2004 - 2012) | 2, 4 | 2, 4 | ||
| Volvo S60 (2010 - ) | 2, 4 2, 4 | |||
| Volvo S90 (2016 - ) | Y 2, 4 2, 4 | |||
| Volvo V40 (2013 - ) | 2, 4 2, 4 | |||
| Volvo V40 Cross County (2013 - ) | 2, 4 2, 4 | |||
| Volvo V50 (2004 - 2012) | 2, 4 2, 4 | |||
| Volvo V60 (2011 - ) | 2, 4 2, 4 | |||
| Volvo V60 Plug-In (2015 - ) | 2, 4 2, 4 | |||
| Volvo V60 (2018 - ) | Y 2, 4 2, 4 | |||
| Volvo V90 (2016 - ) | Y 2, 4 2, 4 | |||
| Volvo XC40 (2018 - ) | Y 2, 4 2, 4 | |||
| Volvo XC60 (2013 - ) 2, 4 2, 4 | ||||
| Volvo XC60 (2017 - ) Y 2, 4 2, 4 | ||||
| Volvo XC70 (2008 - ) 2, 4 2, 4 | ||||
| Volvo XC90 (2003 - 2015) 2, 4 2, 4 | ||||
| Volvo XC90 (2016 - ) Y 2, 4 2, 4 | ||||
| Volvo EX90 (2024 - ) Y 2, 4 2, 4 | ||||
| Volvo EX40 (2024 - ) Y 2, 4 2, 4 | ||||
| Volvo XC40 Recharge (2020 - 2024) Y 2, 4 2, 4 | ||||
| Volvo EX30 (2024 - ) | MOTION 2: REDUCTION IN FRONT SEAT SPACE | Y 2, 4 2, 4 | ||
| Volvo EC40 (2024 - ) | *FRONT SEAT USE ONLY APPLICABLE IF ISOFIX MOUNTINGS AVAILABLE - AIRBAG MUST BE DEACTIVATED FOR REARWARD FACING RESTRAINTS.**TOP TETHER POINT ONLY AVAILABLE IF VEHICLE SEAT ISOFIX IS I- SIZE APPROVED. VEHICLE HANDBOOK MUST BE CONSULTED FOR ADVICE ON AIRBAG ACTIVATION FOR FORWARD FACING RESTRAINTS | Y1, 2, 41, 2, 4 | ||


- Approach Plus 360
- INSTALLING THE CHILD SEAT
- AGELOCK ROTATION SWITCH
- CONNECTING APPROACH PLUS 360 TO THE BASE
- RECLINING APPROACH PLUS 360
- SETTING UP APPROACH PLUS 360 FOR THE CHILD
- MAINTENANCE
- FITTING / REMOVING THE COVER
- CLEANING
- PLASTIC/METAL PARTS
- WARNINGS
- i-Size Universal (40-105cm ≤ 19,5kg)
- i-Size Universal (40-105cm ≤ 19.5kg)
- TENGING ADFLUGS PLÚS 360 VID GRUNNINN
- EU/PACIFIC
- Contact Us
- Vehicle Fitting List
- IMPORTANT SAFETY GUIDE
- VEHICLE FITTING INFORMATION
- Fitting Method:
Brand : Silver Cross
Model : Approach Plus 360
Category : Car seat