USER MANUAL Saeco Granaroma SM6580 PHILIPS
flowchart
graph TD
    A["Grid Layout"] --> B["Open Grid"]
    B --> C["Arrow Up"]
    B --> D["Arrow Down"]
B
flowchart
graph TD
    B1["B1"] --> E["Power Supply"]
    B4["B4"] --> E
    B2["B2"] --> F["Espresso"]
    B2 --> G["Coffee"]
    B3["B3"] --> H["Americano"]
    B3 --> I["Cappuccino"]
    B3 --> J["Latte Macchiato"]
    B3 --> K["Caffe Latte"]
    B3 --> L["More Drinks"]
    B5["B5"] --> M["Logic Gate"]
    B6["B6"] --> N["OK"]
    B6 --> O["✓"]
    O --> P["✓"]
    P --> Q["Settings"]
    B6 --> R["Profiles"]
    B6 --> S["CoffeeMaestro"]
    B6 --> T["Clean"]
    B6 --> U["Settings"]
©
English 6
Azərbaycanca 24
Čeština 42
Crnogorski 60
Dansk 78
Deutsch 96
Eesti 116
Español 134
Français 153
Hrvatski 172
Italiano 191
Latviešu 210
Lietuviškai 228
Magyar 246
Nederlands 265
Norsk 284
O'zbek 302
Polski 321
Português 340
Română 359
Shqip 378
Slovenščina 397
Slovensky 415
Srpski 433
Suomi 451
Svenska 469
Türkmençe 487
Ελληνικά 505
Български 526
Кыргызча 546
Македонски 567
Русский 587
Точикй 608
Українська 629
Қазақша 649
Ruijtntu 668
งษัตย์ 689
Contents
Machine overview (Fig. A) 6
Control panel 6
Introduction 7
Before first use 7
Special functions 8
Brewing drinks 8
Personalizing drinks 10
Adjusting machine settings 11
AquaClean water filter 12
Removing and inserting the brew group 13
Cleaning and maintenance 14
Descaling procedure 16
Error codes 17
Ordering accessories 18
Troubleshooting 18
Technical specifications 23
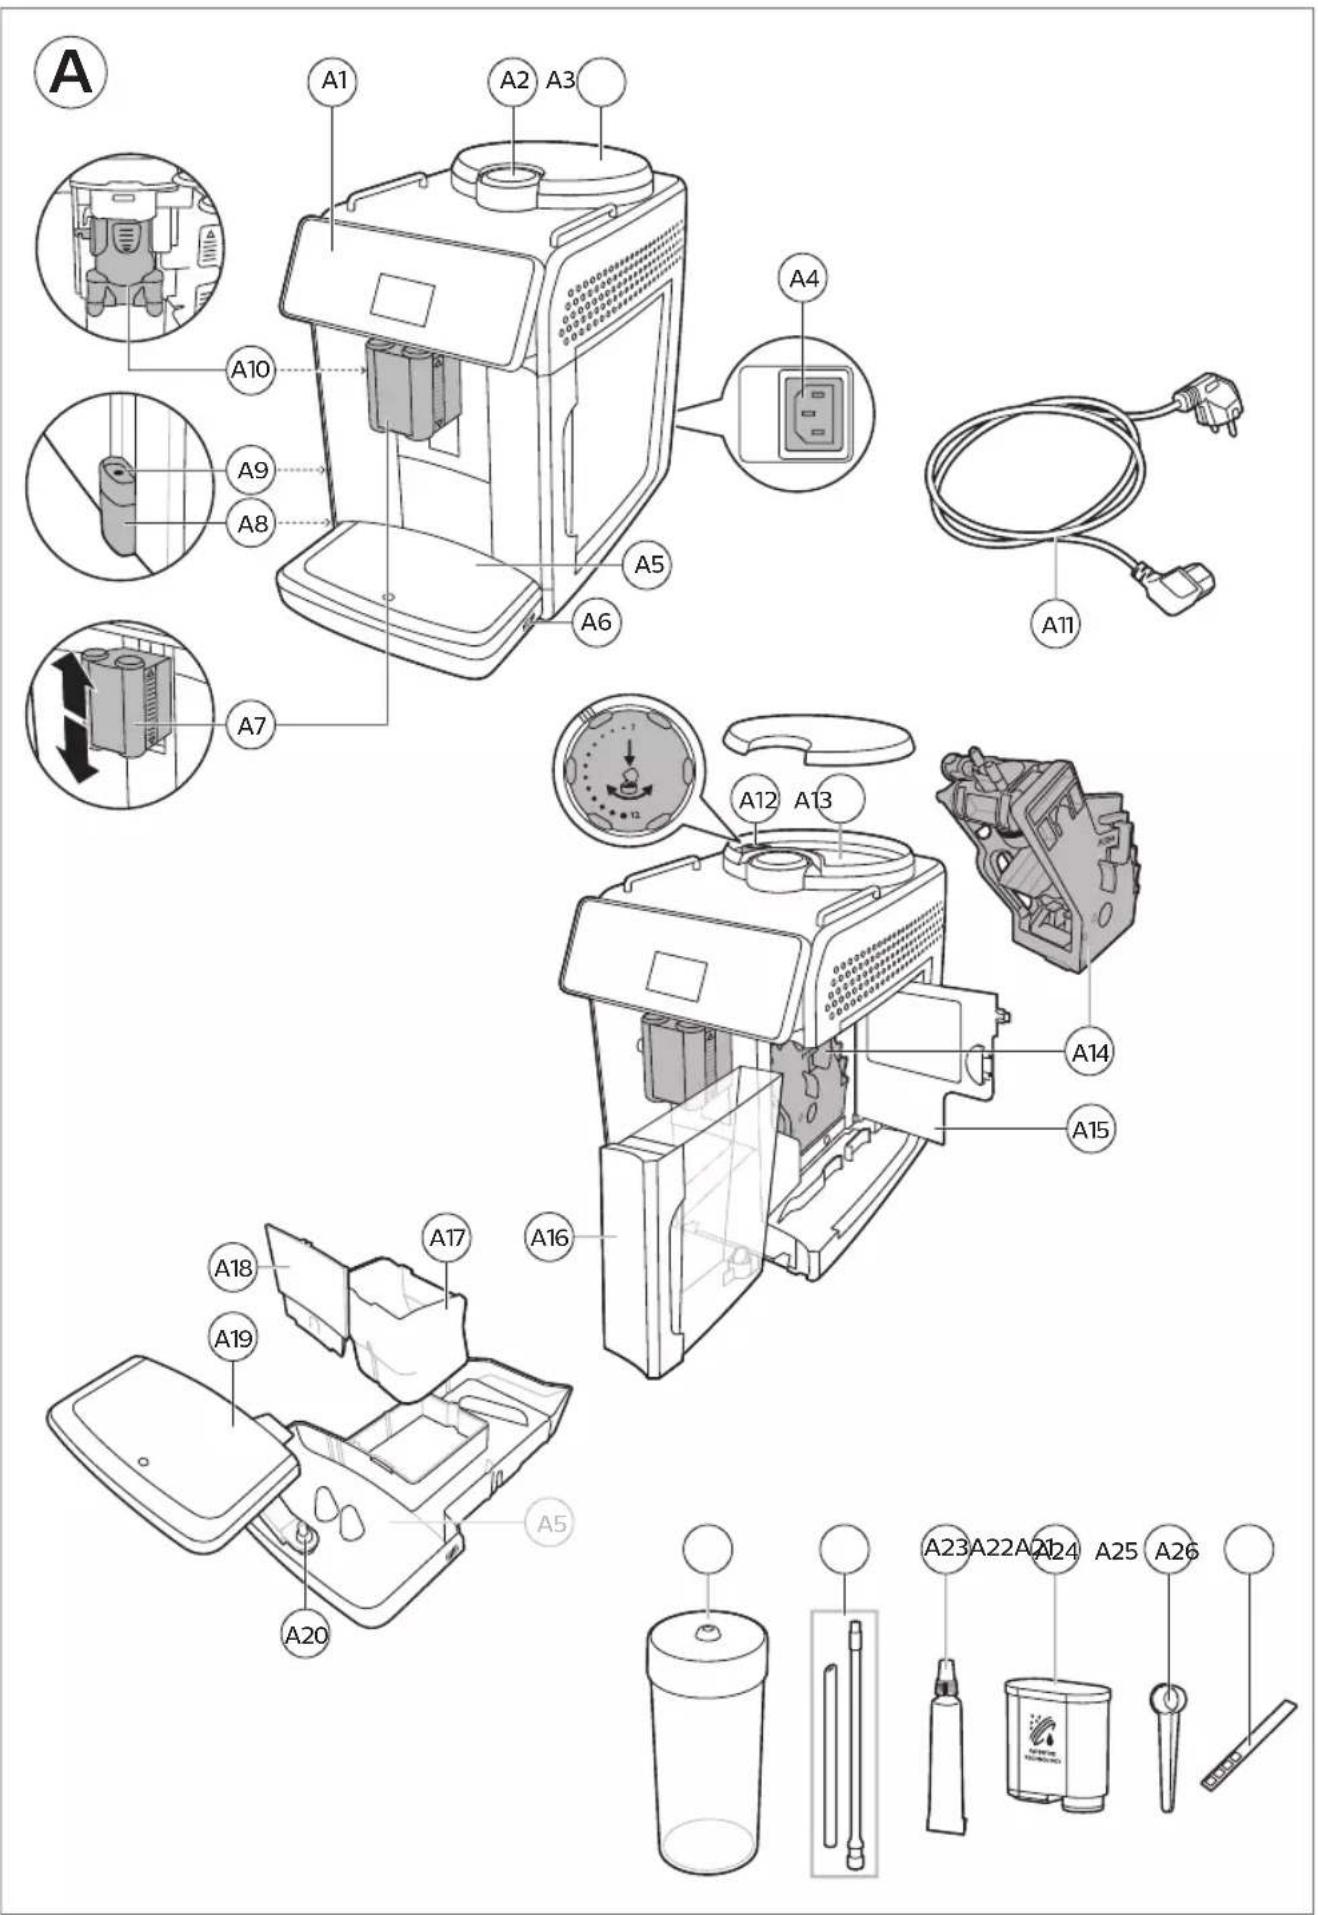
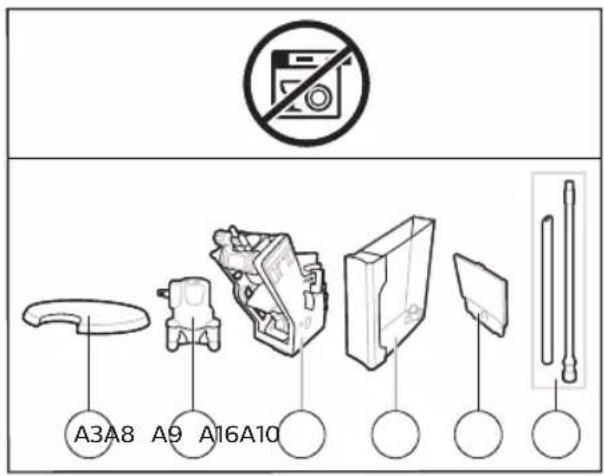
Machine overview (Fig. A)
A1 Control panel
A2 Lid of pre-ground coffee compartment
A3 Lid of bean hopper
A4 Socket for cord
A5 Drip tray
A6 Drip tray release grip
A7 Adjustable coffee and milk dispensing spout
A8 HygieSteam container
A9 HygieSteam cover with milk tube holder
A10 Internal cappuccinatore
A11 Mains cord with plug
A12 Grind setting knob
A13 Bean hopper
A14 Brew group
A15 Service door
A16 Water tank
A17 Coffee grounds container
A18 Front panel of coffee grounds container
A19 Drip tray cover
A20 'Drip tray full' indicator
Accessories
A21 Milk container
A22 Milk tube
A23 Cleaning brush
A24 Grease tube
A25 AquaClean filter
A26 Measuring spoon
A27 Water hardness test strip
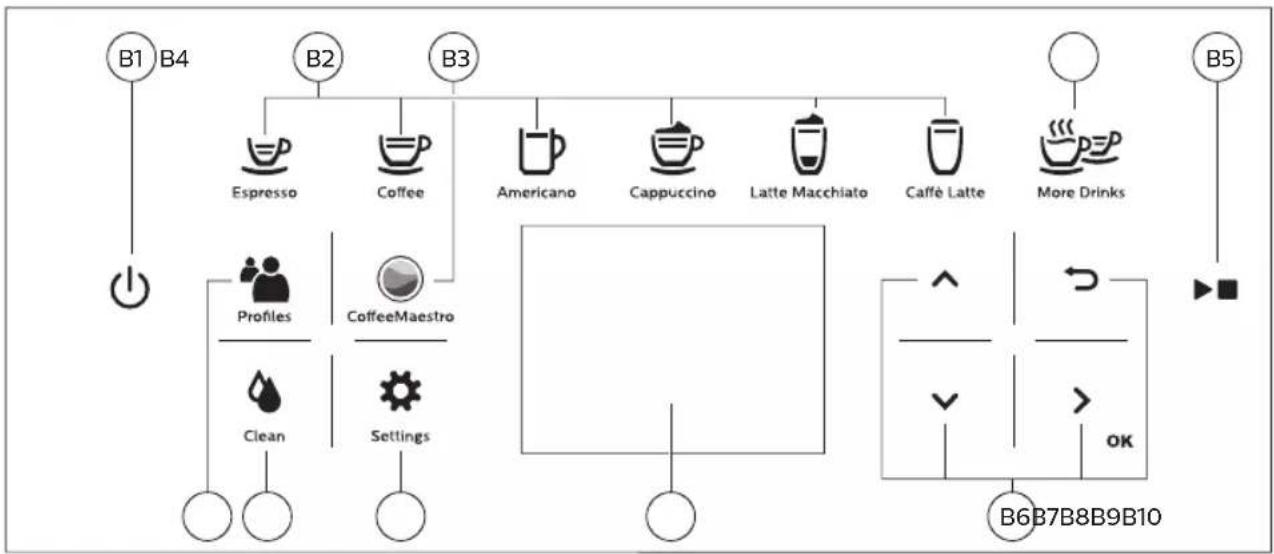
Control panel
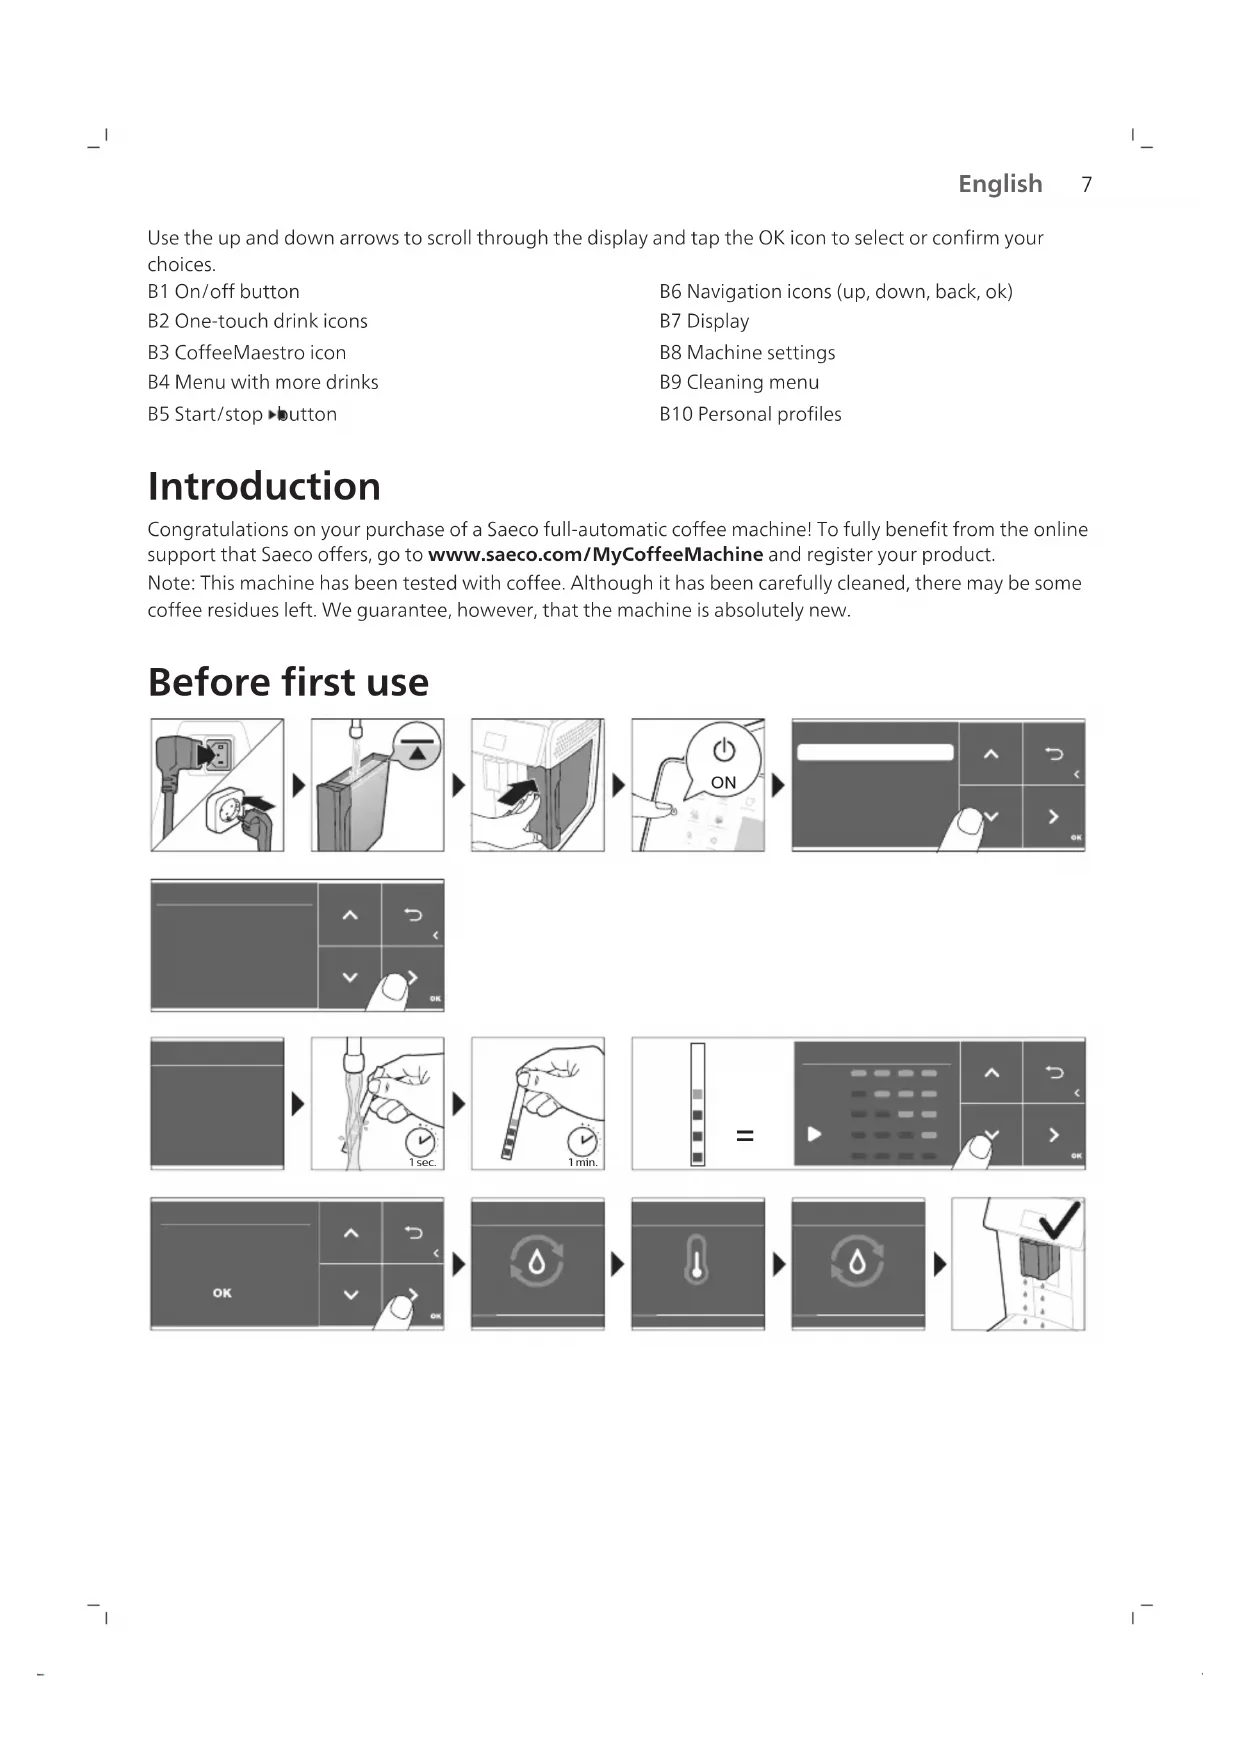
There are two versions of this espresso machine. Their control panels look different, but all buttons and icons work in the same way. Refer to figure B for an overview of all buttons and icons. Below you find the description.
Use the up and down arrows to scroll through the display and tap the OK icon to select or confirm your choices.
B1 On/off button
B6 Navigation icons (up, down, back, ok)
B2 One-touch drink icons
B7 Display
B3 CoffeeMaestro icon
B8 Machine settings
B4 Menu with more drinks
B9 Cleaning menu
B5 Start/stop button
B10 Personal profiles
Introduction
Congratulations on your purchase of a Saeco full-automatic coffee machine! To fully benefit from the online support that Saeco offers, go to www.saeco.com/MyCoffeeMachine and register your product.
Note: This machine has been tested with coffee. Although it has been carefully cleaned, there may be some coffee residues left. We guarantee, however, that the machine is absolutely new.
Before first use
8
English

Special functions
Special function Purpose
 | With CoffeeMaestro you can personalize your coffee by selecting a pre-set taste profile (Delicato, Intenso, Forte) for your beverage instead of changing the settings yourself. |
 | HygieSteam function automatically cleans the milk system, removing microorganisms: use it after brewing cappuccino or other milk-based drinks. |
 | Our durable grinder is made from 100% ceramic to be exceptionally hard and precise. It can be adjusted to your taste with 12-step levels. |
Brewing drinks
General steps
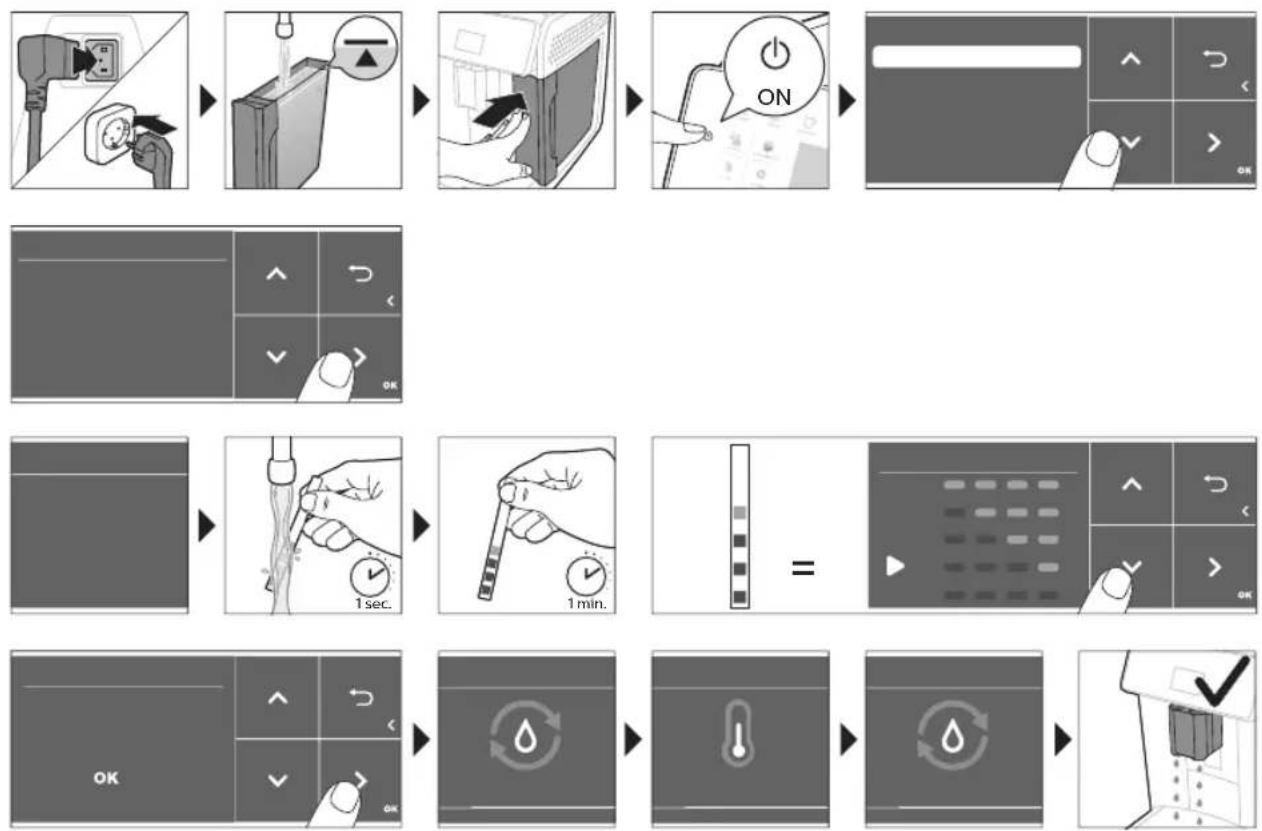
1 Fill the water tank with tap water and fill the bean hopper with coffee beans.
2 Insert the small plug into the socket located on the back of the machine. Insert the mains plug into the wall socket.
3 Press the on/off button to switch on the machine.
- The machine starts heating up and performs the automatic rinsing cycle.
- When all lights in the drink icons light up continuously, the machine is ready for use.
4 Place a cup under the coffee dispensing spout. Slide the coffee dispensing spout up or down to adjust its height to the size of the cup or glass you are using (Fig. 1).
Brewing coffee with beans
1 To brew a coffee, tap the drink icon of your choice (Fig. 2) or tap the 'More Drinks' icon (Fig. 3).
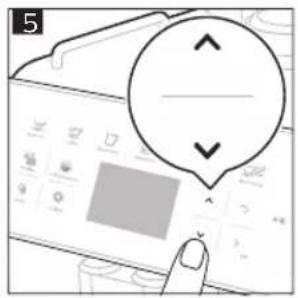
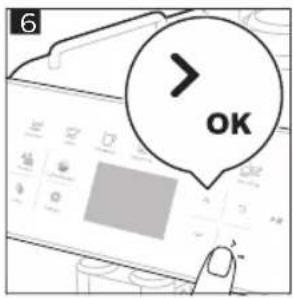
- You can now adjust the drink to your personal taste (Fig. 4). Use the up and down arrows (Fig. 5) to adjust the coffee strength. Tap the OK icon if you want to adjust more settings (Fig. 6).
2 Press the start/stop button at any time to start brewing the selected drink.
3 To stop dispensing coffee before the machine is finished, press the start/stop ▶ button again.
i To brew 2 coffees at the same time, tap the drink icon twice or select the 2x icon scrolling the dedicated bar.
Do not use caramelized or flavored coffee beans.
Brewing milk-based drinks
1 Fill the water tank with tap water and fill the bean hopper with beans.
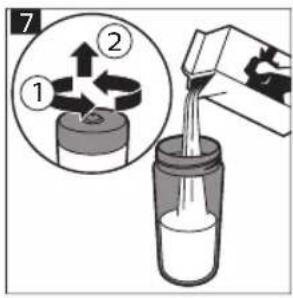
2 Unscrew the lid of the milk container and fill the milk container with milk (Fig. 7). Then place the metal milk tube in the container.
Always use milk coming directly from the fridge for optimal results.
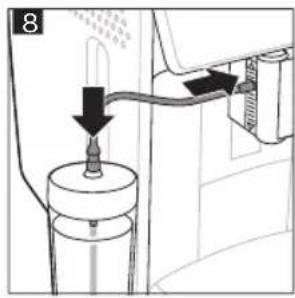
3 Connect the flexible milk tube to the cappuccinatore (Fig. 8).
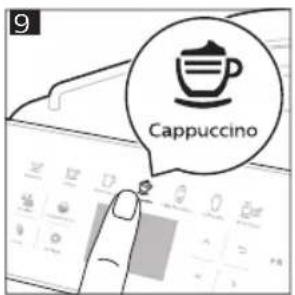
4 Tap the milk-based drink icon of your choice (Fig. 9) or tap the 'More Drinks' icon to select a different drink (Fig. 3).
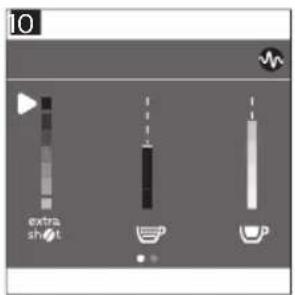
- You can now adjust the drink to your own preference (Fig. 10).
5 Press the start/stop button.
- For specific drinks, the machine first dispenses milk and then coffee. For a number of other drinks this is the other way around, the machine will first dispense coffee and then milk.
- To stop dispensing milk before the machine has dispensed the preset amount, press the start/stop button.
6 To stop dispensing the complete drink (milk and coffee) before the machine is finished, press and hold the start/stop button.
7 Directly after dispensing the milk, the 'HygieSteam Shot' is performed. The machine forces steam through the internal milk system to rinse it quickly.
Brewing coffee with pre-ground coffee
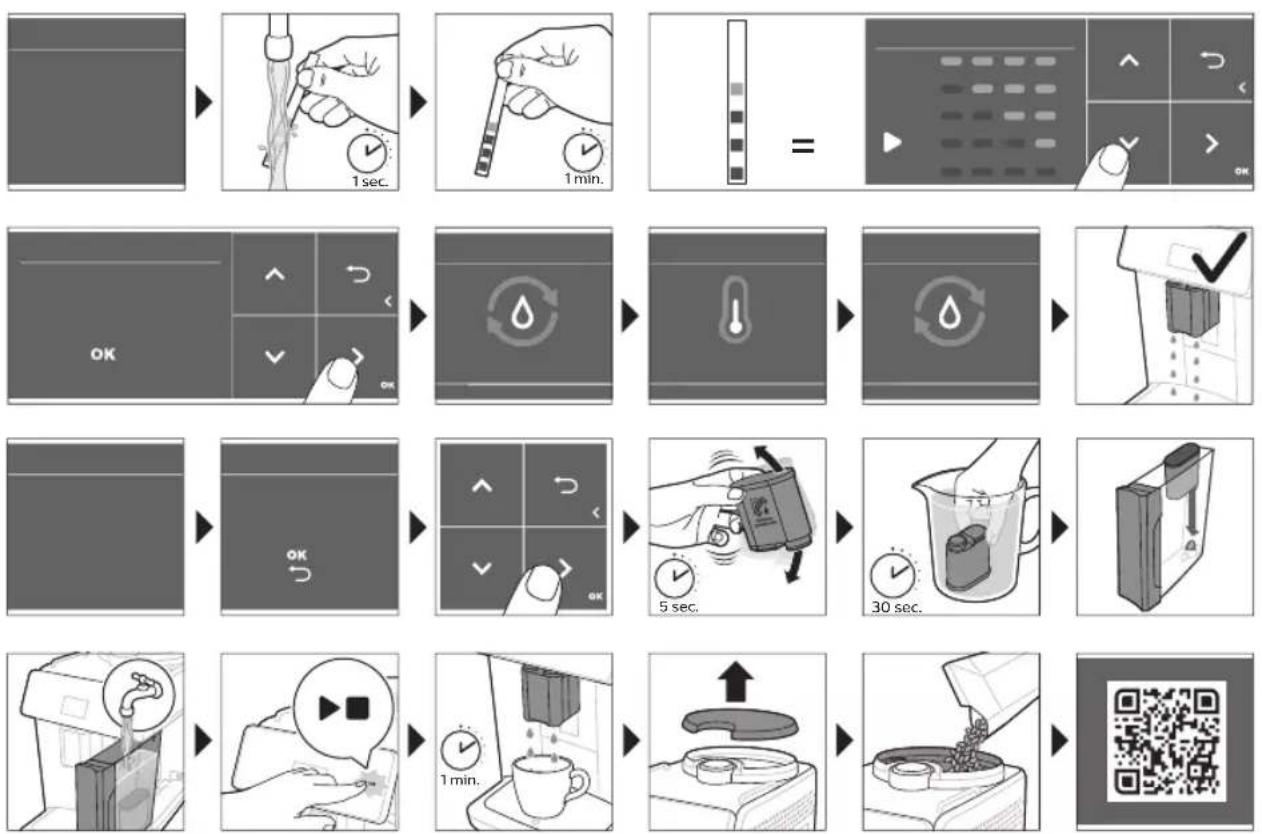
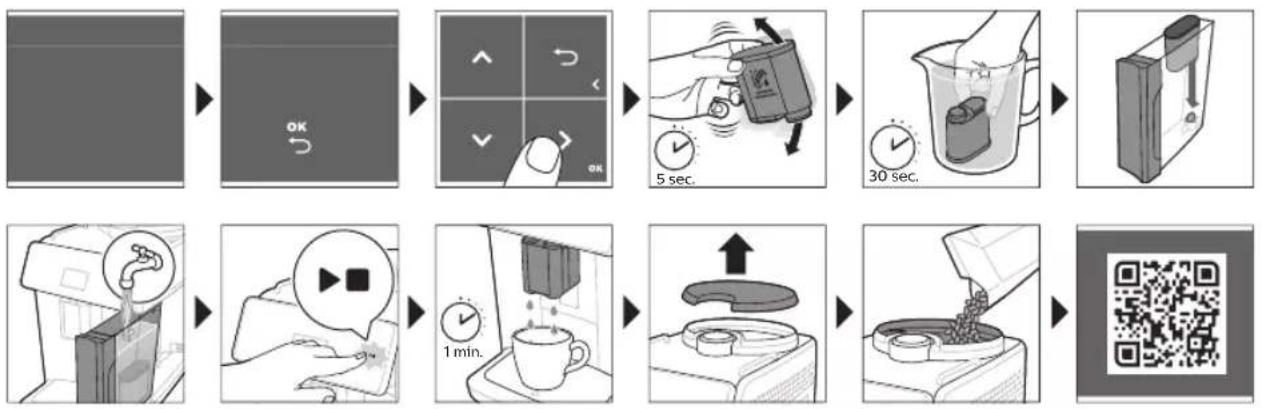
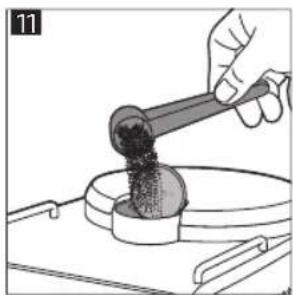
1 Tilt the lid and pour one measuring scoop of pre-ground coffee into the pre-ground coffee compartment (Fig. 11).
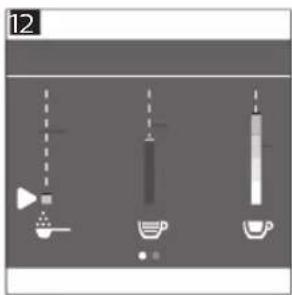
2 After selecting a drink, use the up and down arrows to select pre-ground coffee (Fig. 12). Then press the start/stop button.
Note: If you select pre-ground coffee, you cannot adjust the coffee strength and/or brew more than one drink at the same time.
Dispensing hot water
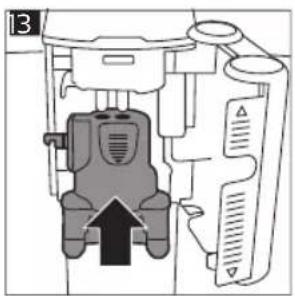
1 Make sure that the internal cappuccinatore is properly attached to the machine (Fig. 13).
2 Place a cup under the spout
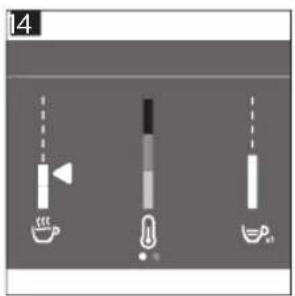
3 Tap the 'More drinks' icon (Fig. 3) and scroll down to select 'Hot Water'.
4 Use the up and down arrows to adjust the hot water quantity or temperature to your preference (Fig. 14).
5 Press the start/stop button.
10 English
6 To stop dispensing hot water before machine is finished, press the start/stop stop ▶ button again.
Personalizing drinks
The machine allows you to adjust the settings of a drink to your own preference and to store the adjusted drink in a personal profile. The different profiles have different colors.
Brewing drinks with CoffeeMaestro function
Your machine offers the possibility to select taste profiles instead of adjusting all settings separately with the CoffeeEqualizer function. You can choose between Delicato, Intenso and Forte. To select a CoffeeMaestro taste profile:
1 Tap the drink icon of your choice (Fig. 2) or tap the 'More Drinks' icon to select a different drink (Fig. 3).
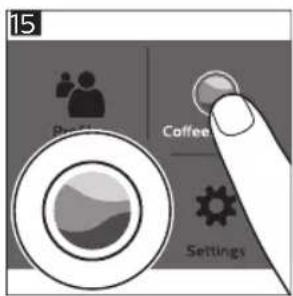
2 Tap the CoffeeMaestro icon repeatedly (Fig. 15).
3 Press OK to confirm your choice.
The main settings of the drink are now adjusted accordingly.
4 Press the start/stop button to start brewing the drink.
CoffeeEqualizer function
After selecting a drink, the CoffeeEqualizer function is activated automatically. You can use the up and down arrows to adjust the following settings:

6 Foam amount
7 You can also decide to prepare 1 or 2 cups
8 Coffee quantity for travel mug (specific types only)
Note: It depends on the drink you choose which settings you can adjust.
Selecting a profile
You can select a profile and store a recipe using the profiles 📁con.
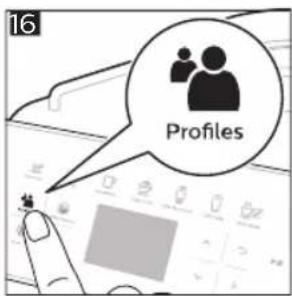
1 Tap the profiles 🎨 icon repeatedly to select one of the colored profiles (Fig. 16). All profiles have a different color.
2 Select a drink by tapping one of the one-touch drink icons or by tapping the 'More Drinks' icon.
3 Adjust the drink settings to your favorite taste.
4 Press start/stop button to brew the drink you selected
- Your new settings have now been stored in the colored profile you selected.
i You can always restore the factory settings of the machine (see 'Restoring factory settings').
Guest profile
Your machine is equipped with a guest profile. When the guest profile is selected, the profile icon is off. When you select this profile, you can still personalize the settings to your own preference but the recipes you brew will not be stored.
Your machine offers you the possibility to add an extra shot of Ristretto to your coffee and milk drinks, for example if you want to have a stronger coffee.
1 Place a cup under the spout.
2 Tap one of the one-touch drinks icons to select a drink (Fig. 2) or tap the 'More Drinks' icon to select a different drink (Fig. 3).
3 Use the up arrow to set the strength to the top level and select the ExtraShot function (Fig. 17).
4 Tap the OK icon if you want to personalize the other settings. Then press the start/stop ▶ button to start brewing the drink.
5 To stop dispensing the drink before the machine has finished, press the start/stop ▶ button again.
When you have selected the ExtraShot function, you can only brew one coffee at the time.
Adjusting machine settings
Setting the water hardness
We advise you to adjust the water hardness setting to the water hardness level in your region for optimal performance and a longer lifetime of the machine. This also prevents you from having to descale the machine too often. The default water hardness setting is 4: hard water.
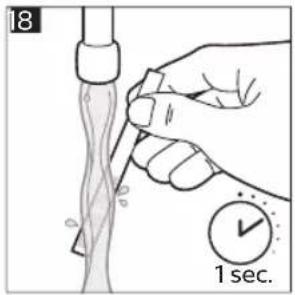
Use the water hardness test strip supplied in the box to determine the water hardness in your region:
1 Immerse the water hardness test strip in tap water or hold it under the tap for 1 second (Fig. 18).
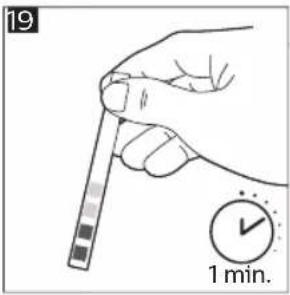
2 Wait 1 minute. The number of squares on the test strip that turn red indicate the water hardness (Fig. 19).
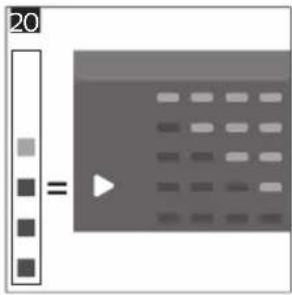
Set the machine to the correct water hardness:
1 Tap the Settings ✕ icon and use the up and down arrows to select 'Water hardness'. Then press the OK icon to confirm.
2 Use the up and down arrows to select the water hardness level. The number of red squares selected on the display should be the same as the number of red squares on the test strip (Fig. 20).
3 When you have set the correct water hardness, tap the OK icon to confirm.
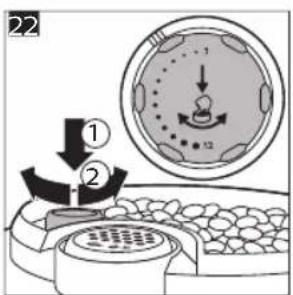
Adjusting the grind setting
You can change the coffee strength with the grind setting knob inside the bean container. The lower the grind setting, the finer the coffee beans are ground and the stronger the coffee becomes. There are 12 different grind settings you can choose from.
The machine has been set up to get the best taste out of your coffee beans. Therefore we advise you not to adjust the grind setting until you have brewed 100-150 cups (approx. 1 month of use).
i You can only adjust the grind setting when the machine is grinding coffee beans. You need to brew 2 to 3 drinks before you can taste the full difference.
Do not turn the grind setting knob more than one notch at a time to prevent damage to the grinder.
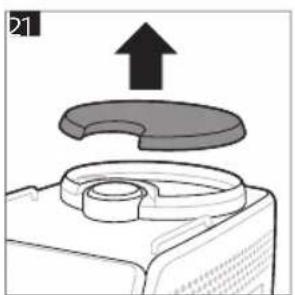
1 Place a cup under the coffee dispensing spout.
2 Remove the lid from the coffee bean hopper (Fig. 21).
12 English
3 Tap the Espresso icon and then press the start/stop button.
4 When the grinder starts grinding, press down the grind setting knob and turn it to the left or right (Fig. 22).
Adjusting other machine settings
By tapping the Settings 📍con you can adjust the following machine settings:
- Water hardness: you can choose between 5 levels according to the water hardness in your region.
- Standby time: you can select 15, 30, 60 or 180 minutes.
- Display brightness: you can select low, medium and high.
- Language: you can select the display language of your preference.
- Sound: you can activate or deactivate the beeping sound of the machine.
- Front illumination: you can choose 'always on', 'on during brewing' or 'always off'.
- Measuring unit: you can choose between ml. or oz.
Restoring factory settings
The machine offers you the possibility to restore the factory settings at any moment.
1 Tap the Settings icon.
2 Use the up and down arrows to select 'Factory settings'. Confirm by tapping the OK icon.
3 Press the start/stop button to confirm that you want to restore the settings.
- The settings are now restored.
i The following factory settings are restored to default: water hardness, standby time, display brightness, sound, front illumination, profiles.
AquaClean water filter
Your machine is AquaClean enabled. You can place the AquaClean water filter in the water tank to preserve the taste of your coffee. It also diminishes the need for descaling by reducing limescale build-up in your machine. You can purchase an AquaClean water filter from your local or online retailer or authorized service centers.
AquaClean filter status indication
When the AquaClean is active, the status of the AquaClean filter is always visible on the screen as a percentage.
- If the status of the AquaClean filter is 10% or less, the screen shows a message for 2 seconds each time you switch on the machine. This message advises you to buy a new filter.
- If the status of the filter is 0%, the machine asks you to replace the AquaClean filter every time you switch on the machine.
Activating the AquaClean water filter (5 min.)
i The machine does not automatically detect that a filter has been placed in the water tank. Therefore you need to activate each new AquaClean water filter that you install in the 'Clean' menu.
When the machine stops showing the filter activation message, you can still activate an AquaClean water filter, but you will need to descale the machine first.
i Your machine has to be completely limescale-free before you start using the AquaClean water filter.
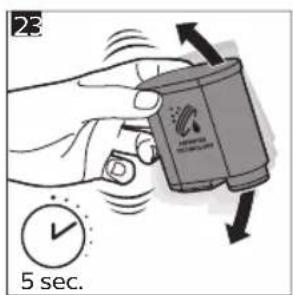
Before activating the AquaClean water filter, it has to be prepared by soaking it in water as described below. If you don't do this, air might be drawn into the machine instead of water, which makes a lot of noise and prevents the machine from being able to brew coffee.
1 Tap the 'Clean' 🔊 icon and use the up and down arrows to select 'AquaClean'.
2 Tap the OK icon to confirm.
3 Tap the OK icon again when the activation screen appears. Follow the instructions on the screen.
4 Shake the filter for about 5 seconds (Fig. 23).
5 Immerse the filter upside down in a jug with cold water and shake/press it (Fig. 24).
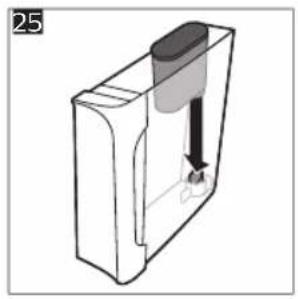
6 Insert the filter vertically onto the filter connection in the water tank. Press it down to the lowest possible point (Fig. 25).
7 Fill the water tank with fresh water and place it back into the machine.
8 Place a bowl under the spout.
9 Press the start/stop button to start the activation process.
10 Hot water will be dispensed from the spout during 1 minute.
11 The filter is now successfully activated.
Replacing the AquaClean water filter (5 min.)
After 95 liters of water have flowed through the filter, the filter will cease to work. The AquaClean status indicator drops to 0% to remind you to replace the filter. As long as the AquaClean status indicator is shown on the display, you can replace the filter without having to descale the machine first. If you do not replace the AquaClean water filter in time, the AquaClean indicator goes out after some time. In that case you can still replace the filter but you first need to descale the machine.
When the AquaClean status indicator drops to 0% or when the machine reminds you to replace the AquaClean filter:
1 take out the old AquaClean water filter.
2 install a new filter and activate it as described in chapter 'Activating the AquaClean water filter (5 min).'
i Replace the AquaClean water filter at least every 3 months, even if the machine does not yet indicate that replacement is required.
Removing and inserting the brew group
Go to www.saeco.com/care for detailed video instructions on how to remove, insert and clean the brew group.
Removing the brew group from the machine
1 Switch off the machine.
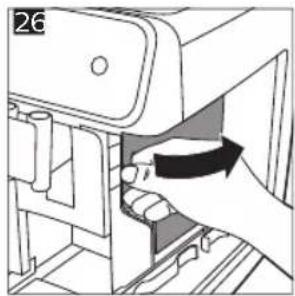
2 Remove the water tank and open the service door (Fig. 26).
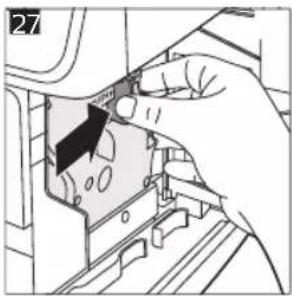
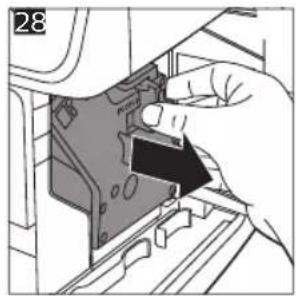
3 Press the PUSH handle (Fig. 27) and pull at the grip of the brew group to remove it from the machine (Fig. 28).
When you remove the brew group from the machine, make sure to empty the drip tray and the coffee grounds container.
14 English
Reinserting the brew group
Before you slide the brew group back into the machine, make sure it is in the correct position.
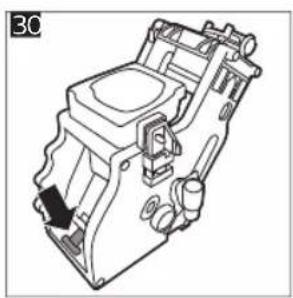
1 Check if the brew group is in the correct position. The arrow on the yellow cylinder on the side of the brew group has to be aligned with the black arrow and N (Fig. 29).
- If they are not aligned, push down the lever until it is in contact with the base of the brew group (Fig. 30).
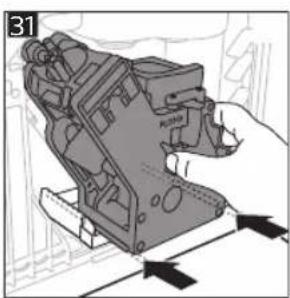
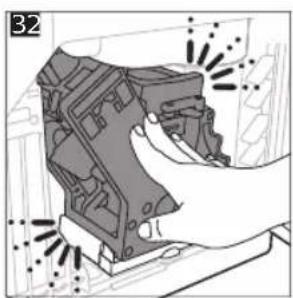
2 Slide the brew group back into the machine along the guiding rails on the sides (Fig. 31) until it locks into position with a click (Fig. 32). Do not press the PUSH button.
3 Close the service door and place back the water tank.
Cleaning and maintenance
Regular cleaning and maintenance keeps your machine in top condition and ensures good-tasting coffee for a long time with a steady coffee flow.
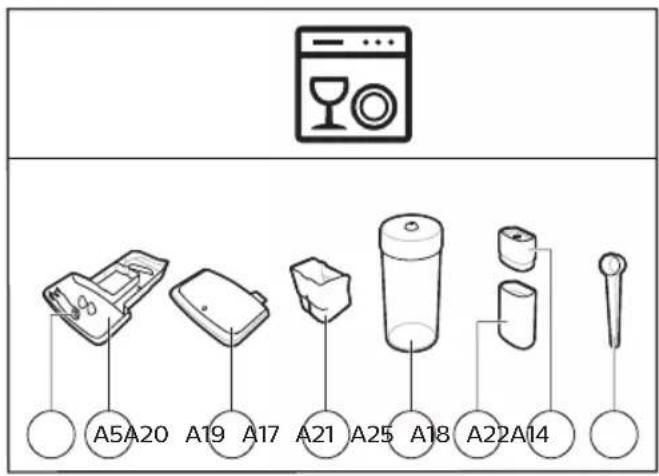
Consult the table below for a detailed description on when and how to clean all detachable parts of the machine. You can find more detailed information and video instructions on www.saeco.com/care. See figure C for an overview of which parts can be cleaned in the dishwasher.
Detachable parts When to clean How to clean
| Brew group Weekly Remove the brew group from the machine (see 'Removing and inserting the brew group'). Rinse it under the tap (see 'Cleaning the brew group under the tap'). |
| Monthly Clean the brew group with the Philips coffee oil remover tablet (see 'Cleaning the brew group with the coffee oil remover tablets'). |
| Milk system/internal cappuccinatore | After every day of use Perform the 'HygieSteam' program in the cleaning menu. Select 'HygieSteam' in the cleaning menu and follow the instructions on the screen. Wipe the outside of the metal milk tube with a damp cloth before placing it into the milk tube holder. |
| Weekly Remove and disassemble the internal cappuccinatore (see 'Cleaning the internal cappuccinatore under the tap'). Rinse all parts under the tap with some washing-up liquid. |
| Monthly Perform the 'Deep Milk Clean' procedure with the Philips milk circuit cleaner. Select 'Deep Milk Clean' in the cleaning menu and follow the instructions on the screen. Go to www.saeco.com/care for detailed video instructions. |
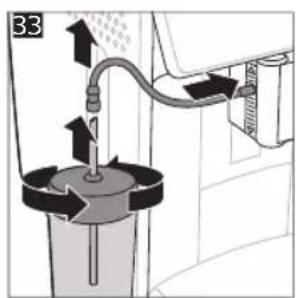
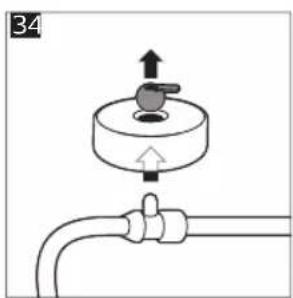
| Milk container Weekly Disassemble the milk container (Fig. 33) and push out the ball using the pin of the milk tube (Fig. 34). Clean all parts of the milk container under the tap or in the dishwasher |
Detachable parts When to clean How to clean
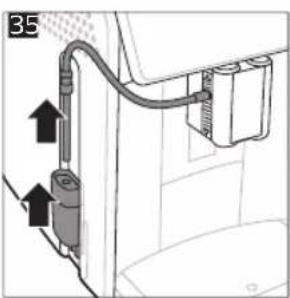
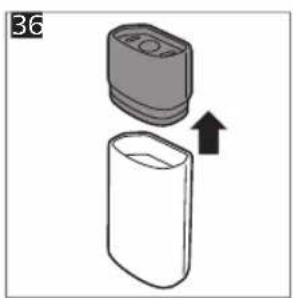
| HygieSteam container (milk tube holder) | Weekly or when the machine reminds you | Remove the HygieSteam container from the machine (Fig. 35) and remove the HygieSteam cover (Fig. 36). Empty the HygieSteam container and clean the container and cover under the tap or in the dishwasher. Let the container and cover air-dry and place them back in the machine. |
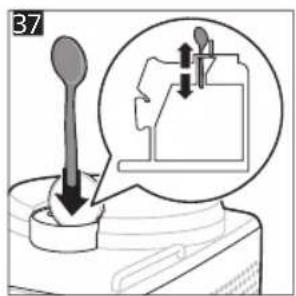
| Pre-ground coffee compartment | Check the pre-ground coffee compartment weekly to see if it is clogged. | Unplug the machine and remove the brew group. Open the lid of the pre-ground coffee compartment and insert the spoon handle into it. Move the handle up and down until the clogged ground coffee falls down (Fig. 37). Go to www.saeco.com/care for detailed video instructions. |
| Coffee grounds container | Empty the coffee grounds container when prompted by the machine. Clean it weekly. | Remove the coffee grounds container while the machine is switched on. Rinse it under the tap with some washing-up liquid or clean it in the dishwasher. The front panel of the coffee grounds container (Fig. A18) is not dishwasher-safe. |
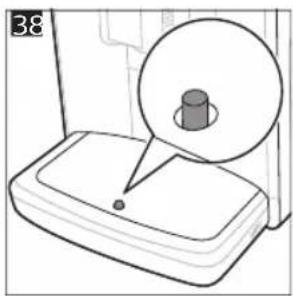
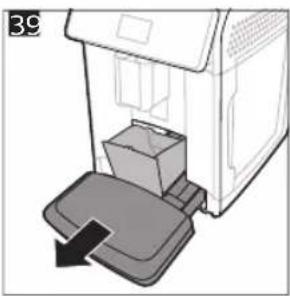
| Drip tray Empty the drip tray daily or as soon as the red 'drip tray full' indicator pops up through the drip tray (Fig. 38). Clean the drip tray weekly. | Remove the drip tray (Fig. 39) and rinse it under the tap with some washing-up liquid. You can also clean the drip tray and the drip tray cover in the dishwasher. The front panel of the coffee grounds container (Fig. A18) is not dishwasher-safe. |
| Lubrication of the brew group | Every 2 months Lubricate the brew group with the by-packed grease (see 'Lubricating the brew group'). |
| Water tank Weekly Rinse the water tank under the tap |
| Machine front Weekly Clean with a non-abrasive cloth |
Cleaning the brew group
Regular cleaning of the brew group prevents coffee residues from clogging up the internal circuits. Visit www.saeco.com/care for support videos on how to remove, insert and clean the brew group.
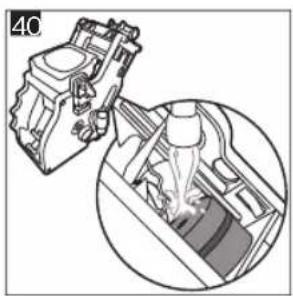
Cleaning the brew group under the tap
1 Remove the brew group (see 'Removing and inserting the brew group').
2 Rinse the brew group thoroughly with water. Carefully clean the upper filter (Fig. 40) of the brew group.
3 Let the brew group air-dry before you place it back. Do not dry the brew group with a cloth to prevent fibers from collecting inside the brew group.
Cleaning the brew group with the coffee oil remover tablets
Only use Philips coffee oil remover tablets.
1 Tap the Clean icon and use the up and down arrows to select 'Brew group clean'.
2 Tap the OK icon to confirm and then follow the instructions on the screen.
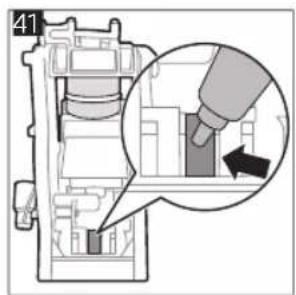
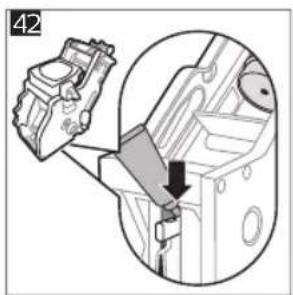
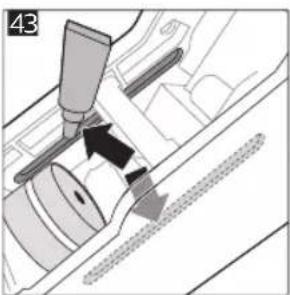
Lubricating the brew group
To improve your machine's performance, we suggest that you lubricate the brew group every 2 months, to ensure that the moving parts continue to move smoothly.
1 Apply a thin layer of grease on the piston (grey part) of the brew group (Fig. 41).
2 Apply a thin layer of grease around the shaft (grey part) in the bottom of the brew group (Fig. 42).
3 Apply a thin layer of grease to the guiding rails on both sides (Fig. 43).
Cleaning programs for the internal cappuccinatore
The machines has three programs to clean the internal cappuccinatore:
- 'HygieSteam Shot': the machine shoots steam through the internal cappuccinatore to rinse it quickly.
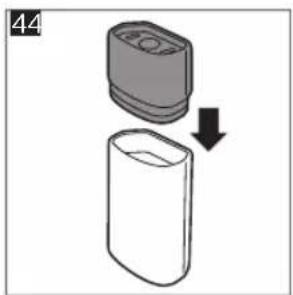
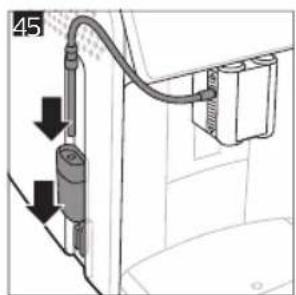
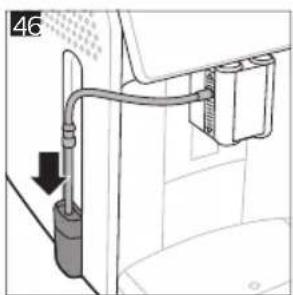
- 'HygieSteam': the machine thoroughly cleans the internal milk system with steam. Make sure that the HygieSteam container is correctly assembled (Fig. 44) and attached to the machine (Fig. 45). Place the milk tube in the milk tube holder (Fig. 46) and follow the instructions on the screen.
- 'Deep Milk Clean': Perform the 'Deep Milk Clean' procedure with the Philips milk circuit cleaner for a thorough cleaning of the internal milk system.
Cleaning the internal cappuccinatore under the tap
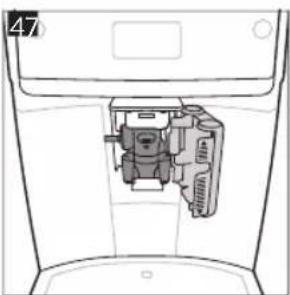
1 Open the door of the internal cappuccinatore (Fig. 47).
2 Remove the internal cappuccinatore by pulling it down (Fig. 48).
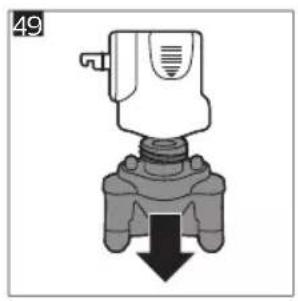
3 Disassemble the internal cappuccinatore by pulling the bottom part off the top part (Fig. 49).
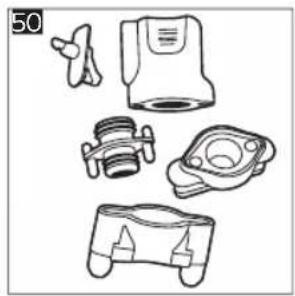
4 Disassemble all parts (Fig. 50) and clean them under the tap.
5 Reassemble the internal cappuccinatore.
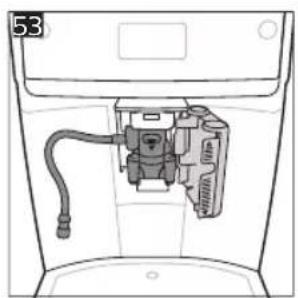
6 To place back the internal cappuccinatore, put it in upright position and make sure the holes are aligned with the two tubes on the machine. Then move the internal cappuccinatore upwards until it locks into place (Fig. 13).
7 Close the door.
Visit www.saeco.com/care for detailed video instructions.
Descaling procedure
Please use Philips descaler only. Under no circumstances should you use a descaler based on sulfuric acid, hydrochloric acid, sulfamic or acetic acid (vinegar) as this may damage the water circuit in your machine and will not dissolve the limescale properly. Not using the Philips descaler will void your warranty. Failure to descale the appliance will also void your warranty. You can buy Philips descaler from your local or online retailer or from authorized service centers.
1 When the machine asks you to descale it, tap the OK icon to start. To start descaling without being prompted by the machine, tap the Clean icon and select 'Descale'.
2 Remove the drip tray, the coffee grounds container and the HygieSteam container (Fig. 35), empty them and put them back into place.
3 Remove the water tank and empty it. Then remove the AquaClean filter.
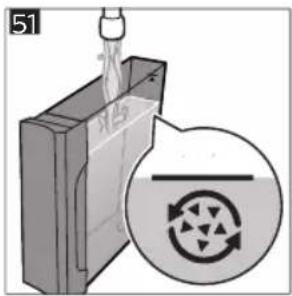
4 Pour the whole bottle of Philips descaler into the water tank and then fill it with water up to the CALC CLEAN level (Fig. 51). Then place it back into the machine.
5 Place a large container (1.5 l) under the coffee dispensing spout.
6 Make sure that the HygieSteam container is correctly assembled (Fig. 44) and attached to the machine (Fig. 45). Place the milk tube in the milk tube holder (Fig. 46).
7 Follow the instructions on the screen to start the descaling procedure. The descaling procedure lasts approx. 30 minutes and consists of a descaling cycle and a rinsing cycle.
8 Once the descaling cycle is finished, you need to rinse the water tank and water circuit. Follow the instructions on the screen.
9 Place a new AquaClean filter in the water tank and activate it (see 'Activating the AquaClean water filter (5 min.)').
Tip: Using the AquaClean filter reduces the need for descaling!
What to do if the descaling procedure is interrupted
You can exit the descaling procedure by pressing the on/off button on the control panel. If the descaling procedure is interrupted before it is completely finished, do the following:
1 Empty and rinse the water tank thoroughly.
2 Fill the water tank with fresh water up to the CALC CLEAN level indication and switch the machine back on. The machine will heat up and perform an automatic rinsing cycle.
3 Before brewing any drinks, perform a manual rinsing cycle. To perform a manual rinsing cycle, first dispense half a water tank of hot water and then brew 2 cups of pre-ground coffee without adding ground coffee.
Note: If the descaling procedure was not completed, the machine will require another descaling procedure as soon as possible.
Error codes
Below you find a list of the error codes showing problems that you can solve yourself. Video instructions are available on www.saeco.com/care. If another error code appears, please contact the Consumer Care Center in your country. For contact details, see the warranty leaflet.
Error code Problem Possible solution
| 01 The coffee funnel is clogged. | Switch off the machine and unplug it. Remove the brew group. Then open the lid of the pre-ground coffee compartment and insert the spoon handle. Move the handle up and down until the clogged ground coffee falls down (Fig. 37). Visit www.saeco.com/care for detailed video instructions. |
| 03 The brew group is dirty or not well-greased. | Switch off the machine. Rinse the brew group with fresh water, let it air-dry and then lubricate it (see 'Lubricating the brew group'). Consult chapter 'Cleaning the brew group' or visit www.saeco.com/care for detailed video instructions. Then switch the machine on again. |
| 04 The brew group is not positioned correctly. | Switch off the machine. Remove the brew group and reinsert it. Make sure that the brew group is in the correct position before you insert it. Consult chapter 'Handling the brew group' or visit www.saeco.com/care for detailed video instructions. Then switch the machine on again. |
| 05 There is air in the water circuit. | Restart the machine by switching it off and on again. If this works, dispense 2-3 cups of hot water. Descale the machine if you have not done so for a longer period of time. |
Error code
Problem Possible solution
| The AquaClean filter was not prepared properly before installation or it is clogged. | Remove the AquaClean filter and try to brew a coffee again. If this works, make sure that the AquaClean filter is prepared properly before you place it back. Put the AquaClean filter back into the water tank. If this still does not work, the filter might be clogged and needs to be replaced. |
| 11 The machine needs to adjust to room temperature | Allow some time for the machine to adjust from transport/outdoor temperature to room temperature. Switch off the machine for 30 minutes and switch it on again. If this does not work, contact the Consumer Care Center in your country. For contact details, see the warranty leaflet. |
| 14 The machine is overheated. | Switch off the machine and switch it back on after 30 minutes. |
| 19 The machine is not connected to the wall socket properly. | Make sure that the small plug of the power cord is properly connected to the socket on the back of the machine. |
Ordering accessories
To clean and descale the machine, only use the Philips maintenance products. These products can be purchased from your local or online retailer or authorized service centers. To find a full list of spare parts online, enter the model number of your machine. You can find the model number on the inside of the service door.
Maintenance products and type numbers:
- Descaling solution CA6700
- AquaClean filter CA6903
- Brew group grease HD5061
- Coffee oil remover tablets CA6704
- Milk circuit cleaner CA6705
- Maintenance kit CA6707
Troubleshooting
This chapter summarizes the most common problems you could encounter with the machine. Support videos and a complete list of frequently asked questions are available on www.saeco.com/care. If you are unable to solve the problem, contact the Consumer Care Center in your country. For contact details, see the warranty leaflet.
Problem Cause Solution
| There are some coffee residues inside my new coffee machine. | This machine has been tested with coffee. | Although it has been carefully cleaned, there may be some coffee residues left. However, the machine is absolutely new. |
Problem Cause Solution
| The drip tray fills up quickly / there is always some water in the drip tray. | This is normal. The machine uses water to rinse the internal circuit and brew group. Some water flows through the internal system directly into the drip tray. | Empty the drip tray daily or as soon as the red 'drip tray full' indicator pops up through the drip tray cover. Tip: place a cup under the dispensing spout to collect rinsing water that comes out of it. |
| The 'empty coffee grounds container' icon remains on. | You emptied the coffee grounds container while the machine was unplugged from the wall socket, or you placed it back too fast. | Remove the coffee grounds container, wait at least 5 seconds and then insert it again. |
| The machine prompts to empty the coffee grounds container even though the container is not full. | The machine did not reset the counter the last time you emptied the coffee grounds container. | Always wait approx. 5 seconds when you place back the coffee grounds container. In this way, the coffee pucks counter will be reset to zero and the number of coffee pucks is counted correctly. |
| The coffee grounds container is too full and the 'empty coffee grounds container' icon did not appear on the display. | You removed the drip tray without emptying the coffee grounds container. | When you remove the drip tray, also empty the coffee grounds container even if it contains only a few coffee pucks. This ensures that the coffee pucks counter is reset to zero and that the number of coffee pucks is counted correctly. |
| I cannot remove the brew group. | The brew group is not in the correct position. | Reset the machine in the following way: close the service door and place back the water tank. Switch the machine off and back on again and wait for the lights in the drink icons to come on. Try to remove the brew group again. See chapter 'Removing and inserting the brew group' for step-by-step instructions. |
| I cannot insert the brew group. | The brew group is not in the correct position. | Reset the machine in the following way: close the service door and place back the water tank. Leave the brew group out. Switch off the machine and unplug it. Wait for 30 seconds and then plug the machine back in, switch it on and wait for the lights in the drink icons to come on. Then put the brew group in the correct position and reinsert it into the machine. See chapter 'Removing and inserting the brew group' for step- by-step instructions. |
| The coffee is watery. The brew group is dirty or needs to be lubricated. | Remove the brew group, rinse it under the tap and leave it to dry. Then lubricate the moving parts (see 'Lubricating the brew group'). |
Problem Cause Solution
| The machine is performing its self-adjustment procedure. This procedure is started automatically when you use the machine for the first time, when you change to another type of coffee beans or after a long period of non-use. | Brew 5 cups of coffee initially to allow the machine to complete its self-adjustment procedure. |
| The grinder is set to a too coarse setting. | Set the grinder to a finer (lower) setting. Brew 2 to 3 drinks to be able to taste the full difference. |
| The coffee is not hot enough. | The temperature is set too low. Set the temperature to the maximum setting (Fig. 52). |
| A cold cup reduces the temperature of the drink. | Preheat the cups by rinsing them with hot water. |
| Adding milk reduces the temperature of the drink. | Regardless of whether you add hot or cold milk, adding milk always reduces the temperature of the coffee. Preheat the cups by rinsing them with hot water. |
| Coffee does not come out or coffee comes out slowly. | The AquaClean water filter was not prepared properly for installation. | Remove the AquaClean filter and dispense some hot water. If this works, the AquaClean filter was not installed properly. Reinstall and activate the AquaClean filter and follow all steps in chapter 'AquaClean water filter'. |
| After a long period of non-use, you need to prepare the AquaClean water filter for use again and dispense 2-3 cups of hot water. |
| The AquaClean water filter is clogged. | Replace the AquaClean water filter every 3 months. A filter that is older than 3 months can become clogged. |
| The grinder is set to a too fine setting. | Set the grinder to a coarser (higher) setting. Note that this will impact the coffee taste. |
| The brew group is dirty. Remove the brew group and rinse it under the tap (see 'Cleaning the brew group under the tap'). |
| The coffee dispensing spout is dirty. | Clean the coffee dispensing spout and its holes with a pipe cleaner or needle. |
| The pre-ground coffee compartment is clogged | Switch off the machine and remove the brew group. Open the lid of the pre-ground coffee compartment and insert the spoon handle into it. Move the handle up and down until the clogged ground coffee falls down (Fig. 37). |
Problem Cause Solution
| The machine circuit is blocked by limescale. | Descale the machine with Philips descaler (see 'Descaling procedure'). Always descale when the machine prompts you. |
| The milk does not froth. The internal cappuccinatore is dirty or not inserted correctly. | Clean the internal cappuccinatore and make sure that you position and insert it correctly (see 'Cleaning the internal cappuccinatore under the tap'). |
| The type of milk used is not suitable for frothing. | Different types of milk result in different amounts of froth and different froth qualities. |
| The milk is splashing. The milk you use is not cold enough. | Make sure you use cold milk coming directly from the fridge. |
| The flexible milk tube is not connected properly. | Open the door of the coffee dispensing spout (Fig. 47) and check if the flexible milk tube is fully connected to the cappuccinatore. Note that the cappuccinatore and milk tubes may be hot. Let the cappuccinatore and the tubes cool down before you touch them. |
| The cappuccinatore and milk tubes are not clean. | Remove and disassemble the internal cappuccinatore (see 'Cleaning the internal cappuccinatore under the tap'). Rinse all parts under the tap. For thorough cleaning, use Philips milk circuit cleaner and perform the Deep Milk Clean procedure via the cleaning (menu. Note that if the parts have been cleaned in the dishwasher, they may have become clogged by food particles or detergent residues. A visual check that they are not obstructed is also recommended. |
| We advise you to perform the HygieSteam program every day: 1) Press 'Clean' on the control panel. 2) Select 'HygieSteam'. 3) Press the start button to start the process. Then confirm all steps on the display. |
| The milk tubes are clogged. Always store the milk container without the milk tubes in the refrigerator. Leftover milk could accumulate inside the milk tubes and block the flow of milk through the tubes. Rinse the milk tubes before storage. |
22 English
Problem Cause Solution
| The machine seems to be leaking. | The machine uses water to rinse the internal circuit and brew group. This water flows through the internal system directly into the drip tray. This is normal. | Empty the drip tray every day or as soon as the 'drip tray full' indicator pops up through the drip tray cover. Tip: Place a cup under the dispensing spout to collect rinsing water and reduce the amount of water in the drip tray. |
| The drip tray is too full and has overflowed which makes it look like the machine is leaking. | Empty the drip tray every day or as soon as the 'drip tray full' indicator pops up through the drip tray cover. |
| The water tank is not fully inserted, some water is leaking out of the water tank and air is drawn into the machine. | Make sure the water tank is in the correct position: remove it and reinsert it into the machine as far as possible. |
| The brew group is dirty/clogged. Rinse the brew group. |
| The machine is not placed on a horizontal surface. | Place the machine on a horizontal surface so that the drip tray does not overflow and the 'drip tray full' indicator works properly. |
| I cannot activate the AquaClean water filter and the machine asks for descaling. | The filter has not been installed or replaced in time after the screen shows the AquaClean reminder. This means your machine is not completely free of limescale anymore. | Descale your machine first and then install the AquaClean water filter. |
| The new water filter does not fit. | You are trying to install another filter than the AquaClean water filter. | Only the AquaClean water filter fits into the machine. |
| The rubber ring on the AquaClean water filter is not in place. | Place back the rubber ring on the AquaClean water filter. |
| The machine is making a loud noise. | It is normal that your machine makes some noise during use. | If the machine starts to make a different kind of noise, clean the brew group and lubricate it (see 'Lubricating the brew group'). |
| The AquaClean water filter was not prepared properly and air is now drawn into the machine. | Remove the AquaClean water filter from the water tank and prepare it for use properly before you place it back. See chapter 'AquaClean water filter' for step-by-step instructions. |
| The water tank is not fully inserted and air is drawn into the machine. | Make sure the water tank is in the correct position: remove it and reinsert it by pushing it into the machine as far as possible. |
Technical specifications
The manufacturer reserves the right to improve the technical specifications of the product. All the preset quantities are approximate.
Description Value
| Size (w x h x d) 262 x 383 x 448 mm |
| Weight 8 - 8.5 kg |
| Power cord length 1200 mm |
| Water tank 1.8 litres |
| Coffee bean hopper capacity 300 g |
| Coffee grounds container capacity 12 pucks |
| Milk container capacity 600 ml |
| Adjustable spout height 87 - 147 mm |
| Nominal voltage - Power rating - Power supply See data label on inside of service door (Fig. A15) |
24 Azərbaycanca
Mündəricat
B3 Ikon for CoffeeMaestro
B8 Maskinindstillinger
B5 Knappen Start/stop ▶
B10 Personlige profiler
Introduktion
flowchart
graph LR
    A["Screen Screen"] --> B["Lock/Timer Display"]
    B --> C["5 sec. Handheld with a coffee can"]
    C --> D["30 sec. Inlet of water in beaker"]
    D --> E["QR Code"]
    E --> F["1 minute intruder"]
    F --> G["1 minute watch-up"]
    G --> H["1 minute coffee cup with coffee cup"]
Erifunktsioonid
A8 Recipiente HygieSteam
flowchart
graph LR
    A["Start"] --> B["OK"]
    B --> C["Scan to press"]
    C --> D["5 sec. Reading device"]
    D --> E["30 sec. Watch the video"]
    E --> F["Monitor with 30 seconds"]
    F --> G["Display screen"]
    G --> H["1 min. Use in coffee cup"]
    H --> I["Up arrow to coffee cup"]
    I --> J["Teach holding coffee cup"]
    J --> K["QR code icon"]
flowchart
graph LR
    A["Screen Screen"] --> B["Lock/Timer Display"]
    B --> C["5 sec. Handheld with a device"]
    C --> D["30 sec. Beaker with a glass container"]
    D --> E["QR Code"]
    E --> F["1 min. Onboard with coffee cup and tray"]
    F --> G["1 minute of play button"]
Posebne funkcije
Posebna funkcija Namjena
flowchart
graph LR
    A["Start"] --> B["OK"]
    B --> C["Switch"]
    C --> D["OK"]
    D --> E["Hand press"]
    E --> F["5 sec."]
    F --> G["Hand press"]
    G --> H["30 sec."]
    H --> I["Water jar with clock"]
    I --> J["Monitor"]
    J --> K["1 min."]
    K --> L["Play button"]
    L --> M["Play button"]
    M --> N["Up arrow to screen"]
    N --> O["Teach cup with coffee cup"]
    O --> P["Teach cup with coffee cup"]
    P --> Q["QR code icon"]
flowchart
graph LR
    A["Start"] --> B["OK"]
    B --> C["Switch"]
    C --> D["OK"]
    D --> E["Hand press"]
    E --> F["5 sec."]
    F --> G["Hand press"]
    G --> H["30 sec."]
    H --> I["Beaker with clock"]
    I --> J["Monitor"]
    J --> K["1 min."]
    K --> L["Play button"]
    L --> M["Play button"]
    M --> N["Up arrow to screen"]
    N --> O["Teach cup with coffee cup"]
    O --> P["Teach cup with coffee cup"]
    P --> Q["QR code icon"]
Speciális funkciók
B5 Start/stop-knop ▶
A12 Bryter for maleinnstillinger
A13 Bønnetrakt
A14 Bryggeenhet
A15 Servicedør
A16 Vannbeholder
A17 Kaffegrutbeholder
AquaClean-vannfilter
flowchart
graph LR
    A["Screen Screen"] --> B["Lock/Timer Display"]
    B --> C["5 sec. Handheld with a coffee can"]
    C --> D["30 sec. Inlet of water in beaker"]
    D --> E["QR Code"]
    E --> F["1 minute intruder"]
    F --> G["1 minute watch-up"]
    G --> H["1 minute coffee cup with coffee cup"]
Maxsus funksiyalar
Maxsus funksiya Maqsad
| Coffee Maestro | CoffeeMaestro bilan sozlamalarni o'zingiz o'zgartirish o'rniga ichimliklaringiz uchun tayyor ta'm profilini (Delicato, Intenso, Forte) tanlash orqali qahvangizni moslashtirishingiz mumkin. |
| HygieSteam | HygieSteam funksiyasi mikroorganizmlarni yo'q qilish orqali sut tizimini avtomatik tozalaydi: undan kapuchino yoki boshqa sutli ichimliklarni damlagandan keyin foydalaning. |
| Ceramic Grinder | Chidamli yanchgichimiz juda qattiq va mustahkam bo'lishi uchun 100% keramikadan tayyorlangan. Uni 12 ta daraja yordamida didingizga moslashingiz mumkin. |
Ichimliklar damlash
Umumiy bosqichlar
1 Suv idishni jo'mrak suvi bilan, qahva doni bunkerini esa qahva doni bilan to'ldiring.
2 Kichik vilkani mashinaning orqasida joylashgan rozetkaga ulang. Tarmoq vilkasini devordagi rozetkaga ulang.
3 Mashinani yoqish uchun On/Off tugmasini bosing.
- Mashina qizishni boshlaydi va avtomatik chayish siklini bajaradi.
- Ichimlik belgisidagi barcha chiroqlar doimiy yonib turganda, mashina ishlatishga tayyor bo'ladi.
4 Finjonni qahva quyish jo'mragi ostiga qo'ying. Qahva quyish jo'mragi balandligini siz ishlatadigan finjon yoki stakan o'lchamiga rostlash uchun jo'mrakni tepaga yoki pastga suring (Rasm 1).
Personalizar as bebidas 344
Personalizar as bebidas
Encomendar acessórios
A8 Recipient HygieSteam
Vodni filter AquaClean
flowchart
graph LR
    A["Initial 1: Plug electrical outlet"] --> B["Step 1: Insert battery with switch"]
    B --> C["Step 2: Replace battery with 'ON' button"]
    C --> D["Step 3: Click 'ON' button"]
    D --> E["Final 4: Display screen with 'OK' button"]
Специальные функции
Специальная
функция
Цель

flowchart
graph TD
    A["Start: Battery Open"] --> B["Step 1: Lock Access"]
    B --> C["Step 2: Lock Button Off"]
    C --> D["Step 3: On/Off Control"]
    D --> E["End: Display with OK/Off/Control buttons"]

    subgraph Before
        F["Before Start"] --> G["Step 1: Lock Access"]
        G --> H["Step 2: Lock Button Off"]
        H --> I["Step 3: On/Off Control"]
        I --> J["End: Display with OK/Off/Control buttons"]

    end

    subgraph After
        K["After Start"] --> L["Step 1: Lock Access"]
        L --> M["Step 2: Lock Button Off"]
        M --> N["Step 3: On/Off Control"]
        N --> O["Step 4: On/Off Control"]
        O --> P["End: Display with OK/Off/Control buttons"]
610 Точикй
Вазифахои махсус
Вазифаи махсус Максад

A1 ЧWNWUWNU WUWHWUWU
A2 Unwgud uninah pudwutnuph ywhwnh
A3 Unipah hwnhlyutph unnuhh ywwhwnhz
A4 Lwnh hwúwn púhy
A5 Чушрwlжні цьшну
A15 Uwwuwnluyui npuwly
A16 Ωnh ρωρ
A17 Unipah uuuuqwoph ynuntjutan
A18 Unipoh tuunluwaph ynüuntjutph wngluh
wwutl
Чышwlwyn Peninsula lymph Kuwait
Uju 伍uŋtun unǎtch úbptùwù wǎlyw ʒ tŋlynì wwnptpnwlynj: ʔnwùg ywnwùlpnúwù qwhwùwylutph wpnuwphù untupn wwnptn ʒ, uwlqujù pninn ynǎwylutpù ni wwnylntpnwylutpù niùtù ünyù
B5 Utyuwnqh/ywùqh ▶nǎwly
B6 Cwylwnyúwù wwwlnytnwlyǔtn (utnlu, utnplu, htun, ok)
B7 Eynwu
B8 Uptuujh ywnqwynnuiutn
B9 Uwpnúwù núnnwgwùy
B10 Uthwnwlywù wynn\$hlutn
Utwnδηρηι
Cunphwulnnniu tup Saeco jnhul wulnniwn unatuh utptiuu qutini ywwwugnupjwup: Saeco-h lnnihg wnwqwnlyunn wngwug wgwugnupniuhg jhwndtp oqnultini hwuiwn wugtp www.saeco.com/MyCoffeeMachine hnniynul u qnwugtp atn uwnpn:
U2niú Uju útptùwù yhnàwnyulti ʃ unipǎnu: ðtu wju hùuwúpnu úwpnulti ʃ, hùwnwulnn ʃ, nn unipǎh uǔwgnnnùtn uìwgwò jhùtu: Ujùniwúbùwjǔhu, útūp tnww2huwqlnnniú bùp, nn útptùwù pwgwnàwlywwytu ünn ʃ:
Lwhpwù wnwghù wùqwú oqunwqnɒtɪŋ
Rwunnily qnpδwnnypəutn
| 3wnnnly qnnðwnnjuːə | Luwunwɪy |
 | CoffeeMaestro qnnðwnnjuːh oqùnɪjəjwúp lʊwnnŋ tɒ wùhwunwʊljuwùwɡʊtʃl unɪnəh uwwunpwuinniːŋ: Ujù pəniyl ʒ unwiʃhu lʊwnqʊwʊŋnniʊtʃnɪ hūpùnɪnniːju lʊwnwʊntʃni ʊhnhuwntɪu nùnptʃl ʊwhuwwuːtu uwhúwúluwð huuúwjhʊ ywnʃhl (Delicato, Intenso, Forte): |
 | HygieSteam $nɪʊlɡħwɪu wʊlunníwun lʊtnuŋul úwpnniú ʒ lʊwɪŋ huuúwʊwnqnˈ hɪnwɡʊtʃniʊ lʊhlynnonquuhqu̱utʃn: oqunwɑqnðtɪp wjʊ lʊwwnɪshɪn lʊwɪ lʊwɪŋ lʊnw hhuúuʃwð wjl núwɪtʃhpʊtn uwwunpwuuntʃnɪg htʊnn: |
 | Utn nhúwɡlniːu unǎwnwɡn uwwunpwuunljuwð ʒ 100% lʊtnuúhlywjhg, nnuftuqh wjʊ jhʊh pugwunwwuːtu lŋzɪn lu ă2qnhun: Ujʊ lʊwnnŋ ʒ hwnúwntgʊtʃl àtn ăw2wʊlhʊ 12 ʊhnuiwɪng úwʊwɒnnwʊlju̯tʃnnuː; |
Cuiwthputnh wwnnwnnniu
Cùnhwùnín qnnònníŋnìuìtn
1 2nh pwnp igntap dnpwuh gnnu, huy unipah hwnhylutph unnuhn` unipah hwnhylutpnu:
2 Φnpn hupngwyn uingntap utptuwjh htunuh uwuniu qinuiunn puhlyh ubg: Uhwgntp hnuwuph hupngwyn wwnh ywnnwyh:
3 Utηύτρ ύħωgώμι/ωμχωνίμι υπαλη' υπρτίμι υħωgύτηι hωίωη:
- Uptiwi uunui 5 unpwuwu l ywnwnni 5 wulnnuun wqnwnnui ghyn:
- 6np núwqihgútph wwnlytnwlyútph pninn niuwjhù gnighsútph qwnzbtù hwwunwunniu iynunj, úbptüwù wwnpwnuun t oqunwqnòúwù:
4 Unipah wnunwúnúwù δnpwlḥ unwú untnwnntip pwdwly: Όnnwln uwhtgntip ʊtnu lwwú ʊtnplu` npw pwnànnuējnīnǚ oqunwqnòulnn pwdwlyh zwiqhù hwiúwwwnwnuwuhwutgūtlni hwiúwn (Uy. 1):
Зwinhylutnhg unipoh wwnpwnunniu
1 Unipá tyhtjini hwúwn unnybp dtn üwuhpünnwö (Uy. 2) núwtyjhph wwwunytynwyn lyuó «Ujl púwtjhputn» wwwunytynwyn (Uy. 3):
- Ujdú lwwnnt btp puwthp hwnuwnwgutl dtn wuhwnwlywù ǎw2wlyhù (Uy. 4): Oqunwqnδtpr nthwh ytn u ntwh ywn ninnylwò uwwguttn (Uy. 5) unipǎh wǔnnjānīn lwwnwlnntni hwiūn: Utnútp OK wwnytnwnyn, tiāt guìyu wùniú btp lwwunnti wjj lwwnwlnnniutn (Uy. 6):
2 Swuwrwgw6 wwhh utnubp utlywnph/ywugh 4mawlp nunnuw6 nuwthph wwnnwwnniup ulutjni hwuwn:
A11 grades/disability and quality
B1 RS#030/RS#m#03n# PS#ns#
B2 gmnn dgbgdnb lssdqnnl bsqyngjdn
CoffeeEqualizer ๑๒๖๐
phosphorus phosphorus phosphorus phosphorus phosphorus phosphorus phosphorus phosphorus phosphorus phosphorus phosphorus phosphorus phosphorus phosphorus phosphorus phosphorus phosphorus phosphorus phosphorus phosphorus phosphorus phosphorus phosphorus phosphorus phosphorus phosphorus phosphorus phosphorus phosphorus phosphorus phosphorus phosphorus phosphorus phosphorus phosphorus phosphorus phosphorus phosphorus phosphorus phosphorus phosphorus phosphorus phosphorus phosphorus phosphorus phosphorus phosphorus phosphorus phosphorus phosphorus phosphus phosphorus phosphorus phosphorus phosphorus phosphorus phosphorus phosphorus phosphorus phosphorus phosphorus phosphorus phosphorus phosphorus phosphorus phosphorus phosphorus phosphorus phosphorus phosphorus phosphorus phosphorus phosphorus phosphorus phosphorus phosphorus phosphorus phosphorus phosphorus phosphorus phosphorus phosphorus phosphorus phosphorus phosphorus phosphorus phosphorus phosphorus phosphorus phosphorus phosphorus phosphorus phosphorus phosphorus phosphorus phosphorus phosphorus phosphorus phosphorus phosphorus phosphoric
modification of the molecular structure of a molecule, which is shown in the following text:
AquaClean -by-mo-gno-mo
AquaClean fiscalu fiscaln fiscaln fiscald fiscal and fiscalm fiscal on fiscal fiscal fiscal and fiscal management of fiscal fiscal fiscal and fiscal management of fiscal fiscal
natural_image
Hand holding a device with a black arrow indicating direction (no text or symbols)

natural_image
Illustration of a hand pouring dark granular substance from a container onto a tray (no text or symbols)

natural_image
Diagram showing a mechanical component with an upward arrow and a circular feature, no text or symbols present.

natural_image
Illustration of a hand pouring liquid into a beaker with a submerged object, accompanied by a stopwatch showing 30 seconds (no text or symbols on the diagram itself)
natural_image
Diagram of a mechanical device with a downward arrow indicating force or movement (no text or symbols)
natural_image
Diagram of a hand inserting a component into a device, showing a black arrow indicating rotation (no text or symbols present)
natural_image
Hand inserting a component into a device (no text or symbols visible)
natural_image
Close-up of hands installing or adjusting a mechanical component with a black arrow pointing to a section (no visible text or symbols)

natural_image
Technical line drawing of a mechanical component with no visible text or symbols
natural_image
Mechanical assembly diagram showing a hand operating a component with directional arrows indicating motion (no text or symbols)
natural_image
Illustration of a hand holding a mechanical component with motion lines indicating movement (no text or symbols)
natural_image
Diagram of a mechanical valve assembly with a handle and pipe connection (no text or symbols)
natural_image
Diagram showing a cylindrical object with a lid and an arrow indicating upward motion (no text or symbols)
natural_image
Diagram of a device with a magnified view showing a cylindrical component and a dot on the base (no text or symbols)
natural_image
Diagram of a device with a bag and arrow indicating left-hand rule (no text or symbols)
natural_image
Mechanical assembly diagram showing a piston and crankshaft mechanism with a magnified inset (no text or labels)
natural_image
Mechanical assembly diagram showing a bracket inserted into a housing with a highlighted section (no text or symbols)
natural_image
Diagram showing a cylindrical container being dropped with a downward arrow, no text or symbols present
natural_image
Diagram of a mechanical or electrical component with a black arrow pointing to a plug, no visible text or symbols
natural_image
Diagram of a vehicle interior showing a mechanical device inserted into a container (no text or symbols visible)

natural_image
Mechanical assembly diagram showing a component inserted into a housing (no text or symbols visible)
natural_image
Mechanical component diagram showing a valve or actuator with a downward arrow indicating force or direction (no text or symbols present)
natural_image
Line drawings of various mechanical components including a device, gear, and housing (no text or symbols)

natural_image
Diagram of a device inside a car door, showing internal components like a plug and cable (no text or symbols)
-1
1_
-1
1
flowchart
graph TD
    A["Grid Layout"] --> B["Open Grid"]
    B --> C["Arrow Up"]
    C --> D["Grid Layout"]
    D --> E["Open Grid"]
    E --> F["Arrow Down"]
4219.450.5387.1 (2/2022) rev.00

421945053871
www.saeco.com/care


MIX
Paper from
responsible sour
FSC®C041324