IAN 378324 - Fitness Equipment CRIVIT - Free user manual and instructions
Find the device manual for free IAN 378324 CRIVIT in PDF.
| Brand | Crivit |
| Model | IAN 378324 |
| Product type | Push-up board with ergonomic handles |
| Dimensions (L x H x D, without handles) | Approx. 65 x 1.75 x 20 cm |
| Maximum user weight | 100 kg |
| Usage class | H (domestic use) |
| Standards | DIN EN ISO 20957-1 |
| Package contents | 1 board, 2 push-up handles, 12 floor protectors, 1 quick start guide |
| Intended use | Push-up exercises for private use, not medical or commercial |
| Main functions | Removable handles for multiple grips, color-coded markers for muscle groups, non-slip thanks to floor protectors |
| Power supply | None (mechanical) |
| Assembly | Simple snap-in assembly of handles |
| Cleaning | With water and a soft cloth; no harsh cleaning agents |
| Storage | Dry, clean place at room temperature |
| Safety | Use under adult supervision, check for damage before each use, do not use as a toy |
| Included accessories | 12 non-slip pads (floor protectors) |
| Repairability | Spare parts not specified; if damaged, replace the unit |
| Manufacturing date | 07/2021 |
Frequently Asked Questions - IAN 378324 CRIVIT
User questions about IAN 378324 CRIVIT
0 question about this device. Answer the ones you know or ask your own.
Ask a new question about this device
Download the instructions for your Fitness Equipment in PDF format for free! Find your manual IAN 378324 - CRIVIT and take your electronic device back in hand. On this page are published all the documents necessary for the use of your device. IAN 378324 by CRIVIT.
USER MANUAL IAN 378324 CRIVIT
natural_image
3D rendering of a black rectangular electronic device with connectors and circular ports, no visible text or symbols
text_image
PDF ONLINE www.lidl-service.comPUSH-UP-BOARD
PUSH-UP BOARD
PLANCHE À POMPES
DE AT CH
PUSH-UP-BOARD
Kurzanleitung
FR BE
PLANCHE À POMPES
Guide de démarrage
PL
DESKA DO POMPEK
Skrócona instrukcja
SK
DOSKA NA CVIČENIE
Krátky návod
DK
PUSH-UP-BOARD
Kort vejledning
GB IE
PUSH-UP BOARD
Quick guide
NL BE
PUSH-UP BOARD
Korte handleiding
CZ
DESKA PUSH-UP
Stručný návod
ES
TABLA DE FLEXIONES
Guía rápida
text_image
A 2 1 2 3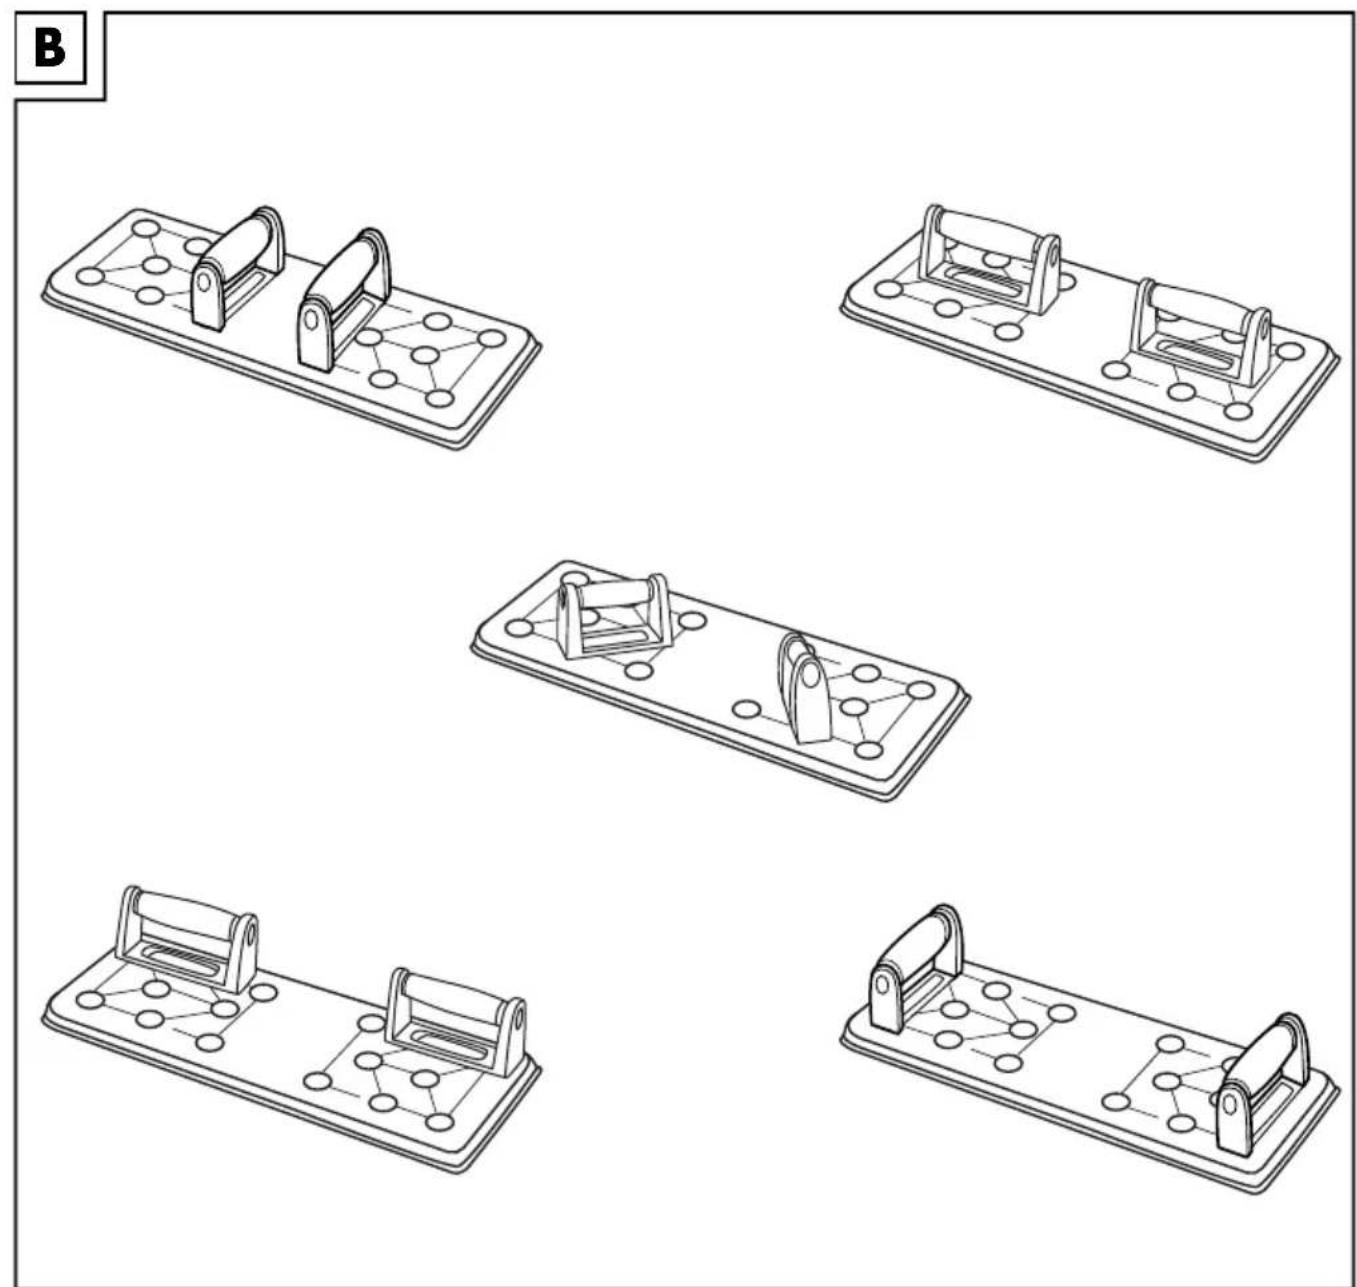
natural_image
Five identical line drawings of a mechanical clamp or bracket device, each with a grid pattern and circular components (no text or symbols)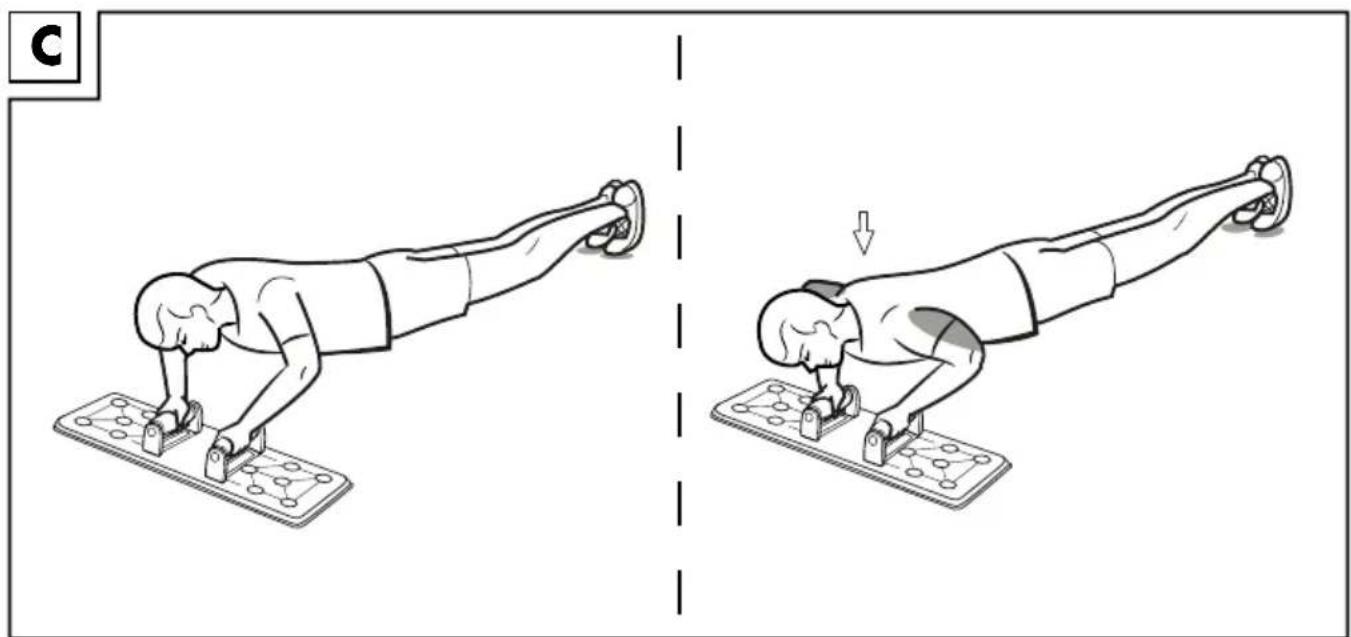
natural_image
Illustration of a person performing a plank exercise on a mat, showing two sequential poses (no text or symbols)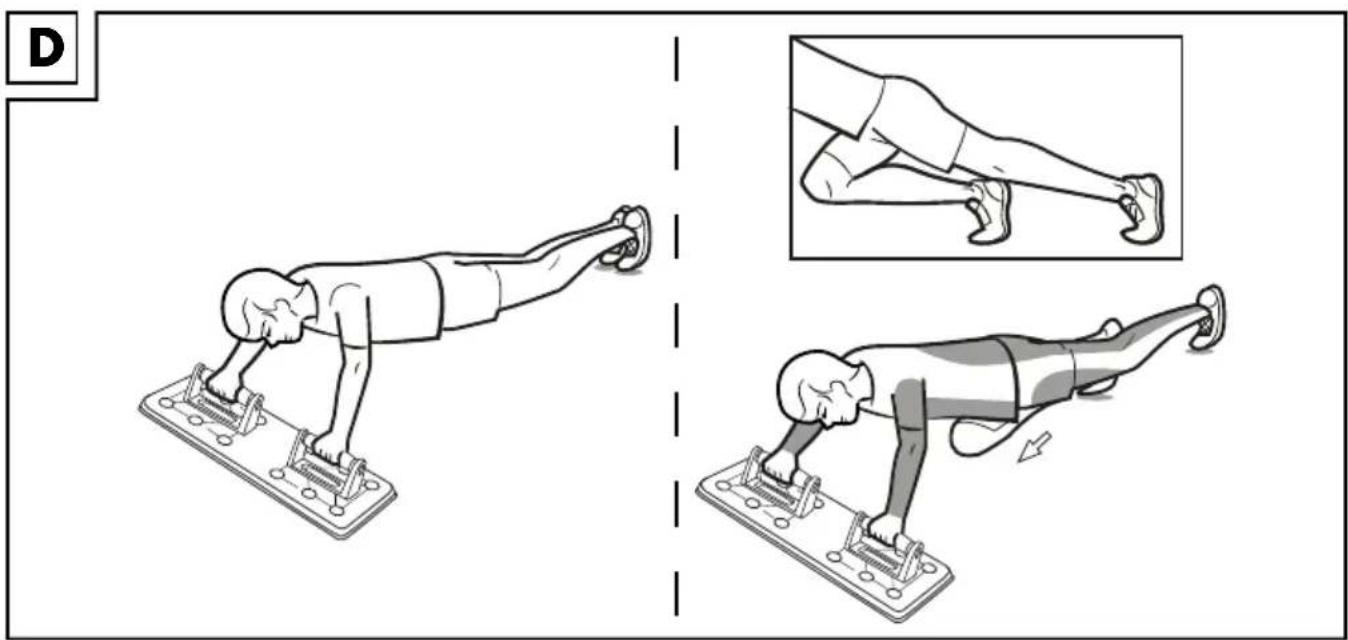
natural_image
Illustration of a person performing push-ups on a mat, with zoomed-in detail showing the movement (no text or symbols)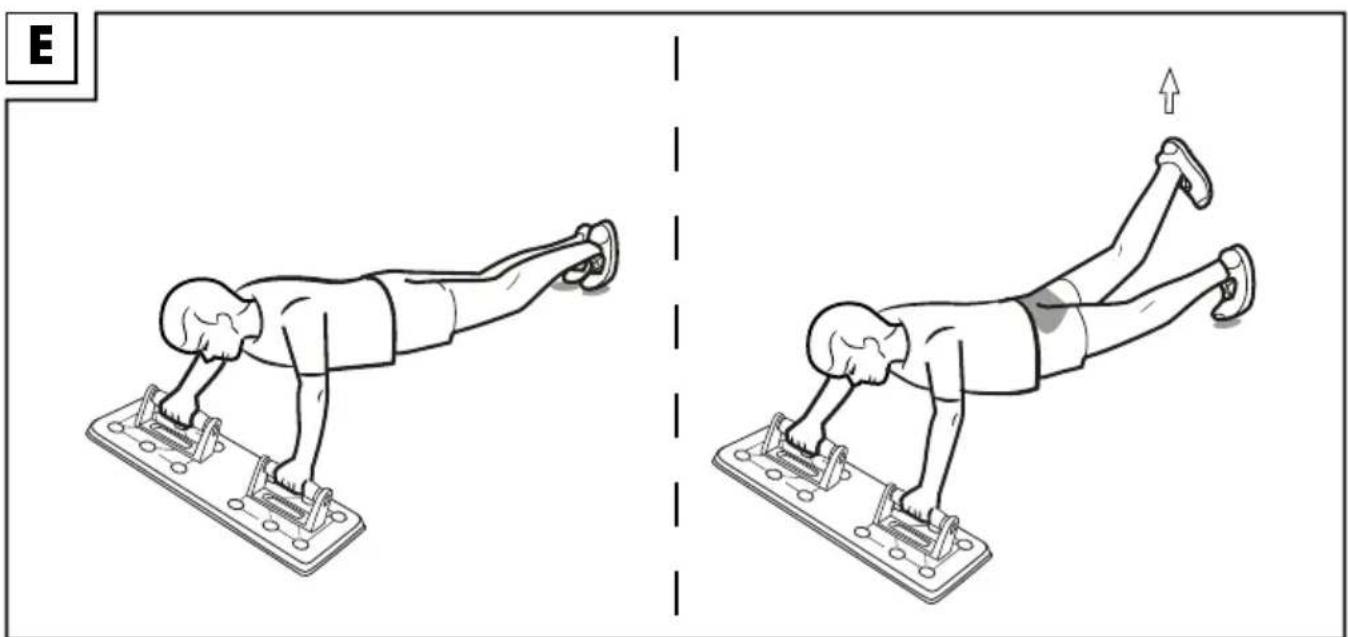
natural_image
Two sequential illustrations of a person performing push-ups on a mat, showing posture changes (no text or symbols)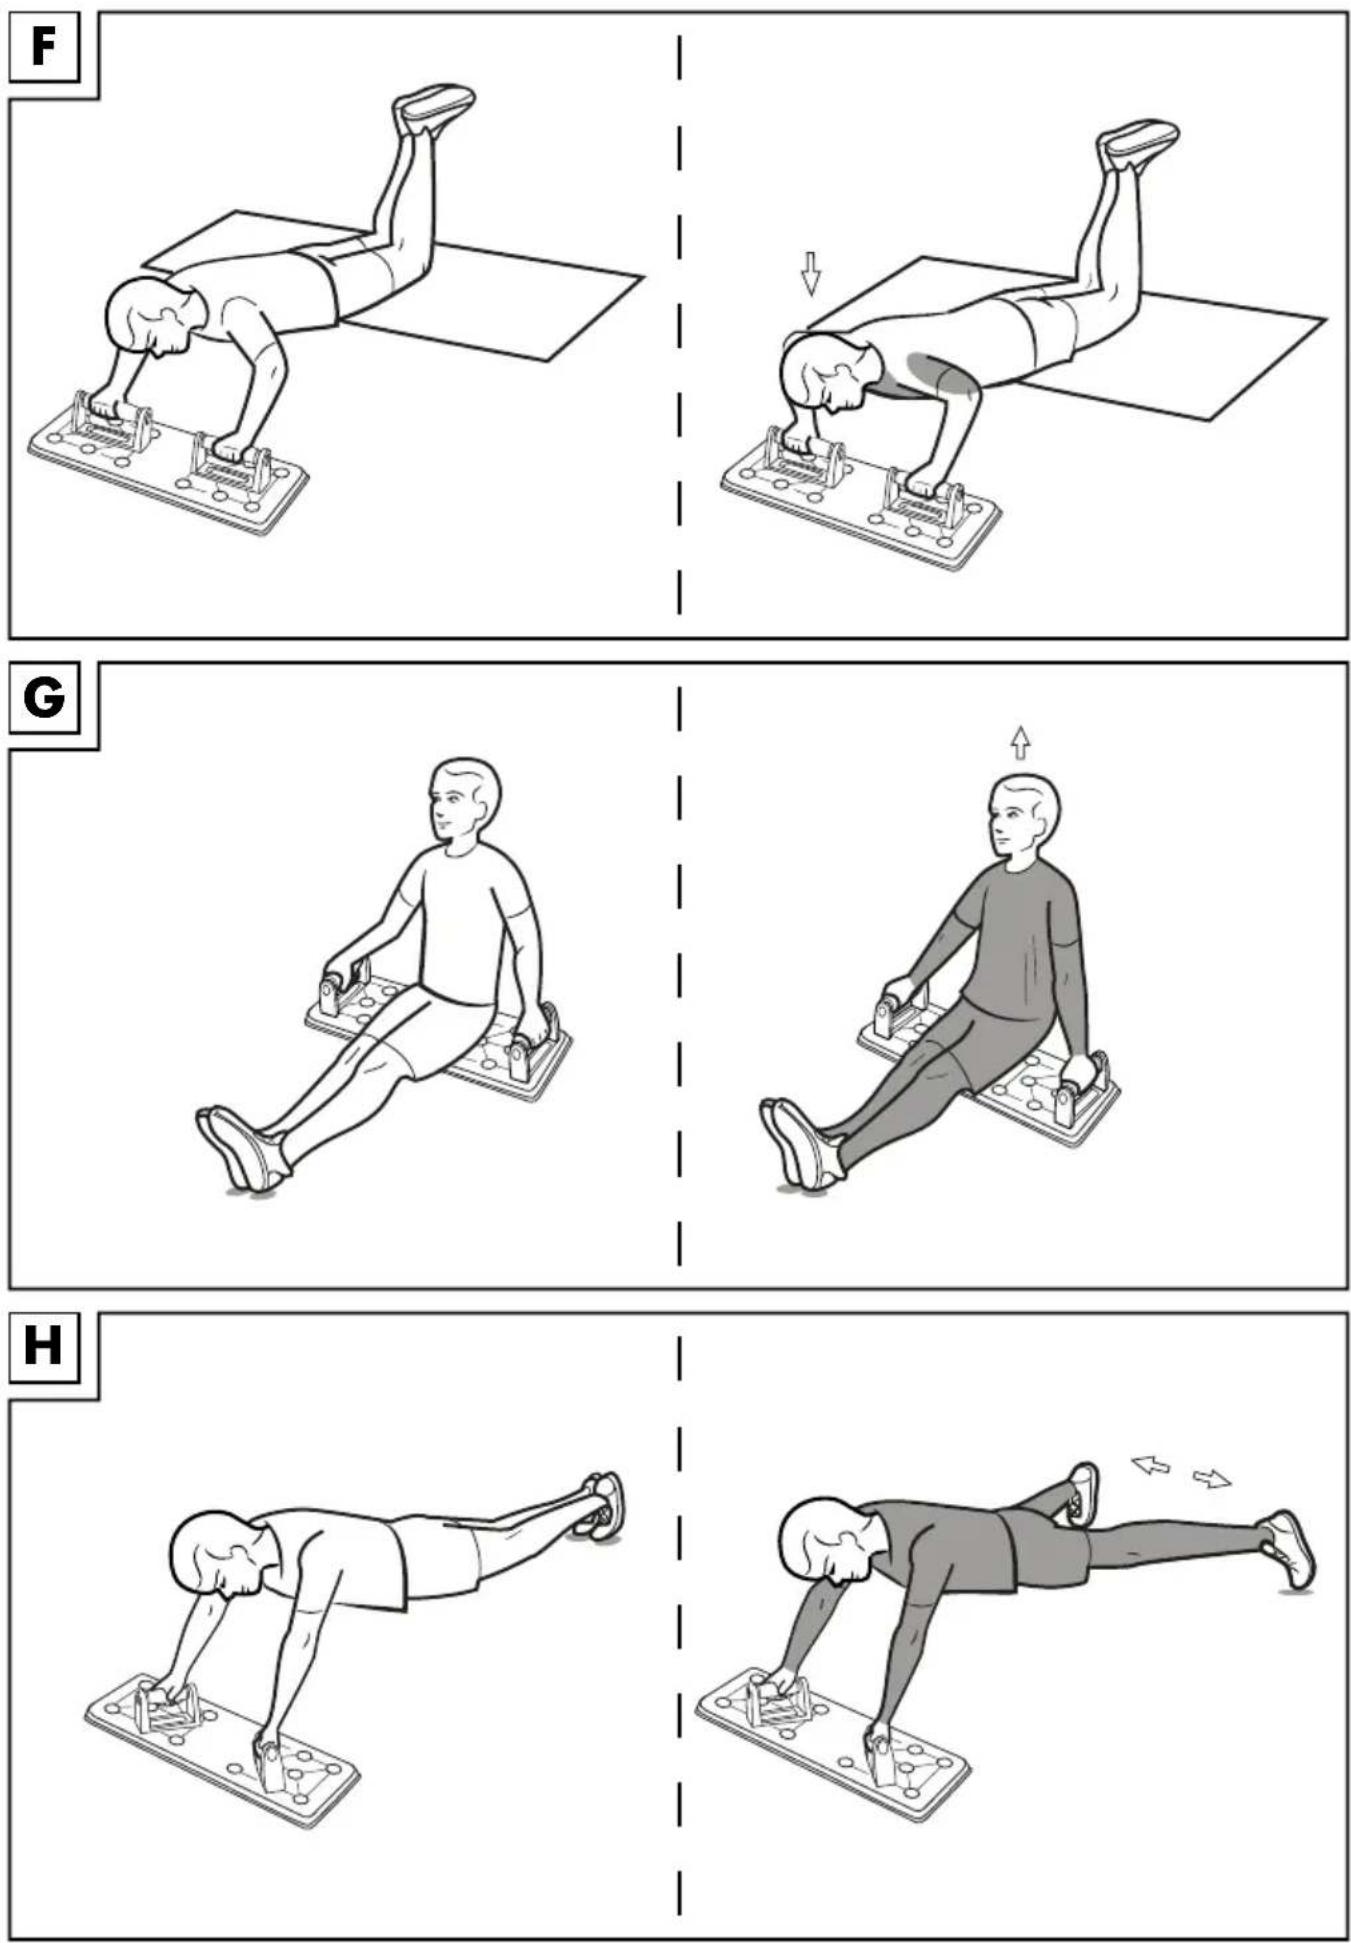
text_image
0,6m 0,6m 0,6m 0,6mDE AT CH
Lieferumfang 9
Technische Daten 9
Extra caution - risk of injury to children! .... 13
Dangers due to wear and tear 13
Assembly and disassembly 14
General training instructions 14
General training plan 14
Warming up 14
Exercise suggestions 14 - 16
Stretching 16
Storage, cleaning 16
FR BE
This document is an abridged print version of the full instructions for use. By scanning the QR code you gain direct access to the Lidl service website (www.lidl-service.com), and by entering the product number (IAN) 378324_2101 you can look at the full instructions for use and download them.
WARNING! Adhere to the full instructions for use and the safety information in order to avoid personal injuries and damage to property. The quick guide is an inherent part of this product. Before using the product familiarise yourself with all usage and safety information. Keep the quick guide handy and pass it on along with all documents when handing over the product to third parties.
Package contents
1 x board (1)
2 x push-up grip (2)
12 x floor protector (3)
1 x quick guide
Technical data
Dimensions (not including grip): approx. 65 x 1.75 x 20cm (W x H x D)
Tested according to: DIN EN ISO 20957-1
Usage class H

Max. user weight: 100kg

Date of manufacture (month/year): 07/2021
Intended use
This product enables a superior movement sequence during push-up exercises which is gentler on your joints due to the ergonomic position of the wrists. The product is designed for private use and is not suitable for medical or commercial purposes.
⚠ Safety information
- The product may only be used under adult supervision and must not be used as a toy.
- Warning. If the floors are slippery, the floor protectors supplied should be used to increase the stability of the product and to avoid the possible risk of injury.
- Consult your doctor before you start training. Make sure you are healthy enough to train.
- Always remember to warm up before training and train according to your current performance ability. High exertion and overtraining can lead to serious injuries. Stop exercising immediately and contact a doctor if you experience pain, weakness or fatigue.
- Always keep the instructions for use with the exercise instructions readily available.
- Pregnant women should only train after consulting with their doctor.
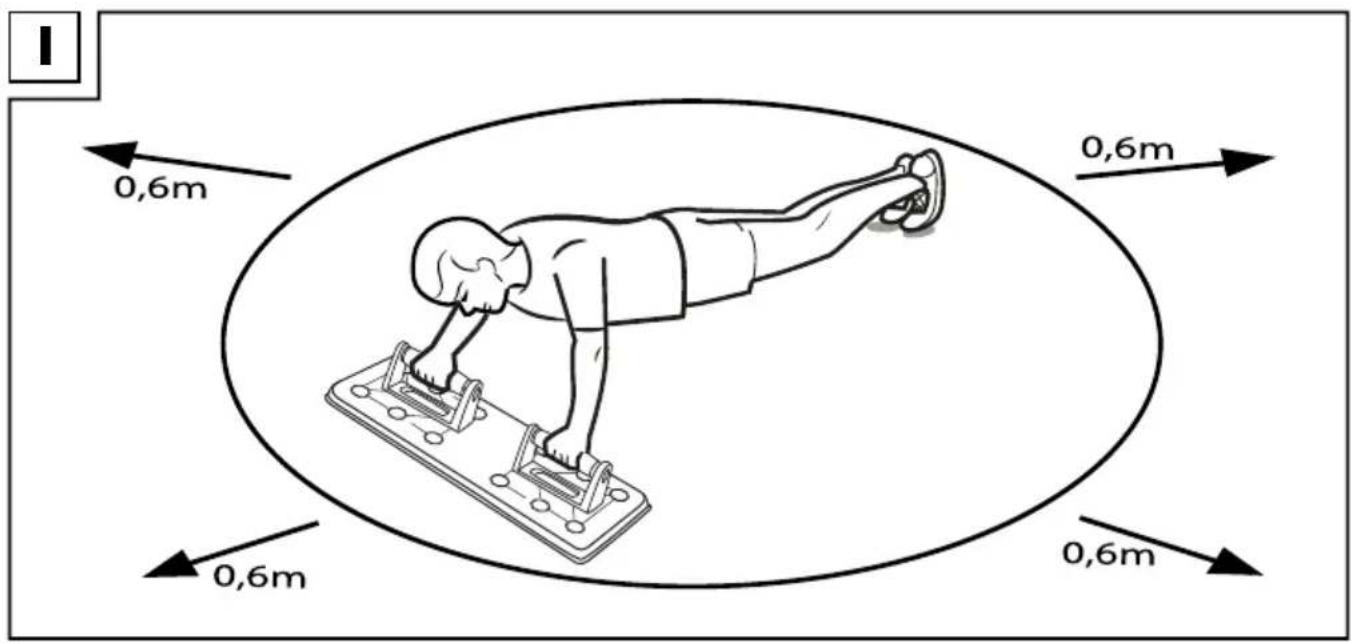
- There must be an area of approx. 0.6m of space around the training area (Fig. I).
- Train on a flat, firm surface only.
- Do not use the product near steps or landings.
Extra caution – risk of injury to children!
- Do not allow children to use this product unsupervised. Show them the correct use of the training equipment and supervise them. Only allow the use of the product if the child's mental and physical development allows it. This product is not a toy.
Dangers due to wear and tear
- The product may only be used if it is in perfect condition. Check the product for damage or wear before each use. The safety of the product can only be guaranteed if it is regularly inspected for damage and wear and tear. If damaged, it must not be used anymore.
- Check the grips for stress whitening points before each use. If the product exhibits these, stop using the product and dispose of it properly.
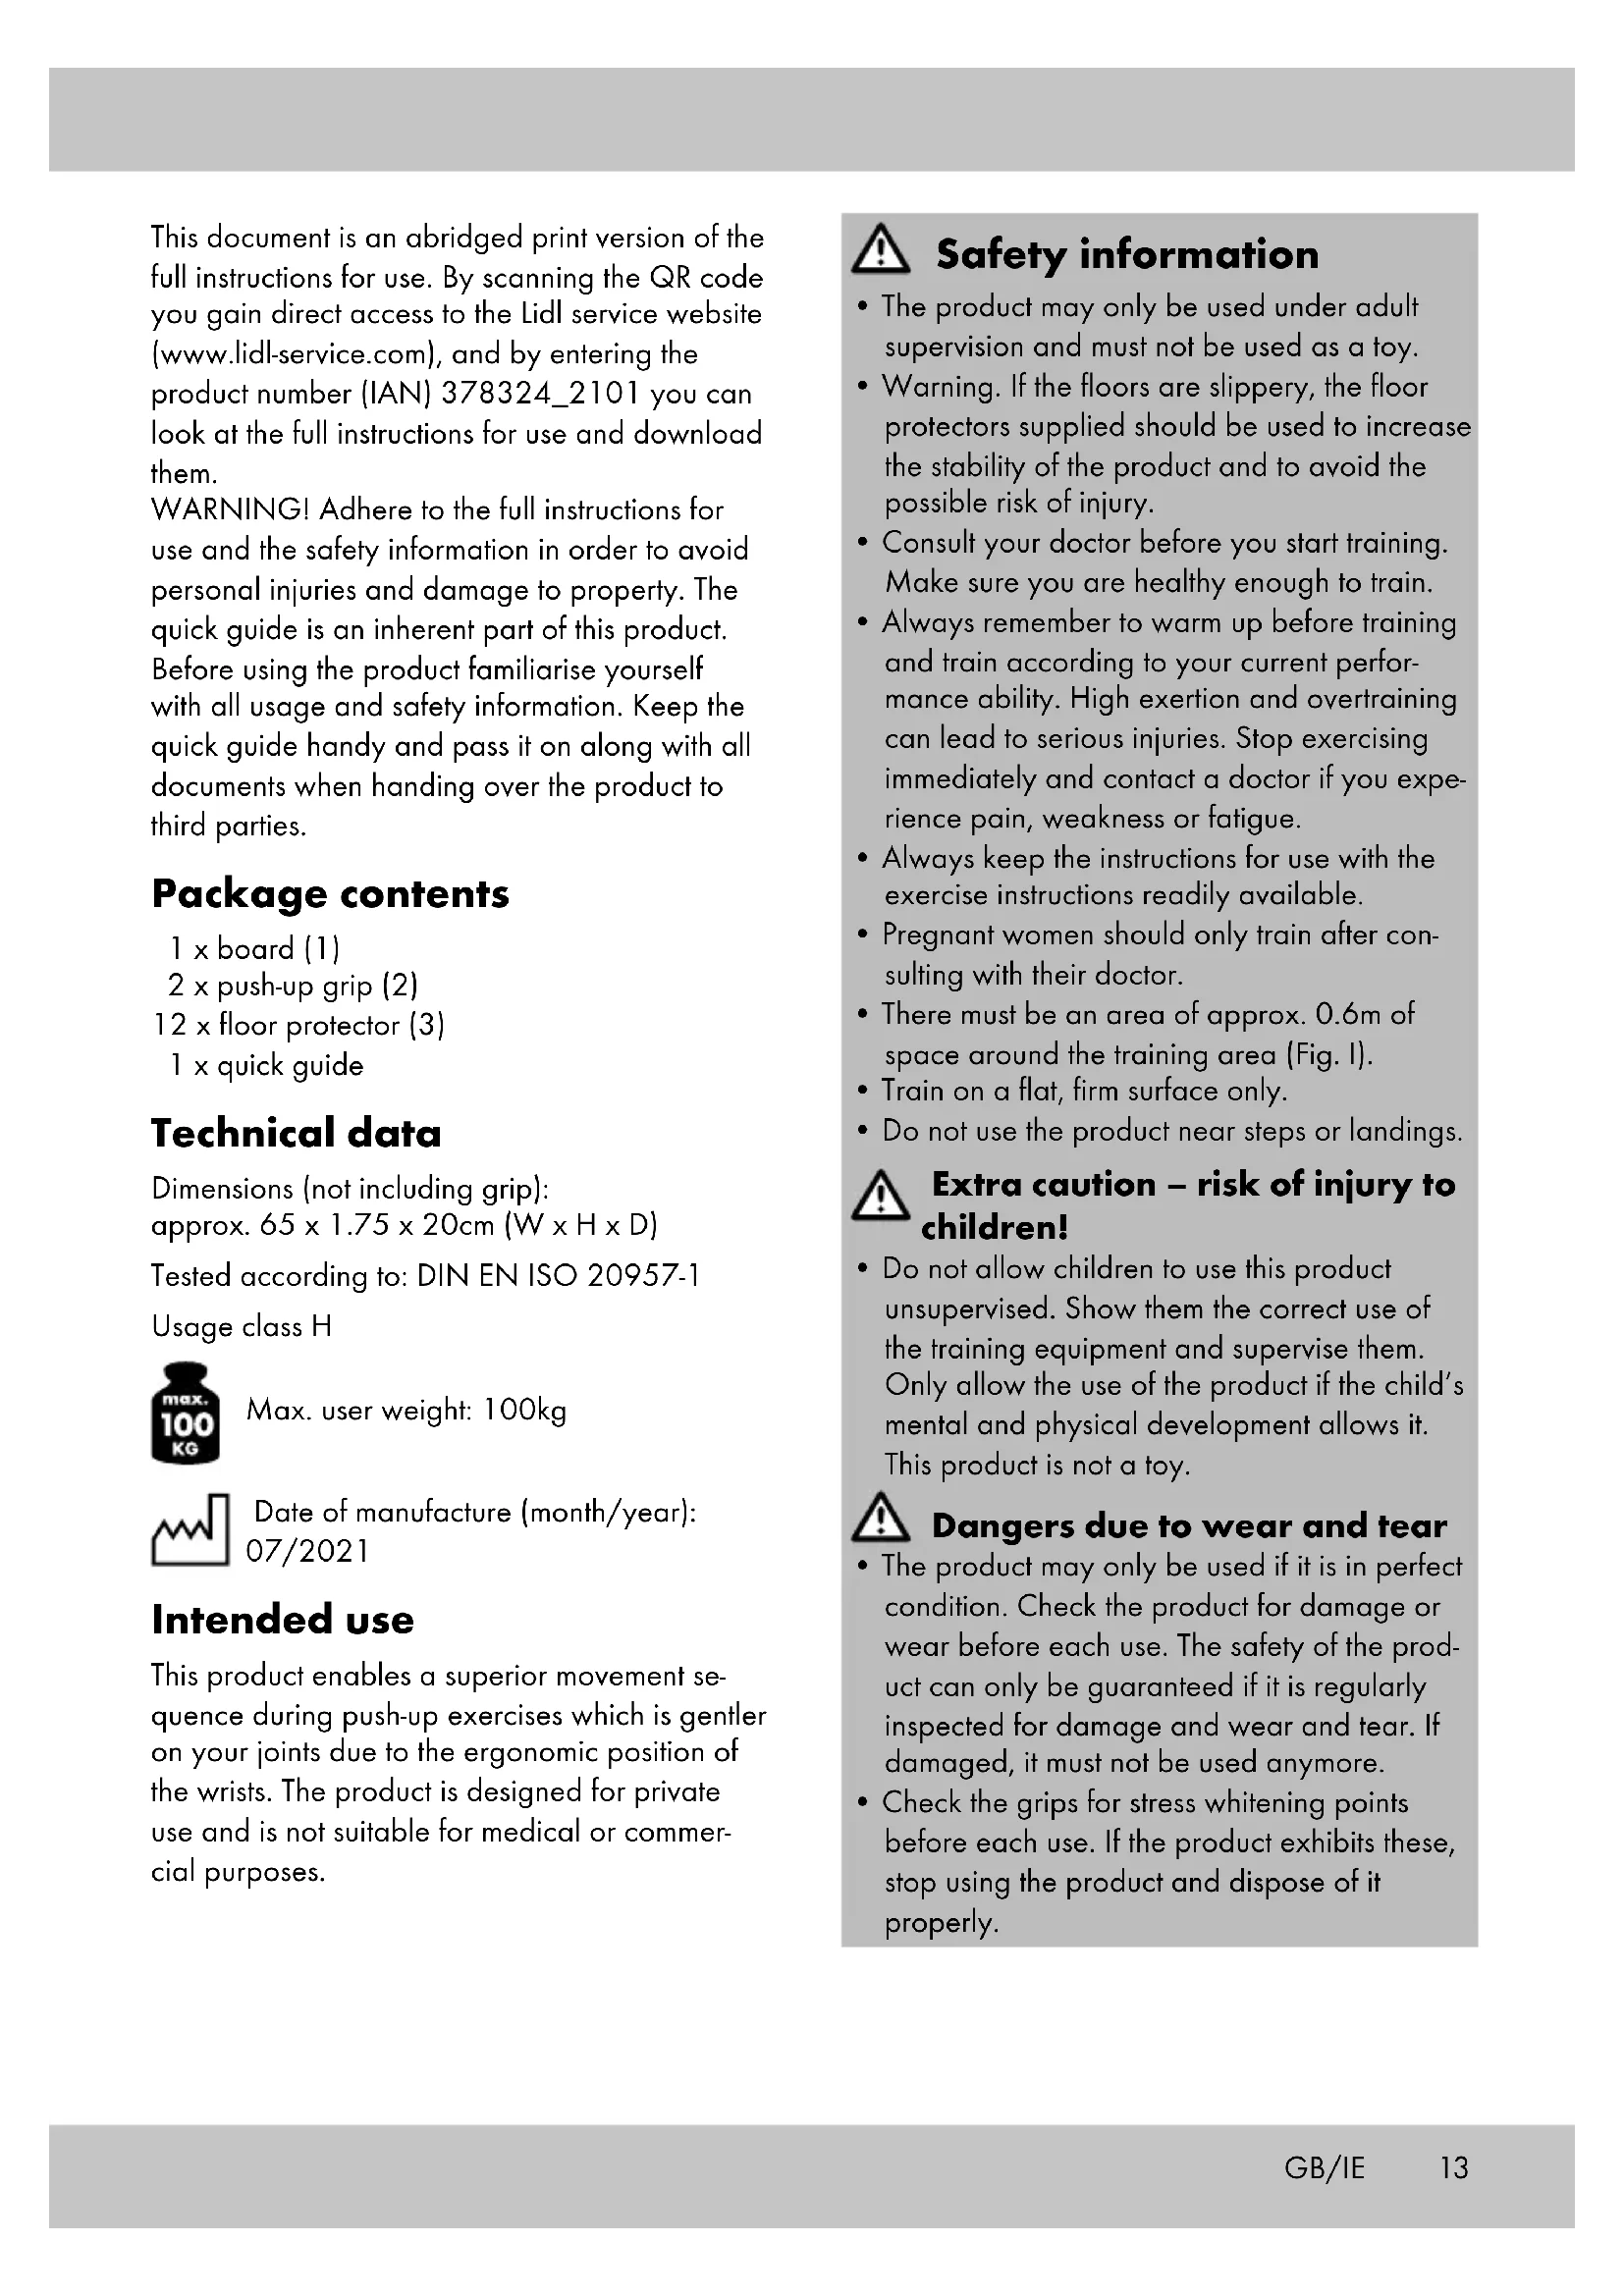
Assembly and disassembly (Fig. A)
- Insert the grips (2) into the board (1) until you hear them click into place.
- Remove the grips if you wish to put the product in storage.
- To prevent the board from slipping, stick the floor protectors (3) to the board under the long sides.
General training instructions Training procedure
- Wear comfortable sports clothing and athletic shoes.
- Warm up before each training session and end the session gradually.
• Take sufficient breaks between the exercises and keep yourself sufficiently hydrated. - If you are a beginner, never train with too much intensity. Increase the intensity of the training sessions slowly.
- Perform all exercises smoothly, not jerkily or fast.
- Be sure to breathe steadily. Exhale during exertion and inhale upon release.
- Maintain correct body posture while exercising.
General training plan
Create a training plan that suits your needs with sets of 6–8 exercises.
Pay attention to the following fundamentals:
- A set should consist of approx. 15 repetitions of one exercise.
• Each set can be repeated 3 times. - You should take a 30-second break between each set.
- Warm up your muscle groups well before each training session.
- We also recommend stretching after each training session.
Warming up
Take sufficient time before each training session to warm up. Some simple exercises to do this are shown below.
You should repeat each exercise 2 to 3 times.
Neck muscles
- Turn your head slowly to the left and to the right. Repeat this movement 4 to 5 times.
- Rotate your head slowly, first in one direction, and then in the other.
Arms and shoulders
- Clasp your hands behind your back and pull them carefully upwards. If you bend your upper body forwards at the same time, all your muscles will be maximally warmed up.
- Rotate both your shoulders forwards at the same time and then change direction after one minute.
- Pull your shoulders up to your ears and then let them drop again.
- Circle your right and left arms alternately forwards and then, after one minute, backwards.
Important: don't forget to keep breathing steadily!
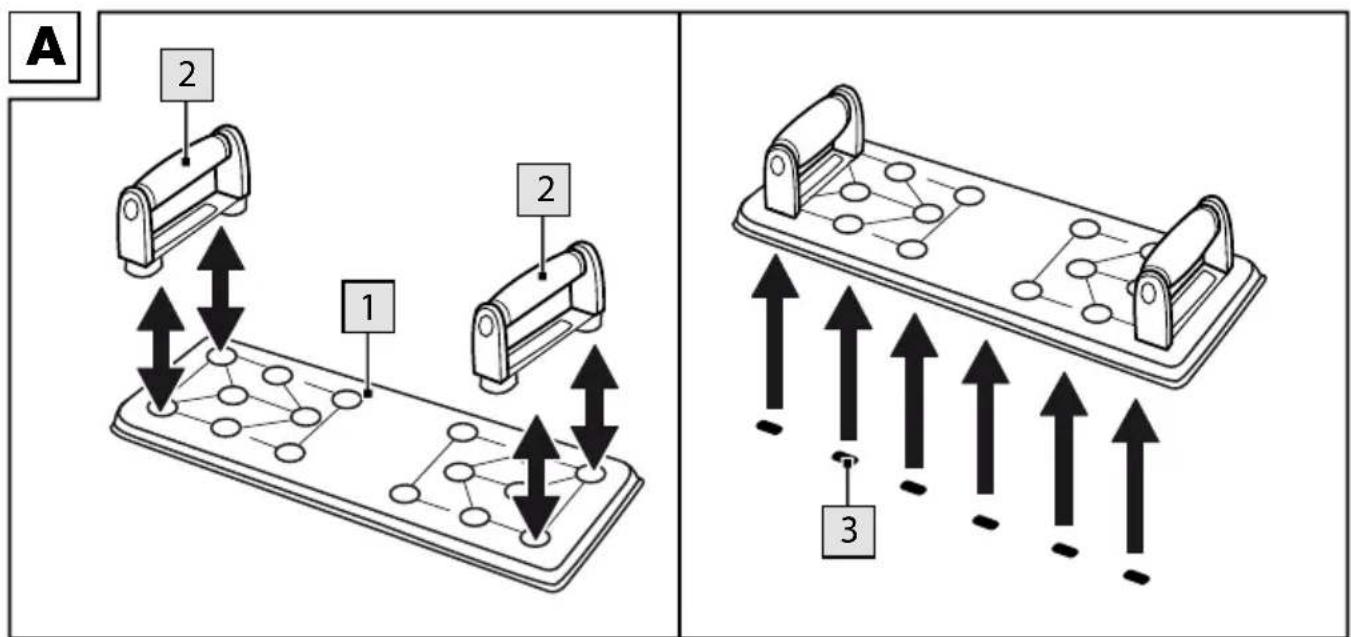
Exercise suggestions (Fig. B)
You have the option of training various muscle groups in your body. These muscle groups are shown in colour in the middle of the product. The appropriate positions of the grips match the colours of the muscle groups shown. Below are some of the many possible exercises.
Narrow push-up (Fig. C)
Starting position
- Get into the push-up position and place the product under you at chest height.
- Support yourself with both hands on the product.
-
Your body is straight and forms a line. Tighten your abdominal muscles.
-
Only the tips of your toes are touching the floor. End position
-
Bend your arms and lower your torso in a controlled movement until your upper arms are parallel with your torso. Make sure you keep your upper arms close to your torso.
-
Push your body upwards again and return to the starting position without straightening your arms completely.
-
Repeat the exercise 10 to 25 times in three sets.
Important: be very careful to maintain your body tension the whole time.
Knee lift (Fig. D)
Starting position
- Position the grips about shoulder-width apart.
- Support yourself with both hands on the grips. Your body is straight and forms a line. Tighten your abdominal muscles.
- Stretch one leg backwards and bend your other leg in front.
End position
- In a jumping movement, bend the straight leg and pull your knee as far as possible towards your chest.
- At the same time, stretch your other leg back, landing on the ball of your foot.
- After your feet have swapped positions, begin your next jumping movement.
- Perform the exercise in sets of three, as many times as possible for approx. 45 to 60 seconds.
Important: be very careful to maintain your body tension the whole time.
Leg lift (Fig. E)
Starting position
- Position the grips about shoulder-width apart.
- Support yourself with both hands on the grips. Your body is straight and forms a line. Tighten your abdominal muscles.
- Only the tips of your toes are touching the floor.
- Tighten your abdominal muscles and do not arch your back.
End position
- Lift your right leg up as far as possible. Keep your leg straight. Make sure that you do not arch your back.
- Hold this position for two seconds and then slowly lower your leg again.
- Repeat this exercise with your left leg.
Important: be very careful to maintain your body tension the whole time.
Push-up on knees (Fig. F)
Starting position
- Position the grips about shoulder-width apart.
-
Support yourself with both hands on the grips. Your body is straight and forms a line. Tighten your abdominal muscles.
-
Lower yourself onto your knees and bend your lower legs upward.
- In the starting position, your arms are straight and your body is raised.
End position
-
Bend your arms and lower your torso in a controlled movement until your upper arms are parallel with your torso. Your elbows are pointing outwards.
-
Push your body upwards again and return to the starting position without straightening your arms completely.
-
Repeat the exercise 10 to 25 times in 3 sets.
Important: be very careful to maintain your body tension the whole time.
Body lift (Fig. G)
Starting position
- Position the grips about shoulder-width apart and sit between the grips.
- Support yourself with both hands on the grips. Your legs are stretched out in front.
End position
- Tighten your abdominal muscles and push yourself up with your arms straight.
- Your legs remain straight and form a 90 degree angle to your torso.
- Briefly hold this position.
- Bend your arms and lower your body back down.
- Repeat the exercise 10 to 25 times in three sets.
Important: be very careful to maintain your body tension the whole time.
Push-ups with a position change (Fig. H)
Starting position
- Position the grips about shoulder-width apart.
- Support yourself with both hands on the grips. Your body is straight and forms a line.
- Bring your legs close together and tighten your abdominal muscles. Only the tips of your toes are touching the floor.
- In the starting position, your arms are straight, your body is raised and your legs are together.
End position
-
Jump your feet wide apart and then back together again. Keep your arms straight and your head as an extension of your spine.
-
Repeat the exercise 10 to 25 times in three sets. Important: be very careful to maintain your body tension the whole time and avoid arching your back.
Stretching
Take sufficient time to stretch after each training session. Some simple exercises to do this are shown below. You should perform each exercise 3 times per side for 15-30 seconds.
Neck muscles
- Stand in a relaxed posture. Pull your head gently to one side with one hand, first to the left and then to the right. This exercise stretches the sides of your neck.
Arms and shoulders
- Stand up straight with your knees slightly bent.
- Bend your right arm behind your head until your right hand is between your shoulder blades.
- Grip your right elbow with your left hand and pull it backwards.
- Change sides and repeat the exercise.
Storage, cleaning
When not in use, always store the product clean and dry at room temperature.
Clean only with water and wipe dry afterwards with a cloth.
IMPORTANT! Never clean the product with harsh cleaning agents.