
IAN 291088 - Fitness Equipment CRIVIT - Free user manual and instructions
Find the device manual for free IAN 291088 CRIVIT in PDF.

| Brand | Crivit |
| Model | IAN 291088 |
| Product type | Fitness equipment |
| Materials | Reinforced plastic, steel |
| Weight | 1.5 kg |
| Dimensions (L x W x H) | 30 x 20 x 10 cm |
| Power | None (manual device) |
| Main functions | Muscle strengthening, balance and coordination exercises |
| Maximum supported load | 100 kg |
| Care and cleaning | Clean with a damp cloth, dry immediately |
| Safety instructions | Check stability before use, do not use on slippery floors |
| Spare parts | Not available separately |
| Repairability | Device not repairable by user |
| Warranty | 2 years |
| Usage | Indoor only |
Frequently Asked Questions - IAN 291088 CRIVIT
User questions about IAN 291088 CRIVIT
0 question about this device. Answer the ones you know or ask your own.
Ask a new question about this device
Download the instructions for your Fitness Equipment in PDF format for free! Find your manual IAN 291088 - CRIVIT and take your electronic device back in hand. On this page are published all the documents necessary for the use of your device. IAN 291088 by CRIVIT.
USER MANUAL IAN 291088 CRIVIT
natural_image
Product photo of a set of black athletic equipment including straps, rings, and a bag, with no visible text or symbols on the main subjects.SCHLINGENTRAINER SUSPENSION TRAINER SANGLE DE SUSPENSION
DE AT CH
SCHLINGENTRAINER
Gebrauchsanweisung
FR BE
SANGLE DE SUSPENSION
Mode d'emploi
CZ
ZÁVĚSNÝ POSILOVACÍ SYSTÉM
Návod k obsluze
PT
APARELHO DE EXERCÍCIOS COM CINTAS
Instructions for use
NL BE
SLINGTRAINER
Gebruiksaanwijzing
ES
Scope of delivery/Part names 15
Technical data 15
Correct use 15
Safety notes 15-16
Assembly instructions 16
Shortening and lengthening the sling trainer 16 - 17
Recommended length of the sling trainer ..... 17
General training notes 17
Warming up 17
Suggested exercises 18-19
Stretching 20
Care and storage 20
Disposal 20
Notes on the guarantee and service handling 20
FR BE
natural_image
Illustration of a person performing a bridge exercise with a leg, showing two sequential poses (no text or symbols)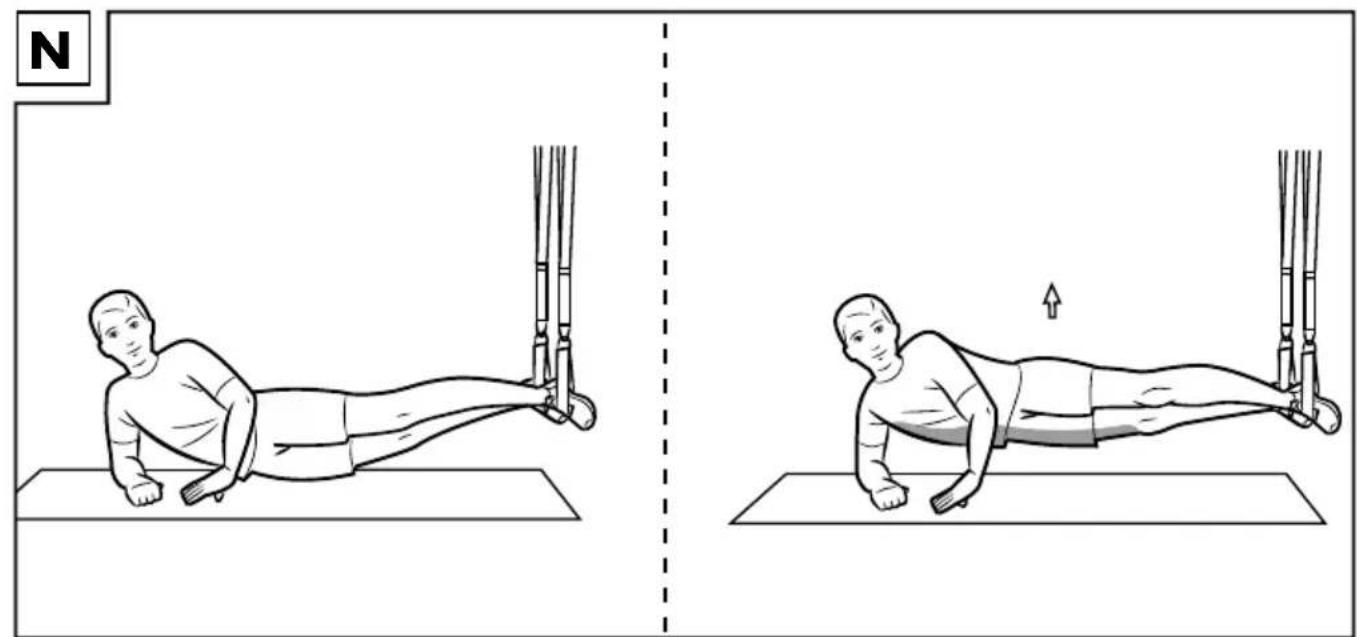
natural_image
Illustration of a person performing two different postures on a mat, one with extended legs and the other with a curved leg (no text or symbols)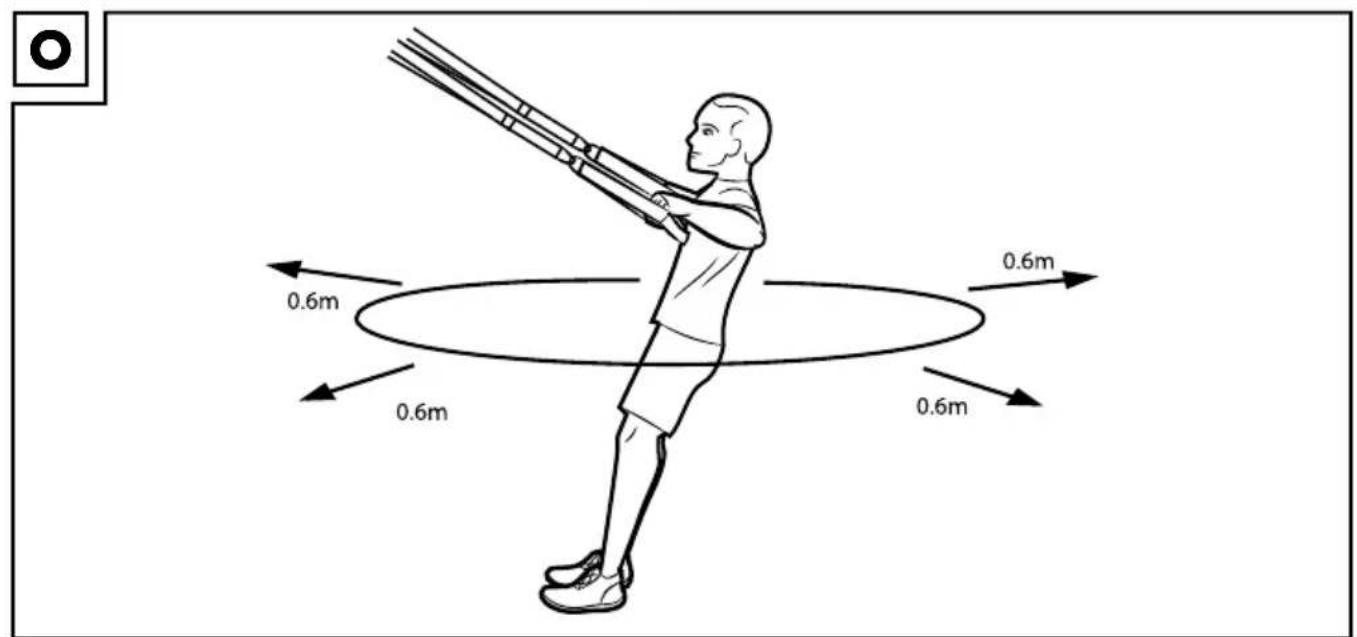

With your purchase you have decided on a high-quality product. Get to know the product before you start to use it.
Carefully read the following instructions for use.
Use the product only as described and only for the given areas of application. Keep these instructions safe. When passing the product on to a third party, always make sure that the documentation is included.
Scope of delivery/ Part names (figure A)
1 x Instructions for use
1 x Suspension trainer
(1) Adjustment clasp
(2) Foot loops
(3) Handles
(4) Storage bag
(5) "Stop" sign for the door
(6) Anchor loop
(7) Door anchor
(8) Hook and loop fastener
(9) Adjustment loops
(10) Belt strap
(11) Extension strap
1 x A3 Exercise poster
Technical data

Maximum weight of user: 120kg

Date of manufacture (month/year):
Correct use
This article was developed as a piece of training equipment that can be used to train your whole body. The sling trainer was designed for private use, and it is not suitable for medical and commercial use. This article has been designed for both indoor and outdoor use and may only be attached to doors with the included door anchor or on rods, branches, hooks, or similar using the additional snap hook.

Safety notes
Risk of injury!
- Consult with your doctor before you begin training. Make sure that you are in suitable health for the training.
- Do not use the article if you are injured or if your health is impaired.
- This article is designed for a maximum body weight of 120kg. Do not use the article if your body weight is higher than this.
• Always remember to warm up before training and train in accordance with your current abilities. Serious injury can occur if you exert yourself too much and overtrain. Cease training immediately if you experience discomfort, weakness, or fatigue and consult a doctor. - Keep the operating instructions and exercise descriptions to hand at all times.
- Pregnant women should only train with the article following consultation with their doctor.
- The article may only be used by one person at a time.
- This article is not suitable for therapeutic training.
- Keep an area of approx. 0.6m around the training area on all sides (figure O).
- Only train on a flat and non-slip surface.
- Do not use the article in the vicinity of stairs or steps.
- Cease training immediately if you feel dizzy, experience palpitations etc. and consult with a doctor immediately.
- The article must be assembled by an adult in order to avoid injuries through incorrect handling. Make sure you only use the article once it has been fully assembled.
- Do not train if you are tired or lack concentration. Do not train immediately after eating. Wait for approximately 2 hours after meals before training.
- Ventilate the training room sufficiently but avoid draughts.
- Drink sufficient liquids during training.
-
Never wrap the article around your head, neck, or chest. Risk of strangulation!
-
Do not use the article for other purposes (e.g. as a tow or pulling rope or similar).
- Caution! Only attach the suspension trainer to doors.
- Warning! Risk of injury! Only attach the suspension trainer to doors that open outwards (away from you)!
Never mount the suspension trainer on doors that open inwards (towards you). The door could pull open, which could lead to serious injury! - Warning! Risk of injury! Always lock the door to which you have attached the suspension trainer!
- Caution! Always use the included door sign while you are training. Make sure that it located on the other side of the door and that it is legible.

Particular caution – risk of injury for children!
- Keep the packaging materials away from children. There is a risk of suffocation!
- The article is not suitable for use as a toy and must be stored out of the reach of children while not in use. Children may not be within reach of the article during training to eliminate the risk of injury.
- Instruct children specifically that the article is not a toy.

Risks from wear
- The article may only be used when in perfect condition. Examine the article for damage and wear before each use. The safety of the suspension trainer can only be guaranteed if it is examined regularly for damage and wear.
- Only use original replacement parts.
- Protect the article from extreme temperatures, sun, and moisture. Incorrect storage and use of the article can lead to premature wear and possible breakage of the structure, which could result in injury.
- Do not attach the article to areas with sharp edges, e.g. door hinges. Nylon will tear if it scrapes along sharp edges.
- Do not saw! Sawing movements lead to premature wear.
- Inspect the article regularly for damage and wear. Cease use of the product if damage is found.

Beware of damage to property
- Never drop the suspension trainer or allow it to spring back against the door. Otherwise the door may be damaged.
Assembly instructions
- Select a training area with dimensions of approx. 3.00 × 1.80m (L x W).
- Attach the sling trainer at a height between 1.80 and 2.30m.
- Only train on a level, non-slip surface.
- Only mount the sling trainer on doors that open outwards (i.e. away from you) (figure B).
- Lay the anchor over the top of the door in the centre (figure B).
- Lock the door securely.
- Caution! Risk of injury! Always lock the door!
- Use the door sign that is included with the product!
- Make sure the door that you attach the anchor on the sling trainer is stable and robust, and that it can support your body weight and that the anchor is securely attached. Pull hard on the bands a few times to test this (figure C).
Assembly/use of the additional snap hook
The additional snap hook can be used to attach the suspension trainer to rods, branches, hooks, or extension loops (figure F). Remove the door anchor from the loop to use the snap hook.
⚠ Warning! Always test the load-bearing capacity of the attachment points in order to make sure that there are sufficient safety margins. There is a risk of serious injury if this is not adhered to.
Shortening and lengthening the sling trainer
Note: Before making adjustments always ensure that the bands are not twisted!
Shortening:
- To shorten the bands, hold onto the belt on the sling trainer.
- Use your thumb on one hand to press down on the adjustment buckle on the belt and take the black adjustment loop in the other hand.
- Press the buckle down and at the same time pull up on the band with the adjustment loop, towards the attachment point. Repeat the process for the other band (figure D).
- If the bands are still too long for some exercises, you can change the anchor point. To do this, open the hook-and-loop fastener on the door anchor and remove the anchor from the anchor loop. Put it in one of the lower loops and secure the anchor using the hook-and-loop fastener on the loop.
- Caution! Only position the anchor in the anchor loops that are marked on both sides with blue markings.
- Caution! Risk of injury! Never wind the hanging belt around the anchor to shorten it. The band could come loose.
Lengthening:
- To lengthen the bands, press both adjustment buckles down at the same time and pull the bands downward, away from the attachment point (figure E).
Recommended length of the sling trainer
Adjust the length of the sling trainer for each exercise as described below:
Length of sling trainer: short
Shorten the sling trainer as much as possible.
Length of sling trainer: medium length
Adjust the sling trainer to a medium length by fixing the black adjustment loops to the blue double markings that are sewn onto the middle of the band.
Length of sling trainer: knee height
Adjust the sling trainer so that the handles are just below your knees.
Length of sling trainer: long
Pull the bands on the sling trainer out fully so that the handles are approximately 7cm above the floor.
General training notes
Training process
- Wear comfortable sport clothing and trainers.
- Warm up well before each training session and end each training session gradually.
• Take sufficiently long breaks between the exercises and drink enough. - As a beginner do not train too intensely. Slowly increase your training intensity.
- Carry out all the exercises steadily, not with sudden movements or too quickly.
- Be sure to breathe regularly. Breathe out with effort and breathe in on recovery.
- Ensure a correct body position during the exercises.
Warming up
Take sufficient time before each training session to warm up. The following includes descriptions of some simple exercises for this purpose. Repeat these exercises 2 to 3 times each.
Neck muscles
- Turn your head slowly to the left and to the right. Repeat this movement 4-5 times.
- Circle your head slowly, first in one direction and then in the other.
Arms and shoulders
- Clasp your hands behind your back and pull them carefully upwards. If you bend your upper body forwards at the same time all the muscles are warmed up optimally.
- Circle both your shoulders forwards at the same time and then change direction after one minute.
- Pull your shoulders up to your ears and let your shoulders fall again.
- Circle your right and left arms alternately forwards and then after one minute backwards.
Important: Don't forget to continue breathing steadily throughout!
Suggested exercises
Some of many exercises are described below.
Caution! Always wear non-slip sports shoes!
Squats (figure G)
Length of suspension trainer: medium
Starting position:
- Stand upright facing towards the attachment point. Stand with your feet shoulder-width apart and your elbows angled at your sides.
- Exercise slight tension on the suspension trainer by leaning backwards slightly.
End position:
- Tense your stomach and buttock muscles.
- Squat down. Your knees should be parallel to your toes. Keep your heels firmly on the ground.
- Extend your buttocks out backwards slightly and keep your upper body upright.
- Return to the starting position.
- Repeat the exercise 15 times.
Important: Increase the intensity of the exercise by increasing your speed or by carrying the exercise out while standing on one leg.
Rowing (figure H)
Length of suspension trainer: short
Starting position:
- Stand upright facing towards the attachment point. Stand with your feet shoulder-width apart.
- Hold both handles with your arms extended.
- Lean back and step forwards until you find a reasonable angle of resistance.
End position:
- Pull your upper body forwards and tense your back muscles.
- Your elbows should be at an angle of 90^ to your body.
- Return to the starting position.
- Repeat the exercise 10 times.
Important: Press your shoulder blades together while you are pulling yourself forwards.
Most exercises are more difficult while standing because your base is smaller. The exercise is easiest with your legs wide apart. It is more difficult with your feet together and most difficult when standing on one leg.
Hip dips (figure I)
Length of suspension trainer: long
Starting position:
- Stand sideways to the attachment point and hold the handles above your head.
- Take one step forwards with your inside foot. Your feet should be in a straight line.
- Lean away from the attachment point and keep the bands tense.
End position:
- Tense your arm and stomach muscles.
- Lean your hips outwards, away from the attachment point.
- Move in one comfortable, slow, and controlled movement.
- Return to the starting position by tensing your stomach muscles.
- Repeat the exercise with the other leg.
- Perform the exercise 10 times for each leg.
Important: Ensure you keep your body tensed throughout the exercise. Hold your elbows wide and in line with your hips.
Roll-ups (figure J)
Length of suspension trainer: long
Starting position:
- Stand facing away from the attachment point with your feet shoulder-width apart.
- Take several steps backwards until you are positioned in a reasonable angle of resistance.
- Extend your arms forwards and lean into the bands.
End position:
- Tense your arm, buttock, and stomach muscles.
-
Slowly lift your arms. Make sure that you keep your body tensed during this forwards movement.
-
Return to the starting position.
- Repeat the exercise 15 times.
Important: Most of the exercises are easier in a standing position if you place one foot slightly forwards and support some of your weight on this foot. An offset foot position is also more stable.
Leg curls (figure K)
Length of suspension trainer: knee height
Starting position:
- Lie down, facing upwards, and place your heels in the foot loops.
Note: Push the plastic handles upwards for a more comfortable foot position.
- Your arms are at your sides.
End position:
- Tense your stomach muscles.
- Pull your heels up to your pelvis.
- Slowly return to the starting position.
- Repeat the exercise 10 times.
Important: Press your heels into the foot loops during the entire movement. Increase the intensity by lifting your pelvis during the exercise.
Crunch (figure L)
Length of suspension trainer: knee height
Starting position:
- Place your feel into the foot loops with your toes facing downwards.
Note: Push the plastic handles upwards for a more comfortable foot position.
- Take a plank position supporting yourself on your hands.
End position:
- Tense your buttock and stomach muscles.
- Pull your knees into your chest.
- Move back into the starting position.
- Repeat the exercise 15 times.
Important: Make sure you keep your body tensed and retain good posture.
Most plank exercises on the floor are easier if you support yourself on your lower arms.
If you support yourself on your hands with your arms extended then the exercise becomes more difficult.
Hip lifts (figure M)
Length of suspension trainer: knee height
Starting position:
- Lie on your back with your heels in the foot loops.
- Your arms are at your sides and your palms flat on the floor.
End position:
- Tense your core muscles.
- Lift your pelvis off the ground by pressing your heels into the foot loops.
- Lower your pelvis again half way.
- Repeat the exercise 15 times.
Important: Make sure you keep your body tensed and retain good posture.
Most floor exercises become more difficult the further away you are from the attachment point (and vice versa).
Side plank (figure N)
Length of suspension trainer: knee height
Starting position:
- Lie on your left hip and support yourself on your lower left arm with your toes in the foot loops under the attachment point.
- Your legs are offset with the upper leg in front.
End position:
- Tense your buttock and stomach muscles.
- Lift your pelvis into a plank position and hold for 10 seconds.
- Return to the starting position.
- Repeat the exercise 10 times on each side.
Important: Increase the intensity by supporting your free arm on your hip or extending it upwards.
Stretching
Take sufficient time after each training session to stretch. The following illustrates some simple exercises for this purpose.
You should carry out the relevant exercises 3 times on each side for 15-30 seconds.
Neck muscles
- Stand in a relaxed position. Pull your head gently to one side with one hand, first to the left and then to the right.
This exercise stretches the sides of your neck.
Arms and shoulders
- Stand up straight with your knees slightly bent.
- Bend your right arm behind your head until your right hand is between your shoulder blades.
- Hold your right elbow with your left hand and pull it backwards.
- Change sides and repeat the exercise.
Leg muscles
- Stand upright and lift one foot off the floor.
- Circle it slowly, first in one direction then in the other.
- Change foot after a while.
Important: Make sure that your thighs are parallel to one another. Push your hips forwards, keeping your upper body upright.
Care and storage
Always store the article in a dry, clean and temperature-controlled place.
Disposal
Dispose of the article and the packaging materials in accordance with current local regulations. Packaging materials such as foil bags are not suitable to be given to children. Keep the packaging materials out of the reach of children.
Notes on the guarantee and service handling
The product was produced with great care and under constant supervision. You receive a three-year warranty for this product from the date of purchase. Please retain your receipt.
The warranty applies only to material and workmanship and does not apply to misuse or improper handling. Your statutory rights, especially the warranty rights, are not affected by this warranty.
With regard to complaints, please contact the following service hotline or contact us by e-mail.
Our service employees will advise as to the subsequent procedure as quickly as possible.
We will be personally available to discuss the situation with you.
Any repairs under the warranty, statutory guarantees or through goodwill do not extend the warranty period. This also applies to replaced and repaired parts.
Repairs after the warranty are subject to a charge.
IAN: 291088
GB Service Great Britain
Tel.: 0871 5000 720 (£ 0.10/Min.)
E-Mail: deltasport@lidl.co.uk
IE Service Ireland
Tel.: 1890 930 034
(0,08 EUR/Min., (peak))
(0,06 EUR/Min., (off peak))
E-Mail: deltasport@lidl.ie
You can also find spare parts for your product at:
www.delta-sport.com, category Service - Lidl Spare Parts Service

Félicitations !
Dobrar as pernas (fig. K)
- SCHLINGENTRAINER SUSPENSION TRAINER SANGLE DE SUSPENSION
- SCHLINGENTRAINER
- SANGLE DE SUSPENSION
- ZÁVĚSNÝ POSILOVACÍ SYSTÉM
- APARELHO DE EXERCÍCIOS COM CINTAS
- SLINGTRAINER
- FR BE
- Carefully read the following instructions for use.
- Scope of delivery/ Part names (figure A)
- Technical data
- Correct use
- Safety notes
- Risk of injury!
- Particular caution – risk of injury for children!
- Risks from wear
- Beware of damage to property
- Assembly instructions
- Assembly/use of the additional snap hook
- Shortening and lengthening the sling trainer
- Shortening:
- Lengthening:
- Recommended length of the sling trainer
- Adjust the length of the sling trainer for each exercise as described below:
- General training notes
- Training process
- Warming up
- Neck muscles
- Arms and shoulders
- Important: Don't forget to continue breathing steadily throughout!
- Suggested exercises
- Caution! Always wear non-slip sports shoes!
- Squats (figure G)
- Starting position:
- End position:
- Important: Increase the intensity of the exercise by increasing your speed or by carrying the exercise out while standing on one leg.
- Rowing (figure H)
- Important: Press your shoulder blades together while you are pulling yourself forwards.
- Most exercises are more difficult while standing because your base is smaller. The exercise is easiest with your legs wide apart. It is more difficult with your feet together and most difficult when standing on one leg.
- Hip dips (figure I)
- Important: Ensure you keep your body tensed throughout the exercise. Hold your elbows wide and in line with your hips.
- Roll-ups (figure J)
- Leg curls (figure K)
- Crunch (figure L)
- If you support yourself on your hands with your arms extended then the exercise becomes more difficult.
- Hip lifts (figure M)
- Side plank (figure N)
- Stretching
- Leg muscles
- Care and storage
- Disposal
- Notes on the guarantee and service handling
- Félicitations !
- Dobrar as pernas (fig. K)
Brand : CRIVIT
Model : IAN 291088
Category : Fitness Equipment