Spot ONE S - Lamp STEINEL - Free user manual and instructions
Find the device manual for free Spot ONE S STEINEL in PDF.
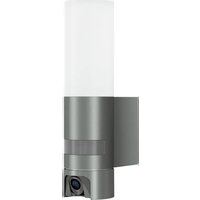
| Product type | Outdoor LED spotlight with infrared motion detector |
| Brand | Steinel |
| Model | Spot ONE S |
| Category | Lamp |
| Power supply | 220-240 V, 50/60 Hz |
| Power consumption | 7.5 W |
| Luminous flux | 512 lm |
| Color temperature | 3000 K (warm white) |
| Protection rating | IP44 |
| Protection class | I |
| Detection type | Passive infrared |
| Detection angle | 90° |
| Detector range | 10 m maximum |
| Adjustable time delay | 8 seconds to 35 minutes |
| Adjustable trigger threshold | 2 to 1000 lux |
| Light source type | GU10 LED (max. 9 W) |
| Number of sources | 1 |
| Ambient temperature | -20 to +40 °C |
| Manufacturer warranty | 36 months |
| Mounting | Outdoor wall mounting |
Frequently Asked Questions - Spot ONE S STEINEL
User questions about Spot ONE S STEINEL
0 question about this device. Answer the ones you know or ask your own.
Ask a new question about this device
Download the instructions for your Lamp in PDF format for free! Find your manual Spot ONE S - STEINEL and take your electronic device back in hand. On this page are published all the documents necessary for the use of your device. Spot ONE S by STEINEL.
USER MANUAL Spot ONE S STEINEL
natural_image
Two metallic pipe fittings with flanged ends, shown from different angles (no text or symbols visible)Spot ONE
Spot ONE S
Spot ONE SC
Spot DUO S
Spot DUO SC

GB...18 Follow written instructions!
natural_image
Technical line drawing of a mechanical component with screws and bolts (no text or symbols)3.2
natural_image
Technical line drawing of two cylindrical mechanical components with mounting flanges and a series of screws below (no text or symbols)3.3
3.4
3.6
3.5
3.7
3.8
3.9
radar
| Angle | Value | |-------|-------| | 0° | 1200 | | 30° | 100 | | 60° | 80 | | 90° | 60 | | 120° | 40 | | 150° | 20 | | 180° | 10 |5.1
natural_image
Technical diagram of a mechanical assembly with internal components and directional arrow (no text or symbols)4.1
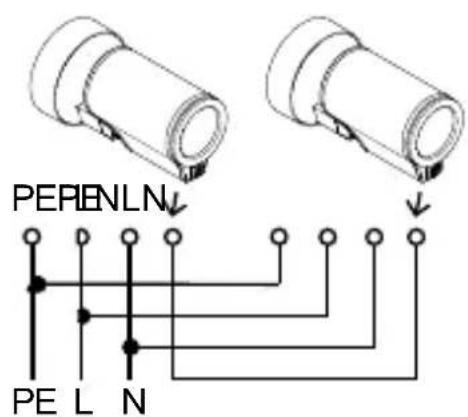
PE L N
PE L N
5.2
natural_image
Diagram of a mechanical assembly with gears and shafts inside a circular housing, showing a hand holding a bracket (no text or symbols)5.3
natural_image
Technical diagram of a mechanical assembly with arrows indicating components (no text or labels)5.4

5.7
natural_image
Technical diagram of a mechanical assembly with internal components and directional arrows (no text or labels)5.5

natural_image
Mechanical assembly diagram showing internal components and directional arrows (no text or labels)5.8
natural_image
Mechanical assembly diagram showing a tool interacting with a component, no text or symbols present5.6
natural_image
Technical line drawing of a mechanical component with a knob and arrow indicating direction (no text or symbols)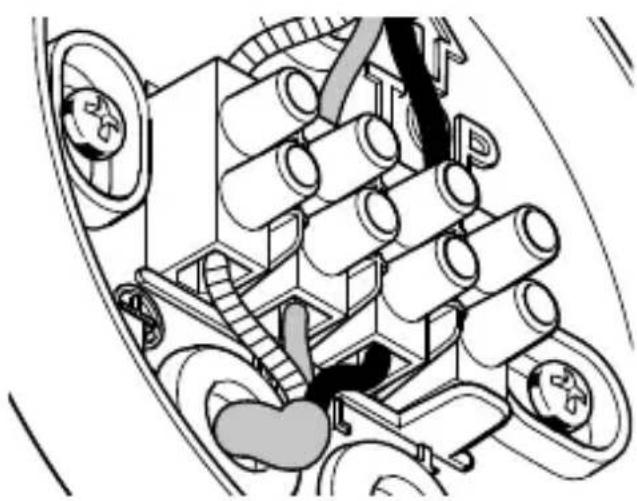
natural_image
Technical line drawing of a mechanical assembly with rollers and gears (no text or symbols)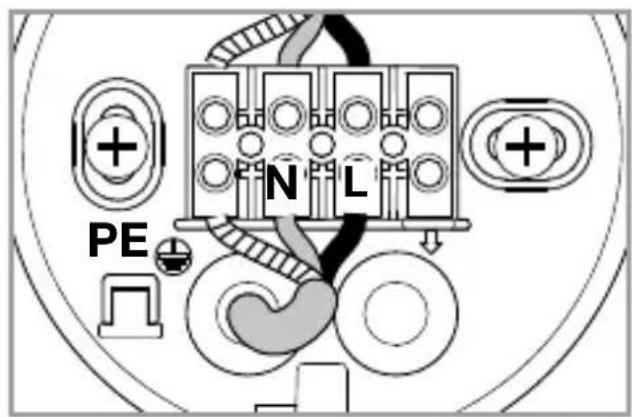
5.9
natural_image
Diagram showing a hand operating a screwdriver to move a mechanical component inside a gear-like housing (no text or symbols present)6.2
F

natural_image
Simple line drawing of a sun, moon, and directional arrow inside a circle (no text or symbols)G

7.1
6.1

natural_image
Technical line drawing of a mechanical device with a lever and base mount (no text or symbols)7.2

natural_image
Technical diagram showing a mechanical assembly with two circular components and directional arrows indicating rotation (no text or symbols)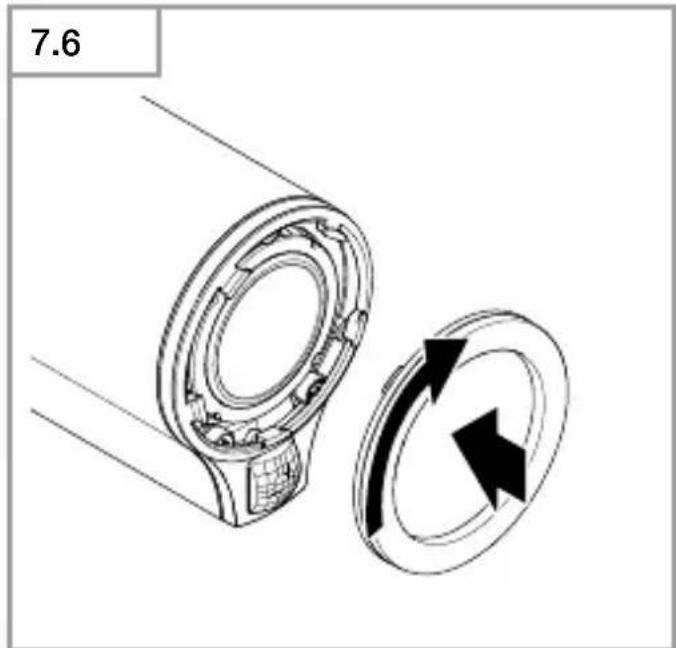
natural_image
Technical diagram showing a mechanical component with two circular arrows indicating rotation or movement (no text or symbols)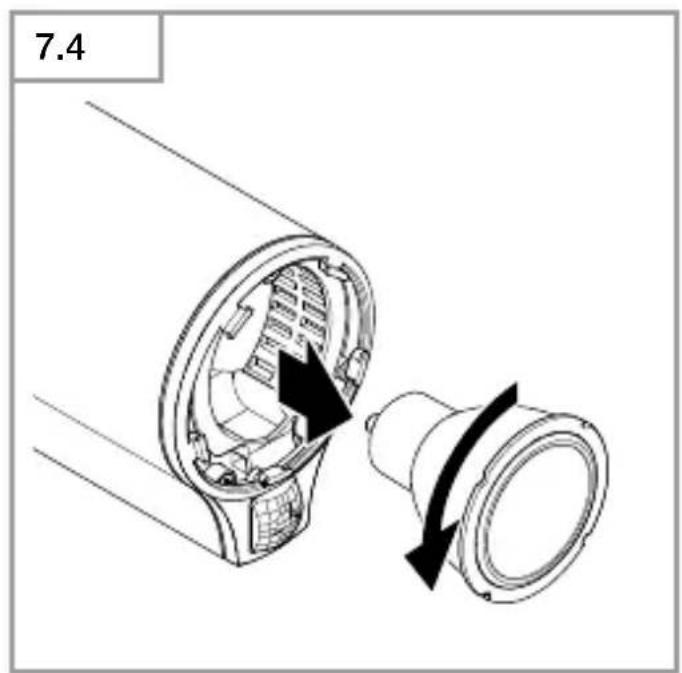
DE
3. Spot ONE / Spot ONE S / Spot DUO S Spot ONE SC / Spot DUO SC
Spot ONE S / Spot DUO S
Spot ONE SC /Spot DUO SC
Spot ONE S / Spot DUO S
Werkseinstellungen
Spot ONE SC /Spot DUO SC
Werkseinstellungen

9. Entsorgung
- Please read carefully and keep in a safe place.
- Undercopyright.
Reproduction either in whole or in part only with our consent. - Subject to change in the interest of technical progress.
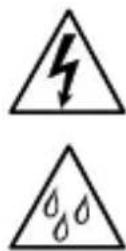
Symbols

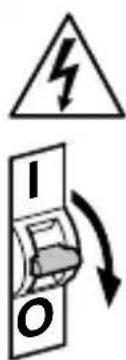
Hazard warning!
Reference to other information in the document.
2. General safety precautions

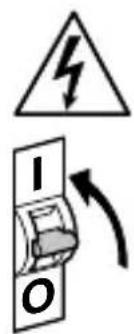
Disconnect the power supply before attempting any work on the unit.
- During installation, the electric power cable to be connected must not be live. Therefore, switch off the power first and use a voltage tester to make sure the wiring is off-circuit.
- Installing the light involves work on the mains voltage supply. This work must therefore be carried out professionally in accordance with national wiring regulations and electrical operating conditions.
- Only use genuine replacement parts.
• Repairs may only be made by specialist workshops. - Not suitable for use with halogen lamps.
3. Spot ONE / Spot ONE S / Spot DUO S Spot ONE SC / Spot DUO SC
Proper use
- LED light for outdoor wall mounting
Spot ONE S / Spot DUO S
- The sensor-switched LED light contains an infrared motion detector.
Spot ONE SC /Spot DUO SC
- The sensor-switched LED light contains an infrared motion detector and can only be adjusted via Bluetooth.
Non-intended use
-The LED light cannot be dimmed.

Not dimmable
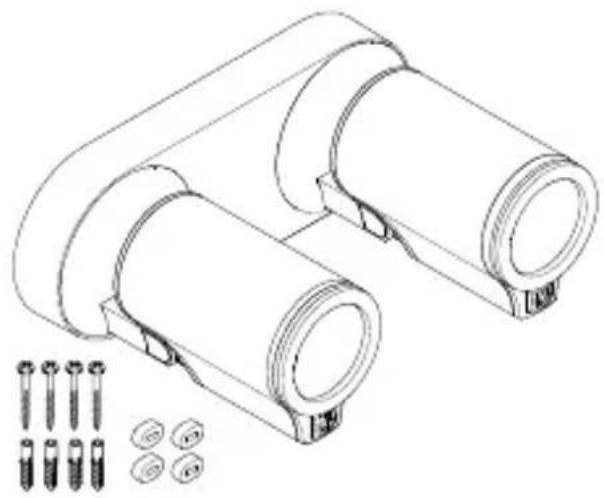
Spot ONE package contents (Fig. 3.1)
- Light
- Three screws
- Three ground plugs
-Three spacers
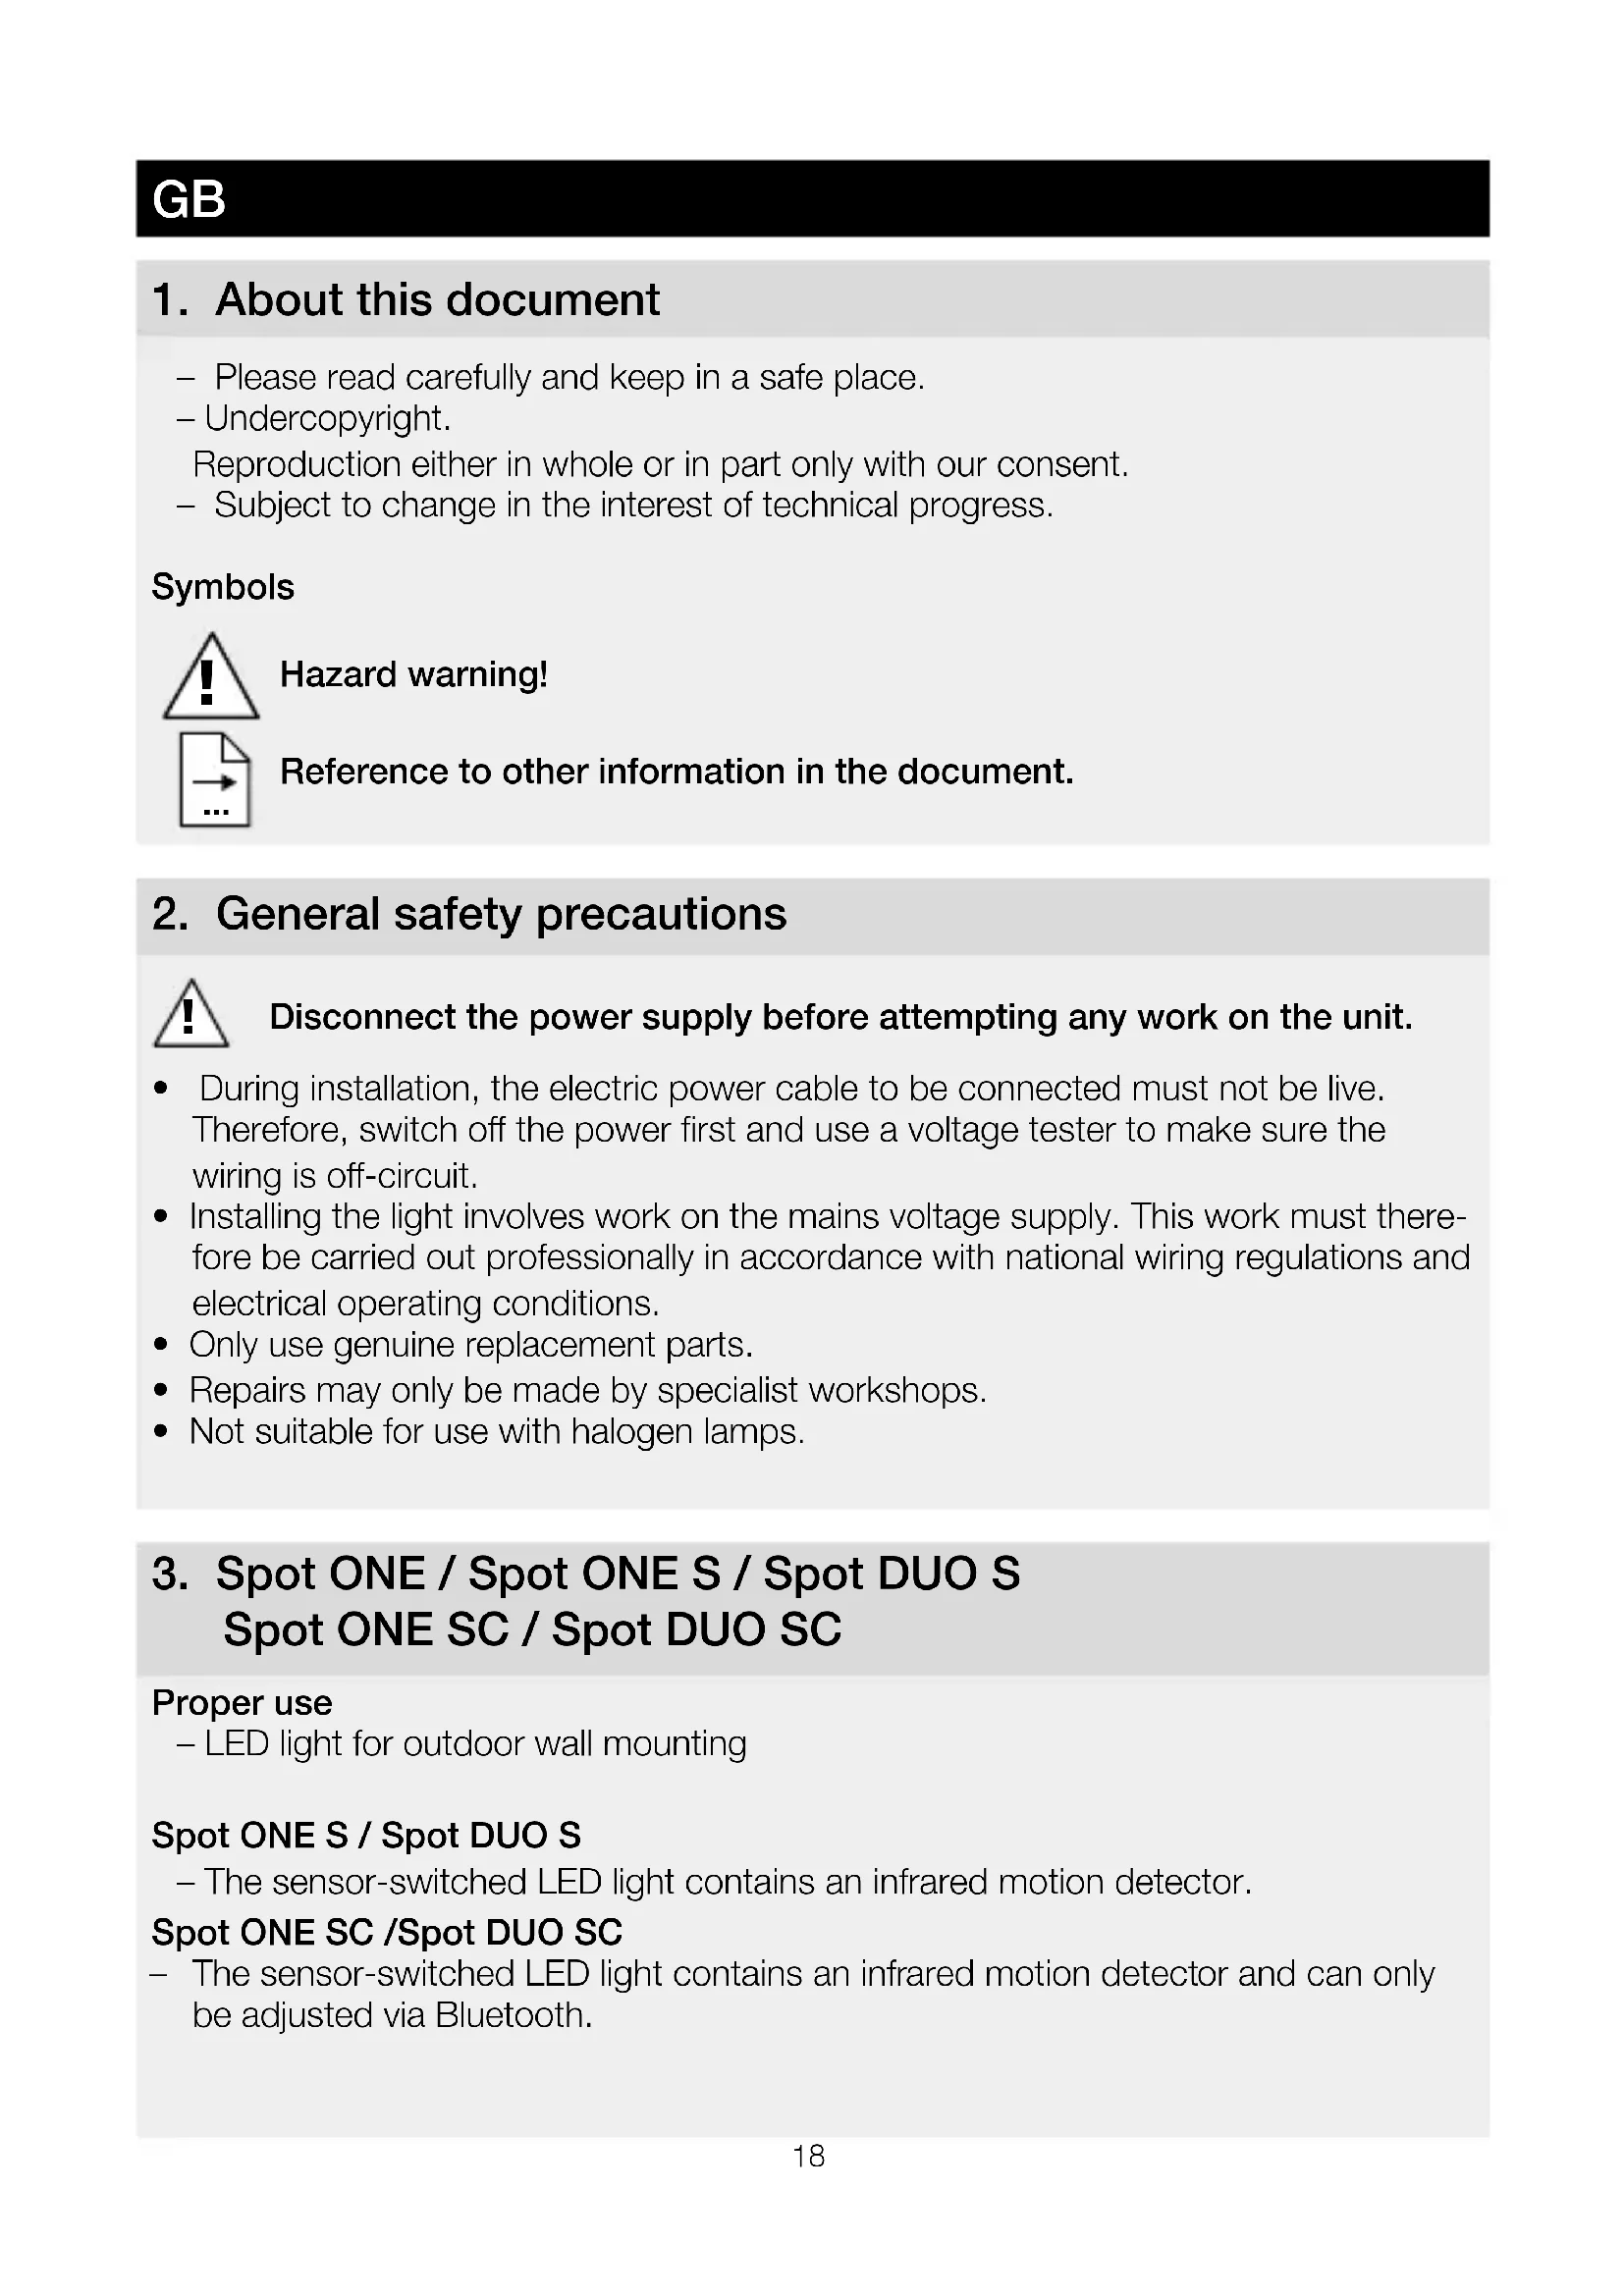
Spot DUO package contents (Fig. 3.2)
- Light
- Four screws
- Four wall plugs
-Four spacers
Product dimensions
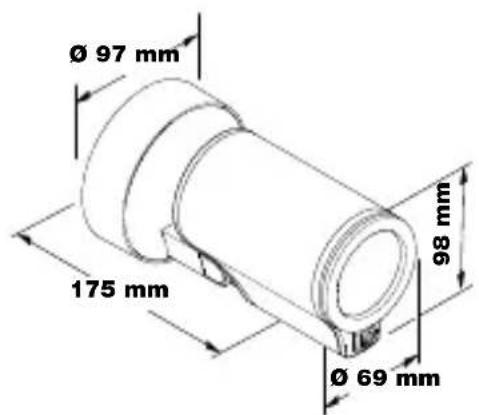
Spot ONE (Fig. 3.3)
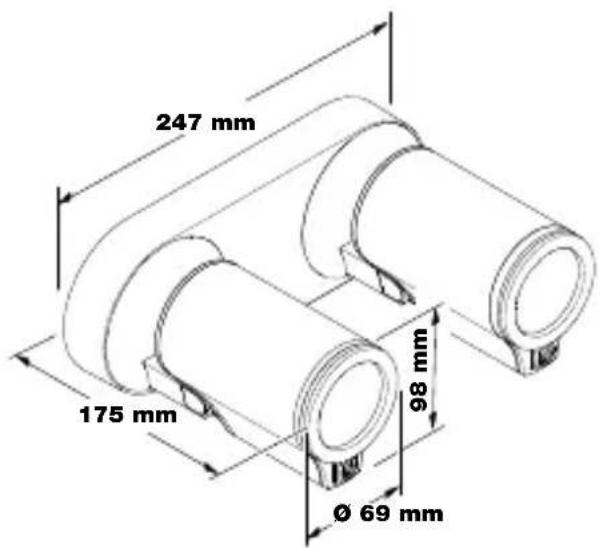
Spot DUO (Fig. 3.4)
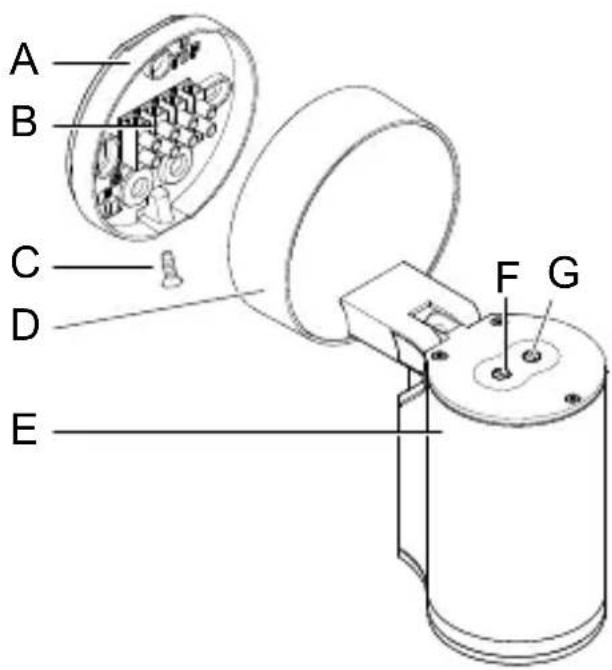
Product parts (Fig. 3.5)
A Wall mount
B Connecting terminal
C Locking screw
D Light base
E Light enclosure
F Twilight setting (Spot ONE S / DUO S only)
G Time setting (Spot ONE S / DUO S only)
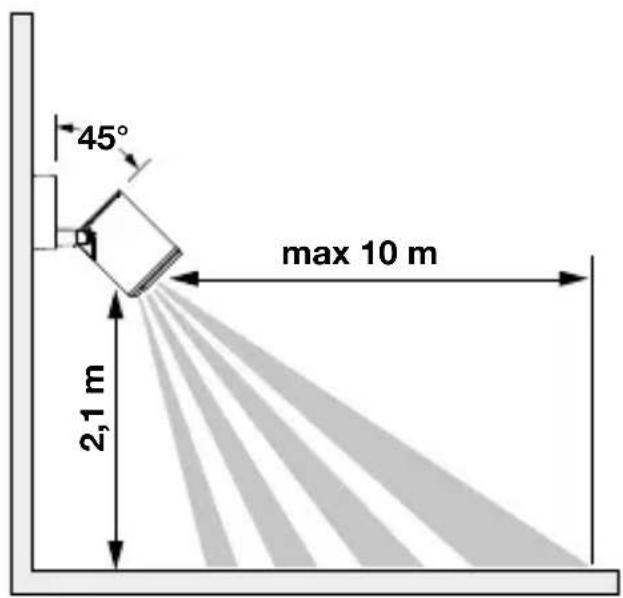
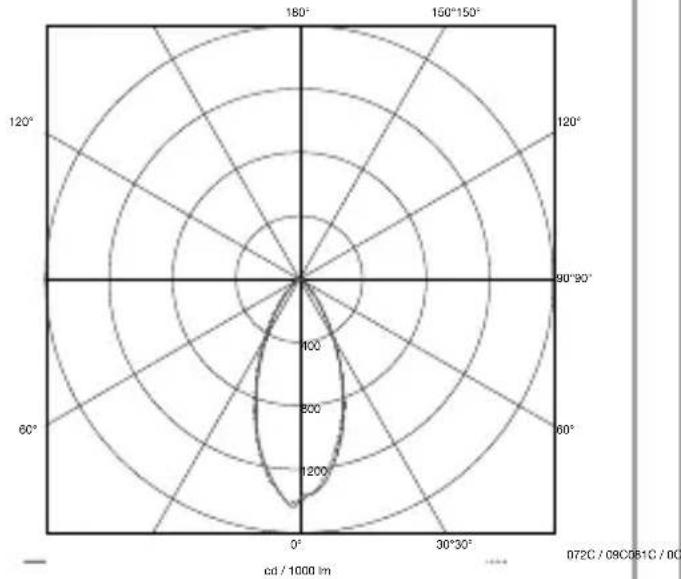
Spot ONE S / DUO S detection zone (Fig. 3.6-3.8)
Luminous intensity distribution (Fig. 3.9)
4. Electrical connection
Wiring diagram (Fig. 4.1)
The supply lead is a three-core cable:
L = phase conductor (usually black, brown or grey)
N = neutral conductor (usually blue)
PE = protective-earth conductor (green/yellow)
If you are in any doubt, identify the conductors using a voltage tester; then disconnect from the power supply again. Connect phase (L), neutral (N) and protective-earth conductor (PE) to the terminal.
Important:
Incorrectly wired connections will produce a short circuit later on in the product or fuse box. In this case, you must identify the individual conductors once again and reconnect them. A mains power switch for turning the unit ON and OFF may of course be installed in the mains supply lead.
Interconnection
"↓" used for interconnecting lights. As many as 10 lights of this type can be connected in parallel. (Fig. 4.1)
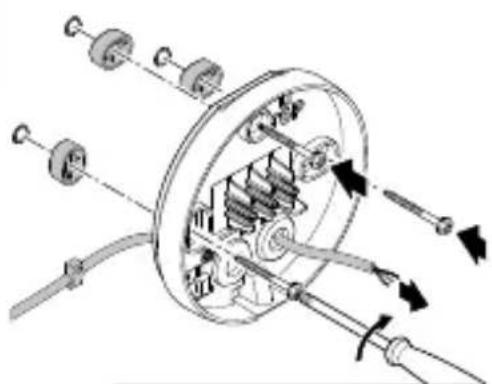
5. Mounting
- Check all components for damage.
- Do not use the product if it is damaged.
- When installing the light, make sure the installation site is not subject to vibration.
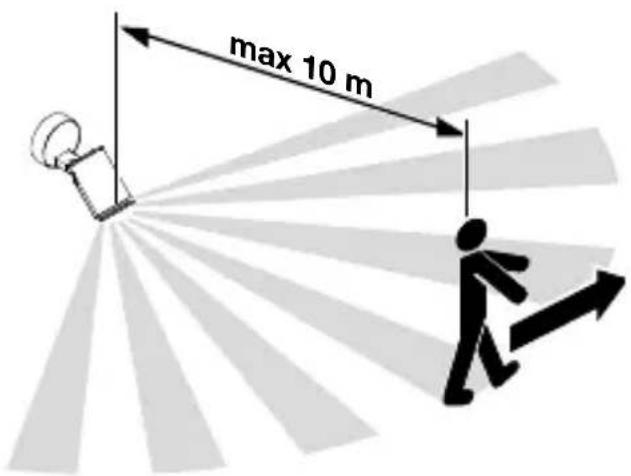
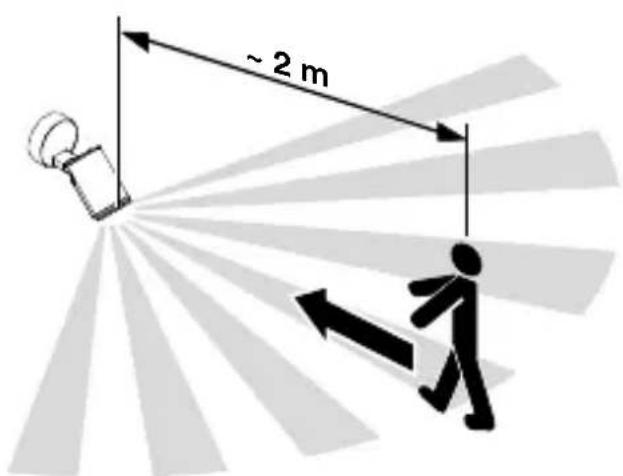
- Select an appropriate mounting location, taking the reach and motion detection into consideration.
The most reliable way to detect movement is given by mounting the light to point across the direction in which people walk and by making sure no obstacles (e.g. trees, walls etc.) interrupt the line of sensor vision.
Mounting procedure
- Switch OFF power supply. (Fig. 4.1)
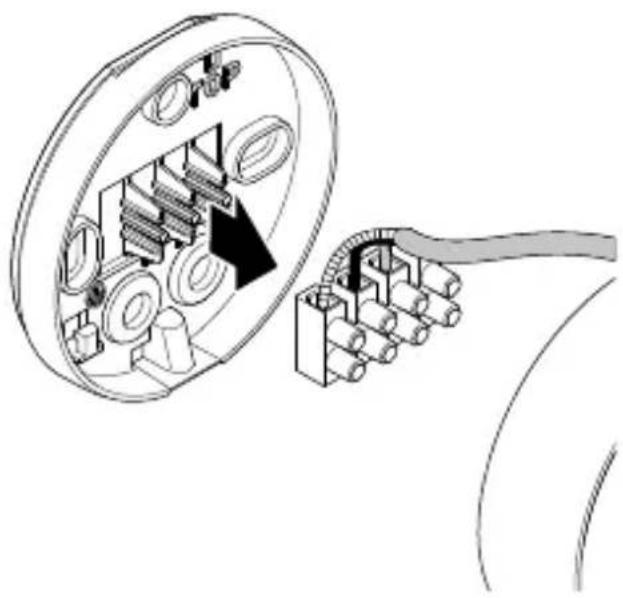
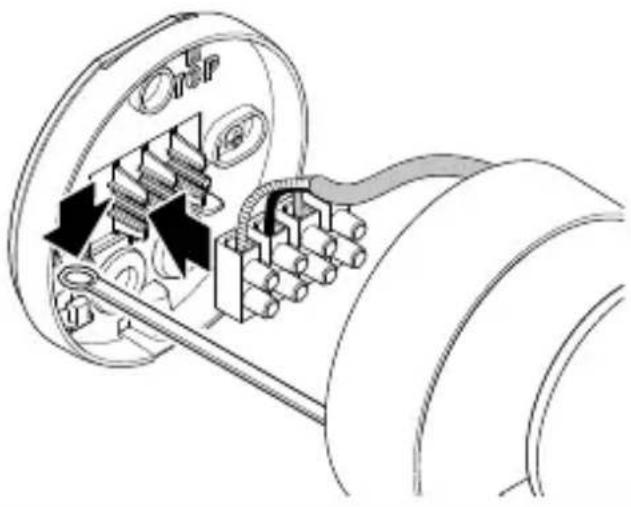
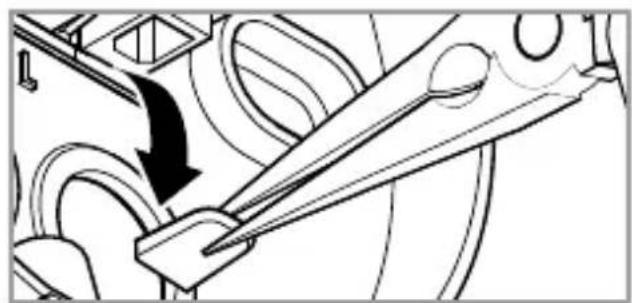
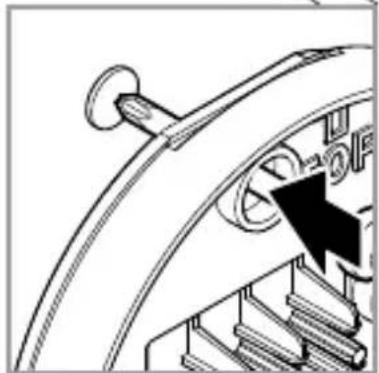
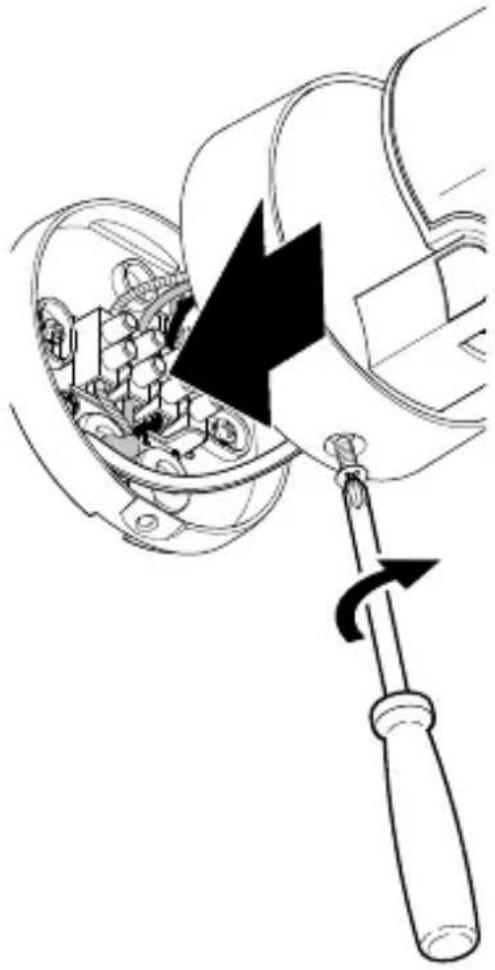
- Undo locking screw and detach light enclosure from wall mount. (Fig 5.1)
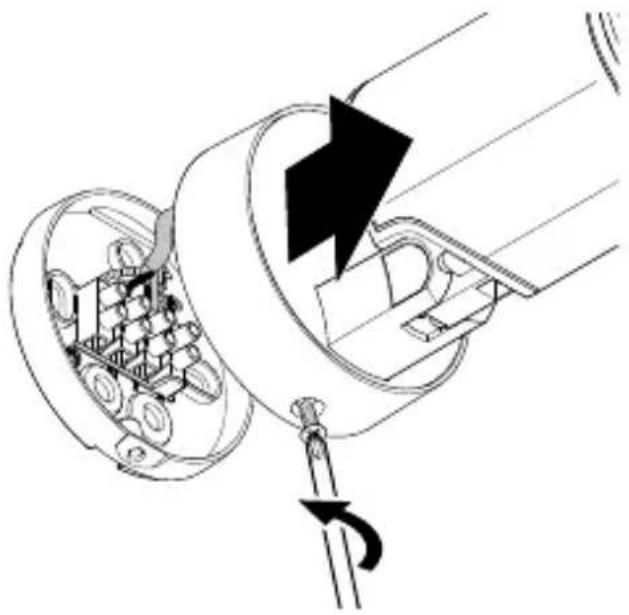
- Detach plug-in terminal and remove light enclosure from wall mount. (Fig. 5.2)
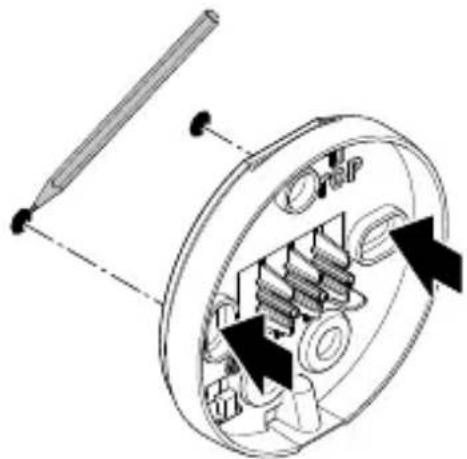
• Mark drill holes. (Fig. 5.3) - Drill holes and fit wall plugs. (Fig. 5.4)
- Concealed mounting. (Fig. 5.5)
- Surface-mounted installation with spacers. (Fig. 5.6)
- Attach retaining strap to the wall mount and fit plug-in terminal. (Fig. 5.7)
- Connect conductors. (Fig. 5.8)
- When interconnecting several lights, break out safety tab. (Fig. 5.8)
- Fit light enclosure onto wall mount. (Fig. 5.9)
- Screw in locking screw. (Fig. 5.9)
- Switch ON power supply. (Fig. 5.9)
- Make settings "6. Function"
6. Function
Spot ONE S / Spot DUO S
Factory settings
-Twilight level: 1000 Lux
-Time setting: 8 seconds
Twilight setting (Fig. 6.2 F)
The chosen response threshold can be infinitely varied from approx. 2 to 1000 Lux.
-Control dial set to ⚙ = daylight mode (not depending on ambient brightness)
-Control dial set to = night-time operation (approx. 2 lux)
The control dial must be turned to 🧑 when adjusting the detection zone and performing the functional test in daylight.
Time setting (Fig. 6.2 G)
The light's stay ON time can be set to any period from approx. 8 seconds to a maximum of 35 minutes. Any movement detected before this time elapses will restart the timer.
-Control dial set to + = approx. 35 minutes
-Control dial set to - = approx. 8 seconds
Note:
After the light switches OFF, it takes approx. 1 second before it is able to start detecting movement again. The light will only switch ON in response to movement once this period has elapsed.
Spot DUO S
Factory configuration:
Both light heads are interconnected and always switch ON and OFF at the same time. To operate the two light heads separately, the connection between the terminals must be removed (↓1 and ↓2).
Spot ONE SC /Spot DUO SC
Factory settings
-Twilight level: 2000 lux
-Time setting: 5 seconds
Smart Remote app
To configure the light via smartphone or tablet, you must download the STEINEL Smart Remote app from your app store. You will need a Bluetooth-capable smartphone or tablet.
Android iOS


The following functions can be set via Smart Remote app:
-Time setting
-Twilight setting
-ON and OFF times
-Automatic/manual control, depending on situation
-Interconnection
-Grouping
-Naming groups and lights
Note:
After the light switches OFF, it takes approx. 1 second before it is able to start detecting movement again. The light will only switch ON in response to movement once this period has elapsed. The Spot Connect has an internal clock for time-based activation and deactivation. This automatically synchronises with the clock of the connected smartphone via the Smart Remote app each time a Bluetooth connection is established. To ensure correct function following an interruption in the light's power supply, it must be re-connected via the Smart Remote app. The internal clock is re-synchronised with the smartphone clock.
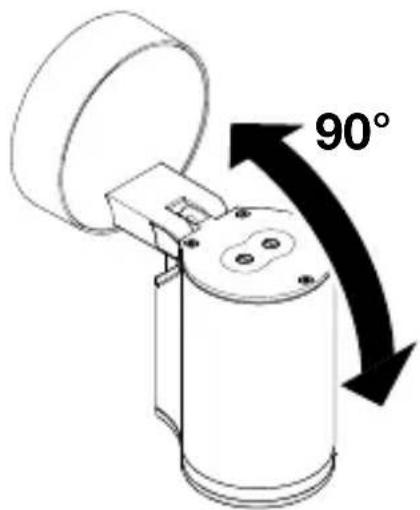
7. Light tilting/swivelling range / Changing lamp
Light swivelling/tilting range (Fig. 7.1/7.2)
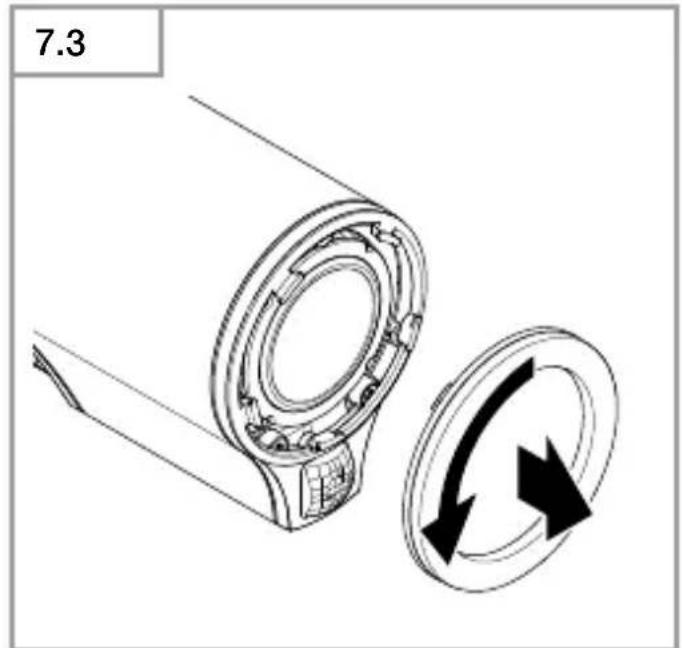
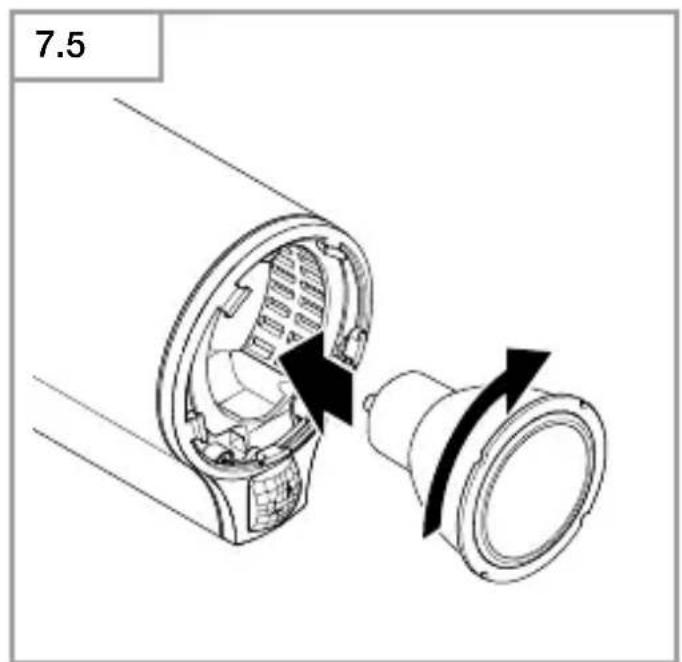
Changing lamp
- Undo glass cover and detach from light enclosure. (Fig. 7.3)
- Disconnect and remove lamp. (Fig. 7.4)
- Insert new lamp and twist to engage. (Fig. 7.5)
• Fit glass cover and turn to engage. (Fig. 7.6)
Important:
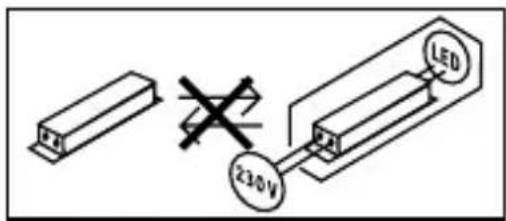
Only use GU10 LED lamp with a wattage up to 9 W.
Note:
- On changing a lamp, make sure that the seal and sealing surface are not soiled or damaged.
8. Maintenance
The product requires no maintenance.
The light can be cleaned with a damp cloth (without detergents) if dirty.
Important note: the control gear cannot be replaced.
9. Disposal
Electrical and electronic equipment, accessories and packaging must be recycled in an environmentally compatible manner.
Do not dispose of electrical and electronic equipment as domestic waste.
EU countries only:
Under the current European Directive on Waste Electrical and Electronic Equipment and its implementation in national law, electrical and electronic equipment no longer suitable for use must be collected separately and recycled in an environmentally compatible manner.
10. Declaration of Conformity
Hereby, STEINEL Vertrieb GmbH declares that the radio equipment type
Spot ONE SC / Spot DUO SC is in compliance with Directive 2014/53/EU.
The full text of the EU declaration of conformity is available at the following internet address: www.steinel.de
11. Manufacturer's Warranty
This Steinel product has been manufactured with utmost care, tested for proper operation and safety and then subjected to random sample inspection. Steinel guarantees that it is in perfect condition and proper working order. The warranty period is 36 months and starts on the date of sale to the consumer. We will remedy defects caused by material flaws or manufacturing faults. The warranty will be met by repair or replacement of defective parts at our own discretion. The warranty shall not cover damage to wear parts, damage or defects caused by improper treatment or maintenance. Further consequential damage to other objects shall be excluded.
Claims under the warranty will only be accepted if the unit is sent fully assembled and well-packed with a brief description of the fault, a receipt or invoice (date of purchase and dealer's stamp) to the appropriate Service Centre.
Repair service:
If defects occur outside the warranty period or are not covered by the warranty, ask your nearest service station for the possibility of repair.

* for LED lamp provided
12. Technical specifications
| Dimensions(∅ × D)(H × W × D) | Spot ONE/ONE S/ONE SC: ∅ 97 × 175 mmSpot DUO S / DUO SC: 98 × 247 × 175 mm | |
| Supply voltage 220-240 V, 50/60 Hz | ||
| Power consumption (Pon) * Spot ONE: 6.7 WSpot ONE S: 7.5 WSpot ONE SC: 7.9 W | Spot DUO S: 2 × 7.5 WSpot DUO SC: 14.6 W | |
| Luminous flux / brightness Light * Spot ONE:512 lm; 76.4 lm/WSpot ONE S:512 lm 68.6 lm/WSpot ONE SC:512 lm; 66.6 lm/W | Spot DUO S:2 × 512 lm; 68.6 lm/WSpot DUO SC:1024 lm; 70.1 lm/W | |
| Standby (light) Spot ONE S:2 × 0.5 WSpot ONE SC: .42 W | Spot DUO S: 2 × 0.5 WSpot DUO SC: 0.42 W | |
| Luminous flux Lamp 620 lm 92.5 lm/W | ||
| Power consumption Lamp 6.7 W | ||
| Standby Network Spot ONE SC: 0.42 W Spot DUO SC: 0.42 W | ||
| Colour temperature * 3,000 K (warm white) | ||
| Colour rendering index * R a >80 | ||
| Average rated life expectancy * L70B50 at 25°C: >20,000 hours | ||
| Colour consistency SDCM * Starting value: 6 | ||
| Luminous intensity distribution * | ||
| Sensor technology | Spot ONE/DUO S, ONE/DUO SC: Passive infrared | |
| Detection zone: angle of coverage | Spot ONE/DUO S, ONE/DUO SC: 90° | |
| Detection zone: angle of aperture | Spot ONE/DUO S, ONE/DUO SC: 90° | |
| Detection reach | Spot ONE/DUO S, ONE/DUO SC: max. 10 m | |
| Lamp | GU10 LED lamp (max. 9 W) | |
| Time setting | Spot ONE/DUO S: 8 s - 35 minSpot ONE/DUO SC: 5 s - 60 min | |
| Twilight setting | Spot ONE/DUO S: 2-1,000 luxSpot ONE/DUO SC: 2-2,000 lux | |
| IP rating | IP44 | |
| Protection class | I | |
| Ambient temperature | -20°C - +40°C | |
| Bluetooth frequency | Spot ONE/DUO SC: 2.4 - 2.48 GHz | |
| Bluetooth transmitter power | Spot ONE/DUO SC: 5 dBm/3 mW | |
| Energy efficiency class | This product contains one / two energy efficiency class "F" light source(s). | |
13. Troubleshooting
Malfunction Cause Remedy
| LED light does not switch ON | ■ Fuse has tripped, not switched ON, break in wiring■ Short circuit■ Lamp faulty | ■ Activate, change fuse, turn ON mains switch, check wiring with voltage tester■ Check connections■ Change lamp |
| Sensor-switched LED light does not switch ON | ■ Twilight setting in night-time mode during daytime operation■ Mains switch OFF■ Fuse has tripped■ Detection zone not correctly adjusted | ■ Reset■ Switch ON■ Activate, change fuse, check connection if necessary■ Readjust |
| Sensor-switched LED light does not switch OFF | ■ Continued movement within the detection zone | ■ Check zone and readjust if necessary or apply shroud |
| Sensor-switched LED light keeps switching ON/OFF | ■ Animals moving in detection zone | ■ Tilt sensor higher; adjust detection zone |
| Sensor-LED light switches ON when it should not | ■ Wind is moving trees and bushes in the detection zone■ Cars in the street are detected■ Sudden temperature changes due to weather (wind, rain, snow) or air expelled from fans, open windows■ Sensor-switched LED light is swaying (moving) due to gusts of wind or heavy rain | ■ Change detection zone■ Change detection zone■ Adjust detection zone or install in a different place■ Mount sensor-switched LED light on a firm surface |
FR
3. Spot ONE / Spot ONE S / Spot DUO S Spot ONE SC / Spot DUO SC
Utilisation conforme aux prescriptions
Spot ONE S / Spot DUO S
Spot ONE SC /Spot DUO SC
Spot ONE S / Spot DUO S
Spot ONE SC /Spot DUO SC
Application Smart Remote

| Dimensions | |
| (∅ × P) | Spot ONE/ONE S/ONE SC : ∅ 97 × 175 mm |
| (H × I × P) | Spot DUO S / DUO SC : 98 × 247 × 175 mm |
3. Spot ONE / Spot ONE S / Spot DUO S Spot ONE SC / Spot DUO SC
Spot ONE S / Spot DUO S
Spot ONE SC /spot DUO SC
Spot ONE S / Spot DUO S
Fabrieksinstellingen
–Schemerinstelling: 1000 lux
Spot ONE SC /Spot DUO SC
Fabrieksinstellingen
–Schemerinstelling: 2000 lux

3. Spot ONE / Spot ONE S / Spot DUO S Spot ONE SC / Spot DUO SC
Spot ONE S / Spot DUO S
Spot ONE SC /Spot DUO SC
Spot ONE S / Spot DUO S
Spot ONE SC /Spot DUO SC

3. Spot ONE / Spot ONE S / Spot DUO S Spot ONE SC / Spot DUO SC
Uso previsto
Spot ONE S / Spot DUO S
Spot ONE S / Spot DUO S
Spot ONE SC /Spot DUO SC

3. Spot ONE / Spot ONE S / Spot DUO S Spot ONE SC / Spot DUO SC
Utilização prevista
Spot ONE S / Spot DUO S
Spot ONE SC /Spot DUO SC
Spot ONE S / Spot DUO S
Spot ONE SC /Spot DUO SC

3. Spot ONE / Spot ONE S / Spot DUO S Spot ONE SC / Spot DUO SC
Spot ONE S / Spot DUO S
Spot ONE SC /Spot DUO SC
Spot ONE S / Spot DUO S
Spot ONE SC /Spot DUO SC

3. Spot ONE / Spot ONE S / Spot DUO S Spot ONE SC / Spot DUO SC
Korrekt anvendelse
Spot ONE S / Spot DUO S
Spot ONE SC /Spot DUO SC
Spot ONE S / Spot DUO S
Standardindstillinger
-Skumringsindstilling: 1000 lux
-Tidsindstilling: 8 sekunder
Skumringsindstilling (fig. 6.2 F)
Spot ONE SC /Spot DUO SC
Standardindstillinger
-Skumringsindstilling: 2000 lux
-Tidsindstilling: 5 sekunder
Smart Remote-app
For at konfigurere lampen med smartphone eller tablet skal du downloade STEINEL Smart Remote-appen fra din AppStore. Du skal bruge en smartphone eller tablet med Bluetooth.
Android iOS


Følgende funktioner kan indstilles via Smart Remote-appen:
3. Spot ONE / Spot ONE S / Spot DUO S Spot ONE SC / Spot DUO SC
Spot ONE S / Spot DUO S
Spot ONE SC /Spot DUO SC
Spot ONE S / Spot DUO S
Tehdasasetukset

3. Spot ONE / Spot ONE S / Spot DUO S Spot ONE SC / Spot DUO SC
Spot ONE S / Spot DUO S
- Sensor LED-lampen inneholder en infrarød bevegelsessensor
Spot ONE SC /Spot DUO SC
Spot ONE S / Spot DUO S
Fabrikkinnstillinger
-Skumringsinnstilling: 1000 lux
-Tidsinnstilling: 8 sekunder
Skumringsinnstilling (ill. 6.2 F)
-Skruknapp + = ca. 35 minutter
-Skruknapp - = ca. 8 sekunder
NB:
Spot ONE SC /Spot DUO SC
Fabrikkinnstillinger
-Skumringsinnstilling: 2000 lux
-Tidsinnstilling: 5 sekunder
Smart Remote-app
For å konfigurere lampen med smarttelefon eller nettbrett, må du laste ned STEINEL Smart Remote App fra din app-butikk. Du trenger en Bluetooth-aktivert smarttelefon eller nettbrett.
Android iOS


3. Spot ONE / Spot ONE S / Spot DUO S Spot ONE SC / Spot DUO SC
Spot ONE S / Spot DUO S
Spot ONE SC /Spot DUO SC
Spot ONE S / Spot DUO S
Spot ONE SC /Spot DUO SC

3. Spot ONE / Spot ONE S / Spot DUO S Spot ONE SC / Spot DUO SC
Spot ONE S / Spot DUO S
Spot ONE SC /Spot DUO SC
Spot ONE S / Spot DUO S
Fabrika ayarları
Spot ONE SC /Spot DUO SC
Fabrika ayarları

3. Spot ONE / Spot ONE S / Spot DUO S Spot ONE SC / Spot DUO SC
Spot ONE S / Spot DUO S
Spot ONE SC /Spot DUO SC
Spot ONE S / Spot DUO S
Gyári beállítások
Spot ONE SC /Spot DUO SC
Gyári beállítások

| Méretek | |
| (∅ × T) | Spot ONE/ONE S/ONE SC: ∅ 97 × 175 mm |
| (Ma × Sz × Mé) | Spot DUO S / DUO SC: 98 × 247 × 175 mm |
| Hálózati feszültség 220-240 V, 50/60Hz | ||
| Teljesítményfelvétel (Pon) * Spot ONE: 6,7 WSpot ONE S: 7,5 WSpot ONE SC: 7,9 W | Spot DUO S: 2 × 7,5 WSpot DUO SC: 14,6 W | |
| Lámpa fényárama / fényereje * Spot ONE:512 lm; 76,4 lm/WSpot ONE S:512 lm 68,6 lm/WSpot ONE SC:512 lm; 66,6 lm/W | Spot DUO S:2 × 512 lm; 68,6 lm/WSpot DUO SC:1024 lm; 70,1 lm/W | |
| Standby (lámpa) Spot ONE S:2 × 0,5 WSpot ONE SC: ,42 W | Spot DUO S: 2 × 0,5 WSpot DUO SC: 0,42 W | |
natural_image
World map silhouette in grayscale, showing continents and oceans without any text or labelsContact
www.steinel.de/contact