
AP09RT - Air-conditioner LG - Free user manual and instructions
Find the device manual for free AP09RT LG in PDF.
| Product type | Wall-mounted split air conditioner |
| Brand | LG |
| Model | AP09RT |
| Installation type | Wall mounting |
| Refrigerant | R32 (flammable) |
| Cooling capacity | 2.5 kW (approx. 9,000 BTU/h) |
| Heating capacity | 2.8 kW (approx. 9,600 BTU/h) |
| Power supply | 220-240 V ~ 50/60 Hz |
| Indoor unit dimensions (W×H×D) | 900 × 300 × 200 mm |
| Outdoor unit dimensions (W×H×D) | 800 × 550 × 300 mm |
| Indoor unit weight | 10 kg |
| Outdoor unit weight | 30 kg |
| Noise level (indoor) | 30-50 dB(A) depending on speed |
| Connectivity | Wi-Fi (2.4 GHz) via LG ThinQ app |
| Main functions | Cooling, heating, dehumidification, fan, Jet mode, sleep mode, timer, oscillation, air purification |
| Filters | Micro dust filter (washable), optional triple filter (activated carbon) |
| Sensors | PM1.0 sensor for air quality |
| Maintenance | Clean the micro dust filter every month |
| Safety | Auto restart, self-diagnosis, safety lock |
| Included accessories | Wireless remote control, batteries, remote control holder |
Frequently Asked Questions - AP09RT LG
User questions about AP09RT LG
0 question about this device. Answer the ones you know or ask your own.
Ask a new question about this device
Download the instructions for your Air-conditioner in PDF format for free! Find your manual AP09RT - LG and take your electronic device back in hand. On this page are published all the documents necessary for the use of your device. AP09RT by LG.
USER MANUAL AP09RT LG
Read this owner's manual thoroughly before operating the appliance and keep it handy for reference at all times.
TYPE: WALL MOUNTED
Original instruction
EN ENGLISH
PL POLSKI
CZ CESTINA
SK SLOVENCINA
LT LIETUVIU
MKMAKEIOHCKN
FR FRANÇAIS
HU MAGYAR
ET EESTI
SL SLOVEN'SCINA
GA GAEILGE
SQ SHQIP
EL EAAHNIKA
BG bJIAPCKN
MT MALTI
LV LATVIEŠU
SR SRPSKI
BS BOSANSKI
NL NEDERLANDS
HR HRVATSKI
RO ROMÁNÁ
SAFETYINSTRUCTIONS 3
IMPORTANT SAFETY INSTRUCTIONS 4
OPERATION 11
Notes for Operation 11
Parts and Functions 11
Wireless Remote Control 12
Restarting the Air Conditioner Automatically 17
Using the Mode Function 17
Using the Jet Mode Function 20
Using the Fan Speed Function 21
Using the Air Flow Direction Function 21
Setting the On/Off Timer 22
Using the Sleep Function (Optional) 23
Using the Simple Timer Function (Optional) 23
Using the Energy Display Function (Optional) 24
Using the Light Off Function (Optional) 24
Using the Comfort Air Function (Optional) 24
Using the Energy Control Function (Optional) 25
How to Use Air Purification. 25
Checking Overall Cleanliness 26
Using Special Functions 28
SMART FUNCTIONS 29
LG ThinQ Application 29
Smart Diagnosis 31
MAINTENANCE 32
Replace and Clean the Micro Dust Filter 34
Replace the Triple Filter (Optional) 35
Clean the PM1.0 Sensor 36
TROUBLESHOOTING 37
The following safety guidelines are intended to prevent unforeseen risks or damage from unsafe or incorrect operation of the appliance.
The guidelines are separated into 'WARNING' and 'CAUTION' as described below.

This symbol is displayed to indicate matters and operations that can cause risk. Read the part with this symbol carefully and follow the instructions in order to avoid risk.

WARNING
This indicates that the failure to follow the instructions can cause serious injury or death.

CAUTION
This indicates that the failure to follow the instructions can cause the minor injury or damage to the product.
The following symbols are displayed on indoor and outdoor units. (for R32)

This symbol indicates that this appliance uses a flammable refrigerant. If the refrigerant is leaked and exposure to an external ignition source, there is a risk of fire.

This symbol indicates that the Operation Manual should be read carefully.

This symbol indicates that a service personnel should be handling this equipment with reference to the Installation Manual.

This symbol indicates that information is available such as the Operating Manual or Installation Manual.
IMPORTANT SAFETY INSTRUCTIONS

WARNING
To reduce the risk of explosion, fire, death, electric shock, injury or scalding to persons when using this product, follow basic precautions, including the following:
Children in the Household
This appliance is not intended for use by persons (including children) with reduced physical, sensory or mental capabilities, or lack of experience and knowledge, unless they have been given supervision or instruction concerning use of the appliance by a person responsible for their safety. Children should be supervised to ensure that they do not play with the appliance.
For use in Europe:
This appliance can be used by children aged from 8 years and above and persons with reduced physical, sensory or mental capabilities or lack of experience and knowledge if they have been given supervision or instruction concerning use of the appliance in a safe way and understand the hazards involved. Children shall not play with the appliance. Cleaning and user maintenance shall not be made by children without supervision.
Installation
- Do not install the air conditioner on an unstable surface or in a place where there is danger of it falling.
- Contact an authorized service center when installing or relocating the air conditioner.
-
Install the panel and the cover of the control box safely.
-
Do not install the air conditioner in a place where flammable liquids or gases such as gasoline, propane, paint thinner, etc., are stored.
- Make sure that the pipe and the power cable connecting the indoor and outdoor units are not pulled too tight when installing the air conditioner.
- Use standard circuit breaker and fuse that conform to the rating of the air conditioner.
- Do not input air or gas into the system except with the specific refrigerant.
- Use non-flammable gas (nitrogen) to check for leak and to purge air; using compressed air or flammable gas may cause fire or explosion.
- The indoor/outdoor wiring connections must be secured tightly, and the cable should be routed properly so that there is no force pulling the cable from the connection terminals. Improper or loose connections can cause heat generation or fire.
- Install dedicated electric outlet and circuit breaker before using the air conditioner.
- Do not connect the ground wire to a gas pipe, a lightning rod, or a telephone ground wire.
- Keep any required ventilation openings clear of obstruction. (for R32)
- Means for disconnection must be incorporated in the fixed wiring in accordance with the wiring rules.
- Do not install the unit in potentially explosive atmospheres.
Operation
- Be sure to use only those parts listed in the service parts list. Never attempt to modify the equipment.
- Make sure that children do not climb on or hit the outdoor unit.
- Dispose of the batteries in a place where there is no danger of fire.
-
Use only the refrigerant specified on the air conditioner label.
-
Cut off the power supply if there is any noise, smell, or smoke coming from the air conditioner.
- Do not leave flammable substances such as gasoline, benzene, or thinner near the air conditioner.
- Contact an authorized service center when the air conditioner is submerged by flood waters.
- Do not use the air conditioner for an extended period of time in a small place without proper ventilation.
- In the event of a gas leak (such as Freon, propane gas, LP gas, etc.) ventilate sufficiently before using the air conditioner again.
- To clean the interior, contact an authorized service center or dealer. Using harsh detergents may cause corrosion or damage to the unit.
- Be sure to ventilate sufficiently when the air conditioner and a heating appliance such as a heater are used simultaneously.
- Do not block the inlet or outlet of air flow.
- Do not insert hands or other objects through the air inlet or outlet while the air conditioner is operating.
- Make sure that the power cable is neither dirty, loose, nor broken.
- Never touch, operate, or repair the air conditioner with wet hands.
- Do not place any objects on the power cable.
- Do not place a heater or other heating appliances near the power cable.
- Do not modify or extend the power cable. Scratches or peeling insulation on the power cables may result in fire or electric shock, and should be replaced.
-
Cut off the power supply immediately in the event of a blackout or a thunderstorm.
-
Take care to ensure that power cable could not be pulled out or damaged during operation.
- Do not touch refrigerant pipe, water pipe and any internal parts while the unit is operating or immediately after operation.
Maintenance
- Do not clean the appliance by spraying water directly onto the product.
- Before cleaning or performing maintenance, disconnect the power supply and wait until the fan stops.
Technical Safety
- Installation or repairs made by unauthorized persons can pose hazards to you and others.
- Any person who is involved with working on or breaking into a refrigerant circuit should hold a current valid certificate from an industry-accredited assessment authority, which authorizes their competence to handle refrigerants safely in accordance with an industry recognized assessment specification. (for R32)
Servicing shall only be performed as recommended by the equipment manufacturer. Maintenance and repair requiring the assistance of other skilled personnel shall be carried out under the supervision of the person competent in the use of flammable refrigerants. (for R32) - The information contained in the manual is intended for use by a qualified service technician who is familiar with the safety procedures and equipped with the proper tools and test instruments.
-
Failure to read and follow all instructions in this manual can result in equipment malfunction, property damage, personal injury and/or death.
-
The appliance shall be installed in accordance with national wiring regulations.
- When the power cord is to be replaced, the replacement work shall be performed by authorized personnel using only genuine replacement parts.
- This appliance must be properly grounded to minimize risk of electric shock.
- Do not cut or remove the grounding prong from the power plug.
- Attaching the earth wire to the power outlet cover screw does not ground the appliance unless the cover screw is metal, uninsulated, and the power outlet is grounded through house wiring.
- If you have any doubt whether the air conditioner is properly grounded, have the power outlet and circuit checked by a qualified electrician.
- The refrigerant and insulation blowing gas used in the appliance require special disposal procedures. Consult a service agent or a similarly qualified person before disposing of them.
- If the supply cord is damaged, it must be replaced by the manufacturer, its service agent or similarly qualified person in order to avoid a hazard.
- The appliance shall be stored in a well-ventilated area where the room size corresponds to the room area as specified for operation. (for R32)
- The appliance shall be stored in a room without continuously operating open flames (for example an operating gas appliance) and ignition sources (for example an operating electric heater). (for R32)
- The appliance shall be stored so as to prevent mechanical damage from occurring. (for R32)

CAUTION
To reduce the risk of minor injury to persons, malfunction, or damage to the product or property when using this product, follow basic precautions, including the following:
Installation
- Do not install the air conditioner in an area where it is directly exposed to sea wind (salt spray).
- Install the drain hose properly for the smooth drainage of water condensation.
- Exercise caution when unpacking or installing the air conditioner.
- Do not touch the leaking refrigerant during installation or repair.
- Transport the air conditioner with two or more people or use a forklift.
- Install the outdoor unit such that it is protected from direct sunlight. Do not place the indoor unit in a place where it is directly exposed to sunlight via the windows.
- Safely dispose of packing materials such as screws, nails, plastic bag or batteries using proper packaging after installation or repair.
- Install the air conditioner in a place where the noise from the outdoor unit or the exhaust fumes will not inconvenience the neighbors. Failure to do so may result in conflict with the neighbors.
Operation
-
Remove the batteries if the remote control is not to be used for an extended period of time.
-
Make sure that the filter is installed before operating the air conditioner.
- Be sure to check if there is a refrigerant leak after installing or repairing the air conditioner.
- Do not place any object on the air conditioner.
- Never mix different types of batteries, or old and new batteries for the remote control.
- Do not let the air conditioner run for a long time when humidity is very high or when a door or a window has been left open.
- Stop using the remote control if there is a fluid leak in the battery. If your clothes or skin are exposed to the leaking battery fluid, wash off with clean water.
- Do not expose people, animals, or plants to the cold or hot wind from the air conditioner for extended periods of time.
- If the leaking battery fluid has been swallowed, rinse the inside of the mouth thoroughly and consult a doctor.
- Do not drink the water drained from the air conditioner.
- Do not use the product for special purposes, such as preserving foods, works of art, and etc. It is an air conditioner for consumer purposes, not a precision refrigeration system. There is risk of damage or loss of property.
- Do not recharge or disassemble the batteries.
Maintenance
- Never touch the metal parts of the air conditioner when removing the micro dust filter.
- Use a sturdy stool or ladder when cleaning, maintaining, or repairing the air conditioner at a height.
- Never use strong cleaning agents or solvents when cleaning the air conditioner or spray water. Use a smooth cloth.
Notes for Operation
Suggestion for Energy Saving
- Do not over-cool the space. This may be harmful for your health and may consume more electricity.
- Block sunlight with blinds or curtains while you are operating the air conditioner.
- Keep doors or windows closed tightly while you are operating the air conditioner.
- Adjust the direction of the air flow vertically or horizontally to circulate indoor air.
- Speed up the fan to cool or warm indoor air quickly, within a short period of time.
- Open windows regularly for ventilation. The indoor air quality may deteriorate if the air conditioner is used for long durations.
- Clean the micro dust filter once a month, or more, if necessary. Dust and impurities collected in the micro dust filter may block the air flow or reduce the unit performance.
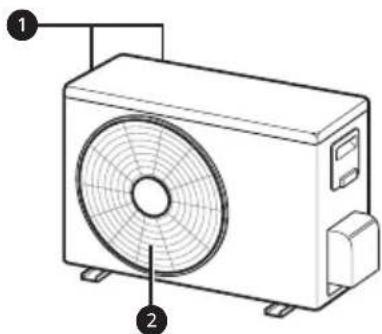
Parts and Functions
Indoor Unit Outdoor Unit
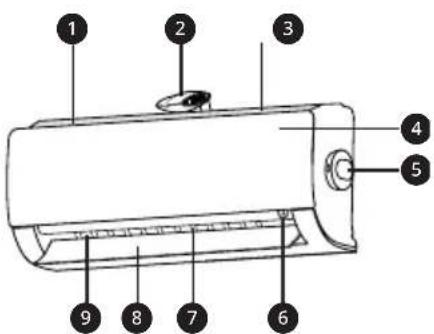
Air Filter + Micro Dust Filter
2 lonizer
3 Air Intake
4 Front Cover
PM1.0 Sensor
6 On/Off Button
Air Deflector (Vertical Louver)
Air Deflector (Horizontal Vane)
9 Air Outlet
Air Intake Vents
Air Outlet Vents
NOTE
- The number and location of operation lamps may vary according to the model of the air conditioner.
The feature may be changed according to the type of model.
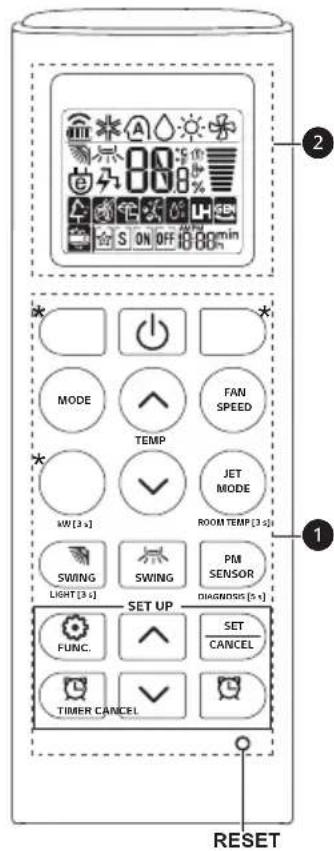
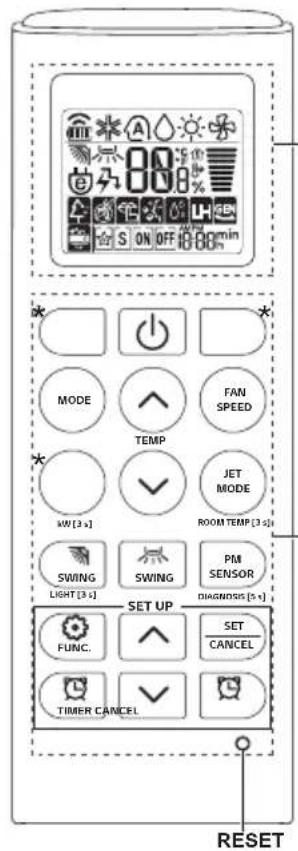
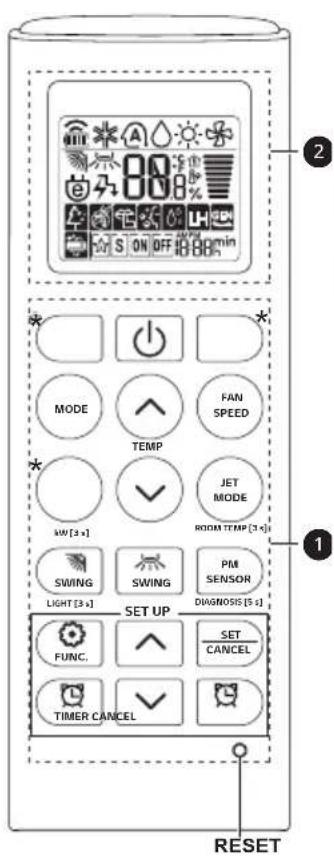
Wireless Remote Control
Inserting Batteries
If the display screen of the remote control begins to fade, replace the batteries. Insert AAA (1.5 V) batteries before using the remote control.
1 Remove the battery cover.

2 Insert the new batteries and make sure that the + and - terminals of the batteries are installed correctly.

Installing the Remote Control Holder
To protect the remote control, install the holder where there is no direct sunlight.
1 Choose a safe and easily accessible location.
Fix the holder by fastening 2 screws firmly with a screwdriver.

Operating Method
Point the remote control towards the signal receiver at the right side of the air conditioner to operate it.

NOTE
-
The remote control may operate other electronic devices if it is directed towards them. Make sure to point the remote control towards the air conditioner signal receiver.
-
For proper operation, use a soft cloth to clean the signal transmitter and receiver.
In case of a function not provided in the product, no buzzer sound occurs from the product when a button for such function on the remote control is pressed except for Air Flow Direction ( SWING), Energy Display ( )Air Purification function
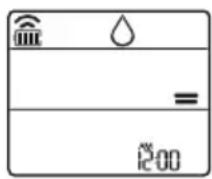
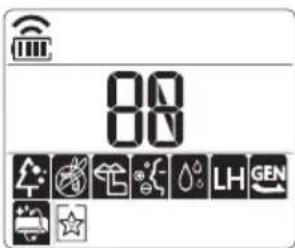
Setting the Current Time
1 Insert batteries.
- The icon below blinks at the bottom of the display screen.

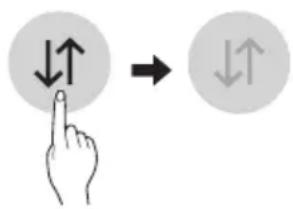
2 Press or button to select the minutes.
3 Press SET/CANCEL button to finish.
NOTE
- The On/Off Timer is available after setting the current time.
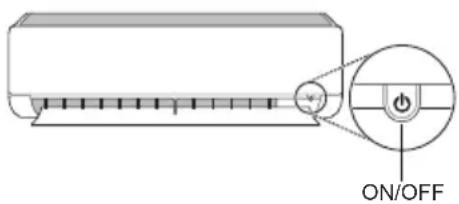
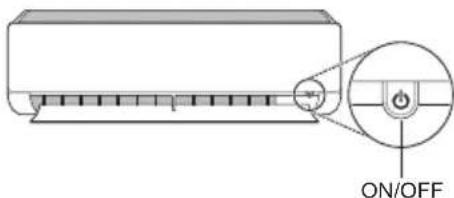
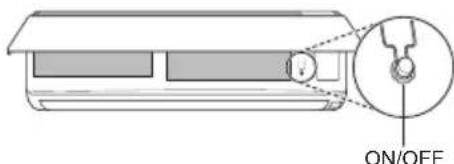
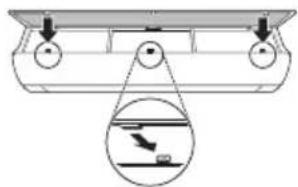
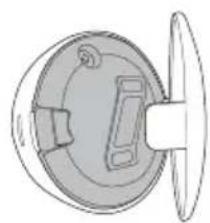
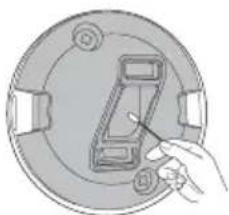
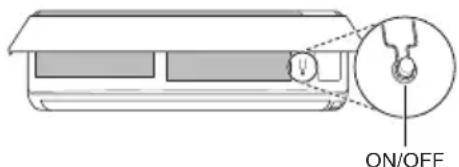
Operating the Air Conditioner without the Remote Control
You can use the ON/OFF button of the indoor unit to operate the air conditioner when the remote control is unavailable.
1 Open the front cover (Type 2) or horizontal vane (Type 1).
2 Press the ON/OFF button.
Type 1

Type 2
NOTE
- The stepping motor may be broken, if the horizontal vane opens rapidly.
- The fan speed is set to high.
The feature may be changed according to the type of model. - The temperature cannot be altered when using this emergency ON/OFF button.
- For cooling-only models, the temperature is set to 22^
- For cooling & heating models, the temperature is set from 22^ to 24^
Using Wireless Remote Control
You can operate the air conditioner more conveniently with the remote control.

| Button | Display Screen | Description | Available Function | |
| Single Split | Multi | |||
| - | To turn on/off the air conditioner. | ○ | ○ | |
| 88° | To adjust the desired room temperature in cooling, heating or auto changeover mode. | ○ | ○ | |
| MODE | * | To select the cooling mode. | ○ | ○ |
| To select the heating mode. | ○ | ○ | ||
| To select the dehumidification mode. | ○ | ○ | ||
| To select the fan mode. | ○○ | |||
| A | To select the auto changeover/auto operation mode. | ○ | ○ | |
| JET MODE | Po | To change room temperature quickly. | ○ | ○ |
| FAN SPEED | To adjust the fan speed. | ○ | ○ | |
| To adjust the air flow direction vertically or horizontally. | ○ | ○ | ||
NOTE
-
- buttons may be changed according to the type of model.
- When connected to the Multi Outdoor unit, the Energy Display, Energy Control, Silent and Smart Diagnosis function may not be supported.
| Button | Display Screen | Description | Available Function | |
| Single Split | Multi | |||
| To turn on/off air conditioner automatically at desired time. | ○ | ○ | ||
| SET/CANCEL | - | To set/cancel the special functions and timer. | ○ | ○ |
| - | To cancel the timer settings. | ○ | ○ | |
| - | To adjust time. ○○ | |||
| LIGHT [3 s] | - | To set the brightness of the display on the indoor unit. | ○ | ○ |
| ROOM TEMP [3 s] | To display the room temperature. | ○ | ○ | |
| *COMFORT AIR | To adjust the air flow to deflect wind. | ○ | ○ | |
| kW [3 s] | - | To set whether or not to display information regarding energy. | ○ | × |
| *ENERGY CTRL | To bring the effect of the power saving. | ○ | × | |
| DIAGNOSIS [5 s] | - | To conveniently check maintenance information of a product. | ○ | × |
| PM SENSOR | - | To check indoor dust status. | ○ | ○ |
| *AIR PURIFY | - | The Ion generator uses millions of ions to help improve indoor air quality. | ○ | ○ |
2
| Button | Display Screen | Description | Available Function | |
| Single Split | Multi | |||
| FUNC. | To reduce noise from outdoor units. | O | X | |
| To remove moisture generated inside the indoor unit. | O | O | ||
| RESET - | To initialize the remote control settings. | O | O | |
NOTE
- Some functions may not be supported, depending on the model.
-
- buttons may be changed according to the type of model.
- Press the SET/CANCEL button to operate the selected FUNC.
Restarting the Air Conditioner Automatically
When the air conditioner is turned on again after a power failure, this function restores the previous settings.
Disabling Auto Restart
1 Open the front cover (Type 2) or horizontal vane (Type 1).
2 Press the ON/OFF button and hold it for 6 seconds, then the unit will beep twice and the lamp will blink twice 4 times.
To re-enable the function, press the ON/OFF button and hold it for 6 seconds. The unit will beep twice and the lamp will blink 4 times.
Type 1
Type 2
NOTE
The feature may be changed according to the type of model.
- If you press and hold the ON/OFF button for 3 - 5 seconds, instead of 6 seconds, the unit will switch to the test operation. In the test operation, the unit blows out strong cooling air for 18 minutes and then returns to factory default settings.
Using the Mode Function
This function allows you to select the desired function.
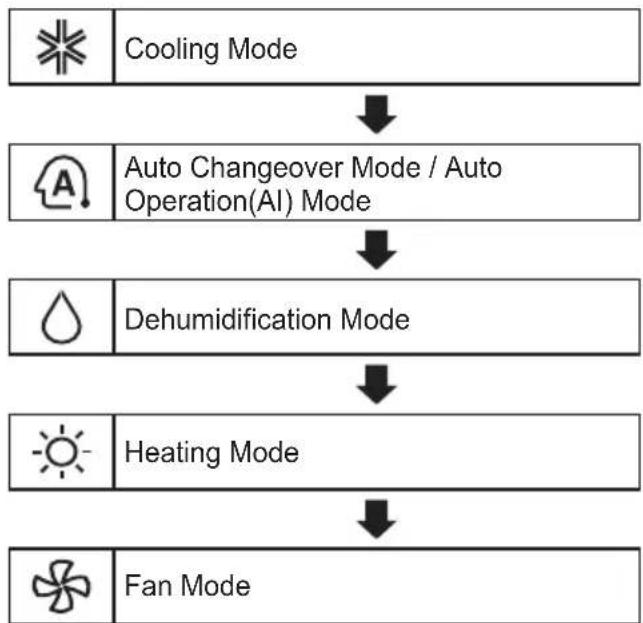
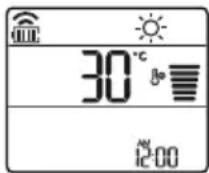
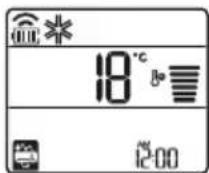
Cooling Mode
1 Turn the appliance on.
2 Press MODE button repeatedly to select the Cooling Mode.
is displayed on the display screen.
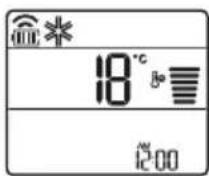
3 Press or button to set the desired temperature.
Auto Operation (Artificial Intelligence)
Multi Model
In this operation mode, the system is automatically operated by the electronic controls.
1 Turn the appliance on.
2 Press MODE button repeatedly to select the Auto Operation.
A is displayed on the display screen.
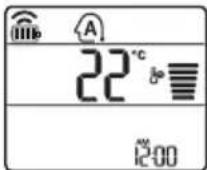
3 Press or button to set the desired temperature.
4 Press FAN SPEED button to adjust the fan speed.
Auto Changeover Mode
Single Split Model
This mode changes the mode automatically to maintain the set temperature at ± 2^
1 Turn the appliance on.
2 Press MODE button repeatedly to select the Auto Changeover Mode.
- A is displayed on the display screen.
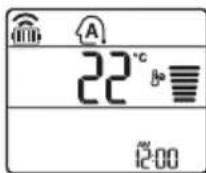
3 Press button to set the desired temperature.
4 Press FAN SPEED button to adjust the fan speed.
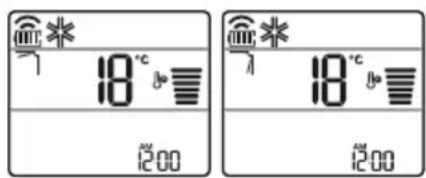
Dehumidification Mode
This mode removes excess moisture from a highly humid environment or during the rainy season, in order to prevent mildew from setting in. This mode adjusts the room temperature and the fan speed automatically to maintain the optimal level of humidity.
1 Turn the appliance on.
2 Press MODE button repeatedly to select the Dehumidification Mode.
- is displayed on the display screen.
NOTE
- In this mode you cannot adjust the room temperature, it is adjusted automatically.
- The room temperature is not displayed on the display screen.
- In the dehumidification mode, compressor and indoor fan may not operate when the room temperature is below 24^
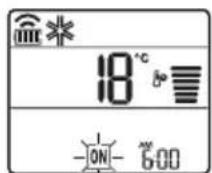
Heating Mode
1 Turn the appliance on.
2 Press MODE button repeatedly to select the Heating Mode.
- displayed on the display screen.
3 Press or button to set the desired temperature.
NOTE
will be displayed on the indoor unit when defrosting is operating.
- Furthermore, this indication will be displayed on the indoor unit:
- When preheating is operating.
- When the room temperature has been reached to the set temperature.
Fan Mode
This mode only circulates the indoor air without changing the room temperature.
1 Turn the appliance on.
2 Press MODE button repeatedly to select the Fan Mode.
is displayed on the display screen.
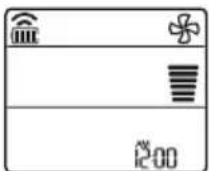
3 Press FAN SPEED button to adjust the fan speed.
NOTE
on will be displayed on the indoor unit when fan mode is operating.
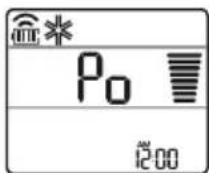
Using the Jet Mode Function
Changing Room Temperature Quickly
This function allows you to cool indoor air quickly during the summer or warm it quickly during winter.
- The Jet Mode function is available with Cooling, Heating and Dehumidification Mode.
1 Turn the appliance on.
2 Press MODE button repeatedly to select the desired mode.
3 Press JET MODE button.
- P_0 is displayed on the display screen.
NOTE
- Jet Heating Mode is not available on some models.
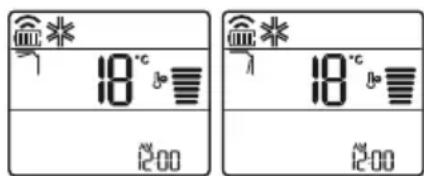
- In Jet Cooling Mode, strong air blows out for 30 minutes.
After 30 minutes later, setting temperature is maintaining 18^ If you want to change the temperature, Press or button to set the desired temperature. - In Jet Heating Mode, strong air blows out for 30 minutes.
After 30 minutes later, setting temperature is maintaining 30^ If you want to change the temperature, Press or button to set the desired temperature. - This function may operate differently from the remote control display.
Using the Fan Speed Function
Adjusting the Fan Speed
- Press FAN SPEED button repeatedly to adjust the fan speed.
| Display Screen Speed | |
| High | |
| Medium - High | |
| Medium | |
| Medium - Low | |
| Low | |
| - Natural Wind | |
NOTE
- The fan speed of Natural Wind adjusts automatically.
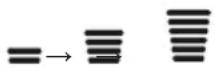
- The fan speed icons are displayed on some indoor units.

- Indoor unit display is displayed only 5 seconds and return to the setting temperature on some models.
Using the Air Flow Direction Function
This function adjusts the direction of the air flow vertically (horizontally).
-
Press SWING button repeatedly and select the desired direction.
-
Select to adjust the direction of the air flow automatically.
NOTE
- Adjusting the air flow direction horizontally may not be supported, depending on the model.
- Adjusting the air deflector arbitrarily may cause product failure.
- If you restart the air conditioner, it starts to operate with the previously set direction of air flow, so the air deflector may not match the icon displayed on the remote control. When this occurs, press SWING or SWING button to adjust the direction of the air flow again.
- This function may operate differently from the remote control display.
Setting the On/Off Timer
This function sets the air conditioner to turn on/off automatically at desired time.
On/Off Timer can be set together.
Setting the On Timer
1 Press button repeatedly.
- The icon below blinks at the bottom of the display screen.
2 Press or button to select the minutes.
3 Press SET/CANCEL button to finish.
After setting the timer, current time and ON icon are displayed on the display screen indicating that the desired time is set.
Canceling the On Timer
1 Press button repeatedly.
- The icon below blinks at the bottom of the display screen.

2 Press SET/CANCEL button to cancel the setting.
Setting the Off Timer
1 Press button repeatedly.
- The icon below blinks at the bottom of the display screen.

2 Press or button to select the minutes.
3 Press SET/CANCEL button to finish.
After setting the timer, current time and OFF icon are displayed on the display screen indicating that the desired time is set.
NOTE
- This function is disabled when you set Simple Timer.
Canceling the Off Timer
1 Press button repeatedly.
- The icon below blinks at the bottom of the display screen.

2 Press SET/CANCEL button to cancel the setting.
Canceling the Timer Setting
- Press button to cancel all timer settings.
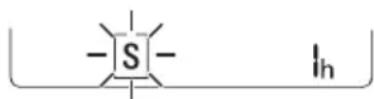
Using the Sleep Function (Optional)
This function turns off the air conditioner automatically when you go to sleep.
1 Turn the appliance on.
2 Press button repeatedly.
- The icon below blinks at the bottom of the display screen.

3 Press or button to select the hour (up to 7 hours).
4 Press SET/CANCEL button to finish.
- displayed on the display screen.
NOTE
- displayed on some indoor units.
- Indoor unit display is displayed from 1H to 7H which is displayed only 5 seconds and then return to the setting temperature.
- In the Cooling and Dehumidification Mode, the temperature increases by 1^ after 30 minutes and additional 1^ after another 30 minutes for a more comfortable sleep.
- The temperature increases up to 2^ from the preset temperature.
- Although the remark for fan speed on the display screen may be changed, the fan speed is adjusted automatically.
Using the Simple Timer Function (Optional)
This function turns off the air conditioner automatically when you go to sleep.
1 Turn the appliance on.
2 Press button repeatedly.
- The icon below blinks at the bottom of the display screen.
3 Press or button to select the hour (up to 7 hours).
4 Press SET/CANCEL button to finish.
- displayed on the display screen.
NOTE
- This function is disabled when you set Off Timer.
Using the Energy Display Function (Optional)
This function displays the amount of electricity generated on the indoor display as the product operates.
Display the Current Energy Usage
1 Turn the appliance on.
2 Press button and hold it about 3 seconds.
- The instantaneous power consumption (88) is displayed for a while on some indoor units.
NOTE
- The unit of the displayed value is kW.
- It is not displayed on the wireless remote control.
If it is more than 99kW which is the range of expression, maintain it as 99kW . - Display wattage under 10kW with 0.1kW unit, and display one over 10kW with 1kW unit.
- The actual power may differ from the power displayed.
- When connected to the Multi Outdoor unit, this function may not be supported.
Using the Light Off Function (Optional)
Display Screen Brightness
You can set the brightness of the indoor unit display screen.
- Press SWING button and hold it about 3 seconds.
NOTE
- Turn on/off the Display screen.
Using the Comfort Air Function (Optional)
Comfort Vane Operation
This function conveniently sets the vane to a preset position to deflect the supply air away from blowing directly onto the occupants in the room.
1 Turn the appliance on.
2 Press COMFORT AIR button repeatedly and select the desired direction.
or is displayed on the display screen.
NOTE
- or is displayed on some indoor units.
- This function is disabled when you press MODE or JET MODE button.
- This function is disabled and auto swing of vertical direction is set up when you press button.
- When this function is off, the horizontal vane operates automatically depending on the set mode.

Using the Energy Control Function (Optional)
1 Turn the appliance on.
2 Press ENERGY CTRL button.
- Press ENERGY CTRL button repeatedly to select each step.
| 1 step 2 step 3 step |
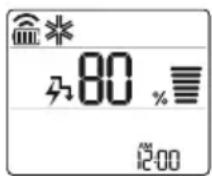
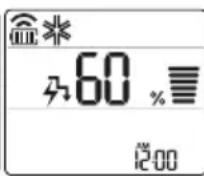
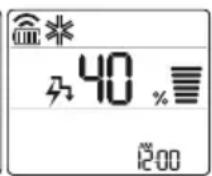
NOTE
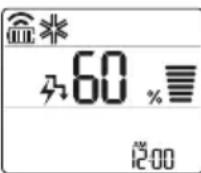
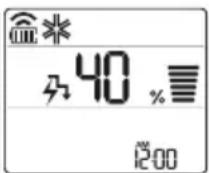
1 step : The power Input is decreased by 20 % compared to rated power input.
is displayed on the display screen.
- 2 step : The power Input is decreased by 40% compared to rated power input.
is displayed on the display screen.
- 3 step (Optional): The power Input is decreased by 60% compared to rated power input.
40 is displayed on the display screen.
- L (1 step), LL (2 step) is displayed on some indoor units.
- This function is available with Cooling Mode.
- Capacity may decrease when Energy Control mode is selected.
- Desired temperature is displayed about 5 seconds if you press FAN SPEED, or button.
- Room temperature is displayed about 5 seconds if you press button for 3 seconds.
- When connected to the Multi Outdoor unit, this function may not be supported.
How to Use Air Purification
lonizer and air purification filter make the indoor air pleasant.
- Press AIR PURIFY button to start the air purification operation.
is displayed on the display screen.
Using Air Purification During Operation Modes
- During cooling, dehumidification, heating or auto changeover operation, if you press AIR PURIFY button, you can use air purification operation at the same time.
- During air purification operation, if you press MODE button, you can use cooling, dehumidification, heating or auto changeover operation at the same time.
Smart Air Purification
- Dust sensor detects the indoor air contamination level, and if overall cleanliness is Orange (Bad) or more, it automatically starts air purification operation. When overall cleanliness reaches Green (Good), air purification operation stops. If you do not want smart air purification operation, clear by pressing AIR PURIFY button. Until you turn off the product and turn on again, air purification operation is not operated automatically.
- It works only in overall cleanliness function applied model.

CAUTION
- During air purification operation, do not touch top side of the product. (Static electricity may be generated by anion created from dust collection ionizer.)
- Do not put metal objects near the appliance. (Static electricity may be generated by anion created from dust collection ionizer.)
NOTE
Air purification single operation is the operation with low energy consumption.
- During air purification single operation, wind direction function can be used, but temperature control function cannot be used.
- During cooling operation or dehumidification operation, if you want air purification single operation, press power button to turn off the product, and press AIR PURIFY button.
- Ionizer and filter components may be different for each model.
Checking Overall Cleanliness
It displays the indoor cleanliness.
1 Turn the appliance on.
2 During the operation, if you press PM SENSOR button, you can check the indoor cleanliness in each level.
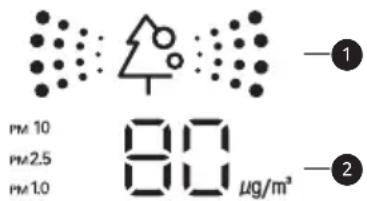
Overall cleanliness color display
Dust size dust concentration display
- Dust concentration is displayed in unit of 1 within 8 999~ g / m^3 . Dust concentration referred to the data sheet of the sensor manufacturer.
- Dust concentration may continuously change according to the change of the indoor environment.
- Overall cleanliness color is displayed based on the highest contamination level among fine dust(PM10), ultra fine dust(PM2.5), and super ultra fine dust(PM1.0).
- Overall cleanliness color is displayed in 4 levels according to the indoor contamination level.
- If dust concentration is high, the difference between the displayed dust concentration and the actual dust concentration may become bigger.
| Color Level | Display standard (μg/m3) | ||
| Super ultra fine dust (PM1.0) | Ultra fine dust (PM2.5) | Fine dust (PM10) | |
| Green | Green (Good) | 12 or less 12 | or less 54 or less |
| Yellow | Yellow (Normal) | 13 - 35 13 | - 35 55 - 154 |
| Orange | Orange (Bad) | 36 - 55 36 | - 55 155 - 254 |
| Red | Red (Very bad) | 56 or more | 56 or more |
NOTE
- Fine / Ultra fine / Super ultra fine dust concentration may be different according to the surrounding environment. (Construction site, road side, factory, etc.)
- Dust concentration may be different according to the installation environment. It is influenced by couches, beds, carpets, cleaners, humidity, smoke, insects, pets, etc.
- In the environment with external air inflow such as near the door, window, or ventilation gate, etc., dust concentration may be measured as high.
Even in the same space, due to the air circulation, dust concentration may be displayed differently from other products. - Cleanliness display displays the fine dust comprehensively, so it may be different from fine dust, ultra fine dust, or super ultra fine dust concentration value.
- Fine dust / ultra fine dust concentration displayed on the product may be different from Ministry of Environment announcement, and it may be different from other measurement devices or other products' measurement standards.
- The displayed fine dust, ultra fine dust, and super ultra fine dust concentration value may be different from Ministry of Environment forecast.
- If products generating steam or fine particles (humidifiers, cooking apparatus, sprays, etc.) are used, fine dust concentration may change.
-
You can check cleanliness only when the air conditioner is in operation state.
-
Dust concentration display value may be different from the actual dust concentration, and it may display different cleanliness color from the actual dust concentration level.
-
Guide to dust particles' size
-
Fine dust: Dust with particle size of 10 m or less (Generated from workplace combustion, vehicle exhaust, etc.)
Ultra fine dust: Dust with particle size of 2.5 m or less (Composed of ion component, carbon compound, and metal compound)
Super ultra fine dust: Dust with particle size of 1.0 m or less (Cigarette smoke, etc.) -
Dust concentration and overall cleanliness level displayed on the product may be different from Ministry of Environment announcements.
- Ministry of Environment uses weight method or beta ray absorption method to measure the dust concentration, but LG product measures the number of dusts and converts to mass concentration, so it may be different from the actual dust concentration.
- The same standard as ultra fine dust is applied to super ultra fine dust's dust concentration level. (LG standard)
- Dust concentration evaluation is carried out with LG standard test dust.
- The shaking around the dust sensor may hinder the normal operation of the dust sensor, and the displayed concentration may be different from the actual dust concentration.
- You can use it only in overall cleanliness function applied models.
- PM SENSOR button in the remote controller can make to check each dust particle's size dust concentration for 10 seconds.
After 10 seconds, the display is displayed the worst dust concentration among Fine, Ultra fine, Super ultra fine Dust particle's size.
Using Special Functions
1 Turn the appliance on.
2 Press FUNC button repeatedly to select the desired function.
3 Press SET/CANCEL button to finish.
| Display Screen | Description |
| To reduce noise from outdoor units. | |
| To remove moisture generated inside the indoor unit. |
NOTE
- Some functions may not be supported, depending on the model.
- Some functions may operate differently from the remote control display.
Canceling Special Functions
1 Press FUNC button repeatedly to select the desired function.
2 Press SET/CANCEL button to cancel the function.
Using the Silent Function
This function prevents potential claims by neighbors, reducing noise from outdoor units.
is displayed on the display screen.

NOTE
- This function is disabled when you press MODE or ENERGY CTRL or JET MODE button.
- This function is available with Cooling, Heating, Auto Changeover, Auto Operation Mode.
- When connected to the Multi Outdoor unit, this function may not be supported.
Using the Auto Clean Function
In the Cooling and Dehumidification Mode, moisture is generated inside the indoor unit. This function removes such moisture.
is displayed on the display screen.
NOTE
- Some functions cannot be used while the Auto Clean function is in operation.
- If you turn off the unit, the fan continues to run for 30 minutes and cleans the inside of the indoor unit.
- is displayed on some indoor units, depending on the model.
LG ThinQ Application
This feature is only available on models with the or ThinQ logo.
The LG ThinQ application allows you to communicate with the appliance using a smartphone.
LG ThinQ Application Features
Communicate with the appliance from a smartphone using the convenient smart features.
Smart Diagnosis
If you experience a problem while using the appliance, this smart diagnosis feature will help you diagnose the problem.
Settings
Allows you to set various options on the appliance and in the application.
NOTE
- If you change your wireless router, internet service provider, or password, delete the registered appliance from the LG ThinQ application and register it again.
- The application is subject to change for appliance improvement purposes without notice to users.
- Functions may vary by model.
Before Using LG ThinQ Application
1 Check the distance between the appliance and the wireless router (Wi-Fi network).
- If the distance between the appliance and the wireless router is too far, the signal strength becomes weak. It may take a long time to register or installation may fail.
2 Turn off the Mobile data or Cellular Data on your smartphone.
3 Connect your smartphone to the wireless router.
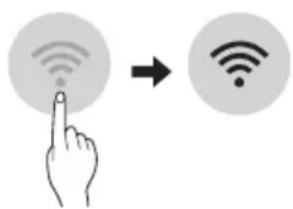
NOTE
- To verify the Wi-Fi connection, check that icon on the control panel is lit.
- The appliance supports 2.4 GHz Wi-Fi networks only. To check your network frequency, contact your Internet service provider or refer to your wireless router manual.
- LG ThinQ is not responsible for any network connection problems or any faults, malfunctions, or errors caused by network connection.
- If the appliance is having trouble connecting to the Wi-Fi network, it may be too far from the router. Purchase a Wi-Fi repeater (range extender) to improve the Wi-Fi signal strength.
- The Wi-Fi connection may not connect or may be interrupted because of the home network environment.
- The network connection may not work properly depending on the Internet service provider.
-
The surrounding wireless environment can make the wireless network service run slowly.
-
The appliance cannot be registered due to problems with the wireless signal transmission. Unplug the appliance and wait about a minute before trying again.
- If the firewall on your wireless router is enabled, disable the firewall or add an exception to it.
- The wireless network name (SSID) should be a combination of English letters and numbers. (Do not use special characters.)
- Smartphone user interface (UI) may vary depending on the mobile operating system (OS) and the manufacturer.
- If the security protocol of the router is set to WEP, you may fail to set up the network. Please change it to other security protocols (WPA2 is recommended) and register the product again.
Installing the LG ThinQ Application
Search for the LG ThinQ application from the Google Play Store or Apple App Store on a smartphone. Follow instructions to download and install the application.
Open Source Software Notice Information
To obtain the source code under GPL, LGPL, MPL, and other open source licenses, that is contained in this product, please visit https://opensource.lge. com.
In addition to the source code, all referred license terms, warranty disclaimers and copyright notices are available for download.
LG Electronics will also provide open source code to you on CD-ROM for a charge covering the cost of performing such distribution (such as the cost of media, shipping, and handling) upon email request to opensource@lge.com. This offer is valid for a period of three years after our last shipment of this product. This offer is valid to anyone in receipt of this information.
Smart Diagnosis
This feature is only available on models with the or lego.
Use this feature to help you diagnose and solve problems with your appliance.
NOTE
- For reasons not attributable to LGE's negligence, the service may not operate due to external factors such as, but not limited to, Wi-Fi unavailability, Wi-Fi disconnection, local app store policy, or app unavailability.
- The feature may be subject to change without prior notice and may have a different form depending on where you are located.
Using LG ThinQ to Diagnose Issues
If you experience a problem with your Wi-Fi equipped appliance, it can transmit troubleshooting data to a smartphone using the LG ThinQ application.
- Launch the LG ThinQ application and select the Smart Diagnosis feature in the menu. Follow the instructions provided in the LG ThinQ application.
Using Audible Diagnosis to Diagnose Issues
Follow the instructions below to use the audible diagnosis method.
- Launch the LG ThinQ application and select the Smart Diagnosis feature in the menu. Follow the instructions for audible diagnosis provided in the LG ThinQ application.
1 Plug the power plug in the outlet properly.
2 Place the mouthpiece of your smartphone close to the or loge.
3 Press and hold the DIAGNOSIS [5 s] button for 5 seconds or longer while holding the smartphone mouthpiece to the logo until the data transfer is complete.
- Keep the smartphone in place until the data transfer has finished. Time remaining for data transfer is displayed.
4 After the data transfer is complete, the diagnosis will be displayed in the application.
NOTE
- For best results, do not move the phone while the tones are being transmitted.
- Be sure to keep ambient noise to a minimum or the phone may not correctly receive the buzzer beeps from the indoor unit.

WARNING
- Before cleaning or performing maintenance, disconnect the power supply and wait until the fan stops.
If the air conditioner will not be used for an extended period of time, dry the air conditioner to maintain it in best condition. Clean the product regularly to maintain optimal performance and to prevent possible breakdown.
- Dry the air conditioner in Fan mode for 3 to 4 hours and disconnect the power. There may be internal damage if moisture is left in its components.
- Before using the air conditioner again, dry the inner components of the air conditioner in Fan mode for 3 to 4 hours. This will help to remove the odor generated from moisture.

Micro Dust Filter
The feature may be changed according to the type of model.
| Type Descrip | ption Interval | |
| Micro dust filter | Clean with a vacuum or brush. | Once a month |
| Triple filter | Do not clean the Triple filter.(It can be replaced only.) | - |
| Ionizer (Optional) | Use dry cotton bud to remove any dust. | Every 6 months |
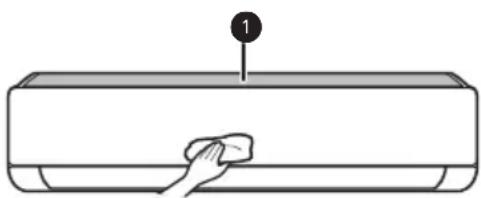
| Indoor unit | Clean the Indoor unit surface by using a soft, dry cloth. | Regularly |
| Have a professional clean the condensate drain pan. | Once a year | |
| Have a professional clean the condensate drain pipe. | Every 4 months | |
| Replace the remote control batteries. | Once a year | |
| Outdoor unit | Have a professional clean the heat exchanger coils and the panel vents.(Consult with technician.) | Once a year |
| Have a professional clean the fan. | Once a year | |
| Have a professional clean the condensate drain pan. | Once a year | |
| Have a professional verify that all the fan assembly is firmly tightened. | Once a year | |
| Clean the electric components with air. | Once a year |
NOTE
- Never use water that is higher than 40^ when you clean the filters. It may cause deformation or discoloration.
- Never use volatile substances when you clean the filters. They may damage the surface of the product.
- Do not wash the Triple filter with water, because the filter can be damaged (Optional).
- Do not wash the Micro dust filter with water, because the filter can be damaged.
Replace and Clean the Micro Dust Filter
Clean the micro dust filter once a month, or more, if necessary.
Disassemble and Clean the Micro Dust Filter
If you look at the indoor unit from above it, can assemble the top filter easily.
1 Turn off the power to the unit.
2 Hold the ionizer, lift it up slightly. And then, hold the knobs of the micro dust filter, lift it up slightly.
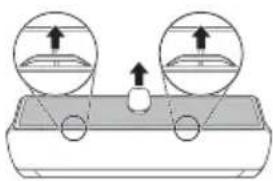
3 Remove it from the indoor unit.
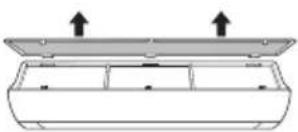
4 Clean the filter with a vacuum cleaner or brush. (Do not wash the micro dust filter with water.)
Assemble the Micro Dust Filter
1 Turn off the power to the unit.
2 Hold the ionizer, lift it up slightly. And then insert the hooks of the micro dust filter into the front cover.
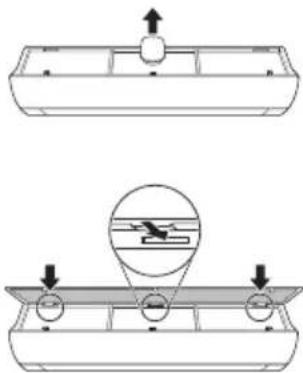
3 Push down hooks to assemble the micro dust filter.
4 Check the side of the front cover for correct assembly of the micro dust filter.
NOTE
- The micro dust filter can be broken when it is bent.
- When the micro dust filter is not assembled correctly, dust and other substances can enter into the indoor unit.
- If dust is caught in the filter, cooling performance is degraded, wind sound gets rough, and the electricity bill increases, so clean the micro dust filter once a month and replace it once every 6 months.
Replace the Triple Filter (Optional)
It effectively removes indoor odor using activated carbon.
1 Take out the micro dust filter.
See the Disassemble and clean the microdust filter.
2 Take out the Triple filter (1).
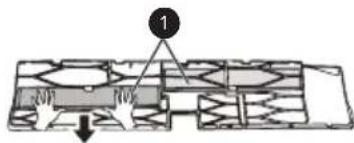
3 Assemble the new Triple filter () in the micro dust filter (2).
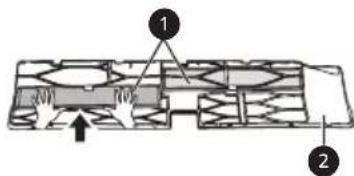
4 Assemble Triple filter and micro dust filter in the reverse order of disassembly.

CAUTION
The front panel may fall and cause injury, so be careful.
After filter replacement, during the re-insertion, completely insert entire micro dust filter. (If it is not fully inserted, it may cause performance degradation or other product failures.)
- Operating air conditioner without filter causes performance degradation and failure of the air conditioner.
- Do not disassemble Triple filter itself, and prevent damage or deformation of it. It may cause no-operation of the product or failure by abnormal operation.
- When you replace the filter, be careful not to drop it under the product.
- For safety, before cleaning or replacement, turn off the product power and pull out the power plug or turn down the main power switch.
NOTE
- The shape and composition of the filter may be different for each model.
If you want filter replacement, you can purchase it at nearby service center. - If contamination is severe, or if filter effect is degraded, replace with a new filter.
- During Triple filter storage, do not rip the packaging. (Filter's lifespan will be reduced.)
- Be careful not to have water enter inside Triple filter. (Filter's effect will be degraded.)
Clean the PM1.0 Sensor
1 Open the PM1.0 sensor cover on the side of the product.
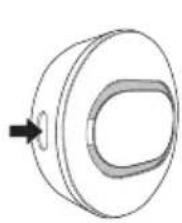
2 Put a little water on a cotton swab, wipe the lens, and wipe again it with a dry cotton swab to remove the moisture.
NOTE
It is applied only for overall cleanliness display models.
Self-diagnosis Function
This product has a built-in self-diagnosis function. If an error occurs, the lamp of the indoor unit will blink in 2 second intervals. If this occurs, contact your local dealer or service center.
Before Calling for Service
Please check the following before you contact the service center. If the problem persists, contact your local service center.
| Symptoms | Possible Causes & Solution |
| The air conditioner does not work normally. | Burning smell and strange sounds are coming from the unit. ·Turn off the air conditioner, switch OFF, or disconnect the power supply, and contact the service center. |
| Water leaks from the indoor unit even when the humidity level is low. ·Turn off the air conditioner, switch OFF, or disconnect the power supply, and contact the service center. | |
| The power cable is damaged or it is generating excessive heat. ·Turn off the air conditioner, switch OFF, or disconnect the power supply, and contact the service center. | |
| A switch, a circuit breaker (safety, ground), or a fuse is not operated properly. ·Turn off the air conditioner, switch OFF, or disconnect the power supply, and contact the service center. | |
| The unit generates an error code from its self-diagnosis. ·Turn off the air conditioner, switch OFF, or disconnect the power supply, and contact the service center. | |
| The air conditioner does not work. | The air conditioner is unplugged. ·Check whether the power cord is plugged into the outlet or the power isolators are switched on. |
| A fuse exploded, or the power supply is blocked. ·Replace the fuse or check if the circuit breaker has tripped. | |
| A power failure has occurred. ·Turn off the air conditioner when a power failure occurs. ·When the power is restored, wait 3 minutes, and then turn on the air conditioner. | |
| The voltage is too high or too low. ·Check if the circuit breaker has tripped. | |
| The air conditioner was turned off automatically at a preset time. ·Turn the air conditioner on. | |
| The battery setting in the remote controller is incorrect. ·Make sure that the batteries are inserted correctly in your remote controller. ·If the batteries are placed correctly, but the air conditioner still does not operate, replace the batteries and try again. | |
| The air conditioner does not emit cool air. | Air is not circulating properly. ·Make sure that there are no curtains, blinds, or pieces of furniture blocking the front of the air conditioner. |
| The micro dust filter is dirty. ·Clean the micro dust filter once a month. ·See “Replace and Clean the Micro Dust Filter” for more information. | |
| The room temperature is too high. ·In summer, cooling the indoor air fully may take some time. In this case, select the Jet Mode to cool the indoor air quickly. | |
| Cold air is escaping from the room. ·Make sure that no cold air is escaping through the ventilation points in the room. | |
| The desired temperature is higher than the current temperature. ·Set the desired temperature to a level lower than the current temperature. | |
| There is a heating source nearby. ·Avoid using heat generators like electric ovens or gas burners while the air conditioner is in operation. | |
| Fan Mode is selected. ·During Fan Mode, air blows from the air conditioner without cooling or heating the indoor air. ·Switch the operation mode to cooling operation. | |
| Outside temperature is too high. ·The cooling effect may not be sufficient. | |
| The fan speed cannot be adjusted. | The Jet Mode, or Auto Operation Mode is selected. ·In some operation modes, you cannot adjust the fan speed. Select an operation mode in which you can adjust the fan speed. |
| The temperature cannot be adjusted. | The Fan Mode or Jet Mode is selected. ·In some operation modes, you cannot adjust the temperature. Select an operation mode in which you can adjust the temperature. |
| The air conditioner stops during operation. | The air conditioner is suddenly turned off. ·The Timer Function may have timed out, which turns the unit off. Check the timer settings. |
| A power failure has occurred during operation. ·Wait for the power to come back. If you have the Auto Restart function enabled, your unit will resume its last operation several minutes after power is restored. | |
| The indoor unit is stilloperating even whenthe unit has beenturned off. | The Auto Clean function is being operated. ·Allow the Auto Clean function to continue since it removes any remaining moisture inside the indoor unit. If you do not want this feature, you can turn the unit off. |
| The air outlet onthe indoor unit isdischarging mist. | The cooled air from the air conditioner makes mist. ·When the room temperature decreases, this phenomenon will disappear. |
| Water leaks from theoutdoor unit. | In the heating operations, condensed water drops from the heat exchanger. ·This symptom requires installing a drain hose under the base pan. Contact the installer. |
| There is noise orvibration. | A clicking sound can be heard when the unit starts or stops due to movement of the reversing valve. Creaking sound: The plastic parts of the indoor unit creak when they shrink or expand due to sudden temperature changes. Flowing or Blowing sound: This is the flow of refrigerant through the air conditioner. ·These are normal symptoms. The noise will stop. |
| The indoor unit givesoff an odor. | Odors (such as cigarette smoke) may be absorbed into the indoor unit and discharged with airflow. ·If the smell does not disappear, you need to wash the filter. If this does not work, contact the service center to clean your heat exchanger. |
| The air conditionerdoes not emit warm air. | When Heating Mode starts, the vane is almost closed, and no air comes out, even though the outdoor unit is operating. ·This symptom is normal. Please wait until the unit has generated enough warm air to blow through the indoor unit. |
| The outdoor unit is in Defrosting Mode. ·In Heating Mode, ice/frost is built up on the coils when the outside temperature falls. This function removes a layer of frost on the coil, and it should finish in approximately 15 minutes. | |
| Outside temperature is too low. ·The heating effect may not be sufficient. | |
| There are differences of overall cleanliness display values and colors for each product. | Air circulation is continued after the product operation. ·If products of different models are used in one space, the contamination concentration value may be displayed differently by the indoor air circulation, and if it is a closed space, as more fine dusts are removed, the difference of the values gets smaller. |
| Overall cleanliness does not change from Good. All the windows of the room are closed. | If it is a closed space with almost no air circulation, the level may not change from Good. ·If overall cleanliness changes when the window or door of the room is opened and air is circulated, it is normal. |
| The PM1.0 Sensor is dirty. ·Clean the PM1.0 Sensor. | |
| Your home appliance and smartphone is not connected to the Wi-Fi network. | The password for the Wi-Fi that you are trying to connect to is incorrect. ·Find the Wi-Fi network connected to your smartphone and remove it, then register your appliance on LG ThinQ. |
| Mobile data for your smartphone is turned on. ·Turn off the Mobile data of your smartphone and register the appliance using the Wi-Fi network. | |
| The wireless network name (SSID) is set incorrectly. ·The wireless network name (SSID) should be a combination of English letters and numbers. (Do not use special characters.) | |
| The router frequency is not 2.4 GHz. ·Only a 2.4 GHz router frequency is supported. Set the wireless router to 2.4 GHz and connect the appliance to the wireless router. To check the router frequency, check with your Internet service provider or the router manufacturer. | |
| The distance between the appliance and the router is too far. ·If the distance between the appliance and the router is too far, the signal may be weak and the connection may not be configured correctly. Move the location of the router so that it is closer to the appliance. |
NOTE
- Some functions may not be supported, depending on the model.
MANUEL' PROPRIÉTAIRE
CLIMATISATION

Smart Diagnosis (Diagnostic intelligent) 31
MAINTENANCE 32
Application LG ThinQ
Smart Diagnosis (Diagnostic intelligent)
Smart Diagnosis (Diagnostic intelligent)
- TnV oOvN eUparicEaTto

3 PntnoTe auto to koupti yia va puoiote tn eTIOUPTN Oepokpaa.
IpeBOD Ha opuHnHaJIHOTo pKOBODCTBO
Toba pkoBODCTBO MOKe Da cbDbpKa
H3o6paKeHnI nn CbDpbKHaHne, pa3NnHO OT
Modena, KOITcTe 3aKyni.
PbKOBOIDCTBOTO noIeJn Ha peaKunr OTo npOn3BOIDTeJ.
HHCTPYKcIM 3A B6E3OJACHOCT 3
BaxHHn Hnctpykun 3a 6e3onacnoct 4
EKCPIIOATAU 11
Benejkn no ekcnloataaeta. 11
Uactn n fynkui 11
Be3KuHNO ducTaHcNoHHo 12
ABTOMaTHo pectapTaHa Ha KInMaTuKa 17
I3noJI3BaHe Ha cyHKUraTa 3a peKIM 17
I3noJI3BaHe Ha cyHKyraTa ,PexkM Ha cTpy" 20
I3noJI3BaHe Ha cyHKyraTa 3a ckopocHa BeHTnlaTopa 21
I3noJI3BaHe Ha cyHKyraTa 3a HacoUbaHe Ha Bb3dyuHnI NOTOK 21
BkIIOUbaHe n N3KIOUBAHe Ha TaIMepa 22
I3noI3BaHe Ha yHKyraTa 3a 3acnBaHe (no I36op) 23
I3no13BaHe Ha fynKUyra 3a cTaNdApTeH TaMep (no n36op) 23
N3noJI3BaHe Ha cyHKyraTa 3a noka3BaHe Ha n3pa3xOeHaTa eHepnna (no n36op) 24
N3no13BaHe Ha cyHKyraTa 3a n3KIOUbaHe Ha oCBetJeHneTo (no n36op) 24
N3no3BaHe Ha cyHKyra Ta 3a yO6Ha no3uHa Bb3DyHnna nToK (no n36op) 24
N3noJI3BaHe Ha cyHKyTA 3a ynpabJeHne Ha eHeprTa (no n36op)25
Kak da n3noJIbAME yHKUra 3a npueHcTBaHe Ha Bb3duxa 25
IpoBepka Ha zIIOCTHaT a NCTota 26
I3noI3BaHe Ha cneuaaHn yHKuH.. 28
HHTEJIINREHTHN FYHKUIN 29
Пиюжене LG ThinQ 29
Smart Diagnosis 31
IODINPBxKKA 32
CmHa n nouCTBaHe Ha MInKpoQnITbP 3a npax. 34
CmHa Ha TpoHnI nTbp (no n36op) 35
Baxhni nHctpyKznn 3a 6e3oNaCHOCT

ПЕДУПЕЖДЕНЕ
3a da haMaJIHTe pIcKa OT noXap, eJIeKTpUYeCKn yIap nIi HapaHЯBaHnHa Xopa npu yNoTpe6a Ha npOdyKtA, TpIbBA da ce cPaa3BaT OCHOBHNTe PpeJna3HN MepKn, BKNIOUHTeJIHNO I CJIeHNTe :
ДецьдомakнсвOTO
To3n ypei He e npedHa3NaueH 3a n3noJ3BaHe OT Xopa (BkIIOHTeJIHO deua) c OrpaHnueHn fN3nueCKn, CetNBn IIn yMCTBeHn CnOCO6HOCTn IIN JINCA Ha ONIT N IO3HaHnA, OCBEN AKO He Ca Na6JIIODaBAHN IIN HNCTpyKTIpaHn OTHOCHO yNoTpe6bata Ha ypeDa OT JInCe, OTROBOPHO 3a TExHaTa 6e3OpacHocT. Deuata Tp8Ba Da ce Na6JIIODaBaT, 3a Da ce rapaHTnpa, Ye He cn IrpaT C ypeDa.
3a ynoTpe6a B Ebpona:
To3n ypei Mojke Da Ce I3PON3Ba OT Deca Ha Bb3pact Na 8 rOdiHn iIiua C HamaJIeHN OIN3UeCKN, CEN3OPHN IINI YMCTBHeH N CNOco6HOCTN IINI IINCa HA ONIT N 3HaHna, CTnra Da ca NaOD Ha6blIOJeHne IINI Da IOnyuaBat INCTpyKcIMN OTHOcHO ynoTpe6aTa Ha ypeDa No 6e3oNaCeH NaHH, pa3bnpaIKn Bb3MOXHnTe ONaCHocTn. Deca He 6nBa Da CN IrpaarT C ypeDa. POnuCTBaHeTo n PoDpBxKkata He 6nBa Da ce I3BbPWBat OT Deca 6e3 Na3Op.
Mоntиранe
He MoHTnpaIte KInMaTnKa Bbpxy HeCTa6nHa NOBbpxHOCT nIi Ha MxCTO,OTKbDeTo MOKe Da naDHe.
- CBbpxKeTe ce c OToPn3npaH cepBn3, KOraTO MOHTnpaTe nI npemeCTBaTe KJIIMMaTnka.
- MoNTnpaIte 6e3ONaCHO nAHeJa n KaNaKa Ha KOHTpOHaTaN KyTna.
He moHTnpaIte KInMaTnKa Ha MxCTO, KbDeTo ce CbXpaHЯBaT 3aapanmTeuHOCTn IJIr Ra3OBe KaTO 6eH3nH, npoHaN, pa3peiTeJI 3a 60n n dpyrn.
- YBepete ce, Ye Bb3dUxOBoT n 3aXpaHBaunr Ka6eI, CBbp3Baunn BbTpewHOTo n BbHShHOTo TAno, He ca ONbHaTn TBbpDe MHORO, KOrato MOHTnpaTe KJIIMMaTuKa.
- Изполизвайта сандартын п配电ьсвач на Верига та и пedingител, Конто OTROВаргт на Класа на Климатika.
He BkapBaIte Bb3dUx nII Ia3 B CnCTeMaTa, OCBeH CbC CneuaJIHOTO OxJaXdaIoo BeIecTBO.
- Изпольайтей He3аалим ra3 (a3OT) 3a поверka 3a ИЗтуане ИпөчнCTbaHe Ha Bb3dуxa, Ты КATO ИЗПОЛ3ВaHETO Ha CгБСТЕН Вь3duyx Илл 3аалим ra3 можеда пчИн пожар ИлпЕКСПLO3ия.
CbeHnHTeHnTe BbTpEshn/BbHsHn eJeKtpueckn npOBODnTp6Ba Da ce oBe30naceHn PTHo, a Ka6eJbT Tp6Ba Da e npokapan npaBnIHO, 3a Da Hma pInHynteJIHO n3DbPnBaHe Ha Ka6eJa OT CbeHnHTeHnTe KJemn. HenpaBnHnTe nIi Xna6abN Bpb3Kn MoKe da npuHNr TReHepnpaHe Ha ToIINHa IIN Noxap.
- MoHTnpaIte OTdJIeH eJeKtpnueCKN KOHTaKT I ppeKbCBaU Ha BepnraTa IpeDN ekCpIIOaTaunrTa Ha KInMaTnka.
He cBbP3BaIe 3a3eMraUng npoBOdHc C ra3Oba Tpb6a, rpbMOOTBOd IIN 3a3eMRAU pOBODHc Ha TeJefoHHa IINHn.
- ДрьжтЕ BCИЧКВ BEHTINlaциоHн OTВОРи CBОбODи OT 3aNYшBaHe. (3a R32)
BbBФнкиранata eNeKtpnuecka nHcTaIaunr Tp6Ba da 6bDaT BKIOUeHN CpeIDCTBa 3a pa3eINHЯBaHe B CbOTBeTCTBne C npabNlaTa 3a pa6Ota c eI. MpeXn.
He moHTnpaIte yCTpoiCTBOTO B nOTeHcuaJIHO eKcPiO3nVBHa cpeJa.
Ekspnoataza
- Използваши само часте, конто са вклочень спська с peзервни част. Некora не се оптваши за мдифицра特有的 obopyдва_HETO.
He nO3B0JIaBaiTe Ha decaTa Da ce KaTepT no IJn Da ydpT BbHsHOTo TJINo. - I3xBbprjIte 6aTeepnnte Ha MrcTo, KbdeTo Hma OnaCHOCT OT NOXap.
-
Изпольваite само охлajдац�о Вешистwo, уka3aHO Bbpxу etnkeTa Na KJIIMMaTnka.
-
Изключete зхранвано в слуай на ШуМ, миризma илдим OT Kлиматиka.
He octabayte 3anaIIMN BeIeCTBa KaTo 6eH3nH, 6eH30J npa3peDntel 6n3O Do KInMaTnKa. - Cbpxte ce c otOpn3npaH cepBn3eH ueHTbp, aKO KInMaTnKbTe 3aJH C BODa npn HABODHeHne.
He n3noJ3BaIte npOdbJIxHtEnHO KJIIMMaTnKa B MaJko NOMEueHne 6e3 noDxoJaIoo npOBeTpEne.
BcnyaHa n3TuHaHe Ha ra3 (kaTo Hnnpmep fpeoH, nponaH, BTeuHen nTpOJeH ra3 i npOBeTpPeTe do6pe, npeDn da N3PON3BaTe OTHOBOKlIMMaTnKa.
3a nouchtahe OTbTpce ce CbpxKeTe C OTOpn3napc cepBn3eH ceHTbp nIITbproBeu. N3noJ3BaHeTo Ha CNIN NOUcTbaun npenapatm Moke da npuHH Kopo3nI nn NobpeDa Ha TJIOTO. - Побетразваite добpe пи сновременно n3noJ3BaHe ha KJIIMaTnka n OTONJIInTeJeH ypeД kaTo neUka.
He 6IoknpaTe BxOda nnn n3XoDa Ha Bb3dUshnna NOTOK.
He nbxaIte npbCTn nIIN ppeImEtN BbB Bb3dUHnRA BXoJ nIIN I3XoJ, DOKaTO KInMaTnKbT pa6OTn. - Ybepete ce, Ye 3axpaHbauT Ka6eI He e MpbceH, Xla6ab Nnnpekbchat.
- Hukora He DoKocBaIte, He n3NoJ3BaIte n He nonpaBraTe KJIIMaTnKa C MOKpn pbce.
He noctabraye npedmetn Bbpxy 3axpanbaunka6en.
He noctabyTe neka nn npuToOnnTeHn ypeN 6nn3o do 3axpaHbauaun Ka6en.
He moiФицрайTe n He ydbJxBaIte 3axpaHbAunKa6eI.ДpackOTHHn n OTJIePЯSe ca n3OJaUNHa 3axpaHbAUnKa6eI MoKe Da npUHNr TNOKAp IIN TOKOB yIap, B KOITo cIyauaN 3axpaHbAUnr Ka6eI Tp8Ba dA ce NODMeHN. -
I3KJIIOUeTe He3a6abHbO 3axpaHbAHeTo B CJIyauHa Ha BpeMeHHo IIpeKbcBaHe Ha eJIeKTpNueCTBOTO INI rPbMOTeBnUHa 6ypra.
-
YbepTe ce, Ye 3axpaHbaunr Ka6eI He MoKe Da 6bJe n3DbpnaH nn NOBpeDeH No BpeMe Ha pa6ota.
He dokocbaite Tpb6ata 3a XnaIINHnA areHT nI IN Tpb6ata 3a BODa, IINI KOJTO I da 6nIO BbTpeuHa qact, DOKaTO ypeDbT pa6OTn IINI HENOCpeDCTBeHO cIeI pa6Ota.
PoaepbXka
He nouchte ypea qe3 npbckahe Ha Boda dnpekTHO Bbpxy npodykta.
- Прети поочье Илпи n3Bbршане На подрьжka n3KЛючete 3axpaHbaHeTo И n3чakaiTe BEHTnlaTOpbT Да спpe.
TexHnuecka 6e3OpacHocT
- MoNTaXbT INIIN peMOHTbT OT HeOTOpN3npaHIn JNuca MoXe Da N3JIOXn BAc N dpyrN Xopa Ha OnaCHOCT.
Bcekn YOBek, KOIto pa6OTn Bbpxy OxnaNTeHaTb Bepnra, Tp6Ba Da npTeKabBa BaINIO CBnDETeJCTBO, N3daJeHO OT akpeiHTnpaH OpranB IpnOMnIeHnO TpaCbl, KoETO yIOCTOBepRABa HeROBaTa KOMnTeHTHOCT Da pa6OTn C XJaINHn aReHTN 6e3OnacHo n B CbOTBeTcTBnE C ONpeJeHnTe HOpMn B OTPcbla. (3a R32) - 06cnyxbaHTo Tp8Ba Da ce n3BbPbBA B CbOTBETCTBHe C npenopbknte Ha npo3BOinteJHa o6OpyDbAHeto. POndpbXkaT a N peMOHTnte, n3NCKBaUn NOMOuTa Ha dpyr o6yuH nepcoHaI, Tp8Ba Da ce n3BbPbBAT NOd Haa3Opa Ha IInCeTO, KOMPeTeHTHO B n3NoJ3BaHTo Ha 3aapanmXnaDnHn areHTn. (3a R32)
- Информацята в НасторюTo ръкововостBo e п徳на3начеHa 3a N3ПОЛЗВаHe OT KBалифицпан сервизэн ТхнК, КОТо e 3aПОЗнот С пpoцедурITE 3a БezонасноCT и pa3полara c Heo6xODIMnTe INHCTpyMeHTN ИНСТPyMeHTN 3a TECTBaHe.
-
Пренигваиму на почитаму и Изпьнэну.To Ha BCИЧКИ нстукци може за доведо Нелразина paбота Ha оборудваиму, MaTeрпални сeТи, Физческо habараве И/ИПС Смьрт.
-
YpeIbT ce MOHTnpa B CbOTBETCTBnE C HaCuHOHaJIHnTe pa3PopeI6n 3a eJekTpUyeCKn MOHTax.
- Ako e Heo6xOdIma NODmHa Ha 3axpaHbAun Ka6eJ, Tc Ce n3BbPbBa OT OToN3npan NepcoHaJ, KaTO Ce n3NoJ3BaT cMo OpuHaJIHn pe3epBHN qactn.
- YpeIbT TpI6Ba Da ce 3a3eMn IpaBnHNo, 3a Da ce HamaJI npCKbT OT TOKOB yIap.
He npepaBaiTe Hn He OTCpaHbAaTe 3a3eMaBauNnHa 3axpaHbAunu IeNceI.
3akpenBaHTo Ha 3a3emYBaUaTa KIeMa Ha aAnTepa KbM BnHTOBaTa pe36a Ha KaNaYeTo Ha UeNceJIHaTa KytIa Ha CTeHaTa He 3a3EmyBa YpeDa, OCBen aKO BnHTOBaTa pe36a Ha KaNaYeTo He e MetaJIHa n HEn3OJInpaHa N UeNceJIHaTa KytIa Ha CTeHaTa He e 3a3EmeHa Ype3 eJeKTPnueckata INHCTaJaUaTna Ha CrpaIaTa. - Ako He cTe cnrgpHn dajn KJIIMMaTnKbT e 3a3eMeH npabNlHo, obbpHeTe ce KbM KBaIINΦnCupan eJekTpOTexHnK, KOITo da npOBepn UenCeJIHaTa KyTna Ha cTeHaTa n IpekbcBauHa BepnRaTa.
OxnaJdaIoo To BeIecTBO n I30laUHOHHnT neHoo6pa3yBaIra3, n3IOJI3BaHn B ypeDa, n3NCKBaT CneUaJIHn IpOceDpyn 3a n3XBbPJIHe. CbpxKeTe ce cbc cepBn3eH npEcdTaBnTeI nII JnIeC pIoO6Ha KBaJIuΦnKauzn, npEi Da rN n3XBbPInTe. - Ako 3axpaHbauT Ka6eI e NobpeDeH, Toi Tp86Ba Da 6bJe IOdMeHeN OT npOn3BODnteJIa, OT HeROBITE cepBn3HN aReHTN nIIN OT TexHnK C NOdo6Ha KBaInΦnKauzIa, 3a Da ce N36erHe onaCHOCT.
- YpeIbT Tp86Ba Da ce NocTaB B Do6pe PPOBeTpReMo NOMEuEHe, uHTo pa3Mep OTROBapr Ha onpeJeHnra 3a pa6Ota Ha ypeHa. (3a R32)
- YpeIbT TpI6Ba Da ce NocTaB B NOMEuHne 6e3 HnpeKbChaTo pa6OteuN OTKpITn PIIaMbU (HaIprIMep pa6OteU yCTPOiCTBO Ha ra3) n I3TOUHnHa 3aIaNBAHe (HaIprIMep pa6OteU eJIeKTpUueCKn KOTIOH). (3a R32)
- YpeIbT TpI6Ba Da ce NoCTaB TaKa, Ye Da ce IpeIoTbPaTЯBa Bb3HnKBaHe Ha MexaHnUHn NobpeDn. (3a R32)

BHIMAHNE
3a HamaJIyBaHe Ha pUcKa OT He3HaunTeJHo HapaHЯBaHe Ha IInu, HeIpaBnIHa pa6Ota IIn NoBpeDa Ha npOdyKtA IIn MaTePnaJIH N ⅢeTn CnA3BaIte OCHOBHITe IpeDnA3HN MepKn, BKJIIOUHTeJHo:
Mоntиранe
He MoHTnpaIte KInMaTnKa Ha MAcTo, KbDeTo e N3IOJKeH dIpeKTHo Ha MOpCKn 6pn3 (coJeHn npbckn).
- MoNTnpaIte npaBnIHO mapKyu3a OTTuHaHe Ha KOHdEh3npaJa BOda.
-БыдeteВнIMATEJIHи ри pa3ОпAKOBaHeTo И мOLTажа на Климатиka.
He IOKocBaIte n3TnuaIoTO OxJaXdaIoo BeIecTBO npN MOHTaX uIN peMOHT.
- TpaHcnpTnpaIe KJIIMMaTnKa C DbAma IIN IOBueYe DuSh NIN N3PON3BaIte BNCOKONoBdInraU.
- MohtupaTe BbHshHOTo TnTo TaKa, Ye Da e 3aunTeHO OT npraKa CbHueBa CBETnHa. He nocTABrTe BbTpEshHOTo TnIO Ha MxCTO, KbDeTo e N3IOXeHO Ha npraKa CbHueBa CBETnHa npe3 np03OpuTe.
- I3xBbpyIe nO 6e30aCeH naH yPbTHHTeHn MaTePnaJI KATO BnHTObE, nPoHn, HaiNoHOBn PIIKOBe nIi 6aTePnN, KaTO n3IOJ3BaTe IOxOJa a OnaKOBka CneD MOHTaX nIi peMOHT.
- MoNTnpaIte KInMaTnka Ha MAcTo, KbDeTo WymbT OT BbHsHOTo TAnIO nIIu N3ropeIte r3OBe HЯMa Da npUHHaBt HeyDo6CTBO Ha CbCeIte. B npOTnBeH cIyauM MoKe CTnHHeTe Do KOHΦJInkT CbC CbCeIte.
Ekspnoataua
-
Изва对接е ба对接е OT Достацноото, ак Ная мд се ИЗПОЛЗВА 3a подьжшенин лрноД оТ Всeme.
-
Праздн ekсплоатуята на Климатика ce уberpeTe, che Фнгтьрт e noctabeh.
3aIbIKNTeJHNO npOBepTe 3a n3TnUaHe Ha OXJaKDaIo BeIeCTBO CNeI MOHTaJa IJI pEMOHTa Ha KJIIMMaTnKa.
He nocTaBraIte npedMeTn Bbpxy KInMaTnKa. - HnKora He cmeBaIte pa3JIuHn BnIOBe 6aTePnN nJn CTapn N HOBn 6aTePnN 3a DnCTaHcUHOHOTO.
He octabraye KInMaTnKa da pa6oTu npOdbJxKtEnHO, aKO HbOTO Ha BnaXHocTe e MHOrO BnCOKO nIIN BpaTa IIN pO3OpEc e OCTaBeH OTBOpeH. - Cnpete da n3noJI3BaTe dinCTaHcIIOHHOTO B clyuaH ha n3TnUaHe Ha TeuHOCT B 6aTeepnra. Ako dpexnte nn Koxata BN ca n3IoXeHn Ha n3TnUaHa ot 6aTeepnra TeuHOCT, n3pepeTe nn n3MmIte C YnCTa BOda.
He n3laarTe npoDbJnxTeJnHO xopa, KINBOTHn nn paCTeHna CTydeHaTa Nn TOpNaTa Bb3dUsha Ctpya OT KInMaTnka. - Пи польшане на ИЗтуашио ATбатерят TeuhoCT n3плakhte obnilno yctHaTа Кухин a N ce KOHCyItpaayTe c Jekap.
He niiTe BODaTa, n3TOueHa OT KInMaTnKa.
He n3noJ3BaIte npOyKta 3a cneuajnH ueJI KATO 3aJa3BaHe Ha xpaHn, npoN3BeJeHna Hn3KycTBOTOn Ipyr. KInMaTnKbTe npedHa3NaueH 3a Notpe6nteJcKn ceJI, a He e pEun3Ha OxJaDaaCnCTema. Ima pNCK OT MaTePnAJaHa igeTa nn 3aRy6a.
He npe3apejdaite n He pa3rno6baite 6atepnnte.
Poiapbxxka
- HNKORA He ДOKOCBAITE MeTaJIHnTe YaCTn Ha KJIIMMaTnKa, KOraTO OTCTpaHЯBaTe MUKPOΦnITbPa 3a npax.
- Използваite стабинна onopa пл сълба рп поисвае, подрьжka пл ремоHT Ha Климатиka, akO e MOHTИран Ha BИСOKО място.
Hnkora He n3noJ3BaTe CnHn NOuchTbaU npenapTu nn pa3TBOpNTeI INn PpbCKaHe Ha BODa pRn NOUCHTaHe Ha KJIIMMaTnKa. N3noJ3BaTe MeKO napYe PnAT.
HactpoBaeHaTeKyuIaJy
YnpaBJIeHne Ha KInMaTnKa 6e3 DnCTaHcNoHHOTO
Moxete da n3noJ3BaTe 6yToHa ON/OFF Ha BbTpewHOTraNo 3a ynpabIeHne Ha KInMaTnKa, KOrato DnCTaHcIOHHOT He e HAnuHO.
1 OToBopeTe npednna Kanak (Tin 2) nnn xOpu3oHTaJIHOTo KpIIO (Tin 1).
2 HaTnchTe 6yToHa ON/OFF.

Tun 1
Tun 2
3ABEJIENKKA
-БьрзOTO OТВарян He XOpN3OHTaJIHOTo KpINOMOKeДа ПОВpeДи CTbIKNOBnMOTop.
3aandaehataCKOpOCTHaBeHTnlaTopa e TBbpDe BUCOKa.
-ФункцяТа може да ce pa3лчаВа B 3aBnCmOcT OT Tuna Ha MoDEla.
TemnepaTpyaTa He MoKe Da ce peryInpa npu 3nIOJ3BaHe Ha To3n 6yToH ON/OFF (6yToH 3a BKIOUChBaHe/IN3KIOUChBaHe) 3a IN3BbHpeDN H cNTyaUN.
3a MoDeJIH, KOINTO Ca IpeHa3HaYeHN caMo 3a OXJaXKaHe, TempepaTypaTa ce HacTpoiBa Ha 22^
3a moTeH, KOHTO ca npedHa3HaueHn 3a oxJaXdaHe n OTOpIeHne, TeMpepaTypaTa ce HacTpoBa MeKdy 22^ n 24^
N3noJ3BaHe Ha 6e3XnHOTO nIcTaHcNoHHO
Mokete da ynpabJIaBaTe KImatka C nCTaHcIOHHOTo 3a NO-ToJrMo yDObCTBO.
HMM 1eNOKa3BaT Ha BbTpewHOTo TJIIO, KORATO pa6OTn pexm Ha BeHTnIaTOP.
I3noJ3BaHe Ha yHKnjaTa „Pexim Ha ctpy
OTMЯHa HaHacTpOJaTa Ha TaMepa
HaTnchete 6yToHa,3a Da OTMeHHTe BCNUKn HAcTpOuKN Ha TaMepa.
I3noJ3BaHe HaФункцЯТа 3a 3acnVBaHe (no n36op)
Ta3nФyHKUH N3KJIHOUBa KJIIMaTNUKa aBTOMaTNUHO, KORATO CN JRAte.
1 BkIIOUeTe ypea.
2 HaTnchHeTe 6yToHa HEKOJIKKpaTHO.
- IkoHaTa no-dOJy Mna B DoJIHaTa YacT Ha DnCnJIe.

3 HaTnCHete 6byToHa yJIn ,3aJa n36epTe yaca (do7yaca).
4 HaTnCHHe 6yToHa SET/CANCEL,3a Da 3aBbPunTe HAcTpOuBaHeto.
- noka3Ba Ha ekpaHa.
3ABEJIEXKA
Ha HrykOu BbTpewHn Tena Ce noka3Ba
-Дисплягн ha BbTpseHOTTo TЯNo NOKa3Ba OT 1чdo7ч Koeto ce BnKda camo 3a 5 cek, CneI Koeto ce Bpbua Do HacTpoNkata Ha TemnepaTypata.
BpekmHa oxnaKdaHe n 3cuBaHaTeMnepaTypaTa ce yBeHnUaBa c 1 ^ C Cnei 30MNHyTu IOnbHnTeJeH 1 ^ C CneI Oue 30MNHyTu 3a No-KOMΦopTeH cbH.
Temnepatypata ce noBwaba c do 2°C ot npedbapntenHO 3aanaeHaTa TemnpaTpa.
Bbnpekn ye ot6eJ3BaHeTo Ha ckopocTtHa BeHTnIaTopa Ha DnCnpe MoKe Da ce npomeH, CKOpocTTHa BeHTnIaTopa ce perynpa ABTOMaTNo.
I3noJ3BaHe HaФункцЯTa 3a cTaNДapTeH TaMep (no n36op)
Ta3nФyHKUH N3KJIIOUHBA KJINMaTNUKa ABTomATNUHO, KOrato CN JIraTe.
1 BkIIOUe Te ypea.
2 HaTnuchete 6byToHa HEKoJkoKpaTHO.
- IkoHaTa no-dony Mna B doJHaTa YacT Ha DnCnpe.
3 HaTnCHete 6yToHa ,3aJa n36epTe yaca (do7 yaca).
4 HaTnCHTe 6yToHa SET/CANCEL,3a Da 3aBbPunTE HAcTPOuBaHETO.
- 6e noka3Ba Ha ekpaHa.
3ABEJIEXKA
Taa3nФyHKcuae 3a6paHaHe, KOraTo HAcTpOuBaTe TaMepa 3a N3KnUoyBaHe.
I3noJ3BaHe Ha ФункцЯТа 3a noka3BaHe Ha I3pa3XOeHaTa eHeprna (no n36op)
Ta3nФункця noka3Ba KOnuYeCTBOTO
n3pa3xoDbHa eNeKtpuYecka eHeprna Ha DnCpIe
Ha BbTpEshOTo TAno, DoKaTO npOdyKTbT pa60Tu.
Ioka3BaHe Ha TekyuataTa n3pa3XoDbHa eHeprna
1 BkIIOUeTe ypeDa.
2 HaTnchTe n 3aApbXkTe 6yToHa 3a OkoNo 3 ceKyuHdN.
MomeHTa KaHcyMaun Ha eHepn 88) ce noka3Ba 3a KpaTko Bbpxu Dncnpe Ha HAKO MOeIN BbTpueHN TeNa.
3ABEJIEXKKA
- EdnHncaTa Mpa Ka 3a CToHocTta, KOrTo ce noka3Ba Ha ducnner, e kW.
THe Ce noka3Ba Ha 6e3KnHHTO DuctaHIOHO.
AkoTRe nOBeue OT 99 KBT, Koeto e DOnyctUmNt Dnana3OH, RaonDbpkaTe Ha 99 KBT. - POKaKTe MoUHocTt a NOD 10 kBc 0,1 kBte eINHnI n POKaKTe eINH naD 10 kBc 1 kBte eINHnI.
-ДиCTBNTeJIHaTAMOuHOCMOKeJa cepa3NuaBAOTNOKa3HaHATAMOUHOCT. - Pn Cbbp3BaHe KbM BbHsHo TAno Ha MyTTncNCTema Ta3n 0yHKuMa MOKe Da He Ce NOIbpxka.
I3noJ3BaHe Ha yHKnJaTa 3a I3KJIIOUBAHe Ha OCBETJeHneTo (no n36op)
Ярков на ekpaHA на диспег
MoKeTe Da HacTpOte RaKocTtHa DnCnJIe Ha BbTpEshOTo TJIIO.
- Hatnchete n 3a npbxte 6yToHa SWING 3a OKoNo 3 CEkyHdN.
3A6EJIENKKA
BkIIOUeTe/IN3KIOUeTe ekpaHa Ha DNcPJIeJ.
I3noJ3BaHe Ha cyHkCnYTa 3a yD06Ha N03nCnHa Bb3dUshnI NOtOK (no n36Op)
Ydo6Ha nO3nCnHa nepKaTa npi pa6ota
Ta3nФyHKZna 3aDaba NO ydo6eH hauHH N03uHnHa nepkata, KOrTO ce 3aIaMeTBA npeDbapNTeHNO, 3a Da OTKIOH NODaBaHnBb3dYx, Taka Ye da He dya Xa DInpeKTHO CpeSy obntaTeJIte B cTaTA.
1 BknHouTe ypea.
2 HaTnchTe 6yToHa COMFORT AIR HeKOJIKKoPaTHO u n36epeTe JeJaHaTa n03uIa.
Haekpaha ce noka3Ba
3A6EJIENKKA
HaHraKoBbTpewHnTeNa ce noka3Ba nn.
- Ta3n ΦyHKπη e 3a6paHeHa, KOraTo HaTnCKaTe 6yToHa MODE nJN JET MODE.
Ta3nФyHKUЯe 3a6paHeHa n aBTOMaTNUHOTOBbPTHe BbB BepTKaJIHa NOCOKa ce 3aJaBA,KOrato HaTNCHeTe 6yToHa SWING
Korato Ta3nФyHKuЯ e N3KJIIOUeHa, XOpN3OHTaJIHata nepka ce 3aJeIcTba aBTOMaTHUHO B 3aBNCIMoCT OT peKIma Ha HAcTpoIBaHe.
I3noJ3BaHe Ha ФункцЯТа 3a ynpaBJIeHne Ha eHepnJaTa (no n36op)
1 BkIIOUeTe ypeHa.
2 HaTnchTe 6yToHa ENERGY CTRL.
- HaTnchete 6yToHa ENERGY CTRL HeKoJIkOKpaTHO 3a n3bOp Ha BCa Ka CTbNka.
CTbnka 1 CTbnka 2 CTbnka 3

3ABEJIEXKA
- Cтbnka 1: Bxodjaata MouHocTe hAmajna c 20% BCpaBHeHne C HOMHaJIHaTa BxOJaMa MOUHOCT.
Haekpana ce noka3pa - Cтbnka 2: BxodyaTa MoHocTe hAmajra c 40% BCpaBHeHne C HOMHaJIHaTa BXODaMoHocT.
Haekpana ce noka3pa - Cтьпа 3 (избор): Вхоряца Т моцноct e hamаллс 60 % B сравене c hominaHaTа BXODЯmoцноct.
Haekpana ce noka3pa
Ha Harykon BbtpeHn Tena ce noka3Ba L (CTbNka 1), CTbNka 2).
Tasn yHKun e doctbna c pexm Ha oxnaKdahe.
KanaunTeTbMoKe da ce noHnKn, kOraTo e n36paH peKm Ha ynpaBneHne Ha eHepnTa. - KeJaHaTa TempepaTpa ce noka3Ba 3a OKoI05 cek, ako HaTnCHete 6yToHa FAN SPEED,
- Cтайната Temпература ce noka3ba OKOto 5 cekyн,在aKO HaTnchTe 6yToHa JET 3a 3 cekyн.
- Pn Cbbp3BaHe KbM BbHsHo TЯNo Ha MyIITncNCTema Ta3n ΦyHKcIg MOKe Da He Ce NOIbpxka.
KakДаи3ПОЛ3ВaMeФункцЯТа 3aIpeuNCtBaHe Ha Bb3dUxa
HOnn3aTopbT nΦnTbpbT 3a npeHuCTBaHe Ha Bb3dUxa npaBraT BbTpewHnR Bb3dUx npnAteH.
- HatncheTe 6yToH AIR PURIFY, 3a da cTaptnape TpyHKuYraTa 3a npeYnCTBaHe Ha Bb3dUxa.
Haekpana ce noka3
I3noJ3BaHe Ha cyHKnJaTa 3a npueHCTBaHe Ha Bb3dUxa nOBpeMe Ha pa6OTHTe pexmN
-По Врeme Ha oxlaждаHe,и3сушаBaHe, 3aTOПЯн He nI aBTOMaTnUHa cMЯHa,aKO HATnCHe6bToH AIR PURIFY,MoKTe Da n3NoJI3BaTe CbSeBpeMeHHOФyHKuYraTa 3a npueHCTBaHe Ha Bb3dUxa.
- По Врeme Ha ФункцяТа 3a пpeчntBaHe Ha Bb3dUxa, aKO HATnCHeTe 6yToH MODE, moKeTe CbSueBpeMeHHO Da n3PON3BaTe ФункциITE 3a OXlaJxDaine, n3CyuJBaHaTe, 3aTOpIJIe NII nABTOMaTHUHa CMHa.
IHTeJIrREHTHO IpeuNCTBaHe Ha Bb3dUxa
-Датукьтза пax установая НИВОТо Ha 3ambpcraBaHe Ha Bb3dYxa, ИacoцЯноctHaTачсToTe OpaHKeBO (noWo) Ип NOBEue,TOI aBTOMaTHUHO CTAPTnpaФуHKcIyra 3aпpeuNTBaHe Ha Bb3dYxa. KoratoцЯноctHaTачсToTe DOCTURHe 3eNEHO (do6bp),пpeuNTBaHTo Ha Bb3dYxa cInpa.Ako He KeJaTeФуHKcIyra 3a ИНТeINrEHTHOпpeuNTBaHe Ha Bb3dYxa,MOxKeTeДЯ n3TpneTe KATO HATnCHete 6yTOH AIR PURIFY.DOKATO He n3KlIOChte npOdykTa И He ro BKJIIOChte OTHOBO,ФуHKcIyra 3aпpeuNTBaHe Ha Bb3dYxa He pa6OTn aBtOMaTHUHO.
Tpa6oTn cmo npnpinoKeH moeJHa yHKuJaTa 3a zIIOCTHa YNCTota.

BHIMAHNE
- По врeme Ha pa6oTa Ha ФункцЯТа 3aпpeuHCTBaHe Ha Bb3dYxa, He DoKOCbaIte rOpHaTа CTpaHa Ha npOdykta. (Mоже да ce reHepupa CTaTHUHO eNEKtpnueCTBO OT aHNoHa, CB3daEN OT nOHn3aTopa 3a Cb6UpaHe Ha npax.)
He nocTabRnTe MeTaJIHn npEIMeTn 6nI3o do ypea. (Moxe da ce reHepuP a cTaTuHo eNeKtpnueCTBO OT aHNOHa, cb3daJeH OT HoHN3aTopa 3a cb6bnpaHe Ha npax.)
3ABEJIEXKA
- EdHHnHaTaФyHKuN3a npeHcTbaHe Ha Bb3dyxa eФyHKuNraC Hncka KOHCymuaNHa eHeprna.
- Ito BpeMe Ha eDHHuHaTa FyHKuJa 3a IpeuHCTBaHe Ha Bb3dUxHa MoKe Da ce N3NoJ3Ba FyHKuJaTa 3a NocOka Ha Brtbpa, Ho FyHKuJaTa 3a KOHTpOHa TempePaTypaTa He MoKe Da Ce N3NoJ3Ba.
- По Врeme Ha Функцята 3a oxлaxдане Ли
- Фуннкцята 3a ИЗсушаванe, Akо келаerte
- синьпа
- Быха, Натиchedе 6byTOH power, 3a Д
- ИЗКЛЮЧNTe порукta, И натуchedе 6byToHa AIR PURIFY.
- HoHn3aTopbT IN KOMNoHEHTIte Ha 0nJIbpa MoKe Da ca pa3INuHN 3a BCEKN MoJeN.
Пюверka Ha цялостhaТачNTOTA
Noka3Ba BbTpewHaTa YnCTOTA.
1 Bknnoye ypeda.
2 IIO Bpeme Ha pa6oTa, aKO HATnCHeTe 6yToH PM SENSOR, MoKeTe Da npOBepnte BbTpewHaT aNCTOta Ha BCaKO HnBO.
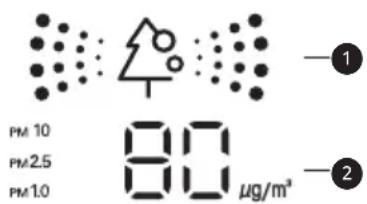
1 LBeTeH DnCnJIeH Ha YJIOCTHa YNCTaTa
2 Dicnnei Ha npaxoBaTa KOHcHTpaunna pa3Mep Ha npaxa
- KoHcHTpaunraHa npaxa ce noka3Ba BeHNnca ot 1 do 8~999 μg/m³. KoHcHTpaunraHa npax e NORcHeHa B INΦOpMaζnoHHnЯ JNCT 3a DaTnka Ha pON3BODInTeIa.
- KoHcHTpaunraHa Ha npax MoKe Da ce npomHe NaocToaHNoCnpeepnOMaHaTa Ha BbTpueHaTa CpeDa.
- LBeTb3a cIyIOCTHa YIcCTota Ce NOKa3Ba Bb3 OCHOBa Ha Hau-BuCOKOTO HnBO Ha 3aMbpcBaHe CpeiHnna npax (PM10), yItpa FInn npax (PM2,5) n cynep yItpa FInn npax (PM1,0).
- LBeTbT 3a YIIOCTHa YIcCTOTA ce Noka3Ba Ha 4 HnBa CnopeB bTpEshOTo HnBO Ha 3AmbpcaBaHe.
Ako KOHcHTpaunraHa npax e BncoKa, pa3nKata MExdy Noka3BaHaTa KOHcHTpaun Ha npax I DeiCTBnTEJHaT KaOHcHTpaun Ha npax MoKe Da ce yBeJIuN.
| Цват N. I. I. I. I. I. I. I. I. I. I. I. I. I. I. I. I. I. I. I. I. I. I. I. I. I. I. I. I. I. I. I. I. I. I. I. I. I. I. I. I. I. I. I. I. I. I. I. I. I. I. | Ано | Стоадагт на дислес (μg/m³) | ||
| Сунер ултура Фин прах (PM1,0) | Ултура Фин прах (PM2,5) | Фин прах (PM10) | ||
| Зелени | Зелен (добър) | 12 milli milla | 12 milli milla | 54 milli milla |
| Жылто | Жылт (обикн-овеньо) | 13 - 35 13 | 35 55 - 154 | |
| Оразожево | Оразожев (посо) | 36 - 55 36 | 55 155 - 254 | |
| Черван | Черван (MHoro loша) | 56 milli mille | 56 milli mille | 255 milli mille |
3A6EJIEXKA
- Konzentrajsa ha pfH / yItpa pfH / cynep yItpa pfH npa moKe da ce pa3nuaBa cnopei 3ao6nkaJauaTa cpea. (CtpoNTeJeH oBeKT, nbTHa Yact, fapbpuKa n T.H.)
KoHcHTpaunraHa npax MoKe da ce pa3nUaBa cnopei HnCTanauOnHaTa CpeJa. Ta ce BnIe OT dUbaH, Nerla, KInlMM, NOuchTbAsn CpeCDtBa, BnaXHOCT, DmM, HaceKOMN, DomaHn IIObMnI T.H.
Ako cpeaata C bHweH Bb3dyweH nToK aTo Hapnmep 6n3o Do BpaTata, np03opeua, IIN BeHTnlaCNoHHN BEHTnI T.H., KOHcEHTpaunraHa npax MoKe da ce n3Mepn KATO BnCOKa.
-ДориВсьшOTnPoCtpaHCTBO,nopadu cnpkynaTHaBb3dUxa,KOHcHTpaunrTa Ha npax MoKe Da ce nokaxe pa3nHHO OTdpyrn npOdykTN.
ДисплгТаЧИСТОТа NOKa3Ba OБСТонHo ФинЯ npax,Тaka Ye ToI MoKe Дa e pa3ЛчeH OT CTоHOCCTTа Ha KOHцEHTPaцЯ Na Фин npax, yntpa Фин npax, ИИс cynep уNTpa Фин npax. - KonüentpaunraHa Ha npax 3a φnH npax / yntpa φnH npax, noka3aHa Bbpxy ypeDa, MOke Da e pa3JInuHa OT o6aBeHata OT MInHcTePcTBOTO Ha OKoJnHaTa CpeDa, N MOke Da e pa3JInuHa OT dpyrN i3MepBaTeHN yCTpoiCtBa iINn dpyrN cTaNdapTN 3a i3MepBaHe Ha npOdykTN.
- Ioka3aHaTa cToHocT Ha KOHcHTpaCnIra 3a
Фин праx, ултpa Фин прах, И сунер ултpa Фин
прах може д e pa3JIuHa OT ПОгнOЗаТа на
МинисерстВOTо HA OKONHаТа срEDA.
Ako ce n3no3BaT npOdykTu reHepnau npa npu nn Hn uactn (OBnaXnTeu, anapat 3a roTBHe, cnpeIOBE n T.H.), KOHcHTpaunraHa Hn npax MoKe da ce npomeH. -
Moxe Ta npomeHnte YnCTOta cAmo KOraTo KInMaTnKbTe B CbCTOHa Ha EKcNtOaTna.
-
CToHocCTTa Ha dncnner 3a KOHcHTpaunHa npax MoKe Da e pa3nUHa ot DeiCTBnteHaT a KOHcHTpaunHa npax, N MoKe Da noka3Ba pa3nUHeh CBRT 3a YNCTota OT DeiCTBNTeHOTo HnBO Ha KOHcHTpaunHa npax.
- Yka3aHnO THOcH O pA3Mepa Ha npaxOBtE yactu
-Фин прах:Прах с размер на частицente 10umилno-maNKo(reHepuPAH OT ropeHe Ha pa6OTHOTo MrcTO,ИЗropeIIN ra3OBe OT npeBO3HO cpeIcTBo,ИТ.H.)
- YItpaФINH npax: Ipax c pa3Mep Ha qactnnte 2,5 μm nnn no-MaIIKO (cbcToaI ce OT NHOEN KOMNOHEHT, BbrrpeoHcBedeHNHeHne, n MeTaIHO CbeDNHeHne)
Cynep yItpa pH npax: Ppax c pa3mep Ha qactnnte 1,0 um nnn no-MaIKo (unrapen dIM m T.H.)
KoHcHTpaunraHa npax HnBOTO Ha cIIOCTHa YnCTOTA, NOKa3aHN Bbpxy npOdyKTa, MOKe Da ca pa3NnHn OT O6BaHeHnte OT MHHCTepCTBOTO Ha OKOHnHa TcpeJa.
MHHCTepcBOTO Ha OKJHaTa CpeDa n3NoJ3Ba TERNOBeH MeToD INn METoD Ha a6Cop6uNc 6bTa IbUH 3a n3MePBAHeTO Ha KOHcEHTpaCnraTHa npax, Ho LG npOyKbT n3MePba 6pOHa npaxOBete Hr pNeo6pa3yBa B KOHcEHTpaCnHa Macata, 3aTOBa MoKe Da ce pa3NuYaba OT DeIcTBtENHa KOHcEHTpaCnHa npax.
CbunrT cAndapt kaTo yItpa fnh npax ce npnara KbM HnBOTO Ha KOHcHTpaunna Ha npax 3a cynep yItpa fnh npax. (LG cAndapt)
- OüeHЯBaHéTo Ha KOHcEHTpaCuaTHa npax ce n3BbPwBa cbc cTaHapTeH Tect 3a npax Ha LG.
- TpenTeHTo OKONo DaTUnka 3a npax MoKe da Bb3nnpa HopMaJIHaTa pa6Ota Ha DaTUnka 3a npax, INoKa3aHaTa KOHcHTpaUra MoKe da e pa3NnuHa OT DeIcTBNTeHNHaTa KOHcHTpaUra Ha npax.
- Moxe Ta ro n3no3BaTe cMo B npInoKeHn MoeHa yHKuYra 3a YIocTHa YNCTota.
C nocJeIOBaTeJIHOTo HaTnCKaHe Ha 6yToHa PM SENSOR OT dNCTaHcUOHHO To ynpabIeHne Ha dncJIeHa KInMaTnKa ce Noka3Ba HΦpOMaZra 3a KOHcHTpaZra Ta Ha TpNTe pa3Mepa npaxOBu YacTnZu, KaTO BCEKn OT Tx MoKe Da 6bDe Noka3BaN 3a 10 cekyHn.
Cne10cekyHnHaDncnpeCe noka3Ba HOpMaun 3a Han-NoWata KOHeHTpaun Ha npax cpe npaxOBu qactn C pa3Mepn: hn, yntpa nn HnN cynpy nHn.
I3noJ3BaHe Ha cneuaJIHnФункцИ
1 BknueTe ypeHa.
2 HaTnCHeTe 6yToHa FUNC HeKoJkoKpaTHO n 36epete XeJaHaTa No3uZna.
3 HaTnchHeTe 6yToHa SET/CANCEL, 3a da 3aBbPwnte HactpoiBaHeto.
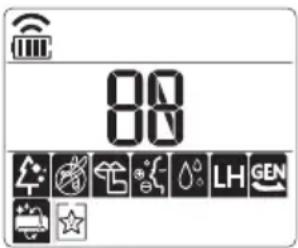
CmHa Ha TpoHnHa 1p (no n36op)
ToIOTCTpaHraBe epeKTHBHO BbTpewHN MmPn3MN NocpeDCTBOM aKTINBEH BbTneH.
1 N3BaTe MmKpoΦnITbpa 3a npax.
BnKTe Pa3rNo6BaHe n noUcTbaHe Ha MnkpoΦnntbP 3a npax.
2 13BaTe TpoHnA φnITbp (1).
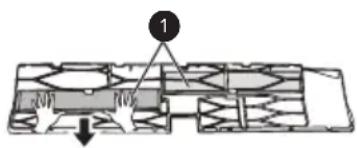
3 Crno6eTe HOBn Tpoen nPTbp (1) B MnkpoonTbpa 3a npax (2).
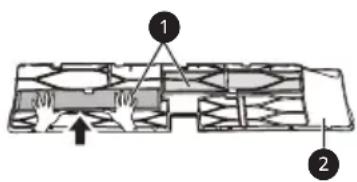
4 Ctrno6eTe TpoHnIaΦnITbP mNkPoΦnITbPa 3a npax B o6paTeH peD ha pa3rno6BaHeTo.

BHIMAHNE
-Ппднгпанел може да паден И да пиуни Нараянб,ЗТОВа 6БДTe BНмATEHn.
Cnei cMaHa Ha fHnTbpa, no BpeMe Ha NOBTOPO NoCTaBHe, BKapaTe HAnbNHO CEJIIM MKNpOoHnTb3a npax. (Ako He e HAnbNHO BKapaH, MOKe Da npuHH NOnHxKaBaHe Ha eΦeKTHBHOCTTa IIN dpyrH HeN3PpABHOCTNa npodykTa.)
Pa6oTaTHa KImMaTuKa 6e3 pInTpBp npuHnRa NoHxKaBaHe Ha epeKTHBHOCTTa Hn3npaBHOCT Ha KImMaTuKa.
He pa3rIb6BaIte camn Tpoen fIHTbp n npedotBpaTe NOBpea nn DeOpMaun no Hero.ToMoke da npuHn HeBb3MOXHOCT 3a pa6ota Ha npOdykTa nn HEn3npabHOCT Ype3 aHomaiHa pa6ota.
Korato CmeHrTe pntbpa, BnHmBaIte da He ro n3nycHete npd npOdykta.
C orIeHa 6e3oNaChocTtA, npEi NouchBaHe nn CMraHa, N3KIOUeTe 3axpaHbAHeTo Ha npOdykTa H3DbpnaIte UenCeLa NNn N3KIOUeTe OT KIOUa 3a rnaBHaTa Bepira.
3A6EJIEXKA
-ΦopMaTaNcCTaBbTHaΦnITbpaMOKeJa ca pa3JIuHn 3a BCEKN MoJeI.
- Ako nckate cmraHa Ha qnntbpa, MoKte da 3akynnte ot 6n3kn cepBn3eh cHTbp.
- Ako 3ambpcraBaHeTo e cnJHo nJn epeKtBTOT
- cnNTbpa e noHKeH, CMeHete C HOB cnNTbp.
- Поваме на сбханене на Тpoйня Фпгьр, He pa3KbCbaIte onakOBkata. (Ekсплоатационнят СрOK Ha Фпгьраз можда hamalee.)
BHHMaBaIe Da He nonaDa Boda BbB BbTpEshOCTTa Ha TpoHnHa nITbp. (EpeKTbT HaΦnITbpa une Ce noHxN.)
VAŽNE SIGURNOSNE UPUTE

UPOZORENJE
Kako biste smanjili opasnost od eksplozije, požara, smrti, strujnog udara, ozljede ili opekotina osoba prilikom upotrebe ovog proizvoda, slijedite osnovne mjere opreza, uključujuci sljedeće:
Djeca u kućanstvu
Vycistete snimae PM1,0. 36
ODSTRANOVÁNIZAVAD 37
Vycistete snimač PM1,0
1 Otevretekryt snimace PM1,0 na boku vyrobku.


2 Naneste navatovy tampon trochu vody,otfete cocku a nasledne ji otrete suchymvatovym tamponem, abyste odstranili vlhkest.
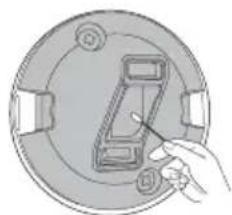
POZNÁMKA
Olulised ohutusjuhised 4
KASUTAMINE 11
Olulised ohutusjuhised

OHT
1 Avage PM1,0 anduri kate toote kuljel.
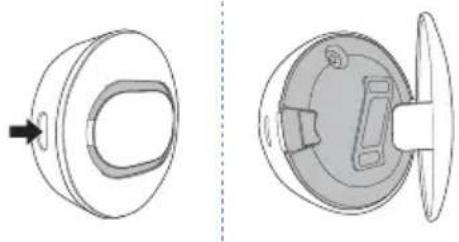
Noti ghat-Thaddim 11
Remote Control Bla Wajar 12
Terga' Tixghel il-Kundizzjonatur tal-Arja Awtomatikament. 17
L-Uzu tal-Funzoni tal-Modalita 17
L-Uzu tal-Funzoni tal-Modalita Propulsiva (Jet Mode Function) 20
L-uzu tal-Funzjoni tal-Velicita tal-Fann. 21
Remote Control Bla Wajer
Meta Ddaḥhal il-Batteriji
Jekk I-iskrin tal-wiri tar-remote control jibda jiccara, ibdel il-batteriji. Dahhal batteriji AAA (1.5 V) qabel ma tuza r-remote control.
1 Nehhi I-ghatu tal-batteriji.
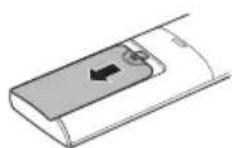
2 Dañhal il-batteriji l-godda u aghmel cert li t-terminals + u - tal-batteriji huma installati tajbeb.

Installazzjoni tal-Holder tar-Remote Control
Biex tipprotegi r-remote control, installa I-holder fejn ma hemmx dawl tax-xemx dirett.
1 Aghzel post sigur u fejn tilhqu faciliment.
2 Wahhal il-holder permezz ta'zewg viti mwaehla sew b'tornavit.
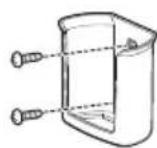
Metodu ta'hidma
Ipponta r-remote control lejn ir-ricevitur tas-sinjal fuq in-naha leminija tal-kundizzjonatur tal-arja sabiex thaddmu.
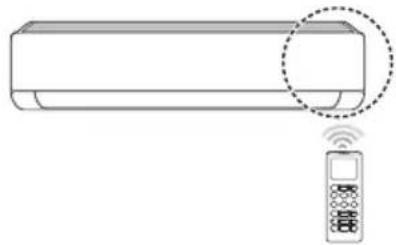
NOTA
- Ir-remote control jista' jhaddem apparti elettronici ohrajn jekk ikun IPPuntat lejhom. Aghmel cert li qed tippona r-remote control lejn ir-ricevitur tas-sinjal tal-kundizzjonatur tal-arja.
Ghal thaddim tajeb, uza carruta ratba biex tnaddaf it-trazmettitur ur-ricevitur tas-sinjal.
F'kaiz funzoni ma tkunx provduta fil-prodott, I-ebda sinjal ta' hoss ma johrog mill-prodott meta buttuna ghal funzoni bhal din fuq ir-remote control tigi maghfusa ghajr ghall-funzionijiet tad-Direzzjoni tal-Fluss tal-Arja (SWING), Displej t'Energija (O), Purifikazzjoni tal-Arja (
pass 1 pass 2 pass 3

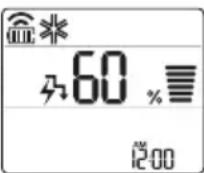

NOTA
pass 1: Id-Dhul tal-energija jitnaqqas b'20% meta mqabbel mad-dhul tal-energija kklassifikat. intwera fuq l-iskrin tal-wiri.
pass 2: Id-Dhul tal-energija jitnaqqas b'40% meta mqabbel mad-dhul tal-energija kklassifikat.
pass 3 (Faulttattiv): Id-Dhul tal-energija jitnaqqas b'60 % meta mqabbel mad-dhul tal-energija kklassifikat.
(1) (pass 1), (2) jintwera fuq xi unitajiet ta' gewwa.
- Din il-funzjoni hija disponibbli bil-Modalità tat-Tkessih.
- Il-kapacità tista' tonqos meta tintghazel il-modalità tal-Kontroll tal-Energija.
- It-temperatura mixtieqa tintwera ghal bejn wiehed u iehor 5 sekondi jekk taghfas il-buttuna FAN SPEED, few.
- It-temperatura tal-kamra tidher madwar 5 sekondi jekk taghfas il-buttuna JET MODE ghal 3 sekondi. ROOM TEMP [3 s]
Meta qieghed imqabbad mat-taghmir Multi Outdoor, din il-funzjoni jaf ma tahdimx.
Pasul 1 Pasul 2 Pasul 3
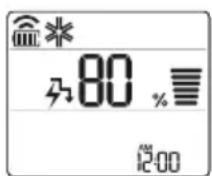


NOTÁ
Cistenie snimača PM1,0. 36
RIESENIE PROBLEMOV 37
DÔLEŽITÉ BEZPEČNOSTNÉ POKNY

VAROVANIE
Notiriet PM1,0 sensoru 36
TRAUCJUMU MEKLEŠANA 37
Notiriet PM1,0 sensoru
1 Atveriet PM1,0 sensora vaku produkta sanā.

2 Uzpiliniet nedaudz udens uz vates tampona, noslaukiet objektivu un pec tam noslaukiet to ar sausu vates tamponu, lain nonemtu mitrumu.
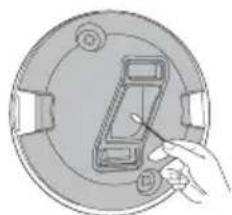
PIEZIME
"Smart Diagnosis" 31
PRIEZIURA 32
"LG ThinQ" programs characteristikos
Taispeain Gile Scathlain
Is féidir an gile a shocrú don scáthlan an aonaid laistigh.
- Bruigh an cnaipe SWING agus coinnigh bruite é ar 3 shoicind. LIGHT [3 s]
NOTE
Cas ar/as an scailean Taispeain.
Ag uśáid an fheidhm aer compórdach (roghnach)
Oibriuchán Eite Compórd
Socraionn an theidhm seo an eite go heasca go suiomh reamhshocraithe chun an aer solathraithe a sraonó dul direach go dtí na daoine sa seomra.
1 Cas an gléas air.
2 Bruigh an cnaipe COMFORT AIR cusla uair chun an treo ata uait a roghnu.
- no mar a thaispeánann an scathlán.
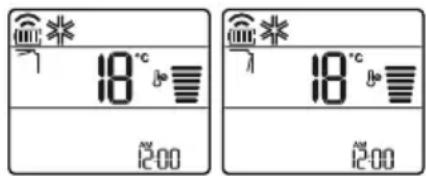
NOTE
nd ma a thaispeanann cuple aonaid laistigh.
- Ta an fheidhm seo dichumasaithe nuair a bhruietear MODE no JET MODE.
- Ta an fheidhm seo dichumasaithe agus socraitear an uath-athru treo ingearach nuair a bhruiitear SWING.
- Nuair ata an fheidhm seo as, oibrionn an eite cothromanach go huathoibrioch de reir an mhodh socraithe.
Ag uśáid an fheidhm smacht fuinnimh (roghnach)
1 Cas an gléas air.
2 Brúigh an cnaipe ENERGY CTRL.
- Brúigh an cnaipe ENERGY CTRL cópla uair chun gach.ceim a roghnú.
Conas Ionadh Aeir a Usaid
VAZNA BEZBEDNOSNA UPUTSTVA. 4
RAD 11
Napomene za rad. 11
Deloviifunkcije 11
Bezichdaljinskiupravljač 12
Automatsko ponovnoPokretanje klima uredaja 17
Korischencjefunkcije rezima 17
VAŽNA BEZBEDNOSNA UPUTSTVA

UPOZORENJE
IcHCTeTe ro ceH3oPoT 3a PM1,0 36
PEWABAHEPIOBJIEMN 37
CJIeHnTe 6e36eHocn yNaTCTBa ce HameHeTn 3a da cnpeayat HepeBndeHn pN3nI nIi WTeTn OJ He6e36eHNo IIN He npaBnH0 KopncTeHbE Ha Ipon3BODoT.
Ynata ce noJeHn Ha 'PDEyPENEYBAHbE' n 'BHIMAHNE' KaKo 7To e OnuHaNo noOJy.

Oboj cHm60J O3NaUyBa npEaMeTn aKTHBHOCTN 1TO MOKe da npEiIN3BnKaat pN3NK. IpouHTajTe rO BHNMaTeJIHO DeIOT CO OBOJ cHm60J n CJIeDeTe rN yNaTcTBaTa 3a dA n36eHHeTe pN3NK.

PPEdUnPEdyBAHbE
Oba nokajyba deka HenoHTyBaHbeTo Ha ynaTCTBaTa MoKe da npedn3Bnka cepno3Ha nobpeda nIIN CmPT.

BHIMAHNE
Oba nokajyba deka HeNoHTyBaHbeto Ha yNaTCTBaTa MoKe da npedn3BnKa IecHa NobpeDa NmMaI MaIa StTeTa Ha npOn3BOIoT.
CneHnTe cIbOJIe CpKakyBaat Ha BHaTpeShHaTa n HAdBopeuHaTa eDInHua. (3a R32)

Овoj симбол укожува на тоа дeca anapatOT kopnstn 3аразлпво сретсво 3a ладеь. Ако сретсвото 3a ладeь e Истechени и ИзLOженин Ha наВоршен ИЗВор На палы, NOCTON рИЗИК OД пожар.

Oboj cimboJykaJyBa deKa PnpaunKOT 3a pa6oTa Tpe6a da ce npouHTa BnMaTeJIHo.

Овoj симбол укajува.Deka cepвисян персан Треба за paкува co obaa onpema, сюред упатства тд Прираунков за инсталачиJA.

Oboj cmmboJykaJyBa deKa HOpMaunJaTa e DocTaNHa KaKo
PnpaHnk 3a paBoTa nn PnpaHnk 3a nHcTaNJa.
BAJHn B3BEOCHN yIATCTBA

PPEyPENEYBAHbE
3a Da ce HamaJI np3IKOT oJ noXap, cTpyeH yIap nIIN IOBpeiHa Iuca pRn KOpNCTeHe Ha npOn3BOIoT, Tpe6a Da ce IOuyBaat OCHOBHInTe 6e36eDHOChN MepKn, BknyuBajKn rN CJIeHNTE.
ДецьдомakнсвOTO
Oboj anapat He e Hamehet 3a ynotpe6a od cTpaHa Ha Iuca (Bknybajkn deua) CO HamaJIeHN fIINH NII MENTaHn CnoocHOCTN, INIc HO NCKyCTBO N 3HaEHe, OCBEN aKO Ce IOd HAD3Op INIaKO DoNBaAT yNaTCTBa 3a yNOTpe6aTa Ha anapatOT OD JIuce KOeHTO e OndROBOPHO 3a HINbHaTa 6e36eHocT. DeUata Tpe6a Da 6nDat POn HAD3Op 3a Da He Ce D03BOJn Da cn nIgpaT co anapatOT.
BhaTpeSha eHnHa HaDbOpeHa eHnHa
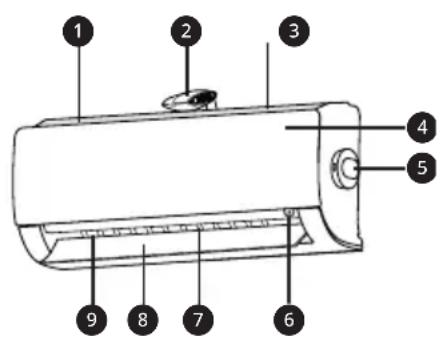
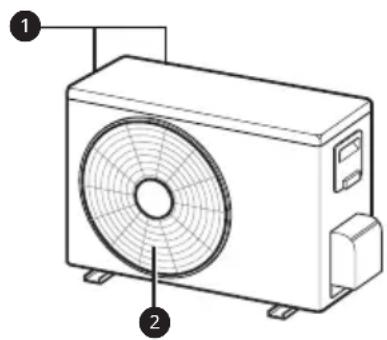
ΦnTep 3a BO3dyx + ΦnTep 3a MKNPOCKONCKN YecTNuKN npab
JOHn3aTop
3 IOBOHa BO3NyX
4 ΠpeDeH kanaK
PM1,0 ceh30pot
Bknyu/IVcknyu konue
7 Bo3dyuhen deepneKtop (BepTnKaIHo pe6po)
8 Bo3dyuhen deqneKTop (xopn3oHTaJHa nepka)
OДВОД Ha BO3dYx
OTBOPnHaIOBOOHT Ha BO3nyx
OTBOPnHaOdBODTHaBO3nyX
HANOMEHA
- Бpojoилokaциjsa Ha pa6oTHnTe CBeTna MoKe Da Bapnpa BO 3aBnCHocT Od MoJeNt Ha KInMa ypeIoT.
-Функида може да се MeHyBa BO 3aBnCHOCT OД TINOT Ha MOneJIOT.
БeЗкунец далецнскуnpаByBauch
CTabaHe 6aTeepn
Ako ekpaHOT Ha daJeHHCKNOT ynpaByBaY noUHe Da 6IeDHee, 3aMeHeTe rN 6aTePnITE. CTabete AAA (1.5 V) 6aTePn INpei KopncTeHbETo Ha daJeHHCKNOT ynpaByBaY.
1 OtctpaheTe ro kanaKOT Ha MeCTOTO 3a 6aTeepu.
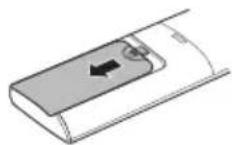
2 CTabete HOBn 6aTePmN n OcnHypeTe ce deKa +n -noJOBnTE Ha 6aTePnITE ce npabNJHO NOCTaBeHn.
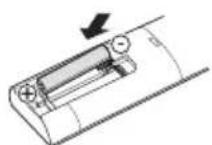
HnctaInpaIbe Ha dpjkaUToHa daJIeunHckNt ynpaByBaU.
3apaN 3aWNTa Ha daNeuHCKNOT ynpaByBaU, HCTanipajTe ro dpkaOT Ha MeTo KaTe wTO Hema Da 6nDE NOd dIpeKTHa COHcEBA CBETnHa.
1 Ⅰ36epeTe 6e36eHNo n IecHO DoCTaHNO MeCTO.
2 3aucpcTeTe ro npkaoyCo cnHOpnpuBpctyBahe Ha 2 3aBpTk, co 3aBpTyBa.
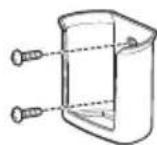
MeToHa pa6ota
Hacouete ro daJeHHcknot ynpaByBauchon npneMHKOT ha cnHaNot Ha deChata cTpaHa oKnma ypeDTo, 3a da ro KOHTponpate.

HANOMEHA
-ДалачинсnotуnpaByBaMожда кOTpoJnpa HeKoI dpyrEneKtpuHn ypeDn,akO ce HacOCh KOH HNB.Ocnypete ce DeKa cTe ro HacOChJe DaJIeUHcNt OynpaByBauchon npHeMHNKOT Ha cnHaJNot,Ha KInMa ypeDoT.
3a npabnHOn 0yHKUohnpaHe, KopncTeMeKa Kpna 3a YnCTeHe Ha npedeBaTeJOT nPnEMHNKOT Ha CNHaJOT.
Bo cnuyaj cyHKnjaT aHa e npedBndeHa 3a npo3BOoT, Hema da ce yye 3ByueH cInHan od npo3BOoT, Kora konyeto 3a Taa cyHKnja Ha daJeHHCKnOT ynpabvBauchce npNTNCHe, OCBEN 3a HAcOKATA Ha BO3DyXOT ( SWING), ekpaHOT 3a eheprna ( ) cyHKnJaTa 3a npOCHTyBaBe Ha BO3DyXOT
NoctabyBaHbe Ha TEKOBHOTO BpeMe
1 CTabeTe 6aTePm
- IkoHaTa Koja ce Haora noDony, Ke 3aTppeepn Ha dHOTo Ha ekpaHOT 3a npikaJyBaHe.
AM 12:00
2 IpnTnCHTe ro konHeTo 3a nn n36peTe MNHyTN.
3ПиТиСнeTe FO KOnчeTo SET/CANCEL 3aДa 3aВpшITE.
HANOMEHA
BknyyBaBeTo/ncknyyBaBeTo Ha MepaOT Ha BpeMe Ke cTaHe DoCTaHNo, OTKako Ke ro NOCTABNTe TEKOBHOTO BpeMe.
PaKyBaHbe co KInMa ypeDoT 6e3 daJeHHcN ynpaByBaU
Moxete da ro kopuctte konqueTo ON/OFF ha BHaTpeuHaTa eHNHua, 3a paKyBaHe co KInMa yPeoT Kora daJeunHcKnOT ynpabyBaU He e DoCTaneH.
1 OTbopete ro npedHnot kanaK (Tn 2) nnn xopn3oHTaHaTa nepka (Tn 1).
2 PnTusheTo KOuTeo ON/OFF.

Tun 1
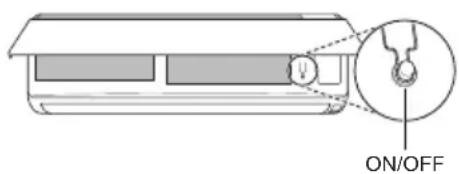
Tun 2
HANOMEHA
- YeKOpHnOT MOTOP MOKe Da Ce NCKpUH, aKO 6pry ce OTBOpN XOpu3OHTaJIHata nepKa.
- Брзината на BeHTиларopot e NOCTaBeHa HbBUCOKa.
-Функида може да ce MeHyBa BO 3aBnCHOCT OД TINOT Ha MOneJNot. - TemnepaTypaTa He MoKe Da ce MeHyBa Kora Ce ynoTpe6yBa Oba Konue 3a NTHOCT ON/OFF.
Kaj moJeJIte KOHTo ce cMo 3a NaHebe, Tempepatypata e nocTaBeHa Ha 22^
Kaj mojene 3a naehe & rpeehe, Temepaypata e nocTaBeHa od 22^ do 24^
KopncTeIbe Ha 6e3xuHnot daJeHHcN ynpaByBaay
Mhory noIeCHO moKeTe da paKyBaTe CO KInIma ypeIoT, Ipeky KopnCTeHbETo Ha daJIneHHckNt ynpaByBaU.
A B T O M A T C K O p a b o t e h e (B e w T a u k a H N T E N I R E H C U N J a)
Mynm moen
Bo oobj pexim Ha pa6oTa, cnCTemOT aBTOMaTCKCe ynpabyBa npeky eNeKtpoHcKIne KOHTpOIn.
1 NyuTete ro anapaTOT.
2 IpnTnchTe ro konyeTo MODE noBeKeNaTu, 3a da ro n36epeTe aBtOMaTcKTo pa60TeHe.
A ce npkaKyBa Ha ekpaHOT 3a npkaKyBaHe.
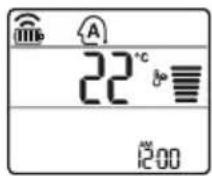
3 PnTnCHTe ro konyeTo 3aJa ja NOCTaBNTe nocakyBaHaTa TEMpepatypa.
4 PnTncHeTe ro konHeTo FAN SPEED 3a da ja npnilarOndte 6p3nHaTa Ha fehOT.
PexmHa aBTomatcko MeHyBaHbe
MoeJHa eDnHeuHa noeI6a
Oboj pekim aBtOMaTcKn ro MeHyBa peKIMOT, 3a da ja oDpKIN NOCTaBeHaTa TEMpepaTypa Ha ±2 °C
1 NywTeTe ro anaparot.
2ПиTиСHTeToKoNHTO MODE NOBeKeNaTn, 3a Da ro N36epTe pexHmOT Ha aBtOMaTcKO MeHyBaHbe.
A ce npkaKyBa Ha ekpaHOT 3a npkaKyBaHe.

3 PnTnCHTe ro konyeTo 3a da ja noCTaBnTE nocakyBaHaTa TEMpepatya.
4Пинсhte ro koncheTo FAN SPEED 3a da ja npnilarodnte 6p3nHaTa Ha phenot.
Pexim 3a HamaIyBaIbe Ha BlaXHOCTa
Oboj peKIMr OOTcPaHyBa BnOkoT Ha Bnara OD BnCOKO BnAJaHATA CpeINHa, INN 3a Bpeme Ha DoXIOBHaTa Ce3OHa, CO cEJ Da Cnpeyno6nkyBaHeTo Ha NoCTaByBaHeTo. Oboj peKIM m ABtOMaTCKn rnpNJarOdyBa Co6HaTa TemnepaTypa n 6p3nHaTn Ha QeHOT, 3a da ro 3aDpxn ONTImaHHTO HNO HA BnAxAHOCT.
1 NywTeTe ro anapatoT.
2ПиTиСHTeToKoNueTo MODE noBeKeNaTn, 3a DaTo n36epeTe pexmOT 3a HAmanyBaHbE Ha BJIaXHoCTa.
- ce npkaKyBa Ha ekpaHOT 3a npkaKyBaHe.
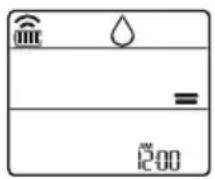
HANOMEHA
- Bo oboj pexim He moxe Ta ja npunaorOnte co6hata TempepaTpa, Taa ABtOMaTcN Ke ce npunaoro.
Co6hata Tempepatya He e npkaKaHa HaekpaHOT 3a npkaKyahe.
Bo pexmuT ha OdBnaJxHyBaHbe, KOMnpecopoT n BHaTpeuHnO T oEH MOKe Da He pa6oTaT DoEka temepaTypata Ha cobata e 24^
PexnHa rpeebe
1 NywTeTe ro anapatot.
2 IpnTnucHeTe ro konUeTo MODE noBeKeNaTn, 3a da ro n36epTe peKIMOT 3a rpeHbe.
- npkaKyBa Ha ekpaHOT 3a npkaKyBaHe.
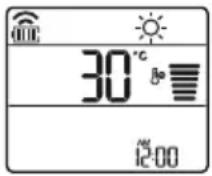
3 PnTnCHeTe ro konyeTo 3aJa ja noCTaBnTe nocakyBaHaTa TempepaTypa.
HANOMEHA
Ke 6nata npkaaHa Ha BHaTpeHHaTa eHHua, kora Ke pa60Tu Odmp3HyBaHeTo.
- Pohatamy, Oboj noka3aTeJ Ke 6nJe npkaKaHa Na BHaTpeuHaTa eINHua:
Kora pa6oTn npe3arpeBaHbTeO.
Kora co6HaTa TemnepaTypa ke ja noctnHe nocTabeHaTa TemnepaTypa.
PexmHaΦeHOT
Oboj peXIM eINHCTBeHO rOpKyInpa BHaTpeuHnOT Bo3dyx, 6e3 da ja n3MeHn Co6HaTa TemepaTypa.
1 NywTeTe ro anapatot.
2ПиTINCHETe ro konueTo MODE noBeKeNaTn, 3a da ro n36peTe pexIMOT ha ceHOT.
- ce npikaKyBa Ha ekpaHOT 3a npikaKyaHe.
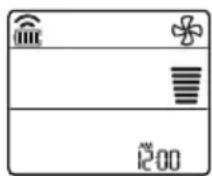
3 IpnTuscheTe ro konueTo FAN SPEED 3a da ja npnilarodnte 6p3nHaTa Ha fehOT.
HANOMEHA
KeBdnt npkkaHn Ha BHaTpeuHaTa eHnua Kora pa60Tu peXmOT Ha BeHTnIaTOP.
KopncTeHe Ha yHkunjaTa Mna3eH pexnM
- IkoHaTa KoJa ce Haora noOny, Ke 3aTpeneepn Ha dHOTo Ha ekpaHOT 3a npKakkyBaHe.
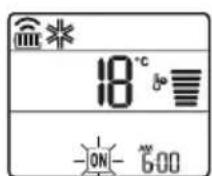
2Пинсhte ro koncheTo SET/CANCEL 3a ja ja OKkxeTe nocTabkaT.
IocTaByBaHBe Ha NcKnyUyBaHBe Ha MepaOT Ha BpeMe
1 PnTnCHTe T O KOnyeto TIMER NOBeKeNaTu.
- IkoHaTa Koja ce Haora noDony, Ke 3aTpeneepn Ha dHOTo Ha ekpaHOT 3a npKakyBaHe.
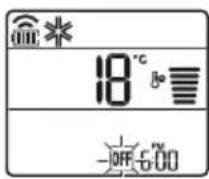
2 PnTncheTe ro konyeto 3a nn 36epete MNHytN.
3 PnTncheTe ro konyeTo SET/CANCEL 3a da 3aBpnte.
- IIO NOCTaByBaHbETo Ha MepaOT Ha BpeMe, TEKOBHOTO BpeMe NIKOHATA 06e npNKaKyBaAT Ha ekpaHOT 3a npNKaKyBaHbe, yKaKyBajKn DeKa e NoCTaBeHo NOCaKyBaHOT BpeMe.
HANOMEHA
Obaa cyHKunja e OHEBO3MOKeHa Kora Ke ro NOCTaBNTe eHOCtABHNOt MepaH Ha BpeMe.
OTkaKyBaHbe Ha NCKJnyeHnOT MepaHa BpeMe
1 PnTnuchete ro konyeto noBekenaTu.
- Ikoha ta koja ce Haora noDony, Ke 3aTpeneepn Ha dHOTo Ha ekpaHOT 3a npKakxBaHe.

2 IpnTnucHete ro konyeTo SET/CANCEL 3a da ja otKaXeTe NOCTaBkata.
OTkaKyBaHbe Ha noCTaBknte Ha MepaOT Ha BpeMe
- PnTnCHeTe ro konyeTo 3a da rN OTkXKeTe CNTe NOCTaBKn Ha MepaOT Ha BpeMe.
KopncTeHbe Ha cyhKcunjaTa cnnHe (OnuHaJIHo)
Obaa cyHKunja aBtOMaTcKn ro NCKnyuBa KInMa ypeDoT, kora ke OTnDeTe Ha cnneHe.
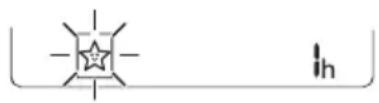
1 NywTeTe ro anapatot.
2ПиТиСHTeToKoNueTo TIMER NOBeKeNaTn.
- IkoHaTa Koja ce Haora NDoIy, Ke 3aTppeepn Ha dHTo Ha ekpaHOT 3a npKakjyBaHe.
3 PnTnCHete ro konyeto 3a da ro n36epete yacot (cé do 7 yaca).
4ПиТиСнeTe FO KOnчeTo SET/CANCEL 3aДa 3aВpшte.
- npkaKyBa Ha ekpaHOT 3a npkaKyBaHe.
HANOMEHA
He npkaJyBa Ha HeKoN Od BHaTpeHHTe eINHn.
- EkpaHOT Ha BHaTpewHaTaeHNuca ce npikakjyBa oJ 1u Do 7u, camo Bo TeKOT Ha 5 cekyni, a notoa ce Bpaka Ha nocTaBeHaTa temnepaTypa.
Bo pexkmoT Ha naebe n pexkmot Ha HamaNyBaBe Ha BnaJHoCTa, TempepaTypaTa ce 3roJeMyBa 3a 1 ^ C no 30 mHyTu, n DonoHnTeIeH 1 ^ C no npynte 30 mHyTu, 3apaDn noydo6Ho cInneHe.
- TemnepaTypata ce 3roIeMyBa do 2^ oD MomeHTaHHaTa TemnepaTypa.
- Iako 3a6eilekkaT3a 6p3nHaTa Ha fehOT Ha ekpaHOT,3a npKakyBaHe MOKe Da ce npomeHn, 6p3nHaTa Ha fehOT aBTOMaTcN Ce npunafoDyBa.
KopncTeHe Ha ФункиJaTa eHocTaBeH MepaH a BpeMe (OПцИОнALHo)
Obaa yHKunja aBTOMaTcN I NCKJyUyBa KINMa ypeDoT, Kora Ke OTnTe Ha CnneHe.
1 NywTeTe ro anapatot.
2 PtntncheTe ro konueTo TIMER noBeKeNaTn.
- IkoHaTa Koja ce Haora noDoNy, Ke 3aTpeNepn Ha dHOTo Ha ekpaHOT 3a npKkaXyBaHbe.
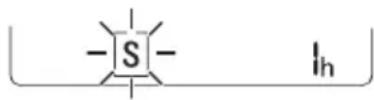
3 PnTnCHete ro konyeTo 3a na ro n36peTe yacot (cé do 7 yaca).
4ПиТиСнeTe ro konчeto SET/CANCEL 3a da 3aВршITE.
- npnkaKyBa Ha ekpaHOT 3a npnKaKyBaHe.
HANOMEHA
Obaa yHKunja ce OHaBO3MOxyBa Kora Ke ro nocTabte Ha NcknyeHO MepaOT Ha BpeMe.
KopncTeHe Ha cyHKunjaTa PnKaKyBaHb e Ha eHeprJata (OnuHaIHo)
ObaaФункиja ja npikaЖуBa KOLNUHaTa Ha npoIN3BeDEHaTa eJekTpUHa eHepnJa Ha BHaTpeuHNoT ekpaH, 3a BpeMe Ha pa6oTaTa Ha npoIN3BODoT.
Прикада наTekовната notpoшувачka Ha eJeKtpnua eHeprnuja
1 NywTeTe ro anapatoT.
2 PnntncheTe ro konyeTo n npkeTe ro okony 3 cekyHdN.
MomeHTaHaTa NotpoWbauKa Ha eHeprJa (Bpe npkaXyBa HeKoe OndpeDeHO BpeMe, Ha HekO BHaTpeHn EINHn.
HANOMEHA
- EdnHuaTa Ha npKakKaHaTa BpeHocTe kW.
He ce npkaKyBa Ha 6e3KuHnot daJeHHckn ynpabvba.
Ako e noBeke od 99 kW, Toe oncerot Ha n3pa3yBaHe, OdpxByajTe ro Ha 99 kW.
-Прикakи jaВataхаразо10kWco0.1kW eHnua,иprikakneHa koja eHa10kWco 1kW eHnua.
-ФakTnUKOTO HANOjyBaHBe MoKe Da ce pa3NkYBaO, npNKaKaHaTO HANOjyBaHBe.
Kora e noBp3aH co MyIITn HAdBopeuHaTa eINHua, OBaa FyHKunja MoKe6n HeMa da 6nnde noDprkaHa.
KopncTeHe Ha cyHKunjaTa NcknyeHo oCBetIyBaHbe (OOnNoHaJIHo)
OcBeTnyBaHbe Ha ekpaHot 3a npKakyBaHbe
Mokete Da ro npnilarOInTe ocBETnyBaHBeTo Ha ekpaHot 3a npikakyBaHBe,Ha BHaTpeWHaTa eDHHUca.
- PnTncheTe ro KonHeTo SWING n npKeTe ro Okoly 3 CEkyHdN.
HANOMEHA
BnyyeTe/ncknyteTo ekpaHOT 3a npkaKxyBaHe.
KopncTeHe Ha yHKnjata nOroDen BO3dUx (OnCuNoHaJIHo)
Iorodno pa6otehe Ha nepkaTa
Obaa yHKunja noroJHO ja noCTabyBa nepkata BO 3aadaenata n03nju, 3a da ce CBPTN DOBOHNOT BO3dyx OJ DnpeKTHOTO dyBaHe Ha CTAHAPNTe BO co6ata.
1 NywTeTe ro anapaTOT.
2ПиTиСнeTe ro konuTeTo COMFORT AIR NOBeKeNaTu, n 36epTe ja noCaKyBaHaTa Hacoka.
- nii ce npkaKyBa Ha ekpaHOT 3a npkaKyaBHe.
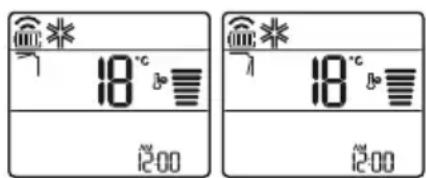
HANOMEHA
- nIcpeKakyBaHaHeKoO BHaTpeHnTeeHNu.
- Obaa Фуннкида e оно3moхена kora ke ro npntncheTe konheTo MODE nJN JET MODE.
ObaaФyHKUja e OHeBO3MOxHeHa n aBTOMaTCKOTO 3aMaBHyBaHBe NO BepTKaJIHa HAcOka ce NoCTaByBa, Kora Ke ro npNTuCHTe KOnYeTO SWING.
Kora Obaa Фуннциja e Иckлучeha,хориэталнотаперka abTomatckn pa6OTN,BO 3abnCHOCr od noctabehnoT peKM.
KopncTeHe Ha cyHKunjaTa KoHTpOHa Ha eIeKtpnHaTa eHeprJa (OnznoHaJIHo)
1 NywTeTe ro anapaTOT.
2Пи捜нсhteго кончeto ENERGY CTRL.
AnikaJaTa LG ThinQ Bn OBO3MoKyBa Da KOMyHnUpaTe co ypeDoT CO NOMOu Ha NaMeTeH TelefoH.
KapakTepeNCTnKn Ha anJnKaunjata LG ThinQ
Komyu npajte co ypeodT npeky Baunot MObInen TeNefoH, KopncTejKn Tn KopncHTe NaMeTHN ONUIN.
Smart Diagnosis
Ako nckycnte npo6lemdoeka ja kopnctnte anikaunjata, onujaT3a naMeTHa djuarHOCTNka Ke BN NOMORHe da ro DNjarHOCTUnpaTe npo6lemot.
NoDecyBaHa
Bn OBO3MOxkyBa Da nOCTaBnTe pa3NnHn ONuNn Kaj anapaTOT N BO anNkaujata.
HANOMEHA
Ako ro npomehnte cbojot 6e3xuueh pytep, do6abybaoyt ha nHTepHET ycnynn nn no3nKaT, n36pnwTe ro pernctppaHnot anapat od annkaunjata LG ThinQ n nobtopho perncptpajte ro.
- Anikajata noJnxn Ha npomeHn 3apAn noO6pyBaHe Ha anapaT0, 6e3 da nM ce daNe npedynpeDyBaHe Ha KOpncnnte.
- KapakTepnCTnKe MoKe Da BapnPaaT Bo 3aBnCHOCT OJ MOJeNOT.
1 I3BaTeTe roΦnItePOT 3a MmKpOcKoNcKn YeCTnUKN npaB.
- IorneHHeTe ro DeIOT 3a packlOnyBaIbe n IcHnCTeTe ro fJItePOT 3a MmKpOckoNcKn YecTnUKN npab.
2 N3BaTeToTpojHnOTΦnItep (1).
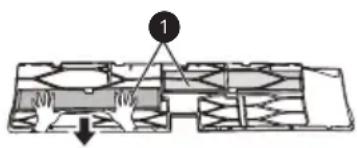
3 IocTabete ro HOBNOT Tpoeh 1nTep (1) BO 1nTepot 3a Mnkpockonckn YecTNKn npab (2).
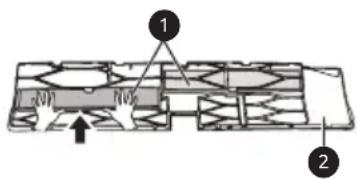
4 NocTaByBajTe ro TpojHnOT fHnTep n fHnTepo3a MnkPoCKOncKn YecTnUKN npab BO o6paTeH peOcNeD oN packNoynBaHbeto.

BHIMAHNE
-Ппeнnot панел може да падн e nдаппeн3Викa пореди,затoa 6идeteВимATEнH.
-ПоЗamehaHaфиntepoT,3aВpeMeHa NOBTOPOTO BMEHYBaHBe,ueNoCHO BMEHTeTe ro ueNIOrOΦHnTEp 3a MmKpOcKOpCKn YecTHuKN npab.(Ako He e ueNoCHO BMeTHaT,MOKe da npedn3BnKa npo6IeMco nepfOpMaHcNte HnN dpyrn npo6IeMco npOn3BOIoT.)
- Ako kIIma ypeoT pa6oTu 6e3 qHnTeP, Toa MoKe Da npEdu3BvKa np6bEmu Co nepOpMaHCnte U np6bEmu co kIIma ypeoT.
He packlonnybajte ro camnot troe Hnntep Ha nHnBnDyaJIHn DeIOBN IneJaTe da He ce OwTeN nn DeOpMnpa. Toa moKe da npEIN3BnKa npo6Iemn co pa6Otata Ha npOn3BOJOT.
Kora ro MeHyBaTe qHITepoT, BHIMaBajTe Da He Bn PAnHe NOd Ipon3BOIoT.
3a noroJema 6e36eHocT, nped da ro nCnCTNTe nn 3aMeHnTe, NCKnyteTe ro npOn3BOoT Od HanojyBaHe n N3BneYeTe ro npNKnyOKOT OD Ctpya NN NCKnyteTe ro co rnaBHnOT npeknHyBa.
HANOMEHA
- 06JIHKOT n coCTaBOT Ha φnITepoT MoKe Da ce pa3JNUHn 3a CeKOj MoJeI.
Ako cakate da ro 3aMeHnte fHTepoT,MOKeTe da Kynite pe3epBEN BO Haj6nCKNOT cepBnCeH ueHTap.
Ako eMHory KOHTaMHnHpaH, Hn epeKTOT Ha cnItpnpaBe e HamaNeH, 3ameHeTe ro CO HOB cnItnep.
Kora ro cknaDnape pe3epBHNOT Tpoeh fHNTep, He oTBopajTe ro naKyBaHbeto. (Pa6oTHNOT BEK Ha fHNTepOT ce HamaNyBa Taka.)
BHHMaBajTe Da He HabJIe3e BODa BO TpoJHnOT 1IITep. (EΦeKToT Ha ΦIITpnpaHe MoKe da ce HAMAn.)
Исучтete ro ceH3OpOT 3a PM1,0
1 OToBopTe ro kanaKOT ha ceH3OpOT 3a PM1,0 od cTpaHa Ha ypeDoT.
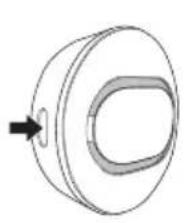
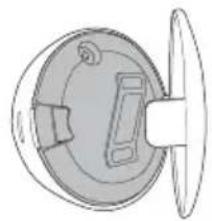
2 IOTOnete naMyHo cTanue co MaNky Boda, NcHnCTeTe FO ObjektBot IN 36pniuTe To NOBTOPO CO cyBO naMyHO cTAnue 3a da ja oTCTpaHInTE BlnaxHoCTa.
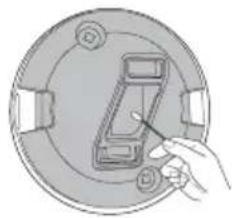
HANOMEHA
Pastroni sensorin e PM1,0 36
ZGJIDHJA E PROBLEMEVE 37
Pastroni sensorin e PM1,0
1 Hapni kapakun e sensorit PM1,0 ne ane tè produitit.

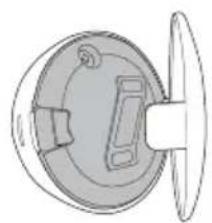
VAZNA SIGURNOSNA UPUTSTVA. 4
RAD 11
Napomene prilikom rada 11
VAŽNA SIGURNOSNA UPUTSTVA

UPOZORENJE
Da biste smanjili opasnost od eksplozije, požara, smrti, strujnog udara, povrede ili opekotina za osobe prilikom korištenja ovog proizvoda, pridržavajte se osnovnih mjera prepostrožnosti, uključujuci sljedeće:
Djeca u domacinstvu
Ovaj urežajnosti namijenjen za upotrebu od strane osoba (ukljucujuci djecu) sa smanjenim fizickim, senzornim ili mentalnim sposobnostima, ili s nedostatkom iskustva i znanja, osim u sluceju da su te osobe pod stalnim nadzorom ili su instruirane po pitanju korištenja urežaja od strane osobe koja je odgovorna za njihovu sigurnost. Djeca trebaju biti pod nadzorom kako bi se osiguralo da se ne igraju s urežajem.