HG05987 - Vise PARKSIDE - Free user manual and instructions
Find the device manual for free HG05987 PARKSIDE in PDF.

User questions about HG05987 PARKSIDE
0 question about this device. Answer the ones you know or ask your own.
Ask a new question about this device
Download the instructions for your Vise in PDF format for free! Find your manual HG05987 - PARKSIDE and take your electronic device back in hand. On this page are published all the documents necessary for the use of your device. HG05987 by PARKSIDE.
USER MANUAL HG05987 PARKSIDE
UNIVERSAL-SCHRAUBSTOCK/ DIY VICE/ÉTAU UNIVERSEL
DE AT CH
UNIVERSAL-SCHRAUBSTOCK
Operation and safety notes
FR BE
ÉTAUNIVERSEL
Intended use Page 12
Description of parts and features.. Page 12
Technical data.. 13
Included items.. 13
Safety advice.. Page 13
Fixing in place. Page 14
Use
Clamping and releasing a workpiece Page 14
Mounting the tube attachment.. Page 15
Cleaning and care.. Page 15
Disposal.. Page 15
Service
Diy vice
Introduction
We congratulate you on the purchase of your new product. You have chosen a high quality product. Familiarise yourself with the product before using it for the first time. In addition, please carefully refer to the operating instructions and the safety advice below. Only use the product as instructed and only for the indicated field of application. Keep these instructions in a safe place. If you pass the product on to anyone else, please ensure that you also pass on all the documentation with it.
Intended use
The product is intended for clamping small, light workpieces made of wood or metal, e.g. for model-making, to hold them still while further work is performed on them. Other uses or changes to the product are considered to be contrary to the intended use and may harbour risks of injury and damage. The manufacturer does not accept any liability for injury or damage resulting from use of this product contrary to its intended use. The product is not intended to be used for commercial purposes.
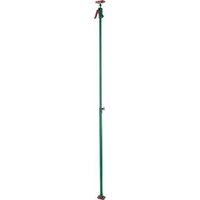
Description of parts and features
1 Jaw protectors
2 Jaws with V-grooves
3 Hexagonal socket head screw
4 Hexagonal socket head screw
5 Ball joint
6 Ball joint tommy bar
7 Clamping screw
8 Hexagonal socket head screw
9 Vice jaws tommy bar
10 Spindle
Vice base
12 Hexagon socket screw key 13 Tube attachment
Technical data
Maximum jaw opening width: approx. 70~mm
Length of jaws: approx. 78mm
Maximum bench top thickness: approx. 50mm
Weight: approx. 900g
Dimensions height: approx. 16.5 × 7.8 × 26 cm (l x w x h)
Height from top of bench: approx. 15.5cm
Tube attachment: approx. 38 - 43mm
Max. tube weight: 2kg
Max. tube length: 30~cm
- Included items
1 Diy vice
1 Hexagon socket screw key
1 Tube attachment
1 Operating instructions

Safety advice
KEEP ALL THE SAFETY ADVICE AND INSTRUCTIONS IN A SAFE PLACE FOR FUTURE REFERENCE.

CAUTION! DANGER OF INJURY! When working with hand-held electrical power tools, you can be seriously injured if the clamped workpiece slips or becomes loose. Never work on a clamped workpiece using hand-held electrical power tools.
Check the product before each use for any damage. Do not use the product if you discover it is damaged in any way.
- Check all threaded connections on the product for proper seating before each use.
Use the product on a stable, flat, undamaged surface (e.g. a workbench).
- Place circular workpieces in the vertical or horizontal V-groove and clamp them tightly in place. By doing this you will prevent the workpiece from slipping.
The vice is an aluminium injection casting and therefore is only impact resistant to limited extent.
- Do not use extension tubes on the tommy bars. There is the danger of overloading (fracturing) the spindle.
Wear safety gloves and glasses.
Fixing in place
- Attach the vice on to a smooth, flat surface.
To do this turn the clamping screw anticlockwise until the clamp opening has widened enough.
Push the vice on the supporting surface (table-top, workbench) and fix it in place on the supporting surface by turning the clamping screw 7 in clockwise direction.
Use
- Clamping and releasing a workpiece
- Turn the vice base 11 into the desired position and fix the ball joint 5 in position with the ball joint tommy bar 6
Note: Turn the vice base 11 so that the ends of the jaws 2 project out over the supporting surface. This allows you to clamp even long workpieces (in the limiting case with one end on the floor) to work on their ends.
- Turn the vice jaws tommy bar 9 anticlockwise to open the jaws 2.
- Place the workpiece between the jaws 2 and clamp it by turning the vice jaws tommy bar 9 clockwise. Ensure that the workpiece is tightly clamped.
You can now work on the workpiece.
□ After completing work on the workpiece, release it by turning the vice jaws tommy bar 9 anticlockwise.
- Mounting the tube attachment
The tube attachment is intended for clamping tubes with a diameter of 38 - 43mm
- Release the hexagonal socket head screw 3 at the end of the spindle using the supplied hexagon socket screw key 12
- Turn the vice jaws tommy bar 9 anticlockwise until the spindle 10 is turned out of the rear jaw 2.
- Using the supplied hexagon socket screw key 12, release the hexagonal socket head screw 8 on the underside of the vice base 11 and remove the spindle 10 from the vice.
- Now that the hexagonal socket head screw 4 is accessible, remove it and take the vice base off the ball joint 5
- Place the tube attachment 13 on to the ball joint 5 and fasten it in place with the hexagonal socket head screw 4
- Turn and tilt the ball joint 5 to achieve the right position.
- Cleaning and care
- Never use aggressive or corrosive cleaning agents, as they may damage the product.
Clean the product with a dry, fluff-free cloth.
Disposal
The packaging is made entirely of recyclable materials, which you may dispose of at local recycling facilities.
Contact your local refuse disposal authority for more details of how to dispose of your worn-out product.
GB Service Great Britain
Tel.: 08000569216
E-Mail: owim@lidl.co.uk
IE Service Ireland
Tel.:1800200736
E-Mail: owim@lidl.ie
Introduction
Utilisation conforme.. Page 18
Description des pieces.. Page 18
Caracteristiques.. Page 19
Furniture. Page 19