
HG06876 - Electric sprayer PARKSIDE - Free user manual and instructions
Find the device manual for free HG06876 PARKSIDE in PDF.
| Product type | Backpack sprayer (16 L) |
| Brand | Parkside |
| Model | HG06876 |
| Tank capacity | 16 L |
| Dimensions (L x W x H) | 350 x 184 x 490 mm |
| Empty weight | 3.2 kg |
| Maximum weight (full tank) | 19.2 kg |
| Maximum operating pressure | 2-4 bar |
| Spray hose length | 1300 mm |
| Average flow rate (conical nozzle) | 0.85 L/min (at 3 bar) |
| Average flow rate (fan nozzle) | 0.90 L/min (at 3 bar) |
| Average flow rate (double conical nozzle) | 1.40 L/min (at 3 bar) |
| Average flow rate (four-hole nozzle) | 1.20 L/min (at 3 bar) |
| Nozzles included | Conical nozzle, fan nozzle, double conical nozzle, four-hole nozzle |
| Operating temperature | 0-40 °C |
| Transport mode | On back with straps |
| Pump type | Manual lever pump |
| Pressure regulating valve | Yes (opening 1.4 bar, closing 1 bar) |
| Filters | Filter screen and handle filter |
| Delivery contents | Sprayer, hose, straps, manual, spare parts |
| Warranty | 3 years |
| Standards | EN ISO 19932-1:2013, EN ISO 19932-2:2013 |
| Intended use | Water and approved pesticides for garden/greenhouse |
Frequently Asked Questions - HG06876 PARKSIDE
User questions about HG06876 PARKSIDE
0 question about this device. Answer the ones you know or ask your own.
Ask a new question about this device
Download the instructions for your Electric sprayer in PDF format for free! Find your manual HG06876 - PARKSIDE and take your electronic device back in hand. On this page are published all the documents necessary for the use of your device. HG06876 by PARKSIDE.
USER MANUAL HG06876 PARKSIDE
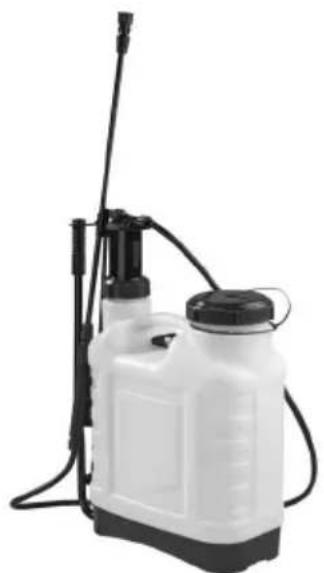
natural_image
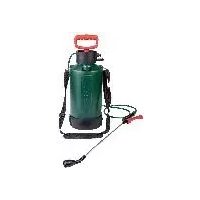
White spray sprayer with black filter and hose, no visible text or symbols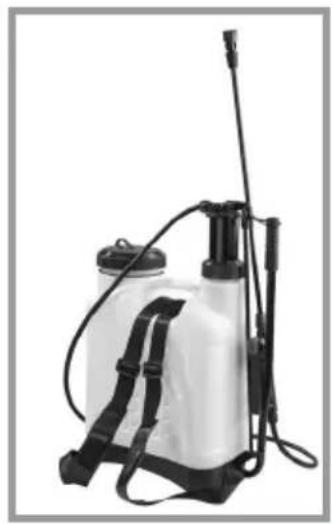
natural_image
Exterior view of a spray sprayer with black and white plastic casing (no text or symbols visible)
IMPORTANT SAFETY INSTRUCTIONS! READ CAREFULLY BEFORE USING THE PRODUCT AND KEEP FOR FUTURE REFERENCE!
RUCKSACK-DRUCKSPRÜHER 16L/16L BACKPACK PRESSURE SPRAYER / PULVÉRISATEUR À DOS 16 L
DE AT CH
RUCKSACK-DRUCKSPRÜHER16L
Assembly, operating and safety instructions
NL BE
RUGZAK-DRUKSPROEIER16L
23, 24, 25, 26): ca. 2-4 bar
Peter Fischer Managing Director
Dr. Thorsten Maier Authorised Signatory
Introduction......Page 20
Proper use....Page 20
Description of parts and features......Page 20
Technical data......Page 21
Included items Page 21
Safety advice......Page 21
General safety advice Page 21
About the pressure regulating valve....Page 23
Exchange of nozzles......Page 24
Before use......Page 24
Bringing into use......Page 24
Attaching the spray tube....Page 24
Filling the pressure sprayer tank....Page 25
Changing of chemicals....Page 25
Building up the operating pressure....Page 25
Spraying Page 25
Emptying the pressure sprayer and disposal of spray solution.....Page 26
Transport of the pressure sprayer......Page 26
Cleaning and care....Page 26
Clean the pressure sprayer Page 27
Store the pressure sprayer....Page 27
Troubleshooting Page 27
Exchange of spare parts included....Page 28
Disposal Page 29
Warranty Page 29
Warranty claim procedure......Page 29
Service Page 29
EC Declaration of conformity....Page 30
16 L Backpack Pressure Sprayer
- Introduction
We congratulate you on the purchase of your new product. You have chosen a high quality product. Familiarise yourself with the product before using it for the first time. In addition, please carefully refer to the operating instructions and the safety advice below. Only use the product as instructed and only for the indicated field of application. Keep these instructions in a safe place. If you pass the product on to anyone else, please ensure that you also pass on all the documentation with it.
- Proper use
The product is used for spraying liquids in the garden and well ventilated greenhouses. The spraying of solvents or solvent-containing liquids or oil is a particular example of improper use of the product. This product is intended for private use only. The pressure spraying device is used only for spraying the following fluids in the garden or in well ventilated greenhouses.
- Water,
- The application of BVL-approved liquid pesticides (BVL: German Federal Office of Consumer Protection and Food Safety)
The sprayed agent may only be sprayed in the concentration specified by the manufacturer of the agent. If in doubt, consult the manufacturer of the agent. The pressure spraying device is designed for private use only.
Incorrect use includes, in particular, the spraying of the following:
- Solvents or liquids containing solvents
- Oil
- Easily flammable fluids
- Corrosive fluids such as acids or alkalis.
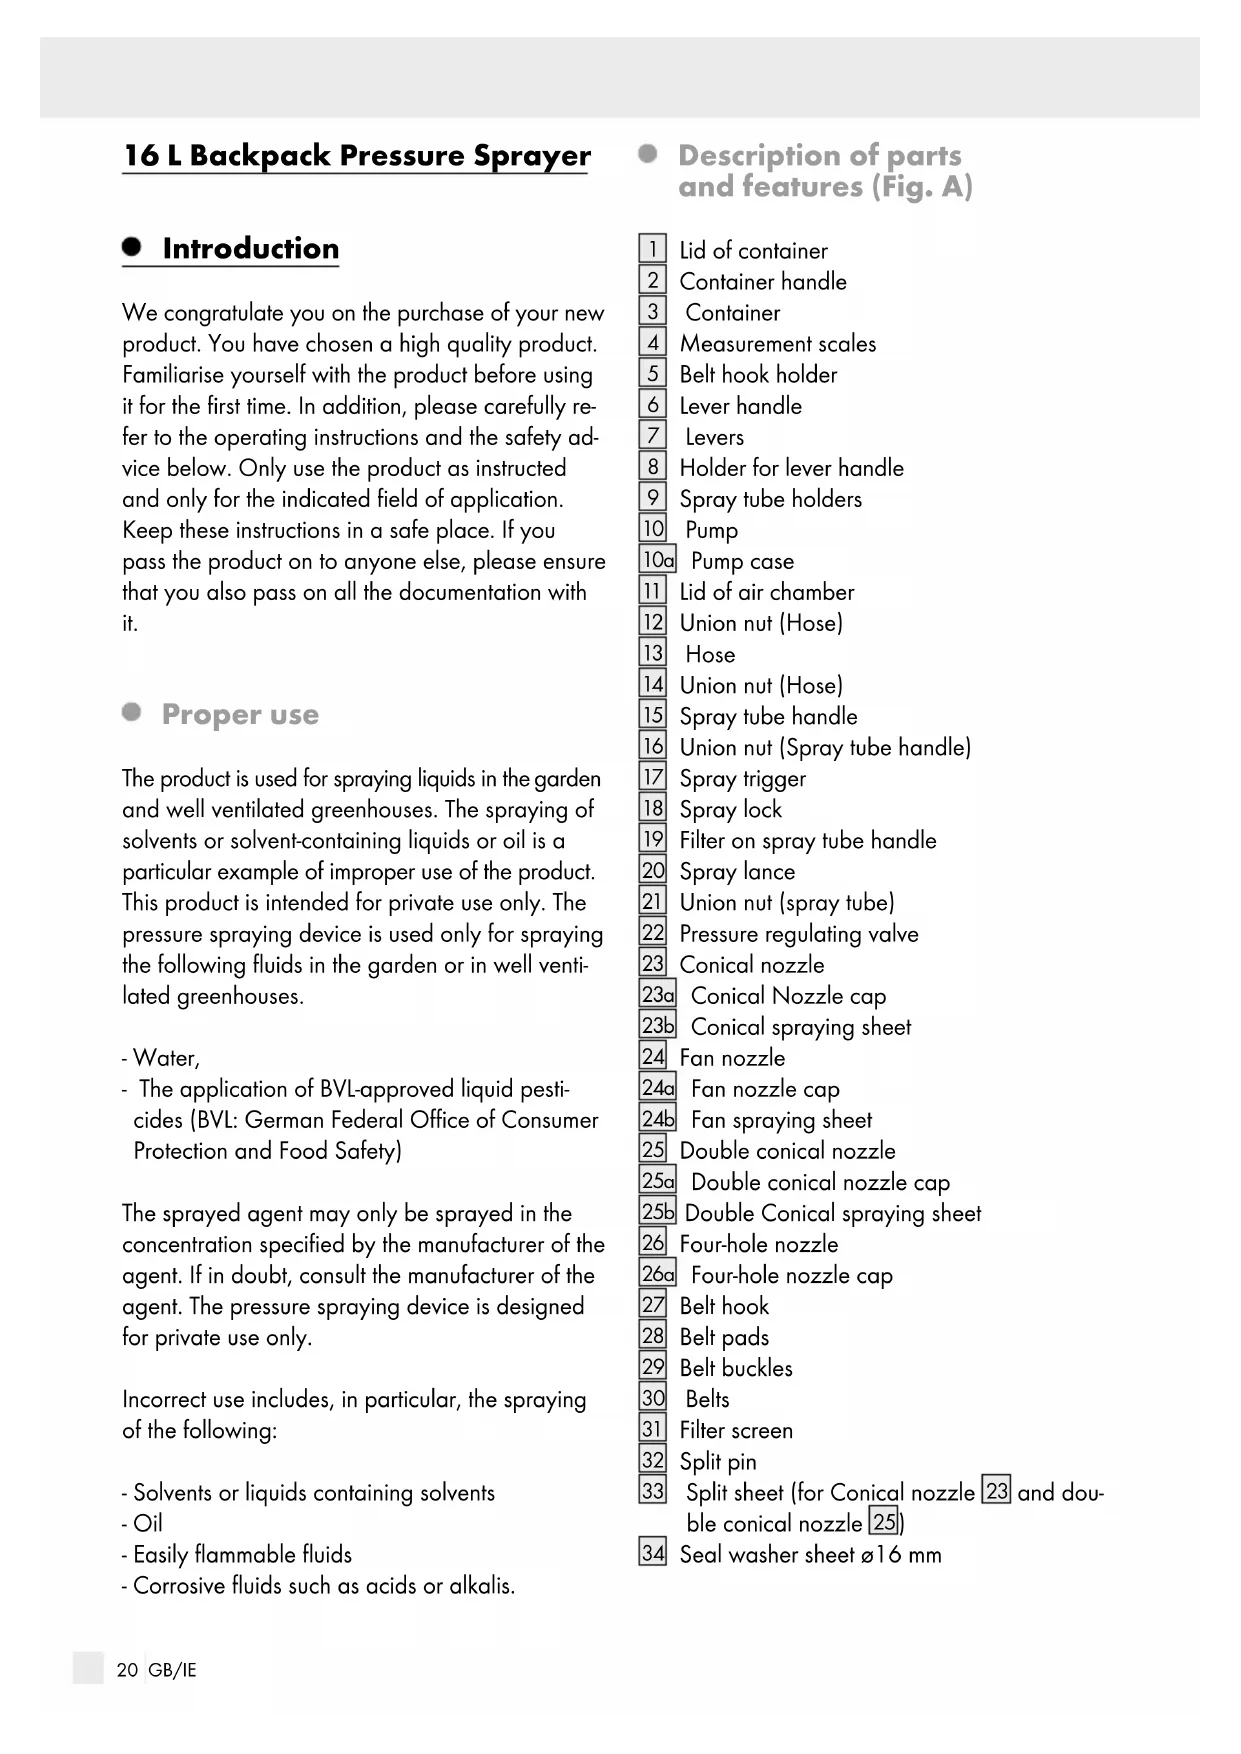
• Description of parts and features (Fig. A)
1 Lid of container
2 Container handle
3 Container
4 Measurement scales
5 Belt hook holder
6 Lever handle
7 Levers
8 Holder for lever handle
9 Spray tube holders
10 Pump
10a Pump case
11 Lid of air chamber
12 Union nut (Hose)
13 Hose
14 Union nut (Hose)
15 Spray tube handle
16 Union nut (Spray tube handle)
17 Spray trigger
18 Spray lock
19 Filter on spray tube handle
20 Spray lance
21 Union nut (spray tube)
22 Pressure regulating valve
23 Conical nozzle
23a Conical Nozzle cap
23b Conical spraying sheet
24 Fan nozzle
24a Fan nozzle cap
24b Fan spraying sheet
25 Double conical nozzle
25a Double conical nozzle cap
25b Double Conical spraying sheet
26 Four-hole nozzle
26a Four-hole nozzle cap
27 Belt hook
28 Belt pads
29 Belt buckles
30 Belts
31 Filter screen
32 Split pin
33 Split sheet (for Conical nozzle 23 and double conical nozzle 25)
34 Seal washer sheet ø16 mm
Extra Spare Parts (included) (see fig. M)
8 Holder for lever handle
34 Seal washer sheet ∅16 mm
35 Piston
36 O-ring ø15 mm
37 Collet
38 Aligning buckle
39 O-ring ø18.5 mm
- Technical data
Container dimensions: approx. 350 × 184 × 490 mm (W x L x H)
Overall weight,
empty weight: approx. 3.2 kg
Filled weight (max. 16 l): approx. 19.2 kg
Volume of the total residual: approx. 25 ml
Length of spray tube: approx. 1300 mm
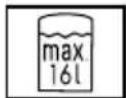
Max. Filling capacity: approx. 16 l
Max. permissible
operating pressure
(including the entire
nozzle 23, 24, 25, 26): approx. 2-4 bar
Average flow rate of
different nozzles at
common working
pressure of 3 bar: 0.85 l/min (Conical
nozzle 23)
0.901/min (Fan
nozzle 24)
1.40l/min (Double
conical nozzle 25)
1.20l/min (Four-
hole nozzle 26)
Size of nozzles: ∅ 1.77 mm
(Conical nozzle 23)
1.4 × 0.7 mm
(Fan nozzle 24)
ø 1.77 mm (Double
conical nozzle 25)
∅ 1 mm (Four-hole
nozzle 26)
Size of filter inside
spray tube handle 19: ø 0.7 mm
Size of filter screen 31: ∅ 1.1 - 1.8 mm
Pressure regulating
value 22:
1.4 ± 0.2 bar
(Open pressure)
1 ± 0.15 bar (Close
pressure)
Operating
temperature:
0-40°C
Carrying method:
At the operator's
back, using the car-
rying belts 30
Included items
1 Garden pressure
sprayer
1 Hose
1 Spray tube
1 Assembly, operating
1 Pair of carrying belts
and safety instructions
Spare parts:
1 Piston
2 Collets
4 Seal washer sheet
1 Aligning buckle
∅ 16mm
1 Holder for lever
2 O-ring ø15 mm
handle
2 O-ring ø18.5mm

Safety advice
- General safety advice
KEEP ALL THE SAFETY ADVICE AND INSTRUCTIONS IN A SAFE PLACE FOR FUTURE REFERENCE!
Children or persons who lack the knowledge or experience to use the device or whose physical, sensory or intellectual capacities are limited must never be allowed to use the device without supervision or instruction by a person responsible for their safety. Children must never be allowed to play with the device.
Warehousing of pesticide. It shall be kept out of reach of children. Disposal of pesticide shall follow the safety instructions furnished its manufacturer
- Keep spraying requirement away from children and young persons under 16.
- Do not leave the device unattended while it is in operation. Use the device as intended!
WARNING! Secure the device during transport to prevent the spray liquid escaping.
WARNING! Examine the product before each use, ensure it is free of damages, congestions and all parts work as intended. Rubber parts such as the hoses or O-rings must not show any cracks or appear porous. Pay particular attention to the safety devices. Ensure all connections are fitted tightly.
Examine the product before first use after winter.
CAUTION: Do not use the product if any visible damage or loss of functionality.
■ Always place the device on an even, flat surface.
WARNING! During the sprayer is being filled, adjusted, used, transported, emptied, cleaned or maintained. Protect yourself with suitable personal protective equipment (PPE).
■ Wear eye protection (goggles or face shield)
■ Wear respiratory protection and appropriate protective clothing
■ Wear water-proof glove and rubber boots - Read the instruction handbook
- Keep bystanders away when spraying
WARNING! Only use spare parts and accessories provided by the manufacturer (pls. follow the step of "Exchange of spare parts included" described in the manual). All other repairs shall only be carried out by the manufacturer, its service agent or similarly qualified persons. Improper maintenance can lead to a hazardous situation.
■ Wash your hands and face after each spraying session.
In case of intoxication via skin contract, please rinse with water immediately and consult doctor advice.
CAUTION! RISK OF

EXPLOSION! Do not place the device (empty or full) in direct sunrost.
■ Always read and observe the information provided by the chemical manufacturer when working with or mixing spray solutions.
■ Only mixing and filling the sprayer outdoors or in well-ventiled greenhouse.
All the applicant and liquid for the device shall not over 40^ C and refer to the information provided by chemical manufacturer.
■ Never mix more spray solution / pesticide then is required. Do not dispose of residues in the drains. Disposal shall follow the safety introduction according to chemical manufacturer.
WARNING! Do not exceed the nominal volume! Ensure the liquid to be sprayed is compatible with the product. Ensure that the use of the pesticide, liquid fertiliser or cleaning agent is permitted in your country.
WARNING! Do not store the device in livestock buildings due to the ammonia vapours (danger of brass cracking), do not fill with solutions containing nitrogen or phosphates.
- Do not store spraying pesticides in the device.
■ Never spray into wind, water, or drinking water source. Never spray at human or animals.
WARNING! Take into account of wind, rain and other climate and environmental conditions to avoid hazard of uncontrolled or unintended liquid distribution. Avoiding drift during spraying operation. - Do not use device when any leakages, uneven spray jet.
■ Release the residual pressure after each use.
Before each use, pls. ensure the device is in good condition. Pay attention to the tightness of the screw connection and appearance of the device. If damage is suspected and leakage found, take out of the operation immediately. - Do not blow out blocked nozzles using the mouth.
The sprayer may not be used if the operator is tired, ill or under influence of alcohol, drugs or medication.
Procedure after accidents: If you contact with the spray solution or the blockage of spraying occurs after pressurized, release the pressure sprayer immediately by unlocking the belt hook 27 and sliding the pressure sprayer down the floor. Danger to health due to contact with the plant protection products! Plant protection products may cause damage to health by inhalation, ingestion or absorption
through the skin. If symptoms occur or in case of doubt, seek medical advice. Therefore, observe the following safety instructions:
- Observe the safety instructions on the labels of the plant protection products. Observe the specified max. concentration. Certain liquids require protective goggles, gloves or other protective measures.
- Always request a safety data sheet from the spray manufacturer.
- Always empty the residue pressure and spray solution according to "Emptying the pressure sprayer and disposal of spray solution" when you are safe. You shall also clean the filter on spray tube handle 19 to avoid any blockage.
* Only trained, healthy and rested operators may work with the product.
* Ensure inexperienced users receive a proper training before use.
Explanation of the symbols used:
16-I pressure sprayer
Permissible operating pressure: Max. approx. 2-4 bar
Not for use with corrosive substances!

Do not spray on electrical devices, electrical cables or wires.
Do not spray on people!
Do not spray on animals!

Spray on plants only!
Do not use the product for drinks!

Do not leave the pressurized spraying device standing in the sun. There is a risk of explosion!

Keep away from naked flames and heat sources. Seal containers securely. Store in a fireproof way! Do not use easily flammable fluids!

Protect from frost and store away from frost.
Store at 0 °C–40 °C in a dry, dust-free location.

Wear eye protection

Wearrespiratory protection

Wearappropriate protective clothing

Wearwater-proof rubber boots

Wearwater-proof glove
Before using for the first time, pls read the instruction carefully.
● About the pressure regulating valve
The Pressure Regulating Valve ^22 is an important device to reduce spraying pulse, maintain the constant pressure, ensure even spraying, minimize environmental pollution and enhance the pest control performance.
The Pressure Regulating Valve ^22 is normally opened at pressure of 1.4±0.2 bar, and normally closed at pressure of 1±0.15 bar. When the
pressure inside the tank 3 increases above open pressure, the sprayer can start spraying by compressing its spray trigger 17. When the pressure is lower than the close pressure, the regulating valve 22 will shut off automatically and stop spraying. You shall pressurize the pump 10 if you desire to proceed spraying.
Note: Residual pressure still exists in the tank 3 due to the regulating valve 22, even though spraying was finished. Loosen the union nut 16 and remove the spray tube 20. Open the lid of container 1, move the spray tube toward into the opening of tank 3, press the spray trigger 17 to release the residual pressure above the opening of tank 3.
☐ Check the container 3, the hose 13 and the carry belts 30 for visible damage.
☐ Check that the hose connections 12 and 14, pipe connection 16 and 21, pressure regulating valve 22 and nozzles 23 24 25 or 26 are fitted tightly.
☐ Check that the lid of container 1 and lid of air chamber 11 are closed tightly.
☐ Trial spraying with clean water and a check of tank, hose, shut-off and nozzle for possible leakage are required prior to operation.
☐ Check that the filter screen 31 and filter on spray tube handle 19 are not blocked. Filter screen 31 and filter on spray tube handle 19 are for filtering the solid substance."
Exchange of Nozzles
WARNING! Protect yourself from hazardous substances during exchanging the nozzles by wearing suitable personal protective equipment (PPE) (eye protection, respiratory protection, protective clothing, waterproof gloves and boots).
CAUTION! Check safe function!
□ Lossen the nozzle 23, 24, 25 or 26 from the pressure regulating valve 22.
☐ Replace and fasten the nozzle 23, 24, 25 or 26 to the pressure regulating valve 22.
Before use
WARNING! Protect yourself with suitable personal protective equipment (PPE) of wearing eye protection, respiratory protection, appropriate protective clothing, water-proof gloves and boots from hazardous substances.
CAUTION! Check that the device is functioning properly! Check the pressure sprayer before each use to ensure that it is free of visible damage and is functioning safely. To do this, carry out the following tests and inspections:
☐Thehose 13 or O-rings 36 39 must not show any cracks or appear porous.
- Bringing into use
WARNING! Protect yourself with suitable personal protective equipment (PPE) of wearing eye protection, respiratory protection, appropriate protective clothing, water-proof gloves and boots from hazardous substances. Only mixing and filling outdoors or in well-ventiled greenhouse.
- Attaching the spray tube (Fig. B–E)
☐ Attach the conical nozzle 23, fan nozzle 24, double conical nozzle 25 or four-hole nozzle 26 to pressure control valve 22. Fasten the nozzle in a clockwise direction.
☐ Attached the pressure regulating value 22 to the union nut 21 on spray tube 20 . Tighten the union nut 21 .
☐ Insert the spray tube 20 into the spray tube handle 15, then tighten with the union nut 16.
☐ Connect the hose 13 to the spray tube handle 15, tighten the union nut 14.
☐ Tighten the union nut 12 in a clockwise direction.
□ Fasten the lid of air chamber 11 as far as it goes.
□ Attach the belt hook 27 to belt hook holder 5.
☐ Adjust the length of belts 30 with the belt buckles 29 and move the belt pads 28 for suitable carrying position.
Note: adjust in the same way before wearing to give even load.
Note: The device must worn as close to the body as possible and parallel to the spine.
- Filling the pressure sprayer tank (Fig. F)
WARNING! Only mixing and filling outdoors or in well-ventiled greenhouse.
- Check the volume application rate when filling the liquid into the sprayer.
Note: Before using the product, check to see that it is in good condition and free of defects.
☐ Click the spray tube 20 on the spray tube holder 9 (s. fig. 1).
☐ Unscrew the lid of container 1 in an anti-clockwise direction and open.
☐ Now fill the tank with prepared mixture through the filter screen 31 carefully. Filter screen 31 is for filtering the solid substance.
Note: Fill the tank with only the amount of liquid that you actually need for that particular spraying session (not more than 16 l).
Note safety instructions on the labels of the spraying pesticides used. Pay attention to the stated max. concentrated.
■ Always request a safety data sheet from the spraying agent manufacturer.
Place the lid of container 1 back onto the container 3 and fasten in a clockwise direction clockwise as far as it will go.
- Changing of chemicals
☐ Pls. follow the step of "Emptying the pressure sprayer and disposal of spray solution" described in the manual
☐ Pls. follow the step of "Cleaning and care" described in the manual.
☐ Check the product according to the "Before use" described in manual.
☐ Pls. follow the step of "Filling the pressure sprayer tank" described in manual.
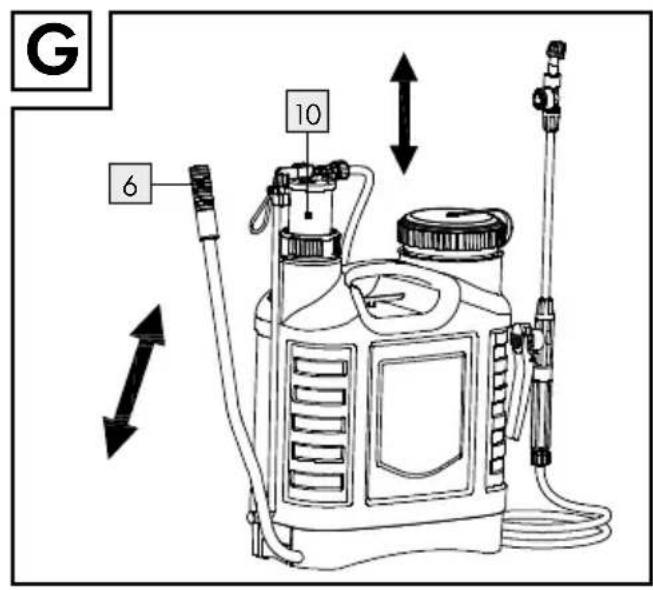
• Building up the operating pressure (Fig. G)
General the pressure through the pump 10 by moving lever handle 6 on levers 7 up and down until the pressure sprayer has been pumped up to a pressure not exceeding the maximum permissible operating pressure of 4 bar.
☐ When carrying the tank 3 with spraying process, can generate the pressure by moving the levels handle 6 on levers 7 up and down with left hand if the pressure in the tank 3 becomes low.
Spraying
□ Carry the pressure sprayer over your shoulder by the carrying belts 30.
Note: Ensure that the pressure sprayer is always kept upright. Only when held in this orientation will the sprayer work properly.
☐ Hold the spray tube handle 15 firmly by the hand and direct the spray nozzle 23, 24, 25 or 26 e.g. at a plant.
☐ Press the trigger 17 to start the spraying process.
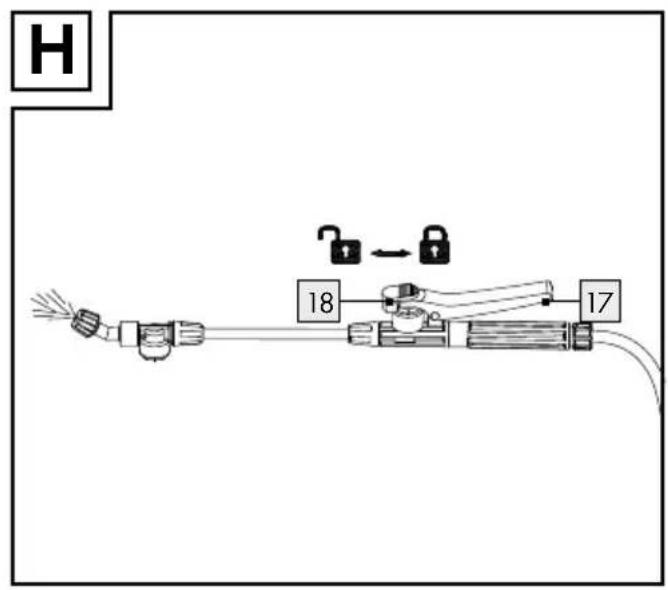
Note (Fig. H): For continues spraying, move the spray lock 18 backward. To release continues spray, move the spray lock 18 toward.
☐ Release the trigger 17 to stop the spraying process.
Note: When the pressure in the container is no longer sufficient to spray, pump the
container 3 to increase the pressure again up to but not exceeding the maximum permissible operating pressure of 4 bar (see "Building up the operating pressure").
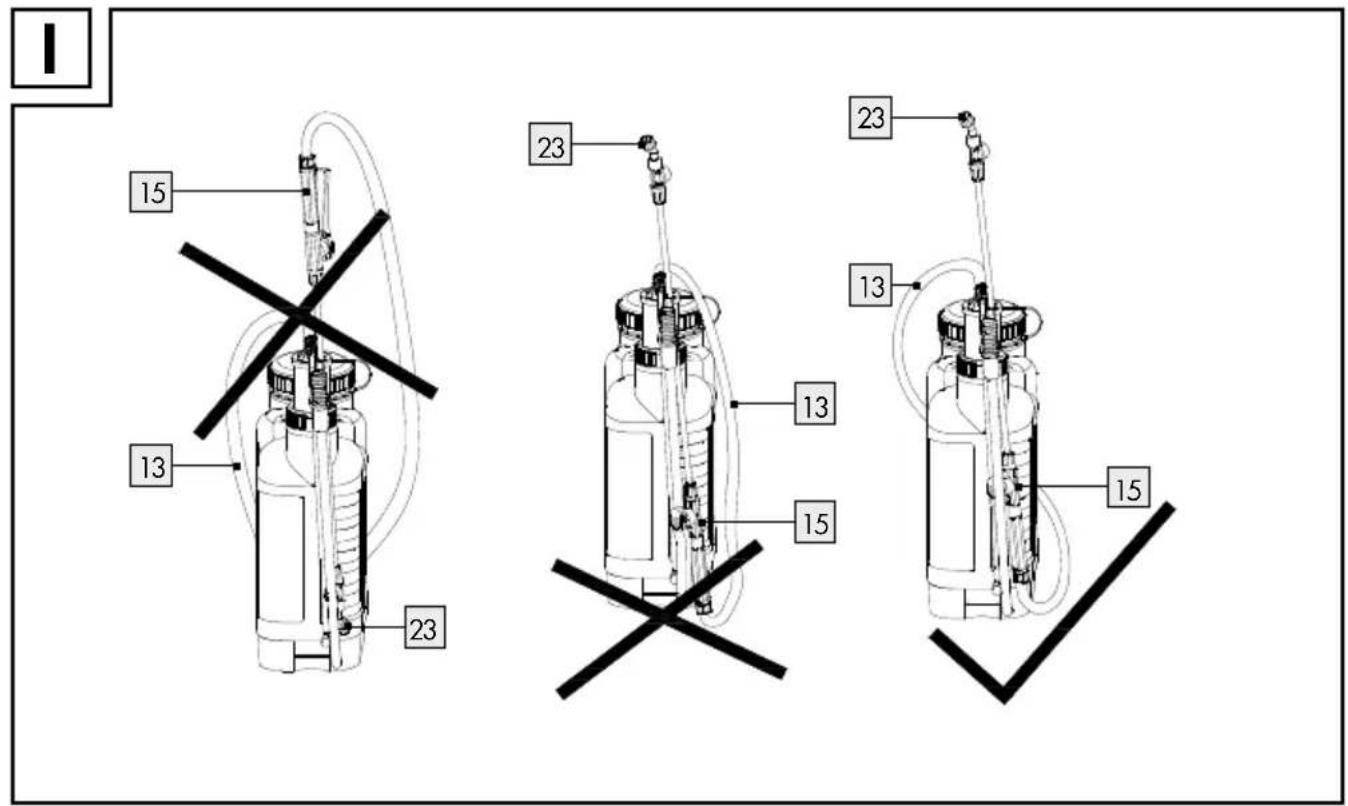
☐ Clip the spray tube 20 on spray tube holder 9 during work interruptions and breaks.
Note (Fig. 1): The nozzle 23, 24, 25, 26 always on the top position when the spray tube 20 is clipped onto the spray tube holder 9.
After spraying, loosen the union nut 16 and remove the spray tube 20. Open the lid of container 1, move the spray tube handle 15 toward into the opening of tank 3, press the spray trigger 17 to release the residual pressure above the opening of tank 3. For the residue spray solution, pls. follow the step of "Emptying the pressure sprayer and Disposal of spray solution" described in the manual.
● Emptying the pressure sprayer and disposal of spray solution
WARNING! Always release residual pressure before transport and cleaning. Protect yourself with suitable personal protective equipment (PPE) from hazardous substances. Take precautions to avoid environmental contamination from hazardous substances.
☐ Loosen the union nut 16 and remove the spray tube 20.
Open the lid of container 1, move the spray tube handle 15 toward into the opening of tank 3,
☐ Press the spray trigger 17 to release the residual pressure above the opening of tank 3.
☐ Remove any leftover spray product from the tank and the pipes and store it in a suitable container.
- Do not dispose of residues down the drain. Dispose shall follow the safety introduction according to the chemical manufacturer.
WARNING! Always keep the product away from other people during emptying and disposal.
● Transport of the pressure sprayer
WARNING! Protect yourself with suitable personal protective equipment (PPE) of wearing eye protection, respiratory protection, appropriate protective clothing, water-proof gloves and boots from hazardous substances. Only mixing and filling outdoors or in well-ventiled greenhouse.
WARNING! Make sure to release pressure & empty the container 3 before transportation.
- Secure the product against falling, overturn, vibration, extremely high or low temperatures, direct sunlight and impacts during transportation to avoid damages.
■ Tighten the sprayer with lid and all the union nuts during transport to prevent loss of fuel, damage or injury.
■ Always kick the spray tube 20 onto the spray tube holder 9 (s. fig. 1) for transport or storage.
Note: Make sure that the pressure sprayer is always in an upright position.
Transport after use, clean the device and dry. Follow the step of "Cleaning and are" described in manual. Kick the spray tube 20 onto the spray tube holder 9 (s. fig. 1). Carry with the container handle 2.
- Cleaning and care
WARNING! During cleaning, always protect yourself with wearing suitable personal protective equipment (PPE) of wearing eye protection, respiratory protection, appropriate protective clothing, water-proof gloves and boots from hazardous substances.
Note: Even after spraying has ended, there is still residual pressure in the container 3 due to the pressure regulating valve 22. To release it, first loosen the pipe connection 16 and remove the spray tube 20. Open the cover of the container 1 and point the spray tube handle 15 at the opening of the container 3.
Press the spray trigger 17 to release the residual pressure over the opening of the container 3.
If the nozzle seems to be blocked, do not try to blow it free with your mouth.
Note: Clean the pressure sprayer after each use! Empty the bottle after each use.
- Clean the pressure sprayer
The pressure sprayer shall be washed in an allowed site.
☐ Loosen the spray nozzle 23, 24, 25, 26 from 22 pressure regulating valve and clean under running water.
☐ Loosen the nozzle cap 23a, 24a, 25a, 26a, clean under running water together with the inner parts of spraying sheet 23b, 24b, 25b, split sheet 33, seal washer sheet 34.
☐ If the spray nozzle 23, 24, 25, 26 is clogged, clean it by pushing a needle through it.
☐ Flush through the pressure sprayer, pressure regulating valve 22, pipes and tubes with water.
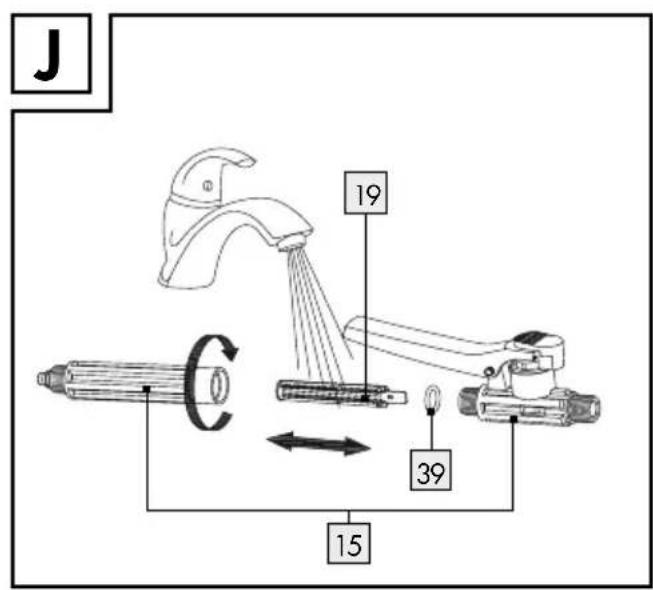
☐ Remove the spray handle 15 from pressure sprayer and disassemble. Clean under running water together with the filter 19 and O-ring 18.5mm 39. Pls. use brush for clean the filter 19 (Fig J).
Take out the filter screen 31 under running water with brush.
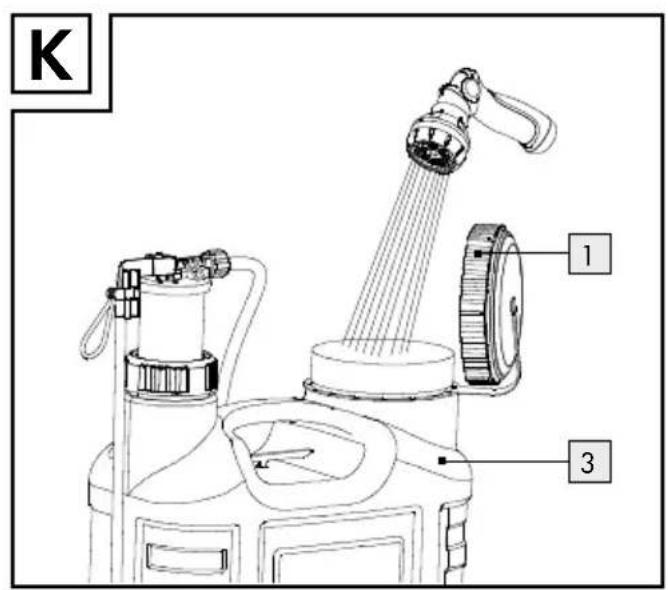
☐ The surface and inner part should be cleaned with high pressure injection water till drainage become clean (Fig. K). After clean, always kick the spray tube 20 onto the spray tube holder 9 (s. fig. I) for transport or storage.
After operation and cleaning of product, always change clothes and wash those exposed part of body such as hands and face. In case of toxic pesticide and germicide, a shower after operation is required to ensure safety.
- Store the pressure sprayer
⚠ WARNING! Always release any residual pressure still present in the container 3 after use by following the step of "Emptying the pressure sprayer and disposal of spray solution" and "Cleaning and care".
☐ Thoroughly clean the device and allow it to dry before you put it away for the winter. This will avoid frost damage.
☐ Clip the spray tube 20 on spray tube holder 9 (s. fig. 1).
Store the pressure sprayer in a dry, dust-free place.
WARNING! Do not store the device in livestock buildings due to the ammonia vapours (danger of brass cracking), do not fill with solutions containing nitrogen or phosphates.
- Check the product regularly each year after winter by using of clean water. Check product before each use.
■ Check the product after each use.
- Troubleshooting
If the measures listed below are not successful, contact the manufacturer.
● = Fault
● = Potential causes
O = Remedies
● No pressure is established in the tank.
The lid of container 1 is not firmly fastened into place.
- Fasten the lid of container 1 firmly into place.
- Fasten the union nut 12, 14, 16 and 21 firmly into place.
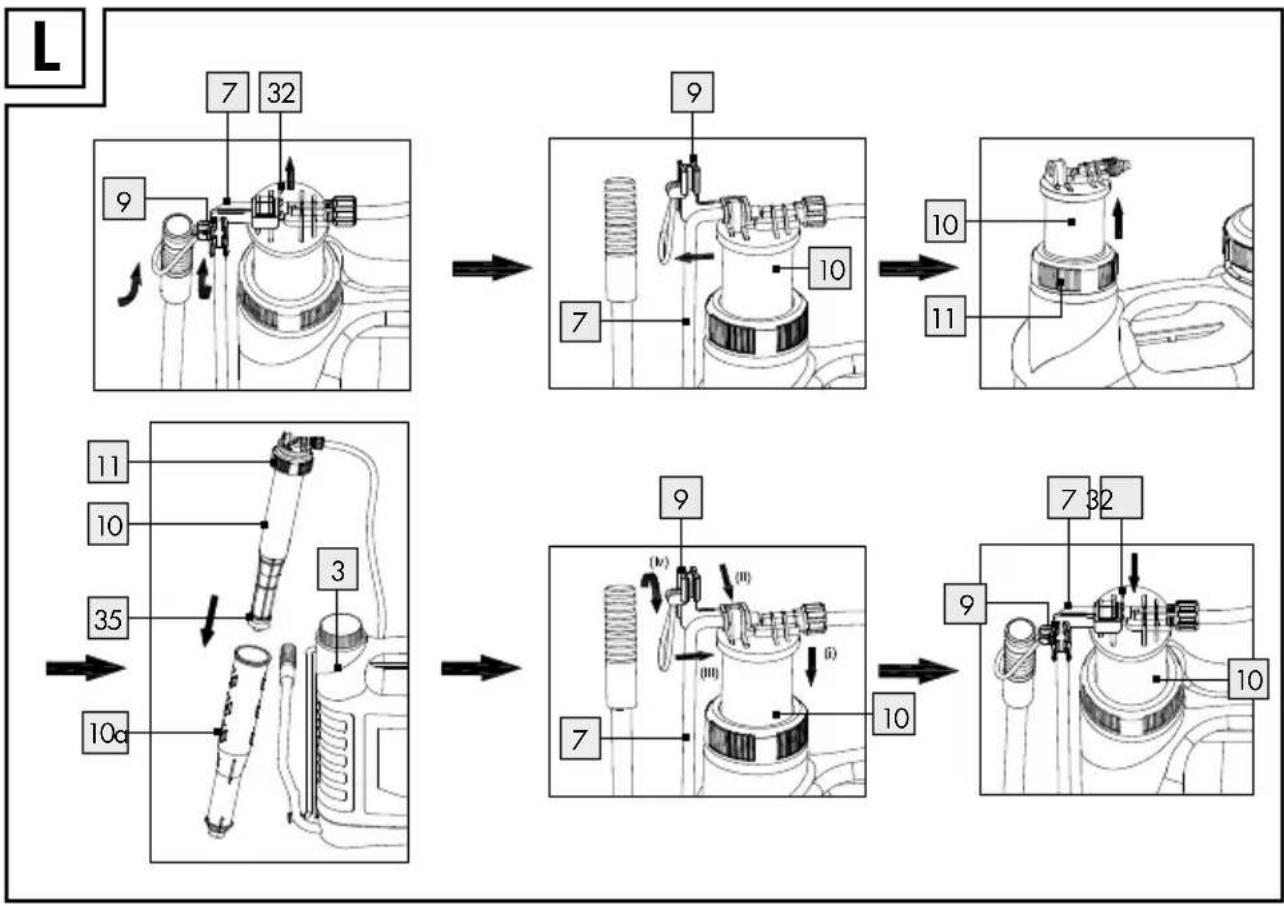
Thepiston 35 may have been damaged
○ Replace the piston 35 according to "Replace included spare parts" described in manual.
Split pin 32 fetch way
○ Re-tight the split pin 32 on the product properly.
● Spray nozzle does not spray.
No pressure present.
○ Generate pressure through the pump 10 by moving the lever handle 6.
The spray nozzle is blocked.
Stop use, unpressured, take care about pesticide to person and environment. Clean the spray nozzle 23, 24, 25, 26 (PIs follow the step of "Cleaning and care" section described in the manual).
No spray in the tank.
○ Fill with spray.
- Filter 19 is blocked.
- Clean the filter with brush (please refer to the "Cleaning and care" section).
The seal-ring loose or is damaged.
○ Re-tighten up or replace.
● Rock Lever is too heavy to operate.
Levers 7 is too tight.
○ Check and adjust the levers 7.
● Pump charmer 10 insufficiently lubricated.
○ Apply lubricant.
●Nozzle 23, 24, 25, 26 or filter 19 is blocked.
Stop use, unpressured, take care about pesticide to person and environment. Clean with brush (please refer to the "Cleaning and care" section).
● Pump is block.
Check the position of lever 7 and split pin 32. Pls. contact its service agent or similarly qualified persons. Failure to do so may result in hazard.
● Exchange of spare parts included
WARNING! Protect yourself with suitable personal protective equipment (PPE) of wearing eye protection, respiratory protection, appro priate protective clothing, water-proof gloves and boots from hazardous substances.
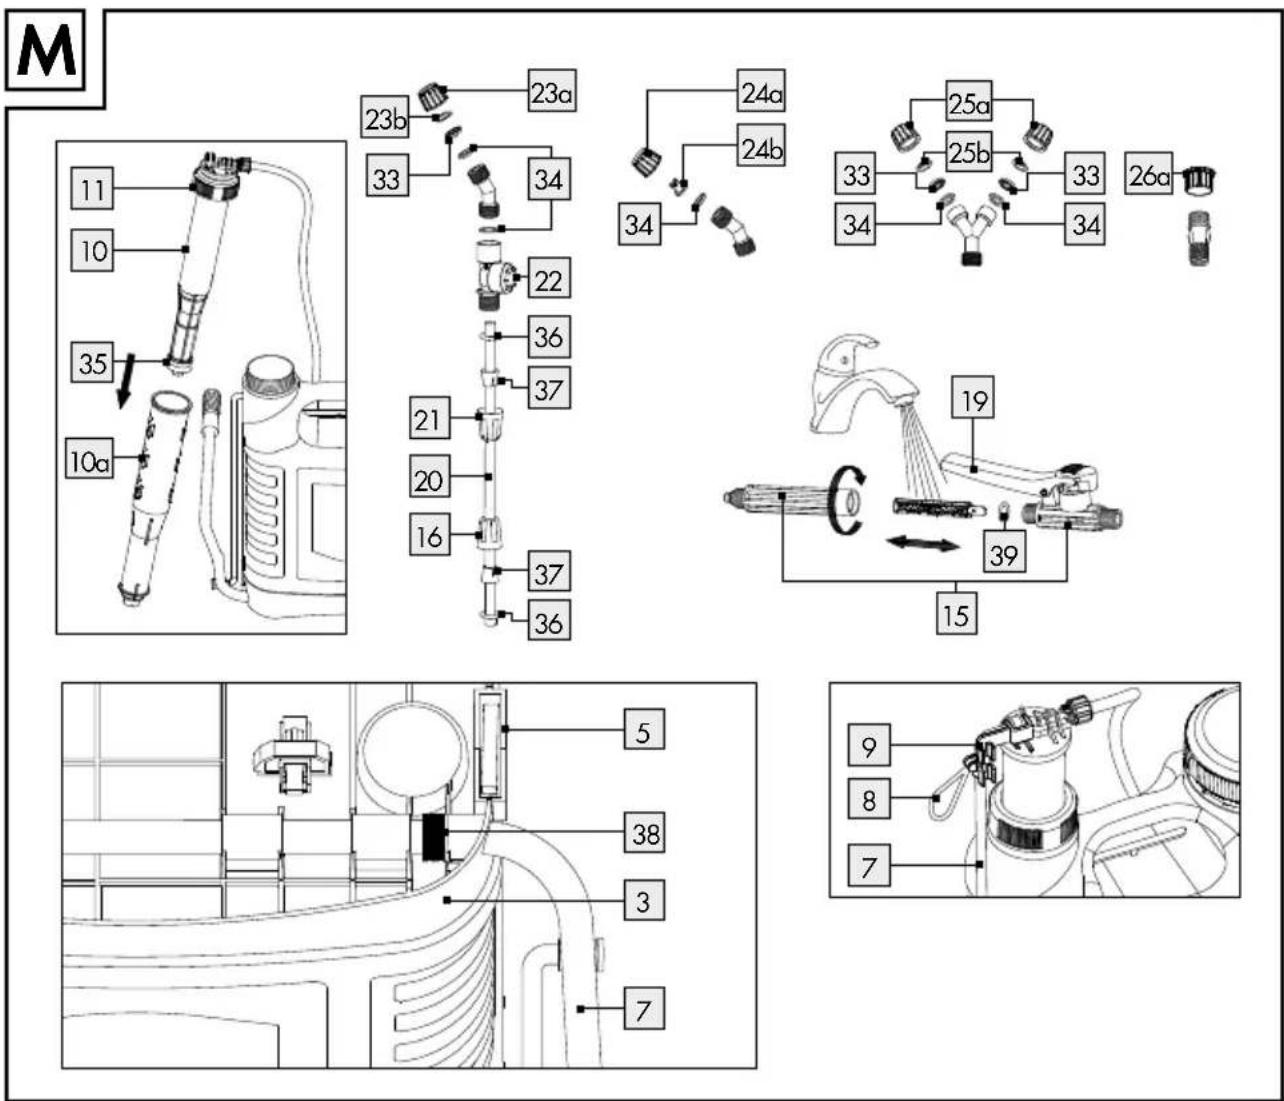
WARNING! Only use spare parts and accessories provided by the manufacturer. All other repairs shall only be carried out by the manufacturer, its service agent or similarly qualified persons. Hazards can arise due to improper maintenance (Fig. M).
WARNING! After any replacement, pls. put all parts back together and check the product beforeuse.
| If found damaged with following part no. replace with the spare parts included in the package | |
| Lever handle 8 | Remove the damaged holder for lever handle 8 from the holder 9 and replace. |
| Seal washer sheet ø 16 mm 34 | Loosen the nozzel cap 23a, 24a or 25a, remove the damaged seal washer sheet ø 16 mm 34 and replace. |
| O-ring ø 15 mm 36 | Loosen the union nut 16 from spray tube handle 15 or the union nut 21 from the pressure regulating value 22, remove the damaged O-ring ø15 mm 36 and replace. |
| Collet 37 | Loosen the union nut 16 from spray tube handle 15 or the union nut 21 from the pressure regulating value 22, remove the damaged collet 37 and replace. |
| Aligning buckle 38 | Remove the aligning buckle 38 from the levers 7 on the bottom of sprayer and replace. |
| Pison 35 (Fig. L) Remove | the split pin 32, disassemble the spray tube holder 9 and lever 7 from prump 10. Take out the pump 10 with pump case 10a. Hold the lid of air chamber 11 and remove the pump case 10a. Remove the piston 35 underneath the pump 10 and replace. After replacement, pls. put all parts back together. |
| O-ring ø18.5mm 39 | Disassemble the spray handle 15. Take out the damaged O-ring ø18.5mm 39 and replace (Fig. J). |
●Disposal
The packaging is made entirely of recyclable materials, which you may dispose of at local recycling facilities.
Contact your local refuse disposal authority for more details of how to dispose of your worn-out product.
- Warranty
The product has been manufactured to strict quality guidelines and meticulously examined before delivery. In the event of product defects you have legal rights against the retailer of this product. Your legal rights are not limited in any way by our warranty detailed below.
The warranty for this product is 3 years from the date of purchase. The warranty period begins on the date of purchase. Please keep the original sales receipt in a safe location. This document is required as your proof of purchase.
Should this product show any fault in materials or manufacture within 3 years from the date of purchase, we will repair or replace it – at our choice – free of charge to you. This warranty becomes void if the product has been damaged, or used or maintained improperly.
The warranty applies to defects in material or manufacture. This warranty does not cover product parts subject to normal wear, thus possibly considered consumables (e.g. batteries) or for damage to fragile parts, e.g. switches, rechargeable batteries or glass parts.
- Warranty claim procedure
To ensure quick processing of your case, please observe the following instructions:
Please have the till receipt and the item number (e.g. IAN 123456_7890) available as proof of purchase.
You will find the item number on the rating plate, an engraving on the front page of the instructions for use (bottom left), or as a sticker on the rear or bottom of the product.
If functional or other defects occur, please contact the service department listed either by telephone or by e-mail.
You can return a defective product to us free of charge to the service address that will be provided to you. Ensure that you enclose the proof of purchase (till receipt) and information about what the defect is and when it occurred.
Service
GB Service Great Britain
Tel.: 08000569216
E-Mail: owim@lidl.co.uk
IE Service Ireland
Tel.:1800200736
E-Mail: owim@lidl.ie

● EC Declaration of conformity
EC DECLARATION OF CONFORMITY
IAN: 356373_2007
Product identification: "PARKSIDE" 16L Backpack Pressure Sprayer
Model Number: HG06876
The object of the declaration described above is in conformity with the relevant Community harmonisation legislation:
| Directive 2006/42/EC |
| 2009/127/EC amending Directive 2006/42/EC |
References to the relevant harmonised standards used or references to the specifications in relation to which conformity is declared:
| N° / Parts |
| Directive 2006/42/EC |
| EN ISO 19932-1:2013 |
| EN ISO 19932-2:2013 |
Name and address of the manufacturer:
This declaration of conformity is issued under the sole responsibility of the manufacturer.
Original declaration of conformity
| Neckarsulm | 26.11.2020 |
| Place | Date |

Introduction......Page 32
DÉCLARATION DE CONFORMITÉ CE
IAN: 356373_2007
| Directive 2006/42/EC |
| 2009/127/EC amending Directive 2006/42/EC |
Inleiding ...... Pagina 47
| Directive 2006/42/EC |
| 2009/127/EC amending Directive 2006/42/EC |
DEKLARACJA ZGODNOŚCI WE
IAN: 356373_2007
| Directive 2006/42/EC |
| 2009/127/EC amending Directive 2006/42/EC |
Peter Fischer Managing Director
Dr. Thorsten Maier Authorised Signatory
Úvod....Strana 73
trysek 23, 24, 25, 26): cca 2-4 bary
| Directive 2006/42/EC |
| 2009/127/EC amending Directive 2006/42/EC |
Úvod....Strana 85
| Directive 2006/42/EC |
| 2009/127/EC amending Directive 2006/42/EC |
boquillas 23, 24, 25, 26): aprox. 2-4 bar
| Directive 2006/42/EC |
| 2009/127/EC amending Directive 2006/42/EC |
Indledning ...... Side 110
dyse 23, 24, 25, 26): ca. 2-4 bar
Directive 2006/42/EC
2009/127/EC amending Directive 2006/42/EC
Directive 2006/42/EC
EN ISO 19932-1:2013
EN ISO 19932-2:2013
Authorised Signatory
flowchart
graph TD
    A["Initial Measurement"] --> B["Step 1: 7, 32"]
    B --> C["Step 2: 9, 7, 10"]
    C --> D["Step 3: 10, 11"]
    D --> E["Step 4: 10, 11, 10"]
    E --> F["Step 5: 10, 10a, 35"]
    F --> G["Step 6: 10, 10a, 3"]
    G --> H["Step 7: 7, 10"]
    H --> I["Step 8: 9, (v), (i), (ii)"]
    I --> J["Step 9: 7, 32"]
    J --> K["End"]
OWIM GmbH & Co. KG
Stiftsbergstraße 1
74167 Neckarsulm
GERMANY
Model-No.: HG06876
Version: 11/2020
- RUCKSACK-DRUCKSPRÜHER 16L/16L BACKPACK PRESSURE SPRAYER / PULVÉRISATEUR À DOS 16 L
- RUCKSACK-DRUCKSPRÜHER16L
- RUGZAK-DRUKSPROEIER16L
- Introduction......Page 20
- Safety advice......Page 21
- About the pressure regulating valve....Page 23
- Exchange of nozzles......Page 24
- Before use......Page 24
- Bringing into use......Page 24
- Emptying the pressure sprayer and disposal of spray solution.....Page 26
- Transport of the pressure sprayer......Page 26
- Cleaning and care....Page 26
- Troubleshooting Page 27
- Exchange of spare parts included....Page 28
- Disposal Page 29
- Warranty Page 29
- EC Declaration of conformity....Page 30
- L Backpack Pressure Sprayer
- - Introduction
- - Proper use
- • Description of parts and features (Fig. A)
- Extra Spare Parts (included) (see fig. M)
- - Technical data
- Included items
- Spare parts:
- Safety advice
- - General safety advice
- Explanation of the symbols used:
- ● About the pressure regulating valve
- Exchange of Nozzles
- Before use
- - Bringing into use
- - Attaching the spray tube (Fig. B–E)
- ● Emptying the pressure sprayer and disposal of spray solution
- ● Transport of the pressure sprayer
- - Cleaning and care
- - Clean the pressure sprayer
- - Store the pressure sprayer
- - Troubleshooting
- ● No pressure is established in the tank.
- ●Disposal
- - Warranty
- - Warranty claim procedure
- Service
- GB Service Great Britain
- IE Service Ireland
- ● EC Declaration of conformity
- EC DECLARATION OF CONFORMITY
- Introduction......Page 32
- DÉCLARATION DE CONFORMITÉ CE
- Inleiding ...... Pagina 47
- DEKLARACJA ZGODNOŚCI WE
- Úvod....Strana 73
- Úvod....Strana 85
- Indledning ...... Side 110
- OWIM GmbH & Co. KG
Brand : PARKSIDE
Model : HG06876
Category : Electric sprayer