
MRK11 - Food Processor MPM - Free user manual and instructions
Find the device manual for free MRK11 MPM in PDF.
| Brand | MPM |
| Model | MRK11 |
| Product type | Multifunction food processor |
| Power supply | 230 V ~ 50 Hz, 800 W |
| Number of speeds | 3 + PULSE function |
| Maximum speed | 13100 rpm |
| Mixing bowl capacity | 1.5 liters |
| Blender jug capacity | 1.0 liters |
| Main functions | Kneading, chopping, blending, whisking, shredding, juice extraction, citrus pressing |
| Included accessories | Mixing bowl, lid, pusher, dough hook, metal blade, discs (slicing, french fry, grating), citrus press, juice extractor, whisk, storage base |
| Estimated dimensions | 30 x 30 x 40 cm |
| Estimated weight | 5 kg |
| Maintenance and cleaning | Wash accessories in soapy water, wipe the motor unit with a damp cloth |
| Safety | Safety locks on lids, do not immerse motor unit, unplug before cleaning, supervise children |
| Spare parts and repairability | Interchangeable accessories, authorized service center for repairs |
| General information | Domestic use, do not use outdoors, do not immerse motor unit, not recommended for hot liquids |
Frequently Asked Questions - MRK11 MPM
User questions about MRK11 MPM
0 question about this device. Answer the ones you know or ask your own.
Ask a new question about this device
Download the instructions for your Food Processor in PDF format for free! Find your manual MRK11 - MPM and take your electronic device back in hand. On this page are published all the documents necessary for the use of your device. MRK11 by MPM.
USER MANUAL MRK11 MPM
EN We wish you satisfaction from using the product and invite you to check a wide range of other MPM appliances
natural_image
White cooking machine with digital display and control panel (no visible text or symbols)CZ NAVOD K OBSLUZE 3
DE BEDIENUNGSANLEITUNG.
EE KASJTUSJUI LND 15
EN USER MANUAL 21
ES MANUAL OF INSTRUCCIONES 26
FR MANUEL DE L'UTILISATEUR 32
HU HASZNÁLAT UTASÍTÁS 38
IT MANUALE D'USO 44
LT VARTOTOJO VAĐOVAS 50
LV IIF TOTÁIA POKASGRÁMATA 55
NL CCRUKERSI HANDLEDING 61
PL INSTRUKCJA OBSLUCI 67
RO MANUAL DE UTILIZARE 75
RU ИНСТРУКЛИЯ ПО ОБСЛУЖИВАЛИЮ 79
SK POUZ'VATELSKÁ PRÍRUCKA 86
UA ПОСИБНИК КОРИСТУВАЧА 92
MPM agd S.A.
natural_image
Three views of a white blender with a side view showing the blade and handle (no text or symbols visible)BEZPEČNOSTNÍ TIPY PRO POUŽITÍ
A - PRACOVNÍ JEDNOTKA
A1 - hnací hřídel
H3 - Mahlapressi filter
H4 - mahlapressi konteiner
I - VAHTPEKSJA
I1 - vahtplastist klopipea
12 - vahtpeksuri lisatarvik
J - BAAS TARVIKUTE JAOKS
ENNE ESMAKORDSET KASUTAMIST
-Prior to using the appliance carefully read and understand this manual.
- Do not immerse the food processor in water or any other liquids to avoid electrocution.
-Pay extreme attention when using the appliance with children nearby.
- Unplug the appliance when it is out of use and before cleaning it.
- Place the food processor on a smooth and even surface when preparing it for work.
- Do not turn off the safety switches in a different way than it is intended for in the design (use: mixer jug G2; blender lid B2, juice extractor lid H2 or citrus squeezer container D2). This can lead to the damage of the appliance or even injury.
-Before starting work make sure there is no hard tool (spoon, spatula etc.) in the blender container B1, juice extractor container H4 or mixer jug G2. It can lead to a severe damage of these components or even the appliance itself.
- Do not use the appliance when it is out of order or its plug or cable is damaged, because it may pose a safety risk to the user. In such a case contact the Authorised Service Centre (APS) to have the defect rectified.
- Do not use accessories or attachments which are not authorised by the manufacturer, because it may result in damaging the appliance.
- Do not use the appliance outdoors.
- Do not hang the cable over sharp edges and never let it touch hot surfaces.
- Before starting the appliance make sure all the attachments and accessories are properly assembled.
-Before disassembly wait until the motor stops completely.
-To push the processed food use the blender pusher B3 or the juice extractor pusher H1. Other objects must not be used for this purpose, because it may result in damaging the appliance or injury.
-Before disassembly first disconnect the appliance from the mains supply and wait until the motor stops completely!
- Do not use the appliance when the juice extractor strainer is damaged.
-Pay particular attention when changing the cutting discs, while using the food processor, emptying and cleaning it!
- This appliance is not intended for use by children under 8 years of age and individuals with reduced physical, sensory or mental capabilities, or lack of experience and knowledge, unless they have been given supervision or instruction concerning use of the appliance in a safe way and if they understand the hazards involved. Cleaning and user maintenance shall not be carried out by children without supervision.
- Store the appliance and its cord out of reach of children under 8 years of age.
-Children should be supervised to ensure that they do not play with the appliance.
- Do not place the appliance in vicinity of electric and gas cookers, burners, ovens.
-Do not use the appliance outdoors.
-This appliance has been designed for domestic use only.
-Do not pull the plug by holding the power cord.
-Do not connect the power plug with wet hands.
-In order to ensure your children's safety, please keep all packaging (plastic bags, boxes, polystyrene etc.) out of their reach.
- WARNING! Do not allow small children to play with the foil as there is a danger of suffocation!
ACCESSORIES
At the beginning of the manual there are illustrations showing the component parts the food processor KASIA type 116. These illustrations also demonstrate the assembly sequence of the individual attachments and accessories.
A - PROCESSING UNIT
A 1 - driving shaft
A2 - main switch and speed controller knob
A3 - position 1 (slow motor speed)
A4 - position 2 (average motor speed)
A5 - position 3 (fast motor speed)
A6 - OFF position (switched off)
A7 - PULSE position (enables starting the appliance for the time of keeping the switch in this position)
B - BLENDER
B1 - container of the blender
B2 - lid of the blender
B3 - pusher of the blender
C - DISCS
C1/2 - slicing disc
C3 - French fries disc
C4/5 - medium and coarse shredding disc
C6 - fine shredding disc
C7 - disc holder
D - CITRUS SQUEEZER
D1 - squeezer head
D2 - squeezer container
E - SPATULA
F - DOUGH HOOK AND METAL CUTTER
F1 - dough hook
F2 - meat and vegetable metal cutter
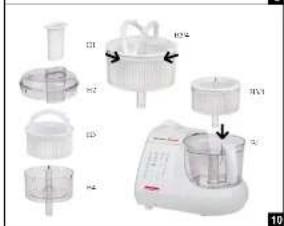
G - MIXER
G1 - lid of the mixer
G2 - jug of the mixer
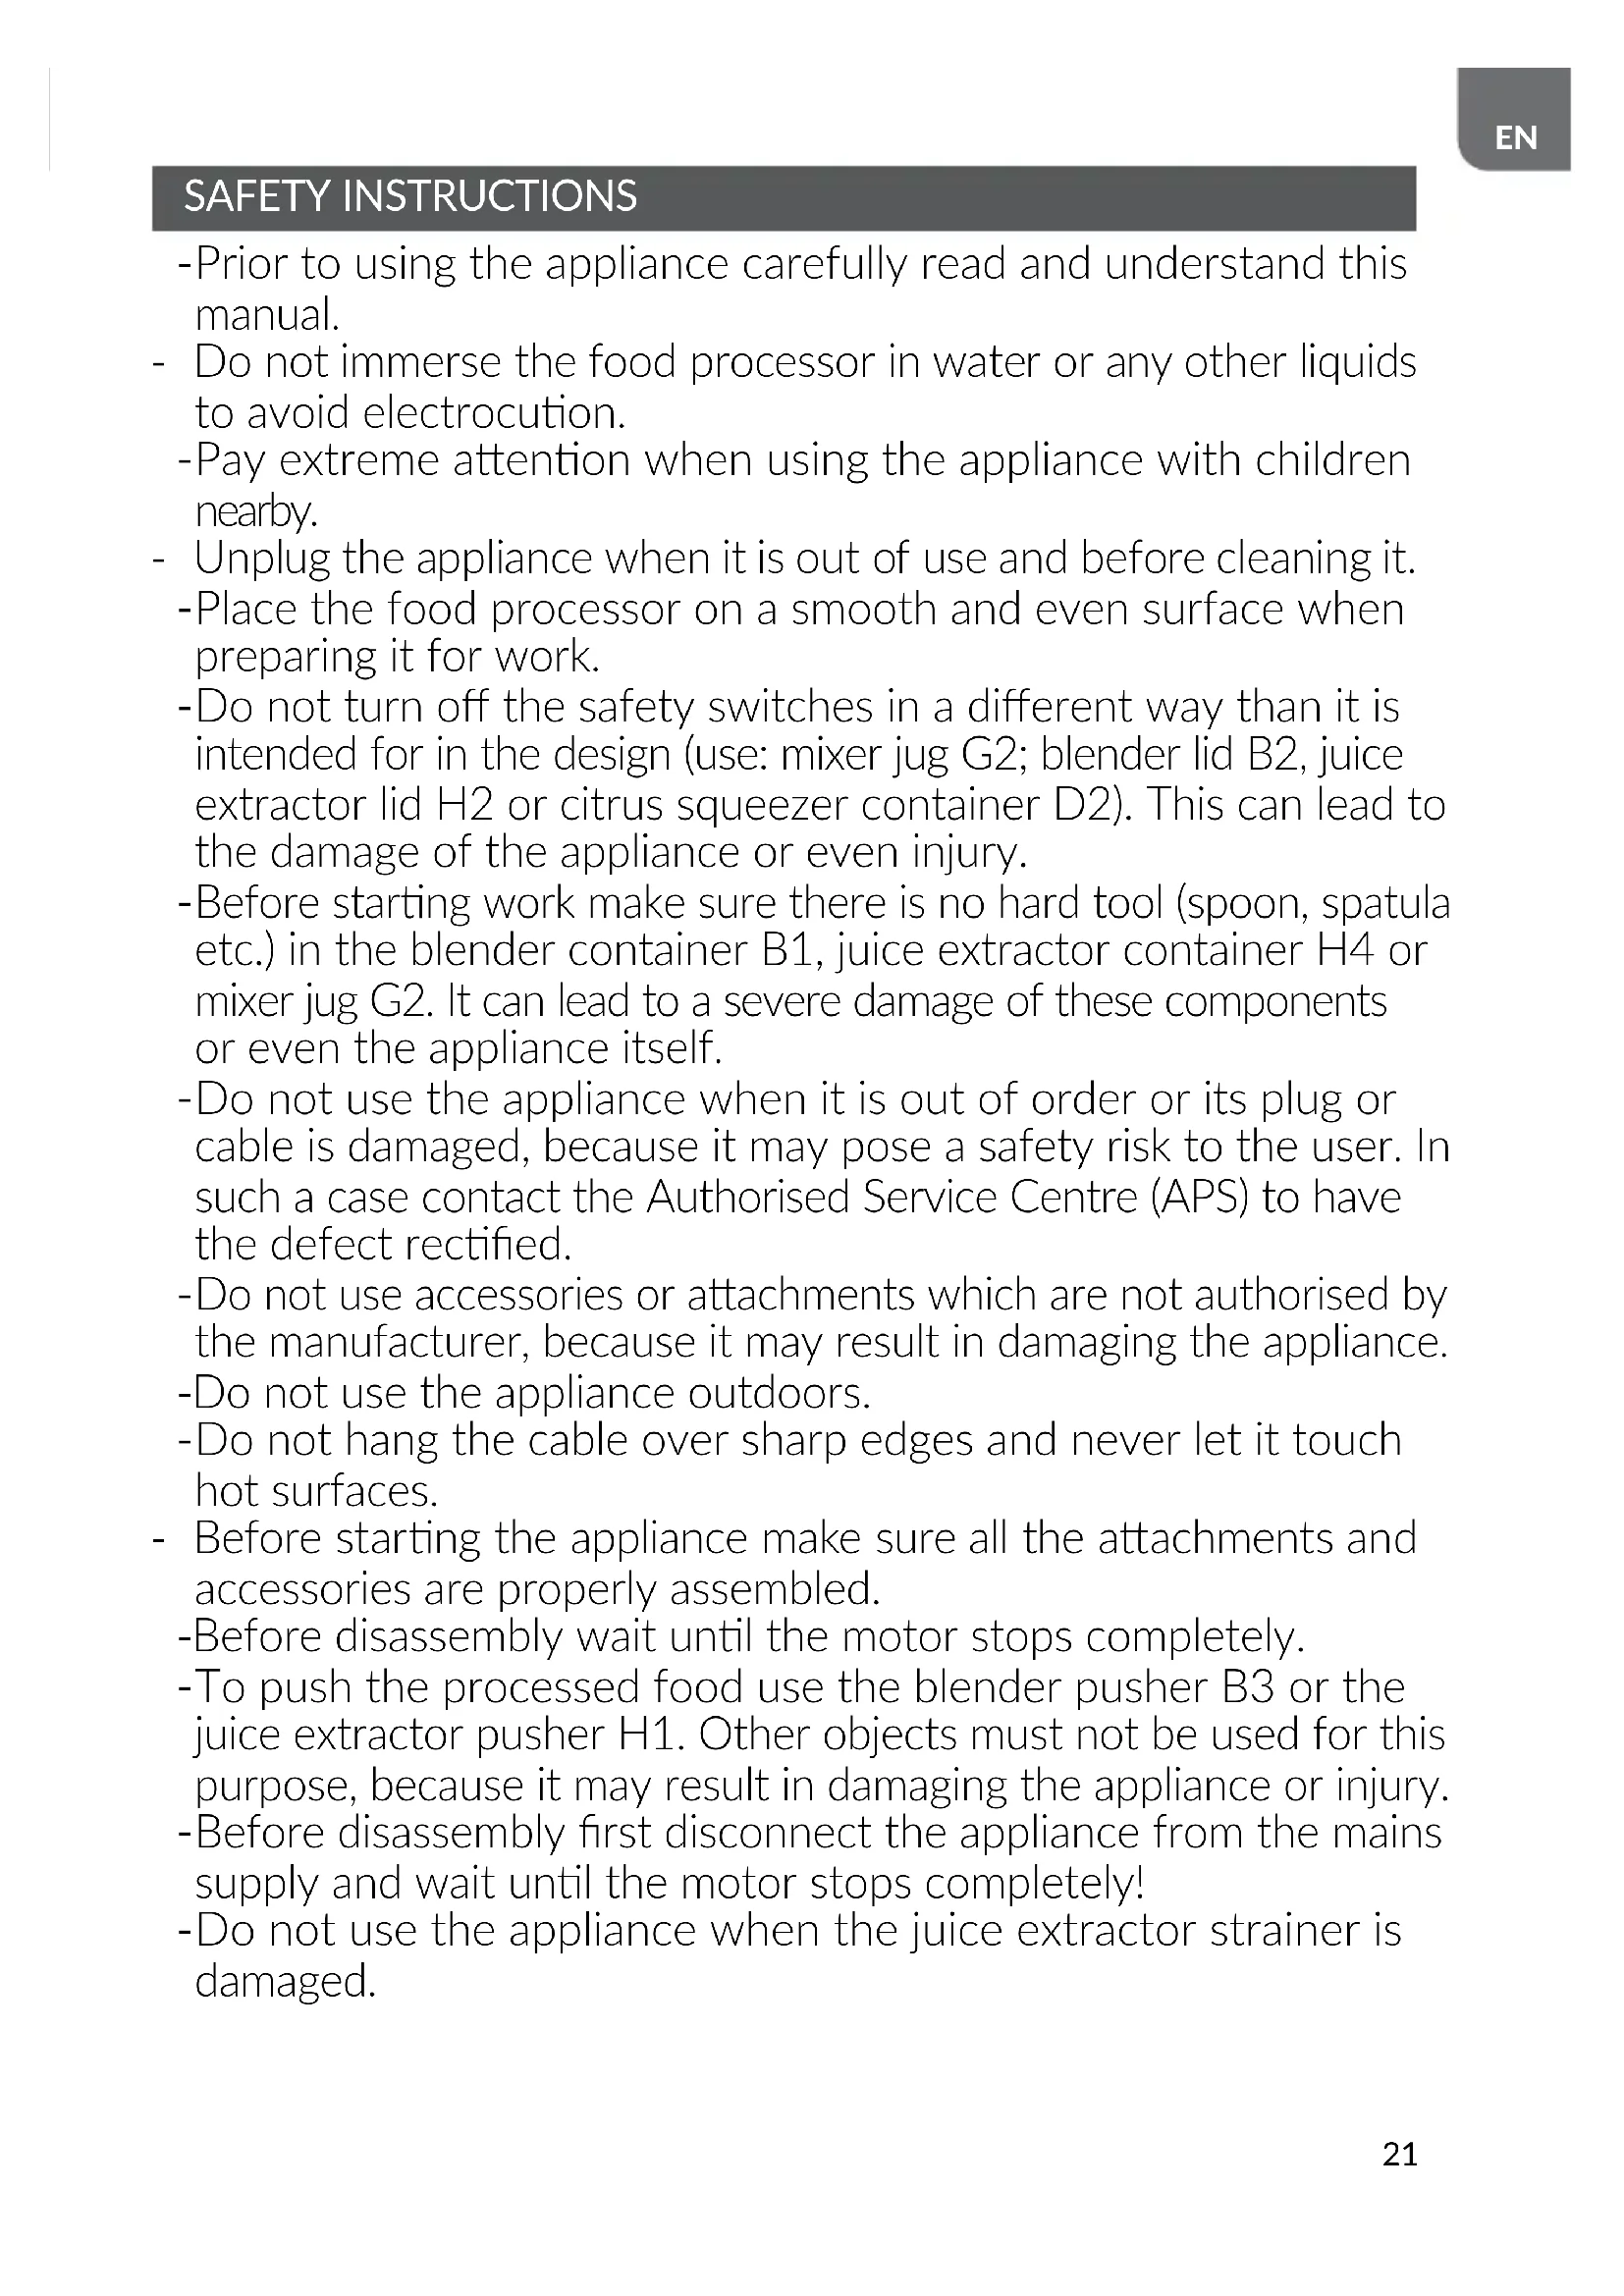
H - JUICE EXTRACTOR
H1 - pusher of the juice extractor
H2 - lid of the juice extractor
H3 - filter of the juice extractor
H4 - container of the juice extractor
I - EGG WHIPPER
I1 - egg whipper head
12 - egg whipper end
J - ACCESSORIES STAND
BEFORE FIRST USE
After purchasing and unpacking the appliance, wash all the attachments and accessories in warm water. Do not immerse the processing unit in water or other liquids, but only wipe it with a damp cloth. Carefully read the following instructions.
DOUGH KNEADING
To start operation attach the blender container B1 onto the processing unit A. Place the blender container on the driving shaft of the processing unit A1, with the handle directed at you, and turn it counterclockwise until the clasps snap in place. Place the dough hook F1 in the blender container. Place the food to be processed into the blender container, put on the blender lid B2, turning it counterclockwise until the fastening clasps snap closed. The blender is now ready to use. Place other food products in the blender container through the opening in the lid and push them with the blender pusher B3, if necessary. The blender pusher may also be used for dosing loose and liquid ingredients.
ATTENTION! When kneading the dough, make sure it does not form a ball, because it may damage the appliance.
Recommended speeds: in the initial phase of dough kneading, it is advised to set the speed controller in the first level, and turn it up after a few seconds of work, depending on the type of dough.
CHOPPING
For this function use the blender container B1 as well, and to attach it follow the same procedure as for the dough kneading, but instead of the hook use the metal knife for meat and vegetables F2. Use this attachment to chop meat or vegetables.
Recommended speed: for chopping use settings 2 or 3 or the PULSE function – A7. If it is necessary to push the products placed in the blender container through the opening in the lid, use only the blender pusher B3.
MIXING
Remove the blender container B1 from the processing unit A by turning it clockwise. Then place there the mixer jug G2 and turn it counterclockwise until the clasps snap in place.
Place the ingredients to be mixed into the jug.
ATTENTION! Do not fill the jug with hot liquids. Do not pour more than 1 l of liquids into the mixer jug.
Recommended speed: adjust the speed of the mixer to the recipe or your own needs.
WHIPPING EGG WHITES
Put the egg whipper head I1, together with the whipper end I2, on the blender container B1 on the driving shaft A1 and close with the blender lid B2. Twist it counterclockwise until the clasps snap closed.
Use the egg whipper only to make foam from egg whites. When trying to use the whipper to mix even the most delicate of dough, it may result in damaging the whipper head I1 and repair costs will not be covered by the warranty.
Recommended speed: best use speed setting 3.
SHREDDING AND GRATING
Attach the disc holder C7 to the blender bowl B1 on the driving shaft A1. Place one of the metal discs C1/2-C6 on the disc holder, depending on the products which will be processed and what effect you want to achieve. Next, place the lid B2 and turn it counterclockwise, until the clasps snap shut.
ATTENTION! Use only the blender pusher B3 to hold down and push the processed products.
Recommended speed: depending on the disc, use speed setting 2 or 3. The PULSE function A7 may also be used.
JUICE EXTRACTOR
Attach the juice extractor container H4 with the filter H3 in the blender container B1 on the driving shaft A1. Next, place the juice extractor lid H2 and turn it counterclockwise, until the clasps snap shut. Feed the fruit you want to juice through the opening in the lid and push or hold them down only with the pusher H1.
Recommended speed: for highest juicing efficiency use speed setting 3, because at these setting of the speed controller the centrifugal force in the container is greatest and can transfer the juice extracted in the juice extractor container to the container of the blender.
CITRUS SQUEEZING
Place the squeezer container D2 in the blender container B1 and turn it counterclockwise, until the clasps snap shut. Next, place the squeezer head D1 in the opening in the squeezer container to attach it to the driving shaft A1. Cut each citrus fruit you want to squeeze into halves and place each half with the pulp facing the squeezer head.
Recommended speed: set the speed controller to the setting 1.
ATTENTION! The blender container can maximally contain 1.5 litre of juice.
ACCESSORIES STAND
As a standard equipment, the food processor KASIA type 116 has an accessory stand, which makes it easier to store the appliance's attachments. The following attachments can be placed on the stand: discs C, citrus squeezer D, spatula E, dough hook and metal cutter F, egg whites whipper I.
CLEANING AND MAINTENANCE
Before cleaning the appliance always unplug it. Disassemble the attachments and accessories in the order reverse from that in which they were attached for their functions. Wash all the attachments and accessories in water with a cleaning agent (preferably right after use, which makes the cleaning process easier) and then dry them.
Never immerse the processing unit A in water or any other liquids. It should only be wiped with a damp cloth.
ATTENTION! Pay attention when touching cutting blades, especially when removing them from the container, emptying it and during cleaning.
NO OPERATION
- Check if the appliance is properly plugged in to the mains and if there is power in the socket.
- Check if the blender container B1, the blender lid B2 and the juice extractor lid H2, squeezer container D2 or mixer jug G3 are properly assembled.
- If everything is properly assembled and attached, and the appliance still does not work, contact an Authorised Service Centre to have the defect identified and rectified.
TECHNICAL DATA
Power supply: 230V \~50Hz
Maximum power: 800 W
Maximum rotation: 13100 rpm
Speed settings: 3 + PULSE function
Capacity of the blender container: 1.5 litre
Capacity of the mixer jug: 1.0 litre
KB MAX = 5 min
$$ L _ {W A} = 7 5 \mathrm{dB} $$

NOTE! MPM agd S.A. reserves its right to modify the technical data.
Proper disposal of the product (waste electrical and electronic equipment)

Marking on the product indicates that after the service-life of the product expires, it should not be disposed with other type of municipal waste. Used equipment may have a negative impact on the environment and health of people due to potentially containing hazardous substances, mixtures and components.
Mixing electric waste with other types of waste or disassembling those in an unprofessional manner may cause a release of substances that are hazardous to the environment and health. Used equipment should
be handed-over to a point for collection of electric waste. In order to obtain detailed information regarding the electric waste collection points, the user should contact the municipal point of electric waste collection or used equipment processing department.
F - KABLIO MIŠINYS IR METALINIS PEILIS
KAI JRENGINYS NEVEIKIA
J - BASIS VOOR ACCESSOIRES
D - WYCISKACZ DO OWOCÓW CYTRU-
- BEZPEČNOSTNÍ TIPY PRO POUŽITÍ
- A - PRACOVNÍ JEDNOTKA
- I - VAHTPEKSJA
- J - BAAS TARVIKUTE JAOKS
- ENNE ESMAKORDSET KASUTAMIST
- ACCESSORIES
- A - PROCESSING UNIT
- B - BLENDER
- C - DISCS
- D - CITRUS SQUEEZER
- E - SPATULA
- F - DOUGH HOOK AND METAL CUTTER
- G - MIXER
- H - JUICE EXTRACTOR
- I - EGG WHIPPER
- J - ACCESSORIES STAND
- BEFORE FIRST USE
- DOUGH KNEADING
- CHOPPING
- MIXING
- WHIPPING EGG WHITES
- SHREDDING AND GRATING
- JUICE EXTRACTOR
- CITRUS SQUEEZING
- ACCESSORIES STAND
- CLEANING AND MAINTENANCE
- NO OPERATION
- TECHNICAL DATA
- Proper disposal of the product (waste electrical and electronic equipment)
- F - KABLIO MIŠINYS IR METALINIS PEILIS
- KAI JRENGINYS NEVEIKIA
- J - BASIS VOOR ACCESSOIRES
- D - WYCISKACZ DO OWOCÓW CYTRU-
Brand : MPM
Model : MRK11
Category : Food Processor