GDM5510 - Other computer accessories SONY - Free user manual and instructions
Find the device manual for free GDM5510 SONY in PDF.
| Product Type | 21-inch CRT Monitor (Trinitron screen) |
| Brand | Sony |
| Model | GDM-5510 |
| Screen Size | 21 inches (diagonal) / Display area 403.8 x 302.2 mm |
| Display Technology | Trinitron FD (aperture grille 0.24 mm) |
| Maximum Resolution | 2048 x 1536 pixels |
| Recommended Resolution | 1600 x 1200 pixels |
| Scan Frequencies | Horizontal 30-130 kHz, Vertical 48-170 Hz |
| Input Signal | Analog RGB 0.700 Vp-p, 75 Ω |
| Synchronization | Separate H/V, composite or sync on green |
| Input Connectors | 1x 13W3 (input 1), 1x HD15 (input 2) |
| Power Supply | 100-240 V AC, 50-60 Hz, 135 W max |
| Standby Consumption | ≤ 3 W (inactive mode) |
| Dimensions (L x H x P) | 501 x 508 x 505 mm |
| Weight | Approximately 31.5 kg |
| Adjustment Functions | Contrast, brightness, size, centering, geometry, convergence, moiré, color (temperature, sRGB, expert) |
| Power Saving Function | Yes (VESA, ENERGY STAR, NUTEK compliant) |
| On-Screen Display (OSD) | Multilingual menu (English, French, German, etc.) |
| Plug & Play | DDC2B/DDC2Bi, GTF |
| Operating Temperature | 10°C to 40°C |
| Maintenance | Soft cloth, no abrasive products |
| Safety | Use a power cord suitable for the mains voltage |
Frequently Asked Questions - GDM5510 SONY
User questions about GDM5510 SONY
0 question about this device. Answer the ones you know or ask your own.
Ask a new question about this device
Download the instructions for your Other computer accessories in PDF format for free! Find your manual GDM5510 - SONY and take your electronic device back in hand. On this page are published all the documents necessary for the use of your device. GDM5510 by SONY.
USER MANUAL GDM5510 SONY
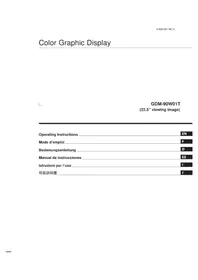
21-Inch FD Premium (19.8-inch Viewable)
Color Monitor GuideMonitor Guide
Operating Instructions
Before operating the unit, please read this manual thoroughly and retain it for future reference.
Mode d'emploi
Identifying parts and controls 4
Setup....5
Step 1: Connect your monitor to your computer ..... 5
Step 2: Connect the power cord .... 5
Step 3: Turn on the monitor and computer ..... 5
Selecting the on-screen menu language (LANGUAGE) ..... 6
Selecting the input signal 6
Customizing Your Monitor 7
Navigating the menu 7
Adjusting the brightness and contrast (CONTRAST/BRIGHT) .... 8
Adjusting the centering of the picture (SIZE/CENTER) 9
Adjusting the size of the picture (SIZE/CENTER) 9
Automatically sizing and centering the picture (AUTO) 9
Adjusting the shape of the picture (GEOMETRY) ..... 10
Adjusting the convergence (CONVERGENCE) ..... 10
Adjusting the picture quality (SCREEN) 11
Adjusting the color of the picture (COLOR) 12
Additional settings (OPTION)....14
Resetting the adjustments (RESET) 14
Technical Features ....15
Preset mode timing table 15
Power saving function 15
Troubleshooting....15
If thin lines appear on your screen (damper wires) 15
On-screen messages 15
Trouble symptoms and remedies 17
Self-diagnosis function 19
Specifications....19
- Trinitron ^® is a registered trademark of Sony Corporation.
- VESA and DDC ^TM are trademarks of the Video Electronics Standard Association.
• ENERGY STAR is a U.S. registered mark. - All other product names mentioned herein may be the trademarks or registered trademarks of their respective companies.
- Furthermore, “TM” and “®” are not mentioned in each case in this manual.
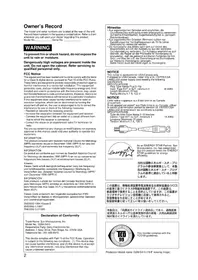
Precautions
Warning on power connections
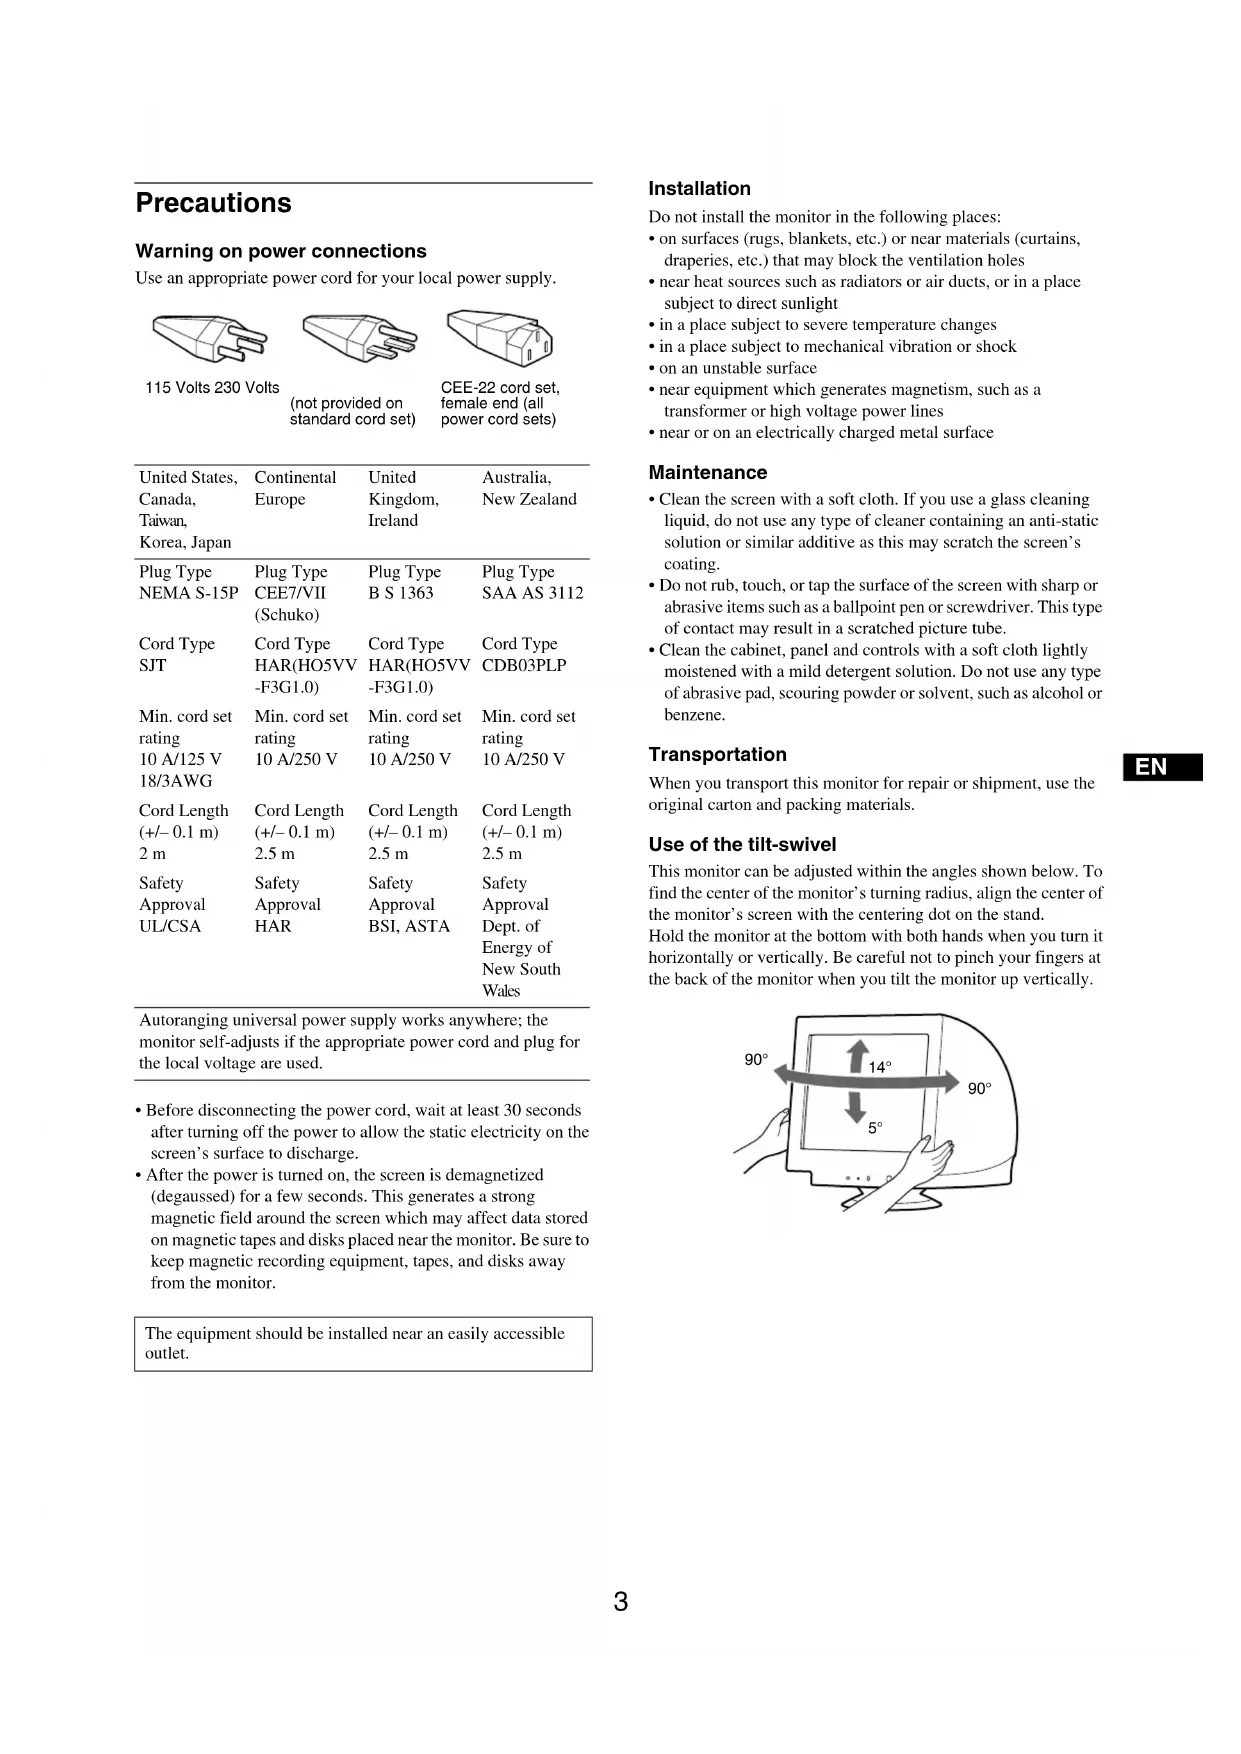
Use an appropriate power cord for your local power supply.

115 Volts 230 Volts
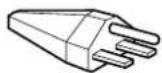
(not provided on standard cord set)
CEE-22 cord set, female end (all power cord sets)
| United States, Canada, Taiwan, Korea, Japan | Continental Europe | United Kingdom, Ireland | Australia, New Zealand |
| Plug Type NEMA S-15P | Plug Type CEE7/VII (Schuko) | Plug Type B S 1363 | Plug Type SAA AS 3112 |
| Cord Type SJT | Cord Type HAR(HO5VV -F3G1.0) | Cord Type HAR(HO5VV -F3G1.0) | Cord Type CDB03PLP |
| Min. cord set rating 10 A/125 V 18/3AWG | Min. cord set rating 10 A/250 V | Min. cord set rating 10 A/250 V | Min. cord set rating 10 A/250 V |
| Cord Length (+/- 0.1 m) 2 m | Cord Length (+/- 0.1 m) 2.5 m | Cord Length (+/- 0.1 m) 2.5 m | Cord Length (+/- 0.1 m) 2.5 m |
| Safety Approval UL/CSA | Safety Approval HAR | Safety Approval BSI, ASTA | Safety Approval Dcept. of Energy of New South Wales |
Autoranging universal power supply works anywhere; the monitor self-adjusts if the appropriate power cord and plug for the local voltage are used.
- Before disconnecting the power cord, wait at least 30 seconds after turning off the power to allow the static electricity on the screen's surface to discharge.
• After the power is turned on, the screen is demagnetized (degaussed) for a few seconds. This generates a strong magnetic field around the screen which may affect data stored on magnetic tapes and disks placed near the monitor. Be sure to keep magnetic recording equipment, tapes, and disks away from the monitor.
The equipment should be installed near an easily accessible outlet.
Installation
Do not install the monitor in the following places:
- on surfaces (rugs, blankets, etc.) or near materials (curtains, draperies, etc.) that may block the ventilation holes
- near heat sources such as radiators or air ducts, or in a place subject to direct sunlight
• in a place subject to severe temperature changes
• in a place subject to mechanical vibration or shock
• on an unstable surface - near equipment which generates magnetism, such as a transformer or high voltage power lines
• near or on an electrically charged metal surface
Maintenance
- Clean the screen with a soft cloth. If you use a glass cleaning liquid, do not use any type of cleaner containing an anti-static solution or similar additive as this may scratch the screen's coating.
- Do not rub, touch, or tap the surface of the screen with sharp or abrasive items such as a ballpoint pen or screwdriver. This type of contact may result in a scratched picture tube.
- Clean the cabinet, panel and controls with a soft cloth lightly moistened with a mild detergent solution. Do not use any type of abrasive pad, scouring powder or solvent, such as alcohol or benzene.
Transportation
When you transport this monitor for repair or shipment, use the original carton and packing materials.
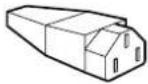
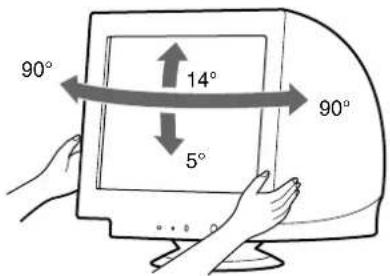
Use of the tilt-swivel
This monitor can be adjusted within the angles shown below. To find the center of the monitor's turning radius, align the center of the monitor's screen with the centering dot on the stand.
Hold the monitor at the bottom with both hands when you turn it horizontally or vertically. Be careful not to pinch your fingers at the back of the monitor when you tilt the monitor up vertically.
Identifying parts and controls
See the pages in parentheses for further details.
Front
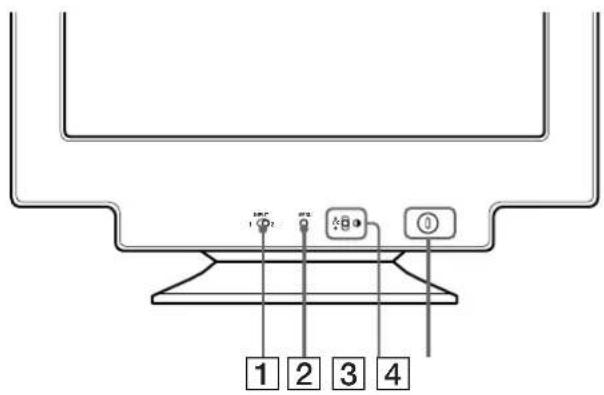
1 INPUT (input) switch (page 6)
This switch selects the INPUT 1 (video input 1 (13W3) connector: ☑1) or INPUT 2 (video input 2 (HD15) connector: ☑2).
② MENU button (page 7)
This button is used to display or close the menu.
3 Control button (OK, ↑/↓) (page 8)
This button is used to make adjustments to the monitor and call up the CONTRAST menu directly.
4 ① (power) switch and indicator (pages 5, 15, 19)
This button turns the monitor on and off. The power indicator lights up in green when the monitor is turned on, and lights up in orange when the monitor is in power saving mode.
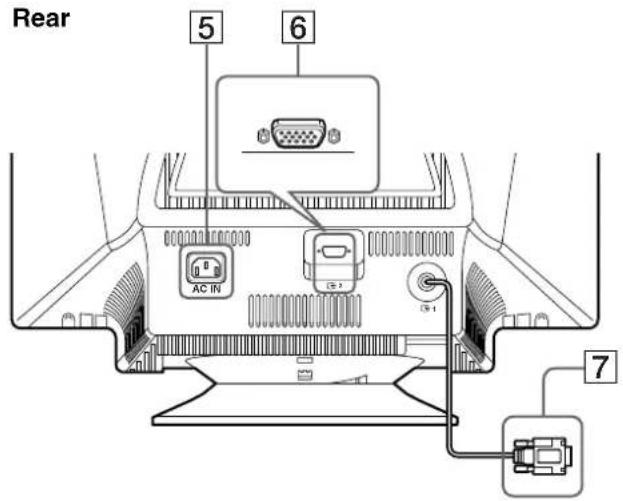
5 AC IN connector (page 5)
This connector provides AC power to the monitor.
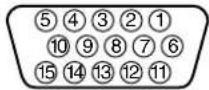
6 Video input 2 connector (HD15) (page 5)
This connector inputs RGB video signals (0.700 Vp-p, positive) and sync signals.
7 Video input 1 connector (13W3) (page 5)
This connector inputs RGB video signals (0.700 Vp-p, positive) and sync signals.
6 HD15
7 13W3
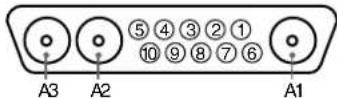
| No. | 6 Signal | 7 Signal |
| A1 — Red | ||
| A2 — Green | ||
| A3 — Blue | ||
| 1 Red Data Clock (SCL)* | ||
| 2 | G r e e n DDC + 5V* (Composite Sync on Green) | |
| 3 | B l u e | — |
| 4 ID (Ground) | DDC Ground* | |
| 5 DDC Ground* | C Sync** | |
| 6 Red Ground | Bi-Directional Data (SDA)* | |
| 7 Green Ground | V. Sync | |
| 8 | Blue Ground | ID (100Ω) |
| 9 | DDC + 5V* | ID (100Ω) |
| 10 | Ground | Ground |
| 11 | ID (Ground) | — |
| 12 | Bi-Directional Data (SDA)* | — |
| 13 | H. Sync | — |
| 14 | V. Sync | — |
| 15 | Data Clock (SCL)* | — |
* DDC (Display Data Channel) is a standard of VESA.
**Pins serve a dual purpose as combined sync input and as H.sync input if V.Sync is present on pin no. 7.
Setup
This monitor works with platforms running at horizontal frequencies between 30 and 130 kHz.
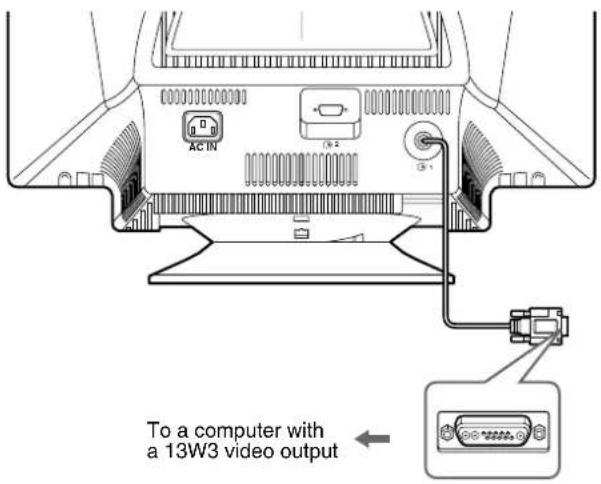
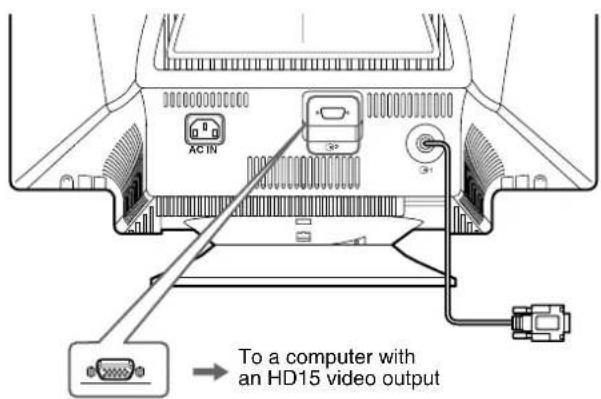
Step 1: Connect your monitor to your computer
Turn off the monitor and computer before connecting.
Notes
- Do not touch the pins of the video signal cable connector as this might bend the pins.
- When connecting the video signal cable, check the alignment of the HD15 connector. Do not force the connector in the wrong way or the pins might bend.
■Connecting to the 13W3 connector
■Connecting to the HD15 connector
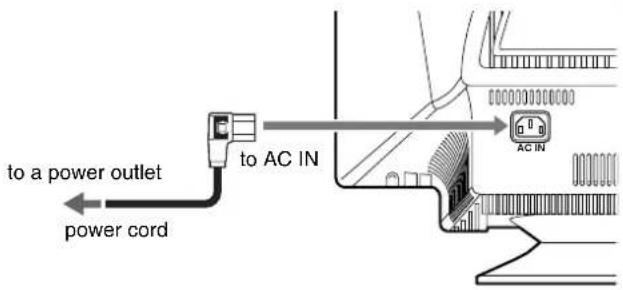
Step 2: Connect the power cord
With the monitor and computer switched off, first connect the power cord to the monitor, then connect it to a power outlet.
Step 3: Turn on the monitor and computer
First turn on the monitor, then turn on the computer.

The installation of your monitor is complete.
If necessary, use the monitor's controls to adjust the picture.
If no picture appears on your screen
- Check that the monitor is correctly connected to the computer.
- If NO SIGNAL appears on the screen, try changing the input signal (page 6), and confirm that your computer's graphics board is completely seated in the correct bus slot.
- If you are replacing an old monitor with this model and OUT OF SCAN RANGE appears on the screen, reconnect the old monitor. Then adjust the computer's graphics board so that the horizontal frequency is between 30 – 130 kHz and the vertical frequency is between 48 – 170 Hz.
For more information about the on-screen messages, see "Trouble symptoms and remedies" on page 17.
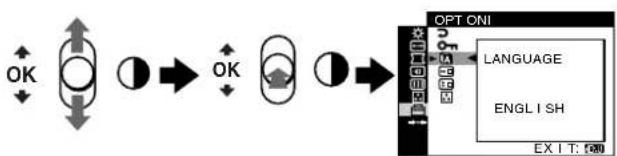
Selecting the on-screen menu language (LANGUAGE)
English, French, German, Spanish, Italian, Dutch, Swedish, Russian and Japanese versions of the on-screen menus are available. The default setting is English.
1 Press the MENU button.
The menu appears on the screen.
2 Move the control button up or down to highlight OPTION and press the control button.

flowchart
graph LR
    A["OK"] --> B["ON"]
    B --> C["ON"]
    C --> D["OFF"]
    D --> E["CONTROL LOCK"]
3 Move the control button up or down to highlight A LANGUAGE and press the control button.
flowchart
graph LR
    A["OK"] --> B["O"]
    B --> C["OK"]
    C --> D["O"]
    D --> E["OPT ONI"]
    E --> F["LANGUAGE"]
    E --> G["ENGLISH"]
    E --> H["EXIT: 50"]
4 Move the control button up or down until the desired language appears on the screen. Then press the control button to select the language.
Each time you move the control button up and down, the selectable languages appear cyclically.
• ENGLISH
• FRANÇAIS: French
• DEUTSCH: German
- ESPAÑOL: Spanish
• ITALIANO: Italian
• NEDERLANDS: Dutch
• SVENSKA: Swedish
•:Русский
• :日本語csc
To close the menu
Press the MENU button. If no buttons are pressed, the menu closes automatically after about 45 seconds.
To reset to English
Select ENGLISH in step 4 above.
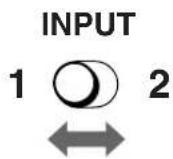
Selecting the input signal
You can connect two computers to this monitor using the video input 1 (13W3) and video input 2 (HD15) connectors. To select one of the two computers, use the INPUT switch.
Move the INPUT switch.
The selected connector appears on the screen for 3 seconds. "INPUT 1" or "INPUT 2" appears on the screen.
Note
If no signal is input to the selected connector, NO SIGNAL appears on the screen. After a few seconds, the monitor enters the power saving mode. If this happens, switch to the other connector.
Customizing Your Monitor
You can make numerous adjustments to your monitor using the on-screen menu.
Navigating the menu
Press the MENU button to display the menu on the screen. See page 8 for more information on using the MENU and control buttons.
Use the control button to select one of the following menus.
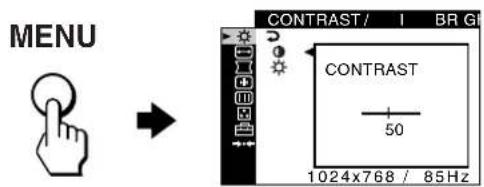
CONTRAST/BRIGHT (page 8)
Adjusts the contrast and brightness. You can also call up this menu directly by moving the control button up or down while there is no menu on the screen.
SIZE/CENTER (page 9)
Adjusts the size or centering.
□ GEOMETRY (page 10)
Adjusts the rotation and shape of the picture.

CONVERGENCE (page 10)
Adjusts the picture's horizontal and vertical convergence.
SCREEN (page 11)
Adjusts the picture's quality.
The options include:
• degaussing the screen (DEGAUSS)
• adjusting the moire cancellation (CANCEL MOIRE)
• adjusting the landing (LANDING)
COLOR (page 12)
Adjusts the picture's color temperature to match the monitor's colors to a printed picture's colors.

OPTION (page 14)
Adjusts the monitor's options.
The options include:
- locking the controls
- changing the on-screen menu language
- changing the on-screen menu position
- changing the picture's color temperature setting mode
→←RESET (page 14)
Resets the adjustments.
EN
■Displaying the current input signal
When you press the MENU button to display the menu, the horizontal/vertical frequencies of the current input signal are displayed in the menu. If the signal matches one of this monitor's factory preset modes, the resolution is also displayed.
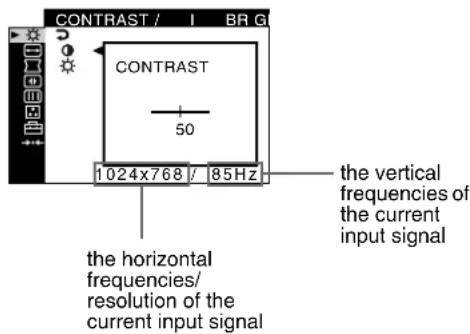
(continued)
■Using the MENU and control buttons
1 Display the menu.
Press the MENU button to display the menu on the screen.
MENU

2 Select the menu you want to adjust.
Highlight the desired menu by moving the control button up or down. Then press the control button.
flowchart
graph TD
    A["Vertical Arrow"] --> B["Circle with Up/Down Arrow"]
    B --> C["Arrow to Right"]
    C --> D["Circle with Up/Down Arrow"]
    D --> E["Circle with Down Arrow"]
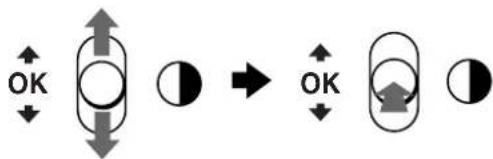
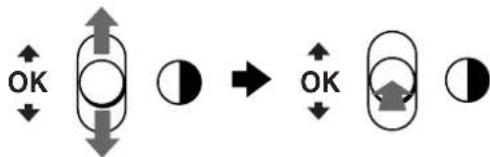
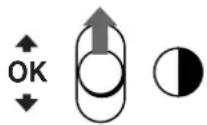
3 Adjust the menu.
Move the control button up or down to make the adjustment and press the control button.
If you want to select another menu;
move the control button up or down to select and press the control button to exit the menu.
flowchart
graph TD
    A["Circle with upward arrow"] --> B["Oval with downward arrow"]
    C["Circle with crescent symbol"] --> D["Oval with upward arrow"]
    style A fill:#f9f,stroke:#333
    style B fill:#ccf,stroke:#333
    style C fill:#cfc,stroke:#333
    style D fill:#fcc,stroke:#333
4 Close the menu.
Press the MENU button. If no buttons are pressed, the menu closes automatically after about 45 seconds.
MENU
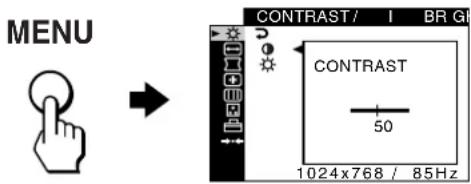
Adjusting the brightness and contrast (CONTRAST/BRIGHT)
These settings are stored in memory for the signals from the currently selected input connector.
1 Press the MENU button.
The menu appears on the screen.
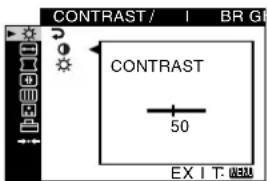
2 Move the control button up or down to highlight. Then press the control button.
The CONTRAST/BRIGHT menu appears on the screen.
3 Move the control button up or down to highlight ⏻ or ⚙Then press the control button.
4 Move the control button up or down to adjust the contrast (0) or brightness (0). Then press the control button.
If you are using the sRGB mode
If you selected the sRGB mode in the COLOR MODE (☐ of the OPTION (☐ menu, the following CONTRAST/BRIGHT menu appears on the screen.
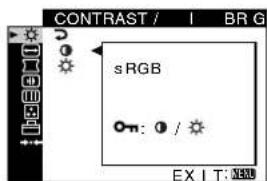
You cannot adjust the contrast (○) or brightness (○) on this screen. If you want to adjust them, select a mode other than sRGB in the COLOR MODE (Zof the OPTION ( ) menu.
For more information about using the sRGB mode, see "Adjusting the color of the picture (COLOR)" on page 12.
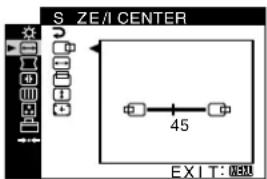
Adjusting the centering of the picture (SIZE/CENTER)
This setting is stored in memory for the current input signal.
1 Press the MENU button.
The menu appears on the screen.
2 Move the control button up or down to highlight
SIZE/CENTER and press the control button.
The SIZE/CENTER menu appears on the screen.
3 Move the control button up or down to select for
horizontal adjustment, or for vertical adjustment.
Then press the control button.
4 Move the control button up or down to adjust the
Adjusting the size of the picture (SIZE/CENTER)
This setting is stored in memory for the current input signal.
1 Press the MENU button.
The menu appears on the screen.
2 Move the control button up or down to highlight
← SIZE/CENTER and press the control button.
The SIZE/CENTER menu appears on the screen.
3 Move the control button up or down to select for
horizontal adjustment, or for vertical
adjustment. Then press the control button.
4 Move the control button up or down to adjust the
size.
Automatically sizing and centering the picture (AUTO)
You can easily adjust the picture to fill the screen by using the SIZE/CENTER menu.
1 Press the MENU button.
The menu appears on the screen.
2 Move the control button up or down to highlight
SIZE/CENTER and press the control button.
The SIZE/CENTER menu appears on the screen.
3 Move the control button up or down to select
(AUTO). Then press the control button.
The adjustment window appears on the screen.
4 Move the control button up or down to select OK.
Then press the control button.
The picture automatically fills the screen.
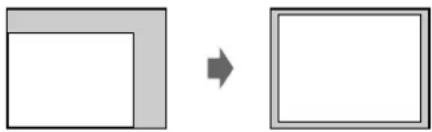
natural_image
Two geometric shapes: a square with a gray border and a rectangle with a white border, both rotated by an arrow (no text or symbols)Notes
- If you do not want to use the AUTO function, select CANCEL in step 4.
- This function is intended for use with a computer that provides a full-screen picture. It may not work properly if the background color is dark or if the input picture does not fill the screen to the edges.
- The displayed image moves for a few seconds while this function is performed. This is not a malfunction.
Adjusting the shape of the picture (GEOMETRY)Y)
The GEOMETRY settings allow you to adjust the rotation and shape of the picture.
The (rotation) setting is stored in memory for all input signals.
All other settings are stored in memory for the current input signal.
1 Press the MENU button.
The menu appears on the screen.
2 Move the control button up or down to highlight □ GEOMETRY and press the control button.
The GEOMETRY menu appears on the screen.
3 Move the control button up or down to select the desired adjustment item. Then press the control button.
The adjustment bar appears on the screen.
4 Move the control button up or down to make the adjustment. Then press the control button.
| Select To | |
| rotate the picture | |
| expand or contract the picture sides | |
| shift the picture sides to the left or right | |
| adjust the picture width at the top of the screen | |
| shift the picture to the left or right at the top of the screen | |
| RESET | reset all the GEOMETRY adjustments to the factory setting levels. Select OK. |
For more information about using the RESET mode, see
"Resetting the adjustments (RESET)" on page 14.
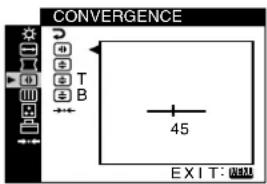
Adjusting the convergence (CONVERGENCE)
The CONVERGENCE settings allow you to adjust the quality of the picture by controlling the convergence. The convergence refers to the alignment of the red, green, and blue color signals. If you see red or blue shadows around letters or lines, adjust the convergence.
These settings are stored in memory for all input signals.
1 Press the MENU button.
The menu appears on the screen.
2 Move the control button up or down to highlight CONVERGENCE and press the control button. The CONVERGENCE menu appears on the screen.
3 Move the control button up or down to select the desired adjustment item. Then press the control button.
The adjustment bar appears on the screen.
4 Move the control button up or down to make the adjustment. Then press the control button.
| Select To | |
| horizontally shift red or blue shadows | |
| vertically shift red or blue shadows | |
| T TOP | vertically shift red or blue shadows at the top of the screen |
| B BOTTOM | vertically shift red or blue shadows at the bottom of the screen |
| RESET | reset all the CONVERGENCE adjustments to the factory setting levels. Select OK. |
For more information about using the RESET mode, see
"Resetting the adjustments (RESET)" on page 14.
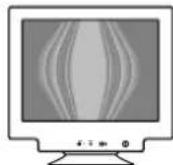
Adjusting the picture quality (SCREEN)
The SCREEN settings allow you to degauss (demagnetize) the monitor manually and adjust the picture quality by controlling the moire and landing.
- If the color is not uniform or the picture is fuzzy, degauss the monitor (DEGAUSS).
- If elliptical or wavy patterns appear on the screen, cancel the moire (CANCEL MOIRE).
- If the color is irregular at the corners of the screen, adjust the landing (LANDING).
The monitor is automatically demagnetized (degaussed) when the power is turned on.
The screen is degaussed for about 2 seconds. If a second degauss cycle is needed, allow a minimum interval of 20 minutes for the best result.
The CANCEL MOIRE setting is stored in memory for the current input signal. All other settings are stored in memory for all input signals.
1 Press the MENU button.
The menu appears on the screen.
2 Move the control button up or down to highlight SCREEN and press the control button.
The SCREEN menu appears on the screen.
3 Move the control button up or down to select the desired adjustment item. Then press the control button.
The adjustment bar appears on the screen.
4 Move the control button up or down to make the adjustment. Then press the control button.
| Select To | |
| DEGAUSS | degauss the monitor. To degauss the monitor manually, select OK. |
| CANCEL MOIRE | adjust the degree of moire cancellation until the moire* is at a minimum |
| LANDING | reduce any color irregularities in the screen's top left corner to a minimum |
| LANDING | reduce any color irregularities in the screen's top right corner to a minimum |
| LANDING | reduce any color irregularities in the screen's bottom left corner to a minimum |
| LANDING | reduce any color irregularities in the screen's bottom right corner to a minimum |
| RESET | reset all the SCREEN adjustments to the factory setting levels. Select OK. |
* Moire is a type of natural interference which produces soft, wavy lines on your screen. It may appear due to interference between the pattern of the picture on the screen and the phosphor pitch pattern of the monitor.
Example of moire
Note
The picture may become fuzzy when the CANCEL MOIRE function is activated.
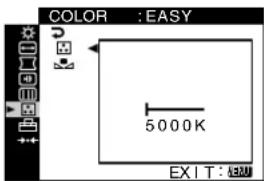
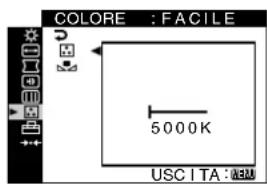
Adjusting the color of the picture (COLOR)
The COLOR settings allow you to adjust the picture's color temperature by changing the color level of the white color field. Colors appear reddish if the temperature is low, and bluish if the temperature is high. This adjustment is useful for matching the monitor's color to a printed picture's colors.
You can set the color temperature for each of the video input connectors.
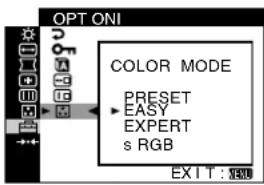
■Select the COLOR mode
There are 4 types of adjustment modes, EASY, PRESET, EXPERT, and sRGB. The default setting is EASY which can be adjustable from 5000K to 11000K.
If you want to set another mode (other than EASY), select the desired mode in the OPTION (menu). Then adjust the selected mode in each COLOR (menu.
1 Press the MENU button.
The menu appears on the screen.
2 Move the control button up or down to highlight OPTION and press the control button.
The OPTION menu appears on the screen.
3 Move the control button up or down to highlight ☐ COLOR MODE. Then press the control button.
4 Move the control button up or down to select the COLOR mode.
■EASY mode
1 Press the MENU button. The menu appears on the screen.
2 Move the control button up or down to highlight COLOR and press the control button. The COLOR menu appears on the screen.
3 Move the control button up or down to highlight. Then press the control button.
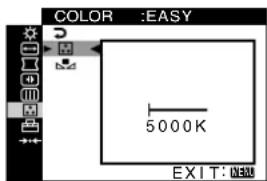
4 Move the control button up or down to fine tune the color temperature. The new color temperature setting you fine tuned between 5000K to 11000K is stored in memory.
■PRESET mode
1 Press the MENU button. The menu appears on the screen.
2 Move the control button up or down to highlight COLOR and press the control button. The COLOR menu appears on the screen.
3 Move the control button up or down to highlight. Then press the control button.
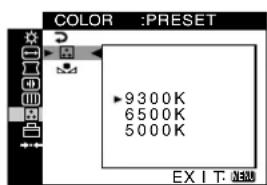
4 Move the control button up or down to select the desired temperature. The preset color temperatures are 5000K, 6500K, and 9300K. Since the default setting is 9300K, the whites will change from a bluish hue to a reddish hue as the temperature is lowered to 6500K and 5000K.
(continued)
■EXPERT mode
You can make additional adjustments to the color in greater detail by selecting the EXPERT mode.
1 Press the MENU button.
The menu appears on the screen.
2 Move the control button up or down to highlight ☐ COLOR and press the control button.
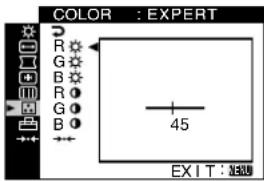
3 Move the control button up or down to adjust the R (red), G (green), and B (blue) component of input signal for each of GAIN (O) and BIAS (F). Then press the control button.
If you want to reset the EXPERT adjustments, select (RESET) in COLOR menu. Then select OK in the RESET window.
■sRGB mode
The sRGB color setting is an industry standard color space protocol designed to correlate the displayed and printed colors of sRGB compliant computer products. To adjust the colors to the sRGB profile, simply select the sRGB mode in the COLOR MODE (☐menu of the OPTION () menu.
However, in order to display the sRGB colors correctly ( = 2.2 , 6500K), you must set your computer to the sRGB profile. If you select this mode, you cannot operate the CONTRAST/BRIGHT menu adjustments.
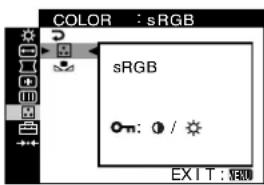
Note
Your computer and other connected products (such as a printer), must be sRGB compliant.
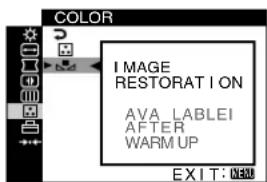
Restoring the color from the EASY, PRESET, or sRGB modes (IMAGE RESTORATION)
The colors of most display monitors tend to gradually lose brilliance over several years of service. The IMAGE RESTORATION feature found in the EASY, PRESET, and sRGB menus allows you to restore the color to the original factory quality levels. The explanation below explains how to restore the monitor's color from the EASY mode for example.
First, select the EASY, PRESET, or sRGB mode in the OPTION menu (page 12).
1 Press the MENU button.
The menu appears on the screen.
2 Move the control button up or down to highlight ☐ COLOR and press the control button.
The COLOR menu appears on the screen.
3 Move the control button up or down to highlight 📍 IMAGE RESTORATION. Then press the control button.
4 Move the control button up or down to select OK. Then press the control button.

The picture disappears while the color is being restored (about 2 seconds). After the color is restored, the picture reappears on the screen again.
Notes
- Before using this feature, the monitor must be in normal operation mode (green power indicator on) for at least 30 minutes. If the monitor goes into power saving mode, you must return the monitor to normal operation mode and wait for 30 minutes for the monitor to be ready. You may need to adjust your computer's power saving settings to keep the monitor in normal operation mode for the full 30 minutes. If the monitor is not ready, the following message will appear.
- The monitor may gradually lose its ability to perform this function due to the natural aging of the picture tube.
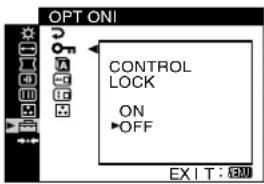
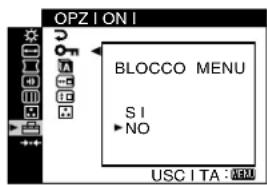
Additional settings (OPTION)
You can lock the controls, change the on-screen language, change the menu position, and set the COLOR mode.
1 Press the MENU button.
The menu appears on the screen.
2 Move the control button up or down to highlight OPTION and press the control button.
The OPTION menu appears on the screen.
3 Move the control button up or down to select the desired adjustment item.
Adjust the selected item according to the following instructions.
■Locking the controls (CONTROL LOCK)
You can protect the adjustment data by locking the controls. Move the control button up or down to highlight ON (CONTROL LOCK) and press the control button. Then move the control button up or down to select ON and press the control button.
Only the ① (power) switch, MENU button, INPUT switch, and
- (CONTROL LOCK) of the OPTION menu will operate. If any other items are selected, the mark appears on the screen.
To cancel the control lock
Repeat the procedure above and set (CONTROL LOCK) to OFF.
■Changing the on-screen language (LANGUAGE)
See page 6.
■Changing the menu's position (OSD POSITION)
Change the menu's position if it is blocking an image on the screen.
Move the control button up or down to select (OSD POSITION) for horizontal adjustment, or (OSD POSITION) for vertical adjustment and press the control button. Then move the control button up or down to shift the on-screen menu.
■Setting the COLOR mode
See page 12.
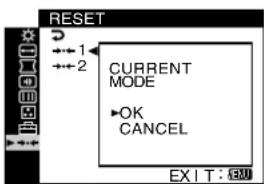
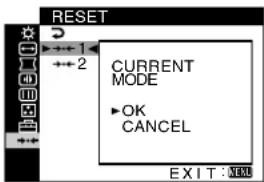
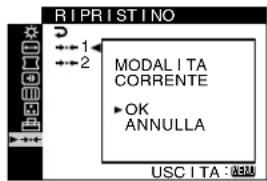
Resetting the adjustments (RESET)
This monitor has the following 2 reset methods.
■ Resetting all the adjustment data for the current input signal
1 Press the MENU button.
The menu appears on the screen.
2 Move the control button up or down to highlight →← RESET and press the control button.
3 Move the control button up or down to select -1 (CURRENT MODE) and press the control button.
4 Move the control button up or down to select OK and press the control button.
Note that the following items are not reset by this method:
• on-screen menu language (page 6)
- color mode setting in the OPTION menu (EASY, PRESET, EXPERT, sRGB) (page 12, 13)
• color temperature setting in the PRESET mode (5000K, 6500K, 9300K) (page 12)
• on-screen menu position (page 14)
■ Resetting all of the adjustment data for all input signals
Select ←2 (ALL MODES) in step 3 above.
Note
The RESET function does not function when (CONTROL LOCK) is set to ON.
Technical Features
Preset mode timing table
When the monitor receives an input signal, it automatically matches the signal to one of the factory preset modes stored in the monitor's memory to provide a high quality picture at the center of the screen. For input signals that do not match one of the factory preset modes, the digital Multiscan technology of this monitor ensures that a clear picture appears on the screen for any timing in the monitor's frequency range (horizontal: 30 – 130 kHz, vertical: 48 – 170 Hz). If the picture is adjusted, the adjustment data is stored as a user mode and automatically recalled whenever the same input signal is received.
Preset mode timing table
| No. Resolution (dots × lines) | Horizontal Frequency | Vertical Frequency |
| 1 1600 × 1200 93.750 kHz 75 Hz | ||
| 2 1280 × 1024 81.130 kHz 76 Hz | ||
| 3 1152 × 900 71.809 kHz 76 Hz | ||
| 4 1280 × 1024 79.976 kHz 75 Hz | ||
| 5 1280 × 1024 71.691 kHz 67 Hz | ||
| 6 1152 × 900 61.846 kHz 66 Hz | ||
| 7 1024 × 768 60.023 kHz 75 Hz | ||
| 8 1280 × 1024 120.941 kHz 112 Hz | ||
Power saving function
This monitor meets the power-saving guidelines set by VESA, ENERGY STAR, and NUTEK. If no signal is input to the monitor from your computer, the monitor will automatically reduce power consumption as shown below.
| Power mode | Power consumption 1 (power) indicator | |
| normal operation | ≤ 135 W green | |
| active off*(deep sleep)** | ≤ 3 W | amber |
| power off Approx. 0 W | off | |
* When your computer enters power saving mode, the input signal is cut and NO SIGNAL appears on the screen before the monitor enters active off mode. After a few seconds, the monitor enters power saving mode.
**“Deep sleep” is power saving mode defined by the Environmental Protection Agency.
Troubleshooting
Before contacting technical support, refer to this section.
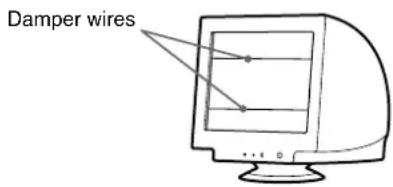
If thin lines appear on your screen (damper wires)
The visible lines on your screen especially when the background screen color is light (usually white), are normal for the Trinitron monitor. This is not a malfunction. These are shadows from the damper wires used to stabilize the aperture grille. The aperture grille is the essential element that makes a Trinitron picture tube unique by allowing more light to reach the screen, resulting in a brighter, more detailed picture.
On-screen messages
If there is something wrong with the input signal, one of the following messages appears on the screen.
If NO SIGNAL appears in section 1
This indicates that no signal is input from the selected connector.
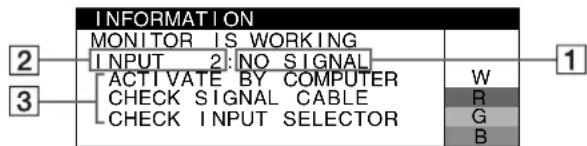
2 The selected connector
This message shows the currently selected connector (INPUT 1 or INPUT 2).
3 The remedies
The following messages appear on the screen.
- If ACTIVATE BY COMPUTER appears on the screen, try pressing any key on the computer or moving the mouse, and confirm that your computer's graphics board is completely seated in the correct bus slot.
- If CHECK SIGNAL CABLE appears on the screen, check that the monitor is correctly connected to the computer (page 5).
- If CHECK INPUT SELECTOR appears on the screen, try changing the input signal (page 6).
(continued)
If OUT OF SCAN RANGE appears on line 1
This indicates that the input signal is not supported by the monitor's specifications.
![MONIINGS WORKTOR INPUT 1:200.0kHz/ 85Hz] OUT OF SCAN RANGE CHANGE SIGNAL TIMING W R G B](/content/2026/03/536674/images/3780eddc1cbc4d43e825c4c061d6b1ae9c69d54ba91970332a6c8d0cfbb0593e.jpg)
2 The selected connector and the frequencies of the current input signal
This message shows the currently selected connector (INPUT 1 or INPUT 2). If the monitor recognizes the frequencies of the current input signal, the horizontal and vertical frequencies are also displayed.
3 The remedies
CHANGE SIGNAL TIMING appears on the screen. If you are replacing an old monitor with this monitor, reconnect the old monitor. Then adjust the computer's graphics board so that the horizontal frequency is between 30 - 130 kHz and the vertical frequency is between 48 - 170 Hz.
For more information, see “Trouble symptoms and remedies” on page 17.
Displaying this monitor's name, serial number, and date of manufacture.
While the monitor is receiving a video signal, press and hold the MENU button for more than 5 seconds to display this monitor's information box.
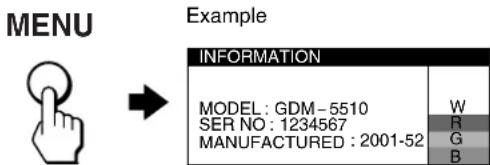
If the problem persists, call your service representative and give the following information.
• Model name: GDM-5510
- Serial number
- Name and specifications of your computer and graphics board.
Trouble symptoms and remedies
If the problem is caused by the connected computer or other equipment, please refer to the connected equipment's instruction manual. Use the self-diagnosis function (page 19) if the following recommendations do not resolve the problem.
| Symptom Check these items | |
| No picture | |
| If the 1 (power) indicator is not lit | Check that the power cord is properly connected.Check that the 1 (power) switch is in the “on” position. |
| If the NO SIGNAL message appears on the screen, or if the 1 (power) indicator is amber | Check that the video signal cable is properly connected and all plugs are firmly seated in their sockets (page 5).Check that the INPUT switch setting is correct (page 6).Check that the video input connector’s pins are not bent or pushed in.■Problems caused by the connected computer or other equipmentThe computer is in power saving mode. Try pressing any key on the keyboard or moving the mouse.Check that the computer’s power is “on.”Check that the graphic board is completely seated in the proper bus slot. |
| If the OUT OF SCAN RANGE message appears on the screen | ■Problems caused by the connected computer or other equipmentCheck that the video frequency range is within that specified for the monitor. If you replaced an old monitor with this monitor, reconnect the old monitor and adjust the frequency range to the following.Horizontal: 30 – 130 kHzVertical: 48 – 170 Hz |
| If no message is displayed and the 1 (power) indicator is green or flashing amber | Use the Self-diagnosis function (page 19). |
| Picture flickers, bounces, oscillates, or is scrambled | Isolate and eliminate any potential sources of electric or magnetic fields such as other monitors, laser printers, fluorescent lighting, televisions, or electric fans.Move the monitor away from power lines or place a magnetic shield near the monitor.Try plugging the monitor into a different AC outlet, preferably on a different circuit.Try turning the monitor 90° to the left or right.■Problems caused by the connected computer or other equipmentCheck your graphics board manual for the proper monitor setting.Confirm that the graphics mode and the frequency of the input signal are supported by this monitor (Technical Features). Even if the frequency is within the proper range, some graphics boards may have a sync pulse that is too narrow for the monitor to sync correctly.Adjust the computer’s refresh rate (vertical frequency) to obtain the best possible picture. |
| Picture is fuzzy | Adjust the contrast and brightness (page 8).Degauss the monitor* (page 11).Adjust the degree of moire cancellation until the moire is minimal, or set CANCEL MOIRE to OFF (page 11). |
* If a second degauss cycle is needed, allow a minimum interval of 20 minutes for the best result. A humming noise may be heard, but this is not a malfunction.
(continued)
| Symptom Check these items | |
| Picture is ghosting | Eliminate the use of video cable extensions and/or video switch boxes.Check that all plugs are firmly seated in their sockets. |
| Picture is not centered or sized properly | Set the AUTO (function to OK (on) in the SIZE/CENTER menu (page 9).Adjust the size or centering (page 9). Note that with some input signals and/or graphics boards the periphery of the screen is not fully utilized. |
| Edges of the image are curved | Adjust the geometry (page 10). |
| Wavy or elliptical pattern (moire) is visible | Adjust the degree of moire cancellation until the moire is minimal (page 11).■Problems caused by the connected computer or other equipmentChange your desktop pattern. |
| Color is not uniform | Degauss the monitor* (page 11). If you place equipment that generates a magnetic field, such as a speaker, near the monitor, or if you change the direction the monitor faces, color may lose uniformity.Adjust the landing (page 11). |
| White does not look white | Adjust the color temperature (page 12). |
| Letters and lines show red or blue shadows at the edges | Adjust the convergence (page 10). |
| Monitor buttons do not operate (appears on the screen) | If the control lock is set to ON, set it to OFF (page 14). |
IMAGE RESTORATION function does not operate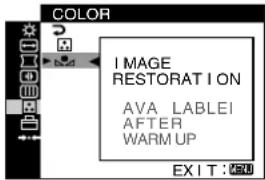 | Before using this function, the monitor must be in normal operation mode (green power indicator on) for at least 30 minutes. For more information on using the IMAGE RESTORATION function, see page 13.Adjust the computer's power saving settings to keep the monitor in normal operation mode for more than 30 minutes.The monitor may gradually lose its ability to perform this function due to the natural aging of the picture tube. |
| A hum is heard right after the power is turned on | This is the sound of the auto-degauss cycle. When the power is turned on, the monitor is automatically degaussed for a few seconds. |
* If a second degauss cycle is needed, allow a minimum interval of 20 minutes for the best result. A humming noise may be heard, but this is not a malfunction.
Self-diagnosis function
This monitor is equipped with a self-diagnosis function. If there is a problem with your monitor or computer(s), the screen will go blank and the ① (power) indicator will either light up green or flash amber. If the ① (power) indicator is lit in amber, the computer is in power saving mode. Try pressing any key on the keyboard or moving the mouse.

natural_image
Pure technical line drawing of a mechanical component with no text or symbols① (power) indicator
■If the ① (power) indicator is green
1 Disconnect any plugs from the video input 1 and 2 connectors, or turn off the connected computer(s).
2 Press the ① (power) button twice to turn the monitor off and then on.
3 Hold the control button upward for 2 seconds before the monitor enters power saving mode.
If all four color bars appear (white, red, green, blue), the monitor is working properly. Reconnect the video input cables and check the condition of your computer(s).
If the color bars do not appear, there is a potential monitor failure. Inform your service representative of the monitor's condition.
■If the ① (power) indicator is flashing amber
Press the ① (power) button twice to turn the monitor off and then on.
If the ① (power) indicator lights up green, the monitor is working properly.
If the ① (power) indicator is still flashing, there is a potential monitor failure. Count the number of seconds between amber flashes of the ① (power) indicator and inform your service representative of the monitor's condition. Be sure to note the model name and serial number of your monitor. Also note the make and model of your computer and graphic board.
Specifications
CRT 0.24 mm aperture grille pitch
21 inches measured diagonally
90-degree deflection
FD Trinitron
Viewable image size Approx. 403.8 × 302.2 mm (w/h)
(16 × 12 inches)
19.8" viewing image
Resolution
Maximum Horizontal: 2048 dots
Vertical: 1536 lines
Recommended Horizontal: 1600 dots
Vertical: 1200 lines
Input signal levels Video signal
Analog RGB: 0.700 Vp-p
(positive), 75 Ω
SYNC signal
H/V separate or composite sync:
TTL 2.2 kΩ, Polarity free
Sync on Green: 0.3 Vp-p
(negative)
Standard image area Approx. 388 × 291 mm (w/h)
(15^3/8 × 11^1/2 inches)
or
Approx. 364 × 291 mm (w/h)
(14^3 / 8× 11^1 / 2 inches)
Deflection frequency* Horizontal: 30 to 130 kHz
Vertical: 48 to 170 Hz
AC input voltage/current 100 to 240 V, 50–60 Hz, 2.0–1.0 A
Power consumption Approx. 135 W
Operating temperature 10 °C to 40 °C
Dimensions Approx. 501 × 508 × 505 mm (w/h/
d) (19^3 / 4× 20× 20 inches)
Mass Approx. 31.5 kg (69 lb 7 oz)
Plug and Play DDC2B/DDC2Bi, GTF**
* Recommended horizontal and vertical timing condition
- Horizontal sync width duty should be more than 4.8% of total horizontal time or 0.8~ s , whichever is larger.
• Horizontal blanking width should be more than 2.3 μsec.
- Vertical blanking width should be more than 450 sec.
** If the input signal is Generalized Timing Formula (GTF) compliant, the GTF feature of the monitor will automatically provide an optimal image for the screen.
Design and specifications are subject to change without notice.
Table des Matières
Précautions 3
flowchart
graph TD
    A["Circle with upward arrow"] --> B["Oval shape with downward arrow"]
    C["Circle with downward arrow"] --> D["Oval shape with upward arrow"]
    E["Circle with downward arrow"] --> F["Oval shape with downward arrow"]
natural_image
Two geometric shapes: a square with a gray border and a rectangle with a black arrow pointing to its right face (no text or symbols)Remarques
flowchart
graph LR
    A["Left Circle"] --> B["Right Circle"]
    B --> C["Downward Arrow"]
    C --> D["Left Arrow"]
    D --> E["Right Arrow"]
    E --> F["Downward Arrow"]
natural_image
Two geometric shapes: a gray L-shaped frame and a white square, connected by an arrow (no text or symbols)Hinweise
natural_image
Line drawing of a vintage computer monitor with a screen and indicator lights (no text or symbols)Bildschirmmeldungen
50 - 60 Hz, 2,0 - 1,0 A
Plug and Play DDC2B/DDC2Bi, GTF**
(DIMENSIONE/CENTRO) 9
(DIMENSIONE/CENTRO) 9
flowchart
graph TD
    A["Circle with upward arrow"] --> B["Oval with downward arrow"]
    C["Circle with crescent symbol"] --> D["Oval with upward arrow"]
    style A fill:#f9f,stroke:#333
    style B fill:#ccf,stroke:#333
    style C fill:#cfc,stroke:#333
    style D fill:#fcc,stroke:#333
flowchart
graph TD
    A["Circle with upward arrow"] --> B["Oval shape with downward arrow"]
    C["Circle with downward arrow"] --> D["Oval shape with upward arrow"]
    E["Circle with downward arrow"] --> F["Oval shape with downward arrow"]
natural_image
Two geometric shapes: a square with gray border and an arrow pointing to a blank square (no text or symbols)Note
Nota
natural_image
Simple line drawing of a computer monitor with a screen and pointer lines (no text or symbols)Messaggi a schermo
natural_image
Pure technical line drawing of a mechanical component with no text or symbolsflowchart
graph LR
    A["Left Circle with Up/Down Arrow"] --> B["Right Circle with Up/Down Arrow"]
    B --> C["Right Circle with Up/Down Arrow"]
    style A fill:#f9f,stroke:#333
    style B fill:#ccf,stroke:#333
    style C fill:#cfc,stroke:#333
3 Ajuste el menú.
natural_image
Two geometric shapes: a square with a gray border and a rectangle with a black arrow pointing to its right face (no text or symbols)Notas
Plug and Play DDC2B/DDC2Bi, GTF**
flowchart
graph LR
    A["Circle with upward arrow"] --> B["Oval shape with downward arrow"]
    C["Circle with downward arrow"] --> D["Oval shape with upward arrow"]
    style A fill:#f9f,stroke:#333
    style B fill:#ccf,stroke:#333
    style C fill:#cfc,stroke:#333
    style D fill:#fcc,stroke:#333
4 Stäng menyn.
natural_image
Two geometric shapes: a gray square with a right angle and a white rectangle, both without any text or symbols.Obs!
natural_image
Pure technical line drawing of a mechanical component with no text or symbols① (ström) indikator
■ Om ① (ström) indikatorn lyser grönt
Plug and Play DDC2B/DDC2Bi, GTF**
natural_image
Simple line drawing of a vintage CRT monitor mounted on stacked books (no text or symbols)内部を開けない
natural_image
Illustration of a person using a computer with a lightning bolt symbol above (no text or symbols present)水のある場所に置かない
natural_image
Illustration of a person washing in a bathtub with a TV and a steaming cup nearby (no text or symbols)電源コードを傷つけない
natural_image
Simple line drawing of a plug with a pointed tip and two blades, no text or symbols present雷が鳴りだしたら、電源プラグに触れない
感電の原因となります。

接触禁止
natural_image
Illustration of a person pointing at a TV screen with a lightning bolt, next to a curtain on top (no text or symbols)付属の電源コードを使用する
natural_image
Simple line drawing of a potted plant on a base with steam rising (no text or symbols)natural_image
Illustration of two people carrying a cardboard box together (no text or symbols)注意
natural_image
Illustration of a person using a tool to clean or wear a clothes (no text or symbols present)natural_image
Cartoon illustration of a person steaming from a TV while another person is smoking (no text or symbols)natural_image
Illustration of a vintage CRT monitor with an open CD and a flat CD on its screen, surrounded by triangular warning symbols (no text or labels)flowchart
graph TD
    A["Vertical Oval Structure"] --> B((Oval Shape))
    B --> C["Circle"]
    C --> D["Oval Shape"]
    D --> E((Circle)
3 調整する
natural_image
Two geometric shapes: a gray L-shaped frame and a white square, connected by an arrow (no text or symbols)ご注意
natural_image
Pure technical diagram of a mechanical component with no text or symbols①(電源)インジケーター
flowchart
graph TD
    A["Vertical Oval Structure"] --> B["Arrow"]
    B --> C["Oval Shape"]
    C --> D["Single Circle"]
4 메뉴를 닫습니다.
natural_image
Two geometric shapes: a gray L-shaped frame and a white square with a gray border, both rotated by an arrow (no text or symbols)참고
SJT HAR(HO5VV HAR(HO5VV CDB03PLP
-F3G1.0) -F3G1.0)
电线组件最 电线组件最 电线组件最 电线组件最
小额定值 小额定值 小额定值 小额定值
10 A/125 V 10 A/250 V 10 A/250 V 10 A/250 V
18/3AWG
电线长度 电线长度 电线长度 电线长度
(+ / - 0.1 ~m) (+ / - 0.1 ~m) (+ / - 0.1 ~m) (+ / - 0.1 ~m)
2 m 2.5 m 2.5 m 2.5 m
安全认证 安全认证 安全认证 安全认证
flowchart
graph TD
    A["Circle with upward arrow"] --> B["Oval with downward arrow"]
    C["Circle with upward arrow"] --> D["Oval with upward arrow"]
    E["Circle with downward arrow"] --> F["Oval with upward arrow"]
3 调整菜单。
flowchart
graph TD
    A["Vertical Structure with ↑ and ↓ arrows"] --> B((Circle))
    B --> C["Oval Shape"]
    C --> D["Circle with ↑ and ↓ arrow"]
4 关闭菜单。
natural_image
Two blank rectangular shapes with a gray border, one rotated right by an arrow (no text or symbols)注
( IMAGE RESTORATION )
SJT HAR (H05VV HAR (H05VV CDB03PLP
-F3G1.0) -F3G1.0)
2 m 2.5 m 2.5 m 2.5 m
安全認証 安全認証 安全認証 安全認証
flowchart
graph TD
    A["Circle with upward arrow"] --> B["Oval with downward arrow"]
    C["Circle with upward arrow"] --> D["Oval with upward arrow"]
    E["Circle with downward arrow"] --> F["Oval with upward arrow"]
4 關閉選單。
natural_image
Two geometric shapes: a gray L-shaped frame and a white square, connected by an arrow (no text or symbols)註