
PCGABM1 - Other computer accessories SONY - Free user manual and instructions
Find the device manual for free PCGABM1 SONY in PDF.
| Product Type | Bluetooth modem station |
| Brand | Sony |
| Model | PCGA-BM1 |
| Dimensions (with base) | 65 x 118.5 x 172 mm (w/h/d) |
| Dimensions (without base) | 32 x 104.5 x 164.5 mm (w/h/d) |
| Weight (main unit) | 380 g |
| Weight (base) | 135 g |
| Power supply | AC adapter 100-240 V AC, 50/60 Hz |
| Power consumption | Approximately 3 W |
| Bluetooth range | 10 to 100 meters (class 1) |
| Frequency band | 2.4 GHz (2.400-2.4835 GHz) |
| Compatible Bluetooth profiles | Generic Access, Serial Port, Dial-up Networking |
| Integrated modem | V.90, 56 Kbps reception, 33.6 Kbps transmission |
| Maximum number of connected computers | 16 |
| Connectors | LINE jack (modular), DC IN jack |
| DIP switches | 3 switches: installation mode, protection, etc. |
| Maintenance and cleaning | Wipe with a soft, dry cloth; do not use solvents |
| Security | Protection function (Private switch) and passkey |
| Supplied items | AC adapter, telephone cord, detachable base |
| Reset | Reset button on the back (restores default values) |
| Operating conditions | Temperature: 5 to 35°C, humidity: 20 to 80% |
Frequently Asked Questions - PCGABM1 SONY
User questions about PCGABM1 SONY
0 question about this device. Answer the ones you know or ask your own.
Ask a new question about this device
Download the instructions for your Other computer accessories in PDF format for free! Find your manual PCGABM1 - SONY and take your electronic device back in hand. On this page are published all the documents necessary for the use of your device. PCGABM1 by SONY.
USER MANUAL PCGABM1 SONY
Bluetooth™ Modem Station
Operating Instructions GB
Bedienungsanleitung DE
Mode d'emploi FR
Istruzioni per l'uso IT
Bluetooth

PCGA-BM1
Before using the PCGA-BM1, be sure to read the End User Software License Agreement that accompanies it.
Copyright laws prohibit reproducing the software or the manual accompanying it in whole or in part, or renting the software without the permission of the copyright holder.
In no event will SONY be liable for any financial damages, or loss of profits, including claims made by third parties, arising out of the use of the software supplied with this drive.
If a problem occurs with this product as a result of defective manufacturing, SONY will replace it. However, SONY bears no other responsibility.
The software provided with this unit cannot be used with other units.
Please note that, due to continued efforts to improve quality, the software specifications may be changed without notice.
Operation of this unit with software other than that provided is not covered by the warranty.
Owner's Record
The model number and serial number are located on the bottom of this unit. Record the serial number in the space provided here. Refer to the model and serial number when you contact VAIO-Link.
Model Number:PCGA-BM1
Serial Number :
Regulatory information
Sony hereby declares that the PCGA-BM1 Bluetooth™ Modem Station is in compliance with the essential requirements and other relevant provisions of European Directive 1999/5/EC.
Making use of the 2.4 GHz frequency band (2.4 GHz ... 2.4835 GHz) and the Frequency Hopping Spread Spectrum (FHSS) technique, this product is a radio device whose intended purpose is to give other Bluetooth enabled Sony notebooks access to Public Switched Telephone Networks (PSTN) via its built-in modem which is intended to be used for data communications using DTMF (Dual Tone Multi Frequency) signalling (tone dialling) on the PSTN networks.
Sony Bluetooth™ Modem Station complies with all applicable regulations in the following countries and can therefore only be operated in: Austria, Belgium, Germany, Ireland, Netherlands, Switzerland, and the United Kingdom. The PCGA-BM1 Bluetooth™ Modem Station cannot be used in France and Italy.
The PCGA-BM1 Bluetooth™ Modem Station has been tested and found compliant with the limits set out in the EMC directive using a shielded twisted pair interconnection cable not longer than 3 metres (9.8 feet).
The PCGA-BM1 Bluetooth™ Modem Station complies with EN 300328-2 and EN 301489-1 for use in the following areas: residential, commercial and light-industrial.
The PCGA-BM1 Bluetooth™ Modem Station is not designed to support communication via fax. You cannot send or receive fax messages on this modem station.
Before using the modem, make sure that the Windows Regional Setting has been set to the country where you are using the product.
For information about how to set the Windows Regional Settings, please refer to the documentation of your VAIO computer.
Warnings
In some situations or environments, the use of the Bluetooth™ technology might be restricted by the proprietor of the building or responsible representatives of the organization, for example on board of airplanes, in hospitals or in any other environment where the risk of interference with other devices or services is perceived or identified as harmful.
If you are uncertain about the policy applying to the use of Bluetooth™ technology in a specific organization or environment, you are encouraged to first ask for authorization prior to switching it on.
Consult your physician or the manufacturer of personal medical devices (pacemakers, hearing aids, etc.) regarding any restrictions on the use of Bluetooth™ technology.
Use your PCGA-BM1 only with the supplied AC adapter.
Make sure that the socket outlet is easily accessible.
To disconnect it completely from mains voltage, unplug the AC-adapter.
To avoid electrical shock, do not open the cabinet. Refer servicing to qualified personnel only.
To prevent fire or shock hazard, do not expose the unit to rain or moisture.
- Never install modem or telephone wiring during a storm.
- Never install telephone jacks in wet locations unless the jack is specifically designed for wet locations.
- Never touch uninsulated telephone wires or terminals unless the telephone line has been disconnected at the network interface.
CE
- Sony, VAIO and the VAIO logo are registered trademarks of Sony Corporation.
- Microsoft and Windows are registered trademarks of Microsoft Corporation in the United States and/or other countries.
- The Bluetooth trademarks are owned by their proprietor and used by Sony Corporation under license.
- All other names of systems, products and services are trademarks of their respective owners. In the manual, the ^TM or ⑧ marks are not specified.
How to use this product. 9
Names of Parts. 10
Installation 12
Telephone line connection ....12
Power connection 13
Attaching or removing the base 13
Power-on/power-off 15
DIP Switch Settings. 16
Enabling Communication 18
Notebook bonding 18
Installing the Country Selector 20
Selecting the Country Code ....20
Communication 23
To terminate communication .23
Changing the PCGA-BM1 Settings.24
Installing the modem station utility. 24
Changing the Passkey 24
Deleting unnecessary bonding information 26
Changing the device name ....28
Resetting the unit to the factory defaults 30
Usage Precautions 31
Maintenance 32
Bluetooth Wireless Technology ....33
Connection format. 33
Speed 34
Communication range and power 34
Bluetooth standard 34
Security. 35
Getting Help 36
Specifications 37
Troubleshooting. 39
Introduction
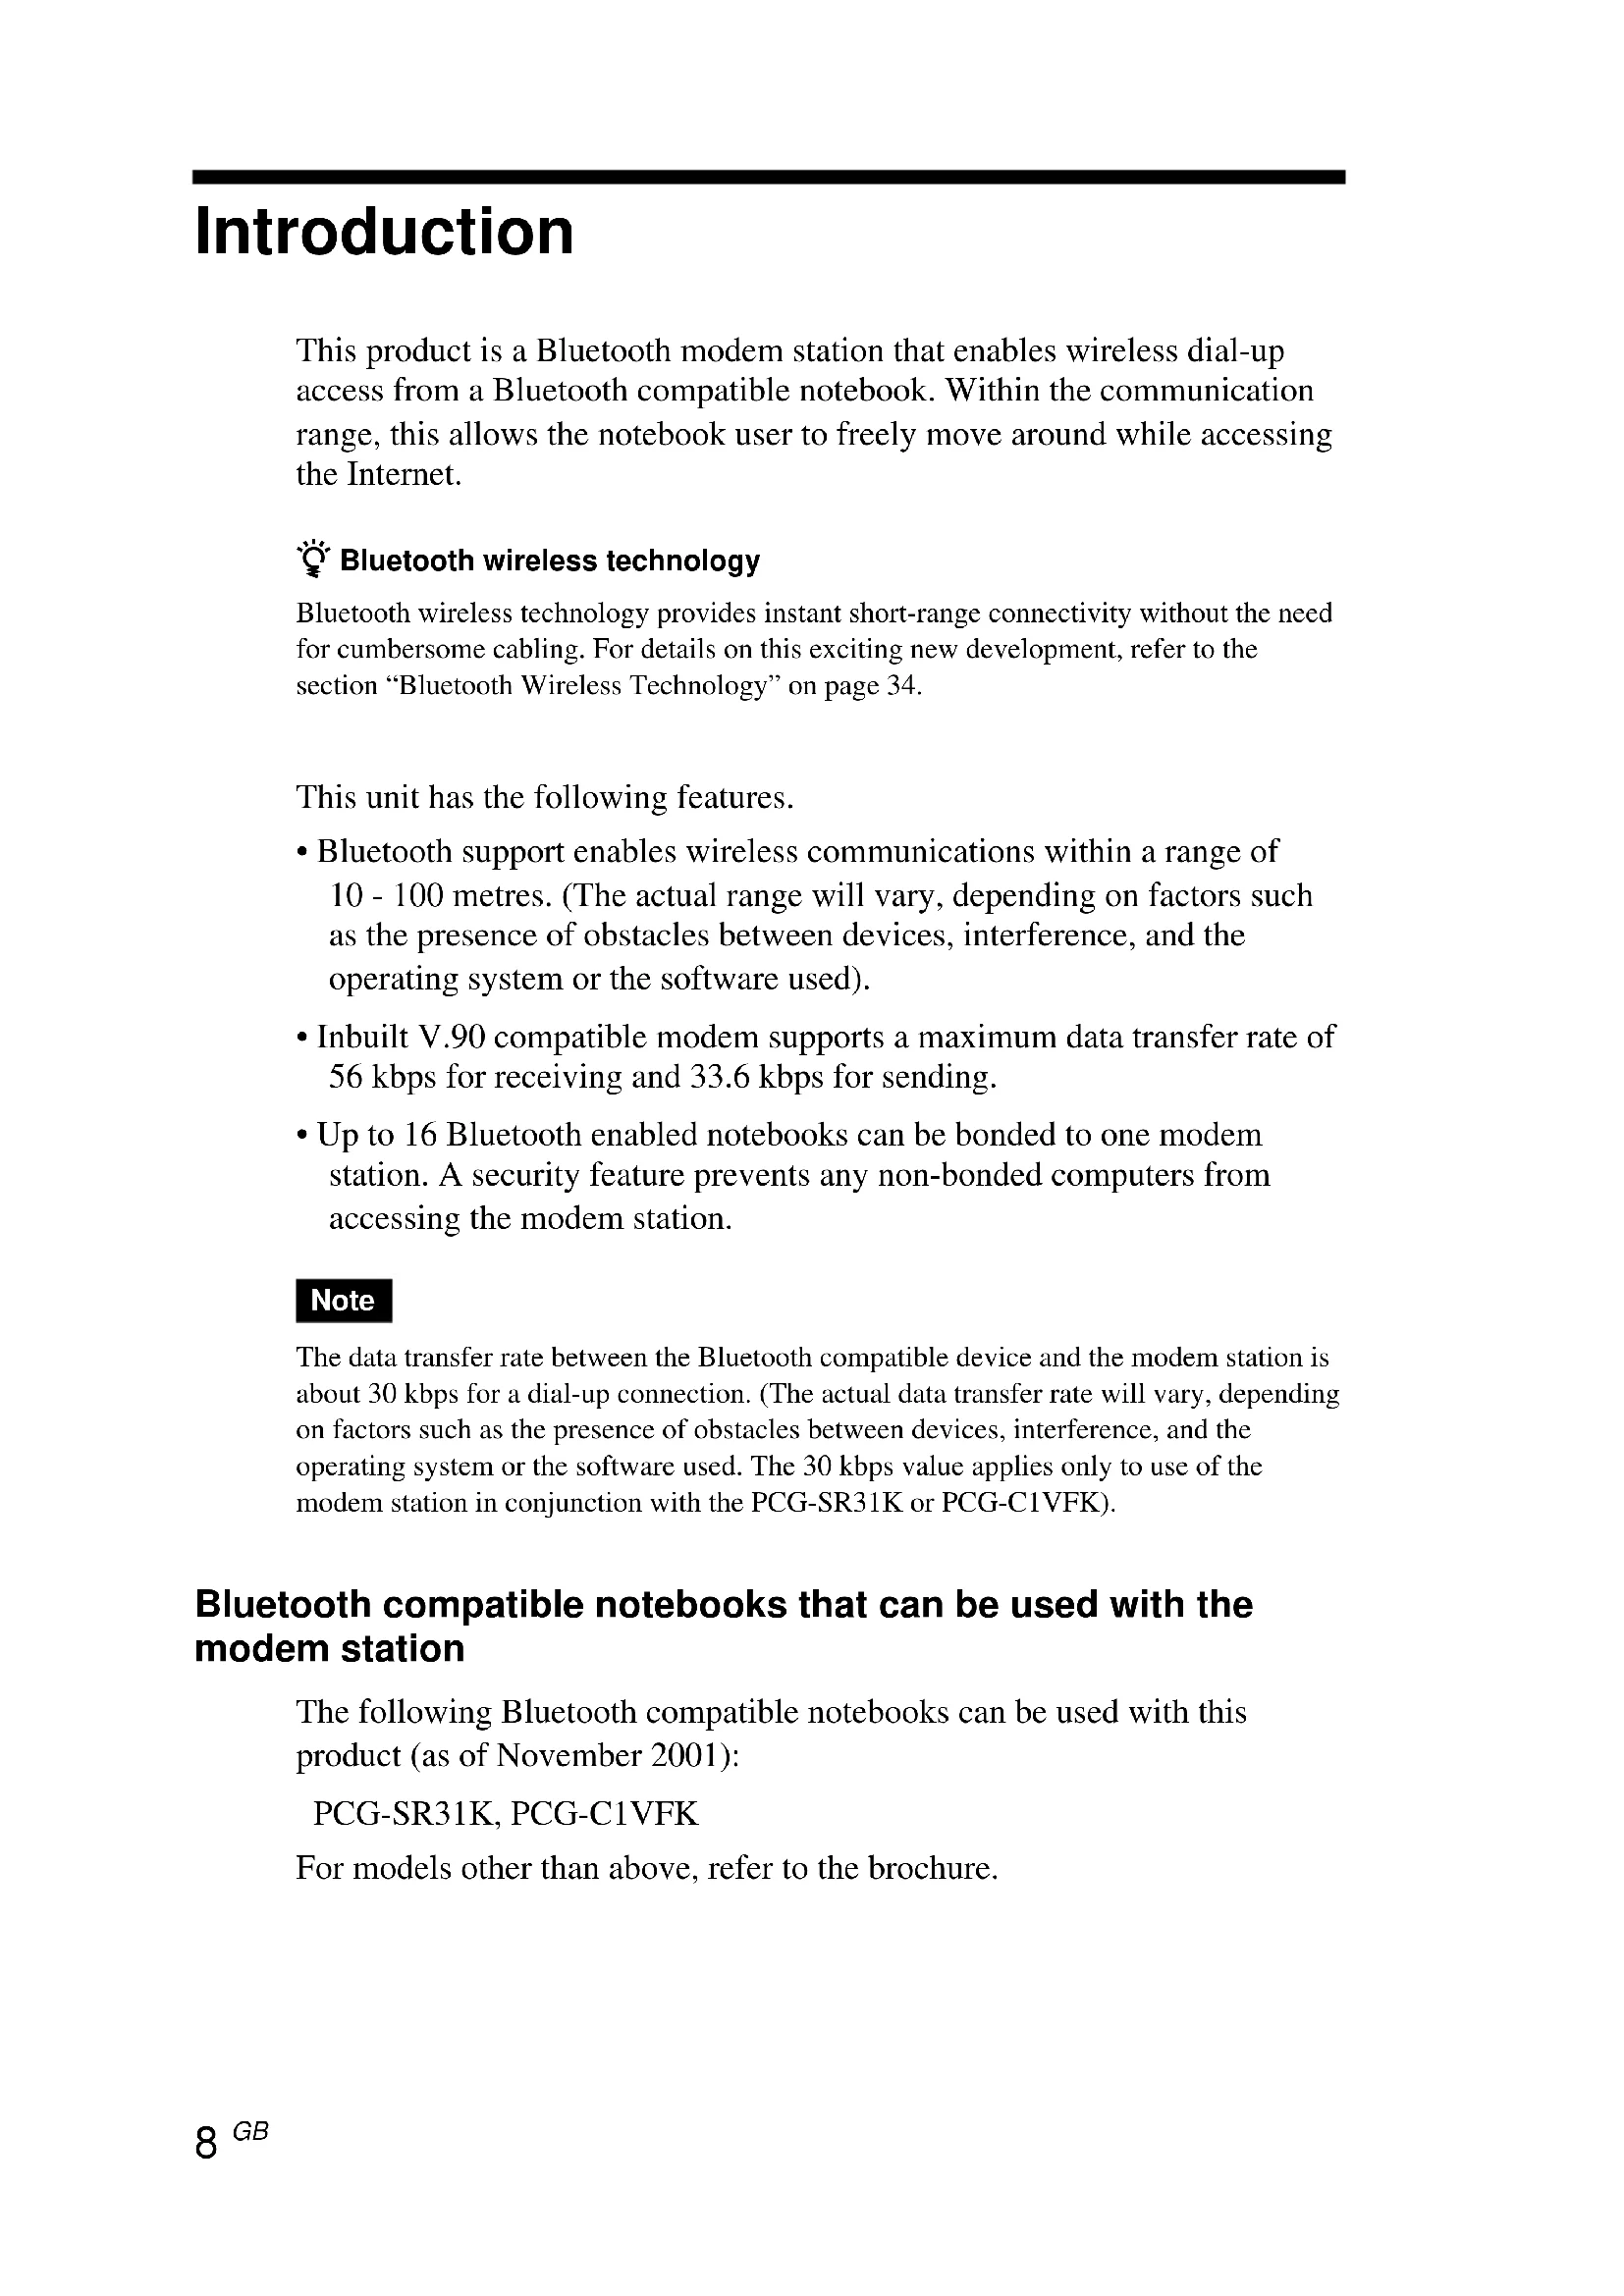
This product is a Bluetooth modem station that enables wireless dial-up access from a Bluetooth compatible notebook. Within the communication range, this allows the notebook user to freely move around while accessing the Internet.
Bluetooth wireless technology
Bluetooth wireless technology provides instant short-range connectivity without the need for cumbersome cabling. For details on this exciting new development, refer to the section "Bluetooth Wireless Technology" on page 34.
This unit has the following features.
- Bluetooth support enables wireless communications within a range of 10 - 100 metres. (The actual range will vary, depending on factors such as the presence of obstacles between devices, interference, and the operating system or the software used).
- Inbuilt V.90 compatible modem supports a maximum data transfer rate of 56 kbps for receiving and 33.6 kbps for sending.
- Up to 16 Bluetooth enabled notebooks can be bonded to one modem station. A security feature prevents any non-bonded computers from accessing the modem station.
Note
The data transfer rate between the Bluetooth compatible device and the modem station is about 30 kbps for a dial-up connection. (The actual data transfer rate will vary, depending on factors such as the presence of obstacles between devices, interference, and the operating system or the software used. The 30 kbps value applies only to use of the modem station in conjunction with the PCG-SR31K or PCG-C1VFK).
Bluetooth compatible notebooks that can be used with the modem station
The following Bluetooth compatible notebooks can be used with this product (as of November 2001):
PCG-SR31K, PCG-C1VFK
For models other than above, refer to the brochure.
How to use this product
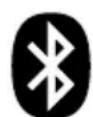
The PCGA-BM1 can communicate with a Bluetooth compatible notebook, eliminating the need for a cable connection. Communication between the PCGA-BM1 and the Bluetooth enabled computer takes place on a 1-on-1 basis.
Notes
- Some Bluetooth compatible devices may not function with the PCGA-BM1, depending on the type of equipment, software version, and other factors. Before purchasing a Bluetooth compatible device, check its operating environment requirements.
- The data transfer rate between the Bluetooth compatible device and the modem station is about 30 kbps for a dial-up connection. (The actual data transfer rate will vary, depending on factors such as the presence of obstacles between devices, interference, and the operating system or the software used. The 30 kbps value applies only to use of the modem station in conjunction with the PCG-SR31K or PCG-C1VFK.)
A typical configuration is shown below.
Analog telephone line
The PCGA-BM1 is connected to the analog telephone line and the built-in modem is used to establish a dial-up connection.
- For information about master device and slave device, see "Bluetooth Wireless Technology" on page 34.
Names of Parts
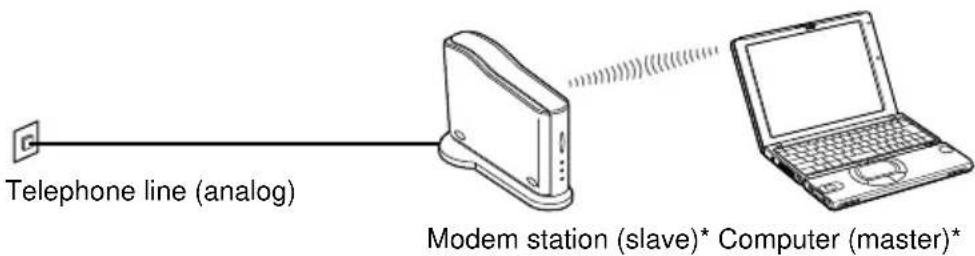
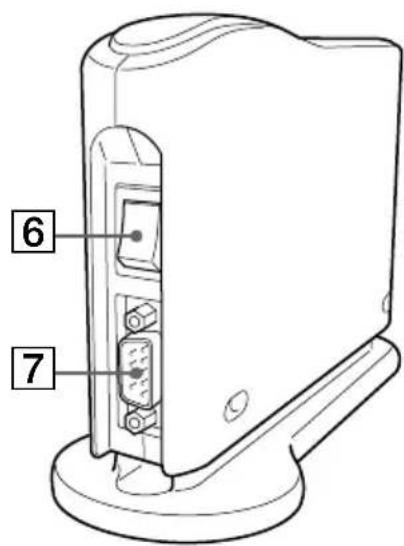
Front view Rear view
1 BLUETOOTH indicator
This indicator flashes slowly when Bluetooth communications are active.
2 POWER indicator
This indicator lights up when the unit is powered.
3PRIVATEindicator
This indicator shows that the security feature of the PCGA-BM1 is active. If the DIP switch 3 (Private ON/OFF selector) on the bottom of the unit is set to ON, this indicator will light when power is turned on.
4MODEM indicator
This indicator lights up when the unit is powered and modem communication is in progress.
5TA indicator
This indicator is not used in Europe.
6Power switch
7Serial connector
This connector is not used in Europe.
Bottom view
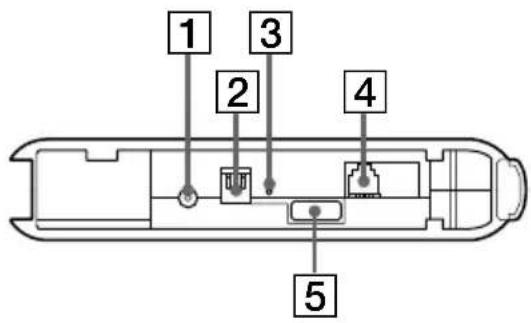
1DC IN connector
The AC adapter cable is connected here.
2DIP switches
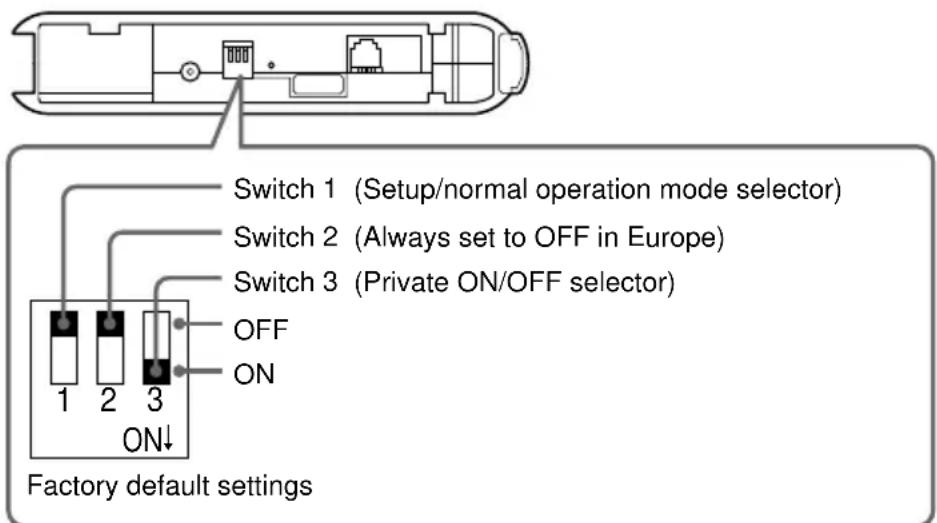
This bank of three switches sets the operation mode of the unit. The switch functions are as follows.
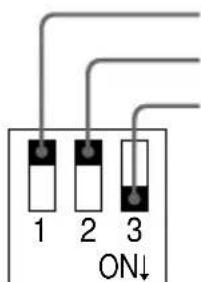
Switch 1 (Setup/normal operation mode selector)
Switch 2 (Always set to OFF in Europe)
Switch 3 (Private ON/OFF selector)
Factory default settings Switch 1: OFF Switch 2: OFF Switch 3: ON
For details on DIP switch settings, refer to the section "DIP Switch Settings" on page 17.
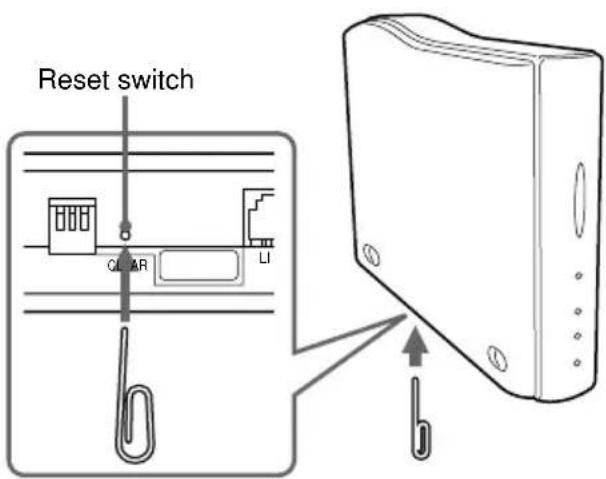
3Reset switch
By pressing this switch with a paper clip or other pointed object, you can reset stored settings (information about bonded notebooks, Passkey string) to the factory defaults. The device name will not be changed by a reset.
Notes
-
To prevent the possibility of unit damage, do not push the reset switch with the tip of a pencil or other object that may break.
-
If the device name of the unit has been changed, the name will not revert to the initial setting even when the reset switch is pressed.
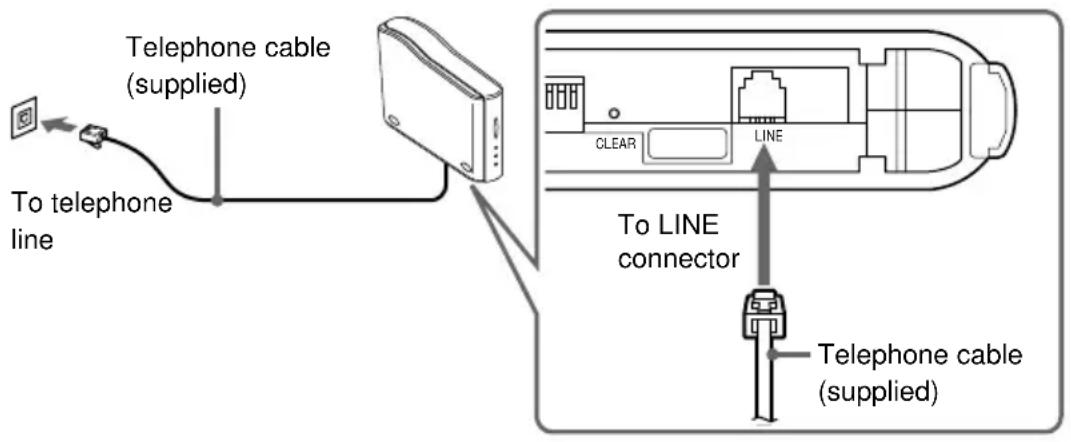
4LINE connector
To connect the unit to the telephone line, plug the supplied telephone cable into this jack.
5Serial number label
The serial number of the unit is shown here.
Installation
Telephone line connection
Use the supplied telephone cable to connect the PCGA-BM1 to the telephone line.
Note
The data transfer rate between the Bluetooth compatible device and the modem station is about 30 kbps for a dial-up connection. (The actual data transfer rate will vary, depending on factors such as the presence of obstacles between devices, radio interference, and the operating system or the software used. The 30 kbps value applies only to use of the modem station in conjunction with the PCG-SR31K or PCG-C1VFK).
Telephone line precautions
- Your computer cannot be connected to a coin-operated telephone, and may not work with multiple phone lines or a private branch exchange (PBX). If you connect the modem to a parallel connected phone line, the modem or the other connected device may not function properly. Some of these connections may result in excess of electrical current and could cause a malfunction in the internal modem.
- If the Internet Service Provider (ISP) provides V.90 or K56flex compatibility, data transfer rates of up to 56 kbps are possible. However, the actual rate will depend on line conditions. V.90 or K56flex is selected automatically.
Power connection
Use the supplied AC adapter to power the PCGA-BM1.
The unit comes with two different AC cables. Choose the correct AC cable for the country where the PCGA-BM1 is used.
Note
Plug in the DC cable from the AC adapter only after the telephone line connection has been established.
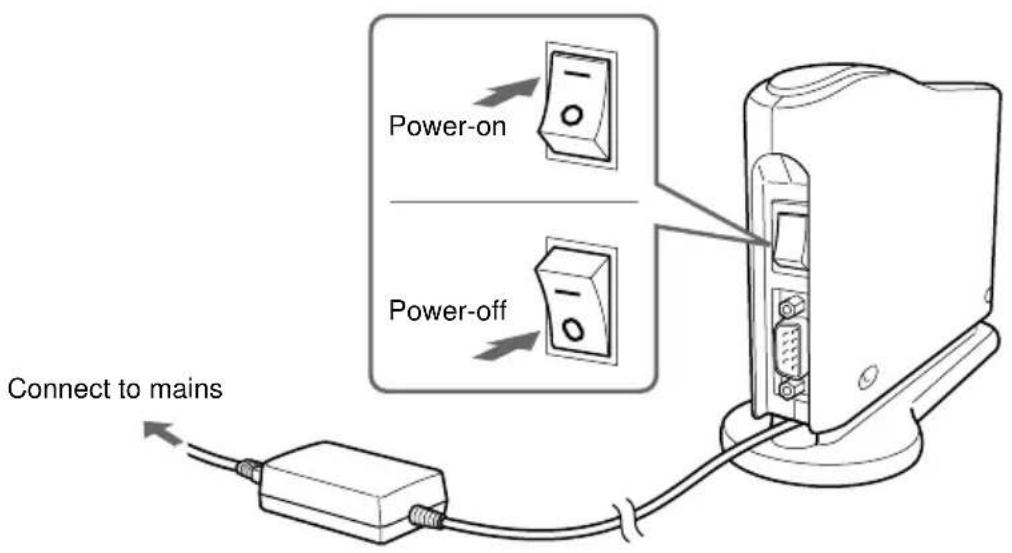
1 Insert the plug of the AC adapter into the mains.
2 Insert the plug of the DC cable from the AC adapter into the DC IN connector on the PCGA-BM1.

Attaching or removing the base
The PCGA-BM1 comes with a base which should be attached in normal use. To change a DIP switch setting or to plug in or unplug the telephone line, the base must be removed.
Attaching the base
Preparation
When installing the PCGA-BM1 for the first time, make a note of the serial number of the unit shown on the serial number label. This number is required as a Passkey for bonding notebooks (see page 19). For the location of the label, refer to "Bottom view" in the section "Names of Parts" on page 12.
Note
If the Passkey becomes known to other persons, they can perform Bluetooth bonding of a computer to the PCGA-BM1 and use it to access a dial-up service which may incur charges to the subscriber. Always handle your Passkey (serial number) with care, in order to prevent unauthorized access.
1 Align the three grooves on the base with the corresponding protrusions on the bottom of the unit and join the two parts together.
2 Slide the unit in the arrow direction until it clicks into place.
The base should be situated at the bottom when joining the parts.
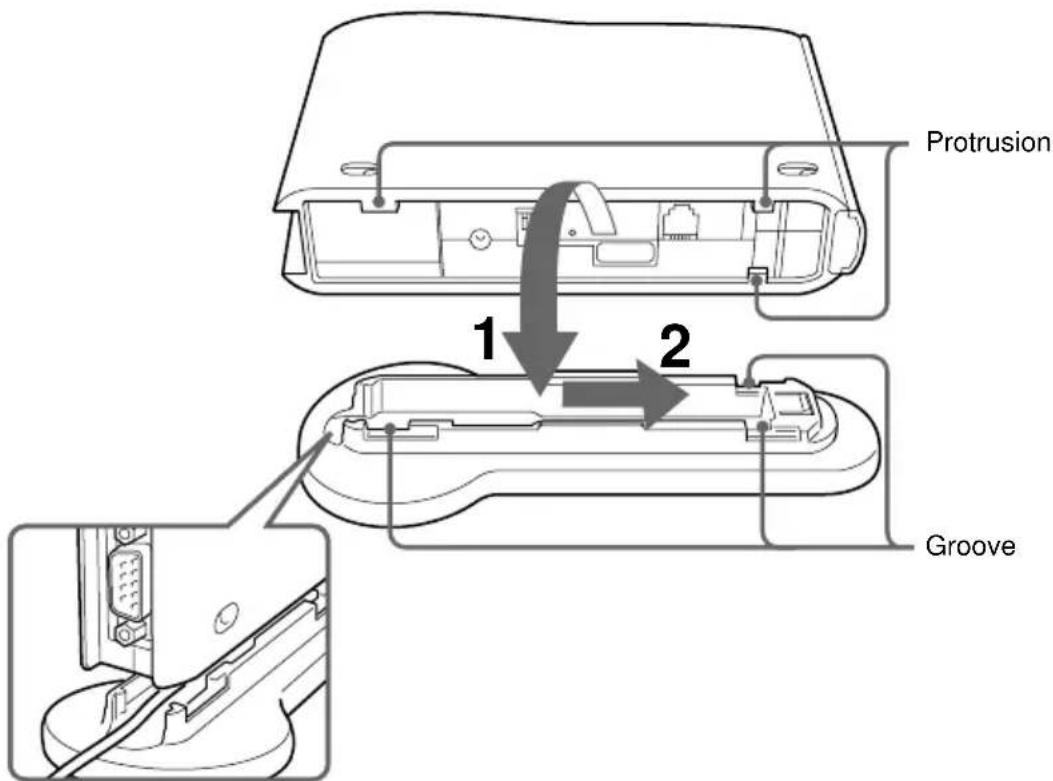
Bring the telephone cable out as shown.
Note
Take care not to pinch the telephone cable when joining the parts.
Observe the following points regarding installation of the unit:
- Choose a stable, level surface.
- If there are obstacles between the unit and the notebook, communications may be impaired and the data transfer rate may drop.
Removing the base
Grasp the unit and the stand and separate the parts by performing the above steps in reverse order.
Power-on/power-off
The power switch for this unit is located on the rear panel.
DIP Switch Settings
The DIP switches serve to set up the operation mode of the unit. When installing the PCGA-BM1, make the required settings. When you make changes later, the DIP switch settings will also have to be changed.
To change DIP switch settings, the power of the unit should be turned off.
1 If the unit is on, turn the power off.
2 Remove the base to gain access to the DIP switches on the bottom.
Set the DIP switches using the information on the next page.
| Switch number | Setting |
| Switch 1 (Setup/normal operation mode selector) | In normal dial-up communications and when performing notebook bonding (page 19), this switch must be OFF. Set the switch to ON only in the following cases: ·When changing the Passkey (page 25) ·When deleting unnecessary bonding information (page 27) ·When changing the device name (page 29) |
| Factory default setting: OFF | |
| Switch 2 Factory default setting: OFF | Always set to OFF in Europe. |
| Switch 3 (Private ON/OFF selector) | In normal operation, this switch must be ON. When performing notebook bonding (page 19) or when using the modem station utility to change the settings of the unit (page 24), set the switch to OFF. |
| Factory default setting: ON | When this switch is set to OFF, the presence of the unit can be detected by other Bluetooth compatible devices. If users of such devices know the Passkey, Bluetooth bonding is possible. |
3 When the switch settings have been made, reattach the base.
The settings become active the next time power is turned on.
Enabling Communication
Before this unit can be used for communication with a notebook, the following steps are necessary:
- Bluetooth bonding of notebook and PCGA-BM1
- Modem driver installation on notebook. For information on the modem driver installation procedure, refer to the separate information booklet "Read Me First"
- Selecting the country code
Notebook bonding
To prevent access from unauthorized Bluetooth compatible devices, the communicating device must be identified. This identification process is referred to as "bonding". A common Passkey is used to bond a notebook to the PCGA-BM1.

What is a Passkey?
A Passkey is a secret code entered by the user to enable two Bluetooth compatible devices to communicate. When the same alphanumeric string is entered at both devices, communication becomes possible. The Passkey may be changed for every communication session. Once a valid link has been established, communication is possible without further Passkey input for a preset period of time.
The PCGA-BM1 retains the current Passkey until the unit is reset to the factory defaults or until the bonding information is deleted.
The factory default Passkey for the PCGA-BM1 is the serial number of the unit, as shown on a label affixed to the bottom panel. For the location of the label, refer to "Bottom view" in the section "Names of Parts" on page 12. The Passkey can be changed to any alphanumeric string, as described in "Changing the Passkey" on page 25.
Note
The Passkey is case-sensitive.
1 Set the DIP switch 1 (setup/normal operation mode selector) and the DIP switch 3 (private ON/OFF selector) on the bottom panel of the unit to OFF.
For details, refer to "DIP Switch Settings" on page 17.
2 Turn on the power of the PCGA-BM1.
3 Activate Bluetooth communications at the notebook and perform a device discovery for the PCGA-BM1, then perform a service discovery.
For details on how to terminate communications, refer to the manuals provided with your Sony notebook.
When the service discovery is carried out, the Passkey input dialog box for the PCGA-BM1 appears on the display of the notebook.
4 Enter the Passkey for the PCGA-BM1 to bond the PCGA-BM1 to the notebook.
The factory default Passkey for the PCGA-BM1 is the serial number of the unit, as shown on a label affixed to the bottom panel. For the location of the label, refer to "Bottom view" in the section "Names of Parts" on page 12.
This step also bonds the notebook to the PCGA-BM1.
5 When the link is established, terminate communications at the notebook.
For details on how to terminate communications, refer to the manuals provided with your Sony notebook.
6 Turn off the power of the PCGA-BM1 and set the DIP switch 3 (private ON/OFF selector) to ON.
Leave DIP switch 1 (setup/normal operation mode selector) in the OFF position.
Note
For normal communications, the DIP switch 1 (setup/normal operation mode selector) must be in the OFF position and the DIP switch 3 (private ON/OFF selector) in the ON position. If the DIP switch 3 is left in the OFF position, other Bluetooth compatible devices can detect the presence of the PCGA-BM1. If users of such devices know the Passkey, they can bond a computer to the PCGA-BM1 and use it to access a dial-up service which may incur charges to the subscriber. Therefore the DIP switch 3 should only be set to ON when performing bonding or changing settings.
Installing the Country Selector
Use the Country Selector application to select the country where the PCGA-BM1 is used. Install the Country Selector from the supplied CD-ROM.
1 Insert the utility CD-ROM into the notebook's CD-ROM drive or other drive capable of reading CD-ROMs, such as a DVD drive.
2 Double-click the "My Computer" icon and then click the CD-ROM drive icon.
3 Double-click the "MsCtySlt" folder.
4 Double-click "Setup.exe".
The installation program for the modem station Country Selector starts. Install the program by following the prompts that appear on the display.
Selecting the Country Code
"United Kingdom" is the default country code of the PCGA-BM1. When using the PCGA-BM1 in any other country, you must make the appropriate country code settings in the Country Selector application.
Perform the following steps.
1 If the power of the PCGA-BM1 is on, turn it off.
2 Set the DIP switch 1 (setup/normal operation mode selector) on the bottom of the PCGA-BM1 to OFF, and then turn the PCGA-BM1 on.
For information on the DIP switches, see the section "DIP Switch Settings" (page 17).
3 Activate Bluetooth communication on the notebook and establish a link to the PCGA-BM1.
For details, refer to the manuals provided with your Sony notebook.
4 Check the communications port allocated to Bluetooth communications.
5 Click the "Start" button and move the pointer to "Programs", then "Modem Station Utility" and click "Modem Station Country Selector" to start the Country Selector.
The Modem Station Country Selector dialog box appears. The modem connected to the default COM4 port is detected, and the current country code setting is shown in the Current Country field.
6 If the number shown in the Com Port field does not match the current port, click and select the number allocated with BlueSpace or other software.
If the number is correct, proceed to step 7.
Note
If the message "Modem answer error. Please try another port or check modem." appears, the wrong COM port was chosen. Select the correct port.
7 If the country shown in the Current Country field is not correct, select the country in the Available Country field.
If the country is correct, proceed to step 8.
8 Click the "Select" button.
The country code change process starts.
When the process is completed, the message "Modem station country selection is OK" is shown.
9 When you are happy with the content of the Current Country field, click the "Cancel" button to close the Country Selector.
This completes the country code selection process.
Bonding multiple notebooks
After the procedure described in the previous paragraph is completed, it is possible to bond further notebooks. Repeat the steps starting on page 16 for each notebook.
The maximum number of notebooks that can be bonded to the PCGA-BM1 is 16. When attempting to bond a notebook after the maximum has been reached, an error message appears. In this case, use the supplied modem station utility to delete bonding information for notebook that is no longer required. For details on this procedure, refer to "Deleting unnecessary bonding information" on page 27.
Communication
To use the PCGA-BM1 to establish a dial-up connection, proceed as follows:
Notes
- Before using the PCGA-BM1 for dial-up access, the preparations described in the previous section (starting on page 19) must be completed.
- The notebook must have been set up for dial-up access. For details on how to set up dial-up access, refer to the manuals provided with your Sony notebook and to the documentation of the ISP.
1 Set the DIP switch 1 (setup/normal operation mode selector) on the bottom panel of the unit to OFF and the DIP switch 3 (private ON/OFF selector) to OFF.
2 Turn on the power of the PCGA-BM1.
3 Activate Bluetooth communications on the notebook and establish a link to the PCGA-BM1.
For details, refer to the manuals provided with your Sony notebook.
4 Execute a dial-up connection at the notebook.
On the modem selection dialog box, select "PCGA-BM1 (Modem)". When the dial-up connection has been established, the MODEM indicator lights up and stays lit until the connection is terminated.
To terminate communication
To terminate communication between the PCGA-BM1 and the notebook, hang up the dial-up connection at the notebook and then terminate Bluetooth communication. For details, refer to the manuals provided with your Sony notebook.
Changing the PCGA-BM1 Settings
Installing the modem station utility
The modem station utility serves for changing PCGA-BM1 settings. Install the utility from the supplied CD-ROM.
Note
Before starting the procedure below, the notebook must be set up to read CD-ROM discs. For details on CD-ROM use, refer to the manuals provided with your Sony notebook and/ or the CD-ROM drive.
1 Insert the utility CD-ROM into the notebook's CD-ROM drive or other drive capable of reading CD-ROMs, such as a DVD drive.
2 Double-click the "My Computer" icon and then double-click the "CD-ROM" drive icon.
3 Double-click the "MSUtil" folder.
4 Double-click "Setup.exe".
The installation program for the modem station utility starts. Install the program by following the prompts that appear on the display.
Changing the Passkey
The Passkey that is used for Bluetooth bonding of the notebook can be changed to any alphanumeric string with the modem station utility.
The factory default Passkey for the PCGA-BM1 is the serial number of the unit, as shown on a label on the bottom panel. For the location of the label, refer to "Bottom view" in the section "Names of Parts" on page 12.
Notes
- If the modem station utility is not installed, it must first be installed as described above.
- The Passkey is case-sensitive.
1 Set the DIP switch 1 (setup/normal operation mode selector) on the bottom panel of the unit to ON and the DIP switch 3 (private ON/OFF selector) to OFF.
For details, refer to "DIP Switch Settings" on page 17.
2 Turn on the power of the PCGA-BM1.
3 Activate Bluetooth communication on the notebook and establish a link to the PCGA-BM1.
For details, refer to the manuals provided with your Sony notebook.
4 Click the "Start" button and go to "Programs", then "Modem Station Utility", and click "Modem Station Utility".
The "Destination" dialog box appears.
5 From the "Communication Port" list box, select the port assigned to Bluetooth communications, and click the "OK" button.
If you are not sure about the communications port, refer to the manuals provided with your Sony notebook.
Clicking the "OK" button starts the modem station utility.
6 Click the "Passkey" tab.
7 Enter the old Passkey and new Passkey in the respective fields, then re-enter the new Passkey in the confirmation field.
The Passkey can be any alphanumeric string of up to 16 characters.
8 Click the "Change" button.
A confirmation message for the Passkey change appears.
9 Click the "OK" button to close the message.
A message indicating the result of the Passkey change procedure appears.
10 Click the "OK" button to close the message.
11 Click the "OK" button to quit the modem station utility.
12 Terminate Bluetooth communications.
For details, refer to the manuals provided with your Sony notebook.
13 Turn off the power of the PCGA-BM1 and set the DIP switch 1 (setup/normal operation mode selector) on the bottom panel of the unit to OFF and the DIP switch 3 (private ON/OFF selector) to ON.
The new Passkey becomes valid when you turn on the power of the PCGA-BM1 again.
Deleting unnecessary bonding information
The supplied modem station utility can be used to check which notebooks have been bonded to the PCGA-BM1. It is also possible to delete bonding information that is no longer needed.
The maximum number of notebooks that can be bonded to the PCGA-BM1 is 16. To bond further notebooks, bonding information must be deleted first.
Note
If the modem station utility is not installed, it must first be installed as described on page 25.
1 Set the DIP switch 1 (setup/normal operation mode selector) on the bottom panel of the unit to ON and the DIP switch 3 (private ON/OFF selector) to OFF.
For details, refer to "DIP Switch Settings" on page 17.
2 Turn on the power of the PCGA-BM1.
3 Activate Bluetooth communication on the notebook and establish a link to the PCGA-BM1.
For details, refer to the manuals provided with your Sony notebook.
4 Click the "Start" button and go to "Programs", then "Modem Station Utility", and click "Modem Station Utility".
The "Destination" dialog box appears.
5 From the "Communication Port" list box, select the port assigned to Bluetooth communications, and click the "OK" button.
If you are not sure about the communications port, refer to the manuals provided with your Sony notebook.
Clicking the "OK" button starts the modem station utility.
6 Click the "Bonded Devices" tab.
Device addresses are shown in the "Bonded Devices List".
The device address of bonded notebooks can be checked on the respective computer.
For the notebooks PCG-SR31K, PCG-C1VFK etc., the BlueSpace software can be used to check the device address. Open the "Bluetooth Setup" dialog box. The device address is shown under the "Properties" tab.
7 From the "Bonded Devices List", select the device you want to delete, and click the "Delete" button.
A confirmation message for the deletion appears.
8 Click the "OK" button to close the message.
A message indicating the result of the deletion procedure appears.
9 Click the "OK" button to close the message.
10 Click the "OK" button to quit the modem station utility.
11 Terminate Bluetooth communications.
For details, refer to the manuals provided with your Sony notebook.
12 Turn off the power of the PCGA-BM1 and set the DIP switch 1 (setup/normal operation mode selector) on the bottom panel of the unit to OFF and the DIP switch 3 (private ON/OFF selector) to ON.
The deletion becomes valid when you turn on the power of the PCGA-BM1 again.
Changing the device name
The device name of the PCGA-BM1 can be changed to any alphanumeric string using the supplied modem station utility. The device name is shown on the notebook when performing Bluetooth bonding.
Note
If the modem station utility is not installed, it must first be installed as described on page 25.
1 Set the DIP switch 1 (setup/normal operation mode selector) on the bottom panel of the unit to ON and the DIP switch 3 (private ON/OFF selector) to OFF.
For details, refer to "DIP Switch Settings" on page 17.
2 Turn on the power of the PCGA-BM1.
3 Activate Bluetooth communication on the notebook and establish a link to the PCGA-BM1.
For details, refer to the manuals provided with your Sony notebook.
4 Click the "Start" button and go to "Programs", then "Modem Station Utility", and click "Modem Station Utility".
The "Destination" dialog box appears.
5 From the "Communication Port" list box, select the port assigned to Bluetooth communications, and click the "OK" button.
If you are not sure about the communications port, refer to the manuals provided with your Sony notebook.
Clicking the "OK" button starts the modem station utility.
6 Click the "Device Name" tab.
7 Click the "Change" button.
8 Enter the new device name.
The maximum length of the device name is 20 alphanumeric characters.
9 Click the "OK" button to close the device name change dialog box.
A message indicating the result of the name change procedure appears.
10 Click the "OK" button to close the message.
11 Click the "OK" button to quit the modem station utility.
12 Terminate Bluetooth communications.
For details, refer to the manuals provided with your Sony notebook.
13 Turn off the power of the PCGA-BM1 and set the DIP switch 1 (setup/normal operation mode selector) on the bottom panel of the unit to OFF and the DIP switch 3 (private ON/OFF selector) to ON.
The device name change becomes valid when you turn on the power of the PCGA-BM1 again.
Resetting the unit to the factory defaults
You can return the unit to the factory default settings (bonded notebook information and Passkey string). This is useful if you have forgotten a changed Passkey or want to delete all bonded notebooks in one operation.
Note
Any changes made to the device name will not be affected by the reset operation.
1 Remove the base.
2 Turn on the power of the unit.
3 Push the reset switch with a paper clip or other pointed object until all indicators light up.
Note
To prevent the possibility of unit damage, do not push the reset switch with the tip of a pencil or other object that may break.
4 Turn off the power of the unit.
The reset becomes valid when you turn on the power of the PCGA-BM1 again.
Usage Precautions
AC adapter
Use only the supplied AC adapter. Use of another adapter can result in damage to the unit.
Protect the unit from shock
To prevent the possibility of damage, take care not to drop the unit or otherwise subject it to strong shocks.
Usage and storage locations
- This unit cannot be used in France and Italy.
- Do not use or store this unit in locations subject to high humidity, high temperatures, strong vibrations, direct sunlight, or high levels of dust.
Operation
- Do not move the unit during operation, to prevent the possibility of malfunction.
- Place the unit on a level surface for operation.
-
Do not place any objects on top of the unit.
-
Protect the unit from sudden temperature changes. Do not use the unit immediately after moving it from a cold to a warm location or after the ambient temperature has risen drastically. Otherwise condensation inside the unit can occur. If the temperature has changed significantly during operation, turn off the power of the unit and let it stand for about an hour.
Transport
Retain the packing material of the unit and reuse it when transporting the unit again.
Notes on discs
On handling discs
- To keep the disc clean, handle only by the edges. Do not touch the surface.
- Do not write on or stick paper or tape to the surface of the disc.
- Do not use a disc with tape, seals, or paste on it. Such a disc may damage the CD-ROM drive.

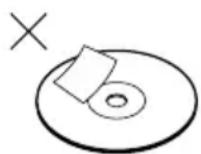
Not this way
On safekeeping
- Do not expose the disc to direct sunlight or heat sources such as hot air ducts, or leave it in a car parked in direct sunlight.
After playing, store the disc in its case. Stacking discs without cases or leaving the disc exposed, may cause damage to the disc.
On cleaning
- Fingersprints, dust or dirt can cause reading errors or reduced sound quality. Always keep the disc clean.
- Clean the disc with a duster. Wipe the disc from the center out.
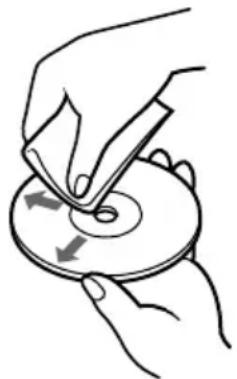
- For dirt, clean the disc with a soft cloth slightly moistened with water, then remove the moisture with a soft dry cloth.
- Do not use solvents such as benzine, thinner, commercially available cleaners or antistatic spray intended for vinyl LPs.
Bluetooth communications
- The 2.4 GHz band used by Bluetooth and wireless LAN devices is also used by various other devices. Bluetooth devices incorporate technology that minimizes interference from other devices using the same wavelength. However, communication speed and achievable distances may be reduced. Interference from other devices can also stop communications altogether.
- The data transfer rate and range of Bluetooth communications will vary, depending on factors such as distance and presence of obstacles between the two devices, radio interference, and the type of software application and operating system in use.
Maintenance
Cleaning the cabinet
- Wipe the outside of the unit with a soft, dry cloth. To remove stains, moisten the cloth with a mild, neutral detergent. Do not use solvents, cleaning alcohol, benzine or other substances that may damage the finish.
- Fingerprints and smudges can be removed by wiping with a lens cleaning cloth.
Bluetooth Wireless Technology
Bluetooth wireless technology is a new development that is about to revolutionize the field of personal networks. As a world-wide standard for short-range, low-cost wireless communications, Bluetooth compatibility will be integrated in a wide variety of devices, allowing notebooks, mobile phones and other mobile equipment to communicate with each other and access the Internet.
The Bluetooth SIG (Special Interest Group) comprises electronics and communications equipment manufacturers and other leading companies in the fields of computing and networking. The SIG has worked out the technological standards for Bluetooth communications. Many Bluetooth compatible products are now being developed and brought onto the market. Along with Sony, the Bluetooth SIG comprises more than 2000 companies worldwide including major computer and communications equipment manufacturers as well as household appliance manufacturers.
Connection format
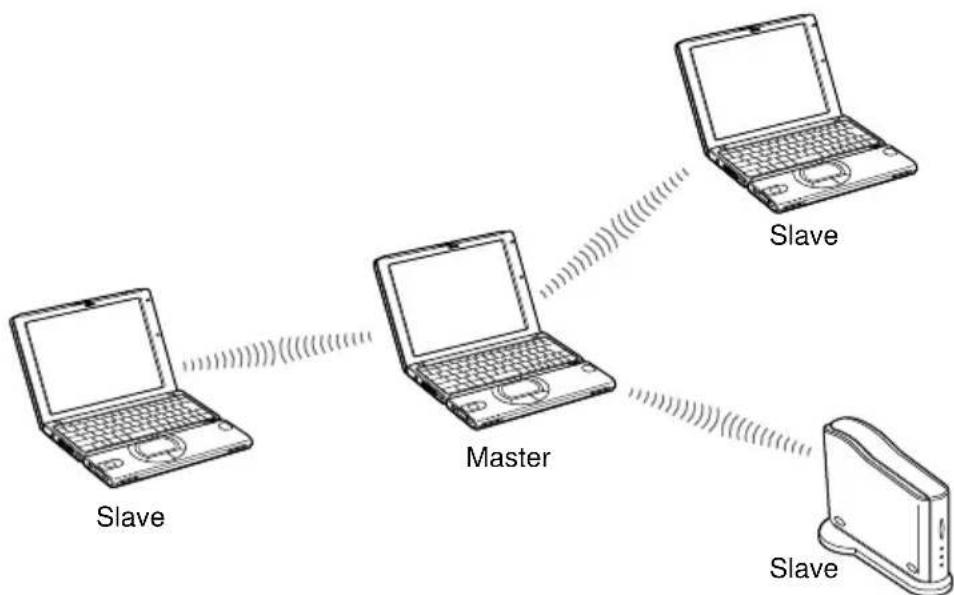
Bluetooth communications are carried out by one master device and up to seven slave devices which form a wireless network for exchanging data. The master device calls other Bluetooth compatible devices in the vicinity. When a device responds, it can be connected to the master as a slave device.
A personal computer such as a notebook can be both a master that calls other Bluetooth devices or a slave that responds and connects to a master device. Continued on next
Speed
Bluetooth communications support a maximum data transfer rate of 723 kbps, but actual data transfer rates will vary, depending on factors such as distance and obstacles between devices, radio interference, the operating system or the software used, as well as equipment sensitivity and the performance of the aerial. Data transfer rates are optimized to achieve the best throughput under a given set of conditions.
Communication range and power
Bluetooth compatible devices are divided into several categories. Power Class 1 devices can communicate over a line-of-sight distance of 10 - 100 metres. Power Class 2 or 3 devices can communicate over a direct distance of less than 10 metres.
- This assumes that no obstacles are present.
The actual range will vary, depending on factors such as the presence of obstacles between devices, radio interference, the operating system or the software used, as well as the equipment sensitivity and the performance of the aerial.
Bluetooth standard
In order to facilitate communication between Bluetooth compatible devices from various manufacturers, the Bluetooth SIG has worked out standards regarding wireless transfer methods, security implementation, application specific data formats, etc. All Bluetooth compatible devices must be certified according to procedures approved by the Bluetooth SIG to make sure that applicable standard requirements are met.
However, even if standard requirements are met, individual device performance and specifications as well as operation procedures vary, which means that data exchange may not be possible in all cases.
Security
Bluetooth wireless communications implement an authentication feature that can be used to prevent unauthorized access from unidentified Bluetooth devices. The first time two Bluetooth devices communicate with each other, a common Passkey must be entered before the two devices are allowed to exchange data. This identification process is referred to as "bonding". Once Bluetooth bonding has been established, communication between the devices can proceed, also after an interruption, without the need to reenter the Passkey.
The PCGA-BM1 can be configured to remain unseen by Bluetooth devices.
Getting Help
This section describes how to get help and support from Sony, as well as troubleshooting tips for your Bluetooth Modem Station.
About Sony's Support Options
Sony provides several support options for your Bluetooth Modem Station. If you have questions about your Bluetooth Modem Station and the software, check these places for answers:
This guide explains how to use your Bluetooth Modem Station.
For customers in Europe
□ VAIO-Link. For addresses and numbers, refer to your Customer Service Guide.
Specifications
Wireless communications
Communication method
Bluetooth standard Ver. 1.0B
Maximum data transfer rate 1)
Approx. 723 kbps
Output
Bluetooth standard Power Class 1
Communication range 2)
Line of sight approx. 10 - 100m
Supported Bluetooth profiles 3)
Generic Access Profile
Serial Port Profile
Dial-up Networking Profile
Frequency band
2.4 GHz band (2.400 GHz - 2.4835 GHz)
1) Maximum data transfer rate according to Bluetooth standard Ver. 1.0B. Actual rate will vary depending on distance and obstacles between devices, interference, operating system, software application, etc.
The data transfer rate between the notebook and the modem station is about 30 kbps for a dial-up connection. (With PCG-SR31K or PCG-C1VFK.)
2) Actual range will vary depending on distance and obstacles between devices, interference, operating system, software application, etc. Value applies only to use of PCGA-BM1 in conjunction with PCG-SR31K or PCGC1VFK.
3) Bluetooth standard profiles specify the usage purpose for Bluetooth devices communicating with each other.
Built-in modem
V.90 compliant
Maximum data transfer rate
56 kbps for receiving
33.6 kbps for sending
This modem is designed for TNV 1 circuit only.
Connectors
LINE connector
Modular phone jack (1)
General
Power source
External power supply jack rated for 6V
Powered by AC adapter (supplied)
Power consumption
Approx. 3 W
Dimensions
With base
Approx. 65· 118.5· 172mm (w / h / d)
Without base
Approx. 32· 104.5· 164.5mm (w / h / d)
Mass
Main unit
Approx. 380g (without base or AC adapter)
Base
Approx. 135g
AC adapter 4)
Power requirements
100-240 V AC, 50/60 Hz
4) Other data see label of AC adapter.
Ambient conditions for operation and storage
Operating temperature
5^ to 35^
(temperature gradient less than 10^/ hour)
Operating humidity
20% to 80% (not condensed),
provided that humidity is less than 65% at 35^ (hygrometer reading of less than 29^ )
Storage temperature
-20°C to 60°C
(temperature gradient less than 10^/hour )
Storage humidity
10% to 90% (not condensed),
provided that humidity is less than 20% at 60^ (hygrometer reading of less than 35^ )
Design and specifications are subject to change without notice.
Troubleshooting
If a problem occurs during operation of the unit, please check the points listed in this troubleshooting guide. You should also consult the manuals provided with your Sony notebook. If the problem persists, contact the Sony dealer where you purchased this product or a Sony service representative serving your area. For contact information, see "Getting Help" on page 37.
Symptom Cause/Remedy
| All indicators are lit and communication is not possible. | →The reset switch on the bottom of the unit may have been pressed. Turn power off and then on again. In this case, stored information about notebook bonding and Passkey will be cleared. Perform bonding again. |
| POWER indicator does not light up. | →Check that the AC adapter is connected properly and the power switch is set to ON. |
| Notebook tries to access PCGA-BM1 but unit is not recognized. | →While the PCGA-BM1 is communicating with another device (BLUETOOTH indicator on PCGA-BM1 flashes slowly), access may not be possible. Wait until the link with the other notebook is terminated. |
| Notebook tries to access PCGA-BM1 but an error message appears and communication cannot be carried out. | →A wrong Passkey may have been entered. Start the link again and enter the correct Passkey. If you have forgotten the Passkey, use the reset switch to reset the unit to the factory default condition (page 31). In this case, stored information about notebook bonding and Passkey will be cleared. Perform bonding again. |
| →The maximum bonding limit of 16 notebooks may have been reached. Delete unnecessary bonding information (page 27). Then start the link again. | |
| →Although the Bluetooth communication between the notebook and the PCGA-BM1 is terminated, the dial-up connection on the notebook could still be activated. | |
| Symptom Cause/Remedy | |
| Communication is not possible. | →Ensure that the AC adapter is connected properly, the power switch is turned on, and the POWER indicator is lit.→The Bluetooth communications range may be exceeded. Decrease the distance between PCGA-BM1 and notebook.→DIP switch 1 (setup/normal operation mode selector) may be set to ON. Turn power to the PCGA-BM1 off, set the DIP switch 1 to OFF, and turn on the power again.→Notebook may not be bonded to PCGA-BM1. Perform Bluetooth bonding (page 19).→Bluetooth function at notebook may have been disabled. Consult the manuals provided with your Sony notebook and enable Bluetooth function. |
| Communication is not possible although distance between PCGA-BM1 and notebook is less than 100 m. | →Communication range may be less than 100 metres, depending on obstacles between devices, interference, operating system, software application, etc. Change the installation location of PCGA-BM1 or otherwise decrease the distance between devices.→While the PCGA-BM1 is communicating with another device (BLUETOOTH indicator on PCGA-BM1 flashes slowly), access may not be possible. Wait until the link with the other notebook is terminated. |
| Dial-up access is not possible. | →Ensure that the DIP switch 2 is set to OFF. If the switch is ON, turn off the power of the PCGA-BM1, set the DIP switch 1 to OFF, and turn on the power again.→The modem driver may not have been installed correctly on the notebook. Check this by performing the following steps.1 Click the “Start” button, move the pointer to “Setup”, and click “Control Panel”.2 Double-click the “Phone and Modem Options” icon to open the “Phone and Modem Options” dialog box.3 Select the “Modems” tab and check the list. If “PCGA-BM1 (Modem)” is not shown, install the modem as described in the separate information booklet “Read Me First”. |
Symptom Cause/Remedy
| Dial-up connection can be established, but correct communication is not carried out. (BLUETOOTH indicator flashes but MODEM indicator is out.) | \( \rightarrow \) A wrong telephone number may be used. Open the Properties dialog box of the dial-up connection of the notebook and check the telephone number. If a prefix is necessary to dial an outside line, make sure that the prefix (usually 0) is specified. For details, refer to the manuals provided with your Sony notebook. \( \rightarrow \) The dialling method (tone or pulse dialling) may have been specified incorrectly. Open the Properties dialog box of the dial-up connection of the notebook and check the dialling method setting. For details, refer to the manuals provided with your Sony notebook. |
| Data transfer speed is slow. | \( \rightarrow \) The data transfer rate varies,depending on distance and obstacles between devices, interference, operating system, software application, etc. Change the installation location of PCGA-BM1 or otherwise decrease the distance between devices. |
| A message appears indicating that all devices are connected, that error 6 (invalid handle) occurred. | \( \rightarrow \) This message appears if the link between the PCGA-BM1 and the notebook was cut by terminating Bluetooth communications without terminating the dial-up connection at the notebook. Click the "Redial" button shown on the message to establish the dial-up link again. |
Bluetooth Standard Power Class 1
Generic Access Profile
Serial Port Profile
Dial-up Networking Profile
Frequenzbereich
Specification Bluetooth version 1.0B
Standard Bluetooth Power Class 1
Printed on recycled paper
Printed in Japan

- Bluetooth™ Modem Station
- Owner's Record
- Regulatory information
- Warnings
- CE
- Introduction
- Bluetooth wireless technology
- Note
- Bluetooth compatible notebooks that can be used with the modem station
- How to use this product
- Notes
- Analog telephone line
- Names of Parts
- Front view Rear view
- BLUETOOTH indicator
- POWER indicator
- 3PRIVATEindicator
- 4MODEM indicator
- 5TA indicator
- 6Power switch
- 7Serial connector
- Bottom view
- Installation
- Telephone line connection
- Telephone line precautions
- Power connection
- Attaching or removing the base
- Attaching the base
- Preparation
- Observe the following points regarding installation of the unit:
- Removing the base
- Power-on/power-off
- DIP Switch Settings
- When the switch settings have been made, reattach the base.
- Enabling Communication
- Notebook bonding
- What is a Passkey?
- Installing the Country Selector
- Selecting the Country Code
- Bonding multiple notebooks
- Communication
- To terminate communication
- Changing the PCGA-BM1 Settings
- Installing the modem station utility
- Changing the Passkey
- Deleting unnecessary bonding information
- Changing the device name
- Resetting the unit to the factory defaults
- Turn off the power of the unit.
- Usage Precautions
- AC adapter
- Protect the unit from shock
- Usage and storage locations
- Operation
- Transport
- Notes on discs
- On handling discs
- On safekeeping
- On cleaning
- Bluetooth communications
- Maintenance
- Cleaning the cabinet
- Connection format
- Speed
- Communication range and power
- Bluetooth standard
- Security
- Getting Help
- About Sony's Support Options
- For customers in Europe
- Specifications
- Wireless communications
- Communication method
- Maximum data transfer rate 1)
- Output
- Communication range 2)
- Supported Bluetooth profiles 3)
- Frequency band
- Built-in modem
- Connectors
- LINE connector
- General
- Power source
- Power consumption
- Dimensions
- Mass
- AC adapter 4)
- Ambient conditions for operation and storage
- Operating temperature
- Operating humidity
- Storage temperature
- Storage humidity
- Troubleshooting
- Symptom Cause/Remedy
Brand : SONY
Model : PCGABM1
Category : Other computer accessories