VGPUVC100 - Other computer accessories SONY - Free user manual and instructions
Find the device manual for free VGPUVC100 SONY in PDF.
| Product Type | USB Visual Communication Camera |
| Brand | Sony |
| Model | VGPUVC100 |
| Sensor | CMOS 1/4 inch, 1,310,000 effective pixels |
| Maximum Image Resolution | 1280 x 1024 pixels |
| Maximum Video Resolution | 640 x 480 pixels (WMV) |
| Maximum Frame Rate | 30 fps |
| Lens | F2.3, focal length 3.8 mm (equivalent to 31.3 mm in 35 mm) |
| Field of View | Horizontal 56.8°, vertical 42.6° |
| Focus | 30 mm to infinity |
| Built-in Microphone | Yes |
| Connection | USB 2.0 (USB 1.1 compatible) |
| Cable Length | Approx. 100 cm |
| Dimensions (normal) | 55 x 50.5 x 40.5 mm (Length x Height x Depth) |
| Dimensions (horizontal) | 55 x 39.5 x 39 mm |
| Weight | Approx. 55 g |
| Power Supply | Via USB port, consumption 1.0 W |
| Rotation | 10° upward, 90° downward, 360° left/right |
| Included Software | VGP-UVC100 driver, VAIO Camera Capture Utility software |
| Compatibility | Windows XP Service Pack 2 |
| Included Accessories | Installation CD-ROM, user manual, warranty card |
| Maintenance and Cleaning | Case: soft dry cloth; lens: blower or soft brush |
| Safety | Do not expose to rain or humidity, do not open the case |
| Operating Environment | 5 °C to 35 °C, humidity 20% to 80% without condensation |
Frequently Asked Questions - VGPUVC100 SONY
User questions about VGPUVC100 SONY
0 question about this device. Answer the ones you know or ask your own.
Ask a new question about this device
Download the instructions for your Other computer accessories in PDF format for free! Find your manual VGPUVC100 - SONY and take your electronic device back in hand. On this page are published all the documents necessary for the use of your device. VGPUVC100 by SONY.
USER MANUAL VGPUVC100 SONY
Visual Communication Camera VGP-UVC100
取扱説明書 / Operating Instructions / Mode d'emploi Bedienungsanleitung / Istruzioni per l'uso / Manual de instrucciones 사용설명서 / 使用説明書
http://www.sony.net/
© 2006 Sony Corporation / Printed In Japan
2-685-285-02(1)

Printed on 100% recycled paper using VOC (Volatile Organic Compound)-free vegetable oil based ink.
IMPORTANTE!
POR FAVOR LEA DETALLADAMENTE ESTE MANUAL DE INSTRUCCIONES ANTES DE CONECTAR Y OPERAR ESTE EQUIPO.
RECUERDE QUE UN MAL USO DE SU APARATO PODRIA ANULAR LA GARANTIA.
SONY®
電波障害自主規制について
natural_image
Illustration showing a hand holding a camera with a device being processed, resulting in a close-up of the camera's lens (no text or symbols present)
ヒント
natural_image
Technical line drawing of a camera module with no visible text or symbolsTo reduce the risk of fire or electric shock, do not expose this apparatus to rain or moisture.
To avoid electrical shock, do not open the cabinet. Refer servicing to qualified personnel only.
When connecting to the USB port, please connect to the USB port with mark.
For customers in the U.S.A. Owner's Record
The model number and the serial number are located on the bottom of the camera. Record the serial number in the space provided below. Refer to this number whenever you call your Sony dealer regarding this product.
Model No. VGP-UVC100
Serial No. ____
FCC Notice
This equipment has been tested and found to comply with the limits for a Class B digital device, pursuant to Part 15 of the FCC Rules. These limits are designed to provide reasonable protection against harmful interference in a residential installation. This equipment generates, uses, and can radiate radio frequency energy and, if not installed and used in accordance with the instructions, may cause harmful interference to radio communications. However, there is no guarantee that interference will not occur in a particular installation. If this equipment does cause harmful interference to radio or television reception, which can be determined by turning the equipment off and on, the user is encouraged to try to correct the interference by one or more of the following measures:
– Reorient or relocate the receiving antenna.
– Increase the separation between the equipment and receiver.
- Connect the equipment into an outlet on a circuit different from that to which the receiver is connected.
- Consult the dealer or an experienced radio/TV technician for help.
The shielded interface cable recommended in this manual must be used with this equipment in order to comply with the limits for a digital device pursuant to subpart B of Part 15 of FCC Rules.
You are cautioned that any changes or modifications not expressly approved in this manual could void your authority to operate this equipment.
For questions regarding your product or for the Sony Customer Information Service Center nearest you, call 1-888-476-6972 in the United States or 1-800-961-7669 in Canada.
The number below is for FCC related matters only.
Declaration of Conformity
Trade Name: SONY
Model No.: VGP-UVC100
Responsible Party: Sony Electronics Inc.
Address: 16530 Via Esprillo,
San Diego, CA 92127
U.S.A.
Telephone No.: 858-942-2230
This device complies with Part 15 of the FCC Rules. Operation is subject to the following two conditions: (1) This device may not cause harmful interference, and (2) this device must accept any interference received, including interference that may cause undesired operation.
For customers in Canada
This Class B digital apparatus complies with Canadian ICES-003.
For customers in Europe
This product conforms with the following European Directives:
89/336/EEC, 92/31/EEC (EMC Directives) 93/68/EEC (CE-Marking Directive)
This product complies with European standards EN55022 Class B and EN55024 for use in the following areas: residential, commercial and light industrial.
Pictures and/or sound distortion may occur if this unit is positioned in close proximity to any equipment emitting electromagnetic radiation.
Repair and maintenance only by authorized Sony technicians. Improper use and repairs can create a safety hazard.
This equipment has been tested and found to comply with the limits set out in the EMC Directive by using connecting cables not longer than 3 meters.
Disposal of Old Electrical & Electronic Equipment (Applicable in the European Union and other European countries with separate collection systems)
This symbol on the product or on its packaging indicates that this product shall not be treated as household waste.
Instead it shall be handed over to the applicable collection point for the recycling of electrical and electronic equipment. By ensuring this product is disposed of correctly, you will help prevent potential negative consequences for the environment and human health, which could otherwise be caused by inappropriate waste handling of this product. The recycling of materials will help to conserve natural resources. For more detailed information about recycling of this product, please contact your local Civic Office, your household waste disposal service or the shop where you purchased the product.
Table of Contents
Introduction 4
Compatible Computers .... 4
Setting up 5
Checking the supplied accessories.... 5
Installing the driver and the software 6
Mounting the camera 7
Activating software 9
Seeing the PDF manual ...... 10
Precautions 11
Maintenance 11
Getting Help 12
Specifications 13
- Sony, VAIO, , and the Eco Info logo are trademarks of Sony Corporation.
- Microsoft and Windows are registered trademarks of Microsoft Corporation in the United States and/or other countries.
- IBM and PC/AT are registered trademarks of International Business Machines Corporation.
- Intel, Pentium and Celeron are trademarks and registered trademarks of Intel Corporation.
- The Bluetooth word mark and logos are owned by the Bluetooth SIG, Inc. and any use of such marks by SONY is under license.
- Adobe and Adobe Reader are trademarks or registered trademarks of Adobe Systems Incorporated in the United States and/or other countries.
- All other names of systems, products, and services are trademarks of their respective owners. In this manual, the ^TM or ^ marks are not specified.
In this manual, Microsoft ^® Windows ^® XP Home Edition, Microsoft ^® Windows ^® XP Professional and Microsoft ^® Windows ^® Media Center Edition are referred to as Windows XP.
Introduction
This camera is a USB 2.0 compatible visual communication camera. The camera enables you to use the TV telephone function on your computer. These are the following features.
• 1.3 Mega-pixel CMOS sensor and microphone.
- Shoot moving and still images, and transfer as video mail with the supplied “VAIO Camera Capture Utility” software.
- Various camera settings, such as Backlight compensation adjustment and brightness, added effects, such as setting a frame, etc., with “VGP-UVC100 device driver.”
• Video chatting when used as a web camera.
Note
Your “Messenger Software” may change the microphone volume automatically to prevent the speaker from howling; the software lowers the speaker volume when the microphone is close to the speaker. If voices are not easily audible, use a headphone or headset.
Refer to the help section of your software instructions for details.
Compatible Computers
The camera is designed to work with computers pre-installed with Windows XP* and equipped with USB ports.
* Requires Windows XP Service Pack 2 to be installed. If it is not installed, download it from Microsoft's website.
Notes
- There is no guarantee of proper operation on a home-built computer or OS upgrade/multi-boot.
- In the above operation environments, there is no guarantee of proper operation on every computer.
- A computer equipped with a camera is incompatible. Even if the camera is connected to the computer, you cannot use it.
- The following operation environments are necessary for capturing still images and movies in the size of VGA or the larger size.
CPU: Pentium III, or Celeron 1.2 GHz or more
We recommend 256 MB of memory or more.
We recommend reducing the screen size or image size, if the image is distorted during
capturing.
- If you display over a million-pixels, this camera is necessarily connected to the connector with Hi-Speed USB (USB 2.0).
- It is necessary to install the software from the supplied installation disc, in order to use the camera.
Setting up
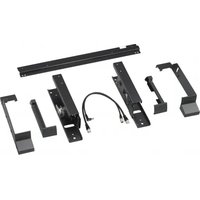
Checking the supplied accessories
Remove the camera from the box and make sure that the box contains the accessories listed below.
If any of the accessories are missing, contact the Sony dealer where you purchased this product or a Sony service representative in your area.
- Visual Communication Camera
- Installation disc (CD-ROM × 1)
- Operating instructions (this manual)
- Warranty card*
* The accessories included vary according to country and region.
Installing the driver and the software
Install the VGP-UVC100 device driver for using the camera on the computer. You can install “VAIO Camera Capture Utility” software for capturing still images and movies.
Notes
- Make sure that your disk drive, such as CD-ROM drive etc., is available for use on your computer. In this manual, the CD-ROM drives or multiple disk drives are referred to as “the CD-ROM drive.” For details on how to connect a CD-ROM drive, refer to the manuals provided with your computer or CD-ROM drive.
- To use “VAIO Camera Capture Utility,” more than 2 GB free space of the hard disc is necessary.
- Update Windows before installing the driver and software.
- Exit all software before installing the driver and software.
- Log on as Administrator before installing the driver and software.
- If the “Add New Hardware Wizard” dialog box appears, click “Cancel,” then disconnect the camera from your computer and reinstall it.
1 Turn on the computer, start the Windows operating system and insert the supplied installation disc into the CD-ROM drive.
The installation program starts automatically and the “Sony Visual Communication Camera VGP-UVC100 Application Installer Setup” screen appears.
2 Make sure that the checkbox to install the software has been checked, and click "Next."

Hint
The checkbox will not appear if the software is already installed.
3 Follow the on-screen instructions until the setup finishes and display closes.

Hint
Click "Yes" if a restart pop-up message appears after installation.
4 Connect the USB cable of the camera to the USB port on your computer.
The necessary driver is installed automatically.
Click “Yes” if a restart pop-up message appears after installation. After restarting Windows, you can begin using the camera.
Notes
- Do not disconnect/reconnect the camera's USB cable while your Windows operating system is starting up or shutting down; doing so may cause the camera or your computer to malfunction.
- Carefully disconnect/reconnect the USB cable of the camera; doing it quickly might result in unstable operation of your computer.
- This camera is designed to constantly secure a fixed amount of USB bandwidth for data transfer to display high-quality images. Therefore, if you use a USB hub to connect USB composite device simultaneously, the amount of bandwidth available for data transfer might not be sufficient to support proper operation.

Hints
- When there are the multiple USB ports, after connecting the USB cable to different USB ports, the necessary driver is automatically installed. Click “Yes” if a restart pop-up message appears after installation. After restarting Windows and connecting to the USB port, you can begin using the camera.
- If the driver is not properly installed, uninstall and then reinstall. Refer to the PDF manual to confirm installing and to uninstall. For details on how to see the PDF manual, see page 10.
Mounting the camera
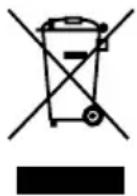
When mounting directly
Mount the camera onto the display panel.
Pinch the arms together and hang the camera on top of the display panel.
natural_image
Illustration showing a hand holding a camera and a camera with a scroll, both before and after adjustment (no text or symbols)
Hint
Depending on the type of computer you use, this camera sometimes cannot be mounted directly.
In this case, see "Placing horizontally" on the next page for details.
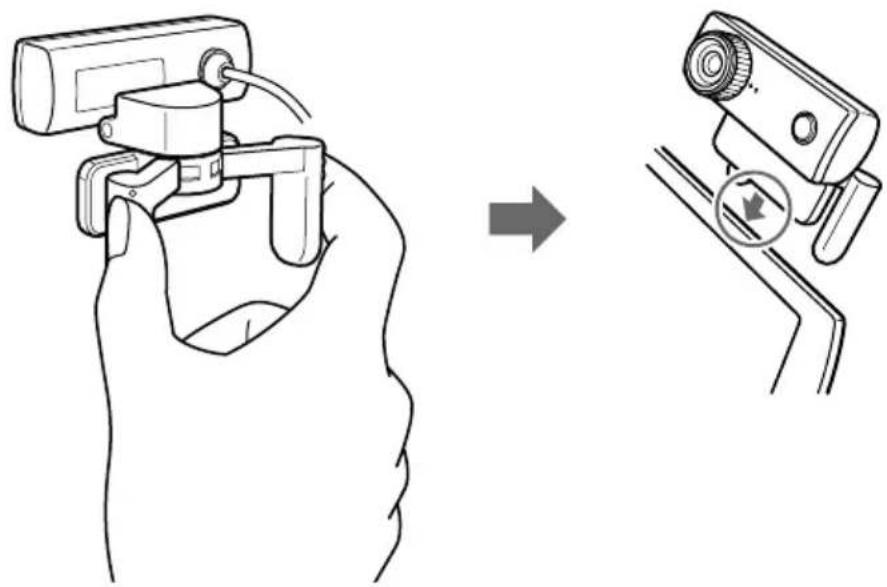
Placing horizontally
If the camera is to be put on a flat and stable place, such as on the CRT display, the computer, etc., do the following:
1 Turn the arm and arm plate towards you.
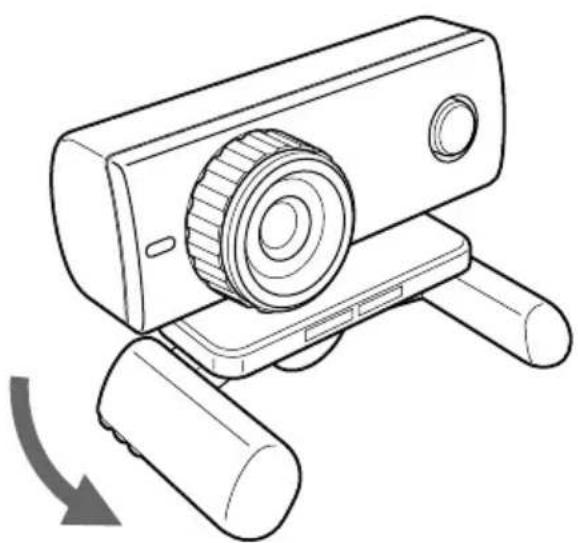
natural_image
Line drawing of a camera with a scroll wheel and base mount, showing a curved arrow indicating rotation (no text or symbols)2 Put the camera on a stable surface.
Removing the camera
Note
When your computer is off, you do not need to perform step 1 below. However, if you disconnect the USB cable while your computer is in power-saving mode, and then connect it again, the camera may not be detected.
1 Close the software used by the camera.
2 Pull out the USB cable from your computer, and then remove the camera.
Note
If you pull on the cable itself when disconnecting the USB cable, you may damage the cable. Make sure that you hold onto the connector when disconnecting the cable.
Activating software
Press the CAPTURE button on the camera.
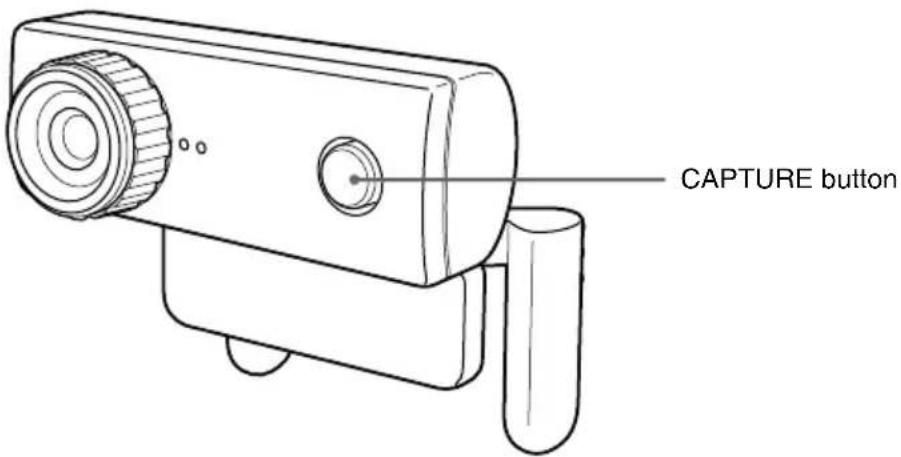
"VAIO Camera Capture Utility" software activates.
Capturing still images and movies requires “VAIO Camera Capture Utility.” When you change the setup of the camera and add effects to images, “VGP-UVC100 device driver” is available. For details regarding use, see the PDF manual in the supplied installation disc and the help section of “VAIO Camera Capture Utility.”
Note
The start-up time of software depends on your computer. Once you press the CAPTURE button, wait for being activated.
Seeing the PDF manual
The way to capture still images and movies and to change the setup of the camera, such as adjustment of Backlight Comp and brightness, are described in the PDF manual included the supplied installation disc.

Hints
- The supplied installation disc is required to be inserted in the CD-ROM drive in advance. When the installation disc is inserted, the “Sony Visual Communication Camera VGP-UVC100 Application Installer Setup” screen will appear. Click “Cancel” when you finish installing the driver and software.
- To see the PDF manual, Adobe Reader is necessary. If it is not installed on your computer, download from the following website: http://www.adobe.com/
1 Click the "Start" button, "My computer" and then double click the CD-ROM drive icon.
2 Open the "Manual" folder and then open the "GB" folder.
3 Double click "VGP-UVC100_manual_gb.pdf."
Precautions
Usage and storage locations
Do not use or store this product in the following locations. Doing so may damage the camera.
- Locations subject to abnormally high temperatures
During periods of hot weather or the summer season, the temperature inside closed vehicles becomes especially high, and if the camera is left in such a location, it may warp or be damaged.
- Locations subject to direct sunlight or next to heating appliances
The camera may warp or be damaged.
- Sandy locations, such as the beach
Do not place the camera in a location where sand may be present, such as the beach or other sandy areas. Doing so may damage the camera, and in some cases, repair may not be possible.
- Do not point the lens at the sun.
This could cause burn-in or other lens damage. Be careful when leaving the camera next to a window or outdoors.
Operation
- Do not remove the camera's USB cable during operation. Doing so may cause the camera to malfunction.
-
Do not place any objects on top of the camera.
-
Avoid placing the camera in locations subject to sudden temperature changes. Do not use the camera immediately after moving it from a cold location to a warm location, or after the ambient temperature has risen drastically. Otherwise, condensation may occur inside the camera. Let the camera stand for a moment before using it.
- Do not turn around the camera forcedly. Doing so, the malfunction might occur.
- Do not use the computer except the specification.
- Do not allow water or objects to get inside the camera. Do not open the camera.
Lens
Do not touch the lens.
Maintenance
Cleaning the cabinet
Wipe the outside of the camera with a soft, dry cloth. To remove stubborn stains, moisten the cloth with a mild, neutral detergent. Do not use solvents, cleaning alcohol, benzine or other substances that may damage the finish.
Cleaning the lens
Remove any dust from the front of the lens using a blower brush or soft brush.
Getting Help
This section provides information on how to get help and support from Sony, and on troubleshooting tips for your Visual Communication Camera.
About Sony's support options
Sony provides several support options for your Visual Communication Camera. When you have questions about your camera or the software, refer to the following:
☐This guide explains how to use your camera.
For customers in the United States and Canada
☐The Sony Customer Information Service Center offers information about your notebook and other Sony products that work with your computer. To contact Sony Customer Information Service Center, call 1-888-4SONYPC (1-888-476-6972).
□Sony Online Support
This service provides instant access to information on commonly encountered problems. Type a description of the problem and the Knowledge Database searches for the corresponding solutions online. You can visit Sony Online Support at
For customers in Europe
☐VAIO-Link. For addresses and numbers, refer to http://www.vaio-link.com/
For customers in other countries and regions
☐VAIO Website provides Frequently Asked Questions and solutions. vaio-online.sony.com/
Specifications
Visual Communication Camera
Image pickup
1/4" 1,330,000-pixel (1,310,000 effective pixels) colour CMOS progressive scanning image sensor.
Lens
2 groups, 2 lenses, F2.3
Focal length f=3.8 mm (0.1 inch)
(equivalent to a 35 mm (1.4 inch) camera at f=31.3 mm (1.1 inch))
Focus range 30 mm to ∞ (1.2 inch to ∞)
Angular field of view Horizontal approx. 56.8° Vertical approx. 42.6°
White balance
Indoors/Outdoors
Shutter speed
Auto
Flicker cancel function
50 Hz/60 Hz
Video capture format
RGB24 bits
Picture sizes
1,280×1,024
640 × 480
320 × 240
Movie sizes
640 × 480, WMV
320×240, WMV, MPEG1
160 × 120 , WMV
160×112, MPEG1
Number of display frames
Maximum: 30 frames/sec*
* This rate differs depending on the specifications of your computer and the application you are using.
Camera rotational range
Above 10^ below 90^
Right and left 360° (as cable permits)
Power consumption
Approx. 1.0 W
Dimensions
Normal
Approx. 2.4 × 2 × 1.8 inches (55 × 50.5 × 40.5 ~mm)
(W× H× D)
Horizontal
Approx. 2.4 × 1.2 × 1.2 inches (55 × 39.5 × 39 ~mm)
(W× H× D)
Cable length
Approx. 39.4 inches (100 cm)
Weight
Approx. 2.0 oz. (55 g)
Operating environment
Operating temperature
41^ to 95^ (5°C to 35°C)
(temperature gradient less than 18°F (10°C)/hour)
Operating humidity
20% to 80% (not condensed),
provided that humidity is less than 65% at 95°F (35°C)
(hygrometer reading of less than 84°F (29°C))
Storage temperature
-4^ to 140^ (-20^ to 60^)
(temperature gradient less than 18°F (10°C)/hour)
Storage humidity
10% to 85% (not condensed),
provided that humidity is less than 20% at 140°F (60°C)
(hygrometer reading of less than 95°F (35°C))
Supplied accessories
• Installation disc (CD-ROM × 1)
- Operating instructions (1)
- Warranty card (1)*
* The accessories included vary according to country and region.
Design and specifications are subject to change without notice.
AVERTISSEMENT
natural_image
Line drawing showing a hand holding a camera and a video camera with an arrow indicating motion (no text or symbols)
Conseil
natural_image
Line drawing of a camera with a scroll and base, showing no text or symbolsnatural_image
Illustration showing a hand holding a camera and a right-hand view of a camera with a circular adjustment knob (no text or symbols)
Tipp
natural_image
Line drawing of a camera with a scroll wheel and base mount (no text or symbols)natural_image
Illustration showing a hand holding a camera and a right-hand view of a webcam (no text or symbols present)
Suggerimento
natural_image
Line drawing of a camera with a scroll wheel and base mount, showing a curved arrow indicating rotation (no text or symbols)2 Collocare la fotocamera su una superficie stabile.
Visual Communication Camera
In alto, 10^ in basso, 90^
natural_image
Illustration showing a hand holding a camera and a camera with an arrow indicating motion (no text or symbols present)
Sugerencia
natural_image
Line drawing of a camera with a circular lens mounted on a tripod base, showing a curved arrow indicating rotation (no text or symbols)Aprox. 100cm (39,4")
Peso
Aprox. 55 gr (2,0 oz.)
Entorno operativo
natural_image
Illustration showing a hand holding a camera with an arrow pointing to a video camera (no text or symbols present)
힌트
natural_image
Line drawing of a camera with a scroll wheel and base mount, showing a curved arrow indicating rotation (no text or symbols)2카메라를 안정된 장소에 놓습니다.
카메라 분리하기
주의점
1/4" 1,330,000픽셀(유효 화소수 1,310,000)
natural_image
Illustration showing a hand holding a camera with an arrow pointing to a camera on a tripod (no text or symbols present)