CARLA 180 - Electric bike BLAUPUNKT - Free user manual and instructions
Find the device manual for free CARLA 180 BLAUPUNKT in PDF.
| Product type | Folding electric bike |
| Brand | Blaupunkt |
| Model | CARLA 180 |
| Folded dimensions | 680 × 380 × 630 mm |
| Weight (with battery) | 13.8 kg |
| Maximum supported load | 130 kg |
| Battery type | Lithium-ion, 36 V / 7.8 Ah (LG or Samsung cells) |
| Approximate range | Up to 40 km (depending on usage) |
| Charging time | 3 to 4 hours (do not exceed 6 hours) |
| Motor | Brushless DC, 36 V / 250 W |
| Maximum speed (assistance) | 25 km/h |
| Assistance modes | 5 power levels + push mode (6 km/h) |
| Assistance system | i-CST (Intelligent Cycling Support System) |
| Brakes | Caliper brakes |
| Lighting | Integrated front light, removable rear light |
| Folding | Folding frame, folding stem |
| Frame material | Lightweight aluminum alloy |
| Maintenance | Clean with a damp cloth (no pressurized water) |
| Recommended service interval | Every 1 to 2 months |
| Warranty | See website www.blaupunkt.com |
| Recycling | Do not dispose of with household waste, take to a collection point |
Frequently Asked Questions - CARLA 180 BLAUPUNKT
User questions about CARLA 180 BLAUPUNKT
0 question about this device. Answer the ones you know or ask your own.
Ask a new question about this device
Download the instructions for your Electric bike in PDF format for free! Find your manual CARLA 180 - BLAUPUNKT and take your electronic device back in hand. On this page are published all the documents necessary for the use of your device. CARLA 180 by BLAUPUNKT.
USER MANUAL CARLA 180 BLAUPUNKT
Operating instructions
Mode d'emploi
Manuale d'uso
natural_image
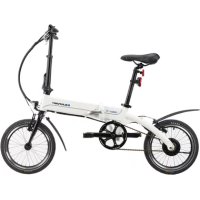
White foldable bicycle with black suspension and blue 'BREADPORT' branding, no visible text or symbols on the body.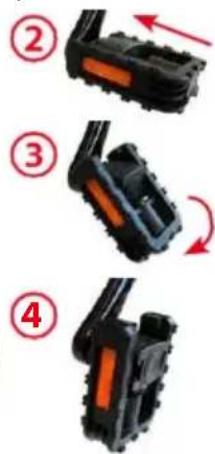

natural_image
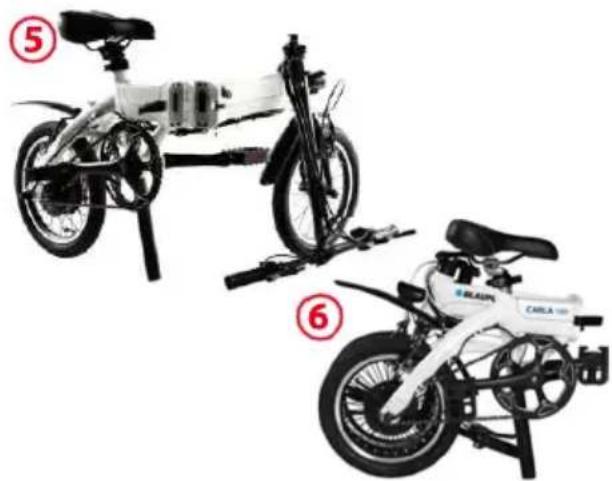
Two white electric bicycles with visible branding and seat covers, labeled 5 and 6 (no text or symbols on the bikes themselves)FALTRAD BEDIENEN
natural_image
Close-up of a black bicycle wheel handle and seat (no text or symbols visible)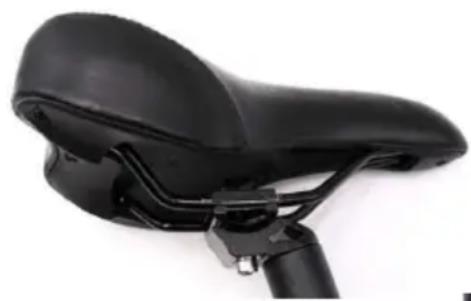
natural_image
Close-up of a black bicycle seat with a curved seat and lever mechanism (no text or symbols visible)natural_image
Close-up of a black cylindrical object with a red circular highlight on its surface, no visible text or symbols.BREMSANLAGE
natural_image
Diagram of a mechanical device with directional arrows indicating movement or force (no text or symbols)GETTING TO KNOW YOUR FOLDING BICYCLE 19
IN THE CARTON 20
HOW TO FOLD AND USE....20
HOW TO FOLD 20
HOW TO USE....21
OPERATIONS AND ADJUSTMENTS.... 21
INTRODUCTION TO THE HYBRID-POWERED SYSTEM – I-CST 21
BATTERY AND CHARGING 22
SAFETY CONCERNS 22
BATTERY MAINTENANCE 23
CYCLING COMPUTER OPERATIONS 24
FUNCTION AND DISPLAY 24
POWER ON/OFF 25
SWITCHING FRONT LIGHT ON/OFF 25
SWITCH POWER ASSIST LEVEL 25
PUSHING MODE 25
AVERAGE SPEED INDICATION 25
MAX SPEED INDICATION 26
RESET 26
PAS MODE 26
SADDLE POSITION....26
SADDLE HEIGHT 26
SAFETY CONCERNS 27
BRAKE SYSTEM....27
GEAR SHIFT (ONLY FOR CARL 280) 27
GEAR SHIFTING OPERATION....27
USE AND MAINTENANCE....28
BEFORE THE FIRST RIDE....28
BEFORE EACH RIDE 29
REGULAR CLEANING....29
REGULAR CHECKS (EVERY 1 TO 2 MONTHS) 29
TECHNICAL INFORMATION 30
WARRANTY 30
SERVICE....30
DISPOSAL NOTES 30
DECLARATION OF CONFORMITY 30
IMPORTANT SAFETY INFORMATION
- Do not operate this bicycle without carefully reading the manual and understanding how to operate the bicycle.
- This e-folding bike is only for non-commercial use!
- Wear your helmet, gloves and other protective gears before riding to protect yourself from injury in case of an accident. We recommend wearing reflective clothes when riding at night.
- Observe traffic rules and regulations when using this bicycle. Passengers should not be carried. When riding under rainy, snowy or slippery conditions reduce your speed and increase the distance between yourself and other vehicles.
- Do not use the e-folding bike if damage is visible or if there are other doubts about it's proper and safe function.
- Your insurance policies may not provide coverage for accidents involving the use of this bicycle. To determine if coverage is provided you should contact your insurance agent.
- Charge the battery in a dry place and ensure there is sufficient ventilation. Neither the battery nor the charger should be covered during the charging process. A lot of heat can be created during the charging process and this has to be able to escape. Otherwise this could lead to a danger of overheating or a possible fire hazard. We recommend charging under supervision. Use only the origin charger supplied with the foldable-bike.
- If planning to store the battery for a long time without using, make sure to charge it before storing. The battery is best stored in a cool and dry environment. It also needs to be charged once a month, if planning to store for several months.
- The bicycle should not be left out in the rain or submerged. If water enters into the controller and motor wheel, it may cause short circuit and damage the electrical components.
- Keep appropriate air pressure inside the tires, off to avoid increasing friction when riding, as low air pressure may easily wear the tires and deform the rim.
- Do not alter any components on the bicycle. Any changes to the bicycle not approved by Blaupunkt will nullify the warranty on the manufacturer's side and may result into damage or injury.
- Drive „ALWAYS“ at an appropriate speed in relation to light, weather and road conditions, traffic, visibility and your driving skills.
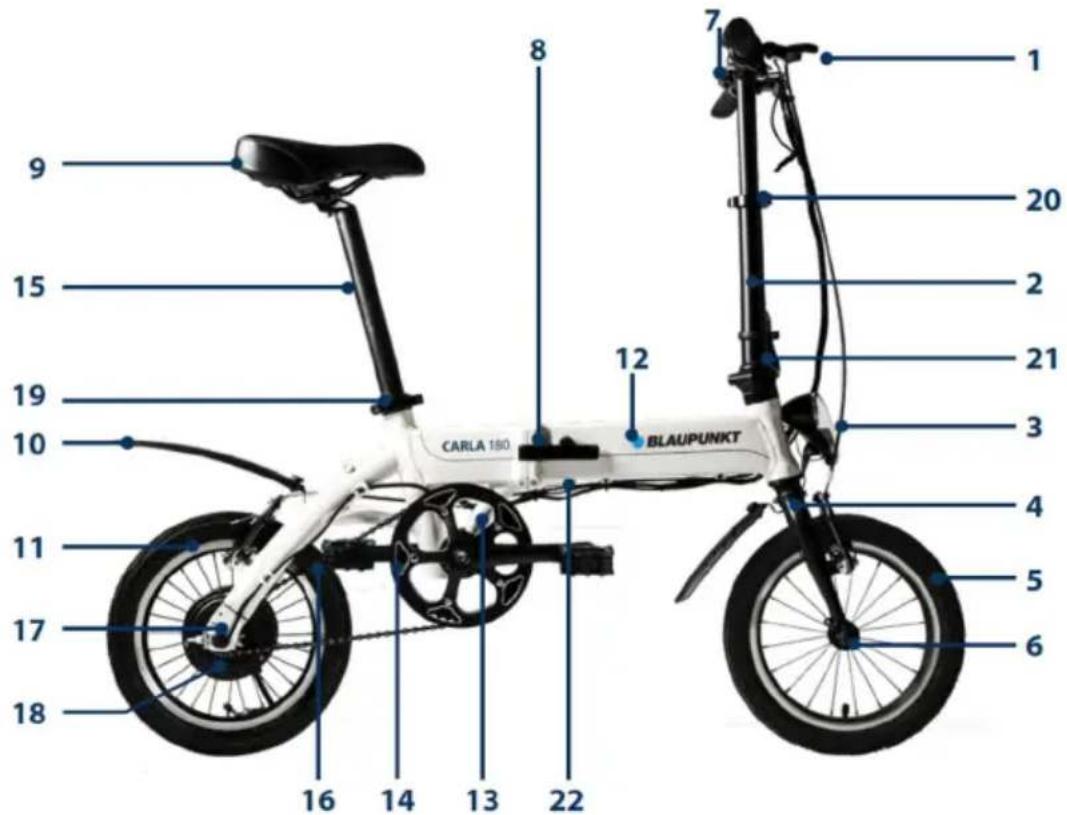
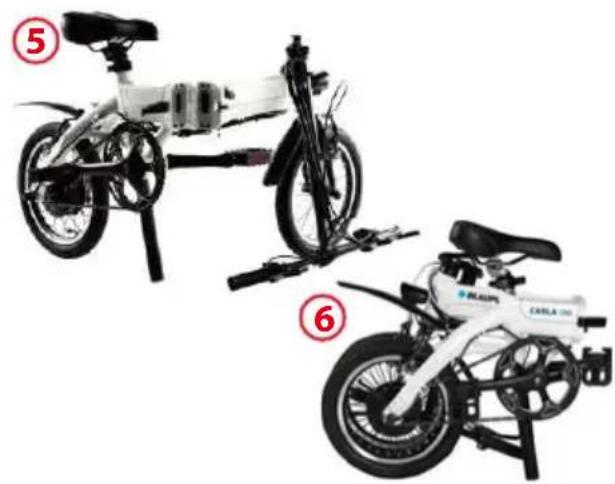
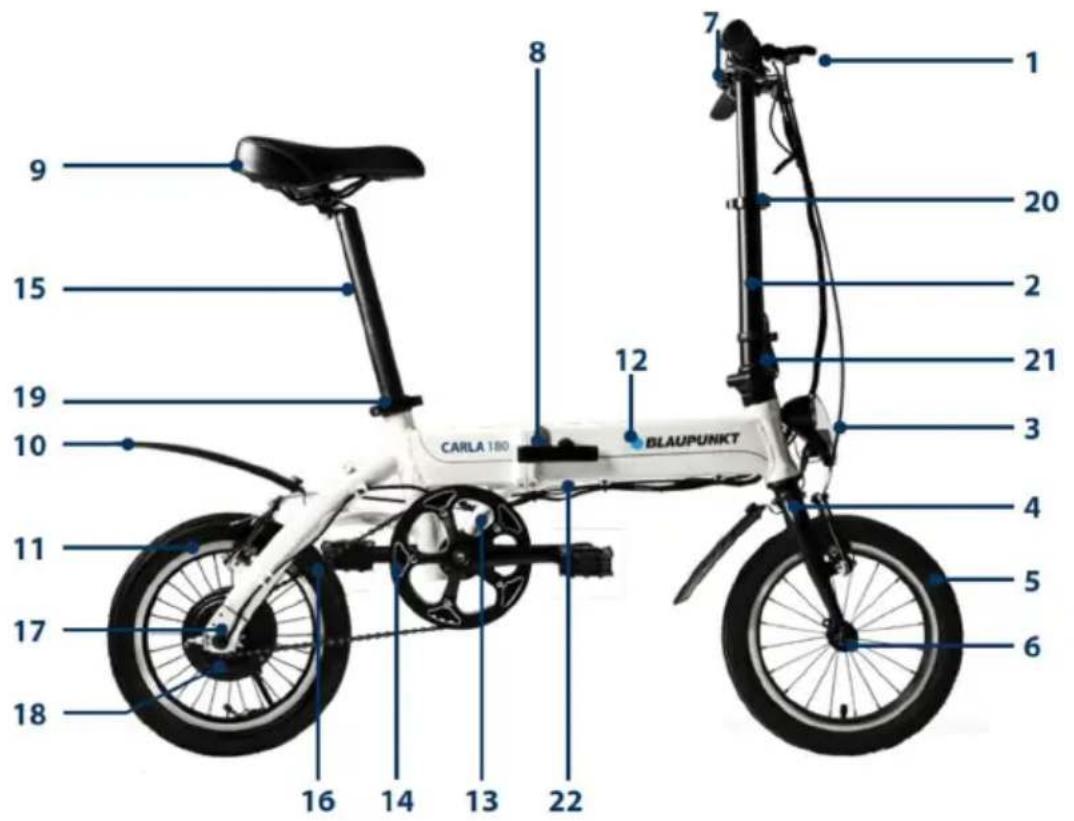
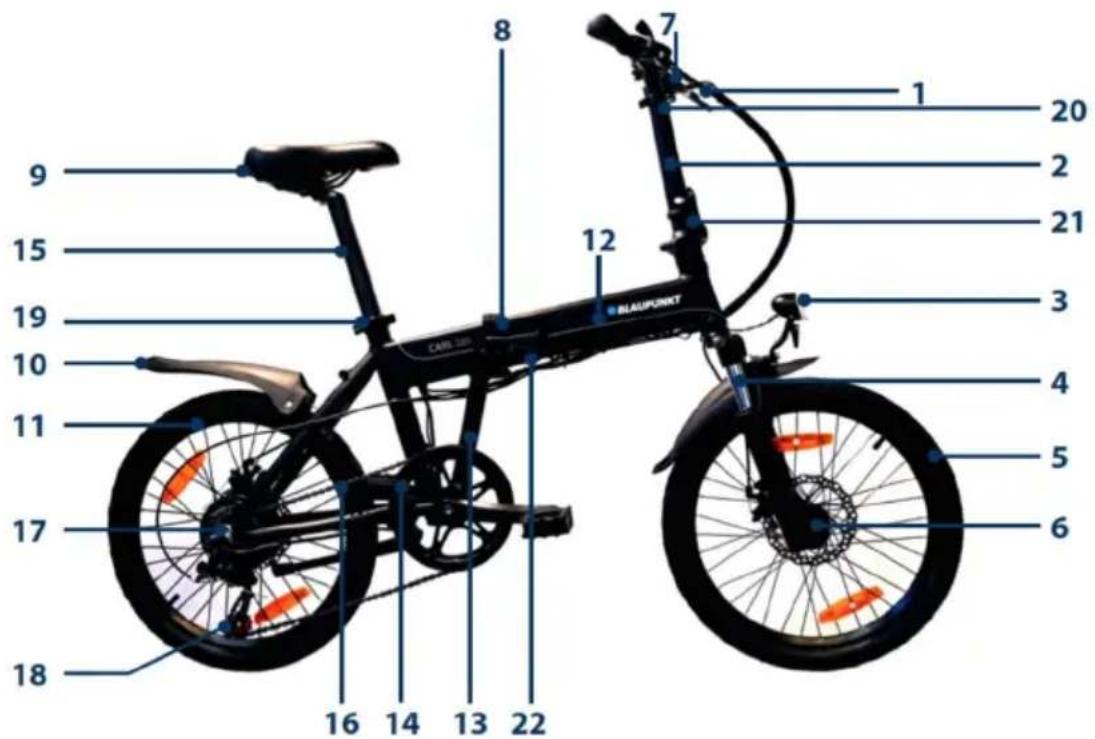
GETTING TO KNOW YOUR FOLDING BICYCLE
CARLA 180
CARL 280
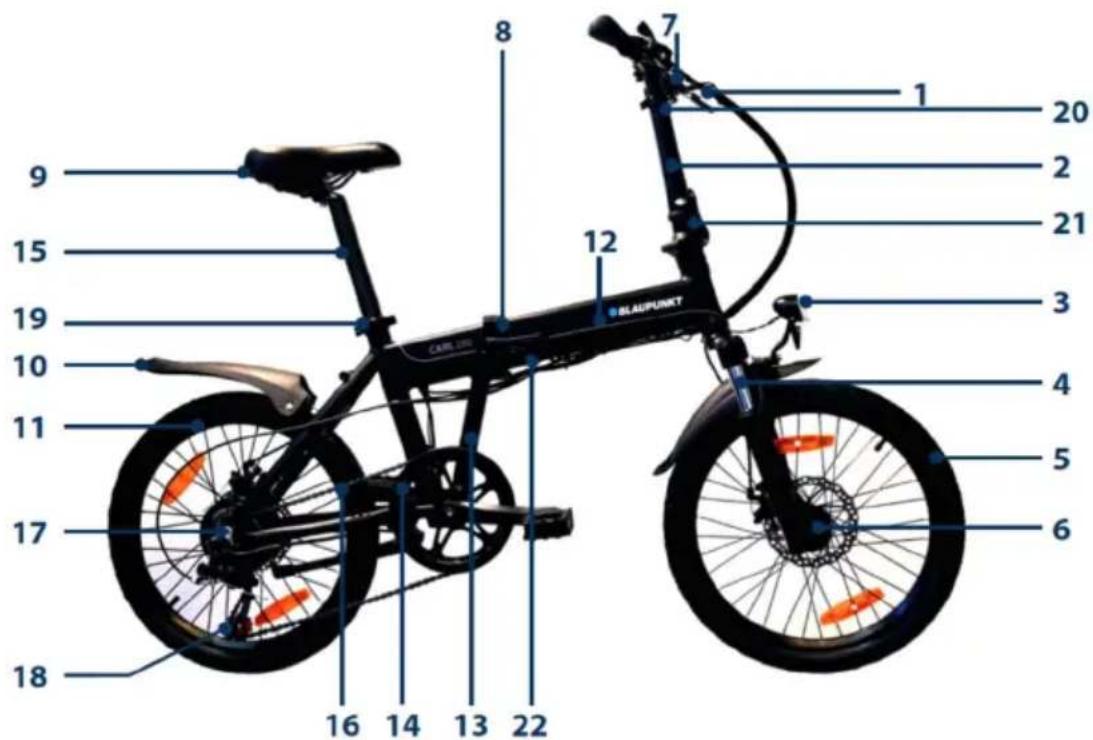
- Handle bar
- Foldable stem
- Headlight
- Front fork (for CARL 280 with suspension)
- Front wheel set
- Disc brake
- Cycling computer
- Folding lock
- Seat (saddle)
- Fender
-
Rear wheel set
-
Inside battery
- Cranks
- Chain ring
- Seat tube
- Chain
- Motor
- Derailleur (only for CARL 280)
- Seat quick-release clamp
- quick-release clamp (to adjust hight of the stem)
- stem folding quick-release clamp
- Charging jack
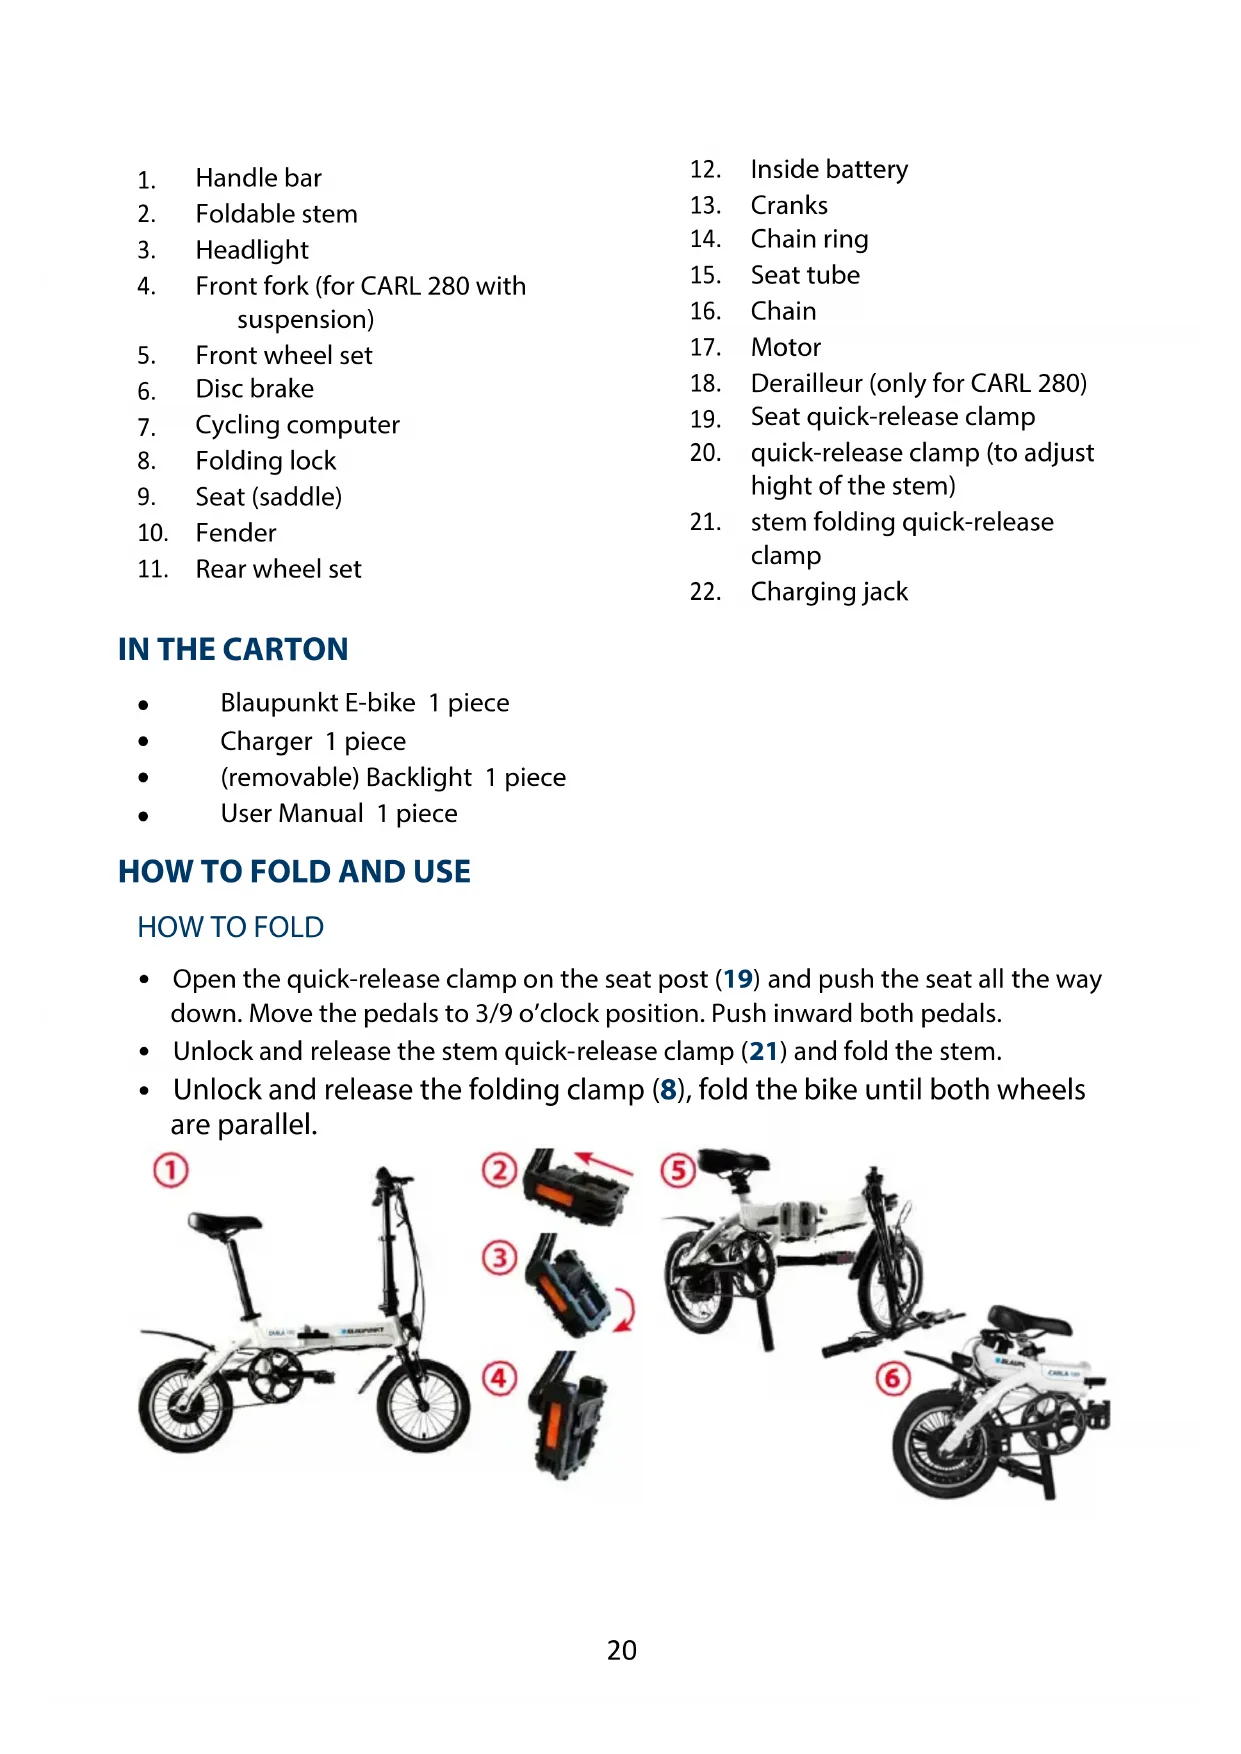
IN THE CARTON
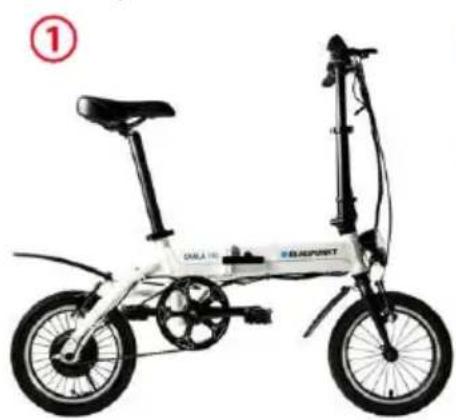
• Blaupunkt E-bike 1 piece
- Charger 1 piece
• (removable) Backlight 1 piece
• User Manual 1 piece
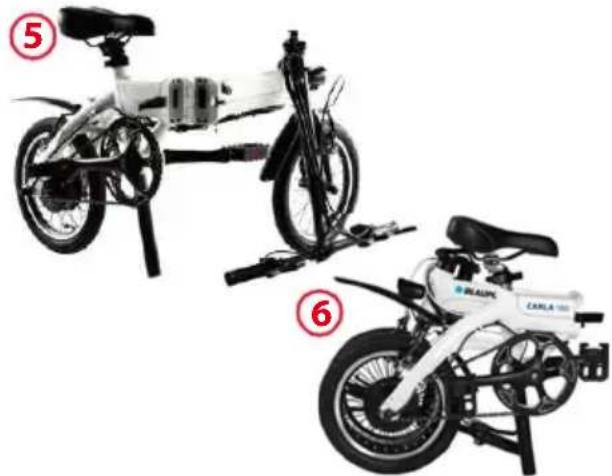
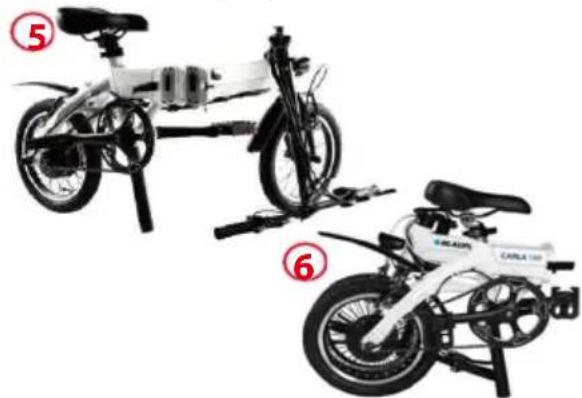
HOW TO FOLD AND USE
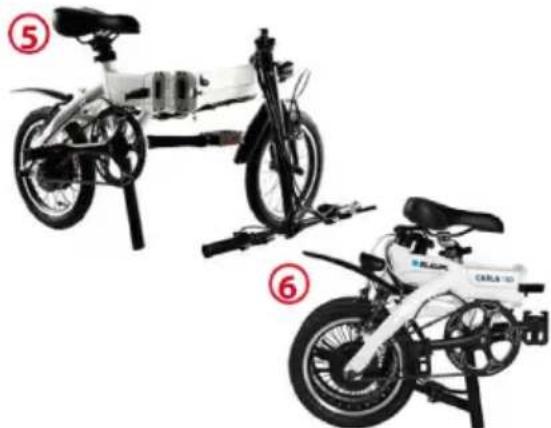
HOW TO FOLD
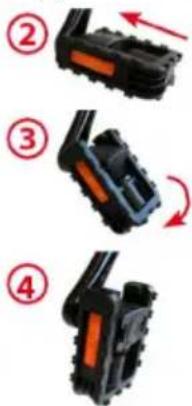
- Open the quick-release clamp on the seat post (19) and push the seat all the way down. Move the pedals to 3/9 o'clock position. Push inward both pedals.
- Unlock and release the stem quick-release clamp (21) and fold the stem.
- Unlock and release the folding clamp (8), fold the bike until both wheels are parallel.
natural_image
Black and white photo of a fully open four-wheeled bicycle with visible wheels and front suspension (no text or symbols)
natural_image
Two open bicycles, one white and one blue with visible branding and numbered labels (no text or symbols on the bikes themselves)HOW TO USE
- Press ⏻ to switch on cycling computer for 2 seconds, press ▲ to choose power assist level, tread the pedal, then start.
- press 📍 on cycling computer for 2 seconds to switch the cycling computer off.
OPERATIONS AND ADJUSTMENTS
INTRODUCTION TO THE HYBRID-POWERED SYSTEM – I-CST
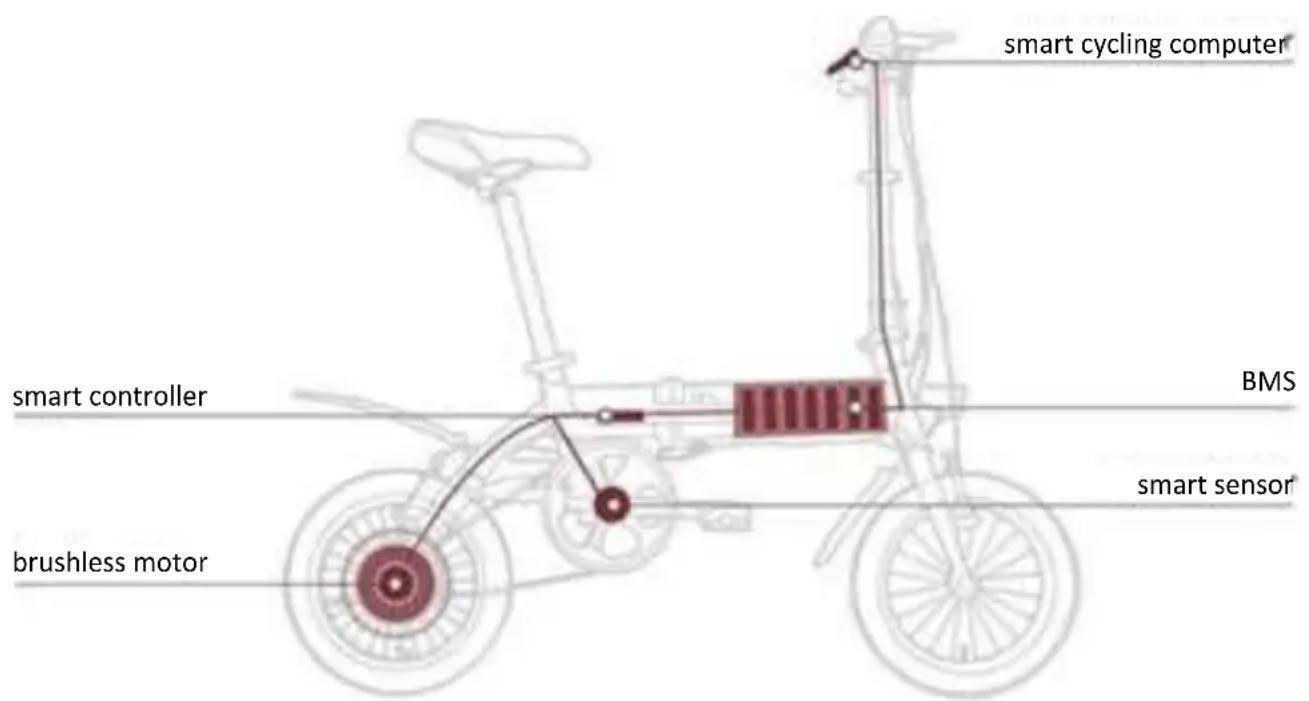
The i-CST (intelligent CYCLING SUPPORT SYSTEM) consists of the following components:
- Smart Sensor – Sensing your pedaling rate and velocity.
- Smart Controller – Real time calculating and coordinating optimized power output.
- BMS (Battery Management System) – Providing electric power to the system while balancing the power consumption and protecting the battery cells.
- Brushless DC Motor – Provide the power assist.
- Smart Cycling computer – Control and display terminal.
As soon as you start pedaling, the i-CST will sense your cadence (pedaling rate) and traveling velocity, and real-timely coordinate the electrical motor to provide the "just-right" power assist that match your riding conditions, making your riding much easier and comfortable.
BATTERY AND CHARGING
The battery must be charged before it is used for the first time. Please use exclusively the original charger designated by Blaupunkt for charging; otherwise it might damage the battery, and may even lead to fire and other hazard. Warranty expires, if a charger other than the designated is used.
- Check carefully whether the rated input voltage of the charger is consistent with the voltage of the power grid.
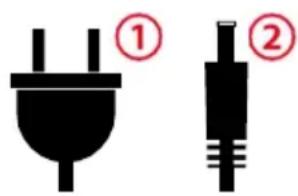
- Connect first the output plug of the charger with the charging jack (22) of the battery. Then connect the input plug of the charger to the AC power supply.

- Fully charge of an "empty" battery takes 3-4 hours, when the charge indicator light on the charger turns from red to green, the battery has been fully charged.
- After charging, first pull out the AC power plug ① and then pull out the plug connected with the battery ②
SAFETY CONCERNS
- The battery should be charged in a spacious environment,
staying away from high temperature, high humidity and fire, because battery and charger are electronic products, high temperature and humidity can corrode electronic components. This can result in harmful gases and soot, and even a possible explosion.
- The charging time is recommended not be longer than 6 hours. An excessive charging time will lead to shortened life expectancy of the battery.
BATTERY MAINTENANCE
- You can achieve the best possible performance and lifespan of your battery by charging on a regular basis and using it within the recommended temperature range. The battery has nearly no memory effect thanks to the Li-ion technology.
- Leaving a fully discharged battery for a long time will lead to permanent loss of function. Please recharge an empty battery as soon as possible. If storing the battery for an extended period, we recommend to recharge at least up to 34 (4 diodes full) at least every 30 days to avoid damage to the battery. A dead battery due to not charging the battery is not a warranty claim.
- Every battery with Li-ion technology is subject to an unstoppable chemical aging process. Provided, the bicycle has been used properly, remaining capacity of 70% after 500 charging cycles.
- Please follow municipal regulations as to how to discard the battery appropriately, so as to avoid environmental pollution.
- Recommended temperature ranges:
o Charging/Discharging: 0-45°C, 32-113°F
o Storage: < 35°C / 95°F
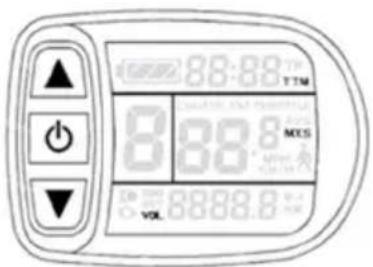
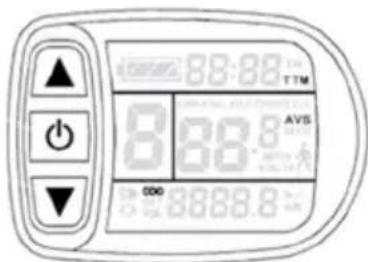
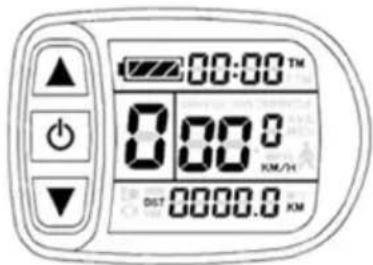
CYCLING COMPUTER OPERATIONS
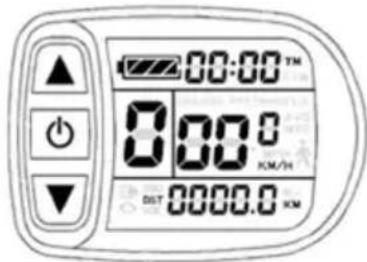
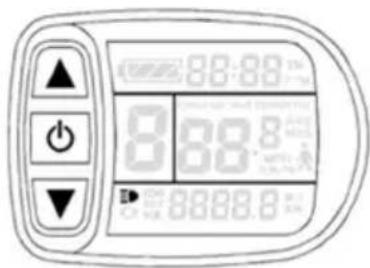
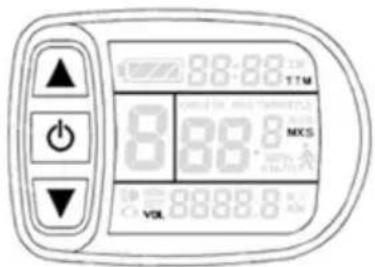
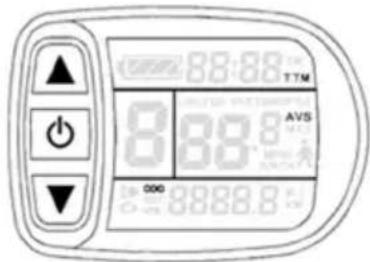
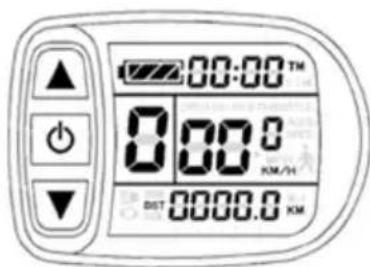
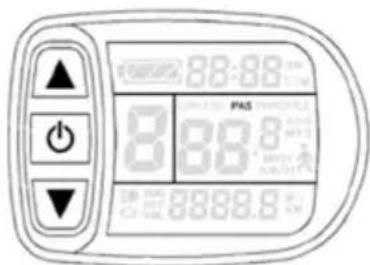
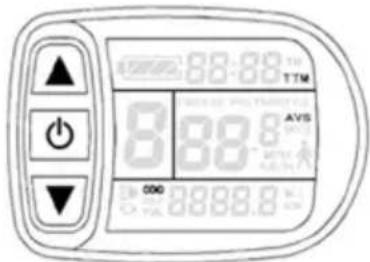
FUNCTION AND DISPLAY
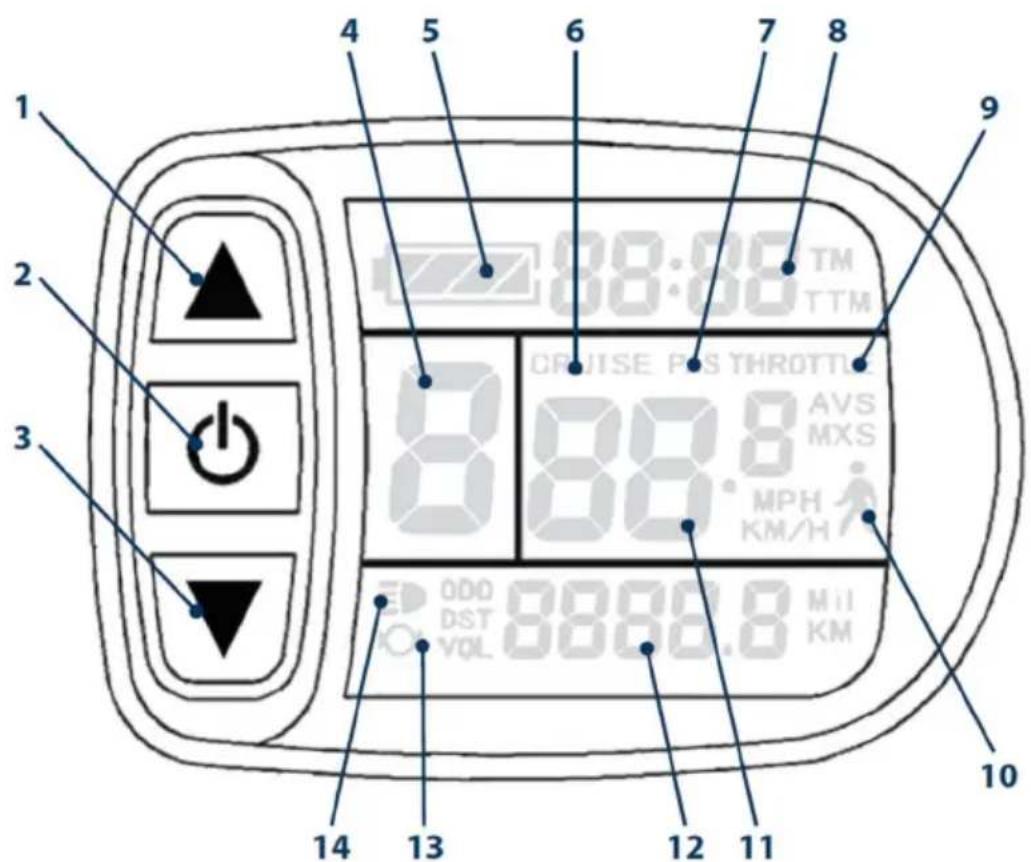
| 1 | UP | 11 | KM/H | Speed (km/h) | |
| 2 | POWER | MPH | Speed (mile/h) | ||
| 3 | DOWN | MXS | Max Speed Per Trip | ||
| 4 | ASSIST | Assist Level | AVS | Average Speed | |
| 5 | Remaining Battery Capacity | 12 | Km | Range (km) | |
| 6 | CRUISE | CRUISE | Mil | Range (mile) | |
| 7 | PAS | Power Assist | DST | Range Per Trip | |
| 8 | TM | Time per Trip | ODO | Total Range | |
| TTM | Total Trip Time | VOL | Battery | ||
| 9 | THROTTLE | Throttle ON 13 | ∅ | Braking | |
| 10 | Pushing Mode 14 | ≡ | Light ON |
NOTE: THROTTLE AND CRUISE MODE ARE NOT AVAILABLE FOR THIS FOLDING E-BIKE.
POWER ON/OFF
Press 📋 2 seconds, power will be on. When power is on, press 📋 2 seconds and power will be off. When power is on, and no action for 10 minutes, then cycling computer will be shut off automatically.
SWITCHING FRONT LIGHT ON/OFF
Long press ▲ cycling computer backlight and bicycle front light will be turned on.
Long press again, cycling computer backlight and bicycle front light will be turned off.
The backlight has to be switched on/off separately, directly on the backlight.
SWITCH POWER ASSIST LEVEL
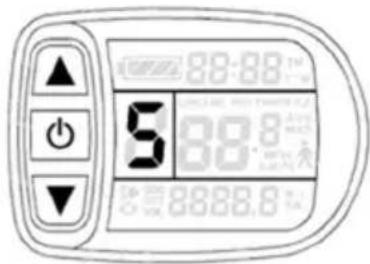
Press or to switch between level 0 and 5. Level 1 is the lowest, level 5 is the highest. Level 0 is no power assist.
PUSHING MODE
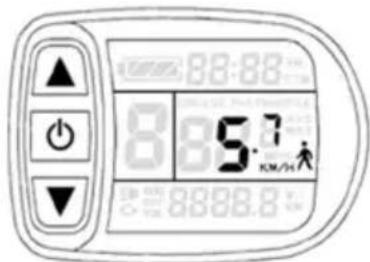
While pushing this bike on the way, press and hold turn on the pushing mode, this bike will run at a speed of 6 km/h. Release to quit pushing mode.
AVERAGE SPEED INDICATION
Press 📄peatedly until AVS is displayed.
MAX SPEED INDICATION
Press Opeatedly until MXS is displayed.
RESET
Long press ⚠️ and confirm with to re ⏻ time per trip (TM), range per trip (DST), average speed (AVS) and max speed per trip (MXS).
PAS MODE
When pedaling, PAS icon is on.
SADDLE POSITION
A properly adjusted saddle can minimize discomfort on the bike and make your pedaling more efficient. Take some time to get the correct saddle position as it will improve your overall riding experience. Saddles can be adjusted in three ways: saddle height, forward/ backward position and tilt.
SADDLE HEIGHT
Open the quick-release clamp on the seat post (19) and adjust the height of saddle. The saddle height controls the leverage for your pedaling. Too low and it puts stress on your knees, too high and you may rub the saddle excessively. There are a number of ways to get the right saddle height. A good way of doing it is to sit on the bike with both feet on the pedals – get help from second person not to fall. Place your pedals in the 6 o'clock and 12 o'clock position. Your bottom leg should be fully extended when the heel is placed on the lower pedal. If it's angled you need to raise the saddle.
If you can't reach the pedal with heel, then lower the saddle.
You can change the saddle angle and the front / rear position by loosening the Allen screw and adjusting the saddle to your convenience. Tighten the Allen screw again when you have adjusted the correct position.

natural_image
Close-up of a black mechanical component with a cylindrical shaft and mounting holes (no visible text or symbols)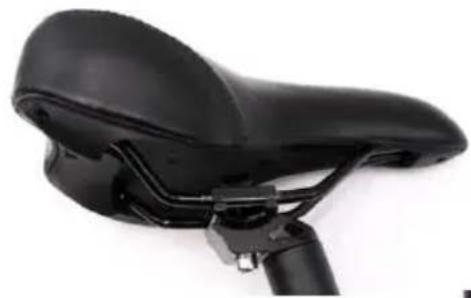
natural_image
Close-up of a black bicycle saddle seat with lever mechanism (no text or symbols visible)SAFETY CONCERNS
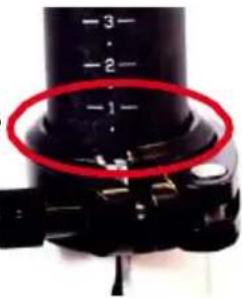
The seat post has a MAX marked line (that is the safety line), this is the MAX height that you can raise the saddle. In any cases of adjustment, the MAX marked line should always below the seat post clamp. Serious injury may be caused to the rider if the saddle height is raised beyond the MAX line.
natural_image
Close-up of a black cylindrical object with a red circular highlight on its surface, no visible text or symbols.BRAKE SYSTEM
Make sure how your brakes are working before you start driving.
Left Brake Lever: Front Brake
Right Brake Lever: Rear Brake
Please note that unfavorable weather conditions may affect the braking performance!
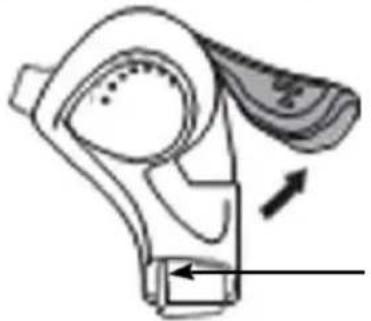
GEAR SHIFT (ONLY FOR CARL 280)
Be sure to operate the gear shift only while pedaling.
- If you want to shift in a lighter gear, push the lever (A) forward step by step for each of the gears. If you move the lever further forward, you can also skip a gear.
- If you want to choose a heavier gear, push the button (B) to shift to each of the gears.
natural_image
Diagram of a mechanical device with directional arrows indicating movement or force (no text or symbols)(A) Lever / gear down
(B) Button / gear up
USE AND MAINTENANCE
This e-bike is intended for transporting one person at a time. Fit your bicycle with suitable equipment if you would like to transport luggage. Ensure that you do not exceed the maximum permissible load (rider + luggage) (130 kg).
The manufacturer and dealer do not assume any liability for activities above and beyond the intended use. This particularly applies for not adhering to safety advice and damage resulting from this, for instance: off-road use, carrying excess weight or making improper repairs to defects.
The e-bike is not generally designed to withstand extreme stress, such as riding down steps or over jumps.
BEFORE THE FIRST RIDE
- Please fully charge the battery before the first use.
- Please ensure that your bicycle is ready for use and is adjusted to fit your body, including setting position and fixture of the saddle and handlebar.
- Checking the assembly and settings of the brakes
• Securing the wheels into the frame and fork - Checking the tire pressure
- Ensure that you know which lever operates which brake. Operate and ride your bicycle first in a quiet and safe place.
- Check that the wheels and thru axles as well as all important nuts and bolts are secure.
- Push the wheels forward with the brakes pulled. The back brake should completely prevent the back wheel from moving, while the front brake should lift the back wheel off the ground with its braking effect. The bicycle's steering should not rattle under braking or exhibit any play.(right/left).
- The effectiveness of brakes can be different in wet conditions or on slippery surfaces. Please take into account the possibility of longer braking distances and slippery road surfaces when riding.
- Check the air pressure in the tires. As a general rule of thumb, e.g. on a ride, you can check the tire pressure as follows: If you place your thumb on a pumped up tire, you should not be able to significantly change its shape by applying pressure.
- Check the tires and rims. Scan them for any damage, cracks or deformations, as well as embedded particles, e.g. shards of glass or sharp stones.
- If you should find any cuts, rips or holes in the tires, please refrain from riding. First have your bicycle checked over by qualified bicycle mechanics.
BEFORE EACH RIDE
Before each ride, please check that:
• The brakes are working safely.
- The tires are free of foreign objects and damage, and the wheels run true.
- The tires have sufficient pressure and tread depth.
- All bolts and nuts are tight.
- Check that all quick releases are still correctly secured.
- The frame and fork are not damaged.
- The handlebar and stem are correctly and securely fastened as well as set up in the correct position.
- The seat post and seat are secure and in the correct position. Try turning the seat or tipping it upwards or downwards. It should not move.
REGULAR CLEANING
- Avoid to use water to clean the e-bike, as the electrical and electronic systems may get wet, resulting in malfunction of the bicycle or personal injury.
- Delicately wipe any dirty painted or plastic parts with a soft, damp cloth and a neutral cleaning solution. Carefully dry the parts with a soft, dry cloth.
- DO NOT grease or use a greasy cloth to wipe down the electrical connectors, brake pads, wheels, tires or plastic parts.
REGULAR CHECKS (EVERY 1 TO 2 MONTHS)
- Check that the handlebar attachment and saddle post are correctly inserted and tightened.
- Check that the wheel hub mounting and quick-release are correctly tightened.
- Check that the wheel rims are not cracked and that no spokes are loose or broken.
- Check that the tires have sufficient thread depth and not punctured.
- Check that the tires do have correct pressure.
- Check that the batteries are sufficiently charged.
- Check that the front and rear brakes brake effectively.
- Check that the brake cables are sufficiently greased, and that the brake pads are in good condition.
- Check that frame welds are in good condition and are free from corrosion or oxidation.
TECHNICAL INFORMATION
| CARL 280 CARLA 180 | ||
| FRAME Light Weight Aluminum Alloy | Light Weight Aluminum Alloy | |
| SIZE folded 780 × 380 × 710 mm 680 × 380 × 630 mm | ||
| WEIGHT 17.7 kg with battery 13.8 kg with battery | ||
| MAX total weight 130 kg 130 kg | ||
| POWER ASSIST MODE 5 Level Pedelec 5 Level Pedelec | ||
| MOTOR 36 V 250 W DC Brushless Motor | 36 V 250 W DC Brushless Motor | |
| BATTERY 36 V 7.8 Ah Li-ion Battery.LG or Samsung Cell | 36 V 7.8 Ah Li-ion Battery.LG or Samsung Cell | |
| MAX SPEED(supported) | 25 km/h 25 km/h | |
| BRAKES Disk brakes | V-brakes | |
WARRANTY
The warranty terms can be called up from www.blaupunkt.com
SERVICE
If you ever need to use a repair service, you will find information about service partners in
your country under www.blaupunkt.com.
DISPOSAL NOTES
Do not dispose the bike in household trash!
Use return and collecting systems available to dispose of the old bike and battery.
DECLARATION OF CONFORMITY
The Blaupunkt – Evo-Sales GmbH declares that the devices complies with the basic requirements and other relevant regulations of the directives 2013/60/EU and DIN EN 15194:2009+A1:2011
The declaration of conformity can be found under www.blaupunkt.com
Subject to technical changes!


SOMMAIRE
LES INFORMATIONS IMPORTANTES RELATIVES À LA SECURITÉ.... 32
DESCRIPTION DU VÉLO PLIABLE ÉLECTRIQUE....33
CONTENU DU COLIS 34
PLIER ET DÉPLIER VOTRE VÉLO 34
PLIER LE VÉLO....34
UTILISATION DU VÉLO 34
FONCTIONNEMENT ET RÉGLAGE....35
SYSTÈME D'ENTRAINEMENT HYBRIDE I-CST 35
BATTERIE ET CHARGEMENT 36
CONSIGNES DE SECURITÉ....36
ENTRETIEN DE LA BATTERIE.... 37
UTILISATION DU COMPTEUR VÉLO....38
FONCTIONS ET AFFICHEUR.... 38
ON/OF 39
ALLUMER/ÉTEINDRE L'ÉCLAIRAGE AVANT 39
SÉLECTIONNER LE NIVEAU DE PUISSANCE DU MOTEUR ÉLECTRIQUE .... 39
MODE D'ASSISTANCE DE POUSSÉE....39
INDICATEUR DE VITESSE MOYENNE 39
INDICATEUR DE VITESSE MAXIMALE....40
RÉINITIALISATION DU COMPTEUR 40
MODE D'ASSISTANCE ÉLECTRIQUE (PAS)......40
UTILISATION DU VÉLO
natural_image
Two black electrical plug symbols with red labels (① and ②), no additional text or symbols present.CONSIGNES DE SECURITÉ
natural_image
Close-up of a black bicycle wheel handle and lever mechanism (no text or symbols visible)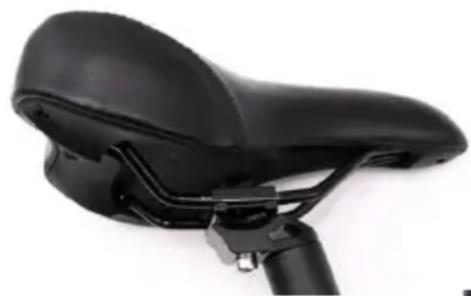
natural_image
Close-up of a black bicycle seat with a curved seat and lever mechanism (no text or symbols visible)CONSIGNES DE SÉCURITÉ
natural_image
Diagram of a mechanical component with directional arrows indicating movement or force (no text or symbols)natural_image
White foldable bicycle with black suspension and wheels, no visible text or symbols on the body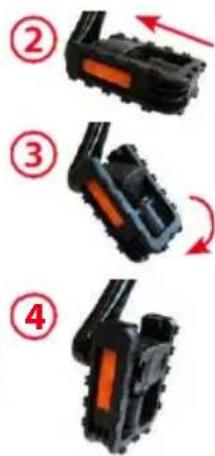

natural_image
Two foldable bicycles, one white and one black with visible branding and numbered labels (no text or symbols on the bikes themselves)USO
natural_image
Close-up of a mechanical component with two circular features and a central hole (no visible text or symbols)natural_image
Close-up of a black bicycle wheel handle and lever (no text or symbols visible)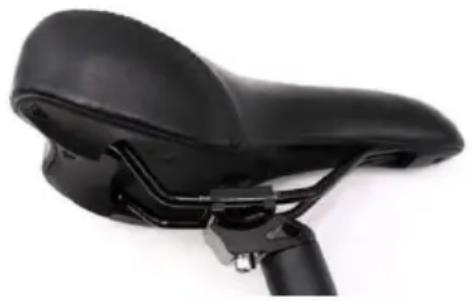
natural_image
Close-up of a black bicycle seat with a lever mechanism (no text or symbols visible)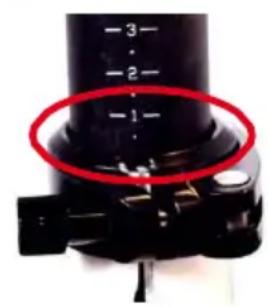
natural_image
Close-up of a mechanical component with a red circle highlighting a specific feature (no text or symbols visible)MISURE DI SICUREZZA
natural_image
Diagram of a mechanical device with directional arrows indicating movement or force (no text or symbols)ACCU EN OPLADEN....66
VEILIGHEIDSMAATREGELEN 66
ONDERHOUD VAN DE ACCU 67
BEDIENING VAN DE FIETSCOMPUTER....68
FUNCTIES EN SCHERM 68
VOEDING IN-/UITSCHAKELEN 69
INDICATIE MAXIMALE SNELHEID....70
VOORAFGAAND AAN IEDERE RIT 74
FIETS REINIGEN 74
PERIODIEKE INSPECTIE (EEN KEER IN DE 1-2 MAANDEN)....74
natural_image
White foldable bicycle with black suspension and wheels, no visible text or symbols on the body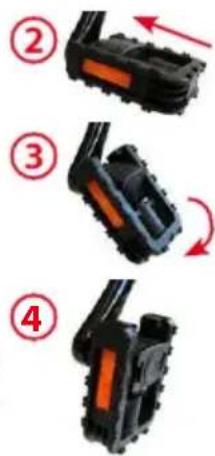
natural_image
Two open bicycles, one white and one blue, with numbered labels (5 and 6) indicating front and side views respectively, no visible text or symbols on the bikes themselves.VEILIGHEIDSMAATREGELEN
INDICATIE GEMIDDELDE SNELHEID
INDICATIE MAXIMALE SNELHEID
natural_image
Close-up of a black bicycle wheel handle and seat (no text or symbols visible)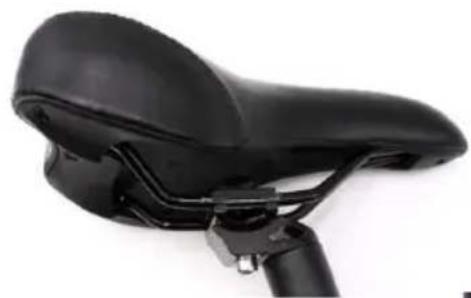
natural_image
Close-up of a black bicycle seat with a lever mechanism (no text or symbols visible)VEILIGHEIDSMAATREGELEN
natural_image
Diagram of a mechanical device with directional arrows indicating movement or force (no text or symbols)(A) Hendel: versnelling omlaag
VOORAFGAAND AAN IEDERE RIT
INNEHÅLLSFÖRTECKNING
VIKTIG SÄKERHETSINFORMATION 77
BESRIVNING AV HOPFÄLLBAR CYKEL 78
FÖRPACKNINGSINNEHÅLL....79
UPPVIKNING OCH ANVÄNDNING....79
SÅ HÄR VIKER MAN UPP CYKELN....79
SÅ HÄR ANVÄNDER MAN CYKELN 80
DRIFT OCH JUSTERING 80
BESKRIVNING AV HYBRIDSYSTEMET I-CST 80
BATTERI OCH LADDNING 81
SÄKERHETSÅTGÄRDER 81
BATTERIUNDERHÅLL 82
ANVÄNDNING AV CYKELDATOR....83
FUNKTIONER OCH DISPLAY....83
STRÖM PÅ / AV 84
FRONTBELYSNING 84
VAL AV ELMOTORNS EFFEKTNIVÅ 84
MAXIMAL HASTIGHET 85
ÄTERSTÄLLNING AV RÄKNARE 85
ELKRAFT-LÄGE (PAS) 85
DRIFT OCH UNDERHÅLL 85
SADELJUSTERING 86
SADELHÖJD 86
SÄKERHETSÄTGÄRDER 86
BROMSSYSTEM 87
VÄXEL (ENDAST I MODELL CARL 280) 87
ANVÄNDNING AV VÄXELN 87
DRIFT OCH UNDERHÅLL 88
FÖRE FÖRSTA ANVÄNDNING 88
FÖRE VARJE ANVÄNDNING....89
RENGÖRING AV CYKELN 89
REGELBUNDEN KONTROLL (VARJE/VARANNAN MÅNAD) 89
Tekniska data 90
GARANTI....90
SERVICE....90
AVFALLSHANTERING....90
FÖRSÄKRAN OM ÖVERENSSTÄMMELSE 90
VIKTIG SÄKERHETSINFORMATION
BESRIVNING AV HOPFÄLLBAR CYKEL
CARLA 180
CARL 280
FÖRPACKNINGSINNEHÅLL
• Elcykel Blaupunkt 1 st.
• Laddare 1 st.
• Bakre belysning (avtagbar) 1 st.
• Användarhandbok 1 ex.
UPPVIKNING OCH ANVÄNDNING
SÅ HÄR VIKER MAN UPP CYKELN
natural_image
White foldable bicycle with black suspension and visible branding, no text or symbols on the body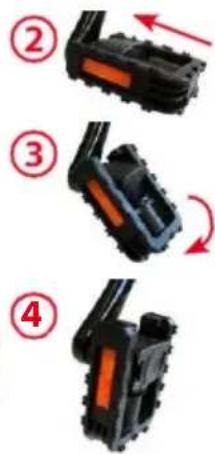

natural_image
Two white electric bicycles with visible branding and numbered labels (5 and 6), no text or symbols on the bikes themselves.SÅ HÄR ANVÄNDER MAN CYKELN
SÄKERHETSÅTGÄRDER
natural_image
Close-up of a black bicycle seat with visible tracks and mounting brackets (no text or symbols)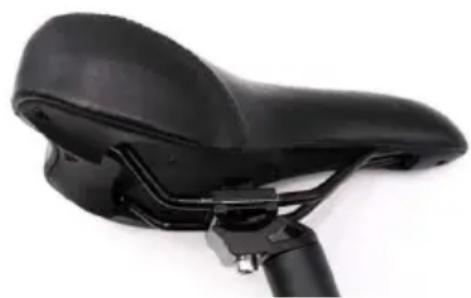
natural_image
Close-up of a black bicycle seat with a lever handle (no text or symbols visible)SÄKERHETSÅTGÄRDER
natural_image
Diagram of a mechanical device with directional arrows indicating movement or force (no text or symbols)USO DE LA BICICLETA
natural_image
Two black electrical plug symbols with red circles indicating positions (no text or labels)natural_image
Close-up of a black bicycle seat with a red circular annotation highlighting the wheel (no text or symbols on the main subject)natural_image
Diagram of a mechanical device with directional arrows indicating movement or force (no text or symbols)HVAD KARTONET INDEHOLDER....108
HVORDAN CYKLEN FOLDES OG ANVENDES 108
HVORDAN DEN FOLDES 108
HVORDAN DEN ANVENDES....108
BETJENING OG REGULERING 109
INTRODUKTION TIL DET HYBRIDASSISTEREDE SYSTEM – I-CST 109
BATTERI OG OPLADNING 109
SIKKERHED F∅RST 110
VEDLIGEHOLDELSE AF BATTERIET.... 110
CYKELCOMPUTER FUNKTIONER 111
FUNKTIONER OG DISPLAY.... 111
TÆNDT/SLUKKET 112
TÆND/ SLUK AF FORLYGTEN 1125
AKTIVERING AF ASSISTANCE-NIVEAU 1125
SKUBBEMÅDE 1125
GENNEMSNITLIG HASTIGHED INDIKATOR.... 112
MAKSIMAL HASTIGHED INDIKATOR 113
NULSTIL....113
ELEKTRISK UNDERST∅TTELSE MÅDE 113
BRUG OG VEDLIGEHOLDELSE 113
SADLENS POSITION 113
SADDELH∅JDE.... 113
SIKKERHED F∅RST 114
BREMSESYSTEMET 114
GEARSKIFT (KUN FOR CARL 280) 114
BETJENING AF GEARSKIFT 114
BRUG OG VEDLIGEHOLDELSE 115
F∅R F∅RSTE CYKELTUR.... 115
F∅R HVER K∅RETUR 116
REGELMAESSIG RENG∅RING 116
REGELMÆSSIG GENNEMGANG (HVER TIL HVER ANDEN MÅNED) 116
TEKNISK INFORMATION....117
GARANTI 117
SERVICE....117
AFFALDSHÄNDTERING 117
OVERENSSTEMMELSESERKLÆRING 117
natural_image
White foldable bicycle with black suspension and wheels, no visible text or symbols on the body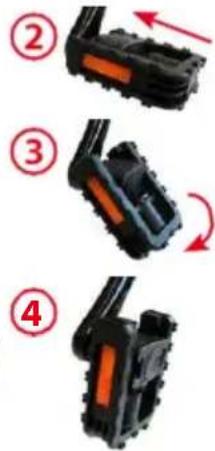
natural_image
Two white bicycle models with visible seatbars and front wheels, labeled 5 and 6 (no text or symbols on the bikes themselves)HVORDAN CYKLEN ANVENDES
natural_image
Two black electrical plug symbols with red labels (① and ②), no additional text or symbols present.SIKKERHED F∅RST
Tryk Montagne gange, indtil AVS vises.
MAKSIMAL HASTIGHED INDIKATOR
Tryk ♦ntagne gange, indtil MXS vises.
NULSTIL
natural_image
Close-up of a black bicycle wheel handle and lever (no text or symbols visible)
natural_image
Close-up of a black bicycle seat with a curved seat and lever mechanism (no text or symbols visible)SIKKERHED F∅RST
natural_image
Diagram of a mechanical device with directional arrows indicating movement or force (no text or symbols)(A) Håndtag/ gear ned
(B) Tast/ gear op
BRUG OG VEDLIGEHOLDELSE
natural_image
White foldable bicycle with black suspension and visible wheels, no text or symbols on the body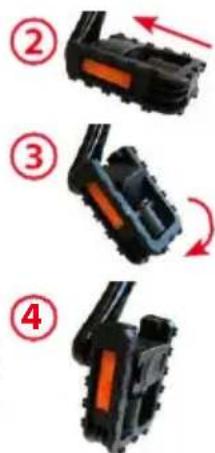

natural_image
Two white bicycle models with visible front and rear views, labeled 5 and 6, showing mechanical components and suspension parts (no text or symbols on the bikes themselves)PYÖRÄN KÄYTTÖ
TURVALLISUUSOHJEET
natural_image
Close-up of a black bicycle wheel (no text or symbols visible)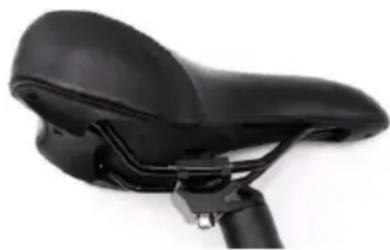
natural_image
Close-up of a black bicycle seat with a curved seat and lever mechanism (no text or symbols visible)TURVALLISUUSOHJEET
natural_image
Diagram of a mechanical device with directional arrows indicating movement or force (no text or symbols)natural_image
White bicycle with black suspension and visible wheels, no text or symbols on the body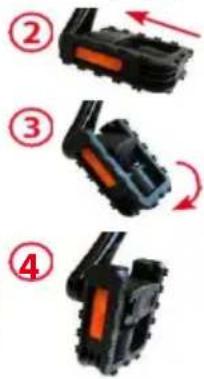
natural_image
Two bicycles with visible engine components and accessories, labeled 5 and 6 (no text or symbols on the bikes themselves)SPOSÓB UŻYTKOWANIA ROWERU
natural_image
Two black electrical plug symbols with red circled labels (① and ②), no text or numbers present.ŚRODKI BEZPIECZEŃSTWA
natural_image
Close-up of a black bicycle seat with visible brackets and mounting feet (no text or symbols)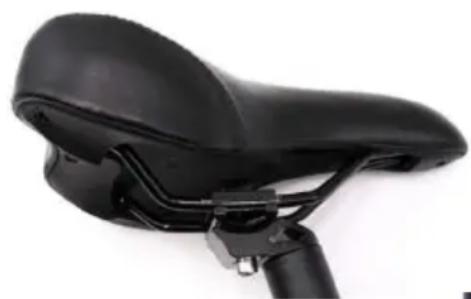
natural_image
Close-up of a black bicycle seat with a curved seat and lever mechanism (no text or symbols visible)ŚRODKI BEZPIECZEŃSTWA
natural_image
Diagram of a mechanical device with directional arrows indicating movement or force (no text or symbols)PRAVIDELNÉ PROHLÍDKY (JEDNOU ZA 1–2 MĚSÍCE)....159
TECHNICKÉ PARAMETRY....160
ZÁRUKA....160
SERVIS 160
LIKVIDACE 160
PROHLÁŠENÍ O SHODĚ 160
DŮLEŽITÉ BEZPEČNOSTNÍ INFORMACE
natural_image
FMC bicycles with black suspension and white body, no visible text or symbols on the bicycle body