 — Electric bike — Mode d'emploi PDF")
Frida (2024) - Electric bike BLAUPUNKT - Free user manual and instructions
Find the device manual for free Frida (2024) BLAUPUNKT in PDF.

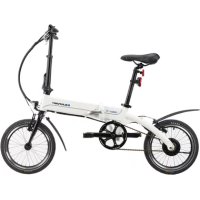
| Product Type | Foldable Electric Bike |
| Brand | Blaupunkt |
| Model | Frida (2024) |
| Maximum Supported Weight | 120 kg (user + luggage) |
| Battery | Removable lithium-ion, 36 V, 10-14 Ah (depending on model) |
| Range | Approximately 40-60 km (depending on assistance and terrain) |
| Motor | Brushless hub motor, 250 W (estimated) |
| Assisted Maximum Speed | 25 km/h |
| Brakes | Disc brake / rim brake / coaster brake (depending on model) |
| Gear Shift | Derailleur or hub gear (depending on model) |
| Assistance Levels | 5 levels (1-5) + walking assistance (6 km/h) |
| Display | LCD screen with speed, distance, battery level, etc. |
| Lighting | Integrated front light and rear light |
| Folding | Foldable frame and handlebars, folding pedals |
| Unfolded Dimensions | Approximately 150 x 60 x 110 cm (estimated) |
| Weight | Approximately 20 kg (estimated) |
| Charging Time | 3 to 4 hours |
| Operating Temperature | 0-45 °C (charge/discharge) |
| Warranty | Check conditions on blaupunkt.com |
Frequently Asked Questions - Frida (2024) BLAUPUNKT
User questions about Frida (2024) BLAUPUNKT
0 question about this device. Answer the ones you know or ask your own.
Ask a new question about this device
Download the instructions for your Electric bike in PDF format for free! Find your manual Frida (2024) - BLAUPUNKT and take your electronic device back in hand. On this page are published all the documents necessary for the use of your device. Frida (2024) by BLAUPUNKT.
USER MANUAL Frida (2024) BLAUPUNKT
natural_image
Battery icon with lightning bolt symbol, no text or labels presente mobility
Enjoy it.
Bedienungsanleitung
Owners manual
Návod k použití
Brugervejledningen
Mode d'emploi
Manuale
Gebruiksaanwijzing
Instukcja Obsługi
Användarmanual
εγχειρίδιο χρήσης
natural_image
Side view of a white F-340 bicycle with red directional arrows indicating motion, no text or symbols present.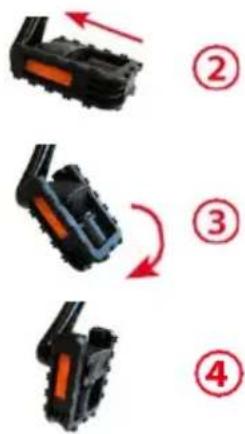
natural_image
Side view of a white folding bicycle with visible suspension and wheel mechanism (no text or symbols)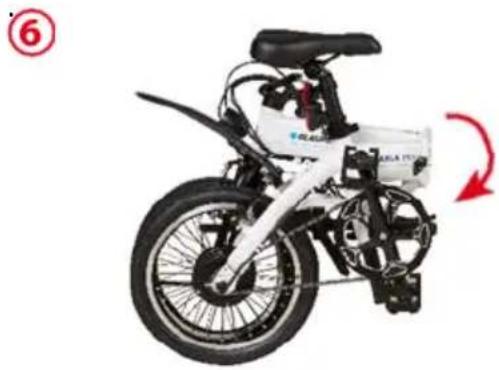
natural_image
Side view of a white bicycle with visible suspension components and a red rotation arrow indicating motion (no text or symbols)natural_image
Close-up of a mechanical component with two circular features and cylindrical ends (no visible text or symbols)WARTUNG
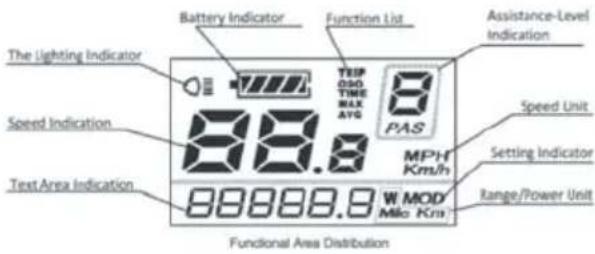
Functional Area Distribution
1.1 Battery indikator:
1.5 Setting indicator:
1.8 Speed indication:
1.9 Lighting indicator:

SICHERHEITSHINWEIS:
1.1 Battery percentage/ battery level:
natural_image
Mechanical assembly diagram showing a hand operating a tool with directional arrows indicating movement (no text or symbols)natural_image
Close-up of a SIS brand pushpin with black and white body, showing brand number 3456 and control dial (no text or symbols on the device itself)natural_image
Close-up of a black electric shaver with a textured grip and directional arrows indicating motion (no text or symbols)12. SCHWENKMECHANISMUS (MODELLSPEZIFISCH)
BETRIEB DES SCHWENKMECHANISMUS
natural_image
Close-up of a black bicycle brake lever handle with a 'SWING LOCK' dial (no text or symbols beyond the label)We congratulate you on purchasing your new Blaupunkt folding e-bike / folding e-trike (hereinafter also referred to as folding e-bike).
We want you to enjoy your folding e-bike for a long time, so please read this manual carefully.
If, contrary to expectations, you have problems with the folding e-bike, please check with the help of the manual if you can solve it. Please note: This manual is not a detailed guide for service, maintenance and repairs. Repairs shall only be carried out by a specialist/ bicycle dealer to ensure the safety of your folding e-bike. Furthermore, some functions / options depend on the model you have purchased and may not apply.
Your dealer and the Blaupunkt service will be happy to assist you.
It is recommended to keep the complete packaging of the folding e-bike, as this will be useful for any shipping that may be necessary for repair or service work, as well as for a possible sale.
TABLE OF CONTENTS
- IMPORTANT SAFETY INFORMATION
- IN THE BOX
- GETTING TO KNOW YOUR FOLDING BICYCLE
- HOW TO FOLD
- INTRODUCTION TO THE DRIVE SYSTEM
- BATTERY (REMOVAL/ INSERTION, CHARGING, MAINTENANCE AND RANGE)
- CYCLING COMPUTER OPERATIONS (MODEL SPECIFIC)
- SADDLE POSITION/ HEIGHT (MODEL SPECIFIC)
- BRAKE SYSTEM (MODEL SPECIFIC)
- HANDLEBAR/ AHEAD STEM (MODEL SPECIFIC)
- GEAR SHIFT OPERATION (MODEL SPECIFIC)
- SWIVELMECHANISM (MODEL SPECIFIC)
- MAINTENANCE: BEFORE THE FIRST RIDE
- MAINTENANCE: BEFORE EACH RIDE
- MAINTENANCE: REGULAR CLEANING
- MAINTENANCE: REGULAR CHECKS
- INTENDED USAGE
- TECHNICAL INFORMATION
- FAQ (FREQUENTLY ASKED QUESTIONS)
- WARRANTY
- SERVICE
- DISPOSAL NOTES
1. IMPORTANT SAFETY INFORMATION
- The folding e-bike is delivered in a pre-assembled, not ready-to-drive state. Before the first start-up, all components and screws must be checked for tightness and tightened if necessary. The setting and function of the gear shift, the brakes and all other mechanical parts must be checked. We suggest to let this be carried out by a specialist/ bicycle dealer.
- The folding e-bike may only be used if all quick-release mechanisms engage or are correctly engaged.
- Do not operate this bicycle without carefully reading the manual and understanding how to operate the bicycle.
• This folding e-bike is only for non-commercial use! - Wear your helmet, gloves and other protective gears before riding to protect yourself from injury in case of an accident. We recommend wearing reflective clothes when riding at night.
- Observe traffic rules and regulations when using this bicycle. Passengers should not be carried.
- When riding under rainy, snowy or slippery conditions reduce your speed and increase the distance between yourself and other vehicles.
- Do not use the folding e-bike if damage is visible or if there are other doubts about it's proper and safe function.
- Your insurance policies may not provide coverage for accidents involving the use of this bicycle. To determine if coverage is provided you should contact your insurance agent.
- The bicycle should not be left out in the rain or submerged. If water enters into the controller and motor wheel, it may cause short circuit and damage the electrical components.
- Do not alter any components on the bicycle. Any changes to the bicycle not approved by Blaupunkt will nullify the warranty on the manufacturer's side and may result into damage or injury.
- Drive always at an appropriate speed in relation to light, weather and road conditions, traffic, visibility and your driving skills.
2. IN THE BOX
- Blaupunkt folding e-bike
• Folding e-bike battery (with keys if removable, model specific) - Charger
• Battery lights (if not preinstalled, optional, model specific) - User Manual
- Tools (optional, model specific)
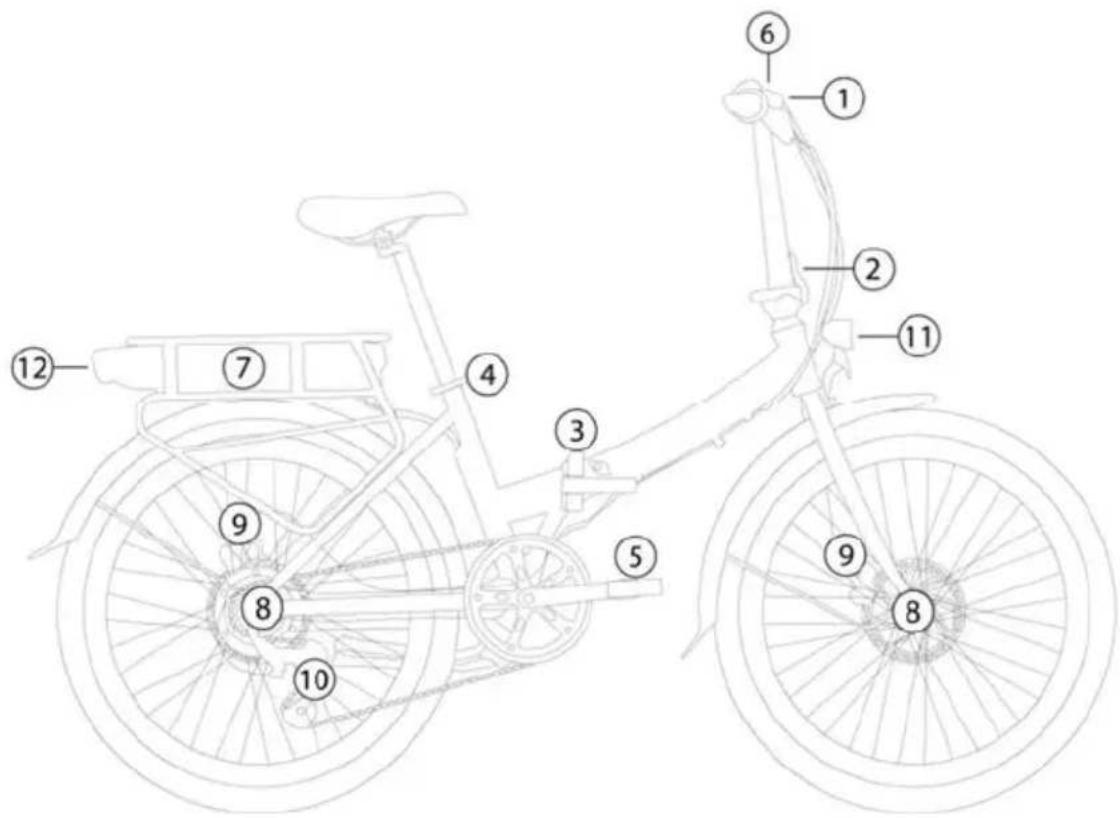
3. GETTING TO KNOW YOUR FOLDING BICYCLE

① Handlebar (depending on model with quick release for height adjustment)
② Quick release / folding handlebar
③ Quick release / folding joint frame
④ Quick release for saddle height
⑤ folding pedals
⑥ computer
⑦ Battery (removable depending on model, with charging socket, switch and capacity indicator)
⑧ hub motor rear wheel or front wheel (depending on model)
⑨ Disc brake / rim brake / coaster brake (depending on model)
⑩ Hub or derailleur gears (depending on model)
⑪ front light
⑫ rear light (depending on model with integrated brake light)
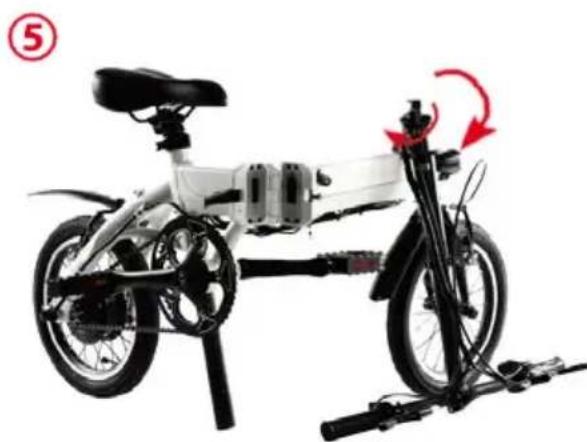
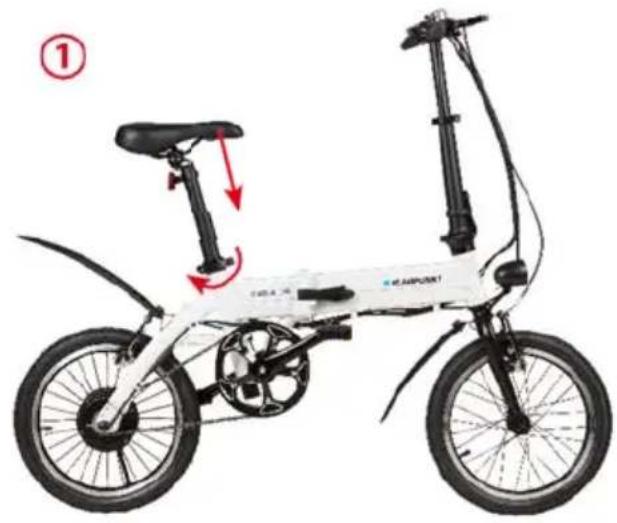
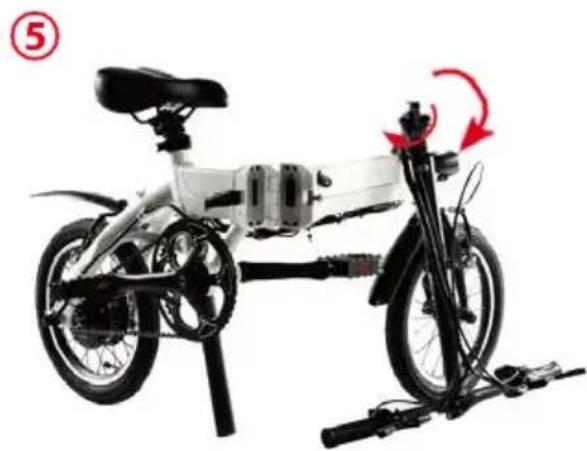
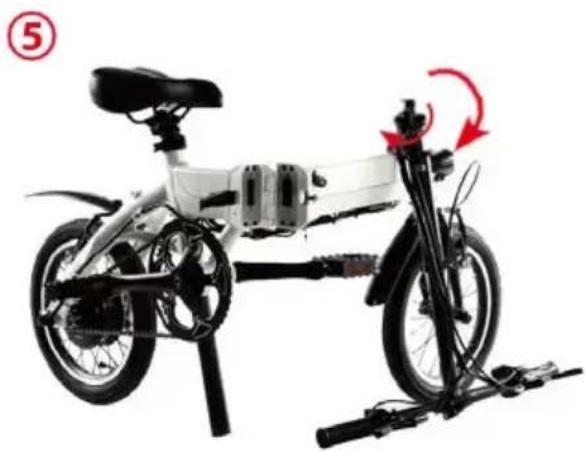
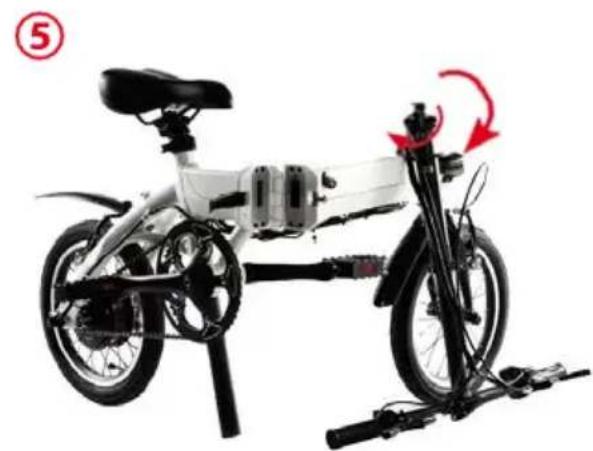
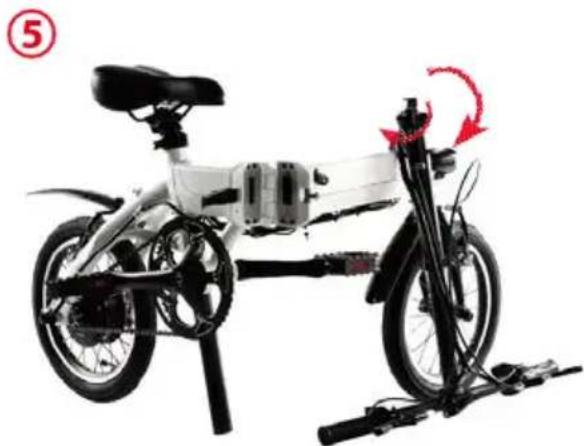
4. HOW TO FOLD
HOW TO FOLD
- Open the quick-release clamp on the seat post (1) and push the seat all the way down.
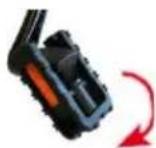
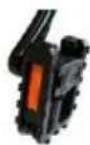
- Push inward both pedals and fold them (2-4).
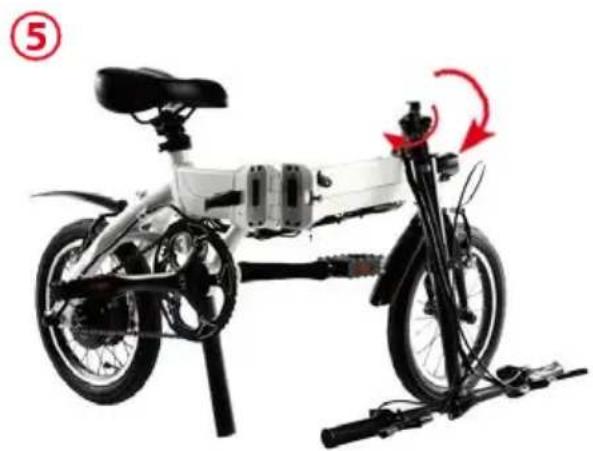
- Unlock and release the stem quick-release clamp (5) and fold the stem.
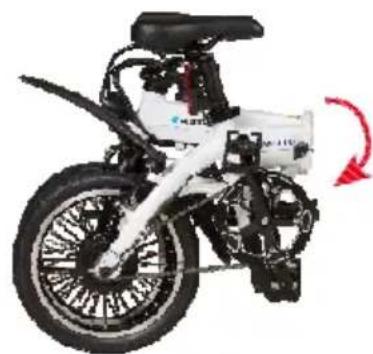
- Unlock and release the folding clamp (6), fold the bike until both wheels are parallel.
natural_image
Side view of a white semi-film bicycle with black suspension and red directional arrows indicating motion (no text or symbols)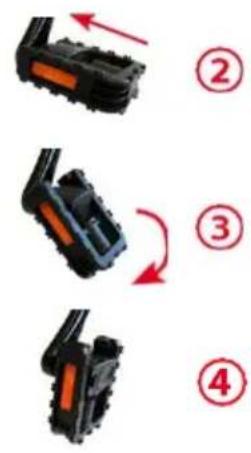
natural_image
Side view of a white electric bicycle with visible suspension components and a red rotation arrow indicating motion (no text or symbols)
natural_image
Side view of a white bicycle with black suspension components and a red rotation arrow indicating motion (no text or symbols)SAFETY NOTES:
Make sure all locks are properly fastened and closed before riding the folding e-bike.
Do not close the frame lever when the folding e-bike is folded, as this may damage the contacts during transport.
Note: This is a schematic representation of a folding e-bike with various possible equipment options.
The options shown may vary.
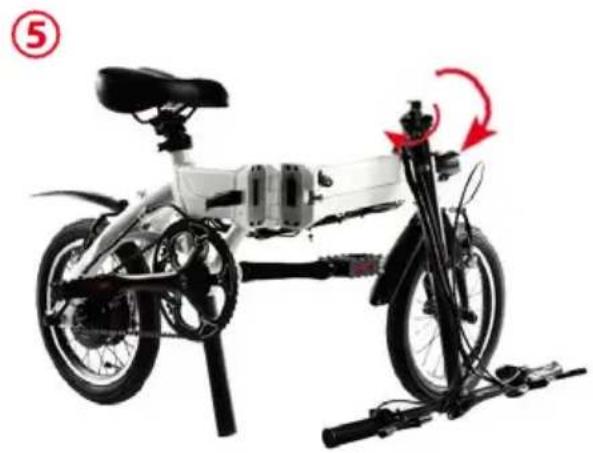
5. INTRODUCTION TO THE DRIVE SYSTEM
This system consists of the following components:
• Cadence- Sensor: Sensing your pedaling rate
• Smart Controller: Real time calculating and coordinating optimized power output.
- BMS: Battery with BMS (Battery Management System), providing electric power to the system while balancing the power consumption and protecting the battery cells.
- Brushless DC Motor: Provide the power assist.
• Smart Cycling computer: Control and display terminal.
As soon as you start pedaling, the system will sense your cadence (pedaling rate) and traveling velocity, and real-timely coordinate the electrical motor to provide the just right power assist that match your riding conditions, making your riding much easier and comfortable.
Note: This is a schematic representation of a folding e-bike with various possible equipment options. The options shown may vary.
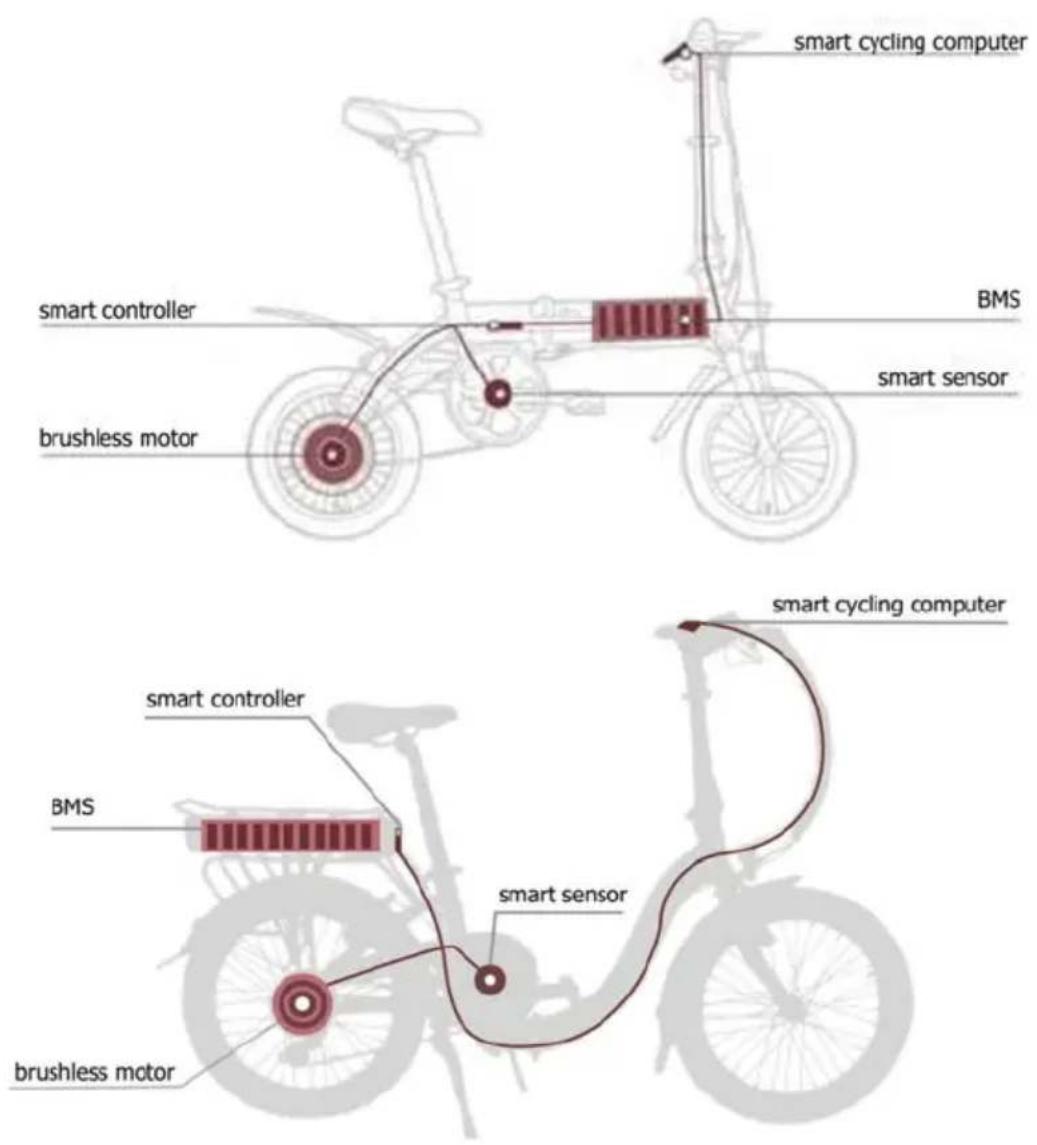
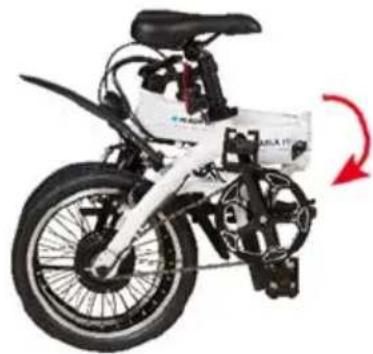
6. BATTERY (REMOVAL/ INSERTION, CHARGING, MAINTENANCE AND RANGE)
REMOVAL/ INSERTION
Depending on the model, the battery can be removed and charged separately:
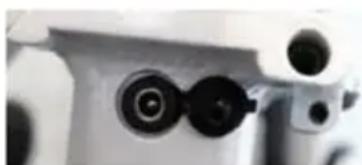
- Unlock the battery ⑦ with the key near the seat post ④ (see blue arrow), depending on lock type you have to unlock and hold the key in unlock position during removal of the battery
- Grasp the battery under the tail light ⑫ and carefully pull it out to the rear without using force (long, green arrow). Canting or lifting/pressing down must be avoided.
Note: Depending on the model, the battey may also be in the frame and the removal of the battery may differ.
CHARGING
The battery must be charged before it is used for the first time. Please use exclusively the original charger designated by Blaupunkt for charging; otherwise it might damage the battery, and may even lead to fire and other hazard. Warranty expires, if a charger other than the designated is used.
- Check carefully whether the rated input voltage of the charger is consistent with the voltage of the power grid.
-
Charge the battery in a dry place and ensure adequate ventilation. Neither the battery nor the charger may be covered during the charging process.
• -
Connect first the output plug of the charger (2) with the charging jack of the battery. Then connect the input plug (1) of the charger to the AC power supply.
• Depending on the model, you can remove the battery and charge it separately. - Fully charge of an empty battery takes 2-8 hours, depending on charging state, when the charge indicator light on the charger turns from red to green, the battery has been fully charged.
- After charging, first pull out the AC power plug (1) and then pull out the plug connected with the battery (2).
• Do not leave the battery connected to the charger permanently and / or unattended.
• Only charge the battery in rooms with a smoke detector installed. Charge the battery - The use of inverters with a modified sine wave is not recommended and can lead to malfunctions.


②
natural_image
Close-up of a microscope objective lens and objective lenses (no text or symbols visible)MAINTENANCE
- You can get the best performance and life out of your battery by charging it regularly before use, even if it is not fully discharged.
- Charge the battery at room temperature.
• Use the battery in the temperature range from 0° - 25°C. - If you store a completely discharged battery for a long time, this leads to a permanent loss of function. Recharge an empty battery as soon as possible.
- If the battery is stored or unused for a longer period of time, keep the battery with approx. 50-70% charge and check regularly for any remaining charge. If the battery has a switch (model-specific), this must be switched off.
• A defective battery due to failure to charge does not constitute a warranty claim. - Every battery with Li-Ion technology is subject to an unstoppable chemical aging process, this process also takes place without using or charging the battery. The capacity of the battery decreases with age. Decreasing capacity is not a defect or reason for complaint.
• To avoid pollution, follow the local regulations for the proper disposal of the battery.
BATTERY RANGE
The specified, model-dependent range is a maximum. In our in-house driving tests, these ranges could be easily achieved or even exceeded. However, far shorter ranges of less than 20 km are also possible.
The range with one battery charge depends on many factors, such as:
- Assistance level / driver's own contribution - use smaller assistance levels and increase your own contribution to maximize the range.
- Driving speed - higher speeds, especially with higher support levels, cost more battery power.
- Cadence - higher cadence (faster pedaling) optimize efficiency, slow pedaling costs more energy.
- Starting and braking - Frequent braking and the associated starting drains the battery faster than long distances at a constant speed.
- Rider's physical fitness – the more and more often you ride a bike, the more you increase your physical fitness and will achieve greater ranges
- Shift behavior of the driver (if there is a shift) - correct shifting optimizes efficiency, starting and climbing is best done in a small, light gear.
• Road conditions - flat road surfaces reduce rolling resistance and increase range. - Wind conditions / driver's posture - upright sitting positions increase wind resistance, and driving in headwind requires more energy.
• Weight - The total weight of the bike, luggage and rider should be kept as low as possible. - Tire pressure - minimize the rolling resistance by fitting the tire pressure, a higher tire pressure ensures a lower rolling resistance.
- Temperature - With lower temperatures, the performance of the battery decreases. In winter, the ranges decrease with one battery charge. Store the battery at room temperature in winter and only insert it into the bike when you start your journey.
- Computer Performance Indicator - Some computer models show engine power, an average lower power rating means a longer range.
7. CYCLING COMPUTER OPERATIONS (MODEL-SPECIFIC)
LC-CONTROL DISPLAY (Computer model no. 1)
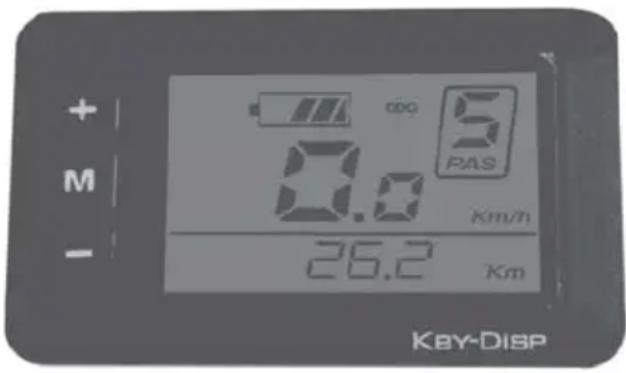
The control unit is integrated with the LC-Display and operates the drive system. It is located on the handlebar.
Control Unit Function Overview
1.1 Power Button ON/OFF
Hold Button for 2 seconds to switch on/off the LED control unit and electric drive system.
The system will automatically turn off if left idling for more than 10 minutes.
1.2 Assist mode
Hold of buttons to select the desired assist level for electric system. The lowest is Level 1 and the highest is Level 5. When powered on, the default is Level 1. When there is no numeric power level displayed it means the folding e-bike is in park or it functions as a standard bike with no assist from the motor. You will feel the electric assistance kicking in once selecting again between Levels 1 up to 5.
SAFETY NOTE: When you move the pedals, the engine can start if you are not yet safely on the bike. Do not switch on the computer until you have taken a seat on the folding e-bike or set the support level to 0. Set the support to 0 before getting off the bike.
1.3 Lights/ Backlit Button ON/ OFF
With the display switched on, hold the button for 2 seconds to turn on/off the headlight, taillight (model specific) and the display backlight. There are five levels of backlight brightness that can be selected by user.
1.4 Walk Assist
The folding e-bike comes equipped with walk assist function. This feature propels forward your folding e-bike with a constant speed of 6km/h without pedaling and requires nothing but to hold it balanced when walking along side it. It comes very handy when needing to push it up a steep incline.
Hold the button to activate the walk assist. This function remains activated as long as you hold the button and deactivates the moment you stop holding it.
SAFETY NOTE: Push Assist function should only be used when the wheels are in contact with the ground. Danger of injury may occur if push assist function is activated since the wheel will start spinning.
You can toggle between various
information, press button to view: Current speed -> Trip distance -> Trip duration (hours) -> Maximum speed -> Average traveling speed -> Motor power output (Watts) -> Current speed.
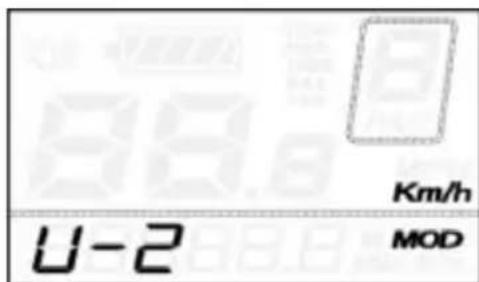
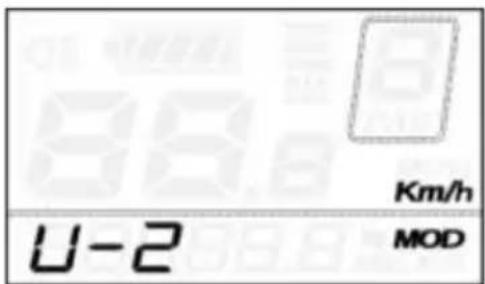
1.1 Battery indicator:
When the battery is completely charged all the LED segments as well as the border are lit up, segments gradually going off as the battery depletes during use. If all the segments are off and the border is flashing, the battery needs to be charged immediately.
1.2 Function List:
It displays current display mode: Trip distance (TRIP), total distance (ODO), trip time, max. speed, average speed.
1.3 Assistance- Level Indication (PAS):
Shows selected level of power assist from 0 (off) to 5 (highest assist level) or P for push- assistance (6 km/h).
1.4 Speed unit:
Indicates if shown speed is km/h or MPH (factory default: km/h)
1.5 Setting indicator: MOD indicates active setting mode (see general settings menu)
1.6 Range/ Power unit: Indicates current display unit
1.7 Text area indication: Displays various information including ERROR code in case of malfunction.
SAFETY NOTE: Don't use your folding e-bike if an error is shown, contact your dealer immediately!
1.8 Speed indication: Instant traveling speed display
1.9 Lightning indicator: Lights/ Backlit on/ off status display.
General settings Menu
After the system is switched on, hold both UP and DOWN buttons for 2 seconds to access general settings menu. To exit general settings menu hold MODE button for 2 seconds.
TRIP DISTANCE reset:
TC is displayed. Toggle between Y or N by pressing UP and DOWN buttons. Default value is N. Press MODE button to store settings and switch to contrast settings.

BACKLIGHT CONTRAST setting:
bL is displayed. Choose between Levels 1, 2 and 3 where 3 is maximum contrast. The default value is 1. Press UP or DOWN to toggle between various contrast levels. Press MODE button to store settings and switch to km/mile conversion settings.

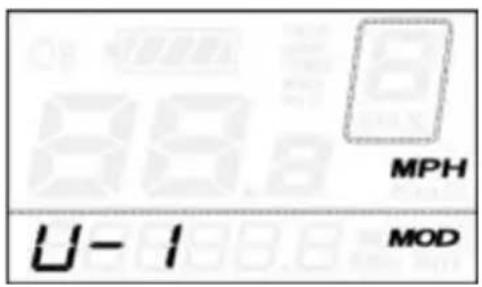
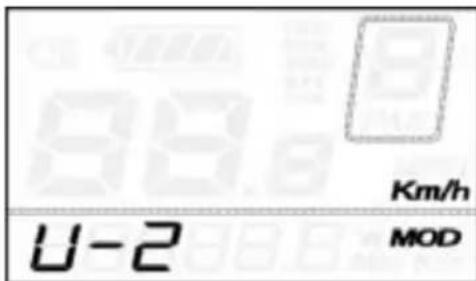
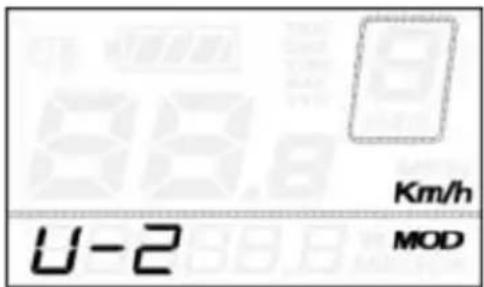
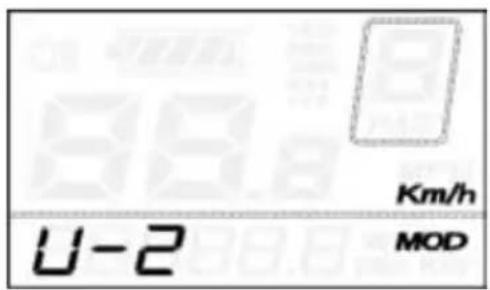
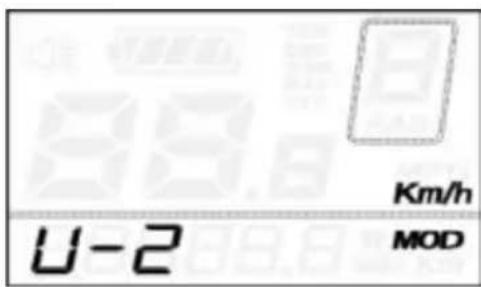
KM/MILE display conversion setting:
U is displayed. 1 stands for miles and 2 stands for kilometer. The default value is 2. Press UP/DOWN buttons to select desired mode. To store changes press MODE button to store settings. The system will take you back to trip distance reset.

SAFETY NOTE:
Only operate settings in case of parking the folding e-bike.
Control Unit Function Overview
1.1 Power Button ON/OFF
Hold Button for 2 seconds to switch on/off the LED control unit and electric drive system.
The system will automatically turn off if left idling for more than 10 minutes.
1.2 Assist mode
Hold or buttons to select the desired assist level for electric system. The lowest is Level 1 and the highest is Level 3. When powered on, the default is Level 1. When there is no numeric power level displayed it means the folding e-bike is in park or it functions as a standard bike with no assist from the motor. You will feel the electric assistance kicking in once selecting again between Levels 1 up to 3.
SAFETY NOTE: When you move the pedals, the engine can start if you are not yet safely on the bike. Do not switch on the computer until you have taken a seat on the folding e-bike or set the support level to 0. Set the support to 0 before getting off the bike.
1.3 Lights/ Backlit Button ON/ OFF
With the display switched on, hold the button for 2 seconds to turn on/off the headlight, taillight and the display backlight. There are five levels of backlight brightness that can be selected by user.
1.4 Information display
You can toggle between various
information, press button to view: Trip distance -> Total distance -> Trip duration (hours)
SAFETY NOTE:
Only operate settings in case of parking the folding e-bike.
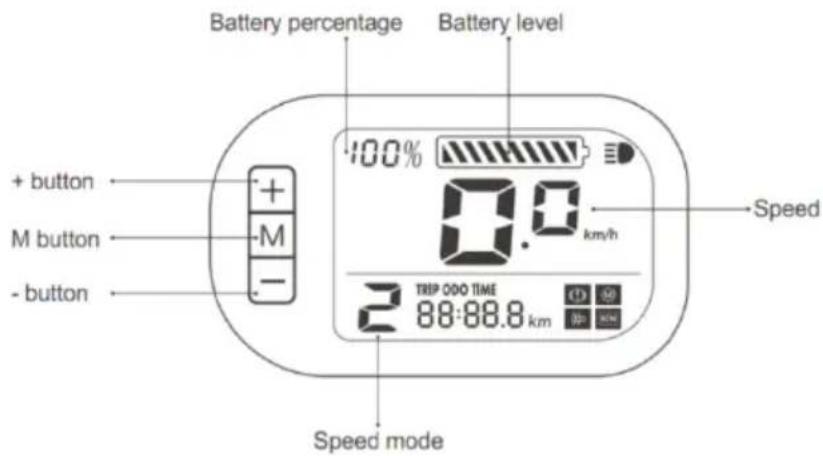
1.1 Battery percentage/ battery level:
If battery is fully charged, all segments are shown and display shows 100%.
Segments gradually going off as the battery depletes during use.
If all segments are gone, battery needs to be changed immediately.
1.2 Speed
Shows current traveling speed
1.3 Speed mode (PAS):
Shows selected level of power assist from 0 (off) to 3 (highest assist level).
Shows additional trip information: Trip distance (TRIP), total distance (ODO), trip time (TIME).

Indicates that front
light is on. Please also check lamp for
additional switch (model specific)
SAFETY NOTE: Don't use your folding e-bike if an error is shown, contact your dealer immediately!
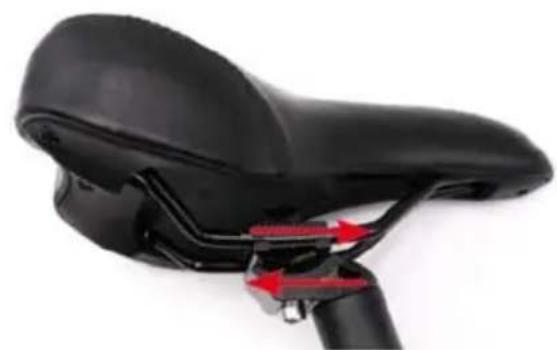
8. SADDLE POSITION/ SADDLE HEIGHT (MODEL-SPECIFIC)
A properly adjusted saddle can minimize discomfort on the folding e-bike and make your pedaling more efficient. Take some time to get the correct saddle position as it will improve your overall riding experience. Saddles can be adjusted in three ways: saddle height, forward/ backward position and tilt.
Open the quick-release clamp on the seat post. If the saddle can be rotated / adjusted with the quick release closed, readjust the quick release with the thumbscrew on the quick release. To do this, the quick release must be open. If it is too difficult to close the quick release, loosen the thumbscrew slightly.
Note: Some models use no quick-release clamp, in this case use the designated tool to release/fasten the screw which fixes the saddle.
The saddle height controls the leverage for your pedaling. Too low and it puts stress on your knees, too high and you may rub the saddle excessively. There are a number of ways to get the right saddle height. A good way of doing it is to sit on the folding e-bike with both feet on the pedals – get help from second person not to fall. Place your pedals in the 6 o'clock and 12 o'clock position. Your bottom leg should be fully extended when the heel is placed on the lower pedal. If it's angled you need to raise the saddle. If you can't reach the pedal with heel, then lower the saddle.
You can change the saddle angle and the front/ rear position by loosening the Allen screw (1) and adjusting the saddle to your convenience. Tighten the Allen screw again when you have adjusted the correct position.
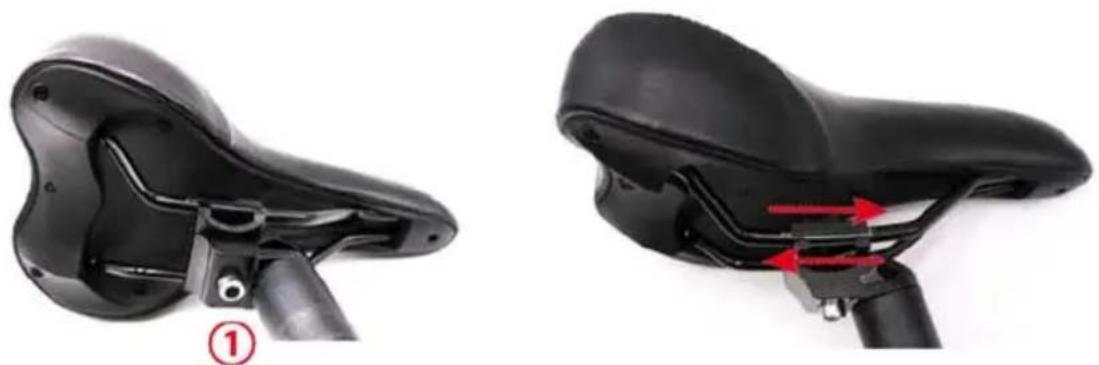
SAFETY NOTE: The seat post has a MAX marked line (that is the safety line), this is the MAX height that you can raise the saddle. In any cases of adjustment, the MAX marked line should always below the seat post clamp. Serious injury may be caused to the rider if the saddle height is raised beyond the MAX line.
9. BRAKE SYSTEM (MODEL-SPECIFIC)
Make sure how your brakes are working before you start driving.
Left Brake Lever: Front Brake
Right Brake Lever: Rear Brake
An additional coaster brake is available for some models with hub gear. You apply this brake by pressing the pedals against the normal pedaling movement.
On some models (e.g. the Foldable-E-Trike) the brakes can be locked to prevent it from rolling away. To do this, apply the brake, press the button on the brake and while the button is still being pressed, release the brake lever. The brake must be applied once before the journey, the button is now released and the brake is released.
SAFETY NOTE:
Please note that the effectiveness of the brakes can vary in wet conditions or on slippery surfaces. Please take into account the possibility of longer braking distances and slippery surfaces when driving and adapt your driving style accordingly (e.g. reduce speed, increase safety distances)!
Get new brake pads ready for ride:
Accelerate the bike to 25 km/h.
Brake in a controlled but powerful way to a standstill.
Repeat this about 10-20 times.
SAFETY NOTICE: Please note that the brakes get hot if they are used frequently, touching them can cause injury!
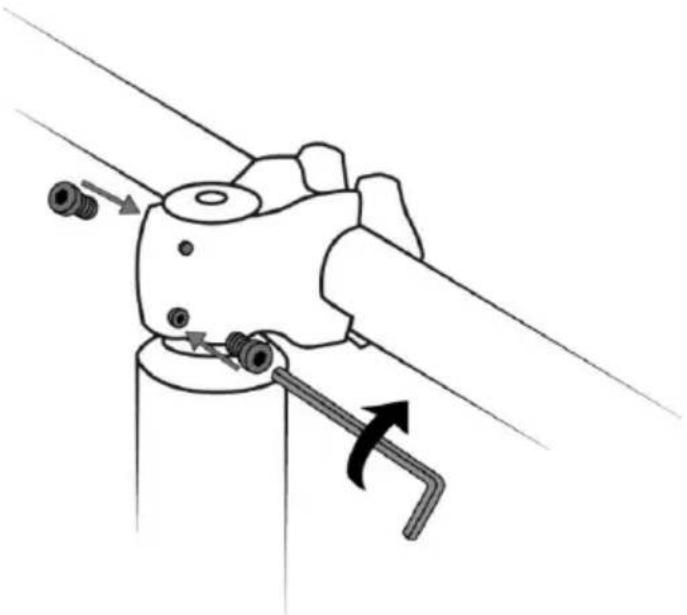
10. HANDLE BAR/ AHEAD STEM (MODEL-SPECIFIC)
Depending on the model, the handlebar still must be mounted on the bike:
To do this, remove the cover screwed onto the handlebar and put the handlebar on. The inner stem must not protrude, leave approx. 2 mm space here, otherwise the lid will no longer close flush. Then tighten the two screws. Finally, replace the cover.
Depending on the model, the handlebar must also be mounted on the stem, which usually points forwards in the direction of travel.
For models with quick release(s) on the handlebar, make sure that the quick release(s) are securely closed to avoid twisting the handlebar.
natural_image
Diagram of a mechanical clamp or bracket assembly with directional arrows indicating movement (no text or symbols)11. GEAR SHIFT (MODEL-SPECIFIC)
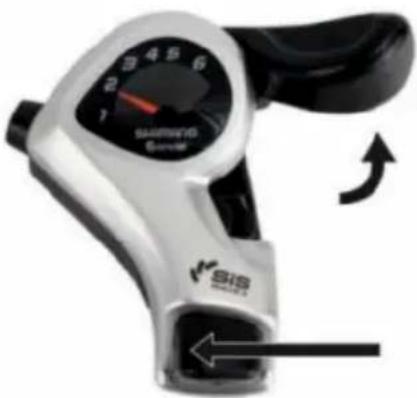
Be sure to operate the gear shift only while pedaling slightly. Change gear for gear, do not apply any force during changing gears.
Derailleur
- If you want to shift in a lighter gear, push the lever (A) forward step by step for each of the gears. If you move the lever further forward, you can also skip a gear.
• If you want to choose a heavier gear, push the button (B) to shift to each of the gears.
natural_image
Close-up of a SIS brand brake shaver with visible brand name and control dial (no text or symbols on the device itself)(A) Lever / gear down
(B) Button / gear up
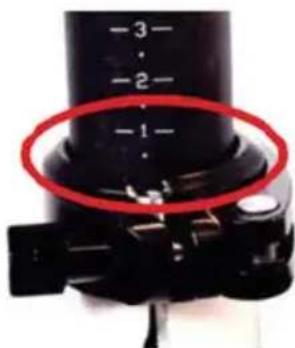
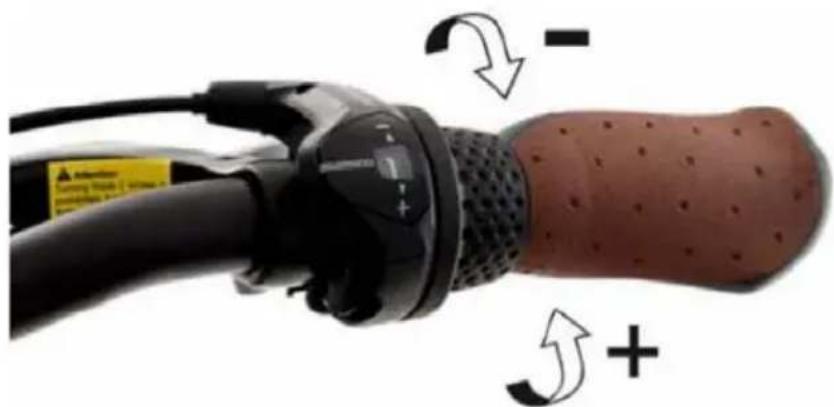
Hub gear
- If you want to shift a lighter gear, turn the shifter forward (+) step by step for each of the gears. On the indicator will be shown the larger number.
- If you want to choose a heavier gear, turn the shifter back (-) step by step for each of the gears. On the indicator will be shown the smaller number.
- Gear ratios should be changed individually, step by step, avoiding shifting several gears at once.
natural_image
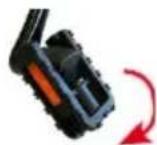
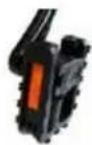
Close-up of a black electric plug with a textured grip and directional arrows indicating motion (no text or symbols)12. SWIVELMECHANISM (MODEL-SPECIFIC)
OPERATION OF THE SWIVELMECHANISM
Due to the system, a trike cannot take a turn like a normal bicycle - the swivel mechanism allows more comfortable driving – more narrow turns / smaller turn radius and a more natural driving experience are possible with active swiveling.
natural_image
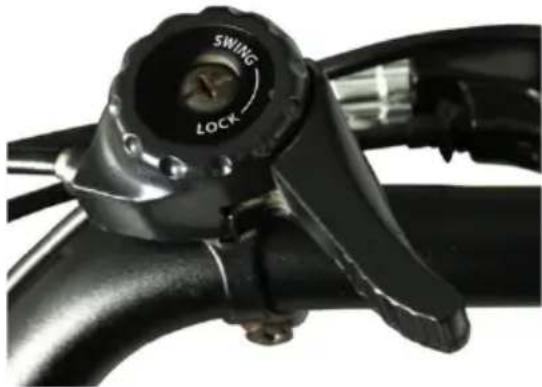
Close-up of a black bicycle steering wheel with a rotary dial labeled 'SWING LOCK' (no additional text or symbols visible)When getting on the bike, the swivel mechanism must be blocked, the lever must be on LOCK as shown in the illustration.
If the swivel mechanism is not locked, move the lever to the LOCK position, move the front part of the TRIKE into a vertical position until the mechanism engages and the front part of the TRIKE is vertically blocked.
After sitting up or starting off, you can move the lever counter- clockwise to the SWING position, until the lever is parallel to the handlebar. This activates the panning. Alternatively, the mechanism can also remain permanently blocked while driving.
SAFETY NOTES:
If you unlock the mechanism, the trike may unexpectedly tip sideways. Please familiarize yourself carefully with the swivel mechanism and, if necessary, have someone help you until you feel safe.
If you move the mechanism to the LOCK position while driving, the driving behavior may change unexpectedly, as the mechanism engages and blocks when it reaches a vertical position.
In sharp turns, the maximum speed of 13 km/h must not be exceeded in order to ensure driving safety.
The swivel mechanism must be set to the LOCK position and locked in place when the folding e-trike is parked.
13. MAINTENANCE: BEFORE THE FIRST RIDE
- Fully charge the battery before the first use.
- Ensure that your bicycle is ready for use and is adjusted to fit your body, including setting position and fixture of the saddle and handlebar.
- Check the locking / screwing of the wheels, handlebars, saddle, brakes as well as all important screws and quick releases.
- Check the tire pressure (you will find information on the minimum / maximum pressure on the tires). As a rule of thumb as follows: If you press your thumb on the inflated tire, you should not be able to change its shape significantly by pressure.
• Operate and ride your bicycle first in a quiet and safe place. - Make sure you know which lever operates which brake. Check the assembly and adjustment of the brakes. Push the bike forward with the brakes applied. The rear brake should completely prevent the rear wheel from moving, while the front brake should lift the rear wheel with its braking action off the ground. The steering of the folding e-bike should not rattle or have play (to the right / left) when braking.
• Make sure that the computer does not show any error message
14.MAINTENANCE: BEFORE EACH RIDE
- Check the tires and rims. Look for damage, cracks, deformation or wear and any foreign objects such as broken glass or sharp stones. If you find incisions, cracks or holes in the tires, please have your folding e-bike checked by qualified bicycle mechanics.
- Check the frame, fork and assembled components for damage and loose parts.
- Check the functionality of the brakes. Push the folding e-bike forward with the brakes applied. The rear brake should completely prevent the rear wheel from moving, while the front brake should lift the rear wheel with its braking action off the ground. The steering of the folding e-bike should not rattle or have play (to the right / left) when braking.
• Do not use the folding e-bike if the computer displays an error message
15. MAINTENANCE: REGULAR CLEANING
- Avoid to use water to clean the folding e-bike, as the electrical and electronic systems may get wet, resulting in malfunction of the bicycle or personal injury.
- Delicately wipe any dirty painted or plastic parts with a soft, damp cloth and a neutral cleaning solution. Carefully dry the parts with a soft, dry cloth.
- DO NOT grease or use a greasy cloth to wipe down the electrical connectors, brake pads, wheels, tires or plastic parts.
16. MAINTENANCE: REGULAR CHECKS
The following points must be checked after no more than 500 km of driving or no later than every six months. We suggest to have this work carried out by a specialist/ bicycle dealer. You will also find a service certificate for this at the end of this instruction booklet, which your dealer can stamp.
Please note that the maintenance intervals can vary depending on the area of application - e.g. very dusty operating environments may make smaller intervals necessary.
- Check the securing/ screwing of the wheels, handlebars, saddle and all important screws and quick releases.
- Check whether the battery is sufficiently charged.
- Check that the brake and shifter cables are adequately lubricated and that the brake pads are in good condition.
- Check whether the bicycle chain is adequately lubricated.
- Check gear shifter adjustment if gears shift not properly or chain rassles.
- Check whether the welds on the frame, spokes / rims are in good condition and free from damage, breakage, corrosion or oxidation.
17. INTENDED USAGE
This folding e-bike is intended for transporting one person at a time. Fit your bicycle with suitable equipment if you would like to transport luggage. Ensure that you do not exceed the maximum permissible load (rider + luggage).
The manufacturer and dealer do not assume any liability for activities above and beyond the intended use. This particularly applies for not adhering to safety advice and damage resulting from this, for instance: off-road use, carrying excess weight or making improper repairs to defects.
The folding e-bike is not generally designed to withstand extreme stress, such as riding down steps or over jumps.
18. TECHNICAL INFORMATION
Error codes computer model 1
| ERROR CODE | DEFINITION |
| Err21 | Current abnormality |
| Err22 | Throttle abnormality |
| Err23 | Motor abnormality |
| Err24 | Motor hall signal abnormality |
| Err25 | Brake abnormality |
| Err30 | Communication abnormality |

Brake error, please check brakes/ brake wiring. Remove battery for 10 minutes and try again. If no success, call service.

Motor error, please remove battery for 10 minutes and try again. If no success, call service.

Controller error, please remove battery for 10 minutes and try again. If no success, call service.

Indicates that throttle mode is not working or is disabled.
Note: Throttlemode is not permitted in Germany and other European countries, it is therefore deactivated. Activation is not possible with this model (depending on the version, the symbol is permanently on or off, both states DO NOT indicate an error)
TORQUE
Please note the information on the bike components themselves, some parts have the max. permissible Torques printed on.
Please always tighten the screws with the necessary feeling, if you are not sure, have the screws checked by a specialist/ bicycle dealer. The smaller a screw is, the more likely it is to be damaged by excessive forces.
19. FAQ (FREQUENTLY ASKED QUESTIONS)
Not possible to turn on:
- Battery is fully charged and inserted properly?
- Battery is switched on (some batteries have an ON/ OFF switch)?
- Please remove battery for about 10 minutes and try again?
Not possible to charge battery:
• (Battery) Temperature too low/ too high?
- Connector/ Charger damaged?
- Charger connected properly?
- Battery already charged?
Computer shows an error:
- Please remove battery for about 10 minutes and try again?
- Please check all visible connectors for correct installation?
- Please check all visible cables for damage?
- Please check brakes for damage/ malfunction?
Not possible to lock folding mechanism:
- Mechanism locked? Please release small lock lever on the lever itself?
- Please check adjustment of mechanism?
- Clean mechanism and add some grease
Saddle, handle bar and other parts move:
- Please check screws?
- Please check quick clamp? Readjust quick release with the thumbscrew on the quick release. To do this, the quick release must be open. If it is too difficult to close the quick release, loosen the thumbscrew slightly.
Low range with one battery charge:
- Battery fully charged?
• Proper pressure on tyres? - Do you start and stop many times during your trip?
- Aging of battery?
- Low outside temperature?
Driving noises have changed or something rattles / grinds etc.:
- Please check the e-folding bike using the items listed under MAINTENANCE
Lights do not work:
• Is computer switched on and lights are activated?
• Cable damaged because of transport or similar?
- Depending on bike model the front light offers an additional switch directly at the front light
- Some bike models use battery lights, these must be switched on separately. Please check state of batteries.
Brake light does not work (model-specific):
• Is system switched on?
- Does motor stop during using the brake? If not- please check cables at brake levers?
- Brake light will only work with the brake levers, since only these have integrated switches. The coaster brake has no electrical connection to the system and brake light will not work with it.
Brakes make noise:
• Have you prepared brakes properly before first use?
- Adjustment of brakes (incl. Brake shoes) okay?
• Do the brake discs show discoloration because they have become too hot?
- Depending on weather conditions and temperature (e.g. cold & humid), this can be a normal phenomenon.
Discomfort / pain while driving:
- saddle and handlebar are adjusted properly?
- Due to the fact that this is a folding bike with relatively small wheels, the possible seating position may not be suitable for longer bike tours depending on the rider.
Repair/ maintenance/ replacement of brakes, gears and other parts:
- Please contact your specialist dealer or the Blaupunkt service department for this; such maintenance work may only be carried out by trained personnel and is not listed in this manual for liability reasons.
The specialist dealer or the Blaupunkt service department will also not provide you with any instructions for this.
20. WARRANTY
Warranty will be valid only for products used in normal usage and conditions. The warranty terms can be called up from www.blaupunkt.com.
The guarantee does not apply to wearing parts or to parts that are worn out prematurely or fail due to lack of care, e.g.: Broken cables, rusted and / or broken chains, worn pinions, worn brakes, rusted attachments, parts damaged by a fall / accident, etc.
21. SERVICE
If you ever need to use a repair service, please contact your Blaupunkt dealer.
You will find information about service partners in your country under www.blaupunkt.com.
22. DISPOSAL NOTES
Do not dispose the folding e-bike in household trash!
Use return and collecting systems available to dispose of the old folding e-bike and battery.

natural_image
Side view of a white F-140 bicycle with black suspension, showing seat, battery, and wheels (no text or symbols)
②
③
④

natural_image
Side view of a white electric bicycle with visible battery, suspension, and front-mounted legs (no text or symbols)⑥
natural_image
Side view of a white and black foldable bicycle with visible mechanical components and a red rotation arrow (no text or symbols)6. BATERIE A NABÍJENÍ
natural_image
Close-up of a mechanical optical component with two circular lenses (no visible text or symbols)7. ÚDRŽBA BATERIE
1.1 Battery indicator:
1.3 Assistance- Level Indication (PAS):
1.5 Setting indicator:
1.8 Speed indication:
1.9 Lighting indicator:
BEZPEČNOSTNÍ UPOZORNĚNÍ:
natural_image
Close-up of a white SIB Srinse brand brake shaver with black adjustment dial and arrow indicator (no text or symbols on device body)natural_image
Close-up of a car plug with a textured grip and directional arrows indicating motion (no text or symbols)12. URČENÉ POUŽITÍ
natural_image
Side view of a white F-140 bicycle with red directional arrows indicating motion, no text or symbols present.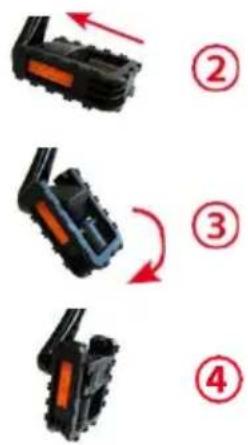
natural_image
Side view of a white bicycle with black suspension components and a red arrow indicating motion (no text or symbols)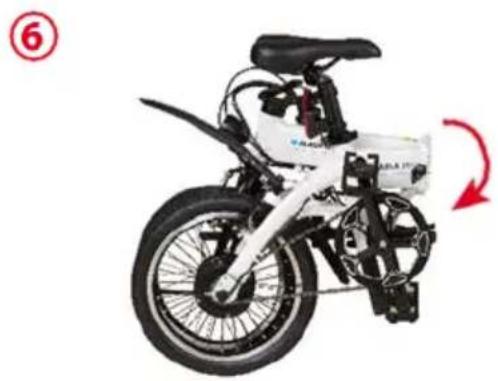
natural_image
Side view of a white bicycle with black suspension components and a red rotation arrow indicating motion (no text or symbols)SAFETY NOTE: Make sure all locks are properly fastened and closed before riding the e-bike.
5. INDLEDNING TIL HYBRID-POWERED SYSTEM - i-CST
natural_image
Close-up of a mechanical component with two circular features and a central lens (no visible text or symbols)7. BATTERI VEDLIGEHOLDELSE
1.2 Support tilstand


1.1 Battery indicator:
1.3 Assistance- Level Indication (PAS):
1.5 Setting indicator:
MOD indikerer aktiv indstilling (se menuen Generelle indstillinger)
1.6 Range/ Power unit:
Angiver den aktuelle displayenhed.
1.7 Text area indication:
1.8 Speed indication:
SIKKERHEDSBEMÆRKNINGER:
natural_image
Close-up of a SIS brand syringe with a speedometer and directional arrow (no text or symbols on the device itself)(A) Gearskift / gear ned
(B) Knap / gear op
Hub gear
natural_image
Close-up of a black electric shaver with a textured grip and directional arrows indicating motion (no text or symbols)12. TILSIGTET BRUG
natural_image
Side view of a white semi-film bicycle with visible suspension mechanism and red directional arrows indicating motion (no text or symbols)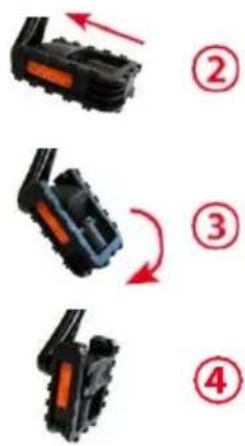
natural_image
Side view of a white electric bicycle with visible suspension and front-mounted legs, showing mechanical components and a red directional arrow indicating motion (no text or symbols)
natural_image
Side view of a white and black bicycle with visible mechanical components and a red rotation arrow (no text or symbols)6. BATTERIE ET CHARGE
natural_image
Close-up of a mechanical component with two circular features and a central hole (no visible text or symbols)7. ENTRETIEN DE LA BATTERIE
1.1 Battery indicator:
1.3 Assistance- Level Indication (PAS):
1.5 Setting indicator:
1.8 Speed indication:
REMARQUE DE SÉCURITÉ :
natural_image
Close-up of a black mechanical component with a numbered label (1) and mounting holes, no visible text or symbols.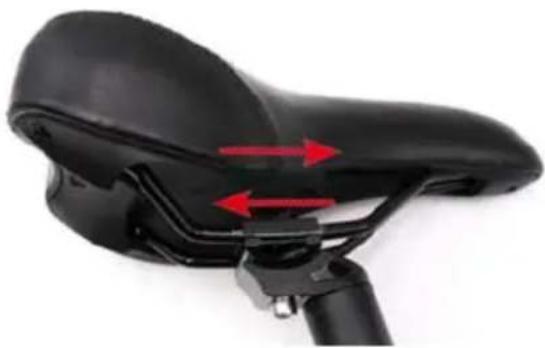
natural_image
Close-up of a black bicycle seat with red directional arrows indicating motion or movement (no text or symbols)natural_image
Close-up of a SIS brand push-button device with black and white casing, showing dial and control knob (no readable text or symbols)natural_image
Close-up of a black electric shaver with a textured grip and directional arrows indicating motion (no text or symbols)12. USAGE PRÉVU
natural_image
Side view of a white bicycle with black frame and red directional arrows indicating motion (no text or symbols)
natural_image
Side view of a white electric bicycle with visible battery, suspension, and front-mounted legs (no text or symbols)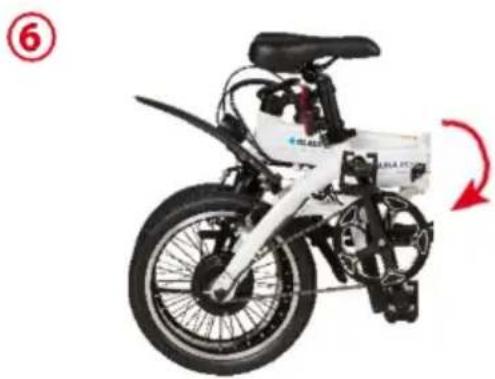
natural_image
Side view of a white bicycle with black suspension components and a red rotation arrow indicating motion (no text or symbols)6. BATTERIA E RICARICA
natural_image
Close-up of mechanical components with circular and rectangular features (no visible text or symbols)1.1 Battery indicator:
1.5 Setting indicator:
1.8 Speed indication:
1.9 Lighting indicator:
NOTA SULLA SICUREZZA:
natural_image
Two black bicycle seat components with red directional arrows indicating movement or force (no text or symbols)natural_image
Close-up of a SIR brand pushpin with visible brand number 3456 and control knob, showing motion arrow (no text or symbols on device body)natural_image
Close-up of a black electric shaver with a textured grip and directional arrows indicating motion (no text or symbols)12. USO PREVISTO
Z
natural_image
Side view of a white semi-film bicycle with black suspension and red directional arrows indicating motion (no text or symbols)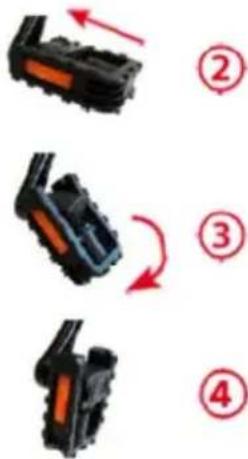

natural_image
Side view of a white and silver bicycle with visible suspension components and a red directional arrow indicating motion (no text or symbols)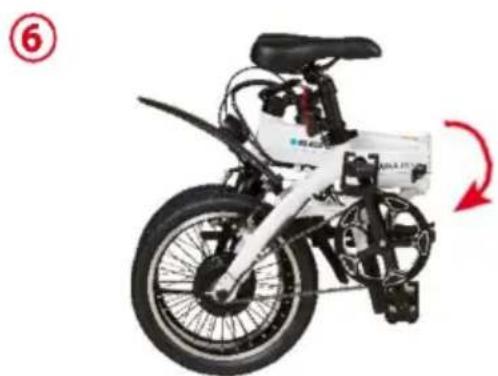
natural_image
Side view of a white electric scooter with black suspension components and a red rotation arrow indicating motion (no text or symbols)
6. BATTERIJ EN OPLADEN
natural_image
Two black electrical plug symbols with red circles indicating positions (no text or labels)
natural_image
Close-up of a mechanical device with multiple circular components and a numbered label (2) in red, no readable text or symbols on the main subject.7. BATTERIJONDERHOUD
1.1 Battery indicator:
1.5 Setting indicator:
1.8 Speed indication:
1.9 Lighting indicator:

natural_image
Two black bicycle seat components with red directional arrows indicating movement or adjustment (no text or symbols)Remhendel links: Voorrem
Remhendel rechts: Achterrem
natural_image
Close-up of a SIS brand pushpin with black and white body, showing brand number 345 and control dial (no text or symbols on device body)natural_image
Close-up of a black electric shaver with a textured grip and directional arrows indicating motion (no text or symbols)12. BEDOELD GEBRUIK
natural_image
Side view of a white foldable bicycle with black suspension and red motion arrows indicating rotation (no text or symbols)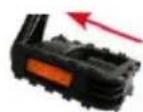
②
③
④

natural_image
Side view of a white bicycle with black suspension components and a red directional arrow indicating motion (no text or symbols)⑥

natural_image
Side view of a white bicycle with black suspension components and a red arrow indicating rotational motion (no text or symbols)WAŻNE:
6. AKUMULATOR I ŁADOWANIE
natural_image
Close-up of a mechanical component with two circular features and a central hole (no visible text or symbols)7. KONSERWACJA AKUMULATORA
1.1 Battery indicator:
1.5 Setting indicator:
1.8 Speed indication:
1.9 Lighting indicator:

WAŻNE:
natural_image
Close-up of a SIS brand wristwatch with hand and wrist movements indicator (no readable text or symbols)natural_image
Close-up of a black electric shaver with a brown body and two arrows indicating direction (no text or symbols)12. PRAWIDŁOWE UŻYTKOWANIE
INNEHÅLLSFÖRTECKNING
-
VIKTIG SÄKERHETSINFORMATION
-
FÖRPACKNINGENS INNEHÅLL
-
DEN HOPFÄLLBARA CYKELNS UPPBYGGNAD
-
ATT FÄLLA IHOP CYKELN
-
INTRODUKTION TILL HYBRIDSYSTEMET
-
BATTERI OCH LADDNING
-
BATTERIUNDERHÅLL
-
ANVÄNDNING AV CYKELDATORN
-
SADELNS LÄGE/HÖJD
-
BROMSSYSTEMET
-
ANVÄNDNING AV VÄXELSPAKEN
-
ANVÄNDNINGSOMRÅDE
-
ATT TÄNKA PÅ INNAN DIN FÖRSTA CYKELTUR
-
ATT TÄNKA PÅ INNAN VARJE CYKELTUR
-
REGELBUNDEN RENGÖRING
-
REGELBUNDNA KONTROLLER (VARJE/VARANNAN MÅNAD)
-
TEKNISK INFORMATION
-
GARANTI
-
SERVICE
-
BORTSKAFFANDE
1. VIKTIG SÄKERHETSINFORMATION
3. DEN HOPFÄLLBARA CYKELNS UPPBYGGNAD
Vs
natural_image
Side view of a white foldable bicycle with black suspension components and red directional arrows indicating motion (no text or symbols)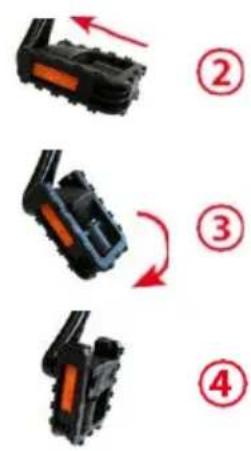
natural_image
Side view of a white electric bicycle with visible battery, suspension, and front-mounted sensor (no text or symbols)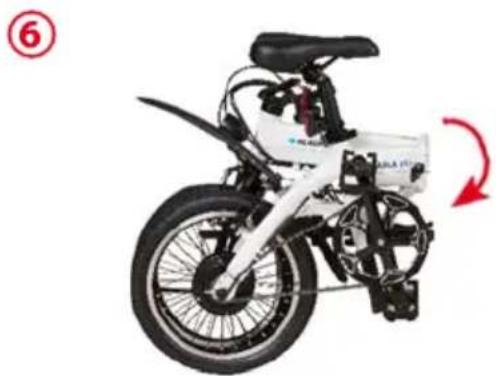
natural_image
Side view of a white bicycle with black suspension components and a red rotation arrow indicating motion (no text or symbols)6. BATTERI OCH LADDNING
natural_image
Close-up of a mechanical optical component with two circular lenses (no visible text or symbols)7. BATTERIUNDERHÅLL
1.1 Battery indicator:
1.3 Assistance- Level Indication (PAS):
1.5 Setting indicator:
1.8 Speed indication:
Visar hastighet
1.9 Lighting indicator:
TÄNK PÅ SÄKERHETEN:
natural_image
Two black bicycle seat components with red arrows indicating movement or adjustment, labeled (①), against white background (no text or symbols on the seats themselves)natural_image
Close-up of a SIS brand pushpin with a rotary dial and directional arrow (no text or symbols on the device itself)natural_image
Close-up of a black electric plug with a textured grip and directional arrows indicating motion (no text or symbols)12. ANVÄNDNINGSOMRÅDE
natural_image
Side view of a white foldable bicycle with black suspension legs and red directional arrows indicating motion (no text or symbols)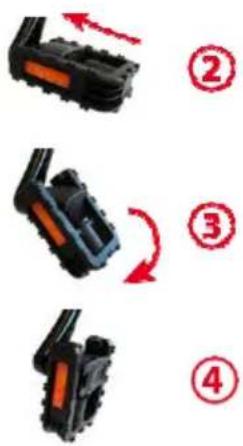
natural_image
Side view of a white electric bicycle with visible battery, wheels, and a red-handled suspension mechanism (no text or symbols)⑥
natural_image
Side view of a white electric scooter with black suspension components and a red arrow indicating rotational motion (no text or symbols)natural_image
Close-up of a mechanical component with two circular features and a central hole (no visible text or symbols)ΣΥΝΤΗΡΗΣΗ
Functional Area Distribution
ΣΗΜΕΙΩΣΗ ΑΣΦΑΛΕΙΑΣ:
natural_image
Close-up of a black bicycle wheel handle and seat (no text or symbols visible)①
natural_image
Close-up of a black bicycle seat with red directional arrows indicating motion or movement (no text or symbols)natural_image
Diagram of a mechanical clamp or tool with directional arrows indicating movement (no text or symbols)11. ΑΛΛΑΓΗ ΤΑΧΥΤΗΤΩΝ (MODEL-SPECIFIC)
natural_image
Close-up of a white SIS Sports device with black handle and speedometer, showing motion arrow (no text or symbols on device body)natural_image
Close-up of a black electric plug with a textured grip and a red rubber head, showing directional arrows (no text or symbols)
- e mobility
- WARTUNG
- Battery indikator:
- Setting indicator:
- Speed indication:
- Lighting indicator:
- SICHERHEITSHINWEIS:
- Battery percentage/ battery level:
- SCHWENKMECHANISMUS (MODELLSPEZIFISCH)
- TABLE OF CONTENTS
- IMPORTANT SAFETY INFORMATION
- IN THE BOX
- GETTING TO KNOW YOUR FOLDING BICYCLE
- HOW TO FOLD
- HOW TO FOLD
- SAFETY NOTES:
- INTRODUCTION TO THE DRIVE SYSTEM
- BATTERY (REMOVAL/ INSERTION, CHARGING, MAINTENANCE AND RANGE)
- REMOVAL/ INSERTION
- CHARGING
- MAINTENANCE
- BATTERY RANGE
- CYCLING COMPUTER OPERATIONS (MODEL-SPECIFIC)
- Control Unit Function Overview
- Power Button ON/OFF
- Assist mode
- Lights/ Backlit Button ON/ OFF
- Walk Assist
- General settings Menu
- TRIP DISTANCE reset:
- BACKLIGHT CONTRAST setting:
- SAFETY NOTE:
- Information display
- Speed
- Speed mode (PAS):
- SADDLE POSITION/ SADDLE HEIGHT (MODEL-SPECIFIC)
- BRAKE SYSTEM (MODEL-SPECIFIC)
- HANDLE BAR/ AHEAD STEM (MODEL-SPECIFIC)
- GEAR SHIFT (MODEL-SPECIFIC)
- Derailleur
- Hub gear
- SWIVELMECHANISM (MODEL-SPECIFIC)
- OPERATION OF THE SWIVELMECHANISM
- MAINTENANCE: BEFORE THE FIRST RIDE
- 14.MAINTENANCE: BEFORE EACH RIDE
- MAINTENANCE: REGULAR CLEANING
- MAINTENANCE: REGULAR CHECKS
- INTENDED USAGE
- TECHNICAL INFORMATION
- TORQUE
- FAQ (FREQUENTLY ASKED QUESTIONS)
- WARRANTY
- SERVICE
- DISPOSAL NOTES
- BATERIE A NABÍJENÍ
- ÚDRŽBA BATERIE
- URČENÉ POUŽITÍ
- INDLEDNING TIL HYBRID-POWERED SYSTEM - i-CST
- BATTERI VEDLIGEHOLDELSE
- Support tilstand
- TILSIGTET BRUG
- BATTERIE ET CHARGE
- ENTRETIEN DE LA BATTERIE
- REMARQUE DE SÉCURITÉ :
- USAGE PRÉVU
- BATTERIA E RICARICA
- NOTA SULLA SICUREZZA:
- USO PREVISTO
- BATTERIJ EN OPLADEN
- BATTERIJONDERHOUD
- BEDOELD GEBRUIK
- WAŻNE:
- AKUMULATOR I ŁADOWANIE
- KONSERWACJA AKUMULATORA
- PRAWIDŁOWE UŻYTKOWANIE
- INNEHÅLLSFÖRTECKNING
- VIKTIG SÄKERHETSINFORMATION
- DEN HOPFÄLLBARA CYKELNS UPPBYGGNAD
- BATTERI OCH LADDNING
- BATTERIUNDERHÅLL
- ANVÄNDNINGSOMRÅDE
- ΣΥΝΤΗΡΗΣΗ
- ΣΗΜΕΙΩΣΗ ΑΣΦΑΛΕΙΑΣ:
- ΑΛΛΑΓΗ ΤΑΧΥΤΗΤΩΝ (MODEL-SPECIFIC)
Brand : BLAUPUNKT
Model : Frida (2024)
Category : Electric bike