
F64 E XGi - Coffee grinder Fiorenzato - Free user manual and instructions
Find the device manual for free F64 E XGi Fiorenzato in PDF.
| Product type | Professional coffee grinder with integrated weighing system |
| Brand | Fiorenzato |
| Model | F64 E XGi |
| Dimensions (L x H x P) | 255 x 635 x 320 mm |
| Net weight | 18 kg |
| Power supply | 220-240 V ~ 50 Hz |
| Power consumption | 350 W |
| Burr type | Flat burrs |
| Burr diameter | 64 mm |
| Burr rotation speed | 1350 rpm (50 Hz) |
| Hopper capacity | 1.5 kg |
| Adjustable dose weight | Single, double and triple dose (by weight or time) |
| Weighing tolerance (single dose) | ± 0.3 g |
| Factory weight single/double dose | 7.5 g / 14 g |
| Control screen | Color touchscreen, customizable (day/night mode) |
| Main functions | Dosing by weight (XGi) or by time, double and triple dose, manual grinding, statistics, screen saver |
| Noise level | 78 dB(A) |
| Safety | Motor thermal protection, locking microswitch, anti-intrusion valve, automatic stop in case of anomaly |
| Maintenance and cleaning | Daily cleaning, monthly burr cleaning, periodic burr replacement |
| Spare parts and repairability | Original burrs, power cable, internal parts; maintenance reserved for authorized technician |
| General information | Professional use, 24-month warranty, CE compliance |
Frequently Asked Questions - F64 E XGi Fiorenzato
User questions about F64 E XGi Fiorenzato
0 question about this device. Answer the ones you know or ask your own.
Ask a new question about this device
Download the instructions for your Coffee grinder in PDF format for free! Find your manual F64 E XGi - Fiorenzato and take your electronic device back in hand. On this page are published all the documents necessary for the use of your device. F64 E XGi by Fiorenzato.
USER MANUAL F64 E XGi Fiorenzato
The most technological line of Fiorenzato.
F64 exgi
F64 EVO XGi
F83 E XGi
F71 EK XGi
INDEX
Serie XG
IT Koltaliano
韩国
EN RUEnglishPycckn
FR PTFrancaisPortugues
DE ESDeutschEspanol
NL THNederlands
EL VI EAAVikia Tieng Vi
HU ZNIagyar
中国人
Serie XG
IT

HOME in "Version nera"
1.1 General information on the manual and how to consult it 5
1.2 Symbols used in the manual 5
1.3 Warnings for the buyer 6
1.4 Manufacturer's contact details 6
1.5 Instructions for requesting assistance 6
1.6 Warranty 7
1.7 Applicable directives 7
2 IDENTIFICATION DATA AND TECHNICAL SPECIFICATIONS 8
2.1 Introduction 8
2.2 Appliance identification 8
2.3 Identification of the main parts of the grinder-doser 9
2.4 Intended use 10
2.5 The models in the xgi line and technical specifications
2.6 Noise level 12
3 SAFETY 12
3.1 General information 12
3.2 Reasonably foreseeable misuse 12
3.3 Precautions for proper and safe use 13
3.4 Safety devices on the grinder-doser 14
3.5 Residual risks 15
3.6 Warning labels attached to the machine 16
4 INSTALLATION 16
4.1 Storage 16
4.2 Choosing the installation location 17
4.3 Unpacking and handling the appliance 17
4.4 Installation and mains connection 18
5 USING THE GRINDER-DOSER 19
5.1 Machine controls 19
5.1.1 Switch 19
5.2 Preparing to use the grinder-doser 20
5.3 "Initial start-up" procedure 21
5.4Operator control panel 23
5.4.1 Home page 24
5.4.2 Disabling/Enabling the XG1 automatic weighing system 27
5.4.2.1 Disabling the XG1 automatic weighing system 27
5.4.2.2 Activation of the xG1 automatic weighing system 27
5.4.3 Settings Menu 28
| EN | XGI Series |
| 4.3.1 Change grinding weights | 30 |
| 4.3.2 Dose weight display | 30 |
| 4.3.3 Change dose times | 31 |
| 4.3.4 Grinding time display | 31 |
| 4.3.5 Show statistics | 32 |
| 4.3.6 Triple dose display | 32 |
| 4.3.7 XGI System | 33 |
| 4.3.8 Initial start-up | 33 |
| 4.3.9 Display brightness | 33 |
| 4.3.10 Screen appearance | 34 |
| 4.3.11 Screensaver | 35 |
| 4.3.12 Language | 35 |
| 4.3.13 Date and time | 36 |
| 4.3.14 Information | 36 |
| 4.3.15 Resetting dose weights | 37 |
| 4.3.16 Administrator password | 38 |
| 5 Adjusting the degree of grinding | 39 |
| 6 xGI system auto-calibration | 39 |
| 7 Dispensing doses | 40 |
6 GRINDER-DOSER MAINTENANCE 41
6.1 Routine maintenance 41
6.1.1 Cleaning the appliance 42
6.1.2 Checking the power cable status 44
6.1.3 Thoroughly cleaning the grinding blades 45
6.1.4 Shutting down the grinder-doser 45
6.1.5 Replacing the grinding blades 46
6.2 Supplementary maintenance 46
7 ANOMALIES - CAUSES - REMEDIES 47
8 REQUESTING SPARE PARTS 51
XG1 Series
EN
1 GENERAL INFORMATION
1.1 General information on the manual and how to consult it

Please read this instruction manual carefully before installing and using the electronic coffee grinder-doser by Fiorenzato M.C. S.r.l. for the first time.
This instruction manual has been drawn up in compliance with the provisions of Directive 2006/42/EC and provides all the useful information for the end user to install, adjust and use the electronic coffee grinder-doser manufactured by the company Fiorenzato M.C. S.r.l.
The content of this manual must be thoroughly read and understood before installing and using the grinder-doser. It must also be stored and kept in good condition for future reference.
The images, data, texts and descriptions included in this documentation are the property of Fiorenzato M.C. S.r.l. and refi ect the state of the art of the machine at the time it was placed on the market.

Fiorenzato M.C. S.r.l. is always looking for new solutions to improve its products and therefore reserves the right to make changes to the grinder-doser and related documentation over time without considering the products already sold to be inadequate and/or obsolete.
A general index makes it easy to find the subject of interest, and a number of informative symbols draw the user's attention to the contents of particular interest for their own safety and for the correct use of the grinder-doser.
1.2 Symbols used in the manual

WARNING - NOTE! Indicates a warning or important note relating to specific functions and/or useful information for the user. Bear in mind the paragraphs marked with this symbol.

GENERAL DANGER - ATTENTION! General danger sign. Text marked with this symbol indicates that failure to follow the instructions given may result in damage to the machine and/or risk of injury to the user.

LIVE APPLIANCE - ATTENTION! Text marked with this symbol indicates a possible risk of electrocution. Follow the instructions provided.

OPERATION INTENDED FOR AUTHORISED TECHNICIANS: Text marked with this symbol indicates that the action described must be carried out by a specialised technician (technical service).
EN
XG1 Series
1.3 Warnings for the buyer
This manual, like the EC Declaration of Conformity, is an integral part of your grinder-doser and must therefore be treated and stored with care. It must be made available to all users and accompany the machine when it is moved or resold to third parties.

In the event of loss and/or deterioration of this documentation, a copy can be obtained from the manufacturer by specifying the manual code on the back cover.
Before allowing another user to use the coffee grinder-doser, please ensure that this person has read and understood the contents of this manual.
The instruction manual contains all the instructions and procedures for use. When correctly followed, they allow you to work safely without causing damage to yourself or to the machine.

It is the purchaser's obligation to provide appropriate training in the use and maintenance of the coffee grinder-doser for the personnel assigned to use it.

The purchaser and all users of the grinder-doser must carefully observe all the specific warnings included in this manual.
1.4 Manufacturer's contact details
If you have any questions, please contact Fiorenzato M.C. S.r.l. at the following address:
1.5 Instructions for requesting assistance
For technical assistance on the machine, the user must contact the dealer from whom the appliance was purchased. For further information or clarification regarding the use and/or maintenance of the grinder-doser, Fiorenzato M.C. S.r.l. remains at your disposal and can be contacted at the above addresses.

XG1 Series
EN
1.6 Warranty
Fiorenzato M.C. S.r.l. provides a 24-month warranty for its products from the date of the sales invoice issued by Fiorenzato M.C. S.r.l..
During the warranty period, the manufacturer undertakes to repair or replace, free of charge, any parts and/or components that are originally faulty due to manufacturing defects.
The warranty covering the product shall become void if:
The warnings/instructions in this manual have not been followed.
- Routine maintenance and machine cleaning operations have not been carried out by a user who has been properly instructed in the correct way to carry them out.
- Repair work has been carried out by personnel who are untrained or not authorised by the manufacturer.
The product is used for purposes other than those specified in this manual.
- Replacements have been carried out using non-original spare parts (please note that replacements with non-original parts, in addition to invalidating the warranty, also invalidate the "Declaration of Conformity" that accompanies the appliance.
- The warranty is void in the event of damage to the appliance caused by: neglect, installation and/or use not in accordance with the instructions in this manual, poor maintenance (cleaning), damage caused by lightning and atmospheric events, incorrect power supply, overvoltage and overcurrents.
1.7 Applicable directives
All coffee Grinding-dosers manufactured by Fiorenzato M.C. S.r.l. have been designed and made in accordance with the essential requirements of the following EU directives:
- 2006/42/EC [Machinery Directive].
- 2014/35/EU [Low Voltage Directive].
- 2014/30/EU [Electromagnetic Compatibility Directive].
-2011/65/EU [RoHS Directive]. - 2015/863/EU [RoHS Delegated Directive].
-2012/19/EU [WEEE Directive].
EN
XG1 Series
2 IDENTIFICATION DATA AND TECHNICAL SPECIFICATIONS
2.1 Introduction
Making coffee is an art and in order to master its secrets, you need to follow precise rules. The formula for a perfect cup of espresso coffee is, indeed, very complex and the part played by the appliance is extremely important. For an excellent result and unquestionable quality, three factors must be successfully combined:
A fine blend.
The appropriate use of available appliances.
- The skill and professionalism of those who make it. To enjoy a good coffee, contrary to popular belief, it is not enough just to choose a particular blend.
The experience and skill of the operator in following the right procedures for preparing the drink and using the appropriate machinery greatly help to create a small masterpiece. This is why professionals attach so much importance to the espresso machine and grinder-doser. Being familiar with these appliances, keeping them in perfect working order and using them to their full potential is a skill that belongs to true coffee masters. The quality of a good espresso coffee depends on a number of operations, including grinding which plays an important role. The grinder-doser is therefore one of the basic appliances for the operator. Its structure must comply with certain characteristics: robustness, resistance and functionality, characteristics that are fully satisfi ed by all the grinder-dosers manufactured by Fiorenzato M.C. S.r.l.
2.2 Appliance identification
On the left side of all grinder-dosers manufactured by Fiorenzato M.C. S.r.l., an identifi cation label is attached, on which the following data is always shown:
Company name of Fiorenzato M.C. S.r.l.
- CE marking and year of construction.
- Any other certification markings.
Model and serial number.
- Appliance power.
Supply voltage and frequency required.

XG1 Series
EN
2.3 Identificaiton of the main parts of the grinder-doser
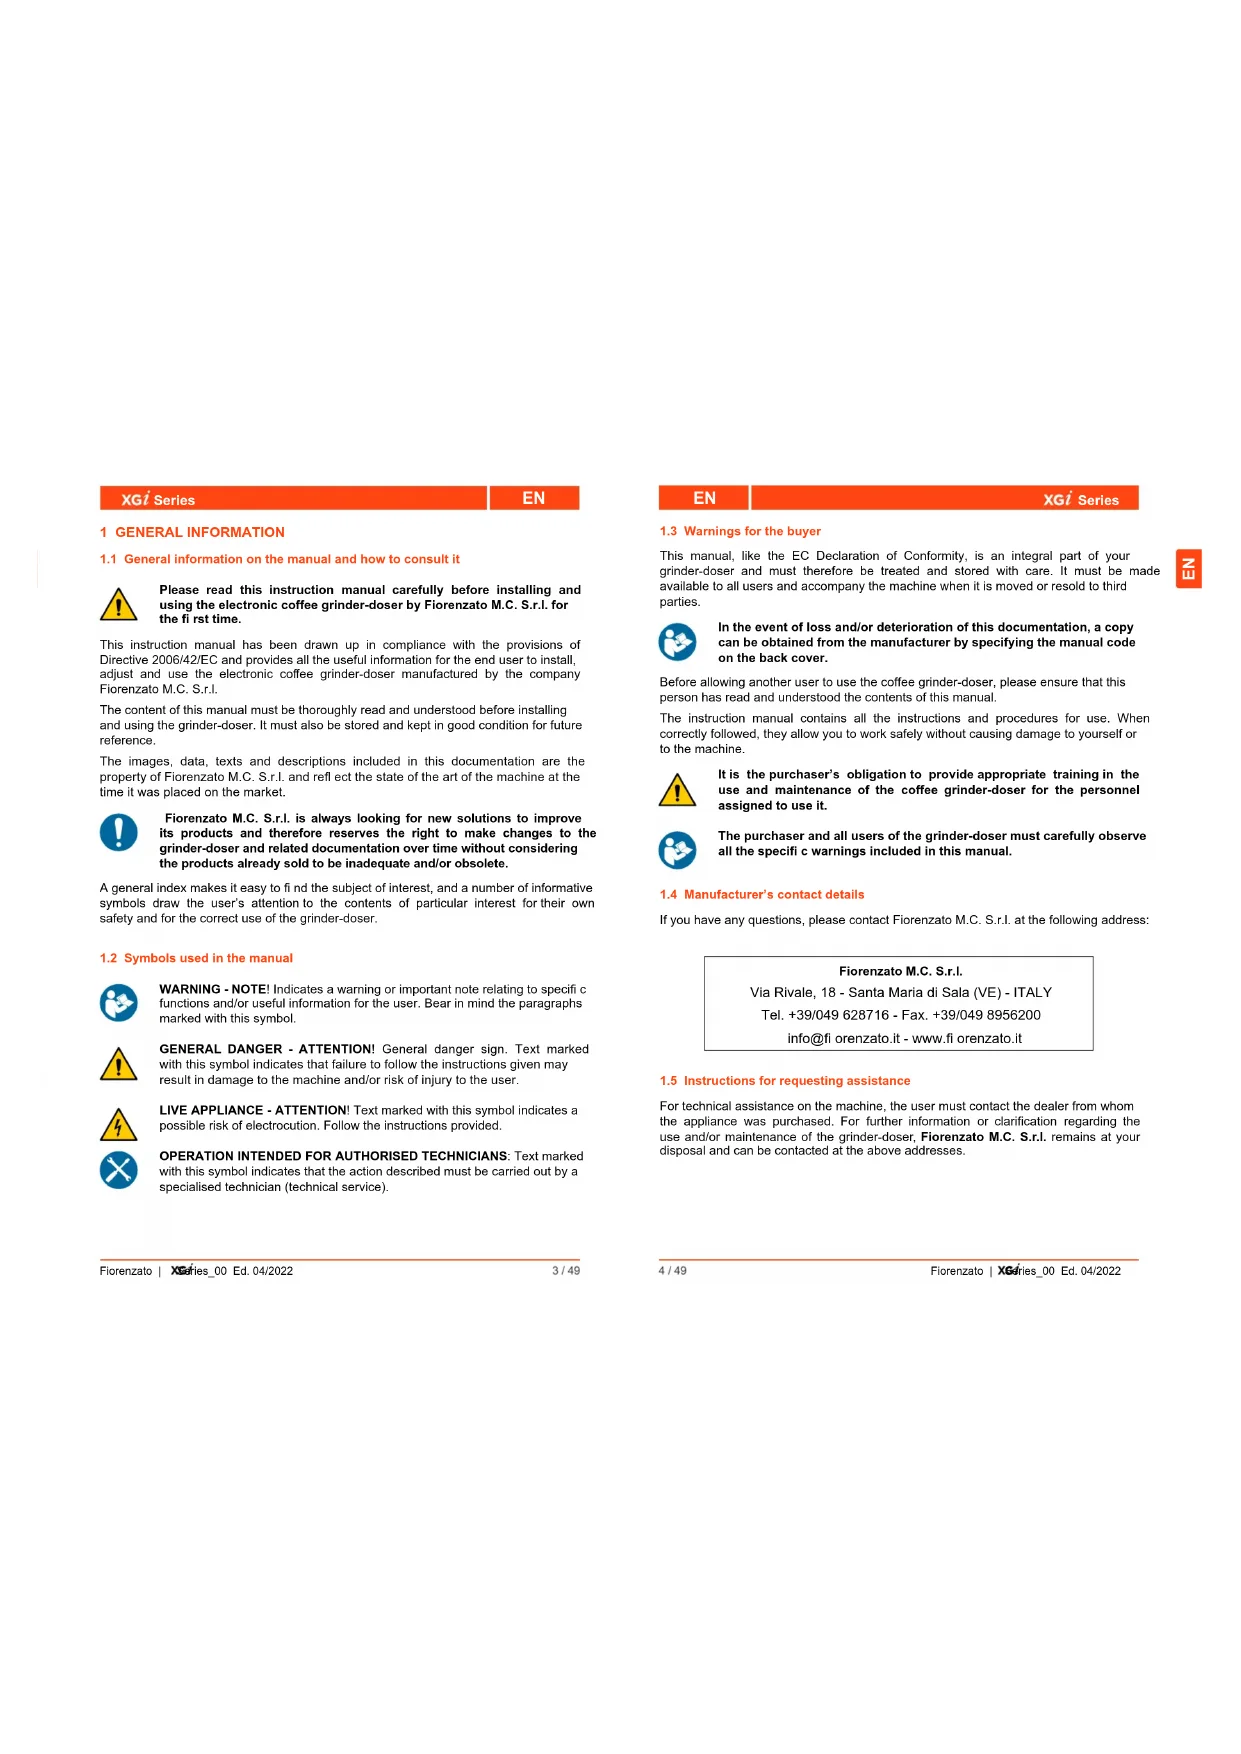
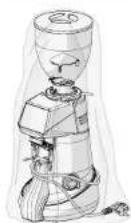
Grinder-dosers consist of a machine body, with all the necessary devices for grinding coffee, and a supply hopper on the top for feeding in the roasted coffee beans to be ground.
With reference to the Fig. 1, all grinder-dosers in the XGI line consist of the following main parts:
| 1 | Hopper lid | 1 2 3 4 5 6 7 8 9 10 11 |
| 2 | Coffee bean feed hopper | |
| 3 | Locking slide on hopper | |
| 4 | Adjustment disk lock lever with microswitch | |
| 5 | Finding adjustment disk | |
| 6 | Control panel | |
| 7 | Machine/user interface display | |
| 8 | Removable ground coffee discharge tube | |
| 9 | Filter holder cup fork | |
| 10 | Machine On/Off switch | |
| 11 | Curved protective elements for scales | |
| 12 | Anti-clumping blade | |
| 13 | Cooling fan (only on mod. "EVO" and "EK") |
EN
XG1 Series
2.4 Intended use
This appliance has been designed exclusively for grinding roasted coffee beans. Any other use is considered improper and therefore dangerous. The manufacturer accepts no liability for any damage caused by improper or incorrect use. Do not use the appliance to grind other types of food or other materials into granules. Our grinder-dosers are intended for professional use by specialised personnel, and are not for domestic use.
2.5 The models in the Xie and technical specifications
Fiorenzato M.C. S.r.l. manufactures grinder-dosers in theXG line in the following models:
| F64 EXGI F64 EVO XGI F83 EXGI F71 EK XGI | E | ||
| Fxx | EVO | XGI | |
| K | |||
How to read the model number
| Fxx | E | EVO | K | XGI |
| Ø 64 mm | Electronic model | High-speed electronic model | Conical grinding blades | Integrated weighing system |
| Ø 71 mm | ||||
| Ø 83 mm |
The tables below show the overall dimensions and the main technical features of the XGI line of coffee grinder-dosers.
Dimensions and weights
| Fig. 2 - Dimensions | Models | Dimensions [A x H x B mm] | Weight [kg] |
| F64 E | 255 x 635 x 320 | 18 | |
| F64 EVO | 255 x 635 x 320 | 18 | |
| F83 E | 255 x 700 x 310 | 20 | |
| F71 EK | 255 x 700 x 310 | 25 |
XG1 Series
EN
Technical specifications
| Model | F64 E F64 EVO F83 E FXEK | XG1 | XG1 | |
| Power supply | 220-240V50 Hz | 220-240V50 Hz | 220-240V50 Hz | 220-240V50 Hz |
| Power [Watt] 350 350 650 | 850 | |||
| Grinding blade type Flat type B Flat type C Flat type B Conical | ||||
| Grinding blade diameter [mm] | 64 64 83 | 71 | ||
| Grinding blade rotation speed rpm | 1350 at 50 Hz | 1350 at 50 Hz | 1350 at 50 Hz | 1350 at 50 Hz |
| 1550 at 60 Hz | 1550 at 60 Hz | 1550 at 60 Hz | 1550 at 60 Hz | |
| Hopper capacity [kg] 1.5 | 1.5 | 1.5 | 1.5 | 1.5 |
| Tolerance (*) on the weight of a single dose [g] | ± 0.3 | ± 0.3 | ± 0.3 | ± 0.3 |
| Weight (**) single dose [g] | 7.5 | 7.5 | 7.5 | |
| Tolerance (*) on the weight of a single dose [g] | ± 0.6 | ± 0.6 | ± 0.6 | ± 0.6 |
| Weight (**) double dose [g] | 14 | 14 | 14 | |
| Daily grinding [kg] | 1÷2 | 2÷3 | 3÷7 | 8÷14 |
| Frequency of grinding blade replacement in working hours (h) and in kg of ground coffee [kg] | ||||
| "Standard" grinding blades (h) - [kg] | (54) - [400] | (33) - [400] | (45) - [600] | (66) - [1200] |
| "Red Speed" grinding blades (h) - [kg] | (216) - [1600] | (132) - [1600] | (180) - [2400] | (264) - [4800] |
| Optional | ||||
| Hopper 500 g | √ | √ | √ | √ |
| Adjustable fork with support | √ | √ | √ | √ |
| Metal tamper | √ | √ | √ | √ |
| "Red Speed" grinding blades | √ | √ | √ | √ |
() The tolerance on the weight of the dose detected by the weighing system varies proportionally to the increase or decrease in the dose.
() Manufacturer's settings.
EN
XG1 Series
2.6 Noise level

The maximum noise emission of our grinder-dosers, measured in a UNI EN ISO 3741 reverberation chamber in accordance with EN 60704-1 standards: 1998 and EN 607043:1996. The equivalent noise exposure level for an operator, exclusively related to an appliance operation limit of 240min over eight hours, is 78 dB(A), in accordance with European Directive 86/188/EEC and subsequent revision 2003/1 0/EEC. Using the appliance does not therefore require any precautions against risks arising from exposure to noise in workplaces (Articles 3-8 of ED 2003/1 0/EEC).
3 SAFETY
3.1 General information
The purchaser must inform all personnel of any risks arising from the improper use of the appliance, of the safety devices used by the manufacturer and of the general regulations on accident prevention laid down by EU directives and by the legislation of the country where the appliance is used.
Users must be aware of the location and operation of all controls and machine features specified in this manual.

ATTENTION! Before installing, switching on and using the grinder-doser of Fiorenzato M.C. S.r.l. for the first time, you must have read and understood all the contents of this documentation and the "SAFETY INSTRUCTIONS" booklet.

ATTENTION: Tampering with or unauthorised replacement of one or more parts of the machine, the use of accessories that alter the use of the machine and the use of non-original spare parts may result in the risk of injury and compromise the proper operation of the machine.

Failure to comply with the above releases Fiorenzato M.C. S.r.l. from any liability for damage to people and/or to property.
3.2 Reasonably foreseeable misuse
Fiorenzato M.C. S.r.l. accepts no liability and the warranty will be rendered null and void in the event of negligence when using the machine or failure by the user to comply with the operating instructions in this manual.

Any use of the appliance other than that described in this manual is considered improper.
XG1 Series
EN
When using the machine, no other work or activities are permitted which are considered to be improper and which, in general, may involve risks in terms of user safety and/or damage to the machine.
Reasonably foreseeable misuse includes:
- Using the machine for grinding products other than roasted coffee beans (e.g. pepper, salt, etc.).
- Using the appliance with pre-ground coffee.
- Improper use of the appliance by personnel who have not been trained to use it and/or have not read this instruction manual.
- Using spare parts that are not original and/or not specifically for the grinder-doser model in your possession.
- Using the machine in a potentially explosive environment.
In addition, the user must never under any circumstances:
- Attempt to remove any foreign objects that may have accidentally fallen into the coffee feed hopper and/or grinding chamber without first disconnecting the appliance from the mains power supply.
- Use the appliance with wet or damp hands.
- Introduce liquids of any kind into the coffee feed hopper and the grinding chamber.

If the machine is not working properly, any necessary steps are the responsibility of the maintenance technicians.
3.3 Precautions for proper and safe use
In order to ensure user safety and to operate the appliance in the best possible way, it is important to comply with some simple but important provisions, namely:
- Avoid improper use of the power cable. Use only cables or extensions with a cross-section suitable for the power installed in the machine.
- Protect the cable from high temperatures, oil and sharp edges.
- Any changes in normal operation (increased power absorption, a rise in temperature, excessive vibration, abnormal noises or alarm signals on the display) indicate improper operation. In order to prevent malfunctioning, which may directly or indirectly cause damage to people or the appliance, ensure you carry out the required maintenance or, if necessary, contact your dealer or a specialised repairer.
- Heavy appliance! Be careful during the phases of transport, handling and installation! Please refer to chapter 4 for proper handling of the appliance.
EN
XG1 Series
3.4 Safety devices on the grinder-doser

All grinder-dosers manufactured by Fiorenzato M.C. S.r.l. are equipped with appropriate mechanical and electromechanical devices to protect the safety of the user and the integrity/functionality of the appliance during use.
The grinder-dosers in the XGI series are equipped with the following safety devices:
- Motor thermal cut-out: The motor of the appliance has a thermal cut-out which protects it against overheating due to overcurrents and intervenes by interrupting the power supply to the motor.
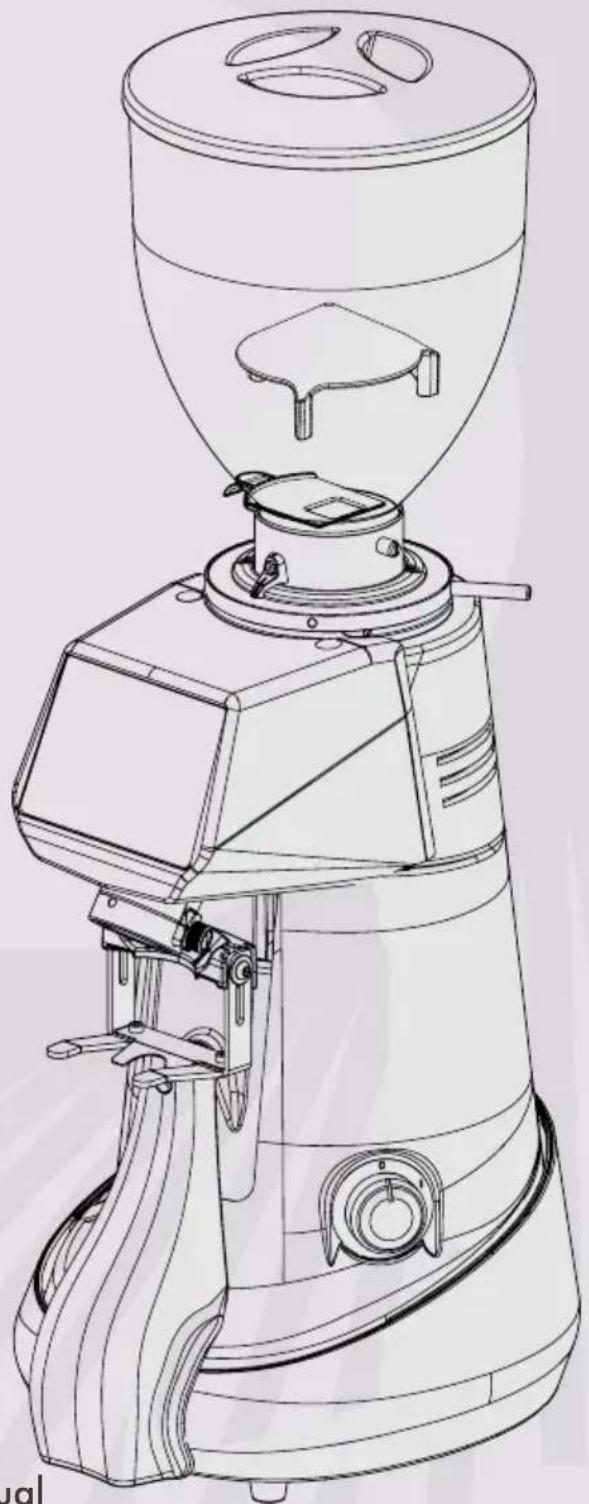
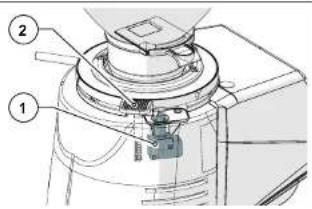
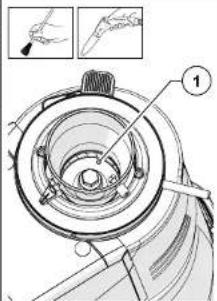
Cooling fan (Fig. 3): Only the grinder-doser models F64 EVO and F71 EK have a cooling fan on the back of the machine body to prevent overheating of the grinding blade drive motor. This fan is activated electronically. Start-up is enabled when communication between the coffee grinder and the weight calculation software has terminated. - Anti-intrusion device on coffee supply hopper (Fig. 4) The anti-intrusion device (Part 1) inside the supply hopper (Part 2) allows the coffee beans to pass through to the grinding chamber, preventing operators from accidentally inserting their fingers.
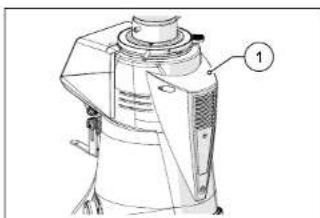
Fig. 3
Fig.4
- Safety adjustment disk lock lever (Fig. 5): To prevent any accidental rotation of the grinding adjustment disk (Part 1), there is an adjustment disk lock lever (Part 2) which must be pressed to allow rotation.
- Microswitch for detection of grinding degree variation (Fig. 6): This microswitch (Part 1), enabled each time the lock lever is pressed (Part 2), is used to inform the control system that a change in the grinding degree may have occurred since the last dose was dispensed and enables the "Dispense dose" mode.
XG1 Series
EN
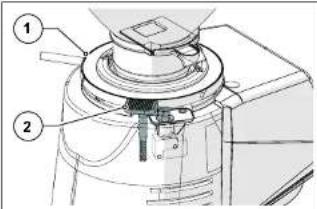
Fig.5 Fig.6
3.5 Residual risks
Fiorenzato M.C. S.r.l. has taken all necessary precautions during the design phase to ensure that the grinder-doser can be used under the safest possible conditions. However, during installation, cleaning and maintenance of the appliance, there are still some residual risks that cannot be eliminated. Their effects can be prevented by appropriately training the user in accordance with the provisions set out in the table below.
For each residual risk, provisions are indicated to limit and/or eliminate the extent of individual risks.
Residual risk Present during: Provisions for reducing the risk
| Bruising and/or crushing of the upper and lower limbs due to the weight of the appliance. | Handling the appliance when: ·Unpacking. ·Installing. ·Handling the appliance to clean the surface on which it stands. | ·Grip the appliance firmly before handling it. ·Make sure you have enough space to handle the appliance safely without hitting any obstacles. ·Use non-slip gloves if necessary when handling the grinder-doser. |
| Electrocution | ·Connecting and disconnecting the power supply cable. | ·Check the condition of the power cable frequently and replace it when it appears to be deteriorated or damaged. ·Make sure that the switch is in the "O" (OFF) position before connecting the power cable to the grinder-doser. |
EN
XG1 Series
3.6 Warning labels attached to the machine
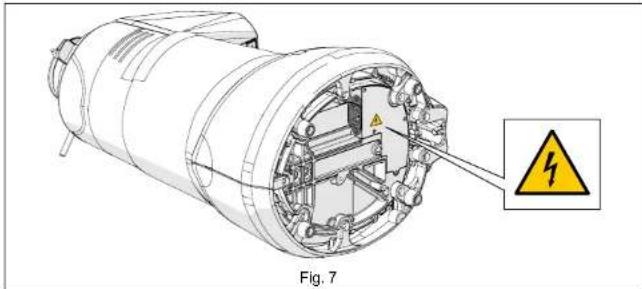
An adhesive label indicating the danger of electrocution is attached to the bottom of the grinder-doser near the power cable (see Fig. 7) The label indicates the presence of live components inside the machine body.

ATTENTION! It is forbidden to remove the bottom cover when the plug is connected to the power socket. All electrical maintenance work (e.g. replacement of a damaged cable) must be carried out by qualified technicians when the appliance is disconnected from the mains power supply.
4 INSTALLATION

ATTENTION! Please read the following instructions carefully before installing and operating the appliance.
4.1 Storage
If the appliance is not immediately installed where it is to be used and it is necessary to store it temporarily, it should be put in a safe place that meets the following requirements:
- the place chosen for temporarily storing the appliance should be a closed environment, protected from the sun and bad weather conditions;
- the temperature of the storage location must be between 5^ and 40^ , with a relative humidity of between 30% and 90% ;
- if the appliance is to be stored for a long time before being installed, it should be kept in its original packaging to ensure better protection.
XG1 Series
EN
4.2 Choosing the installation location
Given the function of the grinder-doser, it is advisable to PLACE IT close to the coffee machine.
Before installing the appliance, please also ensure that the installation location meets the following requirements:
- The surface on which the appliance is to be placed must be fl at, well-levelled and strong enough to support its weight;
- the available space must be large enough to allow proper installation and easy use of the appliance;
- the appliance must not be installed near sinks and/or taps, which may cause it to become wet with jets and/or splashes of water;
The place of use must be suffi ciently well-lit and well-ventilated; - Close to the installation position, there must be a socket, which complies with the regulations in force in the country of use, for connecting the appliance to the mains power supply.

ATTENTION! The socket must be equipped with an efficiient earthing system.

ATTENTION! The mains power supply must also be equipped with a thermal-magnetic circuit breaker located upstream of the socket, in a position known to and easily accessible by the operator in order to protect the appliance from overloads and voltage fluctuations and the user from the risk of electrocution.
4.3 Unpacking and handling the appliance
After opening the packaging, carefully check that the appliance is intact and that there are no damaged parts.
- Open the packaging near the point of installation, ensuring that there is enough space to handle the appliance safely.
Take the appliance out of its packaging, holding it firmly and securely. - Place the grinder-doser on the worktop.

ATTENTION! Take extreme care when handling the appliance. Its weight (18 ÷ 25kg) and the particular rounded shape of the machine body may lead to the risk of slipping and loss of grip, with possible falling and bruising/ crushing of the feet when lifting and/or of the hands when positioning the appliance on the worktop. If you are not sure you have a secure grip, it is advisable to ask another person to help.

ATTENTION! Packaging parts must not be left within the reach of children as they are a potential source of danger. Keep the packaging until the warranty expires.
EN
XG1 Series
4.4 Installation and mains connection
To complete installation and start using your new coffee grinder-doser, all you need to do is:
- Ensure that the voltage of the mains power supply meets the required power requirements and that the electrical rating of the system is adequate to support the power absorbed by the appliance (see product identifi cation label on the side of the grinder-doser).
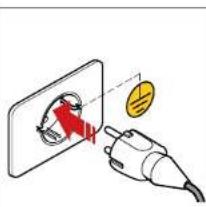
- Put the power cable plug (Fig. 8 Part 1) into the IEC connector on the bottom of the appliance (Fig. 8 Part 2);

ATTENTION! To connect the power plug of the grinder-doser to the socket, it is necessary to tilt it completely and place it on one side. Hold the appliance firmly and handle it carefully, taking care not to damage it and not to crush your hands or fingers.

If it is necessary to use power adapters, power strips or extension cables, it is mandatory to use products that comply with the certifi cation standards in force in the country of use.
- Put the grinder-doser back into the upright position and then connect the cable to the power socket provided (Fig. 9).
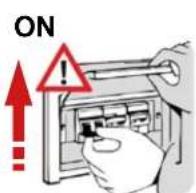
- If present, set the thermal-magnetic circuit breaker located upstream of the power socket to the "ON" position (Fig. 10).
- Turn the machine power switch to the "1" position (see Part 5.1.1).
Fig.8 Fig.9 Fig.10
OFF
The grinder-doser is now powered and ready for use.
XG1 Series
EN
5 USING THE GRINDER-DOSER
5.1 Machine controls
The grinder-doser is controlled by the On/Off switch (see paragraph 5.1.1) and an operator control panel with a TOUCH-type display, for selecting and setting all the operating functions of the appliance (see paragraph 5.4). All information on the operating status of the appliance, working parameters and commands that can be given are shown on the display on the front of the machine. All the command and signalling devices on the grinder-doser are described below.

The grinder-doser is delivered with a xgi weighing system already correctly calibrated by the manufacturer. The weighing system can only be calibrated again (if required) by the specialised technicians of the manufacturer and/or its authorised retailers, who are in possession of the "Administrator Password", thereby allowing access to the reserved pages of the grinder-doser management system.
5.1.1 Switch
Switches the appliance on and off.
- Turned to the "O" position: appliance off (power supply disconnected).
- Turned to the "i" position: appliance on (electrically powered).

EN
XG1 Series
5.2 Preparing to use the grinder-doser
When installation has been completed, the machine is ready for use and can be loaded with coffee beans to be ground. With reference to Fig. 11, to load coffee beans it is necessary to:
- Place the hopper (Part 1) on the grinder-doser (Part 2) and lock it into the operating position by tightening the appropriate fastening screw (Part 3).
- Ensure that the locking slide (Part 4) is completely closed.
- Remove the lid (Part 5) and fill the hopper with the roasted coffee beans to be ground.
- Close the hopper with its lid (Part 5).
Gradually open the locking slide (Part 4) to allow the coffee beans to fall into the grinding chamber. - Switch on the grinder-doser by turning the appropriate switch to the "I" (ON) position (Part 6).
After a few seconds, the display shows the "Confirm Start-up" page and waits for the user to carry out the "Initial Start-up" procedure (§5.3) required in order to make the xgi weighing system operational, which is enabled by default when the appliance is first switched on.
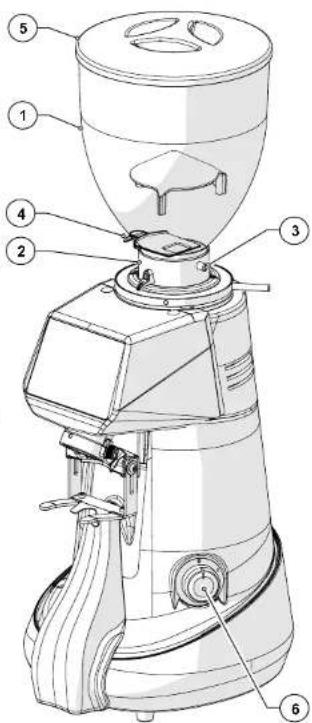
Fig. 11
XG1 Series
EN
5.3 "Initial start-up" procedure
This is the procedure required to start the grinder-doser for the first time.
At initial start-up, the grinder-doser is confi gured by default to operate with the enabled xgi system. With this procedure, the operator is guided to enter and/or confirm the data required to make the grinder-doser operational.
- Check that there is an adequate amount of coffee to grind in the loading hopper. Open the locking slide to feed the grinding blades.
- Power up the machine by turning the switch to the "1" position and wait for the operator panel to initialise.
- When the "Confirm Start" screen appears, press Language to select.
- On the "Language" page, select the required language from those available, then press "Language" to return to the previous page.


- Proceed with adjusting the degree of grinding by turning the adjustment disk (see Part 5.5). Alternatively adjust the adjustment disk and the coffee dispensing command until the required grain size is reached. Then press down the button until the process has been completed.
button until the progress bar is completely fi lled. If necessary, you can continue grinding even after the progress bar has been fi lled. - When the required grain size has been reached, press the "Next" function key to continue.
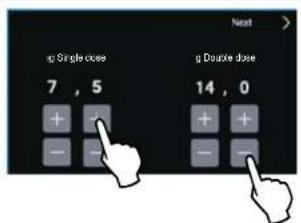
Press "Confirm Start" to switch to the "Change Dose Weight" page. - Set the weight in grams for the single dose.
- Set the weight in grams for the double dose.
- Press the "Next" button to continue.
- Wait a few seconds without touching the appliance to allow the weighing system to detect the tare weight.
- Wait for the "Dispense single dose" command to appear on the display.


| EN XGI Series | |
| Start dispensing a single dose of coffee by pulse pressing the function key shown on the display. The grinding of the single dose of coffee starts and stops when the red progress bar is fi lled. | |
| Wait a few seconds without touching the appliance to allow the weighing system to detect the tare weight. Wait for the "Dispense double dose" command to appear on the display. | |
| Start dispensing a double dose of coffee by pulse pressing the function key shown on the display. The grinding of the double dose of coffee starts and stops when the red progress bar is fi lled. | |
| Wait a few seconds without touching the appliance to allow the weighing system to detect the tare weight. Wait for the "Initial start-up successfully completed" message to appear on the display. | |
| Press the button to return to the HOME page. You can now use the appliance in "WEIGHT" dispensing mode. | |
XG1 Series
EN
5.4 Operator control panel
When the grinder-doser is switched on, after a few seconds for the system to start up, the control panel display shows the HOME page, with all the function buttons required to use and manage the appliance.
The management software adopted by Fiorenzato for its coffee grinder-dosers is extremely intuitive to use. This user guide will allow you to quickly become familiar with the function buttons and the various setting options on your new appliance. It has touch-screen panel, which means that functional commands, menu navigation and the setting of preferences and working parameters are carried out with a simple touch of the finger on the sensitive areas of the display.
All the grinder-dosers in the xgi series can operate in both the WEIGHT (xgi automatic weighing system enabled) dispensing mode and the TIME (XGI automatic weighing system disabled) dispensing mode.
Depending on the type of operation selected, the HOME page (§5.4.1) and certain options in the "Technical Settings" menu (see §5.4.3) will change their appearance from display/setting of grinding parameters expressed in WEIGHT (grams) to display/setting of the same parameters expressed in TIME (seconds). To disable or enable the xgi automatic weighing system, see paragraph5.4.2.
EN
XG1 Series
5.4.1 Home page
Fig. 12 shows the HOME page with a description of the function buttons and display fields. The HOME page can be customised from the "Settings menu", therefore the image shown in the figure below may differ from the screen actually displayed on your appliance when it is first switched on.
All the functions accessible from the "Settings menu" are described in the following paragraphs.
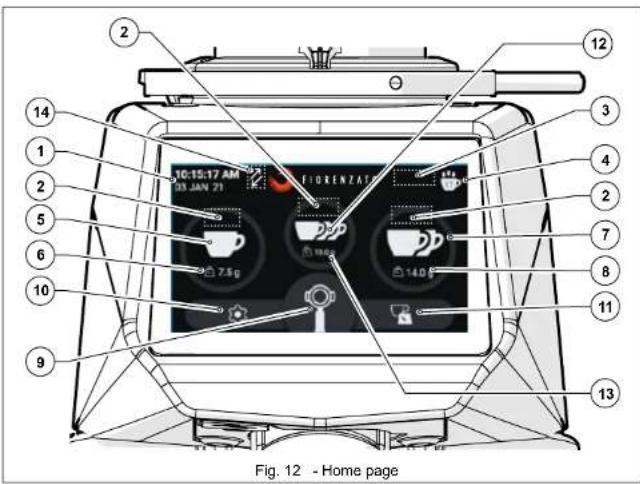
With reference to Fig. 12, the display fields and function buttons on the HOME page are:
| Description | |
| 1 | Display fi eld for the current date and time. The data can be set by accessing the "Date and time" screen from the settings menu (§ 5.4.3.13). |
XG1 Series
EN
| 2 | In this field, the icons for the operating status of thei weighing system (if enabled) are displayed in real time to indicate the conformity or otherwise of the dose dispensed. In particular, the following icons may be displayed: | |
| Green scales: indicate that the dispensed coffee weight is within tolerance of the weight set for the selected dose (§ 5.4.3.1) | ||
| Yellow scales: indicate that the dispensed coffee weight is not within tolerance of the weight set for the selected dose (§ 5.4.3.1) | ||
| Blue scales: it appears after dispensing two doses that are not within tolerance (yellow scales) to indicate that the system has recalculated the seconds required to dispense the correct doses again. After recalculcation, the new dose (third dose) will be dispensed correctly and indicated by the appearance of the "Green Scales" icon. | ||
| Red scales: It is displayed when the system detects an anomaly in the weighing phase due to the possible addition or removal of weight on the appliance, possible vibrations on the support surface, or connection of the appliance to an unsuitable socket. After three consecutive incorrect doses have been dispensed, the display will show a full-screen control message and the XGI system will perform a forced recalculation of the doses. To perform the recalculation procedure, three doses must be dispensed following the instructions on the display. | ||
| 3 | Display-only field for any consecutive sequence of doses not within tolerance, incorrect weighing and/or recalculation of the seconds required to correctly dispense the selected dose. In this field, up to two "Yellow Scales" icons, up to three "Red Scales" icons or one "Blue Scales" icon can therefore be displayed depending on the type of weighing performed by the system (i.e. up to two weighing processes not within tolerance, up to three incorrect weighing processes or one weighing process following automatic recalculation of the grinding times). This field also displays the total weight of ground coffee if several doses are dispensed in succession. | |
| 4 | "Statistics" button. It controls the opening of the window and shows the number of doses dispensed on the current day and week, and the total number of doses dispensed since the grinder-doser was fi rst used. To close the "Statistics" window, simply press the "Statistics" function button again. The "Statistics" button is only displayed if the "Show statistics" function has been enabled in the settings menu (§ 5.4.3.5). | |
EN
XG1 Series
| 5 | Single Dose Dispensing Button. It enables the dispensing of a single dose of coffee according to the weights set on the "Change dose weight" screen (§5.4.3.1). If the xG1 automatic weighing system is not enabled (§ 5.4.2), dosing is carried out on a time basis according to the parameters set in the 'Change dose times' screen (§ 5.4.3.1). Access to the dose time setting page is only possible when the xG1 system is not enabled for operation. |
| 6 | Display fi eld showing only the weight (or time) of grinding set for the single dose, which can be hidden from the menu. |
| 7 | Double Dose Dispensing Button. It enables the dispensing of a double dose of coffee according to the weights set on the "Change dose weight" screen (§5.4.3.1). If the xG1 automatic weighing system is not enabled (§ 6.1.5), dosing is carried out on a time basis according to the parameters set in the 'Change dose times' screen (§ 5.4.3.1). Access to the dose time setting page is only possible when the xG1 system is not enabled for operation. |
| 8 | Display fi eld showing only the weight (or time) of grinding set for the double dose, which can be hidden from the menu. |
| 9 | Manual Grinding Button. Hold-lo-run control for dispensing coffee in the manual mode. Coffee grinding starts when the button is pressed and continues until it is released. When the xG1 system is enabled, dispensing occurs in grams and the weight is displayed in increments up to a maximum dispensing of 96 grams. When it is not enabled, dispensing occurs in seconds and the time is displayed in increments up to a maximum dispensing of 25 seconds. |
| 10 | Menu Settings Button. It provides access to the settings menu (§ 5.4.3), which allows the operator to change the various settings and operating modes of the appliance. |
| 11 | Shortcut button to access the "Change dose weights" (or "Change dose times"). It allows direct access to the page for setting the weights or dose dispensing times (§5.4.3.1) without using the "Settings menu" (§5.4.3). Access to the dose time setting page is only possible when the xG1 system is not enabled for operation. |
| 12 | Triple Dose Dispensing Button. It enables the dispensing of a triple dose of coffee according to the weights set on the "Change dose weights" screen (§5.4.3.1). If the xG1 automatic weighing system is not enabled (§ 5.4.2.1), dosing is carried out on a time basis according to the parameters set in the 'Change dose times' screen (§ 5.4.3.3). Access to the dose time setting page is only possible when the xG1 system is not enabled for operation. The function button is only displayed if the "Triple dose display" function has been enabled in the "Settings menu" (§ 5.4.3.6). |
| 13 | Display fi eld showing only the weight (or time) of grinding set for the triple dose, which can be hidden from the menu. |
XG1 Series
EN
| 14 | In this fi eld, two different icons can be displayed: | |
| XGI system display icon enabled. This is only displayed when the XGI weighing system is enabled (§5.4.2.2). If the XGI system is disabled, the icon is not shown on the display. | ||
| Warning icon. It only appears at the end of the time set by Fiorenzato to indicate the need to replace the grinding blades (§ 6.1.5). | ||
5.4.2 Disabling/Enabling the xGI automatic weighing system
When the appliance is switched on for the first time, the default mode of operation with the automatic weighing of doses is loaded (XGI enabled).
5.4.2.1 Disabling the xgi automatic weighing system
To disable the operation of the XGi system and switch to dispensing doses in the TIME mode, it is necessary to press the function key (seeFig. 12 Part 9) and scroll through the menu until you reach the "XGi SYSTEM" option, then:
- Disable the xGI system by pressing the relevant selector.
XGi System
- Press the " function key to return to the HOME page.
- The xsi automatic weighing system has been disabled and the grinder-doser will use the dose dispensing by TIME mode according to the parameters set in the "Change dose time" page of the menu (§ see 5.4.3.1).
5.4.2.2 Activation of the xG1 automatic weighing system
To enable the operation of the XGI system and switch to dose dispensing by WEIGHT mode, it is necessary to press the function key (seeFig. 12 Part 9) and scroll through the menu until you reach the "XGI SYSTEM" option, then:
- Enable the XGI system by pressing the relevant selector.
XGi System
- Press the " function key to return to the HOME page.
- The XGI automatic weighing system has been enabled again and the grinder-doser will ask you to perform the 'Initial start-up' procedure (see §5.3) to calibrate the appliance before it can dispense the doses again by WEIGHT using the parameters set on the "Change grinding weights" page of the menu (§ see5.4.3.1).
EN
XGI Series
5.4.3 Settings Menu
The 'Settings menu' allows you to set and adjust all the parameters and operating modes of your grinder-doser.
The Settings menu is accessed by pressing the function button, always visible in the bottom left-hand corner of the display (see Fig. 12 Part 9). Once the command has been given, the display will load the menu, allowing you to select the parameter to be changed and/or the function to be enabled/disabled by simply scrolling down the list of possible options until you find the option you require.
As already described in paragraph5.4, some options in the "Settings" menu change according to the type of dose dispensing selected (by WEIGHT or by TIME). Below are the menus displayed for anxgi enabled system (dosing by WEIGHT) and a xgi disabled system (dosing by TIME). Each option in the two menus is associated with a reference to the paragraph describing the individual function/screen.
Settings menu with XGi enabled system (dose dispensing by WEIGHT):
Technical Settings
- Change grinding weights (§ 5.4.3.1)
Dose weight display (5.4.3.2)
Show statistics (5.4.3.5)
Triple dose display (5.4.3.6)
XGi Settings
XGi system (5.4.3.7)
Initial start-up (S 5.4.3.8)
User Settings
Display brightness (5.4.3.9)
Screen appearance (5.4.3.10)
- Screensaver (5.4.3.11)
Language (5.4.3.12)
Date and time (5.5.4.3.13)
Information (5.4.3.14)
Safety Settings
- Reset dose weights (§ 5.4.3.15)
- Administrator password (§ 5.4.3.16)

XG1 Series
EN
Settings menu with a xdisabled system (dose dispensing by TIME):
Technical Settings
Change dose times (5.4.3.3)
Grinding time display (5.4.3.4)
Show statistics (5.4.3.5)
Triple dose display (5.4.3.6)
XGi Settings
XGi system (5.4.3.7)
- Initial start-up (Disabled)
User Settings
- Display brightness (§ 5.4.3.9)
Screen appearance (5.4.3.10) - Screensaver (5.4.3.11)
Language (5.4.3.12) - Date and time (5.4.3.13)
Information (5.4.3.14)
Safety Settings
- Reset dose times (§ 5.4.3.15)
- Administrator password (S 5.4.3.16)

EN
XGj Series
5.4.3.1 Change grinding weights
By pressing the "Change grinding weights" option in the Technical Settings when the xsystem is enabled (see § 5.4.2.2), you can access the page for setting the grinding weights for a single, double and triple dose.
N.B. The triple dose grinding time is only displayed if the "Triple dose display" option has been enabled in the Settings menu (§ 5.4.3.6).
Use the function buttons or to increase or decrease dispensing times
The changed parameters are saved automatically when exiting the page.
5.4.3.2 Dose weight display
With the xgi system enabled (see §5.4.2.2), by enabling the "Grinding time display" option in the "Technical Settings" menu, the weights set for dispensing the different doses are displayed on the HOME page.
During dispensing, the button icon for the selected dose starts to gradually turn red until it is completely filled, thus displaying the current grinding phase. For manual grinding, the weight is displayed to increase up to a dispensing dose of maximum 96 grams, at which point grinding is automatically stopped. If the "Grinding weight display" option is disabled ( ), the dispensing weights are not displayed on the HOME page.


HOME page with visible dose weights
HOME page without visible dose weights
XG1 Series
EN
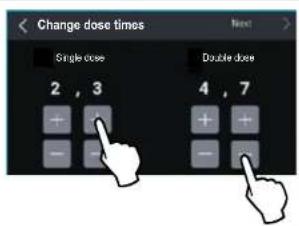
5.4.3.3 Change dose times
By pressing the "Change dose times" option in the "Technical Settings" menu when the xsystem is disabled (see §5.4.2.1), you can access the page for setting the grinding times for a single, double and triple dose.
N.B. The triple dose grinding time is only displayed if the "Triple dose display" option has been enabled in the Settings menu (§ 5.4.3.6).
Use the function buttons or to increase or decrease dispensing times.
The changed parameters are saved automatically when exiting the page.
5.4.3.4 Grinding time display
With the system disabled (see § 5.4.2.1), by enabling the "Grinding time display" option in the "Technical Settings" (1). The times set for dispensing the different doses are displayed on the HOME page.
During dispensing, the button icon for the selected dose starts to gradually turn red until it is completely filled, thus displaying the current grinding phase. For manual grinding, the time is displayed to increase up to a dispensing dose of maximum 25 seconds, at which point grinding is automatically stopped.
If the "Grinding time display" option is disabled (D), the dispensing times are not displayed on the HOME page.

HOME page with grinding times displayed

HOME page without grinding times displayed
EN
XG1 Series
5.4.3.5 Show statistics
It enables () or disables () the "Statistics" function button display on the HOME screen (see Fig. 12 Part 4).
N.B. The dispensed dose count is increased and stored in the memory even if the "Show statistics" option is disabled.

HOME page with "Statistics" button disabled
5.4.3.6 Triple dose display
It enables () or disables () the display and management of the triple dose dispensing function button from the HOME page.

HOME page with "Triple dose" button enabled
XG1 Series
EN
5.4.3.7 XGiSystem
It allows you to enable ( ) or disable
The automatic dose weighing system.
- When the XGI system is enabled, the grinder-doser works by dispensing doses according to the sel weights (§5.4.3.1).
- When the xgi system is disabled, the grinder-doser works by dispensing standard On Demand doses according to the set times (§5.4.3.3).
N.B. Each time the "XGi System" is enabled again, you are requested to follow the "Initial start-up" procedure (\5.4.3.8 and\S 5.3$ required to calibrate the weighing system.

Home page with "XGi System" enabled (dosing by WEIGHT)

Home page with "XGi System" disabled (dosing by TIME)
5.4.3.8 Initialstart-up
The "Initial start-up" procedure is requested automatically when the appliance is switched on for the first time and each time the XGI automatic weighing system is enabled again (§ 5.4.3.7).
The operating sequence of the "Initial start-up" procedure is described in paragraph 5.3.
N.B. If the "XGi System" is enabled, the "Initial start-up" procedure can be carried out at any time, if required.
N.B. If the "XG1 System" is disabled, the "Initial start-up" option is not enabled and is displayed in grey.

First page for "Initial start-up" procedure
5.4.3.9 Display brightness
EN
XG1 Series
When you select the "Display brightness" option, you can access the screen shown in the figure, using it to increase or decrease the brightness of the screen by simply moving the adjustment cursor to the right (increase) or to the left (decrease).

5.4.3.10 Screenshot
When you select the "Screen appearance" option, the screen shown in the figure below opens, and you can choose whether to display the screens in "Dark mode" or "Light mode".

The different way in which the screens are displayed does not affect other options and/or the various parameters that can be set.

HOME page: "Black version"

HOME page: "White version"
XG1 Series
EN
5.4.3.11 Screensaver
When you select the "Screensaver" option, you can access the screen shown in the fi gure and use it to enable ( ) or disable () the function of the same name and select the duration of stand-by after which it is to be started up.
The start of the screen saver can be set after the appliance has been on stand-by for 20 secs, 45 secs or 5 minutes.
When enabled, and after the selected time has elapsed, the display enters the energy-saving mode, showing only the manufacturer's logo and the current date and time.
After 15 minutes of stand-by, the screen switches off.
To exit power-saving or screen saver mode, simply touch the display.

5.4.3.12 Language
Select "Language" to access the screen where you can set the language on the display. Once the chosen language has been selected, all menus and function buttons will be displayed in the required language.
The available languages are:
Italian
- English
French
German
Spanish
Portuguese
Greek
Croatian
Arabic
- Chinese
Korean

Language selection
EN
XGj Series
5.4.3.13 Date and time
The "Date and Time" option allows the current date and time setting page to be loaded.
The two selectors are for setting the time to the 24 or 12-hour clock. For the 12-hour clock, the time band "AM" (Ante meridiem) or "PM" (Post meridiem) must be specified to allow the system to update the date correctly at midnight.
To adjust the time (hours and minutes) or the date (day/month/year), simply press (single tap or hold) the function buttons or
N.B. The setting is stored in the memory in real time, so when you exit the menu, the HOME page will display the correct date and time.

Date and time adjustment
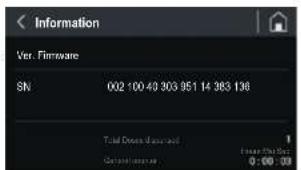
5.4.3.14 Information
Selecting the "Information" option from the Settings menu will take you to the page shown in the figure below, where you will find the following information:
- The version of the Firmware installed on the panel;
- The serial number of the panel installed on the appliance:
- The total number of doses dispensed since the appliance was fi rst used;
The general counter showing the total lime the appliance is actually running (working time of the grinding blade drive motor).
Information page
XG1 Series
EN
5.4.3.15 Resetting dose weights
The "Reset dose weights" option allows you to access the reset page illustrated in the figure, so the user can reset customised dose weights and restore the factory parameters set by the manufacturer.
Warning: The "Reset dose weights" command is irreversible and results in the loss of the user's customised dose dispensing weights. To prevent accidental loss of the set weights, the system will ask the user to confirm the action by pressing the "YES, CONFIRM" button before restoring the weights set by the manufacturer.
If you return to the menu [ ] or load the HOME page [ ] without confiming the Reset action, the customised weights will be stored in the memory.

Resetting dose weights
EN
XG1 Series
5.4.3.16 Administrator password
When you press the "Administrator password" option (last option in the "Settings menu"), the authentication page is loaded, shown in the figure, which allows only authorised technicians to access the reserved pages containing particular settings and functions for initialising the appliance.
N.B. The numerical authentication password is not given to the end user but only to the manufacturer's specialised technicians and authorised dealers.
In this menu, the following options are available:
- enable change in dose weights
- enable display of dose weights
- manual grinder
- enable custom logo
- total reset of statistics
- grinding blade counters
- initialisation
-scales calibration
-scales check

Authentication for access to password-protected pages
XG1 Series
EN
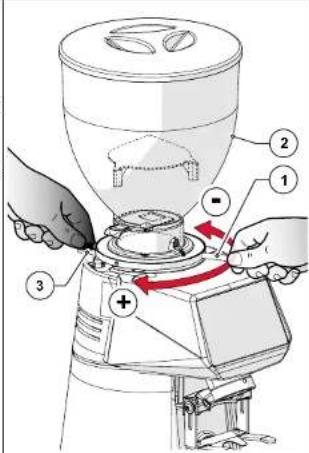
5.5 Adjusting the degree of grinding
To grind coffee more or less finely, adjust the grinding adjustment disk (Part 1) located under the hopper (Part 2).
Adjustment should only be carried out during the grinding phase. We recommend carrying out adjustment when dispensing a double dose of coffee.
To change the grain size, it is necessary to:
- Start grinding the double dose;
- Press and hold the adjustment disk lock lever (Part 3);
- Turn the adjustment disk clockwise for coarser grinding;
- Turn the adjustment disk anticlockwise for finer grinding.
- Release the lever (Part 3) to lock the adjustment disk in the new position.
5.6 xgitem auto-calibration
Each time the adjustment disk lock lever is pressed and/or each time the dose weight (§5.4.3.1) is changed, the message "DISPENSE DOSE" appears on the HOME page and the XGi system will oblige the user to follow the guided procedure for a forced recalculation of the doses.
The following three dispensing operations are used to recalculate the grinding time required to dispense the set weight of the doses.
After the third dispensing operation, the appearance of the icon (blue scales) on the display will indicate that the compulsory recalculation of doses has been carried out and that the weights subsequently dispensed will be within tolerance of the set nominal weights.


Forced recalculation of dispersing times

Forced reacquisition of spending times
EN
XG1 Series
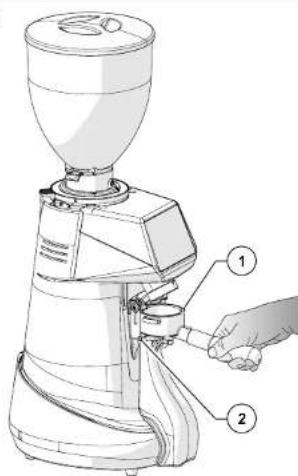
5.7 Dispensing doses
With the grinder-doser ready to use, simply place the filiter cup holder (Part 1) on the special support fork (Part 2) and press the
or buttons to dispense the required dose.
You can also press the button to start continuous grinding of coffee. Continuous dispensing stops automatically when the button is released.
When the or buttons are pressed, the grinder-doser will dispense doses according to the enabled operating mode:
- Dispensing by WEIGHT (with the XGi System enabled, default mode enabled).
Dispensing by TIME (with the XGi System disabled).
XG1 Series
EN
6 GRINDER-DOSER MAINTENANCE
6.1 Routine maintenance

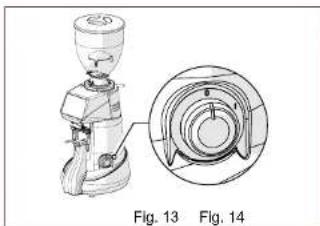
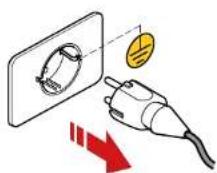
ATTENTION! Before carrying out any routine maintenance work on the grinder-doser, disconnect it from the power supply by turning the power switch (Fig. 13) to the "O" (OFF) position and disconnect the power plug from its socket (Fig. 14).
All routine maintenance for your appliance is summarised in the table below.
Fiorenzato M.C. S.r.l. recommends that customers strictly follow the instructions given and carry them out within the stated times and as described.
| ROUTINE MAINTENANCE WORK | |||
| Frequency Type of intervention Implemented by | Par. | ||
| At the end of every shift | Thorough cleaning of the appliance | User 6.1.1 | |
| At the end of every shift | Checking the power cable status | User 6.1.2 | |
| Every month | Thorough cleaning of the grinding blades | User 6.1.3 | |
| When necessary | Shutting down the Grinding-doser | User 6.1.4 | |
| On the set deadline (indicated on the "HOME" page by the appearance of the icon to the left of the logo). | Replacing the grinding blades | Qualifi ed operator or specialised technician | 6.1.5 |
EN
XG1 Series
6.1.1 Cleaning the appliance
AT THE END OF EVERY SHIFT: Thoroughly clean the appliance
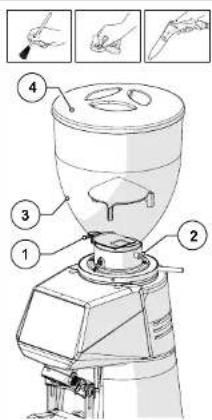
- Close the locking slide (Part 1), loosen the fastening screw (Part 2) and remove the hopper (Part 3) from the appliance.
- Remove the lid (Part 4) from the hopper and empty out the coffee beans inside it. We recommend that you pour the coffee back into the original bag and seal it hermetically to preserve the aroma.
- Clean the inner and outer surfaces of the hopper using warm water and a pH-neutral, unscented, degreasing and cleaning agent specifi caly for use in the food industry. Do not use abrasive sponges and/or aggressive detergents that may damage the hopper surfaces.
Thoroughly dry the washed parts with a soft, dry cloth.

ATTENTION! The hopper cannot be washed in a dishwasher.
- Using a soft-bristled brush (clean and sanitised) and a vacuum cleaner, remove the coffee beans and coffee powder residue from the grinding chamber (Part 1).

ATTENTION! Do not use water and/or detergents to clean the grinding chamber and grinding blades.
XG1 Series
EN
- Loosen the fastening screw (Part 1) and pull out the coffee discharge tube (Part 2) from its position.
- Wash the tube with warm water and a pH-neutral, unscented, degreasing and cleaning agent specifically for use in the food industry.
- Wipe dry with a soft cloth.
- Using a vacuum cleaner and a dry cloth, clean all coffee powder residues from the discharge tube housing.


The exterior of the machine body must be cleaned using soft cloths and products suitable for use in the food industry.

ATTENTION! Do not use abrasive sponges and/or aggressive products that may damage the external surfaces of the machine.

ATTENTION! It is forbidden to use water or steam jets to clean the machine body.


EN
XGj Series
After cleaning, reassemble the machine, put the discharge tube (Part 1) back into place (Part 2) and secure it by tightening the screw (Part 3).
- Place the hopper (Part 4) and secure it with the appropriate screw (Part 5).
- Close the hopper with its lid (Part 6).
The machine is ready to be used again after being fed and filled with coffee beans.

6.1.2 Checking the power cable status
AT THE END OF EVERY SHIFT: check the power supply cable.
- Disconnect the cable from the power socket, check visually and by touching that the protective sleeve is intact, that the wires are not exposed and that the plug is not damaged.

ATTENTION! If the power cable is damaged, replace it with one of the same type.
XG1 Series
EN
6.1.3 Thoroughly cleaning the grinding blades
EVERY MONTH: thoroughly clean the grinding blades
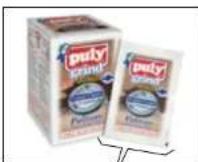
The grinding blades should be thoroughly cleaned once a month (or when necessary), using specific cleaning products for grinder-dosers, which are readily available on the market (e.g. PULY GRIND coffee grinder cleaner).
Thorough cleaning must be carried out after the end-of-shift cleaning. No coffee must be in the machine and the supply hopper must not be attached.
The grinding blades can be cleaned by pouring a dose of the product into the (completely empty) grinding chamber and starting the grinding process. During grinding, the product (in grains or crystals) regenerates the grinding blades by completely removing all coffee, scale, mould and greasy deposits from their surfaces, absorbing oil and destroying any rancid deposits without leaving any residues.
- In this way, regeneration takes place without the need to disassemble the grinding blades and without having to change the set grinding position.
6.1.4 Shutting down the grinder-doser
If the machine is not used for long periods of time (e.g. festive periods, holidays, etc...), we recommended carrying out the following cleaning operations to keep it in good condition and avoid any potential problems when restarting it.
WHEN NECESSARY: cleaning and shutting down the machine.
- The grinder-doser should be thoroughly cleaned as described in Par. 6.1.1.
Thoroughly clean the grinding blades as described in Par. 6.1.3. - Disconnect the power supply cable from the power socket.
- Cover the machine with a cloth to prevent any accumulation of dust and dirt.
EN
XGj Series
6.1.5 Replacing the grinding blades
The scheduled deadline for replacing the grinding blades is set by Fiorenzato M.C. S.r.l. depending on the type of grinders and the grinder-doser model.
At the end of the time set by the manufacturer, the warning icon "0" appears on the display, indicating that they need to be replaced.

ATTENTION! Replacement of the grinding blades must be entrusted to a specialised technician or the manufacturer's authorised dealer, who will replace them with original spare parts. When replacement has been completed, the qualified operator/dealer in possession of the "Administrator Password" (S5.4.3.16) for accessing the "Safety Settings" menu will also reset the grinding blade counters, check the accuracy of the scales and, if required, calibrate them again.
6.2 Supplementary maintenance
There are no scheduled supplementary maintenance operations for the grinder-doser. However, in the event of breakages and/or malfunctioning not covered in the section "7ANOMALIES - CAUSES - REMEDIES", do not intervene on the appliance yourself but inform your local dealer who will contact the Fiorenzato M.C. S.r.l. service department to solve the problem.
XG1 Series
EN
7 ANOMALIES - CAUSES - REMEDIES
The table shows possible faults that may cause the grinder-doser not to work and/or not to function properly. For each anomaly, the possible cause is indicated along with the actions to be taken to restore the correct operation of the appliance.
| Anomaly Cause Remedy | |
| The grinder-doser does not switch on. | No power supply. ·Make sure that the switch is in the "I" (ON) position; ·Make sure that the thermal-magnetic circuit breaker upstream of the socket (if present) is in the "ON" position. ·Make sure that the power cable is intact and correctly connected to the power plug and the socket on the appliance. |
| The coffee beans do not fall out of the supply hopper. | Locking slide closed. ·Open the locking slide. |
| The system loses data from previous settings when it is switched on. | The backup battery of the machine management system is fl at. ·Contact the service department to replace the backup battery. |
| The icon (Yellow scales) appears on the display to indicate that the weight of the last dose dispensed was not within tolerance of the set weight. | ·First daily doses ·A change in the type of coffee in the hopper ·Coffee with a high percentage of robusta ·Grinding blades not well-tuned yet ·Dispense further doses without changing any settings on the appliance. ·After two doses in succession not within tolerance, the XGi software automatically calculates the seconds required to correctly dispense the set dose. Notifi cation of recalculation is indicated by the appearance of the icon (Blue scales). ·The doses dispensed after recalculation will be correct and will be indicated by the appearance of the icon (Green scales). |
| Formally Cause | Remedy | |
| icon (scales) ears on display to state that a has occurred the weighing the last dose tensed. | ·Possible addition (or removal) of weight on the apppliance during the dispensing/ dose weighing cycle. ·The appliance is placed on an unstable work surface that affects the correct detection of weight. ·The appliance is connected to an unsuitable power strip. | ·Make sure that the appliance is placed on stable, vibration-free surface. ·Check and/or replace any power strip to which the device is connected. ·Dispense further doses until the icon (Green scales) indicates that the dose dispensed is correct. ·After the third incorrect dose in succession ( three "Red scales" icons appear on the display), the following message of control appears full screen: After returning to the HOME page, the XGi system enables the sequence for the forced recalculation of the doses and it will be necessary to dispense three doses following the instructions on the display in order to allow the XGi system to perform the recalciation. Notifi cation of successful recalculation is indicated by the appearance of the icon (Blue scales). The doses dispensed after recalculation will be correct and will be indicated by the appearance of the icon (Green scales). |
XG1 Series
EN
| Anomaly Cause | Remedy | |
| After dispensing, the message "Weight detection error" appears full screen. | ·A foreign body is placed on the appliance and the XGisystem fails to detect the hare weight. ·The appliance is subjected to vibrations and/or strong air currents. ·Possible foreign body between the curved protective elements and the machine body. | ·Check the perimeter of the grinder-doser and remove any objects that may be placed on the appliance. ·Make sure that the grinder-doser is not subject to vibrations from other appliances (e.g. dishwashers, blenders, juicers, etc.) or strong air currents from, for example, a fan. ·Check and remove foreign bodies from the curved protective elements of the appliance using a fi ne brush, a suction device or a folded piece of paper. |
| The icon 0' appears on the display accompanied by an alert message about the need to replace the grinding blades. | The grinding blades are close to the manufacturer's working hour limit and therefore their replacement must be planned. | ·The grinder-doser can be used until the set time limit is reached. When the time limit has been reached, the grinding blades must be replaced in order to guarantee maximum machine effi ciency, following the instructions given in paragraph 6.1.5. ·Once they have been replaced, the specialist technician resets the time counter for the grinding blades. |
| Item | Description | Example |
| Comally Cause Remedy | ||
| Drilling grinding motor stops. | Triggering of the motor thermal-magnetic circuit breaker due to blockage of the grinding system if objects or foreign bodies are between the grinding blades. | Switch off the appliance and wait until it has cooled down completely. Disconnect the appliance from the mains power supply. Close the locking slide and remove the supply hopper. Clean the grinding chamber and remove any foreign bodies. Reassemble the appliance and start a grinding cycle. |

ATTENTION! If the anomaly persists even after carrying out the recommended corrective actions, or if functional anomalies occur that are not indicated in the table, contact your local dealer, who will decide whether to contact the Fiorenzato M.C. S.r.l. service department or have the appliance repaired or overhauled by a specialised technician.
XG1 Series
EN
8 REQUESTING SPARE PARTS
If it is necessary to replace worn parts of the grinder-doser (e.g. grinding blades), the end user (e.g. bartender/restaurateur, etc.) must contact their local distributor, a direct intermediary with Fiorenzato M.C. S.r.l., and communicate the grinder-doser model in their possession for identification and to request the supply of original spare parts. Only authorised local distributors will then be given the opportunity to register on our website to order the required spare part.
To request spare parts, local distributors must:
- Visit www.florezato.com, enter the spare parts section and select the grinder-doser model indicated by the end user.
- Access the reserved area by entering their credentials on the form provided (at the fi rst login, they must register by entering their identifi cation data).
- Select the necessary spare parts using the exploded view tables of the product on the portal.
Follow the guided procedure to complete their order and send it to Fiorenzato M.C. S.r.l.. - The local distributor will be contacted by personnel of Fiorenzato M.C. S.r.l., who will take care of the request.

ATTENTION: Please note that the replacement of grinding blades and, in general, of all internal parts of the grinder-doser must be carried out by specialised technicians.

ATTENTION! Fiorenzato M.C. S.r.l. is not liable for any personal injury and/or damage to the appliance caused by the replacement of components with non-original spare parts by unqualified persons.
备
Serie XG
FR
1 INFORMATIONS GENÉRALES 5

HOME in "Heldere modus"
Serie XG7
NL
5.4.3.11 Screensaver
6 SYNTHPHsH OoOMETPIKoy MYAOY 41
6.1 Takriki ouviripnon 41
6.1.1 Kaapiaouooukeun 42
6.1.2 EeYxocKaTaoTao nAekptkoKawoi 44
6.1.3 BaOus kaopiaoospaiaipiv 45
6.1.4 ΘeONoOoMeTkou uAou EKToC Aetoupyia 45
6.1.5 Avikataaon paaiipw 46
6.2 Ekaktn ouvtnpn 46
7 PPOBAHMATA-AITIE-AYEIE47
8IAPATTEIAIINHEIONANTAAAAKTIKON 51
Σεiρα XGi
EL
1 TENIKE ΠAHPOΦOPIE
1.1 FevikeG TAnpoopieG yia To EeyEipio kai nV KAtavonon Tou

Aiaabe TPOeAKTIKA Tt PAPOUcE OBNyIe TPIV EYKATAOTIOETE KAI XpOIOITOnIE YIA TPOUT pOa TOV NAEKTOVIKO BOOOTPIKO MUo Kaape NTs Fiorenzato M.C.S.r.l.
To napov exyeiioeexoovraxoouwva ooo npoBentovai onny obnyla 2006/42/EK ka napexei otov teiaoxpnoi oec ts xpojuec onyiec via nvy ekataoan, n puejun kai xpnon tou nektpovikou ooopetipkou mukou kape mci Fiorenzato M.C. S.r.l.
Npiv aT ovYkataaon Ka T xpnOn Tou OooOeKoMuO, npTei va diaBaSeTe KAI VA KAtrovoIe OAO To TrepEIOeVou Tn oovvEioiou KAI OTU OUVExeiou Va TO puaAeTe KAI VA TO biatnpHoeTe O KaN KATATAaON YEvDxEvJeuM eauovtkiXpnOn.
OIOKROvCaTAtOaYcA,TAKeIeVAKaOI TEPiPyapEs Tou EYEIpoiu OTATEAUV IDOKTnIg Tc Fiorenzo M.C.S.R.l. KaavTIOxouv OTe TExViKA xapaknpiTkA Tc mXAnvN Tc OITyHnTc diaeBcTc otivayopA.

H Fiorenzato M.C. S.r.l. avaqnta diapkvee Looic ie 0KoTto n BAtIwn Tuv Tpoiovtw TNC KAI, OuvTeWc, Diatnei avr taOra otuun To dikaiua va etiepeip Tporottoinoe OTov Doooepetko uo Ka o Ta Eyypapa Tou xupic auto va kabiota akataaannla n'kaat atopxaiuivc Ta Tpoiovta Tou exouv TwaanBei no
Tn kALATEPn KATAVON TOn EYEXPIIDou, UNTAPXe EVa YEVKO EUPETPIO, To OTIOLO DEUKOAUVEI TY AVEUPOEN TOU ΘEATOS TOn EVDIAPEEi, KAoBc KAI OIAE PAtTO ENPEOPWtK OuBOA, TA OIOA ETIONAIVOUV TOV XpOITN IDaTePoC OAnvTAKAnuEAu TOn apoApov Tn OaOAOAe KaT N TooOIN XpOHTN OoOaTePkoMauOu.
1.2 Eua TnO xnoiopoovrta oxyepidio

\PPOEIOONIH\~ -HMEIOIHN! EITIOIAI piooIOIIOINn iia OJauVNI KIOJIeWON YIA EIDKEAIEIOUPYIE NkAI XpOIIeNCS TAnpoopoeC yia ToV xPOnT. AOWTe PPOOxOHTG TAPApPapous Tou IETIOIQAIVovTai ME TO OUBOAO auto.

TENIKOKEKINDA NOE -IPOOXH! 2yEVIKOU KIVDVOU. OAr TO KEJEVEO EINQAIEVAeTeo me To oBBOAo auto,Onaivei ot n m npon Tuv odnyov Tou napexi mnpoe Vpokalaei Bdaec stn unxavn kivdouc Atuxnauoc yia ToV xphtn.

SYKKEYH YIPOOXHI To KeJeuvo Tou Etnaivetai Te to OuBolao auto, avpepeatr ae TIOavov KIVuvv NkEtpoTAnlag. Awote TPOOxNtOIC xETIKcC odNIEc

EMBAH MONI T E E I D KEYMENOY TEXNIKOY: To Keiuevo tou ETIOINJauivetai Te to auo, pnpovae ETEUPAOa Tn PNTe va kEteAeTAt oEIEDKEUVE TKVIKO (SepeBic).
Fiorenzato 工 EipaXgEko22
3/49
EL
Σερα XG
Check
quartet
violin
virothorist
ETUOTU
Avoiodyne
TUV
xpvovn
Tropozygic
EL
Σερα XG
| KO | XGJ XGJ XGJ XGJ XGJ XGJ XGJ XGJ XGJ XGJ XGJ XGJ XGJ XGJ XGJ XGJ XGJ XGJ XGJ XGJ XGJ XGJ XGJ XGJ XGJ XGJ | XGJ XGJ XGJ XGJ XGJ XGJ XGJ XGJ XGJ XGJ XGJ XGJ XGJ XGJ XGJ XGJ XGJ XGJ XGJ XGJ XGJ XGJ XGJ XGJ XGJS XGJS XGJS XGJS XGJS XGJS XGJS XGJS XGJS XGJS XGJS XGJS XGJS XGJS XGJS XGJS XGJS XGJS XGJS XGJS XGJS XGJS XGJS XGJS XGJS XGJ XGJS XGJS XGJS XGJS XGJS XGJS XGJS XGJS XGJS XGJS XGJS XGJS XGJS XGJS XGJS XGJS XGJS XGJS XGJS XGJS XGJS XGJS XGJS XGJ XGJ XGJ XGJ XGJ XGJ XGJS XGJS XGJS XGJS XGJS XGJS XGJS XGJS XGJS XGJS XGJS XGJS XGJS XGJS XGJS XGJS XGJS XGJS XGJ XGJS XGJS XGJS XGJS XGJS XGJ XGJS XGJS XGJS XGJS XGJS XGJS XGJS XGJS XGJS XGJS XGJS XGJS XGJS XGJS XGJS XGJS XGJS XGJS XGJ XGJS XGJS XGJS XGJS XGJ XGJS XGJS XGJS XGJS XGJS XGJS XGJS XGJS XGJS XGJS XGJS XGJS XGJS XGJS XGJS XGJS XGJS XGJS XGJS XGJ XGJS XGJS XGJS XGJS XGJ XGJ XGJS XGJS XGJS XGJS XGJS XGJS XGJS XGJS XGJS XGJS XGJS XGJS XGJS XGJS XGJS XGJS XGJS XGJS XGJS XGJS XGJS XGJS XGJ XGJS XGJ XGJS XGJS XGJS XGJS XGJS XGJS XGJS XGJS XGJS XGJS XGJS XGJS XGJS XGJS XGJS XGJS XGJS XGJS XGJS XGJS XGJS XGJS XGJ XGJ XGJS XGJS XGJS XGJS XGJS XGJS XGJS XGJS XGJS XGJS XGJS XGJS XGJS XGJS XGJS XGJS XGJS XGJS XGJ XGJS XGJS XGJS XGJ XGJS XGJS XGJS XGJS XGJS XGJS XGJS XGJS XGJS XGJS XGJS XGJS XGJS XGJS XGJS XGJS XGJS XGJS XGJS XGJS XGJ XGJS XGJS XGJS XGJ XGJS XGJ XGJS XGJS XGJS XGJS XGJS XGJS XGJS XGJS XGJS XGJS XGJS XGJS XGJS XGJS XGJS XGJS XGJS XGJS XGJ XGJS XGJS XGJS XGJ XGJ XGJS XGJS XGJS XGJS XGJS XGJS XGJS XGJS XGJS XGJS XGJS XGJS XGJS XGJS XGJS XGJS XGJS XGJS XGJS XGJ XGJS XGJS XGJS XGJ XGJ XGJ XGJS XGJS XGJS XGJS XGJS XGJS XGJS XGJS XGJS XGJS XGJS XGJS XGJS XGJS XGJS XGJS XGJS XGJS XGJS XGJS XGJS XGJ XGJS XGJS XGJ XGJS XGJS XGJS XGJS XGJS XGJS XGJS XGJS XGJS XGJS XGJS XGJS XGJS XGJS XGJS XGJS XGJS XGJS XGJS XGJS XGJS XGJ XGJS XGJ XGJ XGJS XGJS XGJS XGJS XGJS XGJS XGJS XGJS XGJS XGJS XGJS XGJS XGJS XGJS XGJS XGJS XGJS XGJS XGJS XGJS XGJS XGJ XGJ XGJS XGJ XGJS XGJS XGJS XGJS XGJS XGJS XGJS XGJS XGJS XGJS XGJS XGJS XGJS XGJS XGJS XGJS XGJS XGJS XGJS XGJS XGJS XGJ XGJ XGJ XGJS XGJS XGJS XGJS XGJS XGJS XGJS XGJS XGJS XGJS XGJS XGJS XGJS XGJS XGJS XGJS XGJS XGJS XGJ XGJS XGJS XGJ XGJS XGJS XGJ XGJS XGJS XGJS XGJS XGJS XGJS XGJS XGJS XGJS XGJS XGJS XGJS XGJS XGJS XGJS XGJS XGJS XGJS XGJ XGJS XGJS XGJ XGJS XGJ XGJS XGJS XGJS XGJS XGJS XGJS XGJS XGJS XGJS XGJS XGJS XGJS XGJS XGJS XGJS XGJS XGJS XGJS XGJS XGJ XGJS XGJS XGJ XGJS XGJ XGJ XGJS XGJS XGJS XGJS XGJS XGJS XGJS XGJS XGJS XGJS XGJS XGJS XGJS XGJS XGJS XGJS XGJS XGJS XGJ XGJS XGJS XGJ XGJ XGJS XGJS XGJS XGJS XGJS XGJS XGJS XGJS XGJS XGJS XGJS XGJS XGJS XGJS XGJS XGJS XGJS XGJS XGJS XGJS XGJ XGJS XGJS XGJ XGJ XGJS XGJ XGJS XGJS XGJS XGJS XGJS XGJS XGJS XGJS XGJS XGJS XGJS XGJS XGJS XGJS XGJS XGJS XGJS XGJS XGJ XGJS XGJS XGJ XGJ XGJ XGJS XGJS XGJS XGJS XGJS XGJS XGJS XGJS XGJS XGJS XGJS XGJS XGJS XGJS XGJS XGJS XGJS XGJS XGJS XGJ XGJS XGJS XGJ XGJ XGJ XGJ XGJS XGJS XGJS XGJS XGJS XGJS XGJS XGJS XGJS XGJS XGJS XGJS XGJS XGJS XGJS XGJS XGJS XGJS XGJS XGJS XGJ XGJS XGJ XGJS XGJ XGJS XGJS XGJS XGJS XGJS XGJS XGJS XGJS XGJS XGJS XGJS XGJS XGJS XGJS XGJS XGJS XGJS XGJS XGJS XGJS XGJ XGJS XGJ XGJ XGJ XGJS XGJS XGJS XGJS XGJS XGJS XGJS XGJS XGJS XGJS XGJS XGJS XGJS XGJS XGJS XGJS XGJS XGJS XGJS XGJS XGJ XGJ XGJS XGJS XGJ XGJS XGJS XGJS XGJS XGJS XGJS XGJS XGJS XGJS XGJS XGJS XGJS XGJS XGJS XGJS XGJS XGJS XGJS XGJS XGJS XGJ XGJ XGJS XGJ XGJ XGJS XGJS XGJS XGJS XGJS XGJS XGJS XGJS XGJS XGJS XGJS XGJS XGJS XGJS XGJS XGJS XGJS XGJS XGJS XGJS XGJ XGJ XGJ XGJS XGJ XGJS XGJS XGJS XGJS XGJS XGJS XGJS XGJS XGJS XGJS XGJS XGJS XGJS XGJS XGJS XGJS XGJS XGJS XGJS XGJS XGJ XGJ XGJ XGJ XGJS XGJS XGJS XGJS XGJS XGJS XGJS XGJS XGJS XGJS XGJS XGJS XGJS XGJS XGJS XGJS XGJS XGJS XGJ XGJS XGJ XGJS XGJS XGJS XGJ XGJS XGJS XGJS XGJS XGJS XGJS XGJS XGJS XGJS XGJS XGJS XGJS XGJS XGJS XGJS XGJS XGJS XGJS XGJ XGJS XGJ XGJS XGJS XGJ XGJS XGJS XGJS XGJS XGJS XGJS XGJS XGJS XGJS XGJS XGJS XGJS XGJS XGJS XGJS XGJS XGJS XGJS XGJS XGJ XGJS XGJ XGJS XGJS XGJ XGJ XGJS XGJS XGJS XGJS XGJS XGJS XGJS XGJS XGJS XGJS XGJS XGJS XGJS XGJS XGJS XGJS XGJS XGJS XGJ XGJS XGJ XGJS XGJ XGJS XGJ XGJS XGJS XGJS XGJS XGJS XGJS XGJS XGJS XGJS XGJS XGJS XGJS XGJS XGJS XGJS XGJS XGJS XGJS XGJ XGJS XGJ XGJS XGJ XGJ XGJS XGJS XGJS XGJS XGJS XGJS XGJS XGJS XGJS XGJS XGJS XGJS XGJS XGJS XGJS XGJS XGJS XGJS XGJS XGJ XGJS XGJ XGJS XGJ XGJ XGJ XGJS XGJS XGJS XGJS XGJS XGJS XGJS XGJS XGJS XGJS XGJS XGJS XGJS XGJS XGJS XGJS XGJS XGJS XGJ XGJS XGJ XGJ XGJS XGJS XGJ XGJS XGJS XGJS XGJS XGJS XGJS XGJS XGJS XGJS XGJS XGJS XGJS XGJS XGJS XGJS XGJS XGJS XGJS XGJ XGJS XGJ XGJ XGJS XGJ XGJS XGJS XGJS XGJS XGJS XGJS XGJS XGJS XGJS XGJS XGJS XGJS XGJS XGJS XGJS XGJS XGJS XGJS XGJS XGJ XGJS XGJ XGJ XGJS XGJ XGJ XGJS XGJS XGJS XGJS XGJS XGJS XGJS XGJS XGJS XGJS XGJS XGJS XGJS XGJS XGJS XGJS XGJS XGJS XGJ XGJS XGJ XGJ XGJ XGJS XGJ XGJS XGJS XGJS XGJS XGJS XGJS XGJS XGJS XGJS XGJS XGJS XGJS XGJS XGJS XGJS XGJS XGJS XGJS XGJ XGJS XGJ XGJ XGJ XGJ XGJS XGJS XGJS XGJS XGJS XGJS XGJS XGJS XGJS XGJS XGJS XGJS XGJS XGJS XGJS XGJS XGJS XGJS XGJS XGJ XGJS XGJ XGJ XGJ XGJ XGJ XGJS XGJS XGJS XGJS XGJS XGJS XGJS XGJS XGJS XGJS XGJS XGJS XGJS XGJS XGJS XGJS XGJS XGJS XGJS XGJ XGJ XGJS XGJS XGJS XGJ XGJS XGJS XGJS XGJS XGJS XGJS XGJS XGJS XGJS XGJS XGJS XGJS XGJS XGJS XGJS XGJS XGJS XGJS XGJS XGJ XGJ XGJS XGJS XGJ XGJ XGJS XGJS XGJS XGJS XGJS XGJS XGJS XGJS XGJS XGJS XGJS XGJS XGJS XGJS XGJS XGJS XGJS XGJS XGJS XGJ XGJ XGJS XGJ XGJS XGJ XGJS XGJS XGJS XGJS XGJS XGJS XGJS XGJS XGJS XGJS XGJS XGJS XGJS XGJS XGJS XGJS XGJS XGJS XGJS XGJ XGJ XGJS XGJ XGJ XGJ XGJS XGJS XGJS XGJS XGJS XGJS XGJS XGJS XGJS XGJS XGJS XGJS XGJS XGJS XGJS XGJS XGJS XGJS XGJS XGJ XGJ XGJ XGJS XGJS XGJ XGJS XGJS XGJS XGJS XGJS XGJS XGJS XGJS XGJS XGJS XGJS XGJS XGJS XGJS XGJS XGJS XGJS XGJS XGJS XGJ XGJ XGJ XGJS XGJ XGJ XGJS XGJS XGJS XGJS XGJS XGJS XGJS XGJS XGJS XGJS XGJS XGJS XGJS XGJS XGJS XGJS XGJS XGJS XGJS XGJ XGJ XGJ XGJ XGJS YGA/JS |
6 41
6.1 41
6.1.1 42
6.1.2 44
6.1.3 45
6.1.4 45
6.1.5 46
6.2 隸部用子
7 47
8 51
XG1
KO
1日
1.1 电明表及电明表电用表

首鍵鍾鍾鍾鍾鍾鍾鍾鍾鍾鍾鍾鍾鍾鍾鍾鍾鍾鍾鍾鍾鍾鍾鍾鍾鍾鍾鍾鍾鍾鍾鍾鍾鍾鍾鍾鍾鍾鍾鍾鍾鍾鍾鍾鍾鍾鍾鍾鍾鍾鍾鍿鍾鍾鍾鍾鍾鍾鍾鍾鍾鍾鍾鍾鍾鍾鍾鍾鍾鍾鍾鍾鍾鍾鍾鍾鍾鍾鍾鍾鍾鍾鍾鍾鍾鍾鍾鍾鍾鍾鍾鍾鍾鍾鍾鍾鍾鍾鍾鍾鍾鍹鍾鍾鍾鍾鍾鍾鍾鍾鍾鍾鍾鍾鍾鍾鍾鍾鍾鍾鍾鍾鍾鍾鍾鍾鍾鍾鍾鍾鍾鍾鍾鍾鍾鍾鍾鍾鍾鍾鍾鍾鍾鍾鍾鍾鍾鍾鍾鍾鏁銘銘銘銘銘銘銘銘銘銘銘銘銘銘銘銘銘銘銘銘銘銘銘銘銘銘銘銘銘銘銘銘銘銘銘銘銘銘銘銘銘銘銘銘銘銘銘銘銘銘銼銘銘銘銘銘銘銘銘銘銘銘銘銘銘銘銘銘銘銘銘銘銘銘銘銘銘銘銘銘銘銘銘銘銘銘銘銘銘銘銘銘銘銘銘銘銘銘銘銘銲銤銲銤銲銤銲銤銲銤銲銤銲銤銲銤銲銤銲銤銲銤銲銤銲銤銲銤銲銤銲銤銲銤銲銤銲銤銲銤銲銤銲銤銲竊竊竊竊竊竊竊竊竊竊竊竊竊竊竊竊竊竊竊竊竊竊竊竊竊竊竊竊竊竊竊竊竊竊竊竊竊竊竊竊竊竊竊竊竊竊竊竊竊竊竍竊竍竍竍竍竍竍竍竍竍竍竍竍竍竍竍竍竍竍竍竍竍竍竍竍竍竍竍竍竍竍竍竍竍竍竍竍竍竍竍竍竍竍竍竍竍竍竍竍竍竍竳竍竍竍竍竍竍竍竍竍竍竍竍竍竍竍竍竍竍竍竍竍竍竍竍竍竍竍竍竍竍竍竍竍竍竍竍竍竍竍竍竍竍竍竍竍竍竍竍竍竝鑰鑰鑰鑰鑰鑰鑰鑰鑰鑰鑰鑰鑰鑰鑰鑰鑰鑰鑰鑰鑰鑰鑰鑰鑰鑰鑰鑰鑰鑰鑰鑰鑰鑰鑰鑰鑰鑰鑰鑰鑰鑰鑰鑰鑰鑰鑰鑰鑰鑰鑪鑰鑰鑰鑰鑰鑰鑰鑰鑰鑰鑰鑰鑰鑰鑰鑰鑰鑰鑰鑰鑰鑰鑰鑰鑰鑰鑰鑰鑰鑰鑰鑰鑰鑰鑰鑰鑰鑰鑰鑰鑰鑰鑰鑰鑰鑰鑰鑰鑰鑯鑰鑰鑰鑰鑰鑰鑰鑰鑰鑰鑰鑰鑰鑰鑰鑰鑰鑰鑰鑰鑰鑰鑰鑰鑰鑰鑰鑰鑰鑰鑰鑰鑰鑰鑰鑰鑰鑰鑰鑰鑰鑰鑰鑰鑰鑰鑰鑰鑰鑻鈴鈴鈴鈴鈴鈴鈴鈴鈴鈴鈴鈴鈴鈴鈴鈴鈴鈴鈴鈴鈴鈴鈴鈴鈴鈴鈴鈴鈴鈴鈴鈴鈴鈴韆韉韉韉韉韉韉韉韉韉韉韉韉韉韉韉韉韉韉韉韉韉韉韉韉韉韉韉韉韉韉韉韉韉韉韉韉韉韉韉韉韉韉韉韉韉韉韉韉韉韉韆韉韉韉韉韉韉韉韉韉韉韉韉韉韉韉韉韉韉韉韉韉韉韉韉韉韉韉韉韉韉韉韉韉韉韉韉韉韉韉韉韉韉韉韉韉韉韉韉韆韆韉韉韉韉韉韉韉韉韉韉韉韉韉韉韉韉韉韉韉韉韉韉韉韉韉韉韉韉韉韉韉韉韉韉韉韉韉韉韉韉韉韉韉韉韉韉韉韉韽彎彎彎彎彎彎彎彎彎彎彎彎彎彎彎彎彎彎彎彎彎彎彎彎彎彎彎彎彎彎彎彎彎彎彎彎彎彎彎彎彎彎彎彎彎彎彎彎彎彎彵彎彵彵彵彵彵彵彵彵彵彵彵彵彵彵彵彵彵彵彵彵彵彵彵彵彵彵彵彵彵彵彵彵彵彵彵彵彵彵彵彵彵彵彵彵彵彵彵彵彵彵影彵彵彵彵彵彵彵彵彵彵彵彵彵彵彵彵彵彵彵彵彵彵彵彵彵彵彵彵彵彵彵彵彵彵彵彵彵彵彵彵彵彵彵彵彵彵彵彵彵彸巔巔巔巔巔巔巔巔巔巔巔巔巔巔巔巔巔巔巔巔巔巔巔巔巔巔巔巔巔巔巔巔巔巔巔巔巔巔巔巔巔巔巔巔巔巔巔巔巔巔巕欒欒欒欒欒欒欒欒欒欒欒欒欒欒欒欒欒欒欒欒欒欒欒欒欒欒欒欒欒欒欒欒欒欒欒欒欒欒欒欒欒欒欒欒欒欒欒欒欒欒欱欱欱欱欱欱欱欱欱欱欱欱欱欱欱欱欱欱欱欱欱欱欱欱欱欱欱欱欱欱欱欱欱欱欱欱欱欱欱欱欱欱欱欱欱欱欱欱欱欱欫欱欱欱欱欱欱欱欱欱欱欱欱欱欱欱欱欱欱欱欱欱欱欱欱欱欱欱欱欱欱欱欱欱欱欱欱欱欱欱欱欱欱欱欱欱欱欱欱欱欿欱欱欱欱欱欱欱欱欱欱欱欱欱欱欱欱欱欱欱欱欱欱欱欱欱欱欱欱欱欱欱欱欱欱欱欱欱欱欱欱欱欱欱欱欱欱歜嘗嘜嘜嘜嘜嘜嘜嘜嘜嘜嘜嘜嘜嘜嘜嘜嘜嘜嘜嘜嘜嘜嘜嘜嘜嘜嘜嘜嘜嘜嘜嘜嘜嘜嘜嘜嘜嘜嘜嘜嘜嘜嘜嘜嘜嘜嘜嘜嘜嘜嘜嘬嘜嘜嘜嘜嘜嘜嘜嘜嘜嘜嘜嘜嘜嘜嘜嘜嘜嘜嘜嘜嘜嘜嘜嘜嘜嘜嘜嘜嘜嘜嘜嘜嘜嘜嘜嘜嘜嘜嘜嘜嘜嘜嘜嘜嘜嘜嘜嘜嘜嘦頃頃頃頃頃頃頃頃頃頃頃頃頃頃頃頃頃頃頃頃頃頃頃頃頃頃頃頃頃頃頃頃頃頃頃頃頃頃頃頃頃頃頃頃頃頃頃頃頃頃頄頃頃頃頃頃頃頃頃頃頃頃頃頃頃頃頃頃頃頃頃頃頃頃頃頃頃頃頃頃頃頃頃頃頃頃頃頃頃頃頃頃頃頃頃頃頃頃頃頃頭囀囀囀囀囀囀囀囀囀囀囀囀囀囀囀囀囀囀囀囀囀囀囀囀囀囀囀囀囀囀囀囀囀囀囀囀囀囀囀囀囀囀囀囀囀囀囀囀囀囀囲
KO
XG1
5.4.1 Home 品时
HG12HOMEPeIiJGKTHF3HtHtHtHtHtHtHtHtHtHtHtHtHtHtHtHtHtHtHtHtHtHtHtHtHtHtHtHtHtHtHtHtHtHtHtHtHtHtHtHtHtHtHtHtHtHtHtHtHtHtH t H0MEpIiJ'SELGTpeN'oEaRgAaRgAaRgAaRgAaRgAaRgAaRgAaRgAaRgAaRgAaRgAaRgAaRgAaRgAaRgAaRgAaRgAaRgAaRgAaRgAaRgAaRgAaRgAaRgAaRgAaRg
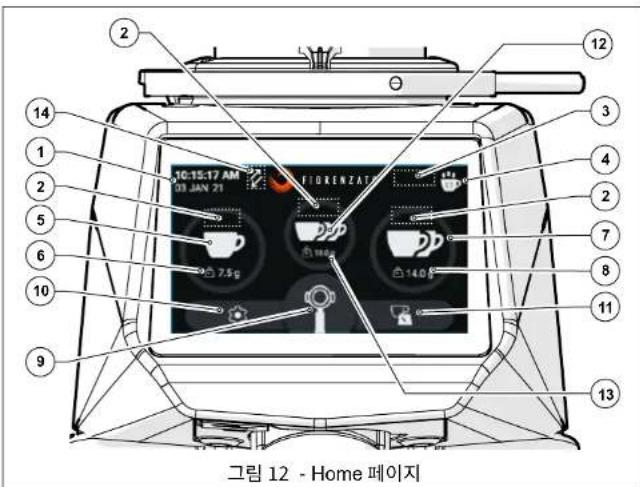
- 連名(本音)是
- 闋之用之用之用之用之用之用之用之用之用之用之用之用之用之用之用之用之用之用之用之用之用之用之用之用之用之用之用之用之用之用之用之用之用之用之用之用之用之用之用之用之用之用之用之用之用之用之用之用之用之用之
·本德力是国
·鼎公电
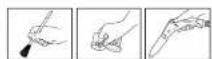
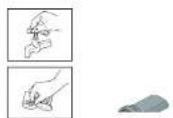
- 1

Kra.如L.如T.如T.如T.如T.如T.如T.如T.如T.如T.如T.如T.如T.如T.如T.如T.如T.如T.如T.如T.如T.如T.如T.如T.如T.如T.如T.如T.如T.如T.如T.如T.如T.如T.如T 1
Pepy eTcAHOBKOH N cONNoB3oABHMeN KoFemOJNK CdoaTOpOM Heo6XoDMNOHIOCTbIy IPOHTaBn H NOHTbC OedepeKaHHe DAHHOr POyOBcDBA, a TAKHE XpAHITN NOIDEPKXBATb EBO XPOUeO CoCTOHMR DnA BdHMeWUE cNcNt3oABHHA.
CopepkaaueeB aDHHOIOKOpMHTaUNI IOo6paXehHn, daHHbIe, TeKCTbI n OMCAHNI BAAHOTc CO6CTBEHNCTbIO KOMAHIN Fiorenzato M.C. S.R.I. n OTPAKHOIT COCTOHHE TEXHKKH HAMOMHT BtYNYCA KOFFEMONIK HbHOK.

KOMNAHFiorenzato M.C.S.r.I.B.CerdaAHTeT HOBIe PseHEnn Dn aCoBepHeCTBOBaHn CBoE npdykunu Nno3Omy OctTabre 3a c6o0n npabo BHocntb C tueHHem BpeMHN hM3MeHHEN B KofpeMOkyCdo-3ATOpOM o COOTBeTCTBOUYU DOKYEMaTHAu, He CHTaN yKe pOpaHHy npDykuHn HEaekBAtthn Hmnn YCTapeBWe.
OsiHy kya3aTeIb no3BnIeT NERKO HAIITN INTEpeCyIOU TYo TEMy, a pRd IHOpMaIOHOH BcIMBOONOB 6paIaeT BHIMAHNE NOJIb3OBATEJRA HA cOePjKAnHe, npEcdTabIHOue OocbIy INTEpeCnIero COBCTBeHHO Bo3onacHOtN n paBInbHorO HCNoB3OBAHIN KOePMOKC CdoaTOpOM.
1.2 CmBONbl, Hcnonb3yemble B pykoBocTBe

PNEyPENPEXDEHNE -OBPATNTB BHIMAHHE! Yka3bBaet npEynpeKJHNHe HIN BAXHOE 3aMeuHHe,OTOHcJIeecK KOHKpTeHbM fYHKnIaM,WMNN NOJ3HyIO INHOPMaHIO IINNo3oBaTeN. O6pATNe BHIMAHHe Ha naparpaΦbl,OTMEUHHe 3TMM CMBONOM.

OBJAIOANACHOCTb-BHIMAHHE!OBuIN3hAKoNACHOCTn.Tekc,OTMoeHHBNI 3TNMMCMBONOM,Yka3bBaet HaTO,HTO Heco6bNDHeNE PnPBDeHHbIX INHCPTyKUMOKeT pNBECTN KOBpeXeHNHO MAuHbI WJINOnACHOCTn TpABMPOBAHNI NJIb30BaTeYn.

O6OpyIOBAHHE NIOI HAPRJXEHHEM-BHIMAHNE!TeKCT,OTMeCHHbI 3TM CMBOJOM,YkA3BaBt HA BO3MOKHBnPKPNOJAKEHN3IeTKpHu-CEKHM TOKOM.O6PATEh BHIMAHNE Ha PnBBeDEHbIe YkA3AHNI.

ONEPAUHA KOTOPAR DOJIKHA BbINOHHTBCRA YONHOMOCHEHBMN TEXHMCECKMN CIEUNAINCTAMN:TEKCT,OTMHeHHb3TNMMCBOHOM,03HNAET,OTOFNCAHBHe DEHCTBNI DQNKHb BnINOHHTCBcCNEUANCTOM (CEpBHCHOyK6oH)
RU
CepnXG1
1.3 PpeynpeckdHn nnoKynatena
JaHHOe pyKOBOCTBO, KaK N DeKnapaun COOTBcTCTBUN EC, ABNtca HeoTbEMnMoY aactb bawae KODFEMONK C DOsATOPM, NO3OMY OHO DOnIKHO BepEXHO XpAHNTbCR, PPOCTABNtBcBcEM NoJIbOBATeJAM cCpOBoXdTaMbAIm HpIN eEpeMeueHIM INI pEPnpOdaKe TpeTbIM NIMAM.

B cnyuae ytepn HnHn nopNn daHNOI DOKYMeHTaUN KONHIO MOXHO 3aKa3aTbY npOn3BOuNTeY, yka3aB KoD pyKOBoCTBa, npNBeEHbI Ha 3aDHeB6ONoKke.
PpeM paeHbpyrOmy noIb30BaTeHIO noIb30aBcR KoemoknC D0aTOpOM, y6eDntecb, YTO OH npOHTAN I NOHJr COepKaHMe DAHHo pykOBoCTBA.
HaHoe pykoBDCTBO COePJKIT BCE ykaAHHN I npOeUpyb IO NCHNOB30BAHHIO,
KOTOpBe npnpabHbMO co6IIOeHNIO 30BHOIT 6eOAncho paOtaTB, He npuHHra
BPeDAceE MauHHie.

Poknyatneb 063aH pOBECTn cooTBcTbYIOOee 06yueHHe NO HCnIb3BAnHO nOcbNxyINBAHNKOΦeMOKN dNepcoHana,OTBeTCTBEHORO 3ae IcNOJIb3oBAHN.

KonyaTeB N Bce NoIb3OBATeN KOpEMonKn DoJXHb TuaTeNbHo Co6NoDAt Bce CneuMaHbHe npDyynpeKeDnHc, cOepKaunHeC B aHOM pyKOBOCDTE.
1.4 KOHTAKTHA HΦOPMaUNI npON3BOUnten
No BcEM Bonpocam npocm 6paatcsB Fiorenzalo M.C. S.r.l. no cnedyuouemy aepcy:
2 IDEHTNOKAUHOHHbIE DAHHbIE IN TEXHnueCKNE XAPAKTEPNCIKN
2.1 BBeDHe
PnroTOBHeHKe Kcfo-3TOKcYCTBO, INIraT OTO, TcObTaDcCKoHbHO HsHTyHbE ERO Cekptb, He6xOIMO CnEOBaTB ToCHyIM PpABmAM. OOpMyTAeAbeHOBu HauKIN Kcfo 3cpeccoHa cAmom De OEChCIOXHb, nPoB, KOTopyr IpaTe o6pyoDaHBe, Qe3BbHIO BAHKa. DIn ONITMAnHbO YcNExa N 66CeNtPOHO KAcETBa He6xOIMO PpABnHBoe CoTuAHMeTP EeMeHEToT:
LHeHHaCmEcB
- COOTBETCTByIOOee INONb3OBaHHe IMeHOUIERoC8 O6OpyDobAHn.
MactepTOHnpoecechoHaHmTexKToeroTOTOBHT.10bHaCnAHTbcx XOPOUMKOFe,BOPKePAcPiocpTaHeHHOMyMHEnHO,HEoCTaTOHOPOCTO BbOpBtOnpeDeHNHO CMeB.
Onbln mactepcBO onepaTobB C6bOHeHN npabBbHbX npoUeDpy npwroTOBNEHNAHNTK nNcNtB3OBAHn COOTBCTcyBOUero O6OpyD0AHBN BHOCT BoBHJn BkAaBn CoaDHnane MAnEHbKOr ueEbpA. HmEHNO NoSTOM nppeCooHbH npraADto Taokoe bONBJIO 3hnepeco-Maunme H KOFEMONKE. Xopooee 3hNHxHCTPYMHTOB, NOdEPKAAHn Hx B NnOHn paoToCIOOC6HOCTn MAKCNMAJIbHOe NcNtB3OBAHne PpOcDOCTABREMbX MM 803MOXHOCTe-TO TO MaCTPcEO, KOTOpBM o6NaIaOT HACTOJe Mactepa nprTOPOHEHKe Koae. KaehctBO xOpoiero 3cnpecco 3aBNCHT OT pda Onepauan, cpeDN KOTOpBX BAKHyPoB nPiae NTOM. TAKM Obpa3OM. KOFEMONCI D03ATOPOM BANETC Tn PA6OTHNI OAHNH M 63AOBbH INCHPTPEMYTOB, ctpKYTA POLOPOKA COOTBECTBOBaTB ONPeENHbHM XapAKTEPHKTiAM: yOToHBOCTN, pOHOCTN nFyHKIOHAHBOCTN, KOTOpBM NIOHOCTBO YOBOBTBOPRTOB BCE KOFEMONKI C Do3ATOPOM PnONBODCTB Fiorenzato M.C.S.r.l..
2.2 06o3haueHne ycTpoiCTBa
Ha neboi stropebi bcek kofemolok npov380cbctBa Flenzio M.C.S.r.l.npknpenneha ndhntnKauKauHouHHa TaNchka, ha KOTOPB Ccerda yka3sBAIKOTC chndyUOe daHNHe
- Hana Bhae KOMnAHH Fiorenzato M.C. S.r.l.
MapKpOBKa CE n roD n3roTOBneHnA
ДуггеЗнксерпнkaци. - MoDEnb n cepHbHn HOMep.
MoHocTb np60pa
Tpe6eMoHnAHPKJEKeHNEI HACTOA 3neKTpOHTAA
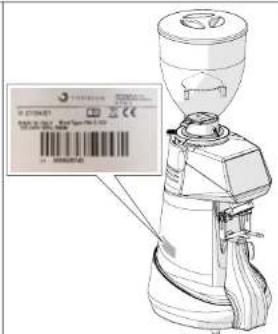
CepnXG
RU
2.3 OchoBHeIe qactn KoemOnKc DoaTOpOM
Koemnonk cdoaTOpomcoctoRn Kopnyca CO BcEMM He6OxDmblmy yctpoiCTBAMn DnI NOMOA KoFe 3aRpyoHOro 6bKepa Cbepx DnI NOaH NoNnEkaux NOMOny o6XapHHHX KoFeHNbX 3epeH.
Co cboiHKnHa Pnc.1, 3e KcfoemIOKn CdoaTOpOM cepNKG/ coctOIT n cneDyouHX OCHBOHX HACTe:
Kpome toro, nonb30BaTeB HnKorDa n Hn npn KaKnx o6ToTEnbCTBax He donKeH:
- BtAtpch ydaNITb NOCTOPHNNHe npEmTb, KOtOpBie MOrn CnyaHNO nonactb ByhKepne DaNCH KoFe mNIN 3OHy NOMoIa, npEdbAPteBHo He OTKIOHM np60pOT3NEKTPOCen.
-ПользоваьсяпрборOMКрьIMNИВаЖнБIMpyKaMn.
-HaHnBaTbKnDkoCTnIIO6oRbUdaB6yHKePdnaNoDAuN KoFe nB3OHy NOMoHa.

B Cnhye AHOMaHbORO NOBedeHHM MAuINHb NIO6oe Heo6xoDMOE BMEUATEJIbCTBO DQNHXB BIIOTHOHTCBaTOJbKO PEMOHTHKBM。
3.3 Mapb npdoctopoxhoctn nla 06cepeHn npabnHoro 6eOaHORIO
IIN OeCneueHn EeONaCHOCTN NOJIbOBeATEJ N ONTNMaJIbHO 3KcNpyatau nnp6opa Heo6xOaMo CO6IOaTb HekOTOpBle IPOCTbe HO BAKHbNe NoIOKeHHa, a MEHHe:
-368eraHnepaBnHoro hcnonb3oBaHHa Hhpya nHaHH. Hcnonb3yHte TOnbko UHpybN HHTAHm Nn yDnHHTeM C cHeHMem, COOTBETCTBYOUIM YCTAHOBHEHOH MOUHOCTH MAUHbI.
-3aIuHaeIe LHyP NtAHnO rO BzDEcTBnB YbCOkIX TemNepaTp, MaCna I octPbX KPOMK.
-OTKIOHOHNEOTOPMAHBOPAOBtIBNobuHEHOE3HepronOTpe6nHHe, NOBbUeHHeMe TnePepaHTy, YpueMehra B6paHna, aHOpMaIbHbIy uM ynn CnTHaHbTpeBOrHa HmCnnee)YkAsBaHOT Ha HenonADKn B pOate. DnnppeoBpaueHHHe HncnPapBHOCTei, KOtOpBe MOrTy pnuHnHITb npmOu HNCBcHHbY uyePbKIOdMn INPiNDbopy, PpOBDnTE Heo6XoDMoe TEXHecKeO 06CNYKBAHHe NIN, PnP Heo6XoDMocTN, OpaTInTeB K Dneppy nIN cNeuaJIIN3pObaAHOMy peMOHTHKy.
TakKeNoe 06OpOBoAHme! ByBte BHNMaTeIbHbI npn TpaHCnpTHpOBe, norpy3HO-pa3RbHbXb pxaboTox yctAOBke! O6paTmTeC b rnae 4 nra npAbnHoIro nepMeueHnepn6oPa.
RU
CepnXG1
3.4 PnpdoxpanntnHbIy cTPOCTBA, pnpmehmblte Ha Kofoemolke C doaTOPOM

Bce kofemonk cdoaTOpom npnoabodcTa Fiorenzato M.C. S.r.l. ochaue HCOOBTCTBYUHMI MEXAHHECKHM N3KETPOMEHXAHHECKMM YCTPOH CTAMM,OBECIEYNAUOMM B3oONACHOIT NOIbOBAeTnN 0IOCTHOCTb/ yHKNUHbHOBCTpnp60Ba BO BPEM IIOJIbOBAHIN
KoemFmN CdoaTOpOM cepIN XGcOcaHbI cneDyKUIMn npdeoxPAHHTeBHMUYctpOCTBAM
Tepmonpotexk TbRnAe: DnBtten npBop0a OCHaEN TepmonpotekpOM, KOTOpB 3auuaeet oE or 0pe3MePHO HArpeBa BCNECTBne nepepykn no TKy ncp6abtaeb, nppeBaN pOoay NTHAn h DaBntbn.
OxnaaHaoBentnTOp(Pnc.3):ToIbkoHaKoFepMOkaxCdo3atopOMMoNei F64 EVO u F71 EK b3aNHeu cAHTKpOcMaMuaBcyu hytEyUeBHeN Oxmkaioo 山 BENTnTOp Dn npTeDpBaUeHN nepePBeBa Dbrgnter npMbDa JepHOOB 3OTBENTHnTOp BKIOVAETCR C NOMUbBO 3NEKTPOHNN.3AnyCKAKTNBA3pyeTCn 0aBepWeHnCB3n MeKdy KoFepMOkOn nIporpaMMhIM oecneHem pac-eta Maccs.
3aunta naibueb Ha 6yHkepe nnaoann Koepe (Pnc.4): 3aunta naibueb (TnO.1) BNYTPn 3arpy3oHoro 6yHKepa (TnO.2) nponyckaet KoeFHne 3epha B mIeBHTenbHyK aMepy, He dOnyckar cnyauHoro nonaHaHH naibueb onepatopa.
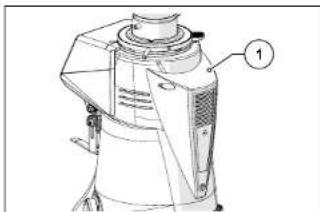
Pnc.3
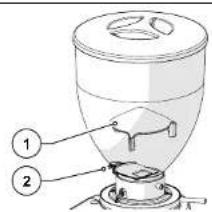
PNC.4
PbHAR 6nKpOBKn npdoxpaHntBHO Knpyrno raKn (Pnc.5):IIN ppeDopTbaeHnCnHaHoro NOBOPota Kpyrno perynnpOBOHn RaKn (PiO.3).1 npeDcMaTPNBaTaCn BnB6KnOpBKN Kpyrno raKn (PiO.2), KOtOpB Heo6XoDMHO HAKaTb, T06bblBnONHHTb NobOPOT.
MnKpOBbIKHouatEnb onpeDeneHn H3MeHeHn CTeHn NOMOna (Pnc. 6): 3OTM MmKpOBbIKHouatEnb (Po3.1), AKTHBnpyEmn PnN KAKDom HAKaTN NpuHa: 6NoKpOBKn Kpyrnn RaiRn (Po3.2), CnyKN Tn Dn CooBcHHeN CAcTeMe YnpabHneH, YTO MoR npOsnOtn N3MeHEHn CTeHn NOMOna No cpaBHeHn C nocdHeN BdaahHO npOpneH, n AINBnHpyET pexMM «IqDaTb npQuHO.
CepnXG7
RU

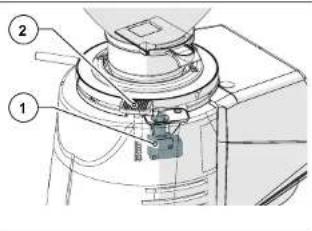
3.5 OcTaToHbIe PnCKN
KOMAHHE Fiorenzato M.C. S.R.I. a npocce pnoektnpobAHn 6bln npnnrTaB BCE Heo6xOIMbIe Mebp InpocdoTPOXHOCTN, TOp6blb oceCNIHTM BAKCMAMHBO G30NAHOc HcNOINs3OBAHHe KOfEMONIK. OAnHO np yctAOHBKe, CYtNE KOBNUKBAHm PnIOBOPA OCTaOTCA OCTaTOHbE, HEYCTPAHMBIE PNCKN, NOCNEDTBIA KOTOpBX MOXHO YcPTaHbNTyETm COOTBETCTBYIOEO BOYEHNH NlB3OBATeR CORNaCHO NOIOKEHMN NIOXIOEHBM B TabnIe NHXe.
Ia KaKdo OTOatoHOPO NcKa 8ka3bBaOTcH Mpebl dI rOPAHHeH WIMN YcTpaHEni CTeNEH OTdEhBbX PCKOB.
4.2 BbIbOp TOck yctaHOBKn
YHTbBaA HaaHaeHene KOFemONKcD0aTOpOM,peKoMeHdyETcRA YCTAHABINBATb eepADmC KOFeMaBHINOH.
Perej yctahOBKO pnpoBa TAKJE y6eDntEcb, YTO MECTo yCTAHOBKO COOTBETCTBYET CnEyduQUM Tpe6oBAHNM:
PObepxHOctb, H KOTOpY YCTAHABINBAETcnp6Op, OJONKHA 6bIbPOBHOH, XOPOO BUBPOBEBHHN IOCTATQHO pNOHOH, YTO6Bi BUBDePKaTb EBO CEC;
- DoctynHOb npOCTpAHCTBO DOANYKHO 6bItb DOCTaTOHNO 6bONHAM, Tc06bI O6eCNHTbnpABINHUY yOCTAHOBKY uYDOHBNO HONLBOAHNEI npBOPa;
Pn6Op HEn3y tC7aHabNtBaT B5N34 aPakOBH WmN KpaHOB, YTO MOKET PnIECTN K EFO HAMOKAHNO T OTyRbWbBbBbBbBb
Mecto hncnloh3oBaHna DOnkHO DocTaOvo HOxopoO oCbeauTbcr N BHTINPOB BAtb;
B HENOCPECDTBHNO 6bn3OCTn OT MeCTa yCTAHOBIN DOJNKA IMTeBCr PO3eTKA DnI 3NEKTPHECKOTIOIOIOHOH NPO6oPA, COOTBECTBYOUAA HOPMAM, DEIECTBYOUIM B CPTAHE ERO ICNTOB30BAHN

BHAMAHWEIJEKNTPCHECKAPO3eKaD0nKhA6bItbOChaHea3ΦΦeKTBHOH CNTSEMOH 3a3eMIIHJIe.

BHIMAHMEI CHNTEMA 3NkETPOCHa6EHNRA TAKGE DOONKHA 6bTb OCAUHe 3auHTHBM TEPMOMARHTHBM BbIKHOATENEM, paoNIOKeHHBIM nepeoP3KOHK. H 3NECTOH M N KfKOdOCTYHOM DnA PAtOPA MeCte, YTObl 3auHTH PBnpOOT npepy2OK mCKaQOB HANpRKeHHa, aONb3OBATEI -OT PCKA NOPAHEKJI EJKTIPeCKHM TKOM
4.3 PacnakOBka n nepemeHne o6OpydoBaHHa
NocBcKbPTy NAYaOKBn BHNMATeBHO npoBepBe TJeIOCTHOCTb Pn6Opa IOTCYTCTBE NOPBExeHbX DeJanE.
OTKPOIteYnAOKBkyB6HbINMeCTaYCTAHOBK, Y6BeDhUIMcB, YTO TAM DOCTAOHO MeCTa YBaEoNACHORO ObaeJHcN C npHbOpM.
BbHbTe np6op n3 ynaKOBKn, KpeNko n HnadeXho ydepKnbAer.
- YctaHOBNTe KooFemONkY c D03aTOpOM Ha pa6OhyIO NOBepXHocTb.

BHIMAHNE! Co6nDaaTe npeIbHyIO octopoKHOCTb npn 06paIeHNc yctpoTcBOM. Bex KocEpmONk (18 + 25 Kr) nOC6aB okyTnaF pOPMa ee KopnyCa MOrT cO3daT bPK CkONJIbHeHn I NOTep 3AxBaTa C B3OMOxHBM NaIeHEM m yuHbOM/pa3Mo3KeHEm HOr npn PNOBeMe HmNpy kPn pa3MeIeHHM MaINHb Ha pa6OHe NIOpeXHOCTn. Ecnbl He YyCtBYeTe YEpeHooCTn B 3axBaTe, peKOMeHdyETc O6pATNTbCe 3a NOMUbko BO BTOPomyeNoBEky.

BHMAHMEI DeTaln yanakOBKHe Hb3rOCTaBnTb B DoctynHom dJeTeMeCe, TaK KAK OHN RANOTC NOTEHUNAJIbHBNIOCTOHNMKOnaCHOCTM.CoxpaHteYnaKOBKYdoNTceHEnRAPANTHNO CPOka.
RU
CepnXG1
4.4 YctaHOBka HIOKNOHHe N 3JKeTPOcETn
TcBbAeBHTUcYTAHOBKuHAWATbHCNtBObATBaWHyHOKOΦeMOnKy, ACE, 100 BA HXHO CenbTA, 30 YCTAHOBbBTtEE:
- Y6eHNTcB, yTo HapJKeHMe 3IeKTPocetu COOTBCTcyET TpeSyemO MOUHOCTHnTOIe3KTPUmckA MOUHOCTb CETN DOCTATOnH YA IIOIePExAHMOUHOCTn, nTOpe6LnEMo np6Opom (CM. uEHTnHfKaUNHOHYo Ta5nHy, pNkpenneHHyK 60koBOI CTOPOE KOeMOnIK).
BCTABLTIEtehteepKHTHpyaNTAHnA(Pc.8No3.1)BaTbEBIIECHaHHNHeHtCAHcyTOPTBBA(PMc.8no3.2);

BHUMAHME!IraToro,TO6bI CoeINHbPo3eTKy u WTeICenB nHTAHH KODEMONIKI, He06XoIMNO NNoHcTBHO HAIOHHTBE ee NNOXHTB Ha6OK. HAdEko 3aXbaWNTe YCTPOiCTBO U NepEmeJuaIe erO octOpXHO, cJeJa 3a Tem,TO6bI He NopeDInrE rBo I He CaaNtBy pKn nn NaIbIu.

ECN HeNoXoDmIO nCnOlb3oBaTb aIadTepb NHTAHINy, yUdNHInTeHINN yUdNHInTeBbHbIHybp, o6a3aTeBbHO nCnOlb3yTe H3eDNEN, COOTBeCTBykoYIe CTAnDaPTAM CeptNDKauIN, DeIECTByouIM B cTpeA hCnOlb3oBAHN.
BepHnTe KoFemOnKy B BepTmKanbHoe noNoXeHne H nOcEaHInTe npoBou K npedycMOTpeHHo 3JNeKTPuecko po3eKe (Pnc.9).
- Ecln HmEeTc, yCTAHOBiteaHTHbIy aTOMATUHeckK bblkIOvateB, paONIOKeHHbdo pOte3Kb, bNONOKeHne《BKJI》(Pnc.10).
- NObepHnTe BbIKIOuOATEB NTaHnMaMHNb Ha I(CM. Nap.5.1.1)
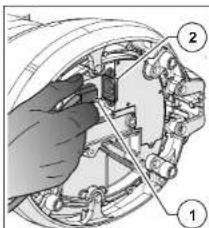
Pnc.8
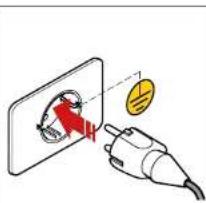
Puc.9
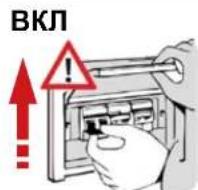
OTKJI
Puc.10
Tenepb kofemonka HaxoDnTC naHnpanxKeHn m roToBa Ka paboTe.
CepnXG
RU
5 INOJIb3OBAHNE KOΦEMONKICD03ATOPOM
5.1 YnpaBHeHneMaunHo
YnpaBnHneKoFepmKOnOcUyIeCTBnTcCNOmoBbBkNIOuATEr (cm.naparpa 5.1.1) n naHEn ynpaBnHne C CEHCOPHBIM dncnneem, c noMoIbKO KTOporo KOHO Bb6pBb N HAcPTBoT Bce pabOye FyHKnn YcTPOBCTBa (cm.naparpa 5.4). BcR INHOpMaJIN O paBOeM coToAHN MaINHb, paboWne napAmetpbN n NOadBaMeBc KOaHbD oTObpKaOTcNa Hdncnnee Ha nepeHne NaeHN MaINHb. Bce yCtpoiCTBa npaBnHneN cHrHnMa3auHa NKo

Koepemonka NoctabnreTcC nCTeMOB 3BeeHbAHNKG, yye KaHbpoBaHHO npOaBDttenEM. Ecn Tpeyetcr HOB KAHIbPOBA KcCTMebl B3eBuMaBHAnA OH MOKeB BIIOHNHTCB TaONK BAANMUPoBBAHBMIM Cneauanlntamm FpMbIu-NiROTOBATEIN NNNY NOYNHOOMeHHbIMN DInepaMM, MHeoummn «IapobdAmHMHCTopotaP, daounn doctyn K aapeepBpuBOAHBMc STpaHcuaM CTeMeBly PnpaJIeHnKoFcpemONKO.
5.1.1 BbiknoyateNb
BbInonHnEeBkHouHeHm BbIKnOHeHne yCTpoiCTBa.
B noJIOXeHHN 《O》: npHbOp BbIKIOUeHn (NTaHHe OTKI
B nnoxekn(1)npn6op BkKouen (3aunTah).
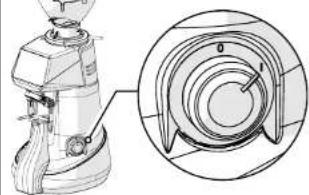
RU
CepnXG
5.2IoprotobKaKICNIOB3OBaHNOKOeOMJKN
Nocne 3aepenHn yctahOBKn MaunHa roToBa K paOte N MoKet 6bIb 3arpyKeHa KofeHmMn 3epHAmn dnnr nomona. Co cBInkOn Ha Pnc. 11, nra 3arpy3Kn KoefHbIx 3epH:
YctaHOBNTe 6yHkep (Pi3.1) Ha KofemONKc cdo3atopOM (Pi3.2) INaФИКСРуE rro p a5OcH mnoJekHH, 3aTnRnAa COOTBCTBYIOUIN KpeNEXHb BnHT (Pi3.3).
y6badtecb, 703acnoNkBa (P03.4) NnHOCTbO 3aKbPTbA.
CHIMMTE KpbuKy (I03.5) 3aonHHTE 6yHKeP 06kapeHHbMM KoPeHbMM 3epHAM, KOtOpBHe Heo6xOmo CMONOTb.
3aKpOHe 6yHKepe KpbIiKoI (No.5).
IocTeNEHNOOTKpbBaTae3ACNOHY (PiO.4)YTObkyoKepeHbEsePHaNoNnB KAMEpydN oNOMA.
BkHIOHTe KcpeMonky,ycTahABHHBaHa Ha 1(BKJI) cneauNbHbIyBknOuyattn (Pto3.6).
No ncteyHn Hcckbnkx ckyHn Ha dmnee Oto6paTnc TcpanHa (NtBteepntnyck)n CHTMa oKnaer, KOrda noIb3oBaTeBbINONHNT npOeDpy(TpeBpy 3aNYck)(S5.3).Heo6xoMHyO nI npBBeHnBaPaoOee cocToTHNE CNTeMbX XG1 B8eBuHnAHn. 3Ta npOeDpya AktiHbNA no YMOnHnHO npn nepBOM BKNHOHnYcTOPOCTCbA.

Pnc.11
CepnXG1
RU
5.3 PpoeDypa «PepBbI 3anyck
3To ynpabJnma npouedya, Heo6xoImma dna nepBoro 3anycka KofoemOnKn.
PnpnepBOM BkIOUeHm KOeMonKa no yMOuAHNO CkOHnHyrnpoBaHa Ha paObyC aKTHINPOBAHHO CTMeON XGI. PnpnoOns 301 npOeDpybI OnepatopA npocAT BBEcN HmN IOdTBePdNTb DaHHbI, Heo6XoDMbIe DnI npMBeEHN KOeMonKn BpaOchce CoCTOHNHE.
YbDNTeC,TOB 3aRpy3OHOM6ByHKpe IMETcCa DoTaTOHoe KOHnCTEOKoE nIPO NOMAOTKpOte 3aONHOy nIOaDaHa XeHPOBa.
IpaHae Ha yctpOHTcBO 3eKtpONHTAHHe,ycTaHABnBBA BkNIOuATeNB Ha(1)INDOKNTeBnHnUaMn3aun nAneHN ynpabnHnE.
- Пгн орлбени Кхар «Пдтбердь nук» HAKMITE «Rashk» ДЯ Вьобора рыka.
Ha ctpaHue «A3bK» Bbl6epTe HnykhBn 3aBk IN pnpcymotpeHHbX n3aTe HAKMTE «A3bK» IIN BO3BPATA K npdeDuynche TaP
BbnoHnTe perynpo8ky cTeEHn noMa, yctahabnBa KpyyIO raHy (CM. Nap. 5.5). NonepeMeHHo perynyPe KpyryIO rayKu n noadaBte KOAMHy BbduaN KoFe Do oocHeKHe Hn Tpe6yeMoN KpyHocTn. 3aTeM ydepKbAie Te HaxaToi KHONy DO Tex nop, NOKa He 6yDet NoHocTbO 3anONHeHa NmHeHa npOrpeCa. Pn Heo6xOIMOCn MoXHO npOdoNkTaNoMOn Nncse 3aoNOnHeNn HnEHN npOrpeCa.
PnnpoNpHENmTpebemyKpyHcOtnn npoDJIeHnHAxMnTeyHKUHOHaBHyIOKnBmuy(JAnee).
HakMMTEeIIOJTeBpENIyCkN DnEpeKoK cTcPAnHeI NImEHMeHNIE MaccbI npOuINi.
3aainTe Maccy B rpaMMax dna OUnHapHO npuMn.
3aatae Maccy B rpaMMax dna DBOHn nopun.
-Дяпpoюнжсннннннннннннннннннннннннннннннннннннннннннннннннннннннннннннннннннннннннннннннn


RU
CepnXG
Pdookinte HECKIOK CekHyH, He npkacarbc KyctpoCTBy, YTObNo3BONNTb CnCTMe B3Be-IMBAHNAO npDEpENTb Tapy.
- DojndteBcPoBNeHnHa MaCnnee KOmAnDbIy [POnadbOdnHarpyo npuHIO].

3aynctte Bbady OndnHApOH nopun KoFe, HxMMBn 0 nITyCKBn OTOpKaeHNHy Ho dCnnne FyHKUOnAHNy KHOKny. HauHaAerc NOMO ONnAPHOr NOPm KoFe, KOtopb 3aBePwAETc npn 3abepeHHn 3aONHeHHn KpaCHo NInHeNknporpecca.

IPOOJKDHTE HECKONBko CekyH,HE NPMKACBcK YCTPOINCTBY,YTOBbIO3BOINTB CNTEME B3BeUHMBAHNA ONPDEINTB TAPY.

DoxideBcPOBENHnHaMcnPeeKOMaHbI<IOpaTbAoHyoNOpuHn。

3aCyTne BbDyHbOHHoN pOpn Koepe, HaxmMg OTo6paeHHy Ho HdncIeepyHKmoHnHaBHyKHOKNy. HauHnaertcHOMON DBOHHoN npOpnn KoKe, KOtopn 3abepuaetc npn 3aBepseHm 3anolHeHnKpaCHOn JInHeKnnpRoPecca.

IPOJOKDHTE HECKONBko CekyHd,He NpMKacAcbK YCTPOINCTBy, YTObI NO3BOINb CTcTeMe B3BeIMBAHNA ONpeDNBt Tapy.

- Doxinktecbn 805BHeHn Ma nCmIe NcOo6UeHnN 「PepbI a3nyck 3aBepwH yceNeuHO

HaKMITE KONky DnBa BO3Bpata Ha IINABHbI 3kpA.
TeneboMxHOINoB3OBaBvCTPOYCTBOB BpeXMMBeBDAuNPOUINNoMACEC
CepnXG
RU
5.4 NaHEnb ynpaBneHH
PnB BKIOHEnHN KOePMONK Cdo3aTOpOM, NocNE HeCKoIbKnx CekyHd, Heo6XoDMbIX dnn 3anyCk cncTeMbl, Ha nCnnee naHeNn ynpaBneHn NOBnEeTCN IABHAR CTpaHua, HA KTOPOH HAOJATCR Bce fHyKUNHOHaHbIe KHOnK, Heo6XoDMbIe DnA INOLOB3OBAHNIu npabNeHHn prn6Opom.
Inonbn3oBaHnne nporpamMHOO obeceeneHHn ynpabHeHH, npinrToro kOMNaHMe FiorenzaoIraa CBOXKoFemONK, Ype3bHaJHIO HHTYINBHO, aDanHBe NcHTpykIMn O pNIMHEHNO 03BOJIT BAM b6CTPO O3HAKOMTbC c FyHKUHbHMKn KABHUNAMn npa3HbHMn BO3MOKHOCTAM Hactpoen BaJero HOBOy TcPOCTBA. NaHEn I Meet CEHCOPHN 3KApA, Yo 03aHaET, Yo FyHKUHbHNe KOMHbI, HABRAJnno M HeIO u yctAHOBKa npedNoTeHHn paObov npapMeTPO OBcUeCTBJIROTC npOCTbM pNkoKCHOBHeHm NpAbu K UyBCTBNTeBLHM oOBtAOMnNnner.
Bce KoeFemOnKc D03atOpom Cepn XGf Moryf paObTaTb KAB Pekmme BbydHn NO MACCE (abTomaTMeckar cHcTeMa B3BeWbAHNIGXI AKTVBHa) TAK N B peKmme BbydHn npocnn No BPEMEHn (abTomaTMeckar cHcTeMa B3BeWbAHNIGXI HEkTNHHa).
B 3abncmctoTbblpaHoro Tnna fynHIOHPOBAHnI IABHAc cTpaHnla (5.5.4.1) n HekOTopbe NyHKtBe MeHO TExHHeCKne HAcTpoKn (cm. S.5.4.3) mEHaRCTCBW BHEuHN BID,NEpEXOaON ToObpaKHeHNAHcTPOKn NapaMePTOB NOmOA NACCE (rpaMMb) KTo6PbKaEHNOHAcTPOKe 3TNX Ke NapaMePTOB NO BPEMEHN (cekyhdu). DnA OTKHouHnNnNoKIOHueyABOMaTHeCKOn CmTeMb bBaeeuHbAHMx mnpaparpa5.4.2.
RU
CepnXG1
5.4.1 TnabHnCTpaHnua
Ha caite Pnc. 12 nok3aHa IABHAR cTpaHnca c onncanhem fhyHKIOHAhBbIX KnaBmHn noen dncnnne. IABHAR cTpaHnca moKet 6bIbN HAcTpoeha N3 MeHOH NaCTpoek),no3ToMy nO6paeKeHe, nOKa3AHHOe Ha pcyHke, moKet OTNNaHTbCnOT 3kpAha, qafKtueckn OTo6paaemoro Ha BAuem NPn6OpE np NepBOM BnKNoEHM. BCE cyHKUIN, NOctynHne i3 MeHO hAcTpoek), oNcAnbI b Cnedyuix Naparpaqax.

HaI NfABHOMK hxaepne, npeTcAbeHHoMa H a PnC. 12, oTo6paKaotcneDuoune noJn AynFkuHOnaHbHe KhoHN:
MeHIO《HaCtpoKn》cakTHBHOcnCTeMOxG(bIya npun no MACCE):
TexHmuecknHaCtpoKn
VMaMeHeHHe MaCbI nomOna (S 5.4.3.1)
- OTo6paKeHHeMaCsbI npuN (S 5.4.3.2)
Poka3aTb cTaTnTky (5.4.3.5)
OTo6paKeHMe TpoHnOpuM (S 5.4.3.6)
HactpoynXGi
CmCTemaXGi(5.4.3.7)
- Pepbbl 3anyck (5.4.3.8)
HactpouknoB3oBaTeTn
Rpkoctb dncnner (5 5.4.3.9)
BHeuHm BnD 3KpaHa (5.4.3.10)
3KpaHHa 3actBa (S 5.4.3.11)
R8bK (S 5.4.3.12)
- Data n Bpem (5.4.3.13)
VHOpMaun (5.4.3.14)
HactpoKn 6e3onacHOCTN
C6poc Maccb npumn (5.4.3.15)
- Paponb aDHHNCTpatopa (S 5.4.3.16)
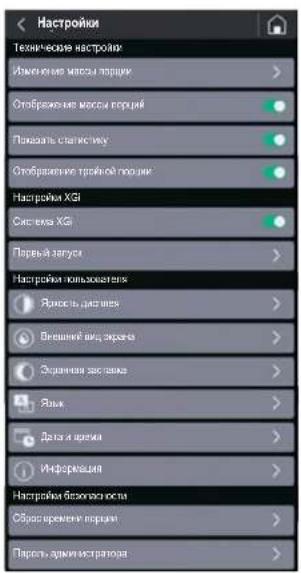
CepnXG?
RU
Meho《Hactpokn》cOTKIOueHHO CNCTeMoH (Hua npun no BPEMEHI):
Texnueckne hactpoukn
- N3MeHeHMe BpeMeHn nopun (S 5.4.3.3)
- OTo6paKeHHe BpeMeHH NOMOA (5.5.4.3.4)
- POKa3aTb CTaTnCTmKy (S 5.4.3.5)
- OTo6paKHeH TpoHn HOpCn (5 5.4.3.6)
HactpoynXGi
CnCTema XGi (5 5.4.3.7)
- Nepbbl 3anyck (OmknoeH)
HactpoKn noB3oBaTeTn
Aepokocb dncnne (5.4.3.9)
BHeuHn BnD 3KpaHa (5.4.3.10)
3KpaHHa 3actBa (5.4.3.11)
R3bIK (5 5.4.3.12)
-ДаТа И ВЕРМА (S 5.4.3.13)
- INΦρομmaɪη (§ 5.4.3.14)
HactpoKb6eOanachocTH
C6pocBpeMeHnNopLm(S5.4.3.15)
Paponb aMHHCTpaTopa (5.4.3.16)

RU
CepnXG1
5.4.3.1 3MeHeHHeMaCCbI NOMONa
Pn HaxatmHa NyHKT (NAmHeHMeMaCbI NOMA)B MeHO(TeXHHeCNEHACToPOHN Pn NOKNIHKeHHO CHCTeMe XG1 (cm.5.4.2.2)OTKpbIAEaTcSTPAHJIaYCTAHOBKnMAcCbI MONTOI Koepe JnOINHApHO,DBOHOH TPOHOH NOpMN
PmpeMueHae: MaccTPOHOH noprr OToBpaKaAeTcra ToIbko B Tom Cnhyae, ecnOnprr OToBpaKaHe TPOHH npOurn) AKTINBPOBaHa B MEHO HAcTpoEk (S 5.4.3.6).
Icnon3yTe FyHKUHOHaBHe KHOKNI INI YBENHEH NIN UMeHB WENH BPEMEHN BbDnA.
N3MeHEHHeIpe npaMeTbI COxPAHIOCTARABTOMATHEeKnPnBbIXOde CToPAHU.

5.4.3.2 OTo6paKeHne MaCCbI npCm
PnA kTNBHO CNTeMe XG1 (cm. 5 5.4.2.2) npn oNDKIOHcHm NpHTa OToOBpaKeHMe Maccb Nopcn B MOHO [TexHueckme HactpoKn] Ha TANBHOM 3kpahe oToobpaKaetcMa cca,3daHaHn DaBbau pa3NHybHex npocn.
BO BpEMB BaDnH 3HaOK KHONK, COOTBECTByOuMn BBbpaHHOH NOpum, HauHHeN NOcteHHNO OkpaunBHcB B KpaCHbI UBET Do NHoro 3AnOnHeHn, OTo6paKaB BInOnHNReMbN 3An NOMa. Pnp yHOM NOMOE Macca OTo6paKaTeC nPnpaUeHMe DO BbDAH MaKCMYM95 rpaMM, PnD OCTnKeHn KOtbpix NOMON ABOMATNuHEckn OoctaHBNBaTeC. Ecn OnUnna《OTo6paKeHne MACCb NOMA》 OKKnOHeHa (M), Macca npoun He oTo6paKaTeC Ha IABHOM 3kPahe.


TJABHbI k3pAan c0to6paKaemO MaccO npCIO
TINABHbI 3KpaC hETo6pKaMaEO MaccO npu
CepnXG?
RU
5.4.3.3 13meHeHne BpeMeHH npuHN
Pn Haxattn Ha nyHKT (N3mehneBpeMeHN npuMn) B MeHO (TExHeCkHEHACHTPOIN PnO TKNKQeHNO CHCTeMe XGf (cm. § 5.4.2.1) OTKpBIAeTcCTPAHNUA DnA YCTAHOBKn BpeMeHN NOMONA OdnHApHON, DaonHOn n TpoHOnnpuHn
BknHouaet HIN BbKnHouaet OTO6pKaHEHe FyHKHOHaBHONKHN CtTaTnCTnKa HA FNABHOM 3kpane (CM.PMC.12No3.4).
PnpmeaHne:KoIInueCTBOBbDaHHbIX NPcui npnpaaaetcNcoxpaHReTcB NaMaTIN,daae ccnnOnuqy《TkoKa3aTb CTAtiTckY》OTKnIOHeNA.

TIAHBIKAPCOTKIOHOHONOHKOHNCKCTATMNTIKB
5.4.3.6 OTo6paKeHMe TpoHoi npu
Bknnoaet 1nn BbKnnoaet OTO6pakenHe INynpaBHeHne BldaHn TpoHOn npOnn FyHKuONabHoN KnaBHeC fTANBOHOKpHa.

TIAHBHm3kpanc B KlnHOeHHoN KOHNKoT TPOINAB NOpnra
CepnXG
RU
5.4.3.7 Cncrema XGi
NoBaanrE NOKIOATb HNN OT-KIOUcYI ABTOMATNCKYIO CNTeMY XG B3BUEINBAHNAI NOPNCI.
PnnoKIOUHOENH CNTEME XG KoΦeMONKa BbIaet NOpuN HCQOYN3 3aADHNOH MaccB (5.4.3.1).
PnO tKNOHCHN CNTcEME XG KO- pemonka dyHKUONHpyet, KAK CTAHdAPTHaM OMeB. On Demand n BbAaTep noOpm NcxO4n 3aDaHHOro BpEmEH (S 5.4.3.3).
PnmeHae:KaKdbpa3 npn noDKnIOeHN《CCTEmbXG)zanaepuBaBcTcnpoBeHne npoeaaybpy《IpeB 3anyck》(5.4.3.8 n §5.3),He6xOIMMOIINKANM6pOBKN CNTEmb B3eBnBAHN

PnahOBb CpOK 3aMeHb XePHOBOB yCTaHOBHe KOMnHaMei Fiorenzato M.C. S.r.l. B 3ABNCMOCTN OT TINa XePHOBOB N MOEIN KOFEMONK.
No ncteyHn BpeMeHn, yCTaHOBHeHOro Ipn3BOJNTeIeM, H a DCnIe ee NOBJIeTcR npedynpeKdaIOuIm 3aOHok « O ), yka3bIAOUIuHa Heo6XMOmocbix 3aMeHb.

BHIMAHME! 3aMeHa KepHOBOB DOJNkHn NopyuTbCBAJIaMnHIpOBoAH HOMy CHeHnAChr TYIIN DnY, YInONHOmEOHHOM npAOBHTeEM, KO-Topb BYIOHNHIT 3aMeHc C nIOIOB3OBAHmEΦpMeHbHx 3a3epeWHeH 3aMeHb KBAINFmuPObAHbN paOToHKn/DnIep, IMeOounn (Napobn AdmNHCTpATopA) (5.4.3.16) dNqDcTyNA K MeHo (KAcptOnk 6e3oNaCHOT), TAKe OByHnCTcYHK KepHOBOB, pOBePHT ToHOCb BEcoB IN, pRn Heo6XoMDocTH, BbIOHNT HOByKO KaNpO6BOy.
6.2 3KCTpeHHoe Texo6cnyKaBaHne
Длг Кдсргдддддддддддддддддддддддддддддддддддддддддддддддддддддддддддддддддддддддддддддддддддддддддддддддддддд徳хун БИССССССССССССССССССССССССССССССССССССССССССССССССССССССССCSCCHBASINHBAOJIHBAOJIHBAOJIHBAOJIHBAOJIHBAOJIHBAOJIHBAOJIHBAOJIHBAOJIHBAOJIHBAOJIHBAOJIHBAOJIHBAOJIHBAOJIHBAOJIHBAOJIHBAOJIHBAOJIHBAOJIHBAOJIHBAOJIHBAOJIHBAOJIHBAOJHBAOJIHBAOJIHBAOJIHBAOJIHBAOJIHBAOJIHBAOJIHBAOJIHBAOJIHBAOJIHBAOJIHBAOJIHBAOJIHBAOJIHBAOJIHBAOJIHBAOJIHBAOJIHBAOJIHBAOJIHBAOJIHBAOJIHBAOJIHBAOJIHBAOЛВ
CepnXG
RU
7 HENCPABHOCTN -PNUHbI -CNOCObY YCTPAHEH
B Ta6nHue npBBeHeBbO3MOxHbI HeNCpABHoCTN, KOtOpBteMOTy pNBecNTK OKtKa3y MnHnepaBnHbHO paBoTe KoeDMoONK. JAn KaXDoH HeNCpABHOCTN ykA3bBAeTc B03MOxHaePnHHaN N DeCTBnH, KOtOpBte Heo6xoDmO npEePnHHTb DnBOcTaHOBHeHn PpaBnHbHO pa6Otbo6OpDyDobAHN.
| Heincpapabnoctb | Pruvnihc Cnoco6 uystpanenry |
| Kofoemolka He Bkloucaetc. | He nodaetc3neK- trponitahme. |
| KofoeHbIe 3epHa He cnyckauotc n3 zargpyochHoro 6yHKpea. | 3akpyta zaclonhka. |
| PpR bKIOUeHN mCCTema TepreT DaHbIe npdeIy DuXHn HAcTpoek. | Pa3paJKeHa 6bypeh-N8aBapAer cNCTeMb UynpaBHe NMaH-Hon. |
| Ha dncPiee oTo- 6bpKaTeTc 3na- YOK (KeJIbIe BeCb), CInHApH- 3npy, qTo MaC- ca NoocDneH BvDaHNoH nop- QmN BByOxDIT 3a yCTAHOBnHbIIe npedeIy DOnycka Maccbl. | IpeBle cyTOuyHbe nopuii IImeHHe KAKxN-Tn5o HAcTpoek ycTroPcICTBa.I Pocne DByx nopuii nopndz 3a npdeIaMn DOnycka npOrpAMM-Hoe obecneHene XGt ABOMaTH- ceckn BByIpONHReT pachET cKUYd, HeobXODIMbX DnprpAMM-BvDaHc 3aAdHNoH nopuii. Nabe- lSeHne O BvONHHeHnpeceHTa CInHAnIaNpyETc NOrABHeHem 3NaCh4 (rOlybBe Cebl). BvDaHbIe nopLe nepeceta nopuii ByDyt npabINbHbIMn i CnHAt- mInPOBaTbc NORBHeHem 3Na- Ka (3eNeHbE Cebl) |
RU
CepnXG1
HecnpabHocbI npuHa Cnocob yctpaHmna
Ha DnCnnee OTObpaKaTecra 3aHOK (KpachBleBeCs), CnHAnM3pyA, 4TO B03Nkla HenoIaKa h Ta 3ne BBaEunBanHna NocnpHeh BduaHNO npuim.
-06baeneHNE (NIN CHTNE) Maccb C YCTPOCTBBA XOde UKKnBaBDAH/ B3BeWbAHnnoPm.
- YcTpoCTBO ONHpaTaC Hn HeyTOmHNyHO paBQyIO NOBEXHOb,He N03OBOHNOUIOpABINbHO npeDeNtB Maccy.
YctpoIcTBo NpO CoeINHeK HeCOOTBETCTBYUeH MHOrFOHe3DHO p03EKe.
Y6eHNTecb, YTO yCTpoHCTBO OnnpaTeTc HAY CT0HmHByo, He NOBBePKeHHyO BO3dEChTBNO B6paun NoBepxHOCTb.
PpOeBpTe MmHnZaMeHnTE MHOrTHeDHy pOe3TKy, K KOtOpO npDoCmeHnEO YcTpOCTBO.
IopaiTe eue HeckoBko NOpuMdo NoRbneHn3HaUka(3eNHeHBeBcbl),KOTOpbIcHnAHHpyet,TOBbDHaHnroPOnpua npabInbHa.
- Nocne TpeTbe HeccoBteCTayuue npum NoPraH -OtobpaKeHHe Ha DmcNlEe Tpex 3HaKOB KpaChIbeBeCb) BO BcBkApaH OtobpaKaTeCnCnyoUe KOHTpOlnHoe Co06UeHHe:

Nocne BoaBpata Ha TIANBHbIekpan CnCTema XGkAtnBn3Hpyet NoCnEdoBATEHoCTbIyI npHyDNTeHOrO nepeceta npouni nnpTeByerCbBaTdaTp npouni no yka3AHmHa cnnnee, YTO61NoBtBNtCBCTMeX GxBIybnHHTpepeCh. NBeaeHene O bblnHHeHH nepecheta cnHahn3HpyetOnNBHeHM 3ha
Ka (rony6be Becb),
BbIaHbIe NoCne nepecUeta
nopun 6ydyT npabNbHbIMn CmHaHn3npoBaTc NOB-
JIHeM 3HaKa (3eHeHbE BeCb).
CepnX67
RU
Hncnpabnoctb PmnuHa Cnoco6 yctpaennn
Pocne BbdaaBb Bo BeC 3KPAH OTOBpaKaetcae Co06BcUHeMe «OUn6ka npn onpeJeHmM MaCCbJ:

Ha yctpoiCTBO yctaHOBEN noCTOPOHNI npMeT N CNTEMA XGHe MoKet onpeHnTb Tappy
Ha yctpoiTEBO DEHTBYOT B6paunu HmHn CnBnHbteCKB03-HKMI.
BOMMOHANHmme noctopOHnE rnpemetaMekdy 3aunTHoKbUkoNIOKPONyCOM yCtpoCTBa.
Ha duinne no- nraeTc 3haoH
<9>,copoB0KxduoHmCscoOeHnEMoEOxoDmIOMOCTaAMHeblxgHOBOB
KepnoBa DOCTHAROT YCTAHOBENHOI rpoB3BDiTeNEMnpedena pa6oOerBpEmeHH, N03TOMyHeo6xDMIMO 3aannHPOBaBT Mx 3AMOHy.
- PpOBepBte nepHMepTp KoFemONKn uYbepNTe BCE npEeMTb, KOTOpbl eMOrT HaxOJITbcra HaycTPOINCTBE.
Y6dntTec, YTO HA KDFemONKHYe
HcETBYOT BnBpaunu, CO3aBaae
Mble DpyMMN pRbOPAMn (HAnPmep, NocyDMOeHNMM MaHHa
MNKCEPAmm, CEHTPNpDfYAMn mP.) HIN MOUHBE NOTOKN B03dy
XaHnPMpe, OT BeHTINrTOPa.
PnOpeBteYnAaJNTHe NHOOPD HbIe npEMeTbH3-NoD 3aUHTHO KpbIkwycTPOCTBcNTOOMIOK MANKHKTIN,blNEOCaNNnCNOXEHORO NCTA6BMAn.
MooHNO pOdoJHKaTb NcOnIb30BAtb KoDpOJKy Do Tx NOp, NOKa HE6yDet DoCTNHy TcyTaHOBnEHn IppeDen BpEmHN. INI Oe6cnEHN MaKmHaJIbHON 3oPfKeTNBIOCTMaHINbHNo DOCTKHeHN IppeDbHOrO 3HaHeHNH Heo5OaIMMo 3aMeHNb JxepHOBA No IHCTpykUAM, PmBeDeHHbIM Bnaparpade 6.1.5.
PocneBbINIOHNEH3aMeHbI cncuaHnCTcpaCbBaETcHTHk paOBoTJKeHOBoB.
RU
CepnXG1
Hncnpabnoctb npuHa Cnoco yctpa Hennr
Bovemraion Bmbrateneb octa- haaJIaIaeTc.
CcbapbtaBbaHne TELIOBOI 3aunHb DBNrTaeN BYTe SNOKPOBKB CICTeMbLOMONA PnIN HANHHNpEeMetOB INN NOCTOPOHHNN TEN MEXDy KeeHOBHOA
BbIIOHnIe PmIbOp IINoJXnIe, nOKa OH NIOHOBtBOOCTbHBeT.
OTKnHnIe npn6p or 3neKtpocetn
3aKpOte 3acONHc HCHMITE 3aRpyaOHb 6yHKep.
OCHNTNE INMENBHTENHHy KAMepy UyaNITE Bce NocTOPOHHNE npDMeTb.
Coepere pnpb np 3nayctne nKnP NOMA.

BHUMAHIE! ECln HEnCpABHOCb COxPAnREc DaJKe NOcE BbINONHEHNI pIeNIOXeHHbIX KOppeKTHpyOuXm DeCTBn INn ECIn BO3HNKAtO FyHKUHOAHbIbe AHOAMIIh, He YKazAaHHe B TaSbJIe, O6paTITcBc K MEChTOMy DInepy, KOtOpB nPrIMet peUeHHe O ToC, CJeNyET Nn 6paTHTbCR B Fiorenzato M.C. r.l. INn npOuyHb PemOH NTn KOHTpoN bnH6pa CneuaHnMPOAHHOmy cneuaHNTCY.
CepnXG
RU
83AKA33APACTEN
PnHne6xOJIMOCTH 3aMeHbI N3HOeHHbIX DeTaeJIe KOFemONIK (HapnMep, KepHOOB) KOHeYH NOJIb3oBAtIEL (HAPNIMEP, 6ApMEH/peCTOpATop I T.D.) DoJIeK HOB3aTeJIbHO 6oPAHtCBc K CBOEMy MEChTOy DnCTPiBbOTopy KAK P nPMOny NocpeDNIky C Fiorenzato M.C. S.r.l. i Co06uHTb MoEJIb NMeIOUeCer y Hero KOFemONIK dI INeHTHKnAaCIN, ZaONOp a NoCTABINbOpINHbX 3anaCbIX TaeeR. Nocne 3TOr TOBbAbotpOHaBHHepePOAHbIbe DnCTPiBbOTOpBI pONyAT Bo3MOHXoCT b3apeNTpnpoBaTa CB HA Hauwem CaIte, YTObSI 3aKa3aTb HEO6xOJmHyO 3anACHy OaCTb.
Iin3npoCa 3anachbix cacte Cneyet o6paatbcK pereHnabHbIM dctpmbotopam
3aBnnte h a cait wfl.fo rezalco, boitte b paedan zanebchv Chetn Bbl 6epite moelj KoFemolki C da3atOpom, ykaahany KOHeHbnI pno3oBATEen.
BOWDNTBE 3aep3epbOABHHy 30Hy, BBOJ CBOI yHtHbIe DAHHbIe B YK3a3HHyO pOMy (pNn nepOBm BxOE B CHTcEMY Heo6xOIMO 3aprrntpOBoBAtc, BBOJ cBOI nDEHTNHkAIOHOHHbIe DAHHJIe).
Bb6epTe Heo6xoDMJIe 3anaChIbe YactI, INcONJb3y TaTbIMU bIOKMOHOEHTHORO 1036paeHnIaNDnHa HnOPTane.
Cnedy Hnctpykiam, Yo6b oopmntb 3aKa3 a npabntb er HA Fiorenzato M.C.srl.
C MECTHbIM dMnT6B6TOPOM CBJETcR IepcoHNr Fiorenzato M.C. S.r.l., KOTOpb 3AIEMETcO6pa60TKOH 3aQPocA.

BHIMAHMEI 6OpATEB HBMAHME, YTO 3aMeHa JKePHOBOB M, B CELOM, BC6X BYHTpeHHX qacte KoFemOJIKo, DIOKHA PnOuBODtBCa CNEUHINHPOBAHHb TMEXHUYECKM NEPCOHANIOM.

BHIMAHHEI KommaHn Fiorenzato M.C.S.r.l.He Hecet OTBeTCTBHeHcTH 3a TpABMb WNN NOBpeXeHnOObOpDyBaHnB, Bbl3BaHbIe 3AmeHOH KOMIOHEHOB HeOPmHnHaJIbHbIMN 3aNaChbIMN YACTRMn, A TAKKE Pn3MaHE KOIMOHOHE HOEBAJIuMPOBaHBm NEpCOHaJOM.
Série XGI
PT
1 INFORMACAO GERAL 5
TODOS OS MESES: limpar completeness as laminas
| xia xia | |
| 1 xia yia 5 | |
| 1.1 xia yau 7 | 5 |
| 1.2 a xia yau 5 | |
| 1.3 xia yau 6 | |
| 1.4 xia yau 6 | |
| 1.5 xia yau 6 | 6 |
| 1.6 xia yau | 7 |
| 1.7 xia yau | 7 |
| 2 | xiaoyuan | |
| 2.1 | 8 | |
| 2.2 | 8 | |
| 2.3 | 9 | |
| 2.4 | 10 | |
| 2.5 | 10 | |
| 2.6 | 12 |
| 3 | 12 |
| 3.1 | 12 |
| 3.2 | 12 |
| 3.3 | 12 |
| 3.4 | 12 |
| 3.5 | 12 |
| 3.6 | 12 |
| 4 | ### | 16 |
| 4.1 | ### | 16 |
| 4.2 | ### | 17 |
| 4.3 | ### | 17 |
| 4.4 | ### | 18 |
| 5 | ### | 19 |
| 5.1 | ### | 19 |
| 5.1.1 | ### | 19 |
| 5.2 | ### | 20 |
| 5.3 | ### | 21 |
| 5.4 | ### | 23 |
| 5.4.1 | ### | 24 |
| 5.4.2 | ### | 27 |
nuaaannnnnaananaananaananaananaananaananaananaananaananaananaananaananaananaananaananaananaananaananaananaananaananaananaananaananaananaananaananaananaananaananaananaananaananaananaananaananaananaananaananaananaananaananaananaananaananaananaananaananaananaananaanara anaa
Fiorenzato M.C. S.r.l. aouyauuunuiu u wauuulus uauuuaa uauuuuauuauuauuauuuuuuuuuuuuuuuuuuuuuuuuuuuuuuuuuuuuuuuuuuuuuuuuuuuuuuuuuuuuuuuuuuuuuuuuuuuuuuuuuuuuuuuuuuuuuuuuuuuuuuuuuuuuuuuuuuuuuuuuuuuuuuuuuuuuuuuuuuuuuuuuuuuuuuuuuuuuuuuuuuuuuuuuuuuuuuuuuuuuuuuuuuuuuuuuuuuuuUU
aauuauuuuuuuuuuuuuuuuuuuuuuuuuuuuuuuuuuuuuuuuuuuuuuuuuuuuuuuuuuuuuuuuuuuuuuuuuuuuuuuuuuuuuuuuuuuuuuuuuuuuuuuuuuuuuuuuuuuuuuuuuuuuuuuuuuuuuuuuuuuuuuuuuuuuuuuuuuuuuuuuuuuuuuuuuuuuuuuuuuuuuuuuuuuuuuuuuuuUU

aunuun - uusnun aynnnnun 2 aannnnnne nnnn nn nnnnnnnnnnnnnnnnnnnnnnnnnnnnnnnnnnnnnnnnnnnnnnnnnnnnnnnnnnnnnnnnnnnnnnnnnnnnnnnnnnnnnnnnnnnnnnnnnnnnnnnnnnnnnnn

aunnnae nnnnne aannnnnne

nannnnnnnnnnnnnnnnnnnnnnnnnnnnnnnnnnnnnnnnnnnnnnnnnnnnnnnnnnnnnnnnnnnnnnnnnnnnnnnnnnnnnnnnnnnnnnnnnnnnnnnnnnnnnnnnnnnnnnnnnnnnnnnnnnnnnnnn
mnnn
XG
1.3
Fiorenzato M.C. S.r.l. 1aunauauuauu uuuu uuuuuuuuuuuuuuuuuuuuuuuuuuuuuuuuuuuuuuuuuuuuuuuuuuuuuuuuuuuuuuuuuuuuuuuuuuuuuuuuuuuuuuuuuuuuuuuuuuuuuuuuuuuuuuuuuuuuuuuuuuuuuuuuuuuuuuuuuuuuuuuuuuuuuuuuuuuuuuuuuuuuuuuuuuuuuuuuuuuuuuuuuuuuuuuuuuuuuuuuuUU
Tnannnnnnnnnnnnnnnnnnnnnnnnnnnnnnnnnnnnnnnnnnnnnnnnnnnnnnnnnnnnnnnnnnnnnnnnnnnnnnnnnnnnnnnnnnnnnnnnnnnnnnnnnnnnnnnnnnnnnn
nssuusaaananaaannnnnaaunau
aannnnnnaananaananaananaananaananaananaananaananaananaananaananaananaananaananaananaananaananaananaananaananaananaananaananaananaananaananaananaananaananaananaananaananaananaananaananaananaananaananaananaananaananaananaananaananaananaananaananaananaananaananaanaraannaa
1 1 1 1 1 1 1 1 1 1 1 1 1 1 1 1 1 1 1 1 1 1 1
| 1 | ### |
| 2 | ### |
| 3 | ### |
| 4 | ### |
| 5 | ### |
| 6 | ### |
| 7 | ### |
| 8 | ### |
| 9 | ### |
| 10 | ### |
| 11 | ### |
| 12 | ### |
| 13 | ### |
mnnn
XG
2.4
aannnnnnaanennnnnnnnnnnnnnnnnnnnnnnnnnnnnnnnnnnnnnnnnnnnnnnnnnnnnnnnnnnnnnnnnnnnnnnnnnnnnnnnnnnnnnnnnnnnnnnnnnnnnnnnnnnnnnnnnnnnnnnnnnnnnnnnnnnnnnnnnnnnnnnnnnnnnnnnnnnnnnnnnnnnnn
2.5 juzuuiuaoxi uanauanwnuaa
Fiorenzato M.C. S.r.l. waiiiaaiyauayxg iuuaiaui:
| F64 E XGI F64 EVO XGI F83 E XGI F71 EK XGI | E Fxx EVO K | XGI |
*aannnnaananaananaananaananaananaananaananaananaananaananaananaananaananaananaananaananaananaananaananaananaananaananaananaananaananaananaananaananaananaananaananaananaananaananaananaananaananaananaananaananaananaananaananaananaananaananaananaananaananaananaanara
(^*) nssnnnns
mnu
XG
2.6

Fiorenzato M.C. S.r.l. wailgauuuaaue aea n uauuunauuauauuuuauuuuuuuuuuuuuuuuuuuuuuuuuuuuuuuuuuuuuuuuuuuuuuuuuuuuuuuuuuuuuuuuuuuuuuuuuuuuuuuuuuuuuuuuuuuuuuuuuuuuuuuuuuuuuuuuuuuuuuuuuuuuuuuuuuuuuuuuuuuuuuuuuuuuuuuuuuuuuuuuuuuuuuuuuuuuuuuuuuuuuuuuuuuuuuuuuuuuuuuuuUU

nntuunuaanwnnnnnaaannnnnnae
xnXG
mnnn
nannnnnnaaennnnnnae nnnnnnnnnnnnnnne nnnnnnnnnnnnne
wawwauwauwauwauwauwauwauwauwauwauwauwauwauwauwauwauwauwauwauwauwauwauwauwauwauwauwauwauwauwauwauwauwauwauwauwauwauwauwauwauwauwauwauwauwauwauwauwauwauwauw
nwnnnnunwunxGgwnnnnnnnnnnnnnnnnnnnnnnnnnnnnnnnnnnnnnnnnnnnnnnnnnnnnnnnnnnnnnnnnnnnnnnnnnnnnnnnnnnnnnnnnnnnnnnnnnnnnnnnnnnnnnnnnnnnnnnnnnnnnnnnnnnnnnnnnnnnnnnnnnnnnnnnnnn nn
nunwnnnn nn nnnn (5.4.1) aannnnnnnnnny "nns
nennnnnnn" (a 5.4.3) annnnnnnnnnnnnng Taaannnnnnnnnnnnnae
n/nnnnnnnnnnnnnnnnnnnnnnnnnnnnnnn (nnu) 111nssuuu/nnnd
nannnnnnnnnnnnnnnnnnnnnnnnn (un) nne anrnrnrnrnrnrnrnrnrnrnrnrnrnrnrnrnrnrnrnrnrnrnrnrnrnrnrnrnrnrnrnrnrnrnrnrnrnrnrnrnrnrnrnrnrnrnrnrnrnrnrnrnrnrnrnrnrnrnrnrnrnrnrnrnrnrnrnrnrnrnrnrnrnrnrnrnrnrnrnrnrnrnrnrnrnrnrnrnrnrnrnrnrnrnr
mnnn
XG
5.4.1 wuusn
WuHOME ananwunau 12 ananwunau wannanaa aannnnaa
wnnnnnaaannnnnnaanennnnnnnnnnnnnnnnnnnnnnnnnnnnnnnnnnnnnnnnnnnnnnnnnnnnnnnnnnnnnnnnnnnnnnnnnnnnnnnnnnnnnnnnnnnnnnnnnnnnnnnnnnnnnnnnnn
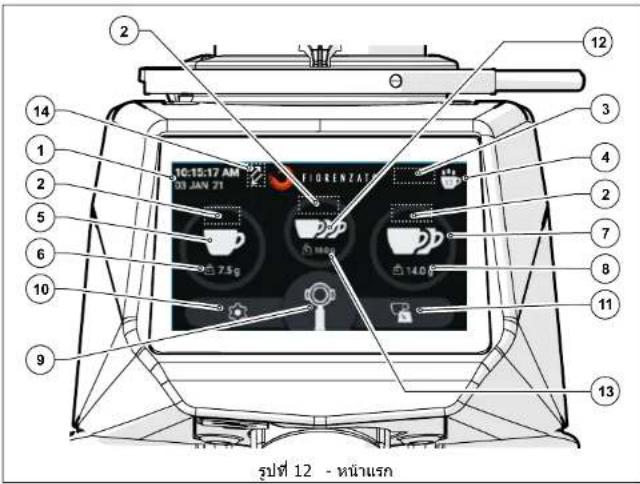
1200000000000000000000000000000000000000000000000000
nun"u"u"u"u"u"u"u"u"u"u"u"u"u"u"u"u"u"u"u"u"u"u"u"u"u"u"u"u"u"u"u"u"u"u"u"u"u"u"u"u"u"u"u"u"u"u"u"u"u"u"uu" uuuuuuuuuuuuuuuuuuuuuuuuuuuuuuuuuuuuuuuuuuuuuuuuuuuuuuuuuuuuuuuuuuuuuuuuuuuuuuuuuuuuuuuuuuuuuuuuuuuuuuuuuuuuuuuuuuuuuuuuuuuuuuuuuuuuuuuuuuuuuuuuuuuuuuuuuuuuuuuuuuuuuuuuuuuuuuuuuuuuuuuuuuuuuuuuuuuuuuuuuUU
y
nwnnnnnnnnnnnnnnnnnnnnnnnnnnnnnnnnnnnnnnnnnnnnnnnnnnnnnnnnnnnnnnnnnnnnnnnnnnnnnnnnnnnnnnnnnnnnnnnnnnnnnnnnnnnnnnnnnnn

5.4.3.4 muaaun
x 17 (5.4.2.1)
mnnnnae nnnnne "nennn
mnnnnn"nnnnnne
HNO" (nannnnnnae nnnnn
Lnnnnaaannnnnnae annnnnne nnnnnnne aannnnnne anennnnnne
nntan"naaannnnnnae

HOME

HOME
mwnw
XG
5.4.3.5 uanannn
Wu Wai Hua ( 1) Wai Hei You (2) Wu You You (3) You You You (4)
wunwun: wunwunwunwunwunwunwunwunwunwunwunwunwunwunwunwunwunwunwunwunwunwunwunwunwunwunwunwunwunwunwunwunw

HOME 1
5.4.3.6 nssnnnnnnnnn
aunuulnauuu ( ) nua 1nu ( nusuaanauannnnn nnnaa HOME

HOME Iauiuui u"annwn
xnXG1
mnu
5.4.3.7 xu XGi
wunwnnnnnaeun ( 1
wnnnnnn nn nnnnnnnnnnnnnnnnnnnnnnnnnnnnnnnnnnnnnnnnnnnnnnnnnnnnnnnnnnnnnnnnnnnnnnnnnnnnnnnnnnnnnnnnnnnnnnnnnnnnnnnnnnnnnnnnnnnnnnnnnnn
- 150000000000000000000000000000000000000000000000000000
XGJgndnunuonnnn nn nnnnnnnnnnnnnnnnnnnnnnnnnnnnnnnnnnnnnnnnnnnnnnnnnnnnnnnnnnnnnnnnnnnnnnnnnnnnnnnnnnnnnnnnnnnnnnnnnnnnnnnnnnnnnnnnnnnnnnnnnnnnnnnnnnnnnnnn
nun: nnnnntn nn "xu XG" any uanauanunnau nau "nununun" (5.4.3.8
uu 5.3) nununun

Wn HOME "xu XG" wnu ay (Jnnnnnnn)

WnHOME nnnnna "snu XG1" (
5.4.3.8 nss
Tuaa "nununun" aen annnnnnae nnannnnnnnnnnnnnnnnnnnnnnnnnnnnnnnnnnnnnnnnnnnnnnnnnnnnnnnnnnnnnnnnnnnnnnnnnnnnnnnnnnnnnnnnnnnnnnnnnnnnnnnnnnnnnnnnnnnnnnnnnnnnnnnnnnnnnnn nn nannnannnannn nn nannnannn nn nannnannn nn nannnannn nn nannnannn nn nannnannn nn nannnannn nn nannnannn nn nannnannn nn nannnannn nn nannnannn nn nannnannn nn nannnannn nn nannnannn nn nannnannn nn nannnannn nn nannnannn nn nannnann nn nannnann nn nannnann nn nannnann nn nannnann nn nannnann nn nannnann nn nannnann nn nannnann nn nannnann nn nannnann nn nannnann nn nannnann nn nannnann nn nannnann nn nannnenn nn nannnann nn nannnann nn nannnann nn nannnann nn nannnann nn nannnann nn nannnann nn nannnann nn nannnann nn nannnann nn nannnenn nn nannnenn nn nannnenn nn nannnenn nn nannnenn nn nannnenn nn nannnenn nn nannnenn nn nannnenn nn nannnenn nn nannnenn nn nannnenn nn nannnenn nn nannnenn nn nannnenn nn nannnenn nn nannnenn nn nannnenn nn nannnenn nn nannnenn nn nannninn aan
wnnnn: nnndnfou "snu Xgi
aannnnnnaanennnnaeau "nns
"unoun" nanaan an nnnn
wnnnn: nnndnfou "snu Xgi
nunnnn" nnndnfou"unoun" unnnn

wunuuaan"nuuuaaun
mnnn
XG
5.4.3.9
aannnnn nnnnnae aennnnne eanennnne ennnnne ennnnne ennnnne ennnnne ennnnne ennnnne ennnnne ennnnne ennnnne ennnnne ennnnne ennnnne ennnnne ennnnne ennnnne ennnnne ennnnne ennnnne ennnnne ennnnne ennnnne ennnnne ennnnne ennnnne ennnnne enannnee

5.4.3.10
aannnnn nnnnnnnnnnnnnnnnnnnnnnnnnnnnnnnnnnnnnnnnnnnnnnnnnnnnnnnnnnnnnnnnnnnnnnnnnnnnnnnnnnnnnnnnnnnnnnnnnnnnnnnnnnnnnnnnnnnnnnnnnnnnnnnnnnnnnnnnnnnn nn nannn nannn nannn nannn nannn nannn nannn nannn nannn nannn nannn nannn nannn nannn nannn nannn nannn nannn nannn nannn nannn nannn nannn nannn nannn nannn nannn nannn nannn nannn nannn nannn nannn nannn nn annn nn annn nn annn nn annn nn annn nn annn nn annn nn annn nn annn nn annn nn annn nn annn nn annn nn annn nn annn nn annn nn annn nn annn nn annn nn annn nn annn nn annn nn annn nn annn nn annn nn annn nn annn nn annn nn annn nn annn nn annn nn annn nn annn nn ann

Tnuee n 700nnnsuunnuanrnnnna Tnueaonnnnssnnnnnnnnnnnne Tnuean nn nannnnnnnnnnnnnnn

WHTHOME HU "Juaa
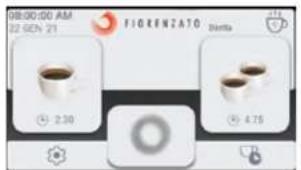
HOME tu "nua
xnXG
mnu
5.4.3.11
aannnnn nnnnnnnnnnnnnnnnnnnnnnnnnnnnnnnnnnnnnnnnnnnnnnnnnnnnnnnnnnnnnnnnnnnnnnnnnnnnnnnnnnnnnnnnnnnnnnnnnnnnnnnnnnnnnnnnnnnnnnnnnnnnnnnnnnnnnnnnnnnnnnnn nn
nnae nanae annnnne aannnne ane ane ane ane ane ane ane ane ane ane ane ane ane ane ane ane ane ane ane ane ane ane ane ane ane ane ane ane ane ane ane ane ane ane ane ane ane ane ane ane ane ane ane ane ane ane
yuaan yu uusnanaaunnae
yuean yuean anen aynnnnnae
yuean yuean anen aynnnnnae
yuean yuean anen aynnnnnae
yuean yuean anen aynnnnnae
yuean yuean anen aynnnnnae
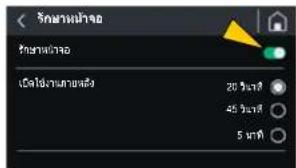
5.4.3.12 m
aannnnn nnnn nnnn nn nnnn nnnnnn nnnn nnnn nnnn nnnn nnnn nnnn nnnn nnnn nnnn nnnn nnnn nnnn nnnn nnnn nnnn nnnn nnnn nnnn nnnn nnnn nnnn nnnn nnnn nnnn nnnn nnnn nnnn nnnn nnnn nnnn nnnn nnnn nnnn nannn nannn nannn nannn nannn nannn nannn nannn nannn nannn nannn nannn nannn nannn nannn nannn nannn nannn nannn nannn nannn
mnnnnae
·
·
muaus
·
-
·
·

nssnn
mnu
XG
5.4.3.13 jiuuaanran
Tn"Juaaun"u Tnaunnnn nn nannnnnnaeauanennnnn 12 12 12 12 12 12 12 12 12 12 12 12 12 12 12 12 12 12 12 12 12 12 12 12 12 12 12 12 12 12 12 12 12 12
wnnnaaannnnn (wnnnn) waaan (wn/aa/1) waaan nnnnnnnn (waaan) waaan (wn) waaan
wnnnn nn nnnnnnnnnnnnnnnnnnnnnnnnnnnnnnnnnnnnnnnnnnnnnnnnnnnnnnnnnnnnnnnnnnnnnnnnnnnnnnnnnnnnnnnnnnnnnnnnnnnnnnnnnnnnnnnnnnnnnnnnnnnnnnnnnnnnnnnnnnnnnnnnnnnnnnnn nn
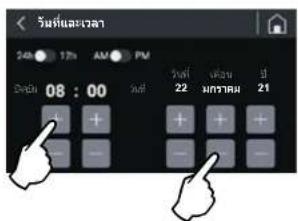
mssuuaa
5.4.3.14 ay a
aannnnn nnnnnnnnnnnnnnnnnnnnnnnnnnnnnnnnnnnnnnnnnnnnnnnnnnnnnnnnnnnnnnnnnnnnnnnnnnnnnnnnnnnnnnnnnnnnnnnnnnnnnnnnnnnnnnnnnnnnnnnnnnnnnnn
aannnnn
a
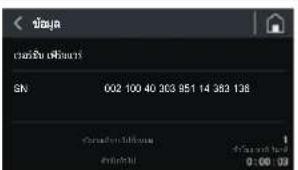
nun"ay
XG
mnnn
5.4.3.15
Tnna"5uunnnn"w nannn nn nnnnnnnnnnnnnnnnnnnnnnnnnnnnnnnnnnnnnnnnnnnnnnnnnnnnnnnnnnnnnnnnnnnnnnnnnnnnnnnnnnnnnnnnnnnnnnnnnnnnnnnnnnnnnnnnnnnnnnnnnnnnnn
aannnnnnaananaananaananaananaananaananaananaananaananaananaananaananaananaananaananaananaananaananaananaananaananaananaananaananaananaananaananaananaananaananaananaananaananaananaananaananaananaananaananaananaananaananaananaananaananaananaananaananaananaananaan ana ane ane ane ane ane ane ane ane ane ane ane ane ane ane ane ane ane ane ane ane ane ane ane ane ane ane ane ane ane ane ane ane ane ane ane ane ane ane ane ane ane ane ane ane ane ane ane ane ane ane anee
wssn! 17waun n sun"uauuuaaauauauuuu u

2 THONG SO DINH DANH VA DAC DIEM KY THUAT 8
2.1 Lopi gioti thieu 8
2.2 Dinh dansh thiiet bi 8
2.3 Xác dinh cac bó phàn chín cúa May xay ca hé tu dong dingh lung ng 9
2.4 Muc dich sudung 10
2.5 Dong san pham Xgi va cac dac tinh ky thai 10
2.6 Tieng on 12
3DAMBAOANTOAN 12
3.1 Thong tin chung 12
3.2 Cach thuc su dung sai co the xay ra 12
3.3 Chuy de sur dung dung cach va an toan 13
3.4 Cac thiet bi an toan duoc ap dung cho may xay ca phe tur dong dinh luong 14
3.5 Cac nguy co rui ro khac 15
3.6 Nhan canh bao duoc ap dung cho may 16
4 LAP DAT 16
4.1 Luu kho 16
4.2 Lya chon dia diem lap dat 17
4.3 Mo bao bi va dich chuyen may 17
4.4 Lap dát va két néi vovi mang luori dien 18
5 CACH SU DUNG MAY XAY CA PHE TU DONG DINH LUQNG 19
5.1 Dieu khien may 19
5.1.1 Nut vän 19
5.2 Chuan bi truck hsi su dung may xay ca phe t dong dinh luoq 20
5.3 Quy trinh "Khoi dong lan dau" 21
5.4 Bang dieu khien 23
5.4.1 Trang chu Home 24
5.4.2 Tuy dong vohieu hao/kich hoat he thong dinh luoang Xgi 27
5.4.2.1 Vô hieu hoa he thong duong dinh luong xgi 27
5.4.2.2 Kich hoiht he thong tur dong dinh lucxgi 27
| VN | Dòng XGI | |
| 4.3 Menu Cái Dát | 28 | |
| 4.3.1 | Thay doi khác turong xay | 30 |
| 4.3.2 | Hiên khác turong cho tùng li等多项 xay 30 | |
| 4.3.3 | Thay doi khác turong xay | 31 |
| 4.3.4 | Hiên khác turion gian xay | 31 |
| 4.3.5 | Hiên khác sǒ li等多项 thế kē | 32 |
| 4.3.6 | Hiên khác xay ba tach ca phé 32 | |
| 4.3.7 | Hé thóc XGI | 33 |
| 4.3.8 | Khoi Dong Làn Dàu | 33 |
| 4.3.9 | Dô sang mân先进技术 | 34 |
| 4.3.10 | Ché do mân先进技术 | 34 |
| 4.3.11 | Báo vè mân先进技术 | 35 |
| 4.3.12 | Ngón ngú | 35 |
| 4.3.13 | Ngày vα gioc | 36 |
| 4.3.14 | Thếng tin tiế技术创新 | 36 |
| 4.3.15 | Khoi phuc lái khác turong xay mác dinh | 37 |
| 4.3.16 | Mát關鍵 quan tri先进技术 | 38 |
| 5 | Dietu chinh kich co xay | 39 |
| 6 | Hé thóc tur dong hieu先进技术 | 39 |
| 7 | Tient huàn xay theo li等多项 luyng | 40 |
| A O T R I M A Y X A Y C A P H E T U D O N G B I N H L U O N G | 41 | |
| 1 | Báo duong dinh ký | 41 |
| 1.1 | Vé sinh tiên bì | 42 |
| 1.2 | Kiém tra tinh trang cuà day dān dèn nguò dien | 44 |
| 1.3 | Làm sacha bàn ráng xay ký turong | 45 |
| 1.4 | Dai Mý xay cā phé tur dong dinh turong vè trang thai nghi | 45 |
| 1.5 | Thay theb bàn ráng xay | 46 |
| 2 | Báo duong ngoa ikey hoach | 46 |
| Y' C O - NGUYEN NHÁN - BIEN PHAP KHÁC PHUC | 47 | |
| EU CAU THAY THE PHU TUNG | 51 | |
Dong XG
VN
1 THONG TIN CHUNG
1.1 Thong tin chung vé so tay hóng dān su dung va phuong thuc tra ciu

Doc ky huong dan sur dung nay trucc khl lap dat va sur dung lan dau tien May xay ca phe dien tur tong dinh luong cua Congty TNHH Fiorenzato M.C. S.r.l.
Huong dan sù dung nay dà duoc soan thao theo cac quy dinh cua Chi thi 2006/42/ EC, nhām cung cap tát ca thong tin húu ich de nguroi dung cuoi co the ca dai, dieu chinh vā su dung May xay ca phe dien tu dong dinh lóng duoc san xuàt bói Cong ly TNHH Fiorenzato M.C. S.r.l.
Noi dung cua so tay hurong dan nay phai duqc doc va hiou toan bo trucc khi lap dat va su dung may xay ca phu dong dinh lucong. Dong thoi, tai liu may phai duqc bao quan va giu gin tong tinh tang tó de co thera cou say na.
Hinh anh, du lieuu, van ban va mô ta có trong tai lieu nay, la tai sian cua Cong ty TNHH Fiorenzato M.C. S.r.l., phan anh tinh trang ky thai cua may tai thoi diem phat hanh trei thuong.

Congy TNNH Fiorenzato M.C. S.r.l. luon ti kim khm ng giang phap moi de cal thien san pham cua minh, do do, theo thoi gian co quyen they doi may xay ca phe tu dong din luyu vai liue cua may khong can xem xac cac san pham da bán co con phu hup va/hoac da loi thoii.
De thuan tien cho vioc tra ciu, hurong dan su dung nay co mot muc luc chung giup xac din chu de quan tam va mot loat cac ky hiuei bat de duh hut sur chu y cua nguo doc den noi dung quan long, tu do dam bao an toan va cach thuc su dung dung dan may xay ca phe tu dong dinong.
1.2 Cac ky hieu duoc su dung trogh so tay hong dan

CANH BAO - LUU Y! The hien mot canh bao hoic mot luy quan tong lien qua n cac chuc nang cu the va/hoac thong lin hcu ich cho nguroi dung. Hay chu y den nhng doan van bän duoc dān duang khy iieu nay.

NGUY HIEM CHUNG - CHU! Dau hieu canh bao nguy hiechung. Van bān, ducoc dans dαng bangi tzung nay, cahb bia viec khong tuan thu hurong dan ducoc ung cap co the gay hu hai cho may va /hoac dan den nguy cor gay thurong tich chou nguri sur dung.

THIET BI CO DIEN AP-CHU Y! Van bän ducc dans dau bang biu turong nay cahn bao ngu co dien giat co the xay ra. Hay can tong va chu y den cac chi dan ducp de ra.

DANH RIENG CHO CAC CHUYEN VIEN KY THUAT DUQC CAP PHEP: Ky hieu nay dang dau cac van ban ma tā nhung bièn phap xu ly thai duoc thuc hiem boi mot chuyen vien ky thua (dōi ngu hó tro ky thaú).
VN
DongXGj
1.3 Canh bao cho nguoi mua
So tay hóng dān su dung nay, cung voi Tuyen bo Tuan tu chuàn EC, la phan khong the hiieu cua may xay ca phe tur dong dinh luong cua quy vi. Do do, hay sur dung va bao quan tai lieu nay can than, bat buoc phai cung cap no cho ta c nh ng ai su dung may va luon de kem theo thiet bi trong truong hop di chuyén hoac ban lai cho ben thu ba.

Trong truong hop mát vā/hoac hu ng hóng tai liéu nay, quy vi co the yèu cau nha san xuàt cung cap mét ban sào, bang cach cho blét má cua so tay hóng dān durgc hi né trén bia sau.
Truckhi chop nguhi khas sut dung May xay c phre tong dinh lrong, hay dam bao rng nguhi do dac vo hiieu nol dung cua sot yau hong dan sut dung na.
So tay hurong dan sur dung gom co tat ca cac chi dan va quy trinh sur dung, ma neu quy vi tuan thu theo mot cach dung dan, se co the vanh may mot cach an toan ma khong gay thiet hai chan than va thei bi.

Nguo mua phai co nghva vu dao tao ky dong nhuan vien phi trach cach dung vba duong may xay che tu dong dinh ungong.

Nguoi mua va tát c nhung ai su dung may xay ca phe tur dong dinh luong phai tuan thu chat che tat ca cac canh bao cu the co trong so tay huong dan nay.
1.4 Chi tiét lién hé cuà nà san xuàt
Néu can them bat cou thong tin gi, quy vi co the lien hé voi Cong ty TNHH Fiorenzato M.C. S.r.l. tai dia chi sau:
2 THONG SO DINH DANH VA DAC DIEM KY THUAT
2.1 Lòi gói thieu
Pha c pha la mot nghe thut, va de nam bat turong tan bi quyet cach lam quy vican phai thuc hi huan xac thee qua tac. That vay, cong thuc pha ca phe esseo hoan hao rat phur tap, dong chi trih bi pha cung dong mai vai tro curky quan tong. De tao ra thanh pham tsi uru voi chat luong khong theban cai, ba yeu to saui phai duroc ket hop chuan xac:
Cape duoc phoi tron hao hang.
- Sûr dung dung cach cac thiet bi pha san co.
Ky nang kheo leo va tinh chuyen nghiep cua nguroi pha ca phe. De thuong thuc mot ly ca phe ngon, trai voi suy nghi cua nhiu nguroi, moh hon hop ca phe duoc phi trio dac biét la khong du.
Concán kinh ngiem va ky nang cua ngoi pha theo dung quy trinh chuan bi do uong, cng voi sur hó tv may moc rung ugng, gop chan quan tong tao nen miq tiac nh no nhān. Day la ly do tai sao cac chuyen gia dingh cao may pha ca phe espesso va may xay ca phe tv dong dinh rung. Thong thao nhug triet bi pha ché, giu cho chung hoat dong tron tru va tan dung het kha nang cua chung la ky nang cua nhong chuyen gia ca phe thuc thu. Ly ca phe espesso ngund hinh thanh tur niieu thao tac pha ché, trong do xay ca phe dong vai tro quan tong. Do da, voi ngoi pha ca phe, may xay ca phe tv dong dinh rung laotrong nhong cong cn ten tang, ma nhat thiet pah co cac tinh chat nhat dinh nuh: do ben, do cha caxi nhang. Tat ca cac may xay pa tve dong dinh ruong do Congty TNHH Fiorenzato M.C. S.r.l. san xuat deu dap und yda du nhng yeu ca nay.
2.2 Dinh dangh thiet bi
O'phia ben trai cua tát cá cac may xay cà phé tur dong dingh lurong dinrg san xuát bói Cong ty TNHH Fiorenzato M.C. S.r.l., déu co môt nhan mac dingh dans luon chuca cac dür liú sau:
Tén Congy TNHH Fiorenzato M.C. S.r.l.
- Nhan hieu CE vānam san xuát.
Cac nhan hieu chung nhn khac.
Makiéu may vaso sé-ri.
- Cong suat cua thiet bi.
Dien ap va tan so dong dien quy djnh.
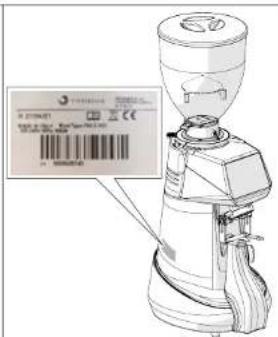
Dong XGj
VN
2.3 Xác dinh cac bo phan chinh cua May xay ca phe tu dong dinh luong
May xay c phe tur dong dinh luyong gom co mot than may voi tat ca cac thiet bi can thiel de xay ca phe va mot pheu o phia trn de nap hat ca phe da rang say can thai xay. Voi inh anh than chiieu Hinh 1 tati ca cac loai may xay ca phe tur dong dinh luyong dong XGI se cac phan chin sau:
3.5 Cac nguy co rui ro khac
Cong ty TNHH Fiorenzato M.C. S.r.l. trong qua trinh thiet ke, da ap dung tat ca cac bien phap ngua c an thiet de dam bao an toan tuyet dai cho viec sur dung may xay ca phe tur dong dinh ngung.Tuy nhien, trong qua trinh lap dat, ve sinh va bao tri may, van tan tai nhung rui ro khong theo loai tru, ma co the dguc xiy bang cach dao tonguroi sur dung chuan xac theo nhung quy dinh neng bang sau.
Doi vovi miot nguy co lai co cac cach hru ich nham han che va/hoac loai tru tung loai rui ro rieng le.
Loai rui ro Xuat hieng trong luc: Cach thuc glam thieu rui ro
| Bànm tim và /hoac dáp nát chi trén và chi du ori do máy de lén | Dich chuyén may dé: ·Lày ra khài bao bi dòng goi. ·Làp dát. ·Dích chuyén may dé lám sacha bè mát ké dōbên du ori. | Namd that chac may trucc khi di chuyén. Dám baco quy vi có du khong gian dé djch chuyén may môt cach an toán ma khong va vào chuáng ngai vát. Có the su dung gāng tay chóng truot dé di chuyén máy xay ca phé tv dong dinh luong. |
| Dièn giṭ | Két néi và ngat két nóliday dān khài nguàn dièn. | Thúrgh xuyén kiem tra tinh trang cúa day nguón va thay thé khi tháy day giǎn chat luong hoac hú hóng. Hāy dam bao ràng cóng tác ò vj tri "O" (TAT) trucc khi két nóliday nguón vòi may xay ca phé tv dong dinh luong. |
VN
DongXG
3.6 Nhan canh bao duoc ap dung cho may
Tai dai cua may xay ca phe t dong dingh uong, gan day dan den nguon dien, co mot nhan dinh (xem Hinh 7) canh bao nguy hien dien giel. Tem nhuan cho biét sur hiend cua cac bac poan co dien ap ben trong than may.

LUU YI Khong duoc thao nap dong phia duoi khi pich cam dang ket nao voi dien. Tát ca cac hoi dong bao duong v dien (vi du: thaty the day dan nao do bi hong) phai duoc thuc hiien boi chuyen vien ky thuat va may da duoc ngat thai nguan dien.
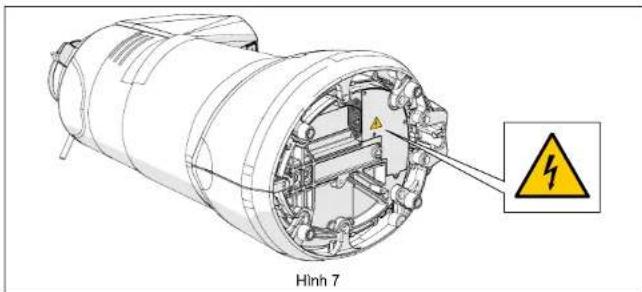
4 LAP DAT

LUU YI Truckhi tien hanh cai dat va vanh thiet bi, hay doc kynhng noidung sa.
4.1 Luu kho
Trong truong hop may khong duoc lap dai ngay tai noi su dung vacan duoc luru tru tam thoi, hay bao quan thiiet bi o noi an toan dap ung cac diu kien sau:
Noi duoc chon de cat giu may tam thoi co moi truong kin, tranh anh nang mai troi va thoi tiet xau;
- nhiét do cua nao bao quan trong khoang tur 5^ den 40^ , voi do am trong dai tur 30% den 90% ;
- néu buoc phai luru tru may trong mot thoi bian dai truc khi lap dat, thi nen gi nguyen bao bi ban dau de dam bao may duoc bao v tot hon.
Dong XGj
VN
4.2 Lya chon dia diem lap dai
Dua vao chu cang cua may xay ca phe tur dong dinh luc ng, chung ta nen DAT no or gan may pha ca phe.
Truoc khi tién hanh lap dai, hyd dam bao rang dia diem dansh cho may dap ung cac yeu cau sau:
Bé māt noi dat may phai bang phang, nhan nhui va du chac chan de chiu dugc trong lurg ng cua may;
- Noi dat may phai co dien tich phai du rong de co the lap dat chan xac va su dung may mot cach de dang;
Khong ducc lap dai may gan bön rna va/hoac vbi nuoc, noi cac tia nuoc va/hoac nuoc ban vao lam uot may;
- Noi sù dūng may phài du anh sāng, thong thoáng;
- Noi lap dai pha co 6 cam dien gan do de co the két noi may voi nguon dien, phu hop vovi cac quy din hien hanh laq cia su dung.

T U Y! O cam phai duoc tranq bi he thong naoi dat an toan hieu qua.
LUU! He thong cung cap dien cing phai lap dai cau dao tong an toan tai dau nguo, trucoc khi dien vao 6 cam, o mot vi tri de nhan biet, noi ngroi van hanh co the dang tiep can, de bao ve thiet bi khong bi qua tai va they doi dien ap dot ngot va tranh rui ro bi dien giat.
4.3 Mo bao bi va dich chuyen may
Sau khi mo bao bi, hay kiem tra can than de dam bao rang thi et bi con nguyen ven va khong co bo phan nao bi hur hóng.
Hay mo bao bi o gan dia diem lap dai dam bao quy vi co du khong bian de dich chuyen may mot cach an loan.
Lay may ra khoi bao bi, cam nam chac chan va an toan.
Dat may xay caphé tudong dinh lourng len be mata di a diem sudung.

LUU Y! Hay het suc chu y khi djch chuyen thi et bj. Voi tro nglu (18÷ 25kg) vahinhang doracbietaa than may co thehnh anghuyco trut, mdtbamdan den roi, gay baindapban chan khi duoc nanglenbangtayva/hoackhi dinh vi thi et bi tren be mat dia diem sur dung.Neu quyv cam thay khong chac chan ve cach cam nam, hany hno den su tro giup cua ngoi thu hai.

LUY! Khong de cac bo phan cua bao bi trong tam voi cua tre em de tranh nhung nguy hiem tiem tang. Gui lai bao bi cho den khi het han bao hanh.
VN
DongXGj
4.4 Lap dát va kénto vii mang luoi dien
De hoan tát véc cai dát va tién hàn hún sù dung may xay ca phe tv dong dinh luyong moi cúa quy vi, chí can:
Dām bao rang hé thong cung cap dien co dien ap dap ungho dai ng hung tiu chu an vngan dien va co cong sua du kha nang chi tai dien nang tiu thu ca ma (xem nhan dinh danh san pham duoc dan trn mat may xay ca phe tu dong dinh lurong).
Két不好意思cama day dan toi ngoun dien(Hinh 8 So 1) den dau cam IEC or duoi day cua hiét bi (Hinh 8 So 2);

LUU Y! De két noidau cam day nguon cua may xay ca phe, can phai dat may nam nghieng hoan toan tren be do. Can phai gur that chac thiet bi va xoay chuyen mot cach can than, de dam bao khong lam hong may hoac khong bi ket ngon lay vban tan.

Neu can sūr dung bō dai nguò, ò dien nhieu ló hoc cap dien nài dai, thi bat buoc phai dung nhong san pham hu p Hop voi cac tieu chuàn chung nhān hiế nhan tui quç gia nài may duc su dung.
Dura masya c phe vé vi tri thang dong, sau do dayi dan voi nguo dien da ducoc lap dai san (Hinh 9).
- Néu có, hyay gat nut cua cau dao bao vé tóng nám tai dαu nguón, trucc khi dién vao o cam, sang vi tri "ON" (bát) (Hinh 10).
Xoay nut van bat tát sang vi tri "I" dé bat may len (xem Muc. 5.1.1).
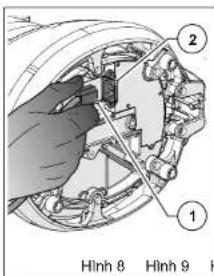
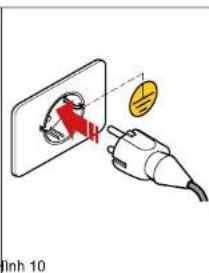
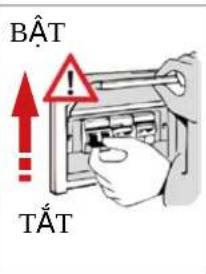
Luc nay may xay cap he t dong dinh luong da duoc cap dien va san sang sur dung.
Dong XG
VN
5 CACHSU DUNG MAYXAYCA PHETU DONGDINH LUONG
5.1 Dieu khién may
May xay ca phe tu dong dinh luong duong quan ly boi nut van balttat (xem muc 5.1.1) va bang dieu khien voi man hinh CAM UNG dung de lura chon va thiet lap toan bu cac chuc nang vananh cua may (xem muc 5.4). Toan bo thong tin v tinh hout dong cua may, cac thong so lam viie, nhong lenh ma may co the xu ly, se hiem thi tren man hinh o mat truc. Duor day la ma ta tat ca lenh dieu khien va tin hiieu hiien thi tren may xay ca phe tu dong dinh luong.

May xay ca phe turong dinh luong duc phan phi voi he thong dinh luong xdi duoc nha san xuat hiue chuan cinh xac. Moi hao dong hiue chu an lai hte thong dinh luong (neu can thiet) pha duoc hiang hien boi chuyen vien ky thaui nha san xuat hoac cua dai ly duoc uy quyen so hou "Mat khau quan tri vien" cho prep truy cap vao cac muc rieng biet cua he thong quan li may xay turong dinh luong.
5.1.1 Nut vän
Cho hép bāt va tām may.
Xoay sang v tri "O":tat may (nguon dien bi ngat).
Xoay sang vi tri "I": bat may (co dong dien chay vao may).
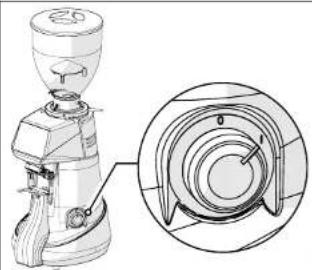
VN
DongXGj
5.2 Chuan bi truoc khi su dung may xay ca phe tu dong dinh luong
Sau khi lap dai xong, may da san sang de duoc su dung va co the nap hat ca phe can xay vao. Voi hinh anh tham khao Hinh 11, de nap hat ca phe thi can phai:
Gan pheu (S1) vao may xay ca phe tur dong dinh luyong (S2) va kho pheu vao vi tri cui na bang cach siet chat vit co dinh (S3).
Dàm bao rang chot dong mo cua pheu (So 4) da hao toan dong.
Thao nap (S65) va do vao pheu hat ca phe da rang can phai xay.
Daynapphu lai (S65).
Mô chām rai choti dong mo cua pheu(So 4) de cho hat ca phe di vao khoang nghién.
Khoi dong may xay ca phe tr dong dinh luong bang cach xao nut van sang vi tri "BAT) (S6.6).
Sau môt vai giay, man hinh hié triang "Xac nhan Bát dαu" va nguro dung can thuc hié quy trinh "Khoi dong lán dαu" (§ 5.3) dé kich hout hé thong xGì dingh urolong theo mač dinh khi tiét bi duroc bát lán dαu tién.
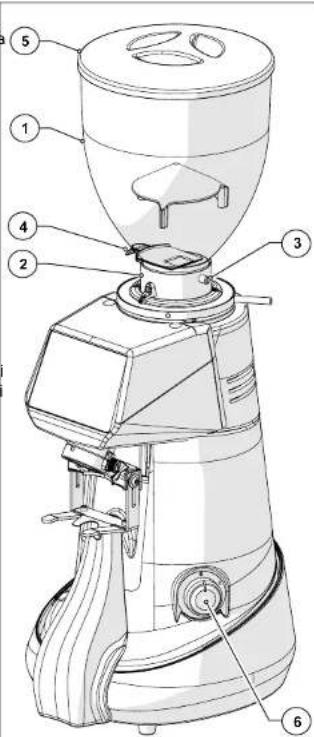
Hinh 11
Dong XGj
VN
5.3 Quy trinh "Khoi dong lan dau"
Day la quy trinh lam theo huong dan can thiet cho lan khoi dong daiu tien cua may xay ca phe ly dong dinh luong.
O lan khoi dong daiien, may xay ca phe tur dong dinh luong duoc cau hinh theo mac dinh de hoat dong voi he thong xGJ duoc kich hoat. Thong qua quy trinh na, nguo i van hanh duoc huong dan nhap va/hoac xac nhan din lieu can thi et de may xay ca phe tur dong dinh luong hoat dong.
Häy dam bao rang co du lurong ca phé can xay trong pheu dung. Mo chot de ca phé di vao khu vrc banh rang xay.
Bai may xay bang cach van nut tali bat sang vi tri "I" va diang dieu khien khoi dong.
Khi xuat hien man hinh "Xac nhan bat dau", nhanh chon muc Ngon ng.
Tai trang Ngon ng, la chon ngon ngmong muon trong so nhung ngon ng co san, sau donh nut Ngon ng de quay lai tang truc do.


Xac dhin kich co xay bang cach xoy vong dieu chinh (xem Muc 5.5). Luan phien dieu chin h vong xoy va lenh xay ca pho cho den khi dat duroc kich co xay mong muon. Sau do, giu nut
cho den khi thanh tiin trinh duoc lap day hoan toan. Neu can, co the tiep tuc xay ngay ca khi thanh tiin trinh da day.
Khi da dat duoc kich coxay mong muon, nhan phim chuc nang "Tiep theo" de tiep tuc.
- Nhan nut "Xac nhan Bat dau" de den tranq "Thay dai Lieu lang Xay".
Cai dai khoi luong tinh bang gam cho mottacphé.
Cai dai khoi luong tinh bang gam cho hai tach ca phe.
- Nhan nut "Tiép theo" dé tiép tuc.

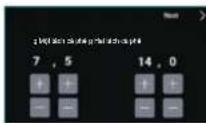
VN
Dong XG
Thiet Lap Nguoi Dung
Do sang man hinh (§ 5.4.3.9)
- Ché dà mān hinh (§ 5.4.3.10)
Bao vé man hinh (5.4.3.11)
Ngôn ngu (§ 5.4.3.12)
Ngay vagio (5.4.3.13)
- Thong tin (S 5.4.3.14)
Thiet Lap An Toan
Khoi phuc lai thei luyong xay mac dinh (5.4.3.15)
- Māt khāu quán tri viēn (§ 5.4.3.16)

VN
DongXGj
5.4.3.1 Thay dai khoi luong xay
Nhan vao muc "Thay dai khoi luong xay" o menu "Thiet lap Ky thua", khi theong xgi dang hoat dong (xem § 5.4.2.2), roi truy cap vao tong dai khoi luong ca phe xay cho mot tach, hai tach va ba tach ca phe.
Ghi chu: Khoi luong de xay ba tach
c phé se chixu hien néu curch né
"Hien triang xay ba tach c phé" duvc kich
hoat trong menu Cai d (5.5.4.3.6).
Su dung cac phim chuc nang hoac de tang hoac giam thoi gian xu ly Cac tham so sé duoc tu dong luu sa khi cai dat va thoat khoi tranq.
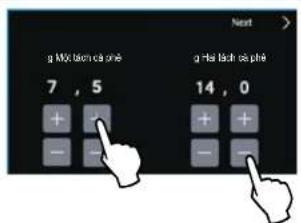
5.4.3.2 Hien thi khoi ngx ng tung liu xay
Khi hé thong xia ng hout dong (xem
$5.4.2.2), neu kich hout muc "Hien the
khoi luyong xay"rong menu "Cai dát Kiy
thuat" man sinh HOME se hién
thi khoi luyong duoc thi lap dé xay cac
lieu mong muon.
Trong qua trinh xay, bieu troung cua nut liue luyong xay da chon chuyen dan sang mau do cho dan khi n o duoc lap day hoan toan,do do the hien qua trinh xay dang dien ra. O che do xay thu cong, may se hien thi khoi luyong xay tang dan len muc toi da la 96 gam, sao dou qu tha trinh xay se t dong dung lai. Neu muc "Hien thi khoi luyong xay" khong duoc kich hoat ( ), khoi luyong xay se khong duoc hien thi tren main hinh HOME.


Mān hinh HOME hién thi khoi lóng xay
Mān hinh HOME khong hié thj khoi luyong xay
Dong XG
VN
5.4.3.3 Thay doi thoi luong xay
Nhan vao muc "Thay dai thioryung xay" o menu "Thiet lap Ky thai", khi theong xstong duvc kich khat (xem 5.4.2.1), rui try cap vao tran gai dat thioryung ca phe xay cho mot tach, hai tach va ba tach ca phe.
Ghi chu: Thoi lucong de xay ba tach ca phé se chi xuat hién néu chur nang "Hié thi xay ba tach ca phé" ducg kicho hout trong menu Cai d (S 5.4.3.6)
Sudung cac phim chuc nang hoac de tang hao giam thoi gian xu ly
Cac tam so sé duoc tóng luu sau khi cai dat vao thoi khoi tranq.

5.4.3.4 Hien thi thoi gian xay
Khi thong xoi vo hieu hoa (xem § 5.4.2.1), neu kich hoat muc "Hien thi chloi lourng xay" trong menu "Cai dai Ky thai" [1] man inhn HOME se hien thi thai giant duoc hiel lap de xay cai leiu mong muon.
Trong qua trinh xay, bieu luong cua nui lieuu luyong xay da chon chuyen dan sang mau do cho den khi no duoc lap day hoan toan, do do the hien qua trinh xay dang dien ra. O che do xay thu cong, may sie hien thi choi luong xay tang dan len muc rtoi da 25 giay, sau do qua trinh xay se t doung dung lai.
Neu muc "Hien thi thai xay" khong duoc kich hoat(), thai luyong xay se khong duoc hien thi tren man hinh HOME.

TRANG CHU HOME hién thi thoi gian xay

TRANG CHU HOME khong hien thi thoi gian xay
VN
DongXGj
5.4.3.5 Hien thi so liu thong ke
Cho phép bê (hôpét) (p) chuc rāng "Thóng kě" trén män hinh HOME (xem Hinh 12 S6 4).
Ghi chu: Bé dem tóng só liu ca phe dā
xay sé tang dan va duroc luu trong bō
nó, ngay ca khi muc "Hien thi só liu
thong ke" khong duroc kich hoat.

TRAN CHU HOME KHNI'SI liu thong ke bi vio huo
5.4.3.6 Hién thj xay ba tach ca phe
Cho hép bat ( hac tat () hihi thi va quan ly nut xay ba tach ca phe tai man hinh HOME.

TRANG CHU HOME hién thj nut "Xay ba tach ca phe"
Dong XG
VN
5.4.3.7 Hé thong XGi
Cho phep kich hoat ( hocv hiéu hóa thong tux dong dinh luyong liue xay.
Khi he thong Xgi da duoc kich hoat, may xay c phe tur dong dinh luong thuc hien xay theo khoi luong duoc thiel lap (5.4.3.1).
Khi he thong Xgi bi vio hieu hou, may xay ca phe tur dong dinh lurong thuc hien xay theo thoi bian duyc thiet lap, giong nhu he tiu chuuan cua dong may On Demand (5.4.3.3).
Ghi chu: Māi khi "He thong XGI" duyc kichoat rto lai, can phai thuc hien quy trinh "Khoi dong lan dau" (§ 5.4.3.8 e § 5.3) can thié dé ihei chin hthong can.

Mān hinh HOME vovi "He thong XGi" duoc kich hoat (ché do xay theo KHOI LU'ONG)

Mān hīnh HOME vōi "He thǒng XGì" bi vò hieu hóa (ché dō xay theo THÖI GIAN)
5.4.3.8 Khoi Dong Lan Dau
May se tr dong yeu cau thuc hien quy trinh "Khoi dong Ian dau" khi thi et bi duoc bat lan dau tien va moi khi he thong can tu dong xuoc kich hoat troi lai (5.4.3.7).
Trinh tu hout dong cua quy trinh "Khoi dong lan dau" duoc mo ta tai muc 5.3.
Ghi chu: Neu "He thong xgi" da duroc kich hoat, quy trinh Khoi dong Ian dau co the duroc thuc hien bat ky luc nao trong truong hop can thiel.
Ghi chu: Neu "He thong xgi bi v hieu hoi, Muc Khoi dong lan dau" khong duoc bat va duoc hi n ti bang mau xam.

Trang bát dαu quy trinh
"Khoi dong lan dαu"
VN
DongXGj
5.4.3.9 Do sang man hinh
Chon muc "Do sang man hinh" de vao phan tuy chinh, nhr tong hinh minho, noi quy co the tang giam do sang cua man hinh mot cach don giang, chi can di chuyen con tro sang phai (tang) nao sang trai (giam).

5.4.3.10 Ché do mān hinh
Chon muc "Che do man hinh" de vao phan tuy chin, nu trong hinh minh hoa, noi quy vi co the lua chion giao dien "Che do nen tai" (Dark mode) hoac "Che do nen sang" (Light mode)

Viechuyendoi chédo hién thi man hinh khong lam thaty dong tuy chon va/ hao cac thong so co the duoc thiét lap khac.

TRANG CHU HOME o "Ché do nèn tói"
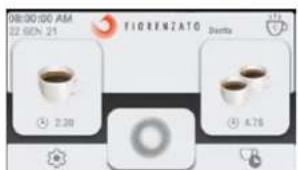
TRANG CHU HOME o "Ché do nèn sāng"
Dong XGJ
VN
5.4.3.11 Bao vé män hinh
Chon muc "Bao v men hinh" de vao phan tuy chin, nru tong hinh minh hoa, noi quy vi co the kich hoat (hoac) bo kich hoat (suc nang nay, cung nuh thiiet lap thoi diem ma man hinh cho se xuat hiien.
Quy v co the chon de trinh bao v man hinh tkrhoi dong sao 20,45 hoac 5 phu khong su dung may.
Khi chrc nang nay duroc kich hoat, sau mok haoang thoi gian cho, man hinh se tv chuyen sang che do tiet kiem nang luyong, do do chi hien thi logo cua nh san xuai, ngay va goi hien tai.
Sau 15 pht khong hoat dong, man hinh sét tát.
Be thoat khoi che do tiel kiem dien hoac che do bao ve, chi can cham vao man hinh.

5.4.3.12 Ngon ng
A few times to lay latrine, turning key is set 2000
VN
DongXGj
5.7 Tién hàn xay theo liè luǒng
Khi may xay c phe tur dong dinh luong da san sang de su dung, chi can dai tay camc chura gioc loc (S6 1) vao cang giu
(So 2) va nhan cac nut, bac
dé tién hàn hieu xay mong muón.
Cung co the nhan nut de bat dau xay ca phe lien tuc. Qua trinh xay lien tuc se tudong dung laigay khi nha nut
Khi nhan cac nut oac man xay ca phe tur dong dinh lucong sien hanh xay theo che do hoat dong ducgc thiet lap:
Xay theo KHoi LUONG (He thong XGi da duc kich hoat, che do hout dong mac dinh).
Xay theo THO1 GIAN (He thong XGihongduock houtai)

Dong XG
VN
6 BAO TRIMAYXAYCA PHE TU DONGDINH LUONG
6.1 Bao duong dinh ky

LUU YI Tnurok khi tien hanh batakybaodu ding hky nao voi may xay ca phetudong dhinluong, hayngatmay khoi nguo dien,bang cach van nut tátbat sang vi tri "O"(TAT)(Hinh 13) va rut pichc cam cua may khoi d (Hinh 14).
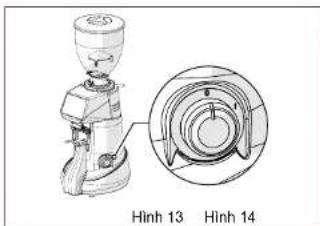
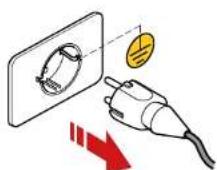
Toan bo noi dung v bao durong dinh ky may cuy vi duoc tom tat trong bang sau. Cong ty TNHH Fiorenzato M.C. S.r.l. khuyn ghi khac hang tuan thu mot cach can than cac bien phap bao durong duoc chi dinh, bang cach thuc hiien bao durong trong khung thai bian vac cach thuc duoc de nghi.
| BIEN PHÁP BAO DUÖNG D(sinh KY | |||
| Tân suat Cach thuc | báo duong Nguòi thuc | hiên | Múc |
| Sau miǒi ca lám viếc | Lam sachaMay ký luong Ngúòi sù dung 6.1.1 | ||
| Sau miǒi ca lám viếc | Kiém tra tinh trang cúa dãy dānden nguón dièn | Nguòi sù dung 6.1.2 | |
| Mǒi tháng mǒt lán | Lam sacha bàn rāng xay saukhi sù dung | Nguòi sù dung 6.1.3 | |
| Khi càn thiet | Dàt May xay cà phé tv dōngdìn hú róng vè trang thai nghi | Nguòi sù dung 6.1.4 | |
| Khi dén han dinh(trèn trang chu"HOME"sé xuáthái biếu turóng "0- àbén trài cúalogo). | Thay thebán rāng xay | Nhân viēn cóchuyén monhoá Chuyénvièn ký vuàt | 6.1.5 |
VN
DongXGj
LUU YI Khong the rua phu bang may rua bat dia.
Sung ban chai co long mem (da duoc lam sach va khorung) va may hut bui, de loai bocac hat ca phe va can bot ca phe trong khoang nghien (So 1).

LUU Y! Khong surdung nuoc va hoac chat tay rua de lam sach khoang nghien va banr rang xay.
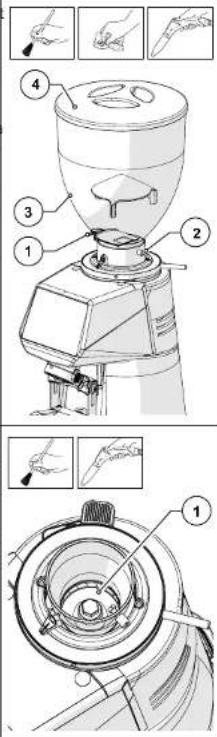
Dong XG
VN
- Nói long vit co dinh (Só 1) vā tháo ñng xá cà phe (Só 2) ra khòi vi tri cuía no.
Rua ng xang nuong nong, chat tay rua khong co mui them va chat dau mo CO PH trung tinh dan rieng cho linh vuc thuc pham.
Lau khô bang khān mēm.
Sudung may hut bui va mot mieng vai kho de lam sach va loai bo toan bo can bot ca phe tai vi tri tong xa gan trin may.
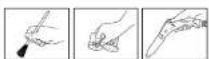
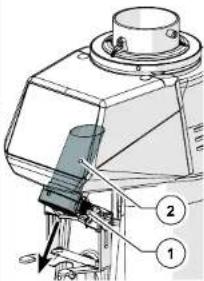
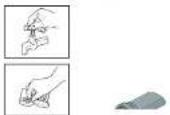
Viec vse sinh bngoai than may phai duroc thuc hien bang vai mem va cac san pham phu hop voi linv hvc thuc pham.
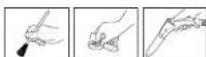

LUU YI Khong su dung mieng rua co mat rap va/hoec chat tay rua manh vi chung co the lam hong be maf cua may.

LUYI YKhongduzucupudungcaccia nucro hao hori nuoc de lam sach than may.
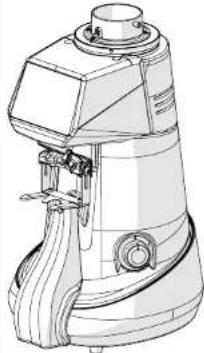
VN
DongXG7
Sau khi vé sinh, lapi ng xà tro lái may (S6 1) vao ding vi tri cuia no (S2) va co dinh no bang cach ding chat vit (S3).
Gän pheu (Só 4) va co dinh no bang cach siét chat vit (Só 5).
Bāy nāp phēu lài (Só 6).
May sé lái sān sāng de su dung, ngay khi duroc két noi vovi nguón va do caphé hat vao pheu.
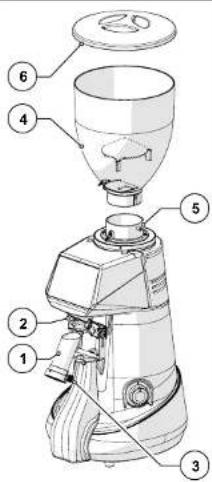
6.1.2 Kiem tra tinh trang cua day dan den nguon dien
SAU MOI CA LAM VIEC: kiem tra day nguan.
Sau khi dai ngat dai nguon khoi dien, hay kiem bra bang ma v bang lay de dam bao rang vo baovc con nguyen ven. day dan khong bj hva phich cam khong bj hong.

LUO YI: Néu phànt hien day ngún co dαu hieu hóng, hay the no bang motday khac coci diem turong tur.
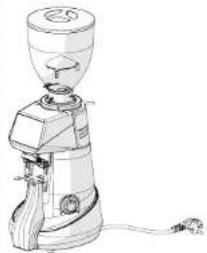
Dong XGj
VN
6.1.3 Lam sach bān rāng xay kǔ lʊng
MÖTHANG MÖT LAN: tién hanh vê sinh bānh räng xay ký luǒng
Vé sinh bānh rāng xay ky luóng phài duoc thuc hién mǒi thai mòt lán (hóac khi cān tiét), bang cach sù dung cac san pham chuyén dung, de vé sīnh bānh rāng xay, co t rén ti truǒng (vi du; chat tāy rùa PULY GRIND cho may xay ca phe).
Viec vse sinh ky luong phai duyc thuc hien vao cui ca lam viec, khi may khong co pa hé va khong co gan phu dung ca pe.
De vé sinh bānh rāng xay, can do mò luong sān pham lam sāch chuyén dung vào khoang nghiè (luc nay hao lan tróng róng) va bát dαu xay. Tróng qá trinh xay, san pham chuyén dung (dāng hat hoac tinhe) sé lām sāch bānh rāng xay, bang cach loài bó hàn loan can cà phe, can bān, nam moc va mo bam trén be mét, dong thori háp thu dai va loai bo miú khô chuì, ma khòng de lái du thor.
Vi vay, qai trinh lam sach dien ra ma khong can phai thao roi cac bänh rang xay, cing nhu khong can phai thai doi kich cox yay da hiel lap.
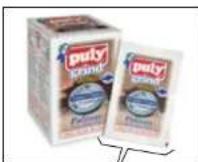
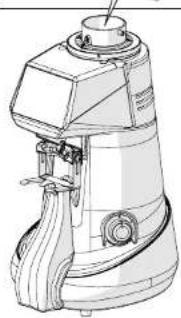
6.1.4 Bāt May xay cā phé tu dong dinh lóng vè trang thai nghi
Khi khong can sur dung may trong thoi gian dai (vi du nh ngay nghi, ngay Ie, v.v.), quy vi nen thec hienc ca thao tac vse sinh sau, de may luon hoat dong tó, dong thoi tranh cac su co co the xay ra tong lan khoi dong liie theo.
KHI CANTHIE:ve sinh va dura may ve trang thai nghi.
Hày lam sach can than may xay c phe tur dong dinh luong nhur dā néu trong muc 6.1.1.
Hälyam sachanbäng xaykyu long cac may mai nhu da néu trong muc 6.1.3.
Ngatdaynguonkhoi dien.
- Che may lai bang vai chum de tranh tich tu bui ban.
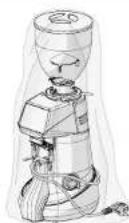
VN
DongXGj
6.1.5 Thay the bānh rāng xay
Thoi han dinh san, duoc thi che lap boi Cong ty TNHH Fiorenzato M.C. S.r.l. cho viec they the banh rang xay, se thay dai tu yhe mau banh rang va kiu may xay tur dong dinh lungng.
Khi gan den ngay do nha san xuat thiet lap, biu turong canh bao " 0" xuat hien trén man hinh, cho biet can phai thay the banh rang xay.

LUU Y! Viêch thê bânh rang xay phai ducoc thuc hiên bói chuyen vien ký thai hou dai ly duoc nha san xuà tuy quyen, vābân rang thay thephai la phu tung chin häng. Sau khi thay thebán rang, ky thai vien chuyen nganh/dai y vori "Mat khau quan tri vien" (§ 5.4.3.16) se truy cap vao menu "Cai dát bao mat" de cai dat láb dem thoi gian lam véc cua bânh rang xay. kiem tra do chinh xac cua hé thong dinh luring v néu can thiêt s thuc hiên hiieu chuan khoi luring.
6.2 Bao duong ngoai ke hoach
Khong co du tru nao cho vioc bao duong ngoai ke hoach. Tuy nhien, trong truong hop bi hong va hao truc trac khong ducr cap tong phan "7 SU CO-NGUYEN NHAN-BIEN PHAP KHAC PHUC", quy vui tuyet dai khong tv can thiep vao may, mamayhao bao cho dai ly tong khu vuc, de ho lien he voi bo phan cham soc khach hang cua Cong ty TNHH Fiorenzato M.C. S.r.l. nham giai quyet van de naiy sinn
Dong XGJ
VN
7 SU CO-NGUYEN NHAN-BIEN PHAP KHACPHUC
Báng nay the hien nhung ván de bat thuong co the khien may xay ca phe bi hong va hoc khong the hoat dong binh thuong. O' moi mot van de lai co nhung nguyen nhan co the da cau thanh nen sur do, va cac hanh dong can thuc hiend may hoat dong tron tru troi lai.
| Su có法律顾问 nhan Biên pháp khác phế | ||
| Mày cà phe tu dòng dinh luong bát khùng lén. | Thiên ngôn dien. • Dânormal ràng nut tát bát o v tri "I" (BAT); • Dânormal cau dao tur dòng ò dāu ngôn dien (néu có) ò v tri BAT. • Háiormal bǎo ràng day ngôn khùng bi hu hai v ducoc két noci chinh xac vói ò dien v dαu cam cua thiet bi. | |
| Hat cà phe khǒng chày xuǒng tür pheu nap cà phe. | Chôt cùa pheu bi dong | • Mô chôt cùa pheu. |
| Khi bát may lén, céc thong só duoc cai dāt trucó do biên mát. | Hé thong quàn l y may hét pin. | • Lien hé vói dich vu chám sóc kháchHang dé thay pin. |
| Biênormal (càn mαu váng) xuát hiên trén män inh bao hiếu kholi luong cúa lièu xay cuoli cùng vuýt qua dung sai cho phep. | • Nhung lán xay dαu tièn trogn ngay • Thay dδi loai ca phe chuá bèn trogn pheu • Hón hop cā phe vói t lê hat robusta cao • Bànnh ràng con qua miú có ma sát cao | • Thuc hiên xay them vai lán nūma khǒng thay dδi bát k y cai dànt nαo cua may. • Sau hai liēu lién tièp vuýt quà dung sai, Phân mém XGI se tur dòng tînh toán sō giày can thiet dé thyc hiên chinh xac lièu xay duoc thiet láp. Qua trinh tinh toán lái duoc hoàn tát khi män hinh xuát hiên cùa biênormal (Càn mαu xanh da troi). • Líeuormal xay sau khi tînh toán lái s é chinh xàc v ducoc bǎo hiếu khi xuát hiên biênormal (Càn mαu xanh la cày) |
VN
DongXG
Su co Nguyen nhan Bien phap khac phuc
Bieu troong (cān má do) xuài.
hién trén män
hinh bao hieu co
dieu bat thuong
dà xay ra trong
quà trinh dinh
luyong lieu xay
cuoi cuìng
Co the do them (hoac bot) trong luyong len thiet bi trong qua trinh xaydinh luyong.
Thiet bi ducat tre nont be mait be do khong on dinh lam mat do chu'an xac trong qua trinh xac dinh khoi luyong.
Thiébi duoc kéntoi vio cām diennhiéu lkhongphu hop.
Hàydam bao rang thiet bi nám trén be mat on dinh vα khong rung lac.
Kiem tra vahoac thay the neu can o dien nhieu lo ket noi voi hi cb.
Tienhanhxaycaclieu tiep theo cho den Khi xuat hien bieu tuyong (Can mau xanh la Cay) de bao hieu lieu uong xay da chuan xac.
Sau ba liue xay balturong lien tiep (hi h hi ba biu turong "cain ma do"), m thong bao la se xuat hi en chu tuan bo man hinh:
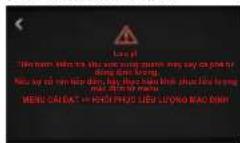
Sau khi quay lai man hinh
HOME,he thong XGi kich hoat
trinh tur bat buoc de tinh toan lai liue luong xay va can phai xay ba lieu theo chi dan hien thi tren man hnhnam cho pheh thong XGi thuc lien tuan lai. Qua trinh tinh toan lai duyc
hoan tan khi man hinh xuat hien cua biue troung CAn mau
xanh da troi). Lieu lóng xay sau khi tinh toan lai se chinh xac va duroc bao hieu khi xuat hién biéu tóng

(Can mau xanh la cay).
Dong XG
VN
Su co Nguyen nhan Bi en phap khac phuc
Sau khi xay, thong bao "Lai trong qua trinh xac dinh khoi luyong" xuat hien tren loan man hinh:

Vathe la dang ti len may xay va he thong XGi khong thexac dinh khoi luyong bao bi.
May xay bi rung lac va/hoac chju nguo gao manh.
Có thec di vat giura khung bao vé va than may.
Trén män hinn, xuàt hièn bièu turong 10 kěm theo Cǎnh bao can pài thay bānh rāng xay
Banh rang xay dang dan dat den gioli han gioc lam viec ma nha san xuat de ra, do du, qu yi cien len ke hoach thé.
Kiem tra khu vuc xung quanh may xay cha pha voai bo bat ky do vat nao dat tren thi bi.
Hày dam bao rang may xay cphé khong bi rung lac boi cac thieti bi khac (vi du: may rua bat, may xay sinh tó, may ly tam, v.v.) hao chju luong gio manh, chang han nhr quat.
- Kiem tra va loai bocac di val trén khung bao vcuay xay bang cach sur dung ban chai mong, may hut bui hao mot to giay gap.
Co the tiop tuc srdung may xay ca phe ty dong dinh luyong cho den thoi han quy dinh. Khi dat den gioi han, de dam bao toi da hieu suat cua may, can phai they the cac banh rang xay theo huong dan duroc neu tai muc 6.1.5.
Sau khi thai the, chuyen vien ky thuat se cai lai b dom thai yi gian lam Viet cua bangrang xay.
VN
DongXGj
Su co Nguyen nhan Bien phap khac phuc
Bong cā dūng
tróng qú trinh
xay.
Bao bé dong co duqic kich hout, lam nguc qac trinh xay, khi co vat the hoac d vat di vao bänr rang xay.
Tat may va doi cho den khi may nguo'i hoan toan.
Ngat may khoi ngon dien.
Dong ché cu phé v tha roi pheu nap ca phe.
Tien hàn hàn lamyack hloanghi néng w laoi boc dà vát
- Lap rapi lain may vā bāt dāu chu trinh xay.

LUU YI Néu vān dā vān tièp diēn, ngay ca khi dà thuc hièn cac bièn phap
khac phuc duçc de xuàt, hoac néu sur co vè chuc náng chóng duçc nhac dén
trong bang néy, hay lièné y viôi dai ly trong khu vuc. Ho sé quét dinh xem nén
su dung dén dich vu hó tro cua cóng tv Congy TNHJ Fiorenzato M.C. S.r.l.
hay giao vioc sura chuá hoac dai tu cho mot chuyén vien ky thai.
Dong XG
VN
8 YEU CAU THAY THE PHU TUNG
Khi can thay the cac bo phan bi an mon trong qua trinh sur dung may xay ca phe tur dong dinh luong (vi du: banh rang xay), nguroi dung coui (vi du: nhan vien pha ca phel chu nha v.v.) nhat thiet phai lien he voi nha phan phoi trong khu vu, la ben trung gian co lien he truc tiep voi Cong ty TNHH Fiorenzato M.C. S.r.l. va quy vi hay nou ma mai yax cph e tro dong lin ngu cua minh, de yeu cau va ducc cang cap phu tung they chinh hang. Chi ngh nha phan phoi duoc uy quyen tong khu vu mi co the dang ky tren trang web cua chi ung to di dai hang cac phu tung can thiet.
De yéu cau cung cap phu tung thay thec nha phan pói dia phuong pái.
Truypangweforenzato.com,vao phan dnh rieng cho phu tung thay the va chon kiu may xay ca phe ma nguo ding cuoi chi dinh.
Truy cap khu vuc bao mat bang cach dien thong tin dang nhap vao bieu mau troong (trong lan truy cap dau tien, can dang ky voi dir liue dinh dans cua dai hy).
- Chon cac phu tung thay the can thiet bang cach sur dung so do tim kiem san pham cua cóng thong tin.
Lam theo trinh huong dan de hoan tát don dat hang va gui den Cong ty TNHH Fiorenzato M.C. S.r.l..
- Nhan vien cua Cong ty TNHH Fiorenzato M.C. S.r.l. se lien hé vovi dai ly dé xu l y yeu cau.

LUU YI Xin luu y la viec thay the banh rang xay, va tat ca cac bo phan ben trong may xay c phe tur dong dinh luong nao chung, thai duoc thorc hien boi chuyen vien ky thuat.

LUU YI Cong ty Cong ty TNHH Fiorenzato M.C. S.r.l. khong chu trach nhiem voi bat ky thuong tich ca nhan va hoc hu hong nao cua this bi, xay ra do vioc thai che cac be phan bang cac phu tung khong chinh hang, va duoc thuc hiien boi nhan vien khong co chuyen mon.


- The most technological line of Fiorenzato.
- Serie XG
- IT
- IDENTIFICATION DATA AND TECHNICAL SPECIFICATIONS 8
- SAFETY 12
- INSTALLATION 16
- USING THE GRINDER-DOSER 19
- GRINDER-DOSER MAINTENANCE 41
- ANOMALIES - CAUSES - REMEDIES 47
- REQUESTING SPARE PARTS 51
- XG1 Series
- EN
- GENERAL INFORMATION
- Symbols used in the manual
- Warnings for the buyer
- Manufacturer's contact details
- Instructions for requesting assistance
- Warranty
- Applicable directives
- IDENTIFICATION DATA AND TECHNICAL SPECIFICATIONS
- Introduction
- Appliance identification
- Identificaiton of the main parts of the grinder-doser
- Intended use
- The models in the Xie and technical specifications
- Noise level
- SAFETY
- General information
- Reasonably foreseeable misuse
- Reasonably foreseeable misuse includes:
- In addition, the user must never under any circumstances:
- Precautions for proper and safe use
- Safety devices on the grinder-doser
- Residual risks
- Warning labels attached to the machine
- INSTALLATION
- Storage
- Choosing the installation location
- Unpacking and handling the appliance
- Installation and mains connection
- USING THE GRINDER-DOSER
- Machine controls
- Switch
- Preparing to use the grinder-doser
- "Initial start-up" procedure
- Operator control panel
- Home page
- Disabling/Enabling the xGI automatic weighing system
- Disabling the xgi automatic weighing system
- XGi System
- Activation of the xG1 automatic weighing system
- XGI Series
- Settings Menu
- Settings menu with XGi enabled system (dose dispensing by WEIGHT):
- Technical Settings
- XGi Settings
- User Settings
- Safety Settings
- Settings menu with a xdisabled system (dose dispensing by TIME):
- XGj Series
- Change grinding weights
- Dose weight display
- Change dose times
- Grinding time display
- Show statistics
- Triple dose display
- XGiSystem
- Initialstart-up
- Display brightness
- Screenshot
- Screensaver
- Language
- Date and time
- Information
- Resetting dose weights
- Administrator password
- Adjusting the degree of grinding
- xgitem auto-calibration
- Dispensing doses
- GRINDER-DOSER MAINTENANCE
- Routine maintenance
- Cleaning the appliance
- AT THE END OF EVERY SHIFT: Thoroughly clean the appliance
- Checking the power cable status
- Thoroughly cleaning the grinding blades
- EVERY MONTH: thoroughly clean the grinding blades
- Shutting down the grinder-doser
- WHEN NECESSARY: cleaning and shutting down the machine.
- Replacing the grinding blades
- Supplementary maintenance
- ANOMALIES - CAUSES - REMEDIES
- REQUESTING SPARE PARTS
- FR
- INFORMATIONS GENÉRALES 5
- Serie XG7
- NL
- SYNTHPHsH OoOMETPIKoy MYAOY 41
- PPOBAHMATA-AITIE-AYEIE47
- 8IAPATTEIAIINHEIONANTAAAAKTIKON 51
- Σεiρα XGi
- EL
- TENIKE ΠAHPOΦOPIE
- Eua TnO xnoiopoovrta oxyepidio
- Σερα XG
- 41
- 47
- 51
- XG1
- KO
- 1日
- 电明表及电明表电用表
- Home 品时
- CmBONbl, Hcnonb3yemble B pykoBocTBe
- RU
- CepnXG1
- PpeynpeckdHn nnoKynatena
- KOHTAKTHA HΦOPMaUNI npON3BOUnten
- IDEHTNOKAUHOHHbIE DAHHbIE IN TEXHnueCKNE XAPAKTEPNCIKN
- BBeDHe
- 06o3haueHne ycTpoiCTBa
- CepnXG
- OchoBHeIe qactn KoemOnKc DoaTOpOM
- Mapb npdoctopoxhoctn nla 06cepeHn npabnHoro 6eOaHORIO
- PnpdoxpanntnHbIy cTPOCTBA, pnpmehmblte Ha Kofoemolke C doaTOPOM
- CepnXG7
- OcTaToHbIe PnCKN
- BbIbOp TOck yctaHOBKn
- PacnakOBka n nepemeHne o6OpydoBaHHa
- YctaHOBka HIOKNOHHe N 3JKeTPOcETn
- INOJIb3OBAHNE KOΦEMONKICD03ATOPOM
- YnpaBHeHneMaunHo
- BbiknoyateNb
- 5.2IoprotobKaKICNIOB3OBaHNOKOeOMJKN
- PpoeDypa «PepBbI 3anyck
- NaHEnb ynpaBneHH
- TnabHnCTpaHnua
- MeHIO《HaCtpoKn》cakTHBHOcnCTeMOxG(bIya npun no MACCE):
- TexHmuecknHaCtpoKn
- HactpoynXGi
- HactpouknoB3oBaTeTn
- HactpoKn 6e3onacHOCTN
- CepnXG?
- Texnueckne hactpoukn
- HactpoKn noB3oBaTeTn
- 3MeHeHHeMaCCbI NOMONa
- OTo6paKeHne MaCCbI npCm
- 13meHeHne BpeMeHH npuHN
- OTo6paKeHMe TpoHoi npu
- Cncrema XGi
- 3KCTpeHHoe Texo6cnyKaBaHne
- HENCPABHOCTN -PNUHbI -CNOCObY YCTPAHEH
- HecnpabHocbI npuHa Cnocob yctpaHmna
- CepnX67
- Hncnpabnoctb PmnuHa Cnoco6 yctpaennn
- Hncnpabnoctb npuHa Cnoco yctpa Hennr
- 83AKA33APACTEN
- Série XGI
- PT
- INFORMACAO GERAL 5
- TODOS OS MESES: limpar completeness as laminas
- mnnn
- XG
- 1.3
- 2.4
- juzuuiuaoxi uanauanwnuaa
- mnu
- 2.6
- xnXG
- wuusn
- muaaun
- mwnw
- uanannn
- nssnnnnnnnnn
- xnXG1
- xu XGi
- nss
- 5.4.3.9
- 5.4.3.10
- 5.4.3.11
- m
- jiuuaanran
- ay a
- aannnnn
- a
- 5.4.3.15
- THONG SO DINH DANH VA DAC DIEM KY THUAT 8
- 3DAMBAOANTOAN 12
- LAP DAT 16
- CACH SU DUNG MAY XAY CA PHE TU DONG DINH LUQNG 19
- Dong XG
- VN
- THONG TIN CHUNG
- Cac ky hieu duoc su dung trogh so tay hong dan
- DongXGj
- Canh bao cho nguoi mua
- Chi tiét lién hé cuà nà san xuàt
- THONG SO DINH DANH VA DAC DIEM KY THUAT
- Lòi gói thieu
- Dinh dangh thiet bi
- Dong XGj
- Xác dinh cac bo phan chinh cua May xay ca phe tu dong dinh luong
- Cac nguy co rui ro khac
- DongXG
- Nhan canh bao duoc ap dung cho may
- LAP DAT
- Luu kho
- Lya chon dia diem lap dai
- Mo bao bi va dich chuyen may
- Lap dát va kénto vii mang luoi dien
- CACHSU DUNG MAYXAYCA PHETU DONGDINH LUONG
- Dieu khién may
- Nut vän
- Chuan bi truoc khi su dung may xay ca phe tu dong dinh luong
- Quy trinh "Khoi dong lan dau"
- Thiet Lap Nguoi Dung
- Thiet Lap An Toan
- Thay dai khoi luong xay
- Hien thi khoi ngx ng tung liu xay
- Thay doi thoi luong xay
- Hien thi thoi gian xay
- Hien thi so liu thong ke
- Hién thj xay ba tach ca phe
- Hé thong XGi
- Khoi Dong Lan Dau
- Do sang man hinh
- Ché do mān hinh
- Bao vé män hinh
- Ngon ng
- Tién hàn xay theo liè luǒng
- BAO TRIMAYXAYCA PHE TU DONGDINH LUONG
- Bao duong dinh ky
- DongXG7
- Kiem tra tinh trang cua day dan den nguon dien
- SAU MOI CA LAM VIEC: kiem tra day nguan.
- Lam sach bān rāng xay kǔ lʊng
- MÖTHANG MÖT LAN: tién hanh vê sinh bānh räng xay ký luǒng
- Bāt May xay cā phé tu dong dinh lóng vè trang thai nghi
- KHI CANTHIE:ve sinh va dura may ve trang thai nghi.
- Thay the bānh rāng xay
- Bao duong ngoai ke hoach
- SU CO-NGUYEN NHAN-BIEN PHAP KHACPHUC
- Su co Nguyen nhan Bien phap khac phuc
- Su co Nguyen nhan Bi en phap khac phuc
- YEU CAU THAY THE PHU TUNG
Brand : Fiorenzato
Model : F64 E XGi
Category : Coffee grinder