gWind Wireless - Anemometer GARMIN - Free user manual and instructions
Find the device manual for free gWind Wireless GARMIN in PDF.
| Product type | Wireless anemometer with wind vane |
| Brand | Garmin |
| Model | gWind Wireless |
| Dimensions after mounting (H × L) | 345 mm × 610 mm |
| Weight | 350 g |
| Power supply | Internal battery (supplied) + WSI unit on 12 V DC mains |
| Consumption (WSI + GND 10) | 1.1 W, 95 mA typical at 12 V DC |
| Wind speed range | 0.9 to 90 knots (0.9 to 50 m/s) |
| Main functions | Measurement of wind speed and angle, wireless transmission to NMEA 2000 network via WSI and GND 10 gateway |
| Water resistance (anemometer) | IPX-6 (protection against sea spray) |
| Water resistance (WSI) | IPX-0 (no special protection) |
| Operating temperature | -20 to 50 °C |
| Storage temperature | 0 to 35 °C |
| Care and cleaning | Clean with a mild soapy solution and rinse with clean water. Do not use detergents or high-pressure water. |
| Storage | Remove the wind vane and WSI and store them in a dry place if not used for a long time. Keep the wind vane away from light to preserve the battery. |
| Battery | Specific Garmin battery supplied. Replacement possible with Garmin spare battery. |
| Spare parts and repairability | Replacement battery available from Garmin or at www.garmin.com. No other spare parts specified. |
| Safety | Follow battery warnings: do not disassemble, do not expose to fire or water, use only Garmin replacement batteries. Wear protection during installation. |
| General information | User manual available in 60 pages. Registration possible on my.garmin.com. Warranty: keep the original invoice. |
Frequently Asked Questions - gWind Wireless GARMIN
User questions about gWind Wireless GARMIN
0 question about this device. Answer the ones you know or ask your own.
Ask a new question about this device
Download the instructions for your Anemometer in PDF format for free! Find your manual gWind Wireless - GARMIN and take your electronic device back in hand. On this page are published all the documents necessary for the use of your device. gWind Wireless by GARMIN.
USER MANUAL gWind Wireless GARMIN
Gamin, the Garmin logo, and Nexus are trademarks of Garmin Ltd. or its subsidiaries, registered in the USA and other countries. GWind™, GND™, and GM1™ are trademarks of Garmin Ltd. or its subsidiaries. These trademarks may not be used without the express permission of Garmin.
NMEA 2000* and the NMEA 2000 logo are registered trademarks of the National Marine Electronics Association.
gWind™ Wireless Installation Instructions
Important Safety Information
WARNING
See the Important Safety and Product Information guide in the product box for product warnings and other important information.
CAUTION
Always wear safety goggles, ear protection, and a dust mask when drilling, cutting, or sanding.
Use caution when working from heights.
This device provides wireless wind speed and wind angle information to a NMEA 2000 network on your boat. The wind transducer transmits information to a Wireless Server Interface (WSI) box, which must connect to a Garmin GND 10 black box bridge to send the data to a NMEA 2000 network.
Registering Your Device
Help us better support you by completing our online registration today.
- Go to http://my.garmin.com.
- Keep the original sales receipt, or a photocopy, in a safe place.
BatteryWarnings
WARNING
If these guidelines are not followed, the battery may experience a shortened life span or may present a risk of damage to the device, fire, chemical burn, electrolyte leak, and/or injury.
- Do not disassemble, modify, remanufacture, puncture, or damage the device or batteries.
- Do not immerse or expose the device or batteries to water or other liquids, fire, explosion, or other hazard.
- Do not use a sharp object to remove batteries.
- Keep batteries away from children.
- Only replace batteries with correct replacement batteries. Using other batteries presents a risk of fire or explosion. To purchase replacement batteries, see your Garmin dealer on the Garmin website.
- Do not operate the device outside of the following temperature range: from -20^ to 50^ (from -4^ to 122^ ).
- When storing the device for an extended time period, store within the following temperature range: from 0^ to 35^ (from 32^ to 95^ ).
- Contact your local waste disposal department to dispose of the device/batteries in accordance with applicable local laws and regulations.
Installing the Battery
NOTICE
The appropriate battery is provided with this device. Installing a battery not provided by or purchased from Garmin may damage the device.
Before mounting the device, you must install the included battery.
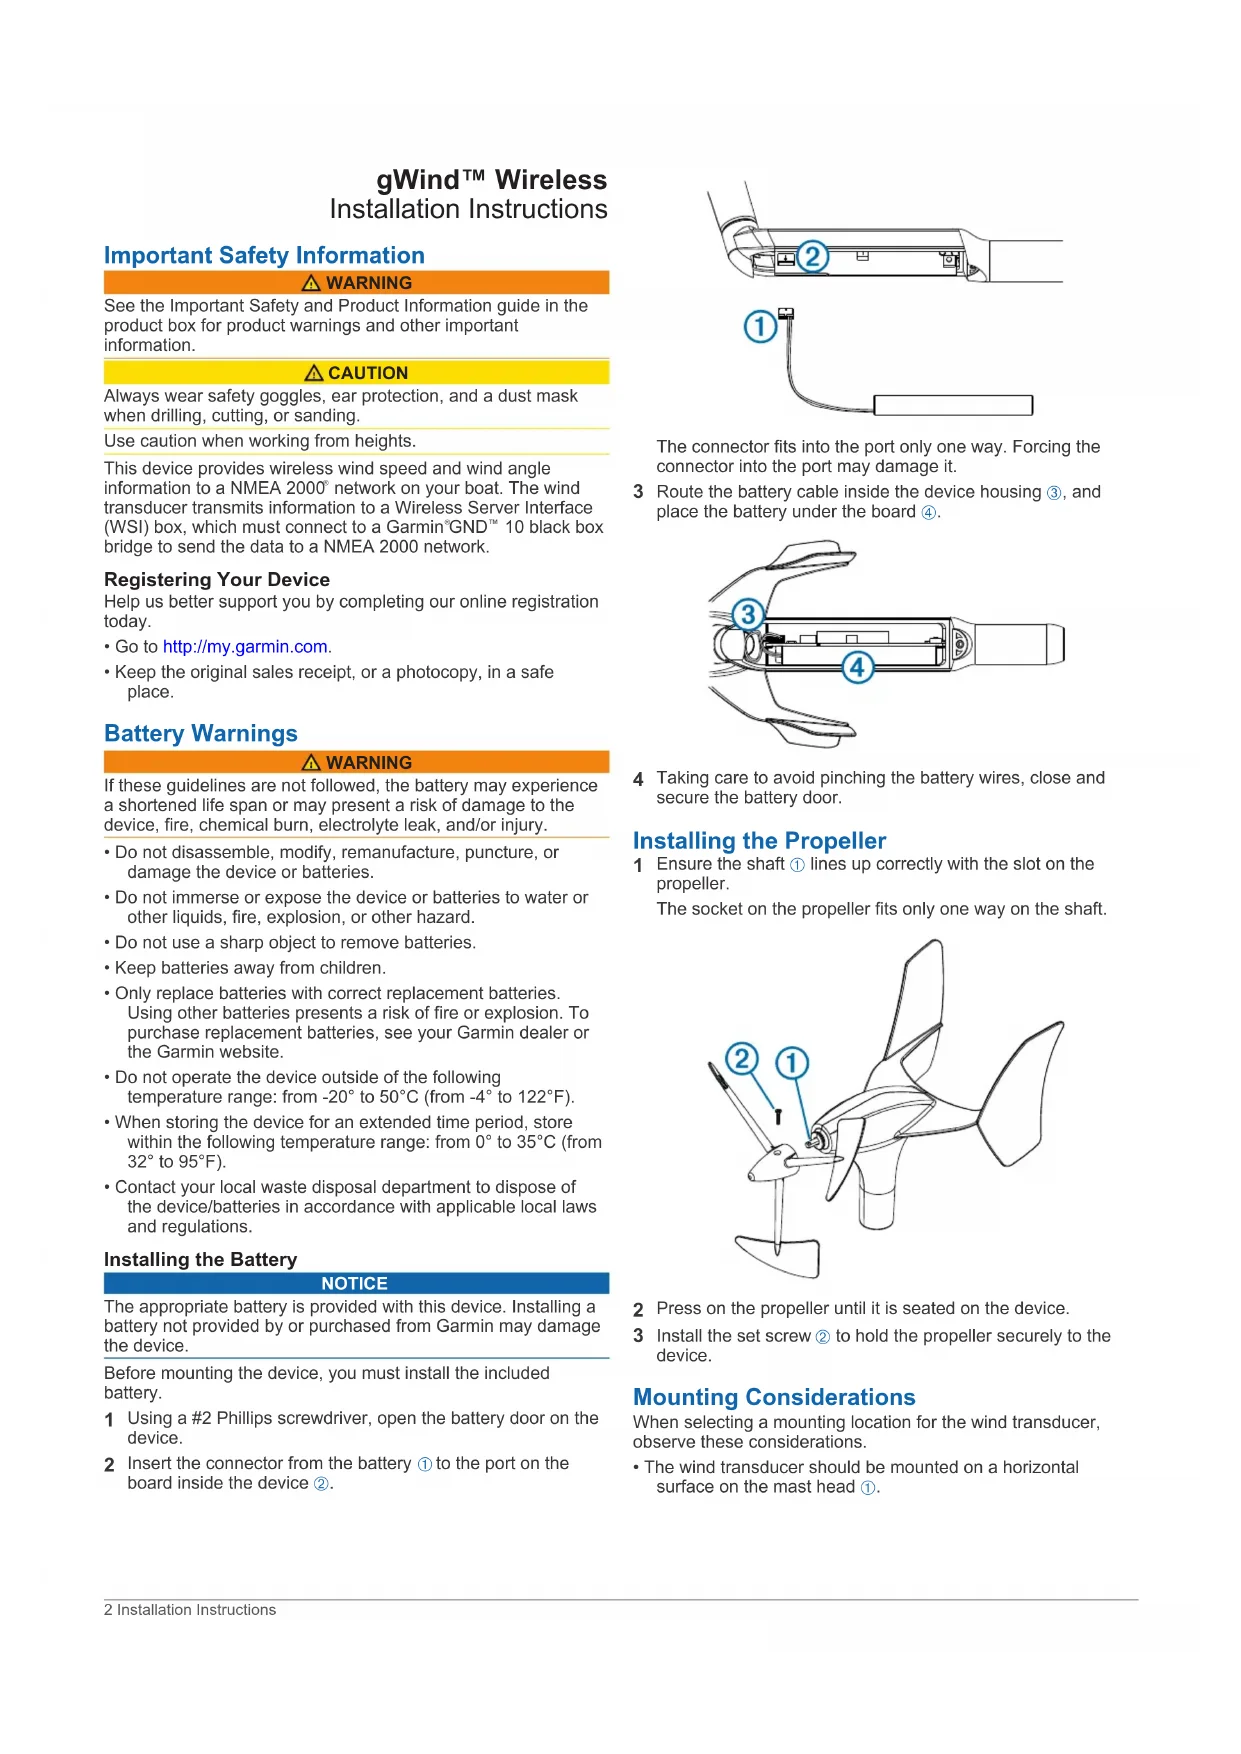
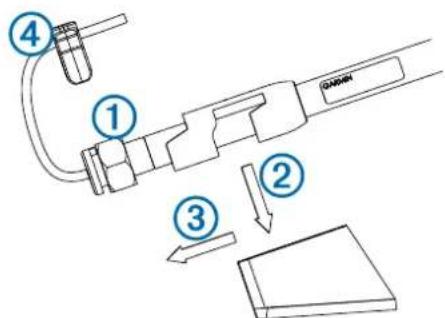
1 Using a #2 Phillips screwdriver, open the battery door on the device.
2 Insert the connector from the battery ① to the port on the board inside the device ②.

The connector fits into the port only one way. Forcing the connector into the port may damage it.
3 Route the battery cable inside the device housing ③, and place the battery under the board ④.
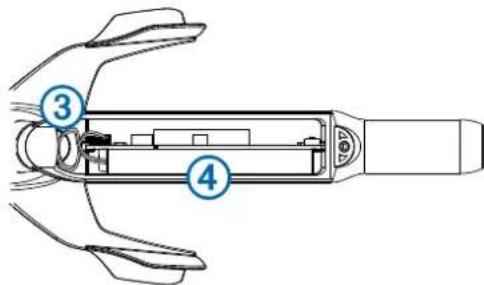
4 Taking care to avoid pinching the battery wires, close and secure the battery door.
Installing the Propeller
1 Ensure the shaft ① lines up correctly with the slot on the propeller. The socket on the propeller fits only one way on the shaft
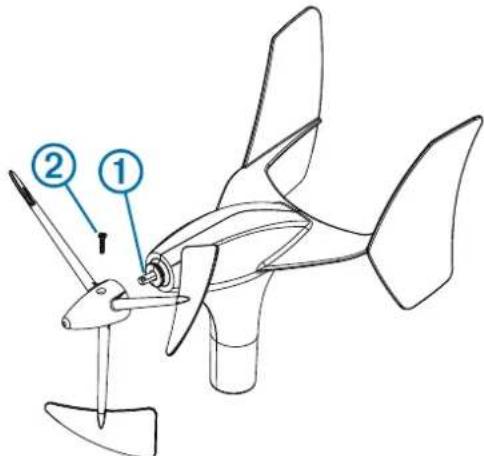
2 Press on the propeller until it is seated on the device.
3 Install the set screw ② to hold the propeller securely to the device.
Mounting Considerations
When selecting a mounting location for the wind transducer, observe these considerations.
- The wind transducer should be mounted on a horizontal surface on the mast head ①.
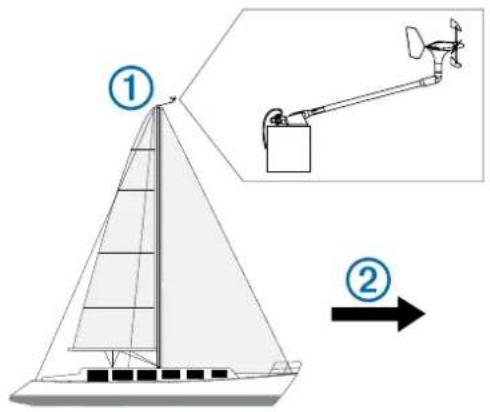
- If there is not a horizontal surface on the mast head, an appropriate shim must be added to create a horizontal surface.
- The wind transducer should be installed facing the front of the boat ② , parallel to the center line.
NOTE: If you do not mount the device facing the exact front of the boat, you must configure the orientation to receive accurate wind-angle data (Adjusting the Orientation, page 4).
When selecting a mounting location for the wireless server interface (WSI), observe these considerations.
- Before permanently mounting the WSI, you must test the signal strength between the wind transducer and the WSI (Testing the Signal Strength, page 3).
- The WSI is not water resistant and must be installed in a location that is not exposed to any spray, washdown, or submersion.
The best location for the WSI is under the deck, near the hull, as high as possible in the boat. - You should install the WSI as close to the wind transducer as possible.
Metallic objects in the path of the wind transducer and the WSI greatly reduce the transmission distance.
The antenna is on the top of the WSI ③ and works best when it is pointing toward the wind transducer.
- The WSI works the best when installed on a bulkhead parallel to the pole of the wind transducer, in a fore-aft direction.
Installing the Mounting Bracket
1 Using the mounting bracket as a template, mark the pilot hole locations.
2 Using a 4.5mm(1164 in.) bit, drill the pilot holes.
3 Fasten the mounting bracket to the surface using the included screws.
Securing the Device in the Mounting Bracket
1 Loosen the lock nut ① on the device by turning it counterclockwise by hand until it stops.
2 Place the device in the mounting bracket by pushing it down ② and sliding it back until it stops ③.
3 Secure the device in the bracket by turning the lock nut clockwise by hand until it stops.
4 Attach the security clamp ④ to the device to prevent the lock nut from loosening.
Mounting the WSI
Before permanently mounting the WSI, you must test the signal strength between the sensor and the receiving box.
1 Determine the mounting location.
2 Using the device as a template, mark the pilot hole locations on the mounting surface.
3 Using a 1 / 8 in. drill bit, drill the pilot holes.
4 Use the included screws to attach the device to the mounting surface.
Testing the Signal Strength
Before you can permanently mount the WSI, you must test the signal strength between the wind transducer and the WSI.
1 Temporarily connect the WSI to the GND 10.
2 If it is not connected already, connect the GND 10 to the same NMEA 2000 network as a marine instrument.
3 Go to a page on the marine instrument that shows wind data.
4 Select an option:
- If no wind data appears on the marine instrument, move the WSI to a new location and repeat step 3.
- If wind data appears on the marine instrument, note the location and permanently mount the WSI.
WSI Box Connection Considerations
NOTICE
It is recommended to provide a direct 12 Vdc power supply to the WSI box. It is mandatory to provide a direct 12 Vdc power supply if any other units are connected to the Nexus network or wired to the WSI box.
The WSI box must connect to a Garmin GND 10 black box bridge to communicate with the NMEA 2000 network on your boat. When connecting the included cable to the WSI box and to the GND 10 bridge, observe these considerations.
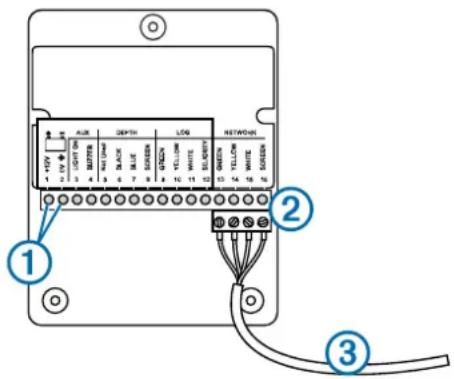
Item Description
| ① | These terminals are used to connect the WSI box to a power source. If you want to use the WSI box with other Nexus products, see the Nexus device owner's manual. |
| ② | This connector fits only one way. Match the wire colors to the terminal blocks before inserting the connector. |
| ③ | This connects to either NEXUS port on the GND 10 bridge. |
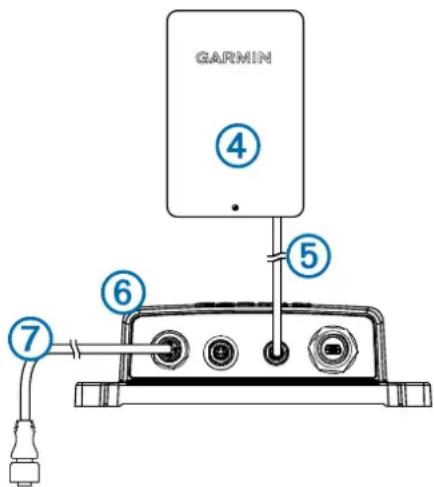
Item Description
| ④ | WSI box |
| ⑤ | WSI cable |
| ⑥ | GND 10 bridge |
| ⑦ | NMEA 2000 network |
Configuring the Wind Transducer
Before you can configure the wind transducer, it must be connected through a GND 10 to a NMEA 2000 network with a Garmin marine instrument, such as a GMI^TM 20. Refer to the marine instrument owner's manual for more information on configuring NMEA 2000 devices.
1 On the marine instrument, go to the NMEA 2000 settings.
2 Select the name of the device (GND 10) to configure.
Adjusting the Orientation
You should adjust this setting if the sensor does not face the front of the boat, exactly parallel to the center line.
1 On the marine instrument, from the NMEA 2000 settings, select the device name (GND 10).
2 Select Wind Angle Offset.
3 Estimate the angle, in degrees clockwise around the mast, by which the sensor points away from the center of the front of the boat:
- If the sensor is facing starboard, the angle should be between 1 and 180 degrees.
- If the sensor is facing port, the angle should be between 181 and 360 degrees.
4 Select the angle observed in step 3.
5 Select Done.
Adjusting the Wind Angle Filter
You should adjust this setting to change the responsiveness of the display to changes in the wind direction.
1 On the marine instrument, from the NMEA 2000 settings, select the device name (GND 10).
2 Select Wind Angle Filter.
3 Select an option:
- Select Off to turn off the filter and make the display the most responsive to changes in the wind angle.
- Select On and adjust the value. Select a higher number to increase the responsiveness of the display to changes in the wind angle, or select a lower number to decrease the responsiveness.
- Select Auto to automatically adjust the filter settings based on wind conditions.
4 Select Done.
Adjusting the Wind Speed Filter
You should adjust this setting to change the responsiveness of the display to changes in the wind speed.
1 On the marine instrument, from the NMEA 2000 settings, select the device name (GND 10).
2 Select Wind Speed Filter.
3 Select an option:
- Select Off to turn off the filter and make the display the most responsive to changes in the wind speed.
- Select On and adjust the value. Select a higher number to increase the responsiveness of the display to changes in the wind speed, or select a lower number to decrease the responsiveness.
- Select Auto to automatically adjust the filter settings based on wind conditions.
4 Select Done.
Maintenance and Storage
- If needed, use a mild soap solution to clean the wind transducer, and rinse it with water. Do not use detergents or high-pressure water.
- It is recommended to remove the wind transducer and store it in a dry location if it will not be used for long periods of time.
- It is recommended to remove the WSI and store it in a dry location if it will not be used for long periods of time.
- When storing the wind transducer, it is best to store it in a location where it is exposed to light. This maintains the battery charge in the device.
- If you store the wind transducer in a dark location, it is recommended to replace the battery at the beginning of each season. Replacement batteries are available from your local Garmin dealer, or from www.garmin.com.
Pairing the Wind Transducer with the WSI
Before you can pair the wind transducer with the WSI, you must have a Garmin marine instrument, such as a GMI 20 connected to the same NMEA 2000 network as the GND 10.
This wind transducer is paired with the WSI at the factory. You must pair the wind transducer with the WSI only if you replace the device.
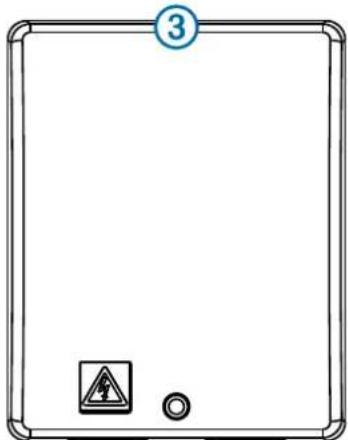
1 Remove the battery cover on the wind transducer.
2 Bring the wind transducer within 2m (6 ft.) of the WSI, and hold the white button on the circuit board until the LED turns off.
The old pairing information is cleared from the wind transducer.
3 On the marine instrument, from the NMEA 2000 settings, select the GND 10.
4 Select Generic Configuration.
5 Enter "UP" (this stands for un-pair), and select Done.
The old pairing information is cleared from the WSI.
6 Bring the wind transducer within 2m (6 ft.) of the WSI, press, but do not hold, the white button on the circuit board, and observe the LED:
- When the LED flashes twice, then turns off, the pairing was successful.
- When the LED flashes twice, then flashes once more for about one second, the pairing was unsuccessful. Move the device closer to the WSI and repeat this step until the pairing is successful.
7 Replace the battery cover on the wind transducer.
Specifications
| Specification Value | |
| Dimensions when mounted (H×L) 3 | 45 mm (13.58 in.) × 610 mm (24 in.) |
| Weight 350 g (12.35 oz.) | |
| Operating temperature From -20° to 50°C (-4° to 122°F) | |
| Storage temperature From 0° to 35°C (32° to 95°F) | |
| Water resistance rating (wind transducer) | IEC 60529 IPX-6 (protected against heavy seas) |
| Water resistance rating (WSI) IEC 60529 IPX-0 (no special protection) | |
| Power usage (WSI and GND 10) 1.1 W | |
| Typical current draw at 12 VDC (WSI and GND 10) | 95 mA |
| Wind speed range From 0.9 to 90 kps | nots (From 0.9 to 50 m/s) |