Espresseria Automatic EA829G - Coffee machine KRUPS - Free user manual and instructions
Find the device manual for free Espresseria Automatic EA829G KRUPS in PDF.
User questions about Espresseria Automatic EA829G KRUPS
0 question about this device. Answer the ones you know or ask your own.
Ask a new question about this device
Download the instructions for your Coffee machine in PDF format for free! Find your manual Espresseria Automatic EA829G - KRUPS and take your electronic device back in hand. On this page are published all the documents necessary for the use of your device. Espresseria Automatic EA829G by KRUPS.
USER MANUAL Espresseria Automatic EA829G KRUPS
Chere Client, cher Client.
ATTENTION, L'ARRET DU CYCLE N'EST PAS IMMEDIATE.
INFORMATION PRODUITS
INFORMATION PRODUITS
PRODUKTINFORMATIONEN
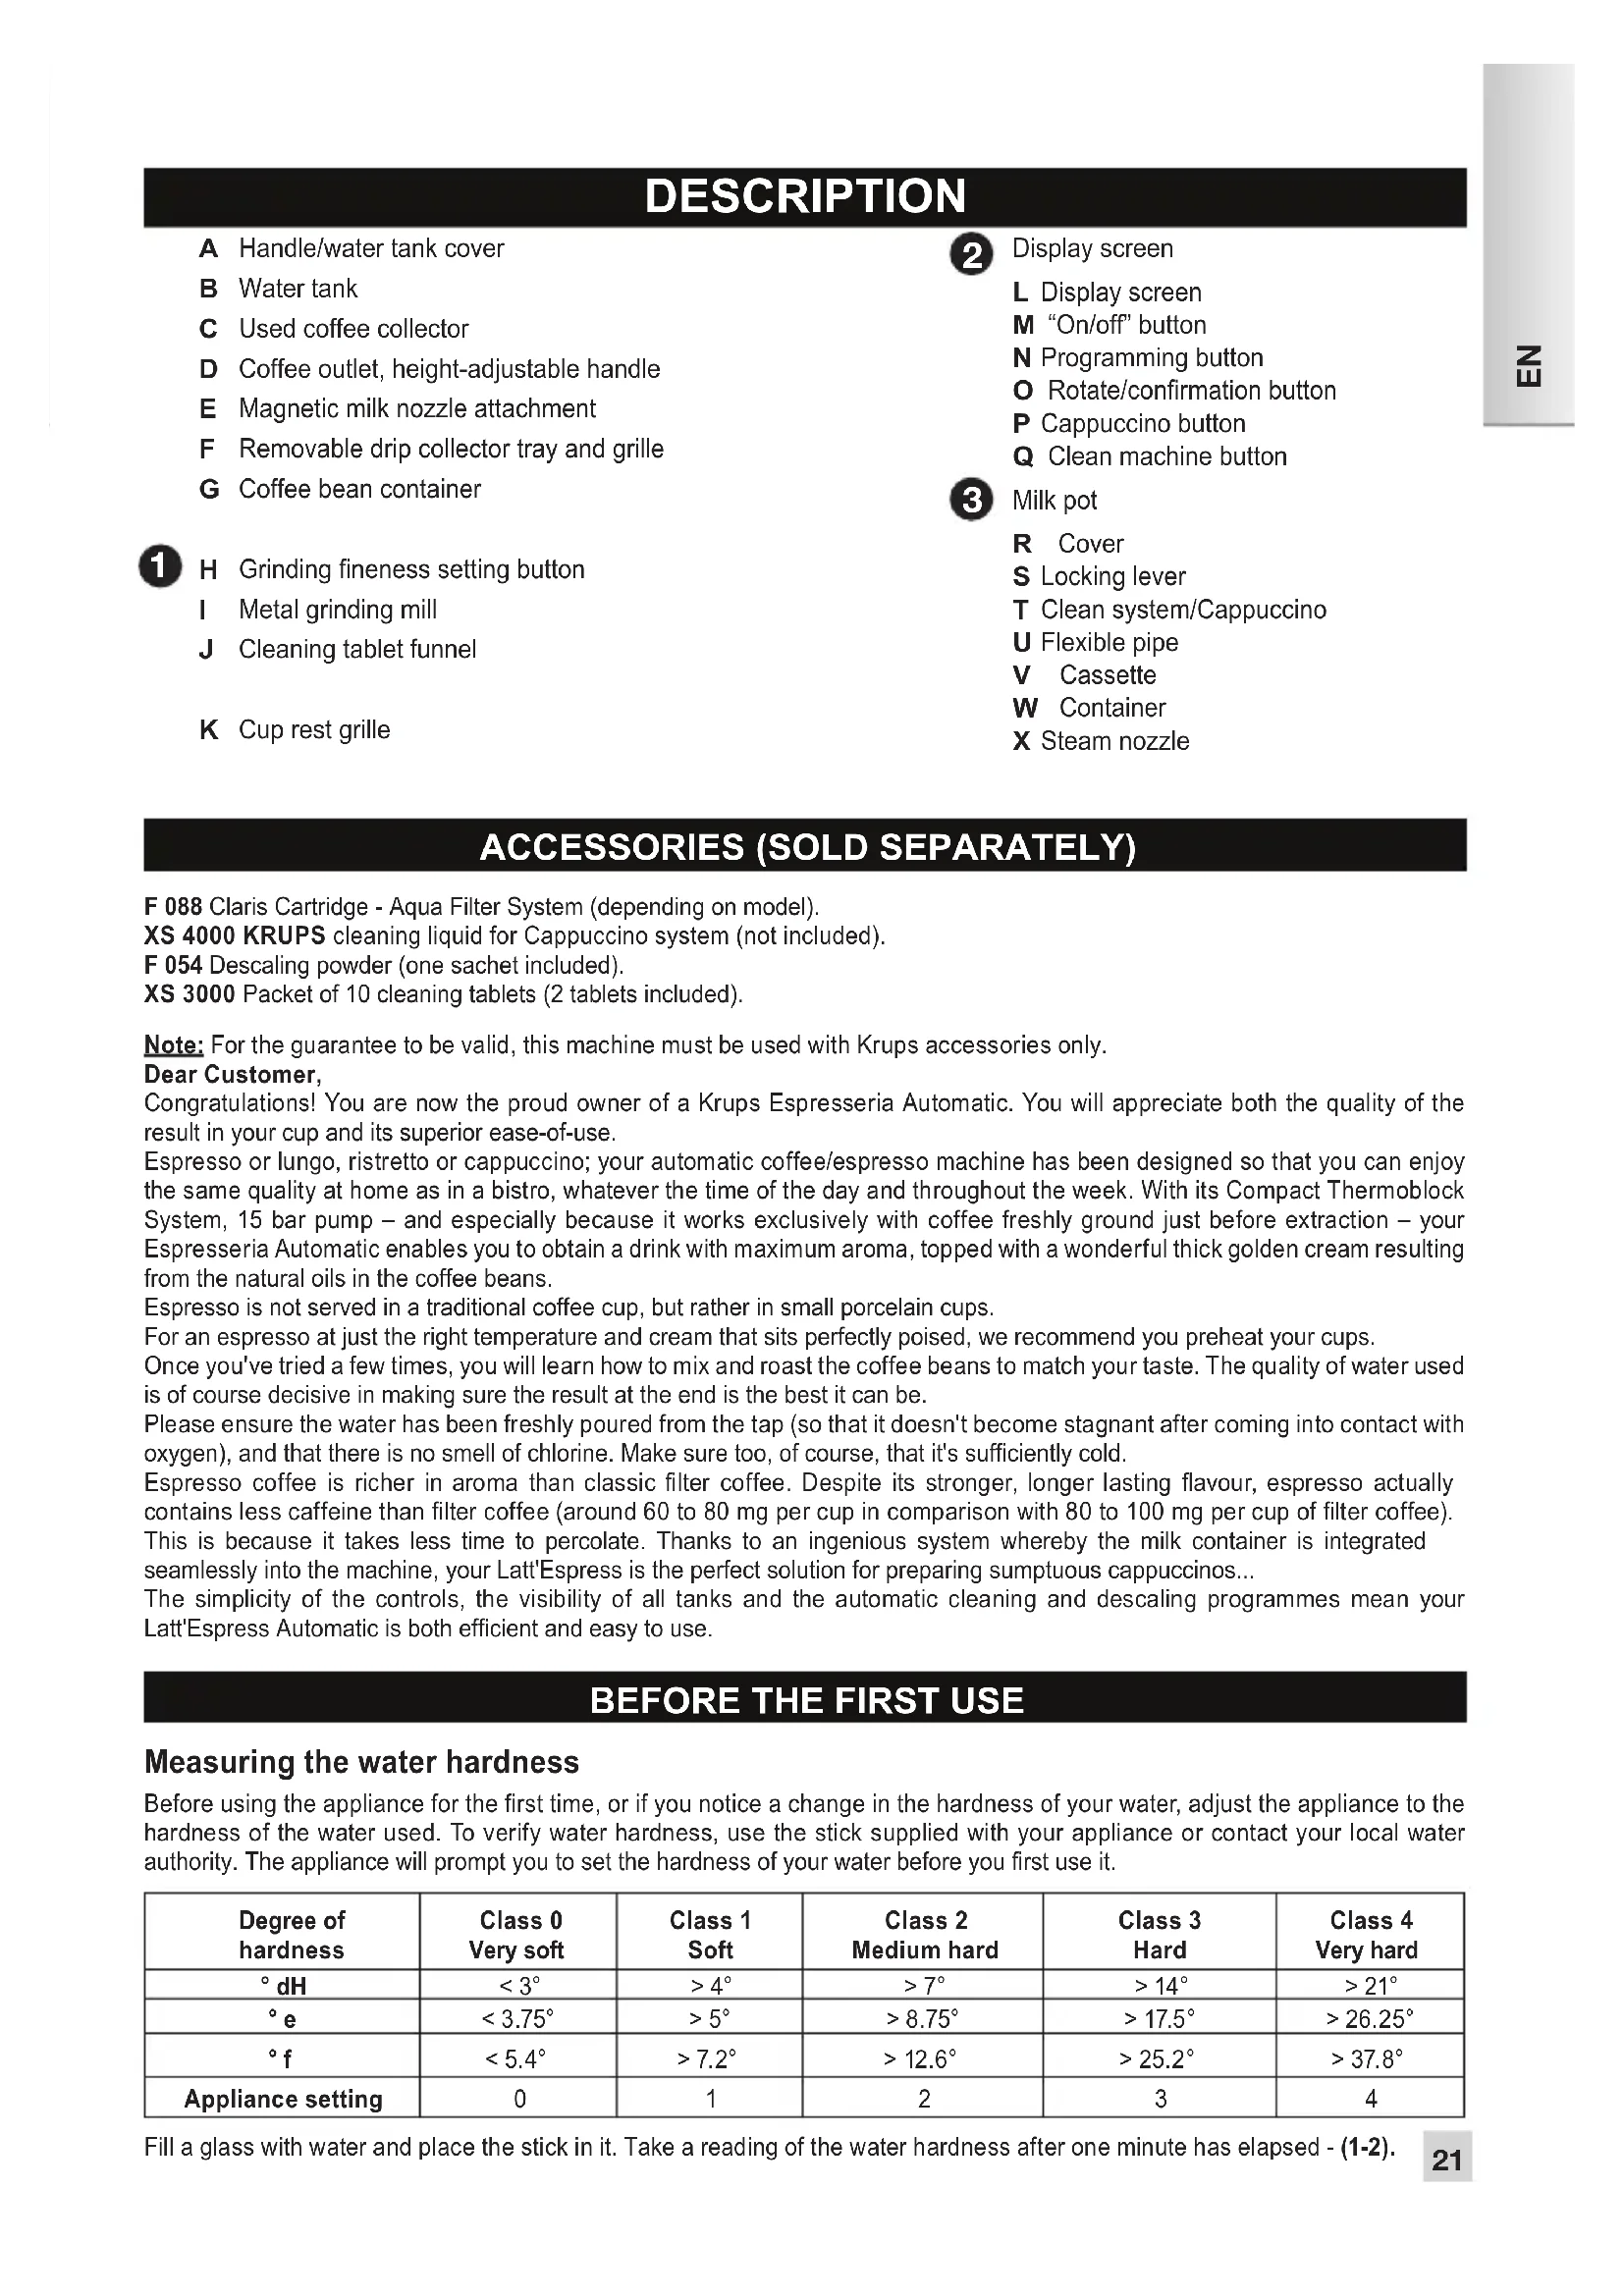
A Handle/water tank cover
B Water tank
C Used coffee collector
D Coffee outlet, height-adjustable handle
E Magnetic milk nozzle attachment
F Removable drip collector tray and grille
G Coffee bean container
1 H Grinding fineness setting button
Metal grinding mill
J Cleaning tablet funnel
K Cup rest grille
2 Display screen
L Display screen
M "On/off" button
N Programming button
- Rotate/confirmation button
P Cappuccino button
Q Clean machine button
3 Milk pot
R Cover
S Locking lever
T Clean system/Cappuccino
U Flexible pipe
V Cassette
W Container
X Steam nozzle
ACCESSORIES (SOLD SEPARATELY)
F 088 Claris Cartridge - Aqua Filter System (depending on model).
XS 4000 KRUPS cleaning liquid for Cappuccino system (not included).
F 054 Dscaling powder (one sachet included).
XS 3000 Packet of 10 cleaning tablets (2 tablets included).
Note: For the guarantee to be valid, this machine must be used with Krups accessories only.
Dear Customer,
Congratulations! You are now the proud owner of a Krups Espresseria Automatic. You will appreciate both the quality of the result in your cup and its superior ease-of-use.
Espresso or lungo, ristretto or cappuccino; your automatic coffee/espresso machine has been designed so that you can enjoy the same quality at home as in a bistro, whatever the time of the day and throughout the week. With its Compact Thermoblock System, 15 bar pump - and especially because it works exclusively with coffee freshly ground just before extraction - your Espresseria Automatic enables you to obtain a drink with maximum aroma, topped with a wonderful thick golden cream resulting from the natural oils in the coffee beans.
Espresso is not served in a traditional coffee cup, but rather in small porcelain cups.
For an espresso at just the right temperature and cream that sits perfectly poised, we recommend you preheat your cups.
Once you've tried a few times, you will learn how to mix and roast the coffee beans to match your taste. The quality of water used is of course decisive in making sure the result at the end is the best it can be.
Please ensure the water has been freshly poured from the tap (so that it doesn't become stagnant after coming into contact with oxygen), and that there is no smell of chlorine. Make sure too, of course, that it's sufficiently cold.
Espresso coffee is richer in aroma than classic filter coffee. Despite its stronger, longer lasting flavour, espresso actually contains less caffeine than filter coffee (around 60 to 80mg per cup in comparison with 80 to 100mg per cup of filter coffee).
This is because it takes less time to percolate. Thanks to an ingenious system whereby the milk container is integrated seamlessly into the machine, your Latt'Espress is the perfect solution for preparing sumptuous cappuccinos...
The simplicity of the controls, the visibility of all tanks and the automatic cleaning and descaling programmes mean your Latt'Espress Automatic is both efficient and easy to use.
BEFORE THE FIRST USE
Measuring the water hardness
Before using the appliance for the first time, or if you notice a change in the hardness of your water, adjust the appliance to the hardness of the water used. To verify water hardness, use the stick supplied with your appliance or contact your local water authority. The appliance will prompt you to set the hardness of your water before you first use it.
| Degree of hardness | Class 0 Very soft | Class 1 Soft | Class 2 Medium hard | Class 3 Hard | Class 4 Very hard |
| °dH | <3° | >4° | >7° | >14° | >21° |
| °e | <3.75° | >5° | >8.75° | >17.5° | >26.25° |
| °f | <5.4° | >7.2° | >12.6° | >25.2° | >37.8° |
| Appliance setting | 0 | 1 | 2 | 3 | 4 |
Preparing the appliance
Remove and fill the water tank (7).
Press firmly to replace it and close the lid.
Remove the lid of the coffee container and add coffee beans. Replace the lid (8).
Do not fill the tanks with hot water, milk or any other liquid. If the water tank is missing or not completely full (beneath the "min" level) while the appliance is switched on, the message "Fill tank" will appear and it will be temporarily impossible to make any coffee or espresso.
Claris - Aqua Filter System F 088 cartridge (sold separately)
For the best flavours and to make sure your appliance lasts as long as possible, we recommend you only use the Claris - Aqua Filter System cartridge, sold separately.
(3): Mechanism to memorise the month the cartridge was fitted and when it should be changed (after 2 months maximum).
Your appliance will let you know when you should replace your Claris - Aqua Filter System cartridge by displaying a message.
Filter installation (Claris - Aqua Filter System cartridge)
Note: To correctly prime your cartridge, ensure that you follow the installation procedure each time you change the cartridge.
First time use: Choose the "YES" option in the "Filter" function, then follow the on-screen prompts.
Installing the cartridge in the machine: screw the filter into the base of the water tank, using the handle provided (4).
Insert the steam nozzle (5).
Place a 0.6 L container beneath the steam nozzle (6).
Later installation or when replacing a filter: Select the "Filter" menu by pressing PROG: "Maintenance" - OK - "Filter"-OK - "Insert" (or change) - OK - and follow the on-screen prompts.
Automatic rinsing
When first using your machine, you may choose to activate automatic rinsing. To do this, choose the "YES" option on the "Auto rinse" menu. Rinsing will take place each time you turn on the machine.
To modify this at a later stage, you can select automatic rinsing by pressing PROG - Settings - Auto rinse.
DURING RINSING OPERATIONS, HOT WATER COMES FROM THE NOZZLES. BE CAREFUL NOT TO SCALD YOURSELF.
NEVER PUT GROUND COFFEE IN THE COFFEE CONTAINER
Use of coffee beans that are oily, caramelised or flavoured is not recommended for this machine. This type of bean may damage the machine.
Make sure that no foreign bodies such as small stones among the coffee beans enter the coffee container. Any damage due to foreign bodies having entered the coffee container is not covered by the guarantee. Do not put water in the coffee bean container.
To avoid staining your worktop or scalding yourself with used water, ensure you attach the drip collector tray.
Check the water tank is clean.
First use/setting the machine
The rotating button enables you to select a function or increase/reduce values. Pressing this button confirms your choice.
Switch the appliance on by pressing the "On/Off" button (9). Follow the on-screen prompts in the "Language choice" menu.
Select a language using the rotating button. The selected language will be highlighted (10-11).
Confirm by pressing the confirmation button (12).
On the first use, the appliance will ask you to set a number of parameters. If you unplug your appliance, you will have to reset some of these parameters.
The appliance will ask you to set:
Language
Volume unit
Date
Clock
Auto-off
Auto-on
Water hardness
Automatic rinsing
Filter
You can select the language of your choice from those presented.
You can set the unit of measurement to ml or oz.
It is up to you to set the date.
You can select the display of a 12 or 24-hour clock.
You can select the length of time after which your appliance will switch off automatically.
You can automatically start pre-heating of your appliance at a selected time.
You must set the hardness of your water between 0 and 4. See the section "Measuring the water hardness".
You can set rinsing to take place each time the machine is switched on.
You must indicate whether or not a filter is present (Claris - Aqua Filter System cartridge).
On the first use, the appliance may ask to be refilled. Simply follow the on-screen prompts.
Circuit rinsing
Coffee circuit rinsing:
You can start rinsing at any time by pressing PROG to display the menus then selecting MAINTENANCE OK RINSING OK.
Steam circuit rinsing:
Install the steam nozzle (5) then place a container beneath the steam nozzle. Select the hot water recipe on the screen and confirm. The cycle will stop automatically after the volume of water indicated on the screen has been flowed through.
It is a good idea to carry out one or more rinses of the two circuits when the appliance has not been used for a number of days.
DURING RINSING OPERATIONS, HOT WATER COMES FROM THE NOZZLES. BE CAREFUL NOT TO SCALD YOURSELF.
Preparing the grinder
You can adjust the strength of your coffee by setting the grinding fineness of the coffee beans.
The finer the coffee is ground, the stronger and creamier the coffee will be.
Set the degree of grinding fineness by turning the button "Grinding fineness setting".
Turning towards the left means finer grinding. Turning towards the right means coarser grinding - (13).
YOU MUST ONLY CHANGE THE SETTING DURING GRINDING.
NEVER FORCE THE GRINDING FINENESS SETTING BUTTON.
PREPARATION OF AN ESPRESSO AND A COFFEE
YOUR APPLIANCE HAS BEEN DESIGNED TO WORK EXCLUSIVELY WITH COFFEE BEANS.
When preparing your first coffee, after a long period of absence or following cleaning or descaling, a little steam and hot water will issue from the steam nozzle (self-priming).
Splashing or scalding may occur if the coffee outlet is set too high for the size of your cups.
Preparing an espresso
The quantity of water required for an espresso is between 20 and 70ml
Press the ① button, wait for pre-heating to end and, if you wish, carry out a rinsing operation.
The drinks selection menu appears (14).
Place a cup under the coffee outlet. You can lower or raise the coffee outlet to suit the size of your cup (15).
Select your drink with the rotating button and confirm by pressing the confirmation button.
You can set the volume of water at any time with the rotating button.
To stop coffee running into the cup, either press a button or reduce the volume with the rotating button.
Preparing a coffee
The quantity of water required for a coffee is between 80 and 160ml
Preparing a long coffee
The quantity of water required for a long coffee is between 120 and 240ml . The appliance automatically carries out a double cycle, so do not remove your cup before preparation is finished.
After grinding, the ground coffee is moistened with a little water. A few moments later, the percolation process begins.
You can adjust the temperature of your coffee.
DO NOT REMOVE THE TANK BEFORE THE END OF THE CYCLE (around 15 seconds after the coffee has finished pouring).
Two-cup function
Your appliance enables you to prepare two coffee or espresso recipes for the following three preparations: espresso/strong espresso/coffee. This function is not available for long coffee drinks. The appliance will automatically run two complete coffee preparation cycles one after the other. You should therefore ensure that you place the second cup beneath the coffee outlet immediately the first cycle has finished.
You have prepared your appliance. The drinks selection menu has appeared (14).
Place a cup under the coffee outlet. You can lower or raise the coffee outlet to suit the size of your cup (15).
Select your drink and confirm by pressing quickly twice on the confirmation button.
A message will indicate that you have requested two cups.
The appliance will automatically run two complete coffee preparation cycles.
Double cup function (using the double espresso accessory)
Your appliance enables you to prepare two cups of coffee or espresso for the following three preparations: espresso/strong, espresso/coffee. This function is not available for long coffee drinks.
Make sure you don't take 2 cups after the first cycle.
You have prepared your appliance. The drinks selection menu has appeared.
Place the double cup accessory under the coffee outlet.
Place 2 cups under the accessory's coffee outlets. You can lower or raise the coffee nozzle with the accessory to suit the size of your cup.
Select your drink and confirm by quickly pressing twice on the OK button.
A message will indicate that you have requested 2 cups.
PREPARING HOT WATER
Install the steam nozzle on the machine. Select the hot water recipe from the drinks selection menu. A message invites you to place a container beneath the steam nozzle. You can start hot water production by pressing the confirmation button.
To interrupt the hot water function, simply press any button.
If the nozzle is obstructed, unblock it with the needle provided.
The maximum quantity of water per cycle is limited to 300ml
PREPARING A CAPPUCCINO
We recommend that you use very fresh, very cold pasteurised or UHT milk, recently opened. Unpasteurised milk does not produce the best results.
Preparing and installing a milk jug
The milk jug is composed of a plastic container, a lid (including a cassette) and a flexible pipe connecting it to the machine's drinks outlet. Before the first use, carefully clean the different elements.
Pour milk into the jug (at least 150ml ) (16). Put the lid on the jug by screwing it down with light pressure (17). Lift the locking lever (18). Install the milk jug on the machine by connecting it to the steam outlet (19), then lowering the locking lever (20). Insert the flexible pipe into the intended opening in the cassette (21) then place the other end beneath the magnetic drink outlet (22). Ensure that the system's lid button is in the cappuccino position (23).
Making a cappuccino
While the screen is displaying the drinks selection menu, give a short press (< 3 seconds) on the machine's cappuccino button (24). A pre-heating phase takes place, then the milk is frothed, and finally the espresso is poured. Your drink is ready (25).
you can interrupt the cycle by pressing OK.
nb the cycle does not stop immediately.
A message appears on the screen telling you to clean the system. We recommend you to carry this out, referring to the paragraphs CAPPUCCINO SYSTEM RINSING and/or MANUAL MAINTENANCE OF THE CAPPUCCINO SYSTEM.
CAPPUCCINO SETTINGS
The machine enables you to set the quantities of milk and coffee according to your desires for a perfectly personalised cappuccino.
You can alter these settings via the Cappuccino Settings menu.
While the screen is displaying the drinks selection menu, give a long press (> 3 seconds) on the machine's cappuccino button.
-
Select Standard for the factory settings
-
Select New to personalise your recipe. The following stages take place:
a. Pre-heating of the machine
b. Milk frothing phase: press OK when the volume of milk required is reached.
c. Coffee phase: press OK when the volume of coffee required is reached.
The machine will indicate that the new volumes have been recorded for the next cappuccinos.
MAINTAINING YOUR APPLIANCE
Warning! To comply with the guarantee conditions, it is essential to carry out the cleaning or descaling cycle when the appliance requests it. Carefully follow the instructions given on the screen. You can continue to use the appliance but it is recommended that you carry it out as soon as possible.
Emptying the used coffee collector and the drip collector tray
Remove the cappuccino system (26).
If the message is displayed, remove, empty and clean the drip collector tray (27).
Remove, empty and clean the used coffee collector (28).
Replace the coffee grounds collector (28), and wipe clean the area where the coffee drawer sits.
The drip collector tray is equipped with floats to indicate when it needs emptying (29).
Once you have removed the used coffee collector, you must empty it completely to avoid any later overflow.
The warning message does not disappear if the coffee drawer area is not cleaned thoroughly and if the used coffee collector is not pushed firmly into place or is incorrectly installed.
While the message is displayed, it is not possible to prepare an espresso or a coffee. The used coffee collector has a capacity of nine coffees.
Circuit rinsing: see page 3
Cappuccino system rinsing
You can rinse the system after producing a cappuccino. This is even possible if there is still milk in the milk jug. It is important to carry out this rinsing cycle after each cappuccino produced.
The milk jug must be in place as described in the paragraph PREPARING A CAPPUCCINO.
Turn the cappuccino system's lid button to the position CLEAN (30).
While the screen is displaying the drinks selection menu, press the machine's CLEAN button (31). Simply follow the on-screen prompts to start the rinsing cycle. At the end of the cycle, turn the cappuccino system button to the CAPPUCCINO position before starting a new recipe.
IMPORTANT:
It is recommended that you carry out this rinsing operation before returning the milk jug (if it still contains milk) to the refrigerator following preparation of the last cappuccino. After each rinsing operation, it is recommended that you clean the different pieces of the system under running tap water (see paragraph Manual maintenance of milk jug).
Coffee circuit cleaning programme - total duration: around 20 minutes
You should run the cleaning programme at the end of around 360 preparations of espresso or coffee.
The appliance will warn you by periodically displaying a message when it is time to carry out cleaning.
To carry out a cleaning programme, you will require a container with a capacity of at least 0.6 L and a KRUPS XS 3000 cleaning tablet (32a).
If you unplug your machine during the cleaning cycle, or if there is a power failure, the cleaning programme will continue from the current phase when the power is returned. It will not be possible to cancel this operation.
This is essential to ensure that the water circuit has been correctly rinsed. In this case, a new cleaning tablet may be necessary. Ensure that the cleaning programme has been completed to avoid any risk of poisoning.
The cleaning cycle is an intermittent cycle. Do not put your hands beneath the coffee outlets during the cycle.
When the message "Cleaning necessary" is displayed, you can start the automatic cleaning programme by pressing the PROG button.
Carefully follow the instructions given on the screen.
The automatic cleaning programme is divided into three parts: the cleaning cycle itself, then two rinsing cycles. This programme takes approximately 20 minutes. You can start cleaning at any time by pressing PROG to display the menus then selecting MAINTENANCE OK COFFEE CLEANING.
Only use KRUPS cleaning tablets (XS 3000). We accept no responsibility for damage caused by the use of tablets of other brands.
You can obtain cleaning tablets from the KRUPS After-Sales Service.
Descaling programme - duration: around 22 minutes
If your product is fitted with our Claris - Aqua Filter System F088 cartridge, please remove this cartridge before the
descaling operation.
The amount of limescale collected depends on the hardness of the water used. The appliance will warn you by periodically displaying a message when it is time to carry out descending.
To carry out a descending programme, you will require a container with a capacity of at least 0.6 L and a KRUPS F 054 (40 g) descending sachet (32b).
When the message "Dscaling necessary" is displayed, you can start the automatic descending programme by pressing the PROG button.
Carefully follow the instructions given on the screen, ensuring that the contents of the sachet have dissolved.
The descending cycle is divided into three parts: the descending phase itself, followed by two rinsing phases.
Use only KRUPS descending products. Descaling products are available from KRUPS After-Sales Service centres.
We accept no responsibility for damage caused to the appliance by the use of other products.
If the appliance is dropped while not in its packaging, it is recommended that you take it to an approved repair centre to avoid any risk of fire or electrical problems.
If a power failure takes place or if you unplug your machine, the cycle will continue from the current phase when the power is returned. It will not be possible to cancel this operation.
Ensure that the descending programme has been completed to avoid any risk of poisoning. The descending cycle is an intermittent cycle. Do not put your hands beneath the steam nozzle during the cycle.
Ensure that you protect your worktop during descending cycles, particularly if it is made of marble, stone or wood.
CAPPUCCINO SYSTEM CLEANING
To carry out a cleaning programme, you will require a container with a capacity of at least 0.6 L and KRUPS XS 4000 cleaning liquid (32c).
Turn the cappuccino system's lid button to the position CLEAN (23).
You can start the cleaning cycle by pressing the button PROG Maintenance Cappuccino cleaning.
Follow the instructions on the screen.
To disassemble the system, follow the following instructions:
Remove the flexible pipe from the jug opening and the drinks outlet (33).
-
Unlock the system from the machine (34).
-
Remove the accessory cassette (35).
-
Remove the black silicone body of the cassette (36).
-
Remove the air nozzle: this is the piece located above the black silicone body. (37). To clean this part thoroughly, rinse the flexible area while pinching it (38). Leave it to soak in hot water and some washing up liquid, then rinse.
-
Also remove the plastic piece (39).
The cappuccino system is now completely disassembled (40).
Take the disassembly key (41)
-
Unscrew the end of the steam nozzle (41)
-
If necessary, unblock using the needle provided for this purpose (42)
You can also remove the milk inlet pipe together with the lid setting button (43).
Once the elements have been cleaned with warm water and dried, put them back in place and replace the cassette on the jug (44-46).
General maintenance
Always remove the mains power cord from the electrical socket and allow the appliance to cool before cleaning it.
Do not use utensils or products likely to scratch or corrode the appliance.
Wipe the outside of the appliance with a damp cloth.
Rinse the water tank with clean water.
These parts are not dishwasher safe.
OTHER FUNCTIONS: PROG BUTTON
You access the menu with the appliance's other functions by means of the PROG button from the drinks selection screen. For all settings, the rotating button enables you to navigate through the menus and options and to confirm a choice, while the PROG button enables you to cancel a selection and return to the drinks selection menu.
| PROG | Maintenance | Enables you to access the various maintenance options. |
| Settings | Enables you to access the various settings options. | |
| Product information Enables you to access product information. | ||
| Exit Takes you back to the previous menu. | ||
MAINTENANCE
All of these options enable you to start the selected programmes. You should then follow the on-screen instructions.
| MAINTENANCE | Rinsing Enables you | to access the rinsing operations. |
| Coffee cleaning Enables | you to access the cleaning operations. | |
| Filter Enables you to | access filter mode. | |
| Exit Takes you back | to the previous menu. | |
| Cappuccino cleaning | Enables you to access the cappuccino system cleaning operations. |
SETTINGS
| SETTINGS | Language You can select the language of your choice from those offered. | |
| Screen contrast You can adjust the screen contrast according to your preferences. | ||
| Date | You must set the date, particularly when you are using an anti-limescale cartridge. | |
| Clock You can select to display a 12 or 24-hour clock. | ||
| Auto-off | You can select the length of time after which your appliance will switch off automatically.From 30 minutes to 4 hours, in 30 minute segments. | |
| Auto-on | You can automatically start pre-heating of the appliance at a selected time. | |
| Automatic rinsing | You can automatically start rinsing of the appliance when it is switched on. | |
| Volume unit You can set the unit of measurement to be ml or oz. | ||
| Water hardness | You must set the hardness of your water between 0 and 4. See the section "Measuring the water hardness". | |
| Coffee temperature | You can adjust the temperature of your espresso or coffee to one of three levels. | |
| Exit Takes you back to the previous menu. | ||
PRODUCT INFORMATION
| PRODUCT INFORMATION | Coffee cycles Displays | the total number of coffees produced by the machine. | |
| Water cycles Displays | the total number of hot water cycles carried out by the machine. | ||
| Cappuccino cycles | Displays the total number of cappuccino cycles carried out by the machine. | ||
| Rinsing Displays | the total number of rinsing operations carried out by the machine. | ||
| Coffee cleaning | Last | Displays the number of coffees carried out since the last cleaning operation. | |
| Next | Displays the number of coffees that can be produced before the next cleaning operation. | ||
| Clean Starts | the cleaning programme. | ||
| Exit Takes | you back to the previous menu. | ||
| Cappuccino cleaning | Displays the total number of cappuccino cleaning operations carried out by the machine. | ||
| Descaling | Last | Displays the total number of hot water or steam cycles made since last scale removal. | |
| Next | Displays the number of hot water or steam operations that can be carried out before the next descaling operation. | ||
| Exit Takes | you back to the previous menu. | ||
| Filter | Last | Displays the date of the last filter change* and the quantity of water used. | |
| Next | Displays the date for the next filter change* and the quantity of water to run through. | ||
| Install Starts | the filter replacement procedure. | ||
| Exit Takes | you back to the previous menu. | ||
*: The first two options in the Filter sub-menu will not be confirmed unless you have correctly installed a filter previously, with the programme accessible via MAINTENANCE FILTER INSTALL.
TURING OFF YOUR APPLIANCE
You can turn off your appliance at any time. When stopped, the machine emits a double beep and "Good-bye" is displayed on the screen. The appliance has registered your request and will stop as soon as possible.
TRANSPORTING THE APPLIANCE
Keep and use the original packaging to transport the appliance.
If the appliance is dropped while not in its packaging, it is recommended that you take it to an approved repair centre to avoid any risk of fire or electrical problems.
END-OF-LIFE ELECTRIC OR ELECTRONIC PRODUCTS
Think of the environment!

1 Your appliance contains many materials which can be recovered or recycled.
Leave it at a local civic waste collection point.
| problem malfunction corrective actions | |
| The appliance does not switch on when the ON/OFF button is pressed. | Turn off and unplug the machine, remove the filter cartridge, wait for 20 seconds and then restart the machine. Ensure that the plug on the electrical cable is fully inserted into the power socket. |
| Water or steam issue from the steam nozzle. | In the case of repeated uses, a few drops may issue from the steam nozzle. |
| The appliance is working but no liquid is coming out. | Check that the water container is in the correct position and that the cord is not jammed between the appliance itself and the water container. |
| The espresso or coffee is not hot enough. | Change the coffee temperature setting. Heat the cups by rinsing under hot water. |
| The coffee is too lightly coloured or too weak. | Check that the coffee bean container holds coffee and that this is flowing correctly. Avoid using oily, caramelised or flavoured coffee beans. Reduce the volume of coffee using the central button. Turn the grinding fineness button to the left to obtain more finely ground coffee. Carry out your preparation over two cycles by using the two-cup function. |
| The coffee is poured too slowly or not at all. | Turn the grinding fineness button to the right to obtain more coarsely ground coffee (may depend on the type of coffee used). Carry out one or more rinsing cycles. Run a damp sponge beneath the coffee outlet. |
| The coffee is not creamy. | Turn the grinding fineness button to the left to obtain more finely ground coffee (may depend on the type of coffee used). Change the Claris - Aqua Filter System cartridge (follow the installation procedure on page 3). Carry out one or more rinsing cycles. |
| The appliance has not produced coffee. | An incident has been detected during preparation. The appliance has automatically restarted and is ready for a new cycle. |
| You have used ground coffee instead of coffee beans. | Use your vacuum cleaner to remove the pre-ground coffee from the coffee bean container. |
| The coffee grinder makes a strange noise. | There are foreign bodies present in the grinder. Contact the KRUPS Customer Service team. |
| The grinding fineness setting button is difficult to turn. | Only modify the grinding fineness setting when it is in operation. There are foreign bodies present in the grinder: contact the KRUPS Customer Service team. |
| The steam nozzle of your cappuccino system seems partially or completely clogged. | Disassemble the nozzle using the dismantling key. Fig. 44 Start the cappuccino system rinsing cycle to remove the remainder of the deposits. Clean the steam nozzle and ensure that the opening of the nozzle is not obstructed by remains of milk or limescale. Use the cleaning needle if necessary. |
| The cappuccino system does not suck the milk. The cappuccino system makes little or no froth. | Check that the appliance is correctly assembled. Ensure that the setting button is in the CAPPUCCINO position. Ensure that the steam nozzle is not blocked. Ensure that the air nozzle is in place and correctly assembled. The air nozzle (Fig. 42) may be blocked; leave it to soak in hot water and some washing up liquid, and then rinse prior to reassembly. Ensure that the flexible pipe is not blocked or twisted and that it is properly inserted into the cassette to avoid any air leak. Ensure the milk suction pipe is fully immersed in the milk. Rinse and clean the system (see corresponding sections). For milk-based preparations: we recommend that you use very fresh, very cold pasteurised or UHT milk, recently opened. Unpasteurised milk does not produce the best results. It is also recommended that you use a cold container. |
| After emptying the coffee grounds collector, the warning message is still displayed on the screen. | Correctly replace the coffee grounds collector and follow the instructions on the screen. Wait at least 6 seconds before replacing them. |
| A power failure occurs during a cycle. | The appliance will automatically restart when the power returns, and will be ready for a new cycle. If the power failure occurs during a cleaning or descending cycle, the machine will continue the cycle at the current stage. |
| There is water or coffee underneath the appliance. | The drip collector tray has overflowed: empty it and clean the coffee grounds collector and wipe clean the area where the coffee drawer sits. Check the drip collector tray is correctly positioned. Do not remove the tank before the end of the cycle. |
| The lid is displayed. | Unplug the appliance for 20 seconds, remove the Claris Aqua Filter System cartridge if applicable, then restart the machine. If the error continues, contact the KRUPS Customer Service team. |
| The water tank has been filled, but the warning message is still displayed onscreen. | Check the tank is correctly inserted in the appliance. The float at the bottom of the tank should move freely. Check and unblock the float if necessary. |
| The machine does not request descaling. | The descaling cycle is requested once a large number of uses of the steam circuit has been reached. |
| Coffee grains have found their way into the drip tray. | This happens if coffee grains fall outside the percolation tank; this keeps the machine clean. |
Here are some recipes to try with your Espresseria Automatic:
Cappuccino
For an exquisite cappuccino, the ideal measures are as follows: 1/3 hot milk, 1/3 coffee and 1/3 milk froth.
Coffee Cream
Prepare a classic espresso in a large cup.
Add a cloud of cream for the ideal coffee cream.
Caffè corretto*
Prepare a cup of espresso as usual.
Then flavour to taste with 1/4 to 1/2 a glass of cognac.
- You can also use anisette, grape eau de vie, sambuca, kirsch or Cointreau. There are many other possibilities for making your espresso really special. The sky's the limit!
Liqueur coffee*
In an empty 0.75 litre bottle, mix three cups of espresso, 250g of brown rock sugar, 1/2 litre of cognac or kirsch.
Leave the mixture to steep for at least two weeks.
- The result is a delicious liqueur, suited perfectly to coffee lovers!
Iced Italian coffee
Four balls of vanilla ice cream, two cups of cold, sweetened espresso, 1/8 litre of milk, crème fraîche, grated chocolate.
-
Mix the cold espresso with the mixture.
-
Place a ball of ice cream in each glass, pour the coffee over it and decorate with crème fraîche and grated chocolate.
Frisian coffee*
Add a little glass of rum to a cup of sweetened espresso.
Decorate with a thick layer of crème fraîche and serve.
Espresso flambe*
Two cups of espresso, two small glasses of cognac, two teaspoons of brown sugar, crème fraîche.
-
Pour the cognac into heat-proof glasses, heat and flambe.
-
Add the sugar, mix, pour in the coffee and decorate with crème fraîche.
The Perfect Espresso*
Two cups of espresso, 6 egg yolks, 200 g sugar, 1/8 litre of sweetened crème fraîche, one small glass of orange liqueur.
- Beat the egg yolks with the sugar until you obtain a thick and frothy mixture.
- Add the cold espresso and the orange liqueur.
- Carefully add the whipped crème fraîche.
- Pour into cups or glasses.
- Put the cups into the freezer.
(^* : Alcohol abuse can seriously damage your health.)
BESCHRIJVING
ESPRESSO EN KOFFIE MAKEN
HET APPARAAT IS ONTWORPEN OM UITSLUITEND KOFFIE TE MAKEN MET KOFFFIEBONEN.
IPIN ANO THN INPQTH XPHSE
Métpnσn tns σkλnpóntηaτ tou vεpóu
Piv xpoiioioeTe n oukeun yia npwn fopa n eav biotiwoeTe aalayn tns oknpntnac tou vepou, pteie va npoapoeTe n oukeun otknpnta tou vepou Tou baiotwe. PokeiEvou va EaKpiBwote Tn oknpnta tou vepou, mtopeite va xpoiuioioeTe n pabdo Tou napexeiAeTn oukeun n va ateuovthe Otnv toikn etaipieia udpeounc. KaTyn pwn xpnon no oukeun 0zntnei Tn oknpota Tou vepou.
SYNTHPHEH THE SYEKEYHSEA
Ppoooxn! Ia va tnpnoov oI opoi nC eyyunong, Ppei va npayuatoTIOeite rov kuklo kaapioou n apalatwnc otav oac to znta n oukeun. Akoauohtote iotata c obnyie c rou eupaviOvta tnv obovn. Mtopeite va ouvexioetve xpoaiotoeite tn oukeun, uviotatai oUw v npoeite oTov kaopiao n Tnu apalatwn to ouvtouoTepo duvatov.
Aeiaoqa Tns Onkns UToaiemuatwV kaé kai Tou ouuAektn otayovwv.
ApaipoeE K Tuv TpOePw To ouotma KaToutoivo (26).
Eav eepaviotei to nuva, apaipote, aeiaote kai kaapioe tov biKO uAoyc uypw (27).
ApaipoeTc, aediaote kai kaopate tov ouaekntn utoaeimuatw kaep (28).
ETTAVATOTTOBENTNOTE Tn 0Nk UToIaMmuTaw KaPé (28).
O biakoc ouuoyns uypwdelta tnei nwnpe cnoa unodekvouav a nao stiynpnte penteva tod eiaote (29).
Moic apaipoeetevovoukkntuTolaeimuatwv kape, TpeTc va tov aedeiaeTe Tnnpoc, wote va anopuyete tuxov utepxaiion otn ouvexia.
To TPOeIOIOTIKO mVUma 0gAkoAouOHei va ePaviciEaiv O uAAekntc UTOAeimuTov KApé EV ExKouPiwoe i n totoetnei oWotá.
Ia ooo euaivzetao TPOeioTIOINTKO mnuu, n npaokeun eoepoe no kaé iiva aouvatn. H xwpntikotnta tou oulambdaektn uToaiemuatwv kapeivai apketni 9 kaepedc.
EeKluon kukwpatwv: BHeTt eAia 3
EkTluon Tou ouatmuos kaoutoivo
H ouakeun aç etitptetie va npaypatotoinaete ektaun tou ouotnmuatoc μe Ta ntpapaekun twkataoutivo ac. Aut o evai epiikto akopa kai ev npapaeivei yala oTo doxeio yalaktoc. Eivai onmuavtko va npaypatotoine iE aut nTv ektaun μe ta antokéte npapaekun kattouvo.
To doxio yalakto npiTc va piketai oTn teon Tou otwC npiypafetai otny npaypapo IPOETOIMAZIA KANOYTEINO.
Fupiote to koupi t oTo kaTaki Tou ouotnmuOc Kaoutoivo tn eoan CLEAN (30).
Otaue oov to eovou etioyo popnatwv, patote to nKtpo CLEAN ts mnxavc (31). Apke va aokouthe tic oynie c tnv oovn pokeiévou va ekivno i kukloc ekluon. Otav oaknpwoet autoc o kukloc, tavaepete to kouptiou ouotnato kantoutivo tn thc CAPPUCINO PPV Ekvnoe me vda uvtayn.
ZHMANTIKO:
Zaouviotoume va npaymuotoinoete autn tvkTluon piv totoehtnoe eva to doxieyo yalaktoS (epooov Tepiexei akouyaka) oTo uyvio tnv oloknpwon nTc teutaiac ouvtaync kattoutivo Tou puymuotoinate. Meta aro Kahe ekTuon, ouviotatai va kaBapicet Ta diapopa Eaaptmata Tou ouotmuato s TEPVuvta ta katw ato to vepo tng Bpuocn (PAPAPPO Xepokivtnn Suvtnpnon Tou doxeiou yalaktoS).
TILBEHØR (SELGES SEPARAT)
F 088 Claris - Aqua Filter System-patron (avhenger av modellen).
XS 4000 KRUPS Rengjoringsvæske for Cappuccino-systemet (ikke inkludert).
F 054 Avkalkingsmiddel (en pose inkludert).
Male vannets hardhetsgrad
Fornaskinen skal brukes forste gang, ell hvis du merker at vannets hardhetsgrad har endret seg, skal du stille inn maskinen i henhold til vannets hardhetsgrad. Du kan malvannets hardhetsgrad ved hjelp av stripsen som folger med maskinen, ell der ku konktate det communale vannverket. Maskinen gir deg beskjed om a stille inn hardhetsgraden for du braker maskinen forste gang.
| Hardhetsgrad | Klasse 0 Svær bløtt | Klasse 1 Bløtt | Klasse 2 Middels hardt | Klasse 3 Hardt | Klasse 4 Svær hardt |
| °dH | < 3° > 4° | 7° > 14° > 21° | |||
| °e | < 3,75° > 5° | > 8,75° > 17,5° | > 26,25° | ||
| °f | < 5,4° > 7,2° | > 12,6° > 25,2° > 37,8° | |||
| Maskinens innstilling | 0 | 1 | 2 | 3 | 4 |
VEDLIKEHOLDE MASKINEN
MUUT TOIMINNOT: PROG-PAINIKE
YcTaHOBnTe eO6paTHo Ha MeCTO, TBepDo HaxaB Bn3 3aKpbB KpbIiKy.
CHMNTe KpbIiKy C KOHTeHepa DnA KoFe n 3acBInbTe B Hero KoFe B 3ephax. YcTaHOBtE KpbIiKy Ha MeCTo (8).
He 3anonHnTe KOHTeHep ropae BDOJ, MoLOKOM IIN JIO60dpyrO xNdkocTbEO. EcIn npBkIouehn np6opa pe3epByap IIN BObl OTCyTCTByET IIN 3aONHHe H Do KOHCA (HNKe yPOB8A MHNM.), NOBtCra COo6ueHne H anolHnTB pe3epByap] n pnproTOBHeNE 3cnpecco IIN KOFe cTaHET BpemEHHO HeBO3MOKHO.
HKNKOrIaHE HAcbIaIaTE MOJIoTbIKoΦE B KOHTeINHEP IJIa KOFE B 3EPHX.
B 3toi KofoemaunHe He peKOMeHdyETc HcNoJIb3OBAt b MacJHnCTbIe, KApaMeJIIN3IpuOBaHHbIe IIN apOMaTn3IpuOBaHHbIe KofoehNble 3epHa. IVx NcNoJIb3OBAHne MoKeT npJBecT N nONOMke np6opa.
Y6eNTecb, YTO B KOHTeHepn KoFe HET NocToPOnHHx PpeMetOB, TaKx KaK MeNKe Kamyu, CoepJkaUneC B KOfeHbIX 3epHax. TapaHTn He pacnPoCTpaHreTc H Na NOBpeXdEHHa, Bbl3BaHHbIe INHOpOHNbIM Nactuamn, IONaBUnmB KOHTeHep. He HanBaIte BoDy B KOHTeHep nKoFe B 3epHax.
Bo n36ekahne okoorOB npotekAHn BOnbHa na paobuyo nobepxHocb He 3abBaTe OnpoxKHTb noDOn dIra c6opka KaTeb.
Cneinte 3a TEM, UTO6bI pe3epByap IJRA BOBJI 6BIN YNCTbIM.
PepBoe npImMeHHeN / NaCTpoKn napaMeTPOB MaunHbI
Bpaaioi np no3BOJnEe Bb6paTb Kakyo-Jn60 yHKnIO, yBeHnHTb nn yMeHbWntb 3HaueHna. Haxatne 3toh KhoNn no3BOJnEe NOtBepDnTc BoBb6op.
BkIIOHTe np6op, HaxKaB KONky «BKn./BbIK.» (9). CneDyIte HNcTpKzma, OTo6pKaemHa 3KpaHe «BbI6Op 3bika>.
C nomooub BpaauoceorpernyaTopa, b6epnte Hxhblra3bk. 3aTe m OH noBnTCB B bDeneHHOM BnE (10-11).
NoTBePnte erHaKaTneM peryIaTopa noTBePxKeHnna (12).
Pn npBOM nCNoIb3OBAHnn np6op nonpocnt Bac hAcTpoNTb HeckoIbKO npaMeTpOB. Ecn Bbl OTKIOHTe yCTpoNCTBO, Bam 6ydt npedIOJKeHO BVHO b YcTAHOBt HekOTOpble N3 3TNX npaMeTpOB.
Pn6op nonpocnt HacptpontB:
3bIK 13 npednoxkeHHoro Bbl MOKeTe onpeJeNTb 3bk IIO CBOeMy Bbl6opy.
EduHua n3MepeHH BbMOKeTe BB6paTb eDHHu y3MepeHHB MIn nn yHuaX.
Data BbldoJXHbHaCTpOHTb DaTy.
Yacbl Bb moKeTe Bb6paTb OTo6paXeHHe BpeMeHn BΦopMaTe 12 nnn 24 cacoB.
ABT. BbIKn. Bbl MoKeTe BbIpaTb BpeM, IIO NCTeHm KOTopoR OyCTpoiCTBO ABTomaTneCKN BblKIIouaETcR.
ABT. BkI. BbMOxKTe aBtOMaTnueckn 3aNyctntb noDorpeB np6oBa B onpeJeHHe Bpemr.
XecTKocTb BObl Bbl DoJIxHbI HAcTponTB XecTKocTb BObl B npedeJax ot 0 do 4. CM. rnaBy «N3mepeHne XecTKoCTn BObl»
ABT. npombibka MoXHO 3anyckTaB npombibky npi KaKdOM BKNIOueHIM MaUNHBI.
BbI dONKHb yka3aTb HJIuHne HnO TcyTcBHe 0nJbTp (pNt Claris - Aqua Filter System).
PnI nepBOM nCNoJIb3OBAHm He nckJIoueHo, YTO npB6op 3aPocnt 3aONHeHne. B 3OM cNyuae IpocTo cNeDuYte NcHTpyKUJMaM Ha
PpombbKa cnCTeM
ПомьИКа снстЕМы пи�OTOBЛeHЯ кофe: BblMOxTe pOun3BecTи PMOBIBKBy LIO60m MOMENT, HaxaB KHOKNy PPOrPAM.Дпя OTObpaJKeHЯ MeHIO, a 3aTeM Bbl6paB OBCIyXnBAHNE OK ПOMbIBKA OK.
IpombIBKa napOBOn cnCTeMbI: UcTaHOBnTe Ha MeTo npoBOe conIO (5), a 3aTeM NoCTaBBte emKocTb noJ napOBoe conIO. BbIbePte peceNT «ropeyraBoa» Ha 3kpaHe n PoTBePdTe BbIbOp. LkKn ABtOMaTnueckn ocTaHaBnBaETc Pocne BbITEkaHn o6bema BoDi, yKa3aHHoro Ha 3kpaHe.

KeNaTeJIbHO BbIOnHHTb OdHy NnHeCKOJIbKO npOMbIBOK CnCTEm B Cnyae, ecnn np6op He nCNOJIb3OBaIcra Ha npOTxJHn HECKOJIbKINx DHeN.
BO BPEM IIPOMbIKI TOPRAJ BODA BbITEKAET YEPE3 CONJIA. ByIDTE OCTOPOXHbI, YTOBbI HE OBxKcBcR.
Ioprotobka KopemoJKN
Bb moke Te Bb6npaTb Kpeo,peynpa ToHkOCTb NOMOA 3epen KoPe.
Em 60nee MeJIKN NOMOT YcTAHOBNEH Ha KoQemOJIke, Tem Kpenue mMraYe 6yET KoPe.
YctAHOBITE Tpe6yEmyTO CteENb NOMOA NOBOPOTm peyIaTOPa ToHkOCTN NOMOA.
NoBOpOT BnEBO - 60nee MeJIKN NOMO.I NoBOpOT Bnpabo - 60nee Kpynbl NOMO1- (13).
PEYIINPOBKY MOXHO IPON3BOIDITb TOJIbKO BO BPEMЯ NOMOJA. HNKoIa HE PbITaIteCb N3MEHHTb NOIOXEHNE PEYJrTOPA TOHKOCTn NOMOJa PIPMEHEHEm CJIbI
INPNIGOTOBJIENHE ECNPECCO N KOΦE
BAIIPN6BOP PA3PA6OTAH NCKJIOUHTeJIbHO IJIY NCIOJIb3OBAHnRA KOFE B 3EPHX.
Pn nepBOM nprirotOBHeHH KoFe nocne npoBeHeHH OuchKn IINu yCTpaHeHH NaKnII, a TaKKe NOcNe dIInTeJIbHOro
npocToR np6bopa n3 napOBoro cOnla BbIXODHT HeMHORO npa I rOpaye BObl (ABTOMaTNUeCKN KOHTpONbHn UIK).
EcNI BbIXoD KoFe ycTaHOBHeN CmIKOM BbICOKM OTHOCHTeJIbHO pa3Mepa Baunx YauEk, BO3HnKaET PnCK
pa36pbI3rNBaHnI INI noNuYeHH OXOrOB.
PnroToBneHne 3cnpecco
KoJnueCTBO BODI DIA OJHO 3cnpceco coctabnreT 20-70 mI.
HaXMMTE Ha KONKY oXdTeCb 3aBepuHnna NbINOpHnTe, pni JKeJIaHmN, IpombIKy.
Ot6pa3ntcMeHIO Bb6opar HAnNTKOB (14).
PiocTaBBte YauKy IOI NBxOdom KoPe. BbIXoD KoPe MOxHo yCTaHOBtB BIIe INHKe B 3aBNCIMOCTH OT pa3MepOB YauKn (15).
Bb6epHTe BaHANrOK C NOMOsbIO BpaAuaOHeOra perYIaTOPa I NOITBepDnTe Bb6Op HaxaHTeM perYIaTopa NoITBepKJeHnra.
Bb ICerDa MoXeTe HAcToPb HxhBi Obem BoDi C NOMOsbIO BpaAuaOHeOra perYIaTopa.
UTo6bl OctaHOBtB 3anONHeHne YauKn, Bbl MoXeTe INoBo HaxaTb Ha KNOpKy, INoBo yMeHbWHTb obEm c NOMOsbIO BpaAuaOHeOra perYIaTopa.
PnuroToBJIeHne KoPe
KoJnueCTBO BOdI JnO horo Kofoe coCTaBnraT 80-160 mI.
PnroToBneHne Kofo JyHro
KoJIuYeCTBO BOIbI OJHOrO KoPe IyHro COCTaBnIeT 120—240 Mn. YcTpoiCTBO aBTOMaTIueCKN BbINOJIHReT DBoHoi LInKJI, He yIupaIte BaUy uAkwy do KOHca nprirotoblenia.

Monotbkynd HauHaeTc npouec cniltpaun.
CneuaIbHaФyHKUINo3BOJnEeTpeYnnpOaTb TempeaTyP KoFe.
HE CHIMAI TE PE3EPBYAP DO OKOHUAHN LUKKIA (T. e. He pahee Yem Ypee 15 cekynd nocne BbITEKAHNI KoPe).
Функця «Дычашки»
Bau np6op no3b0n8e npiroTOBtB 2aUkN KoPe nIIN 3cnpceo dIg 3 cneIyUOxN npiroTOBHeH: 3npceo / hacblueHHb Icnpceco / KoPe. 3Ta cyHKuIg HeIOCTynHa dIg npiroTOBHeH N KoPe nyHro. Pp6op aTOMaTHueCKn BblONHIT 2 nonHbIX uKNa npiroTOBHeH N KoPe OINH 3a Dpym. TaKe He 3abYbTe yCTAHOBtB BTOpy IOAiky NOD BbIXoDm KoPe nocne 3abepeHnepBoro Lkna.
BbI noTOTOBIN Bau np6op K pa6ote. OTo6pa3nIOc bMeHIO BbI6opa HAnNTKOB (14).
NocTaBbTe YauKy NOD BbIXoDm KOe. BbIXoD KoFe MoXHO yCTaHOBnTB BblIe HnHKe B3aBcMOnCTn O pA3MePoB YaUKN (15).
Bb6epnte cBOHnHTOK nIOaTBePNTe Bb6Op 6bICTpbIM dBOHbIM HaxKaTHeM HapeYJrTOp NOITBePXXeHnI.
IorBHTc coo6eHne, yka3bHaOuEe Ha 3aPoc DByx ChaWeK.
Pn6op aBtOMaTneCK BbINoHnT 2 noNbIX uKkna npiroTOBHeHH Koepe.
BbMOKeTe npeBaTb uKN,HaKaBa Ha OK.
BHIMAHNE! OCTAHOBKA LUKKIA HE IPOICXOJNT MOMHTAJIbHO.
Ha 3kpaHe NOBITc COO6HHe N ppeIIOXeHEm OUHCTKn CNTEmbl. Mbl peKOMeHdyem Bam BblONHHTb ee, O3HAKOMNBWcB c naparpaPam POMblBKA CNCTEMbl KANYUHHo n/nn OBCJNYKBAHNE CNCTEMbl KANYUHHO.
PEYJINPOBKA KANYUHNO
Maunha no3boJareT perylnpoBaTB KOINueCTBO MONoka N KoFe B COOTBETCTBn C BaUNM INpeIIOHTeHnMn B npiroTOBHeHn KanyuHo.
3Ta perynnpobka ocuyceCTBnaeTcC nOMoub MeHIO Perynpobka kanyuHo.
B To BpemKaK Ha 3kpaHe OTo6paxaetc MeHIO Bbl6opa HAnrKOB, BblONHnTe DnITeNbHOe HaxaTne (> 3 c) KHNKn KaanyuHoHa MaunHe.
1. BbI6epnte nyHKT No yMOnHaHHIO nIra 3aBOcknx HacTpoek
2. BbI6epntHoBbI dIaHCTpoKn BaWero peeNTa no CO6CTBeHHOMy yCMOTpeHIO. IaRn BbINONHIOrTcB CneDyUoE nocJeDoBaTeNbHOCTN:
a. NpOOrpeB MaunHbI
b. Φa3a BCnEHBaHn MoJOKa: HaxMNTe Ha KHOk Ky OK, KOrJa 6yJeT DOCTNHyT JeJaembl o6beM MoJOKa.
YXOD 3A IPINIEOPOM
BHHMaHHe! Iyra co6JIOeHnra paANTnHbIx ycNoBn Heo6xoHmO npoBOuMbI npoceDpybI ydaJeHnHaKnnn OuchTkn MaunHbI, KOrda OHa 3TORo Tpe6yET. CneDuTe HNCTpykCnMn Ha 3KpaHe. Bbl MoKeTe npoDoJIkaTb NcNoIb3OBaTb ycTroIcTB0, HO JeNaTeNbHO, YTObI 3TN Oepaunn 6bII INBIOJHEnbI KAK MOXHO bICTpee.
OnyctouhTe KOHTeHep dIg Otpa6oTaHHoro KoOe n IOTOK dIg KaIeJIb
CHIMMTE ppeBapnteJbHO cIcTeMy kanyuHNO (26).
Ecni noBnraTc coo6eHne, n3BneKeNTe noDOn dIa c6opa Kanelb, CneIte H3 Hero Body nOCHNTe (27).
I3BJIeKHTe, OOnpOxHnTe N OChCTnTe KOJIneKTOp KoFeHNoI rUu (28).
YctaHOBtKe KOHTeHep DnI Otpa6oTaHHOrO KoPe Ha MeCTo (28).
IopdoH JIA c6opa KaneB cA6xH nonPbKamn, KOtOpBcBaYKaXyT Ha Heo6xoDmOCTb erO onopoKHeHn (29).
KaTToIbKO Bbl N3BneyeTe KOJIeKTop KopeHOn rUu, Bbl DOJXHbI erO NOJHOCTbIO ONOPOXHTb, YTObI B DaJIbHeiWeM 136ekaT nepenolnHeHn.
Ecn KOnJIeKTop KoFeHON rUuN BCTaBnEH He Do KOHca Nn yCTaHOBnEHnPaBnIbHo, OTo6pa3ntc npedynpexkdaOoee coo6ueHne.
ToTnO pNk BAeTc npdypeKdaUoee coo6ueHne, nproTOBHe 3cnpe Hb03MOxHO.
KoJIneKToP paccuTah Na c6Op KoFeeHNo rUzni 9 uAweKe KOFe.
PpmbIBka cncTeM: cm. cTpaHnUy 3.
PpmbkcaCnCTembl kanyuHo
MaunHa No3BOJnEe TpOMbITb CNTcEmy Nocne 3aBepuHHeN npriOTOBHeH Bawero KanyuHNo. 3To BO3MOxHO, daKe ecnB EMKoCTn MOnOCHoro CTaKaHa OCTaETcM OJIOKO. BaXHo BbINONHrTb IpombIKy Nocne kaxdoT o pnirotobHeHnnpznnKanyuHNO.Heo6xoDmO, YTO6bl MoOnHbI CTaKaH HaxOuINcH Ha MeCTe, Ka 3To ONnCAHO BnaparpaFe PNIOTOBHEHNEKANYUHO.Y6eDInTEcb, YTO KHONKa KpbIshKn CNTcEMbI KanyuHNO HaxOuINTCB B NOLOXeHHN OUYCTNTb (30).
B To BpemKa KaHa 3KpaHe OTo6paXaetcMaHIO BbIbopa HAnNTKOB, HaxMnte Ha KHOKNy MaunHbO UChCTNtB (31).UTo6b3aNyCTnTb ZIKJI npOMbIBKn, IpocTo CneDyTe INHCTpyKzumrMa 3KpaHe. IpeKeJe Yem Npeeyn K npriroTOBJIeHNIO HOBORopeuNTa, B KOHeze 3TOrO zIKNa nepemeCTnTe KHONky CnCTeMbI KanyuHb BO NOLOKeHne KANYUHO.
BAXHO!
XeIaTeIbHNo npOBecTn 3Ty npMbIKy Do TOrO, KaK MoJOnHybI CTaKaH (ecIn OH BCE eIe CoDEpKNT MOnIOKO) 6yET y6paH B XoIoNJIbHnIK NocIe NocJeHero npiroTOBHeHnpeCenTa KanyuHNO. NocIe KaKdoI pOMbIKn peKOMeHdyETcOuCTNTb pa3JIuHbIe qACTn CnCTeMbl NoD CTpyE BoDOpBOHO BObI (cm. naparpaΦ ObCyKbAHne MoOnHoro cTaKaHa).
Iporpamma ouhctkn cnctembl npnroTOBneHna Kope - o6uaa dInTeNbHOCTb: npn6n3nteHbHO 20 MmHyT
Heo6xoDIMO BbIIOJIHrTb npOpaMMy OUcIeK TpIepe 360 npiroToBHeHn 3cnpceco nI Koe.
Pn Heo6xOIMocTn npOBeHnry OUcTKn yCTpOncTbO 6yTeT yBeOMJIb BAC o6 3Tom OTO6paKeHNEM COOTBeTCTByIOeRO coo6uHn.
Дя Выл�неня nporpammbi OuchTkn Bam noHaIObntc emKocTB, KOTopa MoKet BmecTnTb He MeHee 0,6 n Ta6NeTky ot NaKuIN KRUPS (XS 3000) (32a).
Ecnn Bbl OTKIIOHTe BaUy MaunHy BO BpeM OuncTk NnB Cnyae c6oNtAHn, nporpaMa OuncTk 6ydet npdoJIkeHa c npeBaHHoro wa. OTNOKntb 3Ty onepaHIO 6yDet HeBO3MOxHO.
3TO ABnIeTc 6b3aTeNbHbIM ycNoBHeM NO COo6paKeHnM Heo6xoJIMOCt N pOmbIBK KoHTypa cIpKpyJauu BODbl. B 3TOM Cnyae Bam Moket NoHaIO6ntbc HOBa Ta6JIeTka OT hAKIN. Heo6xoJIMo BblONHITb IporpamMy OuncTkB INOHOM Obeme, YTO6bl I36ExaTb IIO60rPnCKaUu.
Lckn oucn kny aBnreTc npepbBnCTbIM, BO Bpem ero BblnoHHeH He cneDyET noctabTb pyKn nD bixO KoPe.
CnedyTe HNCTpyKUm, NOBJIHOUMcra Ha 3kpahe.
A B T O M A T N U C E C K A P O R P A M M A O U N C T K N CO C T O N T N 3 3 a c t e n: c a m u k l o u n c t K N, 3a t e m 2 u k n p o m b i k n. 3T a n p o r p a M M A D I N T C A OK J I O 20 M H Y T. B b Mo j e t e p o n 3 B e c t n O u n c t K y B I N 6 0 B M O M E H T, H a k a B K H O N K Y P O P R P A M. d I R O T O B P a X E H N M E H I O, a 3 a t e m B b b p a B O S C L I Y X K N B A H H E OK O U N C T K A C N C T E M bI K O F E.
Iolb3yItecb toIbKO Ta6IeKamn OT haknn KRUPS (XS 3000).Pon3BODntJIb He Hecet OTBeTCTBeHHocTn 3a yuep6, npuHHeHHb B pe3yIbTaTe IcNoIb3OBAHn Ta6IeTOk dpynx Mapok.
Bb moKTe npno6peCTn YnCTaTnE Ta6IeTKN B CepBnChbIX cEHtpax PnpMbI KRUPS.
Pporpamma aBTOMaTHueckoro ydaJIeHnHaKnn - dIITeJbHOCTb: npN6JIN3NTeJbHO 22 MHyTbI
EcnHaBaWeKoFemaHHe yctaHOBHeN pIbTp dIy BoDbI Claris-Aqua Filter System F088,CHMnTe ernope npOBeDeHem uKkna ydaJeHn HAKIN.
KoHueCTBO HauKnn 3aBnCnT OT JcctKocn IN cNoIb3yEmoB BoDbl. PpN HeO6xoDMOCn ydaJeHnHaKnn ycToiCTBO 6ydet yBeOMJIb Bac o6 3om OTO6paXeHNem COOTBeTCTByIOUeO COOSeHn.
Дя ВыллненяnporpamMbI ydaHЯня HAKINN BAM NOHaObNTcA EMKocTb, KOTOPaR MoKET BmecTnTb He MeHee 0,6 JI, n NaKeTnKДя ydaHЯня HAKINN KRUPS (40 r) F 054 (32b).
Korda Ha 3kpahe NOBHTc coo6eHne «Tpebyetc ydaNTb HauNb», Bbl MOKeTe 3aNyCTnTB abTomatueckyI nporpaMMy ydaJIeHn HauNn, HauKaB KhoNkI PPOrPAM.
CnedyTe HNCTpyKzma, NOBbIIOUIMcHa 3kpaHe, CnEa 3a paTbOpHneMaKeTuKa.
LNIOT ONUCTKN OT HAKINN COCTONT 3 3aTee: cama oana ONUCTKN, 3aTeM 2 oanpmbIBKN.
IcnoJIb3yIte ToJIbKO n3dJIeNn OTHaKINn Ipon3BOcCTBa KRUPS. Bbl MoKeTe npNo6peCTn n3dJIeNn OTHaKINn B cepBnCHbIX ceHTpax dnpMbI KRUPS.
Pon3BODIeJIb He Hecet OTBETCTBHeHOctn 3a yuepe6, npuHHennbI np6Opy B pe3yIbTaTe IcNoIb3OBAHnI dpyrnx n3denn.
Ecn npon3oewen C60B N noDAe 3neKTPoNTaHn Hn ecn Bbl OTKnOChn MaunHy, cKn 6ydt NOBTOHO 3anyueh C npepbaHHoro wara 6e3 Bo3MOXHOCTN OTNOKHTb DAHNHYO OpeaHIO.
Heo6xOdmo BbIOnHHTb npOrpAmMy OcNCTKN OT HAKINB N OJHom OBeMe, YTO6bl N36ExKaTb JIO6Oro pNCKaU.
LKOnCTKOn OT HAKINI YBJIeTcNpepbIBnCTbIM, BO BpeM erO BbIOJIHeHn He CJIeDyET NODCTaBJIrTy pKn IOn napoBoe conJIO.
Bo Bpem npoBeHn uOCTKn OT hKnTtAteIbHo o6epaTe pa6oyu IOBepxHocTb npexde BCero B TOM cnyae, ecn OHa n3rTOBHeHa n3 MpaMopa, KaMHy nn DepeBa.
OuNTKA CNTEMbl KanyuHNO
Дя Выллгеня поррамьочсTk Bam noHaioobntc emKocTB, KOTopa MoKet BmecTNTb He MeHee 0,6 n, n ChctuaJxNdkocTB KRUPS XS 4000 (32c).
NoBepHnTe KhoNk Ky KpbIuKn CnCTeMbI KaNyHnO B NoLoXKeHn KAnyUHnO (23).
Bb moKTe npCtynTb K ouNCTke, Haxab KHONky «Pporpa.» «O6cnyxuBaHne» «OChctka cnCTembl kanyuHO.
CneyTe HNCTpyKUmaH Na 3kpaHe.
OBCJNYXINBAHNE CNTEMbl KANYUHNO
YTo6bI DEMOHTNPOBAtb CNCTeMy, BbINOJIHnTe CJIeDyUOuNe DeiCTBnA:
BbInbTe WJHaH n3 OTBepCTnA CTaKaHa N BbIXOda HAnITka (33).
- Pa36noknyte cnTeMy MaunHbI (34).
- N3BNeKIne KAccSeTy (35).
BbHbTe n3 Hee Kopnyc n3 uehoro cnMkoHa (36).
- CHHMTE BO3dyuHbI HakoHeuHK: 3To MeaJIInueckaJeTaJIb, paCNoJIOKeHHa HaI KOpNycOM n3 YepHOrO CnIKoHa (37). TaKke CHMNTe PIIactNKOByU DeTaNb (38). 3AmOHTe ee Ha HeKOtOpoe BpEma B TropayeB BoDe Cdo6abJeHNem CpeDCTBa dJa MbITb IocyDbI, Iocne Yero IpomOnTe.
Takke ydaIte nactMaccObyo DetaIb (39).
CnCTema kanyuHNO Tepeb nolnoctbpo 0a3o6paHa (40).
-Bo3bMITE KIIIOUДЯpa36OpKIN (41)
- OTKpyTnte HakoHeuHnK napoBOro conna (41)
- Pn Heo6xOaHMOCTn IpoUcHTte CoJIIO C NOMOUsbIO CneuaJbHO INrOJIKN N3 KOMIIeKTA (42)
BbTaKxMe MoKeTe CHaHbHOn WJNaHr DnMa MONoka, a TaKxE KHOkky DnpeynpOBKn KpbIuKn (43).
Iocne TOrO KaK 3JIeMeHbI IpnMbItbI TeNIOB BDOON N BbICyUeHbI, YcTaHOBnTE IN HA MecTO IN BHOB bIOMeCTNTe KACCETy Ha CTaKaH (44-46).
06n yxo
Ipeed npoBeHnem OuncTKBnky nntAHn Heo6xOIMO BbHyTb n3 po3eTKn 3neKtpuecko Cetn n octaBnB np6op, T06blocbl.
He npmeHnTe HnctpyMeHTb IIN YnCTaue CpeDCTBa, KOtOpBie MOrY T noCuapanatb IIN NOBpeDntb pnp6op.
Ipeplaraem Bam HeckoIbko peeIToB, KOToPbI Bbl MOKeTe NcNoIb3OBaTb DnI npiroTOBennepa3JIuHbIX BnIOB KoPe c nOMoUbIO np6opa Espresseria Automatic:
KanyuHNO
IpynroTOBHeHna HactoJero KaunHO ndeaHbIMn ABJIOTc cneDyUOne nponopu: 1/3 Tennoro MoIOka, 1/3 Kope, 1/3 MOIOHNO neHbl.
KoepaTte
PnroTOBbTe Knaaccnueckn 3cnpecco B 60nbou Yauke.
Iobabte HeMHoro BCnHeHHbIX CnBOK nnyonyuHnKofo Jatte.
KoΦe koppetto*
PnirtoBbTe Knaaccnueckn 3cnpecco.
Iobabte 1/4 nnn 1/2 ctaKaHa KOhBaHOro Nnkepa, YTO6bl npdaTb KoPe HOBbIKyC.
YKpaCbTe TOCTbIM CNOEM B36NTbIX CNBOK N NOaIte Ha cTOnI.
BunbepiMbOy 3a DonomoroIpepyIaTopa.BoHa 3'ABuTbcHa Dnucnnei (10-11).
PiTBePdiB cBi Bn6ip, HATNCHyBwN KHOKNy PiTBePdxKeHHa (12).
Iiud nepworo BnKopncTahnHa npnaDi noTpio Ho hanaTyBaTu 6araTo npametpiB. Kaio Bu BmKHeTe npua, To Bam Bye 3anponoHOBAHO 3HOBy HanaTyBaTu deaKi 3ux npametpiB.
Napametpn, rki Heo6xioH0 HanaWtbyatn:
Moba
OuHnUz BmipHOBaHHa
Data
Taimep
ABTomatuHHe BUMKHeHHA
ABTomatuHHe BBIMKHeHHH
XopctKictb BODn
Moxha Bn6paTNI MOY i3 3anpOnHObaHOro nepeJIky.
Moxha Bn6paTm Mipy BaN: mIniItpn yu Hui.
Heo6xiHOb BCTaHOBnT daTy.
PnBCTaHOBHeHHI rOHHHnKa Bn MaTe 3MOrY Bn6paTn 12- a6o 24-roHHnΦopMaT.
Moxha TAKOK Bn6paTuac, Chepe3 kyn npuaad ABTomuHOBUMkaTbcra.
Bn maTe 3mOry aBtOMaTnHNo 3anycTnPiirpiBaHHra npnJa, Bn6paBUn neBnI yac.
BnCTaTBe HanaUtyBaHHJ KOpCTKoCTI BOiN BiD 0 do 4. NvB. po3diJ «BmipHOBaHHJ KOpCTKoCTI BOiN».
ABTomatuHne npommbaHH
Bn Maete 3mory 3anyckatni nporpamy npommbaHHn npnaNy niJ qac kOxHoro noro niiKIOUeHHdo eJeKTpomepeki.
Φinbtp
Heo6xioBkazatn HaeBHicTb a6o BiCyTHicTb φijbTpα (kaptpnck Claris - Aqua Filter System).
Ipi npwmy BnKopncTahHi npnila MoKe BmaraTn HAnOBHeHRe pe3epByapa DnBOD. Y taKOMy pa3i BnKOHyTe Bk3iBKN, BiOobpaKeHHa DnCnPeI.
PpommbaHHcCTEm
PpomBaHHn CnCTeMn npriroTyBaHHK KabN:
PpOMBaHHMOxHa 3diHCHNTB 6yDb-kyn qac, HATNCHyBwn KONky PPOr. IJIa BIO6paKeHHa MeHIO, a dani Bn6paTN OBCJYROBYAHHRA OK PpOMBAHHRA OK.
POMUBAHNAH NAPOBOI CNTEMN
BctaHObitb napobe conno (5), notim noCTabte nocydyh ni napobe conno. Bn6epitb ha dincnnei napameTp «rapya BOda» ta niTbepiBn6ip. Lnk npommbHH 3abepuHTbcra abTomauH nicna BntikaHH neBHOi kInbKOcTi BOH, ykaahoi Ha dincnnei.
PpomnTe 6bui CNTeM KInbKa pa3iB, KaIO npuJa IOBRO He BIKOpNCToByBaBCa.
IⅡI YAC IIPOMNBAHNR YEPE3 CONIIA BNXODNTB TAPRAA BODA. IOTPIMYTECR IPNABNJ TEXHIKN BE3NEKN, 10OB YHNKHYTN ONIKIB.
PiIroTOBka MJIINHka
Bn MaTe 3Mory hanaTobyBaTN MiHicTB KabN, perynoucN cTyinHb nepemeneHHK KabOBux 3epen.
YmdpbiHniCtynihnepeMeHnKabOuX3epen,TMIiHiO6ydeKaBa,TaTmKpaU niHyBOHa6yeMaTn.
BidperynIte ctyinb nepemeneHHKabn, nobepnybun peryraTOp «PeyniobAHHcTpyeho nepemeneHHA».
Pn noBopoti peryIaTopa BnIO nepemeneHna 6yde npi6hiuM. Pn noBopoti peryIaTopa Bnpabo nepemeneHna 6yde npybiuM (13).
PEYIIOBAHHMAICPOBODHTNCAIDYACNEPEMEHEHHKABOBX3EPEH.
3ABOPOHReTbCnJIbHO HATNUCKATN HA PEYJARTOP CTUNEH NEPEMEJIHHK KABN
He 3a6npaTe 2 uawkn nicn nepworo nukny npriroTybaHna.
Bn iDroTyBaHn Cbi npnaI.3'8BnEbCm HIO B6Opy HanoiB.
Pomictb akcecyap nna npuroTybaHn DBox yaWok niD OTbOpn nnBxOy KabN.
Pomictb 2 yawkn nD OTBOpn dIy BxOdy KabN. Bm moKeTe nHrtn a6o onyCTHTn OTBip BxOdy kabN 3 akcecyapom 3aJexHO bID po3mpy yaowk.
Bn6epiB cbi Hani i nIqTBePdItb Bn6ip WbnkM NODbiHMM HAtnckaHHK KNOK. OK.
3'BAITbCIOBIDOMIeHHIPO 3aIHT Ha pIroTOBaHn 2 aWok.
PnroTyBaHHa Ta BCTaHOBHeHHa npna KOnTeHepa dMa MoNoka
KoHTeHep dnn MOkOa cKaIaDaTbc3 nIacTMacBOi CKnHKn, KpNkN 3 KaceTO Ta rHyUKO WHaTRA, kN 3EHyETbc3 OTBOPOM BNTOKy HANOIO 3 npnaNy. Ipeed nepuIM BnKOpNCtAHm peTeJIbHO BMNIte KOHTeHep i NOrO cKnAdOBi YactHH.
HaHnIe B KOHTeHep MoKO (Mn. 150 m) (16). 3aKpInTe NOro KpuKoIO u 3aKpinITb, 3nerKa HATNCHyBun (17). BiDnyctitb Baxinb KpinHnra (18). BCTaHObitb cKnIHKy 3 MoNOKom Ha npuaad, 3'EDHAVnn II 3 OTbOPOM BxOdy nap (19), notim onyctItb Baxinb KpinHnra (20). BCTaBe rHyckm wnaHr y npnaHcHenn dIy HbOro OTbip KacETn (21), a IHsNI KHeu 3'EDHaHTe 3 MarHITHM OTbOpOM BxOdy HanoIO (22). IpeekohaiTecra, 0KONka KpuKu CnCTemn 3hAxOndbcB nNoXeHHi KaNyHNO (23).
PnroTyBaHHaKanyuHNO
KoHa nucnneipnnay BiOobpaKaebcMeHO Bn6opy Hanoib, KopoTKoaycho (< 3 cek.) HaTNCHTb KHONky KanyuHo (24) Ha npnadi. POnHnAeTbcra Tadir niirpibHHa, Notim etan yTBopeHHn 3 MoNk 3 MONoka, i HanpkiHci BNtika Kaba ecnpco. Moxha KyTuBAtn Han (25).
Moxha npinnHnTuKKn, HATncHyBwn KhoNkOK.
Ybara!PpnnnHeHHy uKny He Bi6yBaCTbcra MNTTcBO.
Ha dincnnei BnCbiyetybce iHcpopmaiz yOdo oUHc HcTeMn. PekomeHybcBn OuHcH, KepyoHcB biNobiHNmu po3diamn «IPOMBAHH CNTEMN KanyuHOn» Ta/a6o «OBcnyroBvAHHc NCTTEMN KANYUHO BPYHy>.
HAJIASTYBAHHKANYUHOO
PnnaD aE MoKJIbICt b perynoBaTn KInbKicTB MOkA Ta KaB N KaynH0 3aJexHo BID Baunx no6aKaHb i CmAkIB.
LcHaIaTuBaHHBnKoHcyTbcraYepe3MeHIO《HaIauTuBaHHkanyuHO》
KoJIIN DcNpIe npIaNy Bucbiye MeHIO Bn6Opy HanoIB, KopoTKOuacHO HaTnciBtB (>3 cek.) KhoNkY kanyuHo Ha npIaIaI.
- Bn6epitb 3a 3amOBuyBaHHm 3aBODcbKi HanaWtBuHH
- Bn6epitb HOBu, uo5 Hanui BiNobiDaB Baum no6aKaHHM. Etani npiroTybaHry nyTb y TaKOMy nopAky:
a.Пдгрваннpyиау
b. Ctaia yTBOpEHMa MoNoHoi NiHKn: HATNCHTb KONky OK, KOJIN o6'Em MoNoka DoCg 6aKaHoro pIBHa.
c. Ctadir npirotybaHHaKbH: HATNCiB KONky OK, KOJn 06'em KaBn DOcR 6axaHoro pIBHa.
Iotim npinad nobidomntb, 0o HOi 3haeHHN O6cRy Kabn Ta moIOHoi nIH N36epexeni Ira HAcTyTHOro npiroToBaHHa KanyuHO.
YB4A! 3yINHKA LKJLY PnIROTYBAHH NIK HE 3DINCHIOETbC MMTTEBO
OBCJNYROBYAHNBAUOFOIPNJADY
Ybara! DnIy dOpImaHry yMOB rapaHTII Heo6xIDHO 3a Notpe6n npoBOuNTn npoceDpyn 3 BnDaJIeHNHaKInny Ta OunueHH. YBaXHO 3HaJOMTeC8 3 IHCTpykUIMn, kki 3'ABJIObTc8n Ha DncPNei. Bu Maete 3Mory n HadaNl KopNCtBuTnca npniladom, aIe 10 npocedpy Heo6xIDHO BIKOHaTHn kHaNWBuDwe.
CnopoXHeHHa KOHTeHepa Ira KaBOBoI rUsi Ta nIDOnHy IJRA 36Opy KOHeHcaTy
Iepw 3a BCE 3HIMITb CNCTeMy KanyuHNO (26).
3a HABHOCTI NOBIDOMHHe HA DnCnneI, Heo6xIDHO CNOPOXHTN Ta OYNCNTNI IIN DOH INJ 36Opy KOHDeHCATy (27).
BnMItb, cnopoXhHt b i ouncitb kOHTeHep dJa KaBOBoI ryu (28).
YctaHObITbHaMICe KOHTeHep dna 360py KaBOOi ryui (28).
PiDOnIg 360py KOHeHcAty OchaueHn nonLabkam, kci nHanizyToB npo Heo6xHicTb NOrO OuHcHn (29).
TikIbKn BV BnHnKoHTeHep dJa KABBOOiyu, ONUCTiB NOro NobHicTIO dJa 3aNo6irAHn WBNkOMy 3a6pydHeHHIO BNTOKy Upe3 Kpa.

Ko KHTeHep Ia KaBOOITyIbCTAHOBHeHn HEnpaBnIbHO,HaDcNPeI'3'YBtBCa NOBIOMHeHn.
Ecnpeco He moKHa npiroToyBaTn, kUo Ha dinCnIe BIDO6paXeHe nonepdKyBaIbHe NOBIDOMLeHH. KOHTeHep po3paxOBaHn Ha KaBOy ruy bID 9 nopui kabN.
PpOMnBaHHcNCTeM:INB.CTOp.3
PpommbaHHcntEmKanyuHo
Ppnaad dae 3mory 3diinCHOBaTH npommbaHH CnCTemN nicra npiroTyBaHH KanyuHNo. Ce moKnnBO 3po6ntn HabItb KOJI MOJOKO 3aJINwAeTbcra BMOJOnyHO KoHTeHepi. PpommbaHH Heo6xIHHO 3diinCHOBaTH nicra KOxHOro npiroTyBaHH KanyuHNo.
KoHTeHep dI Ma 3hXoHTncB Micci, 3a3HaeyHomy B po3diPi PNrOTyBAHH KanyuHIO.
NobepHtB KhoNk Ky KpnKcn CnCTemn KaynHb NIOJoxeHHr OUYUENHr (30).
KoHa DnCnnei npnaIy BiO6paKaetc MeHIO Bn6Op HanoIB, HATNCHTb KHONky OUYUeHHRA (31). 0o6 3anyctntu KnKn npommbaHn, o3HaonmTec 3 iHCTpykuiMn, 0o 3'ABNtbc Ha dncnnei. Iicra 3abepeHHra uKKny nocTaBte KHONky CnCTemn kanyuHb N noJooHeHH KAnyuHNo, 0o6 po3noatn Do npiroTuBaHHHOBoi npucii Kabn.

BAJKIIBO:
PekomeHdyetbcra 3diinCHNT npomBaHHnpeep Tm, knoCTaBHT KOtheHep dna MoJoka (Ako BOHO ue 3annuiooc) y xonodnbHK nicnpiroTOyBaHHo octaHHboi nopui KanyuHNO. Iicna Koxhoro npomBaHHn peKomeHdoBaHO MNTN BcI deTani cncTeMn iipntoouHO BOIO 3KpHa (DVB. po3dIn «O6cnyroByaHHn KOtheHep da moJoka BpyHy).
Pporpama ouHnueHHcNCTeMn KaBn - NOBHa TpNBaJIcTb: np6Jn3Ho 20 XBnIH
Heo6xio npobodntu ounueHHn cncemn nicra toro, k6ynde npirotoBaHO np6Jn3HO 360 npui Kabn ecnpco.
Ko Heo6xIDHO BIKOHATN OUNHNN, npnad CNOBICTNTb npo uepe3 nobidomneHH Ha dncnnie.
PYUHE OBCJNYROBYAHHRCNCTEMNKANYUHO
Ioo6 po3i6paTH CnCTemy, DToPmMyIeTcB HaBeDeHN HIXKHe BkA3iBOK.
- BnMItb rhyckm 7nAnr 3 OTbOpy KOHTeHepa Ta OTbOpy BntOky HanoHO (33).
- 3HIMITb CnCTeMy 3 npnJaNy (34).
BnIMtB donomixHy kaceTy (35).
BnmiTb cOpHn cnJIkoHOBn eJeMeHT i3 KaceTu (36).
3HIMITb NOBITpHn HAKOHeuHK (MeTaneBa DeTaJIb, 3HOxOHTbcra 3BepxHa dOpHm CnIKoHOBM enEMeHTOM) (37). IpeTeNbHorO OunueHHa ciE deTani npomnte rHyky 3ohy, nounnyouH II (38). 3amOHTb II Ha deekn yac y rapayi BDi 3doabAHHM 3ac06y drr MTTT nocdy, nicra YORo npomnte. - 3HIMITb TAKOK NlaCTMaCOBy DeTaNb (39).
Tenep cncTeMa kanyuHIO noBHiCtIO po3i6paHa (40).
Bizbmitb kIIOU dIy po36ipkn (41)
BikpyTb hacaKy napoBoro conna (41) - RaKuo Heo6xidno, npoucntiB conNo cneuaIbHOIO roJIO 3 KOMnEeKy (42)
Moxha 3HnTn nHaHr noaHi MoNoka, a TaKoX KHOkY HaAaHTyBaHH KpUKN (43).
PnnpmBaHnB Tenni Bodi Ta cyuHH 3HOy 36epitb elemEni CnCTemN KanyuHNO, BCTaHObitb ix Ha Micue i 3HOby nomictib Kacety Ha cTakah (44-46).
ItoouheTexhue O6cnyroByBaHHa
3aBxDn BiKKnHouaTe 7Hpy XmBHeHH BID eJeKtpomepeXi Ta daBaIte npnaDy OxIoHHT nepeoOuHnM.
3a6bopohetbcBVKOpncTObyBaTu IHcTpymEnTu, kI MOKytNoPpnaTn a6o cnpuHHTN KOp03IO npnAdy.
BntnpaTe KOpNc npnlaDy BOnorOTo raHypkoIO.
Petelbno npommbaTe pe3epByap dna BOn.
Li deTani He npn3Hauehi dna MMTB NocydomnHi MaunHi.
PnroTyTe KlaacnHn ecnpco.
IodaiTe 1/4 a6o 1/2 cKnHKn KOhBnyHoro Nikeyu, u6 naatn Kabi HOBO rpiuMaKy.
- Idoanytb npncmky hanoTO TAKOX anicoba a6o BnHorpaHa ropinka, cam6yka, kipu, KyaHTpo. C n iHwi cnocob 3pObntcmaekecnpco BnUykaHiIm. YBa Be3mexha.
Kabobni Jikep*
Ynnpuo 075 npa 3miuaTe 3aakn ecnpco, 250 r kopnuebo ro cykpy, 1/2 ntpa kohny a6o kupy.
JaTe CymiH HAcToTnCn npToTrom 2 TnXkHB.
-Bn OtpmaTe BiDmiHHn Iikep, knn nepw 3a Bce ouiHrTB JIO6bnti KaBN.
Kaba rnae no-itaniicbkn
4 KylbK BAHINbHoro MOpO3nBa, 2 YauKx OIoOnHoro cOnoKnOr ecnpco, 1/8 mOnoka, BepuK, HapeTm Wokona.
- 3MiuaTe XoIOnHe ecInpeCo 3 MoJIOKOM.
- POKnaDiTb KylbKn MOpO3nBa y CkIaHKn, 3BepxHaJIInTe KaBn, PpIKpaCbTe BepKamTa HaTeptTm LWOKoJaDOM.
XoJIoHa KaBa 3 Bepzkamn\*
IodaiTe yapky pomy B uawky cooKoro ecnpco.
UeDpo npnKpaCtbe CbIXMMBepuKaM Ta nOdaBaIte Do cTOny.
Ecnpco qnam6e*
2 chaWKn ecnpeco, 2 ManeHbki yapkn KOhByk, 2 loxKn KopnyHeBoro LyKpy.
- Hanne Te KOnbky XapocTki CknaHKn, nidiirpite n 3anaJIitb.
-ДоаиTe ukype,пeрмiшaиTe,нaнiTe KaBn,пикpaсte Вершam.
Ecnpeco naphe*
2 chaekn ecnpco, 6 eunx kobkib, 200 r cykpy, 1/8 niTpa coonKbX BepkiB, 1 ctonka anebcnoHOBoro Nikeyp.
-36nIteJeuHiXOBtKn3UyKpOMDo rYcToi nHn.
-ДоаиTe XOJOdHm ecnpecTo aneJIbCnHOBm liKepe.
-Notim 3miwaute 3i 36ntmBepzkamn.
-Po3knaTb yBa3ouchn a6o cKn.
-ПoctabeBa30ukndoMopo3nJIbHoiKaMepu.
- 3ЛовЖиBaHHаДИКОЛЕмШКоДТь 3Доров'Ю.