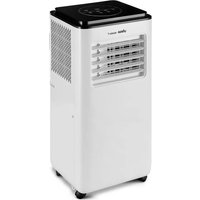
Nuuk+ - Air Conditioning UFESA - Free user manual and instructions
Find the device manual for free Nuuk+ UFESA in PDF.
| Product Type | Air conditioner (air cooler) |
| Brand | UFESA |
| Model | Nuuk+ |
| Power supply | 220-240 V ~ 50 Hz (estimated) |
| Power consumption (fan) | 61.4 W |
| Standby consumption | 0.2 W |
| Maximum airflow | 5.03 m³/min |
| Maximum air speed | 3.9 m/s |
| Sound power level | 56.3 dB(A) |
| Seasonal electricity consumption | 19.9 kWh/year |
| Water tank | Removable, with level mark |
| Ice trays included | 2 ice trays |
| Number of speeds | 3 (low, medium, high) |
| Ventilation modes | Normal, Natural, Sleep |
| Cooling function | Yes, with water pump and wet curtain |
| Oscillation | Yes, horizontal |
| Timer | 1 to 12 hours |
| Remote control | Yes, with CR2025 battery |
| Touch panel | Yes, with light sleep function |
| Dust filter | Washable with hot water (max 40°C), weekly cleaning recommended |
| Safety | Child protection (min. age 8 years), automatic shut-off after cooling |
| Warranty | According to current legislation in the country of sale |
| Technical service | Contact a service authorized by B&B TRENDs, S.L. |
Frequently Asked Questions - Nuuk+ UFESA
User questions about Nuuk+ UFESA
0 question about this device. Answer the ones you know or ask your own.
Ask a new question about this device
Download the instructions for your Air Conditioning in PDF format for free! Find your manual Nuuk+ - UFESA and take your electronic device back in hand. On this page are published all the documents necessary for the use of your device. Nuuk+ by UFESA.
USER MANUAL Nuuk+ UFESA
MANUTENÇÂO E LIMPEZA
LIMPEZA DE FILTROS DE POEIRA
Para garantir que o arrefecedor de ar funciona de forma eficiente, deve limpar o filtro de poeira antes cadamana de funciona. Siga os passos segentes:
WE WOULD LIKE TO THANK YOU FOR CHOOSING UFESA. WE WISH THE PRODUCT PERFORMS TO YOUR SATISFACTION AND PLEASURE.
WARNING
PLEASE READ THE INSTRUCTIONS FOR USE CAREFULLY PRIOR TO USING THE PRODUCT. STORE THESE IN A SAFE PLACE FOR FUTURE REFERENCE.
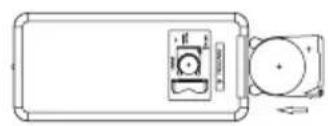
DESCRIPTION
- Air outlet
- Front board
- Filter
- Pump
- Castors
- Water tank
- Touch display
- Ice box (x2)
CONTROL PANEL
a.Mode button
b. Speed button
c. Swing button
d. On/Standby button
e. Cool button
f. Timer button
g. Light button
SAFETY INSTRUCTIONS
-
This appliance can be used by children aged from 8 years and above and persons with reduced physical, sensory or mental capabilities or lack of experience and knowledge if they have been given supervision or instruction concerning use of the appliance in a safe way and understand the hazards involved. Children should not play with the appliance. Cleaning and user maintenance shall not be made by children without supervision.
-
If the supply cord is damaged, it must be replaced by the manufacturer, its service agent or similarly qualified persons in order to avoid a hazard.
- It is necessary to disconnect the appliance before assembling, disassembling and cleaning.
- This appliance is designed for use at a maximum altitude up to 2000m above sea level.
IMPORTANT INFORMATION
This appliance is intended exclusively for domestic use for the ventilation of rooms. Do not use it for other purposes. Any other use should be considered improper and dangerous. The manufacturer shall not be held responsible for any damage resulting from improper, incorrect and irresponsible use and/or for repairs made by unqualified technicians. Do not insert your fingers or any other objects through the fan's protector grille.
The appliance must be kept out of the reach of children.
Do not use the appliance if it is not working properly, or if it appears to be damaged. If in doubt, take it to a professional, qualified technician.
Do not move the appliance while it is operating.
When the appliance is not being used, remove the plug from the mains socket. Do not touch the appliance with wet hands or feet.
Do not drag the appliance by the cable to move it.
Do not pull the cable or the appliance itself to remove the plug from the mains socket.
To clean the appliance, follow the instructions in the manual in the section dedicated to cleaning and maintenance.
B&B TRENDS, S.L. will not be held liable for any harm or damage which may occur to people, animals or objects as a result of failure to observe the aforementioned warnings.
INSTALLATION
- The appliance can be operated with the control panel or the remote control. The remote control has the same buttons as the control panel.
- Insert the plug into the socket. A beep sound will be heard and the power icon "ON/STANDBY" (d) will light on the display.
- Press the button "ON/STANDBY" (d) on the appliance. The appliance defaults to the low fan speed and Normal Wind mode. Press it again to turn off the appliance (before pressing the on/off button, please ensure the air outlet on the front is open).
-
Press the "Speed button" (b) under normal wind mode to select the fan speed. There are 3 speeds Low-Medium-High for choice. They are indicated by the corresponding indicators on the display panel:
-
Press the "Mode button" (a) to select the wind mode (Normal wind/ Natural wind/Sleep wind). They are indicated by the corresponding indicators on the display panel:
A. Normal wind: the fan operates at constant speed according to the set wind: strong, medium and low wind.
B. Natural wind: The fan motor operates irregularly according to the pre-programmed computer program, and can be divided into strong, medium and low natural wind according to the setting of the wind speed, making the air volume softer and more comfortable.
C. Sleep wind: When the sleep wind mode is selected, the fan motor enters into the sleep wind computer program control, and the fan air volume gradually decreases.
When it is set to strong sleep wind, the fan will run for half an hour according to strong natural wind, then turn to middle natural wind, and then turn to low natural wind after half an hour, until the preset time is over or turned off.
When the medium sleep wind is set, the fan will operate at the middle natural wind for half an hour, and then turn to the Low natural wind until the preset time is over, or it is turned off.
When the initial setting is weak sleep wind, the fan operates according to the low natural wind until the preset time is over or turned off.
- Press the "Cool button" (e), the cool mode indicator lights up and the water pump will be working. Before you touch the button, please ensure that the water tank is filled with water. In the cool mode, the appliance pumps water from the water tank to generate mist to humidify the air and improve the cooling effect.
To exit the cool mode, press the "Cool button" (e) again. The cool mode indicator turns off. - Press the "Swing button" (c). The oscillation function moves the deflectors left and right to adjust the direction of the air flow. The corresponding indicator will light on the display panel.
- The appliance can be programmed to automatically turn off from 1 to 12 hours. To use the timer, press the "Timer button" (f) to cycle through the numbers of hours (From 1 to 12h). The corresponding hours indicators light up. When your desired number of hours appears, stop pressing the "Timer button" (f). The timer will start immediately.
- Press the "Light button" (g). All the indicator lights, including the room temperature digital display will shut off. Press any button, all the indicator lights will turn on.
- If the appliance is turned off when the "cool" function is running, the machine will run at high wind speed for 5 minutes and will shut down automatically after the wet curtain is dried.
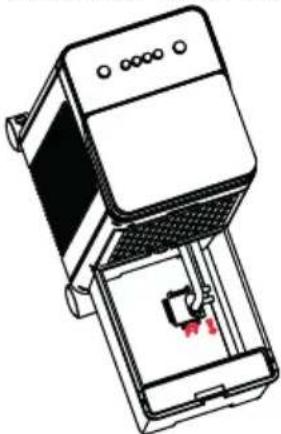
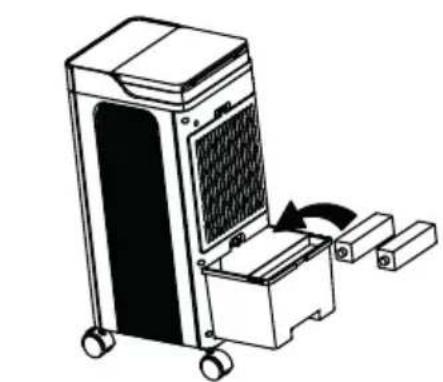
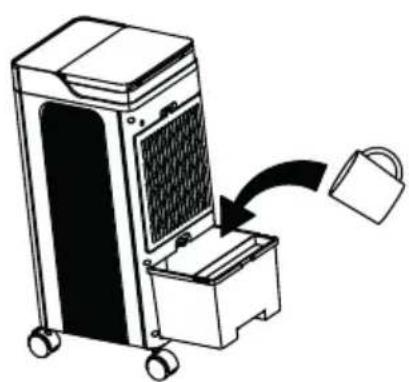
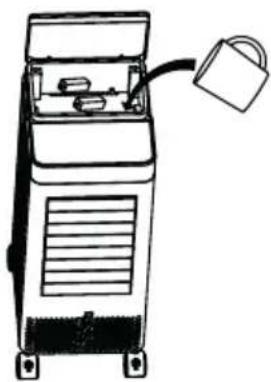
ADDING WATER
Before using the cool mode, you must add water to the water tank of the appliance. You may also add ice boxes to the water tank to improve the cooling effect. Make sure the appliance is not connected to an electrical socket.
There are 2 ways to Add water:
(1) Turn the lock button of the water tank to the left (see pic1), pull out the drawable water tank, and then slowly pour some clean tap water into the water tank (pic 2). Note: When adding water, observe the water level through the water level mark of the water tank at back. Do not exceed the maximum water level of the water tank when adding water.
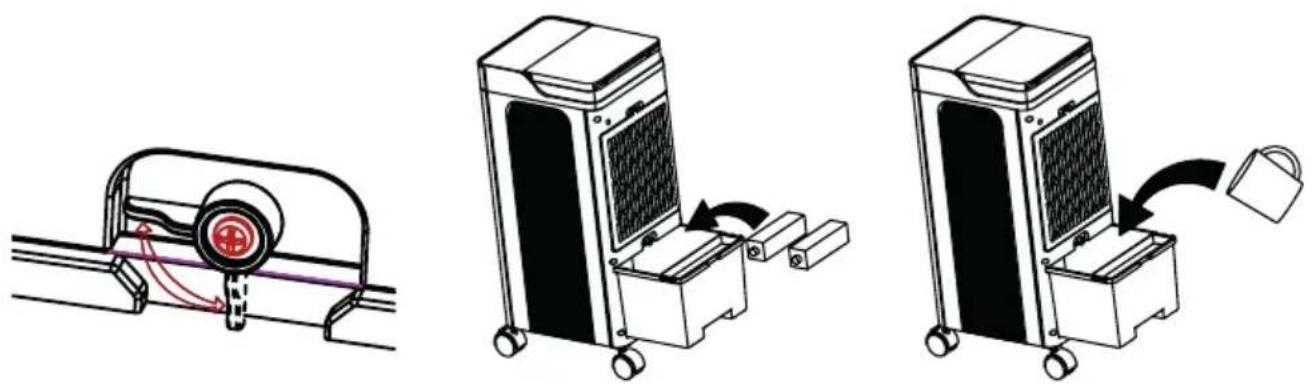
Pic 1
Pic 2
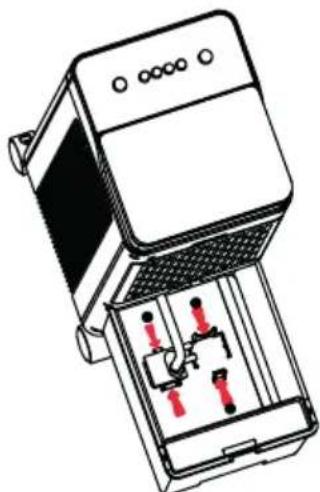
(2) Add water from top tank. Open the water tank cover and pour some clean tap water into the water tank slowly (pic 4). Note: When adding water, observe the water level through the water level mark of the water tank at back. Do not exceed the maximum water level of the water tank when adding water.
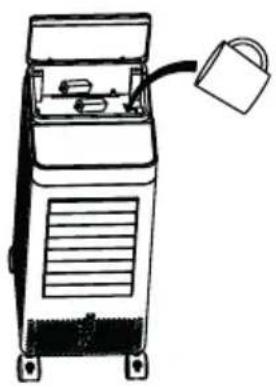
Pic 3
Note: There are 2 ice boxes offered. Fill water in the ice boxes, then put them into the refrigerator to let them get frozen. Then put them into the water tank. Make sure the maximum water level of the water tank is not exceeded after adding the ice boxes. After filling up the water and putting the iceboxes, please lock the water tank or close the top water tank cover.
USE OF REMOTE CONTROL
The appliance comes with a remote control to allow you to easily operate the appliance from a short distance. The remote control has the same function icons as the control panel. You can start using the remote control after switching on the appliance. When using the remote control, make sure:
- You are less than 3 meters away from the appliance.
- You point the remote control at the appliance.
- There is a clear line of sight between the appliance and the remote control.
The remote control is powered by a CR2025 battery. Follow the steps below to insert or replace the battery:
- Turn the remote control over so that you can see the back.
- Pull the battery compartment out of the remote control.
- If you are replacing the battery, remove the dead battery from the battery compartment.
- Insert the supplied or a new CR2025 battery into the battery compartment, making sure that the positive (+) side of the battery faces upwards.


MAINTENANCE AND CLEANING
CLEANING DUST FILTERS
To ensure that the air cooler operates efficiently, you should clean the dust filter after each week of operation. Please follow these steps:
- Before cleaning the appliance, switch it off, then wait a few minutes, and then unplug it to disconnect the appliance from the mains power supply.
- Turn the lock button at the top of the filter upwards, then remove the air filter from the appliance. Use a vacuum cleaner to remove dust accumulations from the filter. If the filter is very dirty, immerse it in warm water and rinse a number of times. The water should never be hotter than 40^ .
- Before putting the dust filter back into the cover grille, allow it to dry out well after washing.
- Reinstall the clean, dry filter before next use or storage.
- Caution: Never use the appliance without a filter because dirt and lint will clog it and reduce performance.
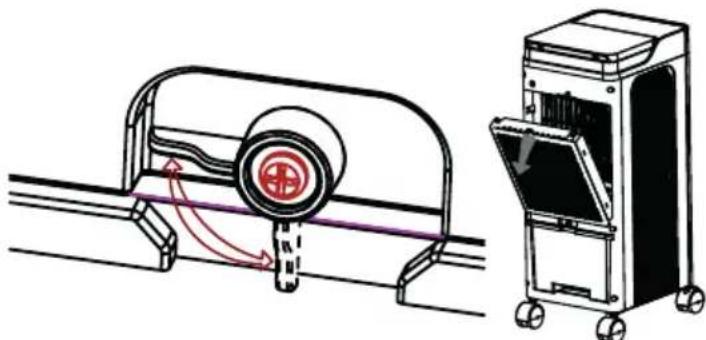
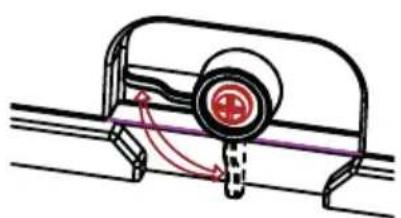
EMPTYING THE WATER TANK
It is recommended to empty the water tank every 2-3 weeks during use. Please follow these steps:
- Pull the mains plug from the socket.
- Loosen the button fixing the water pump (as shown in the below figure). Take out the water tank and pour out the water.
- Once the tank has been completely emptied, reinstall the clips at 2 ends of the water pump (as shown by the arrow in the figure) and checked it's installed firmly.
CLEANING THE HOUSING
Before cleaning the appliance, switch it off, then wait a few minutes, and then unplug it to disconnect the appliance from the mains power supply.
- Clean the housing of the appliance with a slightly damp cloth and then dry with a dry cloth.
- Never wash the appliance with water. It could be dangerous.
- Never use benzene, alcohol or solvents to clean the appliance – this could be dangerous.
- Do not spray insecticides or similar agents on to the air cooler.
PRODUCT DISPOSAL
This product complies with European Directive 2012/19/EU on Waste Electrical and Electronic Equipment, known as WEEE, which establishes the legal framework applicable in the European Union for the disposal and recycling of electrical and electronic appliances. Do not throw this product into the bin. Take it to the nearest electrical and electronic waste treatment plant. The product may contain batteries. Remove them before disposing of the product and dispose in special containers approved for this purpose.
We hope you are satisfied with this product.
The product may contain batteries. Remove them before disposing of the product and dispose in special containers approved for this purpose.
| Description Symbol Value Unit | |||
| Maximum fan flow rate F 5.0B m3/min | |||
| Fan power input P 61.4 W | |||
| Service value SV 0.082 (m3/min)/W | |||
| Standby power consump-tion | PSB 0.2 W | ||
| Fan sound power level LWA 56.3 dB(A) | |||
| Maximum air velocity | C 3.9 meters/s | ||
| Seasonal electricity con-sumption | Q | 19.9 kWh/a | |
| Measurement standard for service value | IEC 60879:2019 - Comfort fans and regulators for household and similar purposes - Methods for measuring performance |
AVERTISSEMENT
VEUILLEZ LIRE ATTENTIVEMENT LE MODE D'EMPLOI AVANT D'UTILISER LE PRODUIT. CONSERVEZ-LE DANS UN ENDROIT SÜR POUR POUVOIR LE CONSULTER ULTERIEUREMENT.
DESCRIPTION
J 1 J 1 J 1 J 1 J 1 J 1 J 1 J 1 J 1 J 1 J 1 J 1 J 1 J 1 J 1 J 1 J 1 J 1 J 1 J 1 J 1 J 1 J 1 J 1 J 1 J 1 J 1 J 1
:161 aoloy jia sb lio
1 1 1 1 1 1 1 1 1 1 1 1 1 1 1 1 1 1 1 1 1 1 1 1 1 1 1 1 1 1 1 1 1 1
()
()
()
()
1 1 1 1 1 1 1 1 1 1 1 1 1 1 1 1 1 1 1 1 1 1 1 1 1 1 1 1 1 1 1 1 1
( r > 0,0 > 0)
a 1 a 1 1 1 1 1 1 1 1 1 1 1 1 1 1 1 1 1 1 1 1 1 1 1 1 1 1 1 1 1 1 1
#
J 1 J 1 J 1 J 1 J 1 J 1 J 1 J 1 J 1 J 1 J 1 J 1 J 1 J 1 J 1 J 1 J 1 J 1 J 1 J 1 J 1 J 1 J 1 J 1 J 1 J 1 J 1 J 1 J 1 J 1 J 1 J 1 J 1 J 1 J
aogoo
1.1.1.2.3.4.5.6.7.8.9.10.11.12.13.14.15.16.17.18.19.20.21.22.23.24.25.26.27.28.29.30.31.32.33.34.35.36.37.38.39.40.41.42.43.44.45.46.47.48.49.50.51.52.53.54.55.56.57.58.59.60.61.62.63.64.65.66.67.68.69.70.71.72.73.74.75.76.77.78.79.80.81.82.83.84.85.86.87.88.89.90.91.92.93.94.95.96.97.98.99.10
:
.4a#gabwogagjzj:odabgljrll g aolacrwo agb1 jss:AolgljrlA
Jdssssg. laoo g oolj g bdo y Jk afo jco:
.401g 4ogxj jgl 1gll 100 12y y 100 . 12y 12y 12y 12y 12y 12y 12y
J 1 J 1 J 1 J 1 J 1 J 1 J 1 J 1 J 1 J 1 J 1 J 1 J 1 J 1 J 1 J 1 J 1 J 1 J 1 J 1 J 1 J 1 J 1 J 1 J 1 J 1 J 1 J 1 J 1
.10g61 198 p00 200 g .p0ll
j 1 jg 1 g 1 1 1 1 1 1 1 1 1 1 1 1 1 1 1 1 1 1 1 1 1 1 1 1 1 1 1 1 1 1 1 1 1 1 1 1 1
A. 交 交
j 1 j 1 1 1 1 1 1 1 1 1 1 1 1 1 1 1 1 1 1 1 1 1 1 1 1 1 1
.
a aabababababababababababababababababababababababababababababababababababababababababababababababababababababababababababababababababababababababababababababababababababababababababababababababababababab
.
Jj j j J.0000000000000000000000000000000000000000000
1 1
.
.1Jg0 000000000000000000000000000000000000000
.1gJ 10111111111111111111111111111111
.
(f) «Ogbl j» 1e bfoi. Cogbl pluowy. aLw 1 J 1 no lalld alfoa aay jagll aoo y
iJlIeLwI sE yBbI Ioo. (AeLw 1 J 1) eLwI sE jn
.1JgJgJgJgJgJgJgJgJgJgJgJgJgJgJgJgJgJgJgJgJgJgJgJgJgJgJgJgJgJgJgJgJgJgJgJgJgJgJgJgJgJgJgJgJgJg
aJrJ aJrJ aLJI uJ 15 . Jgbl gJgJgJgJgJgJgJgJgJgJgJgJgJgJgJgJgJgJgJgJgJgJgJgJgJgJgJgJgJgJgJgJgJgJgJgJgJgJgJgJgJgJgJgJgJgJgJgJgJgJgJ
. 1gol g
0 0 0 0 0 0 0 0 0 0 0 0 0 0 0 0 0 0 0 0 0 0 0 0 0 0 0 0 0 0 0 0 0 0 0 0 0 0 0 0 0 0
.1111 1111 1111 1111 1111 1111
yoo
1 1
.
#
在 Rt ABN 中:
aolo 11 agu1.9
201.4
a
= 1
1,2,3,4 ÷ j · j = 0.
Jooa Jaa aal .V
(x)g
Soo 1
gjj.a
aJj.b
- 1.1.1.1.
1JxJU/1J.
juijj.e
a0b1j.f
g. all j.g
aLwJl
loggwI gJyJgJyJyJyJyJyJyJyJyJyJyJyJyJyJyJyJyJyJyJyJyJyJyJyJyJyJyJyJyJyJyJyJyJyJyJyJyJyJyJy
INFORME DE GARANTÍA
B&B TRENDS, SL. guarantees compliance of this product, for the use for which it is, during the period established by the legislation in force in the country of sale. In the case of breakdown during the term of this warranty, users are entitled to repair or else the replacement of the product at no charge if the former is unavailable, unless one of these options proves impossible to fulfil or is disproportionate. In this case, you can then opt for a reduction in price or cancellation of the sale, which must be dealt with directly with the sales vendor. This also covers replacement of spare parts provided that the product has been used according to the recommendations specified in this manual for both cases, and has not been tampered with by any third party that is not authorised by B & B TRENDS, SL. The warranty will not cover any parts subject to wear and tear. This warranty does not affect your rights as a consumer in accordance with the provisions in Directive 1999/44/EC for member states of the European Union.
USE OF WARRANTY
Customers must contact a B&B TRENDS, SL., authorised Technical Service for repair of the product. Since any tampering of the same by anyone not authorised by B&B TRENDS, SL., or the careless or improper use of the same shall render this warranty null and void. You must keep the purchase invoice, receipt or delivery docket in order to exercise your warranty rights. For technical service and after-sales care outside the Spanish territory, please submit your query to the point of sale where you purchased the item.
BON DE GARANTIE
a a a a a a a a a a a a a a a a a a a a a a a a a a a a