
PA7000 - Food Processor UFESA - Free user manual and instructions
Find the device manual for free PA7000 UFESA in PDF.


| Product type | Multifunction food processor |
| Brand | Ufesa |
| Model | PA7000 |
| Power supply | 220-240 V ~ 50/60 Hz |
| Power | 800 W |
| Dimensions (L x W x H) | 35 x 25 x 30 cm |
| Weight | 5 kg |
| Bowl capacity | 3 L |
| Bowl material | Stainless steel |
| Number of speeds | 6 speeds + pulse function |
| Main functions | Knead, mix, beat, chop, blend, slice, grate |
| Included accessories | Whisk, dough hook, beater, chopping blade, slicing/shredding discs |
| Care and cleaning | Dishwasher-safe accessories; bowl and lid hand wash with soft sponge |
| Safety | Bowl locking system, automatic shut-off in case of overload, non-slip feet |
| Spare parts and repairability | Parts available on Ufesa website; repairability index: 8.2/10 |
| Warranty | 2 years |
Frequently Asked Questions - PA7000 UFESA
User questions about PA7000 UFESA
0 question about this device. Answer the ones you know or ask your own.
Ask a new question about this device
Download the instructions for your Food Processor in PDF format for free! Find your manual PA7000 - UFESA and take your electronic device back in hand. On this page are published all the documents necessary for the use of your device. PA7000 by UFESA.
USER MANUAL PA7000 UFESA
05 1 Chemicals and Coatings, SA
电话:010-6875977
[Unreadable]
[Unreadable]
The image is too blurry to recognize any text content.

natural_image
Exterior view of a modern electric juice maker with green juice and a glass, set against a red background (no text or symbols visible)ufesa
A




www.ufesa.es

F


[1]
Congratulations on your choice of our appliance and welcome to the group of ufesa product users. In order to achieve the best possible results we recommend using exclusively original ufesa accessories. They have been specially designed for this product. Please, read these instructions carefully. Special attention should be paid to safety information. Keep this manual so that you can refer to it in the future.
Safety operation instructions
Please read the entire user manual before using the appliance.
DANGER! / WARNING!
Risk of injury

- Never operate the appliance if the power cord is damaged or the casing is visibly damaged.
- If the non-detachable cord is damaged, it should be replaced by the producer, proper service facility or qualified person in order to avoid any hazards.
- The appliance can be repaired by qualified staff only. Incorrect repair may cause serious hazard to the user. In case of any defects, contact an authorised service facility.
- Turn off the device and unplug it before replacing any elements or approaching any moving parts during use.
• Always disconnect the appliance from the supply if it is left unattended and before assembling, disassembling or cleaning.
• After use turn off the appliance. Do not disassemble the
components of juice extractor, do not remove the cover of the jug and food processor container until the engine and all moving parts come to a complete stop.
• Guide food through the feeder tube only with the pusher provided with the appliance.
- Be particularly cautions when the juice extractor is used in the presence of children.
- This appliance shall not be used by children. Keep the appliance and its cord out of reach of children.
• Appliances can be used by persons with reduced physical, sensory or mental capabilities or lack of experience and knowledge if they have been given supervision or instruction concerning use of the appliance in a safe way and if they understand the hazards involved.
• Children shall not play with the appliance.
- Never put the appliance on any wet surfaces.
- Keep the appliance and the power cord away from cooking surfaces and burners.
Juice extractor
- Do not use a juice extractor if the filter (strainer) is damaged.
- Before starting the juice extractor check whether the cover is properly fixed with clamps.
- Do not remove the leftovers tank or release clamps while juice extractor is running.
Mixing cup / grinder
- Turn the control knob to "O" before removing the cover from the jug and before removing the mixing cup and grinder from the
base for accessories. Wait until the blades completely stop.
- Do not use a mixing cup if an overlay of the cover is not placed.
- Do not insert your hands into the jug, even when it was taken down for cleaning, because the blades are still dangerous - they are very sharp.
- Do not insert hard objects (like a spoon, scoop, spatula etc.) into the jug when you connect the appliance to power.
- Do not wash blades immediately using your hand. To clean the blades use a brush attached as the equipment.
Food processor (blender)
- Do not touch equipment in motion with your hands, especially dangerous are double-sided disc and a blade of food processor. They are very sharp! Rough handling can lead to injury.
- Be careful when handling cutting blades, when you empty the container and during cleaning.
- Do not wash food processor blade and double-sided disc directly using your hand, for washing use a brush which is attached as equipment.
WARNING!
Risk of property damage

Do not disconnect the plug from the socket by pulling on the cord.
Place the motor unit near a wall socket on a flat, stable surface so that the vent holes of the appliance are not blocked.
The appliance must be plugged only to an alternating current socket with power corresponding to the power stated on the name plate of the appliance.
Immediately stop the operation and unplug the appliance if any liquid gets into the motor. Return the appliance to an authorised service facility for examination and servicing.
Never overload the appliance by processing extensive amounts of products or pushing them too hard into the feeding tube.
Do not expose the appliance to temperatures exceeding 60^ C.
Do not leave unattended the apliance connected to the power supply.
Do not immerse the motor unit in water or rinse it under running water.
For cleaning the case do not use abrasive detergents such as emulsions, cleaning creams, pastes, etc. They may remove the graphic information symbols such as marking signs, warning signs, etc.
Clean the metal parts (especially the filters/strainers with a sharp blade grinder, food processor blade and disc) with a small brush attached as equipment.
Juice extractor
Unplug the juice extractor immediately if you notice excessive vibration or rotation decrease.
Clean the filter/strainer and its housing.
Stop operation and unplug the appliance from the outlet when the product is blocked in loading hopper or on a pulping blade. Remove the cause of the blockage.
Do not use the juice extractor without the container for leftovers.
Mixing cup / grinder
Do not fill the jug with boiling liquids.
When storing never keep the cover placed on the jug. Do not fill the jug above the '900 ml' mark - if that happens, then its contents can raise the cover when the engine is being started.
Do not overfill the jug. If the liquid gets into/under the engine system, it can be sucked into the engine, causing it to fail.
When you mix, the jug should contain at least 300 ml of liquid.
It is recommended to use the appliance with an integrated mixing cup / grinder in continuous operation for not more than 30 seconds. After this time, turn off the appliance and wait 5 minutes before restarting, allowing the engine to cool down. The mixing process can consist of up to five 30-second cycle times.
Do not operate the appliance with installed mixing cup / grinder when it is empty, because it may overheat the appliance.
The temperature of the ingredients used for mixing should not exceed 60^ C.
Food processor/blender
Before starting operation, check whether inside the food processor container there is not a solid object (eg. a spoon).
Do not stop the appliance operation by opening the cover of the food processor or by turning the food processor container (emergency braking).
This results in faster wear on the drive and should be avoided.
Do not clean the metal parts in the dishwasher.
Aggressive cleaning agents used in such devices cause darkening of the above mentioned parts.
Wash them by hand under running water with detergent and soft brush.
TIP
Product information and tips for use

The appliance is intended for domestic use. In case it is used for food business purposes, the warranty conditions shall change.
Before first use, remove all packaging from the appliance and wash all accessories thoroughly.
Unplug the appliance when finished extracting juice.
Technical data
The drive of appliance is adapted to co-operate with the juice extractor, mixing cup (liquidizer), grinder and food processor (blender).
Technical specifications are given on the plate you may see on the appliance.
Maximum allowed time of continuous operation of the drive:
-Two minutes with the juice extractor
-30 seconds with mixing cup (liquidizer)
-30 seconds with grinder
-30 seconds with the food processor
The time interval before re-use of the drive with a juice extractor: 30 minutes
The time interval before re-use of the drive with a mixing cup (liquidizer) or grinder: 5 minutes
The time interval before re-use of the drive with the food processor (blender): 10 minutes
The noise emmited by appliance ( L_WA ):
-With the juice extractor: 77 db/A
- With the mixing cup (liquidizer): 83 dB/A
-With the grinder: 82 db/A
-With the food processor (blender): 86 db/A
The appliance features double electrical insulation
(Class II) and does not require grounding ☐
Ufesa appliances satisfy the requirements of relevant standards.
The appliance meets the requirements of the following directives:
–Electrical equipment designed for use within specific voltage limits (LVD) - 2006/95/EC.
-Electro-Magnetic Compatibility (EMC) - 2004/108/EC.
The product is marked with CE symbol on the name plate.
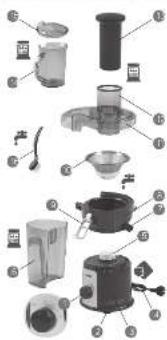
The architecture of appliance

1 The control knob (PULSE, 0, Speed #1, Speed #2)
2 The feet
3 The drive
4 Wire connection
5 The driver (driving tool)
Juice extractor elements
6 The container for leftovers
7 The spout
8 The bowl
9 Mounting brackets (clamps)
10 The strainer
11 The cover
12 The hopper
13 The pusher
14 The container of juice
15 The cover of the container with foam separator
16 The brush
The base for attachments (accessories)
17 The base for attachments (accessories)
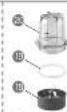
Grinder elements
18 The grinder's base with a set of blades
19 The gasket of grinder
20 The container of grinder
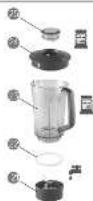
Mixing cup elements
21 The set of mixing cup blades
22 The gasket
23 The jug with level indicator
24 The cover of the jug
25 The overlay of the cover
Blender elements
26 The gear (transmission)
27 The food processor container
28 The double-sided disc
29 The food processor blade
30 The cover of food processor
31 The pusher of food processor
FOOD PROCESSOR (BLENDER)

Characteristics of the appliance
Blender is designed to perform operations to prepare meals. Interchangeable equipment (a blade of food processor, double-sided disc) allows for chopping, cutting, mixing dough and chopping vegetables.
Application of accessories
Food processor blade – is used for the processing of raw or cooked meat. You can also use it to mix the dough (cake batter).
Double-sided disc
-A side applicable to making the slices - can be used to cut into slices.
-A side for making the chips - can be used for cutting / grinding into chips.
Preparing the appliance for operation
Before the first use of installed blender (or after storage for a longer period of time), clean the food processor elements (the pusher, the cover, the container, the blade and double-sided disc) with hot water plus dishwashing detergent, rinse well and dry these elements.
Maintenance and operation

1 Install the gear on the base for accessories, so that the symbol ▼ on the gear is aligned with the symbol
on the base for accessories, and then lock the gear by turning it clockwise to clockwise until it blocks; the
symbol ▼ on the gear is aligned with the symbol ▼ on the base for accessories (the characteristic "click" indicates that the gear is properly installed).
2 Fit the food processor container on the base for accessories, so that the symbol ▼ on the container is aligned with the symbol □ in the base for
accessories. Then press the container to the base for the accessories and lock it by turning clockwise until the lock; the symbol ▼ on the container is aligned with the symbol 🔒 in the base for accessories (the characteristic "click" indicates that the food processor container is properly fitted).
The food processor container holder should be placed on the right side of the appliance.

Working with the blender's blade

1 Insert the food processor blade into container.
- Place the food in the container.
2 Place the food processor cover so that the pin on the cover hit the hole in the blade and the symbol ▼ on the cover is aligned with the symbol ■ in the container of food processor.
3 Tighten the food processor cover to the container's flange and lock it by turning clockwise until the symbol
▼ on the cover is aligned with the symbol 📄 in the container.
- Insert the food processor pusher to the hopper of food processor.
- Turn on the appliance by turning the control knob to the desired position.
Do not use appliance with installed food processor in continuous operation for more than 30 seconds. After this time, turn it off and wait 10 minutes before res allowing the engine to cool down.

4 While running the appliance you can add products (spices, ingredients etc.) through the hopper after removing the food processor pusher. Put the products into hopper of the cover and if there is a need - gently press them with pusher.
Do not push products with your fingers or other objects.

- To stop the appliance, turn the speed control knob to "0".
- Open the food processor (blender) in a manner opposite to that described in paragraphs 3 and 2.
Working with double-sided disc

1 Insert the double-sided disc to the food processor container applying the side suitable for use (slices / chips).
2 Place the food processor cover so that the pin on the cover hit the hole in the blade and the symbol ▼
on the cover is aligned with the symbol □ in the container of food processor.
3 Tighten the food processor cover to container flange and lock it by turning clockwise until the symbol
▼ on the cover is aligned with the symbol □ in the container.
4 Insert the products into food processor hopper and - if possible - insert the food processor pusher.
5 Turn on the appliance by turning the control knob to the desired position.
Do not use the appliance with installed food processor in continuous operation for more than 30 seconds. After this

time, turn it off and wait 10 minutes before restarting, allowing the engine to cool down.
- During operation, add the products through the hopper after removing the food processor pusher. Put the fruit or vegetables into the hopper of the cover and lightly press them with pusher.
Do not push products with your fingers or other objects.

6 To stop the appliance, turn the speed control knob to "0".
- Open the food processor (blender) in a manner opposite to that described in paragraphs 3 and 2.
Operational guidelines
- Do not crush too large pieces with the food processor blade. Before loading the container mill (crush) large products in order to obtain chunks of approximately 3 cm.
- When grinding cheese, butter or margarine do not allow for too long operation. Processed food may become hot and dissolve.
- If the product stick to the blade or to the inner walls of the container, turn off the appliance, remove the cover and grab the products from blade and container walls.
Double-sided disc - a side applicable to making slices
- You can get regular slices without a scrap when the appliance is disabled during filling the hopper. You can either use the "PULSE" to this end.
Double-sided disc - a side applicable to making chips
- You can fill the hopper with products while the appliance is working.
Care and cleaning of appliance with installed food processor (blender)

Clean the appliance immediately after use. This will prevent leftovers build-up inside the food processor.

- After each use, carefully wash the equipment parts being in contact with the processed product with warm water plus dishwashing liquid to prevent drying leftovers.
- Wipe the drive housing with a damp cloth with dish washing liquid.
- Remove the dirt in crevices or corners with bottle-washing brush or toothbrush.
• Dry thoroughly all parts after cleaning. - Always store food processor blade in food processor container.
JUICE EXTRACTOR

Description of the appliance
Your juice extractor is designed for fast fruit and vegetable juice centrifuging with automatic separation of pulp. Centrifugation speed was carefully selected to ensure excellent quality juices. Small particles of fruit (or vegetable) contained in the extracted juice are healthy, but may affect the clarity of juice. This is an intended effect, as keeping the highest nutrient, health and dietetic values of your juices is more important than their clarity. The quantity of juice obtained with 1kg of fruit or vegetables depends on their freshness, cleanness of the filter and condition of the shredding disc (e.g. for fresh carrots it is 50-60%). All parts in contact with processed products are made of materials suitable for contact with food.
Preparing for operation

Disassembling

Before first use, disassemble the appliance and wash all parts in contact with processed fruit or vegetables.

1 Press the locking clamps all the way down to release the lid.
2 Remove the pusher and the lid.
3 Slide out the pulp container.
4 Remove the juice bowl with the strainer by turning the bowl counter-clockwise so that the symbol ▼ on the bowl is aligned with the symbol □ in the motor unit. Remove the juice bowl from the motor unit.
Wash all parts (except the motor unit) carefully in warm water with some washing liquid. You can also clean them in a dishwasher at max. 60°C (except the juice bowl, strainer and motor unit). Dry all parts thoroughly and replace once dry.

Assembling

1 Place the juice bowl on the motor unit, aligning the symbol ▼ on the underside of the bowl with the symbol ■ in the motor unit.
2 Lock the juice bowl by turning it clockwise so that the Symbol on the motor unit is aligned with the symbol on the underside of the bowl.
3 Mount the strainer on the skimmer so that the notch on the skimmer is aligned with the groove in the strainer.
The strainer may be mounted in one position only.

4 Slide the pulp container under the lid as follows: lean the pulp container and place it under the insert of the bowl so that the protrusion in the pulp container is placed inside the groove in the bowl. Then slide it in towards the motor unit.
5 Install the lid so that the protrusion of the lid is in the notch of the juice bowl.
6 Lift up both clamps and clamp them onto the fasteners located on the lid.
7 Press the clamps to the juice bowl (a characteristic click indicates that they are clamped correctly).
8 Put the juice collector so that the juice spout is inside the collector.
If you fail to assemble the locking clamps correctly, a safety device will prevent the switch-on of the appliance.

Prepare washed fruit and vegetables and place them near the appliance.

Juice extractor start up and operation
- Make sure control knob is set to position "0".
- Insert the plug into the wall outlet and run the juice extractor turning the control knob as required to speed 1 or 2 (see the table "Recommended centrifugation speeds for selected fruits and vegetables").
- Put the fruit or vegetables into the hopper of the cover and lightly press them with pusher.
Do not push products with your fingers or other objects.

- Transfer the extracted juice from the container into glasses, cups, etc.
The jug has a lid with a froth separator to stop coarse juice particles and froth.

- If necessary (if excessive pulp deposited on the strainer causes vibrations) use the "PULSE" function.
PULSE function
The "PULSE" function allows to remove excessive pulp on the strainer. Turn and hold the control knob to "PULSE" to operate the appliance at maximum speed. Release the knob to stop the appliance.
After each use
- Turn the control knob to "0" to switch off the appliance.
• Unplug the appliance.
- Once the motor unit stops, disassemble the appliance to wash all parts (see "Disassembling").
- Remove all pulp from the pulp container.
Do not allow the overflow of the tank for leftovers. When you pull it out, accumulated surplus of leftovers may fall from the tank when tilting.

Cleaning and maintenance
- Wash the appliance thoroughly after each use to prevent adhesion of juice and pulp to the walls.
- Use a soft brush to remove dirt from crevices and corners of the appliance.
- Clean the motor unit using a damp cloth with some washing liquid. Then dry thoroughly.
If water or juice leaks into the inside of the motor unit, abort operation immediately and have the appliance checked at a service centre.

- Wash the following elements in warm soapy water: juice bowl, lid, pusher, jug with froth separator, pulp container.
- The lid, pusher and pulp container can also be washed in a dishwasher at max. 60°C.
- Wash the strainer only using the brush supplied with the appliance. Never use any metal brushes for washing the strainer!
- Some plastic parts of the appliance may change colour after long-term use. It is not a defect.
- Orange stains from carrot juice can be removed by cleaning the surface with a cloth immersed in cooking oil.
• Dry all parts thoroughly after washing. - Reassemble the appliance (see "Assembling").
Take care when handling transparent plastic parts of the appliance. They are sensitive to hitting and falling and may break easily.

Preparing healthy and delicious juice
- Fruit and vegetables for juice extraction process should be fresh and well washed. Vegetables should be cleaned of sand and soil under running water and peeled. Handbooks on juice preparation recommend soaking the vegetables in water with salt and citric acid for 5 minutes. Prepared in this way, vegetables do not darken during processing and the juice has a natural colour.
- Berry fruits should be washed directly before use, so they retain their freshness.
- Your selection of fruit and vegetables depends on the time of year, your tastes and recommended diet. Nutritional values of fruit and vegetable juices depend on the method of preparation.
-
For perfect flavour and fragrance, juices should be made with ripe, fresh and juicy fruits and vegetables.
-
The following vegetables are best to juice: tomatoes, carrots, celeries, beetroots, parsley, onions, cabbages, cucumbers, black turnip, rhubarb, etc.
- Vegetables like radish, chives, green parsley, dill and cress can be added to juice finely chopped.
- Almost all kinds of fruit are suitable for juicing.
- After washing, apples, peaches, apricots and plums should be blanched in boiling water on a strainer.
- Make sure to remove stones from the fruit you wish to juice, as they may damage your appliance.
- Juicing plums, blueberries, raspberries, soft pears and apples, or other soft fruit may be problematic, as the flesh of these fruit turns into a spongy pulp, blocking the strainer mesh. To process this type of fruit successfully, it is best to add them in small quantities to other fruit or vegetables. More frequent cleaning of the strainer is required.
- You can extract a small amount of grapes juice, but it is necessary to put whole bunch to the chute after removing ligneous stalk.
- Root vegetables and hard fruit should be cut into pieces small enough to pass through the feeder tube. Cut the apples into pieces (if not small enough to enter the feeder tube) without peeling and coring.
- Feed the fruit or vegetables into the tube only after starting the appliance.
- The nutritional value of freshly extracted juice is comparable to that of the fruit and vegetables before processing.
- Fresh juices are especially recommended for children and the elderly.
- As vegetable juice tends to be very thick, it is recommended to have it with a small amount of water. If not diluted, a daily portion of vegetable juice should not be larger than half a glass.
- It is not recommended to mix fruit and vegetables, except for vegetable-apple combinations. Melon juice should not be combined with other juices.
- Juices should not be stored for later consumption.
- The following spices can be added to vegetable juices to improve their flavour: pepper, dill, cumin, nutmeg, thyme and marjoram. Fruit beverages can be made with added: vanilla, cinnamon and clove. It is recommended to crush the spices thoroughly before use to enjoy their full fragrance. Spices should be used in small quantities to maintain the natural fragrance and flavour of your juices. Due to low caloric content, fruit and vegetable juices are highly recommended for people on a slimming diet.
- Fruit and vegetable juices are best served at room temperature or with ice cubes.
Fresh juices for your health

Carrot juice
Carrot juice stimulates the metabolism, as it is rich in vitamins and minerals necessary to maintain the proper function of the body. Obtained from the carotene, Vitamin A benefits your eyesight, while other components of the carrot juice reduce harmful effects of nicotine and restore your skin's natural and healthy colour. Small children are recommended to drink half a glass of carrot juice and half a glass of milk daily whereas elderly people can boost their energy with a glass of carrot juice mixed with apple juice.
Tomato juice

Ripe and fresh tomatoes give excellent quality juice which can be mixed with virtually all other vegetable juices.
Tomato juice is a rich source of vitamin A and C. Two glasses of tomato juice contain your daily requirements of C vitamin. Season your juice with salt and pepper according to taste.
Beetroot juice

Beetroot juice and orange juice make a delicious combination. However, make sure to consult your doctor before drinking pure beetroot juice.
Cabbage juice

Cabbage juice is recommended for treatment of gastric ulcers. Always ask your doctor first before consumption. Best combined with carrot juice – makes an excellent choice even for people with sensitive stomach.
Spinach juice

Spinach juice stimulates production of red blood cells in the body. It has a very intensive taste, so it is best combined with carrot juice. Mix equal volumes of spinach juice,
carrot juice and celery juice for a tasty drink.
Celery juice

Celery leaves have bitter taste, so remove them first before processing the root in your juice extractor. Celery juice is very tasty and goes well with other vegetable juices. It should be consumed in smaller quantities than the carrot juice. Enhance the taste by adding apple or lemon juice.
Cucumber juice
Due to its natural bland taste, cucumber juice is best combined with apple, carrot or celery juice. Cucumber juice is used for skin care and is known to support kidney filtration process. It is also recommended for a slimming diet.
Apple juice

Made from fresh and ripe apples, apple juice has pleasant fragrance and flavour. It is a rich source of vitamin A and B and valuable minerals. Apple juice has been shown to improve digestion owing to the high content of pectin. Fresh apple juice is also recommended for people with gout and rheumatism. In general, apple juice provides great overall benefits for your health.
Blackberry juice

Blackberry juice with a dash of sugar and mineral water is a great refreshing beverage. Due to high concentration of vitamins and minerals blackberry juice boosts the vital functions, particularly in elderly people.
Elderberry juice

Rich in various nutrients, elderberry juice promotes perspiration and is therefore recommended in the treatment of cold. When preparing fruit preserves you can mix elderberry juice with other fruit juices.
Black currant juice

Black currant juice has specific fragrance, high acidity and distinct sourness. Due to its chemical composition and high vitamin content black currant juice is one of the most recommended juices. It should be mixed with other low-acidity juices or with water, honey and sugar.
Special health recipes

Energy drink
6 carrots
2 apples
1/2 beetroot
"Strong breath" drink
1 handful of spinach
1 handful of parsley
2 celeries
4 carrots
Body detox juice
4 carrots
1/2cucumber
1 beetroot
"Timeless regulator" juice
2 apples
1 hard pear
1/4 lemon or a handful of spinach
6 carrots
| "Sunny" drink2 apples6 strawberries | "Love" drink3 big tomatoes1/2 cucumber1 celery1/4 lemon | FRUIT/VEGETABLES | SPEED LEVEL | |
| 1 | 2 | |||
| Apples | ● | |||
| Cabbage | ● | |||
| Fennel | ● | |||
| Carrot | ● | |||
| Melons | ● | |||
| Apricots | ● | |||
| Nectarines | ● | |||
| Cucumbers | ● | |||
| Kiwi | ● | |||
| Tomatoes | ● | |||
| Celery | ● | |||
| Grapes | ● | |||
Troubleshooting

| PROBLEM CAUSE SOLUTION - WHAT TO DO | ||
| The appliance does not work. | The locking clamps are not locked correctly on the lid. | Switch off and unplug the appliance. Lock the locking clamps correctly on the lid (see “Assemblying”). Switch on the appliance. |
| Overheating protection was activated. | Switch off and unplug the appliance. Allow the appliance to cool down for 30 minutes and try switching it on again. | |
| The appliance produces unusual smell. | The appliance is new. | The appliance may produce a specific smell when switched on and used for the first time. This however is not dangerous in any way and does not indicate that the appliance is damaged. The smell should wear off after you use the appliance several times. |
| The appliance is overloaded. | Compare the extracting performance and times with the ones stated in the manual. | |
| Check if the voltage stated on the rating plate corresponds to the voltage in your supply system. | ||
| The casing becomes hot / The appliance is too loud and produces smoke. | The motor unit is damaged. | Switch off and unplug the appliance. Return the appliance to an authorised service centre. |
PROBLEM CAUSE SOLUTION - WHAT TO DO
The strainer is blocked.
The product is not suitable.
The appliance is overloaded.
The feeding tube touches the strainer / The appliance vibrates.
The strainer is not fitted correctly.
The appliance cannot be used with fruit or vegetables that are especially hard or contain long fibres.
Switch off and unplug the appliance. Wait until the appliance stops. Clean the feeding tube, strainer, lid and pulp container.
Switch off and unplug the appliance. Check if the strainer sits correctly on the skimmer. Check if the strainer is not damaged. If the strained is damaged, you must repair the appliance at an authorised service centre.
Preparing the appliance for operation with accessories

1 Set the drive unit on a dry, stable and leveled surface near an electrical outlet and away from children.
Route the power cord so that it is not hanging down from the table or counter and could not be accidentally pulled or hooked.

2 Put the base for accessories on the drive unit, so that the symbol ▼ you may see on the side of the base is aligned with the symbol □ you may see on the drive unit.
3 Lock the base for accessories by turning it clockwise to clockwise, so the sign you may see on the drive unit coincides with the symbol ▼ on the basis of (the characteristic "click" indicates that the base is properly installed).
4 Plug the power cord into a wall outlet.
Before plugging in the appliance, make sure the control knob is set to "O".

Characteristics of the device
Mixing cup is designed for chopping and mixing all kinds of products. It can be used to prepare soups, sauces and smoothies, you can also mix vegetables, fruits and meat, and mill (or pound) cooked ingredients into food for the infants.
Preparing the appliance for operation
Before the first use of a mounted mixing cup / liquidizer (or after its storage for a longer period of time), clean the jug, cover and the cap of the cover in warm water with detergent, rinse well and dry all these parts.
Keep your hands away from blades - they are sharp.

Maintenance and operation

1 Mount the mixing cup on the base for accessories, so that the jug handle is placed on the right side of the appliance.
2 Lock the jug by turning it clockwise until it locks (the characteristic "click" indicates that the jug is correctly installed).
The jug handle should be placed on the right side of the appliance.

3 Put the ingredients into the jug. Do not fill beyond the '900 ml' mark you may see on the jug.
You can load the ingredients into the jug of blender in any way, but you have to know that better results are obtained by adding the hard components at first.

4 Put the cover on the jug so that the side of cover on which the strainers of the cover are not placed, is located at the spout of the jug. The cover installed in this way prevents splashing of the components during the mixing process.
The cover of jug can be installed in three positions, but only one position of the cover is used in the process of mixing.

The remaining two positions are used when transferring the mixed contents of the jug into the utensils.
5 Insert the cover's cap into the hole in the cover so that the noses on the overlay are placed in the notches of the cover. Lock the cap by turning it clockwise to clockwise until it locks.
Do not operate the appliance with installed mixing cup (liquidizer) without overlay of the cover, especially if you mix the solid components. They can be thrown through the hole.

6 Turn on the mixing by turning the control knob to the desired position.
If you mix at speed #2, you may achieve better results.

Do not use the appliance with installed mixing cup (liquidizer) in continuous operation for more than 30 seconds.

After this time, turn it off and wait 5 minutes before restarting, allowing the engine to cool down.
7 During mixing, you can add products (spices or ingredients) through the hole after removing the cover plate.
8 To stop the appliance, turn the speed control knob to "0".
If the consistency of mixed products does not meet your expectations, turn the control knob to "PULSE" and hold it in this position for several seconds; the appliance will start its operation at maximum speed. When the knob is released, the appliance stops.
Ice crushing
Device with installed mixing cup (liquidizer) can also be used to crush ice cubes, you get small pieces of ice about the same size.
Before using the mixing cup to crush ice cubes, make sure it is clean. Otherwise, wash it thoroughly with clean water. Any detergent residue can affect the taste of crushed ice and cause loss of taste of the to which it will be added.

Put into a jug no more than 15 ice cubes (about the size of not more than 2 cm). In addition to ice cubes pour approximately 15 ml (1 tsp) fresh cold water more. Put the jug cover along with the overlay, then turn the control knob to position "1". The appliance starts its operation, and you have to crush ice every 3 seconds, repeat it the action until the ice is completely crushed. If the consistency of ice does not correspond to your expectations (i.e. you want to get the consistency of snow), turn the control knob to "PULSE" and hold it in this position for several seconds, the appliance will start operation at maximum speed. When the knob is released, the appliance stops.
Do not crush ice cubes without adding water to the jug.

After working with the mixing cup (liquidizer)
- Turn the appliance off and remove the connection plug from the wall outlet.
- Remove the mixing cup, to do this hold the base for accessories with one hand, and using other hand grab the jug handle.
- Turn the jug in a counter-clockwise direction until it reaches the end stop and remove the jug from the base for accessories.
• Pour the cocktail you made into dishes.
The jug cover can be installed in three positions, but only one position of the cover is used in the process of mixing.

The other two positions (wide strainer, narrow strainer) are used when transferring the mixed contents of the jug into the dishes.
- Wash your mixing cup (see section "Cleaning and maintenance of appliance with installed mixing cup (liquidizer) / grinder").
Removal of cutting set

- Disconnect the plug from the wall outlet.
- Turn the cover counter-clockwise until it reaches the end stop and remove the cover from the jug.
1 Empty the jug.
2 Clean the jug (see section "Cleaning and maintenance of appliance with installed mixing cup (liquidizer) / grinder"). Turn the jug upside down and place it on a flat and stable surface.
3 Hold the jug with one hand and the other hand use to unscrew the blade set in a counter-clockwise direction.
4 Carefully remove the blade set together with gasket.
Blades used in appliance are sharp. Handle with care.

Installation of cutting set

1 Insert the gasket into the pit in the blade set.
2 Remove the cover from a jug of the blender. Turn the jug upside down and place it on a flat and stable surface.
3 Put the blade set into the hole in the bottom of the jug.
4 Hold the jug with one hand while the other one use to spin blade set clockwise until it stops.
GRINDER
Characteristics of the appliance
Grinder is designed for crushing and grinding components, such as pepper, coffee beans, rice, wheat, sesame seeds, nuts (shelled), etc., as well as for chopping meat.
Grinder is not suitable for grinding very hard ingredients such as ice cubes, and nutmeg.

Never use a grinder to grind the sugar, as this may damage the appliance.

Before proceeding to chop, peel the meat from the veins, mucous and fat and then cut into pieces of approximately 2x2 cm.

Maintenance and operation

- Put the ingredients into a container of grinder.
Do not exceed the maximum level of content, as it is marked on the grinder container.

1 Put and tighten the basis of grinder with a set of blades grinder on the thread of the container of grinder.
2 Turn the grinder upside down and place it on the base for accessories.
3 Block the grinder by turning it clockwise until it locks (the characteristic "click" indicates that the grinder is correctly installed).
- Run the appliance by turning the control knob to the desired position. Adjust the speed according to mixed components.
We recommend using the "PULSE" program, or maximum speed.

Grinding of different products that are grouped together without a thorough washing may result in penetration of smell and taste of the product previously ground.
Do not use the appliance with installed grinder in continuous operation for more than 30 seconds. If within 30 seconds failed to complete the process of grinding, turn off the appliance and wait 5 minutes before restarting.

4 After the grinding set the control knob to "0".
Always immediately after use wash the container of grinder and grinder base with a set of blades with hot water plus dishwashing liquid. Wipe the grinder seal with a damp cloth.

After working with grinder
- Turn the appliance off and remove the plug from the wall outlet.
- Remove the grinder, to his end hold the base for accessories with one hand and use other hand to catch the grinder. Turn the grinder counter-clockwise until it reaches the end stop and take it off from the base for accessories.
- Turn the grinder upside down (the base to the top).
- Turn the grinder base with a set of blades in a counter-clockwise direction and remove the base with the set of blades from the grinder's cover.
- Pour the ground contents into the dish.
- Clean the grinder (see section “Cleaning and maintenance of appliance with installed mixing cup (liquidizer) / grinder”).
Cleaning and maintenance of appliance with installed mixing cup (liquidizer) / grinder

Cleaning the appliance must be followed immediately after use. This will prevent leftovers build-up inside jug of the blender.

- Pour about 450 ml of water into the jug and run the appliance for about 10 seconds by turning and holding the control knob to "PULSE".
- Then pour out the water from the jug, turn it upside down and dry.
- If necessary, wash the jug, the cover and cover cap, a set of blades, grinder container and grinder base with a set of blades with hot water plus dishwashing liquid.
- Wipe the gasket seal of mixing cup and grinder seal with a damp cloth.
- Then rinse it in clean running water and dry.
- If you left the jug for a long time without cleaning and the pieces of mixed ingredients stuck to the inside of the jug, use a nylon brush for cleaning.
- We do not recommend putting the jug, the cover and cover cap, the grinder, the set of blades, grinder container and grinder base with a set of blades into a dishwasher. Aggressive cleaning agents may adversely affect the surface condition of the appliance.
- Wipe the outside of the drive with a damp and soft cloth.
Do not put the drive unit into water or other liquid.

- To clean the drive unit do not use aggressive and abrasive detergents such as emulsions, cleaning creams, pastes, etc. They may remove the graphic symbols.
- Do not clean the jug and grinder container with abrasive sponges or rags.
• Dry thoroughly all parts of the appliance.
Advice on disposal

Our goods come in optimised packaging. This basically consists in using non-contaminating materials which should be handed over to the local waste disposal service as secondary raw materials.
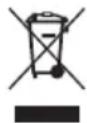
This product complies with EU Directive 2002/96/EC. The crossed wheelie bin symbol shown on the appliance indicates that when it comes to dispose of the product it must not be included in with household refuse. It must be taken to a special refuse collection point for electric and electronic appliances or returned to the distributor when purchasing a similar appliance. Under current refuse disposal regulations, users who fail to take discarded appliances to special refuse collection points may be penalised. Correct disposal of discarded appliances means that they can be recycled and processed ecologically, helping the environment and allowing materials used in the product to be reused. For more information on available waste disposal schemes contact your local refuse service or the shop where the product was purchased. Manufacturers and importers are responsible for ecological recycling, processing and disposal of products, whether directly or via a public system.
Your local town council can provide you with information about how to dispose of obsolete appliances.
The manufacturer/importer does not accept any liability for any damages resulting from unintended use or improper handling. The manufacturer/importer reserves his rights to modify the product any time in order to adjust it to law regulations, norms, directives, or due to construction, trade, aesthetic or other reasons, without notifying in advance.

Cher client,

Disque double face - tranchoir
- ufesa
- Safety operation instructions
- DANGER! / WARNING!
- Risk of injury
- Juice extractor
- Mixing cup / grinder
- WARNING!
- Risk of property damage
- Food processor/blender
- TIP
- Product information and tips for use
- Technical data
- The architecture of appliance
- Juice extractor elements
- The base for attachments (accessories)
- Grinder elements
- Mixing cup elements
- Blender elements
- FOOD PROCESSOR (BLENDER)
- Characteristics of the appliance
- Application of accessories
- Double-sided disc
- Preparing the appliance for operation
- Maintenance and operation
- Working with the blender's blade
- Do not push products with your fingers or other objects.
- Working with double-sided disc
- Do not use the appliance with installed food processor in continuous operation for more than 30 seconds. After this
- Operational guidelines
- Double-sided disc - a side applicable to making slices
- Double-sided disc - a side applicable to making chips
- Care and cleaning of appliance with installed food processor (blender)
- Clean the appliance immediately after use. This will prevent leftovers build-up inside the food processor.
- Description of the appliance
- Preparing for operation
- Disassembling
- Before first use, disassemble the appliance and wash all parts in contact with processed fruit or vegetables.
- Assembling
- Juice extractor start up and operation
- PULSE function
- After each use
- Cleaning and maintenance
- Preparing healthy and delicious juice
- Fresh juices for your health
- Carrot juice
- Tomato juice
- Beetroot juice
- Cabbage juice
- Spinach juice
- Celery juice
- Cucumber juice
- Apple juice
- Blackberry juice
- Elderberry juice
- Black currant juice
- Special health recipes
- Energy drink
- "Strong breath" drink
- Body detox juice
- "Timeless regulator" juice
- PROBLEM CAUSE SOLUTION - WHAT TO DO
- Preparing the appliance for operation with accessories
- Characteristics of the device
- Ice crushing
- After working with the mixing cup (liquidizer)
- Removal of cutting set
- Installation of cutting set
- GRINDER
- After working with grinder
- Cleaning and maintenance of appliance with installed mixing cup (liquidizer) / grinder
- Advice on disposal
- Disque double face - tranchoir
Brand : UFESA
Model : PA7000
Category : Food Processor