
Topline 2.0 GTS - Baby car seat HARTAN - Free user manual and instructions
Find the device manual for free Topline 2.0 GTS HARTAN in PDF.
| Brand | Hartan |
| Model | Topline 2.0 GTS |
| Category | Stroller / pram |
| Use | From 6 months (up to 22 kg), with carrycot from birth (0-12 months, max 9 kg) |
| Maximum child weight | 22 kg |
| Power | None (manual stroller) |
| Brake type | Adjustable parking brake (rear wheels), optional handbrake |
| Suspension | Adjustable oscillating suspension (soft or sporty) |
| Hood | With removable extendable sun canopy, protection bar |
| Safety harness | 5-point, magnetic closure, adjustable |
| Wheels | Lockable swivel wheels, inflatable tires (max pressure 1.5 bar) |
| Adjustments | Height-adjustable reversible handlebar, reclinable seat, adjustable footrest |
| Folding | Yes, with safety lock |
| Compatible accessories | Foldable carrycot XL (0-12 months), sun shade, umbrella holder |
| Maintenance | Machine washable fabrics at 30°C (delicate cycle), chassis clean with water, lubricate axles every 4 weeks |
| Standards | Fabrics certified Öko-Tex 100 |
| Warranty | 2 years (material and manufacturing defects) |
Frequently Asked Questions - Topline 2.0 GTS HARTAN
User questions about Topline 2.0 GTS HARTAN
0 question about this device. Answer the ones you know or ask your own.
Ask a new question about this device
Download the instructions for your Baby car seat in PDF format for free! Find your manual Topline 2.0 GTS - HARTAN and take your electronic device back in hand. On this page are published all the documents necessary for the use of your device. Topline 2.0 GTS by HARTAN.
USER MANUAL Topline 2.0 GTS HARTAN
Article Number / Article number:
Stoff-Farbe (Design):
Colour of fabric (design)
Zubehör / Accessories:
Kaufdatum / Date of purchase
Salesperson (name in block letters)
Notes: Signing this acceptance certificate does not restrict the legal rights of the purchaser.
Handler/Dealer
00000000000000000000
Topline 2.0 GTS/Topline 4.0 GTS
T2 GTS/T4 GTS
GBUnited Kingdom (UK)

F La France

NL Nederlands

DK Danmark

N Norge

S Sverige

FIN Suomi

ITALIA


Espana

Cz Ceska republika

SK Sloversko

HR Hrvatska

UA Ukraine

SLO Slovenica

TR Turkyis

RUS Pocca

PL Priska
Product of Germany
^a Vermiander, Sea hot water, DPU, dikes, the East-West

durch schadottoll
Geprute Textblien

- Completeness
- Function check
Folding mechanism (checked/OK) not applicable
Road behaviour checked/OK not applicable
Wheels
Adjusting mechanism checked/OK not applicable
■ Brakes check 3 checked OK -1 not applicable.
■ Suspension check 10/26/09-10/27/09 - Imacness
■ Emotion state
Frame check checked/OK not applicable
Fabric check (1) checked/OK (2) not applicable
Plastic parts check checked/OK not applicable.
I have checked the product and have ascertained that it is supplied .complete has no unfoital visible faults and that all functions are fine
complete, has no external, variable rules and thus all functions are static.
I have received sufficient information concerning the product and its functions before any use and have been informed so far and
maintenance.


Deutschland

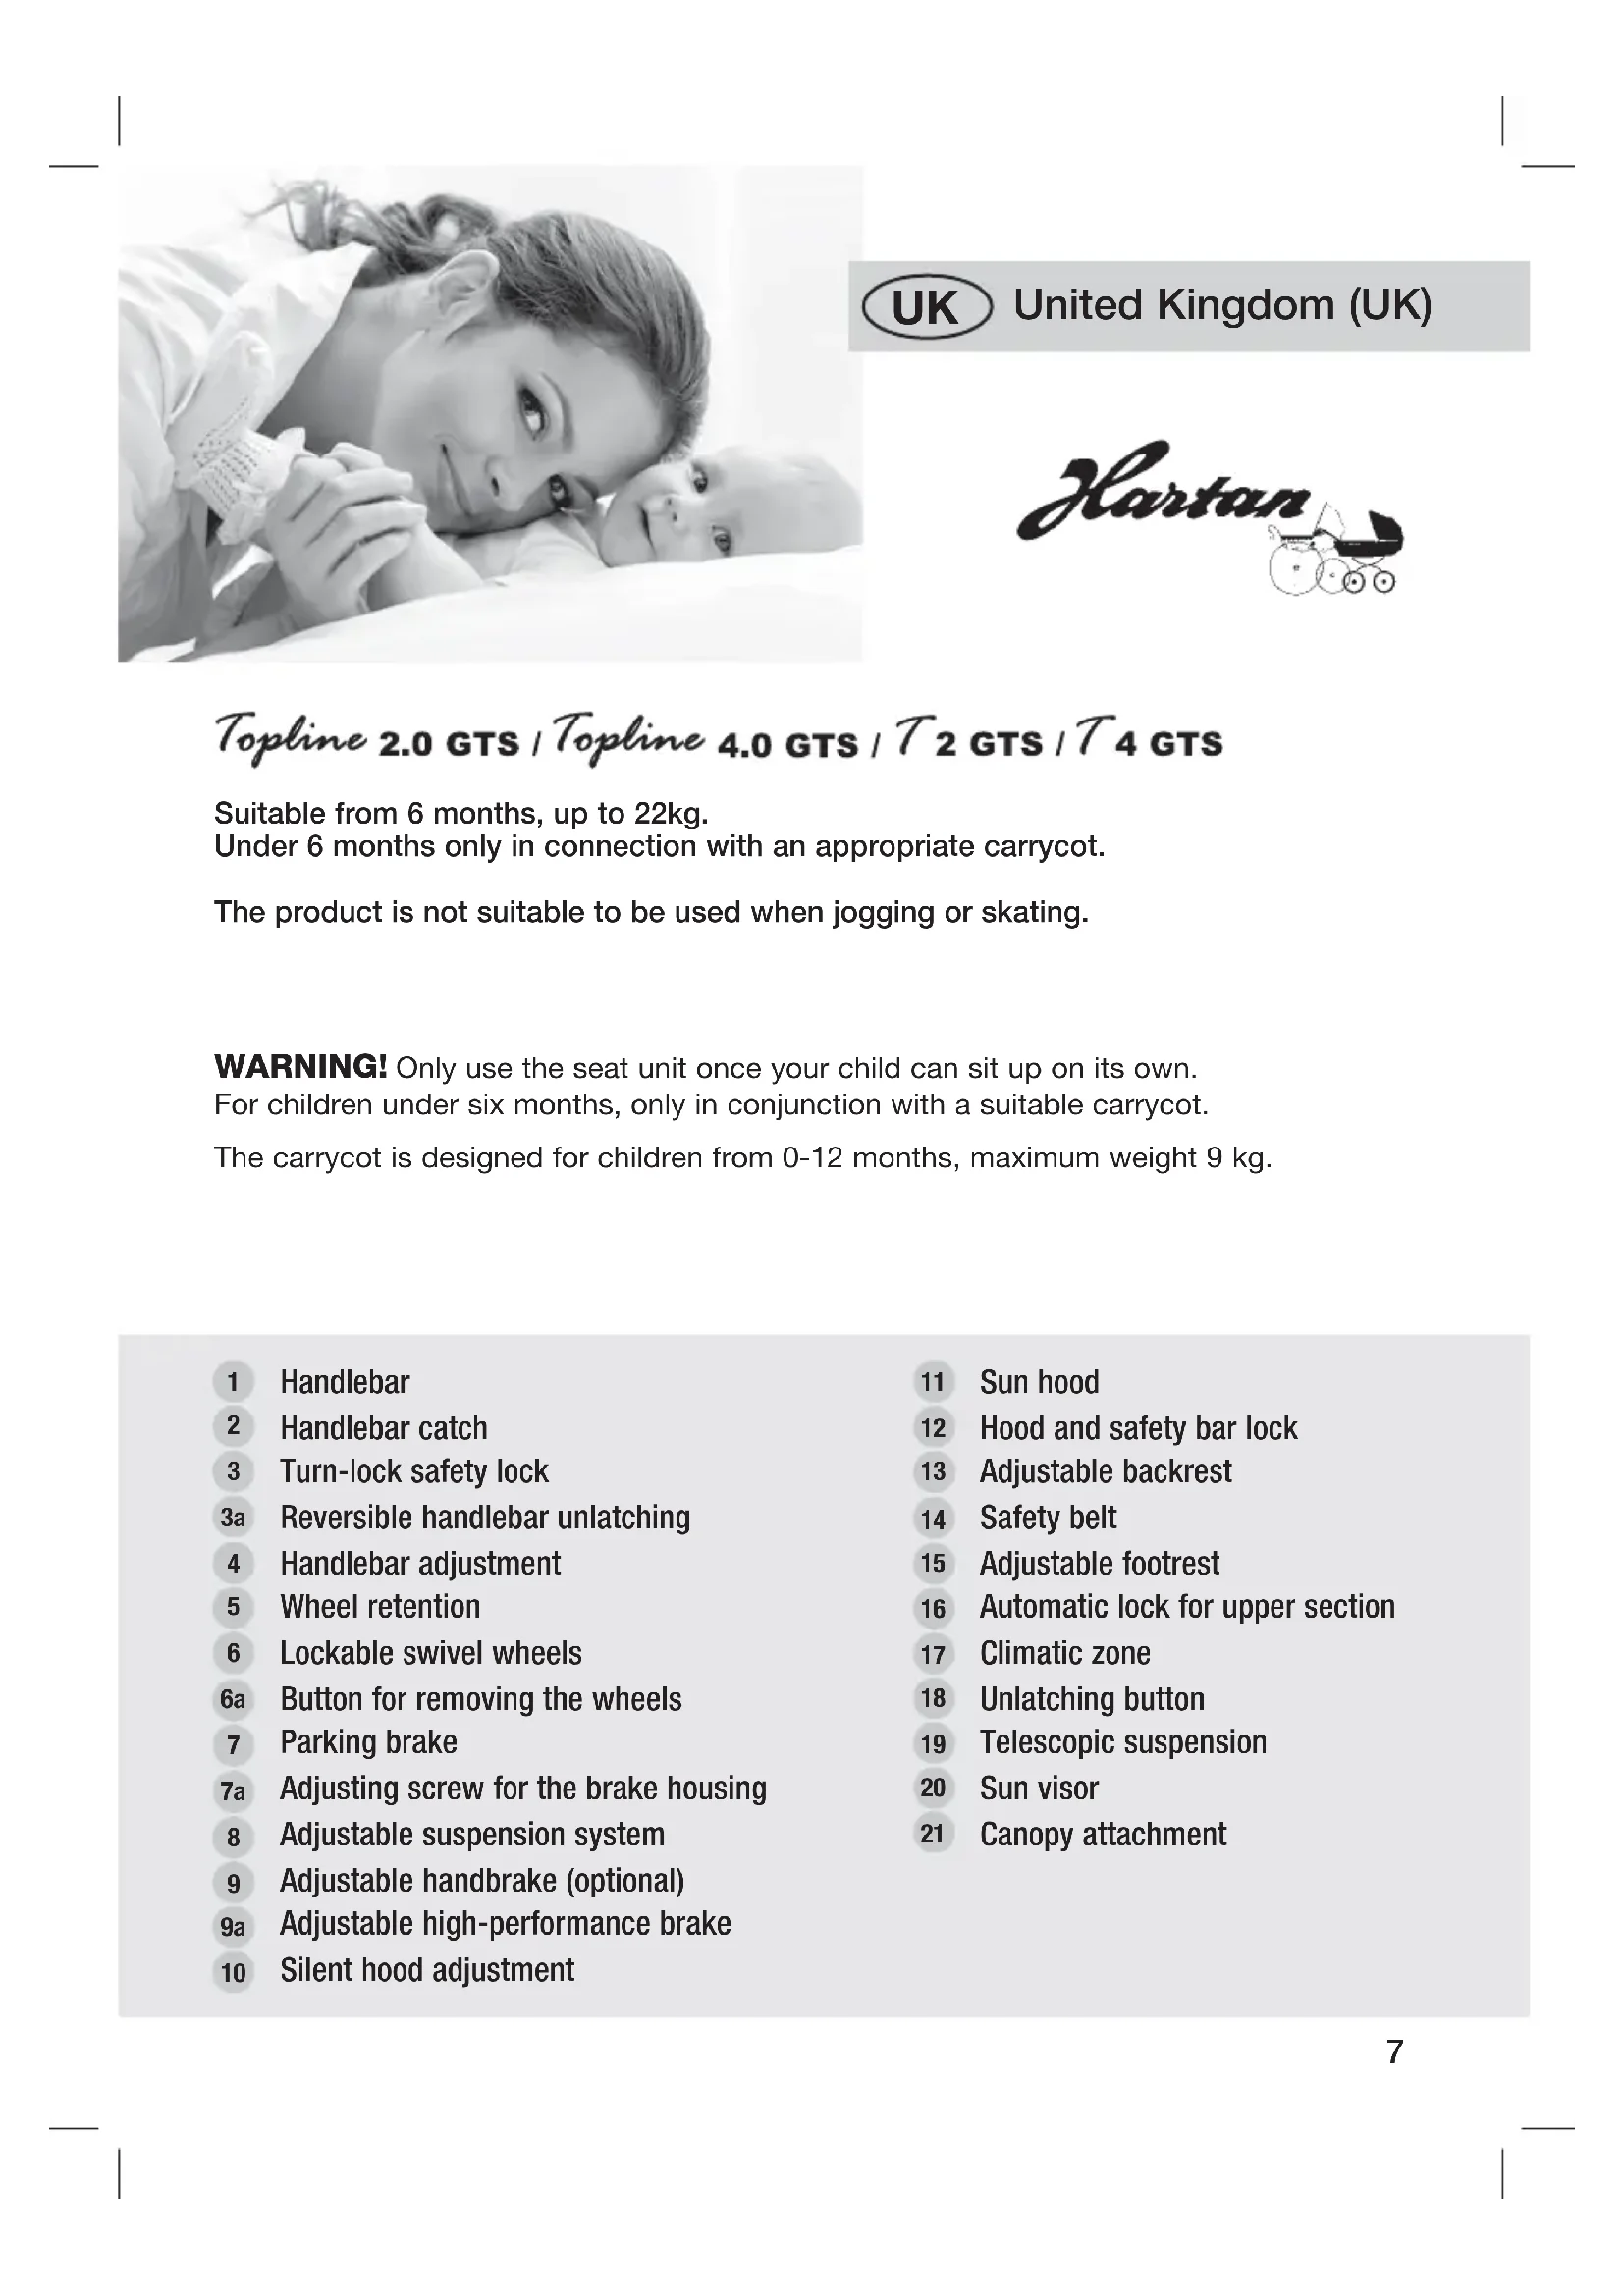
Suitable from 6 months, up to 22kg
Under 6 months only in connection with an appropriate carrycot.
The product is not suitable to be used when jogging or skating.
WARNING! Only use the seat unit once your child can sit up on its own.
For children under six months, only in conjunction with a suitable carrycot.
The carrycot is designed for children from 0-12 months, maximum weight 9kg
1 Handlebar
2 Handlebar catch
3 Turn-lock safety lock
3a Reversible handlebar unlatching
4 Handlebar adjustment
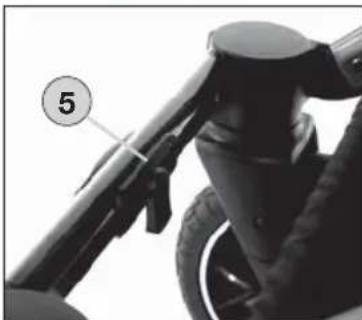
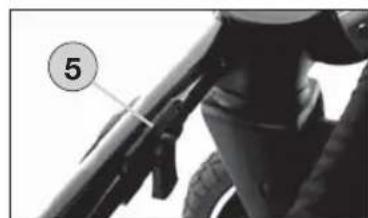
5 Wheel retention
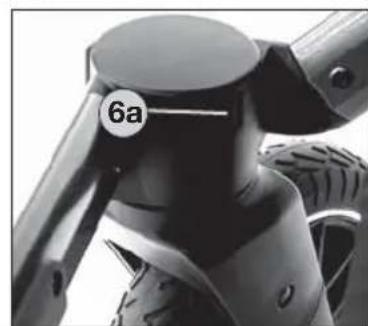
6 Lockable swivel wheels
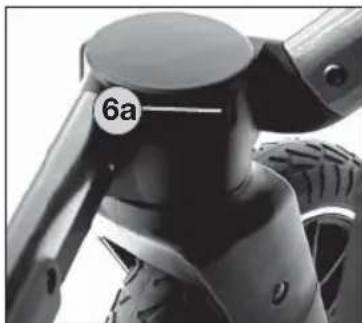
6a Button for removing the wheels
7 Parking brake
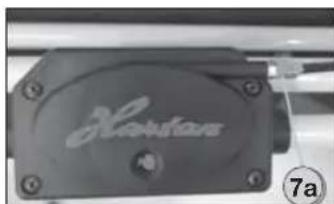
7a Adjusting screw for the brake housing
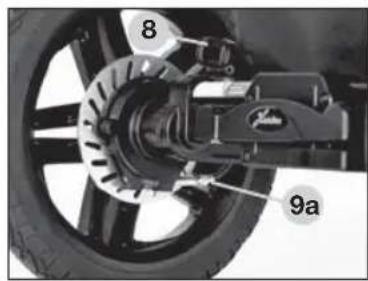
8 Adjustable suspension system
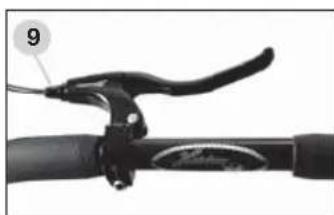
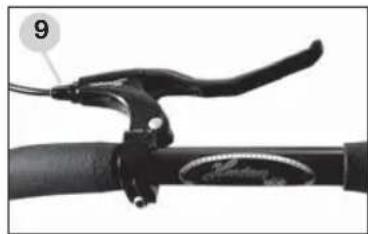
9 Adjustable handbrake (optional)
9a Adjustable high-performance brake
10 Silent hood adjustment
11 Sun hood
12 Hood and safety bar lock
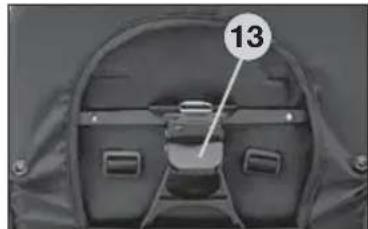
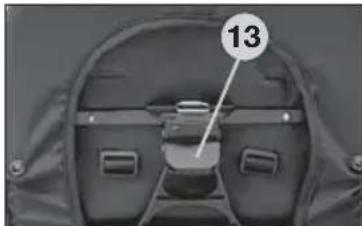
13 Adjustable backrest
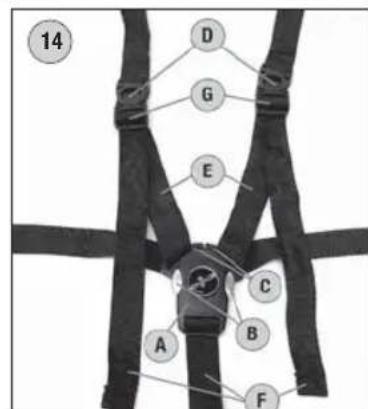
14 Safety belt
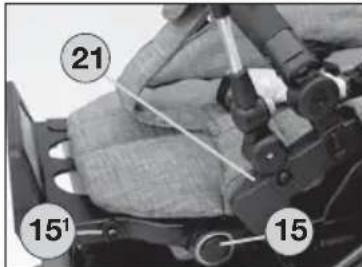
15 Adjustable footrest
16 Automatic lock for upper section
17 Climatic zone
18 Unlatching button
19 Telescopic suspension
20 Sun visor
21 Canopy attachment
Congratulations on your purchase
You want your baby to feel safe and secure, that's why you have purchased a high-quality product. You have made an excellent choice.
Hartan products are manufactured with the greatest possible care and monitored constantly by rigorous quality control assuring that your pram will provide life-long satisfaction. The textiles used for our products have been tested for harmful substances (chemical residues) according to the industry's own, Oko-Tex-Standard 100' to guarantee that all the fabric parts of your pram are safe for your baby.
Importantly! Please do not use this pram before reading the instructions carefully, and keep these instructions for queries or future reference. Your child's safety may be affected if you do not follow these instructions.
If you do not understand the instructions or if you require more detailed information, contact your dealer.
Please ensure that other users are also informed about the functions of the carriage and the notes on safety.
For the safety of your child
WARNING! - Before use, conduct an initial check of the carriage, and do not use it if it is damaged or if parts are torn or broken.
WARNING! - Make sure when unfolding the pram and folding it together that your child is at a safe distance, to avoid any injuries
WARNING! - Never leave your child unattended in the pram.
WARNING! - Make sure before using it that the carrycot or the seat unit or the child's car seat is correctly latched into place.
WARNING! - Negotiating stairs or steps as well as overloading may damage the pram and endanger your child.
WARNING! - When parking the pram, make sure the brake is engaged. When using public transport, ensure the pram stands safely.
WARNING! - A pram, stroller or carrycot is not a substitute for a cradle or a bed. It is intended to be used exclusively as a means of transport.
WARNING! - Using this pram while jogging, skating, etc. can be dangerous and is therefore not allowed.
WARNING! - Do not allow children to play either near or with the pram.
WARNING! - Always use the restraint system.
WARNING! - Fix no bags, handbags or other loads to the handle, backrest or sides of the carriage, as this will affect its stability.
WARNING! - This model has been designed for 1 child.
WARNING! - A second child seat is not allowed for this model.
WARNING! - The seat unit and carrycot are not to be used for transporting in a car.
WARNING! - The rain cover may not be used when the hood is taken off (danger of suffocation). Never expose the rain cover hood to sun while the child is in the carriage (overheating).
WARNING! - Keep the carriage away from open fires or other sources of heat.
WARNING! - Remove immediately all film packaging, and do not allow your child to play with it (asphyxiation).
WARNING! - Accessories and spare or replacement parts not approved by the manufacturer must not be used.
WARNING! - Please ensure the swivel wheels are latched in place when you are using the pram with the reversible handlebar from the swivel wheel end.
Instructions
WARNING! When opening out and folding down the frame and when adjusting the back-rest, pinchpoints may be caused in which fingers etc. can be trapped unless care is exercised. Ensure that your child has plenty of clearance space.
Unfolding the pram
By pushing the lock buttons 4, unfold the upper section to bring the handle in horizontal position. Pull handle 1 upwards until handle catch 2 has engaged. WARNING! Before using the pram, make sure all catches are locked.
Folding the pram
Important: Swing the handlebar 1 that the white symbols on the twist grip 3 are visible from above. Turn rotating lock 3 inwards until the handle unlocks, then push the handle down. Then press retaining buttons 4 and fold the top part of the handle downwards.
Reversible handlebar
To reverse the handlebar, turn the twist grips 3a in the direction of the arrow. WARNING! When reversing the handlebar, take care that no movable parts jam the baby's limbs, or fingers, etc. Finally, make sure the hand lebar has reengaged properly, which is indicated by a click sound.
Height adjustment of handlebar
Press the two handle-folding lock buttons 4 to bring the upper section of the handlebar 1 in the desired position.
Sun hood
The sun visor 20 can be folded out and in as additional protection. It can be detached by means of a zip.
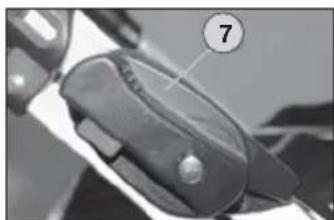
Parking brake
To lock the wheels, depress the securing button on the brake lever 7 and swing the lever down. The two toothed brake-crown wheels engage, which is indicated by a click sound. To release the brake, swing the lever up until it snaps into place. Having parked the pram, try to push it to check the brake.
WARNING! Make sure the brake is always closed when placing the baby in the carriage or taking it out of it.
Adjusting the parking brake
After prolonged use, the wheels may cause a rattling noise. You can eliminate the problem by readjusting the setting screw 7a situated at the brake housing.
Adjust the handbrake (optional)
Readjust the hand brake by means of the cable adjusting barrel 9 (above). A different brake effect on the two rear wheels can be corrected by means of the cable adjusting barrel 9a (below).
Adjustable suspension system
By turning the selector 8, a "hard" or "soft" position can be selected for suspension.
Hood and safety bar
By pressing the bayonet joint 12, the hood or the safety bar can be pulled out. When inserting it, make sure the safety bar locks into place correctly and be careful not to pinch any of the fabric parts. By pressing the buttons, the safety bar position can be changed.
WARNING! The hood bar of the stroller and the safety bar are not suitable for carrying the pram.

Instructions
Changing the rear wheels (also the front wheels on 4)
Release the parking brake 7. Depress push button 4 and pull the wheel off. Push the wheel right to the axle's stop. Please ensure that all wheels are locked in position correctly.
Changing the swivel wheels (only at 2)
To remove, press the pushbutton 6a on the inside of the swivel wheel bracket 6 and pull the wheel out of the bracket. To assemble the wheel, insert the fastening pin in the holding device, and engage it by a forcible push, which is indicated by a click sound.
Lock-type-swivel wheels (only at _2
To lock the swivel wheels, fold the control lever 5 downwards, the wheels lock automatically on both sides as soon as they are in the direction of travel. To release, fold the control lever 5 into the horizontal position. On very uneven surfaces, and when going very fast, we recommend locking the swivel movement, to prevent the wheels from blocking.
Climatic zone 17
You may open the hood flap to prevent heat from accumulating. To do so, pull the top cover up. You can fold out the sun shade 20 for additional protection.
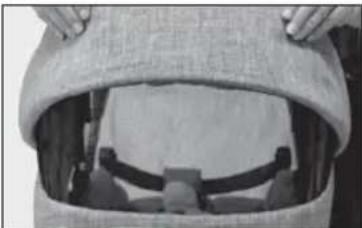
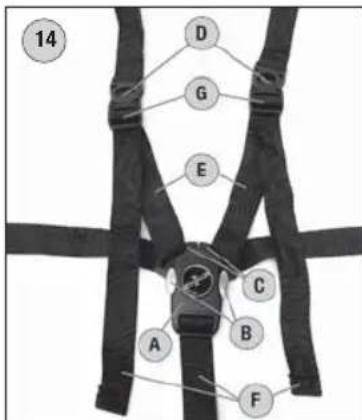
Safety harnessWARNING!
Secure your child with the 5-point belt system 14.
Make sure that the shoulder belts D are inserted and the belt fits snugly against your child. You can adjust the length and tautness of the belts with the belt ends F. You can adjust the width of the shoulder and lap belts by tilting open the quick-release slider G and pulling on the belt E.
Opening the belt: Press the two buttons B at the same time and remove the magnetic closer A. The bottom fixing C can then be removed easily.
Closing the belt: Hold together the two fixings C and attach the magnetic closer A; the fastener locks automatically.
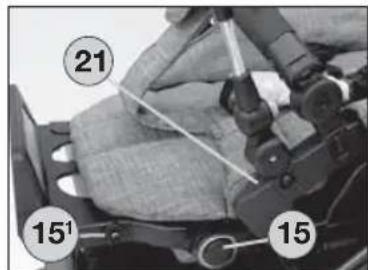
Canopy attachment 21
Insert then the fixing peg of the canopy in the slot of the canopy attachment.
Adjusting the footrest
By pressing the two red safety buttons 15 at the same time, the footrest can be lowered. When lifting it, adjustment of positions is effected automatically. The footrest can be lengthened. To do this, pull the two red pins 15^ and turn the footrest by 180^ .
WARNING! In case the carrycot is attached to the frame, the footrest should always be in horizontal position, as an additional protection preventing it from slipping out. Secure the carrycot according to the operating instructions.
Automatic attachment locking 16
Place the seat unit on the frame in such a way that both locking handles are sitting on top of the support studs. The latches on both sides lock automatically as soon as you let go of the handles.
WARNING!
Check before use that the seat unit is securely fixed! To open the lock, pull the red knob out slightly, then the seat unit can be removed. The seat unit can also be turned round.
Adjusting the backrest
By raising adjustment lever 13 on the back, the seat-back can be precisely adjusted to any incline between an upright seated position and a lying position. WARNING! When adjusting the backrest, take care that no movable parts jam the baby's limbs, or fingers, etc. Finally, make sure the backrest has reengaged properly.
Protection from falling out WARNING!
As additional protection against falling out, fix the press Buttons of the hood to the metal frame of the backrest.
Checking and care instructions
All the materials we use can easily be cared for.
Care of the fabric parts
Clean soiled fabrics when dry using a clothes-brush or lukewarm water (then use hair dryer). Do not rub fabrics extensively. Remove tenacious stains using a soft detergent. All removable fabric parts may be machine washed in lukewarm water at a gentle setting and reduced agitation, at 30^ . Let's say you have encountered a heavy rain shower. Dry your carriage with the hood still on in a dry and airy room using a cloth. This prevents marking as well as the underlining fabrics from moist soaking in through the seams. As a guaranteed protection against rain, we recommend that you use our rain cover, which is either included or can be purchased at your dealer's. Our fabrics have quite a number of distinctive features. However, they are very sensitive to excessive sunlight. That's why you should park your carriage in the shade whenever possible.
Care of the chassis
The chassis requires regular care. You should clean and slightly lubricate the wheel axles at a regular 4-weeks interval. Before oiling the wheels and push-in axles, make sure these are absolutely clean and free of sand etc., in order not to compromise the proper working of the locking mechanism. Use a silicone based lubricant spray for all moving plastic parts to maintain them in an operative condition. Keep all coated and chromeplated metal parts in dry condition, and use a finish restorer or chrome paste if necessary. Remove smaller chassis paint damages by means of a touch-up applicator.
Do not use high-pressure cleaners when cleaning your carriage, due to risk of damaging the ball bearings of the wheels (greased) and other functional parts (grinding and creaking noise).
Wheels: Overpressure may result in accidents and personal injuries. Replace worn plain wheel bearings and springs in time. Replace worn plain wheel bearings and springs in time. Little stones in the thread, etc. may just as well damage the floor covering. When parking the carriage in the blazing sun or cramming it in the boot at temperatures of above 40^ , the semi pneumatic tires may flatten or become deformed.
For pneumatic tires
When using pneumatic wheels, make sure they have got enough air in the tire. Specified tire inflation pressure should be between 1.2 and 1.5bar max.
WARNING! Max. tire pressure will be reached quickly. Tires tend to lose air over time. When blowing up a flat tire, inflate it only halfway first, and make sure the tire is evenly seated, to avoid "wobble". Replace worn plain wheel bearings and springs in time. Then continue to inflate it to the proper pressure.
Quality agreement
2 YEARS WARRANTY
This product is guaranteed for a period of 2 years by your contract partner. For possible submission of proof, please keep your receipt, the completed warranty card as well as the hand-over check bearing your signature for the length of the warranty period. These documents must be submitted to qualify for service under the warranty.
IN CASE OF WARRANTY CLAIM
This product is warranted against defects in materials and workmanship that existed at the time it was handed over.
THIS WARRANTY DOES NOT COVER ....
We disclaim liability for defects in the object of purchase that are beyond our control.
This especially applies to:
natural wear and tear (wear-related defects) and defects due to excessive stress
■ consequential defects, originally caused by neglect of defects/damages
but developing into conditions necessitating a more difficult repair
defects due to improper or inappropriate use (see Instructions)
defects due to incorrect assembly or operation
defects due to negligent handling or lack of maintenance of the product
defects due to improper alteration of the product.
WARRANTYCLAIM—YESORNO?
Rust: To provide a proper basic protection of the chassis, it has undergone a rust-proofing treatment. However, rust-stains may be found when lacking maintenance. This case will not be covered by the warranty.
Scratches: Scratches caused by wear and tear will not be covered by the warranty.
Mould formation: Fabric parts, having become wet, should be dried properly to prevent mould formation (see Instructions). Mould formation will not be covered by the warranty.
Bleaching of the fabrics: We confirm that the fabrics comply with the established standards. It cannot be ruled out that colours of the fabrics may fade while the parts are exposed to direct sunlight, washed too frequently, come into contact with sweat and detergents, or suffer abrasive wear (especially on those parts where the pram is handled). Consequently, colour fading is excluded from the warranty. It is unavoidable that colours sometimes differ slightly from one individual batch to the next, which is why this case will not be covered under the warranty.
Knob formation on fabrics: We recommend that you apply general clothes care. As with woollen sweaters, the knobs can easily be removed by using a clothes-brush or burling machine.
Tearing of seams, fabrics, press studs : At the time of purchase, please check carefully that all the fabric parts, seams and snap fasteners have properly been sewn and fastened. In case of a possible complaint concerning seams/defective snap fasteners, a claim must immediately be reported to your dealer after the defect has been discovered.
Wheels: As wheels used on prams will not be balanced, they may show slight run-outs ("wobbles"). Worn tires will be regarded as natural wear and tear. No claim can be raised if your pram, using pneumatic tired wheels, has a "flat". This will be attributed to extraneous causes — a small hole caused by a pointed object, or pushing the pram about when it has not got enough air in the tire. This case will not be covered by the warranty.
WHAT TO REMEMBER WHEN BUYING YOUR PRAM
Check that your pram is complete when it is handed over and no parts are missing. Check the function of all parts and confirm this by signing the hand-over check.
WHAT TO DO IN CASE OF A COMPLAINT
Call your dealer, from whom you bought the pram, to file the complaint and to discuss how to handle the matter. In case of defects concerning safety regulations, your complaint must be filed at your dealer within a 30 days period from the date the defects have occurred, otherwise these defects will not be warranted for. When handling your warranty claims, we will apply product-specific depreciation rates. We refer you to our general terms and conditions displayed at our premises.
Make sure that the pram is in a clean condition before being sent in for repair. Repairs will not be carried out on prams which are in a dirty condition.
USE, CARE AND MAINTENANCE
To maintain the original quality of your pram as a means of transportation for your child, it requires care and maintenance according to the instructions


La France

Topline 2.0 GTS / Topline 4.0 GTS / T2 GTS / T4 GTS
O CEMU MORATE VODITI RACUNA PRILIKOM KUPNJE
Provjerite da li su kolica kompletna prilikom isporuke i da li nedostaju neki dijelovi. Provjerite da li sve funkcije kolica fungcioniraju u potpunosti i potvrdite ovo na listi o primopredaji.
POSTUPAK KOD REKLAMACIJE
IHCTPYKlIgI3 3ACTOCYBAHHI
HanauTyBaHH pyHoro ranbMa (oniz)
Oeptaoun perynbAhe KInbue 9, BN MoKTe BIDperyHOBaTH pyHe raBmo. P3Hi peXmRraMbYBaHHaDHX KOIC MOxHa HAnaHTyBaTH 3a DOnOMorOo perynHOBAhBO HorTa 9a.
PeryIbObaHa nIdbicka roIdaKn
Bm moxete HanaaTyBaTN M'ky a6o cnpTnBHy niDbicky, noBepHyBwn pykny perynobHH 8.
Ko3npok i DbepuTa
IicnaHaTnckaHHHa 6aHohETHM KOBnaOK 12 MoXHa BHTHHyTN Habic a6oDbepura.T.BctabnHOu,nepekoHaTEcR,UO uTaHra npabnBHO 3aikcoBaHa i He 3aTnchyTa XoJHa YactNa TKAHHN.3a DonomoroKHO NKONOK perynbAHHH KHNKn 11,DbepuraMoXHa 3aTnHryTN.
NONEPENKEHNA! Habic nIcnpTnBHorO Bi3ka i nonepeuHa He nixoanb nI nepeBe3EHn CnoptNBHO B3ka.
3HATTA 3aHbOro KOneca (taKoX nepeHix KOnic Ha74)
BiDnycitb ralbo mui yac 3ynHKn 7. HAtncHtB KHONky 4 i 3hIMtB KOeco. PnTNCHTb KOeco do ynopy oci Ta HATNCHTb KHONky. PepekoHaTeC, 0o BcI KOeca npabunbHo 3aFikCoBaHi.
3HATT pyxomnx KOIC (TINbKn dna T2)
Uo6 3Hn KOncO, HATNCITb KONKy 6a Ha BHyTpiuHi CTOpOHI TPMAya NOBOPOTHO KOnca 6 I BHTRHTb KOncO 3 TpIMaya. Uo6 3HOBY BCTAHOBNTN KOncO, BCTABTe NOrO Ha3aJ Y TpIMay 3a DOnOMORoH oikCyHoyo UTnTa i UjNbHO pNTNCHTb, JOKN KOncO 3HOBy He 3aDfIKCYtBCr 3I 3BYKOBm CnHaNoM.
Konichn6ap'ep,po pyxaetbca (Tinbkn Dnla 72)
Ioo6 3a6nokybatn nobopotHi koneca, nepebeidtB baxiNb ynpabniHH 5 BHN3; Koneca aBTOMATNUHO 3a6nokyIObC 3 06ox 60kIB, RIK TINbBOHn CTaHyTB HepyxOMMn B HaprMky pyxy. 1o6 po36nokyBatn, nepebeidtB baxiNb ynpabniHH 5 B TOpN3OHTaJIbneNoJoxeHH. Ha Nyke hepibhi MicueboCTi abo npu WbnKki XoDb6i Mn peKomeHnyEmo 6nokyBatn pxyomi Koneca, o6 yHnKHyTN 6nOKyBaHH KOIC.
KlimaTnHa 3oHa 17 y M'rkOMy daxy
Ioo6 3an06irn HakonuueHHo TeNa, BN MoKeTe BiKpnTn KpnKny M'koROr Bepx. Ia Iboro NotarHtB KpnKny M'koROr Bepx Bropy. Ia DoaTKOBOrO 3axNCTy MOkHa BiKInHyTu COHc3axnChn Ko3npok 20.
Pemih6e3neKNIONEPEJXEHHRA!
PpncTe6HtB DnTnHy 5-TOUKObIM pemeHem 6e3neKn 14.
Ipekeohntecn, 10 pemehi D 3acte6hyti, a pemihb 6e3neKn Hadiinho 3aTnHytn. DobkinypeMeHr MOxHa BiDperyIOBAtn 3a DonomorOo KIniB pemeHIB F, a wipiny nleuOBO r ta3OBoro pemeHIB MoXHa BiDperyIOBATN, BNTRHyBwN WBNKo3HIMHy HAKNaKy G i NotraHyBwn 3a peMHb E.
HaTnCHiB Dbi KhoNk B pa3om i BN6epiMbarrHHTy 3acti6ky A. HxKHO 3acti6ky C moXHa nERKO 3HRTN. 3akpinitb peMHb.

Tpmau napacobkn 21
3HIMITb HNKHIO qACTINHy npacOInbKN,NOTIM BCTABTe fIKcyOuyn UTNDPT npacOInbKnB rHI3D0 TpMaayapacOInbKN iINOKiTHnKa.
PerykoBaHHn iNCTabKn dHir
PiHIXKMyMOXHaONCTHTN,HaTNCyBUNOHOHOCHaCHO BIBKHOKN63NEKe15.PnPiHRTTI NOOXeHHNIIHIXKKNpeYnHOETBCABATOMaTHNO.HaTNCKaHHM DBOXKHONO15PiHIXKMyMOXHaBNTARHYTNITAKHM YHOM NODOBXHTN.
NONEPENKHH! Konn IIObka BiDperynbOHa, 3aBXN BCTaHOHNe TIHIXKY roPn3oHTaIbHo, 06 DoaTKOBO 3axNCNTu DNTHNY BiN BnCn3aHH. 3aKpinitb cyMKy BiINOBiHO do IHCTpykui 3 ekCnnyataui.
ABTomatuHm BepxHi Kicatop 16
TOMICTITb CINIHHa pamy TaKIM YHOM, 06 Ob DBI pyuKN IINIphi KICaJIc CINPAJNc Hc CTONOPHI UTNOFTNIO BXODHTO KO KOMNIJEKTy. 3AMKN aBTOMATNUHO 3AKPINAOTBCa 3 06X 60kIB, KOIN Bn BiDnyCCKAeTE pyuKN. NONEPEDXEHHA! Pepe BNKOpNCtAHNM nepekoHaiTeCA, IO CINIHHa HAIiHHO 3AKpIRHe! IO6 BiDkPNTn 3AMOK, NOTRAHTB pyuKy BROPY, NICIA YORO MOKHs HA 3HHTN CINIHHa TAKOX MOKH NaOBepTaTN.
PeryIIOBaHHcnnHKn
PiHimaOu npKy peryNIOBaHHa 13 Ha cnHnCi, MoXHa TOHc BipeRyIOBAtn CnHKy Bic nIeYoro Do HanibExaYoro NOnoXeHHa. NONEPdXeHHA!Pi cac perynHOBAHH cInHKn CTexkTe 3a TMM, 06 DmTHHa He NotpanHa Mx pyxOMMn YactNHAM i 06 cbNka 3HOb By 6yNa HaneKHM uHOM 3aqiKcOBaHa.
3axnCTBID BUNaHINH NONEPEJXEHHA!
IINIOaTkoBOrO 3axncty BiD BInaHINH INKpiniTB KONKn 6andxina Ho METaneBOI TnCnHKn.
IHCTPYKZIЯ NO INEPBIPZI TA DOIGIAY
Bci BnKOpNCTOByBaHmATEpian MoJHa NerKo npaTm.
Dorra 3a TeKCTnblbHMMn DeTaNMa
OuHuaTe TeKCTnHbI cactHn 10IOgrydo NOBHO BcHxAHHb ABO OIOHO CyoHTb POHOM. YHKaTe CNbHO TepTR TEKTNIHO. CTkiPiMaBnAduAte M'AKHM NMOHUM 3aco6oM. Yci 3HIHMI cactHn MOXHa npATB n ppaBbHIM MAUHHI 3a DOLOMOHO M'AKRO MHOHO 3aco6y npn TEMrepeatpyi 30C (ekOHOMHa nporpama). Ako Boac 3actab do, npocuytB BIOK CYOX RAHQIPKO B CYXOMY npOBITPOBAHOMy PmIMUeHHI. Ld 3anobixNtB NOTpanHHBOONr y BHyTIuHbO oBuWbky epe3 wBn. B IHOMy BnauDky Moxyt yTBOpNTCA BOHHi CTOBHNK. HAnkpaumm 3axhCTom Bi HerOei E npKpInneH KOBtA afo Qoxon, kMy moXHa npDbaTn B cceuaianBOAHOMy MaarzHH. BIKOPCTOBByaHA TKAHnHa Mae bato No3HTNBHX BnACTINBOCTe, ane BOA HyTNBa DO CNbHIX COAHHX npOMEHB. M peKoMeHdymo 3aniuHaT BIOK B THI.
06cnyrobyBaHHxOJIOBOiYactHn
XoOBy cactHy Heo6xHIO peryIaHNO 0cBnyOBaTH. Konichi oci cnid ouuata H KoxHI 4 TnKHI i 3nerKa 3MaUyBaTH MaTINOM. Pyxomi nactKobietanl MOKHa 3MaUyBaTH CNIKOHUM CNPEEM, uO6 3anobirn CKPNY XoOBOI qACTHH. NpeD 3MaUyBaHHM KONICHX Ocei o ocien kBOPHBIE pekoHaiTeCRA, 100 Oci NOBHCIO OHUIHBI BID BY I NICKY, uO6 He npoyunni PObOT MEXAHIMy 5kOyBAHN. NocapobahTI TA xPOMOBAHI METANEBI detani cnid TPMATN cymmn 13a Heo6xHIOCTI Obo6HNI ABTONONIPOLNI ABO xPOMOBAHO AO tAOHNEI NoPpHNI CND BUNAIONA 3a DOONORO YoKII, 100 MCTITb paFby, kY MoKHn PnD6aTN B CNEJIANI3OBAHOM YARANHI. HIKOn He uCtTB B3OK MmKO HO BNCOKO TORCKY, ockINKn CE np3BeDE Do yHyaBHAA 3maeHnx shAPKIOIHINIK INK ONICI FyHKNUOHAH NACHTN B3K (CKPNI C KPERIT). Koneca: NiIMNHINK KOB3AHN - konichi BCTABKN TnpyHNI Heo6xHIO BVACHO 3AMHO BTOI 3HOWEI. Kpim TOrO, dpi6HI KAMHI, 103 aCtPAHNI BCOEAC, MOXYB NOWKOINI NIDNORY. RIOIO 3aNNHNI KONCKY HA CNEKOTOMHY COHJI ABO B BarakHNky ABTOM0BIn PNi TEMNEPATy BnEe 40^, ce moKe npn3BecTn do noNkOKeHHN KONIC 3 BHUTPIHMN TP6kAMN.
DnA mH
HINI 3 BHYTIWHIMK KAMEPAMN NEPEKOHAIECRA, IO TNC DOCTAHTBO BWCOKN - BiD 1,2 do 1,5 6ap. NONEPEDKHEH! Maxcmmahn HTKN y KOncac DoCAeTBCaBnIO, TOMy 6ydiTe oBepekHI, OCKINbKN 3aHaTO BWCOKN TNC MOKE npH3BecTHdo Heuachoro BnauKy a6 ToPBM. He 3aMuahe Btck 3 BHYTIWHIMN Ty6bKaMa H CBtiN iNIOs3 I NBX a6o NInone My HA TpBaanu Yac, OckInbKN Ha HIX, Ra I BCx RymOBHX KONeAC, Moxyb TaIIHNNTCupH II PMAH. KIOKO E NOBCTHO 3yNOc, CNOATky HAnOBHbIHoro HANOBHMy, 063 Zano6iITn DeOpMauiK OKeCA, BIPIBHHe TKECO, 06 BOHO pauOBOAn HaneKHMM YHOM, a Notim HAnOBHbI HorO BoEpyX.
TAPAHTIЯKOCTI
2 POKI rapaHTII
IrapaTInHe 06cLyroBvBaHHHa DaHny npOdyKuio Die npotrorm 2 pokib. Y pa3i BUNHKHeHHn Otnpe6n y HadaHHI rapaHTII, 6yNb Iacka, 36epirate yek, Ta 3anOBHeHHn rapaTInn TAnOH npotrorm ycboR o nepiody dIrapaTInHoro 06cLyroBvBaHH. Ppi nOtpe6i, Bam Tpe6a 6yde nped'ABNTn Bci zi DOKymEnTHn dIra OTPMaHHra rapaTInHoro 06cLyroBvBaHH.
KoHn HadaeTbca rapaTtiHe 06cIyROByBaHHa
TapaHTIHe O6cLyroBvAHnHaHdAeTbCBy BUNaNDy BnAnBeHH DaHOrO npOdyKty, 0o 6yIn OTpMaHi npBnPo6HNTi Ta Ha Yac NpeDau Nioro Do CnoXnBaA BKe icHyBaII.
IapaHTiHe 06cnyroByBaHHHe Hadaetbcra
Mn He HecemO BiIDNOBIaIbHocTi 3a DeΦeKTI BnRbIeHi Ha npOdyKuII, RKi E No3a HauIM KOHTPOIe To6To:
3BnauHn 3NOC npodykui, Ta depeKTN, OTPMaHI BHaCNIOK HAdMIPHO BHKOPCTAH
BippaH He nomuehi defeKTH / nowkoJKeHH, kI nepepoCTaOTb y 6ilbW cyTTeBi ta notpe6yIOb cnlaHoro DOCKHOHaIOro pemOHty
I DepeKtn, 3Bnnc BHaCIOk HnnpabHbHO BnKOpCTaHHA (DnBtbcnHcTpykuio no EKcnnyatauii)
I DefeKtn, 0o 3'BNnCBAHacnIOk HENpABINbHOrMOHTaKy uEcknnyatau
I Defeektn, 0o 3'BNHnCBAHcnIOK He6bAnor BOBKnOpCTaHHa BIDcyTHOcTI TeXHINHO O6ClyroBOyBaHHN npOdykii
DeΦeKTH, 3BnHcR BnCnIOB HceHH 3mH B KOHCTpyKUHO daHO npOyKu
Pdnnn: Pnpnnn OtpmaH Bhacniok 3ocy (noctiHoro BNkopncTAH) npdykty He e rapaHTiHm Bnpankom, i Tomy rapaHTiHe o6cnyroByBaHH He hadaetbc.
YtBOpHn nnichBn: Pn HAMokhHi TeKCTnIbHnx eIeMeHTIB BOH nOTpe6yIbT rapHOI npocuIK, 0o6 yHnKHyTN YtBOpHH nnichBn (DunItbcra hCtpKcIO NO ekcnnyataui). YtBOpHH nnichBn He c rapaHTIHm BnnaKOM, i TOMy rapaHTiHe ocbnyroByBaHH He hadaetcb.
BnBtAHN TkAHNN: Mn CTBePdKyoMo, 10 BcI TeKCTnblH eIeMeHTn, BnKOpNCaHI Ha Haui npOdyKuII, BnROTOBHe 3 DToPMaHm B iD NobIHnx CTAHApTIB. Ane Mn He BnKnIOuaEMo MOKlnBicTB BuBtAHN KoNBopB npHaMipHomy nepe6yBaHHi Haoi npOdyKuII niD npRMM COHryHM CBITLOM, YACTOM npAHHI, KOHTAKTI 3 NOTOM NMIouHM 3ac6amN 4bHaHbHorO CTpaHnR (OC6bNoB B Tnx Micx De 3a KOLrCKy BepybC pyKaMn). TOMy BuCbitAHN TkaHHn He E rapaHTiHm BnAakOM. Be3ymOBHO, KObOp napti npOdyKuII MoKyb TpOxN BiDpi3Hrtnc, npote rapaHTiHe 0cbNyroByBaHHY y TaNX BnnaKaX He Hadaetcb.
YbOpHn3KAtyBaHHa TkAHHi: PeKOMeHnyEmo Bam dOtpmByBntc3aRaJIbHnx npabNl DOrIy 3aTkAHnHaMn. HanpKnAd, 3 WepCTaHnx BpuO6iB 3KaTyBaHHa NERKO MoXHa npnbpatn 3a DonomoroIO 3BnuAaiHO iTkn Ira OaRy a60 cneiaJbHorO npucptpo.
Po3xOxJHn H WIB, PO3PN TB KaHHN, HcnpabHicTB KNONK: Nlaac nokyn npOdyu, 6yNb lacna, yBaXHO nepeBipTe Rkictb npoWnBKN, BiDcyTHiCt b po3xOxJHHeHH WIB Ta CnpabHicTB Bcix 3actioK. Y pa3i BnRbHeHH DeEeKty TaKOro nnAHy, BiDpa3y 3BepHITBCa DO BaWoRo npOdaBu.
KoIeCa:KIOeCa KONcN He 36aHaHcObaHi, II MoKe KNaTa (BODnB p3HI 60Kn). 3Hoc WnH He e rapaTtHM BnAekOM, TAK cAmO JIKpObHTa WnHa, YH HeDOKaUHa, UO MoKe npu3BecTN Do pO3roDyBaHH KoIaCKn. B TaKnx BnAakx rapaTtHe O6CnyROByBaHH He HaDaETcb.
HA IIO TPE6A 3BEPHYN YBAY KYNYIOH KOJRACKY
Ipebeipte, u noBHCIO yKOMnIeKTOBaHa KOJIaCKa, kky Bn 36npaTeCg npu6aTu, u n cnpabHb Cbi II eIemEnT, ta 3acbiDitb ce niincaBun DorOBip Kynibli.
IOPOBNTUYPA3I BUNKHEHHCKAPT
3aTelefohynte Bawomy npoabuio, po3kaiktb npo npo6emy, kya y Bac BNHKna, ta o6roBopitb wJxHn II BpiweHH. Y Bnauky BnauBneHH defektib, 0c tocyotbcn npuyehn npabun 6e3neKn, Bam tpeba noatn ckapry do Bauro npodabua npotrom 30 dHIB 3acy ix BnauBneHH, iHaKwe, ce He 6yde po3radaTncr k rapaHTIHn BnuAOK. OTPmABNI Bawi BmOrn cTocoBHO raptAHIO o6ClyROBYBaHH Mn po3rdaeMoNTAHN 3MeHweHH BAPTOCTI daHORO npOdykTy. Mn 3aBxDn cnpaemocra Ha hawi 3araIbHI npabnla Ta yMOBN, 3 kHMn BN MoKeTe O3HaOMTNCR B HauNX mara3nhax. Npeed TmM, kBidabatn Bawy koncky B peMOHT, nepekoahTeecr 0c BCI II eemeHTn uHCTi. bpydHi kONCKN B pEmOHt He npinMaHOTcBc.
BHKOPNCTAHH,IOIJA TATEXHICHEOBCNYROBYAHHH
KoIaCKa -e, B nepuy eprpy, 3aci dny nepebe3ennn BaWoi dntnn. Tomy, 3aJn toro, uO6 36epertn II B 6e3dorAHHomy CTahi, BOHa notpe6ye noctiHoro dorgnay Ta texhuiHoro o6cnyroBaHHa, BiNobiDHO do IHCTpykui no Ecnnyatauii.

SLO
Slovenscina

Topline 2.0 GTS / Topline 4.0 GTS / T2 GTS / T4 GTS
primeren za otroke od 6 mesecev do 22kg
za mlajse od 6 mesecev s primerno nosilno turbo.
Ta izdelek niprimeren za tek,rolanje ali kotalkanje.
BHMaHHe- KJIaCKa He RaIeTcKPOBaTbHO MoKeT 6bITb NcNoIb3ObaHa TOnbKO B cIeJX TpaHCnOpTnpOBKn.
BHMaHne! - HcnoJIb3OBAHne KOJIaCKn npi 6ere, npoIyIkax Ha polIKax, cKeIe n T.D. onaCHO, n IO3TOMy He pa3peWaaTcR.
BHMaHHe! - He donyckaIte, yTo6bl nrgpaIOuIne DeTn HaxOOnNcB 6JI3n KOJrCKn, He daBaTe IM nrgpTa b c KONrCKoI.
BHHMaHHe! - Bcerda nCnOlb3yIte peMeHb 6e3OnaCHOCTN.
BHMaHne! - He 3akpePnIe cyMkn IIn TAgKeIbe BeuHa pyUke, CnIHKe I NO 6OKam KOnrCKN, 3TO MOKET IOBnIaTb Ha ee yCTOUYBOCTb.
BHMaHHe! - DaHHa MoeJIb KOJIaCKn IpeHa3HaueHa dIra ODHoro pe6eHka.
BhImaHne! - PpIMeHeHne DOnOpHnTeIbHbIX CnDEHn IINr 3ToN MoEIn He pa3peUHeO.
BHMaHne! - BepxHIOU qactb KOJACKn HEnb3a HcN0Nb3OBaT dIra nepeBO3Kn pe6eHka B MaunHe.
BhImaHne! - 3aunTHbIKoNnak OTdoXdHe MoKet 6bIb HcNoJIb3OBaH npi CHrTOM BepXe (OanachocTB yduWeHnA). TaKxe HeNb3R OCTaBnTb 3aunTHbIKoNnak Ha CoINHe, ecnn B KOJACKe HaxODNTcpeBcHok (pepepeBaHne).
BHMaHHe! - CneIte 3a Tem, YTO6bI KOJIcKa He HAXOINacb BOIN3N OTKpbITOrO ORHn INpyHX NCTOCHIKOB KApbl.
BHMaHHe! - He3aMeIeNTbHO H3BKeKte KOJIcCKy I3 BCEx yNaKOBOUHbIX MaTePnAIOB IN He daBaIte BaWemy pe6Ehky C HmN HrpaTb (OnaCHOCTb ydyWeHn).
BHMaHHe! - 3anpeueHO nCnOJIb3OBaHHe npHaIeJXHOCTe N CMeHHbIX DeTanei, He Odo6peHHbIX pON3BOIDNTeJIem.
BHMaHHe! - CneiNb 3a TeM, yTo6bI BpaAioUInecra Koneca 6bIIIN 3aΦHKCuPObAHbI, KOrda BpaAioUaia pyka KOnrckn pacnoJIOKeHa co CTOpOHbI BpaAioUnx Konec.
Hnctpykunno 3Kcnnyatau
BnHMaHHe! npaPacKnaIbBAHH nCKlaIbBAHH paMbI n npnepeCTaJIeHH cIeHm MOryt oBaTaOBaTcB MeCTa, B KOTOpBx npn HeBHMMATEnbHOCTn MOryt 6bITb 3aJatb YacCTn Tela, TaKHM Opa3OM, npINBOJaUne K paHEnrM. CJeDHTe 3a TEM, yTO6bI BaW pe6EHK HaxOJINCR Ha 6eONachOM pacCTOAHN OT KOJIACKN.
PacnaDbBaHne KOJACKN
HaKaTHem Ha appeTnHbIe KhoNKn 4 cIeIyET npeBecTn BepxHOIO YacTb pyKu B roPn3OHTaNbHO eNoJKeHne.
Jaee Heo6xoJHMo pyKy 1 NOITRAHyTB BBepx Do 6nOKpOBKn 3aMka pyKn 2.
BhImaHHe! Npeed nCnOJIb3OBAHHeM y6eIITecb, yTO BCE 3aMKN 3aKpbTb.
CKlaDbBaHne KOJACKN
Baxho! -yky 1 Bpaata bdo toro MOMeHTa, noka 6bIbe cIMBObl Ha BNHTOBOn pyKe 3 He 6byT BnHbCBepyx.
3aunTHbBHTBOB 3AMOK 3 npOBepHyb BOBHTb DO pa36nOKnpOBaHnB BpaAioeC pyKN, 3aTeM onyCTntb ee HaKaTneBHN3. HkaTb Ha Kcnpyoine KOnKn 4 nOyCTnB BN3 BepxHO Yactb BpaAIOoeC pyKN.
BpaueHne pyuKn
IbpaueHnpyuKn npOBepHnTe BnHTOBbIe pyuKn 3a no HanpaBHeHIO CTpeJIKN.
BHMaHHe!Pn BpaueHHpyuKo6paauTe BHMaHHe Ha To, UTo6b BaW pe6eHok He nonaJI MeKdY
DnHmMbIMN qACTMn HTO6bI pyHa 3aΦHKcPbObaIacb, h3dAB 3ByK - ΜeIyOK («Klnk»).
Perynpyema npka
HeoXoHMO HaKaTb C 06eHX CTOpOH appeTpHbIe KHOJIc CRHbApy4 n noCJIe 3TOrO BO3MOJHO nepeCTaJIeHne BepxHeu qactn pyK1BKeJaEMyIO nO3nIO.
CHRTME KOJEC
Pa36noknyte TOpM03 7. HAnmTe KhONkY 5 dIa ChATN IIN yCTaHOBKn KOnc. PIny UcTaHOBKe CneIte 3a TEM, YTO6bI KOleco 6bl npabunbHO 3akpenneHo B depKatene.
BbCTaBJIeHHeMoDyIpyJINH
Bpaaay pyky nepectabneHn8,MOxHO nepectabnIpyxHHbIMARKnN CnpTnBBn MOyC.
IpepecTabJeHne cHHKn
PpnoDnmaXomYt 13, HaxoJusncHa O6paTHO CTOPHe KOJIckn, BO3MOKHO PnabHoe nepeCTaBHeHne CmHKn n3 CNJaYeBO Jekayee NOIOKeHne.
BHIMAHHE! O6paTte BHMaHHe Ha To, YTO6b npn nepeCTabNeHH
CnDHeH BAt Pe6EHOK He nonan MeKdY
ДБИЖУПМИССЧАТЯМИ YTOБЛКРЕПLEHNE CПИKHIN XОРОЮ BCTAИNUOCB B NA3.
CHATNE 3aHnIX KOLEC (TaKoKe NepeHNHe KOJec npuT4)
CHMMTE KOJIACKY CO CTOHNOHOrO TOPMO3a 7. HaXMITE Ha KHOIIky 4 N BbIbTe KOJECO. BCTABTE KOJECO DO yNopa B COOTBETCTBYIOoee MeCTO HA OCh. CnEpyET yBeiITbcR, YTO BCE KOJECA npabINbHO 3aKpePInHeB I BepKAtene.
CHATNE BpaaouxKONec (Tolbko npu T2)
IIN CHATN KONeCA HAXaTB KHONK6a HA BHYtpENHeI CTOpOHe DEpKaTeH NOBOPOTHO KONECA 6 N BVHbYb KONECO IN DEpKaTeH. IIN 3aKpePnEHHa KONE BCtABBe T KONEco 3akpeNTenBbIM 60TOM B KpePnEHHe N, pImMeHHa CmNy, HaxMMte Ha Hero Do TOR MOMHTA, NOKA OHO He 3aФнкCpyETcR, m3dab COOTBETCTBYUOuM 3ByK.
TAPAHINHbIE O83ATEIbCTBA HE PACPPOCTPAHIOTCA:
Ha eCTeCTBeHHbI n3Hoc, a TAKKHe Ha NOBpeJxDeHnA, Bbl3BaHhIbe Ype3MePnoH Harpy3Ko;
Ha noBpeKdEHHa, Bo3HnKwne BCJeCTBHe npImeHHeH He No Ha3HaueHnIO nn HnpeBaNbHOh 3KcIpyaTaun;
pemOHn 3aMeHy DeTaN B CBAHn C Nx ECTECTBEHHbIM N3HOCOM, a TAKKe KAMEpbN uINHbI;
IOBpeKdEHeH nlaCTNKOBbIX DeTaIe BnpoceCEkCNyatau;
peMOHT ToBapa B HeaBTopn3OBaHHbIX CepBnCbIx ΒeHtpax;
Haiuue deopmaun n Tpeunn BO3HNKxnx B npocce 3Kcnnyataun;
3JemeHbI, BblIOJIeHHbIe I3 TkaHN IIN BX, MoHIn, 3aKJIeKN;
PnBHeCENH NOKyNaTeJIeM 3MeHeHb V KOHCTpyKUIO Y KOMPiJeKTAciNIO;
nocne Bo3deIcTBnHa ToBap o6ToTebCTB HenpeoOnmoCnbl (3emTpcHe, ydpb MoHnnox, noxap, HABOHeHne, Hae3d TpaHcnpTa n T.D.) a TaKHe XmMueckn AKTNBOH CpeDb N KpacnteNei, KOIOSe-PEKyux npedMeTOB, pa3NHybIX 3aqrpa3HNTeJe.
PnpeMOHTeIIN CMeHe 3JeMEnTOB KOJcKm MaTepuTbIe NOKpbITHr He MeHrJOTCa.
TapaHTnHbI cIyauH nn HET?
PkaHHa: Kopnyc oba6oTaH coCTabOM, npedotBpaauOuMnpoueCC NOBHeHn pKaBunHb, OTCyTcBne 0cbNyKBaHHa KOLAKN MOKeT npBecTN NOBLeHNIO MeT, nopaxeHHbIX PkaBUnHO. Ha TAKNE cUYaH rapaHTNa He paCNPocPaHAreTcA.
UapanHHI: IIOBHeHne capanHH He BXOHT B CNYaH, Ha KOTOpbIE paCnpocTpaHReTcra papaTHn, T.K. OHN ABJIANTCA HOpMaJIbHbIMn np3HaKaAMn N3HOca.
06pa3oBaHne rpn6ka: B clyaee ecn mATEpnaI KOJIaCKN CInbHO npOMK, ero HeO6xoJIMo TuaTeNbHO npocuWntb, YTO6bl npedTbPAHTb 6pa3oBaHne rpn6ka. POBJIeHne rpn6ka He RaJIaTc rapaHTnHbIM clyaem.
BbucBaHne MaTePnAIOB:Bce MaTePnaIbI, nCNoIb3yIOUeNecR B HauNX N3JeINx, COOTBeTCTBYOT TEkyuM HOpMaM.
BcneCTBnE BO3deIcTBnA COJIeHbIX Lyey H CNIuKOM YactoR O MBtB He NCKIOUeHO BbIcBeTaHne MaTePnAna, n 3TO He ABJETcnpuHHo peKlamaun. He3NaHTeNbHoe OTNue MeKdy pa3INuHbIMn YactTm npOykTA He Bcerda ydaetcna36ekatb npn pOn3BOcTBe, noTOMy TaKne Clyaun TaKke He ABJIOTcnpuHHo peKlamaun.
CkatabaHneTKAH: Cnyaan cKaTbHaBHe TKAH He OTHoCraK R rapaHTnHbIM clyaam, OHMOyT 6bIb ydaJIeHbCTaHdapTHbIMn cnocobmno yxOdy 3a wepctraHbIMn nCHTeTneckmNB euaAMn, C NOMOuBu CNEuaNbHOJ ueTKn IIN MaunHKn.
PacxoxkdeHne wOB: IoxaIyIcTa, npOeBpTe WbIи KhoNk npn nokynK n3dEIna. B clyae o6hApyeHn NOpeKdHn WOB nI IN KHOONK, He3ameDInTeJbHo 06paTtecb MmaraIN, rge 6blIO npno6peTeHO n3dEIne.
Koneca: Tak kak KOleca Ha KOJrckHe 6aHaHcnpyIOCTc, BO3MOKeH JeKm Dn6bAanC. CTeptbE KOleca ABJIHOCTc HAtypaJIbHbIM N3HOCOM. IpOKoJI B KOJecax MOryt 6bITb Bbl3BaHbI TOlbKO BHeWHm BO3DeiCTBnEM, PO3TOMy BCE 3TN CInyauH He ABJIOTc rapaHTnHbIMN.
Kak cneJeYeCe6a BcTeH BcLyuApe peknaMaun
He3aMeIInTeBHO coo6Hte O npOBeMe B CneuaIIN3npOBaHHb Maar3H, B KOTOpOM Bby npIO6peN KOJIeCKy, npeCTaBtE h Mara3Ha coo6HnT O Tom, KaK DeHCTBOBaT b DaJIbWe. Ha HEnoJAdKN, CBa3AHbIe C 6e3OnacHOCTbIO, O KOTOpBX He 6blIO 3aIBHe B cneuaIIN3npOBaHHb Maar3H B TeueHHe 30 dHe c DaTb NOKyKn rapaHTn He pacpnoCtpaHReTcR.
C npoep6noCTMn CB3aHbIMn C o6pa60TKo peKlamaunOHbIX 3aBHeHn, kacaioxxCra npOyKuHn Hawei hnpMbI, BmOKeTe O3HaKOMITbC B YcTaBe Haewero npedpnaTn.
TapaHTnHbIe 6aTeJIbCTBa
Ha cyto cIeJyET o6paTntb BnMaHne npn nokynke.
IpoBepbTe ynaKOBky c npno6peTeHHoN KOJIACKoH Ha HAIuHne Bcex Heo6xoDnMbIX 3aunacteH n pa60tocnoc6hOcTB Bcex yHKUHOHaNbHbIX aacteH.
IcnoIb3OBAHne, yXoI n o6cIyJxNBAHne.
Kolnka YBnaTcA CpeDCTBOM TpaHcnpTnpOBKn BaWero pe6eHka, noaTomy 3a He Hno6xoJIMO yXaXnBaTb B COOTBeTCTBnC INHCTpyKUnei NO 3KcnLyatauN, UTO6bl CoXpaHnTbe ee n3HaayalbHoe KaueCTBO.
Ipn otnpaBke cneDntb 3a Tem, yTO6bl KOJcKa 6bla YnCToN. rpa3HbIe KOJIaCKn Ha peMOHT He npHHMaOTcra.
ΦOPMUYIAP KOHTPOJI IPN IOKYNIKE
MoeJIb dTeckoKolrckn
LBeT
Даразпокурки
R npOBepnI KOMnJIeKTHOcTb DeTcKOJ KOJIaCKN I NOHOCTBIO yDOCTOBepnIC, UTO KOJIaCKa NepeDaHa MHe B NOHOM KOMnJIeKTe N BCE ee YHKUIN DeiCTBYOT B NOHOM Osbeme
R noIyunl doCTaTOUHyIO nHΦopMaζuO 6 n3delenn npnraK cBeDeHNO yKa3aHnno ee 3KcNlyataζn
Iopnnscnokynatae
Ismnpnoabua/npnnscb


Polska

Topline 2.0 GTS / Topline 4.0 GTS / T2 GTS / T4 GTS
GWARANCJA NIE OBEJMUJE...
- Topline 2.0 GTS/Topline 4.0 GTS
- T2 GTS/T4 GTS
- Product of Germany
- Deutschland
- Congratulations on your purchase
- For the safety of your child
- Instructions
- Unfolding the pram
- Folding the pram
- Reversible handlebar
- Height adjustment of handlebar
- Sun hood
- Parking brake
- Adjusting the parking brake
- Adjust the handbrake (optional)
- Adjustable suspension system
- Hood and safety bar
- Automatic attachment locking 16
- WARNING!
- Adjusting the backrest
- Protection from falling out WARNING!
- Checking and care instructions
- Care of the fabric parts
- Care of the chassis
- For pneumatic tires
- Quality agreement
- YEARS WARRANTY
- IN CASE OF WARRANTY CLAIM
- THIS WARRANTY DOES NOT COVER ....
- WARRANTYCLAIM—YESORNO?
- WHAT TO REMEMBER WHEN BUYING YOUR PRAM
- WHAT TO DO IN CASE OF A COMPLAINT
- USE, CARE AND MAINTENANCE
- La France
- Topline 2.0 GTS / Topline 4.0 GTS / T2 GTS / T4 GTS
- O CEMU MORATE VODITI RACUNA PRILIKOM KUPNJE
- POSTUPAK KOD REKLAMACIJE
- IHCTPYKlIgI3 3ACTOCYBAHHI
- HanauTyBaHH pyHoro ranbMa (oniz)
- PeryIbObaHa nIdbicka roIdaKn
- Ko3npok i DbepuTa
- 3HATTA 3aHbOro KOneca (taKoX nepeHix KOnic Ha74)
- 3HATT pyxomnx KOIC (TINbKn dna T2)
- Konichn6ap'ep,po pyxaetbca (Tinbkn Dnla 72)
- KlimaTnHa 3oHa 17 y M'rkOMy daxy
- Pemih6e3neKNIONEPEJXEHHRA!
- Tpmau napacobkn 21
- PerykoBaHHn iNCTabKn dHir
- ABTomatuHm BepxHi Kicatop 16
- PeryIIOBaHHcnnHKn
- 3axnCTBID BUNaHINH NONEPEJXEHHA!
- IHCTPYKZIЯ NO INEPBIPZI TA DOIGIAY
- Dorra 3a TeKCTnblbHMMn DeTaNMa
- 06cnyrobyBaHHxOJIOBOiYactHn
- DnA mH
- TAPAHTIЯKOCTI
- POKI rapaHTII
- KoHn HadaeTbca rapaTtiHe 06cIyROByBaHHa
- IapaHTiHe 06cnyroByBaHHHe Hadaetbcra
- HA IIO TPE6A 3BEPHYN YBAY KYNYIOH KOJRACKY
- IOPOBNTUYPA3I BUNKHEHHCKAPT
- BHKOPNCTAHH,IOIJA TATEXHICHEOBCNYROBYAHHH
- SLO
- Slovenscina
- Hnctpykunno 3Kcnnyatau
- PacnaDbBaHne KOJACKN
- CKlaDbBaHne KOJACKN
- BpaueHne pyuKn
- Perynpyema npka
- CHRTME KOJEC
- TAPAHINHbIE O83ATEIbCTBA HE PACPPOCTPAHIOTCA:
- TapaHTnHbI cIyauH nn HET?
- Kak cneJeYeCe6a BcTeH BcLyuApe peknaMaun
- TapaHTnHbIe 6aTeJIbCTBa
- Ha cyto cIeJyET o6paTntb BnMaHne npn nokynke.
- IcnoIb3OBAHne, yXoI n o6cIyJxNBAHne.
- ΦOPMUYIAP KOHTPOJI IPN IOKYNIKE
- Polska
- GWARANCJA NIE OBEJMUJE...
Brand : HARTAN
Model : Topline 2.0 GTS
Category : Baby car seat