
POWDPGLWS1 - Lawn mower PowerPlus - Free user manual and instructions
Find the device manual for free POWDPGLWS1 PowerPlus in PDF.
| Product type | Cordless lawn mower |
| Brand | PowerPlus |
| Model | POWDPGLWS1 |
| Power supply | 20 V (Lithium-ion battery, not included) |
| Rotation speed | 2800 min⁻¹ |
| Cutting width | 340 mm |
| Grass catcher capacity | 30 L |
| Cutting height | 25-65 mm (5 positions) |
| Housing material | Plastic |
| Front wheel diameter | 140 mm |
| Rear wheel diameter | 170 mm |
| Sound pressure level | 63 dB(A) |
| Sound power level | 84 dB(A) |
| Vibration | 1.9 m/s² |
| Warranty | 36 months |
| Usage | Domestic |
| Functions | Collection, mulching (with plug) |
| Safety | Blade brake, safety key, automatic stop |
| Cleaning | Damp cloth and mild soap, avoid solvents |
| Spare parts | Replacement blade, battery, charger, grass catcher bag |
| General information | CE compliant, class III |
Frequently Asked Questions - POWDPGLWS1 PowerPlus
User questions about POWDPGLWS1 PowerPlus
0 question about this device. Answer the ones you know or ask your own.
Ask a new question about this device
Download the instructions for your Lawn mower in PDF format for free! Find your manual POWDPGLWS1 - PowerPlus and take your electronic device back in hand. On this page are published all the documents necessary for the use of your device. POWDPGLWS1 by PowerPlus.
USER MANUAL POWDPGLWS1 PowerPlus
FI·EL·HR·CS·SK·RO·PL·HU·RU·BG
LAWNMOWER - GRASMAIER TONDEUSE A GAZON - RASENMAHER CORTACESPED - RASAERBA
| NL | NEDERLANDS | VERTAALDE VERSIE VAN DE ORIGINELE HANDLEIDING |
| FR | FRANÇAIS | TRADUCTION DU MODE D'EMPLOI D'ORIGINE |
| EN | ENGLISH | ORIGINAL INSTRUCTION MANUAL |
| DE | DEUTSCH | ÜBERSETZUNG DER ORIGINALBETRIEBSANLEITUNG |
| ES | ESPÁÑOL | TRADUÇÃO DEL MANUAL DE INSTRUCCIONES ORIGINAL |
| IT | ITALIANO | TRADUÇÃO DEL MANUALE DI ISTRUZIONI ORIGINALE |
| PT | PORTUGUES | TRADUÇÃO DO MANUAL DE INSTRUÇões ORIGINAL |
| NO | NORSK | OVERSETTESE AV ORIGINAL BRUKERVEILEDNING |
| DA | DANSK | OVERSETTESE AF DEN ORIGINALE BRUGSVEJLEDNING |
| SV | SVENSKA | ÖVERSÄTTNING AV DEN URSPRUNGLIGA BRUKSANVISNINGEN |
| FI | SUOMI | ALKUPERAISEN OHJEKIRJAN KÄÄNNÖS |
| EL | Ελληνια | Μετάφραση του πρωτότυπου εγχεριδίου σθηγιών |
| HR | HRVATSKI | PRIJEVOD ORIGINALNOG PRIRUCNIKA S UPUTAMA ZARAD |
| CS | ČESKY | PREKLAD ORIGINÁLNÍHO NÁVODU K POUžITÍ |
| SK | SLOVENÇINA | PREKLAD NÁVODU NA POUžÍVANIE Z ORIGINALU |
| RO | ROMÁNÁ | TRADUCEREA MANUALULUI DE INSTRUCTIONIUNI ORIGINALE |
| PL | POLSKI | ΤΟUMACZENIE ORYGINALNEJ INSTRUKCJI OBSLUGI |
| HU | MAGYAR | AZ EREDETİ KEZELÉSI UTSİTÁS FORDİTÁSA |
| RU | PYSCKEN | ОПИГHAЛБНА ИНСТРУКЦА NOЗКПЛУATAÇИ |
| BG | ББЛГAPСКИ | ПЕВODΗ OПИГHAЛHOTO РБКOBODCTBO |
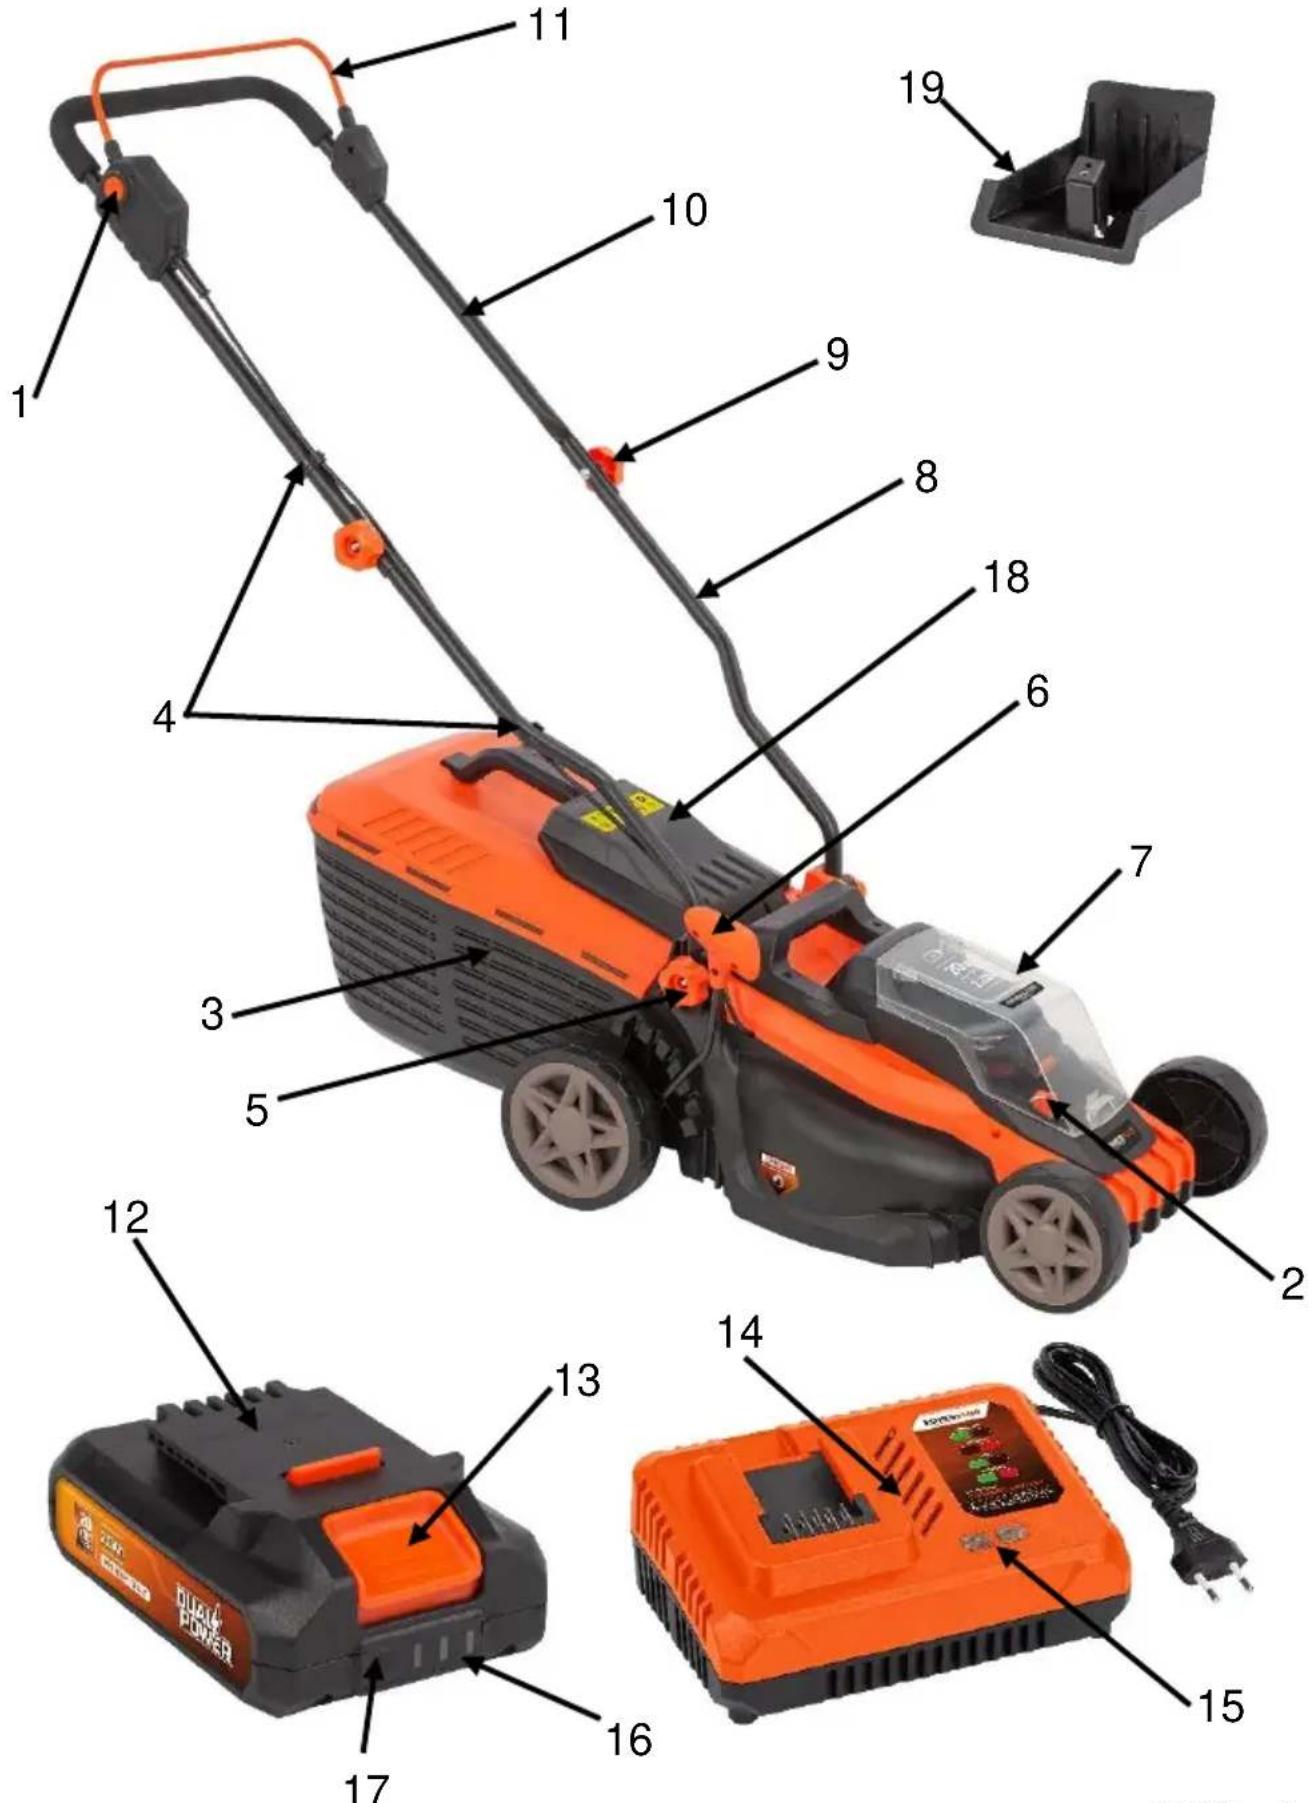
FIG. A
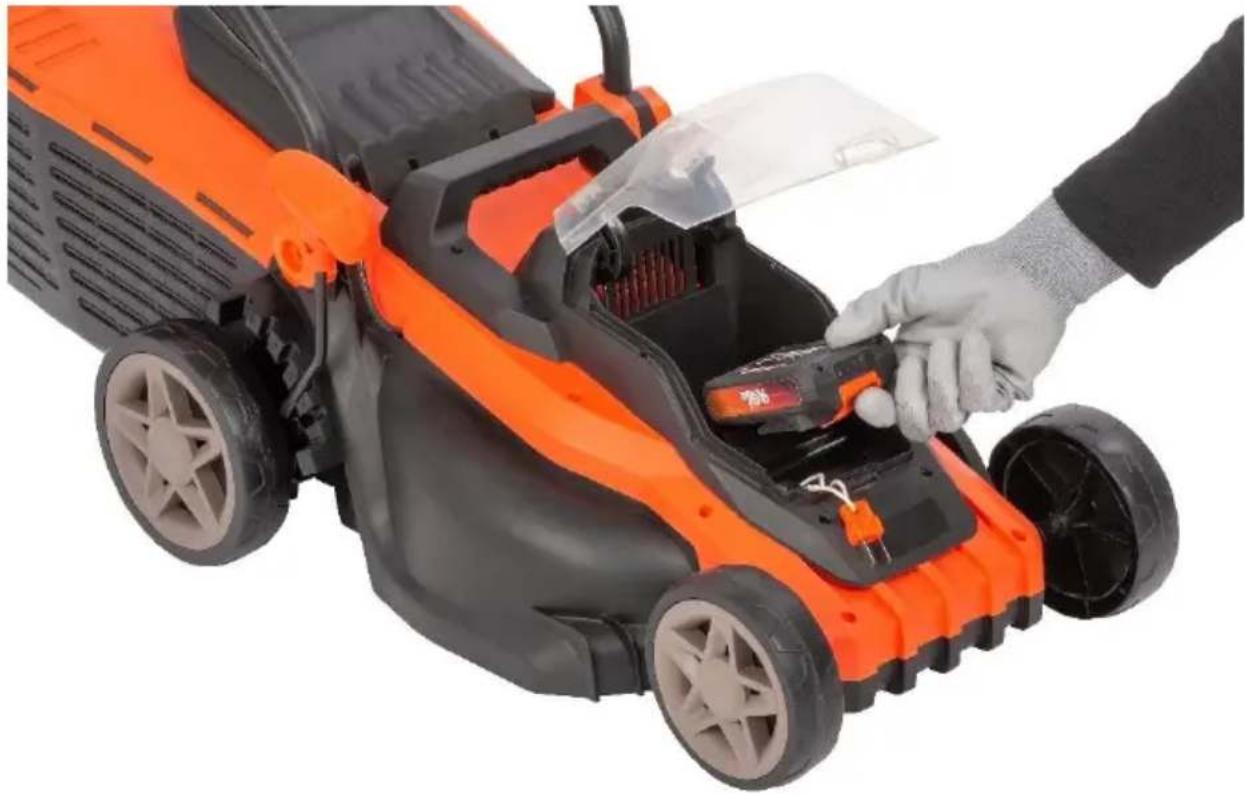
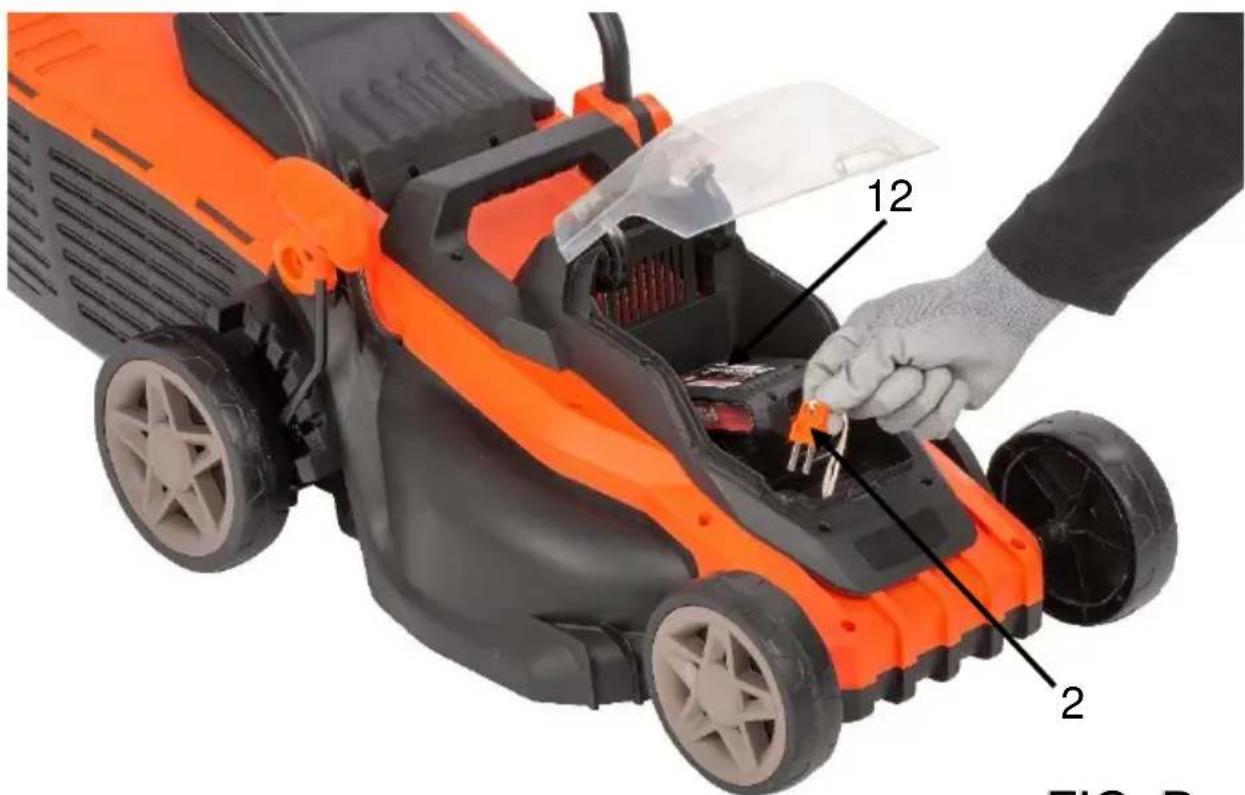
FIG. B
POWDPG75561
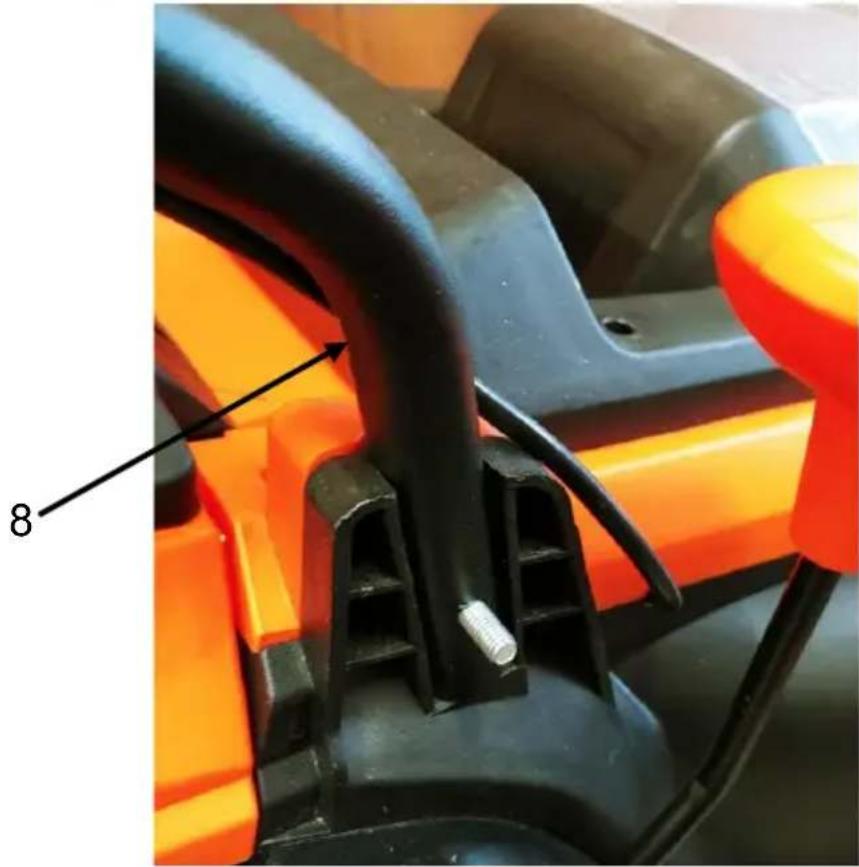
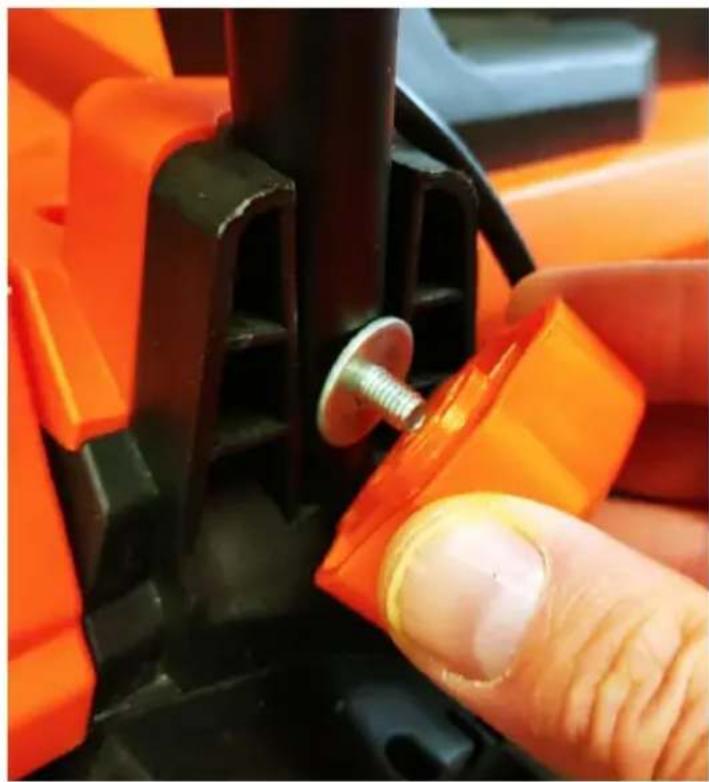
FIG. C
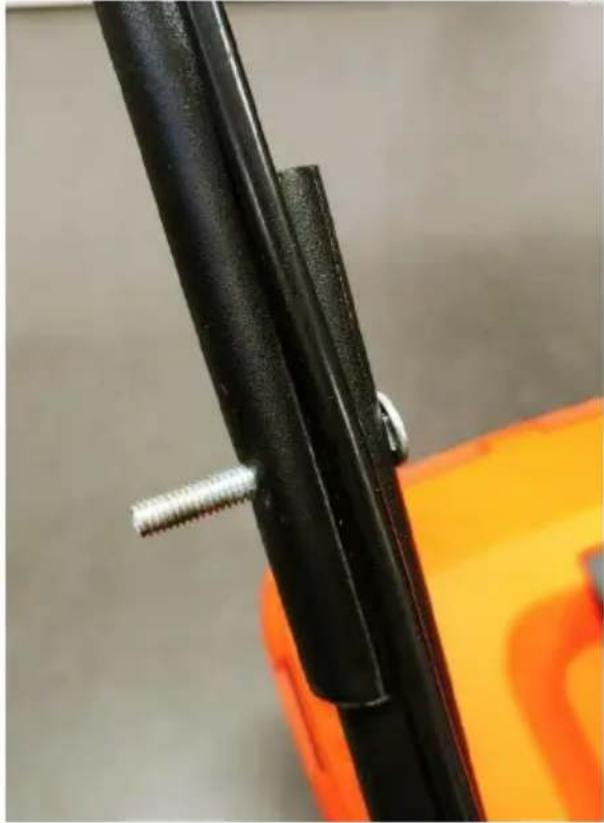
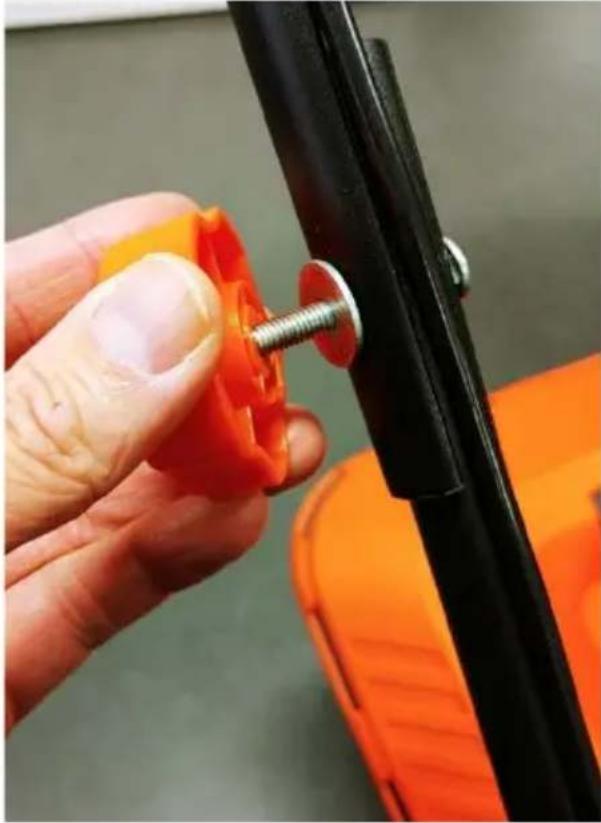
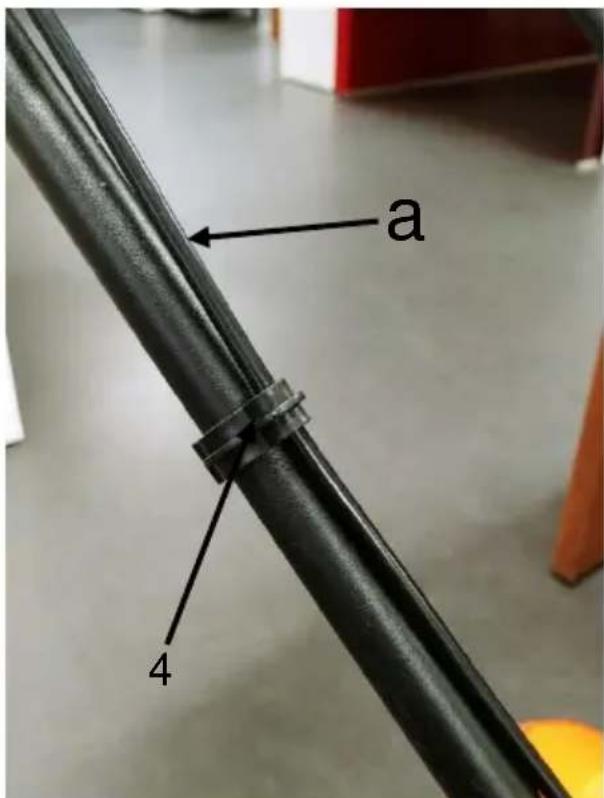
FIG. D
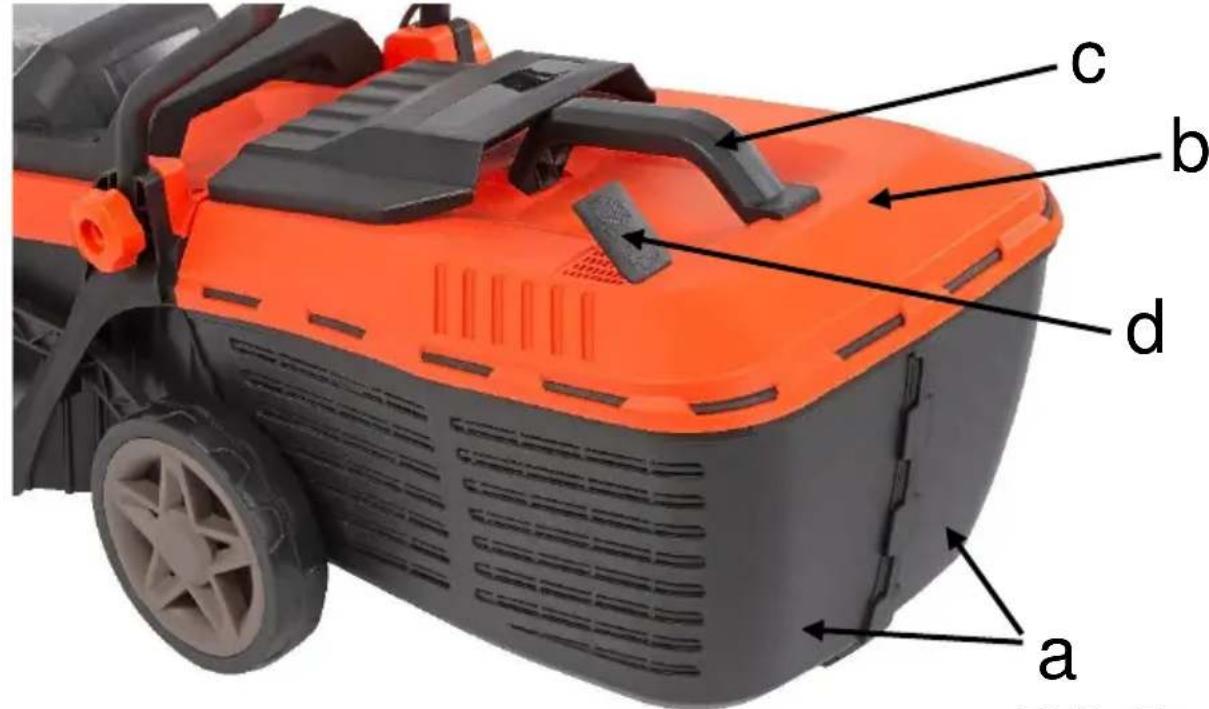
FIG. E
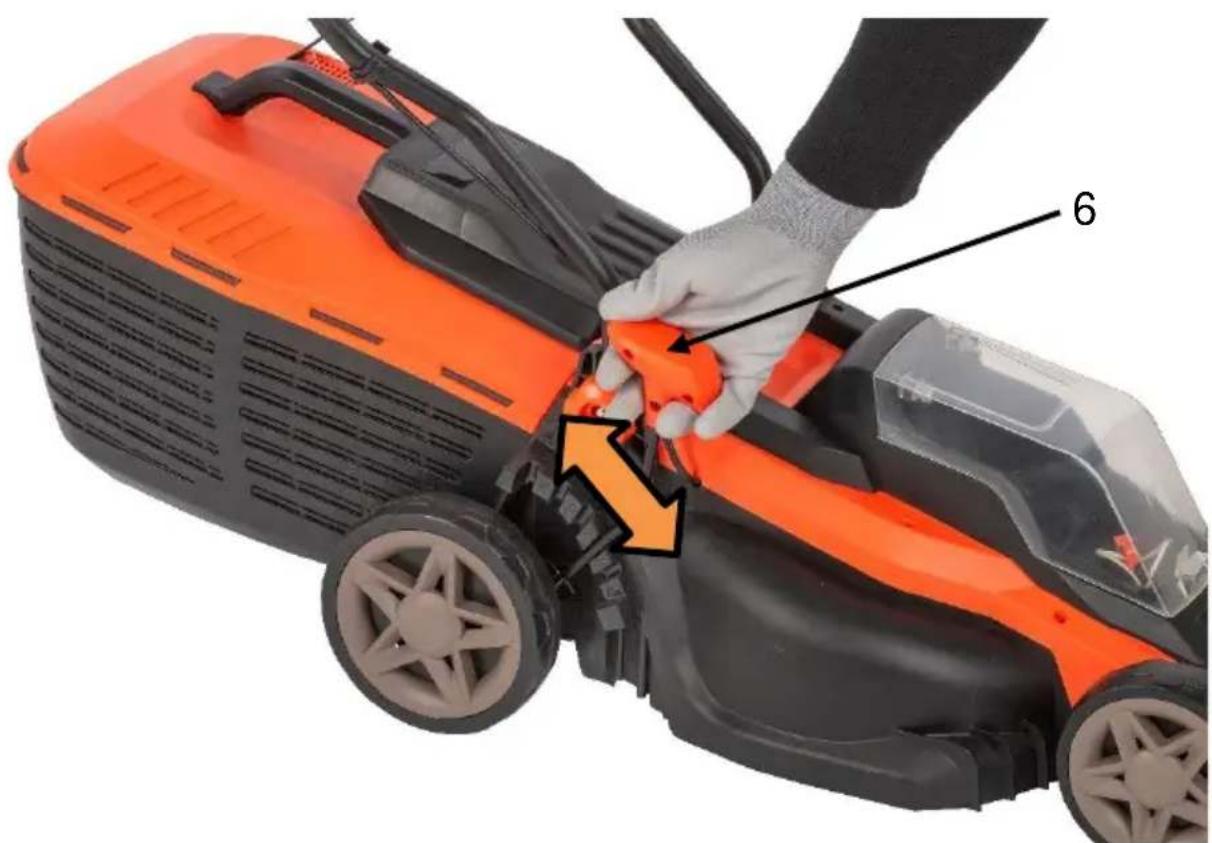
FIG. F
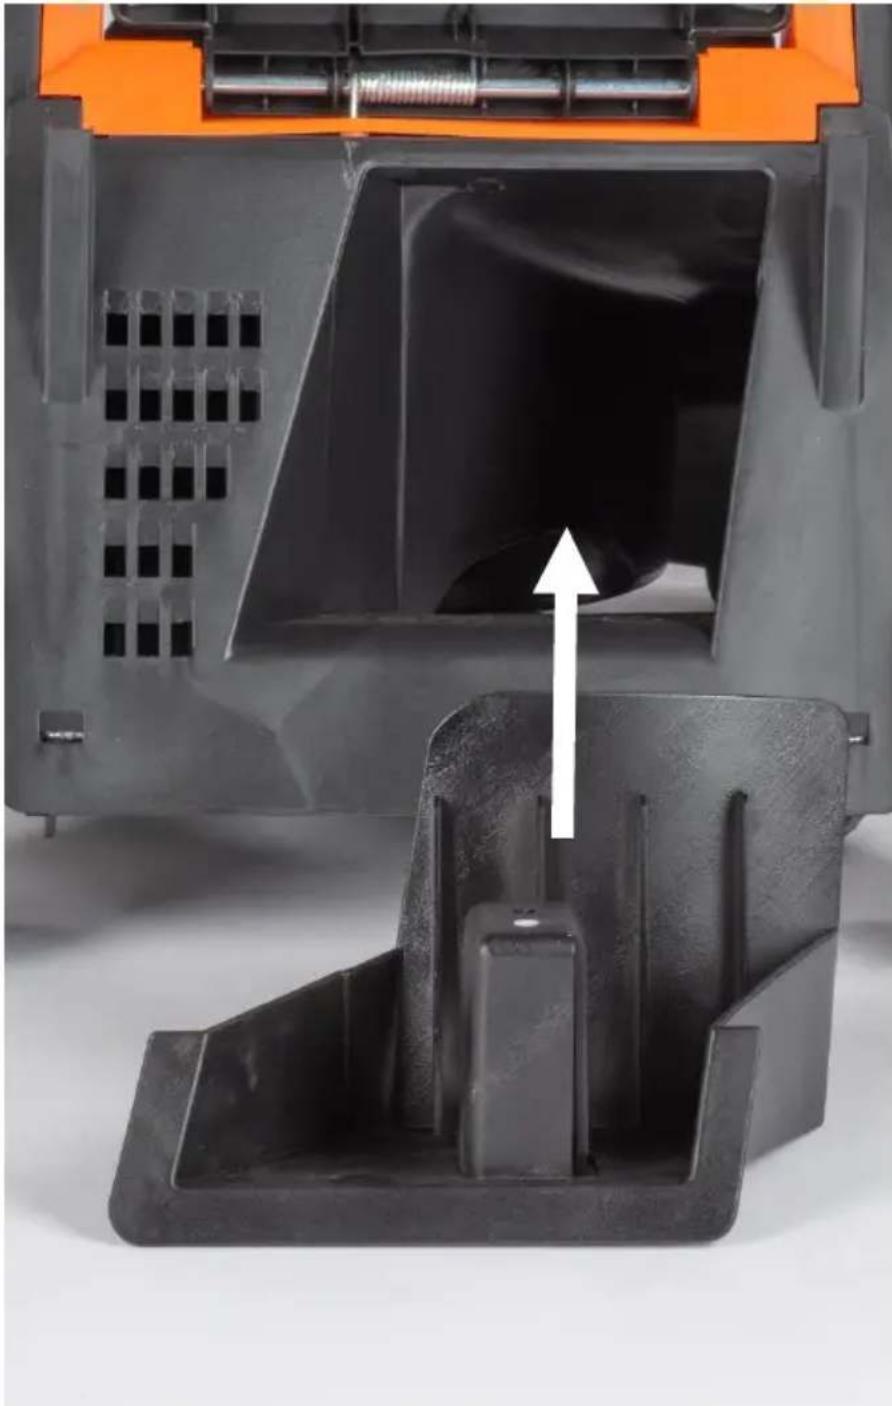
FIG. G
1 BEOOGD GEBRUK 3
2 BESCHRIJVING (FIG. A) 3
3 INHOUD 3
4 TOELICHTING VAN DE SYMBOLEN 4
5 ALGEMENE VEILIGHEIDSVOORSCHRIFTEN 5
5.1 Werkplaats 5
5.2 Elektrische verilgheit 5
5.3 Veiligheid van personen 5
5.4 Zorgvuldige omgang met en gebruik van elektrisch gereedschap.. 6
5.5 Service 6
6 BIJKOMENDE VEILIGHEIDSINSTRUCTIES VOOR GRASMAIERS
7 BIJKOMENDE VEILIGHEIDSINSTRUCTIES VOOR BATTERIJEN EN LADERS 8
7.1 Batterijen 8
7.2 Laders 9
2 BESCHRIJVING (FIG. A)
Certification Manager
20/10/2023, Lier - Belgium
Certification Manager
20/10/2023, Lier - Belgium
1 INTENDED USE 3
2 DESCRIPTION (FIG. A) 3
3 PACKAGE CONTENT LIST 3
4 SYMBOLS 4
5 GENERAL POWER TOOL SAFETY WARNINGS 5
5.1 Work area 5
5.2 Electrical safety 5
5.3 Personal safety 5
5.4 Power tool use and care 6
5.5 Service 6
6 ADDITIONAL SAFETY INSTRUCTIONS FOR LAWN MOWERS...6
7 ADDITIONAL SAFETY INSTRUCTIONS FOR BATTERIES AND CHARGERS 8
7.1 Batteries 8
7.2 Chargers 8
8 CHARGING AND INSERTION OR REMOVAL OF BATTERY.....8
8.1 Charger indicators (15)(Fig. A) 8
8.2 Insertion of battery (Fig. A & B). 9
8.3 To remove battery pack (Fig. A & B) 9
8.4 Battery capacity indicators (Fig. A) 9
9 ASSEMBLY 10
9.1 Handle assembly. 10
9.1.1 Mounting the lower handle. (Fig. A & C) 10
9.1.2 Assembly of the upper handle (Fig. A & D): 10
9.1.3 Guiding the power cable (Fig. A & D) 10
9.1.4 To lower the upper handle (Fig. A & D) 10
9.2 Grass box assembly (Fig. A & E) 10
9.3 Installing the grass box (Fig. A & B) 10
10 OPERATION 11
10.1 Starting/stopping the mower (Fig. A & B) 11
10.2 Setting blade height (Fig. A & F) 11
10.3 Grass box warning system (Fig. A & E) 11
10.4 Mulching (Fig. G) 11
11 CLEANING AND MAINTENANCE. 11
11.1 Cleaning 11
11.2 Blade maintenance 11
11.3 Replacing the blade 12
12 TECHNICAL DATA 12
13 NOISE 12
14 WARRANTY 13
15 ENVIRONMENT 13
16 DECLARATION OF CONFORMITY 14
LAWN MOWER 20V 340MMPOWDPG75561
1 INTENDED USE
The purpose of this lawn mower is to cut grass. This lawn mower has been designed for cutting grass areas in a domestic garden. Not suitable for professional use.

WARNING! For your own safety, read this manual and general safety instructions carefully before using the appliance. Your power tool should only be passed on together with these instructions.
2 DESCRIPTION (FIG. A)
-
Start button
-
Brake lever
-
Key
-
Battery pack (NOT INCLUDED)
-
Grass box
-
Battery pack release button
-
Cable clip
-
Charger (NOT INCLUDED)
-
Lower handle knob
-
Charger indicators
-
Height adjustment lever
-
Battery capacity indicator
-
Battery cover
-
Button for battery capacity indicator
-
Lower handle
-
Discharge door
-
Upper handle knob
-
Mulching plug
-
Upper handle
3 PACKAGE CONTENT LIST
- Remove all packaging materials.
- Remove remaining packing and package inserts (if included).
- Check that the package contents are complete.
- Check the appliance, the power cord, the power plug and all accessories for transportation damage.
- Keep the packing materials as long as possible till the end of the warranty period. Dispos it into your local waste disposal system afterwards.

WARNING: Packaging materials are not toys! Children must not play with plastic bags! Danger of suffocation!
1x lawn mower
1x key
2x grass box base
1x grass box top
1x grass box handle
2x cable clips
1x manual
2x bolt M6x40mm
2x washer
2x knob upper handle
2x lower handle tubes
1x mulching plug

If any parts are missing or damaged, please contact your dealer.
POWDPG75561 EN
4 SYMBOLS
In this manual and/or on the machine the following symbols are used:
| Denotes risk of personal injury or damage to the tool. | Read manual before use. | ||
| Keep bystanders away. | Warning! Flying objects! | ||
| Keep hands and feet away from sharp parts. | Switch off and remove isolator key before adjusting, cleaning and before leaving the product unattended for any period. | ||
| Indicates electrical shock hazard! | Never operate the machine in the rain or in damp or wet conditions. Moisture is an electrical shock hazard. | ||
| STOP | Wait until all machine components have completely stopped before touching them. The blades continue to rotate after the machine is switched off, a rotating blade can cause injury. | Wearing of eye protection advised. | |
| CE | In accordance with essential safety standards of applicable European directives. | class III - tool in which protection against electric shock relies on supply at safety extra-low voltage and in which voltages higher than those of safety extra-low voltages are not generated | |
| Wear gloves. | Wearing of protective shoes advised. | ||
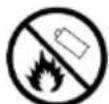
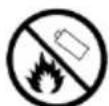
| MAX. 40°C | Do not expose charger and battery pack to water. | Do not incinerate the battery. | |
| Ambient temperature 40 °C max. (only for battery). | Use battery and charger only in closed rooms. | ||
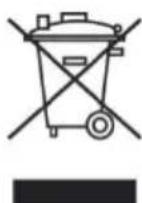
| Important information | Electrical products must not be disposed with the domestic waste. |
5 GENERAL POWER TOOL SAFETY WARNINGS

Read all safety warnings and all instructions. Failure to follow all warnings and instructions may result in electric shock, fire and/or serious injury. Save all warnings and instructions for future reference. The term "power tool" in the warnings refers to your mains operated (cored) power tool or battery operated (cordless) power tool.
5.1 Work area
- Keep work area clean and well lit. Cluttered and dark areas invite accidents.
- Do not operate power tools in explosive atmospheres, such as in the presence of flammable liquids, gases or dust. Power tools create sparks which may ignite the dust or fumes.
- Keep children and bystanders away while operating a power tool. Distractions can cause you to lose control.
5.2 Electrical safety
- Always check that the power supply corresponds to the voltage on the rating plate.
- Power tool plugs must match the outlet. Never modify the plug in any way. Do not use any adapter plugs with earthed (grounded) power tools. Unmodified plugs and matching outlets will reduce risk of electric shock.
- Avoid body contact with earthed or grounded surfaces such as pipes, radiators, ranges and refrigerators. There is an increased risk of electric shock if your body is earthed or grounded.
- Do not expose power tools to rain or wet conditions. Water entering a power tool will increase the risk of electric shock.
- Do not abuse the cord. Never use the cord for carrying, pulling or unplugging the power tool. Keep cord away from heat, oil, sharp edges or moving parts. Damaged or entangled cords increase the risk of electric shock.
- When operating a power tool outdoors, use an extension cord suitable for outdoor use. Use of a cord suitable for outdoor use reduces the risk of electric shock.
- If operating a power tool in a damp location is unavoidable, use a residual current device (RCD) protected supply. Use of an RCD reduces the risk of electric shock.
5.3 Personal safety
- Stay alert, watch what you are doing and use common sense when operating a power tool. Do not use a power tool while you are tired or under the influence of drugs, alcohol or medication. A moment of inattention while operating power tools may result in serious personal injury.
- Use safety equipment. Always wear eye protection. Safety equipment such as dust mask, non-skid safety shoes, hard hat, or hearing protection used whenever conditions require will reduce personal injuries.
- Avoid accidental starting. Ensure the switch is in the off position before plugging in. Carrying power tools with your finger on the switch or plugging in power tools that have the switch on invites accidents.
- Remove any adjusting key or wrench before turning the power tool on. A wrench or a key left attached to a rotating part of the power tool may result in personal injury.
- Do not overreach. Keep proper footing and balance at all times. This enables better control of the power tool in unexpected situations.
- Dress properly. Do not wear loose clothing or jewellery. Keep your hair, clothing and gloves away from moving parts. Loose clothes, jewellery or long hair can be caught in moving parts.
POWDPG75561 EN
If devices are provided for the connection of dust extraction and collection facilities, ensure these are connected and properly used. Use of these devices can reduce dust related hazards.
5.4 Power tool use and care
- Do not force the power tool. Use the correct power tool for your application. The correct power tool will do the job better and safer at the rate for which it was designed.
- Do not use the power tool if the switch does not turn it on and off. Any power tool that cannot be controlled with the switch is dangerous and must be repaired.
- Disconnect the plug from the power source before making any adjustments, changing accessories, or storing power tools. Such preventive safety measures reduce the risk of starting the power tool accidentally.
- Store idle power tools out of the reach of children and do not allow persons unfamiliar with the power tool or these instructions to operate the power tool. Power tools are dangerous in the hands of untrained users.
- Maintain power tools. Check for misalignment or sticking of moving parts, breakage of parts and any other condition that may affect the power tool's operation. If damaged, have the power tool repaired before use. Many accidents are caused by poorly maintained power tools.
- Keep cutting tools sharp and clean. Properly maintained cutting tools with sharp cutting edges are less likely to stick and are easier to control.
- Use the power tool, accessories and tool bits etc., in accordance with these instructions and in the manner intended for the particular type of power tool, taking into account the working conditions and the work to be performed. Use of the power tool for operations different from intended could lead to a hazardous situation.
5.5 Service
- Have your power tool serviced by a qualified person using only identical replacement parts. This will ensure that the safety of the power tool is maintained.
6 ADDITIONAL SAFETY INSTRUCTIONS FOR LAWN MOWERS
- This device should not be used by children. Children should be supervised to ensure that they do not play with the appliance. Cleaning and maintenance may not be performed by children.
- This unit can be used by persons with reduced physical, sensory or mental capabilities, or lack of experience and knowledge, on condition that they have been given supervision or instruction concerning the safe use of the equipment and understand the resulting risks.
- Familiarize yourself with the instructions and the proper use of the machine.
- Avoid wearing loose clothing or clothing with hanging cords or belts.
- Worn or damaged parts must be replaced.
- Be especially careful when turning the mower around and when pulling it towards you.
- Do not start the engine when the grass bag is not installed.
- Be aware that on machines with multiple cutting blades, the movement of a cutting diameter can lead to rotations of the other blades on it.
- When adjusting the machine make sure that no fingers are trapped between moving cutting knives and fixed parts of the machine.
- Allow the engine to cool before storing machine.
- When servicing the cutting blade, note that even if the power supply is switched off, the blades can still be moving.
- Replace worn or damaged parts for safety. Use only original spare parts and accessories.
- The machine should be operated with a tripping current not exceeding 30mA via a residual current device (RCD).
- Never allow children or people unfamiliar with these instructions to use the lawnmower. Local regulations may restrict the age of the operator.
POWDPG75561 EN
- Never mow while people, especially children or pets, are nearby.
- The operator or user is responsible for accidents or hazards occurring to other people or their property.
- Do not operate the lawnmower when barefoot or wearing open sandals, always wear substantial footwear and long trousers.
- Thoroughly inspect the area where the lawnmower is to be used and remove all stones, sticks, wires, bones and other foreign objects.
- Before using, always visually inspect to see that the blades, blade bolts and cutter assembly are not worn or damaged.
- Replace worn or damaged blades and bolts in sets to preserve balance.
- Mow only in daylight or in good artificial light.
- Avoid operating the lawnmower in wet grass, where feasible.
- Walk, never run.
- Never operate the appliance with defective guards or shields, or without safety device, for example deflectors and/or grass catchers in place.
-
Mowing on banks can be dangerous:
-
Do not mow excessively steep slopes.
- Always be sure of your footing on slopes or wet grass.
- Mow across the face of slopes - never up and down.
Exercise extreme caution when changing direction on slopes. - Use extreme caution when stepping back or pulling the lawnmower towards you.
-
Never mow by pulling the mower towards you.
-
Stop the blades if the lawnmower has to be tilted for transportation when crossing surfaces other than grass and when transporting the lawnmower to and from the area to be mowed.
- Do not tilt the machine when starting or switching on the motor, except if the machine has to be tilted for starting in long grass. In this case, do not tilt it more than absolutely necessary and tilt only the part which is away from the operator. Always ensure that both hands are in the operating position before returning the machine to the ground.
- Switch on the lawnmower according to instructions and with feet well away from the blades.
- Do not put hands or feet near or under rotating parts.
- Keep clear of discharge opening at all times.
- Never pick up or carry the lawnmower while the motor is running.
- Make sure that all moving parts have come to a complete stop.
whenever you leave the mower;
- before you remove blockages or clear blockages in the ejection channel:
before checking, cleaning or working on the mower;
- when a foreign object is hit. Look for damage to the lawn mower and perform the necessary repairs before restarting and operating the mower.
-
If the lawnmower starts to vibrate abnormally, an immediate check is required.
-
check for obstructions:
- perform the necessary repairs on damaged parts;
-
make sure that all nuts, bolts and screws are tightened.
-
Keep all nuts, bolts and screws tight to be sure that the lawnmower is in safe working condition.
- Check the grass catcher frequently for wear or deterioration.
- Replace worn or damaged parts for safety.
7 ADDITIONAL SAFETY INSTRUCTIONS FOR BATTERIES AND CHARGERS

Use only batteries and chargers applicable for this machine.
7.1 Batteries
-
Never attempt to open for any reason.
-
Do not store in locations where the temperature may exceed 40^ .
-
Charge only at ambient temperatures between 4^ and 40^ .
-
Store your batteries in a cool dry place (5^ - 20^) . Never store batteries in discharged state.
It is better for Li-ion batteries to discharge and reload them regularly (at least 4 times a year). The ideal charge for long-term storage of your Li-ion battery is 40% of capacity.
-
When disposing of batteries, follow the instructions given in the section "Protecting the environment".
-
Do not cause short circuits. If connection is made between the positive (+) and negative (-) terminal directly or via accidental contact with metallic objects, the battery is short circuited and an intense current will flow causing heat generation which may lead to casing rupture or fire.
-
Do not heat. If batteries are heated to above 100^ , sealing and insulating separators and other polymer components may be damaged resulting in electrolyte leakage and/or internal short circuiting leading to heat generation causing rupture or file. Moreover do not dispose of the batteries in fire, explosion and/or intense burning may result.
-
Under extreme conditions, battery leakage may occur. When you notice liquid on the battery, proceed as follows:
-
Carefully wipe the liquid off using a cloth. Avoid skin contact.
-
In case of skin or eye contact, follow the instructions below:
-
Immediately rinse with water. Neutralize with a mild acid such as lemon juice or vinegar.
In case of eye contact, rinse abundantly with clean water for at least 10 minutes. Consult a physician.
Do not incinerate the battery.
7.2 Chargers
- Never attempt to charge non-rechargeable batteries.
- Have defective cords replaced immediately.
- Do not expose to water.
- Do not open the charger.
- Do not probe the charger.
- The charger is intended for indoor use only.
8 CHARGING AND INSERTION OR REMOVAL OF BATTERY
8.1 Charger indicators (15)(Fig. A)
- Connect the charger (14) to the power outlet socket:
Solid green: ready to charge. - Flickering red: charging.
Solid green: charged.
Solid green and red: battery or charger damaged.
POWDPG75561 EN

Note: if the battery does not fit properly, disconnect it and confirm that the battery pack is the correct model for this charger as shown on the specification chart. Do not charge any other battery pack or any battery pack that does not securely fit the charger.
- Frequently monitor the charger and battery pack while connected.
- Unplug the charger and disconnect it from the battery pack when finished.
- Allow the battery pack to cool completely before using it.
- Store the charger and battery pack indoors, out of reach of children.

NOTE: If battery is hot after continuous use in the tool, allow it to cool down to room temperature before charging. This will extend the life of your batteries.
8.2 Insertion of battery (Fig. A & B)

WARNING Always remove battery pack (12) and key (2) from your tool when you are assembling parts, making adjustments, cleaning, or when not in use. Removing battery pack and key will prevent accidental starting that could cause serious personal injury.
- Raise the battery cover (7).
- Place the battery pack (12) in the mower.
Align raised ribs on battery pack with grooves in the mower's battery port. - Push down into battery compartment until the battery clicks into place.
- Lower the battery cover.

WARNING Make sure the latch on the top of the battery pack snaps in place and the battery pack is fully seated and secure in the mower's battery port before beginning operation. Failure to securely seat the battery pack could cause the battery pack to fall out, resulting in serious personal injury.
8.3 To remove battery pack (Fig. A & B)
- Raise the battery cover (7).
- Press and hold the battery latch button (13) at the top of the battery pack.
- Remove battery pack from the mower.

WARNING: To avoid serious personal injury, always remove the battery pack and key when carrying or transporting the tool.
8.4 Battery capacity indicators (Fig. A)
- There are battery capacity indicators (16) on the battery pack, you can check the capacity status of the battery if you squeeze the button (17). Before using the machine, please press switch trigger to check if the battery is full enough for properly working.
- Those 3 LED's show the status of the capacity level of the battery:
3 LED's are litt: Battery fully charged.
2 LED's are litt: Battery 60% charged.
1 LED is litt: Battery almost discharged.
9 ASSEMBLY
9.1 Handle assembly
9.1.1 Mounting the lower handle. (Fig. A & C)
- Remove the locking knob(5) and washer on both sides, located above the rear wheels
- Slide the lower handle (8) over the mounting bolts located above the rear wheels.
- Slide the washers over the bolts.
- Fasten the handle with the locking knobs (5).
9.1.2 Assembly of the upper handle (Fig. A & D):
- Insert one long mounting bolt through the opening at one side of the lower handle(8), with the end facing outwards.
- Place the upper handle(10) over the end of the bolt, install washer and upper handle knob(9).
- At the opposite side, lign up the holes of the upper(10) and lower(8) handle and mount the other long bolt.
- Install washer and upper handle knob(9). Tighten both knobs.

NOTE: If the lower handle (8) is loose or does not seat completely in the slot, turn the lower handle locks clockwise to secure the handle.
9.1.3 Guiding the power cable (Fig. A & D)
- Guide the power cable on top of the lower and upper handlebars using the supplied cable clips (4).

Caution: the power cable (a) must always be positioned on top of the handlebar. This provides free movement of the cable on top of the lower section, when the handle is folded. Incorrect mounting of the cable could lead to damaging and/or straining it, resulting in a malfunction of the machine. In this case the guarantee is void.
9.1.4 To lower the upper handle (Fig. A & D)
- Loosen the upper handle knobs (9) until the handle (10) can rotate easily.
- Fold the upper handle forward, the mower is now more compact for storage.
9.2 Grass box assembly (Fig. A & E)
The grass box (3) comes in 3 separate parts and needs to be assembled.
- Put the lower part (a) on a flat surface and fit the top part (b) in place.
- Make sure all connecting parts snap firmly together.
- Fit the handle (c) to the top part in the same way.
9.3 Installing the grass box (Fig. A & B)
- Remove key (2) and battery pack (12).
- Lift the rear discharge door (18).
- Lift the grass box by its handle and place under the rear discharge door so that the hooks on the grass box are seated onto the slots on the mower housing.
- Release the rear discharge door (18).
- Reinstall key and battery pack when you are ready to mow.
10 OPERATION
10.1 Starting/stopping the mower (Fig. A & B)
- Raise the battery cover (7).
Install battery pack (12). - Insert the key (2) into the key hole.
- Lower the battery cover (7).
- Press and hold the start button (1). Pull the brake lever (11) toward the handle and release the button to start the mower.
- To stop the mower, release the brake lever (11).
10.2 Setting blade height (Fig. A & F)
When shipped, the wheels on the mower are set to a low-cutting position. Before using the mower for the first time, raise the cutting position to the height best suited for your lawn.
- Remove key (2) and battery pack (12).
To raise the blade height, grasp the height adjustment lever (6) and move it toward the back of the mower. - To lower the blade height, grasp the height adjustment lever (6) and move it toward the front of the mower.
- Reinstall key (2) and battery pack (12) when you are ready to mow.
10.3 Grass box warning system (Fig. A & E)
There is a warning piece (d) in the grass box which will indicate the grass volume.
If the flap (d) is open it means that there is still space for grass collection.
If the flap (d) is closed it means that there is no space for grass collection.
- Grass catcher warning system doesn't function when height setting adjustment is set to the lowest position!
10.4 Mulching (Fig. G)
Your lawn mower can also be used for mulching. To do so, install the mulching plug :
- Raise the discharge door and remove the grass box.
- Push the mulching plug into the deck. Lock it tightly in its position.
Lower the discharge again.
11 CLEANING AND MAINTENANCE
11.1 Cleaning
- Keep all safety devices, air vents and the motor housing free of dirt and dust as far as possible. Wipe the equipment with a clean cloth or blow it with compressed air at low pressure.
We recommend that you clean the device immediately each time you have finished using it. - Clean the equipment regularly with a moist cloth and some soft soap.
- Do not use cleaning agents or solvents; these could attack the plastic parts of the equipment. Ensure that no water can seep into the device.

Never use solvents such as petrol, alcohol, ammonia water, etc. These solvents may damage the plastic parts.
11.2 Blade maintenance
- Regularly remove grass and dirt from the blade.
-
At the beginning of the gardening season, carefully examine the condition of the blade.
If the blade is very blunt, sharpen or replace the blade.
If the blade is damaged or worn, fit a new blade. -
If the blade is slipping, put the screwdriver into the location hole, tighten the blade by wrench.

Warning! Observe the following precautions:
- Be careful not to cut yourself. Use heavy-duty gloves or a cloth to grip the blade.
- Only use the specified replacement blade.
- Do not remove the impeller for any reason.
11.3 Replacing the blade

For safety reasons, we recommend having the blade replaced by an authorized professional.

Important: Wear work gloves!
12 TECHNICAL DATA
| Type | POWDPG75561 |
| Voltage | 20 V |
| Rotation speed | 2800 min-1 |
| Cutting width | 340 mm |
| Collect box | 30 l |
| Cutting height | 25-65 mm |
| Material housing | Plastic |
| Number of height positions | 5 |
| Diameter front wheel | 140 mm |
| Diameter rear wheel | 170 mm |
| Top carrying handle | Yes |
| Foldable handle | Yes |
| Grass box | Yes |
13 NOISE
Noise emission values measured according to relevant standard. (K = 3)
Acoustic pressure level LpA
63dB(A)
Acoustic power level LwA
84dB(A)

ATTENTION! Wear hearing protection when sound pressure is over 85 dB(A).
aw (Vibration)
1.9m/s²
K = 1.5m / s^2
POWDPG75561 EN
14 WARRANTY
This product is warranted for a 36-month period effective from the date of purchase by the first user.
-
This warranty covers all material or production flaws excluding : batteries, chargers, defective parts subject to normal wear & tear such as bearings, brushes, cables, and plugs, or accessories such as drills, drill bits, saw blades, etc. ; damage or defects resulting from maltreatment, accidents or alterations: nor the cost of transportation.
-
Damage and/or defects resulting from inappropriate use also do not fall under the warranty provisions.
We also disclaim all liability for any bodily injury resulting from inappropriate use of the tool.
-
Repairs may only be carried out by an authorised customer service centre for Powerplus tools.
-
You can always obtain more information at the number 00 32 3 292 92 90.
-
Any transportation costs shall always be borne by the customer, unless agreed otherwise in writing.
-
At the same time, no claim can be made on the warranty if the damage of the device is the result of negligent maintenance or overload.
-
Definitely excluded from the warranty is damage resulting from fluid permeation, excessive dust penetration, intentional damage (on purpose or by gross carelessness), inappropriate usage (use for purposes for which the device is not suitable), incompetent usage (e.g. not following the instructions given in the manual), inexpert assembly, lightning strike, erroneous net voltage. This list is not exhaustive.
-
Acceptance of claims under warranty can never lead to the prolongation of the warranty period nor commencement of a new warranty period in case of a device replacement.
Devices or parts which are replaced under the warranty therefore remain the property of Varo NV.
-
We reserve the right to reject a claim whenever the purchase cannot be verified or when it is clear that the product has not been properly maintained. (Clean ventilation slots, carbon brushes serviced regularly, etc.).
-
Your purchase receipt must be kept as proof of date of purchase.
-
Your appliance must be returned undismantled to your dealer in an acceptably clean state, (in its original blow-moulded case if applicable to the unit), accompanied by proof of purchase.
-
Your tool must be charged at least 1x per month to ensure optimal operation of this tool.
15 ENVIRONMENT
Should your appliance need replacement after extended use, do not dispose of it with the household refuse, but in an environmentally safe way.
Waste produced by electrical machine items should not be handled like normal household rubbish. Please recycle where recycle facilities exist. Check with your Local Authority or retailer for recycling advice.
16 DECLARATION OF CONFORMITY

varo
VARO - Vic. Van Rompuy N.V. - Joseph Van Instraat 9 - BE2500 Lier - BELGIUM, solely declares that,
Product: LAWN MOWER - BATTERY OPERATED
Trade mark: PowerPlus
Model:POWDPG75561
is in conformity with the essential requirements and other relevant provisions of the applicable European Directives/Regulations, based on the application of European harmonized standards. Any unauthorized modification of the apparatus voids this declaration.
European Directives/Regulations (including, if applicable, their amendments up to the date of signature):
2011/65/EU
2006/42/EC
2014/30/EU
2000/14/EC Annex VI LwA
Measured 84dB(A)
Guaranteed 86dB(A)
Notified Body TUV SUD - 0036
European harmonized standards (including, if applicable, their amendments up to the date of signature):
EN60335-1:2012
EN60335-2-77:2010
ENIEC55014-1:2021
EN IEC55014-2:2021
Keeper of the Technical Documentation : Philippe Vankerkhove, VARO - Vic. Van Rompuy N.V.
The undersigned acts on behalf of the company CEO,
Mertens Ludo
Ludo Mertens
Certification Manager
20/10/2023, Lier - Belgium
POWDPG75561 DE
Certification Manager
20/10/2023, Lier - Belgium
1 USO PREVISTO 3
2 DESCRIPCION (FIG. A) 3
3 CONTENIDO DE LA CAJA 3
4 SIMBOLOS 4
5 ADVERTECIAS GENERALES EN MATERIALA DE SEGURIDAD . 5
Certification Manager
20/10/2023, Lier - Belgium
Certification Manager
20/10/2023, Lier - Belgium
Notified Body TUV SUD-0036
Certification Manager
20/10/2023, Lier - Belgium
1 TILTENKT BRUK 3
2 BESKRIVELSE (FIG. A) 3
3 PAKKENS INNHOld 3
4 SYMBOLER. 4
5 GENERELLE SIKKERHETSFORSKRIFTER 5
5.1 Arbeitsplassen 5
5.2 Elektrisk sikkerhet 5
5.3 Personsikkerhet 5
5.4 Vær noyaktig og omhyggelig nár du omgås elektroverktoy 6
5.5 Service 6
11 RENGJØRING OG VEDLIKEHOLD
11.1 Rengjoring
Bruk参加会议, but he was not able to speak. Bruk woke up and looked at the man who had spoken to him. "I'm sorry for it," he said, his voice softening.
20/10/2023, Lier - Belgium
Certification Manager
20/10/2023, Lier - Belgium
20/10/2023, Lier - Belgium
Certification Manager
20/10/2023, Lier - Belgium
1 IPOBAENOMENH XPHSH 3
2 IEPIRPAΦH (EIK. A) 3
3 AISTA INPEIEXOMENQN YZKEYAIAE 3
4 SYMBOAA 4
5 TENIKEΣ ΣYMBOYΛΕΣ ΓΙA THN AΣΦΑΛΕΙA 5
5.1 Xwpoc epyaia
5.2 Hεκτρικήσφάλεια 5
5.3 Atoiikn aovpaleia 6
5.4 PpOeKtIKoC XepiOaOc Kai xpnoT wv nEeKtpikw epyaIew 6
5.5 7
6 IPOsOETeOADHIEAΦAAEIAEIGA XAOOKONTIKEe MHXANE
7 IPOsOETE OAHIGE AΦAIAIg IIA MNATAPIEKAI FOPTIeE
7.1 Mparapiεs
7.2 9
8 ΦOPTIeH KAI EIArOΓH H AΦAIPeEH THE MNATAPIAE.....10
8.1 Evεiεic φορπη (15) (Eik. A). 10
8.2 Eioaywn nC mparapiaac (Eik.A & B) 10
8.3 Aqaiopoeon nC umarapiae (Eik. A & B) 11
8.4 ik s k a a i (Eik.A) 11
9 SYNAPMOAOH
9.1 11
9.1.1 Σερεωηn tnc kατω λαβής (Eik. A & C) 11
9.1.2 SuvaipouAoynon Tou πavu TuHuaToc TcAaBnc (Eik.A & D) 11
9.1.3 Oshynon Tou kawoiou eupatoe (Eik.A & D) 11
9.1.4 Xaunawua Tns Tavw Aabns (Eik.A & D). 12
9.2 v a p o o y n u k i i o u (E i k, A \& E) 12
9.3 Tonoettno tou ouuAektn ypaoiou (Eik.A & B) 12
10 AEITOYPIA 12
10.1 Evapn/iaKoTn λeIoupyiac Xlookotnikou (Eik.A & B) 12
10.2 Póthiôn χρούς λεπίδας (Eik. A & F) 12
10.3 2oTnma npoeiDOnoiinogyraov ouAaleKtng ypaoiDiou (Eik.A & E) 13
10.4 E8aΦokαλuψη (Eik. G) 13
11 KAOAPIEMOe KAI SYNTHPHsH 13
11.1 Kaopipouos 13
11.2 13
11.3 Avrikarataaon nS i a 13
12 TEXNIKA XAPAKTHPIETIKA 14
13 0OPYBOE 14
14 ERTYHSEH 14
15 IEPIBAMON 15
16 16
XAOOKONTIKH MHXANH 20V 340MMPOWDPG75561
1 PPOBÄENOMENH XPHΣH
AutoTo Tpoiov TpoopiciEaI yia To KoUpeMa ypaoiDiou oikiw. AkatalAnlo yia ETTayyEmaTikn XpnoI.

IPOEIOIHsH! Napakaloue diaaote TPOoEKtikto EYxepidio Xpnoans PIV aTTo th xponkai quale To yia va avatpeXe OE auto oTo eAov.Eavetabaoetee auto To nAektpko epyaleio,napadwote maKi kai TIG odnyiecs Xpnoans.
2 ΠΕΡΑΦH (EIK. A)
Certification Manager
20/10/2023, Lier - Belgium
1 NAMJENA 3
2 OPIS (SLIKA A) 3
3 POPISSADRZAJAPAKETA 3
4 SIMBOLI 4
5 OPCA UPOZORENJA O ELEKTRICNIM ALATIMA. 5
5.1 Područje za rad 5
5.2 Elektricna sigurnost 5
5.3 Osobna sigurnost 5
5.4 Koristenje i odrzavanje elektricnog alata 6
5.5 Servis 6
6 DODATNE SIGURNOSNE UPUTE ZA KOSILICE. 6
7 DODATNE SIGURNOSNE UPUTE ZA BATERIJE I PUNJACE ....8
7.1 Baterije 8
7.2 Punjači 8
8 PUNJENJE IUMETANJE ILI UKLANJANE BATERIJE. 8
8.1 Indikacione punjaça (15) (sika A) 8
8.2 Umetanje baterije (slike A i B) 9
8.3 Za uklanjanje baterijskog paketa (slike A i B) 9
8.4 Indikator kapaciteta baterije (slika A) 9
9 SASTAVLJANJE 10
9.1 Sklapanje ruache 10
9.1.1 Ugradnja donje ručke (slike A i C) 10
9.1.2 Sklapanje gornjeg rijeka ručke (slike A i D): 10
9.1.3 Provlacenje kabela za napajanje (slika A i D) 10
9.1.4 Za spustanje gornje ručke (slike A i D) 10
9.2 Sklapanje kutije za travu (slike A i E) 10
9.3 Postavljanje hvatača trave (slike A i B) 10
10 KORISTENJE 11
10.1 Pokretanje/zaustavljanje kosilice (slike A i B) 11
10.2 Postavljanje visine ostrice (slike A i F) 11
10.3 Sustav upozorenja na kutiji za travu (slike A i E) 11
10.4 Malciranje (sika G) 11
11 CIscENJE I ODRZAVANJE 11
11.1 Cijscenje.. 11
11.2 Održavanje noža 11
11.3 Zamjena noza 12
12 TEHNICKI PODACI 12
13 BUKA 12
14 JAMSTVO. 13
15 OKOLIS 13
16 IZJAVA O SUKLADNOSTI 14
KOSILICA ZA TRAVNJAKE 20V 340MMPOWDPG75561
1 NAMJENA
Certification Manager
20/10/2023, Lier - Belgium
1 OBLASTPOUZITI 3
2 POPIS (OBRAZEK A) 3
3 OBSAH BALENI 3
4 SYMBOLY 4
5 OBECNÁ BEZPEČNOSTNI UPOZORNÉNÍ PRO ELEKTRICKÉ STROJE. 5
20/10/2023, Lier - Belgium
1 ZAMYSLANEPOUZITIE 3
2 POPIS (OBR. A) 3
3 OBSAH BALENIA 3
4 SYMBOLY 4
5 VŠEOBECNÉ BEZPEČNOSTNÉ VAROVANIA PRE ELEKTRICKÉ NÁRADIE. 5
Certification Manager
20/10/2023, Lier - Belgium
1 UTILIZARE PREVÄZUTÄ 3
2 DESCRIERE (FIG. A) 3
3 CONTINUTUL PACHETULUI 3
4 SIMBOLURI 4
5 AVERTISMENTE GENERALE DE SIGURANÀ PRIVIND
APARATELE ELECTRICE 5
5.1 Zona de lucru 5
5.2 Siguranta electrica 5
5.3 Siguranta personala 5
5.4 Folosirea 山 intretinerea aparatului electric.. 6
5.5 Service 6
6 INSTRUCTION DE SIGURAN T A SUPPLEMENTARE PENTRU MA SINILE DE TUNI IARBA 6
7 INSTRUCTION SUI SUPPLEMENTARE DE SIGURAN T A PENTRU ACUMULATORI S I INCARCA TOARE 8
7.1 Accumulatorii 8
7.2 Incarcatoare 8
8 INCARCArea, INTRODUCEREA SAU SCOATEREA ACUMULATORULUI. 9
Certification Manager
20/10/2023, Lier - Belgium
1 PRZEZNACZENIE 3
2 OPIS (RYC. A) 3
3 SPIS CZESCI 3
4 OZNACZENIA 4
5 OGOLNE ZASADY BEZPIECZNEJ PRACY
ELEKTRONARZEDZIAMI 5
20/10/2023, Lier - Belgium
Certification Manager
20/10/2023, Lier - Belgium
POWDPG75561 RU
1 NcIIOJIb3OBAHNE IO HA3HAUeHNI0 3
2 OINCAHNE (PUC.A) 3
3 CODEPJKMOE YNAKOBKN 3
4 YCIOBHBIE O603HAUHIN 4
5 OБлAJHCTPYKUNI NO TEXHNIK E3ONACHOCTN IPN PABOTE C 3JNEKTPOHCTPymeHTOM
5.1 Pa6oyee Mecmo 5
5.2 3Jekmpo6e3onachocmb... 5
5.3 Lluyna 6e3oNaChocmb 6
5.4 3Kcnnyamaua u yxod 3a 3JekmpouHcmpymHomom 6
5.5 06cnyxuehue 7
6ДОПОЛНТЕЛьнtie INHCTPYKUINI NO TEXHNIKE 6E3ONACHOCTN IPN ICSIOJIb3OBAHIN IAOHOKOCNJOK
7ДОПОЛНТЕЛьнtie INHCTPyKUINI NO TEXHNIKE 6E3OПАСHOCTN ПРИ OБPAUSEHIN C AKKUMYJIATOPAMN I 3APЯДHBIMYUCTPOICTBAMN .9
7.1 Akkymyjnmopbl 9
7.2 3apnHbIe ycmpoUcmea 10
8 3APYDKA N YCTAHOBKA INI CHRTNE AKKUMYJATOPA....10
8.1 Hdukamopbl 3aprdno ycmpoucmea (15) (Puc.A). 10
8.2 YcmaHOeKa aKKyMylmopa (Puc.A u B) 10
8.3 Chmue akkymyamopa (Puc.A u B) 11
8.4 Hndukamopbl 3apraa akkymyarnopa (Puc.A) 11
9 CBOPKA 11
9.1 C6opka pykoarnku 11
9.1.1 YcTaHOBka HIXHei pyKoTKn (Pnc.AnC) 11
9.1.2 C6opkaBepxHei pyKoTkn(Puc.AuD) 11
9.1.3 HanpaBHeHne cInoBoro Ka6eR (Pnc.AnD) 12
9.1.4 OnyckaHne BepxHe pyKoTKn (Pnc.AuD) 12
9.2 C6opka mpaoc6opHuKa (Puc. A u E) 12
9.3 YcmaHOka mpaoc6opHuKa (Puc.A u B) 12
10 3KcPJIyATAUa. 12
10.1 3anyck/ocmaHO6ka a3oHOKocunku (Puc.A u B) 12
10.2 Hacmpouka ebicombi ne3eu (Puc. Au F) 12
10.3 Cucmema npedynpekdeHua mpaosocbOpHuka (Puc. A u E) 13
10.4 MyIbIyIupoeaHue (Puc. G) 13
11 13
11.1 Yucmka 13
11.2 06cnykueaHue Hoxa.. 13
11.3 3aMeHa HoKa 13
12 TEXHnueCKNE DAHHbIE 14
13 14
14 14
15 OKPYXAIUOJIa CPeIa 15
16 DEKJIAPAUJIO COOTBETCTBUN 16
3 CODEPXMOE YNAKOBKN
- YdaHnTe BCE ynaKOBOHyIe MaTePnAnbl.
- YdaIInTe ocTaTKn ynaKOBKn n peKnaHbIe JnCTKn-BkJaDbIuN (ecnn ecTb).
- PpOBepbTe nonHOTy KOMnneKta NOCTaBKn.
- Пюверьтae annapaT, синоов Кабени, StTenceNB BCE npHAnIeXHocTN Ha npeMTe
новөждэн рп ТраHCnOpТИрOBke.
XpaHnTe ynaKOBOHyIe MaTePnaJIbI NO BO3MOxHOCTN Do nCTeueHnraHTnHOro cPOKa. Iocne 3TOrO n36aBbTEcB OT HIX, nCNoJIb3yR MeCTHyIO CnCTeMy yTnIN3aunn 6bITOBbIX OTXODB.

IPEyIeHHe: ynaKoBouhIe MaTePnAbl -3To He nrgyUkn! He no3BOJrTe DeTm IrgpaTb C PnactIKOBbIMn NaKeTaM! Ectb OnaChoctbydUweHn!
1xra3oHOKOcnJka
1X KJIHOH
2x ochobAHne TpaBOc6OpHnka
1X BépxHЯ YacThb TpaBoc6OpHnKa
1xpyuKa TpaBoc6OpHnka
2x3axmamJka6eJy
1x pykoBOcTBo NO 3KcnnyaTaunn

Ecnn deta n OTCyTCTByOT nnn noBpeXdeHbI, o6paNTecb K CBOemy dnilepy.
4 yCJIOBHBIE O6O3HauEHHa
B daHOM pyKOoDCTBe n/nn Ha cAmO MaunHe NCNoJb3yOTc CNe dyUoJe CmBOJIb:
- IcnoJb3OBaHHe r3OHOKOcnIKN Ha CKJHOHAX MOXeT 6bITb ONaCHbIM.
-3anpeuaeTcKocntb Ha Upe3MepHO Kpytbix CKIOHAx.
-06a3aTeNbHO cIeIITe 3a onopoi HOr BO BpeMpaObToi Ha CKIOHax IIN Ha MOKpO TpaBe.
-BbINOHnIe cKaaunBaHne nonepeK nnHnCKNoHa - HNKoTa B HAnpaBJeHN BBepx N Bn3 NO CKNOHy.
-Будьт ecobeho BHMaTeIbHbI npn I3MeHeHn HapBaBneHn DBVxKeHn Ha CKNoHaX.
-Co6nOdaIte npedeBHyIO OCTOpOKHOCTb npn OTcTyPHeHn Ha3aI nn npn noTtRnBaHn ra3OHOKOJIKN K Ce6e.
—HnKoIgHa He BbINOJIHЯTe cKaUHbAHne, NOITraHbA r3OHOKOCJky K ce6e.
OctaHOBtE BpaueHHe Ne3Bn, ecn raoHokocnky Heo6xOIMo HaKIOHTb IJn pepeHockn ee uepe3 yuctkn 6e3 TpaBbl nI JnnepeHockn ee K yuctky nIOn ot yactka cKaUNBAHn.
3anpeaetcnaHaknohTbMaunHy Bo BpemBkIOueHnIITaN 3nycka Dniratena, Kpome cnyaeb, Korda MaunHy Heo6xOIMo HAKNOHTb IJRA BKIOUeHnB BBICOKO TpaBe. B 3tOM cnyae He haknohnte ee 60nbwe, yem a6coiOTHO Heo6xOIMo, n HAKIOHnTe TOJIbKO CTOpOHy, ABLIOUeNc DaJIbHeN OT OpeaTopa. O6raTeNbHO y6eINTEcB, YTO o6e pyKn HaxOJrTCB pa6ooyem noIOXeHNn NpeD BO3BpAToM MaunHbI Ha rpyHT.
BkIIOueHHe ra3OHOKOcNJK BblIOJNHte B COOTBeCTBUN C IHCTpyKUJAMN, INPn 3TOM BAHN CTYHN DOJXHBI HAXODITbCRA HA DOCTaTOHOM PACCTOHHN OT Je3BNI.
He noctabJrte pykn nHn HOrn nOd Bpaaohueceyactn.
Cneinte 3a TEM, yTo6bI BcERda HaxoINTbcra B CTopoHE OT pa3rpy3OuHoro OTBepCTnA.
Hikorda He noDNHMaTe HnepeHocnte ra3OHOKOcNkpy npa6oTaOuem DnIraTeJe.
Y6eINTecb, YTObI BCE NOBnKHbIe DeTaJI NIOJHOCTbIO OCTaHOBNiNCb:
-KaKdbi pa3, KOrDa ra3OHOKOcNka ocTabnEeTc8 6e3 npncMOTpa;
-NepeD ydaJIeHHeM IIN OUcTkoB 3aCOpOB B BbIyCKHom KaHaJe;
-Nepeπ npOBepKoN, OuNCtKoN JnI npa6ToN Ha ra3OHOKOCNJke;
- npn ydape o noctopOHnI ppeMeT. Ocmotpnte ra30HOKOcNkU Ha npedMet NOBpeKdEHN I BbINOJIHNTe Heo6xOaMbI peMOHT nepeI NOBtOpHbIM 3aNyckOM N 3KcIIyatauNeI ra30HOKOcNkN.
POWDPG75561 RU
-
Ecnn B ra3ohokocnke Haunhaet Bo3HkaTb NOBblueHHa Rb6paqna, Heo6xOIMO HemeJeHHo BbINONHTb npOBepky.
-
PpOBepbTe HaJIynchpePpeTCTBn.
-BbINOJIHnTe Heo6xOДmbl peMOHT NOBpeKdEHHbIX DeTaJIe.
-86eHNTecb,yTO 3aTAYtB1 BCE rAikn,60NTbN BHTbl.
Cneinte 3a 3atjKOB BCex raeK, 6oTob IN BnHTOB, yTo6bl oBeCneuHb 6e30nacHoe pa6ooye coCTOAHNE ra3OHOKOJIKN.
- PernoDnueckn npOBepaTe TpaOc6OpHnK Ha n3Hoc n NobpeXdEHHa.
Buejx 6e30nachoctn 3aMeHnTe n3HOWeHHbIe nnIOBpeXdeHHbIe deTaJI.
7ДОПОЛНТЕЛьнtie ИНСТPyКци ПОТEXHnke 6E3OПАСHOCTN ПРИ OБРашЕн C AKKUMЛЯТOPAMN IN 3APYДнБIMN YCTPOICTBAMN

IcnoJIb3yIte ToJIbKO npeHa3NaueHHbIe dIaHHO yCTpoiCTBa aKKMyIaTOPbI n 3apAHyIe ycTpoiCTBa.
7.1 Akkymyjarnopby
HnB KOem cnyae He nbTaTecb BCKpbBaTb aKKMyJrTOpbl.
He xpaHnTe aKKymyIaTOpbI B MeCTax, Ie TempePaTypa MoKet npeBbIaTaB 40 ^ C
3apxaaTe aKMyIaTObKO npN TeMnepaTypaX OkpykaUe n cpebl ot 4 ^ C do 40 C.
XpaHnTe Baunn akKymyIaTOpb I B cyxom npoxJaHOM MeCTe (5 ^ C -20 ^ C) .HkoIa He XpaHnTe aKKymyIaTOpb IB pa3prJKeHHOM COCTOAHIN.
JNTN-NOHbIe aKKyMylrTopbl NyUwe Bcero peryIaRHO pa3pIaTb n nepe3apKaTb (MNHMym 4 pa3a B roD).Pn dInTeBHom XpaHeHn JNTN-NOHOro AKKMyIaTopa IdeanbHOn YBnErcra erO 3apAka do 40% MoUHOCTn.
Pn yTnH3aunn akKymJrTOPOB, pyKOBOcTByITeCb IHCTpyKUJMAH, npNBedeHHbIMN B pa3dene «3aunTa OkpyKaIOuSei cpebl》.
He BbI3bIBAIte KOpOTKne 3aMbIkaHn. Ecnn Co3daeTc coeDInHeHne MeJdy NOIOXHTeJIbHOJ (+) n OTPucaTeJIbHOJ (-) KNeMMoH HAnpMyU Nn Upe3 CnyaHbIK KOHTaKT C MeTaJIINueCKIMN PpeDMeTAMN, BO3HnKaET KOpOTKoe 3aMbIkaHne aKKyMylAToPA, I BydET NpOTeKaTb 60JIbWOn TOK, BbI3bBaR BblJeLHeHne TeIINa, KOTOpoe MoKeT npNBecTn K pa3pbIBy KOpNyCa Nn IN BO3rOpAHNo.
He harpeBaIte aKKymJrTopbI. Ecnn aKKymJrTopbI HarpBaHOTcdo TemnepaTpybI Bblwe 100 ^ C MoryT nobpeDntbcra yNIOtHeHna, nOINpyuOune cenapaTOpbI n Dpyrme IOnIMepHbE KOMHOENTbl, Bbl3bIBaYTeKy 3JeKTPoJIHTa N/INBHyTpEHHee KOPOTKOe 3AmbIKHne, npBODaUeK BblJeHNeHIO TeIIa C NOCLJeYIOUIm pa3pbIbOM INI BO3ropaHnEM. Kpome TOrO, He 6pocaiTe aKKymJrTopbI B OROHb - MoKeT pON3OHTN B3pbIB N/IN CNJIbHOe ropeHne.
B 3KCTpeMaJIbHbIX ycNoBnX MoKeT npOn30rTu yTeuKa aKKMyJrToPa. Ecnn Bbl 3aMeTne KNDKOCTb Ha aKKMyJrToPe, cDeNaTe CNeDyIOoee:
-Octopoxho cotpnte xndkoctb c nOmoaBbTOBToHn. N36eraute KOHTaKaTc KaKoeJ.
-ПркоHTaKTe C KoxeN JIn Tna3amN, CneDyIe yka3aHnM HnKe:
HemeJeHNO npomte BDOJ. HeItpaun3yTe cna6o KncIoToJ, TAKO KaK JIMMOHHB COK INN yKCyc.
Pn KOHTaKTe C rIa3aMn, nPoMoTe B 6OJIbWOM KOnHecTBe YHCToB ODoBt TeueHHe MmHmym 10 MNHyT. ObpaNTeCb K BpaCy.
He cXnraIte aKKymyIaTOpbl.
7.2 3apnHbIyycmpoUcmea
Hikorda He nbitaTecb 3apxkaTb Henepe3apxkaemble aKKyMyJrTOpbI.
HemeJeHHo 3aMeHraTe deeKTHbIe HHypbI.
He noBepraTe DeiCTBnIO BObl.
He BCKpbIbAaTe 3apAaHoe yCTPOINCTBO.
He BCTabJyIe HnKakNX IpeDMeTOB B 3apAHOV CTVPOCTBO.
3apraHoe ycTpoiCTBO npedHa3NayeHO ToIbKO IJIa NcNoIb3ObaHn BHyTpN NOMeueHn.
8 3APЯДКA И YCTAHOBKA ИЛN CHЯТNE AKKUMYЛТOPA
8.1 Hhukamopby 3apdno ycmpoucmea (15) (Puc.A)
IopKnHouHTe 3apdHoe yctpoNCTBO (14) K 3neKtpnuecko p03etke:
- TOpNT NOCTOARHNO 3eJIeHbIM CBETOM: TOTOBOKaprKe.
Miraet KpacbIM CBETOM:3apdka. - TOpNT NOCTOARHNO 3eJIeHBIM CBETOM: 3apJxKeHO.
- TOpNT NOCTOARHNO 3eJIeHbIM IN KpaCHbIM CBETOM: aKKyMylrTOp NIN 3apJdHOe yCTPOIcTBONOBpeXDeHbl.

PpimMeaHHe: ecn aKKymJrTOpe HeBO3MOXHO NOKJIIOHTb JIa 3apAKn,OTcoeHNHTe ero n y6eINTeCb, YTO MoJeB aKKymJrTOpa COOTBeTcTByET MoEeN 3apAHorO yCTPOInCTBa, KaK NOKa3aHO B Ta6JIuCe TexHnuecknx XapaKTePrcNTk. He 3apAkaIte aKKymJrTOpbI dpyRnx MoJeN nn aKKymJrTOpbI, KOToPBle HeBO3MOXHO HaDeXHO 3aKpePiNb B 3apAHDom yCTPOInCTBe.
1.Периончeckn npOBepaTe COCTOAHne 3apdHoro ycTpoiCTBa n aKKymyIaTopa npn noKIOUeHN.
2. OTKIIOUaIte 3apAIDHOe yCTPOINCTBO OT cETN IOTCOEINHnTE erO OT aKKyMylrTopa nocne OKOHuaHn3apAikn.
3.петднрьзовимаKKMVЯТОРадэт eMу NOJIHOCTbO OCTbTb.
4. XpaHnTe 3aprAHOe yCToPcTBO n aKKyMylTOp B NOMEuEHN, B HeOCTynHom dIa IteN MeCTe.

IynoHOMOeHHb CnueaJInCT.
12 TEXHnueCKNE DAHHbIE
15 OKPYXKAIOUJAR CPEDA
EcnB Baw annapat Tpe6yET 3ameHbI nocne dInTeNbHO rCNOJb3OBAHn, He Bb6paCbBaIte erO BMecTe C DOMaSHm MycOpOM, a NcNoJIb3yIte 3KOJIOrHuCeCKn 6e3oNaChbI cnOCo6 dIra erO yTINn3aun.
C OTXoJamn 3neKtpnuecknx MaunH HeJb3ra NOCTyNaTb, KaC O6bIHyBMN DOMaunm OTxoJamn. N03a6ObTbTeCb 6b yTuIN3aunn TaM, rDe dJa 3TOrO eCTb COOTBeTcByUOJIe YcTaHOBKn. IpOKOHcyJBtPyuYTeCb y MeCTHBIX oPraHOB Bnactn INy IpoDaBua O BO3MOxHOCHTn yTuIN3aUnn.
16 DEKJIAPAUNO COOTBETCTBNI

varo
VARO - Vic. Van Rompuy N.V. - Joseph Van Instraat 9 - BE2500 Lier - BEBNIA, NCKJIIOHTeJIbHO 3aABJRAET, UTO,
ПюдукТ: BECUJETOUHAR FA3OHOKOCINKA 20 B 0340 MM
Mapka: PowerPlus
Mодь:POWDPG75561
COOTBETCTByET OCHOHBHIM Tpe6OBaHNrM INHbIM COOTBETCTBYUOM NIOJOKeHNrM DeIcTByUOuX EbponeNCKNX DnpeKTHB/peRNaMeHTOB, OCHOBaHHbIX Ha EbponeNCKx rapMOHN3HPOBAHHbIX CTaHdaptax. JIo6oe HecaHKUHOHPOBaHHOE N3MeHeHne yCTpOJCTBa aHHyJIpyET DaHHoe 3aABJIeHne.
Ebponeckne nipeKTHBbl/pernaMeHTbI (BKIOUa, ecn npimeHMO, nx nonpaBkn do daTbI noDncaHna);
2011/65/EU
2006/42/EC
2014/30/EU
2000/14/EC
Annex VI
LwA
Measured 84dB(A)
Guaranteed 86dB(A)
Notified Body TUV SUD - 0036
Ebponeckne rapMOH3npoBaHHbIe cTaHdapTbI (BkJIouyA, ecNI npIMeHMo, INx nonpaBKn Do DaTbI noDnncAHna);
EN60335-1:2012
EN60335-2-77:2010
ENIEC55014-1:2021
ENIEC55014-2:2021
Держател Тхиесков дokум entaци: Флп Baнкехов (Philippe Vankerkhove), VARO - Vic. Van Rompuy N.V.
HnKeNoDnncabWmncr DaenctByeT O T MeHN NcnoNHTeJbHoro DnpeKTopa KOMnaHnn,
Mertens Ludo
Ludo Mertens
MeheJxep no cepTnФkaun
20/10/2023, Lier - Belgium
1 IPEdHA3HauEHNHe HA yNOTPEbATA. 3
2 OINCAHNE (ФИ.А) 3
3 CnncbK HA CbIbPxAHHeTO HA ONAKOBkATA. 3
4 CMBOJN 4
5OBuINIPEyIPeKJdHn3ABe3ONACHOCTPNI 13NOJI3BAHE HA MOUHN HNCTPymEHTN
5.1 Pa6omHa 30Ha.. 5
5.2 EneKmpuecka 6e3onacnocm 5
5.3 JIuHa 6e3oNaChocm 6
5.4 3noJ3BaHe u epuXu 3a MexaHuaPaHua UhcmpymeHm.. 6
5.5 Cep6u3Ho 06cIyXeAne 7
6ДОПьЛНTEЛн ПРавиla3AБE3ОПАСHОCTПИ N3ПОЛ3BAHEHAKOCaKN 7
7ДОПьЛНITEЛНИНСТРУКЦИ 3AБE3ОПАСHОCT3A AKUMYЛATOPHIN BATEPиN 3APЯДнY UCTPOICTBA......9
7.1 Bamepuu 9
7.2 3apndnu ycmpooumea.. 9
8 3APEXДАНЕ, NOCTABЯн e CBAJAнe HA AKUMYJIATOPHATA BATEPnI 10
8.1 Hdukauu Ha 3apadHomoycmpoucmeo (15) (u2.A) 10
8.2 NocmaeHa akymylamophama 6amepu (Fue.A u B)10
8.3 3a omcmpaHaeane Ha akymyamopnue 6Jok (Fua. Au B) 11
8.4 Hdukamop Ha 3apda Ha akymy lamophama 6amepu (Fue.A) 11
9 CΓIOOBRAHE 11
9.1 Canelo6eane Ha pkoeaamka 11
9.1.1 MoHTnpaHe Ha DoJIHaTa pbKoXBaTka (ΦnR.A n C). 11
9.1.2 Crno6BaHe Ha rohpHa Ta YacT Ha pbkoXBaTkata (Phr. 6A n & D) 11
9.1.3 PonoaraHe Ha 3axpaHbuaaia Ka6eI (Fur.A u D). 12
9.1.4 3a cnvckaHe Ha rophHaTa pbkoXBtKa (Φn.r.A n D) 12
9.2 Caoobae He Ha Kymura 3a mpeea (Uz.A u E) 12
9.3 HcmanupaHa ycmpoucmomo 3a yna6nHa mpeea (Ua.A u B)12
10 PABOTA 12
10.1 CmapmupaHe/cnupaHe Ha Kocaykama (Fue.A u B) 12
10.2 Hacmpouka Ha eucouhama Ha HoKa (Fua.A u F) 12
10.3 Ppeynpeumenha cuscema 3a kymura 3a mpeea (Fua.A u B) 13
10.4 MyIyupaHe (Φua. G) 13
11 IOUHCTBAHE I NOIDPbJxKA 13
11.1 Tocumbeane 13
11.2 Nodopbka Ha Hoxa 13
11.3 CmHa Ha Hoxa 13
12 TEXHnueCKn DAHHN 14
13 14
14 TAPAHU 15
15 OKOJIHACPEDA 15
16 DEKJIAPAUJRA 3A CbOTBETCTBNE 16
1 ПЕДHA3HAUECHNE HA YNOTPEBATA
To3n npOdyKT e npEHa3HaueH 3a KocHe Ha Mopaba B DomauHn ycNoBna. HenoDxoJa, 3a npOpeCnoHaHa yNoTpe6a.

IpeynpeJHHe! Ipei Da n3no3BaTe HnCtpymeHTa, npooyTeBHNMaTeJIHO TOBa pkoBOdCTBO N 06uNTe HnCtpyKcN 3a 6e3OnaChocT,3apaN BaWata Co6CTBeHa cnrypHocT. BaWNr T eJeKTponHcTpymeHT Tp8Ba Da ce npdaBA Ha dpyr cAmO 3aeDHO C hAcToaUnte HnCtpyKcN.
2 ONICAHNE (ФИг.А)
- CTapTOB 6yTOH
- KJIIOU
- Top6a 3a cb6puane Ha TpeBaTa
- Ka6eJIHa cKo6a
5.БлOKИРOBКаHaДОЛнHaТpa bkoXbTaKa - Ioc3a perynipane Ha BncounHaTa
- Kanak ha akymylaTophata 6aTepe
8.Долнарькхватka
9.БлOKировkaHa roрнTa pьКoxВаТka - Topha pbkoxbaKa
- CnnpaueH noct
-
Akymynatopeh 6nok (HE E BKJIIOUYEHO)
-
ByToH 3a ocB6o6xJaBaHe Ha aKymyIaTOPnHa 6Jok
- 3apAnHO yctpoNCTBO (HE E BKNIOUOHEO)
- INHДИКаTOPи Ha 3apRdHOTo yCTpoIcTBO
16.Индikatop Ha 3apraHa akyMylaTophata 6atepna - BytoH Ha HnDnKaTopa Ha 3apJa Ha akymlyaTopHaTa 6aTepnia
- Bpatnuka 3a n3npa3BaHe
- Tana 3a MyJnUpaHe
3 CnncbK HA CbIbPxAHNETO HA ONAKOBKATA
- OtctpaheTe BCnKoNAKOBbHm MaTePnAIn.
OTCTpaHete octHaHnTE onaKOBbUHN bPemeHHN nOCTaBKN (aKO nMa TaKnBa).
PpOBepeTe daHn naKeTbT cbDbpxKa BCNUK KOMNHOHeHTN.
IpoBepTe daH ypeBt, 3axpaHbAunrKa6eI, uencenbT n akcecoapte He ca 6nnn noBpeDeH np TpaHcnpTuPaHe. - Ia3eTe onakOBbHnTe MaTePnaI N0Tu NOK pKa rHa rapaHcNoHHnepnO. CneT ToBa n3XBpIeTe B nyHKT 3a cb6npaHe Ha OTnabu.

BHIMAHHE! OnakobbHnTe MaTePnaIh He ca nrgaKn! He no3BOnBaTHe Ha deca da nrgaT c hainloHOBN Top6nUKN! Pnck ot 3aDywaBaHe!
1XINBaDHaKocaYka
1X KJIIOU
2x OCHOBA Ha KyTnra 3a TpeBa
1x Kanak Ha KyTnra 3a TpeBa
1xpbkoXBATKaHa KyTnra 3a TpeBa
2x ka6eHn cko6n
1x HapbUHnK Ha noTppeBnteJr
2x60JTM6x40MM
2x 7a86a
2x 6JIOKINPOBka 3a rOpHaTa pIbKOXBAtKa
2x Tpb6n 3a dOJHa dpXkKa
1x Tana 3a MyIuIpaHe

B cnyuay, Ye HAKON Yactn IINCBaT NIn ca NOBpeHn, CBbpxKeTe ce C MeCTHnI dNcTpnp6yTop.
4 CnMBOJN
B hactoHnHaBcHnK n/nn Bbpxy MaunHaTa ca n3non3BaHn CJeDnTe cMBOJN:
| Овознaya ворасноct от наранявае яйп пореда на Исторемент. | Прочtees ИсторICALs Вимател. Бимаиме! Леташи посmetи! | ||||
| ← | He донускайte доближавае на старашини ліца. | Изменчесу ииз二线д; Изменчесу клоч пожд релуширал, почиствае и остаян на поскута 6e3 надзор за сокль轼ю и за билоч пос ded. Нikora He paбовете с машина ть дъждан; Вразиме, korото e влажно яйп мokpo. Влага та пос посост от пос пос ded. Изменчаду пожд пashа: пожд пashа сра'd; пожд пashа сра'd чд. Послары: Послары сра'd чд. Послары сра'd чд. Послары сра'd чд. Послары сра'd чд. Послары сра'd чд. Послары сра'd чд. Послары сра'd чд. Послары сра'd чд. Послары сра'd чд. Послarkу: Послarkу сра'd чд. Послarkу сра'd чд. Послarkу сра'd чд. Послarkу сра'd чд. Послarkу сра'd чд. Послarkу сра'd чд. Послarkу сра'd чд. Послarkу сра'd чд. Послarkу сра'd чд. ПослARKS ПослARKS ПослARKS ПослARKS ПослARKS ПослARKS ПослARKS ПослARKS ПослARKS ПослARKS ПослARKS ПослARKS ПослARKS ПослARKS ПослARKS ПослARKS ПослARKS Послarkу: Послarkу сра'd чд. Послarkу сра'd чд. Послarkу сра'd чд. Послarkу сра'd чд. Послarkу сра'd чд. Послarkу сра'd чд. Послarkу сра'd чд. Послarkу сра'd Ч. Послarkу сра'd чд. Послarkу сра'd чд. Послarkу сра'd чд. Послarkу сра'd чд. Послarkу сра'd чд. Послarkу сра'd чд. Послarkу сра'd чд. Послarkу сра'd чд. Пос乐 Пос乐 Пос乐 Пос乐 Пос乐 Пос乐 Пос乐 Пос乐 Пос乐 Пос乐 Пос乐 Пос乐 Пос乐 Пос乐 Пос乐 Пос乐 Пос乐 Пос乐 Пос乐 Пос乐 Пос乐 Пос乐 Пос乐 Пос乐 Пос乐 Пос乐 | |||
| STOP | Изучать всяк КOMПОНERTС на машината Да с的对象 на пошто на с Движат, поди на по ДOKОСHTЕ. Ножовete пожд пoshима на с След поочу в�е на Машината, a вьртушият с Нож може на поспьига Нарявае. | Изменчаду пожд пashа: пожд пashа сра'd; чд. Пос乐 Пос乐 Пос乐 Пос乐 Пос乐 Пос乐 Пос乐 Пос乐 Пос乐 Пос乐 Пос乐 Пос乐 Пос乐 Пос乐 Пос乐 Пос乐 Пос乐 Пос乐 Пос乐 Пос乐 Пос乐 Пос乐 Пос乐 Пос乐 Poc乐 Poc乐 Poc乐 Poc乐 Poc乐 Poc乐 Poc乐 Poc乐 Poc乐 Poc乐 Poc乐 Poc乐 Poc乐 Poc乐 Poc乐 Poc乐 Poc乐 Poc乐 Poc乐 Poc乐 Poc乐 Poc乐 Poc乐 Poc乐 Poc乐 POCL Poc乐 Poc乐 Poc乐 Poc乐 Poc乐 Poc乐 Poc乐 Poc乐 Poc乐 Poc乐 Poc乐 Poc乐 Poc乐 Poc乐 Poc乐 Poc乐 Poc乐 Poc乐 Poc乐 Poc乐 Poc乐 Poc乐 Poc乐 Poc乐 Poc快乐 Poc乐 Poc乐 Poc乐 Poc乐 Poc乐 Poc乐 Poc乐 Poc乐 Poc乐 Poc乐 Poc乐 Poc乐 Poc乐 Poc乐 Poc乐 Poc乐 Poc乐 Poc乐 Poc乐 Poc乐 Poc乐 Poc乐 Poc乐 Poc乐 Poc乐意 Poc乐 Poc乐 Poc乐 Poc乐 Poc乐 Poc乐 Poc乐 Poc乐 Poc乐 Poc乐 Poc乐 Poc乐 Poc乐 Poc乐 Poc乐 Poc乐 Poc乐 Poc乐 Poc乐 Poc乐 Poc乐 Poc乐 Poc乐 Poc乐 Poc. Poc乐 Poc乐 Poc乐 Poc乐 Poc乐 Poc乐 Poc乐 Poc乐 Poc乐 Poc乐 Poc乐 Poc乐 Poc乐 Poc乐 Poc乐 Poc乐 Poc乐 Poc乐 Poc乐 Poc乐 Poc乐 Poc乐 Poc乐 Poc乐 Poc乐 | |||
| Hocete 3auntni rhpbkabuichi. | Пrelopьчileltno e da ce hocet rhpbkutnhi obvkn. | ||||
| He nizarai te na Bb3dienCTBneTo Na Boda Зapадно устри? akymunatopnata 6atepna. | He nizarai te akymunatopnata 6atepna. yctproctbo. |
| MAX. 40°C | Околна Temпература 40 °CMakc. (само заakумлалорнaita баерnia). | Изэнзвашиеakумлалорнaitaбаерnia и зapядноустю само взатвореньюпomецни. | |
| i | Вaxхна Информация. | Ельектуески рожуты He Трябва за SFДдатиЗXBырлайни сДомakинскптЕ OTпадьци. |
5OBuINIpeDyPExKdEHN3ABe3OpACHOCTPNN3IOJ3BAHE HA MOUH INHCTPYMEHTN
Ipooyete BCnckn npdeynpejxdeHn 3a 6e3oNaChocN IN BCNUHCTpyKuH. Hecna3BaHeTo Ha BCnckn npdeynpejxdeHn INHCTpyKuH MOKe Da npuHHN eJNEKTpueeCKn ydap, noXap n/nn cepno3Ho HapaHbAhe. 3ana3eTe BCnckn npdeynpejxdeHn INHCTpyKuH 3a 6bDeu n CnpabKn. TepmnhT "MexAHn3npan INHCTpyMeHT" B npdeynpejxdeHnTa Ce OTHacr 3a Baun 3axpaHbAn OT Mpekata (c Ka6en) nnn 3a paBoTeU Ha 6aTePn (6e3 Ka6en) MexAHn3npan Upei.
5.1 Pa6omHa 30Ha
Pa60hata 30Ha Tp86Ba Da 6bJe YnCTa N Do6pe OCBeteHa. HenoDpeHnte N HeocBeteHn 30Hn Ca IpeDnOCTabKa 3a INHCnDEHTN.
He pa6oTeTe C MoUHN HNCTpyMeHTN BbB B3pNUBOONacHa aTMOCpepa, HanpIMep B 6n3OcT Do 3anaHIM TeuHOCTn, Ra3OBe nI npax. MoUHnte HNCTpyMeHTN c3daBaT NCKpn, KOnTO MORAT Da 3anaTn npax nI npnte.
He donyckaIte npncbCTBne Ha deuca nnn cTpaHnHn Iua, kOrato pa6oTnte C MexaHn3upaHna IHcTpymeHT. Pa3ceBaHTo MOKe da BN HApapa da 3ary6nte KOHTpO Bbpxy Hero.
5.2 EneKmpuuecka 6e3onacHocm
- ⅢeNceJIte Ha MexaHn3npaHnTe INcTpymeHTn Tp6Ba Da cBoTBcTcBArHa KOHTaKa. Hrkora He npomeHnIe ⅢeNceNa No HkakBb HauH. He n3non3BaIe HnkakBn ⅢeNceNnnpexOHDnC bC 3a3eMeHnTe MexaHn3npaHn INcTpymeHTn. ⅢeNceJIte, Ha KOnTo He ca npaBeHn IpomeHn, I CboTBcTcBAuNTe IM KOHTaKTn Ⅲe HamaJrT ONaCHOCTTa OT eNeKTPnuCeKn ydap.
- I36raBaIte TeleceH KOHTaKT CbC 3a3eMeH NOBbpxHOCTN, KATO Tp6n, paHaTOpN, CTINaxn XnaJInHn. 3a3eMaBaHeTo Ha BaWeTo TAno BOOn Do No-BNCOK pNCK OT eNeKtpuYeckn ydap.
He n3IaraiTe MexaHn3IpaHnTe IHCTpyMeHTn Ha IbXd N He Tn OCTaBraIe B MOKpa cpeJa. Ako B MexaHn3IpaHnI INCTpyMeHT Bne3e BOda, T r Je yBeJIuN pNcKa OT eNEKtpnueckn yDap.
He 3noynotpe6BaIte c Ka6eHa. HnKora He ro n3no13BaIte 3a npehacrHe, DbpnaHe nn mBaxdahe ot kOHTAKta Ha MexaHn3npaHn IHcTpyment. Pa3eTe Ka6eHa ot TOnnHa, MacNo, OCTpn Pb6oBe nnn DmNKeu Ce yactn. NobpeHnTe nnn onnTeHn Ka6eN yBeHHaBat pNcKa oT eNEkTpueckn ydap.
Korato pa60tnte C mexaHn3npaHn HNCTpyMeHT HaBbH, n3noJ3BaTe ydbJxnteJeH Ka6en, noXoJaU 3a n3noJ3BaHe HaBbH. n3noJ3BaHeTo Ha TaKbB Ka6eJ HamaJIraBa pUcKa ot eJektpnueckn ydap.
Ako n3noJ3BaHeTo Ha MexaHn3upaHn HnCTpyMeHTn BbB BnaXHa cpea e Heu36eXHO, n3noJ3BaIte 3axpaHbA uN3TOUHK C nDfepenuaHa 3aunTa (RCD). N3noJ3BaHeTo Ha RCD hamaJIyBa pNcKa OT eJeKtpnueckn yap.
POWDPG75561 BG
5.3 JIuHa 6e3oNaChocm
-БьдTe Haupek, BHMaBaIe KaKBO npabite n H3noJ3BaIte 3dpabnCn pa3ym, KOrato pa6oTnte c MexaHn3npaH IHCTpymeHT. He n3noJ3BaIte MexaHn3npaH IHCTpymeHT, KOrato cTe yMOpEn IIN CTe NOB BInJHneTO Ha HApKOTnHn BeIeCTBA, aIKOXON IIN IekapCTBa. MomentHOTo HEBHMaHne npn pa6oTa c MexaHn3npaH IHCTpymeHTN MoKe Da DOBeDe IO cepNo3Ha TeJIeCHA NOBpeDa.
- I3noI3BaIte npedna3HO obopydBaHe. BnHar n3noJ3BaIte npedna3Hn cpeIcTba 3a ouIte. PpeJna3HTo obopydBaHe, Hapmep, Macka 3a npax, HeJIb3raunCe 3auNTHN o6yBKn, TBbpda WAnka INN 3auNTHN cpeIcTba 3a yuInTe, I3noJ3BaHO npn CbOTBEHTHNe YCIOBnA, Ue HAMn HapaHbAHnTa.
- 1368BaTe CnyaHTo NyckaHe B DeIcTBne. IpeDn Da BKIOHTe IHCTpyMeHTa B KOHTaKTA, ce yBepTe, ye KIOUbT E B INKIOUcHo NOIOXeHne. HocHeTO Ha MEXAHN3IpaHn INCHTpymEtN C npbCT BbPxy KIOUa 3a BKIOUbaHe INN BKIOUbaHETo IM B KOHTaTKaTpN KIOUH B NOIOXeHne BKIOUeHO Cb3dAba IpeDnOCTABKN 3a INHUNDEHTN.
- Ipei Da BkIIOHTe MexAHn3npaHn HNCTpyMeHT,OTCTpaHEte peRyIINPOBbHN nnraeHn KIIIOvBe. Rauehen nn Dpyr KIOU, OCTaBeH 3aKaueH KbM BbpTtua Ce Yact HaMexAHn3npaHn IHCTpyMeHT,MOKe Da IOBede DO HapaHBAHe.
He ce npehanpraaTe. BbB BCEKN MOMENT cToIe 3dpaBO CTbNIN Ha KpaKaTa cn nna3eTepabHOBeCne.ToBa Ie BN N03BOJIN Da IMate NO-dO6bp KOHTpON HAd MexAHUNpaHn IHCTPVMeHT B HeOyAKBaHN CNTVaUHN.
- ObneueTe ce noDxoJra. He Hocete shnpokn dpexn, HTO 6kxta. DpbkTe Kocata, dpexnte npbKaBnUte cn daJeYOT dBKHeuNTe ce yactn. Wnpoknte dpexn, 6kxtata nn DnTata KOca, MORaT da ce 3axBaHaT B DnKHeuNTe ce yactn.
Ako ca npedoctaBeHN ycTpoNCTBa 3a Cbbp3BaHTo Ha npncnOc6JeHra 3a ynaBHe n Cb6npaHe Ha npax, ce yBepTe, ye Te ca Cbbp3aHn H ce N3noJ3BaT npabNJHo. N3noJ3BaHTo Ha Te3N YCTPONCTBa MOKe Da HamaHn ONaCHOCTte, Cbbp3aHn C npaxa
5.4 N3noJ3eAhe u 2puKu 3a MexaHuaHua Uhcmpymehm
He hacnIbaIte MexaHn3npaHn IHCtpymeHT. 3no3BaIte npaBnHnMexaHn3npaH nHCTpymeHT 3a cbOTBeTHOTO npJIOXeHne. PpaBnHnT MEXaHn3npaH IHCTpymeHT 3e CbDUN da6oTATA NO-IO6pe N IO-6e3OJaCHO, CbC CKOPoCTTa, 3a KOYTO e KOHCTDVnPAH.
He n3no3BaTe MexaHn3npaHn HNCTpyMeHT, aKo KInOybT 3a BkInOyBaHe n N3KnIOUbaHe He pa60Tu. BCEKN MEXaHN3pAH INHCTpyMeHT, KOITHO MeXe Da 6bJe KOHTPOJINpaH Upe3 KInOua 3a BKInOyBaHe u N3KnIOUbaHe, e OnaceH Tp8Ba Da 6bJe DEMOHtUpaH.
I3KnHouBaIte 1eNceTa OT KOHTa, npEn Da npaBnTe perynnpOBK, da CMeHAre npHaJeXHOCTN INn Da np6bpaTe MexAHn3npaHnTe HcTpyMeHTn. IoObHn npEdNa3HN MepKN 3a 6e30nacHOCT HaMaJIraBt PnCKaOT cnyauHo NyckaHe Ha MexaHn3npaHn IHCTpVmEHT.
CbxpaHraBaTe MexaHn3npaHnTe HNCTpyMeHTn, KOTo He ce N3NOJ3BaT, DaJeY OT DoCTbN Ha Deua N He No3BOJRAe Ta Ha IInca, He3aNo3HaTN C MexaHn3npaHnTe HNCTpyMeHTn INIIN HACTOUITE HNCTpyKUIN da pa6OTr C INHCTpyMeHTa. MexaHn3npaHnTe HNCTpyMeHTn ca ONaCHN B PbHeTa Ha Heo6VyeHn Notpe6nteN.
IopdbpxaTe MexaHn3npaHte HNCTpyMeHTn. PpOBepBaTe r 3a pa3eHTpnpaHe nI3aJdaHe Ha DnKxeuNTe Ce qactn, CuynBaHe Ha qactn IIN dpyro cBcTOrHne, KOETO MoKe Da OKaKe BnHnE Bbpyx pa6oTaHa MexaHn3npaHte INCTpyMeHTn. Ako MexaHn3npaHnT INCTpyMeHT ce NOBpeDn, pEmOHtpaTe r npdeI da r N3NoJ3BaTe. Mhoro IHnndENT Ca IpeDn3BnKaHn OT HeIO6pe NoDbpxaHn MexaHn3npaHn INHCTpyMeHTn.
IopdIbpxaItepekeuIteHCTpyMeHTN OcTpNI Bdo6po cBCTOAHne.IpaBnHO IoIbIbpxaHITepekeuINHCTpyMeHTN CocTpNIpeKeuPi b6OBe eNo-MaIKOBepoTHO da ce 3akNeJAT N CE KOHTPOUNPAT NO-JeCHO.
POWDPG75561 BG
I3no3BaIte MexaHn3npaHn IHCtpymeHT, npHaIeXHOCTtE, CmHReMITE pe3uN T.H. B CbOTBeTCTBne C Te3n IHCTpyKUn N IO HaunHa, PpeBnDeH 3a CbOTBeTHnBm MexaHn3npaH INCtpyMeHT, KaTO nMaTe PpeBnD pa6oTHnTe ycNoBn I pa6oTaT, KOrTo Tp8Ba Da Ce n3BbpUn. I3no3BaHeTo Ha MexaHn3npaHn INCtpyMeHT 3a Oepauu, pa3JInuHOn OT Te3N, 3a KOnTO e PpeDa3HaueH, MoKe Da DoBeDe Do OnaHa CNTyaUa.
5.5 Cepu3Ho 06cnykeaHe
Ocnypete CepBn3HO 6cIyXbaHe Ha BaIIM MExaHn3IpaH INCTpyMeHT cMo OT KBaJIINΦuIpaH TexHnK, KOITo N3NoJ3Ba cMo IJeHTNHy pe3epBHN qAcTn. TObA Ie rapaHTnpa NOdIbpxHaTe Ha 6e3OnaCHocCTTa Ha MexaHn3IpaHn INCTpyMeHT.
6ДОПьЛНITEЛН ПРавиJA3AБE3ОПАСHOCTПРИ 3ПОЛ3BAHEHAKOCAYKN
Ta3n MaunHa He Tp6Ba Da 6bJe n3no3BaHa OT Deua. Deuata Tp6Ba Da 6bDaT HaJIeXdAnH, 3a Da ce rapaHTnpa, Ye He IrpAaT C MaunHaT. NOnCTBaHe n TexHuecko O6cnyKbaHe He Tp6Ba Da Ce n3BbPWBat OT Deua.
Ta3n MaunHa He MoKe Da 6bJe n3NoI3BaHa OT Xopa C HamaJIeHn fN3UeCKn, cTeNBn IIN yMCTBeHN cNoOC6HOCTn IIN IINCA Ha ONIT N 3HaHnA, OCBeH aKO He Ca HabIOdaBAHn IIN INCTpyKTupAHN OTHOCHO 6e3oNaCHaT a YnoTpe6a Ha o6OpyDbaHeTo n pa36npat npOn3TuauNTe OT Hero pNCKOBe.
3aNo3HaIte cce nHCTpyKuINTe n npabnHaTa ynotpe6a Ha MaunHaTa.
-
1368raTe HocHe Ha CBO6OdNo 06JIeKNO IIN N6JIeKNO C BnCraIu SHypoBe IIN KOlaHn.
-
I3HOceHnte nnIOBpeDeHN qactn Tp86Ba da 6bdaT 3aMeHHN.
BbTe OcObeHO BHIMaTeJIHn, KOrato 3aBnBaTe C KOcaKata N KOrato JaDbpNaTe KbM ce6e cn.
He cTaptnaIte DnIraTeJRA, aKO TOp6aTa 3a TpeBa He e nHCTaJInpaHa.
B3eMeTe noi BnHMaHHe ToBa, Ye npu MaunHc MHOrpeKeUHN HOXOBe DnHXeHHeTo Ha peKeUIN DaNaMeTbP MoKe Da DoBeDe Do BbPTeHe Ha dpYrnte HOXOBe Bbpxy Hero.
Korato perynipate MaunHaTa ce yBepete, ye npctte Bn Hma da 6bda3axbaHATMEXdy DnHexeUHTe ce pexeun HOXOBe n cKpahnte Yactn Ha MaunHaTa.
OCTaBete DnBaTeTna Ce OxNaI, npeI da npnbepeMaunHaTa.
Korato 06cnykBaTe pexeHJNHO, 06bpeTe BHMaHne, ye daKe aKe eNEKTPO3axpaHBAHeTo e N3KNIOyeHO, HOXOBeTe OSe MORaT Da ce DBHXaT.
3aMeHnTe H3HOceHnTe nIIN NOBpeHn Yactn 3a 6e3oNaHa pa60Ta. N3noN3BaIte camo opuHaJIHn Yactn n akceCoapn.
MaunHaTa Tp6Ba Da 6bDe 3aDenCTBaHa cMo C n3KIOUBAu TK He npBnAbau 30 mA Upe3 DepeKTHOtOKOBO yCTpoiCTBO (RCD).
He no3B0JBAIte Ha deca nnHa IINa, He3aNO3HaTN C Te3n HNCTpyKcHn, da n3noJ3BaT Kocaykata. Bb3MOXHO e MeCTHnte HopMaTNBn aKTOBe Da orpaHnHaBAT Bb3pactTa Ha onepaTopa.
HeKocete, KoratoHa6n3oIMaXopa, nNo-cneuaHNO, DeuA nnDOMaUHN XNBOTHN.
- OnepaTopbT nnn noTppeBnteJrT Hocn OTROBOPHOCT 3a INHcIeHTN nnn ONaCHOCTN, 3anJaWBaun dpyrX opa nn TxHaT a Co6CTBeHOCT.
He pa6oTeTe c kocaykata c 6ocn kpaka nJn c OTbopeHn caHaJI. BuHaI Hocete noXoJaU 3dpabN o6yBkn n Dblr naHTaONH.
- IpoBepete BHNMaTeJHNO 30HaTa, KbDeTo Ue N3NoJ3BaTe KocayKaTa, NOTCTpaHeTe BCnUKN KaMbHn, npbUKN, Ka6eJN IN DpyrN yxKdN ppeDMeTn.
Ipeu n3noJ3BaHe BnHaR npOBepaTe Bn3yaJHO daHn HOxOBeTe, 6oTobTe mN 6Joka 3a p3aHe He ca n3HOceHn Jn NOBpeHn.
3aMeHnTe n3HOceHnTe nnIOBpeHn HOXOBe n 6oJTOBe B KOMnJIeKTH, 3a da 3ana3nTe 6aJHaCa.
- 3nON3BaIte INCTpyMeHTa cAmO Ha dHeBHa CBETnHa IIN npN Do6po N3KycTBeHOOCBETJIeHne.
POWDPG75561 BG
- 1368raBae da pa6oTnte c KocaykaTa B MOKpa TpeBa, KORAto e Bb3MOXHO.
BnHaBn BbpBeTe, B HnKaKbB CJIyuaH He TnuaIte.
B HnkaKbB cnyaH He pa6oTe C MaunHaT, aKO npoteKTOpTE nN 3aHTHe ekpaHn, HapnpMeP OTKIOHRAuNTe npoteKTOpN u/nn yIobnteHt Ha TpeBa, ca depekTHn nn IINCBat.
KocHeTo BbpxHacnIM MoKe Da 6bDe onaCHO:
-HeKoceteNoN3KNIOUHTeJIHOCTpbMHNHaKNOH.N
-Binharn CTbnaTe CnpyNo npu KocHe no HakloHn IJIM MOKpa TpeBa.
-Binharn KocTe HappeuHo Ha CKNoHOBeTe - HNKOra Harope NIN HaDoJy.
-Быдeteи3KIOUHTeJIHO BHIMaTeJHn, KORATO CMeHrTe NOCOKaTApn pa6Ota No HaKIOH.
-БыдeteиЗКИЧИТЕНОВHIMATEJIHN,KORATo BbPbIteHa3aIINДьрnaTe KocaKaTa KaM ce6e cn.
—Hnkora He Kocete Upe3 N3dbpnaHe Ha KocaykaTa KbM Bac.
- 3yaKaTe HOXOBTe Da CnpaT HnBnHO DnBXKeHneTO cn, aKO Tp86Ba Da HaKIOHnTe Kocaykata npu TpaHCnOpTnpaHe, npu NpeKocBaHe Ha NOBbpxHOCTn 6e3 TpeBa n npu TpaHCnOpTnpaHe Ha Kocaykata OT n KbM O6pa6OTbaHHy Uyactbk.
He haknaHnTe MaunHaTApn BkNouBaHTo NnTOBa Ha DnRaTeJI,OCBeH aKO TOBa He e HcOxOIMO 3a CTaptnaHTo My BbB BnCoka TpeBa.B TaKnBa CnyaH He r HAKnAHnTE NOBue O T3aBnKInTeHNmMnHMym N To cAmo B YacCTTa,KoTTo e daJeue OT onepaTopa.BnHar n Ce yBepraBnTe,Ye n DBeTe BN Pbue ca B pa60Tha No3nua, npen Da OCTaBnTe OTHOBo MaunHaTAt Ha 3emrTa.
BknHouBaTe KocauKaTa cbrnacHo HnCTpyKunTe, KaTo KpaKaTa BN Tp6Ba Da ca daJeue OT HOKOBeTe.
He nocTabraTe pbcTe nn KpaKaTa cn 6n3o do BbptaunTe ce qactn nn noT.
BunharnctoIte danueoe ot n3xoHnO rTOBp.
He BdnraTe n He Hocete Kocaykata, DOKaTo DnRaTeJr pa6oTn.
YBepaTeCe,Ye BCnUKN DBNXKeu Ce Yactu ca Cnpen HnBnHO.
-BINHn, KOrato OCTaBtKe KocayKaTa;
-πpeДи Da OTCpaHЯBaTe 6JIOKINPOBKeTe NII NOUHCTBaTe 3aApbCTBaHnra Ta B KaHaJa 3aN3XBbPJIaHE;
-прди поверka, поочтвае пи пабota на Кocayka_ta;
-Korato 6bJe ydapeH uJxI npEmdet - orneJaTe 3a NobpeHa KaCauKaTa n 3nBJIHeTe Heo6XODIMTE peMOHTn, ppeN da CTapTnpaTe OTHOBn pa6OTnte C Kocaykata.
Ako IINBaIHaTa KocauKa 3aOnue He a Bn6pnpa Heo6uHHO, Heo6xOIMa e He3a6abHa npOBepka.
-
npOBepeTe 3a 3aDpBcTBaHn;
-3BbpeTe Heo6xOIMTe peMOHTn Ha NOBpeHte Yaactn;
-yBepTeCe,Ye BCnUKNraIKN,6oNTOBe IN BnHTOBe Ca 3aTeHaTn. -
IpbxTe BCnKn raiKn, 6oJITOBe N BnHTOBe 3dpaBO 3aTeHaTn, 3a Da 6bDeTe cnHypHn, Ye Kocaykata e B 6e30nacHO pa6OTHO cbCTOAHne.
IpoBepaBte YecTo yNoBHTeHa TpeBa 3a N3HOCBaHe NIN BNoWbABe Ha CbCTOARHnETo My.
3aMeHnTe H3HOceHnTe nIIN NOBpeHn Yactn, 3a da NOBUNTE CNrpyHOCTTa.
7ДОПьЛНTEЛНИнСТРУКЦИЗАБЕЗПАСHOCT3A AKUMYЛATOPHIN BATEPиN 3APЯДиN YCTPOICTBA

I3noJI3BaIte cmo npHIOXIMn 3a Ta3n MaUNHa akymyIaTOPn 6aTePNn 3apJdHN yCTPOINCTBa.
7.1 Bamepuu
He ce onntBaIte Da IIN OTBaprTe NO HnKaKbB IOBOD.
He cbxpaHbAaTe Ha MeCTa, KbDeTo TempePaTypTa MoKe Ja IpeBnI 40 ^ C
3apejdaTe cmo npOOKJHn Tempeatypm Mejdy 4^ n 40^
CbxpahraBaiTe cBOITE 6aTeepnHa cyxo, xIaHNO MxCTO (5 ^ C - 20^) . He cbxpapraBaIe HNKORA 6aTeepnTE B pa3peDeHO cbCTOHNHe.
Ha-Do6pe 3a INTneBO-IOHnTe 6atepn e da rna pa3pejdaTe npe3apejdaTe nepnoDnHO (Ha-MAIko 4 nbTn roDnHo). NdeaHTo 3apeJdaHe 3a DbJIroCpOHO cBxApaHHe Ha BaWata INTneBO-IOHnBaTePn e 40% ot kanaHTeTa.
- Ipn n3xBbprnHe Ha 6aTeepnte cna3BaIte IHcTpyKuNTe nocoueHn B pa3dena "3aunHa OKoJHaTa CpeJa".
He n3BpWBaIe CbP3BaHe Ha KbCo. Ako 6bJe HnPaBeHO CbP3BaHe MeJy NOIOKHTENHATA (+) n OTPuataTeHATA (-) KIema DnpeKTHO IIN npn CnyaeH KOHTAKT C MTeJIHN PpeMEn, 6aTePraTa ige 6bJe CbP3aHa Ha KbCo n Ie IpoteYe CNJEH TO KOITo Ie PrUnHHr HeHepnpaHe Ha TOnIIHa, KOrTO MoKe Da NOBpeDN Kopnyca IIN da IN pUnHHn IOXap.
He 3aepraBaiTe. Ako 6atepuite ce 3arpeT do Temnepatypn Had 100 ^ C yntbTheHneTo n 3oNaIOHHITE cenapATOpN iDpyrN NOIMePHN CbCTABKN MOrat da 6bDaT NOBpeDeH NOT N3TuHa He eNeKTPoIHT N/INN BbTpEshO CBbp3BaHe Ha KbCO, KOEtO BOHN DO reHepnpaHe HA TOnPiHa, npuHRAuO NobpeDa NnNoxap. B DoNbJIHeHne He XbPnIte 6atepuite B OrBn, 3aOTo MOKe Da Bb3HnKHe EKCnIO3nN I/INN INHTEH3NBHO N3rapAHe.
- Ipn ektpemHn ycnoBna MoKe da Bb3HnKHe Teu OT 6aTePnTa. Ako 3a6eJKeTte TeuHOCT Bboxy 6aTePnTa, NoCTbneTe NO CNeHNHaHH:
- BHIMATEJHNO 136bpweTe TeuHOCTTa C Kbpna. 136raBaeTe KOHTaC KoKaTa.
BcnyaHa KOHTAKT C KOXata uH OUnTe CJIeDbaIte DOJHInTe IHCTpyKUIN:
He3a6abHO rH 3nIpaKHeTe c BODa. HeyTpapan3npaTe C MEka KnceiHa KaTO NMOHOB COK IIN OUIET.
B cIyauHa KOHTaKT C OUHTe IIN PpOMnTe C O6uHIO KOJIuYeCTBO YIcTa BOda 3a Hau-MaJIko 10 MmHyTu. KoHcyTnupaJte Ce c Jekap.
He n3rapaTe akymylaTopHaTa 6aTeprna.
7.2 3apadHu ycmpoucmea
He ce onntBaIte da 3apekdaTe Hnpe3apekdaun ce 6aTepn.
Ako Ka6eJIte ca DeEkeKTHn, 3aMeHeTe rBEdHaRa.
He n3JIaIarTe Ha Bb3DeIcTBNeTO Ha BOJa.
He OTBapraIte 3aPdHOTO yCTPOINCTBO.
He npobuBaIte 3apAHOTo yCTpoNCTBO.
3apraHOTO yCTPOINCTBO e npedHa3NaueHO cmo 3a pa6oTa Ha 3akpnto.
8 3APEXDAHE, NOCTABYHE IN CBAJARE HA AKYMYLATOPHATA BATEPNY
8.1 Hndukaquu Ha 3apdHomo ycmpoucmeo (15) (Uz.A)
CbpxTe 3apHnOTo yCTPOINCTBO (14) KbM KOHTaKaTa:
- Посторно 3eЛeно: ГOTOBHOC 3a 3apeждан.
Miraio YepBeHo: 3apeKdane. - NOCTOHHo 3eJIeHO: 3apeJeHO.
- IocToaHNo 3eNeHO u cepBeHo: nobpeDeHa akymyIaTOPHa 6aTePnI nn 3apAHO yCTpOJCTBO.

Beleexka: ako akymylaTOPHaTa 6aTePnHa He Ira Do6pe B rHe3doTo Ha 3apdHOTO yCTPOcTBo, H3BaTeEЯ n npOBepeB Ta6nUcaTa CbC cneuФnKaun, daTn TOBa e npabUNnMa Moen 3a TOBa 3apdHO yCTPOcTBo. He 3apeKdaIte dpytn akymylaTOPn 6aTePn nn aKymylaTOPn 6aTePn, KOtO He OTROBaprT Ha 3apdHOTO yCTPOcTBo.
- PpOBepBaIte YecTo BkIIOeHOTo 3apJHOto yCTpoNCTBO n aKymJaTOpHaTa 6aTePnA.
- 3BaTe 3apHTo yCTpoCTBO OT KOHTaTn CBAte AkyMylatopHaTa 6aTePnCne npKIOUbaHe Ha pa6Otata.
- Octabete akymylaTopHaTa 6aTePnJa n3CTnHe HAnbJHo, npeDn Da r n3NOJ3BaTe OTHOBO.
- CbXpaHbAaTe 3aprHTo ycTPOCTBO n akymyIaTOPHaTa 6aTePnB 3aTBopeHO NOMEeHne H3BbH o6cera Ha deca.

БЕLEЖKA: Ако akумлалopнота 6aTeря ce 3arpee npn npodbIxHapabota c nHcTpymeHTa, OCTaBeTeЯ n3ctnHe do CTaHnA TemnepaTpya,npedn daЯ BKNIOUHTe 3a 3apeXdaHe. TOba ue ydIbIXN XNBOTA haakymylalopnata 6aTeprn.
8.2 NocmaeHa akymylamophama 6amepu (Ua.AuB)

IPEyIPEXJEHNE BuHaRn OTCpaHraBaTe aKymlaTopHn8 6loK (12) n KIOUa (2) ot cB0r IHCTpyMeHT, KOrato Crrno6BaTe qactn, npabnte perynpoBkn, noocTBate, nN KOrato He ro n3no3BaTe. OtctpaHraBaHeTo Ha aKymlaTopHn8 6LOk N KIOUa ige ppeoTbpaTHn CnyauHNo CTapTnpaHe, Koeto npuHHIO cepHO HapaHBAHe Ha Xopa.
BdHHeTe KaJaKa Ha aKymVaTOpHaTa 6aTepeia (7).
- Пoctabete akymvnaTOPHЯбLOK (12) в Косачкata.
IoppaBHeTe NOBnHaTnepe6pa Ha akymyJatOpHna 6JOK C KaHaJIte B OTbopa 3a akymyJatOPHata 6atePnHa KocayKaTa.
HaTnCHHe HaIOny OTeJeHHeTo 3a AkymyIaTopHaTa 6aTepeN, DOKaTO NocneHaTa
CnycheTe kanaKa Ha akMyJaTOpHaTa 6aTepe.

PPEyIPEXJEHNE YBepeTe ce, ye 3akOnyJIkata B rOpHaTa qact Ha akymlyaTOPHn6IOK ce fIKCnpa Ha MAcTo N akymlyaTOPHn8 6Iok e npInerHaHnBnHO nro 3actOpopeT B OTBopa 3a akymlyaTOPHa7 6aTeprn npEi 3anOuBaHe Ha pa6oTa. Hecna3BaHeTo Ha cnrypHoto npInrahe Ha akymlyaTOPHnJPOK MoKe Da npUHHn NaJaHe Ha akymlyaTOPHn6IOK n cepNo3Ho HapaHBAHe Ha Xopa.
8.3 3a omcmpaHReaeHa akymyIamOpHua 6Jok (Uz.A u B)
BdHHeTe kanaKa Ha akymyNaTopHaTa 6aTePn8 (7).
HaTnchete H3aPbXte 6yToHa Ha 3aKoNuaIkaTa (13) Ha akymyIaTOPHata 6aTepy B TropHata YAcT Ha aKVMyIaTOPHna 6JOK.
OTcTpaHete aKymyJatopHn8 6JOK OT KocayKaTa

ПЕДУПЕЖДEHNE 3a ИЗБЯВане Ha серноЗн НараяBaнe Ha Xopa BИнаги OTстраяВаite AkумЛаTOPнь 6лOK И КлЮча, KOrATO ппehаTe IIN TpaHCnOPTnPaTe INHCTpyMeNTa.
8.4 Hdukamop Ha 3apraHa akymy lamophama 6amepu (Ua.A)
AkyMaTOpHata 6aTePnHa mHa HnDnKaTOpn Ha 3apexdAnHeTo (16) n MoKe da npOBepnte CbCToHNeto N, KaTO HATNCHeTe 6yToHa (17). PpeDu Da n3NoJ3BaTe INcTpymeHTa, MOJI, HATNCHete 6yToHa, 3a Da npOBepNTe dAJn AkyMyaTOpHata 6aTePnE e DocTaTbUHO 3apeDeHa 3a HopMaJHa pa6ota.
Tpnte CBeToOnoJa NOKa3BaT HnBOTO Ha 3apeXdaHe Ha akymyNaTopHaTa 6aTepe:
CBeTATPNTe CBeToNDoJa: AkymyNatOpHaTa 6aTepeH e HantbNo 3apeDeHa
CBeTЯnDBa CBeToNDoA:AkyMylatopHaTa 6aTepeH e 3apeDeHa Ha 60%
CBeTN eINH CBeToIIOI: AkymyIaTOPHaTa 6aTePnE e noTu pa3peDeHa
9 CΓΙΟΥBAHE
9.1 C2no68aHe Ha pbkoXgamKa
9.1.1 MoHTupaHe Ha dOJIHaTa pbKOxBaTka (Φn.r. A n C)
OTcTpaHHeTe 6nokpaaunra 6yToH (5) nwaibata ot DBeTe CtpaHn, HAMIPAuCe HaJ3aHHTe KOpena.
IINb3HeTe DoJIHaTa pBkoXBaTKa (8) Bbpxy MOHTaxHnTe 6oJTOBe HAMnpuCi ce HaJd 3aHNTE KOJIeJa.
-ПьзHETe шабNTe Bbpxv 60NTOBETe.
3aTeHHeTe pBkoXBaTkata c 6Iokupaunte 6yToHn (5).
9.1.2 Crno6BaHe Ha rOpHaTa yAcT Ha pbKoXBaTkata (Anr. 6A n & D)
BkapaTe eINH bJIb r MOHTaxeH 6oIT npe3 OTbopa B eHaTa CtpaHa Ha DOJIHaTa DkoXBtKa (8) C KpaCooH HABh.
- IocTabete rohpata pkoxbatka (10) Bbpxy kpa ha 6oJta, nHctannpaTe wai6ata m 6nOKpOBkata Ha rohpata pkoxbatka (9).
- Ot cpeuynoJxHaTc TpaHa nOdpaBHeTe OTbOpHe Ha rOpHa (10) nDoJHaTa (8) PkoXBAtKa mOHtPaJte DpynA Dblr 6ont.
HCTaIpaTe 7aI6aTa n 6IOKIpOBKaTa Ha rOpHaTa pBKOXBaTKa (9). 3aTeHete DBeTe 6IOKIpOBKn.
3A6EJEXKA: Ako doJIHaTa pBKOXBaTKa (8) ce pa3xna6n nIi He IЯRa HAnbJIHO B npope3a, 3aBbPTeTe DoJIHaTa pBKOXBaTKa NO YacOBHnKOBAtA CTpeJIka, 3a Da 3actOnOpHTe pBKOXBaTKaT.
9.1.3 Ioparahe Ha 3axpaHbauu Ka6eI (Anr.AnD)
IonojTe 3axpaHbauy Ka6eBbpxy DoJHaTa n TOpHaT a KOpMnHn PbKOXBaTKn KaTO n3noJ3BaTe DOCTaBeHnTe Ka6eJHn CkO6n (4).

BHMaHHe: 3axpaHbAunr Ka6e (a) Tpr6Ba BnHarn da 6bJe
No3uOnHpaH Bpxy pkoXBaTKata. ToBa ocNpyra Cbo6oJHo
DbXKeHne Ha Ka6eJa Bpxy DoJHaTa cekn, KOraTo pkoXBaTKata ce
crBa. HenpaBnIHO MoHTnpaHe Ha Ka6eJa MOxe Da doBeDe Do HeTOBaTa
NoBpeDa n/nn HapraHa, BoeUn Do Heu3npaBHOCT Ha MaunHaT. B To3n
cnya rapaHcunrTa ce anynpa.
9.1.4 3a cnyckaHe Ha ropaTa pbkoxBatka (ΦnR.A n D)
Ocbo6oJeTe 6yToHnTe Ha roPHaTa pBkoXBaTKa (9),doKaTo pBkoXBaTKaTa (10) MoKe da ce Bbptu CBO6oHO.
CrbheTe rophata pbkoXBaTKa Hanpei, Kocaykata cera e no-KOMnaktha 3a cbxpaHeHne.
9.2 Canelo6eane Ha kymura 3a mpeea (Ua.A u E)
Kytna 3a TpeBa (3) ce doctabra kato 3 OTDeJHn Yactn n Tp6Ba da 6bde crIoo6ha.
IocTabete DoHata qact (a) Bbpxy paBHa NOBbpxHOCT IN Noctabete rOpHata qact (b) Ha MACTO.
YBepeTe ce, ye BCnKc Cbbp3Baun yactn ca fKnCupaHn cnpyho EaHa KbM dpyra.
IocTabete pBkoXBatkata (c) KbM rOpHaTa qact no Cbunna HauH.
9.3 HcmaIupaHe Ha ycmpoucmeo 3a ynaeHa mpeea (Ua.A u B)
- OtctpaHete KJIIOHa (2) n akymyIaTOpHn8 6nok (12).
BdHHeTe 3aHaTa BpaTa 3a H3Pp3BaHe (18).
BdHHeTe yctpoiCTBOTo 3a yIaNbAHe Ha TpeBa 3a HerOBaTa IpbXka Iro NoCTaBeTe NO3aHaTbPaTa 3a H3npa3BaHe, Taka Ye KyKInTe Ha yCTpoiCTBOTo 3a yIaNbAHe Ha TpeBa DaJIerHaT B IPOPe3NTe Ha KOpNvCa Ha KocayKaTa.
Ocbo6oTe 3aHaTa BpaTa 3a nIpa3BaHe (18). - HCTaJInpaIte OTHOBO KJIIOUa n aKYMvIaTOPHn8 6JOK, KOraTO CTe rOTOBN da KOCHTe.
10 PABOTA
10.1 CmapmupaHe/cnupaHe Ha kocaykama (Ua.A u B)
BdHHeTe kanaKa Ha akymyNaTopHaTa 6aTePn8 (7).
- HnctaInpaIte akymyIaTOPHn6JOK (12).
BkapaTKeKJIOya(2)BOTBOPa3aKJIOya.
CnycheTe kanaka Ha akymylaTOPHaTa 6aTepey (7).
HaTnCHHeI 3aApbXTe CTapTOBn6yToH (1).N3dbpnaTe CnpaHnIOCT (11) KbM pkoXBAtkata n OTnyChTe 6yToHa, 3a da CTapTnpate KOcaKaTa.
3a Da cnpete KocaykaTAt, OTnycheTe cnnpaHnI IOCT (11).
10.2 Hacmpouka Ha bucoyuHama Ha HoKa (UaA u F)
Ipn doctabkata KOlejata Ha Kocaykata ca noCTaBeHn B HnCKa No3uqna Ha p3aHe. Ipei Da n3noJ3BaTe Kocaykata 3a NpBn NbT, NOBnHte No3uqraHa P3aHe Do BnCOunHaTa, KOrTo e Ha-NoDxOJa 3a BaWata JnBaJa.
3a peRyJnpaHe Ha BnCOuHnHaTa Ha HOxA:
- OtctpaHete KJIIOHa (2) n akymyIaTOPnHn 6JIOK (12).
POWDPG75561 BG
3a yBénluHaBe Ha BnCOunHaTa Ha HOxα XBaHete JIOCTa 3a perylnpaHe Ha BnCOUnHaTa (6) n ITO pEmecTeTe KbM 3aHaTc TpaHa Ha KocayKaTa.
3a HamaJIraBaHe Ha BnCOUHaTa Ha HOxA XBaHeTe JIOCTa 3a peryJInpaHe Ha BnCOUHaTa (6) nTO pEmecTe Te KbM npEnHaTa CTpaHa Ha Kocaykata.
HCTaIpaIte OTHOBKIOUa (2) n akymyIaTOPHn8 6NOK (12), KOraTO cTe roTOBn da KOcHTe.
10.3 Ipeynpeumna cucmema 3a kymura 3a mpea (Ua.A u B)
HnBO Ha 3ByKOBoTo HnIraHe LpA 63dE(A)
HnBO Ha 3BykoBaTa MoUHOCT LwA 84d6(A)

BHIMAHHE! Hocete nHdNvduaHn npedna3Hn cpeCTBa 3a cnyuXa (aHTnΦoHn), aKo 3BykoBTo HaJraHe npebuHn 85 d6(A).
aw(Bn6paun)
1,9m/s² K=1,5m/s²
POWDPG75561 BG
14 TAPAHUN
To3n npodukT mma rapaHcnoHeh cpoK 36 Mececa, KOITo BIn3a BCnna OT daTata Ha nokynka Ha nbpBnna noTppe6nteI.
Ta3n rapaHnI NOKPbBA BCNUKn DeEeKTH Ha MaTePnAIn I npOn3BOODCTBHeN DeEeKTHN, HO He BKNIOUBA: 6aTePN, 3aprAnu yCTPOINCTBa, DeEeKTHN Yactn BCNECDTBne Ha HOpMaJHO n3HOCBaHe n3TPnBaHe KaTo NaRePN, YeTK, KaBeN u ZencelN nn Akcecoapn KATO CBpeDnA, HApKaHnUs 3a npObHNn INCTpyMeHTN, pExeN dNCKOBe N T.H., NOBPeDN I DeEeKTH n POn3TnuaSOn OT HeNPabUNHa yNoTpe6a, 3JonoJyKn nnn HApPaBeHn INPOMEHN, HHTO TPAHCNOPTHNe pa3XoDn.
IIOBpeHn/INJn Deepektn npOn3TuHaaun OT He npabNHO ynoTpe6a He ce 0xbaaat OT Teu rapaHnOHn YCNOBna.
OcBeH TOBa He HOCIM HnKaKBa OTROBOPHOCT 3a TeJeCHn HapaHbAHn Ipon3TuHaUN OTHepaBnHaTa VNOTpe6a Ha IHCTpyMeHTa.
PemOHn MoT a6bDaT n3BbPwBaHc mo OT yIbJIHOMOueH nOTpe6nteN CepBu3EH eHTbp 3a eNEKTPoHCTpyMeHTn.
MoxTe Da IOnyUte IOnbIHTeHa HOpMaun Ha Homep 00 32 292 92 90.
BcnuK TpaHcnpTH pa3xOAnIe 6bDat noEtN OT nOtpe6nten,OCBeH aKO nncMeHO He e dorobopeHo npVro.
B cIIO TO BpeMe, He MORAT da ce IpeJRABaT IpeTeHcun IO rapaHcIraT, aKO NOBpeDaTa Ha ypeDa e BCJeDCTBHe OT IpeHe6perBaHe Ha TEXHNueCKOTO 06ClyXBAHe NIN IpeTOBapBaHe.
- Ot rapaHnraTa KaTeOpuHo Ce n3KJNoUBa NOBpeJa, KOrTO e B pe3yIITaT OT npOHnKBaHe Ha TeuHOCT, MHOrO npax, npeHaMepeHa NOBpeJa (ymNJIeHa nn Nopadn TotAnHO 6e3rpXkne), HEnoDxOJaIO n3PON3BaHe (n3PON3BaHe 3a ceEN, 3a KOnTO ypeDbT He e nOxDxOJaI), HEKOMNeTeHTHO n3PON3BaHe (HaNP. HeCnA3BaHe Ha INHCTpyKUnTE B pBkoBOdCTBOTO), HEKOMnTeHTeM OHTaK, rpbMOTeBnueH yAp, HnPaBnHn HO HanpeXeHne, To3n cnncbK He e n3YeepNaTeJeH.
- Ipiemaheto Ha rapaunOHn npTeHn HNKora He MoKe Da DOBeDe Do yDbJxabaHe Ha rapaunOHnCpOK, HTO do 3anoBaHe Ha HOB rapaHNOHe CpOK B CnyaHa 3amHa HA yCTPOCTBO.
- YcTpoiCTbata nnn Deaunite, KOnTO ca 3aMeHEn CbO6pa3HO rapaHUNOHHTe ycNOBnA, cnEOBaTeNHO OCTaBAT CO6CTBeHOCT Ha VAro NV.
Hne cn 3ana3Bame npaboto da OTXBpIm Bcra Ka npeTeHnry, B cnyaay e nokykata He MoKe Da 6bDe npOBepHa nn, KOraTo e rCHO, Ye npOdyKTbT He e NODbpxaH npabuHNO. (NouchBaHe Ha BeHTnlaunOHnTe OTBOpN, peoBHa NoDpBXKa Ha KapboHOBnTe YETKN....)
CbXpaHbAaTeΦakTypaTa3a NOKyPkata KaTO DOKa3aTeJIcTB0 3a DaTata,Ha KOrTo e HApBaBeHa T.
Tp6Ba Da BbPHeTe HeMeHTnHaHn HcTpymeHt Ha npOdaBa a B npEmJInBO YNCTO CbCToHne, BOpINHaHnTO My JIto Kyapue, aKO yCTpoiCTBOTO mTaKOBa, PNDpyKaBAHO OT DOKa3aTeJICTBOTO 3a NOKyNkata.
BaunrHnctpyMeHT Tp6Ba Da 6bDe 3apeKdH Hau-MaIKO BeHbX MeceHo 3a OcNvprBaHe Ha ONTmAlHaTa My pa6ota.
15 OKOJIHA CPEDA
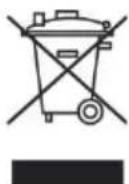
Ako cIeI npOdbJIxHKeJIHa yNOTpe6a MaunHaTa Bn Ce HxKdae OT NOmHa, He n3XbBpIyTe CTapaT npIN DoMaKInHckInTe OTnAbu, a y YHnUoxKeTe No Haun, 6e3onaceH 3a OKoHata Cpea.
HenyxHnTe eJektpnueckn npOyKTn He Tp8Ba da 6bDaT n3XbBpIaHn 3aeDHO domaknHCKnTe OTnaDbu. MoJ, npoyHe Te KbJe IMa Bb3MOxHocTn 3a peunKnpaHe. POnCKaIe OT MeCTHn Beactn nn Ot npoDaBaay Cbbetn OTHOCHOpeUNKnupaHETo.
16ДЕКЛAPALUNA 3ACbOTBETCTBNE

varo
VARO - Vic. Van Rompuy N.V. - Joseph Van Instraat 9 - BE2500 Lier - Beijrna deKnapura eDInHCTBeHO, Ye
npoDyKT: KOCAUKA 20BØ340MM
Mapka: PowerPlus
moJeI:POWDPG75561
e B CbOTBETCTBnE C OCHOBHnTe N3NCKBaHnry n Dpyr n CbOTBeTHn pa3nope6n Ha npInoXmnte Ebponeickn dIpeKtNB/Perynaun, 6a3npaHn Bbpxy npinaraHeTo Ha EbponeicknTe xapMOHN3npaHn CTaNapTn. BcraKe HeynbHHomOuEHa MoDnΦnKauaHn Ha anapaTa aHynpa Ta3N DeKnapau.
Ebponeckn DnpekTbN/Peryaun (BkHouHTeHIO TexHNTe npomeHKn bM daTaTa Ha noDnncBaHe, aKo ca npnoXm):
2011/65/EU
2006/42/EC
2014/30/EU
2000/14/EC
Annex VI
LwA
Measured 84dB(A)
Guaranteed 86dB(A)
Notified Body TUV SUD - 0036
Ebponeckn XapMOH3npaHn CtaHdapTn (BKnIOHTeJIHO TexHNTe npOMEH NbM DaTaTa Ha noDnCBAHe, aKo ca npINOJXIMN):
EN60335-1:2012
EN60335-2-77:2010
EN IEC55014-1:2021
EN IEC55014-2:2021
CbXpaHnTeJHa TexHnueckaTa DOKyMeHTaZn: HnInn BaHKePkXOB, VARO - Vic. Van Rompuy N.V.
DonyoDncaHnT DeiCTBa OT IMeTo Ha N3nbJIHnTeJHnA DnpeKTop Ha KOMnaHnTa,

Ludo Mertens
Certification Manager
20/10/2023, Lier - Belgium
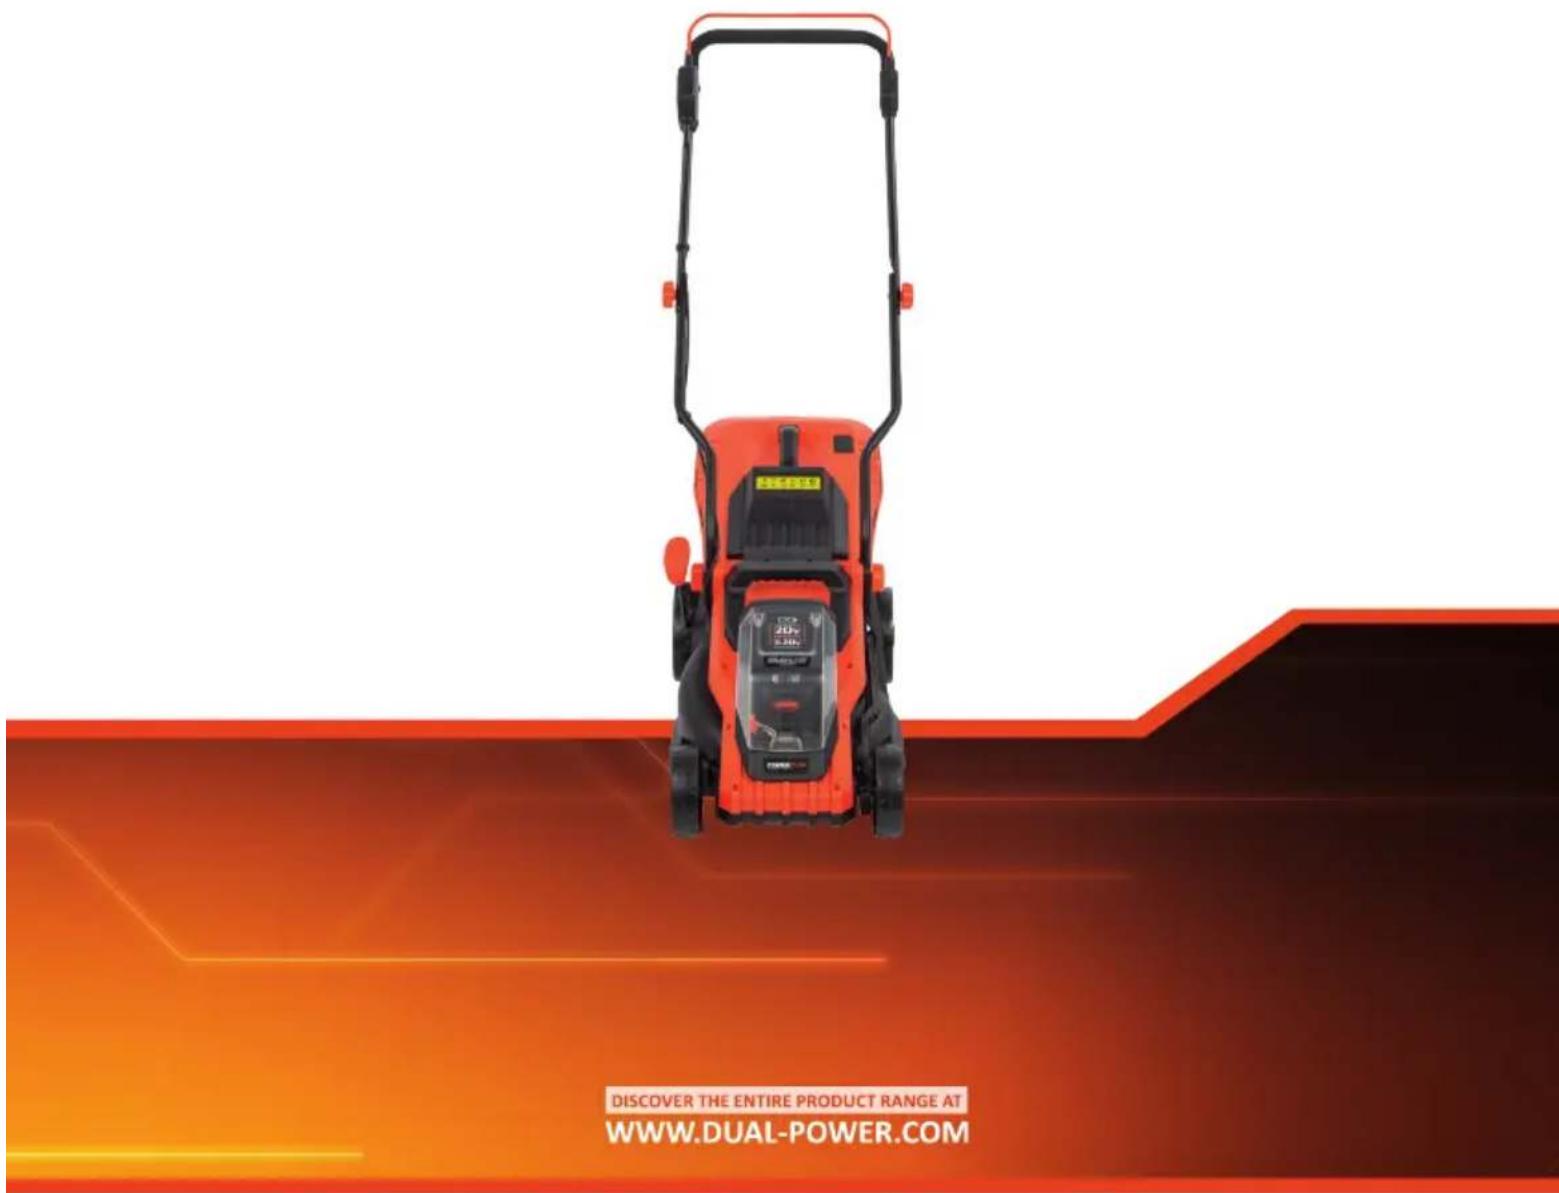


- POWDPG75561
- BESCHRIJVING (FIG. A)
- LAWN MOWER 20V 340MMPOWDPG75561
- INTENDED USE
- DESCRIPTION (FIG. A)
- PACKAGE CONTENT LIST
- POWDPG75561 EN
- SYMBOLS
- GENERAL POWER TOOL SAFETY WARNINGS
- Work area
- Electrical safety
- Personal safety
- Power tool use and care
- Service
- ADDITIONAL SAFETY INSTRUCTIONS FOR LAWN MOWERS
- ADDITIONAL SAFETY INSTRUCTIONS FOR BATTERIES AND CHARGERS
- Batteries
- Do not incinerate the battery.
- Chargers
- CHARGING AND INSERTION OR REMOVAL OF BATTERY
- Charger indicators (15)(Fig. A)
- Insertion of battery (Fig. A & B)
- To remove battery pack (Fig. A & B)
- Battery capacity indicators (Fig. A)
- ASSEMBLY
- Handle assembly
- OPERATION
- Starting/stopping the mower (Fig. A & B)
- Setting blade height (Fig. A & F)
- Grass box warning system (Fig. A & E)
- Mulching (Fig. G)
- CLEANING AND MAINTENANCE
- Cleaning
- Blade maintenance
- Warning! Observe the following precautions:
- Replacing the blade
- For safety reasons, we recommend having the blade replaced by an authorized professional.
- Important: Wear work gloves!
- TECHNICAL DATA
- NOISE
- ATTENTION! Wear hearing protection when sound pressure is over 85 dB(A).
- WARRANTY
- ENVIRONMENT
- DECLARATION OF CONFORMITY
- POWDPG75561 DE
- ADVERTECIAS GENERALES EN MATERIALA DE SEGURIDAD . 5
- RENGJØRING OG VEDLIKEHOLD
- Rengjoring
- Bruk参加会议, but he was not able to speak. Bruk woke up and looked at the man who had spoken to him. "I'm sorry for it," he said, his voice softening.
- XAOOKONTIKH MHXANH 20V 340MMPOWDPG75561
- PPOBÄENOMENH XPHΣH
- ΠΕΡΑΦH (EIK. A)
- KOSILICA ZA TRAVNJAKE 20V 340MMPOWDPG75561
- NAMJENA
- POWDPG75561 RU
- CODEPXMOE YNAKOBKN
- yCJIOBHBIE O6O3HauEHHa
- 7ДОПОЛНТЕЛьнtie ИНСТPyКци ПОТEXHnke 6E3OПАСHOCTN ПРИ OБРашЕн C AKKUMЛЯТOPAMN IN 3APYДнБIMN YCTPOICTBAMN
- Akkymyjarnopby
- 3apnHbIyycmpoUcmea
- 3APЯДКA И YCTAHOBKA ИЛN CHЯТNE AKKUMYЛТOPA
- Hhukamopby 3apdno ycmpoucmea (15) (Puc.A)
- OKPYXKAIOUJAR CPEDA
- DEKJIAPAUNO COOTBETCTBNI
- ПЕДHA3HAUECHNE HA YNOTPEBATA
- ONICAHNE (ФИг.А)
- CnncbK HA CbIbPxAHNETO HA ONAKOBKATA
- CnMBOJN
- 5OBuINIpeDyPExKdEHN3ABe3OpACHOCTPNN3IOJ3BAHE HA MOUH INHCTPYMEHTN
- Pa6omHa 30Ha
- EneKmpuuecka 6e3onacHocm
- POWDPG75561 BG
- JIuHa 6e3oNaChocm
- N3noJ3eAhe u 2puKu 3a MexaHuaHua Uhcmpymehm
- Cepu3Ho 06cnykeaHe
- 6ДОПьЛНITEЛН ПРавиJA3AБE3ОПАСHOCTПРИ 3ПОЛ3BAHEHAKOCAYKN
- 7ДОПьЛНTEЛНИнСТРУКЦИЗАБЕЗПАСHOCT3A AKUMYЛATOPHIN BATEPиN 3APЯДиN YCTPOICTBA
- Bamepuu
- He n3rapaTe akymylaTopHaTa 6aTeprna.
- 3apadHu ycmpoucmea
- 3APEXDAHE, NOCTABYHE IN CBAJARE HA AKYMYLATOPHATA BATEPNY
- Hndukaquu Ha 3apdHomo ycmpoucmeo (15) (Uz.A)
- NocmaeHa akymylamophama 6amepu (Ua.AuB)
- 3a omcmpaHReaeHa akymyIamOpHua 6Jok (Uz.A u B)
- Hdukamop Ha 3apraHa akymy lamophama 6amepu (Ua.A)
- CΓΙΟΥBAHE
- C2no68aHe Ha pbkoXgamKa
- MoHTupaHe Ha dOJIHaTa pbKOxBaTka (Φn.r. A n C)
- Crno6BaHe Ha rOpHaTa yAcT Ha pbKoXBaTkata (Anr. 6A n & D)
- Ioparahe Ha 3axpaHbauu Ka6eI (Anr.AnD)
- 3a cnyckaHe Ha ropaTa pbkoxBatka (ΦnR.A n D)
- Canelo6eane Ha kymura 3a mpeea (Ua.A u E)
- HcmaIupaHe Ha ycmpoucmeo 3a ynaeHa mpeea (Ua.A u B)
- PABOTA
- CmapmupaHe/cnupaHe Ha kocaykama (Ua.A u B)
- Hacmpouka Ha bucoyuHama Ha HoKa (UaA u F)
- Ipeynpeumna cucmema 3a kymura 3a mpea (Ua.A u B)
- TAPAHUN
- OKOJIHA CPEDA
- 16ДЕКЛAPALUNA 3ACbOTBETCTBNE
Brand : PowerPlus
Model : POWDPGLWS1
Category : Lawn mower