WIFIDS21WT - Smoke detector NEDIS - Free user manual and instructions
Find the device manual for free WIFIDS21WT NEDIS in PDF.

| Product Type | Wi-Fi Smoke Detector |
| Brand | Nedis |
| Model | WIFIDS21WT / WIFIDS21WT3 |
| Power Supply | CR123A battery (included) |
| Battery Life | Approximately 1 year (depending on usage) |
| Low Battery Indicator | Yes (beep and red LED flash every 40 seconds) |
| Test/Silence Function | Yes (button on the device) |
| Silent Mode | 9 minutes (activated during alarm) |
| Connection | Wi-Fi (via Nedis SmartLife app) |
| Compatible App | Nedis SmartLife (Android and iOS) |
| Intended Use | Indoor only, smoke detection in confined spaces |
| Operating Temperature | -10 °C to 55 °C |
| Humidity | Avoid high humidity (do not install within 3 m of a humidity source) |
| Recommended Mounting | On the ceiling, at least 50 cm from walls, minimum height 1.80 m |
| Package Contents | Detector, mounting bracket, CR123A battery, 2 screws, 2 wall plugs |
| Certifications | CE, RED 2014/53/EU |
| Maintenance | Test once a week, do not paint |
| Cleaning | Avoid dust and dirt – do not use water |
| Safety | Do not expose to water, rain or high humidity; indoor use only |
| Spare Parts | CR123A battery (replacement) |
| Repairability | Repair by qualified technician only |
Frequently Asked Questions - WIFIDS21WT NEDIS
User questions about WIFIDS21WT NEDIS
0 question about this device. Answer the ones you know or ask your own.
Ask a new question about this device
Download the instructions for your Smoke detector in PDF format for free! Find your manual WIFIDS21WT - NEDIS and take your electronic device back in hand. On this page are published all the documents necessary for the use of your device. WIFIDS21WT by NEDIS.
USER MANUAL WIFIDS21WT NEDIS
natural_image
Line drawing of a rectangular electronic device with a circular button and a small dot pattern on the side (no text or symbols)
EN Quick start guide 9
DE Kurzanleitung 16
FR Guide de démarrage rapide 24
NL Snelstartgids 32
IT Guida rapida all'avvio 40
ES Guía de inicio rápido 48
PT Guia de iniciação rápida 56
SV Snabbstartsguide 64
FI Pika-aloitusopas 72
NO Hurtigguide 80
DA Vejledning til hurtig start 87
HU Gyors beüzemelési útmutató 94
PL Przewodnik Szybki start 102
EL Οδηγός γρήγορης εκκίνησης 110
SK Rýchly návod 119
cs Rychlý návod 127
RO Ghid rapid de inițiere 135
Specifications
| Product Smoke alarm | |
| Article number WIFIDS21WT/WIFIDS21WT3 | |
| Dimensions (l × w × h) 76 × 76 × 28.5 mm | |
| EU Certification EN 14604:2005/AC:2008 | |
| Battery type CR123A 3 V (Included) | |
| Battery lifespan 2 years | |
| Alarm volume ≥85 dB (at 3m) | |
| Alarm output Visual and audible indication, NedisSmartlife notification | |
| Low-battery alert Yes | |
| Operating temperature -10 °C – 55 °C | |
| Operating humidity ≤95% | |
| Wireless connections Wi-Fi: 802.11 b/g/n | |
| Wi-Fi frequency range 2412 - 2472 MHz | |
A
B

flowchart
graph TD
    A["Attic"] --> B["BEDROOM"]
    A --> C["HALLWAY"]
    A --> D["BATHROOM"]
    A --> E["LIVING ROOM"]
    A --> F["KITCHEN"]
    A --> G["GARAGE"]
    A --> H["FURNACE ROOM"]
    A --> I["BASEMENT"]
    B --> J["Recommended"]
    C --> K["Do not use"]
    D --> L["Optional"]
    E --> M["Recommended"]
    F --> N["Recommended"]
    G --> O["Recommended"]
    H --> P["Recommended"]
    I --> Q["Recommended"]
C
text_image
50 cm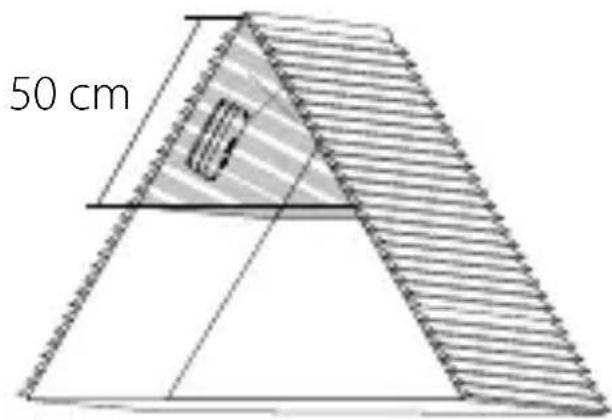
text_image
50 cm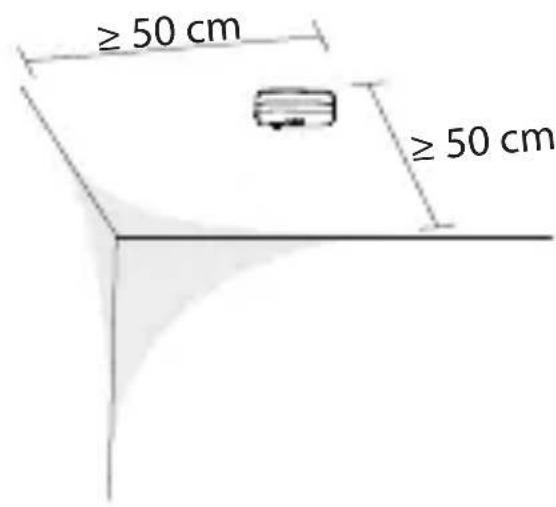
text_image
≥ 50 cm ≥ 50 cmD
natural_image
Technical line drawing of a mechanical component with multiple screw holes and internal features (no text or symbols)E
natural_image
Diagram showing a computer mouse with an arrow pointing to a device casing with internal components (no text or symbols)Smoke alarm
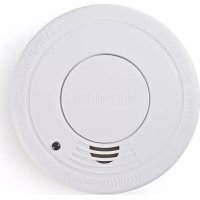
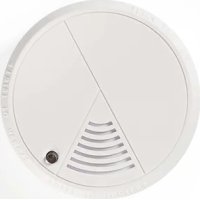
This product is intended for smoke detection in confined spaces.
The product is powered by a CR123A battery (included) and has a low battery warning indicator.
The product is designed for detecting smoke in the air. The smoke alarm cannot prevent a fire.
The product is intended for indoor use only.
Any modification of the product may have consequences for safety, warranty, and proper functioning.
This product is intended to be used in household and similar applications such as kitchen areas.
The product must not be mounted in damp rooms, near doors, windows, ventilators or radiators.
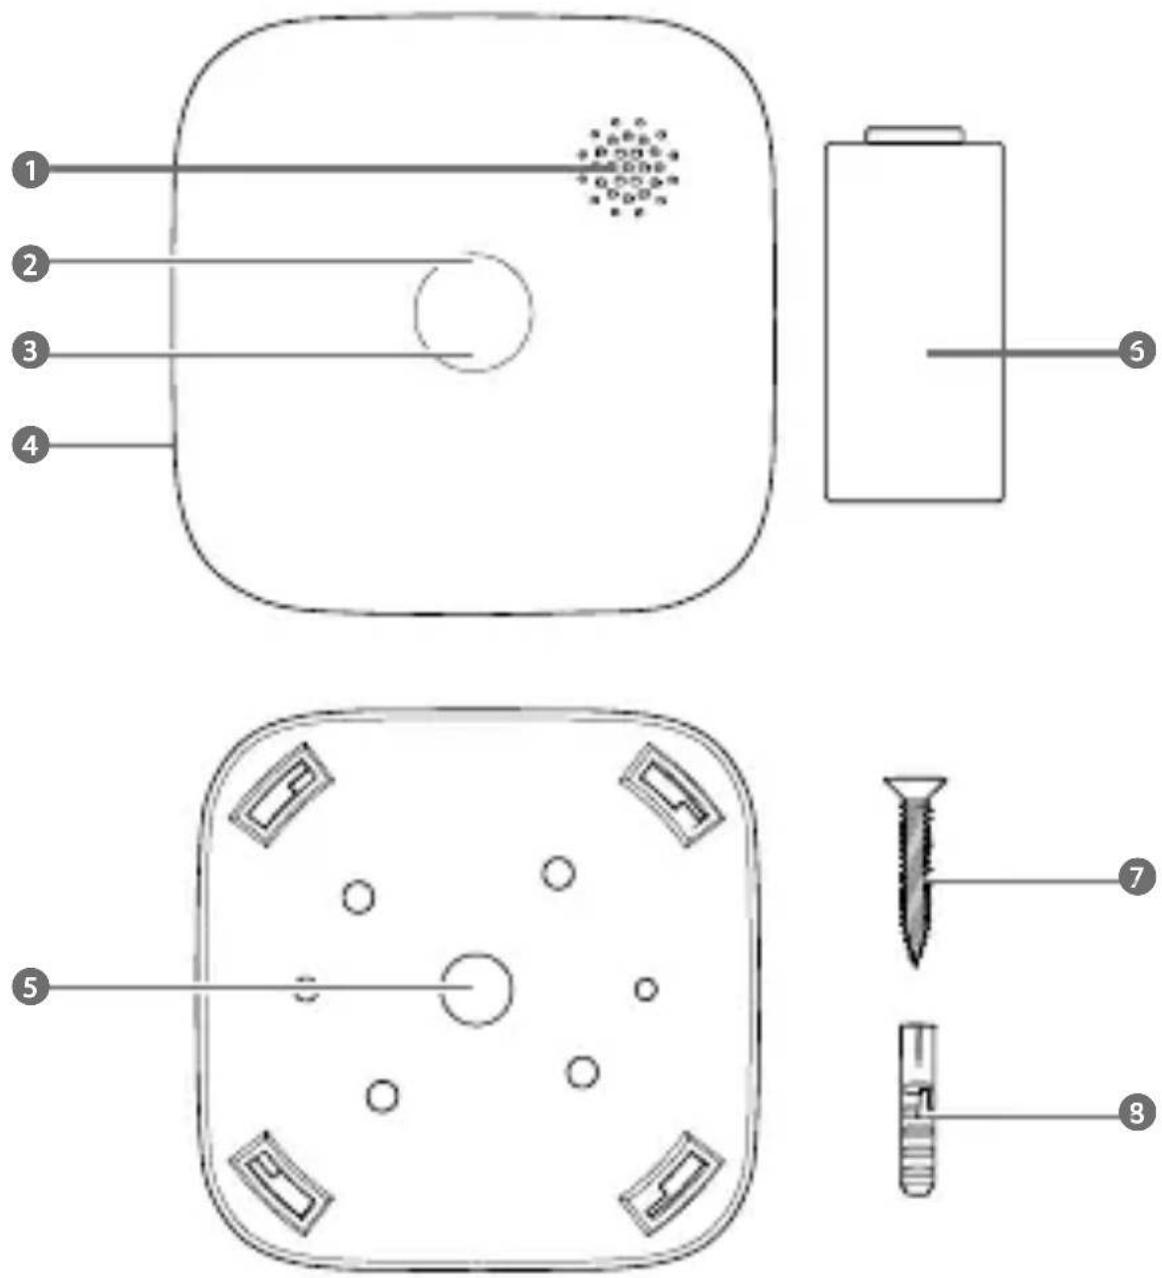
Main parts (image A)
1 Alarm
2 Test/Silence button
3 Indicator*
4 Battery compartment
*The led indicator can appear dim.
5 Mounting bracket
6 Battery
7 Screws (2x)
8 Plugs (2x)
Safety instructions
WARNING
- Ensure you have fully read and understood the instructions in this document before you install or use the product. Keep the packaging and this document for future reference.
- Only use the product as described in this document.
- Do not use the product if a part is damaged or defective. Replace a damaged or defective product immediately.
- Do not drop the product and avoid bumping.
- Do not expose the product to water, rain, moisture, or high humidity.
- Test the product once per week to ensure proper operation.
- Do not paint the product.
- Do not use this product in a dusty or smoky ambience.
- Do not use the product for outdoor uses, the product is designed for indoor use.
- Replace the product under conditions of malfunction or end-of-life.
- This product may only be serviced by a qualified technician for maintenance to reduce the risk of electric shock.
- Do not dismantle, open or shred cells or batteries.
- Do not expose cells or batteries to heat or fire. Avoid storage in direct sunlight.
- Do not short-circuit a cell or a battery.
- Do not store cells or batteries haphazardly in a box or drawer where they may short-circuit each other or be short-circuited by other metal objects.
- Do not subject cells or batteries to mechanical shock.
- In the event of a battery leaking, do not allow the liquid to come in contact with the skin or eyes. If contact has been made, wash the affected area with copious amounts of water and seek medical advice.
-
Only use the battery type(s) recommended in this document.
-
Keep cells and batteries clean and dry.
- Retain the original product literature for future reference.
- Battery usage by children should be supervised.
- Dispose of the cell or battery properly.
- Seek medical advice immediately if a cell or a battery has been swallowed.
Installing the battery
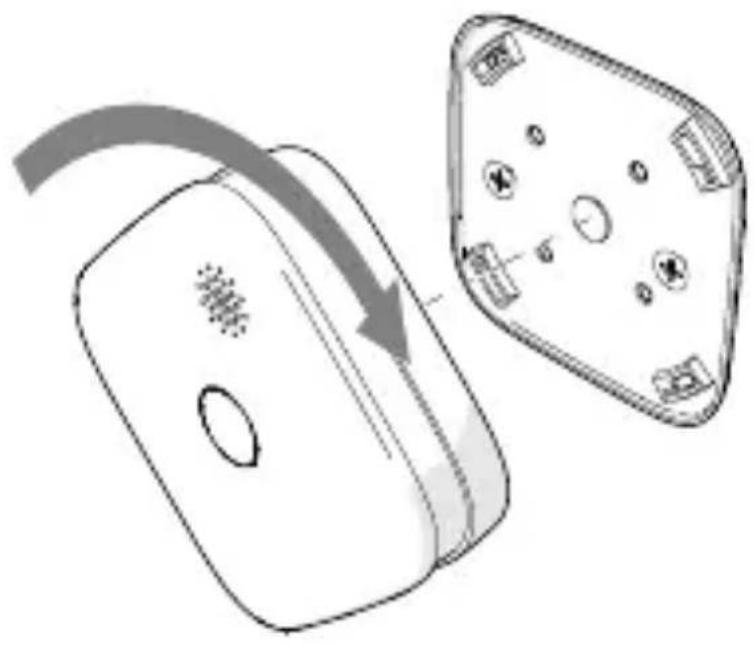
- Turn the alarm A ① counter clockwise to remove it from the bracket A ⑤.
-
Insert the battery A 6 into the battery compartment A 4 . Make sure that the battery polarity (+/-) matches the polarity markings inside the battery compartment.
-
Turn the alarm A 1 clockwise to attach it to the bracket A 5.
-
Test the product.
Constant exposure to high or low humidity may reduce battery life.
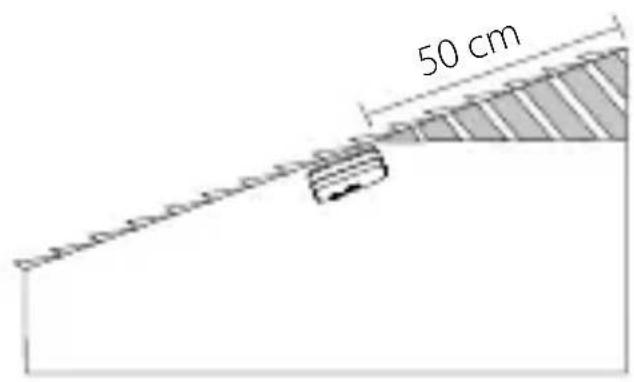
Choosing a location (image B)
For the highest safety, it is recommended to install the product in areas with a source of combustion where smoke can be detected as quickly as possible.
The product should be installed in:
• Every sleeping area.
- Both ends of a hallway longer than 12 m.
- Every room where a furnace, a heat source and/or other burning devices are located.
- Every room where multiple people spend several consecutive hours.
• Install at least one product on each floor of a multi-level home.
In areas with a source of combustion:
- On the ceiling, at least 50 cm away from surrounding walls.
- At a central point in the room.
- Not in turbulent air (near windows, ceiling fans or air conditioners).
The product can also be installed on a sloped ceiling.
not install in the tip of a sloped ceiling as smoke-free air can collect in these areas, preventing smoke from reaching the product.
In sleeping areas:
- Not in turbulent air (near windows, ceiling fans or air conditioners).
- Not behind objects (curtains or closets).
Other areas:
- Not in turbulent air (near windows, ceiling fans or air conditioners).
- Not behind objects (curtains or closets).
For optimal smoke detection install the product at a minimal height of 1.80 m. Do not install the product:
• in dirty, greasy or dusty areas.
• in temperatures below -10 °C.
• in temperatures above 55 °C.
- in turbulent air (near ceiling fans, air conditioners or open windows).
• within 3 meters of a high humidity source.
• within 1.5 meters of kitchen appliances.
• within 6 m of a furnace or fuel burning heat sources.
• behind objects like curtains or closets.
• within 1 m of fluorescent light.
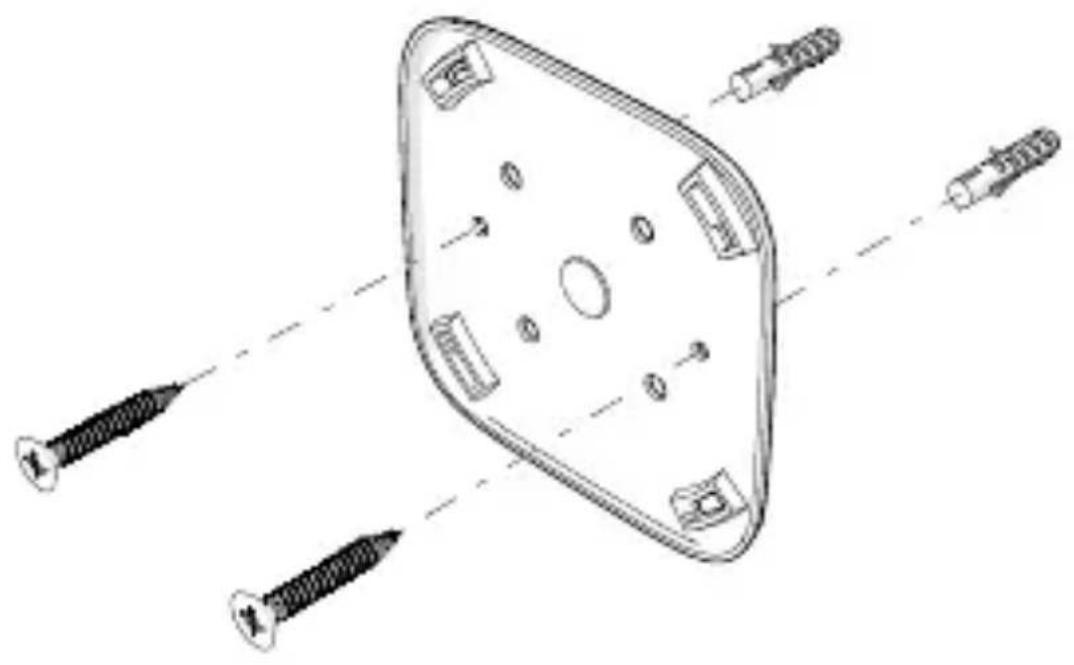
Installing/Mounting the product (image C & D)
- Place the bracket A 5 in the desired location.
Follow steps 2. - 6. for stone/concrete surfaces. Continue to step 5. for wood surfaces.
- Use the bracket A 5 to mark the drill locations with a pencil.
- Drill two ∅ 4 mm holes.
- Insert the plugs A 8 into the holes.
- Fasten the bracket A 5 with the screws A7.
Do not overtighten the screws, this will deform the bracket.
Alternatively, attach the mounting bracket to the surface with the adhesive strip.
- Turn the alarm A 1 clockwise to attach it to the bracket A 5.
Installing the Nedis SmartLife app
- Download the Nedis Smartlife app for Android or iOS on your phone via Google Play or the Apple App Store.
- Open the Nedis Smartlife app on your phone.
- Create an account with your e-mail address and tap Continue.
You will receive a verification code on your e-mail address.
- Enter the received verification code.
- Create a password and tap Done.
- Tap Add Home to create a SmartLife Home.
- Set your location, choose the rooms you want to connect with and tap Done.
Connecting the app
- Make sure Wi-Fi is enabled on your smartphone.
- Make sure Bluetooth is enabled on your smartphone.
- Open the Nedis Smartlife app on your phone.
- Register or login to your account.
- Tap + in the top right corner.
- Select "Wi-Fi Smoke detector"
- Follow the instructions in the app.
Disconnecting the app
- Open the Nedis Smartlife app on your phone.
- Open "Wi-Fi Smoke detector" by tapping the corresponding tile in the app.
- Tap the pencil icon in the top right corner.
- Tap Remove Device at the bottom and confirm.
Smoke alarm
When the product detects smoke, the alarm beeps and the indicator A③ flashes red. In case of an alarm:
- Identify the source of the smoke.
- Resolve the problem.
Testing the product
The product must be tested to ensure proper operation.
Press the test/silence button A2. The alarm beeps six times and the indicator
A3 flashed red.
Silent mode
In silent mode, the alarm does not sound for 9 minutes.
The silent mode can be activated manually during an alarm.
Press the test/silence button A2 while the alarm sounds to activate silent mode.
After 9 minutes, the product returns to standby mode.
| LED light Sound alarm | ||
| Standby mode | A3blinks red every 40 seconds. | Off |
| Silent mode | A3flashes red. | Off |
| Test | A3flashes red. | 6 long beeps. |
| Low battery condition | A3blinks red once every 40 seconds. | Beeps once every 40 seconds. |
| Malfunction | A3blinks red twice every 40 seconds. | Beeps once every 40 seconds. |
| Smoke alarm | A3flashes red. | Beeps continuously. |
The led indicator can appear dim.
Troubleshooting
| Problem Possible solution | |
| The alarm does not respond when you press the test button. | Make sure the battery is installed properly. |
| Try a different battery. | |
| A3 blinks once and the alarm sound once every 40 seconds. | Battery is low. Replace the battery. |
| A3 blinks twice and the alarm sound once every 40 seconds. | The product is malfunctioning. Replace it. |
The led indicator can appear dim.
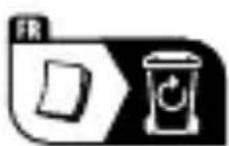
Disposal
natural_image
Symbol of a trash bin with crossed lines indicating no waste or restriction, plus a solid black rectangle below (no text or labels)The product is designated for separate collection at an appropriate collection point. Do not dispose of the product with household waste.
For more information, contact the retailer or the local authority responsible for the waste management.
Declaration of Conformity
We, Nedis B.V. declare as manufacturer that the product WIFIDS21WT / WIFIDS21WT3 from our brand Nedis ^® , produced in China, has been tested according to all relevant CE standards and regulations and that all tests have been passed successfully. This includes, but is not limited to the RED 2014/53/EU regulation.
The complete Declaration of Conformity (and the safety datasheet if applicable) can be found and downloaded via: nedis.com/WIFIDS21WT#support nedis.com/WIFIDS21WT3#support

Kurzanleitung
Rauchmelder
text_image
Symbol of a trash bin crossed out by a diagonal line, indicating no waste or dischargetext_image
Symbol of a trash bin crossed out by a diagonal line, indicating no waste or dischargetext_image
Symbol of a trash bin crossed out by a diagonal line, indicating no waste or disposal.natural_image
Symbol of a trash bin with crossed lines indicating no waste or restriction, plus a solid black rectangle below (no text or labels)natural_image
Symbol of a trash bin with crossed lines indicating no waste or restriction, plus a solid black rectangle below (no text or labels)natural_image
Symbol of a trash bin with crossed lines indicating no waste or restriction, plus a solid black rectangle below (no text or labels)natural_image
Symbol of a trash bin with crossed lines indicating no waste or discharge (no text or numbers present)natural_image
Symbol of a trash bin with crossed lines indicating no waste or discharge (no text or labels)text_image
Symbol of a trash bin crossed out by a diagonal line, indicating no waste or disposal.text_image
Symbol of a trash bin crossed with a diagonal line, indicating no waste or dischargetext_image
Symbol of a trash bin crossed with a diagonal line, indicating no waste or dischargetext_image
Symbol of a trash bin crossed with a diagonal line, indicating no waste or dischargenatural_image
Simple line drawing of a trash bin with two crossed lines indicating no waste or discharge (no text or symbols)text_image
Symbol of a trash bin crossed out by a diagonal line, indicating no waste or disposal.text_image
Symbol of a trash bin crossed out by a diagonal line, indicating no waste or disposal.text_image
Symbol of a trash bin with crossed lines indicating no waste or discharge, accompanied by a black rectangular block below.text_image
QR code image containing encoded data, no visible human-readable text
ned.is/wifids21wt

text_image
QR code image containing encoded data, no visible human-readable text
ned.is/wifids21wt3
Nedis BV
De Tweeling 28, 5215 MC 's-Hertogenbosch – The Netherlands service@nedis.com