PSA25 B1 - Wall hose reel PARKSIDE - Free user manual and instructions
Find the device manual for free PSA25 B1 PARKSIDE in PDF.

| Product type | Wall-mounted hose reel with automatic rewind |
| Brand | Parkside |
| Model | PSA25 B1 |
| Dimensions (W × H × D) | Approx. 47.5 × 24.1 × 41.7 cm |
| Weight (empty) | Approx. 9.5 kg |
| Weight (with water in hose) | Approx. 12.3 kg |
| Swivel range | 180° horizontally |
| Housing material | Weather-resistant and UV-resistant plastic |
| Garden hose length | 25 m |
| Connection hose length | 2 m |
| Hose outer diameter | 15.5 mm |
| Hose inner diameter | 11.3 mm |
| Maximum operating pressure (hose) | 10 bar |
| Maximum operating pressure (tap fittings) | 8 bar |
| Tap connection | 1" (33.3 mm) with 3/4" (26.5 mm) reducer |
| Use | Private use, garden watering and connection of other water-consuming devices |
| Power supply | Connection to water tap (no electrical supply) |
| Delivery contents | Hose housing, wall bracket, 25 m garden hose, 2 m connection hose, spray nozzle, connecting parts, pin, screws and wall plugs |
| Safety | Backflow preventer, integrated water stop, TÜV SÜD tested, detailed safety instructions |
| Maintenance and cleaning | Clean with a damp cloth, no harsh chemicals; drain and store frost-free in winter |
| Spare parts and repairability | Spare parts available during warranty period; repair by customer service |
| Warranty | 3 years from date of purchase |
| Customer service | Tel.: 0202 24750 430/431/432, E-mail: meister-service@conmetallmeister.de |
| Compliance | Applicable European directives, EU declaration of conformity included |
Frequently Asked Questions - PSA25 B1 PARKSIDE
User questions about PSA25 B1 PARKSIDE
0 question about this device. Answer the ones you know or ask your own.
Ask a new question about this device
Download the instructions for your Wall hose reel in PDF format for free! Find your manual PSA25 B1 - PARKSIDE and take your electronic device back in hand. On this page are published all the documents necessary for the use of your device. PSA25 B1 by PARKSIDE.
USER MANUAL PSA25 B1 PARKSIDE
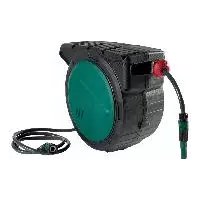
natural_image
Close-up of a black electric shock absorber with attached cable, shown in black and white (no text or symbols visible)WAND-SCHLAUCHAUFROLLER / WALL-MOUNTED HOSE REEL / ENROULEUR DE TUYAU MURAL PSA 25 B1
DE AT CH
WALL-MOUNTED HOSE REEL
Assembly, operating and safety instructions
Translation of the original instructions
NL BE
WAND-SLANGOPWIKKELAAR
Before reading, unfold both pages containing illustrations and familiarise yourself with all functions of the device.
FR BE
GB / IE Assembly, operating and safety instructions Page 13
natural_image
Diagram of a mechanical device with directional arrows indicating motion or force (no text or symbols)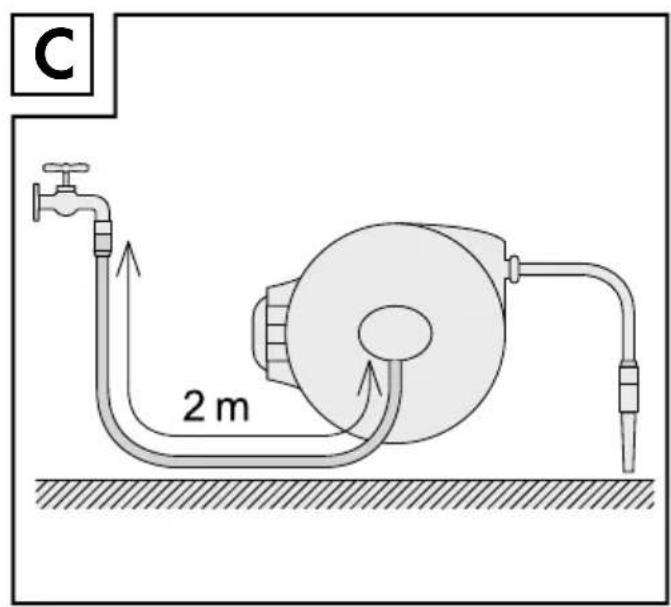
text_image
C 2 m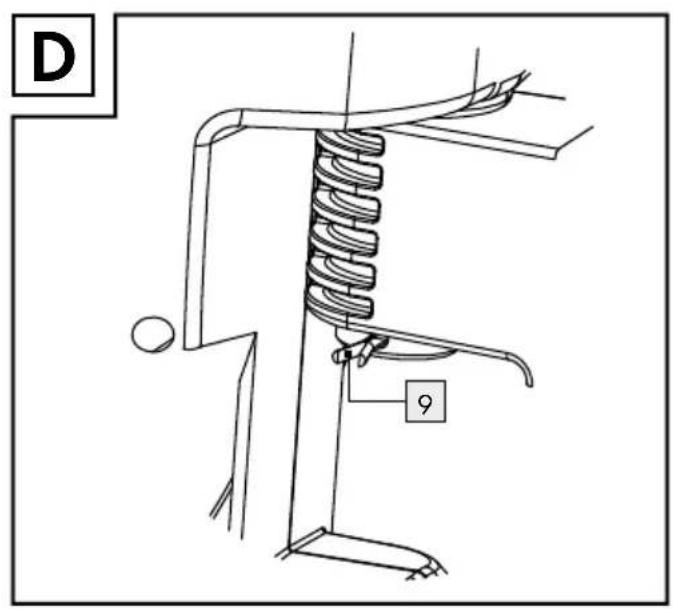
text_image
D 9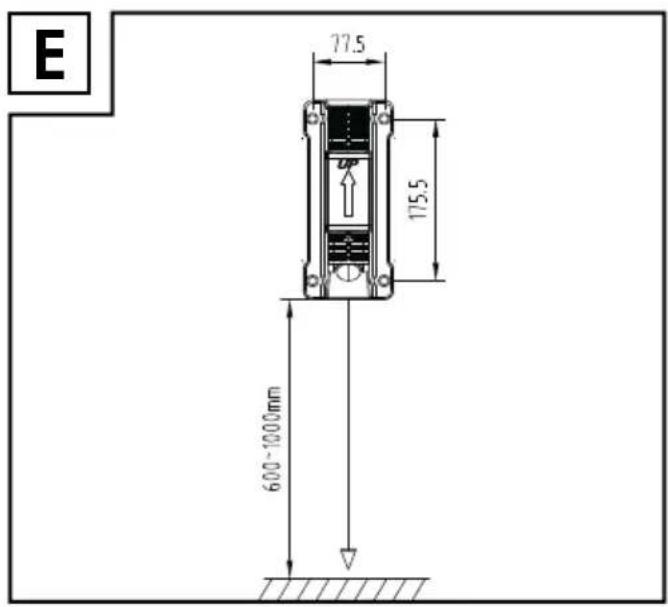
text_image
E 77.5 115.5 600-1000mm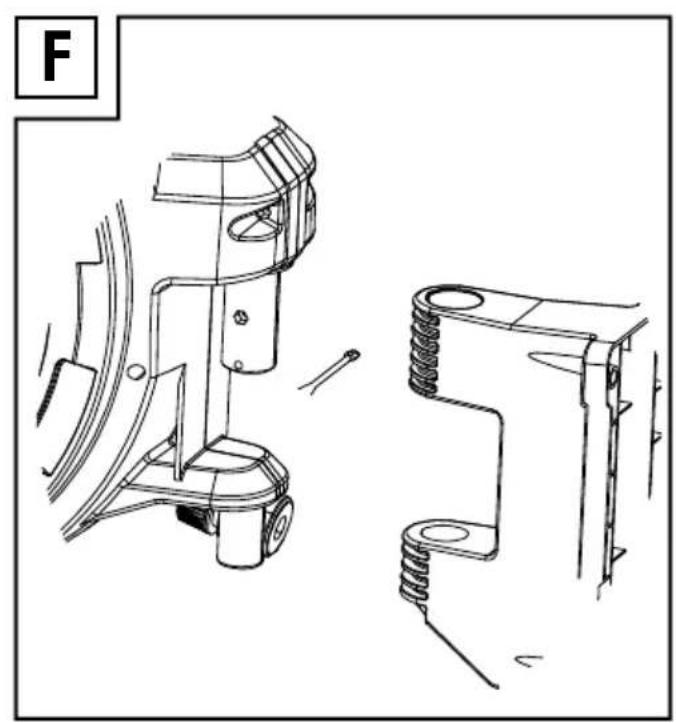
natural_image
Technical line drawing of mechanical components including a bracket, spring, and housing (no text or symbols)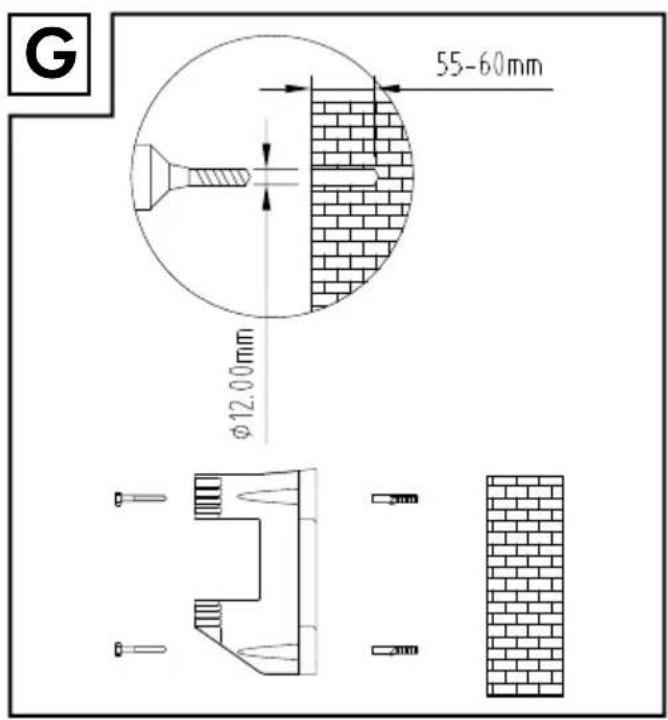
text_image
G 55-60mm φ12.00mm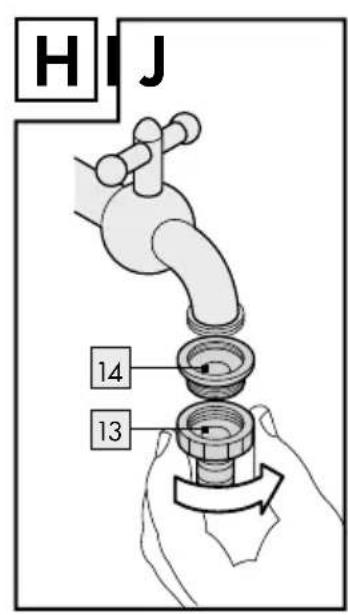
text_image
HIJ 14 13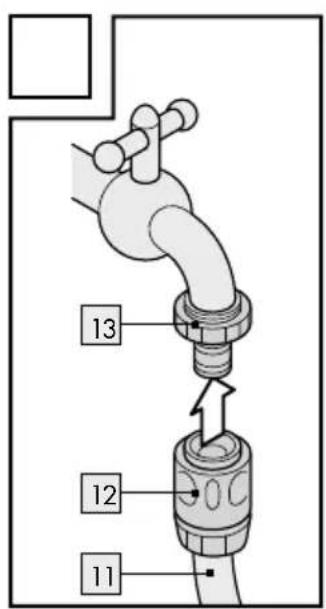
text_image
13 12 11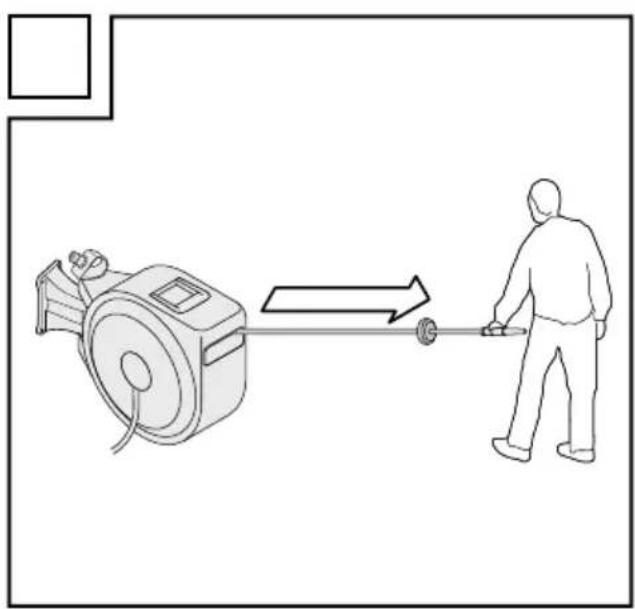
natural_image
Line drawing of a person pulling a cylindrical object from a mechanical device (no text or symbols)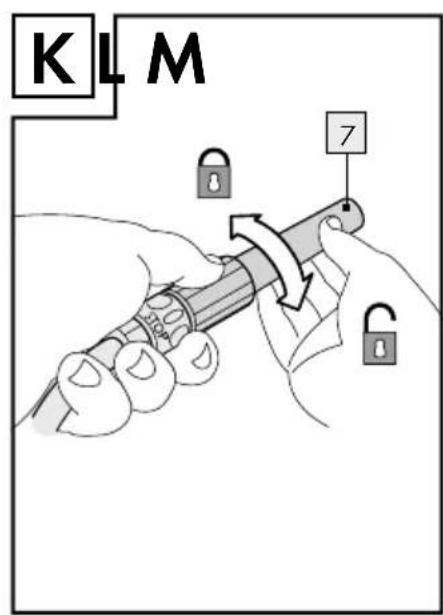
text_image
KLM 7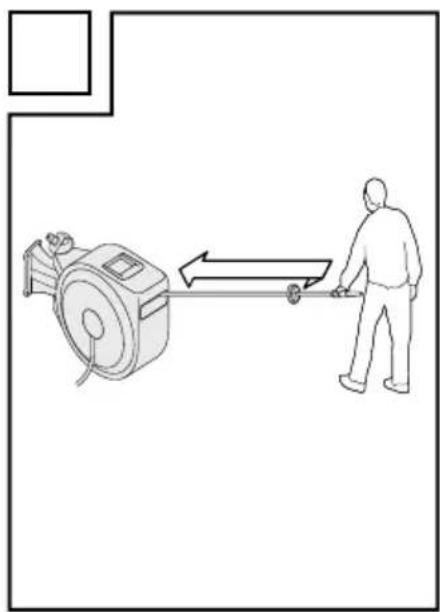
natural_image
Line drawing of a person pulling a cart from a motor, with motion arrows indicating speed (no text or symbols)
text_image
6 71.1 Intended use Page 14
1.2 Parts description / Scope of delivery......Page 14
1.3 Technical data....Page 15
2 Safety notes Page 15
3 Before installation......Page 17
3.1 Selecting the installation location......Page 17
3.2 Selecting the installation material......Page 17
4 Installation......Page 17
4.1 Removal Page 17
5 Operation......Page 17
5.1 Unravelling the hose Page 17
5.2 Re-ravelling the hose....Page 18
5.3 Connecting other devices using water......Page 18
6 Winter storage Page 18
7 Cleaning, maintenance and storage Page 18
8 Disposal Page 19
9 Warranty and service......Page 19
Original EU declaration of conformity Page 76
| List of pictograms used | |||
 | Read the assembly instructions and instructions for use! |   | UV-resistant. |
 | Observe the warnings and safety information! |   | TÜV SÜD-certified safety. |
 | Danger to life and risk of accidents for infants and children! |   PAP PAP | Dispose of the packaging in an environmentally-friendly manner! |
 | Not suitable for potable water. |   | Product meets the applicable European product-specific directives. |
  | Weather-resistant. |  | Do not leave the hose to re-ravel itself. Carefully guide it back into the housing. |
Wall-Mounted Hose Reel
1 Introduction

Congratulations on the purchase of your new product. You have chosen a high-quality product. The assembly instructions
and instructions for use are a part of the product. Please carefully read these assembly instructions and instructions for use before use and observe all instructions. These instructions contain important information about installation, settings and care. Please keep these assembly instructions and instructions for use and pass them on to any future owner.
1.1 Intended use
This product is a hose reel, which has been exclusively conceptualised as a hose drum in a closed hose box with automated ravelling. As well as the spray nozzle, other devices that use water can be connected to the irrigation hose, for example sprinklers, irrigation systems and high pressure washers.
This product is only intended for private, non-commercial use. Only use this product as described in these instructions for use. Any other use is considered improper use and may result in property damage or personal injury. The manufacturer and retailer assume no liability for damages due to improper or incorrect use.
1.2 Parts description / Scope of delivery
1 wall bracket
2 1 carrying handle
3 1 hose box
4 1 limit stop
5 1 irrigation hose
6 1 hose connector with water stop for spray nozzle
7 1 spray nozzle
8 4 wall plugs (12 x 50 mm)
9 1 split pin
10 4 screws (8×70 mm)
11 1 connection hose
12 1 hose connector for tap
13 1 tap connector
14 1 reducer
Assembly instructions and instructions for use
1.3 Technical data
Hose box with wall bracket
Dimensions (W x H x D): approx. 47.5 cm x 24.1 cm x 41.7 cm
Weight: approx. 9.5 kg
(empty)
approx. 12.3 kg (with
water in the hose)
Swivel range: horizontally 180°
Material:plastic,weather-resistant
Tap adaptor: 1" (33.3 mm)
Reducer: 34 " (26.5 mm)
Hoses
Length
Irrigation hose: 25 m
Connection hose: 2 m
Diameter: 15.5 mm (external)
11.3 mm (internal)
Working pressure: max. 10 bar (hose) max. 8 bar (valves)
Material: PVC fabric tube
Installation material
Screws: 8×70 mm
Wall plugs: 12 x 50 mm
2 Safety notes
WARNING! READ ALL
SAFETY NOTES AND INSTRUCTIONS.
KEEP ALL SAFETY INFORMATION AND INSTRUCTIONS FOR FUTURE REFERENCE!
WARNING!
DANGER TO LIFE
AND RISK OF ACCIDENTS FOR INFANTS AND CHIL-
DREN! Do not allow children to play with the product or to carry out cleaning or user maintenance unsupervised.
■ Never leave the product unattended whilst in use.
- Keep children away from the work area during assembly. This product has screws and other small parts. These could lead to suffocation if they are swallowed or inhaled.
- Do not allow children to play with the packaging film or parts of the packaging, otherwise they may become entangled in it whilst playing or swallow parts and suffocate.
■ Make sure that you do not damage any power lines during installation.
■ Never aim the water jet at electrical equipment.
■ Never aim the water jet at people or animals.
■ Make sure that all parts are undamaged and correctly assembled.
■ Regularly check the water pressure to prevent water leaking
under high pressure and causing injury. Do not aim the water jet at people or animals.
■ Never drink the water that you transport with the product. The product is not suitable for potable water. The product is intended for carrying water from installations in fixed locations. You cannot use it to transport other liquids.
■ Only lay the unravelled hose flat on the ground. Avoid loops which stand up. Loops are trip hazards and can cause accidents.
- Do not leave the hose to re-ravel itself. Carefully guide it back into the housing.
- Do not let go of the hose unless the automatic stop function is engaged.
■ Danger of slipping! When the ground is wet, you can easily slip on the ground and injure yourself. Ensure that the ground near the product is kept as dry as possible.
■ Turn the tap off when the product is not in use.
■ Make sure that you do not damage any cables, power lines and water pipes during installation.
Check the installation area with a cable detector before drilling.
■ To avoid frost damage, take the product off the wall in winter and store it dry.
- Do not take the hose around corners or edges and do not move it along pointed or sharp-edged objects. The resulting damage may lead to leakages.
- Do not put the hose in areas where vehicles are known to drive. Driving over the hose may cause it to split.
- Do not open the housing of the product. The springs are pre-loaded, they can spring back.
■ Never remove any screws from parts of the housing.
■ Ensure that the hose does not re-wind itself. Doing so may result in damage.
■ Never block the hose end with your fingers or other objects during use.
■ Installation must be performed by a professional.
- Discontinue using the product if the plastic parts are cracked or deformed. Always replace damaged parts with genuine spare parts.
3 Before installation
■ Make sure that you do not damage any cables, power lines and water pipes during installation. Check the installation area with a cable detector before drilling.
☐ Remove the product from the packaging.
☐ Check that the delivery contents are complete (see fig. A).
- Check to see if the product or the individual parts are visibly damaged. If this is the case, do not use the product.
3.1 Selecting the installation location
- Choose a stable weight-bearing installation location.
- Be aware of the weight of the product including the water in the hose (see chapter „Technical data“).
☐ Choose an installation location where the full 180^ swivel range of the hose box 3 can be used (see fig. B).
☐ Measure the distance to the tap so that the connection hose 11 can be connected with slack (see fig. C).
3.2 Selecting the installation material
☐ For installation on a concrete or brick wall, use the accompanying screws 10 and wall plugs 8 (see fig. G). These are only suitable for concrete or brick walls.
☐ You will need a screwdriver with a head width of 13 mm to screw in the screws ^10 . This is not included.
☐ Use suitable screws and wall plugs for installation on other materials or plaster thicker than 10 mm. Ask a specialist retailer about wall plugs and screws suitable for the respective wall structure.
4 Installation
☐ Mark the drill holes at the specified height and drill four holes (see fig. E).
☐ Insert the wall plugs 8 into the drilled holes.
☐ Mount the wall bracket 1 using the screws 10. The wall bracket 1 must be attached vertically. Ensure that the wall bracket 1 is attached in the direction of the arrow (the arrow must be pointing upwards). For concrete walls and brickwork, follow figure G.
☐ Mount the hose box 3 on the wall bracket 1 (see fig. F). Hold the hose box 3 by the handle 2. Guide the hose box 3 into the wall bracket 1 until the axle holes line up. Secure the hose and wall bracket with the split pin supplied 9 (see fig. D). The bend in the open end of the split pin 9 ensures that the split pin 9 does not reopen.
Connect the tap connector to the tap (see fig. H). Turn the reducer towards the tap connector in accordance with the size of the tap's connecting thread.
☐ Connect the hose piece 12 and the connection hose 11 to the tap connector (see fig. I). Please note that it will click audibly.
☐ Connect the spray nozzle 7 to the hose connector with the water stop 6. Please note that it will click audibly. Ensure that the spray nozzle 7 is closed (see fig. K).
The product is ready to use.
4.1 Removal
☐ In order to remove the product, follow the installation instructions in reverse.
5 Operation
5.1 Unravelling the hose
☐ Pull the irrigation hose 5 out of the hose box 3 to the desired length (see fig. J).
Allow the hose to follow. The irrigation hose will go back a short distance until it is held by the retraction block.
Open the tap. Ensure that the spray nozzle is closed.
Open the spray nozzle 7 by turning it to the right (see fig. K).
The red marking on the hose signifies that you are coming to the end of the hose. From here, the hose can only be pulled out a few more cm.
5.2 Re-ravelling the hose
Risk of injury and damage! If the irrigation hose is not guided, the spring tension of the automated ravelling system can cause it to spin around and lead to injury and property damage.
■ Always guide the irrigation hose by hand. Ensure that no other people are nearby when re-ravelling.
■ Never reach inside of the housing.
☐ Close the spray nozzle 7 by turning it to the left (see fig. K).
Close the tap.
Open the spray nozzle 7 to release the water pressure. Turn the spray nozzle 7 to the right to do so. Close the spray nozzle 7 again by turning it to the left.
☐ Hold the irrigation hose 5 by the spray nozzle 7. Pull briefly on the irrigation hose 5 to release the retraction block. Guide the irrigation hose 5 by hand while it automatically rolls up to the limit stop 4 into the hose box 3 (see fig. L).
□ Swivel the hose box 3 towards the wall to save space (see fig. B).
5.3 Connecting other devices using water
To connect other devices using water, remove the spray nozzle 7 from the hose connector with the water stop 6 (see fig. M). Pull the hose connector with the water stop 6 far enough back that you can disconnect the spray nozzle 7.
☐ The water stop integrated into the hose connector will prevent water from flowing backwards.
Then connect another device using water to the hose connector with the water stop 6. Please note that it will click audibly.
6 Winter storage
Protect the product against frost. The freezing residual water in the hose will expand and may cause damage.
Separate the connection hose 11 from the tap. Pull the hose connector 12 far enough back that you can disconnect the tap connector 13.
□ Completely drain the connection hose. Make sure that the irrigation hose 5 is also emptied.
☐ Allow all parts to dry thoroughly.
First remove the split pin from the wall bracket 1. To do this, straighten both bent ends of the split pin 9 and pull it out.
Remove the hose box 3 from the wall bracket 1 (see fig. D).
Store the hose box so that it is protected from frost.
7 Cleaning, maintenance and storage
Do not use aggressive cleaning agents or sharp or metal cleaning tools such as knives, rigid scrapers, etc. These can damage the surfaces.
☐ Re-ravel the irrigation hose 5 to the limit stop 4 after each use to release the pressure on the retaining spring.
□ Clean all parts with a lightly moistened cloth.
☐ Regularly check the hoses for tears, brittleness and other signs of wear.
☐ All parts must be completely dry prior to storage.
□ Always store the product in a dry location.
☐ Do not expose the product to direct sunlight.
☐ Store the product securely locked away out of the reach of children at a storage temperature between 5 °C and 20 °C (room temperature).
8 Disposal
The packaging is made from environmentally-friendly materials which can be disposed of through your local recycling facilities.
Please contact your local municipality or city administration for information on how to dispose of the worn out product.
9 Warranty and service
The product has been manufactured to strict quality guidelines and meticulously examined before delivery. In the event of product defects you have legal rights against the retailer of this product. Your legal rights are not limited in any way by our warranty detailed below.
The warranty for this product is 3 years from the date of purchase. The warranty period begins on the date of purchase. Please keep the original sales receipt in a safe location. This document is required as your proof of purchase.
Should this product show any fault in materials or manufacture within 3 years from the date of purchase, we will repair or replace it – at our choice – free of charge to you. This warranty becomes void if the product has been damaged, or used or maintained improperly.
The warranty applies to defects in material or manufacture. This warranty does not cover product parts subject to normal wear, thus possibly considered consumables (e.g. batteries) or for damage to fragile parts, e.g. switches, rechargeable batteries or glass parts.
Customer service
(Call charges are dependent on the land-line tariff of your phone provider)
Tel.: +800 34 99 67 53 (from abroad)
Please have your receipt and the item number (IAN 376362_2104) ready as your proof of purchase when enquiring about your product.
WAARSCHUWING! LEVENSGEVAAR EN
KANS OP ONGEVALLEN VOOR KLEUTERS EN KIN-
GB - Original EU declaration of conformity
We declare under our sole responsibility that the following product . . .
WALL-MOUNTED HOSE REEL 25 m
ENROULEUR DE TUYAU MURAL 25 m
WAND-SLANGOPWIKKELAAR 25 m
NAŚCIENNY BĘBEN NA WĄŻ OGRODOWY 25 m
NÁSTĚNNÝ NAVÍJEČ HADICE 25 m
NÁSTENNÝ NAVÍJAČ HADICE 25 m
TAMBOR PORTAMANGUERA DE PARED 25 m
SLANGERULLE TIL VÄGGEN 25 m
PARKSIDE
IAN 376362\_2104·WU9926171-8·PSA 25 B1
... complies with all the provisions of the applicable directives.
Applied harmonised standards:
GB - Authorised person for storing technical documents.