
MBD12 - Other camera accessories NIKON - Free user manual and instructions
Find the device manual for free MBD12 NIKON in PDF.
| Product type | Power grip for Nikon digital SLR camera |
| Brand | Nikon |
| Model | MB-D12 |
| Dimensions (L × H × D) | 151 × 50 × 81 mm |
| Weight | Approx. 365 g (with MS-D12EN and EN-EL15 battery) Approx. 460 g (with MS-D12 and 8 AA batteries) Approx. 310 g (with MS-D12EN and EP-5B connector) Approx. 425 g (with BL-5 and EN-EL18 battery) |
| Power source | EN-EL15 or EN-EL18 Li-ion battery, 8 AA batteries (LR6 alkaline, HR6 Ni-MH, FR6 lithium), or EH-5b/EH-5a/EH-5 AC adapter with EP-5B power connector |
| Operating temperature | 0 to 40 °C |
| Main functions | Vertical shutter release, AF-ON button, multi selector, main and sub command dials, command lock |
| Compatibility | Compatible Nikon digital SLR cameras (refer to camera manual) |
| Supplied accessories | MS-D12EN holder for EN-EL15, MS-D12 holder for AA batteries, holder case, contact cap, user's manual, warranty |
| Maintenance and cleaning | Wipe with a soft dry cloth. Do not use solvents. Protect contacts with the contact cap when not in use. |
| Safety | Do not short-circuit contacts. Use only recommended batteries. Remove batteries if not used for extended periods. |
| Replacement parts and repairability | The MS-D12EN/MS-D12 holders, BL-5 battery chamber cover, and EP-5B connector are available as options. For repairs, contact a Nikon authorized service center. |
Frequently Asked Questions - MBD12 NIKON
User questions about MBD12 NIKON
0 question about this device. Answer the ones you know or ask your own.
Ask a new question about this device
Download the instructions for your Other camera accessories in PDF format for free! Find your manual MBD12 - NIKON and take your electronic device back in hand. On this page are published all the documents necessary for the use of your device. MBD12 by NIKON.
USER MANUAL MBD12 NIKON
Multi-Power Battery Pack
MB-D12
User's Manual
A

·紛失防下力、取外力MBA用接点力八一、MB-D12用接点力八一木尔(必必收纳到下。
PB-6 PB-6 PB-6 PB-6 PB-6 PB-6 PB-6 PB-6 PB-6 PB-6 PB-6 PB-6 PB-6 PB-6 PB-6 PB-6 PB-6 PB-6 PB-6 PB-6 PB-6 PB-6 PB-6 PB-6 PB-6 PB-6 PB-6 PB-6 PB-6 PB-6 PB-6 PB-6 PB-6 PB-6 PB
仄口丁一の入方
MB-D12 Multi-Power Battery Pack
User's Manual
Table of Contents
Safety Precautions 2
Notice for Customers in Europe. 2
Precautions for Use 2
Introduction 4
The MB-D12 and Accessories 4
The MB-D12 and Supplied Accessories 4
Using the Optional EH-5a/EH-5b AC Adapter and
EP-5B Power Connector 4
Using the Optional BL-5 Battery-Chamber Cover.....4
Parts of the MB-D12 5
The MB-D12 Shutter-Release Button, Multi Selector,
Command Dials, and AF-ON Button 5
The MB-D12 Control Lock 5
Using the Battery Pack 6
Attaching the Battery Pack 6
Removing the Battery Pack 6
Inserting Batteries 7
Removing Batteries 9
Specifcations 10
Safety Precautions
To ensure proper operation, read this manual thoroughly before using this product. After reading, be sure to keep it where it can be seen by all those who use the product.
Notice for Customers in Europe
CAUTION RISK OF EXPLOSION IF BATTERY IS REPLACED BY AN INCORRECT TYPE. DISPOSE OF USED BATTERIES ACCORDING TO THE INSTRUCTIONS.
This symbol indicates that electrical and electronic equipment is to be collected separately.
The following apply only to users in European countries:
- This product is designated for separate collection at an appropriate collection point. Do not dispose of as household waste.
- Separate collection and recycling helps conserve natural resources and prevent negative consequences for human health and the environment that might result from incorrect disposal.
For more information, contact the retailer or the local authorities in charge of waste management.
Precautions for Use
The MB-D12 is for use with compatible cameras only.
- Do not use with batteries and battery holders not recommended in this manual.
- To prevent electrical shorts caused by metal objects touching the power terminals, replace the contact cap when the MB-D12 is not in use.
- When a battery holder is removed from the MB-D12, remove the batteries or place the holder or cover in the holder case to prevent electrical shorts caused by contact with other metal objects.
The memory card access lamp may light up when the MB-D12 is attached or removed from the camera, but this is not malfunction.
- Should you notice smoke or an unusual smell or noise from the battery pack, discontinue use immediately. After removing the batteries, take the device to the retailer or a Nikon-authorized service representative for inspection.
- The MB-D12 is not equipped with a power switch. Use the camera power switch to turn the power on or off.
Notice for Customers in the U.S.A.
Federal Communications Commission (FCC) Radio Frequency Interference Statement
This equipment has been tested and found to comply with the limits for a Class B digital device, pursuant to Part 15 of the FCC rules. These limits are designed to provide reasonable protection against harmful interference in residential installation. This equipment gen er ates, uses, and can radiate radio fre quen cy en er gy and, if not in stalled and used in ac cor dance with the instructions, may cause harmful in ter fer ence to radio com mu niations. How ever, there is no guar an tee that in ter ferencewillnotoccurringinaparticularinstallation. If this equipment does cause harm ful in ter fer ence to radio or tele vi sion re cep tion, which can be de ter mined by turn ing the equipment off and on, the user is en couraged to try to correct the inter ference by one or more of the fol low ing mea sures:
Reorient or relocate the receiving an ten na.
- Increase the separation between the equipment and receiveiv er.
- Connect the equipment into an outlet on a circuit diff erent from that to which the receiver is connected.
- Consult the dealer or an experienced radio/television tech nician for help.
Nikon

MB-D12
Tested To Comply
With FCC Standards
FOR HOME OR OFFICE USE
CAUTION
Modifications: The FCC requires the user to be notified that any changes or modifications made to this device that are not expres sly ap proved by Nikon Corporation may void the user's au thor i ty to operate the equipment.
Nikon Inc.,
1300 Walt Whitman Road, Melville, New York
11747-3064,U.S.A.
Tel:631-547-4200
Notice for Customers in Canada
CAUTION
This Class B digital apparatus complies with Canadian ICES-003.
ATTENTION
Introduction The MB-D12 and Accessories
Thank you for your purchase of an MB-D12 multi-power battery pack for use with all Nikon single-lens reflex digital cameras that list the MB-D12 as a compatible accessory in the camera manual. The MB-D12 takes one EN-EL15 or EN-EL18 rechargeable battery or eight AA batteries (alkaline, Ni-MH, or lithium) and includes an alternate shutter-release button, AF-ON button, multi selector, and main and sub-command dials for taking pictures in "tall" (portrait) orientation. Camera menu options allow the user to choose whether the camera battery or the batteries in the MB-D12 are used first; see the camera manual for details.
The MB-D12 and Supplied Accessories
Confirrm that the following items are supplied with the MB-D12 (batteries are sold separately).
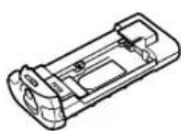
MB-D12
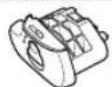
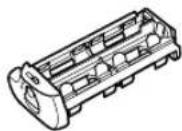
MS-D12EN holder for EN-EL15 batteries
MS-D12 holder for AA batteries
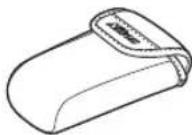
Holder case

Contact cap
The MS-D12EN is inserted in the MB-D12 at shipment. See "Inserting Batteries" for information on removing the battery holder.
- User's manual (this manual)
Warranty
Using the Optional EH-5a/EH-5b AC Adapter and EP-5B Power Connector
The optional EH-5a/EH-5b AC adapter and EP-5B power connector provide a reliable power source when the camera is used for extended periods. To use an AC adapter with the MB-D12, insert the EP-5B into the MS-D12EN battery holder as described on page 7 and then connect the EH-5a/EH-5b as described in the documentation provided with the EP-5B.
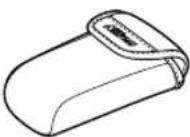
Using the Optional BL-5 Battery-Chamber Cover
A BL-5 battery-chamber cover (available separately) is required when using EN-EL18 batteries.
BL-5 battery-chamber cover
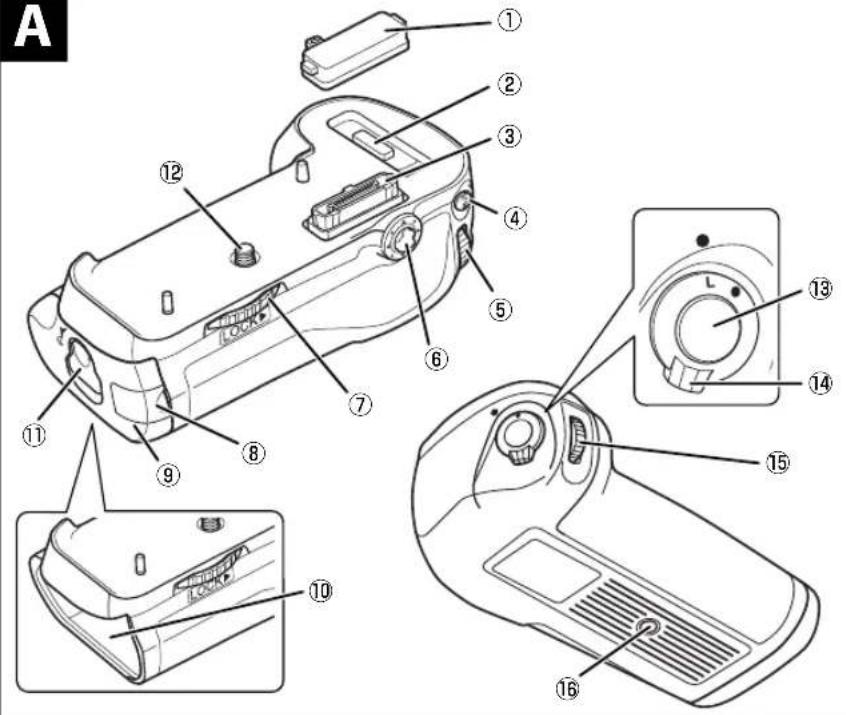
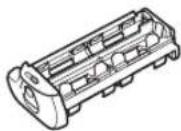
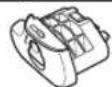
Parts of the MB-D12 (Figure A)
① Contact cap
② Holder for camera contact cover
③ Power/signal contacts
④ AF-ON button
⑤ Main command dial
⑥ Multi selector
⑦ Attachment wheel
Holder power connector cover
9 Battery-chamber cover
10 Battery chamber
1 Battery-chamber latch
12 Mounting screw
13 Shutter-release button
14 Control lock
15 Sub-command dial
16 Tripod socket
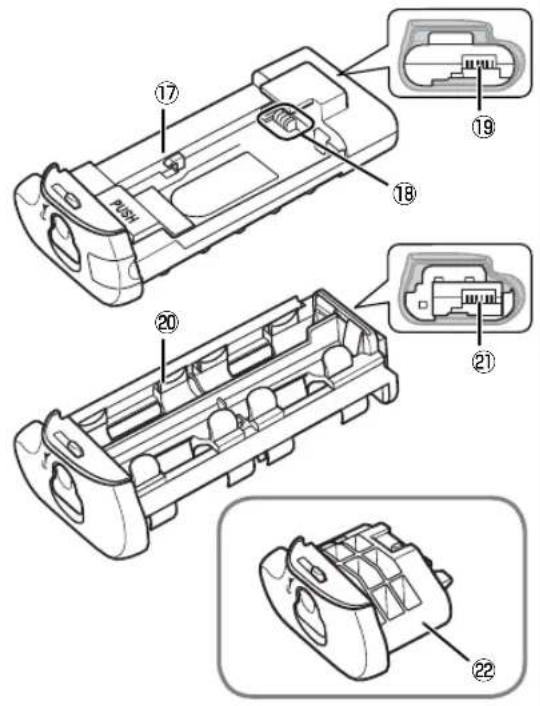
17 MS-D12EN holder for EN-EL15 batteries
18 Power terminals
19 Power terminals (MS-D12EN battery holder)
20 MS-D12 holder for AA batteries
21 Power terminals (MS-D12 battery holder)
22 BL-5 battery-chamber cover (available separately)
The MB-D12 Shutter-Release Button, Multi Selector, Command Dials, and AF-ON Button
The MB-D12 is equipped with a shutter-release button (Figure A-13), multi selector (Figure A-6), main command dial (Figure A-5), sub-command dial (Figure A-15), and AF-ON button (Figure A-4) for use when taking photographs in vertical ("tall," or portrait) orientation. These controls perform the same functions as the corresponding controls on the camera. See the camera manual for more information.
Changes to Multi selector center button, Customize command dials, and Assign MB-D12 AF-ON in the camera Custom Settings menu (Group f) also apply to the multi selector, command dials, and AF-ON button on the MB-D12. Regardless of the option selected for Multi selector, pressing the center of the MB-D12 multi selector will not activate the exposure meters.
The MB-D12 Control Lock
The control lock (Figure A-14) locks the controls on the MB-D12 to prevent unintended use. Before using these controls to take photographs in vertical (portrait) orientation, release the lock as shown at right.
The control lock is not a power switch. Use the camera power switch to turn the camera on and off.
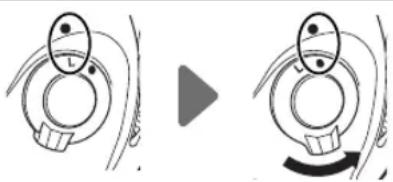
Locked Unlocked
Using the Battery Pack
Attaching the Battery Pack
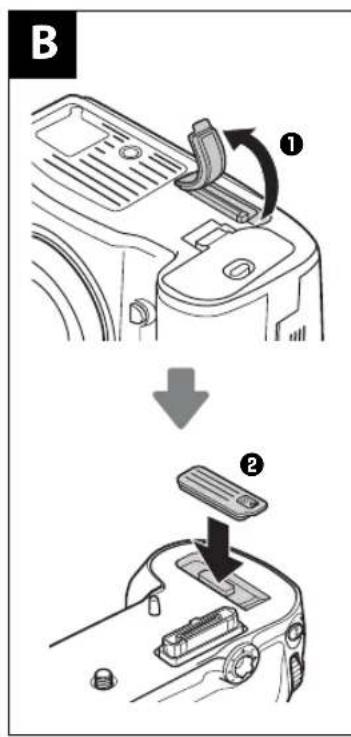
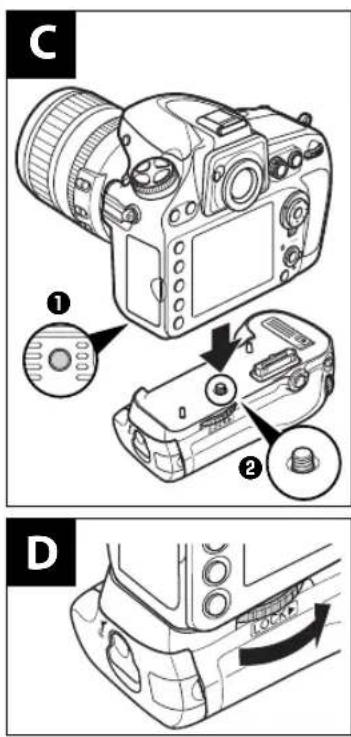
Before attaching the battery pack, be sure that the camera is off and that the MB-D12 control lock (Figure A-14) is in the L position (the illustrations show the D800).
1 Remove the contact cap (Figure A- ①) from the battery pack.
2 The contacts for the MB-D12 are in the base of the camera, where they are protected by a contact cover. Remove the contact cover as shown in Figure B-1 and place it in the contact cover holder on the MB-D12 (Figure B-2).
3 Position the MB-D12, keeping the MB-D12 mounting screw (Figure C-2) aligned with the camera tripod socket (Figure C-1) and tighten the attachment wheel by rotating it in the direction shown by the LOCK arrow (Figure D). There is no need to remove the battery from the camera before connecting the MB-D12. At default settings, the battery inserted in the camera will be used only after the battery in the MB-D12 is exhausted. The Battery order option in the camera Custom Settings menu (Group d) can be used to change the order in which the batteries are used.
Removing the Battery Pack
To remove the MB-D12, turn the camera off and set the control lock on the MB-D12 to L, then loosen the attachment wheel and remove the MB-D12. Be sure to replace the contact cover on the camera and the contact cap on the MB-D12 when the battery pack is not in use.
Be sure to place the camera contact cover in the contact cover holder and to keep the MB-D12 contact cap in a safe place to prevent loss.
A PB-6D and PK-13 auto-extension ring are required when using PB-6 bellows focusing attachment with the MB-D12.
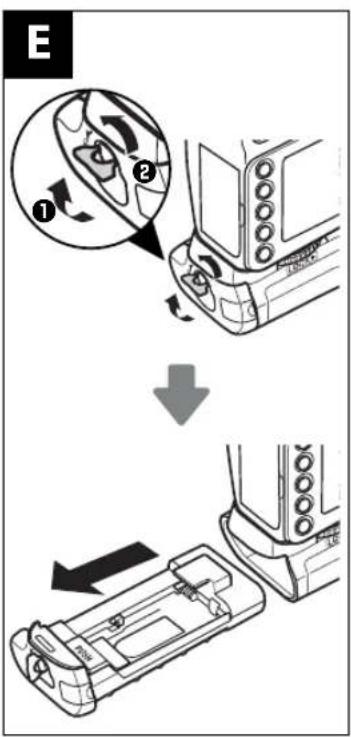
Inserting Batteries
The MB-D12 can be used with one EN-EL15 or EN-EL18 rechargeable Li-ion battery, or with eight AA batteries. A BL-5 battery-chamber cover (available separately) is required when using an EN-EL18 battery.
Before inserting batteries, be sure that the camera is off and that the MB-D12 control lock is in the L position.
1 Turn the MB-D12 battery-chamber latch to and remove the battery holder (Figure E).
2 Ready the batteries as described below.
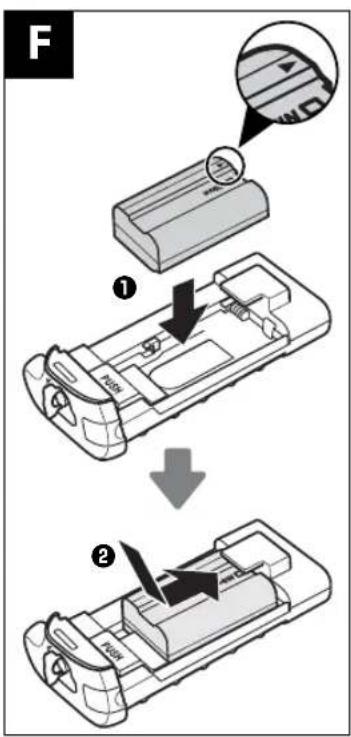
EN-EL15: Matching the indentations on the battery to the projections on the MS-D12EN holder, insert the battery with the arrow (▲) on the battery toward the battery holder power terminals (Figure F-1). Press the battery lightly downward and slide it in the direction of the arrow until the power terminals click into place (Figure F-2).
EN-EL18: If the battery release on the optional BL-5 battery-chamber cover is positioned so that the arrow is visible, slide the battery release to cover the arrow (Figure G-1). Insert the two projections on the battery into the matching slots on the BL-5 (Figure G-2) and confirm that the battery release has slid aside to reveal the arrow.
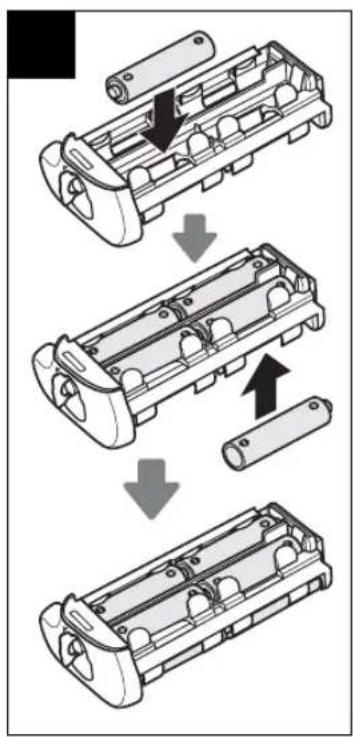
AA batteries: Place eight AA batteries in the MS-D12 battery holder as shown in Figure H, making sure that the batteries are in the correct orientation.
3 Insert the battery holder in the MB-D12 and latch the battery-chamber cover (Figure 1). Make sure the holder is fully inserted before turning the latch.
4 Turn the camera on and check the battery level in the control panel or viewfinder. If the camera does not turn on, check that the battery is correctly inserted.
The EP-5B Power Connector
When using the EP-5B power connector, insert it into the MS-D12EN holder with the arrow (▲) on the connector toward the battery power terminals. Press the connector lightly downward and slide it in the direction of the arrow until the power terminals click into place (Figure J-①). Open the holder power connector cover and pass the EP-5B power cable through the opening (Figure J-②).
Battery Level
The camera displays battery level as follows:
EN-EL15/EN-EL18
| Control panel Viewfinder Description | ||
| — Battery fully charged. | ||
| — | Battery partially discharged. | |
| Low battery. Ready fully-charged spare battery or charge battery. | ||
| (blinks) | (blinks) | Battery exhausted. Charge or exchange battery. |
AA Batteries
| Control panel Viewfinder Description | ||
| — | Charge remaining. | |
| Low batteries. Ready spare batteries. | ||
| (blinks) | (blinks) | Batteries exhausted. Shutter release disabled. |
An option in Group d of the camera Custom Settings menu can be used to change the order in
which the batteries are used. When the camera is drawing power from the MB-D12, a BP icon is displayed in the control panel. If the BP icon blinks, the battery-chamber cover is not locked. Close and latch the battery-chamber cover.
To ensure that the camera shows the correct battery level when AA batteries are used, choose the appropriate option for MB-D12 bat
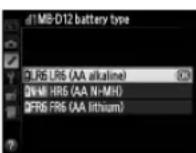
tery type in the camera Custom Settings menu (Group d). If the correct option is not selected, the camera may fail to function as expected.
| Option Battery type | |
| QLR6 | LR6 (AA alkaline) AA alkaline (LR6) |
| GNHMH | HR6 (AA Ni-MH) AA Ni-MH (HR6) |
| QFR8 | FR6 (AA lithium) AA Lithium (FR6) |
Remove the batteries when the MB-D12 is not in use.
Battery Info
Battery information (including calibration information for EN-EL18 batteries) can be viewed from the camera setup menu (the camera battery is listed on the left right). Only the battery when AA batteries are manual for details.
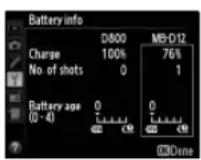
Note: The illustrations on this page are from the D800.
Removing Batteries
Be careful not to drop batteries or the holder.
1 Turn the MB-D12 battery-chamber latch to and remove the battery holder (Figure E).
2 Remove the battery or batteries from the holder.
While pressing the holder PUSH button, slide the battery toward the button. The battery can then be removed as shown.
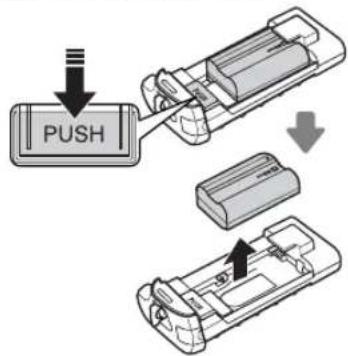
EN-EL15
The procedure for removing the EP-5B power connector is the same as that for the EN-EL15.
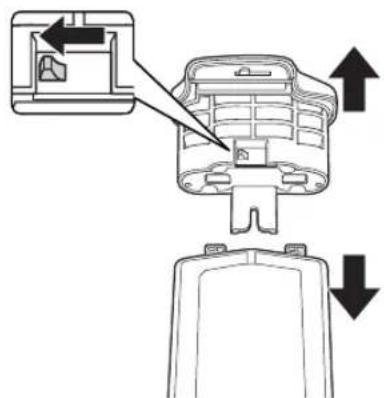
EN-EL18
Slide the battery release in the direction indicated by the arrow () and remove the battery-chamber cover.
AA Batteries
Remove the batteries as shown. Be careful not to drop the batteries when removing them from the holder.

Specifications
| Power source | One EN-EL15 or EN-EL18 rechargeable Li-ion battery, eight LR6 alkaline, HR6 Ni-MH, or FR6 lithium AA batteries, or EH-5b/EH-Sa/ EH-5 AC adapter (requires EP-5B power connector) |
| Operating temperature 0 - 40°C (32 - 104°F) | |
| Dimensions (W × H × D) | Approx. 151 × 50 × 81 mm (6.0 × 2.0 × 3.2 in.) |
| Weight Approx. 365 g (12.9 oz) with MS-D12EN and optional EN-EL15 battery | |
| Approx. 460 g (16.3 oz) with MS-D12 and eight AA batteries (available separately from third-party suppliers) | |
| Approx. 310 g (11.0 oz) with MS-D12EN and optional EP-5B power connector | |
| Approx. 425 g (15.0 oz) with optional BL-5 and EN-EL18 battery | |
| Approx. 280 g (9.9 oz) with MS-D12EN | |
| Approx. 270 g (9.6 oz) with MS-D12 | |
Specific cations and design are subject to change without notice.
EN-EL15 and EN-EL18 Batteries
The performance of EN-EL15 and EN-EL18 batteries drops at temperatures below about 10^ (50°F). Be sure the battery is fully charged and keep a warm spare battery on hand ready to exchange as necessary. Cold batteries will recover some of their charge when warmed.
AA Batteries
Due to their limited capacity, AA LR6 alkaline batteries should be used only when no other alternative is available.
The capacity of AA batteries varies with make and storage conditions and may in some instances be extremely low; in some cases, AA batteries may cease to function before their expiry date. Note that the capacity of AA batteries may drop at temperatures below 20^ (68°F). Use is not recommended at low temperatures.
Frame Advance Rate
EN-EL18 and AA batteries support higher frame advance rates than the EN-EL15; note, however, that in the case of AA batteries the frame advance rate will drop at low temperatures or if the batteries are low. For more information on frame advance rates, see the camera manual.
Poignée-alimentation MB-D12
Federal Communications Commission (FCC) Radio Frequency Interference Statement
1300 Walt Whitman Road, Melville, New York
11747-3064,U.S.A.
Tel:631-547-4200
This Class B digital apparatus complies with Canadian ICES-003.
1300 Walt Whitman Road, Melville, New York
11747-3064,EE.UU.
Tel:631-547-4200
Tested To Comply With FCC Standards
FOR HOME OR OFFICE USE
CUIDADOS
1300 Walt Whitman Road, Melville, New York
11747-3064,U.S.A.
Tel:631-547-4200
AvisoparaosClientsenosCanada
CUIDADO
EBM 50BBL-5BETRIILKHTB(5)
FJW1EAEH-5a/EH-5bAC EAPETEP-5BL-5BETRIILKHTB(5)
TJW1EAEH-5a/EH-5bAC EAPETEP-5BL-5BETRIILKHTB(5)
TJW1EAEH-5a/EH-5bAC EAPETEP-5BL-5BETRIILKHTB(5)
BL-5 本地化封装
EN-EL18 5BTLRRIIeR 5BL-5BTLRRIIeR 5BTLRRIIeR (B)
BL-5 5
MB-D12の状部明確
muaunuiACuEH-5a/EH-5b
AeJnepuACEP-5B 1
mssuaaacnAC 1u EH-5a/EH-5b
LauananaaunannnacAC EP-5B
Jusll Jusll Jusll Jusll Jusll Jusll Jusll Jusll Jusll Jusll Jusll Jusll Jusll Jusll Jusll Jusll Jusll Jusll Jusll Jusll Jusll Jusll Jusll Jusll Jusll Jusll Jusll Jusll Jusll Jusll Jusll Jusll Jusll Jusll J
J 2
aJbJI acgao plsiwI
| JSC) MB-D12 acggaagagaaagaaagaaagaaagaaagaaagaaagaaagaaagaaagaaagaaagaaagaaagaaagaaagaaagaaagaaagaaagaaagaaagaaagaaagaaagaaagaaagaaagaaagaaagaaagaaagaaagaaagaaagaaagaaagaaagaaagaaagaaagaaagaaagaaagaaagaaagaaagaaagaaagaaagaaa |
| (0.800 JSC) MB-D12 acggaagagaaagaaagaaagaaagaaagaaagaaagaaagaaagaaagaaagaaagaaagaaagaaagaaagaaagaaagaaagaaagaaagaaagaaagaaagaaagaaagaaagaaagaaagaaagaaagaaagaaagaaagaaagaaagaaagaaagaaagaaagaaagaaagaaagaaagaaa |
| Lacggaag JSC) MB-D12 acggaagagaaagaaagaaagaaagaaagaaagaaagaaagaaagaaagaaagaaagaaagaaagaaagaaagaaagaaagaaagaaagaaagaaagaaagaaagaaagaaagaaagaaagaaagaaagaaagaaagaaagaaagaaagaaagaaagaaagaaagaaagaaagaaagaaagaaeg |
| (0.75) LACggaag JSC) MB-D12 acggaagagaaagaaagaaagaaagaaagaaagaaagaaagaaagaaagaaagaaagaaagaaagaaagaaagaaagaaagaaagaaagaaagaaagaaagaaagaaagaaagaaagaaagaaagaaagaaagaaagaaagaaagaaagaaagaaagaaagaaagaaagaaagaaagaaa |
| Lacggaag JSC) MB-D2 acggaagagaaagaaagaaagaaagaaagaaagaaagaaagaaagaaagaaagaaagaaagaaagaaagaaagaaagaaagaaagaaagaaagaaagaaagaaagaaagaaagaaagaaagaaagaaagaaagaaagaaagaaagaaagaaagaaagaaagaaagaaagaaagaaagaaagaaagaaagaaagaa |
| (0.6) LACggaag JSC) MB-D2 acggaagagaaagaaagaaagaaagaaagaaagaaagaaagaaagaaagaaagaaagaaagaaagaaagaaagaaagaaagaaagaaagaaagaaagaaagaaagaaagaaagaaagaaagaaagaaagaaagaaagaaagaaagaaagaaagaaagaaagaaagaaagaa |
| Lacggaag JSC) MB-D3 acggaagagaaagaaagaaagaaagaaagaaagaaagaaagaaagaaagaaagaaagaaagaaagaaagaaagaaagaaagaaagaaagaaagaaagaaagaaagaaagaaagaaagaaagaaagaaagaaagaaagaa |
| (0.4) LACggaag JSC) MB-D3 acggaagagaaagaaagaaagaaagaaagaaagaaagaaagaaagaaagaaagaaagaaagaaagaaagaaagaa |
| Lacggaag JSC) MB-D4 acggaagagaaagaaagaaagaaagaaagaaagaaagaaagaaagaa |
| (0.3) LACggaag JSC) MB-D4 acggaagagaaagaaagaaagaa |
| Lacggaag JSC) MB-D5 acggaagagaaagaaagaa |
| (0.2) LACggaag JSC) MB-D5 acggaagagaa |
| Lacggaag JSC) MB-D6 acggaagagaa |
| (0.1) LACggaag JSC) MB-D6 acggaag |
| Lacggaag JSC) MB-D7 acggaag |
| (0.0) LACggaag JSC) MB-D7 acg |
| Lacggaag JSC) MB-D8 acg |
| (0.0) LACg |
| Lacggaag JSC) MB-D9 acg |
| (0.0) LACg |
| Lacggaag JSC) MB-D10 acg |
| (0.0) LACg |
| Lacggaag JSC) MB-D11 acg |
| (0.0) LACg |
| Lacggaag JSC) MB-D12 acg |
| (0.0) LACg |
| Lacggaag JSC) MB-D13 acg |
| (0.0) LACg |
| Lacggaag JSC) MB-D14 acg |
| (0.0) LACg |
| Lacggaag JSC) MB-D15 acg |
| (0.0) LACg |
| Lacggaag JSC) MB-D16 acg |
| (0.0) LACg |
| Lacggaag JSC) MB-D17 acg |
| (0.0) LACg |
| Lacggaag JSC) MB-D18 acg |
| (0.0) LACg |
| Lacggaag JSC) MB-D19 acg |
| (0.0) LACg |
| Lacggaag JSC) MB-D20 acg |
| (0.0) LACg |
| Lacggaag JSC) MB-D21 acg |
| (0.0) LACg |
| Lacggaag JSC) MB-D22 acg |
| (0.0) LACg |
| Lacggaag JSC) MB-D23 acg |
| (0.0) LACg |
| Lacggaag JSC) MB-D24 acg |
| (0.0) LACg |
| Lacggaag JSC) MB-D25 acg |
| (0.0) LACg |
| Lacggaag JSC) MB-D26 acg |
| (0.0) LACg |
| Lacggaag JSC) MB-D27 acg |
| (0.0) LACg |
| Lacggaag JSC) MB-D28 acg |
| (0.0) LACg |
| Lacggaag JSC) MB-D29 acg |
| (0.0) LACg |
| Lacggaag JSC) MB-D30 acg |
| (0.0) LACg |
| Lacggaag JSC) MB-D31 acg |
| (0.0) LACg |
| Lacggaag JSC) MB-D32 acg |
| (0.0) LACg |
| Lacggaag JSC) MB-D33 acg |
| (0.0) LACg |
| Lacggaag JSC) MB-D34 acg |
| (0.0) LACg |
| Lacggaag JSC) MB-D35 acg |
| (0.0) LACg |
| Lacggaag JSC) MB-D36 acg |
| (0.0) LACg |
| Lacggaag JSC) MB-D37 acg |
| (0.0) LACg |
| Lacggaag JSC) MB-D38 acg |
| (0.0) LACg |
| Lacggaag JSC) MB-D39 acg |
| (0.0) LACg |
| Lacggaag JSC) MB-D40 acg |
| (0.0) LACg |
| Lacggaag JSC) MB-D41 acg |
| (0.0) LACg |
| Lacggaag JSC) MB-D42 acg |
| (0.0) LACg |
| Lacggaag JSC) MB-D43 acg |
| (0.0) LACg |
| Lacggaag JSC) MB-D44 acg |
| (0.0) LACg |
| Lacggaag JSC) MB-D45 acg |
| (0.0) LACg |
| Lacggaag JSC) MB-D46 acg |
| (0.0) LACg |
| Lacggaag JSC) MB-D47 acg |
| (0.0) LACg |
| Lacggaag JSC) MB-D48 acg |
| (0.0) LACg |
| Lacggaag JSC) MB-D49 acg |
| (0.0) LACg |
| Lacggaag JSC) MB-D50 acg |
| (0.0) LACg |
| Lacggaag JSC) MB-D51 acg |
| (0.0) LACg |
| Lacggaag JSC) MB-D52 acg |
| (0.0) LACg |
| Lacggaag JSC) MB-D53 acg |
| (0.0) LACg |
| Lacggaag JSC) MB-D54 acg |
| (0.0) LACg |
| Lacggaag JSC) MB-D55 acg |
| (0.0) LACg |
| Lacggaag JSC) MB-D56 acg |
| (0.0) LACg |
| Lacggaag JSC) MB-D57 acg |
| (0.0) LACg |
| Lacggaag JSC) MB-D58 acg |
| (0.0) LACg |
| Lacggaag JSC) MB-D59 acg |
| (0.0) LACg |
| Lacggaag JSC) MB-D60 acg |
| (0.0) LACg |
| Lacggaag JSC) MB-D61 acg |
| (0.0) LACg |
| Lacggaag JSC) MB-D62 acg |
| (0.0) LACg |
| Lacggaag JSC) MB-D63 acg |
| (0.0) LACg |
| Lacggaag JSC) MB-D64 acg |
| (0.0) LACg |
| Lacggaag JSC) MB-D65 acg |
| (0.0) LACg |
| Lacggaag JSC) MB-D66 acg |
| (0.0) LACg |
| Lacggaag JSC) MB-D67 acg |
| (0.0) LACg |
| Lacggaag JSC) MB-D68 acg |
| (0.0) LACg |
| Lacggaag JSC) MB-D69 acg |
| (0.0) LACg |
| Lacggaag JSC) MB-D70 acg |
| (0.0) LACg |
| Lacggaag JSC) MB-D71 acg |
| (0.0) LACg |
| Lacggaag JSC) MB-D72 acg |
| (0.0) LACg |
| Lacggaag JSC) MB-D73 acg |
| (0.0) LACg |
| Lacggaag JSC) MB-D74 acg |
| (0.0) LACg |
| Lacggaag JSC) MB-D75 acg |
| (0.0) LACg |
| Lacggaag JSC) MB-D76 acg |
| (0.0) LACg |
| Lacggaag JSC) MB-D77 acg |
| (0.0) LACg |
| Lacggaag JSC) MB-D78 acg |
| (0.0) LACg |
| Lacggaag JSC) MB-D79 acg |
| (0.0) LACg |
| Lacggaag JSC) MB-D80 acg |
| (0.0) LACg |
| Lacggaag JSC) MB-D81 acg |
| (0.0) LACg |
| Lacggaag JSC) MB-D82 acg |
| (0.0) LACg |
| Lacggaag JSC) MB-D83 acg |
| (0.0) LACg |
| Lacggaag JSC) MB-D84 acg |
| (0.0) LACg |
| Lacggaag JSC) MB-D85 acg |
| (0.0) LACg |
| Lacggaag JSC) MB-D86 acg |
| (0.0) LACg |
| Lacggaag JSC) MB-D87 acg |
| (0.0) LACg |
| Lacggaag JSC) MB-D88 acg |
| (0.0) LACg |
| Lacggaag JSC) MB-D89 acg |
| (0.0) LACg |
| Lacggaag JSC) MB-D90 acg |
| (0.0) LACg |
| Lacggaag JSC) MB-D91 acg |
| (0.0) LACg |
| Lacggaag JSC) MB-D92 acg |
| (0.0) LACg |
| Lacggaag JSC) MB-D93 acg |
| (0.0) LACg |
| Lacggaag JSC) MB-D94 acg |
| (0.0) LACg |
| Lacggaag JSC) MB-D95 acg |
| (0.0) LACg |
| Lacggaag JSC) MB-D96 acg |
| (0.0) LACg |
| Lacggaag JSC) MB-D97 acg |
| (0.0) LACg |
| Lacggaag JSC) MB-D98 acg |
| (0.0) LACg |
| Lacggaag JSC) MB-D99 acg |
| (0.0) LACg |
| Lacggaag JSC) MB-D100 acg |
| (0.0) LACg |
| Lacggaag JSC) MB-D101 acg |
| (0.0) LACg |
| Lacggaag JSC) MB-D102 acg |
| (0.0) LACg |
| Lacggaag JSC) MB-D103 acg |
| (0.0) LACg |
| Lacggaag JSC) MB-D104 acg |
| (0.0) LACg |
| Lacggaag JSC) MB-D105 acg |
| (0.0) LACg |
| Lacggaag JSC) MB-D106 acg |
| (0.0) LACg |
| Lacggaag JSC) MB-D107 acg |
| (0.0) LACg |
| Lacggaag JSC) MB-D108 acg |
| (0.0) LACg |
| Lacggaag JSC) MB-D109 acg |
| (0.0) LACg |
| Lacggaag JSC) MB-D110 acg |
| (0.0) LACg |
| Lacggaag JSC) MB-D111 acg |
| (0.0) LACg |
| Lacggaag JSC) MB-D112 acg |
| (0.0) LACg |
| Lacggaag JSC) MB-D113 acg |
| (0.0) LACg |
| Lacggaag JSC) MB-D114 acg |
| (0.0) LACg |
| Lacggaag JSC) MB-D115 acg |
| (0.0) LACg |
| Lacggaag JSC) MB-D116 acg |
| (0.0) LACg |
| Lacggaag JSC) MB-D117 acg |
| (0.0) LACg |
| Lacggaag JSC) MB-D118 acg |
| (0.0) LACg |
| Lacggaag JSC) MB-D119 acg |
| (0.0) LACg |
| Lacggaag JSC) MB-D120 acg |
| (0.0) LACg |
| Lacggaag JSC) MB-D121 acg |
| (0.0) LACg |
| Lacggaag JSC) MB-D122 acg |
| (0.0) LACg |
| Lacggaag JSC) MB-D123 acg |
| (0.0) LACg |
| Lacggaag JSC) MB-D124 acg |
| (0.0) LACg |
| Lacggaag JSC) MB-D125 acg |
| (0.0) LACg |
| Lacggaag JSC) MB-D126 acg |
| (0.0) LACg |
| Lacggaag JSC) MB-D127 acg |
| (0.0) LACg |
| Lacggaag JSC) MB-D128 acg |
| (0.0) LACg |
| Lacggaag JSC) MB-D129 acg |
| (0.0) LACg |
| Lacggaag JSC) MB-D130 acg |
| (0.0) LACg |
| Lacggaag JSC) MB-D131 acg |
| (0.0) LACg |
| Lacggaag JSC) MB-D132 acg |
| (0.0) LACg |
| Lacggaag JSC) MB-D133 acg |
| (0.0) LACg |
| Lacggaag JSC) MB-D134 acg |
| (0.0) LACg |
| Lacggaag JSC) MB-D135 acg |
| (0.0) LACg |
| Lacggaag JSC) MB-D136 acg |
| (0.0) LACg |
| Lacggaag JSC) MB-D137 acg |
| (0.0) LACg |
| Lacggaag JSC) MB-D138 acg |
| (0.0) LACg |
| Lacggaag JSC) MB-D139 acg |
| (0.0) LACg |
| Lacggaag JSC) MB-D140 acg |
| (0.0) LACg |
| Lacggaag JSC) MB-D141 acg |
| (0.0) LACg |
| Lacggaag JSC) MB-D142 acg |
| (0.0) LACg |
| Lacggaag JSC) MB-D143 acg |
| (0.0) LACg |
| Lacggaag JSC) MB-D144 acg |
| (0.0) LACg |
| Lacggaag JSC) MB-D145 acg |
| (0.0) LACg |
| Lacggaag JSC) MB-D146 acg |
| (0.0) LACg |
| Lacggaag JSC) MB-D147 acg |
| (0.0) LACg |
| Lacggaag JSC) MB-D148 acg |
| (0.0) LACg |
| Lacggaag JSC) MB-D149 acg |
| (0.0) LACg |
| Lacggaag JSC) MB-D150 acg |
| (0.0) LACg |
| Lacggaag JSC) MB-D151 acg |
| (0.0) LACg |
| Lacggaag JSC) MB-D152 acg |
| (0.0) LACg |
| Lacggaag JSC) MB-D153 acg |
| (0.0) LACg |
| Lacggaag JSC) MB-D154 acg |
| (0.0) LACg |
| Lacggaag JSC) MB-D155 acg |
| (0.0) LACg |
| Lacggaag JSC) MB-D156 acg |
| (0.0) LACg |
| Lacggaag JSC) MB-D157 acg |
| (0.0) LACg |
| Lacggaag JSC) MB-D158 acg |
| (0.0) LACg |
| Lacggaag JSC) MB-D159 acg |
| (0.0) LACg |
| Lacggaag JSC) MB-D160 acg |
| (0.0) LACg |
| Lacggaag JSC) MB-D161 acg |
| (0.0) LACg |
| Lacggaag JSC) MB-D162 acg |
| (0.0) LACg |
| Lacggaag JSC) MB-D163 acg |
| (0.0) LACg |
| Lacggaag JSC) MB-D164 acg |
| (0.0) LACg |
| Lacggaag JSC) MB-D165 acg |
| (0.0) LACg |
| Lacggaag JSC) MB-D166 acg |
| (0.0) LACg |
| Lacggaag JSC) MB-D167 acg |
| (0.0) LACg |
| Lacggaag JSC) MB-D168 acg |
| (0.0) LACg |
| Lacggaag JSC) MB-D169 acg |
| (0.0) LACg |
| Lacggaag JSC) MB-D170 acg |
| (0.0) LACg |
| Lacggaag JSC) MB-D171 acg |
| (0.0) LACg |
| Lacggaag JSC) MB-D172 acg |
| (0.0) LACg |
| Lacggaag JSC) MB-D173 acg |
| (0.0) LACg |
| Lacggaag JSC) MB-D174 acg |
| (0.0) LACg |
| Lacggaag JSC) MB-D175 acg |
| (0.0) LACg |
| Lacggaag JSC) MB-D176 acg |
| (0.0) LACg |
| Lacggaag JSC) MB-D177 acg |
| (0.0) LACg |
| Lacggaag JSC) MB-D178 acg |
| (0.0) LACg |
| Lacggaag JSC) MB-D179 acg |
| (0.0) LACg |
| Lacggaag JSC) MB-D180 acg |
| (0.0) LACg |
| Lacggaag JSC) MB-D181 acg |
| (0.0) LACg |
| Lacggaag JSC) MB-D182 acg |
| (0.0) LACg |
| Lacggaag JSC) MB-D183 acg |
| (0.0) LACg |
| Lacggaag JSC) MB-D184 acg |
| (0.0) LACg |
| Lacggaag JSC) MB-D185 acg |
| (0.0) LACg |
| Lacggaag JSC) MB-D186 acg |
| (0.0) LACg |
| Lacggaag JSC) MB-D187 acg |
| (0.0) LACg |
| Lacggaag JSC) MB-D188 acg |
| (0.0) LACg |
| Lacggaag JSC) MB-D189 acg |
| (0.0) LACg |
| Lacggaag JSC) MB-D190 acg |
| (0.0) LACg |
| Lacggaag JSC) MB-D191 acg |
| (0.0) LACg |
| Lacggaag JSC) MB-D192 acg |
| (0.0) LACg |
| Lacggaag JSC) MB-D193 acg |
| (0.0) LACg |
| Lacggaag JSC) MB-D194 acg |
| (0.0) LACg |
| Lacggaag JSC) MB-D195 acg |
| (0.0) LACg |
| Lacggaag JSC) MB-D196 acg |
| (0.0) LACg |
| Lacggaag JSC) MB-D197 acg |
| (0.0) LACg |
| Lacggaag JSC) MB-D198 acg |
| (0.0) LACg |
| Lacggaag JSC) MB-D200 acg |
| (0.0) LACg |
| Lacggaag JSC) MB-D201 acg |
| (0.0) LACg |
| Lacggaag JSC) MB-D202 acg |
| (0.0) LACg |
| Lacggaag JSC) MB-D203 acg |
| (0.0) LACg |
| Lacggaag JSC) MB-D204 acg |
| (0.0) LACg |
| Lacggaag JSC) MB-D205 acg |
| (0.0) LACg |
| Lacggaag JSC) MB-D206 acg |
| (0.0) LACg |
| Lacggaag JSC) MB-D207 acg |
| (0.0) LACg |
| Lacggaag JSC) MB-D208 acg |
| (0.0) LACg |
| Lacggaag JSC) MB-D209 acg |
| (0.0) LACg |
| Lacggaag JSC) MB-D210 acg |
| (0.0) LACg |
| Lacggaag JSC) MB-D211 acg |
| (0.0) LACg |
| Lacggaag JSC) MB-D212 acg |
| (0.0) LACg |
| Lacggaag JSC) MB-D213 acg |
| (0.0) LACg |
| Lacggaag JSC) MB-D214 acg |
| (0.0) LACg |
| Lacggaag JSC) MB-D215 acg |
| (0.0) LACg |
| Lacggaag JSC) MB-D216 acg |
| (0.0) LACg |
| Lacggaag JSC) MB-D217 acg |
| (0.0) LACg |
| Lacggaag JSC) MB-D218 acg |
| (0.0) LACg |
| Lacggaag JSC) MB-D219 acg |
| (0.0) LACg |
| Lacggaag JSC) MB-D220 acg |
| (0.0) LACg |
| Lacggaag JSC) MB-D221 acg |
| (0.0) LACg |
| Lacggaag JSC) MB-D222 acg |
| (0.0) LACg |
| Lacggaag JSC) MB-D223 acg |
| (0.0) LACg |
| Lacggaag JSC) MB-D224 acg |
| (0.0) LACg |
| Lacggaag JSC) MB-D225 acg |
| (0.0) LACg |
| Lacggaag JSC) MB-D226 acg |
| (0.0) LACg |
| Lacggaag JSC) MB-D227 acg |
| (0.0) LACg |
| Lacggaag JSC) MB-D228 acg |
| (0.0) LACg |
| Lacggaag JSC) MB-D229 acg |
| (0.0) LACg |
| Lacggaag JSC) MB-D230 acg |
| (0.0) LACg |
| Lacggaag JSC) MB-D231 acg |
| (0.0) LACg |
| Lacggaag JSC) MB-D232 acg |
| (0.0) LACg |
| Lacggaag JSC) MB-D233 acg |
| (0.0) LACg |
| Lacggaag JSC) MB-D234 acg |
| (0.0) LACg |
| Lacggaag JSC) MB-D235 acg |
| (0.0) LACg |
| Lacggaag JSC) MB-D236 acg |
| (0.0) LACg |
| Lacggaag JSC) MB-D237 acg |
| (0.0) LACg |
| Lacggaag JSC) MB-D238 acg |
| (0.0) LACg |
| Lacggaag JSC) MB-D239 acg |
| (0.0) LACg |
| Lacggaag JSC) MB-D240 acg |
| (0.0) LACg |
| Lacggaag JSC) MB-D241 acg |
| (0.0) LACg |
| Lacggaag JSC) MB-D242 acg |
| (0.0) LACg |
| Lacggaag JSC) MB-D243 acg |
| (0.0) LACg |
| Lacggaag JSC) MB-D244 acg |
| (0.0) LACg |
| Lacggaag JSC) MB-D245 acg |
| (0.0) LACg |
| Lacggaag JSC) MB-D246 acg |
| (0.0) LACg |
| Lacggaag JSC) MB-D247 acg |
| (0.0) LACg |
| Lacggaag JSC) MB-D248 acg |
| (0.0) LACg |
| Lacggaag JSC) MB-D249 acg |
| (0.0) LACg |
| Lacggaag JSC) MB-D250 acg |
| (0.0) LACg |
| Lacggaag JSC) MB-D251 acg |
| (0.0) LACg |
| Lacggaag JSC) MB-D252 acg |
| (0.0) LACg |
| Lacggaag JSC) MB-D253 acg |
| (0.0) LACg |
| Lacggaag JSC) MB-D254 acg |
| (0.0) LACg |
| Lacggaag JSC) MB-D255 acg |
| (0.0) LACg |
| Lacggaag JSC) MB-D256 acg |
| (0.0) LACg |
| Lacggaag JSC) MB-D257 acg |
| (0.0) LACg |
| Lacggaag JSC) MB-D258 acg |
| (0.0) LACg |
| Lacggaag JSC) MB-D259 acg |
| (0.0) LACg |
| Lacggaag JSC) MB-D260 acg |
| (0.0) LACg |
| Lacggaag JSC) MB-D261 acg |
| (0.0) LACg |
| Lacggaag JSC) MB-D262 acg |
| (0.0) LACg |
| Lacggaag JSC) MB-D263 acg |
| (0.0) LACg |
| Lacggaag JSC) MB-D264 acg |
| (0.0) LACg |
| Lacggaag JSC) MB-D265 acg |
| (0.0) LACg |
| Lacggaag JSC) MB-D266 acg |
| (0.0) LACg |
| Lacggaag JSC) MB-D267 acg |
| (0.0) LACg |
| Lacggaag JSC) MB-D268 acg |
| (0.0) LACg |
| Lacggaag JSC) MB-D269 acg |
| (0.0) LACg |
| Lacggaag JSC) MB-D270 acg |
| (0.0) LACg |
| Lacggaag JSC) MB-D271 acg |
| (0.0) LACg |
| Lacggaag JSC) MB-D272 acg |
| (0.0) LACg |
| Lacggaag JSC) MB-D273 acg |
| (0.0) LACg |
| Lacggaag JSC) MB-D274 acg |
| (0.0) LACg |
| Lacggaag JSC) MB-D275 acg |
| (0.0) LACg |
| Lacggaag JSC) MB-D276 acg |
| (0.0) LACg |
| Lacggaag JSC) MB-D277 acg |
| (0.0) LACg |
| Lacggaag JSC) MB-D278 acg |
| (0.0) LACg |
| Lacggaag JSC) MB-D279 acg |
| (0.0) LACg |
| Lacggaag JSC) MB-D280 acg |
| (0.0) LACg |
| Lacggaag JSC) MB-D281 acg |
| (0.0) LACg |
| Lacggaag JSC) MB-D282 acg |
| (0.0) LACg |
| Lacggaag JSC) MB-D283 acg |
| (0.0) LACg |
| Lacggaag JSC) MB-D284 acg |
| (0.0) LACg |
| Lacggaag JSC) MB-D285 acg |
| (0.0) LACg |
| Lacggaag JSC) MB-D286 acg |
| (0.0) LACg |
| Lacggaag JSC) MB-D287 acg |
| (0.0) LACg |
| Lacggaag JSC) MB-D288 acg |
| (0.0) LACg |
| Lacggaag JSC) MB-D289 acg |
| (0.0) LACg |
| Lacggaag JSC) MB-D290 acg |
| (0.0) LACg |
| Lacggaag JSC) MB-D291 acg |
| (0.0) LACg |
| Lacggaag JSC) MB-D292 acg |
| (0.0) LACg |
| Lacggaag JSC) MB-D293 acg |
| (0.0) LACg |
| Lacggaag JSC) MB-D294 acg |
| (0.0) LACg |
| Lacggaag JSC) MB-D295 acg |
| (0.0) LACg |
| Lacggaag JSC) MB-D296 acg |
| (0.0) LACg |
| Lacggaag JSC) MB-D297 acg |
| (0.0) LACg |
| Lacggaag JSC) MB-D300 acg |
| (0.0) LACg |
| Lacggaag JSC) MB-D301 acg |
| (0.0) LACg |
| Lacggaag JSC) MB-D302 acg |
| (0.0) LACg |
| Lacggaag JSC) MB-D303 acg |
| (0.0) LACg |
| Lacggaag JSC) MB-D304 acg |
| (0.0) LACg |
| Lacggaag JSC) MB-D305 acg |
| (0.0) LACg |
| Lacggaag JSC) MB-D306 acg |
| (0.0) LACg |
| Lacggaag JSC) MB-D307 acg |
| (0.0) LACg |
| Lacggaag JSC) MB-D308 acg |
| (0.0) LACg |
| Lacggaag JSC) MB-D309 acg |
| (0.0) LACg |
| Lacggaag JSC) MB-D310 acg |
| (0.0) LACg |
| Lacggaag JSC) MB-D311 acg |
| (0.0) LACg |
| Lacggaag JSC) MB-D312 acg |
| (0.0) LACg |
| Lacggaag JSC) MB-D313 acg |
| (0.0) LACg |
| Lacggaag JSC) MB-D314 acg |
| (0.0) LACg |
| Lacggaag JSC) MB-D315 acg |
| (0.0) LACg |
| Lacggaag JSC) MB-D316 acg |
| (0.0) LACg |
| Lacggaag JSC) MB-D317 acg |
| (0.0) LACg |
| Lacggaag JSC) MB-D318 acg |
| (0.0) LACg |
| Lacggaag JSC) MB-D319 acg |
| (0.0) LACg |
| Lacggaag JSC) MB-D320 acg |
| (0.0) LACg |
| Lacggaag JSC) MB-D321 acg |
| (0.0) LACg |
| Lacggaag JSC) MB-D322 acg |
| (0.0) LACg |
| Lacggaag JSC) MB-D323 acg |
| (0.0) LACg |
| Lacggaag JSC) MB-D324 acg |
| (0.0) LACg |
| Lacggaag JSC) MB-D325 acg |
| (0.0) LACg |
| Lacggaag JSC) MB-D326 acg |
| (0.0) LACg |
| Lacggaag JSC) MB-D327 acg |
| (0.0) LACg |
| Lacggaag JSC) MB-D328 acg |
| (0.0) LACg |
| Lacggaag JSC) MB-D329 acg |
| (0.0) LACg |
| Lacggaag JSC) MB-D330 acg |
| (0.0) LACg |
| Lacggaag JSC) MB-D331 acg |
| (0.0) LACg |
| Lacggaag JSC) MB-D332 acg |
| (0.0) LACg |
| Lacggaag JSC) MB-D333 acg |
| (0.0) LACg |
| Lacggaag JSC) MB-D334 acg |
| (0.0) LACg |
| Lacggaag JSC) MB-D335 acg |
| (0.0) LACg |
| Lacggaag JSC) MB-D336 acg |
| (0.0) LACg |
| Lacggaag JSC) MB-D337 acg |
| (0.0) LACg |
| Lacggaag JSC) MB-D338 acg |
| (0.0) LACg |
| Lacggaag JSC) MB-D339 acg |
| (0.0) LACg |
| Lacggaag JSC) MB-D340 acg |
| (0.0) LACg |
| Lacggaag JSC) MB-D341 acg |
| (0.0) LACg |
| Lacggaag JSC) MB-D342 acg |
| (0.0) LACg |
| Lacggaag JSC) MB-D343 acg |
| (0.0) LACg |
| Lacggaag JSC) MB-D344 acg |
| (0.0) LACg |
| Lacggaag JSC) MB-D345 acg |
| (0.0) LACg |
| Lacggaag JSC) MB-D346 acg |
| (0.0) LACg |
| Lacggaag JSC) MB-D347 acg |
| (0.0) LACg |
| Lacggaag JSC) MB-D348 acg |
| (0.0) LACg |
| Lacggaag JSC) MB-D349 acg |
| (0.0) LACg |
| Lacggaag JSC) MB-D350 acg |
| (0.0) LACg |
| Lacggaag JSC) MB-D351 acg |
| (0.0) LACg |
| Lacggaag JSC) MB-D352 acg |
| (0.0) LACg |
| Lacggaag JSC) MB-D353 acg |
| (0.0) LACg |
| Lacggaag JSC) MB-D354 acg |
| (0.0) LACg |
| Lacggaag JSC) MB-D355 acg |
| (0.0) LACg |
| Lacggaag JSC) MB-D356 acg |
| (0.0) LACg |
| Lacggaag JSC) MB-D357 acg |
| (0.0) LACg |
| Lacggaag JSC) MB-D358 acg |
| (0.0) LACg |
| Lacggaag JSC) MB-D359 acg |
| (0.0) LACg |
| Lacggaag JSC) MB-D360 acg |
| (0.0) LACg |
| Lacggaag JSC) MB-D361 acg |
| (0.0) LACg |
| Lacggaag JSC) MB-D362 acg |
| (0.0) LACg |
| Lacggaag JSC) MB-D363 acg |
| (0.0) LACg |
| Lacggaag JSC) MB-D364 acg |
| (0.0) LACg |
| Lacggaag JSC) MB-D365 acg |
| (0.0) LACg |
| Lacggaag JSC) MB-D366 acg |
| (0.0) LACg |
| Lacggaag JSC) MB-D367 acg |
| (0.0) LACg |
| Lacggaag JSC) MB-D368 acg |
| (0.0) LACg |
| Lacggaag JSC) MB-D369 acg |
| (0.0) LACg |
| Lacggaag JSC) MB-D370 acg |
| (0.0) LACg |
| Lacggaag JSC) MB-D371 acg |
| (0.0) LACg |
| Lacggaag JSC) MB-D372 acg |
| (0.0) LACg |
| Lacggaag JSC) MB-D373 acg |
| (0.0) LACg |
| Lacggaag JSC) MB-D374 acg |
| (0.0) LACg |
| Lacggaag JSC) MB-D375 acg |
| (0.0) LACg |
| Lacggaag JSC) MB-D376 acg |
| (0.0) LACg |
| Lacggaag JSC) MB-D377 acg |
| (0.0) LACg |
| Lacggaag JSC) MB-D378 acg |
| (0.0) LACg |
| Lacggaag JSC) MB-D379 acg |
| (0.0) LACg |
| Lacggaag JSC) MB-D380 acg |
| (0.0) LACg |
| Lacggaag JSC) MB-D381 acg |
| (0.0) LACg |
| Lacggaag JSC) MB-D382 acg |
| (0.0) LACg |
| Lacggaag JSC) MB-D383 acg |
| (0.0) LACg |
| Lacggaag JSC) MB-D384 acg |
| (0.0) LACg |
| Lacggaag JSC) MB-D385 acg |
| (0.0) LACg |
| Lacggaag JSC) MB-D386 acg |
| (0.0) LACg |
| Lacggaag JSC) MB-D387 acg |
| (0.0) LACg |
| Lacggaag JSC) MB-D388 acg |
| (0.0) LACg |
| Lacggaag JSC) MB-D389 acg |
| (0.0) LACg |
Ar
JololSll 1aI b! Jolol
1
1
(MS-D12EN aLbI Jol) aIgSJI 19
AA LsLJbJLJS-MS-D12 Jc
(MS-D12 a,LLaJ Jol) a,JJySJJ bJxJ ②]
(20 15 BL-4 aLJIaI aLc

2020159
a25,11 c1,fgwwS8fMg MB-D12 aLbJI acgco
(J)LbBbBbBbBbBbBbBbBbBbBbBbBbBbBbBbBbBbBbBbBbBbBbBbBbBbBbBbBbBbBbBbBbBbBbBbBbBbBbBbBbBbBb

iIbI
J
Jolli
JLMS-D12JL31
AA
L
aegno 10
MS-D12EN
EN-EL 15
MB-D12
Lg, a 120
jL 10 MB-D12 j
jIgSLR) 1
LlIeJn Jg Jg MBD12 a 10000000000000000000000000000000000000000000000
EN-EL18 EN-EL15
Jg jllj 3 jg2-0g (pM-Hg) AA
j 100000000000000000000000000000000000000000000000000000000000000000000
JL
pssss sss
j:MB-D12acgogolulbLbJOLSLJIaUy
100
()
1
jBn jBMB-D12 aJbJIaGgno JMS-D12EN jJbJIaJIol
No reproduction in any form of this manual, in whole or in part (except for brief quotation in critical articles or reviews), may be made without written authorization from NIKON CORPORATION.

新主用
MOH:MB-D12
制:NikonCorporation
朝正国:香国
生 鸡:()N

KCC-REI-NKR-MB-D12
NIKON CORPORATION
Printed in Japan
© 2012 Nikon Corporation
SB4K05(C3)
6MFC02C3-05
- MB-D12
- 仄口丁一の入方
- MB-D12 Multi-Power Battery Pack
- User's Manual
- Table of Contents
- Safety Precautions
- Notice for Customers in Europe
- Precautions for Use
- Notice for Customers in the U.S.A.
- Federal Communications Commission (FCC) Radio Frequency Interference Statement
- Nikon
- Tested To Comply
- With FCC Standards
- FOR HOME OR OFFICE USE
- CAUTION
- Notice for Customers in Canada
- ATTENTION
- Introduction The MB-D12 and Accessories
- The MB-D12 and Supplied Accessories
- Using the Optional EH-5a/EH-5b AC Adapter and EP-5B Power Connector
- Using the Optional BL-5 Battery-Chamber Cover
- Parts of the MB-D12 (Figure A)
- The MB-D12 Shutter-Release Button, Multi Selector, Command Dials, and AF-ON Button
- The MB-D12 Control Lock
- Using the Battery Pack
- Attaching the Battery Pack
- Removing the Battery Pack
- Inserting Batteries
- The EP-5B Power Connector
- Battery Level
- EN-EL15/EN-EL18
- AA Batteries
- Battery Info
- Removing Batteries
- Specifications
- EN-EL15 and EN-EL18 Batteries
- Frame Advance Rate
- Poignée-alimentation MB-D12
- Tested To Comply With FCC Standards
- CUIDADOS
- AvisoparaosClientsenosCanada
- CUIDADO
- BL-5 本地化封装
- MB-D12の状部明確
- mssuaaacnAC 1u EH-5a/EH-5b
- LauananaaunannnacAC EP-5B
- 2020159
- a25,11 c1,fgwwS8fMg MB-D12 aLbJI acgco
Brand : NIKON
Model : MBD12
Category : Other camera accessories