WPN2 - Other camera accessories NIKON - Free user manual and instructions
Find the device manual for free WPN2 NIKON in PDF.
| Product type | Waterproof housing for digital camera |
| Brand | Nikon |
| Model | WP-N2 |
| Compatible cameras | Nikon 1 J3, Nikon 1 S1 |
| Compatible lens | 1 NIKKOR VR 10-30 mm f/3.5-5.6 |
| Maximum waterproof depth | 40 m |
| Operating temperature | 0°C to 40°C |
| Dimensions (L × H × D) | Approx. 156 × 116 × 128 mm (excluding protrusions) |
| Weight (housing only) | Approx. 750 g |
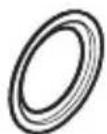
| Seal | O-ring (ref. WP-O1100) |
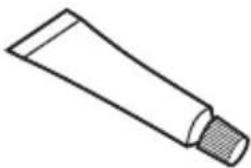
| Silicone grease | WP-G1000 (use only the one intended for WP-N2) |
| Silica gel (moisture absorber) | WP-S1000 (5 packets) |
| Zoom ring for crown | WP-ZG1000 |
| Anti-reflective ring | WP-IR1000 |
| Filter thread | 67 mm |
| Flash shoe | Yes (compatible with SEA&SEA waterproof flashes) |
| Fiber optic cable ports | 2 (with removable protectors) |
| Included accessories | Zoom ring, anti-reflective ring, front cap, strap, O-ring remover, grease, silica gel, manual, warranty |
| Optional accessories | Strap WP-AN1000, O-ring WP-O1100, silica gel WP-S1000, remover WP-OR1000, grease WP-G1000, SEA&SEA YS-D1 flashes |
| Maintenance and cleaning | Rinse with fresh water after each use, dry in shade, do not use detergents or chemicals |
| Safety | Do not dive with, do not exceed 40 m, do not expose to >40°C, do not open underwater |
| Recommended service | Annually by an authorized Nikon representative |
Frequently Asked Questions - WPN2 NIKON
User questions about WPN2 NIKON
0 question about this device. Answer the ones you know or ask your own.
Ask a new question about this device
Download the instructions for your Other camera accessories in PDF format for free! Find your manual WPN2 - NIKON and take your electronic device back in hand. On this page are published all the documents necessary for the use of your device. WPN2 by NIKON.
USER MANUAL WPN2 NIKON
natural_image
Silhouette of a Nikon 1 camera with no text or symbols on the bodyWP-N2
Waterproof Case
使用說明書
User's Manual
Benutzerhandbuch
https://reg.nikon-image.com/
カスタマーサポート
natural_image
Line drawing of a Nikon 1 DSLR camera with no text or symbols on the bodynatural_image
Simple line drawing of a cotton tube with a cap (no text or symbols)□ シリコングリス WP-G1000
natural_image
Simple line drawing of a curved handle or tool with a central dot (no text or symbols)□ ストラップ WP-AN1000
flowchart
graph TD
    A["Receipt"] --> B{Number 1}
    B --> C["Assembly"]
    C --> D["Assembly Step 3"]
    D --> E["Assembly Step 6"]
    E --> F["Final Shipment"]
ストラップの取り付け方
ウォータープルーフケースを開閉する
ウォータープルーフケースを開ける
natural_image
Simple 3D illustration of a mechanical component with gears and a circular button (no text or symbols)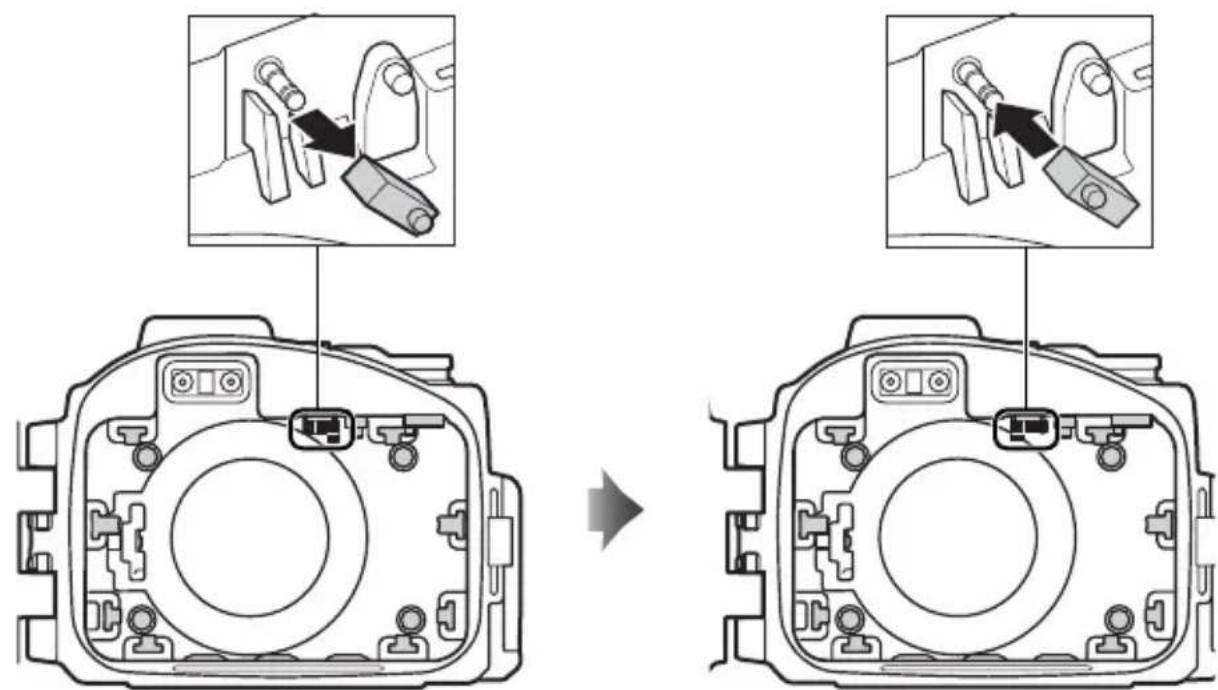
Jp
⑭ フロントクッション(4ヶ所)
S1 を使用する場合(続き)
⑤ サイドクッション(2 ヶ所)
natural_image
Simple 3D icon of a mechanical component with a circular button and triangular pointer (no text or symbols)

natural_image
Technical line drawing of a camera module with labeled components (no text or symbols beyond labels)natural_image
Line drawing of two hands holding a camera case with a small circular button on the screen (no text or symbols)Jp
natural_image
Illustration of two hands holding a camera case with a small object on the screen (no text or symbols visible)natural_image
Technical line drawing of a mechanical component with no visible text or symbols撮影の準備をする
1 カメラ本体の準備をする
3 ズームギアを取り付ける
natural_image
Technical illustration of a camera lens assembly with no visible text or symbols5 カメラを入れる
natural_image
Mechanical component diagram showing internal structure with a circular annotation highlighting a directional arrow (no text or symbols present)フラッシュポップ アップレバー
6 シリカゲルを入れる
natural_image
Illustration of hands installing or adjusting a digital camera module (no text or symbols visible)natural_image
Line drawing of two hands holding a digital camera (no text or symbols visible)Jp
natural_image
Mechanical component diagram showing a lever mechanism with a downward arrow indicating motion (no text or symbols present)Jp
2 使用する撮影モードを選択する
natural_image
Close-up of a mechanical component with a circular gear-like feature and an arrow indicating rotation (no text or symbols)3 構図を決める
natural_image
Mechanical component diagram showing a rotating shaft and housing (no text or symbols)望遠側 広角側
4 撮影する
natural_image
Mechanical component diagram showing a tool interacting with a base, no visible text or symbols動画撮影ボタン
撮影時のご注意
natural_image
Line drawing of two hands holding a camera case with a screen (no text or symbols visible)natural_image
Illustration of hands holding a camera frame (no text or symbols visible)natural_image
Diagram showing a camera module being adjusted to display a screen (no text or symbols present)natural_image
Line drawing of two hands holding a camera (no text or symbols visible)natural_image
Illustration of hands holding a camera frame (no text or symbols visible)Jp
natural_image
Illustration of a DSLR camera with lens and frame (no text or symbols)乾燥時のご注意
natural_image
Illustration of a hand using a tool to adjust or install a mechanical component (no text or symbols visible)Jp
natural_image
Line drawing of a hand using a tool to clean or inspect the internal components of a digital camera (no text or symbols)natural_image
Line drawing of two hands holding a thin, curved object (no text or symbols)Jp
natural_image
Simple line drawing of a mechanical component or device with no visible text or symbols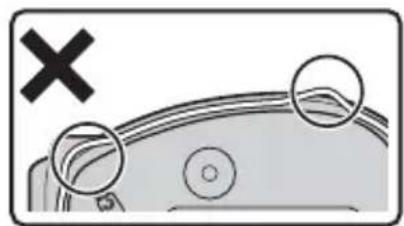
natural_image
Diagram showing a car with a cross mark and two circular features, no text or symbols present√ 洗浄についてのご注意
アフターサービスについて
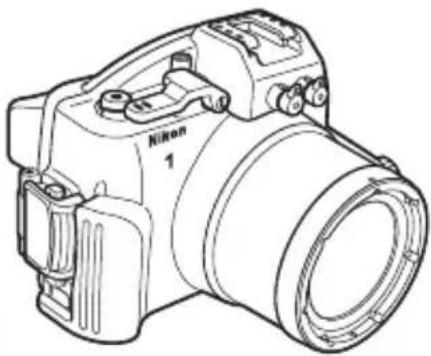
Thank you for your purchase of a WP-N2 waterproof case for Nikon 1 J3 and S1 digital cameras. The WP-N2 is waterproof to a depth of 40 m (130 ft), allowing pictures to be taken underwater or in rain or snow. This manual has been written to help you enjoy taking pictures using the waterproof case. Keep this manual where all those who use the product will read it, and be sure to read both it and the camera manual thoroughly before use.
Symbols and Conventions
To make it easier to find the information you need, the following symbols and conventions are used:

This icon marks cautions, information that should be read before use to prevent damage to the camera or waterproof case.

This icon marks notes, information that should be read before using the product.

This icon marks references to other pages in this manual.

Important: Read Before Use
Before using the waterproof case in or near water, test for leaks as described on pages 9 and 13 of this manual.

For Your Safety
Before using this product for the first time, read the safety instructions in "For Your Safety" (iii–vi).

Life-Long Learning
As part of Nikon's "Life-Long Learning" commitment to ongoing product support and education, continually-updated information is available on-line at the following sites:
- For users in the U.S.A.: http://www.nikonusa.com/
- For users in Europe and Africa: http://www.europe-nikon.com/support/
- For users in Asia, Oceania, and the Middle East: http://www.nikon-asia.com/
Visit these sites to keep up-to-date with the latest product information, tips, answers to frequently-asked questions (FAQs), and general advice on digital imaging and photography. Additional information may be available from the Nikon representative in your area. See the following URL for contact information: http://imaging.nikon.com/
For Your Safety
To prevent damage to your Nikon product or injury to yourself or to others, read the following safety precautions in their entirety before using this equipment. Keep these safety instructions where all those who use the product will read them.
The consequences that could result from failure to observe the precautions listed in this section are indicated by the following symbol:

This icon marks warnings. To prevent possible injury, read all warnings before using this Nikon product.
WARNINGS
Do not disassemble. Failure to observe this precaution could result in injury or product malfunction. Should the product break as the result of a fall or other accident, take it to a Nikon-authorized service representative for inspection, being careful not to injure yourself on the broken parts.
⚠️ Turn the camera off immediately in the event of malfunction. Should you notice smoke or an unusual smell coming from the equipment, remove the battery from the camera immediately, taking care to avoid burns. Continued operation could result in injury. After removing the battery from the camera, take the equipment to a Nikon-authorized service representative for inspection.
Do not use in the presence of fl ammable gas. Do not use electronic equipment in the presence of fl ammable gas, as this could result in explosion or fi re.
⚠️ Observe caution when using the flash.
- Using the fl ash close to your subject's eyes could cause temporary visual impairment. Particular care should be observed if photographing infants, when the fl ash should be no less than one meter (39 in.) from the subject. - Do not aim the fl ash at the operator of a motor vehicle. Failure to observe this precaution could result in accidents.
⚠️ Keep out of reach of children. Failure to observe this precaution could result in injury. In addition, note that small parts constitute a choking hazard. Should a child swallow any part of this equipment, consult a physician immediately.
Do not place the strap around the neck of an infant or child. Placing the strap around the neck of an infant or child could result in strangulation.
Do not dive while holding. To prevent injury caused by the case striking the body, do not jump or dive into water while holding the waterproof case.
En
⚠ Observe proper precautions when handling camera batteries. Batteries may leak or explode if improperly handled. Observe the following precautions when handling camera batteries:
- Use only batteries approved for use in the camera.
- Batteries are prone to leakage when fully discharged. Remove the camera from the case when not in use.
- Should water enter the case, remove the battery from the camera immediately.
- Keep the battery terminals dry. Failure to observe this precaution could result in injury or product malfunction.
Do not leave in direct sunlight. The case could focus sunlight, causing fire.
Do not use at depths in excess of 40 m (130 ft). Failure to observe this precaution could result in leakage or other malfunction.
⚠️ Keep the case watertight. Do not clean the case with a high-pressure jet. Do not open the case where it would be exposed to dust or sand, and be sure to remove any foreign objects from the O-ring and any parts of the case that are in contact with the O-ring before closing the case. Failure to observe these precautions could result in leakage.
Do not exposure to high temperatures. Do not expose the product to temperatures over 40 °C (104 °F). Failure to observe this precaution could cause the product to warp, resulting in leakage.
Do not cover the product during use. The build-up of heat could deform the case or cause fire.
Do not store the camera in the case. Gases released by the camera battery could build up in the case, causing explosion or fire.
⚠ Do not eat silicon grease or silica gel. These products are not edible.
Cautions
To ensure continued enjoyment of your Nikon product, observe the following precautions when storing or using the device.
Preventing Leakage
WATER INSIDE THE CASE COULD NOT ONLY EXPOSE THE CAMERA TO IRREPARABLE DAMAGE BUT ALSO RESULT IN FIRE, ELECTRIC SHOCK, OR EXPOSURE TO GAS. THE ENTRY OF WATER INTO THE CASE CAN BE PREVENTED BY OBSERVING THE FOLLOWING PRECAUTIONS:
- Before sealing the case, examine the O-ring, watertight channel, and any parts of the case that are in contact with the O-ring carefully to ensure that they are free of liquid, dirt, hair, lint, dust, sand, and other foreign objects. Make sure that the O-ring is not twisted or out of position.
- The O-ring requires periodic replacement. Replace the O-ring immediately if it is damaged, cracked, warped, or has lost elasticity. O-rings should be replaced at least once a year; do not use a worn O-ring or a type of O-ring or silicon grease not designated for use in this product. Do not use COOLPIX or NIKONOS O-ring lubricant (grease).
- To prevent damage to the O-ring, use the O-ring remover when removing the ring from the case. Do not use metal objects or objects with sharp points when removing the O-ring.
- Do not use force when removing or positioning the O-ring. Excessive force may permanently stretch the ring, causing the case to leak.
- To prevent wear, use only silicon grease designated for use with this product (☐ 21). Do not use COOLPIX or NIKONOS O-ring lubricant (grease) or other types of silicon grease.
- Do not open the waterproof case in areas exposed to spray, high winds, dust, or sand.
- Do not drop the case, place under heavy objects, or subject to excessive force. Failure to observe this precaution could cause the case to warp, resulting in leakage.
- In the event of leakage, stop use immediately, dry the camera and the interior of the case, and take the camera and case to a Nikon-authorized service representative.
Shock and Vibration
The waterproof case is not designed to protect the camera from blows or vibration. Do not drop the case, strike it against hard objects, throw it into the water, jump into the water holding the case, or leave the case in an area subject to extreme vibration. Failure to observe these precautions could result in damage to the camera.
Maximum Depth
The case is waterproof to 40 m (130 ft). At greater depths, the case could leak, break, or change shape, resulting in damage to the camera.
En
Temperature
Do not leave the case in areas exposed to high temperatures, such as inside a car, near a heater, on a beach, or in direct sunlight. Failure to observe this precaution could weaken or warp the case, resulting in damage to the camera. Sudden changes in temperature could result in condensation inside the case, which could also damage the camera. To prevent condensation:
- When moving from one location to another that is noticeable warmer or colder, leave the camera in the case until it has reached the same temperature as its surroundings.
- Place the supplied desiccant (silica gel) in the case with the camera as directed on page 11 of this manual.
- Do not expose the case to high temperatures by leaving it on the beach or in direct sunlight before entering the water.
Chemicals
- Do not expose the case to volatile chemicals or their vapors. Failure to observe this precaution could result in damage to the case.
- Do not use chemical detergents, rust inhibitors, thinner, alcohol, or other volatile chemicals when cleaning the case. Wash in fresh water only.
- Use only desiccants designated for use with this product (☐ 21).
- Use only silicon grease designated for use with this product (☐ 21). Do not use COOLPIX or NIKONOS O-ring lubricant (grease).
- Do not use sealants or anti-fog chemicals.
- Do not handle the case after applying sunscreen. Sunscreen can damage the clear plastic parts of the case.
- Do not apply stickers to the case, as the adhesive could cause the case to deteriorate.
Travelling by Air
If possible, include the case in your carry-on baggage when travelling by air. When packing the case with checked luggage, leave the case open or remove the O-ring. If the case is sealed, changes in air pressure may damage the case or prevent the case from opening.
High Altitudes
When travelling from high to low altitudes, open the case periodically to equalize the pressure. If the case is kept sealed, changes in air pressure may damage the case or prevent it from opening.
Important!
The WP-N2 waterproof case is for use with compatible cameras only. Do not place other cameras in the WP-N2.
Table of Contents
For Your Safety....iii
Introduction 1
Package Contents....1
Parts of the WP-N2 2
Using the Buckle 4
Unlatching the Case 4
Latching the Case....4
Conf i guration....5
Configuring the Case for the J3....5
Configuring the Case for the S1 5
The Preliminary Leak Test....9
Preparing the Camera....10
The Final Leak Test....13
Taking Pictures.... 14
After Use 16
Maintenance....18
Caring for the O-Ring 18
Storage 20
Technical Notes......21
Specifications....21
Optional Accessories.... 21
Introduction
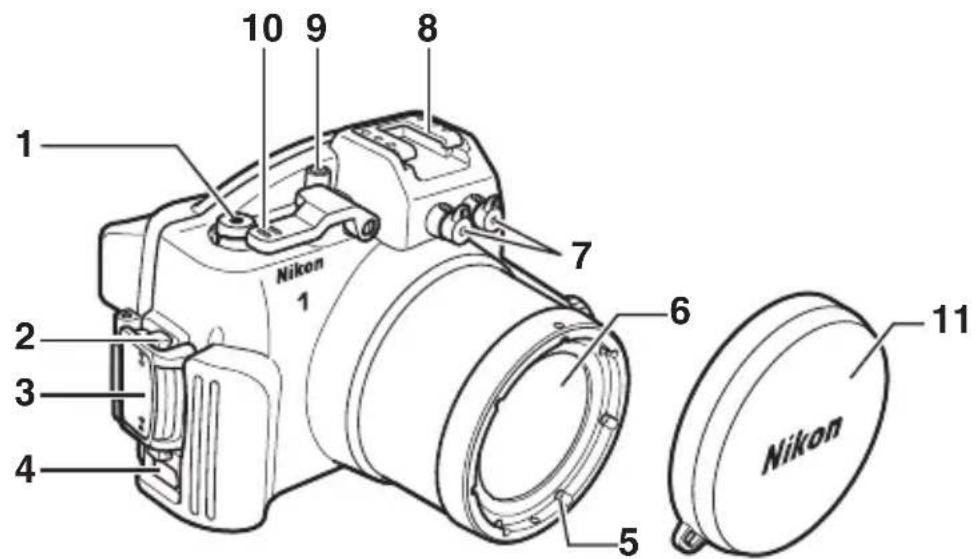
Refer to this section for the names of the supplied accessories and the parts of the waterproof case.
Package Contents
Confir rm that the package contains the items listed below. Contact your retailer if anything is missing.
En
natural_image
Line drawing of a Nikon 1 DSLR camera with no text or symbols on the body itself□ WP-N2 (with WP-01100 O-ring in place; check that O-ring is undamaged before use (☐ 18))
□ WP-OR1000 O-ring remover
□ WP-AN2000 front cap strap
□ User's Manual (this manual)
□ Warranty
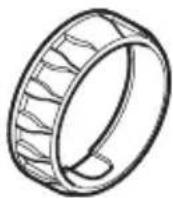
□ WP-ZG1000zoom gear sleeve
□ WP-IR1000 inner-reflection prevention ring
natural_image
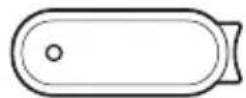
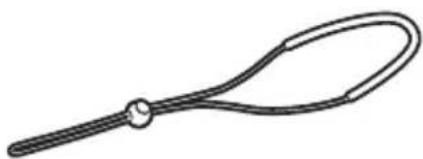
Simple line drawing of a curved handle or grip with a central dot (no text or symbols)□ WP-AN1000 strap
□ WP-LC1000 front cap
WP-S1000 silica gel desiccant (1 package of 5; reseal after opening)
natural_image
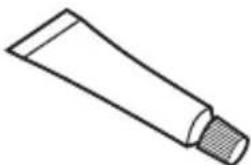
Simple line drawing of a cotton tube with a cap (no text or symbols)□ WP-G1000 silicon grease

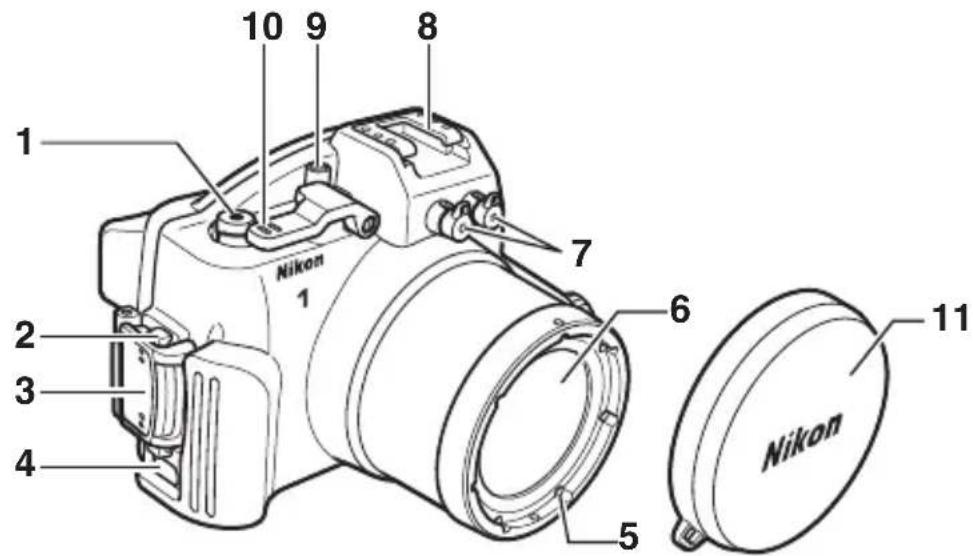
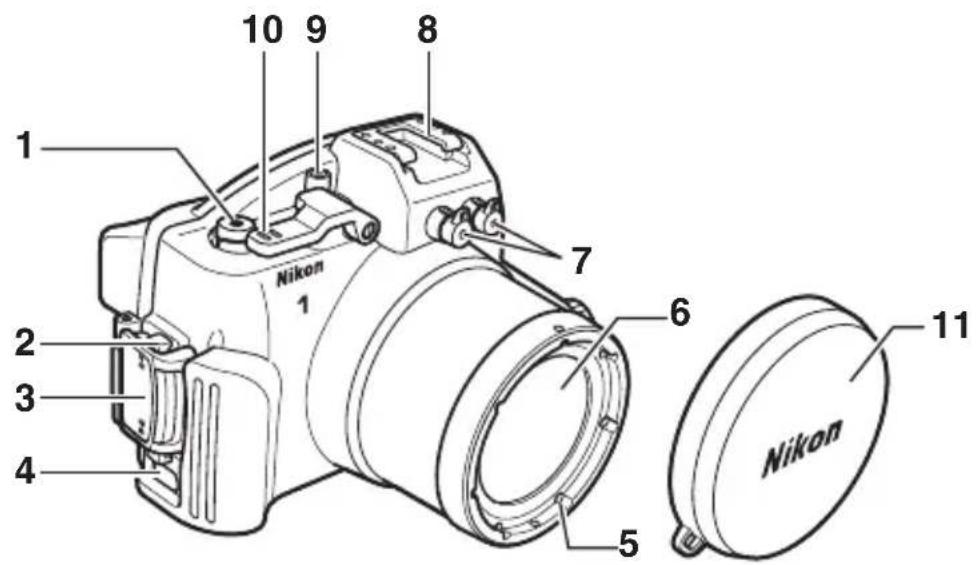
1 Movie-record button ....14
2 Buckle release button ....4
3Buckle....4
4 Eyelet for strap ....3
5∅67 mm filter attachment thread
6 Lens window .....11
7 Fiber-optic cable socket caps* ......21
8 Accessory shoe
9 Power switch 14
10 Shutter lever 14
11 Front cap ....3, 21
* Remove when using SEA&SEA underwater flash units.
12 Rear cover ....4
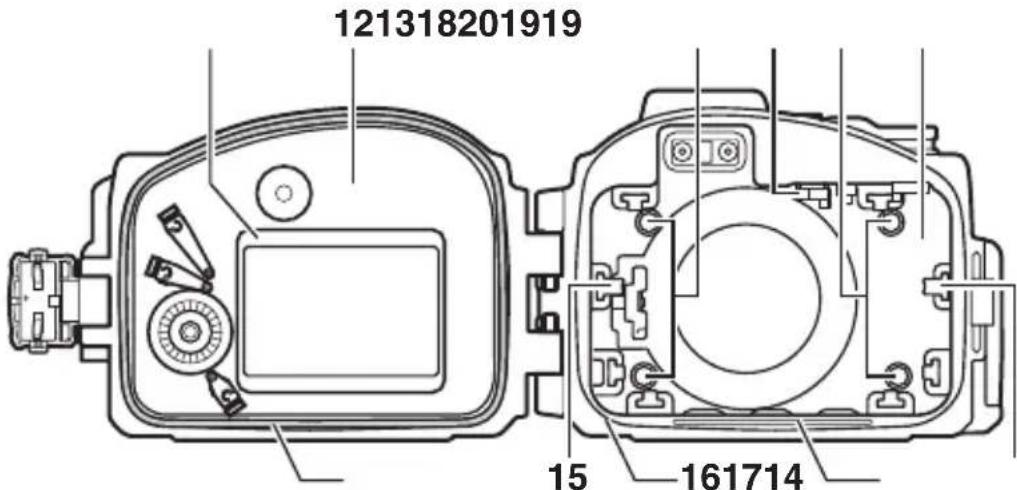
13 Inner hood/Inner hood spacer .....5, 6, 8
14 O-ring/O-ring guide .....12, 18, 21
15 Side cushion....5,8
16 O-ring seal 12, 19
17 Watertight channel 12, 19
18 Front cover 4
19 Front cushion 5,7,8
20 Power switch contact....5,7,8
The Accessory Shoe
The accessory shoe is used for underwater flash units (☐ 21) and other accessories; see the documentation provided with the accessories for information on attachment and removal. Remove accessories from the accessory shoe when transporting the waterproof case on land.
Parts of the WP-N2 (Continued)
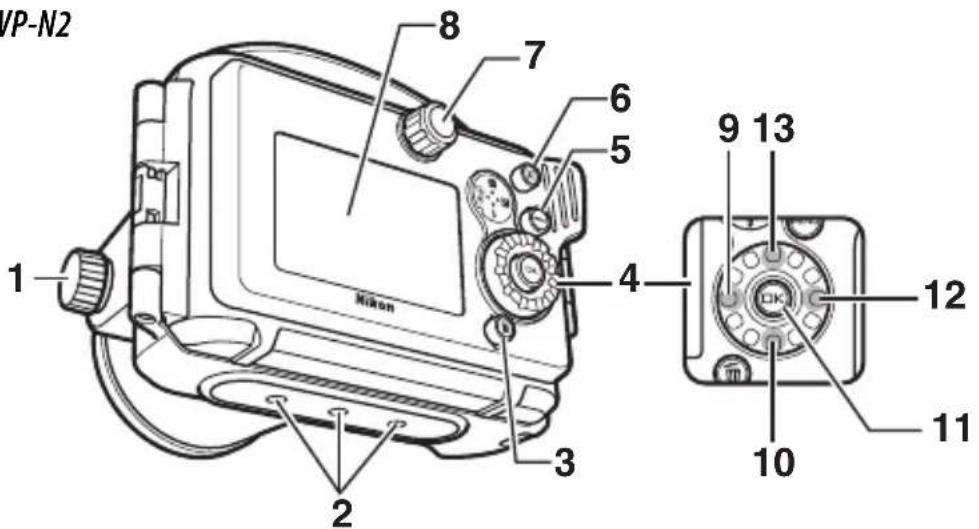
1 Zoom dial ....12, 14
2 Tripod sockets
3 (delete) button
4 Multi selector
5 MENU (menu) button
6 ▶ ( playback) button
7 Mode dial* 14
8 Monitor window
9 ☑ (continuous shooting/self-timer) button
10 ↓ (flash mode) button
11 OK (OK) button
12 (exposure compensation) button
13 F (feature) button
* For use with J3 only
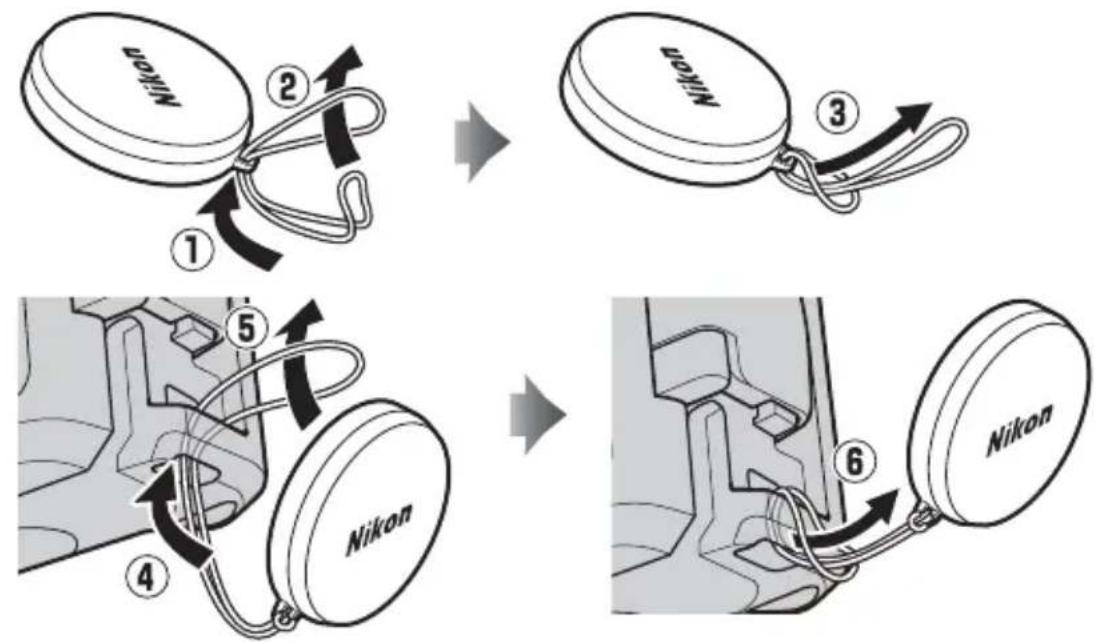
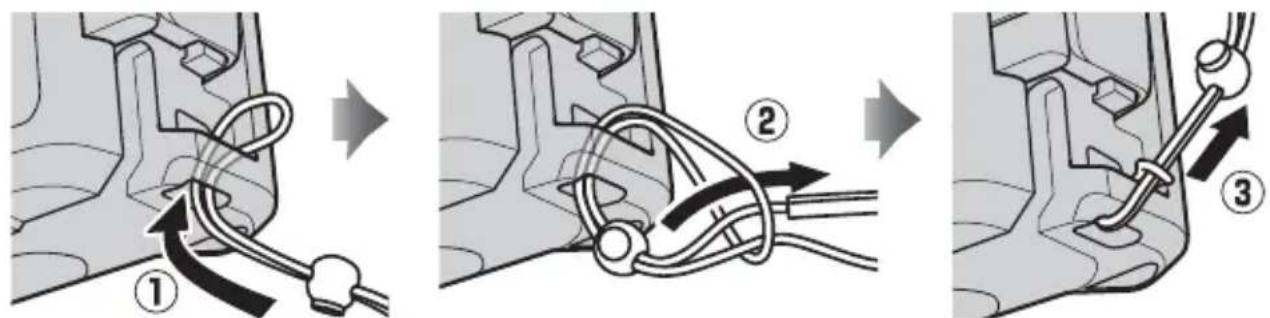
Attaching the Front Cap Strap
flowchart
graph TD
    A["Receipt"] --> B{Number 1}
    B --> C["Assembly"]
    C --> D["Assembly Step 2"]
    D --> E["Assembly Step 3"]
    E --> F["Assembly Step 4"]
    F --> G["Assembly Step 5"]
    G --> H["Assembly Step 6"]
    H --> I["Final Assembly"]
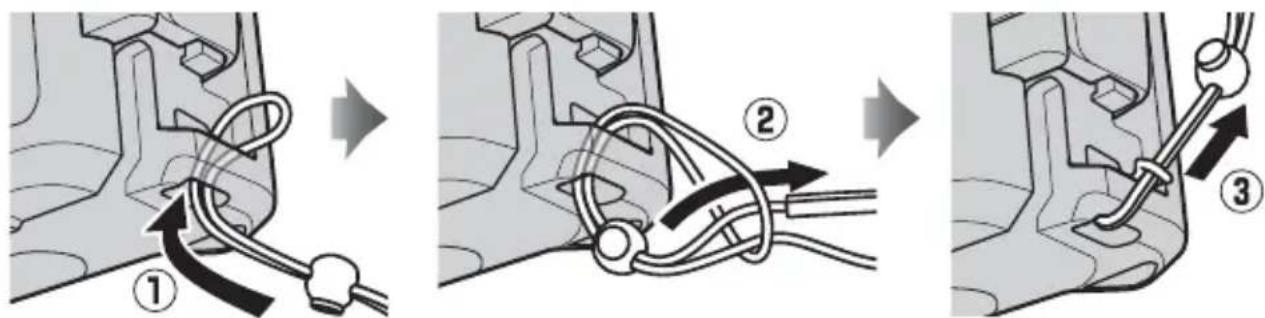
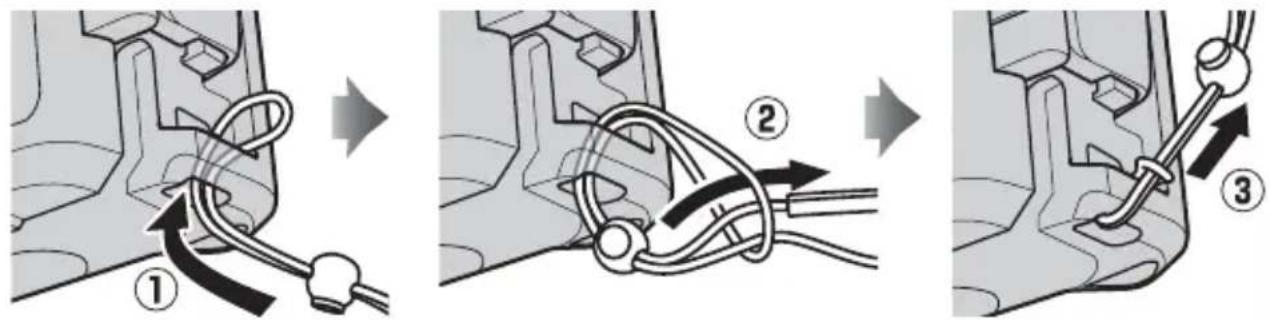
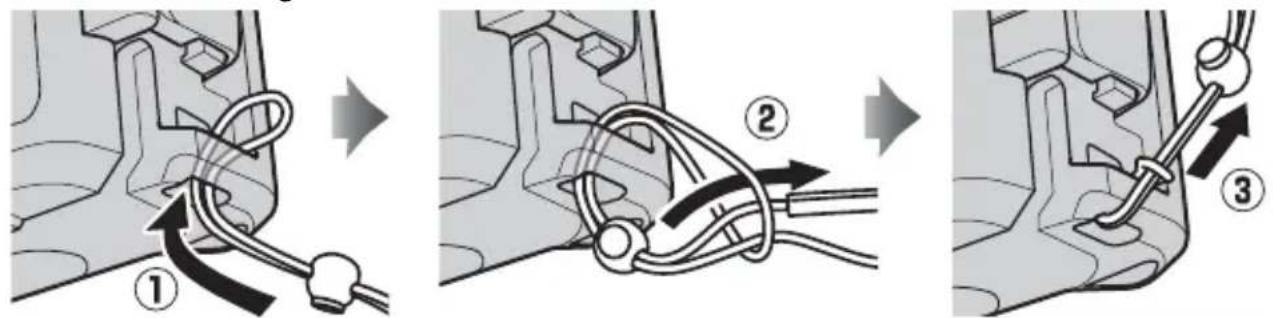
Attaching the Strap
Using the Buckle
Follow the steps below to unlatch or latch the case.
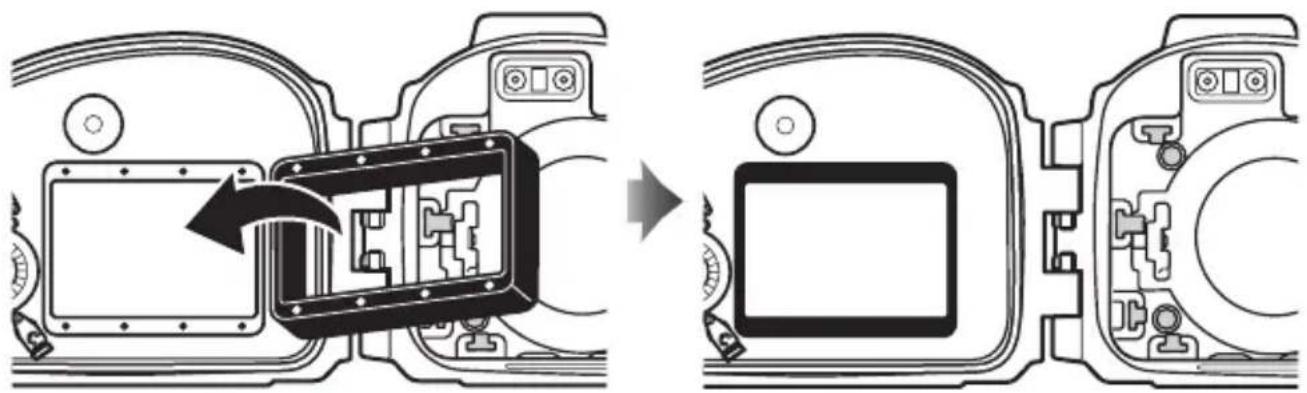
Unlatching the Case
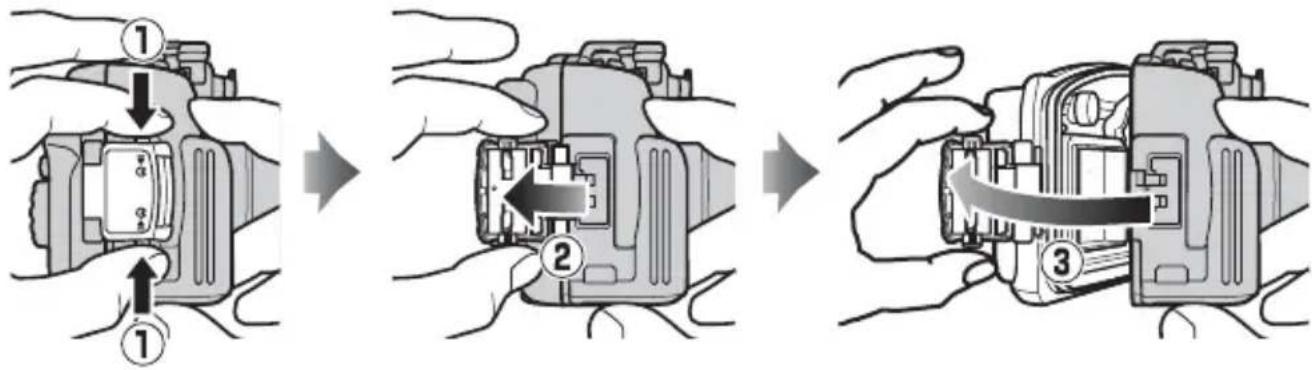
Keeping the buckle release button pressed (①), open the buckle (②) and then open the rear cover (③).
flowchart
graph TD
    A["1"] --> B["2"]
    B --> C["3"]
En
Latching the Case
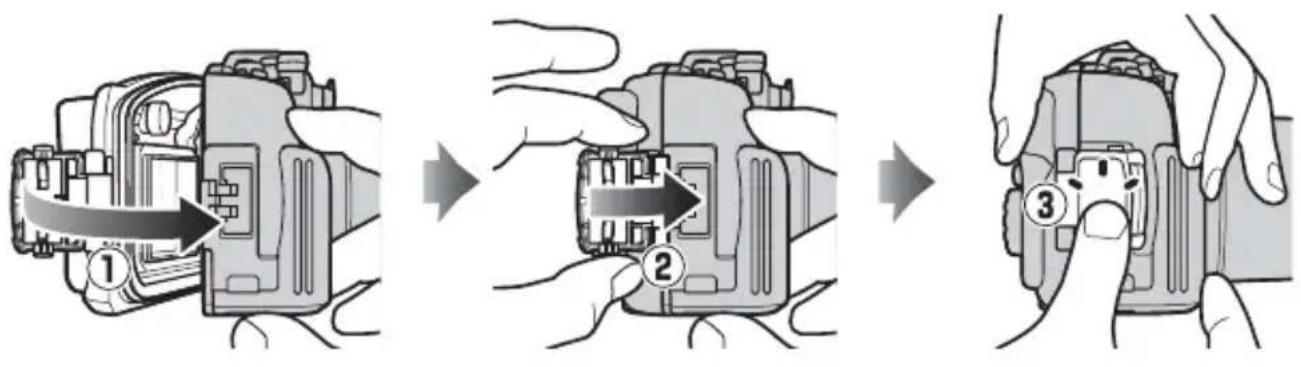
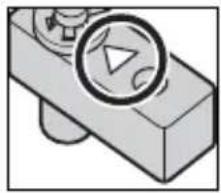
Close the case (①) and flip the buckle onto the front half (②), then press the buckle closed until it clicks into place (③). Check that the case is properly sealed, that the O-ring is in place, and that no foreign objects are caught in the seal (19).
flowchart
graph TD
    A["Component 1"] --> B["Assembly Step 2"]
    B --> C["Assembly Step 3"]
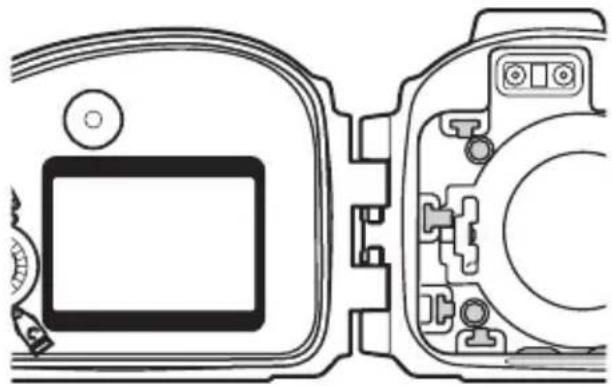
Opening the Case
Before opening the case, be sure it is completely dry and free of dirt. After using the case underwater, wash it in fresh water to remove any sand or other foreign objects and then dry it thoroughly with a soft, dry cloth. Be sure that any water, sand, or other foreign objects left on the case do not fall into the interior when the case is opened. Never operate the buckle or buckle release button underwater.
Be careful not to drop the camera when removing it from the case.
Configuration
At shipment, the case is configured for use with the J3. Removable parts allow the case to be configured for use with the S1. Be careful not to drop the parts during replacement.
Configuring the Case for the J3
The case is configured for use with the J3 at shipment. Do not change the configuration when using the case with the J3.
En
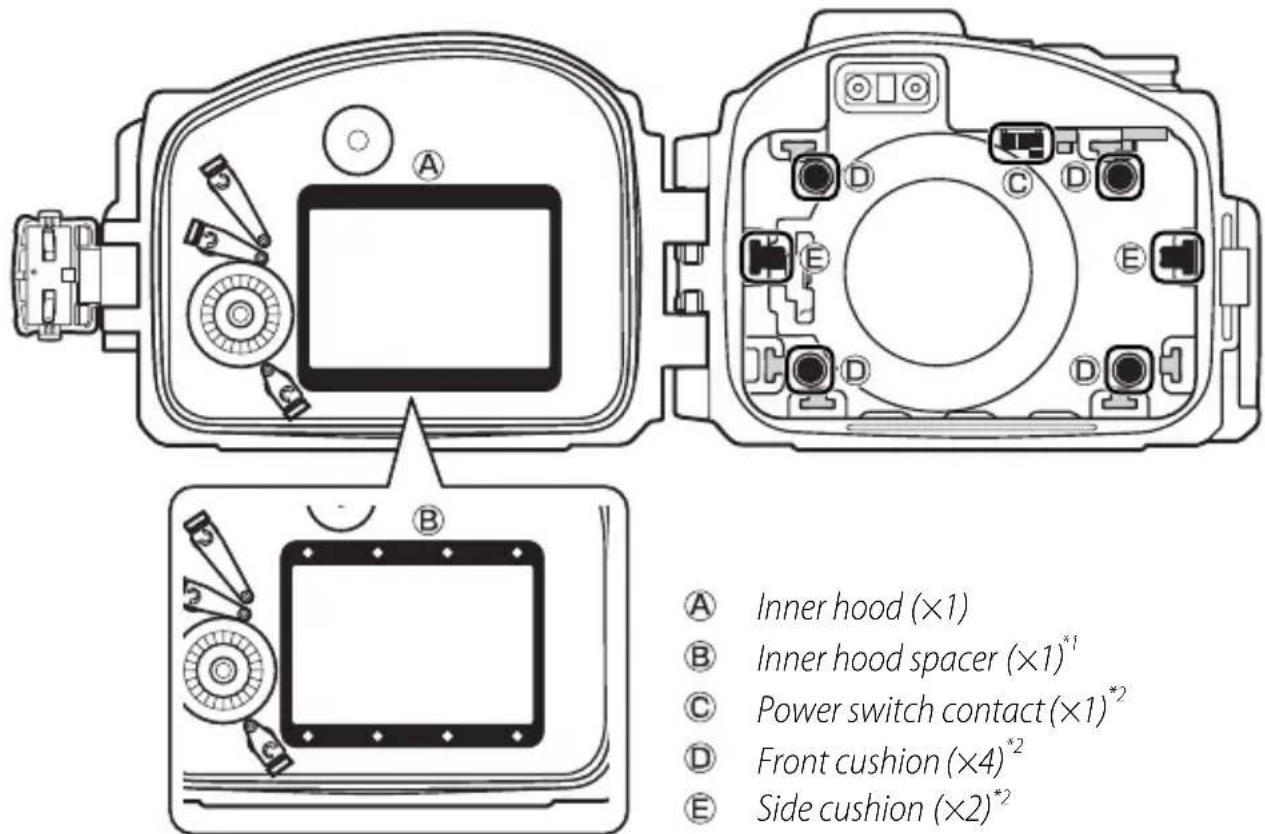
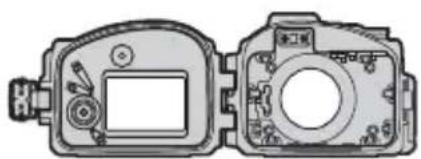
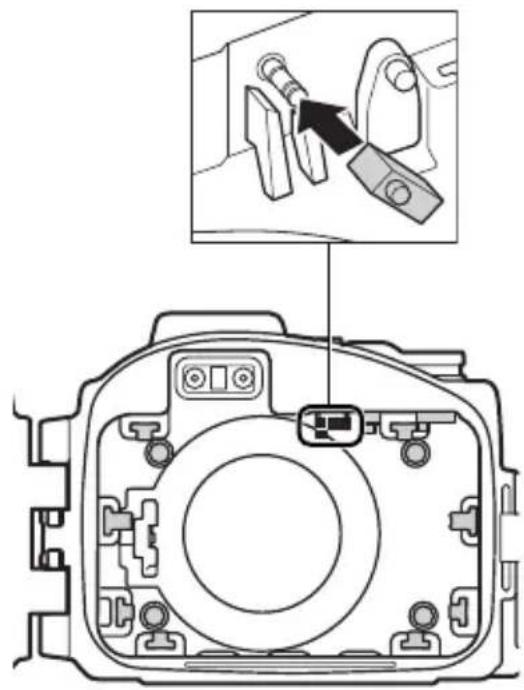
Configuring the Case for the S1
For use with the S1, configure the case as shown below.
*1 Remove when using the case with the S1.
*2 When using the case with the S1, remove, reverse, and reattach.

Important!
Be sure all parts are securely installed. Failure to fully insert removable parts may result in loss or in leaks and damage to the camera. When replacing parts, choose a brightly-lit location and be careful not to hurt your fingers or damage your fingernails.
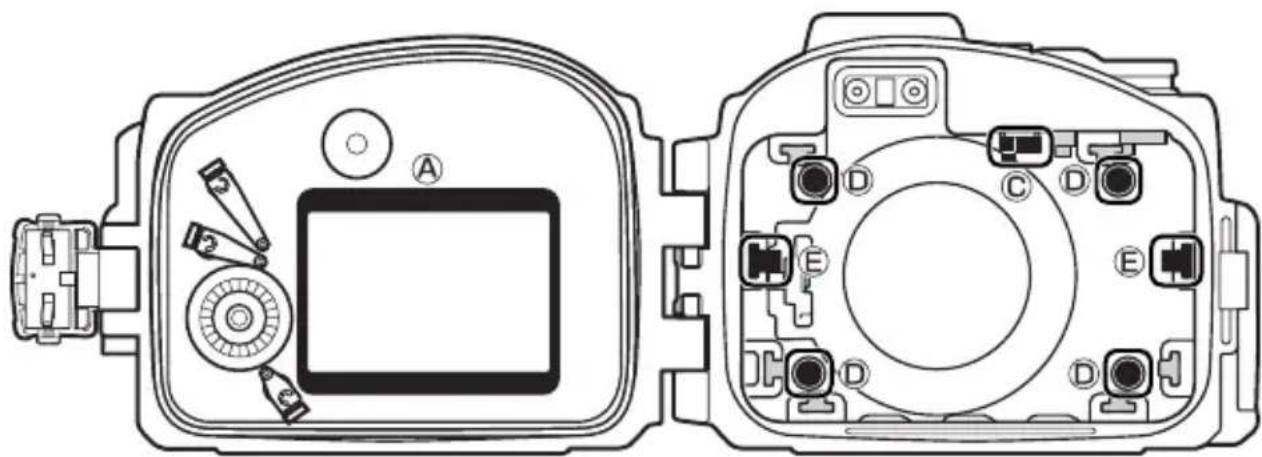
Ⓐ Inner hood/ Inner hood spacer (×1)
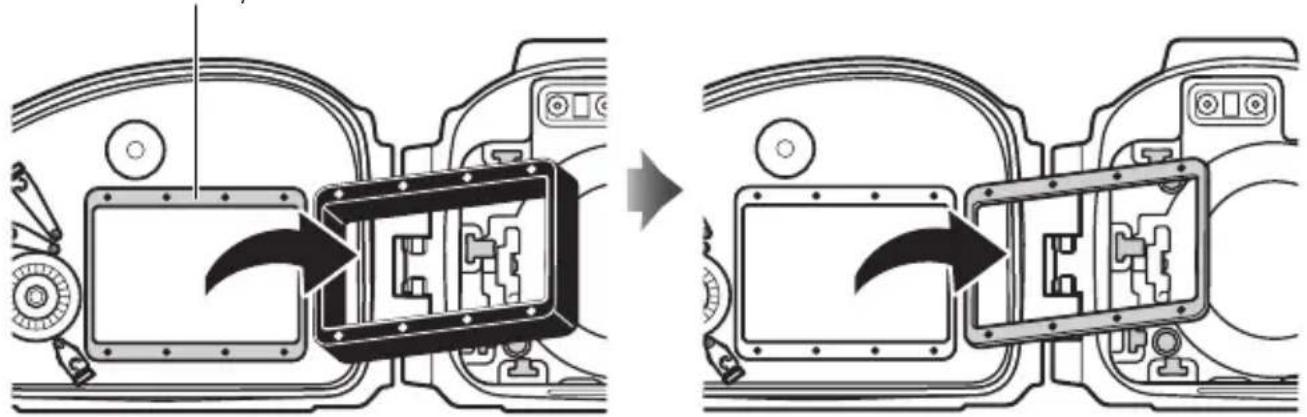
When using the case with the S1, remove the inner hood and inner hood spacer and then reattach the inner hood.
Inner hood spacer
natural_image
Diagram showing vehicle interior components before and after assembly, with no visible text or symbols
En
natural_image
Diagram showing a device's internal structure before and after assembly, with no visible text or symbols.
natural_image
Technical line drawing of a camera module with front and side views (no text or symbols)√ Important!
The inner hood spacer is not required when the case is used with the S1. Remove the spacer and keep it in a safe place.
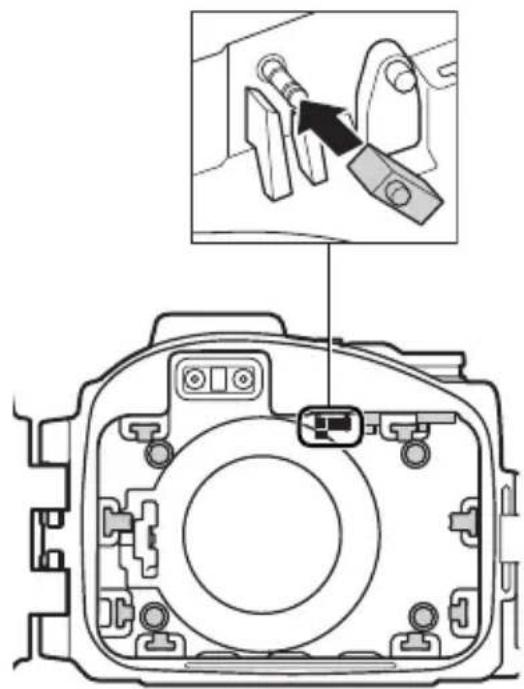
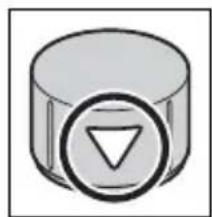
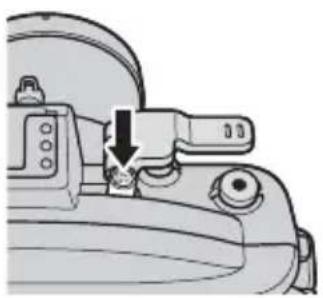
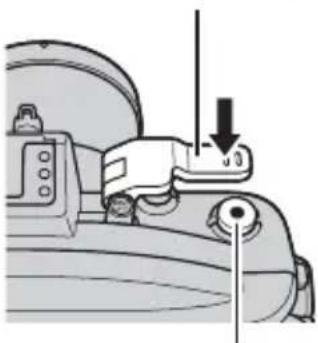
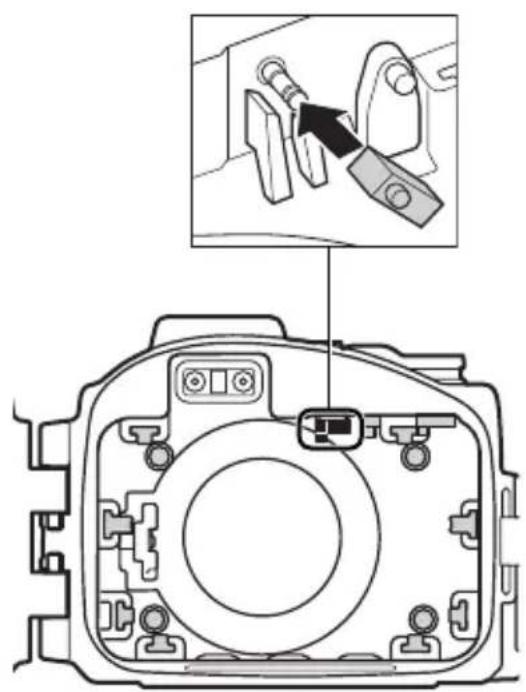
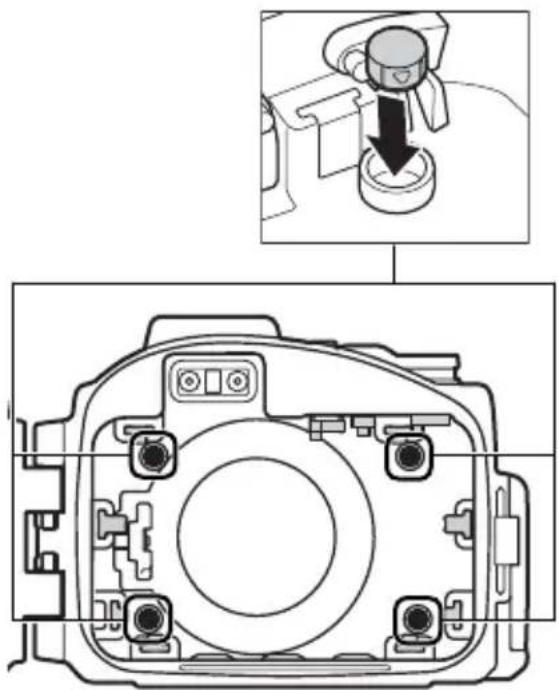
© Power switch contact (×1)
Remove the contact and reinsert it in the hole at the top of the triangle.
natural_image
Simple line drawing of a mechanical component with a circular inset showing a triangle and curved arrow (no text or symbols)En

natural_image
Diagram of a camera module with an inset showing a close-up of a mechanical component (no text or symbols present)
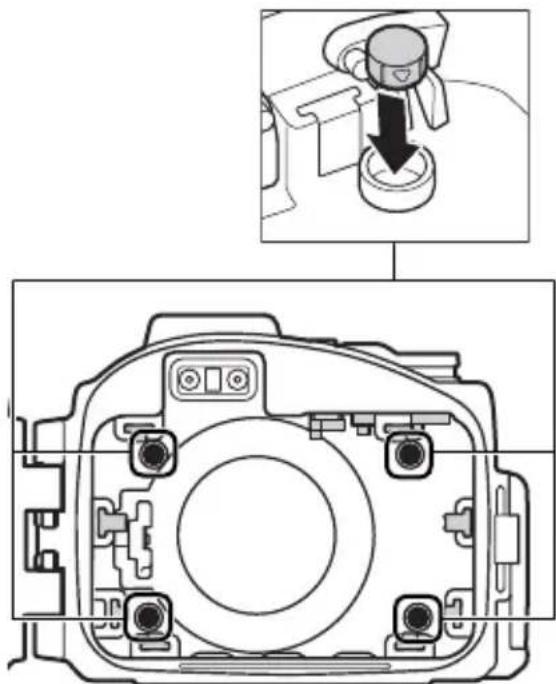
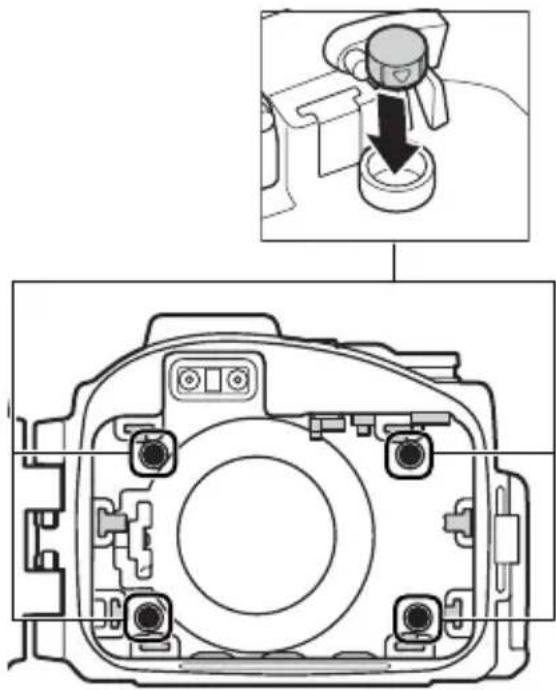
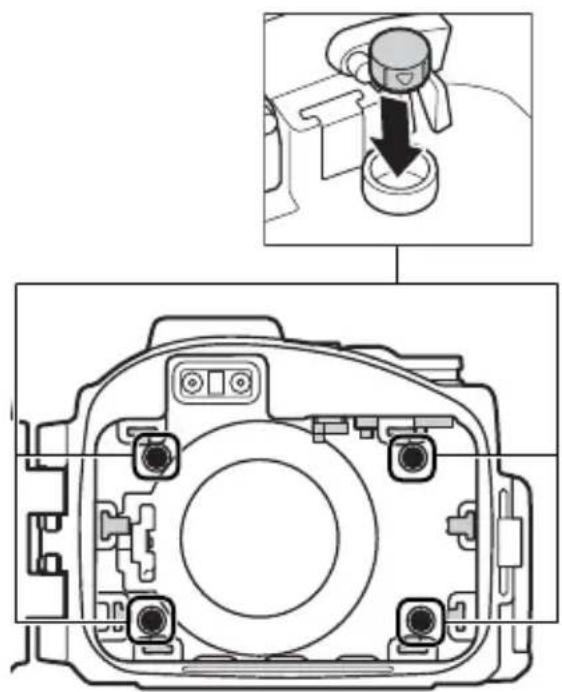
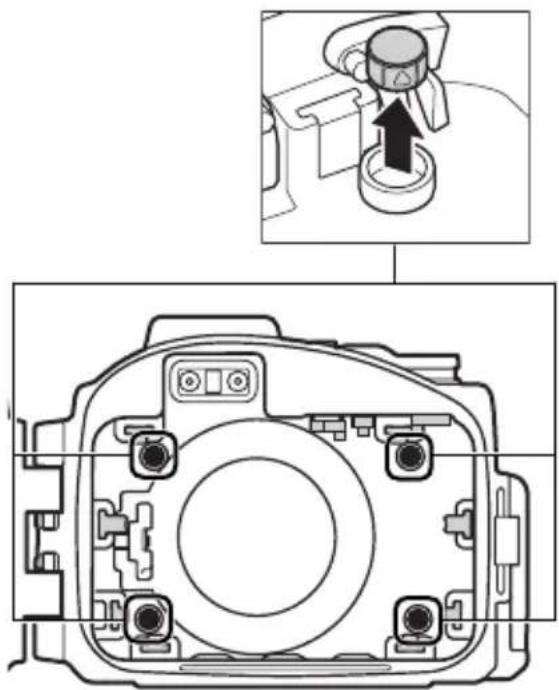
(D) Front cushion (×4)
Remove the cushions and reinsert them with the triangle top down.
natural_image
Simple 3D icon of a cylinder with a circular arrow symbol on its side (no text or labels)
natural_image
Technical diagram of a camera module with an inset showing a mechanical component (no text or symbols present)
natural_image
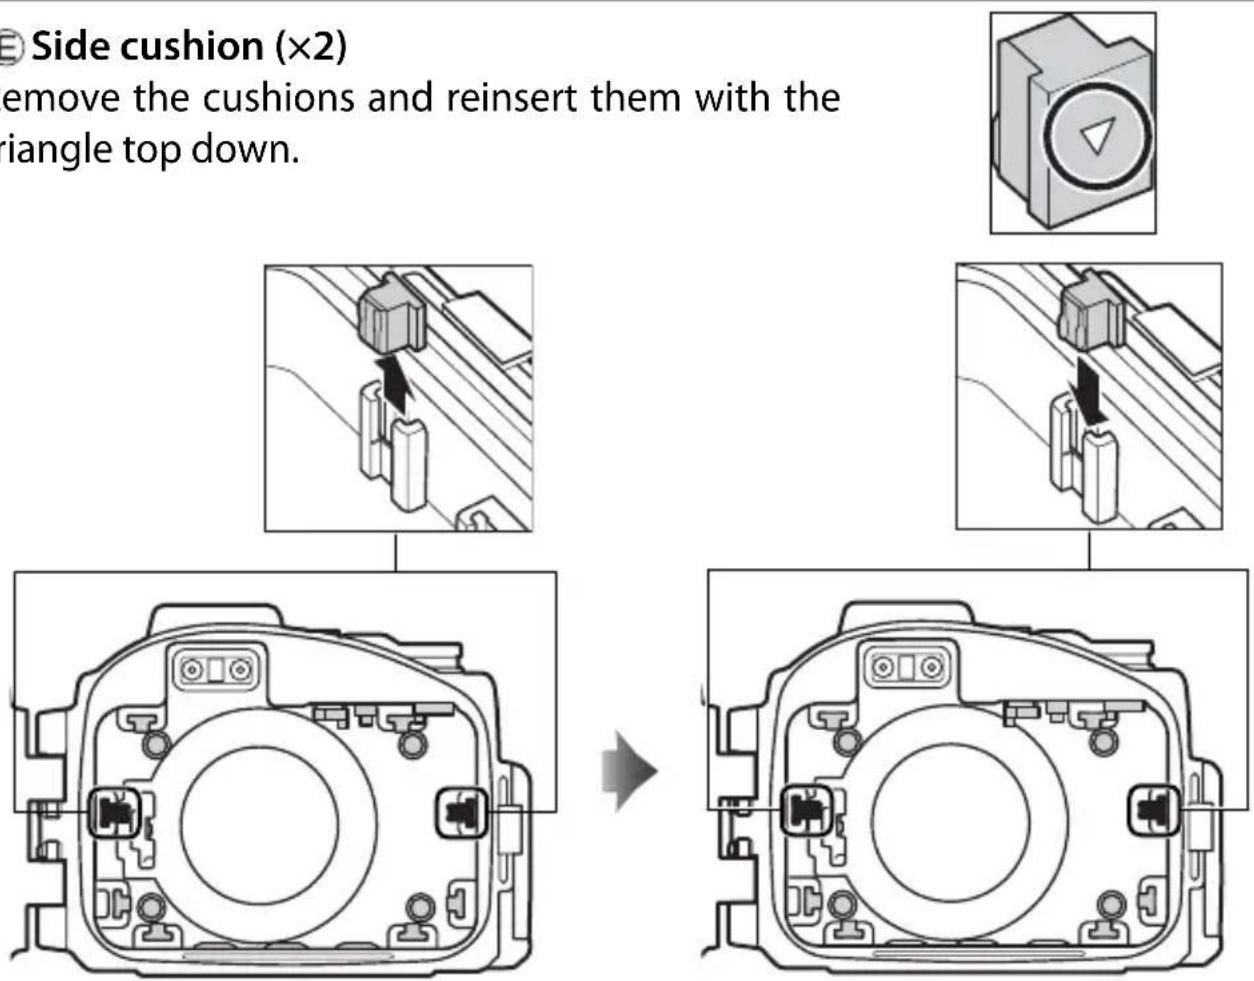
Technical diagram of a camera module with an inset showing a camera's adjustment (no text or labels)E Side cushion (×2)
Remove the cushions and reinsert them with the triangle top down.
The figure below shows the case after it has been configured for use with the S1.
Configuring the Case for the S1
natural_image
Technical line drawing of a camera module with labeled components (no text or symbols beyond labels)Ⓐ Inner hood (×1)
© Power switch contact (×1)
Front cushion (×4)
E Side cushion (×2)
To use the case with the J3, return the parts to their original configuration.
The Preliminary Leak Test
Before placing the camera in the case, latch the case and immerse it in water to check for leaks as described below.
Important!
Before placing the camera in the case, be sure that the camera is functioning normally and that the case does not leak. Failure to check for leaks before use could result in irreparable damage to the camera. Note that leaks may result if the case is cracked or damaged. Check the case for cracking and other damage before use, and consult with a Nikon-authorized service representative in the event that any cracking or damage is found.
1 Latch and immerse the case.
Latch the case and then slowly immerse it in water, stopping if air is expelled from inside the case. Keep the case immersed for 2 or 3 seconds and check for bubbles escaping. Test the case in a shallow area at a depth of about 1 m (3 ft) or in a tub or bucket. Do not use hot water, as this could exceed the operating temperature range of 0–40 °C (32–104 °F).
natural_image
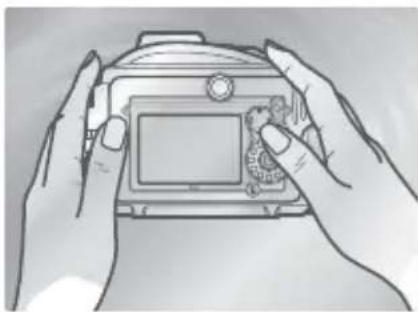
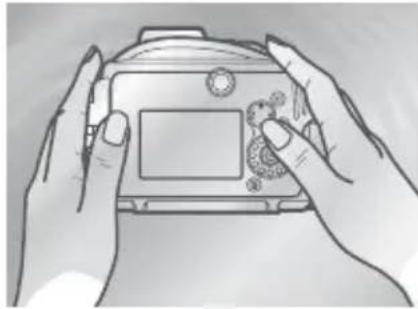
Line drawing of two hands holding a digital camera (no text or symbols visible)2 Test the controls.
Immerse the case and operate the controls underwater for 2 to 3 minutes, checking whether bubbles escape.
natural_image
Line drawing of two hands holding a camera case with a small object inside (no text or symbols)3 Check for water inside the case.
Take the case out of the water and dry it thoroughly with a soft, dry cloth, then open the case and check for water. If water has entered the case, check the O-ring (12, 18–19). If the cause of the leak can not be determined, take the case to a Nikon-authorized service representative.
natural_image
Technical line drawing of a mechanical device housing (no text or symbols)Preparing the Camera
Prepare the camera for underwater photography.
1 Insert the battery and memory card.
Insert a memory card and fully-charged battery.
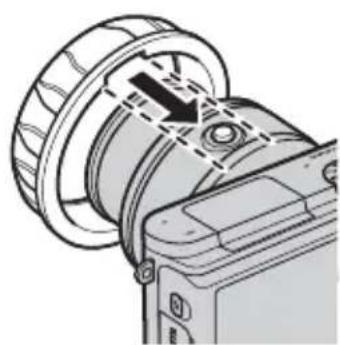
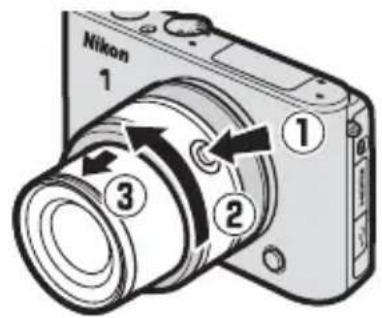
2 Attach and extend the lens.
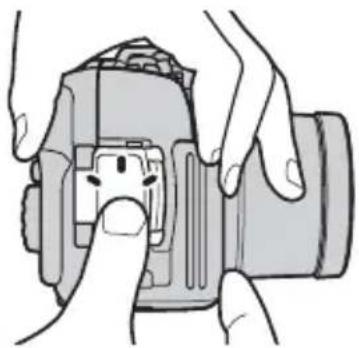
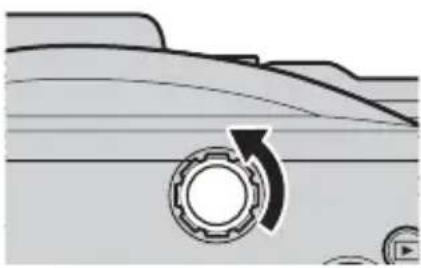
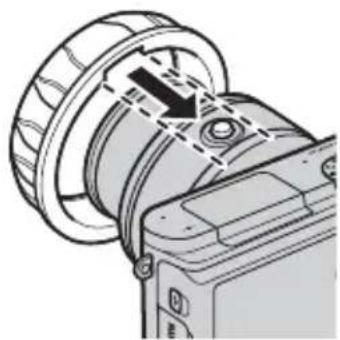
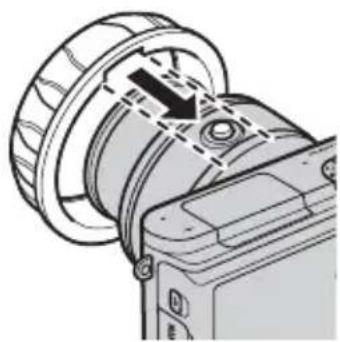
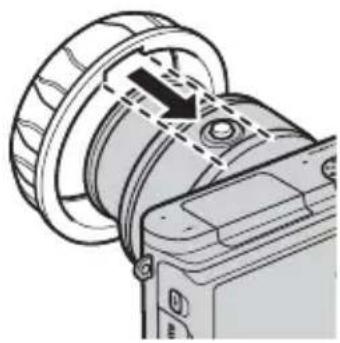
Use a 1 NIKKOR VR 10–30 mm f/3.5–5.6 lens; other lenses can not be used. Keeping the retractable lens barrel button pressed (①), rotate the zoom ring to extend the lens (②). Note that the camera will turn on automatically when the lens is extended; turn the camera off before proceeding to Step 3.
3 Attach the zoom gear sleeve.
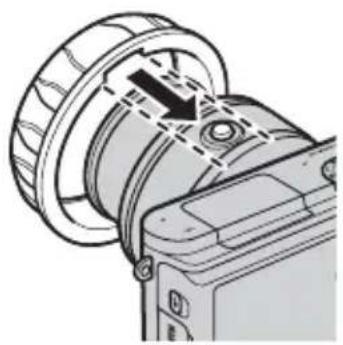
natural_image
Technical illustration of a camera lens assembly with no visible text or symbolsAlign the slot on the inside of the sleeve with the retractable lens barrel button.
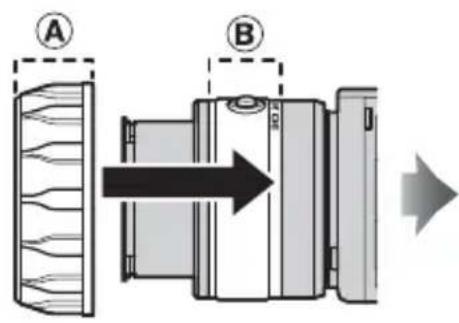
Slide the sleeve straight onto the lens, stopping when Ⓐ overlaps Ⓑ
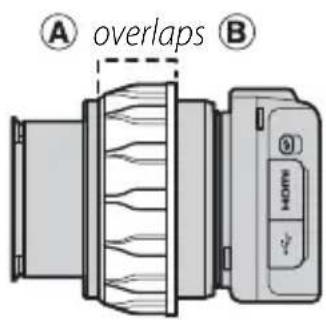
After attaching the sleeve, adjust its position so that the zoom ring rotates freely.
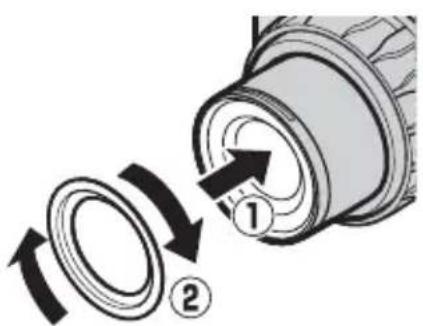
4 Attach the inner-reflection prevention ring.
Attach the ring to the front of the lens as shown. If the ring is not attached, the lettering on the front of the lens may appear in photographs, having been reflected from the inside of the waterproof case lens window.
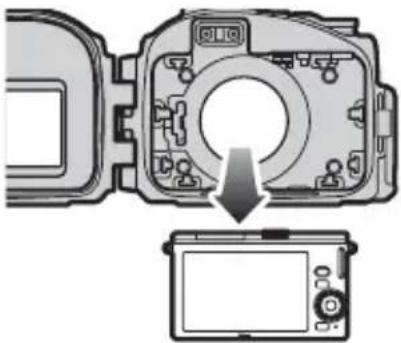
5 Insert the camera.
Center the camera in the camera guides with the lens positioned in the lens window.
Camera guides

natural_image
Diagram of a camera module with an arrow indicating the direction of rotation (no text or symbols present)En
The Camera Strap
To ensure that the camera strap does not get caught in the seal and cause a leak, be sure to remove the strap before placing the camera in the case.
Underwater Flash Units
If you will be using a SEA&SEA YS-D1 underwater flash unit (☐ 21), raise the camera's built-in flash before placing the camera in the case, as once placed in the case the flash may fail to pop up on its own. See the camera manual for information on using the flash.
natural_image
Mechanical assembly diagram showing internal components and a circular inset with directional arrows (no text or symbols)Flash pop-up control
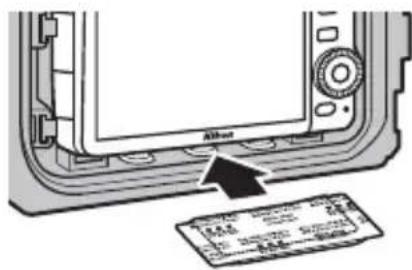
6 Insert desiccant.
To prevent condensation from forming inside the case, insert the supplied silica gel desiccant between the bottom of the camera and the case. Slide the desiccant to the front, where it will not interfere with the case closing. Improper placement could cause the case to leak.
Replacing the Desiccant
Used desiccant loses its capacity to absorb moisture. We recommend replacing the desiccant each time the case is used (☐ 21).
7 Perform a final check.

- Does the zoom ring rotate smoothly and does it adjust zoom? If not, reposition the zoom gear sleeve.
• Is the inner-reflection prevention ring attached?
8 Close the case.
Close and latch the case.
natural_image
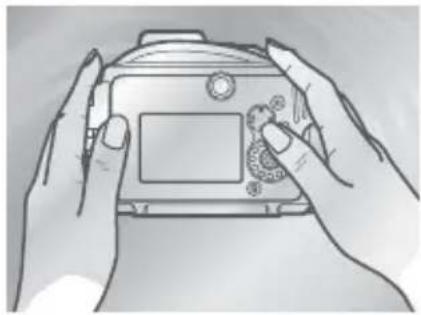
Illustration of hands holding a DSLR camera with a small screen (no text or symbols visible)The Final Leak Test
After inserting the camera and closing the case, perform a final check for leaks.
Important!
Before use, be sure that the camera is functioning normally and that the case does not leak. Failure to check for leaks before use could result in irreparable damage to the camera.
Immerse the case in water and check for leaks as described in “The Preliminary Leak Test” (☐ 9). After completing the test, open the case and check that the desiccant is dry and that no water has entered the case. If a leak is detected, immediately dry the camera and case thoroughly and check that the O-ring is intact and the case properly sealed. If the cause of the leak can not be determined, take the case to a Nikon-authorized service representative.
natural_image
Line drawing of two hands holding a digital camera (no text or symbols visible)En
Taking Pictures
Follow the steps below to take pictures underwater.
1 Turn the camera on.
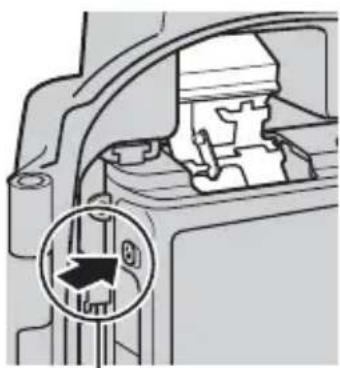
Press the power switch on the waterproof case to turn the camera on. The power lamp will light green and the monitor will turn on (to turn the camera off, press the power switch again and confirm that the monitor has turned off).
natural_image
Mechanical component diagram showing a lever mechanism with a downward arrow indicating motion (no text or symbols present)2 Choose a mode.
Rotate the mode dial to choose a mode (J3) or press the MENU button and choose a mode from the menus (S1). For more information on choosing a mode, see the camera manual.
natural_image
Diagram of a mechanical component with a gear-like circular feature and an arrow indicating rotation (no text or symbols)En
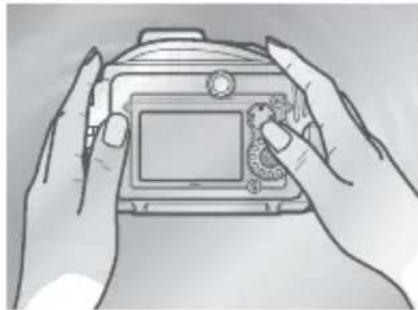
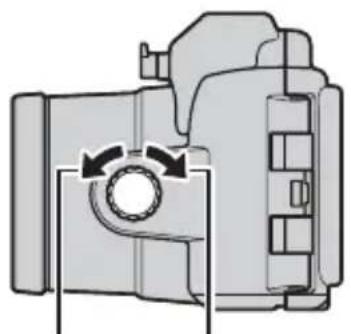
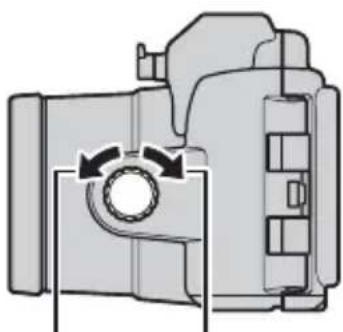
3 Frame the shot.
Rotate the zoom dial to zoom in or out.
natural_image
Mechanical component diagram showing a rotating shaft and housing (no text or symbols)Zoom in Zoom out
4 Take the picture.
Photographs: Lightly press the shutter lever to press the camera shutter-release button half-way and focus, then press the shutter lever the rest of the way down to release the shutter and take a photograph.
Movies: Press the movie-record button to start or stop recording.
Shutter lever
natural_image
Mechanical component diagram showing a lever mechanism with a downward arrow and pointer (no text or symbols)Movie-record button
Underwater Photography
The best time for underwater photography is when the sun is directly overhead (note that pictures taken underwater may have a blue cast). Strong light sources may cause reflections to appear in pictures; check the monitor before shooting and change the angle if necessary. While shooting, keep your fingers and other objects away from the lens window and avoid exhaling bubbles into the frame. Place the front cap over the lens window when the camera is not in use.
The AF-assist illuminator
The AF-assist illuminator can not be used while the camera is in the waterproof case.
Auto Power Off
If no operations are performed for about 30 seconds, the monitor will turn off and the power lamp will flash. If no operations are performed for another 3 minutes, the camera will turn off automatically. See the camera manual for more information.
En
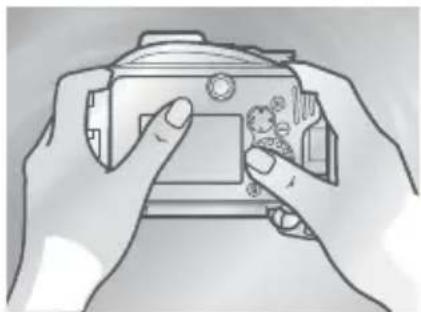
After Use
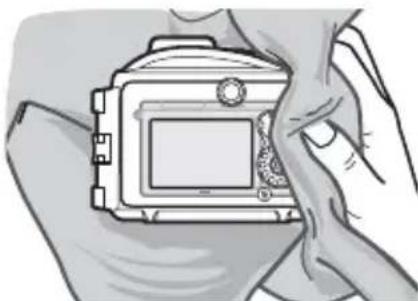
Clean the case and remove the camera.
1 Wash the case.
Clean the case as soon as possible after use. Without opening the case or removing the camera, wash the case in a basin of fresh water.
natural_image
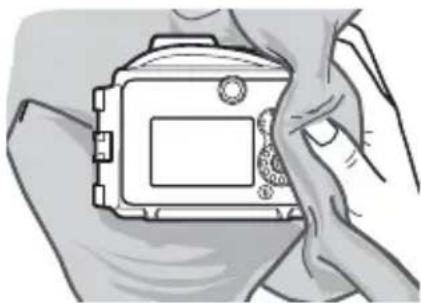
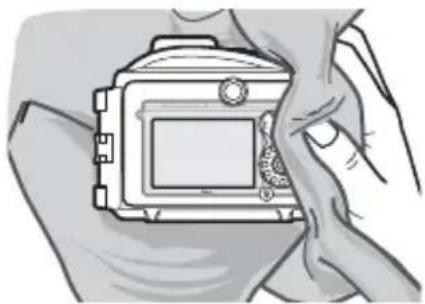
Line drawing of two hands holding a digital camera (no text or symbols visible)2 Wipe dry.
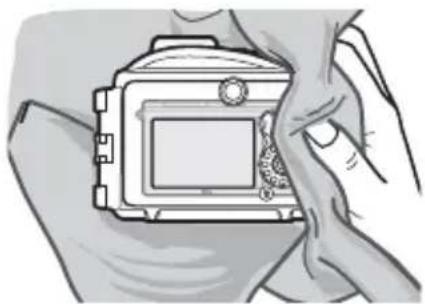
Dry the exterior of the case thoroughly with a soft, dry cloth.
natural_image
Illustration of hands holding a camera frame (no text or symbols visible)En
Drying the Case
Be careful to remove water that may have collected in the buckle, controls, or strap eye-let.
3 Remove the camera.
Remove the camera and wipe the interior of the case with a soft, dry cloth. Do not wash the interior of the case with water.
natural_image
Diagram of a camera module with an arrow indicating rotation or adjustment, showing no text or symbols.Removing the Camera
Never operate the buckle or buckle release button underwater. Before opening the case, be sure that your hands are dry and free from salt or sand; do not open the case in areas exposed to blown sand or spray. When removing the camera, be careful not to drop the device and make sure that droplets from your hair, body, or other objects do not fall into the case or onto the camera. If water does fall onto the camera or into the waterproof case, dry it immediately with a soft cloth. Be sure that your hands are dry and free from salt or sand before handling the camera or battery.
Keep the case upright; do not place the open case with the O-ring or O-ring seal face down.
4 Soak the case in fresh water.
Reseal the case and leave it in a basin of fresh water for two to three hours. Operate each of the controls a few times to remove salt. If salt drys on the controls, they may cease to function or their metal parts may rust, causing the case to leak.
natural_image
Line drawing of two hands holding a camera case with a small object on the screen (no text or symbols)5 Wipe dry.
Dry the case thoroughly with a soft, dry cloth. Do not use a cloth to which salt has adhered.
natural_image
Illustration of hands holding a camera frame (no text or symbols visible)En
6 Let the case dry in the shade.
Leave the case out to dry in a shady, well-ventilated area.
natural_image
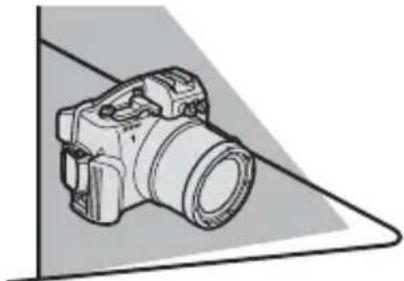
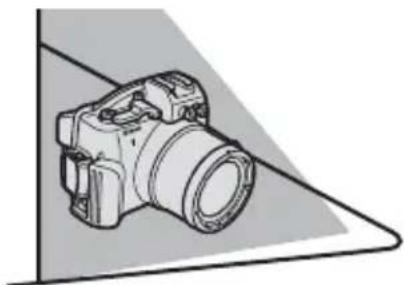
Illustration of a DSLR camera with lens and handle, shown in 3D perspective view (no text or symbols)Do Not Expose to Sunlight or Heat
Do not use a hair dryer or other heat source or place the case in direct sunlight. Heat could cause the case or O-ring to deteriorate, resulting in leakage.
√ Cleaning the Interior of the Case
Use a blower, brush, or a damp, soft cloth to remove foreign objects from the interior of the case. Liquid can be removed with a damp, soft cloth. When using a cloth, be careful not to scratch the case; do not use unnecessary force. Do not use water, detergents, or chemical agents of any kind. Water can damage the coating on the inside of the lens window.
Maintenance
This section describes how to maintain the O-ring and waterproof case.
Caring for the O-Ring
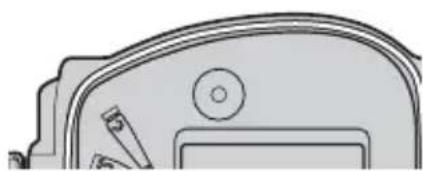
The WP-N2 uses an O-ring to form a watertight seal. Improper handling of the O-ring can produce leaks. Check the condition of the O-ring as described below before each use, and check for the presence of foreign objects on the O-ring each time the case is opened, however briefly.
1 Remove the O-ring.
Use the O-ring remover to remove the O-ring as shown.
natural_image
Illustration of a hand using a tool to adjust or install electronic components (no text or symbols visible)En
Do Not Use Force or Sharp Objects
The case may leak if the O-ring is forcibly stretched or damaged through the use of edged or pointed objects, including fingernails and metal tools.
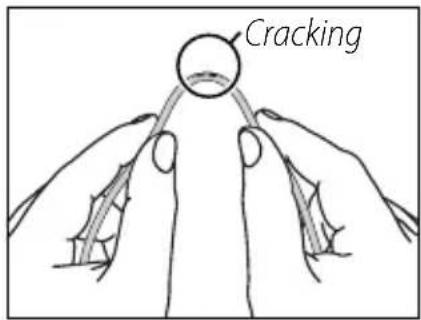
2 Inspect the O-ring.
Remove old silicon grease and other foreign objects with a soft cloth, taking care not to leave tissue or threads on the O-ring. Gently bend the O-ring to check for cracking or other damage.
3 Inspect the O-ring guide.
Use a blower or cotton swab to remove any foreign objects from the watertight channel and all parts of the case that come into contact with the O-ring. Be sure to remove any threads left behind by the swab.
natural_image
Line drawing of a hand using a tool to adjust or install a device component (no text or symbols present)En
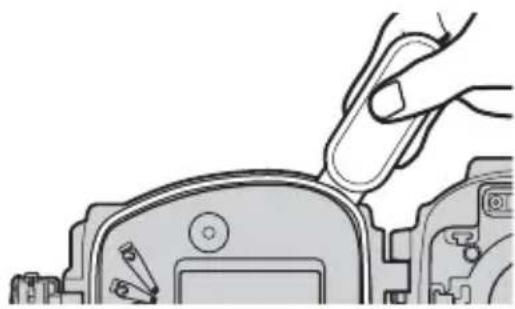
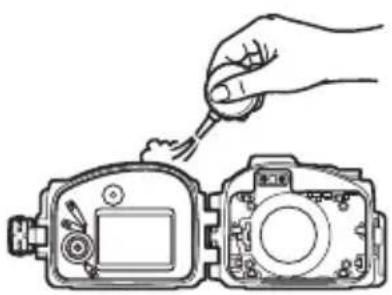
4 Grease the O-ring.
If the O-ring is not properly greased, it may crack or peel, causing leaks. If the surface of the O-ring appears dry, place a drop of silicon grease on your index finger and spread grease on the O-ring by sliding it between your thumb and index finger, evenly covering the

natural_image
Line drawing of two hands holding a thin wire or cable, no text or symbols presentring. Do not use cloth or paper, as these may leave fibers on the O-ring. Note that applying too much grease may cause foreign objects to adhere more readily to the ring, preventing the case from sealing properly.
5 Replace the O-ring.
Making sure the O-ring and guide are free of foreign objects, place the O-ring so that it runs evenly at the same level all the way round the O-ring guide, without undue stretching or twisting and without protruding from the guide.
natural_image
Pure technical line drawing of a mechanical component without any text, numbers, or symbols
natural_image
Diagram showing a cross symbol above a curved surface with circular annotations (no text or labels)0-Rings
The O-ring requires periodic replacement. Replace the O-ring immediately if it is damaged, cracked, warped, or has lost its elasticity. O-rings should be replaced at least once a year. Use only silicon grease designated for use in this product; replacement O-rings and silicon grease can be purchased from a Nikon camera retailer or Nikon-authorized service agent. Do not use COOLPIX or NIKONOS O-ring lubricant (grease).
Cleaning
Do not use detergents or volatile chemicals such as alcohol or thinner when cleaning the case or O-ring. Failure to observe this precaution could result in damage to the case or O-ring.
Storage
Store the case in a cool, well-ventilated area, leaving the case open to prevent the O-ring from deteriorating. When leaving the case unused for an extended period, remove the O-ring, remove all old silicon grease, apply fresh silicon grease, and place the O-ring in a clean plastic bag to ensure that it maintains it elasticity. Do not store the case in direct sunlight or where it will be exposed to sudden changes in temperature or high levels of humidity. Do not store the case or O-ring under other objects, close to open flames, in the vicinity of flammable items, or with naphtha or camphor moth balls.
En
Servicing
Nikon recommends that the case be serviced by a Nikon-authorized service representative at least once a year. A fee is charged for this service.
Technical Notes
Specifications
| Maximum depth 40 m (130 ft) | |
| Camera operating temperature | 0 °C–40 °C (32 °F–104 °F) |
| Dimensions (W × H × D) | Approx. 156 × 116 × 128 mm (6.2 × 4.6 × 5.1 in.), excluding projections |
| Weight Approx. 750 g (26.5 oz), body only | |
Optional Accessories
The following optional accessories are available for the waterproof case:
• WP-ZG1000 zoom gear sleeve
- WP-IR1000 inner-reflection prevention ring
- WP-LC1000 front cap
• WP-AN2000 front cap strap
- WP-AN1000 strap
- WP-O1100 O-ring
• WP-OR1000 O-ring remover
• WP-G1000 silicon grease
• WP-S1000 silica gel desiccant
SEA&SEA YS-D1 Underwater Flash Units
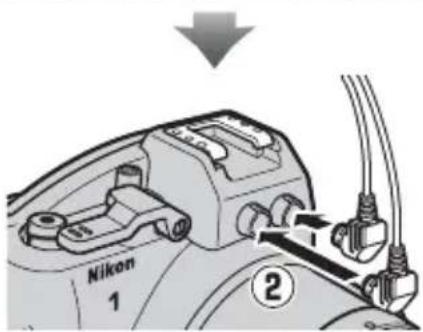
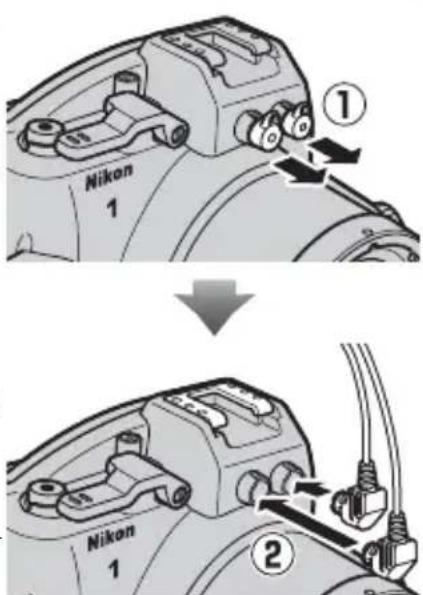
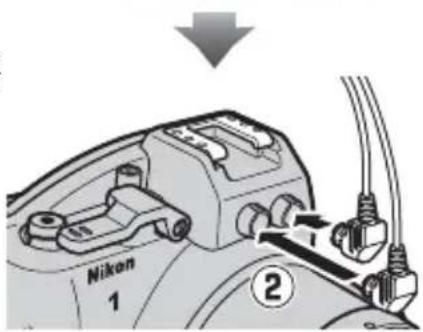
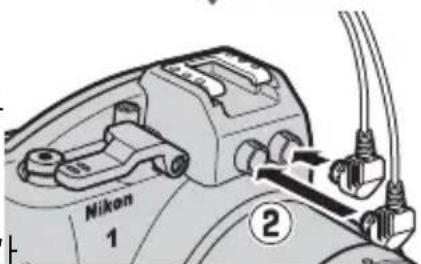
The waterproof case is equipped with 2 fi ber-optic cable sockets, permitting underwater flash units to be connected via optional SEA&SEA fi ber-optic cables and controlled by the camera's built-in flash. When using an underwater flash unit, remove either of the fi ber-optic cable socket caps (①); note that although there is no risk of leaks when the caps are removed, the caps for unused sockets should be left in place), connect the cable (②), and be sure to raise the camera's built-in flash before placing the camera in the case, as once placed in the case the flash may fail to pop up on its own. Before using the flash underwater, take a test shot and confirm that the flash is functioning normally. For more information, see the camera manual and the documentation provided with the flash unit.
natural_image
Line drawing of a Nikon 1 DSLR camera with no text or symbols on the body itselfnatural_image
Simple line drawing of a handle with a circular end and handle (no text or symbols)natural_image
Simple line drawing of a cotton tube with a cap (no text or symbols)WP-G1000 Silikonfett
flowchart
graph TD
    A["Step 1: Valve with Lock"] --> B["Step 2: Door switch"]
    B --> C["Step 3: Rear switch"]
flowchart
graph TD
    A["Component 1"] --> B["Assembly Step 2"]
    B --> C["Assembly Step 3"]
natural_image
Simple line drawing of a mechanical component with a circular inset showing a triangular symbol (no text or labels)De


☐ Vorderes Polster ( × 4)
natural_image
Simple 3D icon of a cylinder with a circular arrow symbol on its face (no text or labels)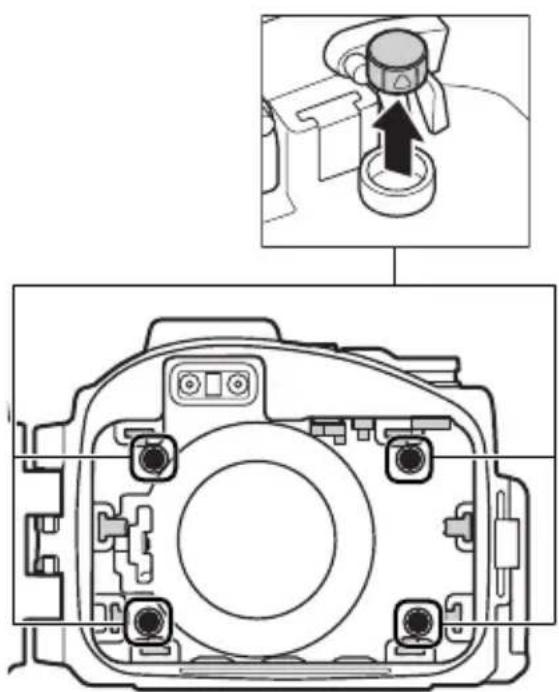
natural_image
Technical diagram of a camera body with an inset showing a camera component being inserted (no text or labels present)

natural_image
Technical diagram of a camera body with internal components and an inset showing a mechanical component (no text or symbols)natural_image
Technical line drawing of a camera module with labeled components (no text or symbols beyond labels)natural_image
Line drawing of two hands holding a digital camera (no text or symbols visible)natural_image
Line drawing of two hands holding a camera case with a small object on the screen (no text or symbols)natural_image
Technical line drawing of a dual-camera camera module (no text or symbols)natural_image
Technical line drawing of a mechanical device with a circular component and a pointer (no text or symbols)natural_image
Diagram of a camera module with an arrow indicating the camera's center point (no text or symbols present)Der Schulterriemen
natural_image
Mechanical component diagram showing internal structure with a circular annotation indicating a directional arrow (no text or symbols present)Blitzentriegelung
natural_image
Illustration of hands adjusting a camera module (no text or symbols visible)natural_image
Line drawing of two hands holding a camera case with a small screen (no text or symbols visible)De
Bilder aufnehmen
natural_image
Mechanical component diagram showing a lever mechanism with a downward arrow indicating motion (no text or symbols present)natural_image
Diagram of a mechanical gear mechanism with an arrow indicating rotational motion (no text or symbols)De
natural_image
Mechanical component diagram showing a rotating shaft and housing (no text or symbols)Einzoomen Auszoomen
natural_image
Mechanical component diagram showing a lever and pivot point (no text or symbols)natural_image
Line drawing of two hands holding a digital camera (no text or symbols visible)natural_image
Illustration of hands holding a camera frame (no text or symbols visible)De
natural_image
Diagram showing a camera module being adjusted to display a screen (no text or symbols present)Entnahme der Kamera
natural_image
Line drawing of two hands holding a camera (no text or symbols visible)natural_image
Illustration of hands holding a camera frame (no text or symbols visible)De
natural_image
Line drawing of a DSLR camera with lens and frame (no text or symbols)natural_image
Illustration of a hand using a tool to adjust or install a mechanical component (no text or symbols visible)De
natural_image
Illustration of a hand using a tool to clean or inspect a device, showing front and side views (no text or symbols)natural_image
Line drawing of two hands holding a curved object, possibly a tool or device (no text or symbols present)natural_image
Simple line drawing of a mechanical component or bracket (no text or symbols)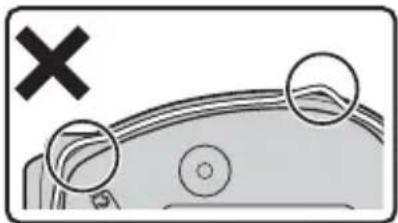
natural_image
Diagram showing a vehicle's cross symbol and two circular features with internal lines, no text or labels present.0-Ringe
Conf i guration....5
natural_image
Line drawing of a Nikon 1 DSLR camera with no text or symbols on the body itselfnatural_image
Simple line drawing of a circular object labeled 'Nikon' with a small protrusion at the bottom (no other text or symbols)natural_image
Simple line drawing of a curved handle or grip with a central dot (no text or symbols)□ WP-AN1000 dragonne
natural_image
Simple line drawing of a tube with a textured cap (no text or symbols)flowchart
graph TD
    A["1: Nikon"] --> B["2: Arrow pointing to component"]
    B --> C["3: Arrow pointing to component"]
    C --> D["4: Arrow pointing to component"]
    D --> E["5: Arrow pointing to component"]
    E --> F["6: Arrow pointing to component"]
    style A fill:#f9f,stroke:#333
    style B fill:#ccf,stroke:#333
    style C fill:#cfc,stroke:#333
    style D fill:#fcc,stroke:#333
    style E fill:#cff,stroke:#333
    style F fill:#ffc,stroke:#333
Fixation de la dragonne
flowchart
graph TD
    A["Component 1"] --> B["Step 1: Internal component with arrows indicating direction"]
    B --> C["Step 2: Internal component with arrow indicating direction"]
    C --> D["Step 3: Final assembly with curved arrow"]
natural_image
Illustration of a mechanical component with a circular component and a triangular symbol (no text or labels)


natural_image
Simple 3D icon of a cylinder with a circular arrow and triangle inside, no text or symbols present.
natural_image
Technical diagram of a camera module with an inset showing a camera's adjustment mechanism (no text or labels present)
natural_image
Technical diagram of a camera module with an inset showing a camera's adjustment (no text or labels)natural_image
Technical line drawing of a camera module with labeled components (no text or symbols beyond labels)Ⓐ Maintien interne (×1)
natural_image
Line drawing of two hands holding a camera case with a small circular button on the screen (no text or symbols)natural_image
Line drawing of two hands holding a camera case with a small object on the screen (no text or symbols)natural_image
Technical line drawing of a dual-camera device casing with no visible text or symbolsnatural_image
Technical illustration of a camera lens assembly with no visible text or symbolsnatural_image
Diagram of a camera module with an arrow indicating the direction of motion (no text or symbols present)natural_image
Mechanical component diagram showing internal assembly with a magnified inset highlighting a directional arrow (no text or symbols)natural_image
Illustration of hands adjusting a DSLR camera (no text or symbols visible)natural_image
Illustration of two hands holding a camera frame, no text or symbols visibleFr
natural_image
Mechanical component diagram showing a lever mechanism with a downward arrow indicating motion (no text or symbols present)natural_image
Close-up of a mechanical component with a circular gear-like feature and an arrow indicating rotation (no text or symbols)Fr
3 Cadrez la photo.
natural_image
Mechanical component diagram showing a rotating shaft and housing (no text or symbols)natural_image
Mechanical component diagram showing a lever mechanism with a downward arrow and pointer (no text or symbols)natural_image
Line drawing of two hands holding a camera frame, no text or symbols present2 Essuyez.
natural_image
Illustration of hands holding a camera frame (no text or symbols visible)Séchage du caisson
natural_image
Diagram of a camera module with an arrow indicating rotation or adjustment, showing no text or symbols.natural_image
Line drawing of two hands holding a camera case with a small object on the screen (no text or symbols)5 Essuyez.
natural_image
Illustration of hands holding a camera frame (no text or symbols visible)Fr
natural_image
Illustration of a DSLR camera on a screen (no text or symbols)natural_image
Illustration of a hand using a tool to adjust or install a mechanical component (no text or symbols visible)Fr
natural_image
Line drawing of a hand inserting a plug into a device component (no text or symbols)natural_image
Line drawing of two hands holding a curved object, no text or symbols presentnatural_image
Pure technical line drawing of a mechanical component without any text, numbers, or symbols
natural_image
Diagram showing a cross symbol above a curved surface with circular annotations (no text or labels)Joints toriques
natural_image
Line drawing of a Nikon 1 DSLR camera with no text or symbols on the body itselfnatural_image
Simple line drawing of a curved handle or grip with a central dot (no text or symbols)□ WP-AN1000correa
natural_image
Simple line drawing of a cotton tube with a cap (no text or symbols)□ WP-G1000 grasa de silicona
Uso del cierre
flowchart
graph TD
    A["Step 1: Lock with 1 minute valve"] --> B["Step 2: Lock with 2 seconds"]
    B --> C["Step 3: Lock with 3 seconds"]
Bloquear la carcasa
natural_image
Simple line drawing of a mechanical component with a circular inset showing a triangular symbol (no text or labels)


Es
© Almohadilla delantera (×4)
natural_image
Simple 3D icon of a cylinder with a triangular pointer symbol on its side (no text or labels)
natural_image
Technical diagram of a camera module with an inset showing a dial indicator (no text or symbols present)

natural_image
Technical diagram of a camera module with an inset showing a camera's adjustment (no text or labels)© Almohadilla lateral (×2)
natural_image
Technical line drawing of a camera module showing front and side views with labeled components (no text or symbols beyond labels)Ⓐ Parasol interior (×1)
© Contacto del interruptor principal (×1)
D Almohadilla delantera (×4)
E Almohadilla lateral (×2)
natural_image
Line drawing of two hands holding a camera with a small object on the screen (no text or symbols)natural_image
Illustration of two hands holding a camera frame, no text or symbols presentnatural_image
Technical line drawing of a dual-camera device casing with no visible text or symbolsnatural_image
Technical line drawing of a mechanical device with a circular component and a pointer (no text or symbols)natural_image
Diagram of a camera module with an arrow indicating the camera's center point (no text or symbols present)natural_image
Mechanical component diagram showing internal structure with a circular annotation highlighting a directional arrow (no text or symbols present)natural_image
Illustration of hands installing or adjusting a digital camera module (no text or symbols visible)natural_image
Line drawing of two hands holding a camera with a screen and scroll (no text or symbols)Toma de fotografías
natural_image
Mechanical component diagram showing a lever mechanism with a downward arrow indicating motion (no text or symbols present)natural_image
Diagram of a mechanical component with a gear-like circular feature and curved arrow indicating rotation (no text or symbols)Es
3 Encuadre la toma.
natural_image
Mechanical component diagram showing a rotating shaft and housing (no text or symbols)Acercar Alejar
4 Tome la imagen.
natural_image
Mechanical component diagram showing a lever mechanism with a downward arrow indicating motion (no text or symbols present)natural_image
Line drawing of two hands holding a camera frame (no text or symbols visible)2 Séquela.
natural_image
Illustration of hands holding a camera frame (no text or symbols visible)Secar la carcasa
natural_image
Diagram of a camera module with an arrow indicating rotation or adjustment, showing internal components without any text or symbols.natural_image
Line drawing of two hands holding a camera case with a small object on the screen (no text or symbols)5 Séquela.
natural_image
Illustration of hands holding a camera frame (no text or symbols visible)natural_image
Illustration of a DSLR camera with lens and handle, shown in 3D perspective view (no text or symbols)Es
natural_image
Illustration of a hand using a tool to adjust or install a mechanical component (no text or symbols visible)natural_image
Line drawing of a hand inserting a small component into a device casing (no text or symbols)natural_image
Line drawing of two hands holding a small object, possibly a tool or device, with no visible text or symbols.natural_image
Pure technical line drawing of a mechanical component without any text, numbers, or symbols
natural_image
Diagram showing a car with a cross mark and two circular features, no text or symbols presentJuntas tóricas
natural_image
Line drawing of a Nikon 1 DSLR camera with no text or symbols on the body itselfnatural_image
Simple line drawing of a curved handle or tool with a central dot (no text or symbols)□ WP-AN1000 cinghia da polso

WP-LC1000 tappo anteriore
natural_image
Simple line drawing of a cotton tube with a shaded cap (no text or symbols)□ WP-G1000 grasso siliconico
Uso del fermaglio
flowchart
graph TD
    A["Initial Seat Body Frame"] --> B["Assembly Step 1"]
    B --> C["Assembly Step 2"]
    C --> D["Final Assembly Frame"]

    subgraph Initial Setup
        E["Left Side Body Frame"] --> F["Internal Structure"]
        F --> G["Top Section Body Frame"]
    end

    subgraph Equipment Setup
        H["Left Side Body Frame"] --> I["Internal Structure"]
        I --> J["Top Section Body Frame"]
    end

    subgraph Final Setup
        K["Left Side Body Frame"] --> L["Internal Structure"]
        L --> M["Top Section Body Frame"]
    end

    style Initial Setup fill:#f9f,stroke:#333
    style Equipment Setup fill:#bbf,stroke:#333
Importante!
natural_image
Simple line drawing of a mechanical component with a circular component and a triangular symbol (no text or labels)

lt
© Cuscinetto anteriore (×4)
natural_image
Simple 3D icon of a cylinder with a triangular pointer symbol on its side (no text or labels)
natural_image
Technical diagram of a camera module with an inset showing a mechanical component being inserted (no text or symbols present)
natural_image
Technical diagram of a camera module with an inset showing a camera's adjustment (no text or labels)© Cuscinetto laterale (×2)
natural_image
Technical line drawing of a camera module with labeled components (no text or symbols beyond labels)natural_image
Line drawing of two hands holding a digital camera (no text or symbols visible)2 Testare i comandi.
natural_image
Line drawing of two hands holding a camera case with a small object on the screen (no text or symbols)natural_image
Technical line drawing of a dual-camera device casing with no visible text or symbolsnatural_image
Technical illustration of a camera lens assembly with no visible text or symbols5 Inserire la fotocamera.
natural_image
Diagram of a camera module with an arrow pointing to the center (no text or symbols present)natural_image
Mechanical component diagram showing internal structure with a magnified circular detail (no text or symbols)natural_image
Illustration of hands adjusting a DSLR camera module (no text or symbols visible)natural_image
Line drawing of two hands holding a camera case with a small object on the screen (no text or symbols)Scatto di immagini
natural_image
Mechanical component diagram showing a lever mechanism with a downward arrow indicating motion (no text or symbols present)natural_image
Close-up of a mechanical component with a circular gear-like feature and an arrow indicating rotation (no text or symbols)natural_image
Mechanical component diagram showing a rotating shaft and housing (no text or symbols)Ingrandire Ridurre
It
natural_image
Mechanical component diagram showing a lever mechanism with a downward arrow and pointer (no text or symbols)natural_image
Line drawing of two hands holding a camera frame (no text or symbols visible)2 Asciugare.
natural_image
Illustration of hands holding a camera frame (no text or symbols visible)natural_image
Diagram of a camera module with an arrow indicating rotation or adjustment, showing no text or symbols.natural_image
Line drawing of two hands holding a camera case with a small object on the screen (no text or symbols)5 Asciugare.
natural_image
Illustration of hands holding a camera frame (no text or symbols visible)natural_image
Line drawing of a DSLR camera with lens and frame (no text or symbols)lt
natural_image
Illustration of a hand using a tool to adjust or install a mechanical component (no text or symbols visible)natural_image
Line drawing of a hand using a tool to clean or inspect the internal components of a digital camera (no text or symbols present)4 Ingrassare l'O-ring.
natural_image
Line drawing of two hands holding a curved object, no text or symbols present5 Sostituire l'O-ring.
natural_image
Pure technical line drawing of a mechanical component without any text, numbers, or symbols
natural_image
Diagram showing a cross symbol above a curved surface with circular annotations (no text or labels)0-Ring
natural_image
Line drawing of a Nikon 1 DSLR camera with no text or symbols on the body itselfnatural_image
Simple line drawing of a curved handle or grip with a central dot (no text or symbols)□WP-AN1000腕带

□WP-LC1000前盖

natural_image
Simple line drawing of a cotton tube with a cork stopper (no text or symbols)□WP-G1000 硅润滑脂
1 动画录制按钮....14
2 锁扣释放按钮....4
3 锁扣 4
4 腕带孔....3
5 67mm 滤镜安装螺纹
6镜头窗口....11
使用锁扣
按照以下步骤可解锁或锁定防水罩。
解除防水罩的锁定
flowchart
graph TD
    A["Component 1"] --> B["Step 1: Internal component with arrows indicating movement"]
    B --> C["Step 2: Internal component with arrow indicating movement"]
    C --> D["Step 3: Final assembly with directional arrows"]
锁定防水罩
打开防水罩
natural_image
Simple line drawing of a mechanical component with a circular component and base (no text or symbols)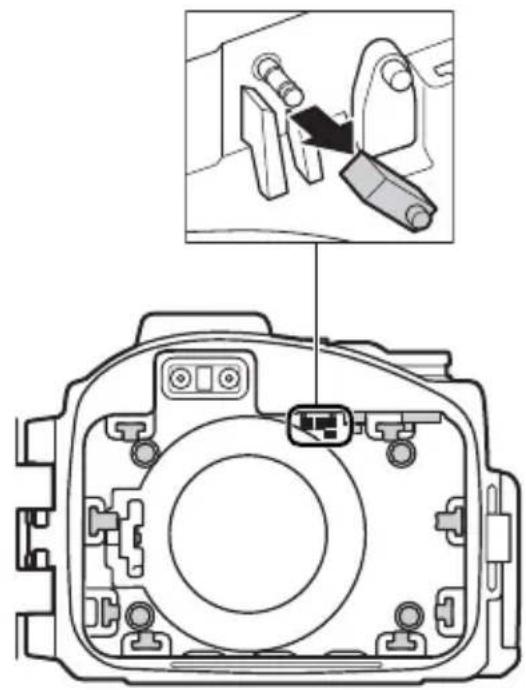
natural_image
Diagram of a camera module with an inset showing a close-up of the component (no text or symbols present)
① 前垫
natural_image
Simple 3D icon of a cylinder with a circular arrow and triangle symbol on its face (no text or labels)
natural_image
Technical diagram of a camera module with an inset showing a camera's adjustment mechanism (no text or labels present)
natural_image
Technical diagram of a camera module with an inset showing a camera's adjustment (no text or labels)⑤侧垫
natural_image
Technical line drawing of a camera module with labeled components (no text or symbols beyond labels)A 内部遮光罩(X)
© 电源开关接点(✗)
⑭ 前垫(×4)
⑤ 侧垫(×2)
natural_image
Line drawing of two hands holding a camera case with a small screen (no text or symbols visible)2 检测控制。
natural_image
Line drawing of two hands holding a camera case with a flower design on the screen (no text or symbols)3 检查防水罩中是否有水进入。
natural_image
Technical line drawing of a dual-camera device casing with no visible text or symbols准备照相机
准备好照相机进行水下拍摄。
1 插入电池和存储卡。
插入一张存储卡和一块充满电的电池。
2 安装并伸出镜头。
3 安装变焦齿轮套。
natural_image
Technical illustration of a mechanical device with a circular component and a pointer indicating rotation (no text or symbols)5 装入照相机。
natural_image
Diagram of a camera module with an arrow indicating the camera's center point (no text or symbols present)照相机背带
natural_image
Mechanical assembly diagram showing internal components and a magnified view of a gear mechanism (no text or symbols)闪光灯弹出控制
Ck
6 插入干燥剂。
natural_image
Illustration of hands adjusting a camera lens (no text or symbols visible)最终渗漏测试
natural_image
Line drawing of two hands holding a camera case with a screen and buttons (no text or symbols)Ck
拍摄照片
请按照以下步骤在水下拍摄照片。
1 开启照相机。
natural_image
Mechanical component diagram showing a lever mechanism with a downward arrow indicating motion (no text or symbols present)2 选择模式。
natural_image
Close-up of a mechanical component with a circular gear-like feature and an arrow indicating rotation (no text or symbols)3 构图。
旋转变焦拨盘进行放大或缩小。
natural_image
Mechanical component diagram showing a rotating shaft and housing (no text or symbols)放大 缩小
Ck
4 拍摄照片。
natural_image
Line drawing of two hands holding a camera case (no text or symbols visible)2 擦干。
用一块干的软布将防水罩的外部彻底擦干。
natural_image
Illustration of hands holding a camera frame (no text or symbols visible)√ 擦干防水罩
natural_image
Diagram of a camera module with an arrow indicating rotation or adjustment, showing internal components without any text or symbols.取出照相机
natural_image
Line drawing of two hands holding a camera (no text or symbols visible)5 擦干。
natural_image
Illustration of hands holding a camera frame (no text or symbols visible)6 在阴凉处晾干防水罩。
将防水罩置于阴凉、通风良好的地方晾干。
natural_image
Line drawing of a DSLR camera on a screen (no text or symbols)Ck
√ 切勿置于阳光底下或靠近热源
natural_image
Illustration of a hand using a tool to adjust or install a mechanical component (no text or symbols visible)√ 切勿用力过度或使用尖锐物品
natural_image
Illustration of a hand using a tool to adjust or install a device component (no text or symbols visible)4 润滑 O 型环。
natural_image
Line drawing of two hands holding a thin object, no text or symbols presentnatural_image
Pure technical line drawing of a mechanical component without any text, numbers, or symbols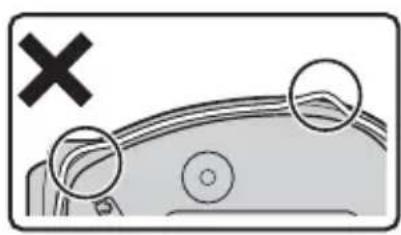
natural_image
Diagram showing a vehicle with a cross symbol and three circular elements, no readable text or labels present.Ck
v0型环
natural_image
Line drawing of a Nikon 1 DSLR camera with no text or symbols on the body itselfnatural_image
Simple line drawing of a curved handle or tool with a central dot (no text or symbols)□WP-AN1000 相機帯

natural_image
Simple line drawing of a cotton tube with a cap (no text or symbols)□WP-G1000 矽潤滑油
□ WP-AN2000 前蓋繩
□使用說明書 (本說明書)
□保修卡
Ch
1 短片記錄按鍵....14
2 鎖扣鬆開鍵....4
3 鎖扣....4
4 相機帶孔....3
5∅67mm 濾鏡安裝螺紋
6 鏡頭窗 ..... 11
使用鎖扣
按照以下步驟可解鎖或鎖定防水罩。
解除防水罩的鎖定
flowchart
graph TD
    A["Component 1"] --> B["Step 1: Internal component with arrows indicating direction"]
    B --> C["Step 2: Internal component with arrow indicating direction"]
    C --> D["Step 3: Final assembly with directional arrows"]
鎖定防水罩
打開防水罩
natural_image
Simple line drawing of a mechanical component with a circular component and gear (no text or symbols)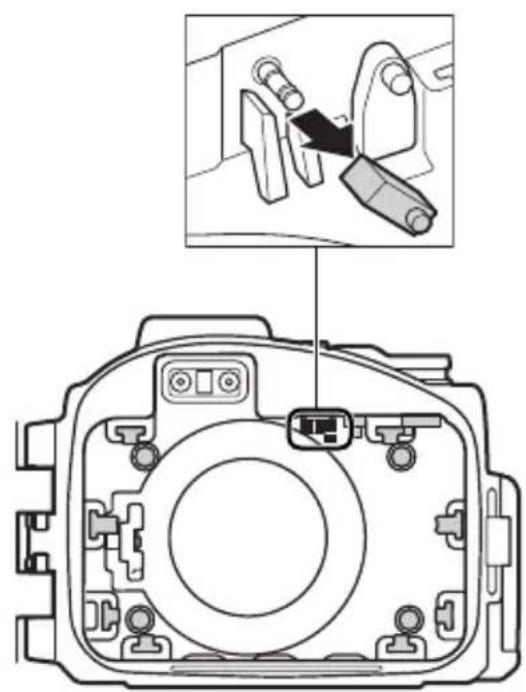
natural_image
Diagram of a camera module with an inset showing a close-up of the component (no text or symbols present)
D 前墊
natural_image
Simple 3D icon of a cylinder with a circular arrow symbol on its side (no text or labels)
natural_image
Technical diagram of a camera module with an inset showing a mechanical component (no text or symbols present)
natural_image
Technical diagram of a camera body with internal components and an inset showing a mechanical component (no text or symbols)E側墊
natural_image
3D geometric shape resembling a cube with a circular arrow and triangle, no text or symbols present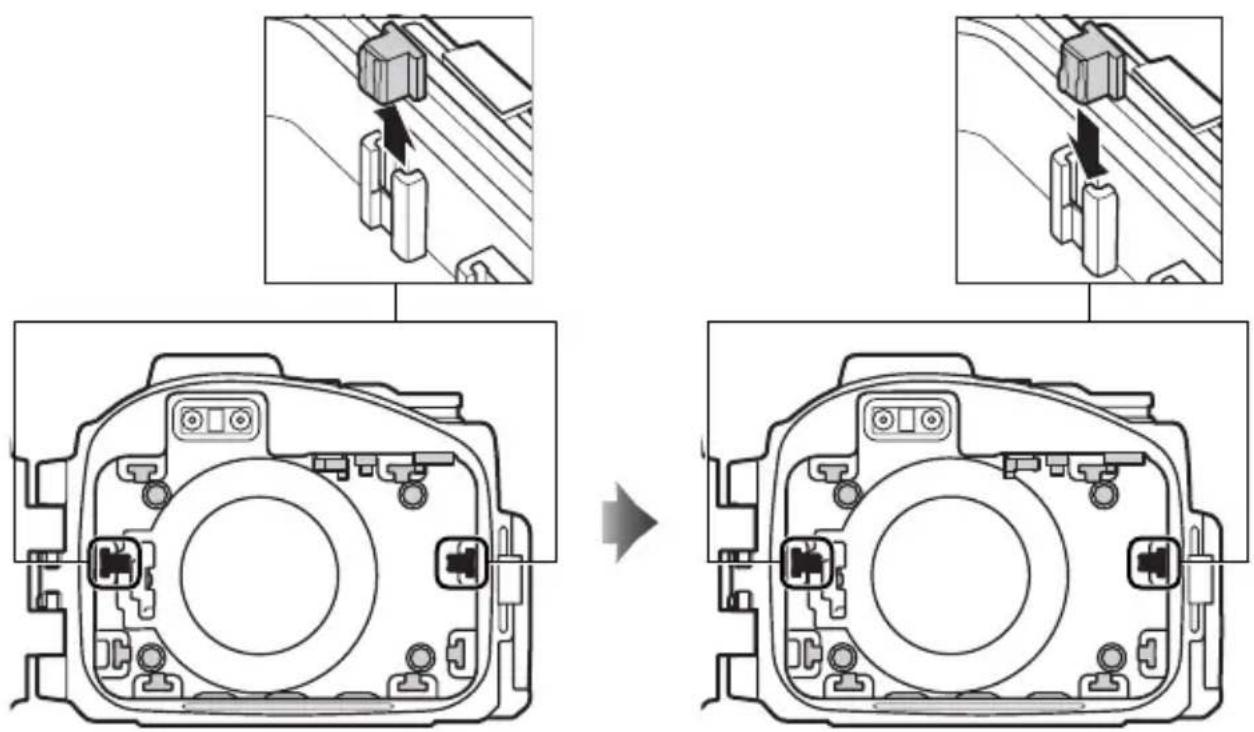
natural_image
Technical line drawing of a camera module showing front and top views with labeled components (no text or symbols beyond labels)natural_image
Line drawing of two hands holding a DSLR camera (no text or symbols visible)2 檢測控制。
natural_image
Line drawing of two hands holding a camera case with a small object on the screen (no text or symbols)Ch
3 檢查防水罩中是否有水進入。
natural_image
Technical line drawing of a dual-camera device casing with no visible text or symbols準備相機
準備好相機進行水下攝影。
1 插入電池和記憶卡。
插入一張記憶卡和一枚充滿電的電池。
2 安裝並伸出鏡頭。
3 安裝變焦齒輪套環。
natural_image
Technical illustration of a mechanical device with a circular component and a pointer indicating rotation (no text or symbols)5 裝入相機。
natural_image
Diagram of a camera module with an arrow pointing to the center (no text or symbols present)相機帯
natural_image
Mechanical assembly diagram showing internal components and a magnified view of a gear mechanism (no text or symbols)閃光燈彈出控制
Ch
6 插入乾燥劑。
natural_image
Illustration of hands adjusting a DSLR camera (no text or symbols visible)最終滲漏測試
natural_image
Line drawing of two hands holding a digital camera (no text or symbols visible)Ch
拍攝照片
請按照以下步驟在水下拍攝照片。
1 開啓相機。
natural_image
Mechanical component diagram showing a lever mechanism with a downward arrow indicating motion (no text or symbols present)2 選擇模式。
natural_image
Diagram of a mechanical component with a gear-like circular feature and rotational arrow (no text or symbols)3 構圖。
旋轉變焦撥盤進行放大或縮小。

natural_image
Mechanical component diagram showing a cylindrical assembly with directional arrows indicating rotation or movement (no text or symbols)拉近 拉遠
4 拍攝照片。
natural_image
Line drawing of two hands holding a camera frame, no text or symbols present2 擦乾。
用一塊乾的軟布將防水罩的外部徹底擦乾。
natural_image
Illustration of hands holding a camera frame (no text or symbols visible)擦乾防水罩
natural_image
Diagram of a camera module with an arrow indicating rotation or adjustment, showing internal components without any text or symbols.取出相機
natural_image
Line drawing of two hands holding a camera (no text or symbols visible)5 擦乾。
natural_image
Illustration of hands holding a camera frame (no text or symbols visible)6 在陰涼處晾乾防水罩。
將防水罩置於陰涼、通風良好的地方晾乾。
natural_image
Illustration of a DSLR camera resting on a triangular surface (no text or symbols)Ch
切勿置於陽光底下或靠近熱源
natural_image
Illustration of a hand using a tool to adjust or install a mechanical component (no text or symbols visible)切勿用力過度或使用尖銳物品
natural_image
Illustration of a hand using a tool to clean or inspect the internal components of a digital camera (no text or symbols present)4 潤滑 O 型環。
natural_image
Line drawing of two hands holding a circular object, no text or symbols present5套上0型環。
natural_image
Simple line drawing of a mechanical component or device with no visible text, numbers, or symbols.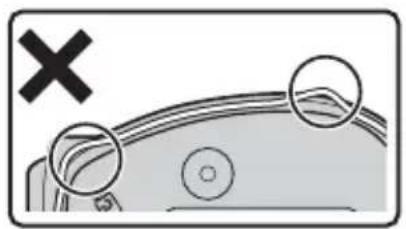
natural_image
Diagram showing a car with a cross mark and two circular insets highlighting the roof section (no text or symbols present)Ch
VO型環
natural_image
Line drawing of a Nikon 1 DSLR camera with no text or symbols on the body itselfnatural_image
Simple line drawing of a curved handle or tool with a central dot (no text or symbols)□WP-AN1000 스트랩

□WP-LC1000 앞캡
natural_image
Simple line drawing of a tube with a cap (no text or symbols)□ WP-G1000 실리콘 그리스
Kr
□ WP-AN2000 앞캡 스트랩
□사용설명서 (본 설명서)
□보증서
flowchart
graph TD
    A["Component 1: Nikon"] --> B["Step 1"]
    B --> C["Component 2: Arrow pointing to component 2"]
    C --> D["Step 2"]
    D --> E["Component 3: Arrow pointing to component 3"]
    E --> F["Step 4"]
    F --> G["Component 5: Arrow pointing to component 5"]
    G --> H["Step 5"]
    H --> I["Component 6: Arrow pointing to component 6"]
    I --> J["Final Assembly"]
스트랩 부착
버클 사용
flowchart
graph TD
    A["Component 1: Left side"] --> B["Step ①: Down"]
    B --> C["Step ②: Left side with arrow pointing to component 2"]
    C --> D["Step ③: Right side with arrow pointing to component 3"]
케이스 잠그기
flowchart
graph TD
    A["Component 1"] --> B["Assembly Step 2"]
    B --> C["Assembly Step 3"]
Kr
케이스 열기
natural_image
Simple line drawing of a mechanical component with gears and a circular element (no text or symbols)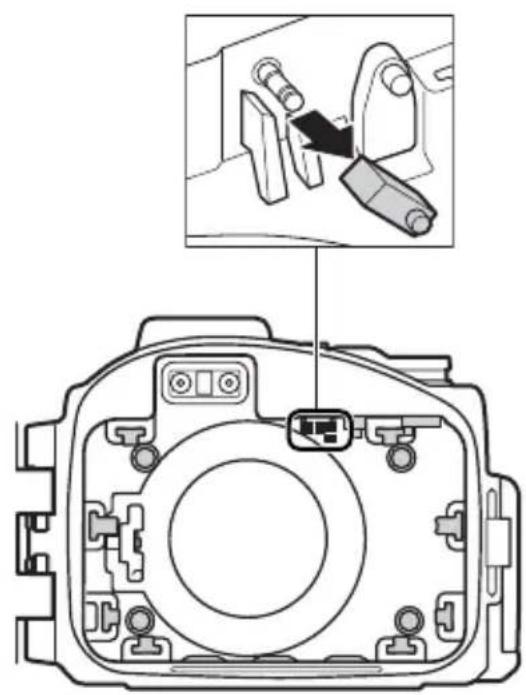


(D)전면 쿠션(×4)
natural_image
Simple 3D icon of a cylinder with a circular arrow symbol on its side (no text or labels)Kr
natural_image
Technical diagram of a camera module with an inset showing a camera component being inserted (no text or labels present)
natural_image
Technical diagram of a camera module with an inset showing a camera's adjustment (no text or labels present)⑤측면 쿠션(×2)
natural_image
3D geometric shape resembling a cube with a circular arrow and triangle, no text or symbols present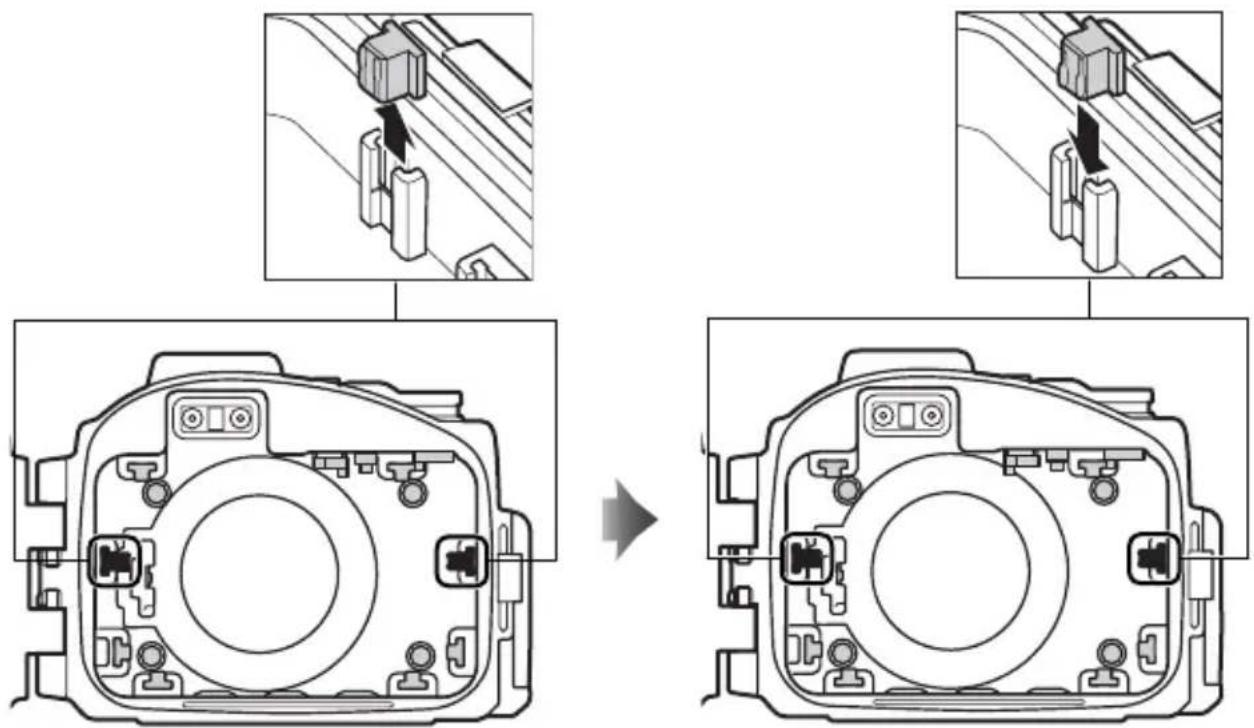
natural_image
Technical line drawing of a camera module showing front and top views with labeled components (no text or symbols beyond labels)natural_image
Line drawing of two hands holding a camera case with a small circular button on the screen (no text or symbols)2 컨트롤을 시험합니다.
natural_image
Illustration of hands holding a camera case with a small object on the screen (no text or symbols visible)Kr
natural_image
Technical line drawing of two camera modules (no text or symbols)카메라 준비
3 좀 기어 슬리브를 부착합니다.
natural_image
Technical illustration of a mechanical device with a circular component and a pointer indicating rotation (no text or symbols)5 카메라를 삽입합니다.
natural_image
Diagram of a camera module with an arrow indicating the direction of viewing or adjustment (no text or symbols present)카메라 스트랩
natural_image
Mechanical component diagram showing internal structure with a magnified inset view (no text or symbols)플래시 팝업 레버
6 건조제를 삽입합니다.
건조제 바꾸기
natural_image
Illustration of hands holding a DSLR camera (no text or symbols visible)최종 누수 확인
natural_image
Illustration of two hands holding a camera case with a small animal on the screen (no text or symbols visible)natural_image
Mechanical component diagram showing a lever and adjustment knob (no text or symbols)2 모드를 선택합니다.
natural_image
Close-up of a mechanical component with a circular gear-like feature and an arrow indicating rotation (no text or symbols)3 촬영 구도를 잡습니다.
natural_image
Mechanical assembly diagram showing a cylindrical component with directional arrows indicating motion (no text or symbols)확대 축소
Kr
4 사진을 촬영합니다.
natural_image
Mechanical component diagram showing a lever and adjustment knob (no text or symbols)동영상 녹화 버튼
수중 촬영
natural_image
Line drawing of two hands holding a DSLR camera (no text or symbols visible)2 건조하게 말리십시오.
natural_image
Illustration of hands holding a camera frame (no text or symbols visible)케이스 말리기
natural_image
Diagram of a camera module with an arrow indicating the direction of motion (no text or symbols present)카메라를 뱔 때
natural_image
Illustration of two hands holding a camera case, no text or symbols visible5 건조하게 말리십시오.
natural_image
Illustration of hands holding a camera frame (no text or symbols visible)6 케이스를 그늘에서 말리십시오.
natural_image
Line drawing of a DSLR camera on a flat surface (no text or symbols)Kr
natural_image
Illustration of a hand using a tool to adjust or install a mechanical component (no text or symbols visible)natural_image
Illustration of a hand using a tool to clean or inspect a digital camera module (no text or symbols present)4 O링에 그리스를 바릅니다.
natural_image
Line drawing of two hands holding a circular object, no text or symbols presentnatural_image
Simple line drawing of a mechanical component with no text or symbols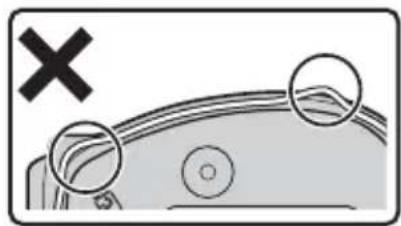
natural_image
Diagram showing a vehicle's roof with two circular components and a cross symbol (no text or labels)Kr
VO 링

No reproduction in any form of this manual, in whole or in part (except for brief quotation in critical articles or reviews), may be made without written authorization from NIKON CORPORATION.