WPAA1 - Other camera accessories NIKON - Free user manual and instructions
Find the device manual for free WPAA1 NIKON in PDF.
| Product type | Nikon camera wired remote control |
| Model | MC-36A (WPAA1) |
| Brand | Nikon |
| Dimensions (L × H × D) | Approx. 155 × 18 × 40 mm (excluding protruding parts) |
| Weight | Approx. 128 g (with batteries) |
| Cable length | Approx. 850 mm |
| Power supply | Two AAA 1.5 V LR03 alkaline batteries (not included) |
| Battery life | Approx. 2 months continuous (delay 5 min, exposure 4 min 56 s, interval 5 min) |
| Operating temperature | -20°C to +50°C |
| Main functions | Programmable timer (delay, exposure, interval, number of shots), manual release, lock control, backlight |
| Delay range (DELAY) | 0 s to 99 h 59 min 59 s (in 1-second increments) |
| Exposure range (LONG) | 0 s to 99 h 59 min 59 s (in 1-second increments) |
| Interval range (INTVL) | 1 s to 99 h 59 min 59 s (in 1-second increments) |
| Number of shots (N) | 1 to 399 or unlimited (--) |
| Connector | 10-pin connector |
| Compatible cameras | Nikon DSLR camera bodies (D4, D3, D2, D1, D800, D300, D810, D700, D200, D100 series) and film camera bodies (F6, F5, F100, F90 series) |
| Optional accessories | MC-21A/MC-21 extension cord, MC-35A/MC-35 GPS adapter, AS-15 flash bracket |
| Maintenance and cleaning | Avoid moisture, shocks, sudden temperature changes, and strong magnetic fields. Clean with a dry cloth. |
| Safety | Do not disassemble, do not expose to water or flames, use only recommended batteries, keep out of reach of children |
| Spare parts and repairability | Batteries (available separately). For any repairs, contact an authorized Nikon service center. |
| General information | Class B (digital equipment), complies with FCC and Canadian regulations. Selective sorting at end of life (WEEE). |
Frequently Asked Questions - WPAA1 NIKON
User questions about WPAA1 NIKON
0 question about this device. Answer the ones you know or ask your own.
Ask a new question about this device
Download the instructions for your Other camera accessories in PDF format for free! Find your manual WPAA1 - NIKON and take your electronic device back in hand. On this page are published all the documents necessary for the use of your device. WPAA1 by NIKON.
USER MANUAL WPAA1 NIKON
For Your Safety. 2
Notices 4
Introduction 6
Parts of the MC-36A 6
Body. 6
Control Panel. 7
Inserting Batteries 7
Replacing Batteries. 7
When the MC-36A Is Not in Use. 8
The Illuminator/Lock Button. 9
Connecting the MC-36A. 9
Using the MC-36A. 10
Timed Photography. 10
Manual Release. 17
Precautions for Use 18
Caring for the MC-36A 18
Specifications. 19
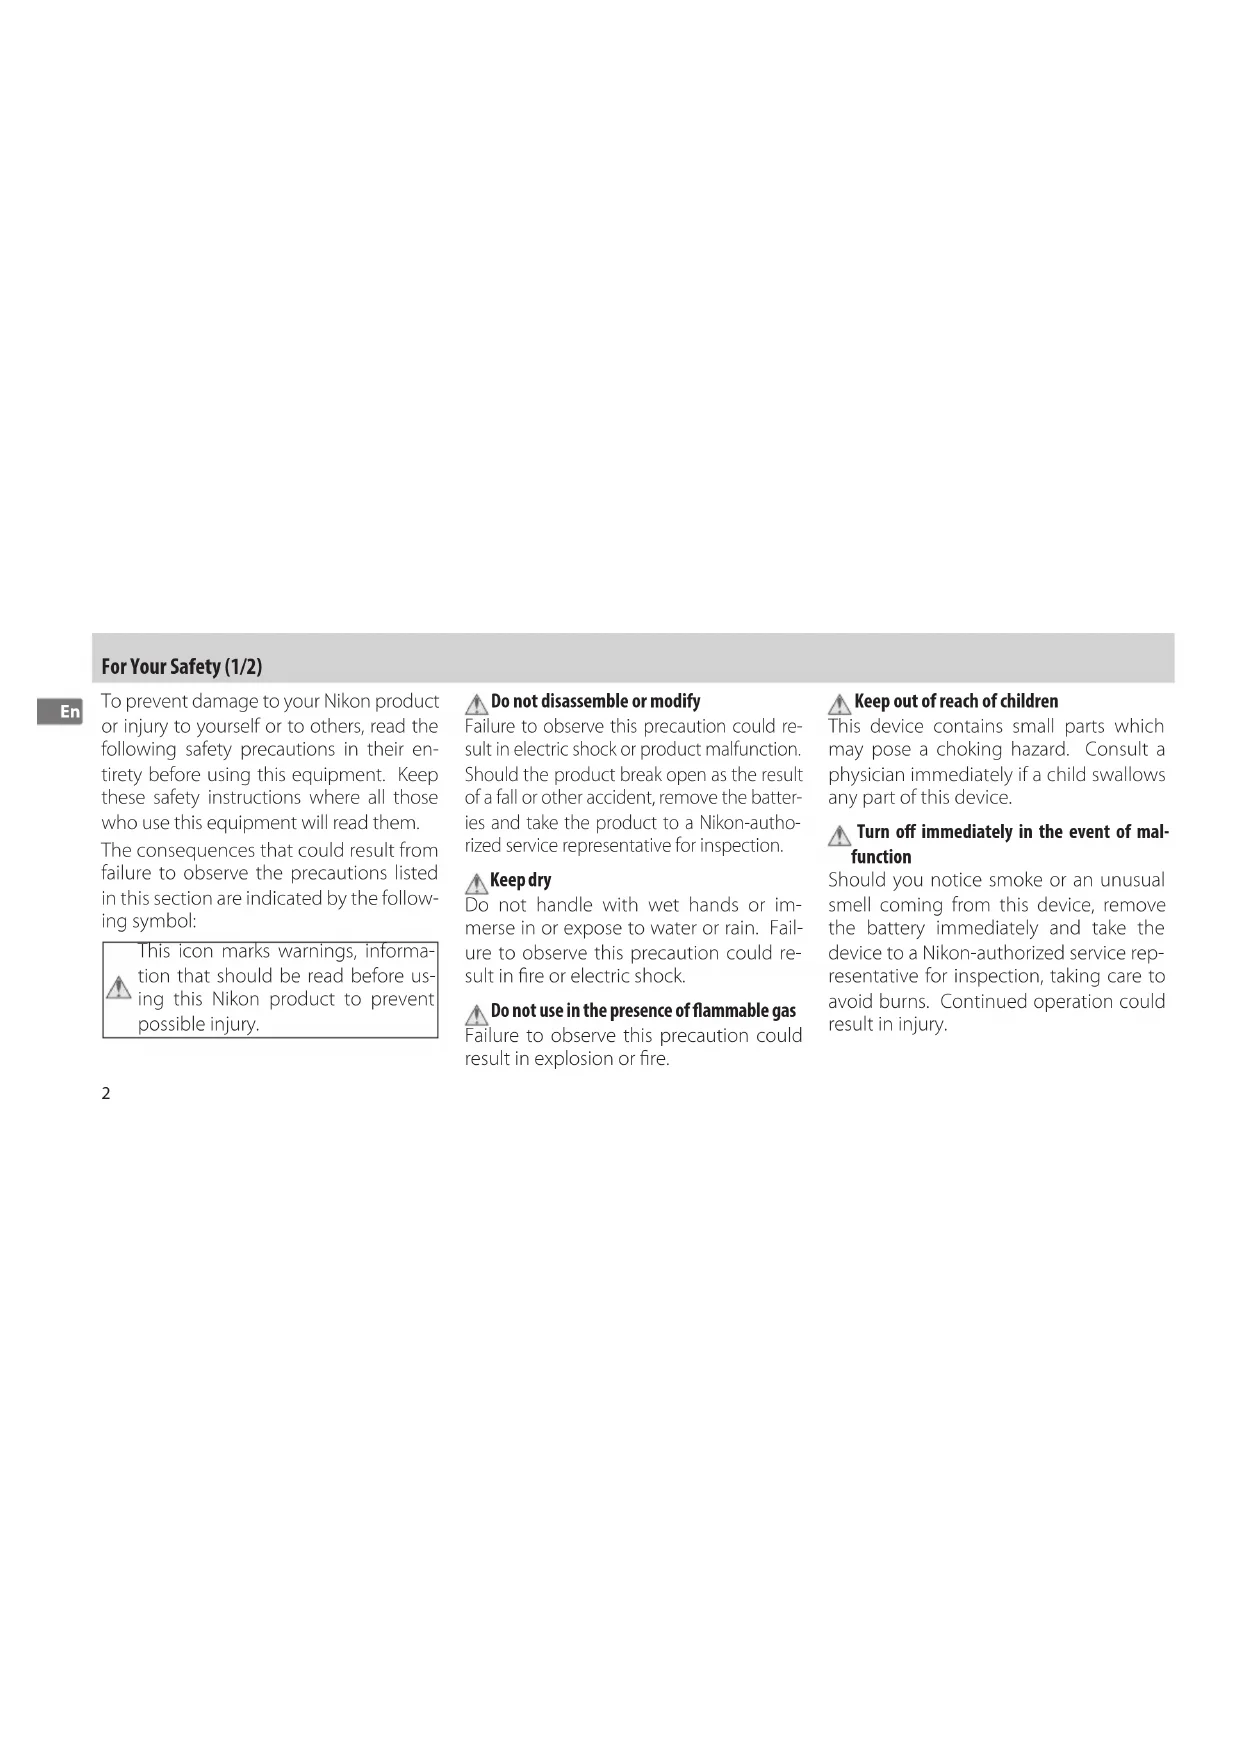
For Your Safety (1/2)
En
To prevent damage to your Nikon product or injury to yourself or to others, read the following safety precautions in their entirety before using this equipment. Keep these safety instructions where all those who use this equipment will read them.
The consequences that could result from failure to observe the precautions listed in this section are indicated by the following symbol:
This icon marks warnings, information that should be read before using this Nikon product to prevent possible injury.
Do not disassemble or modify
Failure to observe this precaution could result in electric shock or product malfunction. Should the product break open as the result of a fall or other accident, remove the batteries and take the product to a Nikon-authorized service representative for inspection.
Keep dry
Do not handle with wet hands or immerse in or expose to water or rain. Failure to observe this precaution could result in fire or electric shock.
Do not use in the presence of flammable gas
Failure to observe this precaution could result in explosion or fire.
Keep out of reach of children
This device contains small parts which may pose a choking hazard. Consult a physician immediately if a child swallows any part of this device.
Turn off immediately in the event of malfunction
Should you notice smoke or an unusual smell coming from this device, remove the battery immediately and take the device to a Nikon-authorized service representative for inspection, taking care to avoid burns. Continued operation could result in injury.
For Your Safety (2/2)
Do not expose to high temperatures
Do not leave the device in a closed vehicle under the sun or in other areas subject to extremely high temperatures. Failure to observe this precaution could result in fire or in damage to the casing or internal parts.
Observe precaution when handling batteries Batteries may leak or explode if improperly handled. Observe the following precautions when handling batteries for use in this device:
-
Use only batteries listed in this manual. Do not mix old and new batteries or batteries of different types.
-
Read and follow all warnings and instructions provided by the manufacturer.
- Do not short or disassemble.
- Do not expose to flame or excessive heat.
- Do not attempt to insert batteries upside down or backwards.
- Batteries are prone to leakage when fully discharged. To avoid damage to the product, be sure to remove the batteries when leaving the product unattended for prolonged periods or when no charge remains.
- Should liquid from the batteries come into contact with skin or clothing, rinse immediately with fresh water.
Notices (1/2)
En
Notice for Customers in the U.S.A.: Federal Communications Commission (FCC) Radio Frequency Interference Statement
This equipment has been tested and found to comply with the limits for a Class B digital device, pursuant to Part 15 of the FCC rules. These limits are designed to provide reasonable protection against harmful interference in a residential installation. This equipment generates, uses, and can radiate radio frequency energy and, if not installed and used in accordance with the instructions, may cause harmful interference to radio communications. However, there is no guarantee that interference will not occur in a particular installation. If this equipment does
cause harmful interference to radio or television reception, which can be determined by turning the equipment off and on, the user is encouraged to try to correct the interference by one or more of the following measures:
- Reorient or relocate the receiving antenna.
- Increase the separation between the equipment and receiver.
- Connect the equipment into an outlet on a circuit different from that to which the receiver is connected.
- Consult the dealer or an experienced radio/television technician for help.
CAUTIONS
Modifications: The FCC requires the user to be notified that any changes or modifications made to this device that are not expressly approved by Nikon Corporation may void the user's authority to operate the equipment.
Interface Cables: Use the interface cables sold or provided by Nikon for your equipment. Using other interface cables may exceed the limits of Class B Part 15 of the FCC rules.
Nikon Inc.,
1300 Walt Whitman Road, Melville, New York 11747-3064,U.S.A.Tel.:631-547-4200
Notices (2/2)
Notice for Customers in Canada
CAUTION: This class B digital apparatus meets all requirements of the Canadian Interference Causing Equipment Regulations.
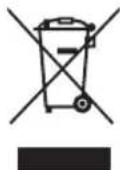
Notices for Customers in Europe
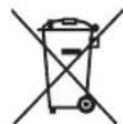
This symbol indicates that electrical and electronic equipment is to be collected separately.
The following apply only to users in European countries:
- This product is designated for separate collection at an appropriate collection point. Do not dispose of as household waste.
- Separate collection and recycling helps conserve natural resources and prevent negative consequences for human health and the environment that might result from incorrect disposal.

- For more information, contact the retailer or the local authorities in charge of waste management.
This symbol on the battery indicates that the battery is to be collected separately.

The following apply only to users in European countries:
- All batteries, whether marked with this symbol or not, are designated for separate collection at an appropriate collection point. Do not dispose of as household waste.
- For more information, contact the retailer or the local authorities in charge of waste management.
Introduction
En
Thank you for your purchase of an MC-36A remote cord. The MC-36A is equipped with an interval timer suited to a wide variety of tasks, including astronomical photography. See page 19 for a list of compatible cameras.
Parts of the MC-36A (1/4)
Refer to the illustrations inside the front cover.
Body
① 10-pin connector. 9
② Cord
③ Release lamp. 14-15
④ Control panel.7-15,17
⑤TIMER START/STOP button. 14-15
⑥ SET button 10, 12, 14
⑦Illuminator/lockbutton. 9
⑧Arrow button 12-13
9Shutter-releasebutton.17
10 Battery-chamber cover. 7
11 Eyelet for strap (available separately; use cell phone or other similar strap)
Parts of the MC-36A (2/4)
Control Panel
Selection cursor. 12-13
Timer display. 12-15, 17
3 Lockindicator. 9
4 Low battery indicator.
5 "TIMER ACTIVE"indicator. 14-15
6 Speaker on/off indicator. 11, 13
7 SET"indicator. 10, 12-14
3"RELEASEindicator. 14-15,17
Number of shots. 11-15
- The illustration inside the front cover shows the control panel with all elements lit. In the other illustrations throughout this manual, elements relevant to the explanation in the accompanying text are shown in black. Indicators not mentioned in the text are shown in gray.
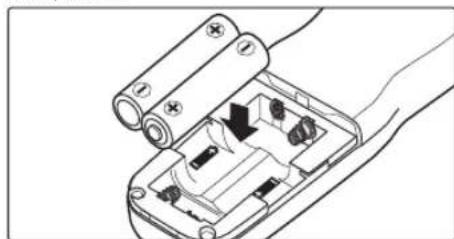
Inserting Batteries
Slide the battery-chamber cover (10) from the back of the MC-36A and insert two AAA 1.5 V LR03 alkaline batteries (available separately) as shown.

The Low Battery Indicator (
The low battery indicator (4) will blink when the batteries are low. Ready spare batteries.
Parts of the MC-36A (3/4)
Replacing Batteries
When replacing batteries:
1Check that the "TIMER ACTIVE" (5) and "RELEASE" (3) indicators are not displayed (see right).
2 Turn the camera off and disconnect the MC-36A.
3 Remove the batteries.
4 Wait until the control panel has gone out and insert new batteries.
When the MC-36A Is Not in Use
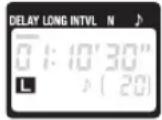
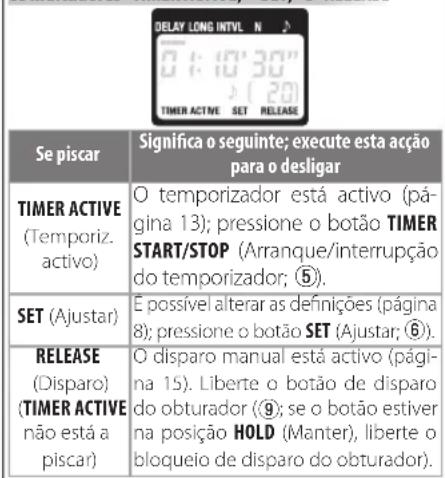
The MC-36A is not equipped with an off switch. To reduce the drain on the batteries when the MC-36A is not in use, end shooting and check that the "TIMER ACTIVE" (5), "SET" (7), and "RELEASE" (8) indicators are not displayed (see right). The drain on the batteries increases when these indicators are flashing.
The "TIMERACTIVE," "SET," and "RELEASE" Indicators
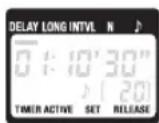
| If this flashes It means this; do this to turn it off | |
| TIMER ACTIVE | Timer active (page 15); press TIMER START/STOP button (⑤). |
| SET | Settings can be modified (page 10); press SET button (⑥). |
| RELEASE (TIMER ACTIVE not flashing) | Manual release active (page 17); release shutter-release button (⑨; if button is in HOLD position, release shutter-release lock). |
Parts of the MC-36A (4/4)
Connecting the MC-36A
The Illuminator/Lock Btttonn the camera off.
Press the illuminator/lock button (7) briefly to activate the control panel backlight. The backlight will remain lit for about six seconds; pressing the arrow button (8) while the backlight is on extends the timer for another six seconds. To lock all controls except the shutter-release (9) and illuminator/lock buttons, press the illuminator lock button until the lock icon (10) is displayed in the control panel. To release the lock, press the illuminator/lock button until the lock icon is no longer displayed. DELAY LONG INTVL N
2Check that the "TIMER ACTIVE" (5) and "RELEASE" (8) indicators are not displayed.
3 Remove the 10-pin terminal cover from the camera. Keeping the mark on the 10-pin connector (①) aligned with the mark on the camera body, insert the connector as shown and then tighten the locking nut.

Illustration shows D3S
Disconnecting the MC-36A
After checking that the "TIMER ACTIVE" (5) and "RELEASE" (6) indicators are not displayed, turn the camera off and disconnect the MC-36A. Replace the 10-pin terminal cover.
Using the MC-36A
En
The MC-36A functions as:
An automatic timer (pp. 10-16). Choose the delay (time before shooting starts), exposure time, interval, and number of shots for timed interval photography. Shutter speed can be selected with the camera if desired (pg. 16).
A manual release (pg. 17). Take photographs manually using the shutter-release button on the MC-36A. Photographs can be taken manually even when the timer is running.
Timed Photography (1/7)
1. Adjust Camera Settings
1.1 Connect the MC-36A (pg. 9) and turn the camera on.
1.2 Adjust camera settings as follows (see the camera manual for details):
| Exposure mode M (manual) | |
| Shutter speed Bulb | |
| Interval timer Off | |
| Focus mode AF-C (continuous-servo autofocus) | * or M (manual) |
| Continuous S (single frame) | |
- Select "release priority" if available.
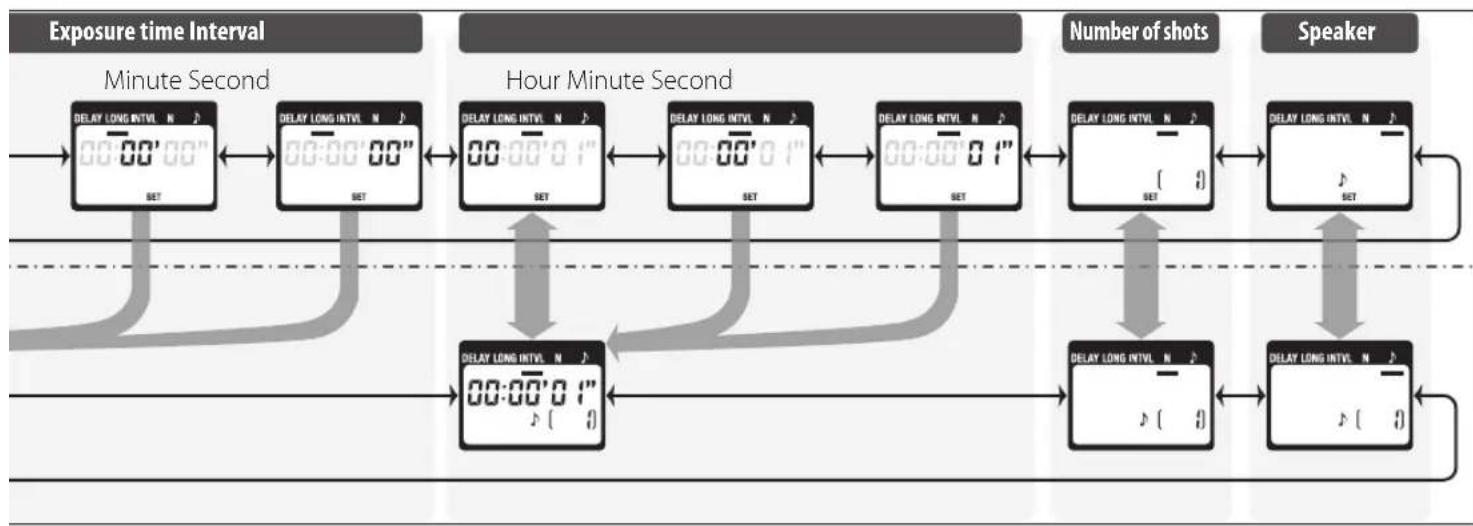
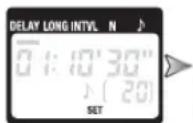
2. Set the Timer
2.1 Press the SET button (6). "SET" will flash in the control panel.
The MC-36A can be connected to the camera after the timer has been set.
Timed Photography (2/7)
2.2 Adjust the following settings:
| Option Description Supported settings | |
| DELAY Delay before shutter is released | 0 s to 99 hrs 59 min 59 s (in one-second increments) |
| LONG Exposure time | |
| INTVL Interval 1 s to 99 hrs 59 min 59 s (in one-second increments) | |
| N Number of shots 1 to 399, | --(unlimited) |
| Speaker on/off (on), (off) | # |
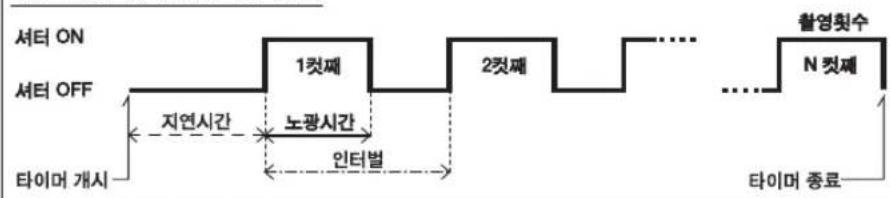
| Delay, Exposure, and Interval Settings Shutter opensShutter opens Shutter closesShutter close Delay Timer starts | Number of shots (N) nth frame Timer ends |
Timed Photography (3/7)
En
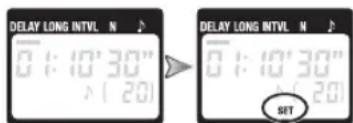
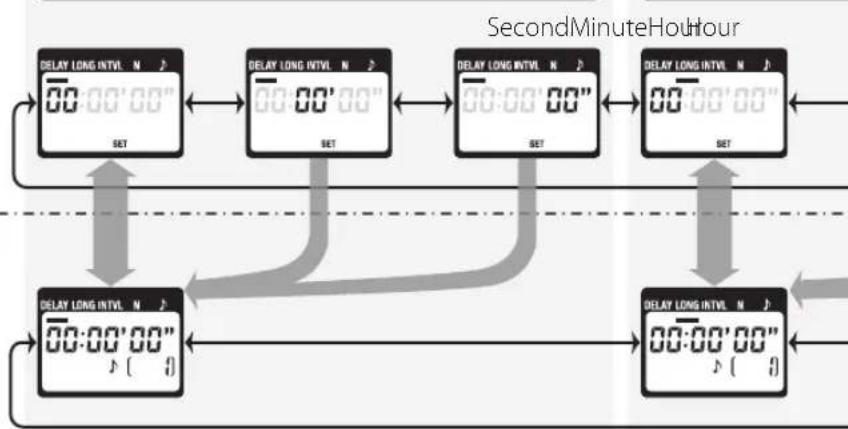
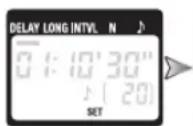
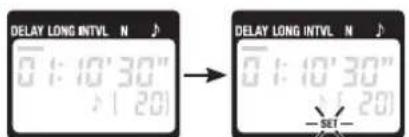
Setting the Timer
Use the arrow button to set the timer. Press left or right to select, up or down to change. The current selection is indicated by the selection cursor (1).

Adjust settings
Press SET 6) at any time to complete the operation and display the new settings for the selected item. To view other settings, press the arrow button left or right. The current selection is indicated by the selection cursor (1). Press the SET button to edit the current setting as described above.
Setting complete
Delay (time until shooting starts)
Timed Photography (4/7)
Timed Photography (5/7)
Setting the Timer
To ensure correct operation, choose an interval at least one second longer than the exposure time. When using autofocus, set the delay to two seconds or more and choose an interval at least two seconds longer than the exposure time to ensure that the camera has time to focus. When using long exposure noise reduction (available with some digital cameras), the interval should be at least twice the exposure time.
Intervals of 00:00:00 will automatically be reset to 00:00:01 when the SET button (6) is pressed to put settings into effect.
To set the number of shots to -- (unlimited), select 1 and press the arrow button (⑧) down or select 399 and press the arrow button up.
2.3 After adjusting all settings as desired, press the SET button (6) to put the new settings into effect. A beep will sound (if the speaker is on) and the "SET" indicator will go out.
The new settings will remain in effect until changed or until the batteries are removed or exhausted.
3.Start the Timer
Press the TIMER START/STOP button 5. The timer will start and "TIMER ACTIVE" 5 will flash in the control panel. Between shots, the control panel will show the time remaining until the next photograph is taken. If the speaker is on, a beep will sound three times at one-second intervals before the shutter opens.
While the shutter is open, the control panel will show the time remaining until the shutter closes, and the release lamp and "RELEASE" indicator 8 will flash at one-second intervals. The number of shots remaining will be updated each time a photograph is taken.
Timed Photography (6/7)
Control Panel Display (Timer Active)

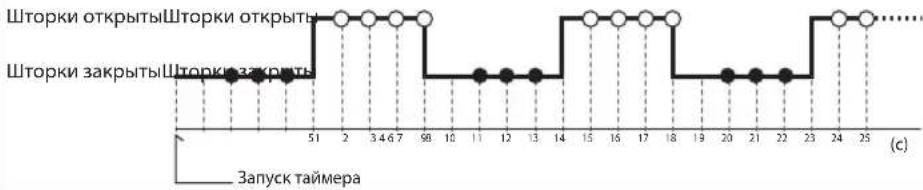
The Speaker and Release Lamp
The following illustration shows when a beep will sound () and the release lamp flash () with a delay of 5s , an exposure time of 4 s, and an interval of 9 s.

4. End Shooting
Shooting will end automatically when the selected number of shots has been taken. To end shooting before all photographs have been taken, press the TIMER START/STOP button (5).
Timed Photography (7/7)
En
Using the Camera to Select Shutter Speed
To take photographs at the shutter speed selected with the camera, adjust settings as follows:
| Camera | Exposure mode M | (manual) or S (shutter-priority auto) |
| Shutter speed Any | ||
| Interval timer Off | ||
| Focus mode AF-C (continuous-servo autofocus) | * or M (manual) | |
| Shooting mode S (single frame) | ||
| MC-36A | Exposure time 0s | |
| Interval Longer than camera shutter speed | ' |
Select "release priority" if available
When using autofocus, choose an interval at least two seconds longer than the camera shutter speed to allow the camera time to focus. When using long exposure noise reduction (available with some digital cameras), choose an interval at least double the camera shutter speed.
Using the Timer
Before using the timer for extended periods, check that the batteries have enough charge. Replace the batteries when the low battery indicator ( ) flashes in the control panel (4).
Manual Release
The MC-36A shutter-release button (9) functions in much the same way as the camera shutter-release button.
1. Adjust Camera Settings
Connect the MC-36A (pg. 9) and turn the camera on. Choose exposure mode, shutter speed, focus mode, and shooting mode as desired.
2. Take Pictures
2.1 Press the MC-36A shutter-release button (9) halfway and check focus and exposure, then press it the rest of the way down to take a picture. While the shutter is open, a beep will sound at one-second intervals, the "RELEASE" in
indicator (8) will flash, and the control panel will show the time remaining until the shutter closes.
To keep the shutter-release button fully pressed for bulb photography, slide the button to the HOLD position. Slide it in the opposite direction to release the lock.

2.2 Release the button to end shooting.
The MC-36A shutter-release button can be used when no batteries are inserted. The control panel will remain off and no beep will sound.
The shutter-release button can be used to release the shutter manually while the timer is active. Timer count-down (including the control-panel display, release lamp, and beep) continues during manual release. If a manual release overlaps with an automatic release, the shutter will remain open until both exposure times have expired.
Precautions for Use
Check the camera battery level and number of exposures remaining before using the MC-36A (see the camera manual for details). The timer will continue to operate even when no pictures can be recorded due to low battery, lack or film or memory, or lack of space in the memory buffer (digital cameras only). An AC adapter (available separately) is recommended for longer sessions.
Some cameras have an AF activation option that determines whether the camera will focus when the shutter-release button is pressed halfway (see the camera manual for details). Enable shutter-release button AF-activation when using the MC-36A.
Please note that the timer is less accurate than most watches or household clocks.
Caring for the MC-36A
Do not drop: The product may malfunction if subjected to strong shocks or vibration.
Keep dry: This product is not waterproof and may malfunction if immersed in water or exposed to high levels of humidity. Rusting of the internal mechanism can cause irreparable damage.
Avoid sudden changes in temperature: Sudden changes in temperature, such as occur when entering or leaving a heated building on a cold day, can cause condensation inside the device. To prevent condensation, place the device in a carrying case or a plastic bag before exposing it to sudden changes in temperature.
Keep away from strong magnetic fields: Strong static charges or the electromagnetic fields produced by equipment such as radio transmitters could interfere with the device.
A note on electronically-controlled devices: In extremely rare instances, unusual characters may appear in the control panel and the device may stop functioning. In most cases, this phenomenon is caused by a strong external static charge. Turn the camera off, disconnect the MC-36A, remove the batteries, and then replace them once the control panel has turned off. Caution is required when handling the batteries, which may be hot from use. In the event of continued malfunction, contact your retailer or Nikon representative.
The control panel: LCD displays tend to darken at high temperatures and exhibit slower response times at low temperatures. This does not indicate a malfunction.
Specifications
| Supported cameras | Nikon D4-series, D3-series, D2-series, D1-series, D810, D800-series, D700, D300-series, D200, and D100 (requires MB-D100 battery pack) digital cameras; Nikon F6*, F5, F100*, F90-series*cameras |
| Timer delay | 0 s to 99 hrs 59 min 59 s in one-second increments |
| Exposure time | 0 s to 99 hrs 59 min 59 s in one-second increments |
| Interval | 1 s to 99 hrs 59 min 59 s in one-second increments |
| Number of shots | 1 to 399, - (unlimited) |
| Power source | Two AAA 1.5 V LR03 alkaline batteries |
| Battery life | Approximately two months of continuous shooting with a delay of 5 min, an exposure time of 4 min 56 s, and an interval of 5 min. Use of the illuminator will reduce battery life. |
| Operating temperature | -20-+50°C(-4-+122°F) |
| Dimensions (W×H×D) | Approximately 155×18×40 mm/6.1×0.7×1.6 in., excluding projections |
| Weight | Approximately 128 g/4.5 oz (with battery) Approximately 105 g/3.7 oz (MC-36A only) |
| Length of cord | Approximately 850 mm/33.5 in. |
| Compatible remote terminal accessories | MC-21A/MC-21 extension cord (operation is not guaranteed if two or more MC-21A/MC-21 extension cords are used), MC-35A/MC-35 GPS adapter cord (connects to 10-pin terminal on MC-35A/MC-35) |
- An AS-15 hot shoe adapter (available separately; attaches to the camera accessory shoe) is required when sync terminal is used.
1300 Walt Whitman Road, Melville, New York
11747-3064,U.S.A.Tel.:631-547-4200

CAUTION: This class B digital apparatus meets all requirements of the Canadian Interference Causing Equipment Regulations.
(Déclenchement) (TIMER ACTIVE
ne clignote pas)
1300 Walt Whitman Road, Melville, New York
11747-3064,U.S.A.Tel:631-547-4200
KhoNka noCBeTKn/6IoknpoBKn 7
PoiocoeHHne MC-36A. 7
Iopraok pa6oTBc MC-36A 8
CbeMa cTaimepom abTOcnyka. 8
PyuHoi cnYCK 3aTBopa 15
Mepbippeoctopoxhocn npncno30baHH 16
YxOa 3a MC-36A 16
TexHHueckxapaKtepcntkn 17
MepblnpedocTopoKHoCTn(1/2)
Bo n36eKaHHe NoIOMKn BaWei TexHnKINikon nI npuHnHn yuepeBaAMnHNOIOkpykaoum, h2yUte CneLyoune npabnInpcOCTOPoXHOCTNepCnICNoJIb3OBaHnEM30JTexHKn. DePKeTNE Tn npabnIBAMeTe, JOCTyHnOM mIIBCExTex, KTO 6yJeTNONb3OBaTBcA 30TJTEXHkoN.
NocJIeCTBnKOTOpbIeMOrTBO3HNKHyTb Bpe3yIbTaTeHapUSeHnYkA3aHHbIXnpaBnIPpeIOCTOpOxHOCTn,063HaueHbCNEyIOUMM3HaKaMn:

3TOT 3NaK O603HaayeT npdynpkJeHne, KOtOpoe He6bXoJyMo npoueCTb nepeNcNoJIb3OBAHmE BaIe TeHNKn Nikon Bo N36ExAHne BO3MOxHOrO BbXoJa ee n3 CTPOW INI pINHHeHn Bpda BaAeMy 3doopBbIO.
He pa36npaTne H me MoHnHcnpyTe H3denn
HecobIOeHne 30n Mepb npdeoctoPOXHOCTM MoKeT npBcETN KnpaKeHIO 3NeKtpueckIM TOKOM HENpabINbHO paOte n3dEINIA. EClm N3dEne pa3bIOcB pe3yIbTaTe naEHHN INPn dpyrNX o6TOReNbCTBaX, n3BNEKHTe BaTapen I npoeactBe erO JnnpOBepKN B cepBNCHy cNxykOMNaHNI Nikon.
AepKte n3dJIe cyHM
He bepnte n3dene MOKpbIM pykAMn, He nprypaIte ero B body INHbIM o6pazom He noDBeprAte ero BO3deCTBnIO Bnarn (HaNPUMep, DOxJa). HecobJeHne 2TO rpe6oBaHn MOKET npuBECTN K NOXApy NIN NopaoKeHHO 3NEKTPrueckm TOKOM.
He nonbayntecb foKamepo npn haHnnnne KOBocnmaehouuxxra30B
HecobIIOeHHe 3ToI Mepb IpeoCTOpoxHOCTN MOKeT PnBecTn K B3pBy NIN NOKApY.
Bepernte ot detei
JaHHoe H3dJIe cOepKHT MeKHe dTAnI, KOtOpBle MOrYT Bb3BaTb ydyBbe npn nonaHaHn B ropNo. HeMeDiNEHNO 6bPaTntEc b K apuy B cnYae,ecn pe6eHcK nporNtT KaKyio-n6o cactb n3dEINIA.
HemeJeHHo BbIKNoaHTe H3JeNne npn HnpaBnblHom erOyHKuOnHnpOBaHH
PnnoBHeHn DbMa HnHnOeBnHoro 3anaxa,
NCXoJIeOOTNDEJIH,HEMeJeEHNOI3BNeKNTe
6BaTapeo,CobIOJAAMEpI ppeOCTopOXHOCTn,
TObHe OBeKeHcB,IOTHecTe B cepBnCHbIeHTP
KOMNaHNI NIKon IPOBepKNmIaHOCHTNK.
PiOpaJIkeHne paObToM oKeT npINBcTn K
NoIyueHHIO TpaBMbl.
MepblnpedocTopoKHoCTn(2/2)
He noDBepraTe H3dEne DeCTBnO BbCOKX Temnepatyp He octabIaIe I3dEne B 3akpytOM ABTOMOBIIe NOI cONHcEM INB DpyrN XMeTAX,IE OHO MOKET NoDBepHTyBCA DeCTBnQ Upe3MepHO BbCOKIX TEMnepatyp. HecobIOgHeN ToTmpebl PedeocToPOKHOCHN MOKET IPnBeCTN KIOKApY NIOBpEXDeHIO KOPyCa NIOBO BHyTpEHNX HaCTeN.
CobnOaHteocpOxHOCTbnpo6paueHNc6batapeMn HnpabInbHoe o6paueHne c6batapeMn MOKTe npBecTH KIX npoTEKaHIO NIN B3pyIBy. CoNIOaHTe CnEkyuIe MebpI npEOCTOpOxHOCTn PnO6paueHNc 6batapeMn,NCnOB3yeMbIMB DAHNOMYCTPOINCTBE:
IcnoB3yTe6atapEnToIbKOToTOrTnA,KOTOpBm
Kb3aHnB HactoUe pykoDBCTBe. HeOnyCTMnO
COMeCtHOe IcNOb3Os3Hne CTApBX N HOBX6TapeE,
aTAKKe 6atapEn p3hXbTNIOB.
O3HAKONBtcebCOCEMMIpeyIpeKJehHMNHCTpyKLIMM,mpoocTaeHHBMnPO4BQdTeEM.
He 3aMbKaIte KOHTaKb6aTapeu Hn He pa3bnpaTe ee.
HeHarpeBaTe 6aTaPeK u He 6pocaiTe ee B orOHe.
-Пиуctановсбатарс co6noaTe npabnblhyo opentauio.
PONHOCTBOpa3pKHeHbIeAkkMyHTOpHbIeBatapeMOTyIPOTEkath.BoMBekKaHneIOBpExJeHHPOTOKAMEPBnBNEKAHTeBaTapeuN3pTOKAMepbI pUcDITENTbHOMHECNOLB3OBAHINUNBcUYaeNOHOPa3pKnDbatape
Bcnyae nonanadnna JxNkOCTn 3aBapen HaKoxy nnoDexy HEmednHnnpomOnTe COOTBeTcByIOoe METo npTOHO BODn.
PpMueaHnIy nIbNoIb3ObaTeNeB Ebpone
JaHHB CMMBOB 03HauHaET,HTO 2eKeTPNueCKoeN eKeTPOHHe OOBpyDabHne DOnKHe
yTNINBAPOBATbCR OTDcNbHOOT BbTOBBIX OTXOIOB.
Cnedyoue 3aemuHnna KacatoTOnbKO nolb3oBaTeNeB Ebponeckx CTpaHax
JaHHOE HJDNNEI NOJNEXT YINNAZIMCU B COOTBETCTBYOUX NHYKTA X COpA. He ABpBaBnAE HJDNIE BMCCTC BHTOBM MyCOPOM.
PaBbIbIc60nIpepaObTKaOTXIO8NOMoAOT CbepeBaTINPPOHIEpeCpCBNIPeDOPBAAIO TOpMaTeBHe NocnECTBNI DIA3DopOBBRIIOE IN OKpyKaUeepB, KOTOpB MORYT 8O3HHKHybN3-3A HnpeabHbHOyTNM3AaH.
IpOoBHe CBeHnMgKHO NPOyHbY npOaBaA HIN B MeCTHOp oprAHMaUN,OTBeTCTBEHHO 3a yPpAbeHne OTxOaDN.
3TOT CMMON Ha batape yka3bIbAc Ha To,HTO DAHHAR GATAPER NOJNEKHT yTHIN3AUN OTdEHLHO OBTOBIX OTXOOB.
CnDyUHcEZAMCCHAHN XACQTCNTOIbXIOIb3OBATcNEB CBPONICCKHXCTPAHIX:
Bce6bapenH3aCIMOOTTOIPOAPKPOABHUNI OHNTHINCMBOJNOHNHTNOEKNTYINNAUCAUNCOBTCTAYOONHNYKTAXcbopa.HeBbpaCBBAHTEN BMECEcCBtOBMIMXTOQDAAM
IpOpaBHe CBeHnM MOHO NOnyHbY npOpaBua KIN B MeCTHOOPraHbALIM,OTBETCBHNO 3a ynpabHe HTEOxDAJIe
BBeHeHne IpeueHb qaTei MC-36A (1/3)
Blaorapm Bac 3a npno6peHHe TPOcKa InCTauHNOHHoro ynpabneHn MC-36A! TpocMK MC-36A OobopyoBaH INTEPBAHBIM TaMepOM, pNFOHbIM IINB BInONHCHn WIpOKOrO CNeKtpa 3aHaB, BKIOUaA cTPOHOUMueckyIO cbEMky. IpepeHb COBMeCtUMbIX FOToKAMep CM. Ha CTpaHnCe 17.
CM. NIIIOCTpaHn Ha nepBOI cTp. 0bNoKu.
Kopnyc
① 10-KoHTaKTHbI thiKepe
② Tpocnik
③ INDnKaTOp cnYcKa 3aTbopa.12-13
④ KOnTpOJIbHbI dIcIIeIeI 6,7,8-13,15
⑤ KhoKa TIMER START/STOP 12-13
6 Khonka SET. 8,10,12
⑦ Khonka noCBeTKN/6nokipOBKN.
⑧ Khoika co ctpelko 10-11
⑨ CnyckoBAr KHOrkA 3aTBopa. 15
10 KpbuKa 6aTaepHOro oTcKa.
1UkoDnpeMn (npno6petaeTcOtJeBHO; nOJIb3yIte pEmHbNMOBnBHO TeneoHaNN DpyroaHaNoNTHypeMeHb)
Ipeuehenb yacteMc-36A (2/3)
KoHTpOJIbHbI dNcPJIeN
1 Kypocop BbIeHn. 10-11
2 Ducnnn TaMepa. 10-13,15
3 INnkaTop 6noknpOBKn
4Hdkatoppa3paia6aatae 6
5 INHdkaTop TIMER ACTIVE 12-13
6 INHINKAToP COCTOHAINHIMAHNKA(BKIOUCH/BBKIOUCH) 9,11
7 INdkaTop SET 8,10-12
8 INDnKaTOp RELeASE 12-13,15
9-13 Ha nepBoi cTpaHnue 6boXKn npEclTaBne HKTpoBbHbI dncnne,Ha KOTOpOM rOHT Bce 3NEMeHTb. Ha dpYnx NIOIOCTpAunx B ATOM pyKOBOoCTBe 3NEMeHTb, O KOTOpBx IET peB b TEKCTe, n06paKeHb YepHbIM CBETOM. HnDkatoPb, He ynomHaioUmeC B TEKCTe, nOKa3aHbI cepBM UEBOTem.
UctaHOBka6Taapei
CINBnBte KpBbHKy 6aTapeHOrO OTeKa (10) Ha 3aHcHueAChMC-36A N BCTaBbTe DBe CHeOnuHbc 6aTapeN AAA TmNA LR03 Ha 1,5 B (npno6peTaOTcN OTdcbHo),co6nDaa yka3aHHyo Ha pncyHKe IONPAHOCTb.
WnDnKaTOp pa3pna6aTapei(
HIMKAtop p3pra 6batae (4) Mrraet, KOrda 3apn 6bapei nOxOHT K KOHy. PnroTOBte 3anachoi KomneKT 6batae.
3aMeHa 6atapei
PopokzamEnb6ataepcnnyiou:
1Ybepntecb,TOHnKATOpby TIMER ACTIVE )I RELEE(8) He oTo6paKaHOTcR (cm. cnpaba).
2BbIKIOHTe foTOKaMepy nOTcoEINHITc MC-36A.
3 V3BneKeNTe 6aTapeN.
4NoOxDTe,OKa KOHTpoBbHbI DCnTne IORaCHET,INCTaBtHe HOBBe BaTapen.
Korda MC-36A He nCnonb3y
TpocnMC-36A He o6opuyoabH BbKIOUaTeNem nTaHn. YTo6bl yMeHbIITb pacXoJ 3eepnn KOrda MC-36A He nCnoJIb3yETc, 3aBepuNTe cbemky uYbEInTEcb, TTO HINkATOpB TIMER ACTIVE (5), SET (7) n RELEE
8 He oTo6paKaIOCTc (m. cnpaba).KOrda 3TN INHdkaTOpbl MMrAOT, HArpy3Ka Ha 6aTapey yBEnuNBAeTc.
Ipeuehen yacTei MC-36A (3/3) IopcoeHneHne MC-36A
INHdkatopby TIMER ACTIVE, SET n RELEEASE
ECN INTEPBAI pABeH 00:00:00,To npn HauKAn KNKON SET(6)C cJIeBIO COxPAHeHNA 3TOPO napAMetpa ero 3HaueHHe ABTomATNUeCKN NOMEHAETCA Ha 00:00:01.
HTO6bIyCTAHOBITb HeorpaHueHHoe YICNO CHMKO8(-),BbEpeNT1N HAKMMTE KHOINKY CO CTPEIKON BHN3(⑧)NIN BbEpeNTe 399 N HAKMMTE KHOINKOc CTpeKNoB BBePcx.
2.3 HactpoB BCE npaMeTpbl Tpe6yEmbIM 06paOM, HaxMMTE KHOIky SET (6), YTO6bl HOBBie yCTAHOBKN BO3bIMEN DeHCTBNE. Pa3daTc8ByKOBOu CnHAn (ecnn DNHaMK BKIOUeH), INHINKaTOP SET norachET.

Hoblye yctahOBKn 6dyT DeiCTBOBaTdo INx N3MeHENN IIN DO INBNeHENIIN60 pa3pda 6aTapei.
3.3anyckTaimepa
HaKmTE KONkY TIMER START/STOP 5.
HaunHaeTc OTCyET BpemCHN, Ha KOHTPOJIbHOM
Dncnnee 3aMnIaet INdNKaTOP TIMER ACTIVE 5.
B nPOMcKytKc MxJdy CHIMKaMn Ha
KOHTPOJIbHOM IMCnIe e OTobpaKaTeC BpeMn,
OCTabWeecr DO CbeMkn CneDuOioero KaJaPa.
Ecn DnHAMIK BKIOUeyH, NpeE ONKpbITnEM
3aTBopa 6ByeT 3ByaTb TPN KOpOTKnx 3ByKObblx
CINHana C INHTepBaIOM BOnHy CeKyHny.
Korda uTOpKn 3aTBopa OTKpbTbHa KOHTPOB HOM DnCnIe OEo6paXaeTC BPEM, OCTabWueecrdo3akpbltnuUToPOK,aHINDKaTOp CNYCKa INHIMKaTOp RELEE (8) MmraIoT C nepIOOM B ONDy CekyHy. YncNo octabuxcx CHIMKOB N3MeHReTc Pnp CBeMe KaJDoTO KaJaPa.
CbeMa TaMepom ABTOcnycka (6/7)
KoHmpoIbHbI duCnIeI (x xode paobommaMepa)

UHAMUK u undukamop cnycka
Ha cIeJyUcE m PcyHKe IokaAaHb MoMeTb, B KOTOpBie 6dyET BbDabAcb3 8yKOBoO cnHnA1 ( ) mMrtat HINKAtOP CnYcKa ( ) np3BaepKke 5 c, dInTeNbHOCTN EKnO3uNN 4 c nHtepBane 9 c.
4.3aBepWeHne CbemKn
CbeMa 3aBepuNTcABTOMaTHueCKN, KOrJa 6ydt CcenaHO yCTaHOBHeHHOC YNCLO CHIMKOB. 106b3aKOHHTb CbeMky paHbIe, HaxMMTE KHOIKY TIMER START/STOP (5).
CbeMa TaMepom ABTOcnycka (7/7)
YCTAHOBKBA BbIePckKc NOMOoiBIO FOToKAmepbi
IJIcBEmKIN C BbIepKoY, yCTaHOBneHHOc NOMOuBIOIeMeHToB ynpabHeHnKaMePoH, HAcTpoTe cJeNyUOnne napaMeTpbl.
| Камера | Рек imm创新创业 | M (pyuho) iviS (aBToMaTueckm c npOpntom 3aTbopa) |
| Быдэржka Лобая | ||
| Таймер abToCnUpcKa OTKIOUeH | ||
| Рек imm Фокс neuropьк | AF-C (нелретынава abToMaTuecka сервфokс neuropьк)* ivi M (pyuho) | |
| Рек imm Сьемки S (пokadpoшя Сьемки) | ||
| MC-36A | ДInteльноctb экнозци | 0c |
| Итэрвал Бolyш, чь Мыдэржka, HabTopeHHa Ha KaMepe | ||
| Yctanobite npInopitet crpaTaBHaHЯ 3aTbopa, ecnno STO BO3MOxHO. | ||
| ПричincNoIb3OBAHIM abToФокс neuropьк Bbl6epHTe INtErBaI, pReBbIaOuIsh yCTaHOBNeHHyO bIePJKKy 3aTbopa lo KpaIneH Mepe Na DBe ceKHyIb, UTObIy y fOToKamEpby bbl NO DocTaTOUHO BpemeHn Ha | ||
| Фокс neuropьк. Приpbote cФунКцeIи noDabJIeHMy IyMa pri nДinteьнOH 3KcNo3UIM (NODeRJKBaETC#r OTdIeHbIMI UINΦoRbIMI ΦOTOKaMePamI) INtEerBaI doJIkeH npeBbIaTb yCTaHOBNeHHoe Bpema BbldePJKKs 3aTbopa Ka MHIHym B Dla pa3a. | ||
Mcnonb3oBaHneTaimepa
IpeXeHcHcHb3oBAt TaMep B TeHHe IINTeBHO BpemH, yBeHTEcb, YTO 3apn6aTapey ABHETc DOCTaOHTbIM. EcnHa KOHTpOBbHom DCNCEE (4) MfAeT HNDKATOp pa3paJa batae (1-3 eHNTeHX.
PyuHoi cnYck 3aTbopa
Cnyckobaa KhoIka 3aTbopa (9) MC-36A cyHKIOHOpye aHaONuHO KhoNKe Cnycka 3aTbopa FOToKApMepbl.
1. Hacptpoika npapaMeTPOB foToKaMepbI
IopcoeHnHTe TPOcK MC-36A (ctp.7) IN BKNIOUHTe KAMepy.Bb6epNTe peKIM EKCNIO3NIM, BbIEpKky, a TaKKe peKIMMbI FOxOyCUPOBKN CBeMKN.
2. OToocbEmKa
2.1 HaKMITE cnYCKOByIO KHOIIky 3aTbopa (9) MC-36 HAnONOBHy, npOBepBte foKycnpoBky n EKcNo3uNIO, a 3aTeM HaKMITE ee do KOHua, yTo6bI cDenA Tb CHIMOK. EcIn IITopKn 3aTbopa OTKpbTbI, pa3daJOTc 3ByKOBBle CINHaNbIC INHTepBaIOM B Ody CEkyHny, INIyKaTop RELEEASE (8) Mfraet, a Ha NaHeIy npabNeHH
OTobpaXaETCA BpEM,OCTabuueeCnD 3aKpbTINU TOPOK.
YTO6b3aHNCPOBAtcIyCKOByIO KHONKy 3aTbopa HaxaToI DnCbeCMKn PnpyHOBuBHePKe, CdBnHbTe eE B IIOXKeHNEHOLD. YTO6bCHrTaHkCaUIO,CdBnHbTe KHOKNy B nPTOBONIOXHom HaPaBneHN.

2.2 OTnyctIte KHNKy, yTObI 3aBepWntb CbEMKy.
CnyckOBa KHONKa 3aTbopa MC-36A MoKet
MCNOBbO3BaTcBcDAxBe B TOM CNYaE,ecNbTaapeH Ye yCTAHOBnEH. PnI ETOM KOHTpOJIbHbI
DnCnNeOCTAHETcOTKnIOHeHHbIM,N 3ByKOBOrO
CnHaHa He 6ydt.
CNYCKOBYK KHONKY 3aTbopa MOXHO NIOJIOB0BaTB
DnI CbEMKN BpyHyIO npI paobTAloWem TaIMpeM.
Pn pyHOM Cnycke 3aTbopa O6paTHbI OTcET
BpEmeHN Ha TaimpeE (BknOyA OTO6paKeHne
Ha KOHTPObHOM DnCnJIe, INHdNKATOp Cnycka
N 3ByKOBoi CNrHAI) PNOJOnJaTeC.EcIN
MometyPCHoro Cnycka 3aTbopa CoBnaTeC
ABOTMaTHueCKM CNYCKOM TO 3aTbOP ByDEt
OCTaBaTbCR OTKpbTbIM JO OKOHuaHHaOBex
BbIDepKeK.
Mepb npedocpoxhoctn npu nCnoIb3oBaHm
PpOeepaTe 3apd 6aTapeH uCnO octabuXcR CHMkoB, npExe Yem nCIOb3oBaTb MC-36A (NOpO6HOCTN CM. B pKOBODCTBE NO 3KcIpyaTaun (OTOKaMepe). PaObaT aIMepa IPOdoJIkaETcJaKe B TOM CUYae, eCN IIIaNNCb CHMkoB HeBO3MOKHa N3-3a HN3KO yPOBBA 3apda B aTapeB, bOTOKaMepe HE OCTAOB PIIENK HIN NHeOCTaTOH NaMaTHN (ToNkDnIuΦpOBBX FOtOKaMeP). PpI IIITIEJbHO CBEMke peKOMEHyETc INTOJIb3OBA TbOK NITAHIN (PnpO6pTaetc OTDeNbHO).
A HeKOTOpbIX foTOKaMepax NmEeTc FyHKUIN AaKtBaUN aBTOfOkyCnPOBKN, KOTOPaONpeENnnET, 6yEtJIN foTOKaMepa PnOM3BODnB fOkyCnPOBk npHaKaTIcN CnyKOBO KHONK 3aTBOPa HAnoBnHIny (NOpO6HOCTn CM. B pyKOBOCTBe NO kCnIpyATAuIN foTOKaMepb). Pn IN cNoNb3oBaHN MC-36A cneJeT BKIOCHaKtBAUNIO aBTOfOkyCnPOBKn HO KaHTIO CNYCKOB KNHKN 3aTBOPa.
POMHHTe, Yo TaMep yctynaet B TOHOCN 60JIbIHHCTBy HApUHybIX N6bITOBbIX YacOB.
YxoⅡa MC-36A
HpohaTe foToKamepy: Kamepa MoXeT BbIITN3CTPOA, ecn ee NDBepraTcMbHbIM ydapaM WIT TpCKE.
Depknte H3dene cymm: daHHoe H3dene He OTHOCNTCR K p43pNDy BOHOHENPOHnAeMbX IN NOCIE IOTpyKHeHH B BOYIMN HAXOeHNB BYCNOBx BcOKoBnBAAKHOCTM MOKET pa60Tb HnOPABINbHO.Kopposy BHTpeHero MEXAHIMMA MOKET HAHECTN H3dene HOE6pAHMBI BPeD.
H36eAtepe3KHX K0e6AHN TEmpeaTpy:pe3KHe KOc6AHn Tmncpatapy, HApnpmeP, npn BixOe B XoNDHyIOIOTyB NTEIIOIOMUChHnM, MOrTy Bb3BaTb IOABLeHnE KOHDECnCATA BJAnBn BHytpi FOtOKaMePy. IIN 3aunbl OT NOBHeHn KOHDECnCATA NOMCTIne FOtOKaMePy B 3akpItBn IIOINTHIOHOBn NaKCT, PcXdYc Hm OIOBcPrTaB Ce pe3KM NMCCHHNr TMNCpTaPy.
BepeHTe H3DJIe OTOB3dEChTBnCHbHbIX
3NeKtpoMaHHTbXnnei CnBbIe CTaTtueckme pa3pRbI bNJI 3NeKtpoMAHHTbIe IIOJI, CoaBaAeMbE pa3JINHbIMO6OpYOBaHMe, HApNIpeM, pa4IOIepeJaTHkAM, MOyT CO3aBbIb TOMEXH II paoBt yICPOCTBA.
3aMeaHHe KacateBHO yCTPOHCTB CKeTPOHHBM
ynpaBHeHMe: bIbAot kpaHne peKne cnyaun, KOla
Ha KOHTpOblHom DnCIIeNE NOBHLOTc HBe6bHHe
CMMBONbIy UCTPOCTBO nepeCTaPT a6oTaTb. B
60bIbWHCTBE CNYaeePnHnH 3TOr ABNtOc
CnblbHe BHEWNIe CTATMueCKNe 3apdBi. BkKnIOHTe
fOTOKaMEpy, OTCoeHNITte MC-36A, N3BKeNTe BAtpen
a 3aTEM YCTAHOBITE IX o6pato, DOxDABuINCB, KOrda
KOHTpOblHb IINCIIeN NorACHT. PnO obpaJIeHN
c 6aTapermN cndyeT cOb1oDaTb OCTOPOXHOCTb.
TAK KAK OHN MOrY T HarpeBaTcB X Oxe pAOtBi.
EcnHcNcPiabHOCTb HC yCTPAHcH, OpaatntecB B
ABTrop3OBANHb CCPBNCbH CEHTP NO OcClyKNBaHNIO
FOToTeXHKn Nikon.
KoHTponbHn Dnncnei KINKOxPCNTaJIuueCeKMe 3KpaHbI NMEIO THeHcNIO K NOYCKHEHNO PNI BBICOKNX TEMEPATpax N yBEmUHeHNO BpeMeHn peAKmnp IN HNkHX TEMEPATpax. ETo He HJINETCH pN3HAKOM HEINCPaBHOCTN.
TexHHueckMe xapaKTepeNCTUKN
| Сов mintимble foToKampebI | Liofpobte foToKampebI Nikon cepi D4, cepri D3, cepri D2, cepri D1, D810, cepri D800, D700, cepri D300, D200 u D100 (trpebyetcnaHaiuHne 6batapeHoro 6boka MB-D100); pIIeHouHne foToKampebI Nikon F6; F5, F100* u cepri F90° |
| ЗадерЖа таймра OT O сdo 99ч 59 мIn M 59 c (сшагь mВ оndу cekyнду) | |
| Длntелбость ExklnoZиMuN OT O сdo 99ч 59 мIn M 59 c (сшагь mВ ondу cekyнду) | |
| Интервал OT 1 с do 99ч 59 мIn M 59 c (сшагь mВ ondу cekyнду) | |
| ЧИСТСНМКOB OT 1 do 399 mIn | - - (he orpaHnueHo) |
| Источник питаня Дibe ue ile nouchы batepei AAA tma LR03 ha napiprjKeHne 1,5 B | |
| Ресур pa6otby ot 6batapei | ПриблзntelbNo Дba MeCAla HeIppeBbHNo CbEaMkn CЗaTePxKo 5MH, ВрemeHem BvIepkKn 4MH NHTePbAOM 5MH. ИспolyZobahme noDcBETKN ChnKaaET cspok clyXb6b6a7b6a7pei. |
| Ра6очая Tempeparatypa -20 +50°C | |
| Размрь (III × B × r) ПrinБлзntelbNo 155 × 18 × 40 MM (6e3 BvICTyaIOuz hucteY) | |
| Мasca ПrinБлзntelbNo 128 r (c 6batapeeY) | |
| Длina Тrosнka ПrinБлзntelbNo 850 MM | |
| Сов mintимble рinnadLeJeKoHCTnДЯ ра3bebma ДиstanTuHOnHOrу npavBAnHnE | УdlinHtelb MC-21A/MC-21 (при coedIneHm Дух x 6bOee уdlnHtelen M-C-21A/MC-21 npabInbHnay pa6ota He rapaTnpyeTcY), shyp-nepexodnIK GPS MC-35A/MC-35 (ндкюаeTcK 10-KoHTakThomy rHe3dy MC-35A/MC-35) |
*PnncnboaHn CnHxPOKoHTa TpeyeTcnoKnIOueHne aadntepa 6aMka nna npHaIeXHocTe A5-15 (npno6peTaetcdoonHnTeBHO; noKnouaetc K 6aMaKy dnn PnHaNaeXHocTe foToKaMepb).
External MC-36A-kabel
Gebruikshandleiding
Inhoud
Voor uwveiligheid 3
Inleiding. 5
Partes do MC-36A (2/3)
Painel de controlo
Osindicadores "TIMER ACTIVE," "SET," e"RELEASE"
0 botao de iluminador/blqelqueigue a camara.
【TaIiMnTnSAHnHnHnHnHnHnHnHnHnHnHnHnHnHnHnHnHnHnHnHnHnHnHnHnHnHnHnHnHnHnHnHnHnHnHnHnHnHnHnHnHnHnHnHnHnHnHnHnHnHnH
Taiyue to use the name of the person you like best. (2/7)
2. TahiMoRr的
a. Taaiursege(6))uRnDa·-
空
MC-36A是首击的,如
b. 《阿里的5年歌》的结尾
··
JiJiJiJiJiJiJiJiJiJiJiJiJi
TaiiMueuHuaHuaHuaHuaHuaHuaHuaHuaHuaHuaHuaHuaHuaHuaHuaHuaHuaHuaHuaHuaHuaHuaHuaHuaHuaHuaHuaHuaHuaHuaHuaHuaHuaHuaHuaHuaHuaHuaHuaHuaHuaHuaHuaHuaHuaHuaHuaHuaHuaHuaHUA HUA HUA HUA HUA HUA HUA HUA HUA HUA HUA HUA HUA HUA HUA HUA HUA HUA HUA HUA HUA HUA HUA HUA HUA HUA HUA HUA HUA HUA HUA HUA HUA HUA HUA HUA HUA HUA HUA HUA HUA HUA HUA HUA HUA HUA HUA HUA HUA HUA HUA
TaiMo的整定范
TaiMo的,

哉卍:締詠龍默頁藥士
Taiyue to use the name of the person who is said to be a good man.
3. 横向投影的大小
TaiiMakochongbuk(⑤)
拉伊哈洛彭长里卡默拉的前日及列(是
十日日日日日日日日日日日日日日日日日日日日日日日日日日日日日日日日日日日日日日日日日日日日日日日日日日日日日日日日日日日日日日日日日日日日日日日日日日日日日日日日日日日日日日日日日日日日日日日日日日日日白
- AF 썸명을 히지는 썸무에는 죅터버트 갑수름을
AF가 기동해로 썸명어
흐심지회 (일부
흐머
라에어
is
is
is
is
is
is
is
is
is
is
is
is
is
is
is
is
is
is
is
is
is
is
is
is
is
is
is
is
is
is
is
is
is
is
is
is
is
is
is
is
is
is
is
is
is
is
is
is
is
is
is
is
is
is
is
is
is
is
is
is
is
is
is
is
is
is
is
哈那拉的徒日格隆里查本德卡上,当人,求有
柏IiM的SINKJHJLHJHJHJHJHJHJHJHJHJHJHJHJHJHJHJHJHJHJHJHJHJHJHJHJHJHJHJHJHJHJHJHJHJHJHJHJHJHJHJHJHJHJHJHJHJHJHJHJHJHJH
| 大変はリフロー | nationwide card of the 1945 US Army and Navy, including the U.S. Navy, the U.S. air force, the U.S. sea freight, the U.S. military, the U.S. marine, the U.S. military, the U.S. military, the U.S. military, the U.S. military, the U.S. military, the U.S. military, the U.S. military, the U.S. military, the U.S. military, the U.S. military, the U.S. military, the U.S. military, the U.S. military, the U.S. military, the U.S. military, the U.S. military, the U.S. military, the U. S. military, the U. S. military, the U. S. military, the U. S. military, the U. S. military, the U. S. military, the U. S. military, the U. S. military, the U. S. military, the U. S. military, the U. S. military, the U. S. military, the U. S. military, the U. S. military, the U. S. army, the U. S. army, the U. S. army, the U. S. army, the U. S. army, the U. S. army, the U. S. army, the U. S. army, the U. S. army, the U. S. army, the U. S. army, the U. S. army, the U. S. army, the U. S. army, the U. S. army, |
| 戦害状態 | 0~99 |
| 対照の相貌 | 0~99 |
| 対照の相貌 | 0~99 |
| 対照の相貌 | 0~99 |
| 対照の相貌 | 0~99 |
| 対照の相貌 | 0~99 |
| 対照の相貌 | 0~99 |
| 対照の相貌 | 0~99 |
| 対照の相貌 | |
| 対照の相貌 | |
| 対照の相貌 | |
| 対照の相貌 | |
| 対照の相貌 | |
| 対照の相貌 | |
| 対照の相貌 | |
| 対照の相貌 | |
| 対照の相貌 | |
| 対照の相貌 | |
| 対照の相貌 |
No reproduction in any form of this manual, in whole or in part (except for brief quotation in critical articles or reviews), may be made without written authorization from NIKON CORPORATION.
NIKON CORPORATION
CCCA
Printed in Japan
© 2012 Nikon Corporation
SB2106(D3)
6MDR05D3-06