Roomie Glide - Baby bed Joie - Free user manual and instructions
Find the device manual for free Roomie Glide Joie in PDF.
User questions about Roomie Glide Joie
0 question about this device. Answer the ones you know or ask your own.
Ask a new question about this device
Download the instructions for your Baby bed in PDF format for free! Find your manual Roomie Glide - Joie and take your electronic device back in hand. On this page are published all the documents necessary for the use of your device. Roomie Glide by Joie.
USER MANUAL Roomie Glide Joie
natural_image
Line drawing of a baby care chair with adjustable legs and seat (no text or symbols)IMPORTANT, RETAIN FOR FUTURE REFERENCE. READ CAREFULLY
Bedside Sleeper Assembly
text_image
1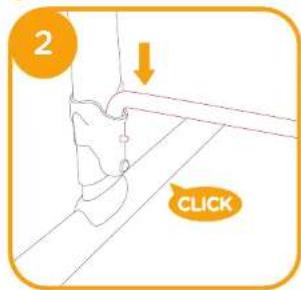
text_image
2 CLICK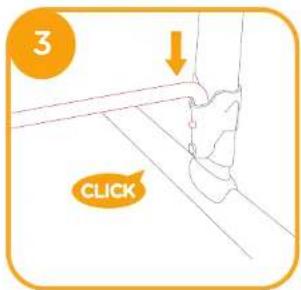
text_image
3 CLICK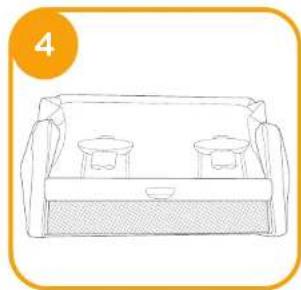
natural_image
Line drawing of a two-wet blanket with two small side baskets, no text or symbols present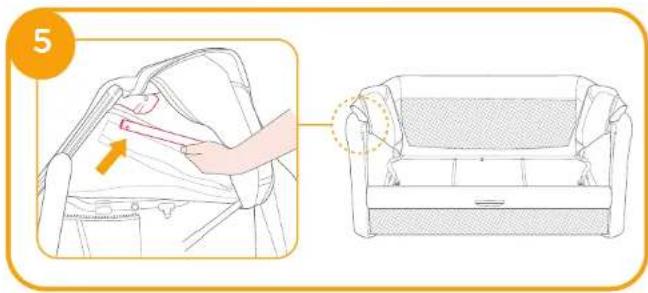
text_image
5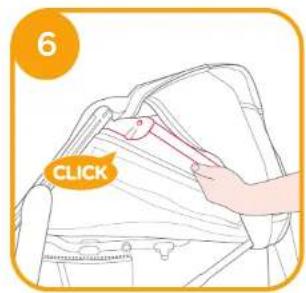
text_image
6 CLICK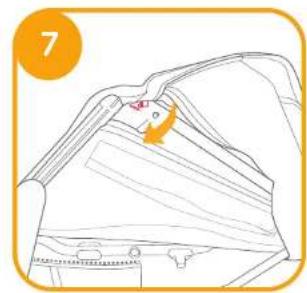
natural_image
Line drawing of a mechanical component with layered structure and highlighted section (no text or symbols)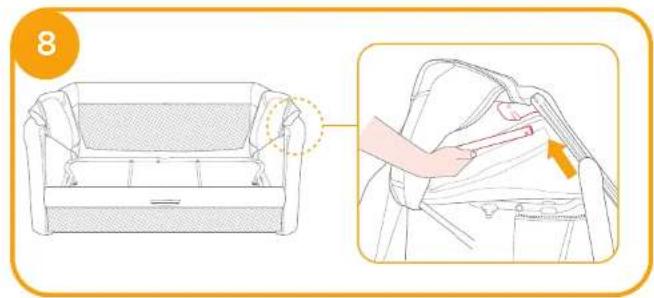
text_image
8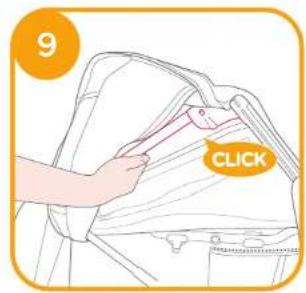
text_image
9 CLICK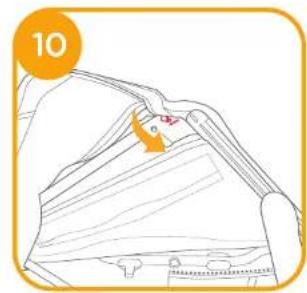
natural_image
Illustration of a person adjusting a garment with a numbered label (10) and an orange arrow pointing to the sleeve (no text or symbols on the garment itself)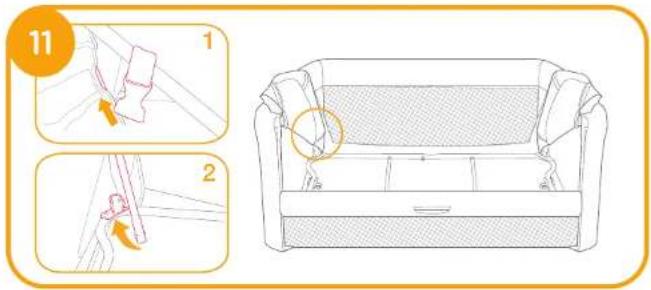
text_image
11 1 2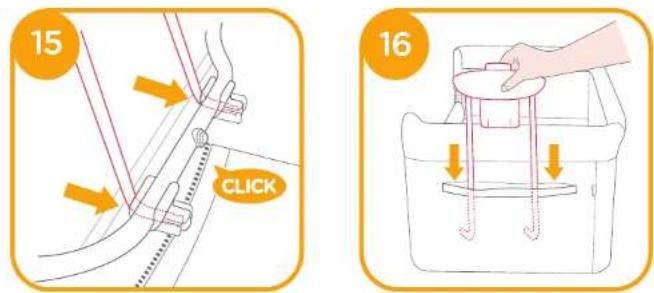
text_image
15 CLICK 16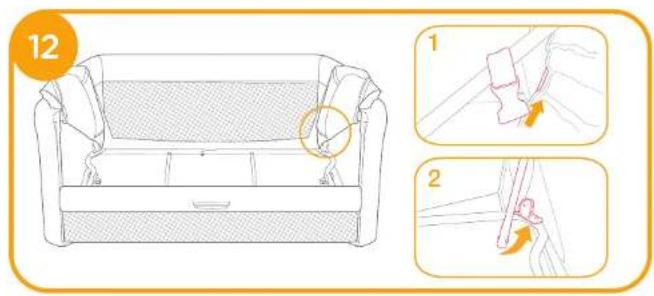
text_image
12 1 2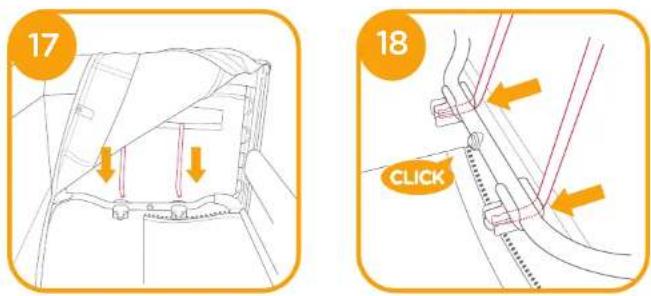
text_image
17 18 CLICK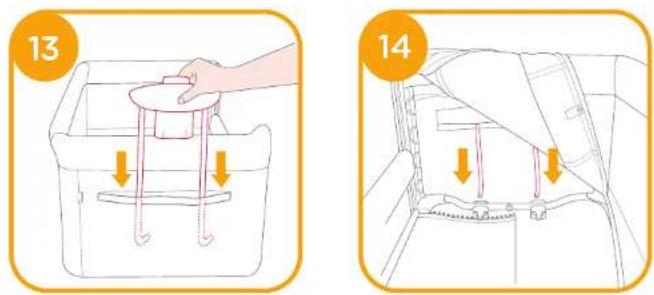
text_image
13 14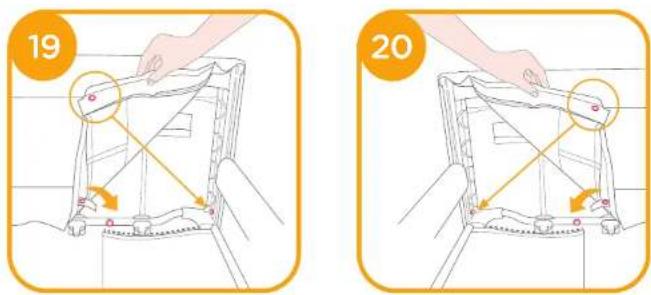
text_image
19 20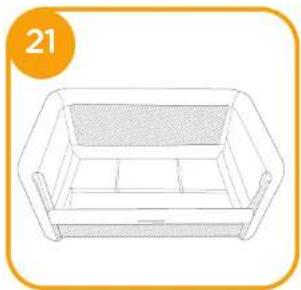
natural_image
Line drawing of a rectangular tray or container with a lid and side compartments (no text or symbols)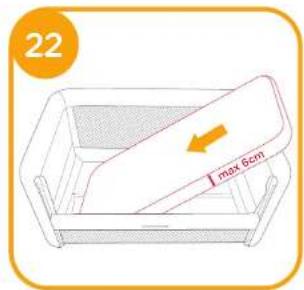
text_image
22 Max 6cm
natural_image
Simple line drawing of a rectangular tray with two downward arrows indicating flow or movement (no text or symbols)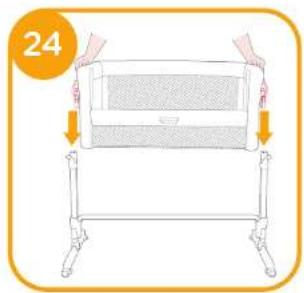
natural_image
Illustration of a baby crib with hands holding the seat, no text or symbols present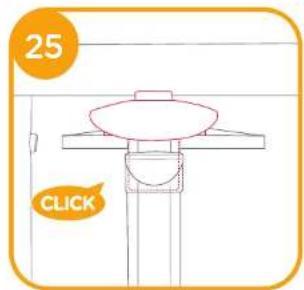
text_image
25 CLICK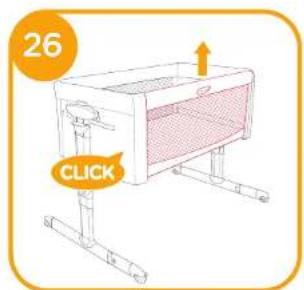
text_image
26 CLICKRocking Function Activation
text_image
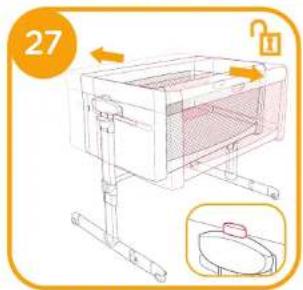
27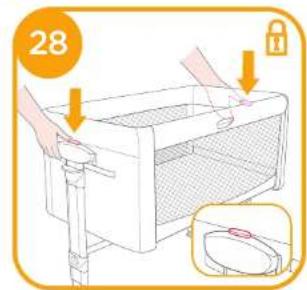
text_image
28Height Adjustment
natural_image
Illustration of a mechanical device with hands operating it, showing internal components and directional arrows (no text or symbols)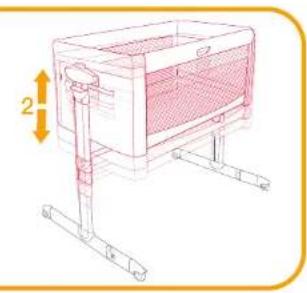
natural_image
Technical line drawing of a mechanical device with no visible text or symbols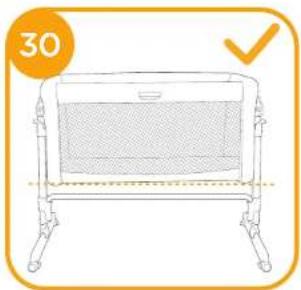
natural_image
Simple line drawing of a baby crib with a mesh backrest and two legs, no text or symbols present.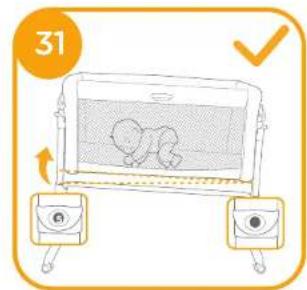
text_image
31Use Wheels
text_image
32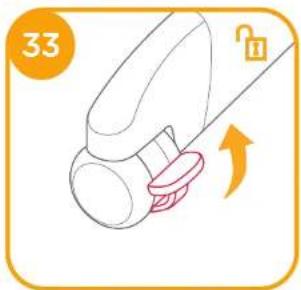
natural_image
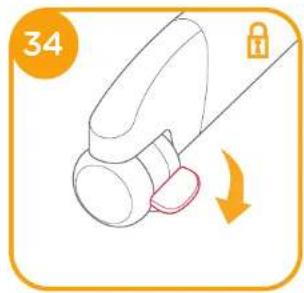
Illustration of a hand holding a baby pacifier with an arrow indicating rotation (no text or symbols)Use Bedside Sleeper
natural_image
Illustration of a hand holding a small object with a lock icon and arrow indicating rotation (no text or symbols)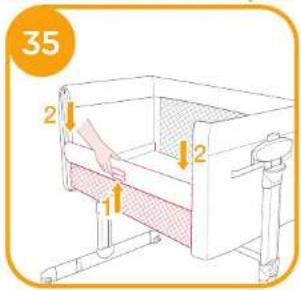
text_image
35 2 1 2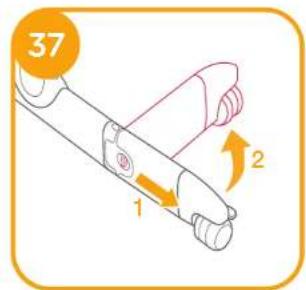
text_image
37 1 2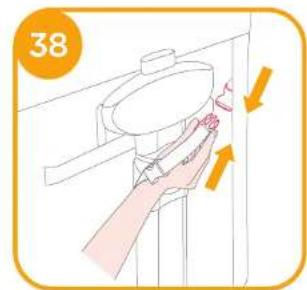
text_image
38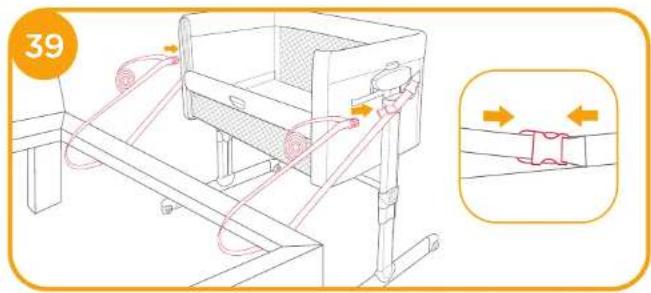
text_image
39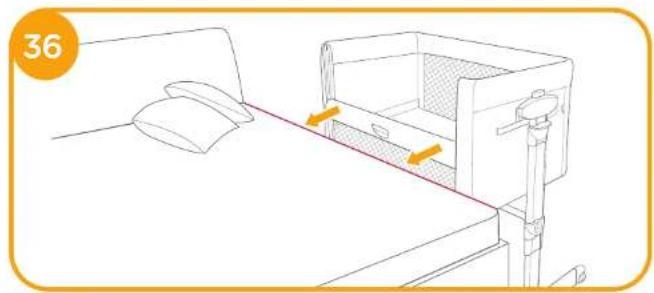
natural_image
Line drawing of a mechanical device with a handle and base, showing motion arrows (no text or symbols)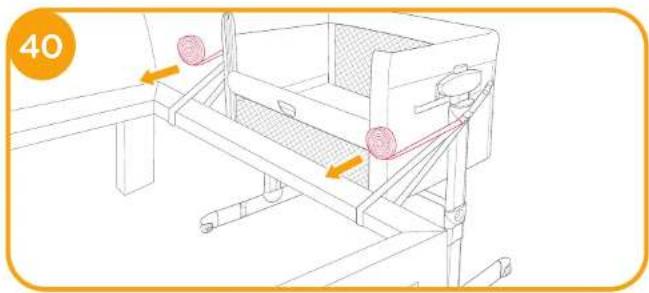
natural_image
Technical line drawing of a mechanical device with two circular components and directional arrows indicating motion (no text or symbols)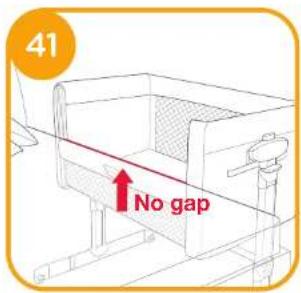
text_image
41 No gap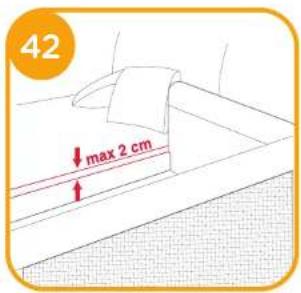
text_image
42 ↓ max 2 cm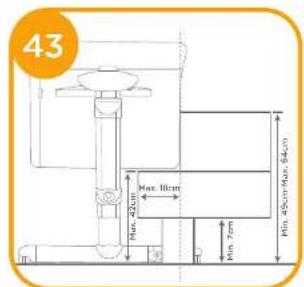
text_image
43 Max. 10cm Max. 25cm Min. 75cm Min. 45cm/Max. 64cm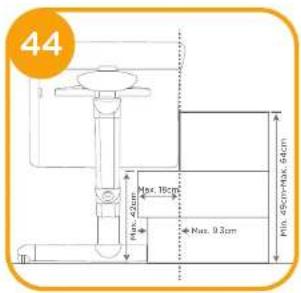
text_image
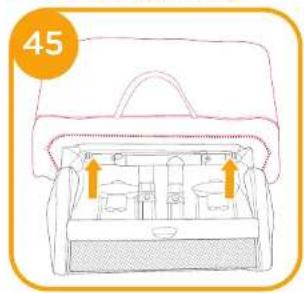
44 Max. 10cm Max. 9.3cm Min. 45cm+Max. 54cmUse Storage Bag
text_image
45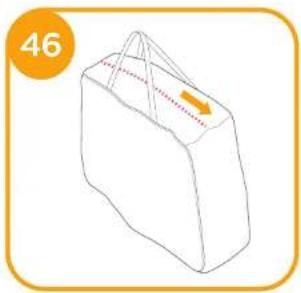
natural_image
Simple line drawing of a shopping bag with handle and dotted outline (no text or symbols)Accessories (May not be included)
Accessories may be sold separately or may not be available depending on region.
Sheet Assembly
natural_image
Illustration of a person climbing a rope, with an arrow indicating movement (no text or symbols)Care and Maintenance
natural_image
Illustration of a human figure in a bent position inside a rectangular frame, with an arrow indicating motion direction (no text or symbols)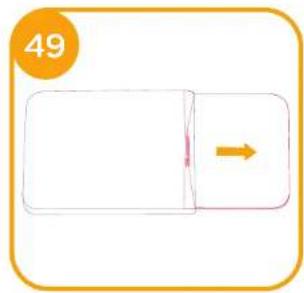
text_image
49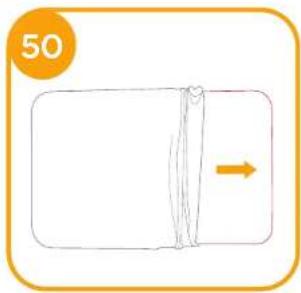
natural_image
Simple line drawing of a vertical human figure inside a rounded rectangle, with an arrow indicating direction (no text or symbols)
Welcome to Joie™
Congratulations on becoming part of the Joie family! We are so excited to be part of your lifewith your little one. While using the Joie roomie glide™, your baby is enjoying a high quality, fully certified product, approved to European safety standards EN 1130:2019 and EN 16890:2017. This product is suitable for use with children weighing under 9kg (approximately 0-6 months). Please carefully read this manual and follow each step to ensure a comfortable sleeping and best protection for your child.
Please keep the Instruction Manual handy for future reference.
Visit us at Joiebaby.com to download manuals and see more exciting Joie products
For warranty information, please visit our website at joiebaby.com
! IMPORTANT
RETAIN FOR FUTURE REFERENCE. READ CAREFULLY.
Contents
| Figures | 1- |
| Warning | 13 |
| Bedside Sleeper Assembly 17 | |
| Rocking Function Activation 17 | |
| Height Adjustment 17 | |
| Use Wheels 17 | |
| Use Bedside Sleeper 17 | |
| Use Storage Bag 18 | |
| Accessories | 18 |
| Care and Maintenance 18 |
Emergency
In case of emergency or accident, it is most important to have your child taken care of with first aid and medical treatment immediately.
Product Information
Read all the instructions in this manual before using this product. If you have any further questions, please consult the retailer. Some features may vary depending on model.
| Product | Roomie Glide |
| Suitable for Materials | Birth to 9kg (approximately 0-6 months)Plastics, metal, fabrics |
| Patent No. | Patents pending |
| Made in | China |
| Brand Name | Jole |
| Website | www.joliebaby.com |
| Manufacturer | Allison GmbH |
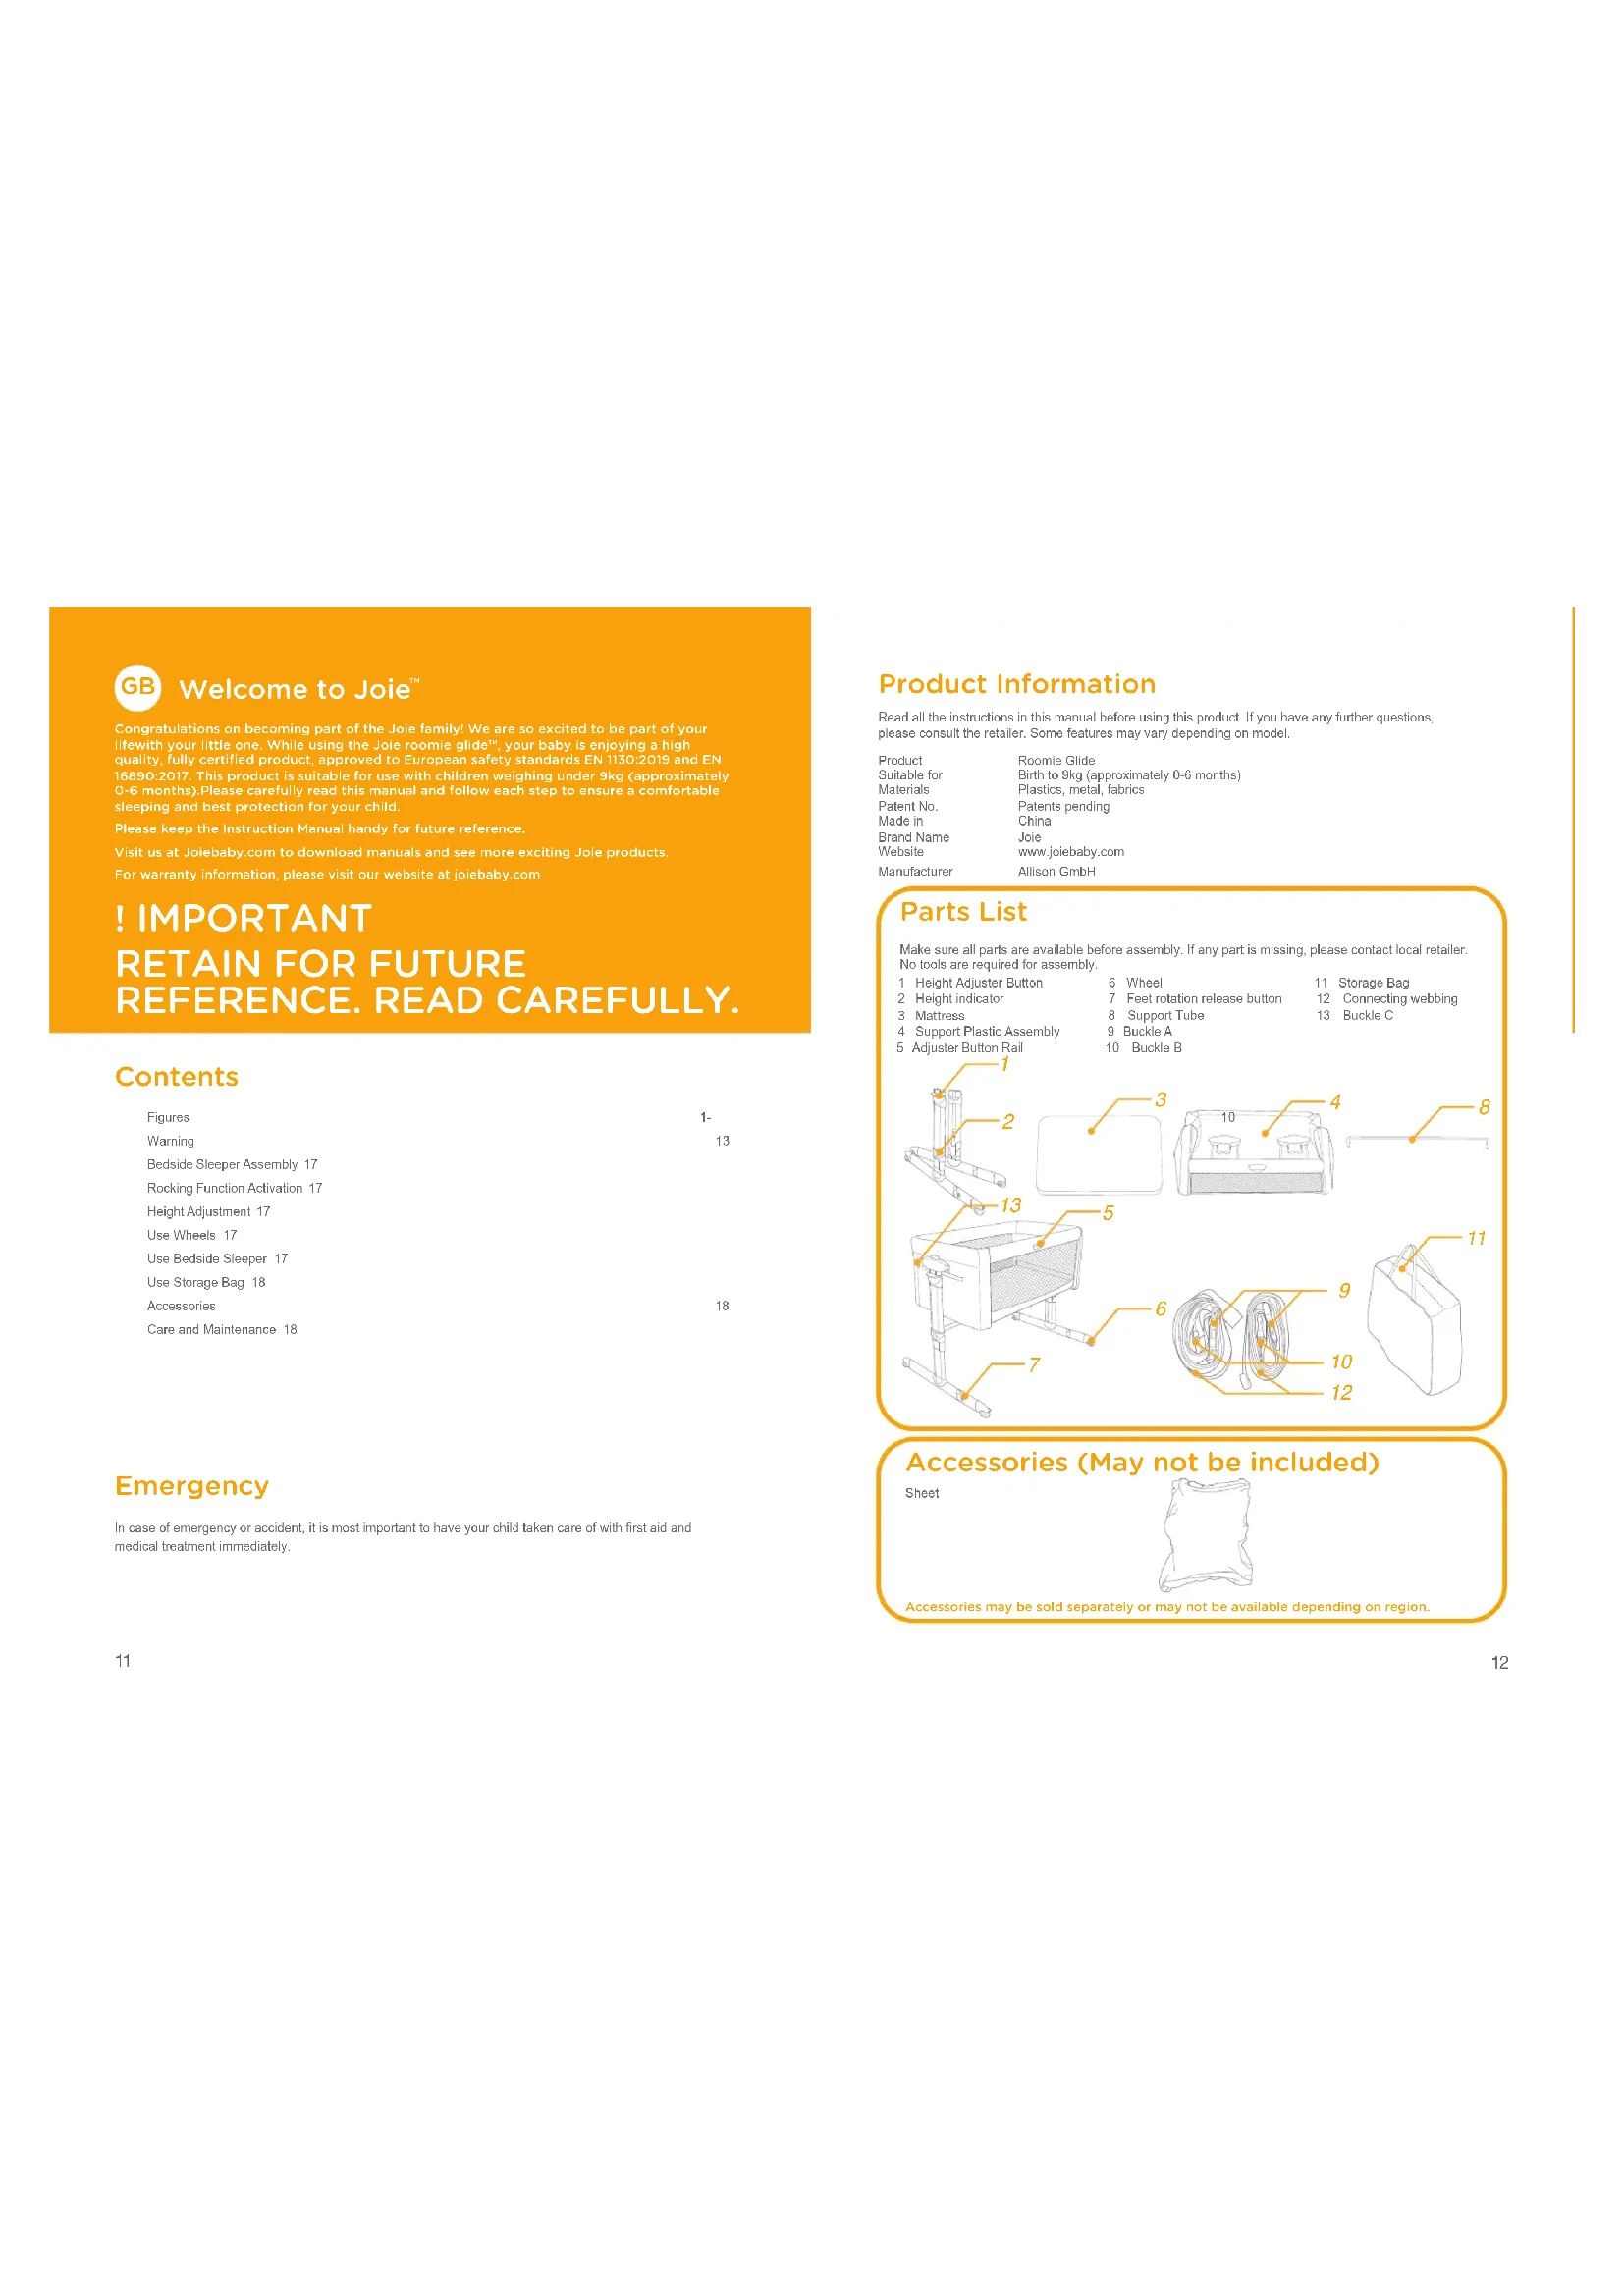
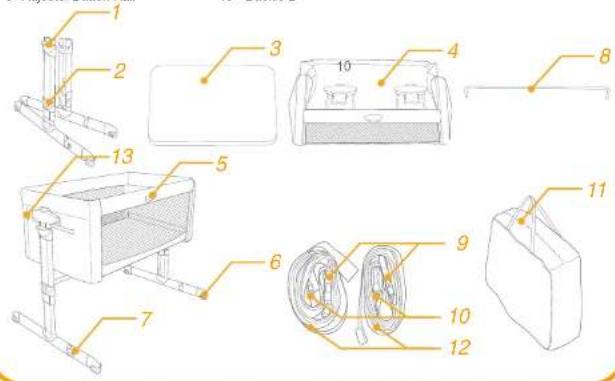
Parts List
Make sure all parts are available before assembly. If any part is missing, please contact local retailer. No tools are required for assembly.
| 1 | Height Adjuster Button | 6 | Wheel | 11 | Storage Bag |
| 2 | Height indicator | 7 | Feet rotation release button | 12 | Connecting webbing |
| 3 | Mattress | 8 | Support Tube | 13 | Buckle C |
| 4 | Support Plastic Assembly | 9 | Buckle A | ||
| 5 | Adjuster Button Rail | 10 | Buckle B |
text_image
Technical diagram of a device with numbered components for identification and assembly reference.Accessories (May not be included)
Sheet
Accessories may be sold separately or may not be available depending on region.
WARNING
! Adult assembly required.
! WARNING! Do not use this product without reading the instructions for use first.
! Discontinue using product when child reaches 9kg (approximately 0-6 months) or is able to climb out.
! WARNING! Stop using the product as soon as the child can sit or kneel or pull itself up.
! Do not place additional items (e.g. toys, pillows ...) in the product.
! Do not use the product if any part is broken; torn or missing and use only spare parts approved by manufacturer.
! DO NOT USE the product in "Crib Configuration" and/or "Bedside sleeper Configuration" if any part is missing, damaged or broken. Contact joie for spare parts and user instructions if needed. DO NOT substitute parts.
! Consult the user manual for the list of components. Examine the product regularly to make sure that there are no loose, damaged or missing parts.
! Always use all parts needed for each configuration of use.
! Be aware of the risk of burning cigarettes, open fires and other sources of strong heat, such as electric bar fires, gas fires, etc. in the near vicinity of the crib.
! Before assembly, check that the product and all of its components have not been damaged during transportation. Should any part be damaged, keep out of reach of children and do not use.
! Make sure that the adult using the product knows exactly how it works.
! The product is ready for use only when all locking mechanisms are engaged. Make sure they are securely engaged before use.
! The crib should be locked in the fixed position when the child is left unattended.
! When the product is being used, and above all in "Crib Configuration", the wheels must always be locked.
! All operations for opening, adjusting, fastening and installing the product must be carried out by an adult.
! Before using in the "Bedside sleeper Configuration" (fastened to bed), make sure the product is fastened and installed correctly.
! Check the tightness of the attachment system before each use by pulling the bedside sleeper in a direction away from adult bed.
! The fixing straps are included in the packaging. Other fastening systems should not be used.
! To prevent danger of choking due to the child's head being trapped, when the crib is in the "Bedside sleeper Configuration" (fastened to the bed) it should be properly fastened to the parents' bed with the fixing straps as explained in the instruction booklet.
! Before placing the child inside the crib when the product is in the “Bed-side sleeper Configuration” (fastened to the bed), be sure that the fixing straps are fastened and tightened correctly. The product must be attached to the parents’ bed frame/support and there shall never be a gap between the lower side of the bedside sleeper and the mattress of the adult bed.
! If there are gaps between the lowest part of the Bedside sleeper crib and the parents' mattress, DO NOT use the product.
! Gaps should not be filled with pillows, blankets or other items.
! DANGER! -Always completely raise the drop side when not attached to the adult's bed.
! WARNING ! –Placing additional items in the product may cause suffocation.
! WARNING! To avoid hazards from the child's neck being caught on the top rail on the side that is next to the adult bed, the top rail must not be higher than the adult bed mattress.
! WARNING!- To avoid the risk of your child being strangled the attachment system to the adult's bed shall always be kept away from and out of the crib.
! A bedside sleeper shall ONLY be used once it has been securely attached to the adult's bed or when the drop side is in the fully raised position to prevent the child falling from height.
! The product must always be placed on a horizontal surface. Never leave the product on a sloping surface with your child inside.
! Young children should not be allowed to play unsupervised in the vicinity of the crib.
! Do not use the product without the frame.
! Keep the fixing straps out of reach of children.
! Do not use more than one mattress in the cot. Only use the mattress that comes with the product.
! WARNING! Only use the mattress sold with this crib, do not add a second mattress on this one, suffocation hazards.
When not attached to the bed, the crib can be inclined by a maximum of 4 positions between one leg support and the other.
! Infants can suffocate on soft bedding. Avoid placing pillows or similar items under newborn babies for additional comfort during sleep.
! Use the crib in the "Bedside sleeper Configuration" (fastened to the bed) only with beds of the size indicated in the reference figure at the beginning of the manual.
! Do not leave anything inside the product that might reduce its depth.
! To prevent the child from being trapped, do not place the crib close to walls or obstacles.
! Do not leave any small objects inside the product that might be swallowed.
! Do not attach any accessories to the product that have not been supplied by the manufacturer.
! Do not make adjustments to the product when the child is in it.
! When in the "Bedside sleeper Configuration" (fastened to the bed), the crib must never be inclined.
! Do not move the product when the child is inside.
! Do not use the product with more than one child at a time.
! Do not place the product close to another product, which could present a danger of suffocation or strangulation, e.g. strings, blind/curtain cords, etc. To avoid strangulation hazards, never give children objects with strings attached, or leave these objects within their reach.
! Prolonged exposure to direct sunlight may cause the product's colour to fade. After prolonged exposure of the product to high temperatures, wait a few minutes prior to putting your child in it.
! All assembly fittings should always be tightened properly and that care should be taken that no screws are loose, because a child could trap parts of the body or clothing (e.g., strings, necklaces, ribbons for babies' dummies, etc), which would pose a risk of strangulation.
! Keep the product out of reach of children when it is not in use.
! Be careful when the child is in the crib, that objects or bedding items do not fall into the crib.
! The mattress of the adult's bed shall be aligned to or above the height of the drop side in the lowest position.
! To prevent a suffocation hazard from entrapment, the bedside sleeper shall be properly secured to the adult bed using the attachment system.
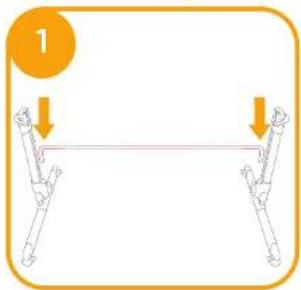
Bedside Sleeper Assembly
see images -
Please read all the instructions in this manual before setting up and using this product.
Please make sure that the adjustable side rail faces in the same direction with adjustable feet.
Rocking Function Activation
see images ⑦ - ⑧
Please lock the rocking function during using the unit as bedside sleeper.
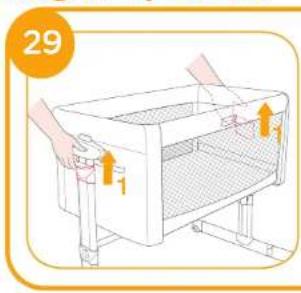
Height Adjustment
see images -
The crib can be adjusted to different height positions.
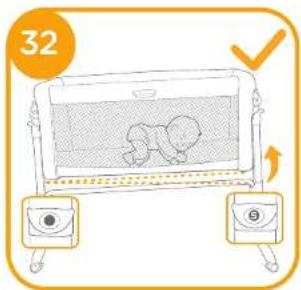
The crib can be inclined with a maximum variance of 4 positions between one leg and the other (for example: the right leg in position 5 and the left leg in position 1, see fig. 31).
It only be applicable to cradle state, but not to bedside sleeper state.
The head of the child should always be positioned on the highest side. 31 82
Use Wheels
see images Ⓜ - Ⓤ
At this point the crib is ready to be used.
Do not use the crib with adjustable feet partially or totally rotated and unlocked. The correct position for use is illustrated in figure 20. In the case of accidental knocks against adjustable feet, return them to the correct position by lifting the crib slightly.
Use Bedside Sleeper
see images Ⓝ - Ⓗ
- Press the button ⚙ - 1 to drop the side down ⚙ - 2.
- Position next to bed ⚙️, Connect Buckle to roomie glide ⚙️ then loop strap around bed frame and connect to adjuster buckle ⚙️, then pull straps tight ⚙️.
During fixing the crib to the parent's bed, if it is not possible to slide the feet of the crib under the parent's bed, you can rotate the adjustable feet. - Ensure no gap between parent's mattress and roomie glide ①. The maximum height difference between the parents' mattress and the drop side at the lowest position is 2cm ②
- The type of adult bed which can be used with bedside sleeper is slatted bed frame and box / divan bed frame, the dimensions of adult bed shown on fig. 13 & 44
! Check to make sure that the crib in the bedside sleeper mode does not interfere with the parent's bed.
During use, make sure that the parents bed sheets, blankets etc. Do not enter and cover the interior of the crib.
In the bedside sleeper mode the 2 legs of the crib should always be adjusted to the same height.
Before every use always check to make sure that there is no space between the parent's mattress and the side of the crib. If there is, pull the belts firmly to tighten until there's no space and the permitted condition of use has been restored.
Use of the product is only permitted with beds and/or mattresses with straight sides. Use of the product with round beds and/or mattresses or water beds is not permitted.
When the product is used in the "bedside sleeper mode" (fixing to the bed, it should always be fitted to the long side of access to the bed. Do not fix the product to the head or bottom of the bed.
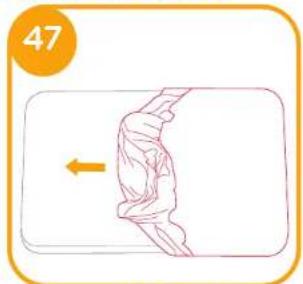
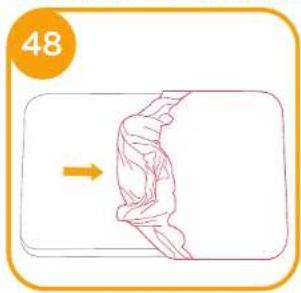
Use Storage Bag
see images 15 - 26
1 Refer to Bedside Sleeper Assembly and perform reverse operation to fold the unit, and use the bag for convenient transportation.
Accessories (May not be included)
Sheet Assembly
see images
Prevent possible suffocation or entanglement. NEVER use product sheet unless it fits securely on product mattress.
! Wrap the sheet around the mattress on all four comers. MAKE SURE the sheet is securely attached to the four comers.
Care and Maintenance
see images 49 - 67
- The fabric cover of crib is not removable.
- Your product can be spot cleaned with a sponge and soapy water.
- Do not use undiluted neutral detergent, gasoline or other organic solvent to wash the product. It may cause damage to the product.
- To wash carry bag, machine wash in lukewarm water and drip-dry. Do not use bleach.
- At the beach or in the garden, clean sand and grit off your product. Sand in the long rail locks may cause damage.
- From time to time, check your product for worn parts, torn material or stitching. Replace or repair the parts as needed.
- If the product is not in use for a long period of time, please put it in the shade where your child cannot access it.
DE
text_image
Exploded view diagram of a refrigerator with numbered parts for identificationtext_image
Exploded view diagram of a household appliance with numbered parts for identificationtext_image
Technical diagram of a device with numbered components for identification and assembly reference.text_image
Exploded view diagram of a refrigerator with numbered parts for identificationtext_image
Exploded view diagram of a refrigerator with numbered parts for identificationWebsite www.joliebaby.com
text_image
Exploded view diagram of a mechanical device with numbered parts for identificationtext_image
Exploded view diagram of a household appliance with numbered parts for identificationPlasty, kov, textile
C. patentu
text_image
Exploded view diagram of a refrigerator with numbered parts for identificationtext_image
Exploded view diagram of a household appliance with numbered parts for identificationtext_image
Technical diagram of a refrigerator with numbered parts for identification and assembly reference.text_image
Technical diagram of a mechanical device with numbered components for identificationtext_image
Exploded view diagram of a mechanical device with numbered parts for identificationtext_image
Technical diagram of a refrigerator with numbered parts for identification and assembly reference.Dodatki (morda niso vkljuceni)
Rjuha
text_image
Exploded view diagram of a mechanical device with numbered parts for identificationAkcesoria
text_image
Exploded view diagram of a mechanical device with numbered parts for identification액세서리
시트 거비