
Freedom FD22G 011 - Vacuum Cleaner HOOVER - Free user manual and instructions
Find the device manual for free Freedom FD22G 011 HOOVER in PDF.
User questions about Freedom FD22G 011 HOOVER
0 question about this device. Answer the ones you know or ask your own.
Ask a new question about this device
Download the instructions for your Vacuum Cleaner in PDF format for free! Find your manual Freedom FD22G 011 - HOOVER and take your electronic device back in hand. On this page are published all the documents necessary for the use of your device. Freedom FD22G 011 by HOOVER.
USER MANUAL Freedom FD22G 011 HOOVER
* Certain models only

INSTRUCTIONS FOR SAFE USE
GB
This appliance should only be used for domestic cleaning, as described in this user guide. Please ensure that this guide is fully understood before operating the appliance.
Always switch off and remove the charger from the socket before cleaning the appliance or any maintenance task.
This appliance can be used by children aged from 8 years and above and persons with reduced physical, sensory or mental capabilities or lack of experience and knowledge if they have been given supervision or instruction concerning use of the appliance in a safe way and understand the hazards involved. Children shall not play with the appliance. Cleaning and user maintenance shall not be made by children without supervision.
If the power cord is damaged stop using the appliance immediately. To avoid a safety hazard, an authorised Hoover service engineer must replace the power cord.
Keep hands, feet, loose clothing and hair away from rotating brushes.
Use only the original charger supplied with the appliance.
Check that your supply voltage is the same as that stated on the charger.
This appliance is supplied with a double insulated battery charger which is only suitable for insertion in a 230V (UK 240V) socket outlet.
Plug the charger in to suitable socket outlet and connect the charger jack plug to the appliance. [2]
When charging the appliance, the power switch lever must be in the off position.
Before first use, charge your appliance for at least 6 hours. The charging LED indicator [H] will illuminate red when charging and will illuminate blue when fully charged.
Re-connect the appliance to the charger after use to recharge the battery.
Never charge the batteries in temperatures above 37^ or below 0^ . It is normal for the charger to become warm to the touch when charging.
Do not unplug the charger by pulling on the power cord.
Unplug the charger in the event of prolonged absence (holidays, etc.). Recharge appliance again before use as batteries may self discharge over increased periods of storage.
If the appliance is to be disposed of the batteries must first be removed. The appliance must be disconnected from the supply mains when removing the battery. Dispose of the batteries safely. Run the appliance until it stops because the batteries are fully discharged. Used batteries should be taken to a recycling station and not disposed of with household waste. To remove the batteries, please contact the Hoover Customer Centre or proceed according to the following instructions.
IMPORTANT: Always fully discharge the batteries before removal.
Run the cleaner until the batteries are completely empty.
Remove the charger jack plug from the appliance.
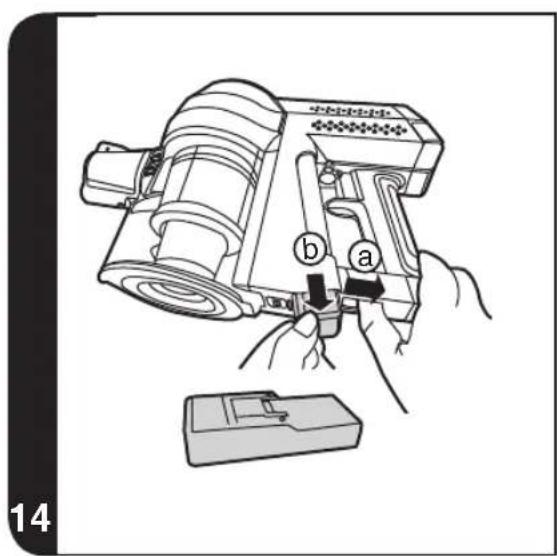
Pull back the battery pack release button and the battery pack will be pushed out a short distance automatically. [14a]
Drag the battery pack slowly from the slot. [14b]
Note: Should you experience any difficulty in dismantling the unit or for more detailed information on treatment, recovery and recycling of this appliance, please contact your local city office or your household waste disposal service.
Use only attachments, consumables or spares recommended or supplied by Hoover.
Static electricity: Some carpets can cause a small build up of static electricity. Any static discharge is not hazardous to health.
Do not use your appliance out of doors or on any wet surface or for wet pick up.
Do not pick up hard or sharp objects, matches, hot ashes, cigarette ends or other similar items. Do not spray with or pick up flammable liquids, cleaning fluids, aerosols or their vapours.
Do not run over the power cord when using your appliance or remove the plug by pulling on the power cord. Do not continue to use your appliance or charger if it appears faulty.
Hoover service: To ensure the continued safe and efficient
operation of this appliance we recommend that any servicing or repairs are only carried out by an authorised Hoover service engineer.
Do not use the appliance to clean animals or people.
Do not replace the batteries with non-rechargeable batteries.
The Environment:
This appliance is marked according to the European directive 2011/65/EC on Waste Electrical and Electronic Equipment (WEEE). By ensuring this product is disposed of correctly, you will help prevent potential negative consequences for the environment and human health, which could otherwise be caused by inappropriate waste handling of this product. The symbol on the product indicates that this product may not be treated as household waste. Instead it shall be handed over to the applicable collection point for the recycling of electrical and electronic equipment. Disposal must be carried out in accordance with local environmental regulations for waste disposal. For more detailed information about treatment, recovery and recycling of this product, please contact your local city office, your household waste disposal service or the shop where you purchased the product.

This product complies with the European Directives 2014/35/EU, 2014/30/EU and 2011/65/EU.
CANDY HOOVER GROUP S.r.l. Via Privata Eden Fumagalli, 20861 Brugherio (MB) Italy
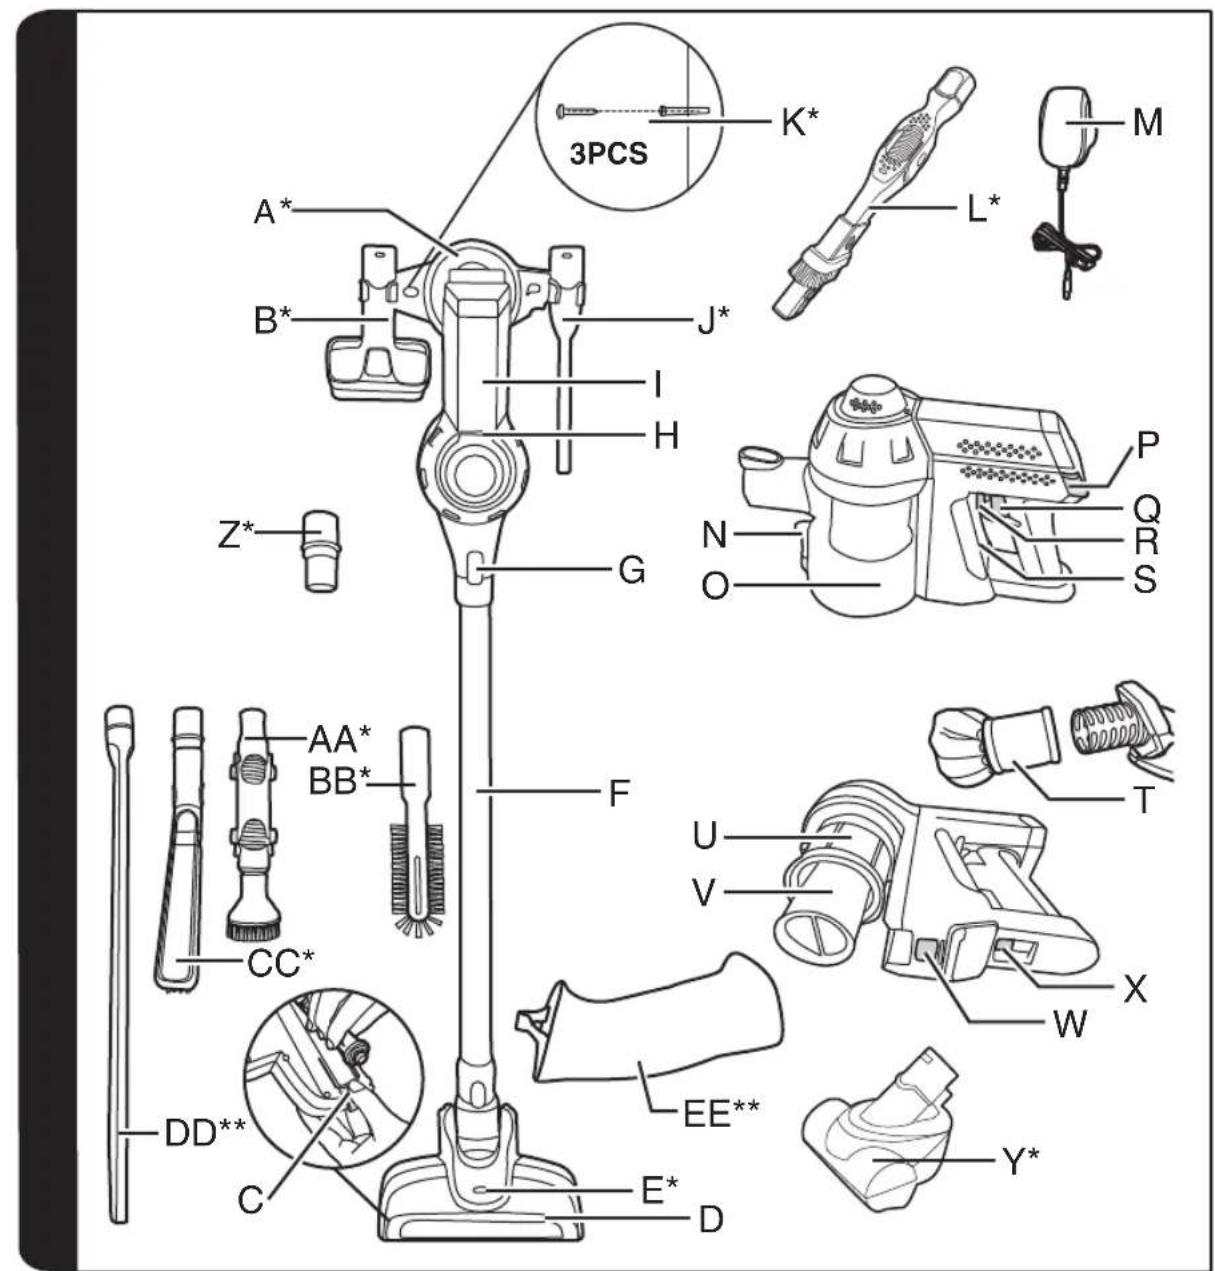
PRODUCT COMPONENTS
A. Docking Station *
B. 2In1 Dusting Brush *
C. Agitator Release Button
D. Power Nozzle
E. Nozzle Led Light *
F. Tube
G. Accessory Release Button
H. Handheld Led Light
I. Handheld Unit
J. Crevice Tool *
K. Screws Plugs *
L. Long Rotation 2 In 1 Brush *
M. Charger
N. Dust Cup Empty Button
O. Dust Cup
P. Exhaust Filter Release Button
Q. Switch On/Off
R. Switch Lever
S. Battery Pack
T. Exhaust Filter
U. Mesh Filter
V. Cyclone Separator
W. Dust Cup Release Button
X. Battery Pack Release Button
Y. Mini-turbo Nozzle
Z. Accessory Adaptor *
AA. Up To Top Tool *
BB. Radiator Tool *
CC. Deep Cleaning Brush
DD. Long Flexible Crevice Tool
EE. Accessory bag
PREPARING YOUR CLEANER
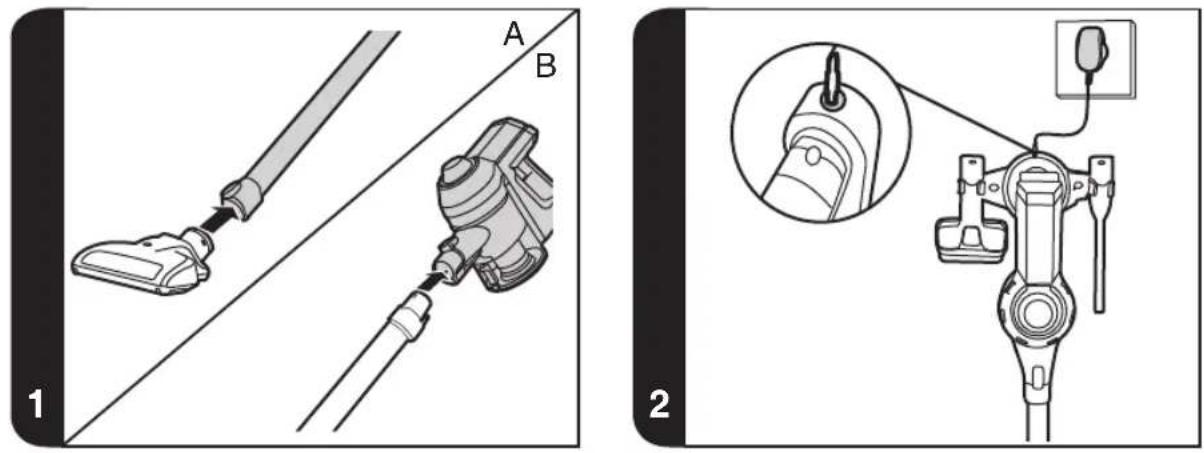
- Fix the docking station to your wall using the screws and screw plugs provided.
- Insert the nozzle head into one side of tube until you hear a "click" sound. [1A]
- Insert another side of tube into handheld unit until you hear a "click" sound. [1B]
- To fully charge the appliance, connect the charger jack plug to the appliance. It will take around 6Hrs. [2]
NOTE: To remove the nozzle press the nozzle release button and pull away from the main body.
NOTE: Use only the charger supplied with your cleaner to recharge.
IMPORTANT: When charging the cleaner the switch lever must be in the OFF position.
It is normal for the charger to become warm to the touch when charging.
USING YOUR CLEANER
Safety protection system
To ensure the reliability of product is not affected if used under arduous conditions, the product features an integrated Safety protection system.
- Certain Models Only
GB
NOTE: The Safety protection system will action if the agitator has a blockage or is locked. Once actioned, the agitator will stop rotating and the Blue LED on the handheld unit will turn red and begin to flash.
If this happens, simply switch off your product and clear the agitator obstruction. To resume cleaning, press the on/off button and the product will restart in normal mode.
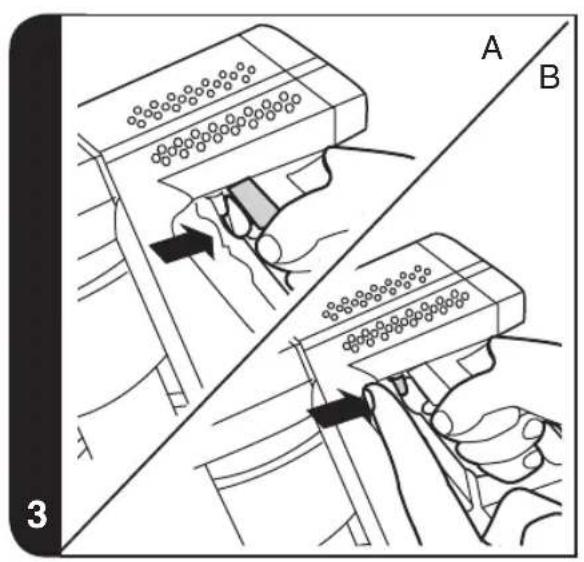
There are two working modes:
- TEMPORARY MODE: The product will start working when you press the on/off switch and stop when released. [3A]
- CONTINUOUS MODE: To enable continuous mode you can pull switch lever back and it will click into place. To disable continuous mode you can push the switch lever forward. [3B]
Chng Indication: The handhled LED light keep red light during charging and turns into blue light when fully charged.
Discharging Indication: When the batteries are discharging, both handheld LED light and nozzle LED light are blue. Handheld LED light will blink when the battery capacity is lower than 5% .
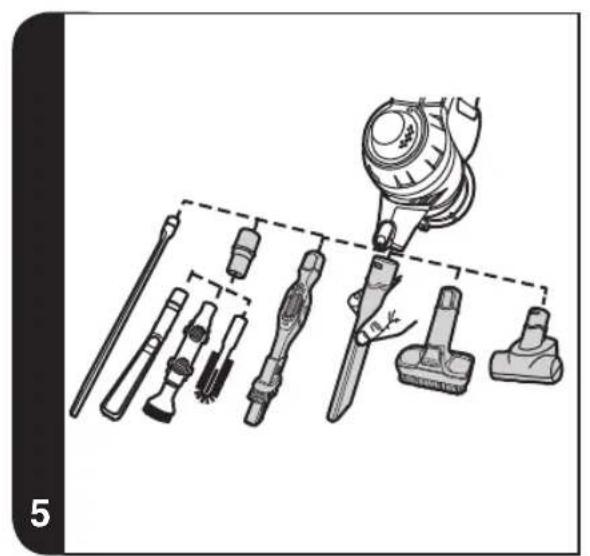
Crevice Tool / 2 in 1 Dusting Brush / Long Rotation 2 in 1 Brush / Mini-turbo Nozzle / Long Flexible Crevice Tool You can insert the accessory directly into the air inlet of handheld unit or one side of the tube and heard a "click" sound. [5] Only Crevice Tool and 2in1 Dusting brush can be stored on the docking station.
Accessory bag*:
Additional accessories can be stored in the accessory bag.
NOTE: The mini-turbo nozzle is ideal for deep cleaning textile surfaces (i.e. sofas) and pet hair removal. Move it steadily backwards and forwards. After using, please remove hair / threads collected on the brush with scissors if necessary.
NOTE: The long flexible crevice tool is ideal for cleaning in hard to reach areas and underneath furniture.
Up to Top Tool*/Radiator Tool*/Deep Cleaning brush*
These accessory must be assembled with accessory adaptor for using.
You can insert the accessory adaptor directly into the air inlet of handheld unit or one side of tube and heard a "click" sound.
NOTE: The up to top tool can easily clean high and hard to reach places and delicate surfaces without scratching.
NOTE: The radiator tool is ideal for cleaning inside and around cabinets, radiators, couches, blinds and more.
NOTE: The deep cleaning brush is useful to clean in tight spaces without scratching surfaces.
IMPORTANT: After each use of your product, please ensure to push the switch lever forward to the unlocked position. Failure to do so may result in a reduction in battery life or failure.
CLEANER MAINTENANCE
Emptying the Dust Container
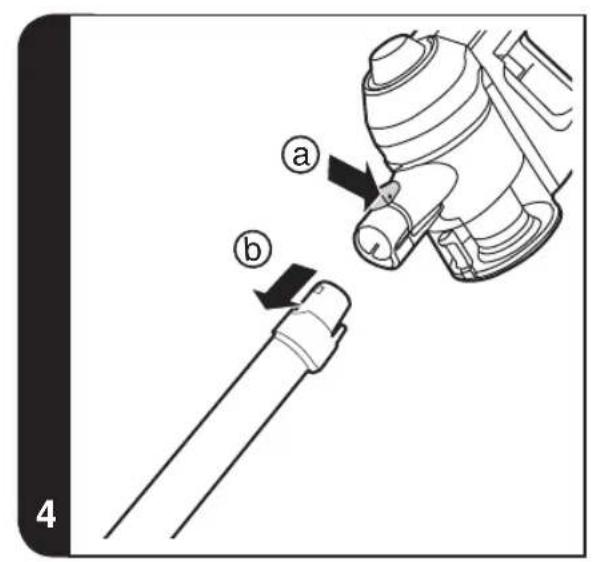
- Press the accessory release button and remove the tube. [4]
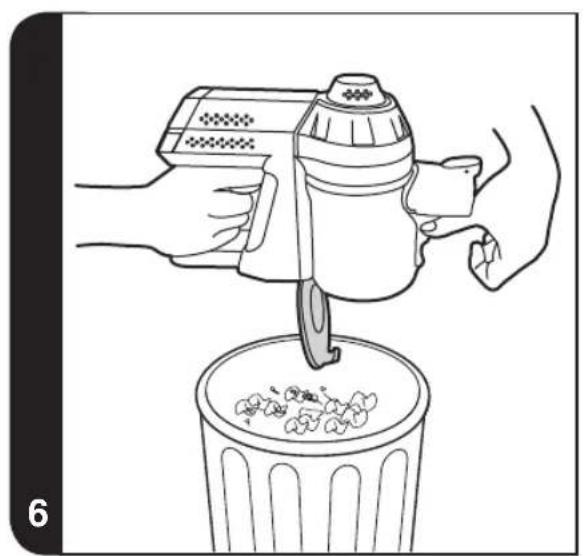
- Push down the dust cup empty button to release the bin flap and empty the contains. [6]
- Close the dust cup flap up, you will hear a click when fully locked.
NOTE: It is recommended to empty the dust cup after each use or when dust is up to the max fill line.
Cleaning the Dust Container and Filter
- Press the accessory release button and remove the tube. [4]
- Press the dust cup empty button to open the bin flap and empty it. [6]
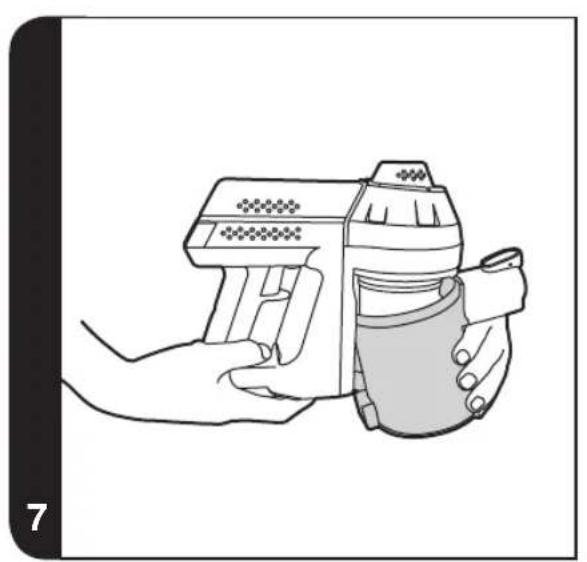
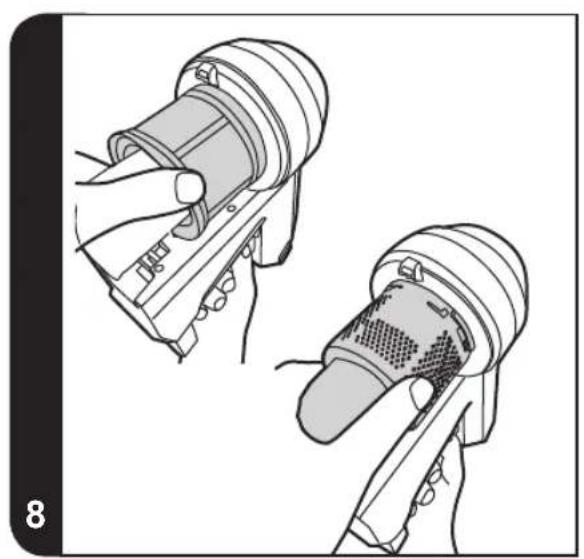
- Press the dust cup release button and also pulling the dust cup away in an downwards and outward direction. [7]
- Turn the mesh filter to the anticlockwise direction to align the arrow mark and then it can be pulled out from the cleaner. [8]
- Turn the cyclone separator to the anticlockwise direction, align the arrow mark and then it can be pulled out from the cleaner. [8]
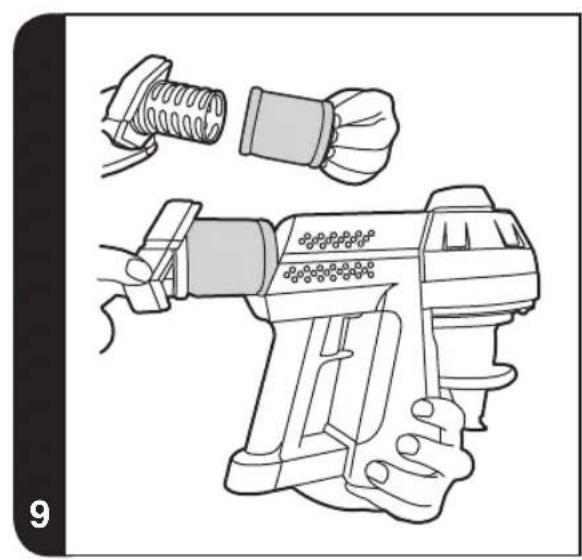
- Press the two exhaust filter release buttons simultaneously and then remove the exhaust filter. [9]
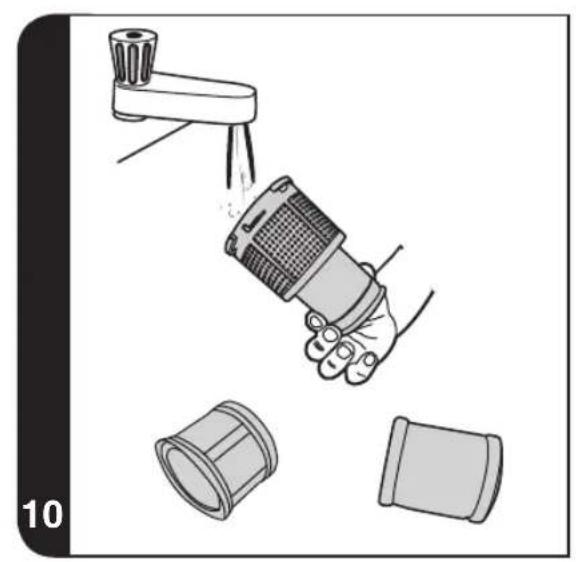
- Wash the exhaust filter in lukewarm water and leave to dry for 24 hours. Reassemble once completely dry and refit to the product. [10] [11]
- Wash the dust cup/mesh filter/cyclone separator in lukewarm water. Ensure it is fully dry before returning to the main body. [10]
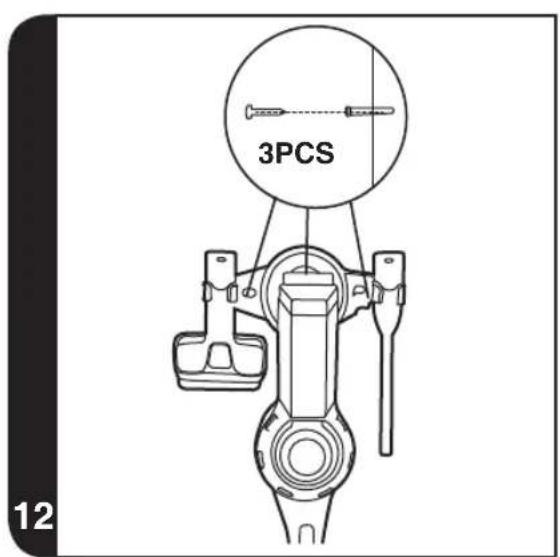
- Reassemble the handheld unit and then attach it to the docking station. [12]
NOTE: Do not use hot water or detergents when cleaning the exhaust filters. In the unlikely event of the exhaust filters becoming damaged, fit a genuine Hoover replacement. Do not try use the product without a filter fitted.
IMPORTANT: For optimum performance, always keep your mesh filter clean. We recommend that the filter should be washed at least once a month.
- Certain Models Only
Changing and Cleaning the Agitator
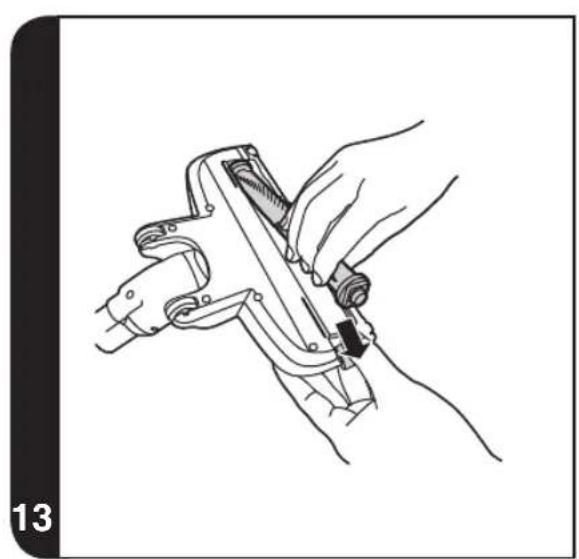
IMPORTANT: Always switch off the cleaner before changing and cleaning the agitator.
- Remove the power nozzle from the tube and slide the agitator release button outward to remove the agitator. [13]
- Remove all the debris from the agitator or if this is not satisfactory you can replace it.
- When you are refitting the agitator please note it can only be fitted in the one direction. To refit slide the agitator release button outwards and locate agitator in correct position then release button, it will lock automatically.
Replacing the Batteries
This cleaner is fitted with a rechargeable Lithium ion battery pack which is replaceable.
WARNING: Only use approved replacement parts for your cleaner. Using parts not validated by Hoover are dangerous and will invalidate your guarantee.
WARNING: Do not try to open the battery pack and repair it by yourself.
- Pull back the battery pack release button and the battery pack will be pushed out short distance automatically. [14a]
- Pull the battery pack slowly from the slot. [14b]
- Remove the old battery pack and replace with the new battery pack.
- Dispos of the batteries safely. Used batteries should be taken to a recycling station and not disposed off with household waste.
TROUBLESHOOTING
Should you have any problem with your cleaner, follow this simple check list before calling the Hoover Customer Service Centre:
A. Cleaner does not switch on.
Check if the cleaner is charged.
B. Cleaner stop working or the agitator does not rotate.
Check if there is an obstruction in the agitator, clear it and ensure the continuous mode lever is off. Once this is done simply press the on/off button, the product will restart after a few seconds.
C. Loss of suction or no suction
Empty the dust cup and wash the mesh filter and cyclone separator.
Remove nozzle and check for any blockages in the duct.
D. Batteries cannot be charged.
This may be a result of very long storage periods (over half year).
Contact Hoover customer service to arrange battery replacement.
If the problem persists contact the Hoover customer service centre.
HOOVER SPARES AND CONSUMABLES
Always replace parts with genuine Hoover spares. These are available from your local Hoover dealer or direct from Hoover. When ordering parts always quote your model number.
YOUR GUARANTEE
The guarantee conditions for this appliance are as defined by our representative in the country in which it is sold. Details regarding these conditions can be obtained from the dealer from whom the appliance was purchased. The bill of sale or receipt must be produced when making any claim under the terms of this guarantee.
Subject to change without notice.
INSTRUCTIONS DE SECURITE D'UTILISATION
VEDLIKEHOLD AV STØVSUGEREN
Tommestovbeholderen
- Trykk ned utloserknappen for tilbehoret og trekk roret ut. [4]
- Skyv ned tommeknappen for stovamleren for a lse nstovbeholderklaffen og tme ut innholdet. [6]
- Lás stóvsamleren fast med klaffen opp. En klikkelyd hores nár den er LAST fast.
MERK: Det anbefales at du tommr stovbeholderen etter hver bruk, ellr nar stvet nro opp til maksljinen.
Ipeed ouinckoi nn o6nykBaHne M Bcerga BbIHMaTe Bnky n3 p03eTKn.
IeTn CTapWe BOCbMn IeT, a TaKKe IInuCa CO CHNKeHHbIM fN3NueCKm, CEHCOPHbIM NIN yMCTBeHHbIM pa3BNTHeM NIN OTCyTCTBHeM ONbITA INI 3HaHnO6 UcToPcIcTBe MOrYT NCNoJIb3OBaTb YcTPOiCTBO NOI PPNCMTpOMNIIEcCnIOHNIOJXHBIMo6pa3OMnPOnHCTpyKTIpoBaHbIO 6e3OJaCHOM NCNoJIb3OBaHnU yCtPoIcTBa N IOHNMaIoT PnCKN, KOTOpBle MoKet NOBLeu b Co6o Ero NCNoJIb3OBaHne. CyCTpOiCTBOM He DoJxHbI nrgaTb DeTn. He cIeDyEt dOnyckaTb DeTeN K OUnCTke IN O6CnyJbAHnIO pNi6opa 6e3 PPNCMTpa B3PoCblix.
Ecn npoBOd nITaHnI NOBpeJdeH, HeMeIeHHO OTKIOUHTe npu6Op. Bo n36exKaHne HecuaCTbIX clyuaeB 3aMeHy npoBOda DOJIKeH OcyuIeCTBnTb TOnbKO CneunIcT aBTOpN3OBAHHORO cepBnCHORO ueHTpa Hoover.
He npnbjkaite Bpaaiounec 8eTKn K pykam, Horam, 6oItaOuieCra OeKDe N BOLOcam.
Ctataueckoe 3neKtpnuecTBO: HeKOToPbIe TINbI KOBPOBbIX NOKpbITNI cnoCo6HbI HaKaJIINBaTb He6OJbWOn 3apRd CTAtuaeeckoTO 3neKtpnuecTBA. Pa3pRd CtaTuaeeckoRo 3neKtpnuecTBA He npedCTaBnreT onaCHOCTN DIA 3doPoBbI.
He npimeha Te np6op BHe NOMEeHn,Ha BnaKhbIX NOBepxHOCTX nIIN dIe c6opa KndKOCTe.
He ncpoIb3yIte npn6op dIra c6opa octpbIX npedMeTOB, cnueK, ropaero nenla, okypkoB nn anahorunhbx obkeTob. He paCnblJrTe nn He co6npaTe rOpOuNe JnkocTn, uNCTaune cpeDCTBa, a3p030nn nn npoune napbl.
He nepebo3nte cBoi np6op uepe3 npoBOJ nHTaHnI He TAHNTe 3a npoBO, BbIHMaBnKy u3 po3eTK. He nCNoJIb3yIte np6Op nII 3apAHOe yCTpOJCTBO, eCNI OHN HeNCnPaBHbl.
CepBnchna clyx6a Hoover: n oecneueHn npoJXntbHO, 6e30nacHoi n ephiKTNBHO pa6Otbl daHHoro 6bITOBoro 3JIeKTPoPnp6op aIIO6oBn BnD peMOHTa peKOMeHnyeTc npOn3BOuNTb TOlbKO CneuaNCTOM ABTOp3OBAHNO cepBnCHoro ceHTpa Hoover. He noIb3yItecb np6Opom dIra OUNCTK JKBOTbIX IIN IIOJe. 3aMeHy MoXHo npOn3BOIDtB TOlbKO Ha aKKymyTAOPHbIe 6aTapei.
Okpykaouaancheda:
Pnp6op Mapknyetc cornacno Ebponecko dnekeTbe 2011/65/EC no oTxoam 3eKtpueckoro n 3eKtpoHHoro 6obopyoHna (WEEE). Co6lnda npabina ytnin3aun daHHoro 3eKtpnpb6opa, bbl nomoraete npedotbpaTtB 8O3MOXhble otpuatelbhe nocneCTBnI dla OKpykaohse cpebl n 3dOpOBba YehOBeka, KOtObie MOrn 6bl IMTe MeTO np HnppaBnHbOH ytnin3aun daHHoro yctpOCTBa. KNeMo Ha daHHOM yctpoCTBe O3Haayet, TTo erO HeB3y ytnin3uPoBaTb kak 6bITobbe otxObl. Ero Heo6xoIMo DoCTaBnB B COOTBETCTByUOsiN pNYKT yTNIN3aun 3eKtpueckoro n 3eKtpoHHoro 6obopyoHna. ytnin3aun doJXHa npOBOnTBcB C COOTBETCTBN C MEChTbIMn PnpoDOOxpaHTbHbIMn npabina mNo ytnin3aun OTxOOB. DInr NOnyEHNA 6Ooe NoDpOHOH INΦOPMaUN NO
yXOyI, BOCCTaHOBHeHIO INepepa6oTKe DaHHoro yCtpoiCTBa 6bpaTInTeCb K TOpOcKIM BlaCTM, B Cnyk6y YTNIN3aUN 6bITOBbIX OTxODOB NIM B Maar3HN, B KOTOPOM 6bINO KynneHO n3dene.

DAnHHbI npH6Op OTBeaayet Tpe6oBaHnAEM Ebponecknx DnpeKtNB 2014/35/EU, 2014/30/EU n 2011/65/EU.
CANDY HOOVER GROUP S.r.l. Via Privata Eden Fumagalli, 20861 Brugherio (MB) Italy
KOMNOHEHTbI NbJIECOCA
A. NapkobouHna cTaHua
B. ΜιεΤα πλην πυλην"2В1"
C. 3aueIka Bpaauouecra ueTkn
D. MmHtyp6oouetKa
E.Дионьи Инданкот HopaКn*
F. Tpy6ka
G. 3aüeJIka HacaIKN
H. INDnKaToP pyHoi 6nOKnpOBKn
I.PyHnHa6bnKnpOBka
J. Κιηναγ ελακα*
K. 3aŋnyka dny BnHTa
L.ДиHHaBpaaIooaJueTka"2B1*
M. 3apraHoe yCTpOncTBO
N. KhoNka n3BneueHnKoHTeHepa dIy nbIN
O. KoHTeHep dIa c6opa nbIIN
P. 3auejika BbIXlonHoro fNlbTpa
Q. BbiknouateIb nITaHn
R. Pbyar nepeknioyateTn
S. AkkymyTOp
T. BbIyckHOJ ΦnIbTp
U. CeTuaTbI ΦnIbTp
V. LUKKIOHbIcenapaTOp
W. KhoNka OToeDInHeHnKoHTeHepa
X. 3auekenaakkymnytopa
Y. Hacadka mInHtyp6o
Z.AaanTep hacaDOK
AA.HacaKaIJaOuHcTKBbICOKNX NOBepXHOCTeN
BB. Hacika Дя ouncTk npaNaTopoB*
CC. ΜεΤΚα ένη ΓιγδόκΟύ Κημις
DD.ДИИннай رигбая щелевая наcaДka*
EE.CymkaIraHacaDOK
IIOIROTOBbTE PbIECOC
- 3akpenite napkoBOuyIO CTaHcIIO Ha CTeHE C NOMOUIB BUHTOB I3aTnyueK I3 KOMJIeKTA.
- BCTaBbTe rONOBky HacaNkC ODNHO CTOpOHy Tpy6bI Do 3aueKINBaHn. [1a]
- BCTaBbTe Dpyryo CTOpOHy Tpy6bl 6nOK C pyKoRtKoI Do 3aueeKnBaHn.[1b]
- Дли понок Зардк npn6opa BCTaBte Bnky 3apdHoro yctpoiCTBa B npn6op. Проecc 3apdKn MoKet 3aHrtb Okono 6 qacob. [2]
PIMMEAHHE: UTo6bI ydaJIInb HacAnky HaXmnte Ha KhoNkY BbINycka HacAnOK N BbITnHte ee n3 Kopnyca.
PIMMEAHHE: 3apRkN nCnObl3yIe TOnbKO 3apRHOcYCTPOJCTBO NOCTABJIReMOe C IbJEcoCOM.
BHIMAHHE!Pn3apdKe PbIeCoCa pbuH BbIKNoaTey NITaHn DOnJxH HaxOHTcB NOJIOxEHIN "BbIKNoeHO."
CobepweHNO HopMaJIbHo, ecn BO BpeM 3apAaK KOChyTbcra 3apAnHO yTcpoiCTBa, To OHO 6yTe TnenblIM.
3KNCPIYATAUINIbJIECOCA
CnCTema 3aunTbI
IЯ obecneueHn haedxHn pa6tbl np6opa B cnoXbIX ycNoBnx 3KcNpyataun OH Ochaaetc BCTpoeHHo cnCTeMo 3aunTbl.
PIMMEAHHE: CnCTema 3auntbI cpa6aTbIaet B cnlyae 3aKynopkn nn 6loKnpoBaHnBpaauoienca qTeKn. Nocne
*TOnbKO y KOHNpeTHbIX MoDenei
RU
cpa6abHn CNTembl 1eTKa OCTaHaBnBaETcA, a CnHn INnKaTOp Ha Ha pyHOM 6Ioke 3aropaeTcKpaChbIM NaHauHHeT MIRatb.
B 3TOM CNYaE HJXHO npocTo OTKIOUHTb pnp6Op n yCTpaHHT b3aKynopky Ha BpaaIoueeCAIeTke. YTO6bI npoDJIaHTb y6OpKy, HaxMITE BBKIOUATEb NITAHN, IN pnp6Op BO3O6HOBNT pa6OTy B o6bYHOM peXIMe.
Ibneoc moKeT pa60TaB B DByx peKmMax:
- BPEMEHHbI PEXUM: ΠbIeoc HaHnHaet pa6oTaB npn HaxaTn KHOKN nTaHn N OCTaHbNBAeTcR npn OTnyCKAHN KHOKN. [3a]
- NOCTOHHbI PEXUM:Дя ВКIOUeHЯ HENpepbBHO pa6ObTy hyxHO OTTRAHyTb pbYar NITAHn Ha3aJ Do 3aueKNBAHn.ДЯ BbIXoJa n HENpepbBHorO pexIMa HxHO nepeDbHHTb pbYar BnepeD. [3b]
HnDnKaun 3apKn:B npouecce 3apKn CBEToNDnBn HndkaTOp Ha 6nOe CpKoRTkO ropnt KpaChbIM n nepeKIOaETc HcHm, KaK TOnbKO aKKyMnyTOp NOnHOCTbO 3apdNTCA.
HnDnKaunpa3pKn:B npocce pa6obt bAkkymyIaTOPOB nHnKAtOpbHa 6noke c pykOHTKO H aCOnJIe ropT CnHM. CBetOnIOH h6noke c pykoTko HaunHaet MuraT, KOrda 3apad AkkymyIaTOpa napaET HnKe 5%.
Iebeha HacaKa / 1eTka nIbIIN "2B1" / IHHHaa Bpaiaouaa 1eTka "2B1" / Hacadka MHNtyp6o*/ IHHHaa
BCTaBHTb HacaIky MoxHHeNo HenocpeIcTBeHHo BOTBepCTne IIN BxOJa BO3dyXHa 6IOke c pyKoTkoI INC OHOJ CTOpOHbI Tpy6bldo 3aueKuBaHn. [5]
Ha napkoBOHOn CTaHmIM MOxHO XpaHnT ToJIbKO UeNeByU HacAnKu N UeTKy IINI IN "2B1".
Cymka nla hacaok*:
IOnoJIHHTeNBHbIe HacaIK MoXHO XpaHHTB CneuaJIbHOcMKe.
PIMMEUHNE: HacKaMa MNHTyp6o NdealbHO NOxOuT INI ONUCTKn TEKTINbHbIX NOBepXHOCTe (HaNPmEp, DnBaHO) U ydaJIeHn IwepCTN XIBOTbIX. PnaBHO nepemeuaTe Bnepei n Ha3aI. Iocne Icnonb3OBAHn HOxHnauM cpeXbTe HAOTabWueCRA Ha 5ETKY BOJOCblnn HHTKN.
PIMMEAHHE: DnHHo Hn6Ko HacaKo nAe ne ydo6Ho YcTmTB TpyHNOocTyNbIe yAcTKn, a TaKke noM Me6BIO.
Hacadka nry oucntkn Bbicox NOBepxnocte / Hacadka nry oucctkn paDnatopob * / Uetka nny6okon oucctkn
3Tu HacaKy Heo6xOIMMo HaDeBaTb Ha aanTep.
BCTaBHTb Hacay MoxHO HenocpeCTBeHHO B OTBepTne DnB XoJa BO3yxa ChepeaanTeP mN C OdHON CTOpOHbI Tpy6bI Do 3aueJIKNBaHn.
PIMMEUHNE: Hacaikon dIy ONUCTKN BbICOKNX NOBepxHOCTeN IERKO YNCNTb TpyNDOCTyNHbIE MeCTa N DeNKaTHbIE NOBepxHOCTN, He capanarix.
PIMMEAHHE: HacaKa dJa 6aTapeu n paDnAToPoB uJealbHo NODXoNT DnO OuncTK BHyTpN IN BOKpyr ShKafoB, paDnAToPbIX 6aTapei, daBaHO, jao3n np.
PIMMEAHHE: 1eTka dny rly6okon ouhctkn none3Ha dny y6opKn B y3knx npoctpaHCTbax, He capanan noBepxHoctb.
BHUMAHNEI Nocne kaxdo IcnoB3oBaHnIbIeNcoCa nepeMeCTte pyuar BblKnOaTeaBnepeB nnoXeHne 6nokpOBKn. B npTnBHom cnyae cokpaaaetc cpoK cnKbIakymyTATopa BnIOt bdo er BOxOda n3 cTpor.
TEXHNUCKOE OBCJNYKBAHNE NJIIECOCA
Ouuctka nbinec6opnka
- HaxmTe Ha KhoNkO tCoeDnHeHn Ha cAdKn, YTO6bI ChrTb Tpy6y. [4]
- Ппхмte рьаг onopokHeHЯ KoHTeHepa Дя NBIN, YTO6bl OTKpbITb OTKNIDHyO KpbIuKy N BbIRpy3NtB Mycop n3 KOHTeHepa.[6]
- 3aKpOte OTKnHyIO KpbIbKy, npN 3aKpbIBaHmN 3aMkA BblcIbWTe IeJyOK.
PIMMEAHHE: PekomeHdyeTcOnopoxHbKoTeHep NoCne KaoDoro NcNoB3OBAHn nn npn er0 3anoJIHeHN.
Ouactnte nblnc6OpHnK n oibTp
- Haxmte Ha KHonky OTCoeiHHeHHaCaN, YTO6bI CHrTb Tpy6y. [4]
2.Пижмпг рьчаг onopokненя KOHTeHepa дЯ nbiIN,чTo6bl OTkpBtB OTKnHyK KpbIshky N BbIrpy3ntb MycOp.[6] - Ппхмтpe рьчаг onopoxненя KOHTeHepa Дг пыл, odHOBpeMeHHO CTaRnBaR KOHTeHep B HappaBHeHn BHN3 n hapxky.[7]
- NOBEPHNTe cTeaTbI ΦmNbTp npOTnB YacBOB CTpeKN Do COBMeueHnR CTpeNOK, nocne yero erO MOxHO BbITAHyTB n3 nbInecoca.[8]
- NOBEPHNTe uKIOHHbI cenapatop npoTMB YacBOB CTpeKN Do COBMeUeHNr CTpeNOK, Nocne Yero erO MOXHO BbITaHyTb 3 NBUEcoca. [8]
- PnJxMnTe OndHOBpeMeHHo 06a pbuHara BbICBO6OxJdeHnBbInyCKHOrO fNtpa, a 3aTeM CHIMnTe BbInyCKHOf nIbTp.[9]
- PpOMoIe BbIyNcKHO fHbTp CnEgKa TEnIO BDOI N OCTaBBTe Ha 24 Haca cyuNTbcra. POnHocTbIO npocyuINB, co6epnte Fbtp n yctAHOBInTe ero HA MeTO B nbIEcOC. [10] [11]
*TOnbKO y KOHKeTHbIX MoJeNei
RU
- Помоге Контейнордяпьл, сетаынфильтп ицкюньсенapatopВ сlerka tenloBоe.Хopoш npocuyinte npexde yem CHOBA yCTaHaBnBaTb B rnaBhbl KOpnyc.[10]
- yctahobnte 6nok c pykoTko Ha nbinecoc, a 3aTeM nocTaBbTe ero B npakOBOuyu CTAHU. [12]
PIMMEAHHE: He noIb3yItec bropueen BOOIN MIOUIMM cpeCTBaAMn npu Ounctke BbIyckHoro fNtpa. BMALOBepoTHOM CNYae NOBpeJdeHN BbIyckHoro fNtpa NcNoJIb3yIte dnn 3aMeHbToTbKO opIRNuHaNbHbNfNtbp Hoover. 3anpeaaetncnoIb30BaHne nbIeocca63 yctahOBHeHHoro fNtpa.
BHUMAHNE! Dnra 3000KTHBHO paObToI Pbncocca cneDHT, YTO6bl cTeHbIy HINbTp BcERda 6bl NCTbIM. Mbl peKOMeHdyEM, npoBOJITb IpombIKy HINbTppa3B MeCra.
3aMeHa N OoNCTKa BpaauoIeCn 1eTK
BHIMAHHE! Ppeed 3ameHOn nn OunchKoB BpaauaoeCn 8etKn Bcerda OTknouaHT npnbop ot ceTn.
- CHINITE HACADKY NOBVIIeHn MOnHocTn C Tpy6bl N nepemecNTe 3aueJIky BpaiaIOeJcra 5eTKn HApJy, YTO6bl CHATb 5eTKy.[13]
- YdaIHTe BeCb MyCop n3 Bpaauouecraetkn.Ecnn 3Toro OKa3bBaetc HnOCTaTOH0,3AmeHInTe tETky.
- Pn yctaHOBKe BpaauouecnaeKn Ha MeTO o6paTne BHNMaHne, YTo ee MoXHO HacaxNBaTb TOnbKO B ODNOM HapBaNHeHH. YTo6bl yCTaHOBt bIeKy Ha MeTO nepeMeCTne 3aueKny HApKy Hacadnte ee B npabNbHOM NOLOKeHH, 3aTeM OTNyCTNE 3aueKky - OHa 3aKpOeTc ABOTMaTnueckn.
3aMeHa 6aTapei
3TOT nbineoc pa6oTaet OT nepe3apxkaembIX NHTIN-NHOHbIX AKKyMnyTOPOB, KOTOpble MoXHO 3aMeHNTb.
BHUMAHVE: NolbyTecb Tolsko YTBepKdeHHbIM 3anaChbIM qactm nBaWero nbineocca. NcNoIb3OBAHne 3anaChbIX aacte, KOTOpBHe He Odo6peHb KomnaHne Hoover, BnIeTcra OnaChbIM nPnBeTeK aHHyMPOBaHIO Baewr rapAHTIN.
BHIMAHHE: He nbTaTecb BCKpbBaT bAKKMyJrTOP n peMOHTnpoBaT erO CaMOCToTeJIbHO.
- OTTHHTe 3aueKky aKKyMnyTopa Ha3a, n aKKyMnyTOp aBOMaTnueckn "BbICKOuNT" n3 OTceKa. [14a]
- MeIeHHo n aKKypaTHO BbITAHHTe aKKyMyJrTOp n3 OTceKa. [14b]
- 3aMeHHTe CTapbI aKKymyIaTOp Ha HObI.
- Co6IIOaIte npabnna Texnkn 6e3oIacHocT npy ytnnn3aunn akkmyrAToPOB. IcnoIb3ObaHHbIe aKkymyraToPbI Heo6xOIMNO cdaBaT B CneuaJIbHbI INyHK TnpMe n HcmeuINBaT C 6obuHBMn 6bitOBbIMN OTXODAMN.
D.AkkymyIaTOp He 3apJXaeTc
Takoe Moket cnuyntbcB pe3ynbTaTe nntenbHoro npocToR (6onee nonyroda).
CByKNTecb c cHTpOM 6cIyKnBaHn KIneHTOB Hoovr dIg opraHn3aun 3aMeHbI aKKMyJrTopa.
Ecn np6nema He yctpaheHa, 6pataNTecb B ceHTp 0cbnykBaHn KIneHTOB KOMNaHH Hoover.
3ANACHbIE YACTN IN PACXODHBIE MATEPNAJIbIK IIJIECOCAM HOOVER
Pn 3aMeHe YacTeH nCnObl3yIe ToBkO opunHaJIbHbIe 3aNaChbIe Yactn npacOJIbIe MaTePnaJIb KOMNaHIn Hoover. Ix MoKHO npno6peTn y BaWero MeCTHOrO dIInepa KOMNaHIn Hoover nII HENOCPeIcTBeHHo B KOMNaHIn Hoover. Pn oOpMneHn 3aKa3a Ha 3aNaChbIe Yactn O63aTeJbHo Yka3bIaIte HOMep MOnEIN PbIncocca.
BAWATAPAHNTN
YcnoBra rapaHTnI dAHHoro 6bITOBOR eNektpueckoro npnbopa onpeJenrTOH HauHm npeCTaBnteBCTBOM B TO CTpaHe, B KOTopo 3OT eNekTPOnpn6Op 6bl kynneH. Bonee noDpo6HyIO INphiMauHIO 63TNX yCNOBnX Bbl MOxTe NOnyUHTb OT HaWero DInepa. Pn npedbAbeHN npTeHnI NO ycNoBnM DaHHbIX rapaTHnHbIX O83aTeNbCTB Heo6XoIMO npeBBAHTb Yek nn KBtAHnIO HA npOdaHHbI TOBaP.
I3meHnMOTy6bTbBHeceHb6e3PipeDbapntbHorOyBeOMnEHN.
INSTRUKCJE BEZPIECZNEGUZYTKOWANIA
PL
NAVODILA ZA VARNO UPORABO
SI