Sub1 - Subwoofer BOSE - Free user manual and instructions
Find the device manual for free Sub1 BOSE in PDF.
| Product type | Powered subwoofer |
| Brand | Bose |
| Model | Sub1 |
| Dimensions (H × W × D) | 53.3 × 26.0 × 52.9 cm |
| Net weight | 15.5 kg |
| Power supply | 100-240 V AC, 3 A, 50/60 Hz |
| Inrush current | 14.9 A at 120 V; 29.3 A at 230 V |
| Standby power consumption | ≤ 0.5 W |
| Auto standby | After 4 hours of inactivity |
| Line inputs | 2 balanced inputs (XLR and 6.35 mm TRS/TS jack) |
| Line outputs | 2 XLR outputs |
| SubMatch connection | SubMatch input and output for linking with L1 Pro32 |
| USB port | USB-C for firmware update and service |
| Input EQ settings | L1 (optimized for L1 Pro) or LPF (low-pass filter) |
| Output EQ settings | FULL (full-range) or HPF (high-pass filter) |
| Phase/Pattern | Polarity + or -, cardioid mode (two Sub1) |
| Signal indicator | Green LED (signal), red (clip/limit) |
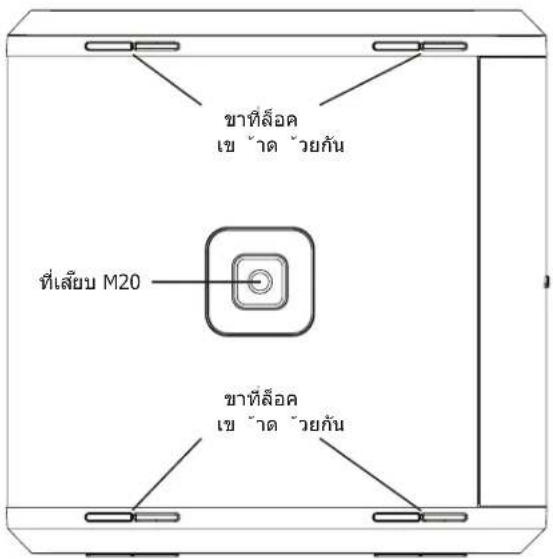
| Threaded pole mount | M20, compatible with pole ≤1.3 m and speaker ≤7.1 kg (S1 Pro) |
| Cleaning | Soft dry cloth; vacuum for grille |
| Warranty | Limited warranty (see global.bose.com/warranty) |
Frequently Asked Questions - Sub1 BOSE
User questions about Sub1 BOSE
0 question about this device. Answer the ones you know or ask your own.
Ask a new question about this device
Download the instructions for your Subwoofer in PDF format for free! Find your manual Sub1 - BOSE and take your electronic device back in hand. On this page are published all the documents necessary for the use of your device. Sub1 by BOSE.
USER MANUAL Sub1 BOSE
Powered Bass Modules
Owner's Guide
Brugervejledning
Bedienungsanleitung
Please read and keep all safety and use instructions.
Important Safety Instructions

Bose Corporation hereby declares that this product is in compliance with the essential requirements and other relevant provisions of Directive 2014/53/EU and all other applicable EU directive requirements. The complete declaration of conformity can be found at: www.Bose.com/compliance.

This product conforms to all applicable Electromagnetic Compatibility Regulations 2016 and all other applicable UK regulations. The complete declaration of conformity can be found at: www.Bose.com/compliance. Bose Corporation hereby declares that this product is in compliance with the essential requirements per Radio Equipment Regulations 2017 and all other applicable UK regulations. The complete declaration of conformity can be found at: www.Bose.com/compliance.
- Read these instructions.
- Keep these instructions.
- Heed all warnings.
- Follow all instructions.
- Do not use this apparatus near water.
- Clean only with a dry cloth.
- Do not block any ventilation openings. Install in accordance with the manufacturer's instructions.
- Do not install near any heat sources such as radiators, heat registers, stoves, or other apparatus (including amplifiers) that produce heat.
- Do not defeat the safety purpose of the polarized or grounding-type plug. A polarized plug has two blades with one wider than the other. A grounding type plug has two blades and a third grounding prong. The wide blade or the third prong are provided for your safety. If the provided plug does not fit into your outlet, consult an electrician for replacement of the obsolete outlet.
- Protect the power cord from being walked on or pinched, particularly at plugs, convenience receptacles, and the point where it exits from the apparatus.
- Only use attachments/accessories specified by the manufacturer.
- Us with the cart, stand, tripod, bracket, or table specified by the manufacturer or sold with the apparatus. When a cart is used, use caution when moving the cart/apparatus combination to avoid injury from tip-over.
- Unplug this apparatus during lightning storms or when unused for long periods of time.
- Refer all servicing to qualified personnel. Servicing is required when the apparatus has been damaged in any way such as power-supply cord or plug is damaged, liquid has been spilled or objects have fallen into the apparatus, the apparatus has been exposed to rain or moisture, does not operate normally, or has been dropped.
WARNING/CAUTIONS

This symbol on the product means there is uninsulated, dangerous voltage within the product enclosure that may present a risk of electrical shock.

This symbol on the product means there are important operating and maintenance instructions in this guide.

Contains small parts which may be a choking hazard. Not suitable for children under age 3.

This product contains magnetic material. Consult your physician on whether this might affect your implantable medical device.

Use at altitude less than 2000 meters only.

This symbol on the product means there is a tip-over hazard when using a pole mount.

Do not alter, modify, or remove the sliding cover over the power input of the Sub1/ Sub2. There is uninsulated, dangerous voltage within the product enclosure that may present a risk of electrical shock.
- The pole-mount M20 threaded insert on the Sub1 and Sub2 is designed to support a pole of up to 1.3 meters (51 inches) with a Bose S1 Pro mounted on the pole. Do not use the Sub1 or Sub2 with a pole exceeding 1.3 meters (51 inches) in height or a loudspeaker weight that exceeds 7.1 kilograms (15.7 pounds). Using a pole/LOUDspeaker combination that exceeds either of these limits or creates an unstable mounting scenario may lead to
a hazardous condition that could result in injury.
- Do NOT make unauthorized alterations to this product.
- Do NOT use in vehicles or boats.
- Do NOT place the product in a confined space such as in a wall cavity or in an enclosed cabinet while in use.
- Keep the product away from fire and heat sources. Do NOT place naked flame sources, such as lighted candles, on or near the product.
To reduce the risk of fire or electrical shock, do NOT expose the product to rain, liquids, or moisture. - Do NOT expose this product to dripping or splashing and do not place objects filled with liquids, such as vases, on or near the product.
- Do NOT use a power inverter with this product.
- Provide an earth connection or ensure the socket outlet incorporates a protective earthing connection before connecting the plug to the mains socket outlet.
- Where the mains plug or an appliance coupler is used as the disconnect device, the disconnect device shall remain readily operable.
Regulatory Information
The product, in accordance with the Ecodesign Requirements for Energy Related Products Directive 2009/125/EC, is in compliance with the following norm(s) or document(s): Regulation (EC) No. 1275/2008, as amended by Regulation (EU) No. 801/2013.
| Required Power State Information | Power Modes | |
| Standby | Networked Standby | |
| Power consumption in specified power mode, at 230V/50Hz input | ≤0.5 W N/A* | |
| Time after which equipment is automatically switched into mode | 4 hours N/A* | |
| Power consumption in networked standby if all wired network ports are connected and all wireless network ports are activated, at 230V/50Hz input | N/A* | |
| Network port deactivation/activation procedures.Deactivating all networks will enable standby mode. | *Product does not utilize a networked standby mode for a Bluetooth* connection and does not have the ability to be configured to a network via Wi-Fi or Ethernet | |
Sub1 Sub2
| Dimensions (H × W × D) | 53.3 × 26.0 × 52.9 cm (21.0 × 10.2 × 20.8 in) | 69.4 × 31.7 × 55.1 cm (27.3 × 12.5 × 21.7 in) |
| Net Weight | 15.5 kg (34.1 lb) | 23.0 kg (50.7 lb) |
| Input Rating 100-240 VAC, 3 A, 50/60 Hz | 100-240 VAC, 4 A, 50/60 Hz | |
| Initial turn on Inrush current | 14.9 A at 120 V; 29.3 A at 230 V | 14.9 A at 120 V; 29.3 A at 230 V |
| Inrush current after AC mains Interruption of 5 s | 5.8 A at 120 V; 32.0 A at 230 V | 5.8 A at 120 V; 32.0 A at 230 V |
Shielded cables are required to maintain regulatory compliance.
The product label is located on the bottom of the product.
Model: 431389G1 / 431389G2. The CMIT ID is located on the bottom of the product.
CANICES-3(B)/NMB-3(B)
Information About Products That Generate Electrical Noise (FCC Compliance Notice for US) NOTE: This equipment has been tested and found to comply with the limits for a Class B digital device, pursuant to Part 15 of the FCC Rules. These limits are designed to provide reasonable protection against harmful interference in a residential installation. This equipment generates, uses, and can radiate radio frequency energy and, if not installed and used in accordance with the instructions, may cause harmful interference to radio communications. However, there is no guarantee that interference will not occur in a particular installation. If this equipment does cause harmful interference to radio or television reception, which can be determined by turning the equipment off and on, the user is encouraged to try to correct the interference by one or more of the following measures:
Reorient or relocate the receiving antenna.
- Increase the separation between the equipment and receiver.
- Connect the equipment into an outlet on a circuit different from that to which the receiver is connected.
- Consult the dealer or an experienced radio/TV technician for help.
Changes or modifications not expressly approved by Bose Corporation could void the user's authority to operate this equipment.
This device complies with part 15 of the FCC Rules and with ISED Canada's license-exempt RSS standard(s). Operation is subject to the following two conditions: (1) This device may not cause harmful interference, and (2) this device must accept any interference received, including interference that may cause undesired operation.
This symbol means the product must not be discarded as household waste, and should be delivered to an appropriate collection facility for recycling. Proper disposal and recycling helps protect natural resources, human health, and the environment. For more information on disposal and recycling of this product, contact your local municipality, disposal service, or the shop where you bought this product.
China Restriction of Hazardous Substances Table
| Names and Contents of Toxic or Hazardous Substances or Elements | ||||||
| Toxic or Hazardous Substances and Elements | ||||||
| Part Name | Lead (Pb) | Mercury (Hg) | Cadmium (Cd) | Hexavalent (CR(VI)) | Polybrominated Bliphenyl (PBB) | Polybrominated diphenylether (PBDE) |
| PCBs X O O | O O O | |||||
| Metal Parts X O O O | O O | |||||
| Plastic Parts | O O | O O O O | ||||
| Speakers X | O O O O | O | ||||
| Cables X O | O O O O | |||||
| This table is prepared in accordance with the provisions of SJ/T 11364. O: Indicates that this toxic or hazardous substance contained in all of the homogeneous materials for this part is below the limit requirement of GB/T 26572. | 15 | |||||
| X: Indicates that this toxic or hazardous substance contained in at least one of the homogeneous materials used for this part is above the limit requirement of GB/T 26572. | ||||||
Taiwan Restriction of Hazardous Substances Table
| Equipment name: Sub1/Sub2 Type designation: 431389G1 / 431389G2 | ||||||
| Restricted substances and its chemical symbols | ||||||
| Unit | Lead (Pb) | Mercury (Hg) | Cadmium (Cd) | Hexavalent chromium (Cr+6) | Polybrominated biphenyls (PBB) | Polybrominated diphenyl ethers (PBDE) |
| PCBs | - | ○ | ○ | ○ | ○ | ○ |
| Metal Parts | - | ○ | ○ | ○ | ○ | ○ |
| Plastic Parts | ○ | ○ | ○ | ○ | ○ | ○ |
| Speakers | - | ○ | ○ | ○ | ○ | ○ |
| Cables | - | ○ | ○ | ○ | ○ | ○ |
| Note 1: “○” indicates that the percentage content of the restricted substance does not exceed the percentage of reference value of presence. Note 2: The “-” indicates that the restricted substance corresponds to the exemption. | ||||||
Date of Manufacture: The eighth digit in the serial number indicates the year of manufacture; "0" is 2010 or 2020.
China Importer: Bose Electronics (Shanghai) Company Limited, Part C, Plant 9, No. 353 North Riying Road, China (Shanghai) Pilot Free Trade Zone
EU Importer: Bose Products B.V., Gorslaan 60, 1441 RG Purmerend, The Netherlands
Mexico Importer: Bose de Mexico, S. de R.L. de C.V., Paseo de las Palmas 405-204, Lomas de Chapultepec, 11000 Mexico, D.F. For service or importer information, call +5255 (5202) 3545
Taiwan Importer: Bose Taiwan Branch, 9F-A1, No.10, Section 3, Minsheng East Road, Taipei City 104, Taiwan. Phone Number: +886-2-25147676
UK Importer: Bose Limited, Bose House, Quayside Chatham Maritime, Chatham, Kent, ME4 4QZ, United Kingdom
Bose Corporation Headquarters: 1-877-230-5639
Wi-Fi is a registered trademark of Wi-Fi Alliance
Bose, L1, and SubMatch are trademarks of Bose Corporation.
All other trademarks are the property of their respective owners.
The Bose Privacy Policy is available on the Bose website.
©2022 Bose Corporation. No part of this work may be reproduced, modified, distributed or otherwise used without prior written permission.
Please complete and retain for your records.
The serial and model numbers are located on the product label on the bottom of the product.
Serial number:
Model number:
Warranty Information
This product is covered by a limited warranty
For warranty details, visit global.bose.com/warranty.

Contents
PRO.BOSE.COM
Overview 5
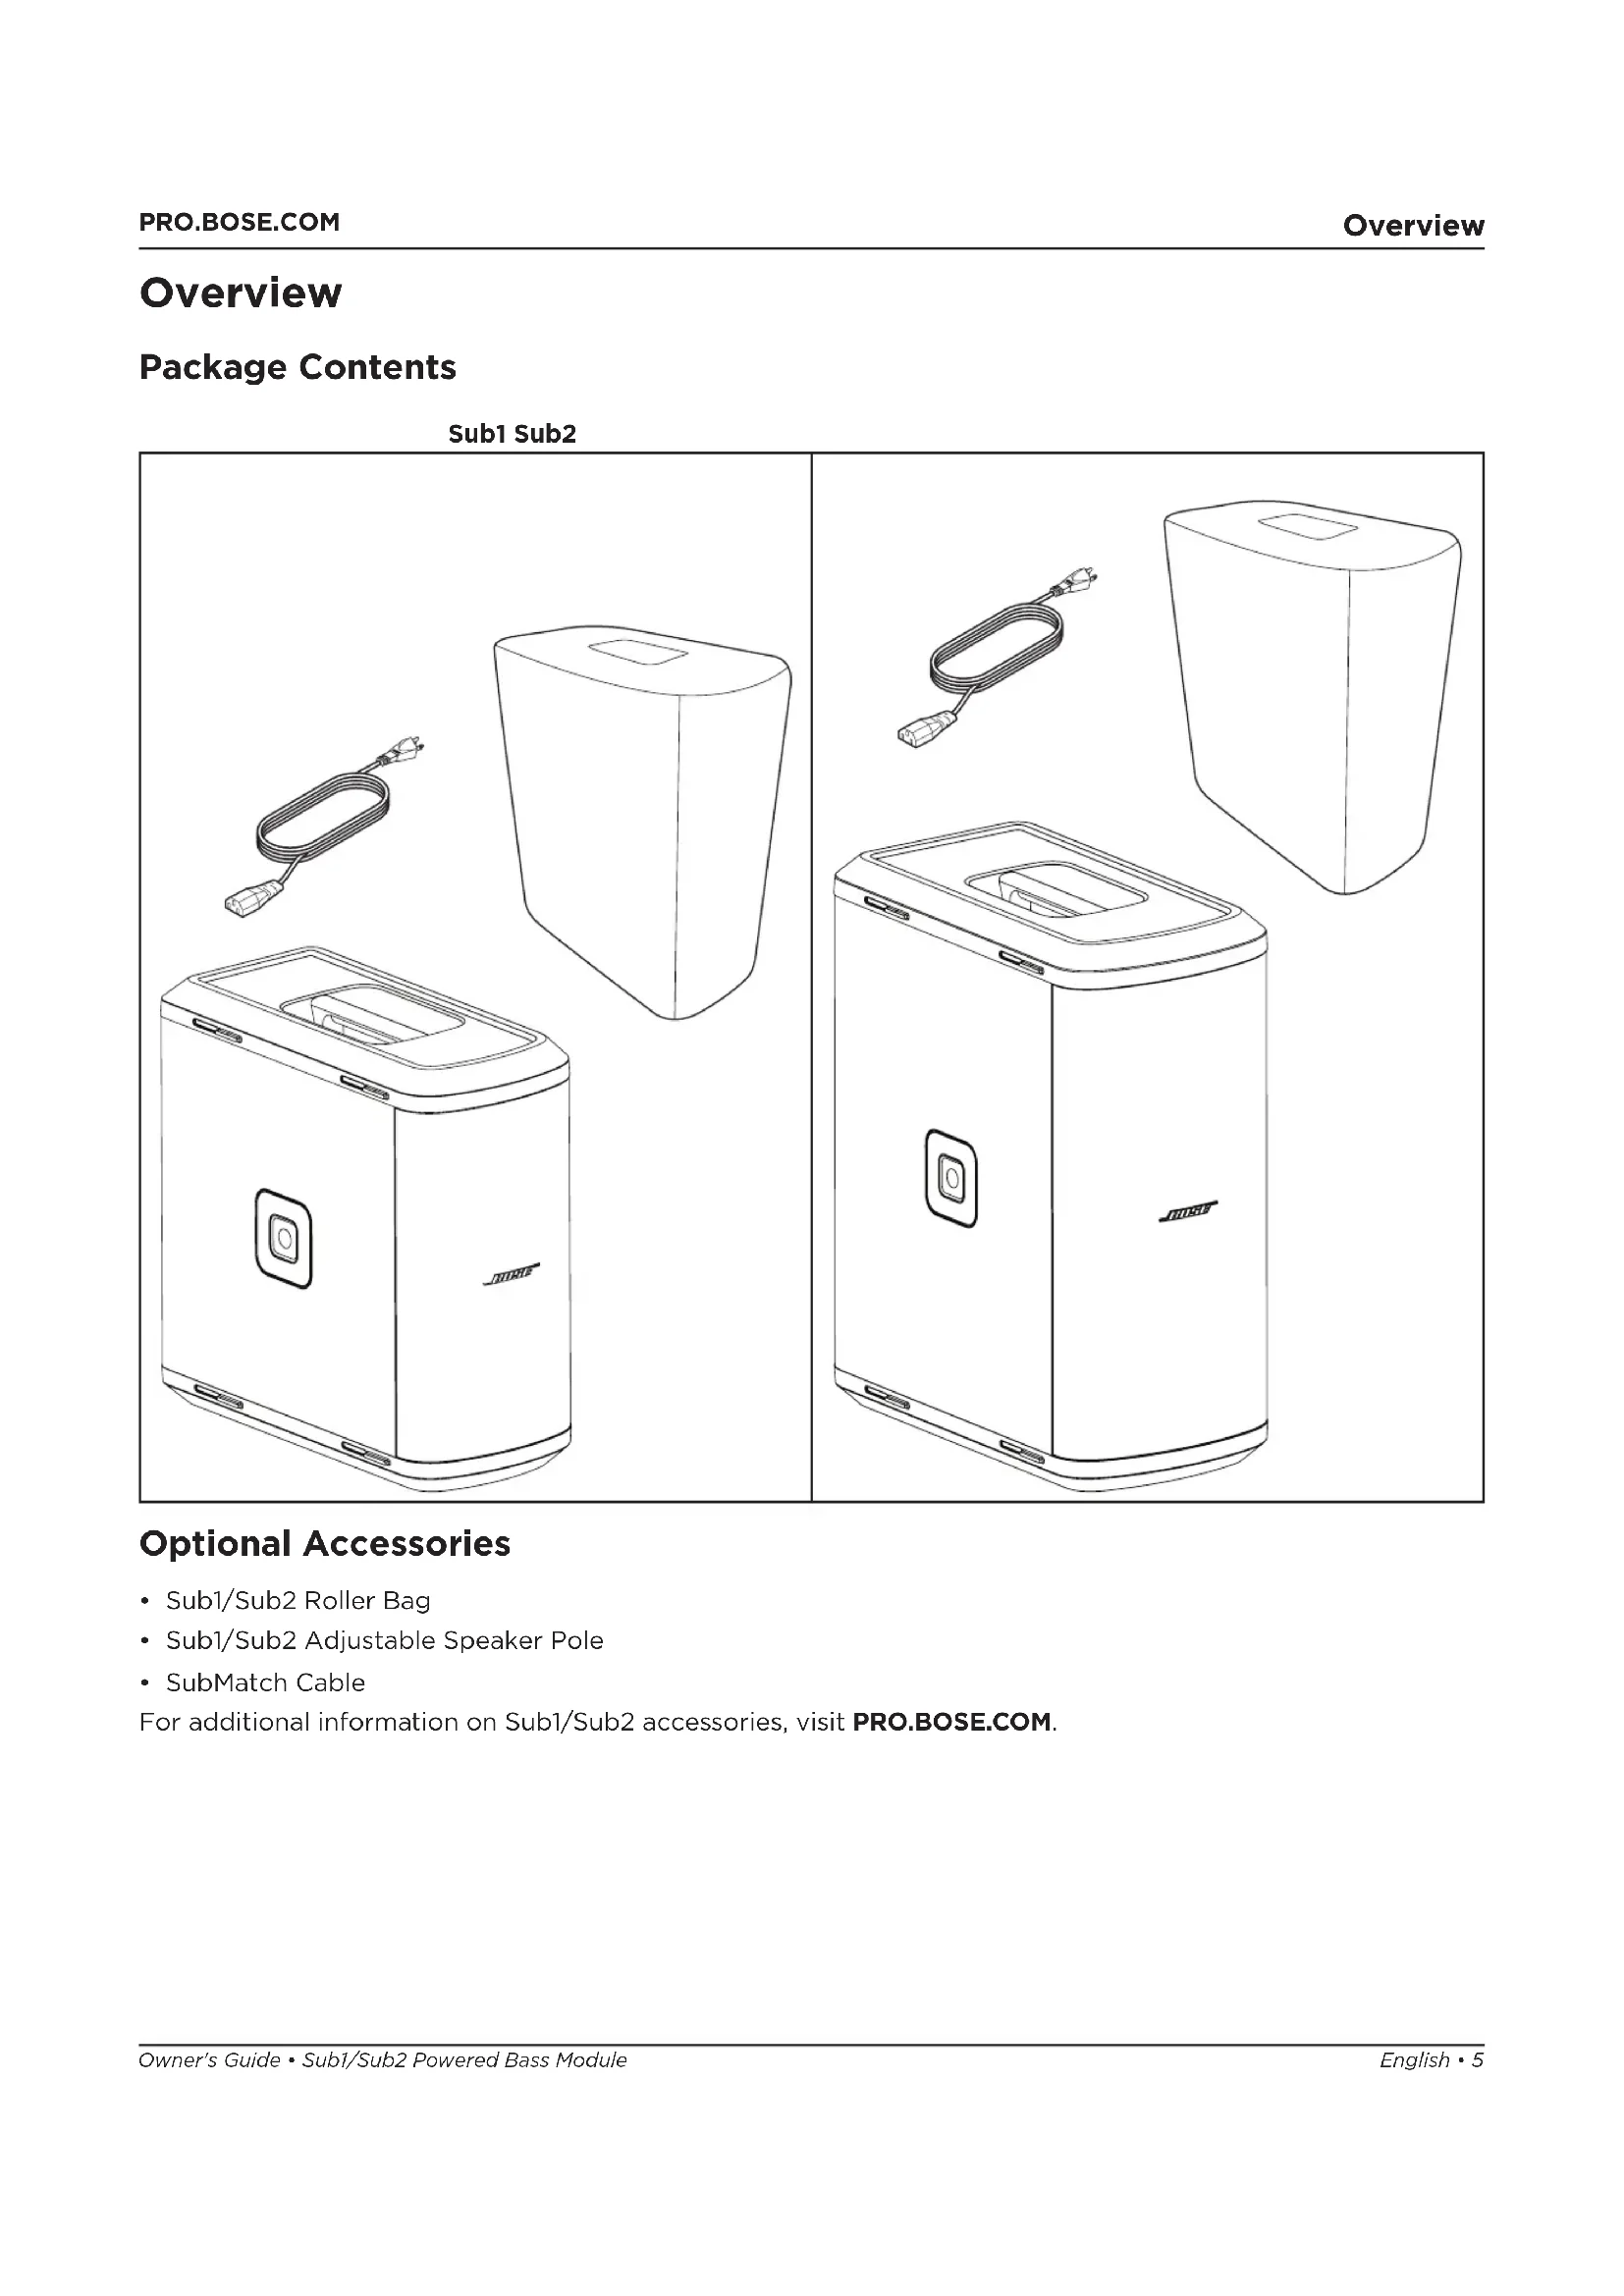
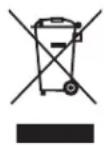
Package Contents 5
Optional Accessories 5
Setup 6
Connections and Controls 6
Connecting Power. 7
Connecting Directly to a Power Outlet. 7
Connecting to an L1 Pro32 with a SubMatch Cable. 8
AutoOff/Low-power Standby 8
Inputs and Outputs. 9
Line Input 9
Line Output 9
Settings. 9
Phase/Pattern 9
Level 10
Line Input EQ. 10
Line Output EQ. 10
Sub1/Sub2 Orientation 10
Using the Pole-mount Insert with an S1 Pro 11
Care & Maintenance 12
Cleaning Your Sub. 12
Troubleshooting 12
Overview
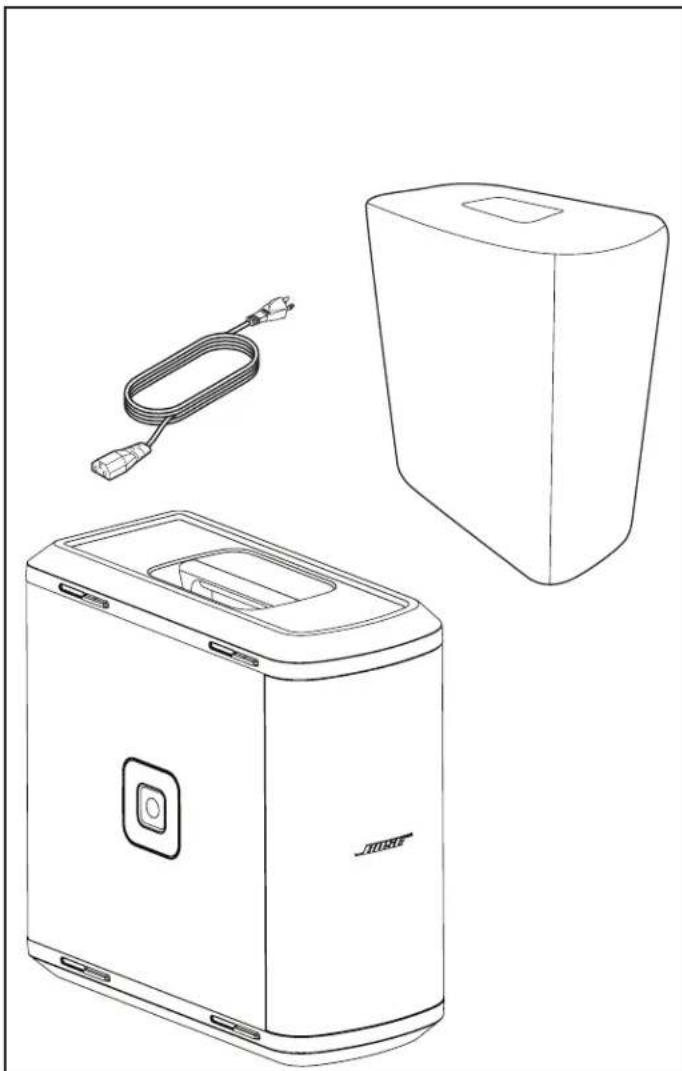
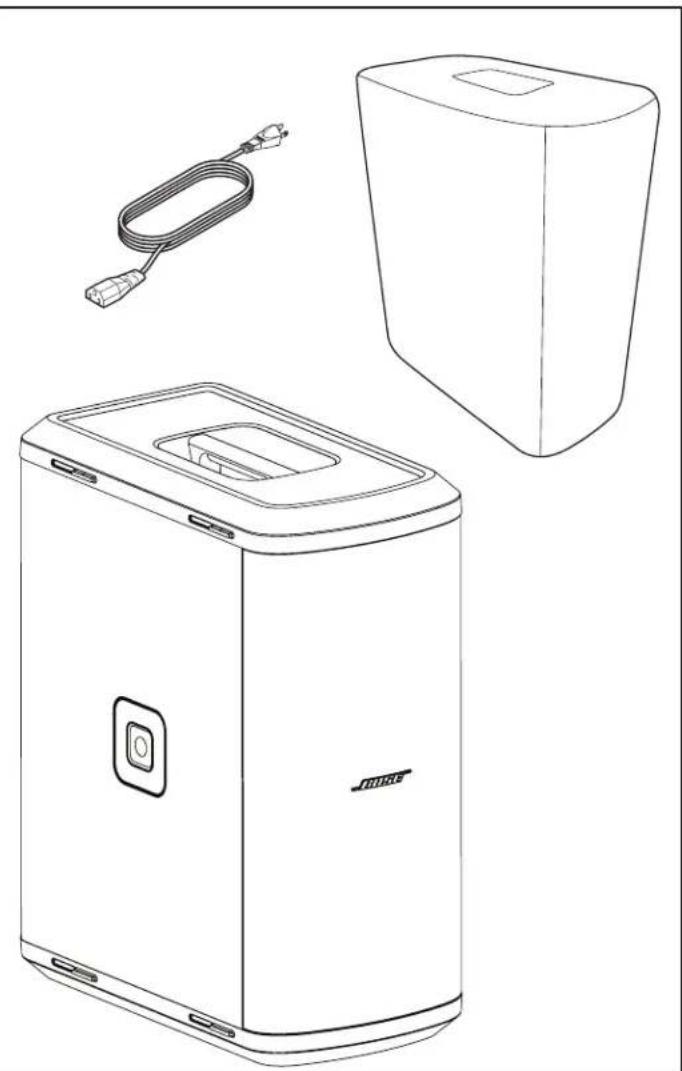
Package Contents
Sub1 Sub2
Optional Accessories
- Sub1/Sub2 Roller Bag
- Sub1/Sub2 Adjustable Speaker Pole
- SubMatch Cable
For additional information on Sub1/Sub2 accessories, visit PRO.BOSE.COM.
Setup
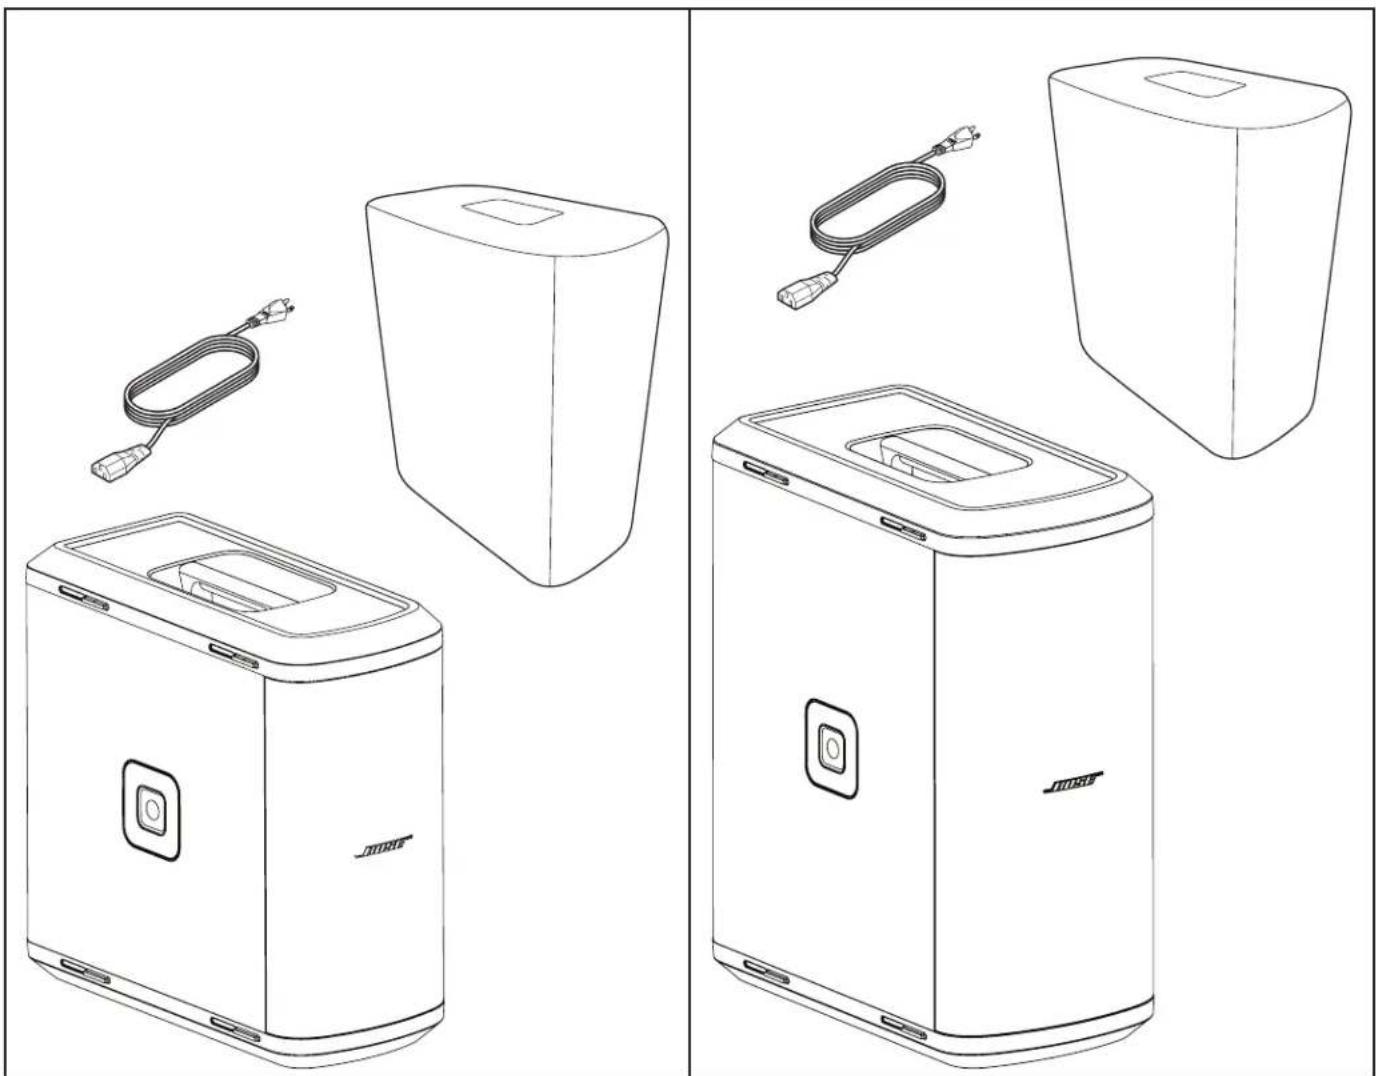
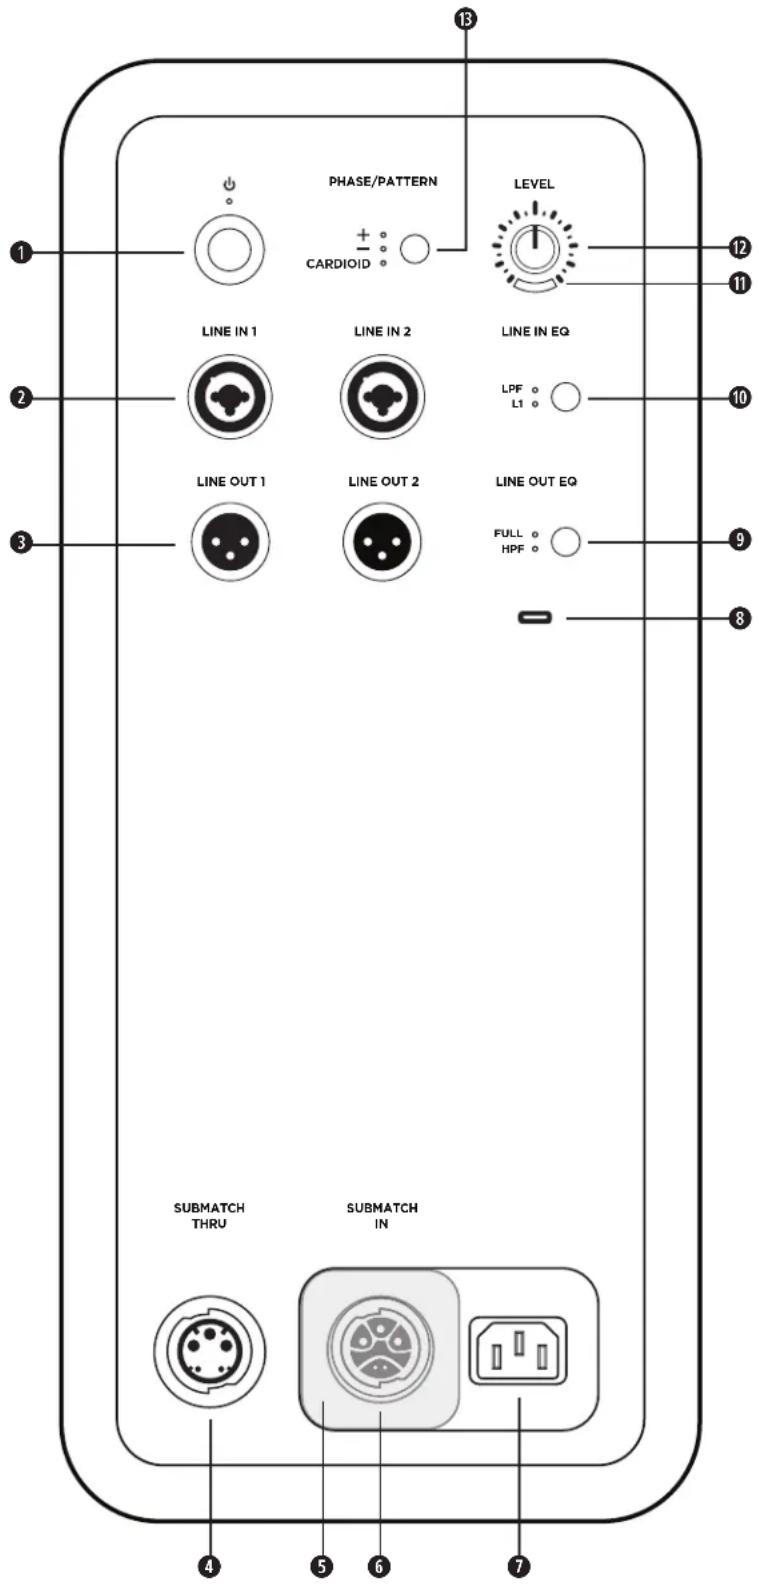
Connections and Controls
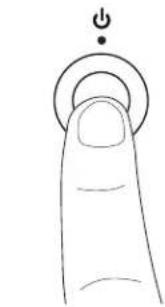
1 Standby Button: Press the button to power on the Sub. The LED will illuminate white while the Sub is on.
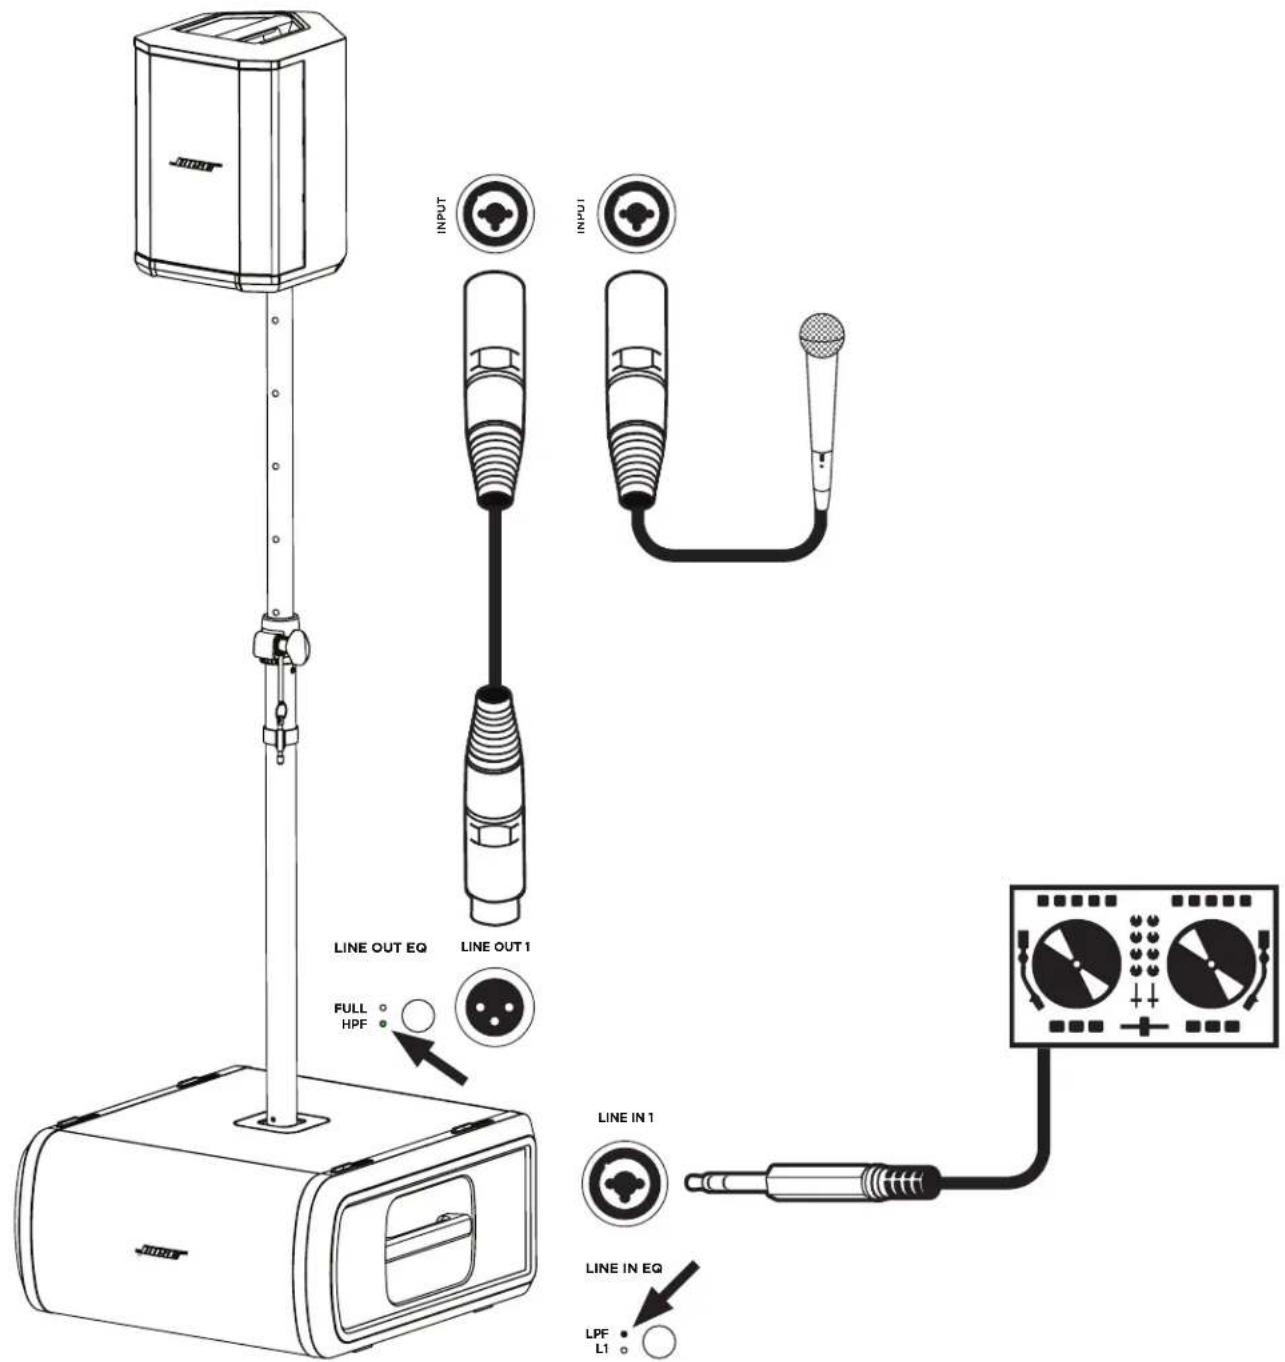
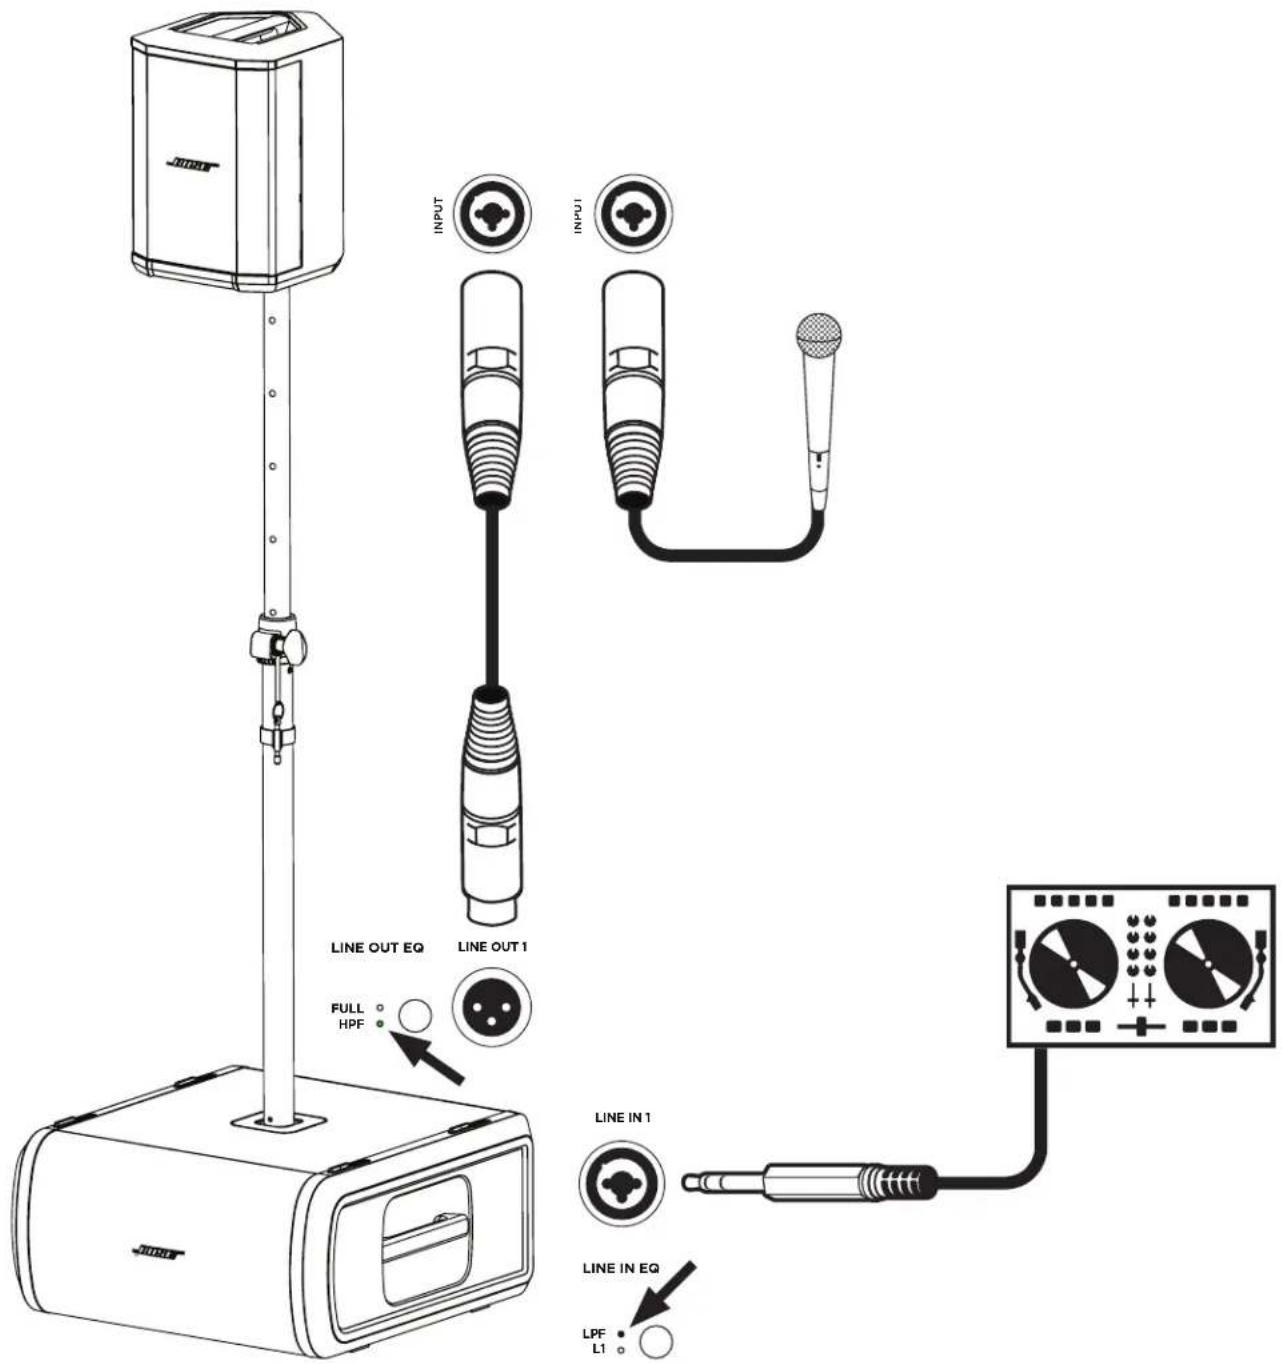
Line Inputs: Analog input for connecting an L1 Pro or other line-level audio source. Compatible with XLR, TRS balanced, and TS unbalanced cables.
Line Outputs: Use an XLR cable to connect the line-level output to a loudspeaker.
SubMatch Thruput: Connect an additional Sub bass module with a SubMatch cable. Up to two Sub1 or Sub2 powered bass modules can be powered by a single L1 Pro32 via SubMatch connection.
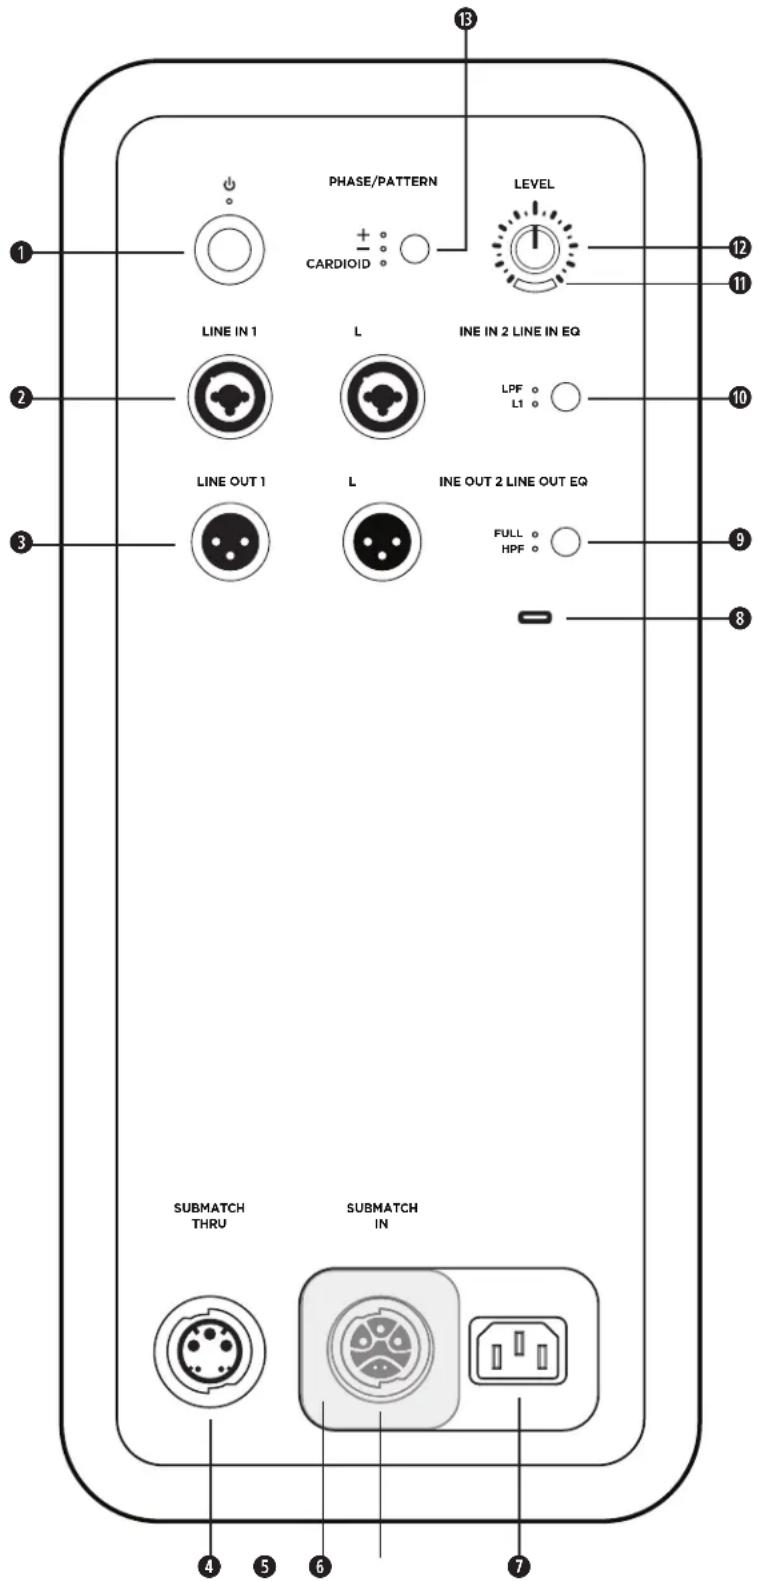
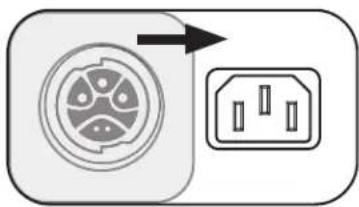
Power Input Cover: Prevents simultaneous use of the SubMatch Input and Power Input. Slide the cover to reveal the power input that is needed for setup.
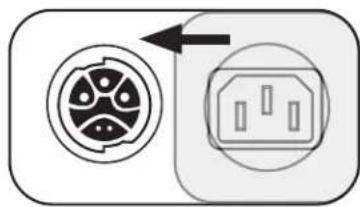
SubMatch Input: Connect the Sub to an L1 Pro32 with a SubMatch cable.
Power Input: IEC power cord connection.
USB Port: USB-C connector for Bose service use and firmware updates. Note: This port is not compatible with Thunderbolt 3 cables.
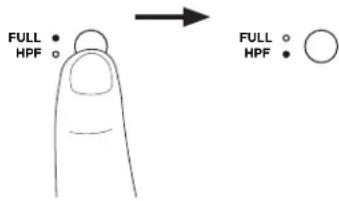
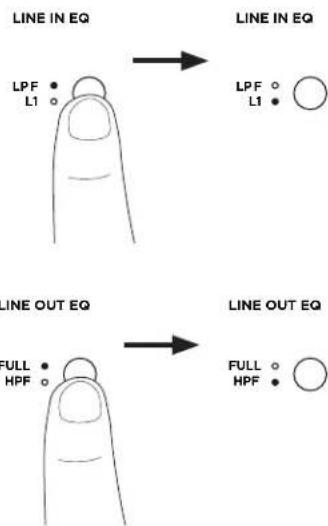
Line Output EQ: Select between FULL bandwidth or a multi-purpose HPF when using Line Outputs. Press the button to switch EQ settings. The corresponding LED will illuminate white while selected.
Line Input EQ: Select between an optimized EQ for an L1 Pro or a multi-purpose LPF when using Line Inputs. Press the button to switch EQ settings. The corresponding LED will illuminate white while selected.
Signal/Clip Indicator: The LED will illuminate green when a signal is present and will illuminate red when the signal is clipping or the Sub is entering limiting. Reduce the level or signal volume to prevent signal clipping or limiting.
Level Control: Adjust the level of audio output. The Level Control does not affect the Line Outputs. The 12 o'clock position is recommended when in use with an L1 Pro32.
Phase/Pattern Button: Adjust the polarity of the Sub. Press the button to switch polarity. The corresponding LED will illuminate white while selected. Also allows access to Cardioid mode when using two identical Sub modules.
Connecting Power
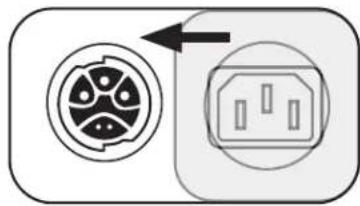
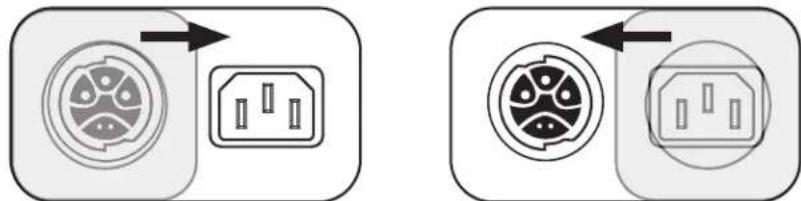
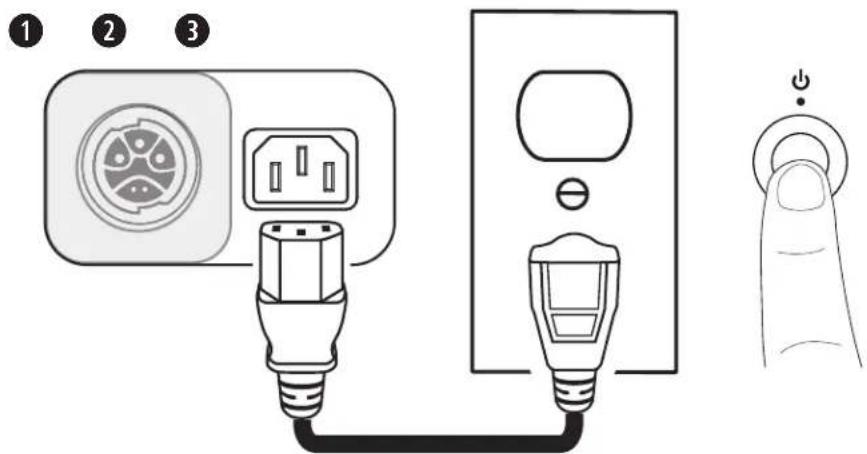
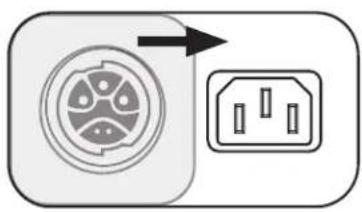
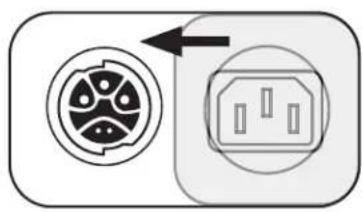
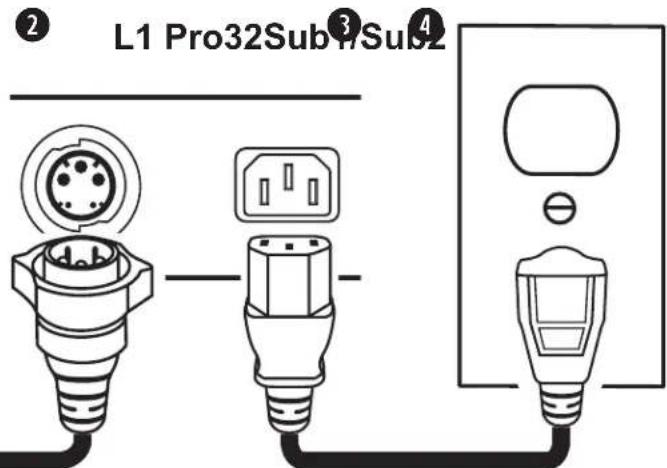
There are two ways to connect a Sub to power: connecting to a power outlet or connecting to an L1 Pro32 with a SubMatch cable. The Power Input Cover prevents simultaneous connection of both power inputs. Only one of the two power connections should be used at a time.
If connecting directly to a power outlet, slide the Power Input Cover to the left, concealing the SubMatch Input. If connecting to an L1 Pro32 with a SubMatch cable, slide the Power Input Cover to the right, concealing the Power Input.

WARNING: Do not alter, modify, or remove the sliding cover over the power input of the Sub1/Sub2. There is uninsulated, dangerous voltage within the product enclosure that may present a risk of electrical shock.
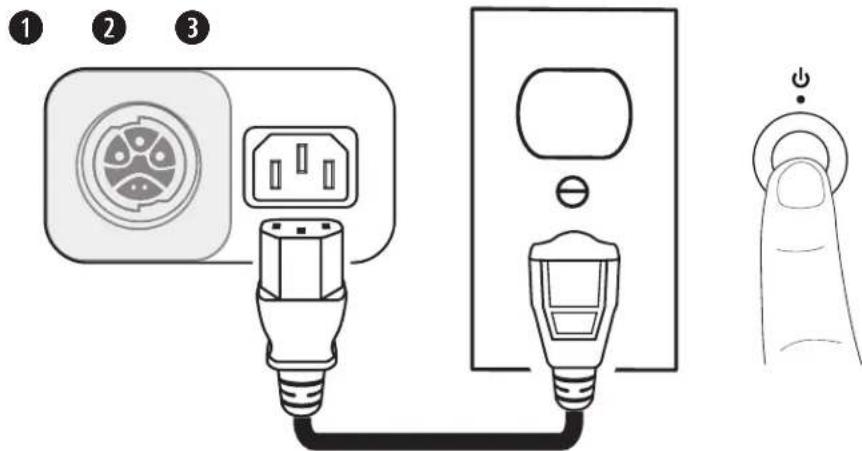
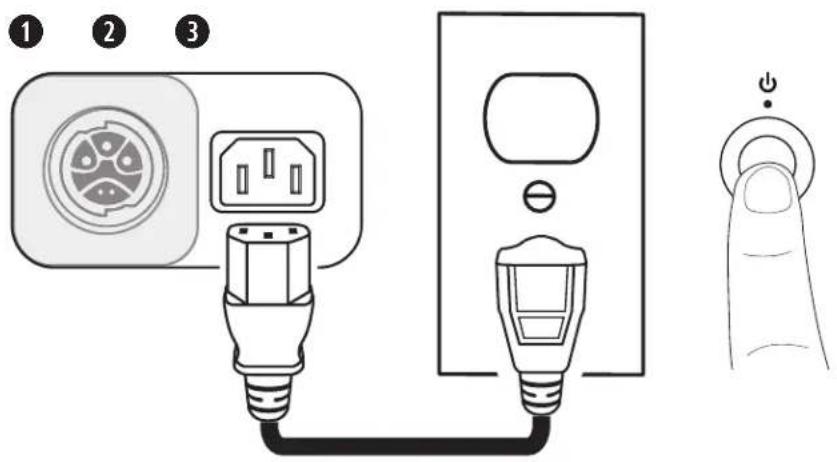
Connecting Directly to a Power Outlet
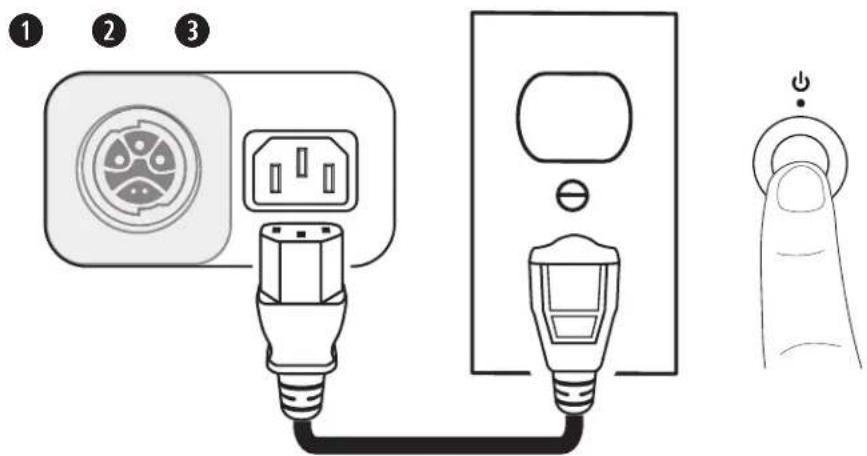
- Plug the power cord into the Power Input.
- Plug the other end of the power cord into a live electrical outlet.
Note: Do not power on the Sub until after you've connected your sources.
3. Press the Standby Button. The LED will illuminate white while the Sub is on.
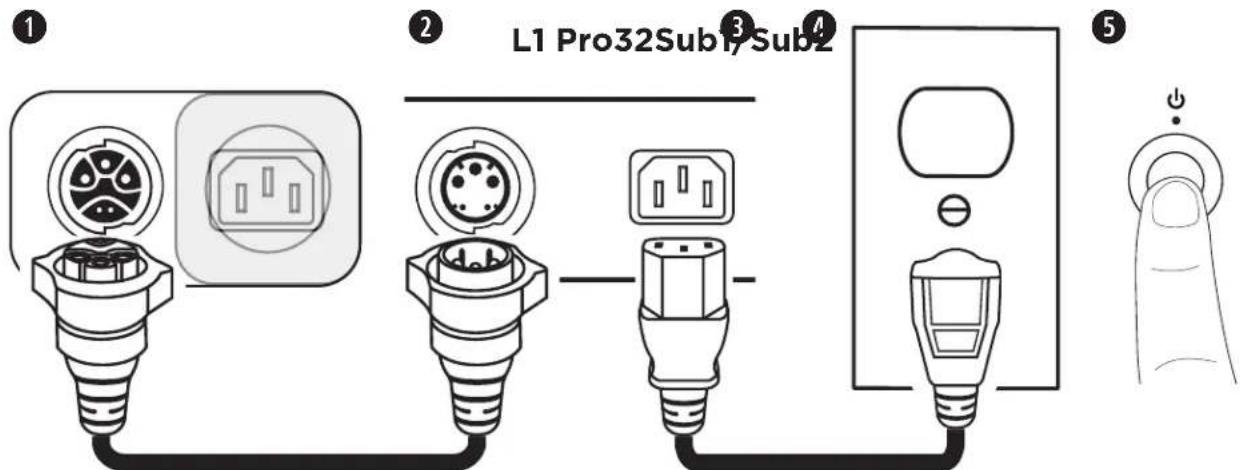
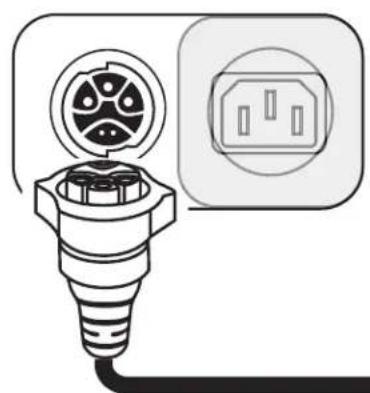
Connecting to an L1 Pro32 with a SubMatch Cable

- Plug the SubMatch cable into the SubMatch Input on a Sub1/Sub2.
- Plug the other end of the SubMatch cable into the SubMatch Output of the L1 Pro32.
- Plug the power cord into the Power Input on the L1 Pro32.
- Plug the other end of the power cord into a live electrical outlet.
Note: Do not power on the L1 Pro or the Sub until after you've connected your sources. See the L1 Pro32 owner's guide at PRO.BOSE.COM for more information about connecting sources to an L1 Pro32.
- Press the Standby Button on the L1 Pro32 then press the Standby Button on the Sub. The LEDs will illuminate white while the L1 Pro and Sub are on.
Note: Press and hold the Standby Button for 10 seconds to reset the Sub to factory settings.
When using two Subs via SubMatch cable connection, first turn on the Sub connected directly to the L1 Pro32, then turn on the second Sub.
AutoOff/Low-power Standby
After four hours of no use, the Sub will enter AutoOff/Low-power Standby mode to save power. To wake the Sub from AutoOff/Low-power Standby mode, press the Standby Button.
Note: Disable AutoOff/Low-power Standby mode by pressing and holding the Phase/Pattern Button and Line Output EQ button simultaneously for 10 seconds. Enable AutoOff/Low-power Standby mode by repeating this step. Disabling AutoOff/Low-power Standby mode will result in higher energy usage when the Sub is not in use.
Inputs and Outputs
Line Input
Analog input for connecting an L1 Pro or other line-level audio source. Compatible with XLR, TRS balanced, and TS unbalanced cables. Use Line Input 1 (Left) and Line Input 2 (Right) together for stereo applications.
Line Output
Use an XLR cable to connect the line-level output to a loudspeaker. Use Line Output 1 (Left) and Line Output 2 (Right) together for stereo applications.
Settings
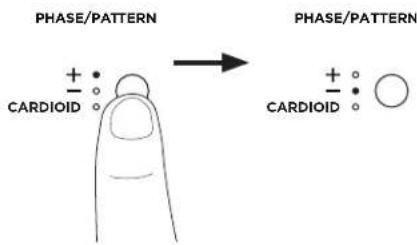
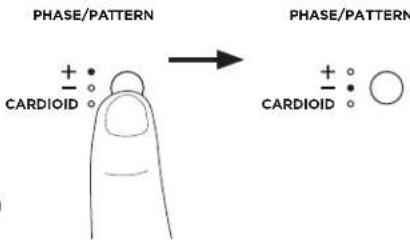
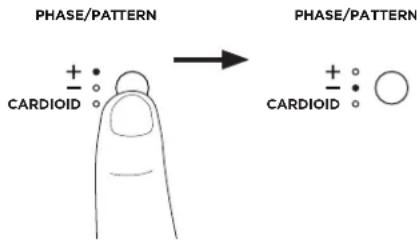
Phase/Pattern
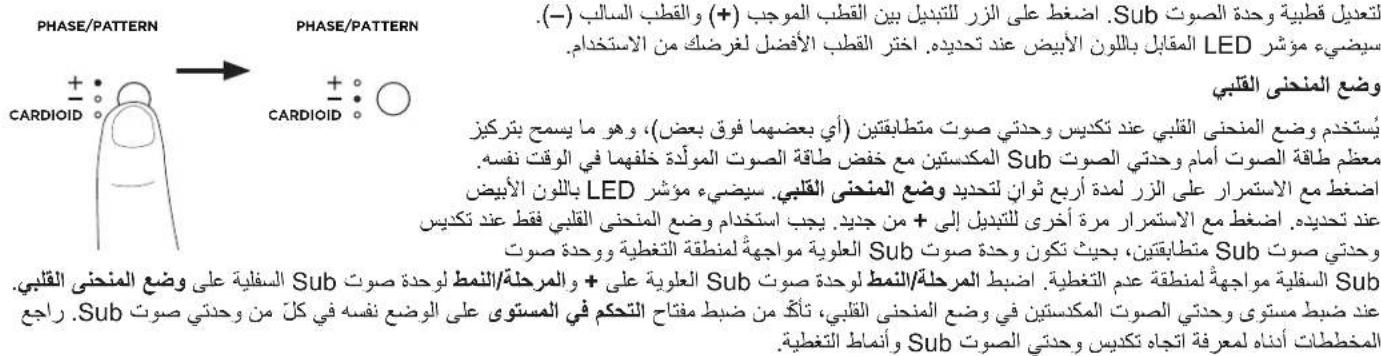
Adjust the polarity of the Sub. Press the button to switch between positive polarity (+) and inverted polarity (-). The corresponding LED will illuminate white while selected. Choose the polarity that sounds best for your application.
Cardioid Mode
Cardioid mode is for use with a stack of two identical Sub modules, which allows for most of the sound energy to be focused in front of the Sub stack
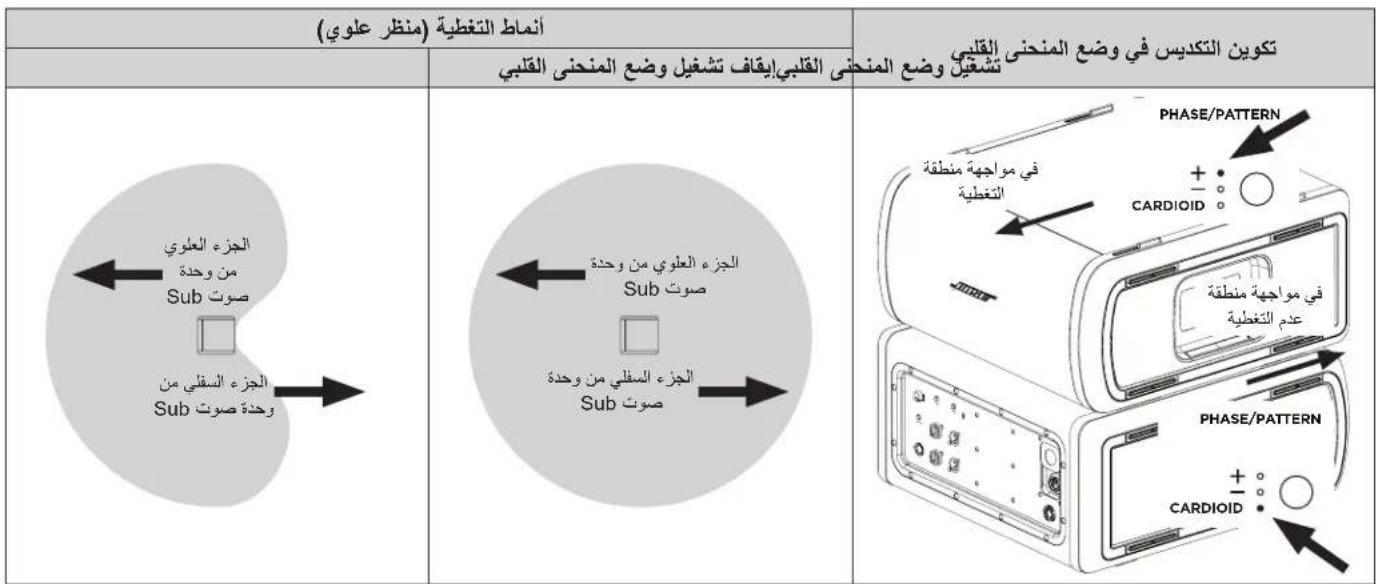
while reducing the sound energy that is generated behind the Sub stack. Press and hold the button for four seconds to select CARDIOID. The LED will illuminate white while selected. Press and hold again to switch back to ^+ . Cardioid mode should only be used in a stacked configuration of two identical Sub modules, with the top Sub facing the coverage area and the bottom Sub facing the non-coverage area. Set the Phase/ Pattern of the top Sub to ^+ and the Phase/Pattern of the bottom Sub to CARDIOID. When adjusting the level of the stacked subs in Cardioid mode, be sure that the Level Control is set to the same position on both Subs. See the below diagrams for Sub stack orientation and coverage patterns.

Level
Adjust the level of audio output from the Sub. Begin with the Level Control set to a low setting and increase the level until the Signal/Clip Indicator illuminates green. The Level Control does not affect the Line Outputs. The 12 o'clock position is recommended when in use with an L1 Pro32. If using two Subs with a single L1 Pro, it is recommended that the Level Control is set to the same position on both Subs.
Line Input EQ
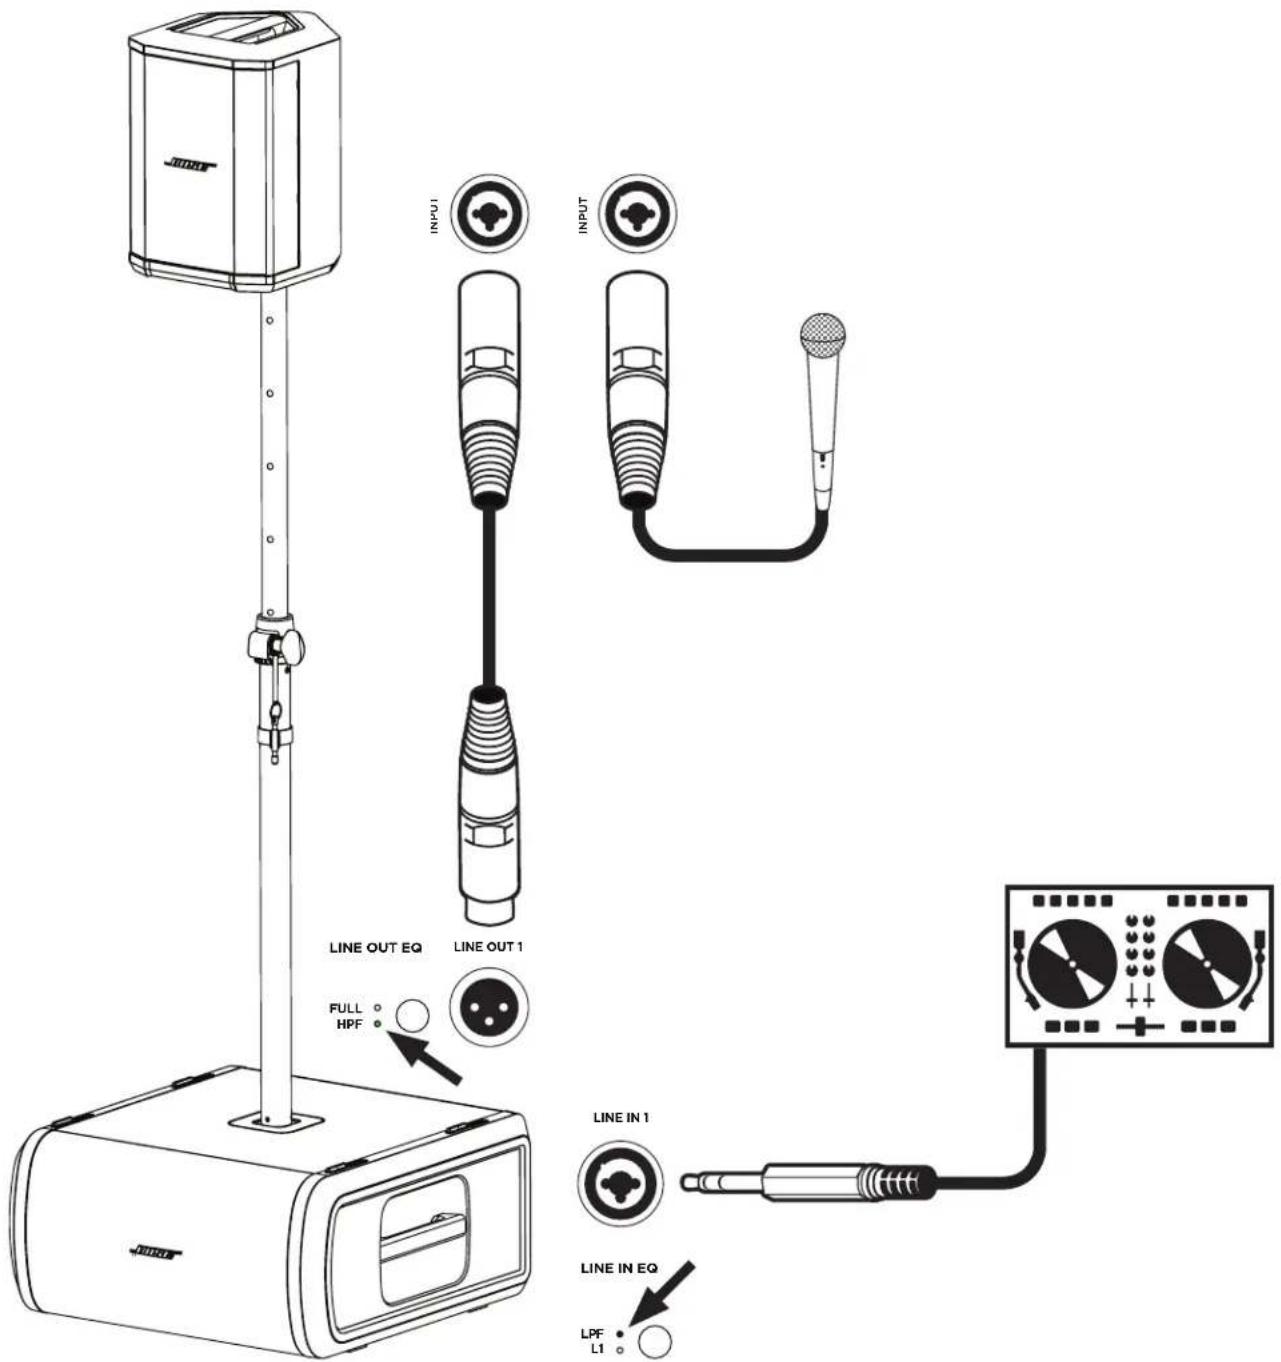
Change the EQ of both Line Inputs by pressing the Line Input EQ button until the corresponding LED for your desired EQ illuminates white. Use L1 to apply an input EQ optimized for L1 Pro products; use LPF to apply a low-pass filter to the inputs. When a Sub is connected to an L1 Pro32 with a SubMatch cable, the Line Input EQ will be fixed to L1.

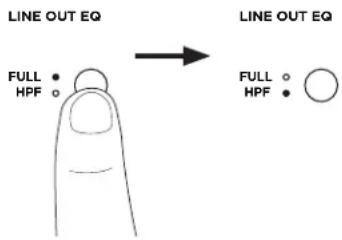
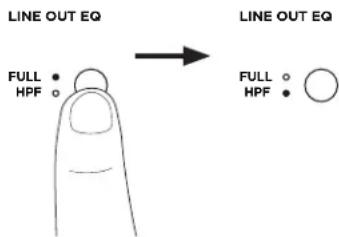
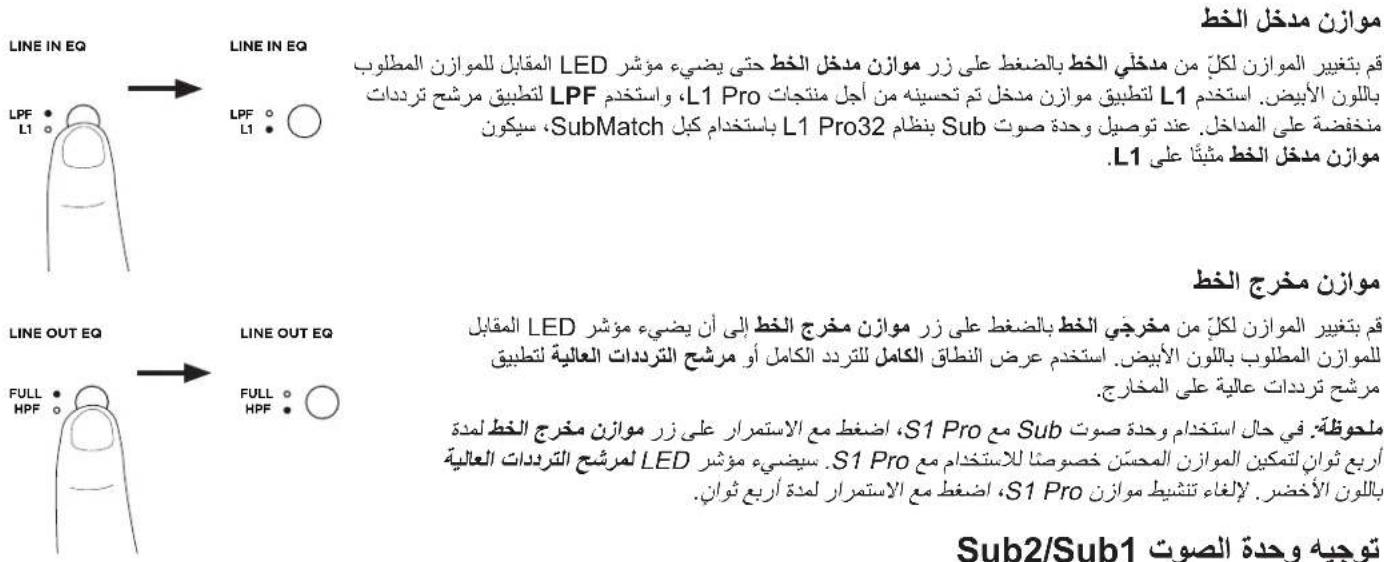
Line Output EQ
Change the EQ of both Line Outputs by pressing the Line Output EQ button until the corresponding LED for your desired EQ illuminates white. Use FULL for full frequency or HPF to apply a high-pass filter to the outputs.
Note: If using the Sub with an S1 Pro, press and hold the Line Output EQ button for four seconds to enable an EQ specifically optimized for use with an S1 Pro. The HPF LED will illuminate green. To deactivate the S1 Pro EQ, press and hold for four seconds.
Sub1/Sub2 Orientation

WARNING: Do not place the equipment in an unstable location. The equipment could become unstable leading to a hazardous condition, which could result in injury.
CAUTION: Do not stack more than two Subs together. Only stack two Subs of the same model.
For horizontal configurations, adjust the logo by rotating it.
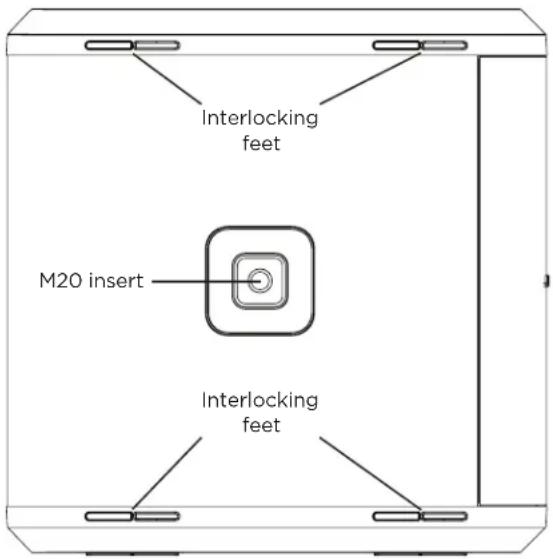
For stacked configurations, the Sub includes four interlocking feet that will attach to another Sub of the same model. When stacking Subs horizontally, always make sure the feet lock together before connecting power and sources.
Using the Pole-mount Insert with an S1 Pro

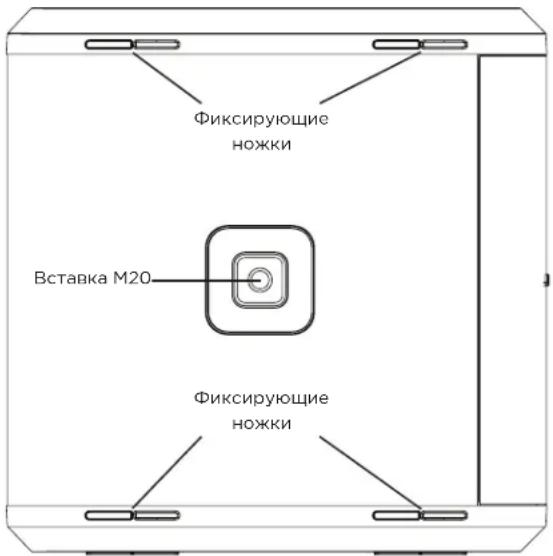
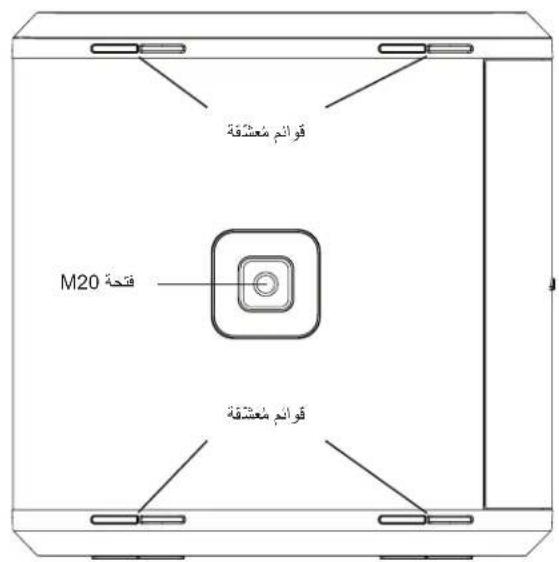
WARNING: The pole-mount M20 threaded insert on the Sub1 and Sub2 is designed to support a pole of up to 1.3 meters (51 inches) with a Bose S1 Pro mounted on the pole. Do not use the Sub1 or Sub2 with a pole exceeding 1.3 meters (51 inches) in height or a loudspeaker weight that exceeds 7.1 kilograms (15.7 pounds). Using a pole/loudspeaker combination that exceeds either of these limits or creates an unstable mounting scenario may lead to a hazardous condition that could result in injury.
The Sub1/Sub2 includes a pole-mount M20 threaded insert. The insert is compatible with the Bose Sub1/Sub2 Adjustable Speaker Pole accessory, designed for use with the Bose S1 Pro system (for more information, see the Adjustable Speaker Pole owner's guide at PRO.BOSE.COM).
Care & Maintenance
Cleaning Your Sub
Clean the product enclosure using only a soft, dry cloth. If necessary, carefully vacuum the grille of the Sub.

CAUTION: Do not use any solvents, chemicals, or cleaning solutions containing alcohol, ammonia, or abrasives.
CAUTION: Do not use any sprays near the product or allow liquids to spill into any openings.
Troubleshooting
| Problem What to do | |
| No power | ·Make sure you have power at the AC outlet. Try operating a lamp or other equipment from the same AC outlet or test the outlet using an AC outlet tester. ·If powered from an L1 Pro32 with a SubMatch cable, ensure the L1 Pro32 is turned on, and not in AutoOff/ Low-power Standby mode. |
| No sound · Make sure your sub is turned on. ·Make sure your source is plugged into the Line Input. ·Make sure the volume is turned up on your source. ·Make sure the Level Control is turned up on the Sub. ·Make sure the Sub isn't in AutoOff/ Low-power Standby mode. | |
| Standby LED is flashing red (thermal fault) | ·Turn off the Sub and wait 30 minutes before turning it back on. ·Move the Sub to a cooler location. ·Move the Sub to a location that has more ventilation. |
| Standby LED is solid red (system fault) | ·Contact Bose customer service. Visit worldwide.Bose.com/contact. |
| With nothing plugged into the Sub, a light hum or buzz is heard | ·Using an AC outlet tester, test the AC outlet the Sub is plugged into for reversed or open (hot, neutral, and/or ground) contacts. ·If using an extension cord, plug the Sub directly into the outlet. |
| Audio source sounds distorted | ·Turn down volume on the source. ·Turn down Level Control. ·Try a different source. |
| Excessive hum when daisy-chaining multiple units | ·Ensure the level on the daisy-chained unit(s) is not set too high. |
Import Kina: Bose Electronics (Shanghai) Company Limited, Part C, Plant 9, No. 353 North Riying Road, Kina (Shanghai) Pilot Free Trade Zone
Importer i EU: Bose Products B.V., Gorslaan 60, 1441 RG Purmerend, Holland
Importar I Mexico: Bose de Mexico, S. de R.L. de C.V., Paseo de las Palmas 405-204, Lomas de Chapultepec, 11000 Mexico, D.F. Ring til +5255 (5202) 3545 for oplysninger om service aller importor
Importer Taiwan: Bose Taiwan Branch, 9F-A1, No.10, Section 3, Minsheng East Road, Taipei City 104, Taiwan. Telefonummer: +886-2-2514 7676
Importor i UK: Bose Limited, Bose House, Quayside Chatham Maritime, Chatham, Kent, ME4 4QZ, Storbritannien
Bose Corporations hovedkvarter:1-877-230-5639
Importeur aus China: Bose Electronics (Shanghai) Company Limited, Part C, Plant 9, No. 353 North Riying Road, China (Shanghai) Pilot Free Trade Zone
Importador para China: Bose Electronics (Shanghai) Company Limited, Part C, Plant 9, No.353 North Riying Road, China (Shanghai) Pilot Free Trade Zone
Importador de la UE: Bose Products B.V., Gorslaan 60, 1441 RG Purmerend, Paises Bajos
www.Bose.com/compliance

Importatore per la Cina: Bose Electronics (Shanghai) Company Limited, Part C, Plant 9, No.353 North Riying Road, China (Shanghai) Pilot Free Trade Zone
Importatore per l'UE: Bose Products B.V., Gorslaan 60, 1441 RG Purmerend, Paesi Bassi
www.Bose.com/compliance.
Kina importor: Bose Electronics (Shanghai) Company Limited, Part C, Plant 9, No. 353 North Riying Road, Kina (Shanghai) Pilot Free Trade Zone
EU-importor: Bose Products B.V., Gorslaan 60, 1441 RG Purmerend, Hollandia
Mexiko importo: Bose de Mexico, S. de R.L. de C.V., Paseo de las Palmas 405-204, Lomas de Chapultepec, 11000 Mexiko, D.F. Szervizzel es importorrel kapcsolatos informacionert hivja a +5255 (5202) 3545-os telefonszamot.
Tajvani importor: Bose Taiwan Branch, 9F-A1, No. 10, Section 3, Minsheng East Road, Taipei City 104, Tajvan. Telefonszam: +886-2-2514 7676
UK-importor: Bose Limited, Bose House, Quayside Chatham Maritime, Chatham, Kent, ME4 4QZ, United Kingdom
Bose Corporation kozpontja:1-877-230-5639
LINE OUT EQ
LINE OUT EQ
Importeur In China: Bose Electronics (Shanghai) Company Limited, Part C, Plant 9, No. 353 North Riying Road, China (Shanghai) Pilot Free Trade Zone
Europese importeur: Bose Products B.V., Gorslaan 60, 1441 RG Purmerend, Nederland
Importor for Kina: Bose Electronics (Shanghai) Company Limited, Part C, Plant 9,
No. 353 North Rying Road, Kina (Shanghai) Pilot Free Trade Zone
Importi EU: Bose Products B.V., Gorslaan 60, 1441 RG Purmerend, Nederland
Importar Mexico: Bose de Mexico, S. de R.L. de C.V., Paseo de las Palmas 405-204,
Lomas de Chapultepec, 11000 Mexico, D.F. For service- eller importorinformasjon kan du ringe +5255 (5202) 3545
Importer for Taiwan: Bose Taiwan Branch, 9F-A1, No. 10, Section 3, Minsheng East Road,
Taipei City 104, Taiwan. Telefonnummer: +886-2-2514 7676
Importor for Storbritannia: Bose Limited, Bose House, Quayside Chatham Maritime,
Chatham, Kent, ME4 4QZ, Storbritannia
Hovedkontoret til Bose Corporation: 1-877-230-5639
Sub1/Sub2 retning. 9
Importer — Chiny: Bose Electronics (Shanghai) Company Limited, Part C, Plant 9, No. 353 North Rying Road, China (Shanghai) Pilot Free Trade Zone
Importer - UE: Bose Products B.V., Gorslaan 60, 1441 RG Purmerend, Holandia
Importer - Meksyk: Bose de Mexico, S. de R.L. de C.V., Paseo de las Palmas 405-204, Lomas de Chapultepec, 11000 Mexico, D.F. Aby uzyska informacao o uslugach lub importerze, zadzwor pod numer +5255 (5202) 3545
Importer - Tajwan: Bose Taiwan Branch, 9F-A1, No.10, Section 3, Minsheng East Road, Taipei City 104, Taiwan. Numer telephone: +886-2-25147676
Importer - Wielka Brytania: Bose Limited, Bose House, Quayside Chatham Maritime, Chatham, Kent, ME4 4QZ, United Kingdom
Siedziba glowna firmy Bose Corporation:1-877-230-5639
www.Bose.com/compliance.
No. 353 North Riying Road, China (Shanghai) Pilot Free Trade Zone
Importador da UE: Bose Products B.V., Gorslaan 60, 1441 RG Purmerend, Paises Baixos
Chatham, Kent, ME4 4QZ, United Kingdom
Sede da Bose Corporation: 1-877-230-5639
Maahantuoja Kilnassa: Bose Electronics (Shanghai) Company Limited, Part C, Plant 9, No. 353 North Riying Road, China (Shanghai) Pilot Free Trade Zone
EU-maahantuoja: Bose Products B.V., Gorslaan 60, 1441 RG Purmerend, The Netherlands
Mekislon kaahantojua: Bose de Mexico, S. de R.L. de C.V., Paseo de las Palmas 405-204, Lomas de Chapultec, T1000 Mexico, D.F. Huolto-tai kaahantojuatietoja vo kysya puhelinnumerosta +5255 (5202) 3545.
Maahantuoja Taiwanissa: Bose Taiwan Branch, 9F-A1, No. 10, Section 3, Minsheng East Road, Taipei City 104, Taiwan. Puhelinnumbero: +886-2-2514 7676
Maahantuoja Yhdistyneessa kuningaskunnassa: Bose Limited, Bose House, Quayside Chatham Maritime, Chatham, Kent, ME4 4QZ, United Kingdom
Bose Corporationin paskonttor:1-877-230-5639
Importor Kina: Bose Electronics (Shanghai) Company Limited, Part C, Plant 9, No. 353 North Riying Road, China (Shanghai) Pilot Free Trade Zone
EU-importor: Bose Products B.V., Gorslaan 60, 1441 RG Purmerend, The Netherlands
Importor I Mexiko: Bose de Mexico, S. de R.L. de C.V. Paseo de las Palmas 405-204, Lomas de Chapultepec, 11000 Mexico, D.F. Ring +5255 (5202) 3545 for service- seller importorinformation.
Importor | Taiwan: Bose Taiwan Branch, 9F-A1, No. 10, Section 3, Minsheng East Road, Taipei City 104, Taiwan. Telefonummer: +886-2-25147676
UK-importor: Bose Limited, Bose House, Quayside Chatham Maritime, Chatham, Kent, ME4 4QZ, United Kingdom
uuaaunnnnnaanannnnaaaananaananaananaananaananaananaananaananaananaananaananaananaananaananaananaananaananaananaananaananaananaananaananaananaananaananaananaananaananaananaananaananaananaananaananaananaananaananaananaananaananaananaananaananaananaananaananaananaananaananaanaraannnna

Bose Corporation waiywnwunwnnneannnnnnae aenrnnnneennnnnneae 1000000000000000000000000000000000000000000000000000000000000000000000000000000000000

Baaeeae aae ane aeannnne arane 2016 24
Bose Corporation www.bose.com compliance.
- aunauonina
- 1
- aannnnnnaaennnnnnaaannnnnnaaannnnnnaa
- 1nnnnae nnnnne nnnnne nnnnne nnnnne nnnnne nnnnne nnnnne nnnnne nnnnne nnnnne nnnnne nnnnne nnnnne nnnnne nnnnne nnnnne nnnnne nnnnne nnnnne nnnnne nnnnne nnnnne nnnnne nnnnne nnnnne nnnnnee nnnnne nnnnne nnnnne nnnnne nnnnne nnnnne nnnnne nnnnne nnnnne nnnnne nnnnne nnnnne nnnnne nnnnne nnnnne nnnnne nnnnne nnnnne nnnnne nnnnne nnnnne nnnnne nnnnne nnnnne nnnn ne
- aannnnnnaaannnnaanrnnnnae nnnnnnnnnnnnnnnnnnnnnnnnnnnnnnnnnnnnnnnnnnnnnnnnnnnnnnnnnnnnnnnnnnnnnnnnnnnnnnnnnnnnnnnnnnnnnnnnnnnnnnnnnnnnnnnnnnnnnnnnnnnnnnnnnn nn
- 1
- 1
- ananangnssnnnnaaannnnaaannnnn
- 1
nau/2005

yannnnnnaaennn nn nnnnnnnnnnnnnnnnnnnnnnnnnnnnnnnnnnnnnnnnnnnnnnnnnnnnnnnnnnnnnnnnnnnnnnnnnnnnnnnnnnnnnnnnnnnnnnnnnnnnnnnnnnnnnnnnnnnnn
aannnnaananaananaan anananaananaananaananaananaananaananaananaananaananaananaananaananaananaananaananaananaananaananaananaananaananaananaananaananaananaananaananaananaananaananaananaananaananaananaananaananaananaananaananaananaananaananaananaananaananaananaananaananaananaanaraannaa
nnaa aanrnnn n 13 uae (51) Taou Bose S1 Pro naaun anu Sub 7 Sub a "nanae rnae 1.3 uae (51) wannwauwnu 7.1 7n (15.7 laa) nnaian /nnae Taainnnnaaennnnae nn "n" nnnnnnnnnnnnnnnnnnnnnnnnnnnnnnnnnnnnnnnnnnnnn
aannnnnnaeaaeae
-
aannnnnnae annnnne aenrnnnne nnnnne eanrnnnne
aannnnnnaanennnnnnaeennnnnne aennnnnnnae annnnae
- 1
aannnnnnaeennnnnnnnnnnnnnnnnnnnnnnnnnnnnnnnnnnnnnnnnnnnnnnnnnnnnnnnnnnnnnnnnnnnnnnnnnnnnnnnnnnnnnnnnnnnnnnnnnnnnnnnnnnnnnnnnnnnnnnnnnnn
aunnnnnae
aannnnaananaan anananaananaananaananaananaananaananaananaananaananaananaananaananaananaananaananaananaananaananaananaananaananaananaananaananaananaananaananaananaananaananaananaananaananaananaananaananaananaananaananaananaananaananaananaananaananaananaananaananaananaan ana
unununununununununununununununununununununununununununununununununununun
yayanunnuu
mnnnnnne nnnnnnnnnnnnnnnnnnnnnnnnnnnnnnnnnnnnnnnnnnnnnnnnnnnnnnnnnnnnnnnnnnnnnnnnnnnnnnnnnnnnnnnnnnnnnnnnnnnnnnnnnnnnnnnnnnnnnnnnnnnnnnnnnnnnnnnnnnnnnnnnnn nnannn nnannn nnannn nnannn nnannn nnannn nnannn nnannn nnannn nnannn nnannn nnannn nnannn nnannn nnannn nnannn nnannn nnannn nnannn nnannn nnannn nnannn nnannn nnannn nnannn nnannn nnannn nnannn nnannn nnannn nnannn nnannn nnannn nnann
| xiaoyuanwenwenwenwenwen | luyuanshu | |
| xunxun | xunxun | |
| nongyuanwenwenwenwenwenwenwenwenwenwenwenwenwenwenwenwenwenwenwenwenwenwenwenwenwenwenwenwenwenwenwenwenwenwenwenwenwenwenwenwenwenwenwenwenwenwenwenwenwenwenwenwenwenwenwenwenwenwenwenwenwenwenwenwenwenwenwenwenwenwenwenwenwenwenwenwenwenwenwenwenwenwenwenwenwenwenwenwenwenwenwenwenwenwenwenwenwenwenwenwenwan | ≤0.5W | luoyu* |
| wuxuanwenwenwenwenwenwenwenwenwenwenwenwenwenwenwenwenwenwenwenwenwenwenwenwenwenwenwenwenwenwenwenwenwenwenwenwenwenwenwenwenwenwenwenwenwenwenwenwenwenwenwenwenwenwenwenwenwenwenwenwenwenwenwenwenwenwenwenwenwenwenwenwenwenwenwenwenwenwenwenwenwenwenwenwenwenwenwenwenwenwenwenwenwenwenwenwenwenwenwan | ||
| wuxuanwenwenwenwenwenwenwenwenwenwenwenwenwenwenwenwenwenwenwenwenwenwenwenwenwenwenwenwenwenwenwenwenwenwenwenwenwenwenwenwenwenwenwenwenwenwenwenwenwenwenwenwenwenwenwenwenwenwenwenwenwenwenwenwenwenwenwenwenwenwenwenwenwenwenwenwenwenwenwenwenwenwenwenwenwenwenwenwenwenwenwenwenwenwan | ||
Sub1
Sub2
| wna (ga × na × gn) | 53.3 × 26.0 × 52.9 μm. (21.0 × 10.2 × 20.8 μm) | 69.4 × 31.7 × 55.1 μm. (27.3 × 12.5 × 21.7 μm) |
| wnuinangn | 15.5 ng. (34.1 μm) | 23.0 ng. (50.7 μm) |
| wnarirwauwau | 100-240 VAC, 3 A, 50/60 Hz | 100-240 VAC, 4 A, 50/60 Hz |
| wnlanswauwauwauwauwauwauwauwauwauwauwauwauwauwauwauwauwauwauwauwauwauwauwauwauwauwauwauwauwauwauwauwauwauwauwauwauwauwauwauwauwauwauwauwauwauwauwauwauwauwauwuu | 14.9 A v 120 V; 29.3 A v 230 V | 15.2 A v 120 V; 28.6 A v 230 V |
| wnuanswauwauwauwauwauwauwauwauwauwauwauwauwauwauwauwauwauwauwauwauwauwauwauwauwauwauwauwauwauwauwauwauwauwauwauwauwauwauwauwauwauwauwauwauwauwauwauwauwauwu | 5.8 A v 120 V; 32.0 A v 230 V | 2.6 A v 120 V; 6.1 A v 230 V |
Huaanuunnnaaunnnnunnunnnnnnnnnnnnnnnnnnnnnnnnnnnnnnnnnnnnnnnnnnnnnnnnnnnnnnnnnnnnnnnnnnnnnnnnnnnnnnnnnnnnnnnnnnnnnnnnnnnnnnnnnnnnnnnnnnnnnnnnn
nnaaannnnnnae
431389G1/431389G2 CMIT ID aayu
CANICES-3(B)/NMB-3(B)
Ninunu: Bose Electronics (Shanghai) Company Limited, Part C, Plant 9, No. 353 North Riying Road, China (Shanghai) Pilot Free Trade Zone
EU: Bose Products B.V., Gorslaan 60, 1441 RG Purnerend, The Netherlands
In: Bose de Mexico, S. de R.L. de C.V., Paseo de las Palmas 405-204, Lomas de Chapultec, 11000 Mexico, D.F. Tulsinsinnnna +5255 (5202) 3545 wanaaannnna "aannnnn
Jinwunwaiwu: Bose Taiwan Branch, 9F-A1, No. 10, Section 3, Minsheng East Road, Taipei City 104, Taiwan. wunwaiwu: +886-2-2514 7676
UK: Bose Limited, Bose House, Quayside Chatham Maritime, Chatham, Kent, ME4 4QZ, United Kingdom
Bose Corporation: 1-877-230-5639
Wi-Fi Wi-Fi Alliance
Bose, L1 uX SubMatch tnnnnae nneae Bose Corporation
nannnnnnaa nnnnnnnnnnnn
- mnn Sub1/Sub2
Sub1/Sub2
SubMatch
nunu ayanumnnnnaa Sub1/Sub2 PRO.BOSE.COM
n75
nlaananaaannnn
1 1uauun: nuiw Sub w LED
Line: yuyunyuyu yuyun yuyu L1 Pro wuyu noeuyu XLR, uynu TRS, uayunu uya uya TS
3 ayunanaan Line: XLR wuaia
SubMatch: SubMatch SubMatch SubMatch SubMatch SubMatch SubMatch
SubMatch uauuuaunwWw aunu
SubMatch: Sub L1 Pro32 SubMatch
7 104
USB: USB-C 1000 Bose uauu wuuu uuuu uuuu uuuu uuuu uuuu uuuu uuuu uuuu uuuu uuuu uuuu uuuu uuuu uuuu uuuu uuuu uuuu uuuu uuuu uuuu uuuu uuuu uuuu uuuu uuuu uuuu uuuu uuuu uuuu uuuu uuuu uuuu uuuu uUU
9 乌云云云云Line EQ: 责责责责 责责责责 FULI HPF launlsss sse HJ EQUOYUAN Line nuiu wuaan uanrueoqn EQ WLED uanu uanu
Line EQ: 1234567890
L1 Pro LPF 1234567890
Line nay 1234567890
EQ W LED nay 1234567890
1 Wwau/wwu: wLED auaa uauuauuuuauuauuauuuuuuuuuuuuuuuuuuuuuuuuuuuuuuuuuuuuuuuuuuuuuuuuuuuuuuuuuuuuuuuuuuuuuuuuuuuuuuuuuuuuuuuuuuuuuuuuuuuuuuuuuuuuuuuuuuuuuuuuuuuuuuuuuuuuuuuuuuuuuuuuuuuuuuuuuuuuuuuuuuuuuuuuuuuuuuuuuuuuuUU
12 nannnnaa: 1nnnnaa aan nn nnnnnae ne naan anananaan Line annnnn 12 nnnaa L1 Pro32
Phase/Pattern: Sub w LED Cardioid
W
2 2 2 2 2 2 2 2 2 2 2 2 2 2 2 2 2 2 2 2 2 2 2 2 2 2 2 2 2 2 2 2 2 2 2 2 2 2 2 2 2 2 2 2 2 2 2 2 2 2 2
wnnnaaiaeaaanrnnnnae "wunwn n "nauuauauauauauauauauauauauauauauauauauauauauauauauauauauauauauauauauauauauauauauauuu

au: aunuuaa uauuau uauuau uauuuauauauauauauauauauauauauauauauauauauauauauauauauauauauauauauauauauauauau
nss
- 1
- 1uuaanana "nuaanunw" uunu wwnu: aunl Sub unununununnuuau
- nauuauunwLED aauauauauuauu Sub
nuaaiau L1 Pro32 aauau SubMatch

- SubMatch SubMatch Sub1/Sub2
- 1a7e7e7e7e7e7e7e7e7e7e7e7e7e7e7e7e7e7e7e7e7e7e7e7e7e7e7e7e7e7e7e7e7e7e7e7e7e7e7e7e7e7e7e7e7e7e7e7e7e7e7
- 1uWw
- 1
WuWu: aHua L1 Pro waa Sub uunnauauauauauauauauauauauauauauauauauauauauauauauauauauauauauauauauauauauauauauauauauauauauauauauuuuuuuuuuuuuuuuuuuuuuuuuuuuuuuuuuuuuuuuuuuuuuuuuuuuuuuuuuuuuuuuuuuuuuuuuuuuuuuuuuuuuuuuuuuuuuuuuuuuuuuuuuuuuuuuuuuuuuuuuuuuuuuuuuuuuuuuuuuuuuuuuuuuuuuuuuuuuuuuuuuuuuuuuuuuuuuUU
5. naiuaauunun L1 Pro32 uananaunun Sub LW LED aauauauauauauu L1 Pro uau Sub tnaay
Wuue: naiuaeauunrnnn 10 uunwaa Sub uunnsanrnnn
Sub Sub SubMatch Sub Sub Pro32 111111111111111111111111
Iuaun/naunwaaanvua
nannnnnna 4 nnu Sub aee "nanaananaananaananaananaananaananaananaananaananaananaananaananaananaananaananaananaananaananaananaananaananaananaananaananaananaananaananaananaananaananaananaananaananaananaananaananaananaananaananaananaananaananaananaananaananaananaananaananaananaanana an
wnu: 1nnuoioiau/10wuwauwovnuiauauauauauauauauauauauauauauauauauauauauauauauauauauauauauauauauauauauauauauauuuuuuuuuuuuuuuuuuuuuuuuuuuuuuuuuuuuuuuuuuuuuuuuuuuuuuuuuuuuuuuuuuuuuuuuuuuuuuuuuuuuuuuuuuuuuuuuuuuuuuuuuuuuuuuuuuuuuuuuuuuuuuuuuuuuuuuuuuuuuuuuuuuuuuuuuuuuuuuuuuuuuuuuuuuuuuuuuuuuuuuuuuuuuUU
aannnnnaan
Line
XLR wauuuaaaynnaananaanwaaanwaaan an Line 1 (w) uau aynnaananaan
n
Phase/Pattern
Sub nauwauwauwauwauwauwauwauwauwauwauwauwauwauwauwauwauwauwauwauwauwauwauwauwauwauwauwauwauwauwauwauwauwauwauwauwauwauwauwauwauwauwauwauwauwauwauwauwauwauwau
Cardioid
nnae Cardioid nnnnne Sub naenrnnnne nnne nnnnne nnne ne nne nne ne nne ne nne ne nne ne nne ne nne ne nne ne nne ne nne ne nne ne nne ne nne ne nne ne nne ne nne ne nne ne nne ne nne ne nne ne nne ne nne ne nne ne nne ne nne ne nne ne nne ne nne ne nne ne nne ne nne ne nne ne nne ne nne ne nne ne
en an nnnn nnne nnne nnne nnne nnne nnne nnne nnne nnne nnne nnne nnne nnne nnne nnne nnne nnne nnne nnne nnne nnne nnne nnne nnne nnne nnne nnne nnne nnne nnne nnne nnne nnne nnne nnne nnne nnne nnne nnne nnne nnne nnne nnne nnne nnne nnne nnne nnne nnne nnne nnnee nnne nnne nnne nnne nnne nnne nnne nnne nnne nnne nnne nnne nnne nnne nnne nnne nnne nnne nnne nnne nnne nnne nnne nnne nnne nnne nnne nnne nnne nnne nnne nnne nnne nnne nnne nnne nnne nnne nnne nnne nnne nnne nnne nnne nnne nnne nnne nnne nnne nnae
uauuuuauuuuuuuuuuuuuuuuuuuuuuuuuuuuuuuuuuuuuuuuuuuuuuuuuuuuuuuuuuuuuuuuuuuuuuuuuuuuuuuuuuuuuuuuuuuuuuuuuuuuuuuuuuuuuuuuuuuuuuuuuuuuuuuuuuuuuuuuuuuuuuuuuuuuuuuuuuuuuuuuuuuuuuuuuuuuuuuuuuuuuuuuuUU
Line EQ
EQUAONNANLLine 2 aunnnnauanLine EQ unwnl WLED uauu EAeU EQUINuauuauuauu L1 wauuaynuuuea "EQ uuuuuaauuauuauu L1 Pro; uLPwauuuaauuauu Low-Pass uuuuuuuuuuuuuu uuuu" uuuuua Sub Nl Pro32 uuuuuu SubMatchgauuauuauu Line EQ
Anan Line EQ
EQUOQyauuuaanLine2aunnsnauuauanLineEQunw LED uueo aoue EQ uueauuauuauuuu FuLL uwnuunuunu uHPF wauuunrnuu High-Pass uuuuauuauuuaan
wnu: nnl2 Sub nS1 Pro lnnaaynnaan Line EQ 4 nnu walalnu EQ mnuauunauwauwauu S1 Pro LW LED HPF aauauuauu uauauu S1 Pro EQ uauauuuu 4 u
Sub1/Sub2

aannnnaananaananaananaananaananaananaananaananaananaananaananaananaananaananaananaananaananaananaananaananaananaananaananaananaananaananaananaananaananaananaananaananaananaananaananaananaananaananaananaananaananaananaananaananaananaananaananaananaananaananaan ana an aannnnnnaa
yauu Sub 2 uu Sub aunnwnnnnn
nnnnnnnnnnnnnnnnnnnnnnnnnnnnnnnnnnnnnnnnnnnnnnnnnnnnnnnnnnnnnnnnnnnnnnnnnnnnnnnnnnnnnnnnnnnnnnnnnnnnnnnnnnn
nunnnnnnnnnaaau Sub nnnnns 4 nnnnnae nnne ne nnnnnnne nne nne nne nne nne nne nne nne nne nne nne nne nne nne nne nne nne nne nne nne nne nne nne nne nne nne nne nne nne nne nne nne nne nne nne nne nne nne nne nne nne nne nne nne nne nne nne nne nne nne
S1 Pro

nau: nannnnnnae Taaunnu M20 nnu Sub1 uae Sub2 uuaanuwwwawau 1.3 wnr (51) TaBose S1 Pro naaayuu anu Sub1 wra Sub2 aanrnnnnau 1.3 wnr (51) waaanwnu 7.1 nnu (15.7 wae) nss/aiwosunu laaunuunnnaaagauuauuauuau
Sub1/Sub2 wawwawwawwawwawwawwawwawwawwawwawwawwawwawwawwawwawwawwawwawwawwawwawwawwawwawwawwawwawwawwawwawwawwawwawwawwawwawwawwawwawwawwaw

n75n
nwnnaa Sub aavnn
vunnuuunnuunnuun uun ununununun Sub aun

20075: auiuunau uuiu uuaaunau uauuuuauuauu
nun
| ### | ### |
| ### | ### |
| ### | ### |
| ### | ### |
| ### | ### |
| ### | ### |
| ### | ### |
| ### | ### |
| ### | ### |
| ### | ### |
| ### | ### |
| ### | ### |
| ### | ### |
| ### | ### |
| ### | ### |
| ### | ### |
| ### | ### |
| ### | ### ### |
| ### | ### |
| ### | ### |
| ### | ### |
| ### | ### |
| ### | ### |
| ### | ### |
| ### | ### |
| ### | ### |
| ### | ### |
| ### | ### |
| ### | ### |
| ### | ### |
| ### | ### |
| ### | ### |
| ### | ### |
| ### | ### |
本登的安原具音用自信到和
中

Bose Corporation是iE 14/53/EU及尼士康的通用 能在汉E司的信数,欧工和关成的上合有中和有

Ii 1000000000000000000000000000000000000000000000000000000000000000000000
www.Bose.com/compliance
www.Bose.com/compliance.
賊藻藻藥藻藻藻藻藻藻藻藻藻藻藻藻藻藻藻藻藻藻藻藻藻藻藻藻藻藻藻藻藻藻藻藻藻藻藻藻藻藻藻藻藻藻藻藻藻藻藻藻藻藻藻藻藻藻藻藻藻
English 4QZ, United Kingdom
BoseCorporation本社:1-877-230-5639
Wi-Fi Wi-Fi Alliance®的登录表如图所示。
Bose,LI及SubMatch是BoseCorporation的上面印尼
©2022 Bose Corporation. <|im_start|>assistant ©2022 Bose Corporation. <|im_start|>assistant Bose Corporation. <|im_start|>assistant Bose Corporation. <|im_start|>assistant Bose Corporation. <|im_start|>assistant Bose Corporation. <|im_start|>assistant Bose Corporation. <|im_start|>assistant Bose Corporation. <|im_start|>assistant Bose Corporation. <|im_start|>assistant Bose Corporation. <|im_start|>assistant Bose Corporation. <|im_start|>assistant Bose Corporation. <|im_start|>assistant Bose Corporation. <|im_start|>assistant Bose Corporation. <|im_start|>assistant Bose Corporation.
吉默用云自
1
1
MOH
表续
i
告中全国自定global.bose.com/warranty将章示

#
T
音表 5
6
英国进口商:Bose Limited, Bose House, Quayside Chatham Maritime, Chatham, Kent, ME4 4QZ, United Kingdom
BoseCorporation总部:1-877-230-5639
Wi-Fi是Wi-FiAlliance的注册商标
www.Bose.com/compliance
Bose Corporation hereby declares that this product is in compliance with the essential requirements and other relevant provisions of Directive 2014/53/EU and all other applicable EU directive requirements. The complete declaration of conformity can be found at: www.Bose.com/compliance.

The product, in accordance with the Ecodesign Requirements for Energy Related Products Directive 2009/125/EC, is in compliance with the following norm(s) or document(s): Regulation (EC) No. 1275/2008, as amended by Regulation (EU) No. 801/2013.
| Required Power State Information | Power Modes | |
| Standby | Networked Standby | |
| Power consumption in specified power mode, at 230V/50Hz input | ≤ 0.5 W N/A* | |
| Time after which equipment is automatically switched into mode | 4 hours N/A* | |
| Power consumption in networked standby if all wired network ports are connected and all wireless network ports are activated, at 230V/50Hz input | N/A* | |
| Network port deactivation/activation procedures.Deactivating all networks will enable standby mode. | *Product does not utilize a networked standby mode for a Bluetooth* connection and does not have the ability to be configured to a network via Wi-Fi* or Ethernet | |
Sub1
Sub2
| Dimensions (H × W × D) | 53.3 × 26.0 × 52.9 cm (21.0 × 10.2 × 20.8 in) | 69.4 × 31.7 × 55.1 cm (27.3 × 12.5 × 21.7 in) |
| Net Weight | 15.5 kg (34.1 lb) | 23.0 kg (50.7 lb) |
| Input Rating | 100–240 VAC, 3 A, 50/60 Hz | 100–240 VAC, 4 A, 50/60 Hz |
| Initial turn on Inrush current | 14.9 A at 120 V; 29.3 A at 230 V | 14.9 A at 120 V; 29.3 A at 230 V |
| Inrush current after AC mains interruption of 5 s | 5.8 A at 120 V; 32.0 A at 230 V | 5.8 A at 120 V; 32.0 A at 230 V |
Shielded cables are required to maintain regulatory compliance.
The product label is located on the bottom of the product.
Model: 431389G1 / 431389G2.The CMIT ID is located on the bottom of the product.
CANICES-3(B)/NMB-3(B)
Information About Products That Generate Electrical Noise (FCC Compliance Notice for US) NOTE: This equipment has been tested and found to comply with the limits for a Class B digital device, pursuant to Part 15 of the FCC Rules. These limits are designed to provide reasonable protection against harmful interference in a residential installation. This equipment generates,
uses, and can radiate radio frequency energy and, if not installed and used in accordance with the instructions, may cause harmful interference to radio communications. However, there is no guarantee that interference will not occur in a particular installation. If this equipment does cause harmful interference to radio or television reception, which can be determined by turning the equipment off and on, the user is encouraged to try to correct the interference by one or more of the following measures:
Reorient or relocate the receiving antenna.
- Increase the separation between the equipment and receiver.
- Connect the equipment into an outlet on a circuit different from that to which the receiver is connected.
- Consult the dealer or an experienced radio/TV technician for help.
Changes or modifications not expressly approved by Bose Corporation could void the user's authority to operate this equipment.
This device complies with part 15 of the FCC Rules and with ISED Canada's license-exempt RSS standard(s). Operation is subject to the following two conditions: (1) This device may not cause harmful interference, and (2) this device must accept any interference received, including interference that may cause undesired operation.
This symbol means the product must not be discarded as household waste, and should be delivered to an appropriate collection facility for recycling. Proper disposal and recycling helps protect natural resources, human health, and the environment. For more information on disposal and recycling of this product, contact your local municipality, disposal service, or the shop where you bought this product.
中国制限載的有害/危險物質一覽
中国仁有之输入元:Bose Electronics (Shanghai) Company Limited, Part C, Plant 9, No.353 North Riying Road, China (Shanghai) Pilot Free Trade Zone
EUIにおはし输入元:BoseProductsB.V.,Gorslaan60,1441RGurmerend,TheNetherlands
MEXICO 0000, D.F.For service or importer information, call +5255 (5202) 3545
台湾における輸入元:Bose Taiwan Branch, 9F-A1, No.10, Section 3, Minsheng East Road, Taipei City 104, Taiwan. Phone Number: +886-2-25147676
英国における輸入元:Bose Limited, Bose House, Quayside Chatham Maritime, Chatham, Kent, ME4 4QZ, United Kingdom
Bose Corporation Headquarters: 1-877-230-5639
- Sub1/Sub2 Roller Bag
- Sub1/Sub2 Adjustable Speaker Pole
- SubMatch Cable
IPEADIPEXKDAEHN/IIPEAOCTEPEXEHN

AHHHCHBOMA HKA KOPNYYCPOOYKTOA3HNAET, YTO B KOPNYYCYPCTPOWCTBA MMKOTCA HCNHOANPOPAHBHEI CTOPHNHMI HAIPNAHNI, KOPTOpBE MORYT CTATb PnINHNOI NpApXEHMR 3AEKTPNECKHM TOKOM.
3T0TNCHMOHAHOKOPYKePNOyAKTAO3HaAeT,4TOBDAHHOMpyKOBOACTBEMMEOTCABAHXHMeNHTPYKUIMNOOKCnAYATAUMNOBcAYKUBAHIO.


CadejpnT MEKAE DETAH, KOOTBIE MOYT CTbT NPPHNO YAYIJI. He npEHAHAeHO DAJ EETAOxPcXACT.

B DAHHOM yCTPOIcTBc COaEPKIMTCMAHHTHOBEUeCTBO.PpOKOHcYbTpyPteCb CCBOM BAPCHOM,MOKET A OHO OK3bIBaTB BAIRHE HA NmTAHTMPOBAAHOE MeIMUNHCIOE YCTPOIcTBO.

NCPOA3yTeTOAiko HA BkCote He 60Aee 2000 McTpoB.

AaHHeO6o3HueHHe Ha H3dEeYk3bIbaet Ha ONaCHOCTb ONPOKnDIBaHnR Pm MOHTaKe HA CTOnke.

He HAMHNEI, He MOUHIMPYTE IN CHMIAI NOAEBKHY KPOUUY HA BxOADNMTAHAR Sub/Sub2.B Kopncy yCTPOBCTBA IMEOTCB HEN30APBOAHHHEI NCTOYAKHN HANPAKEHIN, KOPTOPE MGYT CTAB PNIHHIOH NOPAXHEHIA 3AEKTDPKCKKPM TKOM.
Pe3b60aB BCTABKMA20AARKpEaHnCTOKHnHA Sub1 nSub2 paccHTAHn HA cTOKy BcTOOTdo 1,3MTPOC yCTAHOBaEHBM HA HE BOSI S1Pro. He KNOAb3yTe Sub1 HAM Sub2 CO TOKKAMN BTOCBOBAA E METPOB N POMKOROBOPTEAAMB, CEC KOTOByPNEBbUAET 7,1KT, INIOAb3OBAHNE YCTAHOB 3C TOCKOH N POMKOROBOPTEAAMB, FAE PNEBbUH ODHM
0603aehHHbBIIe npametpoB,MOKET CTbTb pNMMHNO Tnepn yCTOMMBIOCTyCTAHOBKN PNPBECTA KTPABMAM.
He BbnoHnAHTe HmKaHX Hepa3peHHeBHX H3MeHeHn DaHHOrO yCTpoCTBA.
HeNCNcB3yIeTBABTOMO6MAxMIAOAKX
Bo BpMa NcNtAoBbAHaHn He pa3MaUaTe yCTPOACTBo BO rpaHmueHHOM nPoCTpaHCTBE, HAnPIMep B CTHe MM B 3AKpBbTOM LkQaФy.
AepjHte yctpoCTBO BAAOTKpBITOTORHnMCTOHNKOB TnA. He CTABTe ICTOHNKOTKpBITOTOROHn, HAPPMep 3axxkeHHBe CBEaH, HAYCTPOCTBOAMPDAOMC HIM
YTO6bI CHN3HTB PNC B03TROPANH HNNOPAHEH 3AEKTPWCKHM TOKOM, He NOaepraTeYCTPOCTBOB3EChTBMOOJKAA, HKNKOCTeH HNA BAAH.
MzberaTe nonaHaHn KaIeBn 6pIb3r XnKocTn Ha yCtpoCTBO. He CTabte PpeMetbl HAnoAHHeHbE JxKoCTbO, HApIMPeBa3b, Ha yCtpoCTBO AAM PdAm C Hm.
HeHIOAByTe HIBePTnpyIOUmYcHAnTeAb MOIHOCTN CaaHHbIM PPOdYkTOM.
- Pnepa nokaioueHem ceteBoto hlypa B p03eTKy 3AeKTPocTeH Heo6xOAnMo IpeDyCMOTpB 3aEMAHMe MAn CeteByIO p03eTKy C 3aUHTbM 3aEMAHMe LcIIa.
- PnH KTOA630BAAHH CTeBOB BAAK H NII PpIb6pHOrO CoaDHHTEA BKAeCTBe YcTPOECTBa OTKAIQHEHNA 3TO YCToPCTBO BcERda DOAIAHO 6BtB Bpa6OHc COCTOHHN.
HopMaTHBnA HnΦOpMaun
B COOTBTCTBN C DAPKTEHABOON 2009/125/EC NO 3KOALQWHECKMN TPE6OBAHIMN K PNOAUYUN,BAHIOUJE HAI NOTPBEHME NHEPIIM,DAHIOE KIAIAME OTEBAYE TPE6OBAHIMN CADEYQUXIN HOPMATIBHBIX DOKYMEHOTB: PerAAMENT (EC) No. 1275/2008, C yETOM nonpapOB K BPAAMETHE NO. 801/2013.
Hnnpotep BBeAMKo6pHTAHm: Bose Limited, Bose House, Quayside Chatham Maritime, Chatham, Kent, ME4 4QZ, United Kingdom
Uta6-Kbaptma Kopnpaunn Bose Corporation:1-877-230-5639
Wi-Fi RABAETCAperncTpnpoBaHbIM ToaBpHb3HaKOM KOMnAHm Wi-Fi Alliance
Bose, L1 u SubMatch abAIOCT TOBAPHbIMN 3nakmnpopauMn Bose Corporation.
BceOCTaHbIeTOBAPHbIe3HAKIIBARIOTCoCObTeBHHOCTbIO COOTBETCTBYOLIMX BAAdAEAbLIE.
POMTVAKOKHOENAHNAHBOCTNBoSe DOCTYNAHa BBeB-CaTe BoSe.
2022 Bose Corporation. 3anpeuetaTcBocpOImBOaHb, nMehHT, paacpoCTpaHb HnHBM Cnco6oM nIOAbaOBaT bAokbe Yactn TTO DOkymeTA 6e3 pIpeBaPntEhHO rncbMeHHOr oapeHHeHr.
3aOnaHnTe H coXpaHnTe.
CepHHHbHOMeH HOMeMoAaHaxoARcraHa3TmKteNpOaYKaHaHNKHeHnAeHnYCTPOCTBA.
CepHHbH Homep:
Homep moeaik:
O630p 5
KoMnAeKT NoCTaBKn 5
AnonHnTeBHeIe akceccyapbl. 5
HactpoKa 6
PoiKauHn npeyAToptbl. 6
IopKluoyene K nctouHky nntaHna 7
IopKIOUeHHeHocpeAcTBeHHo K PO3eTke 3eKtpOnnTaHnra. 7
IopKaIOUeHne K cncTeMe L1 Pro32 c nOmoIbIO Ka6eA SubMatch 8
A ToMaTnueCKoe BbIKaHcyHeHne /peKIM OxNHaHc Hn3Km 3HepronoTope6aHHeM. 8
BxoAbi N BbIXOAbi 9
AnHeHbI BxOa. 9
AHHneHbI BblXoA 9
Hac trokki 9
Φa3a/DnαρaMma HappaBaeHHoCTN. 9
YpoBehb 10
3KbAaI3ep AInHeHbIX BXOIOB 10
3KbAan3ep AnHeHbIX BbIXoOb. 10
Bb6op HnpaBHeHn npu yctaHOBKe MoyAe Sub1/Sub2 10
IcnoB3OBAHnE BCTaBKn AAn KpePAnEnn CToKn c S1 Pro 11
YxOaH o6cAynBaHne 12
OuicTkMa Moyra Sub. 12
Ponck uyctpaHHe HeucnpaBHOCTeI 12
0630p
KOMNAEKT NOCTABKN
Sub1 Sub2
IoakloueHne K nctOuHnky nHTaHna
CyueTBA cnoo6a noKlueyHnMoayr Sub K nctOuyHKy nTaHn: noKluoyHne K po3e 3eKtponTuHn Hn noKluoyHne K cncTeMe L1 Pro32 c nomoubko ka6eA r SubMatch. KpbuKa BxOa nTuHn npdeOTbpauaet OHOBpeMeHHoe noKluoyHne K oboum BXoam nTaHn. OAOBpeMeHHo MOxHo NCNoAusb0BaTb ToAboKO OAHO n3 ABYX NOKluoyHn K nCTOUYHKy nTaHn.
Pn noKluHHeHocpeCTBeHHo K po3eTke 3AekTpOnHAn HcBnHbTe KpbIuKy BxoDa NtAHN BLeBO, YTo6b1 3aKpItb BxOa SubMatch. Pn noKluHHeHn K cncTeMe L Pro32 c nomouhbo Ka6eAa SubMatch CBAHbTe KpbIuKy pa3beMa NtAHN BnpaO, YTO6bI 3aKpItb BXOa NtAHN.

BHIMAHNE. He n3MeHnTe, He MoAnFmUpyIe N He CHMaIte NoABnKHyIO KpbIuKy HaB BXoOM nITaHn Sub1/ Sub2. B Kopnyce ycTpoiCTBa HMeOTcR HeN3OAnpOBaHHbIe NCTouHKn HApJxKeHn, KOtOpbie MOrY T CTAb npuHnO npaXeHn 3AekTpnuCeKM TOKOM.
IpaKauyehne HnocpeAcTBeHHo K po3etke 3AekTpOnHtAnH
- NpKaHouHTe Ka6eAaNTaHnK BxOy NTaHn.
- POnKAnOHTe ApyroI KOHeI Ka6eI NITaHnI K PO3eTKe 3AeKTpONtAHnI.
PnmeaHHe BkauyTe NtAHne Moayr Sub 0 noKluOeyHn BCEx nTochNKOB.
3. Haxmte KhoNky peXma OxnaHn. Pnp BkIoueHH Moay Sub nHAnKaTOp 3aropntc 6eAbIM.
IpaKaIOueHHe K cncTeMe L1 Pro32 c nomoubIO ka6eA SubMatch
- PioaCOeAHnTe Ka6eAe SubMatch K BxOaY SubMatch Ha Sub1/Sub2.
- IopaoeAHnHTe ApyroKoHeu Ka6eAa SubMatch K BbIXOy SubMatch Ha L1 Pro32.
- PAnKIAIOHTe Ka6eAeB NtAHn K BXOy NtAHn Ha L1 Pro32.
- IopKIAUOHTe ApyroI KOHeI Ka6eA NITAHN K PO3eTKe 3AEKTPOINTAHNA.
PnmeHne. He BkUoayTe NtTaHne CNTeMb L1 Pro mmoAyra Sub do nOaKIOueHna BCex nCTOHHKOB. OonoAHHTeAbHbIe CBeDEHnO IOaKIOueHn INCTOHHKO B K CNTeMe L1 Pro32 cm. B pykoBOAcTBe BAaDeAba L1 Pro32 Ha Be6-cAnTE PRO.BOSE.COM.
5. Haxmte KhoNky pexnma OxnaHnHa cnTeMe L1 Pro32, 3aTe m Haxmte KhoNky pexnma OxnaHnHa moyne Sub. Pn BkAIOyeHH CNTeMb L1 Pro n MOdyA Sub COOTBeTCTByIOUne INAnKaTopb Ha Hx 3aOpTc8eAbim.
IpmeaHne. Haxmte u yepknae KhoNky pexnma OxHaHn B TeueHne 10 cekyHd, yTo6bI BOCCTaHOBtB 3aBOACKHe HactpoiKu Moaylra Sub.
Pnncno3oAHnn AByX MoyAe Sub, noKauyeHHbIX c nmoouk Ka6eAa SubMatch, chayaa BkauoyTe MoyAe Sub, noKauyeHHb HENOCpeCTBeHHO K CNTMe L1 Pro32, a 3aTe M BKauoyTe BTOPOmOyAe Sub.
ABTOMaTHueCKoe BbIKAOUoyHne / pexKm OxNdaHnC Hn3Km 3HeprOtonpe6AeHnEM
Ecam Moayb Sub He nCnoB3yETcB TeueHne YeTbpex YacOB, OH aBTOMaTnueckn BbIKAIOaetcN Nm IepexoNT B pexm OxNAdHn C Hn3KIM 3HeprONoTpe6LeHem DAA 3KOHOOMN 3Heprn. TTo6bl BbIEcTn Moayb Sub n3 COCTOHN A BtOMaTnueeCKTO BbIKAIOueHn Nm PEXMMA OXNAdHn C Hn3KIM 3HeprONoTpe6LeHem, HaxMITE KhoNkY peXmma OXNAdHn.
IpmeaHne. AY OTKIOUeyHnpeKIMAbTOMaBbTOeCKO BbIKAOyeHn HnpeKIMAmOKNADHnC HN3KM 3HEPronOTpe6LeHnEM OHOBPeMeHHo HxMNTe N yApEHNBaTe KONKY 4A3b/AnarpaMMbHappaBHeHocTH IN KHONKY 3KBaAa3epa ANHeHbIX BbXoAOB B TeueHne 10 cekyHa. 4To6bl BKIOUYtbpexHM aBTOMaTNUeCKOROBbIKAOyeHn/ peKIM OKnDAHn C HN3KM 3HEPronOTpe6LeHnEM, NOBTopNTe npNBeAEHHbe BblSe AeCTBn. OTKIOUeyHne peKIMMa ABTomATNUeCKORe BbIKAOyeHn/peKIMAmOKnDAHn C HN3KMm 3HEPronOTpe6LeHnem npNBeDeT K yBeANueHIO NOTpe6LRemOn 3HEprnn, KOrda MoySub He nCNOB3yeTCra.
BxOaBn BblXoAbI
AnHeHbI BXoA
AHaIOrOBbI BxOa AIA NOkAIoueHn CnCTeMb L1 Pro IAn dpyrOIO nCToUHnKa IHeHOrO ayDnOcHnHa. CoBMeCTM C Ka6eAIm XLR, 6aAaHCbIM Na6eAIm TRS n He6aAaHChbIMn Ka6eAIm TS. AIA KOHfNpyaun CO cTepeo3ByKOM NcNoA3yIte AnHeHbI BxoA 1 (Aebi) IN AnHeHbI BxoA 2 (PpaBbI) OdHOBeMeHo.
ANHeHbI BbIXoA
NcnoB3yTe Ka6eIb XLr IaI NOkAIOUeHn AHeHOro BbIXOa K rPOMKOrOBOpTeAIO. AAnCTepeOFOHNuecknx KOHpyauCn UcNoB3yTe AnHeHbI BbIXOa 1 (Aebbl) n AnHeHbIB BbIXOa 2 (pabbl) OdHOBeMeHNO.
HacTpoKn
Φa3a/AnarpaMa HnPaBaeHHoCTN
OTperpynpyTe noArybMoayy Sub. HaxMnte KhoNky AAnpeKluOeHn Mekdy nooXnTeBHOI (+) n o6paTHOH noAryphocTbO (·) .Ppi Bb6ope OAnHOro n3 npaMeTPOB COOTBeTCTByUOni INdNkaTOp 3arOpNTc8eMbIM. Bb6epnte noAryphocTb, KOtopaOBecneuBaET HanAuyUee 3ByuHaHE B NcNoAb3yeMoJ KOHfUrpaun.
KapAnonAHyi peXIM
KapAnOnHbI pexnmpaTcBb3HaueH AINCNoB3OBAHnco CTeKOM n3 AByX NAdHTNHyix MoayMe Sub. OH no3BOAeT cfoKycnpoBaTb 60bWyo qac7b 3ByKOBoi 3Heprn npeA CTeKOM n3 MoayMe Sub n yMeHbWntb 3ByKOByIO 3HeprnIO, rHeepnyEmyO 3a Hm. HaxMnte N yDepxNBaTe KhoNky B TeueHne YeTBipex CeKYd, YTObbl Bb6paTb KapAnOnHbI peXm. PnBb6ope 3TOrO npaMeTpcoootBeTCTbyUoynu INADKaTOp 3aropntc 6eBIM. ChOBa HaxMnte N yDepxNBaTe KhoNky, TTObI nepeKAnOHTBCra O6paTHo Ha NOOXInTeBHyIO NOARPHocTb (+). KapAnOnHbI peXm CLeAyeT NCNoB3OBaTb ToBko B KOHfpyaun Co CTeKOM n3 AByX NAdHTNHyix MoayMe Sub. PnueM BerxHnMoaySub DoJxhen 6bITb HApBaAen Ha OXBaTBiBAeMyO 3OHy, a HIXHN - Ha EOXBaTBiBAeMyO. AAB BerxHero MoayAra Sub CLeAyeT Bb6paTb C NOMOsbIO KHOKNs AaHnPaBAAEHHOCTN NOOXInTeBHyIO NOARPHocTb (+), a AAN HxHReTo MoayAra Sub ycTaHOBnTb C NOMOsbIO KHOKNs Aa3bl/AnpapMaMMbI HApBaAeHHOCTN NOOXInTeBHyIO NOARPHocTb (+), a AAN HxHReTo MoayAra Sub ycTaHOBnTb C NOMOsbIO KHOKNs Aa3bl/AnpapMaMMbI HApBaAeHHOCTN KapAnOnHbI peXm (CARDIOID). PnHACTroKe YPOBnAIACTe Ka MoEyNe Sub B KAPAnOnHOM peXmte Heo6xoAMmoYcTaHOBnTb peryAToPupOBnHa o6oNx MoayAx B ODoHO I TO Jke NoAoKeHne. IHΦopMaunio O Bb6ope HApBaAeHnna DnArpaMMax HaPapBaAeHHOCn CTeKa MoEyNe Sub CM. Na PrnbedeHHbx Hxke cxemax.

YpOBeHb
HactpoTe ypoBHe BbIXOHO rAOIOHO rAaMoYr Sub.ChaaAa yCTaHOBe C nOMOuBIO peryAToPA yPOBn H3Koe 3HaueHne, a 3aTeM IOBbIaHte ypoBHe Do Tex nop, Noka HNDKaTOp CNHbAa/OTceEHn CNHbAa 6yDeT npdoAkaTb ropeTB 3eAeHbIM. PNOXKeHne peryAToPA yPOBn HE BANREt HA ANHeHbE BbIXOAbI. PpN cNoA3OBAHm C cInCTeMOi L1 Pro32 peKoMeHdyETc yTaHOBnTb peryAToP B NOOXeHne «Ha 12 YacOB». PpN cNoA3OBAHm DByx MoyJe Sub c OAnOH cInCTeMOi L1 Pro peKoMeHdyETc yTaHOBnTb peryAToP yPOBn
B ODHIO TO JKe NIOAOKeHHe Ha 06OuX MoDyAyx.
3KbAaI3ep ANHeHbIX BXOAOB
AIAI N3MeHHeHn HAcTpoiKn 3KBaAla3epa 06oX ANHeHbIX BXOAOB HaKImaTe KHOKy 3KBaAla3epa ANHeHbIX BXOAOB, NOKA INHAnKaTOp, COOTBeTCTByIOUm Tpe6yEmomy peKIMy, He 3aRopNTc8eMbIM. YcTaHOBnTE peKIM L1, yTO6bl NCNoB3OBaTb 3KBaAla3ep BxOHOrO CnHbA, ONTNMn3nPoBaHHbI AII npOdyKTob L1 Pro. YcTaHOBnTE peKIM LPF, yTO6bl Ha BXOdax npimeHraCnHbTp Hn3kNx qactOT. PpN IOkAIouChEN MoyA Sub K cInTe Me L1 Pro32 c nOMoBtBu Ka6eLa SubMatch AIA 3KBaAla3epa ANHeHbIX BXOAOB ycTaHaBANBaETc4 nnCnpoBaHHbI peKIM L1.

3KbAaI3ep AINHeHbIX BbIXOAOB
AIAI N3MeHHeHn HAcTPOKn 3KBaAun3epa 06oINX ANHeHbIX BbIXOoB HaXmMaIe KHOKy 3KBaAun3epa AINHeHbIX BbIXoAOB, NOKA INHAnKaTOP, COOTBeTCTByIOUIN Tpe6yEmomy peXmMy, He 3aOpuntc 6eAlIM. YctAHOBNTe peXm FULL, UTo6bl NCNoA3OBAbT NOHbI AnaNa3OH qACTOT, INN peXmHPF, UTo6bl HA BbIXOaX pImeHraC fNtBp BBICOKNX qAcTOT.
IpmeHne.EcMMOyMb Sub nCNOAByeTc CnCTeMoS1Pro,HaXMMte u YApKNaBtTe KONKy 3KBAaAa3epa AInHeNbIX BbIXoOB B TeueHne YeTbipex CeKYH, YTO6bl BKAIOHTb 3KBAaAa3ep, CNEuHaBHO ONTNIM3npoBaHHbIAA NcNoA3OBaHnca CnCTeMoS1Pro. HDAkAtop HPF 3arOpNTc 3eJeHbIM. YTo6bl OTKIAOHTb 3KBAaAa3ep S1Pro,HaXMMte u YApKNaBtTe KONKy B TeueHne YeTbipex ceKYH.
BbI6Op HappaBHeHn npu ycTaHOBe MoaYNe Sub1/Sub2

BHIMAHNE. He pa3MeaIte o6OpyOBAHne Ha HeycToNvBbIX NOBepxHocT8X. O6OpyOBAHne MOKeT IOTepaTb yCTOnuNBOcTB, YTO MOKeT IpNBecTN K BO3HnKHOBeHnO ONaCHoCtTuAun N BO3MOKhbIM TpaBMam.
OCTOPOXHO.He yctaHaBnBaHte B cTeK 6oAee AByx MoyAeN Sub. B cTeKe OAnXhBi NCPOA3OBaTbCRA MOyAu OAHOH N TOJ Ke MOAeN.
B ropuoHTaIbHbIX KOHOFnpyaunx OTe pnyuynrte NoLoXeHne AOrToTna, nobepHyB erO.
Ara co3aHnKoHfIpyaui Co cTekAmN B KOMPiEeT NocTaBKn MoyA Sub BXOaT YeTbipe
Kncpuyuue HoxK, KOtOpBe oecneuBaHT KpeIaeHne KdpYrOmy Moayu Sub aHaAoTuHoi MoeA.
Ptn yCTaHOBKe MoyAe Sub B rOpN3oHTaBHyi CTeK, PpeXe Yem NOAkuOaTb NITaHne N IcTOHKN,
Heo6xOAnMo Bcerda CaeNTb 3a TeM, YTO6bl HOxKb 6bl CNeIaeHbl Bmecte.
HcnoAb3OBAHHe BCTaBKn AAn KpePAnEnn CToKn c S1 Pro

BHIMAHNE. Pe3608aB BCTaBA M20 A KpeIeHn CToIKN Ha Sub1 N Sub2 paccuTHa Ha cToKy BbICOTO 1,3 MeTpca C yctahOBaHbIM Ha Hei Bose S1 Pro. He nCnoA3yIte Sub1 HN Sub2 co CToIkAMn BbICOTo 6oAee 1,3 MeTPOB IAN rPOMKOROBOpNTeAAMn, BEc KOtOpbIX PpeBbIaAet 7,1 KR. NcNoA3OBaHne yCTaHOBKn CO CToIKoN I rPOMKOROBOpNTeAEM, r4e PpeBbIaHE OAnH N3 O6O3HaueHHbIX Bblwe npaMeTPOB, MOKeT CTAb IIpNCHIOI NOTePN YCTOUYBOCTN YCTaHOBKn IN PPUBECTN K TpaBMam.
Moayn Sub1/Sub2 KOMNekTpyoTcpe3b60Bm BCTaBkoM M20 AKNKpeNEnHcToKn. BCTaBa coBMeTIma CdoONAHTeAHO peryAnpyeMo cToKO Boso Sub1/Sub2, npeHa3NaeHHo AINcNoA3OBAHnC cnCTeMOBose S1 Pro. (DoONAHTeAHyIO INΦOpMaUHcM. B pyKOBOdCTBe BlaaDeAa peryAnpyeMo cToKn Ha Be6-caTe PRO.BOSE.COM.)
YxOa n o6cayxNbaHne
OuNCTKa MoAyAra Sub
Ary ouhctkn Kopnyca nCteMbI NCIOB3yIe ToAIBKO MrgkyIO, cyxyIO TkaHb. Pn Heo6xoAMocTN OCTOpOxHO ouhctntpewETky Moayra Sub c NOMouBIO nbIaeocca.

BHIMAHHE.He noB3yITeCb HUKAKMn pAcTBOpHTeAMyN, XUMUeCKMn BeueCTBaMn NAn YNCTRAHMM paCTBOPaMn, COePkaUmm CnnpT, aMMNAK NAn a6pa3NBhIe qAcTIubl.
BHIMAHNE.He nCnoB3yIe aApO3oAN B6An3n yCTpoIcTBA n He dOnyckaIte IonaAahn JNkOcTe BHyTpB AIO6bIX OTBepCTNI.
Ponck nycTpaHene HencnpaBHOtei
U 2010
Vehilal ke Aayatok: Bose Electronics (Shanghai) Company Limited, Part C, Plant 9, No. 353 North Riying Road, China (Shanghai)
Bose Products B.V., Gorslaan 60, 1441 RG Purmerend, The Netherlands
Molmas de Chapultec, 11000 Mexico, D.F. Salmi, 34545 parr kai
Laiyavan 9F-AL, No.10, Section 3, Minsheng East Road, Taipei City 104, Taiwan.
UK Aotayatok: Bose Limited, Bose House, Quayside Chatham Maritime, Chatham, Kent, ME4 4QZ, United Kingdom
Bose Corporation 1-877-230-5639
Wi-Fi, Wi-Fi Alliancea ka Eek paokjokut
Bose, L1, Aoi SubMatch doon Bose Corporation
Anoyy Suhny Tefe 1
Bose kio gopnayatna oit Bose kio neebsaodot pr 4ypal
JzTef 2015
3. 3.5.7.8.9.10.11.12.13.14.15.16.17.18.19.20.21.22.23.24.25.26.27.28.29.30.31.32.33.34.35.36.37.38.39.40.41.42.43.44.45.46.47.48.49.50.51.52.53.54.55.56.57.58.59.60.61.62.63.64.65.66.67.68.69.70.71.72.73.74.75.76.77.78.79.80.81.82.83.84.85.86.87.88.89.90.91.92.93.94.95.96.97.98.99.100
Kikeshi SubMatch kebrel kef Saha L1 Pro32 sre konneek k

- SubMatch kebabal kof Sub1/Sub2 pR SubMatch 2nnpot m Ppag
- SubMatch kebbalke duusre klo L1 Pro32 ke SubMatch 4uotpmt mclgak
- 泰瓦茨卡契克和L1Pro32帕瓦茨贝伊尼阿夫蒂耶夫
- 4
J 1 Pro 32
Aapnne Sub koe saaek karnna
Uotpud k s aay d 1 gai vrtu o k eovl n r m, uoy k pae so h i saf kare | ydt t avvshyak h, to saavthanipukk Sub kti jilat k o h va s

Sahavahajniikiri Sbi vilalayun, rassahayinok pnday y A lkoehl, Amooyia Ahya Ahya k Mihit L sapha cghol ka a npoyogn nohi kare/
Sahmaksya Jnivabar
Aai jll jlll jil jil jil
gill lio aolll jnill lslp
Jg 1
y
www.Bose.com/compliance
2016 p 1
Jabl www.Bose.com/compliance 1
:www.Bose.com/compliance
aill 45
y j 100
j 1
15 2
y
y 1
aal lal y aay
iiaie iie 1
Plant 9, No. 353 North Riying Road, China (Shanghai) Pilot Free Trade
Zone
Bose Products B.V., Gorslaan 60, 1441 RG
Purmerend, The Netherlands
Bose Taiwan Branch, 9F-A1, No. 10, Section 3, Minsheng:
+886-2-2514 7676:East Road, Taipei City 104, Taiwan
: ,Bose Limited, Bose House, Quayside Chatham Maritime, Chatham
Kent, ME4 4QZ. sssall sssll sssll sssll
1-877-230-5639:Bose
Wi-Fi Alliance® AS JIJI 1000 Wi-Fi
Bose Corporation is SubMatch, L1, Bose
ylll llll 1
Bose Bose laa
Bose Corporation 2022
j 1
a
gaii jai jaiaiai jai jai jai jai jai jai jai
:
:
julial jus clina
global.bose.com/warranty 5
y
A
.
·
j
i j k l o p q r s t
Bose Corporation 2
jlll l jnnnne nnnnne
() (FCC) 15.
y 1
y
j 1
aaiy iayal yaiy jai 10yai 1
gill lia aie y jil gll gll glll

jally gald s jgall o jgal
PRO.BOSE.COM Sub2/Sub1
21 × 21
s
gao jia jilge bai:
JedlLED. Sub
.Sub
L1 Pro 5
XLR 154 g jg jg jg jg jg jg jg jg jg jg jg jg jg jg jg jg jg jg jg jg jg jg jg jg jg jg jg jg jg jg jg jg jg jg jg jg jg jg jg jg jg jg jg jg jg jg jg jg jg jg j
glc jzaiLJxLR Ls piai:gbal
j
Sub SubMatch
j 1 JyLo j. SubMatch
Sub2 Sub1
.SubMatch L1 Pro32
jol jol jial plalil gai: aill jlae
SubMatch
eaiy jjgall laljll jll g biall
LLED
LED
ie jssj jgjj gjj jgjj
Sub.
gai gaii
la i 1
j2. gssgssgssgss
y
L1 Pro32 ge plalil 1e (plalol) 12 aell
Sub Sub 1234567890
jlll LED jie aaii
g j 12/2 Sub2/Sub1 12/2
J

0jil 1iab iis jgsill
1
.2
Jusy 21 Sub 000
.Sub 1000000000000000000000000000000000000000000000000000
SubMatch L1 Pro32
1
2
5
.Sub1/Sub2 SubMatch SubMatch 1
L1 Pro32 SubMatch SubMatch
.L1 Pro32 4
4
PRO.BOSE.COM L1 Pro32 5 Sub y!L1 Pro 5 L1 Pro32 pbln
LED Sub L1 Pro32
Sub L1 Pro
Sub 10 aal
L1 Pro32 p 50 Sub SubMatch Sub
Sub
aaiin 1
ailll llll 11111111111111111111111111111111
Jusu 1
aaii jie jie jie jie jie jie jie jie jie jie jie jie jie jie jie jie jie jie jie jie jie jie jie jie jie jie jie jie jie jie jie jie jie jie jie jie jie jie jie jie jie jie jie jie jie jie jie jie jie
y/111 111 111 111 111 111 111 111 111 111 111 111 111 111 11
Sub 1
2
biill jia
TSSLRSXLRgssy L1 Pro
yj 1
biell
yJnL 1 1xLR
1
bailllal
s
Jaluaa/5 Jy 10000000000000000000000000000000000000000000000000000000000000000000000000000000
A !
S1 Pro 2000
Sub2, Sub1
Sub2 Sub1 500000000000000000000000000000000000000000000000000000000
jglal 15,7 14 jg 51)
A
Sub2/Sub1 Sub2/Sub1
Bose 1 S1 Pro 0
(PRO.BOSE.COM
aalgl aie
Sub
Sub 150
Aa 1
y

LgXalglb
| L1 Pro32 SubMatch L1 Pro32 SubMatch SubMatch SubMatch SubMatch SubMatch SubMatch SubMatch SubMatch SubMatch SubMatch SubMatch SubMatch SubMatch SubMatch SubMatch SubMatch SubMatch SubMatch SubMatch SubMatch SubMatch SubMatch SubMatch SubMatch SubMatch SubMatch SubMatch SubMatch SubMatch SubMatch SubMatch SubMatch SubMatch SubMatch SubMatch SubMatch SubMatch SubMatch SubMatch SubMatch SubMatch SubMatch SubMatch SubMatch SubMatch SubMatch SubMatch SubMatch SubMatch SubMatch Sub Match SubMatch SubMatch SubMatch SubMatch SubMatch SubMatch SubMatch SubMatch SubMatch SubMatch SubMatch SubMatch SubMatch SubMatch SubMatch SubMatch SubMatch SubMatch SubMatch SubMatch SubMatch SubMatch SubMatch SubMatch SubMatch SubMatch SubMatch SubMatch SubMatch SubMatch SubMatch SubMatch SubMatch SubMatch SubMatch SubMatch SubMatch SubMatch SubMatch SubMatch SubMatch SubMatch SubMatch SubMatch SubMatch SubMatch SubMatch SubMatch SubMatch Sub match sub match sub match sub match sub match sub match sub match sub match sub match sub match sub match sub match sub match sub match sub match sub match sub match sub match sub match sub match sub match sub match sub match sub match sub match sub match sub match sub match sub match sub match sub match sub match sub match sub match sub match sub match sub match sub match sub match sub match sub match sub match sub match sub match sub match sub match sub match sub match sub match sub match sub match SubMatch SubMatch SubMatch SubMatch SubMatch SubMatch SubMatch SubMatch SubMatch SubMatch SubMatch SubMatch SubMatch SubMatch SubMatch SubMatch SubMatch SubMatch SubMatch SubMatch SubMatch SubMatch SubMatch SubMatch SubMatch SubMatch SubMatch SubMatch SubMatch SubMatch SubMatch SubMatch SubMatch SubMatch SubMatch SubMatch SubMatch SubMatch SubMatch SubMatch SubMatch SubMatch SubMatch SubMatch SubMatch SubMatch SubMatch SubMatch SubMatch Submatch Submatch Submatch Submatch Submatch Submatch Submatch Submatch Submatch Submatch Submatch Submatch Submatch Submatch Submatch Submatch Submatch Submatch Submatch Submatch Submatch Submatch Submatch Submatch Submatch Submatch Submatch Submatch Submatch Submatch Submatch Submatch Submatch Submatch Submatch Submatch Submatch Submatch Submatch Submatch Submatch Submatch Submatch Submatch Submatch Submatch Submatch Submatch Submatch Submatch Sub match sub match sub match sub match sub match sub match sub match sub match sub match sub match sub match sub match sub match sub match sub match sub match sub match sub match sub match sub match sub match sub match sub match sub match sub match sub match sub match sub match sub match sub match sub match sub match sub match sub match sub match sub match sub match sub match sub match sub match sub match sub match sub match sub match sub match sub match sub match sub match sub match submatch sub match sub match sub match sub match sub match sub match sub match sub match sub match sub match sub match sub match sub match sub match sub match sub match sub match sub match sub match sub match sub match sub match sub match sub match sub match sub match sub match sub match sub match sub match sub match sub match sub match sub match sub match sub match sub match sub match sub match sub match sub match sub match sub match sub match sub match sub match sub match sub match sub match sub matching sub matching sub matching sub matching sub matching sub matching sub matching sub matching sub matching sub matching sub matching sub matching sub matching sub matching sub matching sub matching sub matching sub matching sub matching sub matching sub matching sub matching sub matching sub matching sub matching sub matching sub matching sub matching sub matching sub matching sub matching sub matching sub matching sub matching sub matching sub matching sub matching sub matching sub matching sub matching sub matching sub matching sub matching sub matching sub matching sub matching sub matching sub matching sub matching sub matching subMatching sub matching sub matching sub matching sub matching sub matching sub matching sub matching sub matching sub matching sub matching sub matching sub matching sub matching sub matching sub matching sub matching sub matching sub matching sub matching sub matching sub matching sub matching sub matching sub matching sub matching sub matching sub matching sub matching sub matching sub matching sub matching sub matching sub matching sub matching sub matching sub matching sub matching sub matching sub matching sub matching sub matching sub matching sub matching sub matching sub matching sub matching sub matching sub matching sub matching sub Matching Sub Matching Sub Matching Sub Matching Sub Matching Sub Matching Sub Matching Sub Matching Sub Matching Sub Matching Sub Matching Sub Matching Sub Matching Sub Matching Sub Matching Sub Matching Sub Matching Sub Matching Sub Matching Sub Matching Sub Matching Sub Matching Sub Matching Sub Matching Sub Matching Sub Matching Sub Matching Sub Matching Sub Matching Sub Matching Sub Matching Sub Matching Sub Matching Sub Matching Sub Matching Sub Matching Sub Matching Sub Matching Sub Matching Sub Matching Sub Matching Sub Matching Sub Matching Sub Matching Sub Matching Sub Matching Sub Matching Sub Matching Sub Matching Sub Matching Sub MatchingSub Matching Sub Matching Sub Matching Sub Matching Sub Matching Sub Matching Sub Matching Sub Matching Sub Matching Sub Matching Sub Matching Sub Matching Sub Matching Sub Matching Sub Matching Sub Matching Sub Matching Sub Matching Sub Matching Sub Matching Sub Matching Sub Matching Sub Matching Sub Matching Sub Matching Sub Matching Sub Matching Sub Matching Sub Matching Sub Matching Sub Matching Sub Matching Sub Matching Sub Matching Sub Matching Sub Matching Sub Matching Sub Matching Sub Matching Sub Matching Sub Matching Sub Matching Sub Matching Sub Matching Sub Matching Sub Matching Sub Matching Sub Matching Sub Matching Sub Matching sub matching sub matching sub matching sub matching sub matching sub matching sub matching sub matching sub matching sub matching sub matching sub matching sub matching sub matching sub matching sub matching sub matching sub matching sub matching sub matching sub matching sub matching sub matching sub matching sub matching sub matching sub matching sub matching sub matching sub matching sub matching sub matching sub matching sub matching sub matching sub matching sub matching sub matching sub matching sub matching sub matching sub matching sub matching sub matching sub matching sub matching sub matching sub matching sub matching sub mating sub mating sub mating sub mating sub mating sub mating sub mating sub mating sub mating sub mating sub mating sub mating sub mating sub mating sub mating sub mating sub mating sub mating sub mating sub mating sub mating sub mating sub mating sub mating sub mating sub mating sub mating sub mating sub mating sub mating sub mating sub mating sub mating sub mating sub mating sub mating sub mating sub mating sub mating sub mating sub mating sub mating sub mating sub mating sub mating sub mating sub mating sub mating sub mating sub mating sub matching sub matching sub matching sub matching sub matching sub matching sub matching sub matching sub matching sub matching sub matching sub matching sub matching sub matching sub matching sub matching sub matching sub matching sub matching sub matching sub matching sub matching sub matching sub matching sub matching sub matching sub matching sub matching sub matching sub matching sub matching sub matching sub matching sub matching sub matching sub matching sub matching sub matching sub matching sub matching sub matching sub matching sub matching sub matching sub matching sub matching sub matching sub matching sub matching sub qualifying sub qualifying sub qualifying sub qualifying sub qualifying sub qualifying sub qualifying sub qualifying sub qualifying sub qualifying sub qualifying sub qualifying sub qualifying sub qualifying sub qualifying sub qualifying sub qualifying sub qualifying sub qualifying sub qualifying sub qualifying sub qualifying sub qualifying sub qualifying sub qualifying sub qualifying sub qualifying sub qualifying sub qualifying sub qualifying sub qualifying sub qualifying sub qualifying sub qualifying sub qualifying sub qualifying sub qualifying sub qualifying sub qualifying sub qualifying sub qualifying sub qualifying sub qualifying sub qualifying sub qualifying sub qualifying sub qualifying sub qualifying sub qualifying sub qualifying sub qualify sub qualifying sub qualifying sub qualifying sub qualifying sub qualifying sub qualifying sub qualifying sub qualifying sub qualifying sub qualifying sub qualifying sub qualifying sub qualifying sub qualifying sub qualifying sub qualifying sub qualifying sub qualifying sub qualifying sub qualifying sub qualifying sub qualifying sub qualifying sub qualifying sub qualifying sub qualifying sub qualifying sub qualifying sub qualifying sub qualifying sub qualifying sub qualifying sub qualifying sub qualifying sub qualifying sub qualifying sub qualifying sub qualifying sub qualifying sub qualifying sub qualifying sub qualifying sub qualifying sub qualifying sub qualifying sub qualifying sub qualifying sub qualifying sub qualifying sub qualifier qualifying sub qualifying sub qualifying sub qualifying sub qualifying sub qualifying sub qualifying sub qualifying sub qualifying sub qualifying sub qualifying sub qualifying sub qualifying sub qualifying sub qualifying sub qualifying sub qualifying sub qualifying sub qualifying sub qualifying sub qualifying sub qualifying sub qualifying sub qualifying sub qualifying sub qualifying sub qualifying sub qualifying sub qualifying sub qualifying sub qualifying sub qualifying sub qualifying sub qualifying sub qualifying sub qualifying sub qualifying sub qualifying sub qualifying sub qualifying sub qualifying sub qualifying sub qualifying sub qualifying sub qualifying sub qualifying sub qualifying sub qualifying sub qualifying sub qualifyingsub qualifying sub qualifying sub qualifying sub qualifying sub qualifying sub qualifying sub qualifying sub qualifying sub qualifying sub qualifying sub qualifying sub qualifying sub qualifying sub qualifying sub qualifying sub qualifying sub qualifying sub qualifying sub qualifying sub qualifying sub qualifying sub qualifying sub qualifying sub qualifying sub qualifying sub qualifying sub qualifying sub qualifying sub qualifying sub qualifying sub qualifying sub qualifying sub qualifying sub qualifying sub qualifying sub qualifying sub qualifying sub qualifying sub qualifying sub qualifying sub qualifying sub qualifying sub qualifying sub qualifying sub qualifying sub qualifying sub qualifying sub qualifying sub qualifying sub qualifying Sub qualifying Sub qualifying Sub qualifying Sub qualifying Sub qualifying Sub qualifying Sub qualifying Sub qualifying Sub qualifying Sub qualifying Sub qualifying Sub qualifying Sub qualifying Sub qualifying Sub qualifying Sub qualifying Sub qualifying Sub qualifying Sub qualifying Sub qualifying Sub qualifying Sub qualifying Sub qualifying Sub qualifying Sub qualifying Sub qualifying Sub qualifying Sub qualifying Sub qualifying Sub qualifying Sub qualifying Sub qualifying Sub qualifying Sub qualifying Sub qualifying Sub qualifying Sub qualifying Sub qualifying Sub qualifying Sub qualifying Sub qualifying Sub qualifying Sub qualifying Sub qualifying Sub qualifying Sub qualifying Sub qualifying Sub qualifying Sub qualifying Sub qualifyingSub qualifying Sub qualifying Sub qualifying Sub qualifying Sub qualifying Sub qualifying Sub qualifying Sub qualifying Sub qualifying Sub qualifying Sub qualifying Sub qualifying Sub qualifying Sub qualifying Sub qualifying Sub qualifying Sub qualifying Sub qualifying Sub qualifying Sub qualifying Sub qualifying Sub qualifying Sub qualifying Sub qualifying Sub qualifying Sub qualifying Sub qualifying Sub qualifying Sub qualifying Sub qualifying Sub qualifying Sub qualifying Sub qualifying Sub qualifying Sub qualifying Sub qualifying Sub qualifying Sub qualifying Sub qualifying Sub qualifying Sub qualifying Sub qualifying Sub qualifying Sub qualifying Sub qualifying Sub qualifying Sub qualifying Sub qualifying Sub qualifying Sub qualifying SUB qualifying SUB qualifying SUB qualifying SUB qualifying SUB qualifying SUB qualifying SUB qualifying SUB qualifying SUB qualifying SUB qualifying SUB qualifying SUB qualifying SUB qualifying SUB qualifying SUB qualifying SUB qualifying SUB qualifying SUB qualifying SUB qualifying SUB qualifying SUB qualifying SUB qualifying SUB qualifying SUB qualifying SUB qualifying SUB qualifying SUB qualifying SUB qualifying SUB qualifying SUB qualifying SUB qualifying SUB qualifying SUB qualifying SUB qualifying SUB qualifying SUB qualifying SUB qualifying SUB qualifying SUB qualifying SUB qualifying SUB qualifying SUB qualifying SUB qualifying SUB qualifying SUB qualifying SUB qualifying SUB qualifying SUB qualifying SUB qualifying SUB qualifyingSUB qualifying SUB qualifying SUB qualifying SUB qualifying SUB qualifying SUB qualifying SUB qualifying SUB qualifying SUB qualifying SUB qualifying SUB qualifying SUB qualifying SUB qualifying SUB qualifying SUB qualifying SUB qualifying SUB qualifying SUB qualifying SUB qualifying SUB qualifying SUB qualifying SUB qualifying SUB qualifying SUB qualifying SUB qualifying SUB qualifying SUB qualifying SUB qualifying SUB qualifying SUB qualifying SUB qualifying SUB qualifying SUB qualifying SUB qualifying SUB qualifying SUB qualifying SUB qualifying SUB qualifying SUB qualifying SUB qualifying SUB qualifying SUB qualifying SUB qualifying SUB qualifying SUB qualifying SUB qualifying SUB qualifying SUB qualifying SUB qualifying SUB qualifying/sub qualifying/sub qualifying/sub qualifying/sub qualifying/sub qualifying/sub qualifying/sub qualifying/sub qualifying/sub qualifying/sub qualifying/sub qualifying/sub qualifying/sub qualifying/sub qualifying/sub qualifying/sub qualifying/sub qualifying/sub qualifying/sub qualifying/sub qualifying/sub qualifying/sub qualifying/sub qualifying/sub qualifying/sub qualifying/sub qualifying/sub qualifying/sub qualifying/sub qualifying/sub qualifying/sub qualifying/sub qualifying/sub qualifying/sub qualifying/sub qualifying/sub qualifying/sub qualifying/sub qualifying/sub qualifying/sub qualifying/sub qualifying/sub qualifying/sub qualifying/sub qualifying/sub qualifying/sub qualifying/sub qualifying/sub qualifying/sub qualifying/sub qualifying SUB qualifying SUB qualifying SUB qualifying SUB qualifying SUB qualifying SUB qualifying SUB qualifying SUB qualifying SUB qualifying SUB qualifying SUB qualifying SUB qualifying SUB qualifying SUB qualifying SUB qualifying SUB qualifying SUB qualifying SUB qualifying SUB qualifying SUB qualifying SUB qualifying SUB qualifying SUB qualifying SUB qualifying SUB qualifying SUB qualifying SUB qualifying SUB qualifying SUB qualifying SUB qualifying SUB qualifying SUB qualifying SUB qualifying SUB qualifying SUB qualifying SUB qualifying SUB qualifying SUB qualifying SUB qualifying SUB qualifying SUB qualifying SUB qualifying SUB qualifying SUB qualifying SUB qualifying SUB qualifying SUB qualifying SUB qualifying SUB qualifying Sub qualifying Sub qualifying Sub qualifying Sub qualifying Sub qualifying Sub qualifying Sub qualifying Sub qualifying Sub qualifying Sub qualifying Sub qualifying Sub qualifying Sub qualifying Sub qualifying Sub qualifying Sub qualifying Sub qualifying Sub qualifying Sub qualifying Sub qualifying Sub qualifying Sub qualifying Sub qualifying Sub qualifying Sub qualifying Sub qualifying Sub qualifying Sub qualifying Sub qualifying Sub qualifying Sub qualifying Sub qualifying Sub qualifying Sub qualifying Sub qualifying Sub qualifying Sub qualifying Sub qualifying Sub qualifying Sub qualifying Sub qualifying Sub qualifying Sub qualifying Sub qualifying Sub qualifying Sub qualifying Sub qualifying Sub qualifying Sub qualifyingSUB qualifying SUB qualifying SUB qualifying SUB qualifying SUB qualifying SUB qualifying SUB qualifying SUB qualifying SUB qualifying SUB qualifying SUB qualifying SUB qualifying SUB qualifying SUB qualifying SUB qualifying SUB qualifying SUB qualifying SUB qualifying SUB qualifying SUB qualifying SUB qualifying SUB qualifying SUB qualifying SUB qualifying SUB qualifying SUB qualifying SUB qualifying SUB qualifying SUB qualifying SUB qualifying SUB qualifying SUB qualifying SUB qualifying SUB qualifying SUB qualifying SUB qualifying SUB qualifying SUB qualifying SUB qualifying SUB qualifying SUB qualifying SUB qualifying SUB qualifying SUB qualifying SUB qualifying SUB qualifying SUB qualifying SUB qualifying SUB qualifyingSUB qualifyingSUB qualifying SUB qualifying SUB qualifying SUB qualifying SUB qualifying SUB qualifying SUB qualifying SUB qualifying SUB qualifying SUB qualifying SUB qualifying SUB qualifying SUB qualifying SUB qualifying SUB qualifying SUB qualifying SUB qualifying SUB qualifying SUB qualifying SUB qualifying SUB qualifying SUB qualifying SUB qualifying SUB qualifying SUB qualifying SUB qualifying SUB qualifying SUB qualifying SUB qualifying SUB qualifying SUB qualifying SUB qualifying SUB qualifying SUB qualifying SUB qualifying SUB qualifying SUB qualifying SUB qualifying SUB qualifying SUB qualifying SUB qualifying SUB qualifying SUB qualifying SUB qualifying SUB qualifying SUB qualifying SUB qualifying SUB qualifying SUB qualifying/sub qualifying SUB qualifying SUB qualifying SUB qualifying SUB qualifying SUB qualifying SUB qualifying SUB qualifying SUB qualifying SUB qualifying SUB qualifying SUB qualifying SUB qualifying SUB qualifying SUB qualifying SUB qualifying SUB qualifying SUB qualifying SUB qualifying SUB qualifying SUB qualifying SUB qualifying SUB qualifying SUB qualifying SUB qualifying SUB qualifying SUB qualifying SUB qualifying SUB qualifying SUB qualifying SUB qualifying SUB qualifying SUB qualifying SUB qualifying SUB qualifying SUB qualifying SUB qualifying SUB qualifying SUB qualifying SUB qualifying SUB qualifying SUB qualifying SUB qualifying SUB qualifying SUB qualifying SUB qualifying SUB qualifying SUB qualifying SUB qualifyingSUB qualifying/sub qualifying SUB qualifying SUB qualifying SUB qualifying SUB qualifying SUB qualifying SUB qualifying SUB qualifying SUB qualifying SUB qualifying SUB qualifying SUB qualifying SUB qualifying SUB qualifying SUB qualifying SUB qualifying SUB qualifying SUB qualifying SUB qualifying SUB qualifying SUB qualifying SUB qualifying SUB qualifying SUB qualifying SUB qualifying SUB qualifying SUB qualifying SUB qualifying SUB qualifying SUB qualifying SUB qualifying SUB qualifying SUB qualifying SUB qualifying SUB qualifying SUB qualifying SUB qualifying SUB qualifying SUB qualifying SUB qualifying SUB qualifying SUB qualifying SUB qualifying SUB qualifying SUB qualifying SUB qualifying SUB qualifying SUB qualifying SUB qualifying/sub qualifyingSUB qualifying SUB qualifying SUB qualifying SUB qualifying SUB qualifying SUB qualifying SUB qualifying SUB qualifying SUB qualifying SUB qualifying SUB qualifying SUB qualifying SUB qualifying SUB qualifying SUB qualifying SUB qualifying SUB qualifying SUB qualifying SUB qualifying SUB qualifying SUB qualifying SUB qualifying SUB qualifying SUB qualifying SUB qualifying SUB qualifying SUB qualifying SUB qualifying SUB qualifying SUB qualifying SUB qualifying SUB qualifying SUB qualifying SUB qualifying SUB qualifying SUB qualifying SUB qualifying SUB qualifying SUB qualifying SUB qualifying SUB qualifying SUB qualifying SUB qualifying SUB qualifying SUB qualifying SUB qualifying SUB qualifying SUB qualifying SUB qualifying PUBEUBUBUBUBUBUBUBUBUBUBUBUBUBUBUBUBUBUBUBUBUBUBUBUBUBUBUBUBUBUBUBUBUBUBUBUBUBUBUBUBUBUBUBUBUBUBUBUBUBUBUBUBUBUBUBUBUBUBUBUBUBUBUBUBUBUBUBUBUBUBUBUBUBUBUBUBUBUBUBUBUBUBUBUBUBUBUBUBUBUBUBUBUBUBUBUBUBUBUBUBBUBUBUBUBUBUBUBUBUBUBUBUBUBUBUBUBUBUBUBUBUBUBUBUBUBUBUBUBUBUBUBUBUBUBUBUBUBUBUBUBUBUBUBUBUBUBUBUBUBUBUBUBUBUBUBUBUBUBUBUBUBUBUBUBUBUBUBUBUBUBUBUBUBUBUBUBUBUBUBUBUBUBUBUBUBUBUBUBUBUBUBUBUBUBUBUBUBUBUBIBUBUBUBUBUBUBUBUBUBUBUBUBUBUBUBUBUBUBUBUBUBUBUBUBUBUBUBUBUBUBUBUBUBUBUBUBUBUBUBUBUBUBUBUBUBUBUBUBUBUBUBUBUBUBUBUBUBUBUBUBUBUBUBUBUBUBUBUBUBUBUBUBUBUBUBUBUBUBUBUBUBUBUBUBUBUBUBUBUBUBUBUBUBUBUBUBUBUBUBUUBUBUBUBUBUBUBUBUBUBUBUBUBUBUBUBUBUBUBUBUBUBUBUBUBUBUBUBUBUBUBUBUBUBUBUBUBUBUBUBUBUBUBUBUBUBUBUBUBUBUBUBUBUBUBUBUBUBUBUBUBUBUBUBUBUBUBUBUBUBUBUBUBUBUBUBUBUBUBUBUBUBUBUBUBUBUBUBUBUBUBUBUBUBUBUBUBUBUBBERBUBUBUBUBUBUBUBUBUBUBUBUBUBUBUBUBUBUBUBUBUBUBUBUBUBUBUBUBUBUBUBUBUBUBUBUBUBUBUBUBUBUBUBUBUBUBUBUBUBUBUBUBUBUBUBUBUBUBUBUBUBUBUBUBUBUBUBUBUBUBUBUBUBUBUBUBUBUBUBUBUBUBUBUBUBUBUBUBUBUBUBUBUBUBUBUBUBUBIBIBUBUBUBUBUBUBUBUBUBUBUBUBUBUBUBUBUBUBUBUBUBUBUBUBUBUBUBUBUBUBUBUBUBUBUBUBUBUBUBUBUBUBUBUBUBUBUBUBUBUBUBUBUBUBUBUBUBUBUBUBUBUBUBUBUBUBUBUBUBUBUBUBUBUBUBUBUBUBUBUBUBUBUBUBUBUBUBUBUBUBUBUBUBUBUBUBUBUBIBBERBUBUBUBUBUBUBUBUBUBUBUBUBUBUBUBUBUBUBUBUBUBUBUBUBUBUBUBUBUBUBUBUBUBUBUBUBUBUBUBUBUBUBUBUBUBUBUBUBUBUBUBUBUBUBUBUBUBUBUBUBUBUBUBUBUBUBUBUBUBUBUBUBUBUBUBUBUBUBUBUBUBUBUBUBUBUBUBUBUBUBUBUBUBUBUBUBUBIBBER BUBUBBUBBUBBUBBUBBUBBUBBUBBUBBUBBUBBUBBUBBUBBUBBUBBUBBUBBUBBUBBUBBUBBUBBUBBUBBUBBUBBUBBUBBUBBUBBUBBUBBUBBUBBUBBUBBUBBUBBUBBUBBUBBUBBUBBUBBUBBUBBUBBUBBUBBUBBBBUBBUBBUBBUBBUBBUBBUBBUBBUBBUBBUBBUBBUBBUBBUBBUBBUBBUBBUBBUBBUBBUBBUBBUBBUBBUBBUBBUBBUBBUBBUBBUBBUBBUBBUBBUBBUBBUBBUBBUBBUBBUBBUBBUBBUBBUBBUBBUBBUBBIBBERBUBBUBBUBBUBBUBBUBBUBBUBBUBBUBBUBBUBBUBBUBBUBBUBBUBBUBBUBBUBBUBBUBBUBBUBBUBBUBBUBBUBBUBBUBBUBBUBBUBBUBBUBBUBBUBBUBBUBBUBBUBBUBBUBBUBBUBBUBBUBBUBBUBBUBE |